#ides1262
Text
IDES1262 WEEK 10 - Completing the loop.
Over the past ten weeks, I have learnt a variety of skills that assist in communicating a design idea.
In the first few weeks, we practiced using pen and paper to draw basic shapes and objects to a high degree of accuracy. During this time frame, I also learnt about the usefulness of partial auxiliary views and how to draw in perspective. However, the perspective drawing task in week 4 was definitely one of the hardest tasks in this course. Whilst the other tasks so far simply just took a bit more time to do because of the sheer amount of measurements required, I genuinely struggled quite a bit to grasp the method of drawing in perspective. Though in the end, I managed to pull through after a few attempts and video tutorials.
Starting from week 6, we transitioned into the digital workspace. We learnt how to create digital renders of our design ideas and began trying out 3D modelling software such as 3DS MAX. Learning how to work digitally enabled me to create higher fidelity models and therefore improved my design communication skills. Whilst I am still not very familiar with 3DS MAX, I am able to acknowledge its ability in efficiently refining scanned models as well as creating organic shapes. It was quite unfortunate that I wasn't able to experience the scanning and 3D printing process being an online student, but it is definitely something that I am looking forward to in the future. Being a Mac user, it was quite frustrating to use 3DS MAX via MyAccess; it was fairly laggy and the response times were delayed. However, one cannot deny the usefulness of tools like 3DS MAX. As an alternative to 3DS MAX, I plan to try out Blender as it is available on Mac.
Overall, this course taught me a lot of essential skills regarding design communication. To be honest, I probably forgot some of the skills that I've learnt throughout the 10 weeks. However, because of my Tumblr blog posts, I will be able to quickly relearn a lot of the things that I may have forgotten. It was also super helpful that other classmates' blogs were available for me to see; I was able to learn from my peers as well.
I enjoyed learning a myriad skills from IDES1262 and can't wait to learn more!
15 notes
·
View notes
Text
Week 3 — section and auxiliary views
This week’s class focused on showing detail that might be slightly obscured by traditional orthographic projection. This could include detail that is internal to the piece, or in the case of this week’s tutorial exercise, offset on a non-right angle.
I had previously encountered section views to represent a ‘cut’ of an object, but was not familiar with the auxiliary projection. Initially I struggled with understanding exactly what would be represented on the auxiliary section (I wanted to include the whole width of the object). However after explaining that it was to just represent the irregular taped shape, this made it quite simple.

Initially I started with a quick sketch to help create my layout and sizing. I decided to use a 1:2 ratio to make the drawing more compact and neat on my page. This also helped provide room for my title block.
I thought my sketch started to come together quite well. As you can see in the image above, I have added in the first of the hidden lines in the top view. I think this helps increase readability for manufacture as the slight differences in measurements may not be immediately apparent.
Overall I’m really happy with my technical drawing. I think the 1:2 ratio fills the page really nicely. Things that I can improve for next time include not having such a large title block, and improving the way I indicate measurements, which should be a lot closer to the drawing.
14 notes
·
View notes
Text
Week 8 - Digital Iteration
The focus for this week was experimenting and developing our CAD skills specifically with 3ds max. This was achieved through a series of steps that helped me to better understand the program somewhat. However I ended up finding that my own research into tutorials was most beneficial.
Watching Andrew Simpson's video on the development of a razor, its clear the importance of the design process of testing out lots of different elements and ideas to best create a solution. It was informative to hear about the ways different materials effected the weight and ergonomics of the product and is something to always have in mind. Andrew talks about low-fidelity and high-fidelity as different levels of the model making quality. This is in context to an explanation about how the design process isn't always linear with the development of quality and sometimes lower quality models can be made after higher quality models to test out different ideas.
Part 1 "The introduction":
For the first part of this task, we made a simple sphere (done with the sphere tool) which we then played around with in order to explore the effects of the different tools available on 3ds. Personally I find there to be an initially overwhelming amount of different commands that made it difficult to work with. It was interesting seeing what some of them did, but frustrating trying to figure out how to do anything you wanted to achieve. This process was a lot of trial and error, just throwing myself into the depths of this program.
Part 2 "The learning":
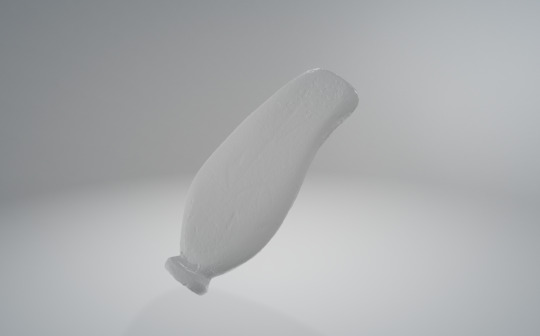
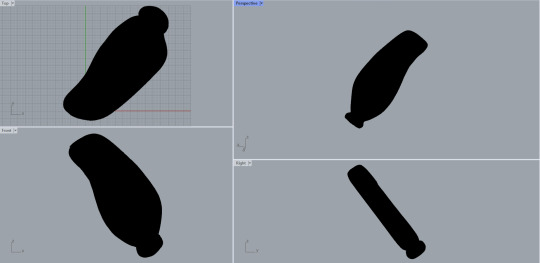
Part 2 is where I really took the initiative on figuring out how to make even the most basic of things I could normally create in a few seconds on other CAD programs. I started out creating a bottle like shape, trying to use everything I had learnt from my experimentation of the different tools with the sphere. The result was something very organic and asymmetrical. Fairly happy with this as a basis, and it definitely looks wieldable so that's nice too.

I wanted to move onto something that looked like it had more intention and structure behind it. I ended up looking through numerous youtube tutorials that better explained the process of making different kinds of objects. I would highly recommend just following a tutorial like this as it helped me a great deal to better understand the specific tools which are actually helpful for average tasks. I ended up following a tutorial to create an omnitrix which I thought of as a complex shape that would require a diverse use of tools to further my learning. I figured out how to properly warp shapes how I wanted to as well as combining/subtracting new parts to add to the form. I also finished the design by adding more fitting colours and am really happy with both how it turned out, and how much I learned from the process. Its very evident the difference in level of intentional design between the bottle and the omnitrix as a result of the research done for it.


7 notes
·
View notes
Text
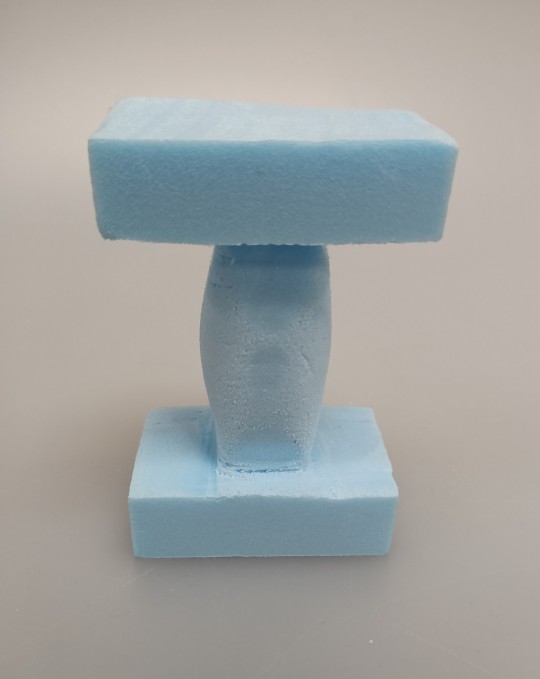
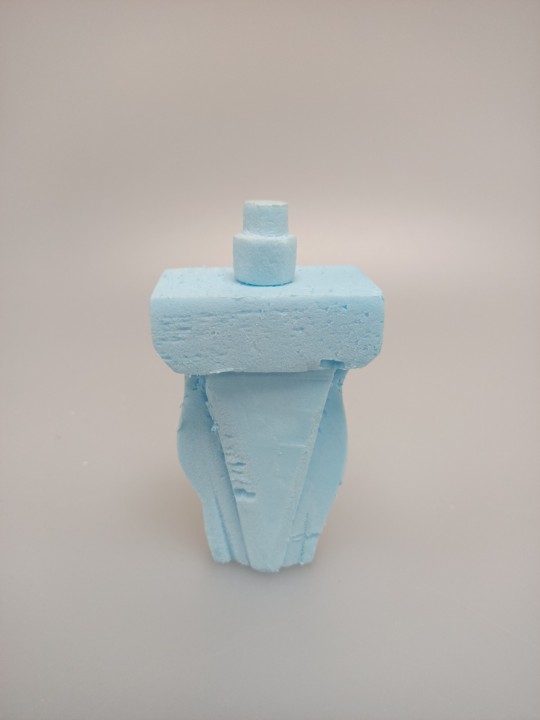
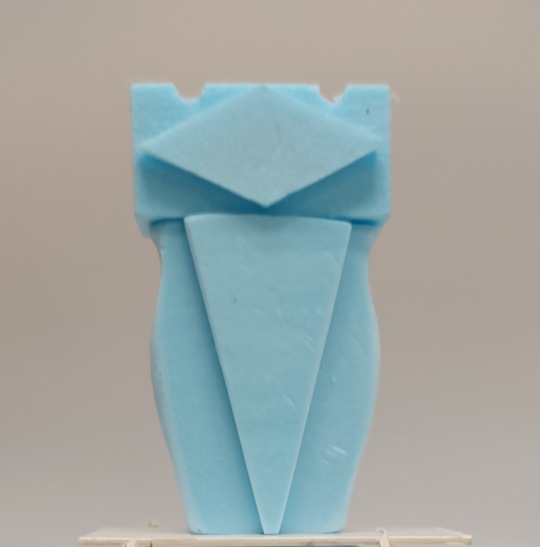
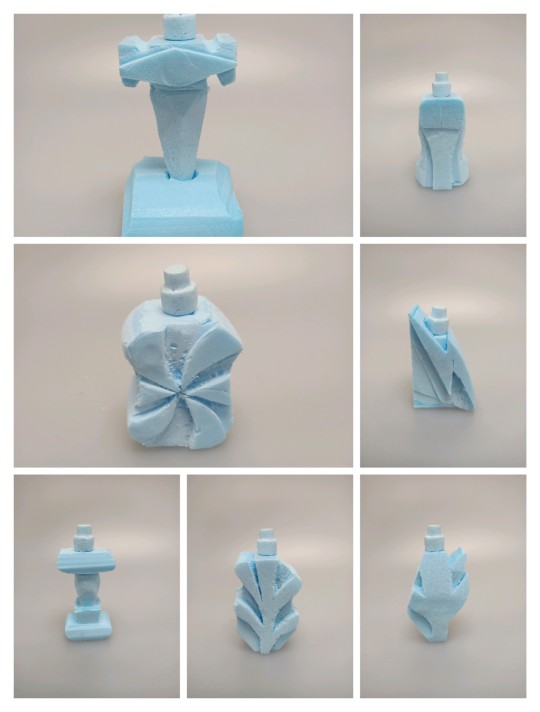
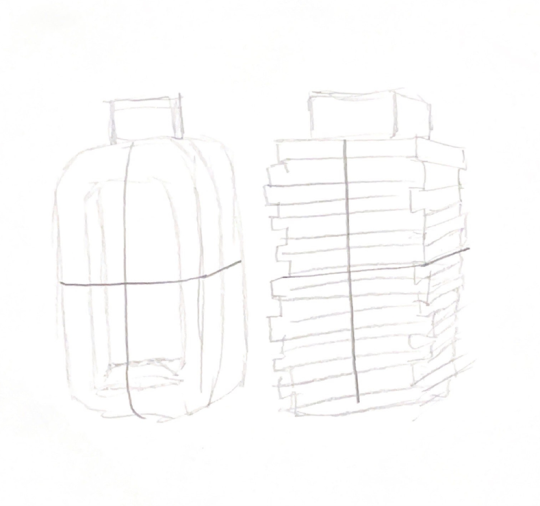
Week 7- Model Making
I found this week to be very relevant and informative given our upcoming assessment for Studio this term. It provided us with time to think about our models as well as improve our craft through taught techniques regarding the hot wire cutter and finishing with sanding.
I experimented with the hot wire cutter but soon realized a modular approach would be far easier given the stacked nature of my model. as such I used long scrap strips of blue foam and cut them into my desired length.
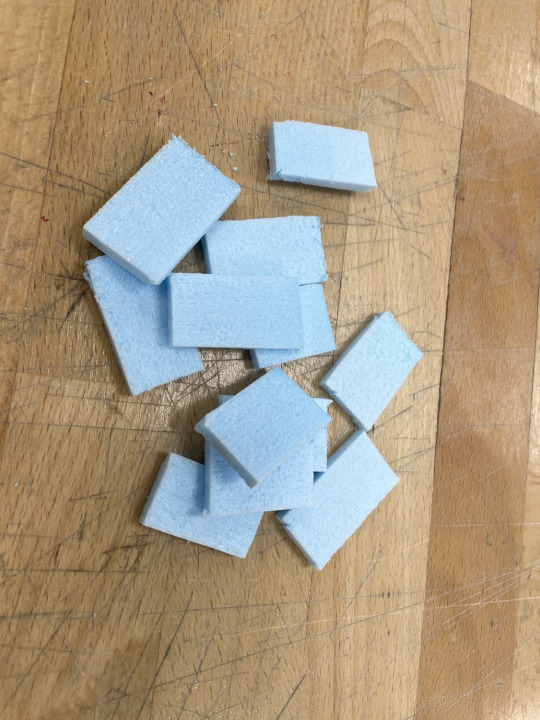
Next, I learned the hard way that superglue is NOT to be used on foam as it had soon eaten a hole through my bottle. Hence, I started once again but this time using a simple glue stick to stick the layers upon one another.
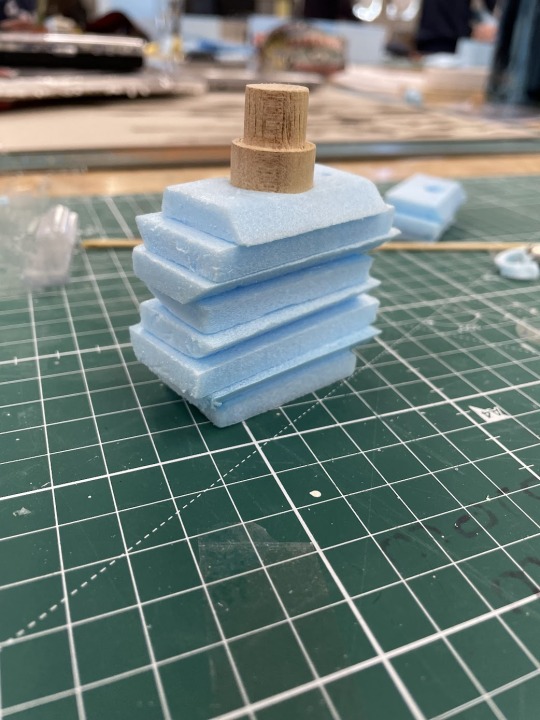
Finally after making a hole for the atomizer to sit in, the model did in fact resemble a 50mL perfume bottle, which I was happy with. I went on to sand the edges which helped the final appearance of the bottle as it looked more resolved and comfortable in the hand. Lastly, for the sake of it I went on to make a very rudimentary stand. This took multiple attempts believe it or not, as I was experimenting with different joints and many of them didn't work. And of course I could not leave the bottle sitting there with out a cap so I quickly whipped one up in the little time I had left.
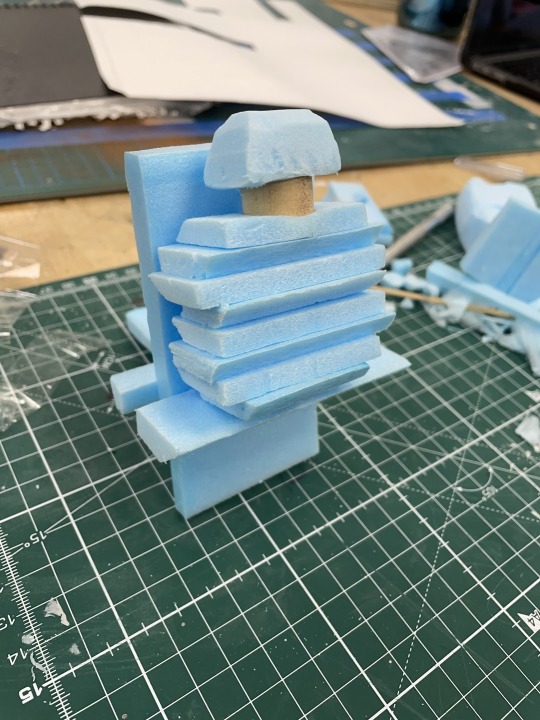
To conclude, this lesson was a fun shift into physical modelling and it was nice to work at the DFL and get to working with your mates, regardless of the strange smell of melting foam. Both of my design relevant subjects were merged in a sense for the day which provided for a unique and fun experience and I definitely feel more confident to use foam in the future.
10 notes
·
View notes
Text
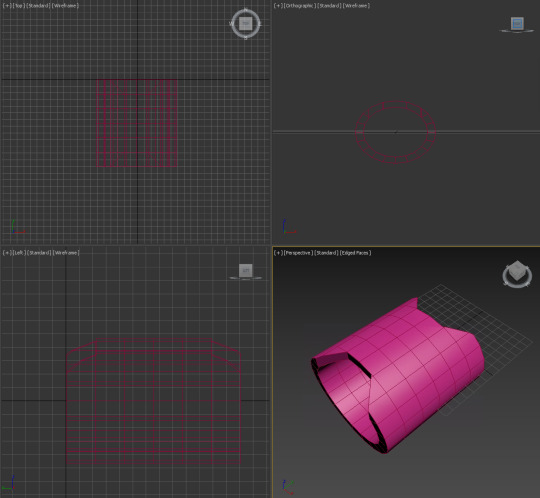
Week 9 - Preparing a 3D Scan for Printing
(Open the photos for a clearer image resolution.)
Pre-Class: Watching Andrew Simpson's video gave me a better insight into the importance of prototypes and models when creating a product and his mention of using different materials to recreate the size and weight made me realize I never took the weight into account. Although blue foam is a good way to recreate the shape, it is way lighter than the final product which is made up of glass filled up with liquid. As such, it gave me the idea to create my next model out of clay as it is closer in weight and still allows a high level of moldability.
Part 1 - Scanning & Meshing
This week was a fun way to learn how different software programs interact with each other and help produce a model for 3D printing. One main thing I learnt was that using a 2015 MacBook to run Rhino and 3ds Max is an insane choice and possibly an inventive way to cause an explosion.
After many failed attempts to boot both programs, I gave up and decided to complete this exercise at home as I had a stronger WiFi connection and a PC with (way) better specs.
Onto the actual work! After the lovely staff of the MCIC helped me scan my perfume bottle model into a 3D scan saved as an .stl file. [F.1] I got to opening it in Rhino and applying a quad remesh as this allows easier manipulation of the model in 3ds Max. [F.2] As someone who used Rhino previously it was comforting to be using a familiar program and had no issue completing this part.
[F.1] Scanned Perfume Bottle.stl
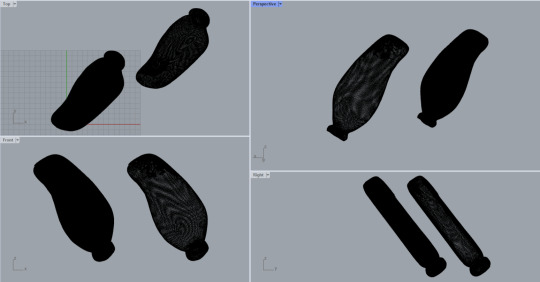
[F.2] Model Before and After Quad ReMesh
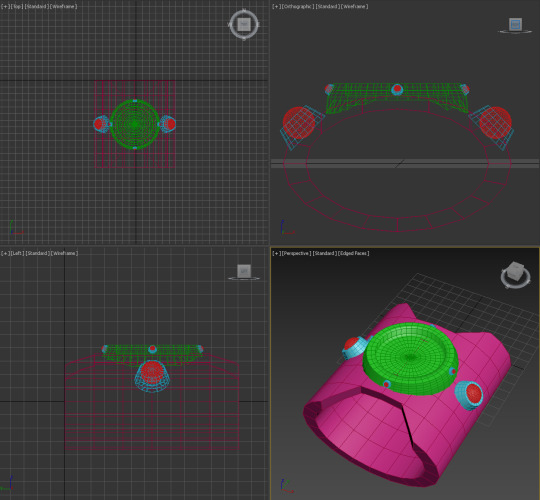
Part 2 - Orientation & Modification
After last week, I dedicated myself to watching tutorial videos on 3ds Max throughout the week so as to get more affiliated with the program which really paid off during this exercise. Once I had the file prepared, I imported it to the program and quickly dealt with the orientation. [F.3]
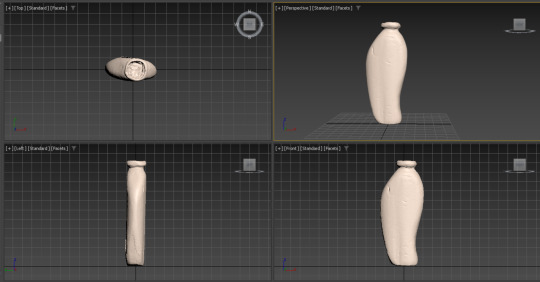
[F.3] Unmodified Model
The modification got a bit tricky after this though as my model had a few bumps around the surface caused by my nails which is less than ideal. The smoothing tool was a great help when combating this issue and luckily the dents were not too deep. I also used the symmetry tool to ensure my front and back view were identical. However, the mirror tool was really tricky to orientate as it is harder to view and the program was lagging heavily. I will look into better options to combat this issue as the lagging should not have occurred at all. Once the model looked ready to print, I saved and exported the file and moved on to Cura. [F.4]
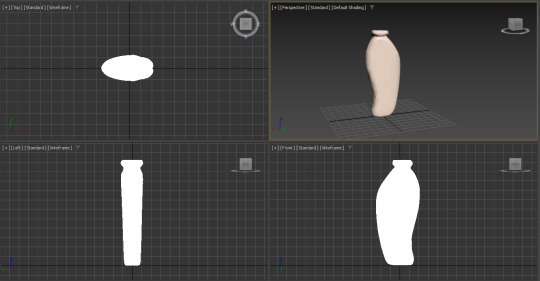
[F.4] Finished Model
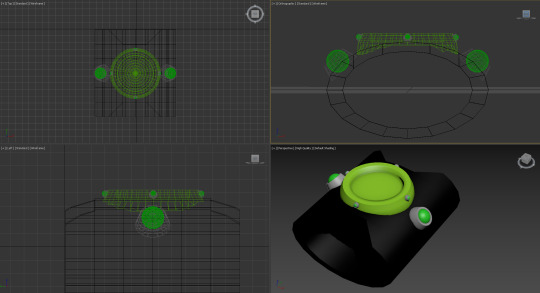
Part 3 - Preparing for 3D Printing
With the file ready to go, once it was uploaded to Cura the rest was quite straightforward. I ensured the scaling of the bottle was right and made sure all the edges were nice and smooth. I then sliced it and my model is ready to print. As I do not have access to the printing services right now, I unfortunately cannot print my model but I could at least preview what it would have looked like. [F.5]
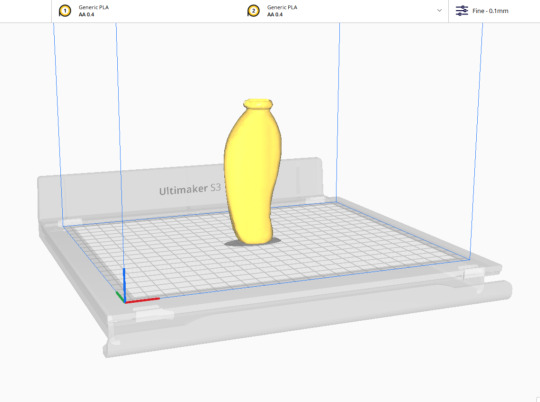
[F.5] Sliced Model Ready to Print
Bonus - Carl Update
Since this exercise did not take too long to complete and I was looking to implement something fun, I remembered how on my previous weekly post I had mentioned that I wished to learn how to 3D print the friend I made, Carl the Capybara. So I decided to do so!
With a quick tutorial, I learnt how to merge together Carl into a singular poly mesh on 3ds Max which meant he was ready for exporting! Once exported, I uploaded him onto Cura and scaled him to a friendly keychain-like size. [F.6]
[F.6] Carl
Once sliced, I realised I should add support beams for the stomach and do an infill to ensure the printing result would be sturdy. Once done, Carl was ready to print! [F.7]
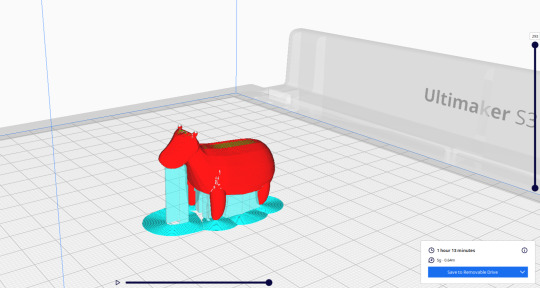
[F.7] Perfection
This week was a fun small activity and I really hope to print off Carl once I am back on campus as a great reminder of what this class has taught me and the progress I have made. He shall keep me company on my desk at home :)
6 notes
·
View notes
Text
Week 5: Sketching
Building off from last week and the basics of perspective drawing I felt confident coming into this. The first part of the task to draw thumbnail concepts was quite easy and fun. Creativity can flow and its hard to draw a front on view so badly it can't be recognized. My first sheet wasn't very good at all however which lead to a complete redraw of 12 new thumbnails which I think 2 or 3 could be taken further.

Now onto Part 2. The punishment from not taking the time to learn how to draw curves in perspective catches up with me. I found translating what I thought my bottles should look like into 3D drawings to be quite the challenge. They seemed to always come out looking boxy or just like a regular cylinder. I attempted many times to find a way to make the rounded corners of the bottle look somewhat accurate, getting closer and closer every time. Different methods were implemented, I was determined to take some time to figure it out. Adding some shading here, breaking up the perspective box this way or that way. I found drawing oval shapes in perspective to match up all the lines helped a bit. Still after construction lines where erased the bottle went back to looking like a round cylinder. So then shading was experimented with. I thought if I had the basic shape done then what was missing was some faux shadows. This seemed to help a bit but the complex curves I was trying to draw from an idea built in my brain still proved to fail me. I think I got close to what I was after but to me more still needs to be done.


7 notes
·
View notes
Text
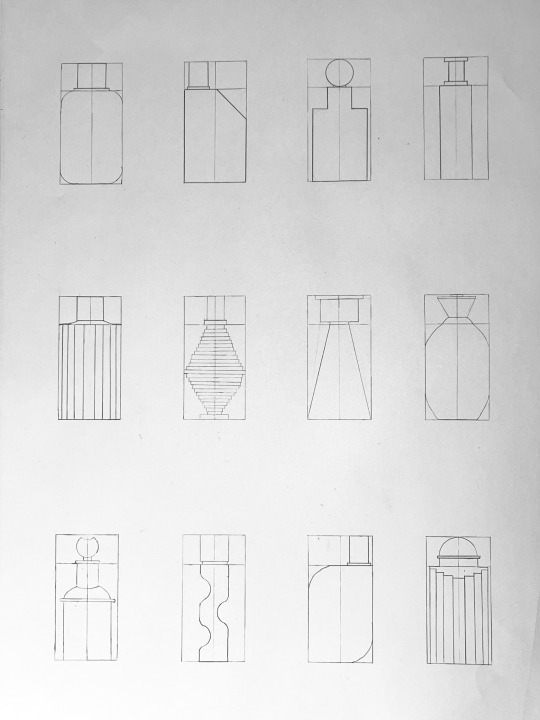
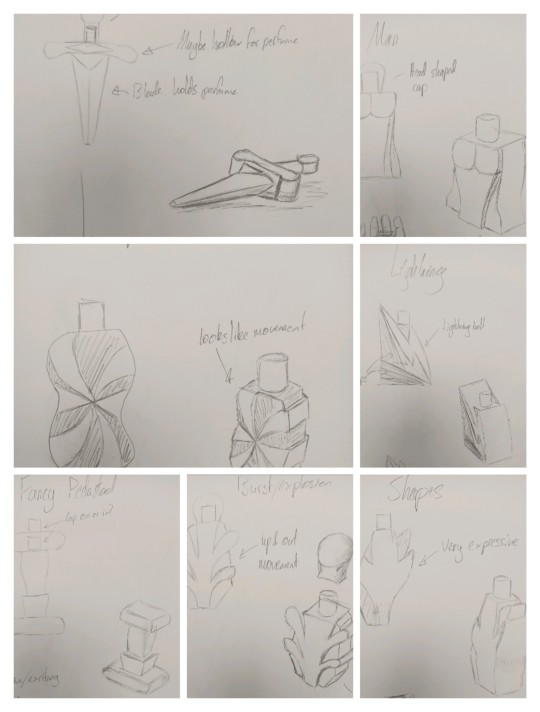
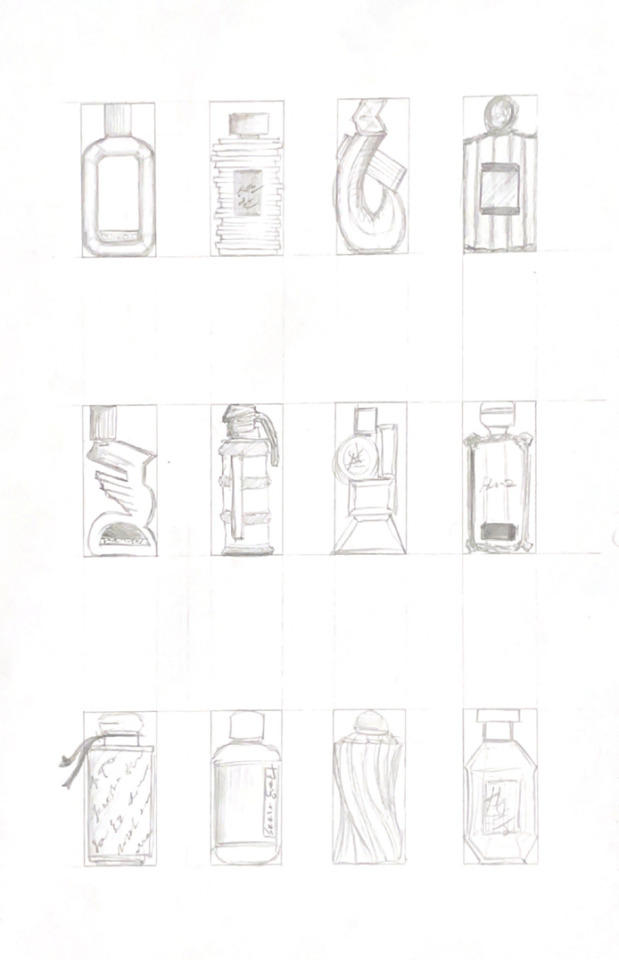
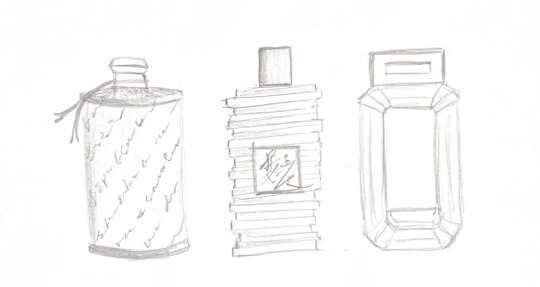
Week 5 - i promise they're not potions
This week's task was a creative change from previous weeks, and I found it useful to highlight the areas where my skills could use a lot of work. To begin with, the amount of time I spent placing the 65*32.5 boxes on an A2 page was absurd, but once I had them I begun sketching the perfume bottles quite quickly as ideas kept coming to mind. I chose pride for the emotion I designed off of, because lord knows I have no idea what 'motivated' means.

I started at the bottom right and worked my way up to the top left, presuming that as I ideated I would have more interesting ideas that I would want to bring attention to first, as opposed to the more basic shapes I had started with.
I ended up creating a good range of shapes which I was halfway pleased with, particularly disliking the top row once I felt I had finished my sketches. I think it's important to also know what you don't like in a design, so I left them as examples of how perhaps too much detail - for example the top right - can detract, and that having more abstract shapes - top left - can make for just ugly shapes. My favourites were the two in the middle row on the right hand side, as well as the more basic tapered prism in the bottom left. I thought these were the most interesting and had the most potential to be expanded upon, so I chose to redraw these in perspective.

I was really quite pleased with how these came out in perspective, especially considering how few straight lines the far left drawing had. I really struggled to get good curves and to accentuate the shape of the bottom of the bottle, but I'm still proud of my progress in perspective drawing. My personal favourite is by far the middle, although I feel like it's not terribly unique in terms of it's design it still conveys pride quite well.

I really struggled adding shading to the drawings, as that's a skill I've always lacked and am still developing, albeit slowly. I don't think it's too bad, and it does help accentuate the shape of the middle one quite well, but I feel it detracts from the far left significantly enough that I think it looked better without.
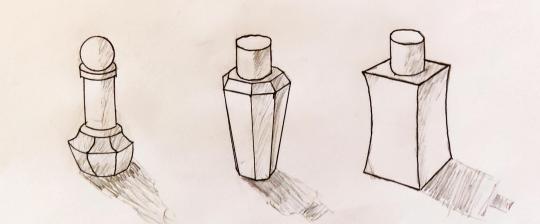
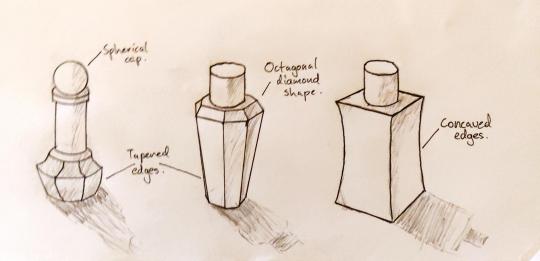
Overall I'm pleased with the outcome of this week's task, and I feel it has helped me identify some of my weaknesses in sketching so I now have a clear path of something to work on. I'm excited to see how these will come out with a digital makeover next week.
8 notes
·
View notes
Text
Week 5
This week's lecture and tutorial were extremely fun and interactive, I really enjoyed the class activities and the discussions and conversations that took place. However I was quite taken aback by the amount of content that we had gone through.
Sketching Drills


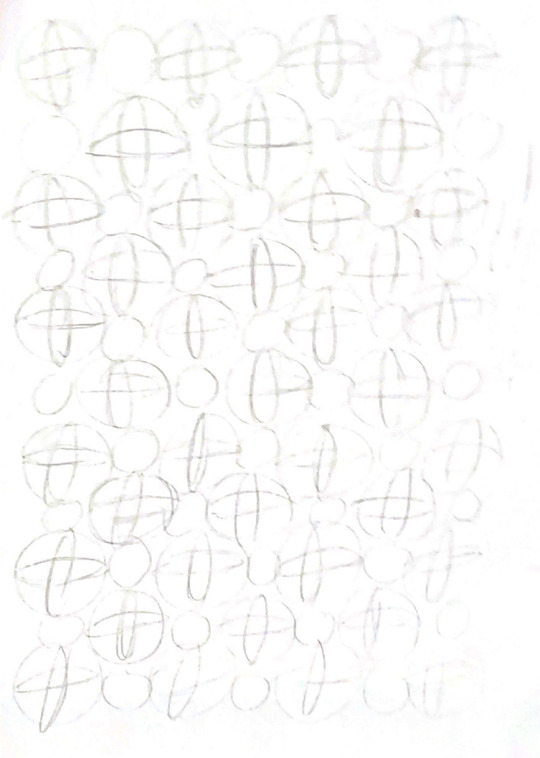
During most of the tutorial I was introduced to 7 different drawing exercises, all aiming to relax my body in order to draw feely without any rulers, pencils or templates.
A super helpful piece of advice given by the tutors was to draw from your shoulders as compared to drawing from your wrist. This technique of drawing is suitable for drawing straight lines, circles, and ellipses and allows the upper body to be free flowing.
As I worked through the drawing drills, I found that the first few fundamental drills had played a big part in preparing for more intricate drills like the cubes and ellipses in perspective.
This sketching drill allowed me to experiment with ballpoint pen and ink pens.
Part 2: 2D Orthographic Thumbnails
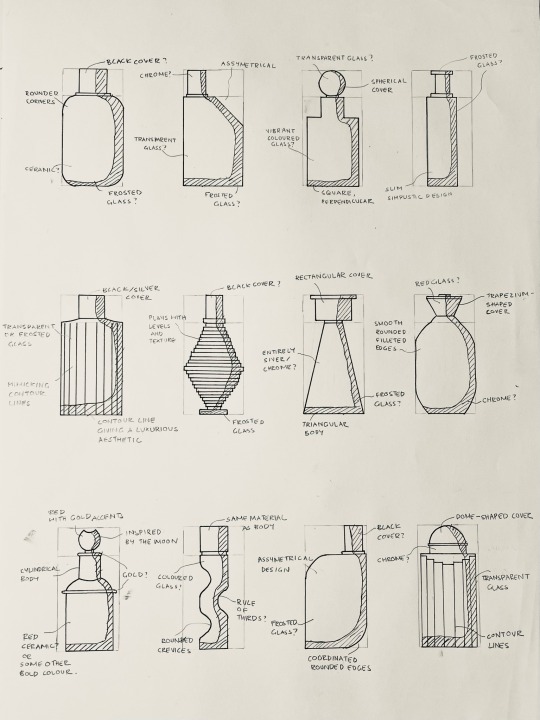
This section was both challenging and interesting, giving us an opportunity to work on our sketching skills while also drawing up perfume bottle concept ideas for the studio 1B class.
I found myself having a relaxed atmosphere when coming up with different silhouettes and shapes that I could incorporate into my own design whilst also taking inspiration from the current market.
This exercise also gave the chance to visualise the possible types of colours, materials, and textures i wanted my perfume bottle to have.
Part 3: Perspective sketch

This exercise was very similar to a sketching drill where I had to draw cubes in perspective. I find being able to draw perspective drawing is a very important skill to have especially when one is pursuing to become an industrial designer.It allows both the designer and client to visualise the product and have a sense of its overall composition, depth, aesthetic.

This was a very packed and full-on week with a lot of useful content and advice.
Excited to bring my sketches to photoshop and experience rendering with it for the first time!
10 notes
·
View notes
Text
Week 1 - Constructing Shapes by Hand
This exercise really impressed upon me the importance of construction lines in hand drawing - loathe though I am to use them.
I'm used to using construction lines a lot in AutoCAD and Rhino - it makes it easier to align and reproduce shapes, and provided you use layers properly they can be hidden or turned off with a single click.
When it comes to hand-drawing though I have mostly avoided or tried to minimise them as I hate having to rub them out. I recognised through doing these drawings that it would have made it far harder for myself to have attempted to draw them without construction lines, and luckily there was no requirement to erase them (provided they are done lightly) and the fine-liner pens cover the lead marks well.
I completed the constructions in class, but left going over it in pen to do at home so I didn't have to rush. Having the reference material to work off and annotate really helped as well and saved me from making terrible mistakes.
I practiced with a spare page, the compass and some pens to ensure I got a feel for drawing with the pens on the bond paper and to figure out how far I had to offset the ruler from a line in order to hit it dead-centre with the pen. I also practiced using the compass to try and achieve even and consistent line weights and avoid blotches (in this I was mostly successful, but there is definitely some room for improvement still.
Getting the curves to connect tangentially proved to be a right pain, but having the circle-tool was really helpful, even though it kind of felt like cheating - to not have to work out the tangent points with a compass as I was taught to do in engineering studies - but it saves a great deal of time, and would have been incredibly impractical given the size of the radii I was working with.
The Final Product:

Learnings:
Consistency of pen pressure and speed is incredibly important to avoid inconsistent thickness or waver in the lines - you need to draw deliberately and not allow the pen to dwell on the page.
It is best to lift the pen while still moving to avoid thicker ends to lines - you can always go back over carefully with a finer pen to adjust the line thickness.
Using a finer pen allows for multiple passes to more cleanly join lines together.
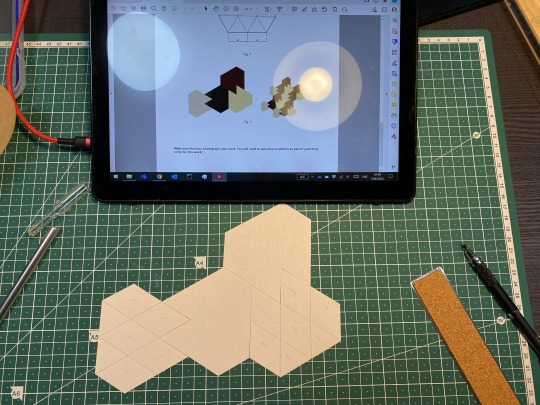
TASK 2.
Using the squares and a ruler it is easy to make a grid of diamonds or equilateral triangles from which the shapes prescribed for task 2 can be cut. It took a bit of experimentation to dial in where to cut but I managed to get 1 complete shape from my first attempt - the rest was scrapped as I cut too far.
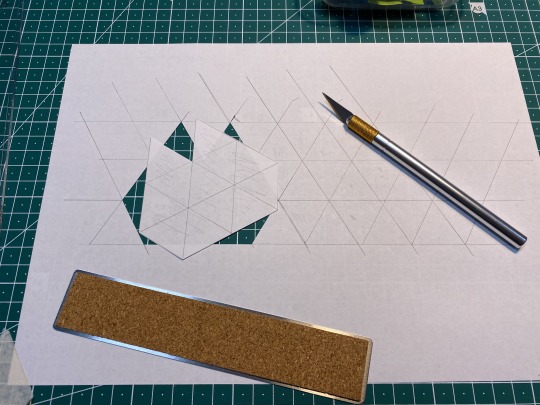
Having the first shape meant I could use it to more effectively plan and produce 3 from the second A4 sheet.
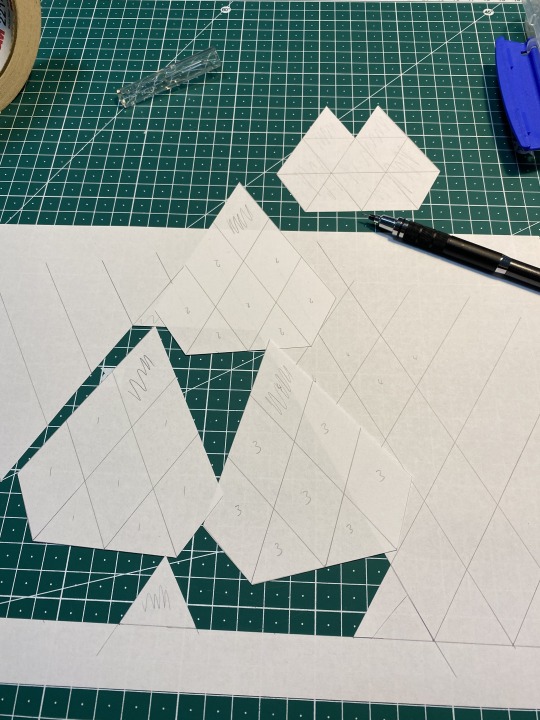
By cutting down the middle of the lines it was easier to produce shapes which fit together well with reasonable tight tolerances (shown pulled slightly apart in the photos to make it easier to see where one shape ends and the next begins. Finished product:
11 notes
·
View notes
Text
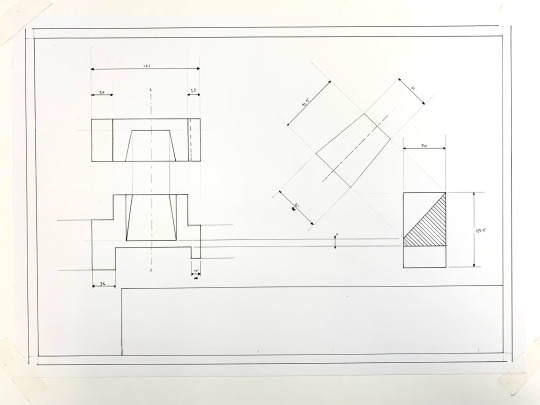
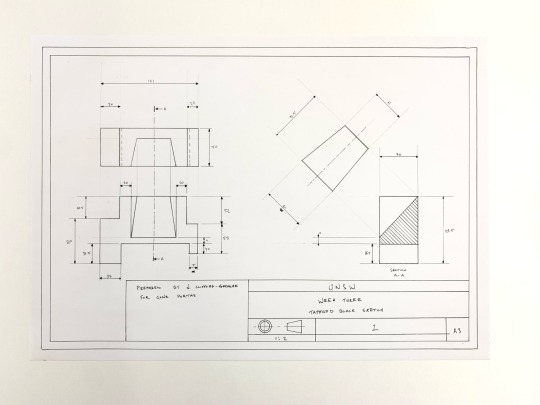
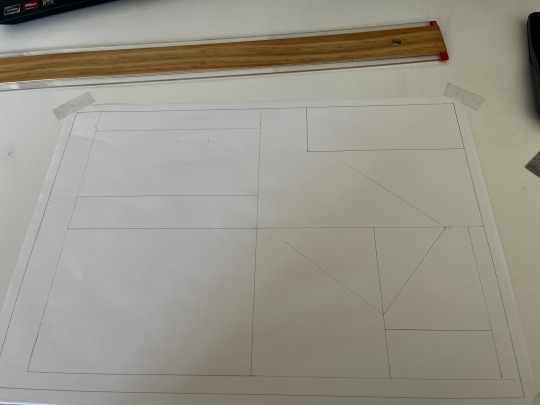
Week 3 Studio Tutorial – Section and Auxiliary Views
This week was an introduction to both Section and Auxiliary Views, as well as further practice for orthogonal technical drawings. While I have some experience in section views from last terms BENV1010 assignment, auxiliary views was a concept I was completely unfamiliar with. Initially it took me some time to wrap my head around how these projections were formed, but eventually I figured out Auxiliary Views conceptually through revising the material on moodle.
Week 3 Task: Orthogonal, Sectional and Auxiliary Views of a Tapered Block.
This week we were tasked with creating a technical drawing of a tapered block using novel views. This block was presented in an isometric view with the dimensions present.
Similarly to last Week 2, I started the technical drawing with a general block out. This was done by observing the overall dimensions of each view of the Tapered Block, and representing each view with a rectangle. Due to the auxiliary projection, the spacing between the different views were relatively tight.
Below is the final illustration of the Tapered Block. I rectified some of the mistakes made in week 2's technical drawing, such as writing everything capitalized and with a more consistent font. Additionally, I had a more comprehensive use of dimensioning in this week's Illustration.

Overall, I am happy with my technical drawings of the week. Some improvements could be made to the drawing however. The inconsistencies of the arrows is still prevalent in this week's work. Additionally, the placement of the title block breaks conventions as they are typically placed in the bottom right hand side of the illustration.
6 notes
·
View notes
Text
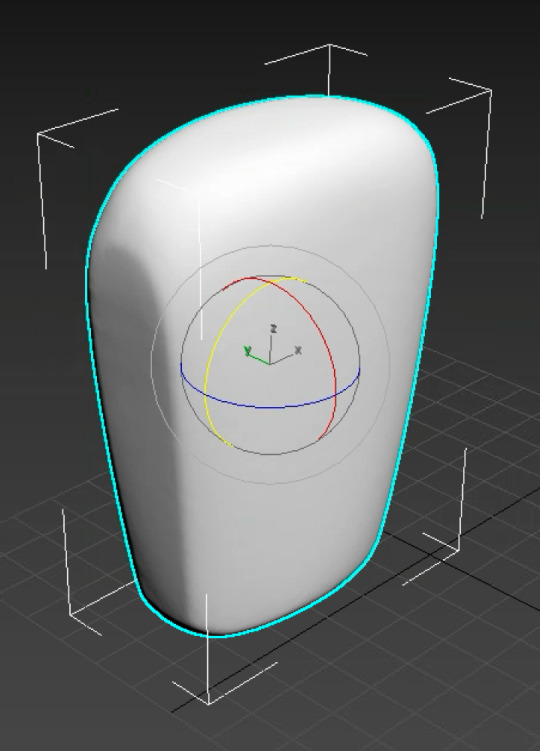
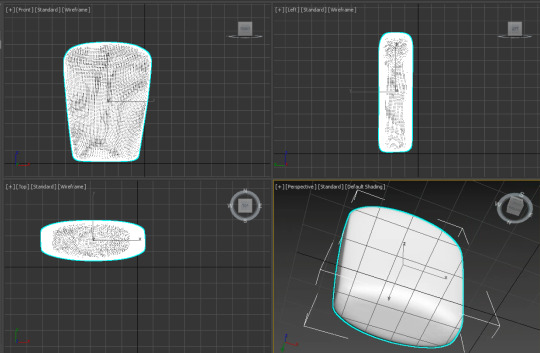
IDES1262 WEEK 9 - Preparing a 3D scan for printing.
This week, we continued using 3DS Max to modify and refine a 3D scanned model to get it ready for 3D printing.
First, I did an X form reset to correct the bounding box for easier modifications later on:
Then, I performed an FFD transform to make minor changes to the form of the model. I pushed both sides closer to the centre to make a slight concave shape:
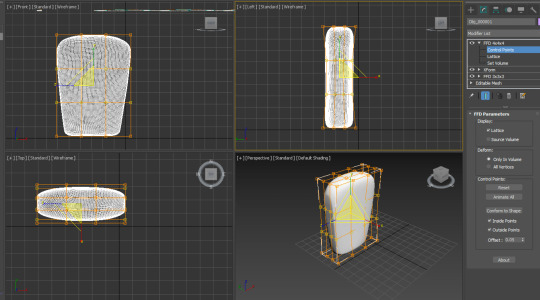
This was quite an efficient way to make slight changes to a 3D model; I can definitely see myself using it again in the future.
Afterwards, I saw a dent at the bottom of the model, so I wanted to fix it:
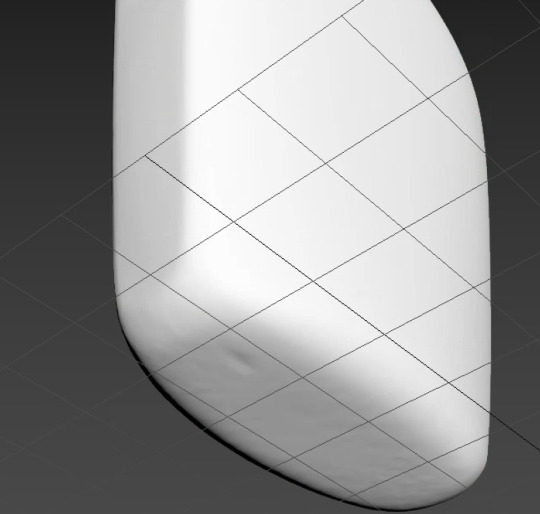
To fix this dent, I first tried to use the edit polygon feature and moved some of the vector points upwards:
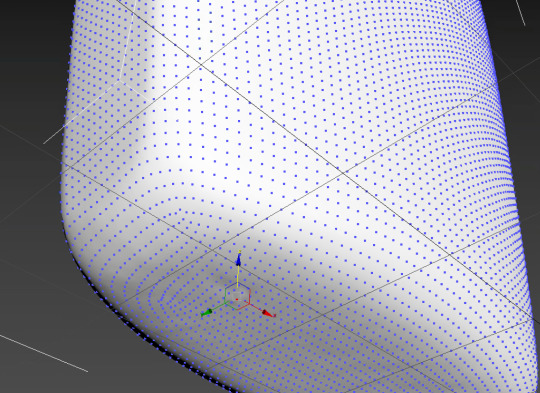
However, I thought that this method wasn't great for fixing the dent; it was not very accurate. Thus, I tried another method. Namely, the relax brush tool:
As seen above, the relax brush tool was way more effective and efficient compared to the previous method. It was intuitive and satisfying to use.
I wanted my bottle to be symmetrical. Thus, after fixing the dent, I used the symmetry tool:
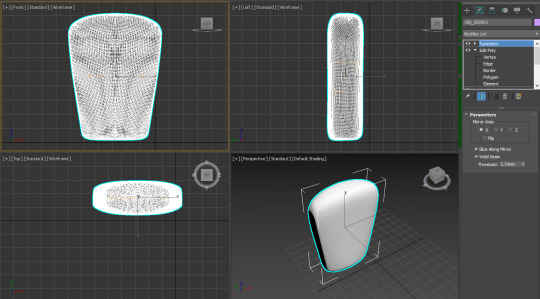
I performed a symmetry modification along the X-axis so that the left and the right sides of the bottle are symmetrical.

I am satisfied with the shape and it is now ready to be 3D printed!
Overall, this week's tutorial was helpful and I am now more knowledgeable regarding how to make final touches to refine 3D models. There are a variety of tools in 3DS MAX that I have yet to explore, but I think that I should definitely try them out.
17 notes
·
View notes
Text
Week 3
The task:
We were given an isometric diagram of a component and instructed to draw an orthographic view of it, included in the drawings a sectional view and a partial auxiliary view that should be shown.
The process:
After reading all the instructions, I drew up a quick layout sketch to plan my A3 page. I then drew boarders, a title block and began drawing each view of the component, front, top, sectional and auxiliary, using projection lines to show the relationship between the views.

To draw the partial auxiliary view I rotated my page so that the T-square could be used to precisely draw the view. I drew over the pencil with pen and added dimensions.

Reflection:
Compared to last weeks task these drawings went faster and ended up looking better, I am very happy with my progression and enjoyed this task too. I have used CAD for years but have never gone back to basics and hand drawn detailed diagrams, I have noticed the importance of order and grew my competence at reading an isometric view. When it comes to order, I've started to begin my drawings from the bottom, working upwards to complete the outline of the component, I then fill in details.
Despite being pleased with the result of this task, I made a few mistakes, such as poor planning resulting in a piece of the drawing going over the border, and an unnecessary line diving the surface cut through in the sectional view.
5 notes
·
View notes
Text
Week 7 - Physical model making
I was quite keen to get into model making this week and developing some ideas I've had into physical form. I created a variety of designs to give myself different kinds of challenges through the model making experience.
Model 1:
For the first model I started fairly simple and so I made a very square template out of card. This template was based on the orthographic views of the design so I could stick them to the foam in order for me to accurately cut into the foam with hot wire.

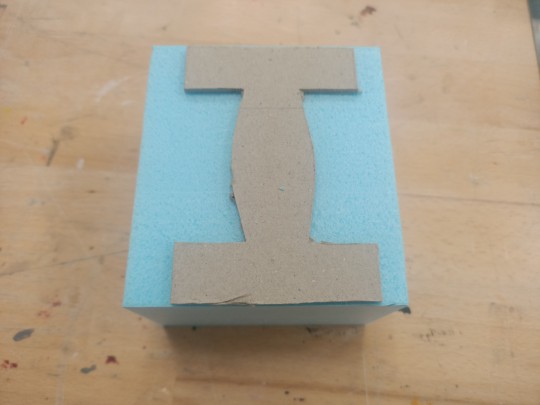
After cutting out the basic shape, I got to work sanding and refining where needed. This is my favourite part of the process as it's where you get to really see the product take its final shape and make any precise changes to improve aesthetics and ergonomics.
Model 2:
For my second model I went for a more difficult design involving different layers and curves. The aim was to find the best tools/techniques to craft the foam into the design.

Once again I started with some sketches to give me something to follow. Then I created a simple template of just the outline to guide me when using the foam cutter. In order to achieve the effect of different layers I used a knife, following an imprint I made in pencil of the design. This worked fairly well however there were noticeable cut marks in the foam where there didn't need to be and also sometimes the foam would get caught on the knife causing tears. I found that having a fresh blade and using more of a back and forth cutting motion helps to stop the tearing, however this isn't really an option when working in tighter spaces as I found in later models. I finished off with some sanding which I could have spent more time doing to improve the model, however I was more set on trying out different things. I also believe that creating the parts individually and assembling the bottle with glue would give a way cleaner look but would take a bit longer.
Model 3:
For my third model I tried really hard to build on the second and try new techniques that would improve the quality of the design. The biggest difference was making each part individually, then using double sided tape which worked very effectively at sticking the foam pieces together. I also used different types of files such as a rounded one to make the indents in the lid. The bottle was finished with a 1500 grit sandpaper giving it a very clean and more professional look.
Models 4-10:
I had a lot of fun coming up with a variety of designs and ended up getting a bit carried away. I tried to be really diverse in the designs, requiring different problems to solve which I believe I've achieved. The hardest problem I faced was definitely in the more curved shapes where I had to try and cut foam out from very tight spaces. As mentioned before, a much better method to achieve these kind of designs would be to cut the parts out individually and glue them.
In the end I believe I've learnt a lot from this exercise, the most important of which is the value of sanding properly for creating a much nicer and cleaner finish. A lot of my designs suffered from lack of refinement but I was able to learn a lot through my plethora of testing and really enjoyed the experience.
11 notes
·
View notes
Text
Week 5 Studio Tutorial – Sketching
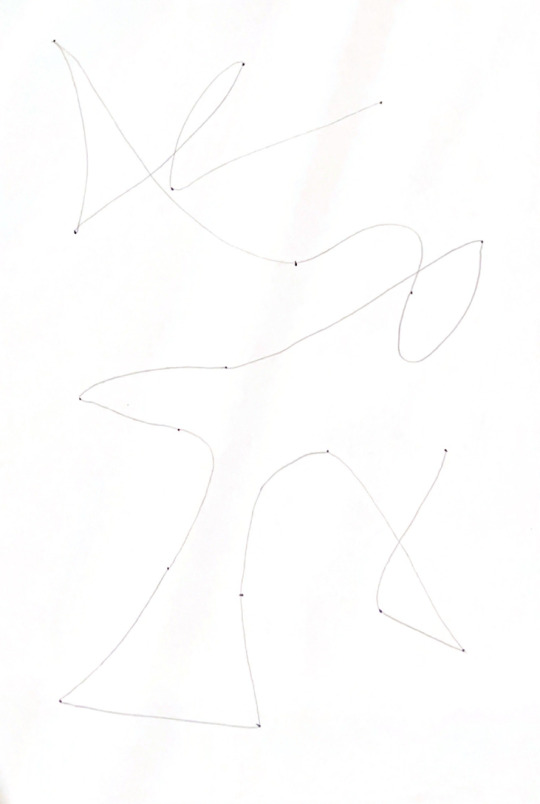
This weeks tutorial began with some rather trivial drawing warm ups as can be seen below. These did in fact warm up my hands to sketching as it had been a while since I had last drawn anything.
We completed in freehand, a grid, line drawing, and a series of circles and ellipses.
This was a fun activity with no real pressure on being precise and neat like some other tasks.

Next on a 4 x 3 grid I sketched some concept models for a perfume bottle, a task given to us for Studio this term. After carefully creating this grid, I had a great time exploring creative bottle designs and thinking out of the box. I got a bit carried away with that and may have added more detail and shading than necessary but it was worthwhile none the less.
Lastly, I redrew my favorite designs and drew some of them in perspective to give a better idea of their design.
In conclusion, week 5's tutorial was both fun and challenging. I enjoyed the actual sketching but found myself a bit stumped when it came to generating original ideas for the bottle designs. As such some of them look quite abstract while some are unique and bespoke.
9 notes
·
View notes
Text
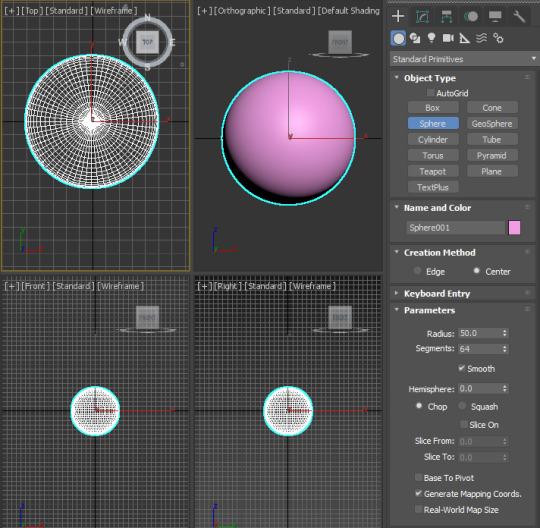
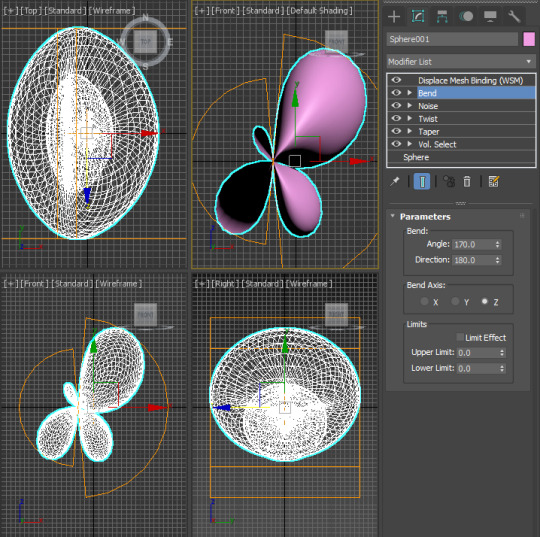
Week 8 - Digital Iteration
(Open the photos for a clearer image resolution.)
Pre-Class: Andrew Simpson's razor handle video goes heavily in-depth on the use of a 3D model, showing how unlike a sketch the 3D iteration can communicate important considerations such as weight, size and ergonomics. When he discusses 'low-fidelity' and 'high-fidelity' models, it can be speculated he is referring to the quality of the model and how close it is to the final product. For example, a quick 3D-printed model with the general shape would be 'low-fidelity' whilst an injection moulded handle with greater detail would classify as 'high-fidelity''.
Part 1 - The Basics
This week was quite the puzzle as I am new to the world of 3D modelling software and it can get somewhat overwhelming very quickly. Prior to starting the exercise many tutorials were watched and a lot of time was dedicated to learning how the 3ds Max interface works.
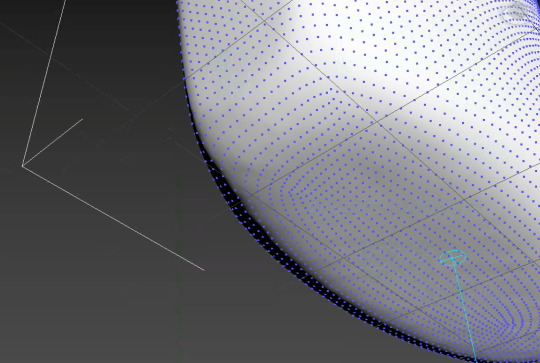
This smaller exercise was a big aid for warming up to the program and found myself messing around with all the settings and endless modifications available. Starting off with my sphere was quite simple and helped me learn how to modify positions and measurements. [F.1]
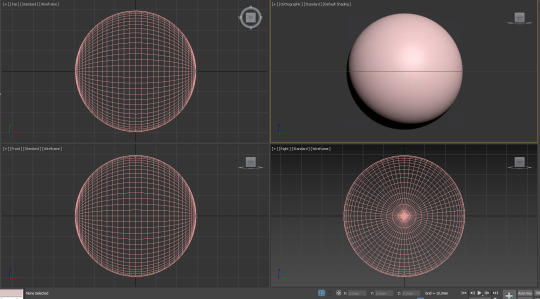
[F.1] The Sphere™
From then on I messed around with colours, modifiers and even different shapes. I made a few abstract and organic shapes which was quite fun and then somehow ended up creating a cartoon-like ice cream; maybe it was the hunger talking. [F.2] I did struggle at first with the layout of the program and finding where the modifiers were and how to toggle them on and off once applied but YouTube was a true friend to help figure this out.

[F.2] Shape Experimentation
Part 2 - Sculptural Forms
Apart from the very random ice cream, I watched the recommended tutorials and began making a few random objects here and there although some looked a bit wonky. I definitely have to get better at using the modifiers to my advantage when creating specific shapes and curves.
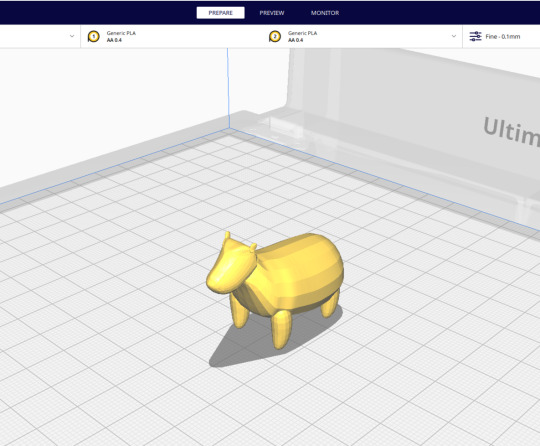
Despite the struggle, I challenged myself to create a quick iteration of an animal. Not necessarily realistic, but crafted well enough that you would know it is an animal. I went with a capybara because they have a pretty simple silhouette and before I knew it I had crafted myself a friend called Carl. [F.3]
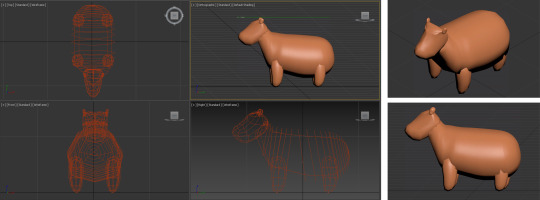
[F.3] Carl the Capybara
Just look at this friendly fella, it radiates nothing but pure happiness! I must admit that I now fear future exercises will never compare to the fun I had creating such a wholesome design. Overall, this week was really entertaining and a good learning experience for someone like myself who was completely new to this program. Hopefully, I can one day I learn how to 3D-print Carl.
6 notes
·
View notes
Text
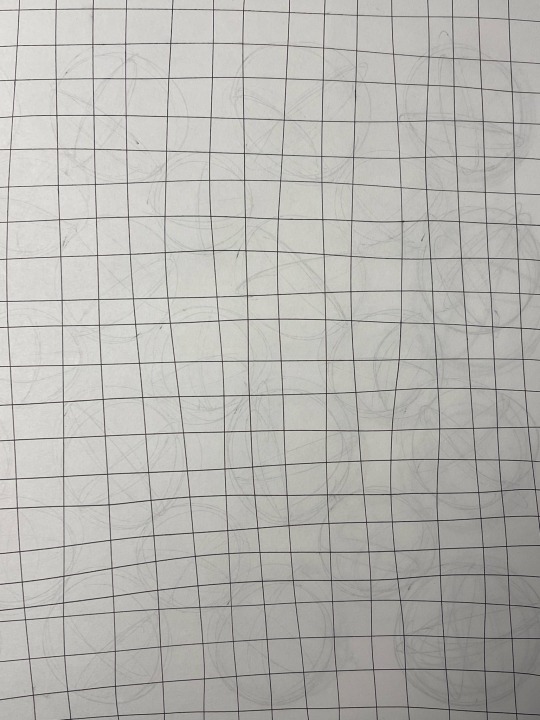
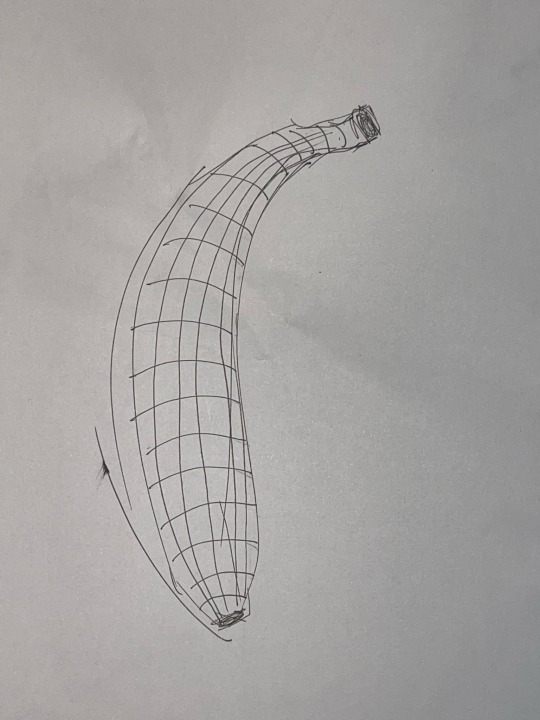
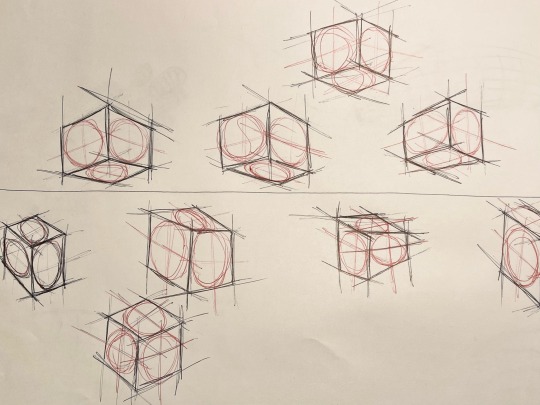
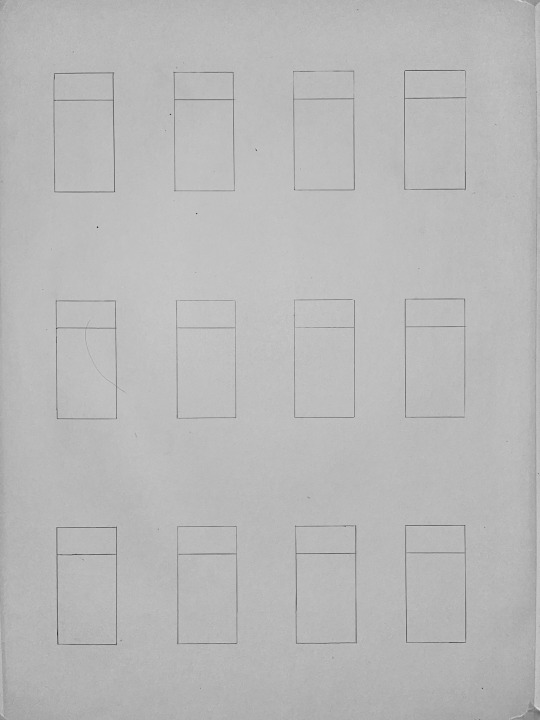
Week 4: Perspective Drawing
This week taught me more than any other week. To learn how to draw in accurate perspectives. The reading for this week proved to be a great help in understanding a previously unfamiliar concept. Translating a 3D object onto the 2D plane while ensuring the distortions that occur stay accurate and legible to the viewers eye was challenging and hard to wrap my head around. After many sheets of paper and mistakes in following the instructions, such as where to put the right and left vanishing points and connecting the wrong lines to said vanishing points, it clicked. The shape came together and looked as it did from my perspective. Once the basis of the concept was grasped things moved along a lot more smoothly. Thanks to help from Rob and my fellow classmates I feel I have a solid foundation to continue doing perspective work.

Part 2 seemed to be a breeze at first. Draw another box and extend the lines out further. But then came the problem. Where do the new boxes end? They do not go on forever and they must have an end point that is still with in relation to the actual dimensions of the box. After some lines drawn here and lines drawn there, I looked on tumblr to see some fellow classmates worked and found out what seemed to be be an accurate place to draw the end lines. However I am not sure if it was in the right place as the boxes do seem a little odd looking. This may have more to do with my vanishing points however.

And then comes Part 3. The circle in perspective. I really found this difficult to do well. Even with a the box square on to make things easier for my self, a few coffees providing a shaky hand and a forgotten ruler lead to some less than desirable circles. I couldn't figure out how to draw the circles to make them seen as if they were in the correct perspective. I think more practice is necessary in this exercise. Perfection comes at the steep price of repetition and hard work, which has always been a weak point for me. I think a calm mind to enable me to find the drawings meditative rather than a task will aid in my future leanings.

9 notes
·
View notes
Last Seen Blogs

plrwave
PLR WAVE
toorduk
Toord

thelildark
Sans titre

dubalicia-blog
BASS, BLING AND ZEBRAS

tanikalangpuso
Kwaderno