#FF14 Guide
Text
A Newbie Guide to Healing
HALO~
I make this guide in the hopes that it will make new players less scared of healing, or at the very least, more mentally prepared for it. Also because the in game tutorial makes me do this (ಠ ∩ಠ)
SO! Suggestions encouraged, just remember this is meant to be a general beginners guide, so I won't be including anything specific to a single dungeon/raid/trial.
Everything under the cut!
Healing is understandably the job the player base finds the most intimidating. The Tank is sturdy, and the DPS nimble, but they depend on you to keep them alive, as none of them can compete with the sheer healing and resurrection powers you have! And that can be a lot of pressure, but we can break this down so its slightly less pressure!
Healing in its most basic form is all about multitasking and prioritizing your moves. Think of it like playing Invaders, you have to make sure you are taking out the closest threats before you can worry about the next - get rid of the first row, then the next row, and so on. In this case the threat is your party members health bars depleting XD
How to Heal
Know Your Skills
Let's start with getting familiar with your skills! The Healer classes all have pretty unique styles to each other, so I advise you READ YOUR TOOL TIPS. For the most part you will have two types of healing spells:
Regular Heal-this heals the player/party for a certain amount of points. Some will heal a little bit, some heal a good amount, and a couple will heal for a lot/all the targets HP. These come in both single target and Area of Effect [AOE] form.
Regenerating Heal-also known as regen. These are spells that initially heal a small amount of points, and then heal a small amount over time, for a few seconds or so. These also come in single target and AOE forms.
The Healer classes also all have unique class specific Heal spells that will have certain effects, or play with class specific mechanics. That is for you to learn as you get more familiar with the classes, as most of them are beyond Lv50 and at that point we're no longer in newbie territory. SO, from this point on I will refer to a "regular heal" as simply a Heal, and a "regenerating heal" as a Regen.
All Healers also have a Role skill called Esuna, a status or debuff clearing heal. These are also called DOTs or Damage Over Time. Keep in mind this will not heal any status, only the ones with a progress bar over them will be cured. You also will not be able to choose which status is healed if your target has multiple. Esuna is a single target skill.
Two of the Healer jobs [SCH & SGE] also have shielding or barrier granting skills. These skills do not heal the party, but instead negate damage for a certain amount of points. This will appear as a yellow section of a player's HP bar capping before their health points. If they have full health it will roll over to an extra line. Any damage taken will first have to go through the barrier before it can get through to the health points. These also can be single target or AoE.
Finally, every Healer has the ability to revive a fallen player, usually referred to as a "res". This will be elaborated on later, but know that you all get this skill very early, and that this has a pretty long cast time normally.
Learning to Cast
Yes I said cast time! All Healing jobs are also casting types! Meaning that for a majority of your skills are spells, and most of them require you to stand still until the cast finishes for it to work! This requires you to position yourself out of danger, but still close enough to heal.
Most of the time a good place to be is a short distance off to the side of the Tank. That way you have a good view of everyone, while being out of harm's way. This applies to both groups of enemies and Bosses.
Single target spells will have a longer range than the AoE ones, and most AoE heals/regens/barriers treat you as the center of the circle. So if you're planning to do a party-wide skill, you need to position yourself so others are in your range!
There is also a helpful tactic called slide-casting, that can assist you if you find yourself in harm's way. There is perhaps a half-second before your spell is done casting, that you can move, but the spell will still finish! It will take some practice to get a feel for it.
You and Your Tank
As the Healer you are responsible for your parties health, but most of all you are also the Tanks partner. They are going to depend on you to keep them alive as they do their best to soak up all the damage to keep the party out of harm's way.
This means you must keep up with the Tank for every pull. If they are running, you are running. If they pull the group around a corner, you have to run around that corner to target them for healing. If they fall, you bring them back up!
But also, if they are taking on too much for you to handle or going too fast, tell them! Very few Tanks will warn or ask if big pulls are ok, because it tends to be assumed. If you're nervous, let them know you are new/new to healing a particular encounter. Most Tanks will ease up and at that point you can tell them if you're comfortable taking on more. They might lead the charge, but you're the one keeping them standing!
The Tank in turn is supposed to be keeping everyone safe, especially you. They do this by generating the most enmity. Enmity is the in game stat that tells the enemies who to attack first, also known as Aggro in most other games. All enemies are drawn to who is creating the most enmity and who is doing the most damage. All Tanks have a Stance that will help them generate enmity, if they have it on, it will look like a little buff by their name called either Iron Will, Defiance, Royal Guard, or Grit. If your Tank is pulling and you don't see this by their name, tell them!
This is important because you as the Healer are also capable of generating enmity, because big heals also tend to grab the enemies attention. Especially regen.
The Pull
OK, let's try to put all that together!
1. The Buddy System
If you are a SGE, immediately put Kardia on your Tank. If you are a SCH, summon your Carbuncle/Fairy if they're not out!
The Tank is the front liner so they will run in first so that they can grab the enemies attention. Always stay behind the Tank, not just because you need to be there to heal them, but because you don't want the enemies to spot you first! You are mighty of mending but squishy of body!
Generally you have two options on your approach: if you are some distance away from an enemy group you can safely throw a regen/barrier on to the Tank without drawing enemy attention. OR you can wait until the Tank have picked up the Boss/all the enemies before starting up any skills.
2. Stay Alive
This is going to sound counterintuitive to your Role, but remember: you are the only Healer! The party might be able to take a few mobs and be okay until you return, but if you die in the boss fight, the rest of the party is often soon to follow.
Make sure you are out of harm's way and your own health is fine, before you start throwing out heals to the others! You can't heal anyone if you are face-planting the earth.
3. Keep the Others Alive
Once you're in a good spot and your own HP bar is okay, it's time to watch everyone else's! When you're the Healer you're going to spend most of the time watching these bars, so it might be helpful to change the size in the HUD to make them bigger. This will make it easier to select the player you want for individual heals.
SCH, your Fairy will also move independently of your commands to heal and shield other players. This is normal, and your game is not tweaking out. It also will not interfere with any of your spells, so don't worry about it!
Generally the Tank will be your priority and the one taking all damage if things are going well. Depending on the amount they are taking, you can heal them every so often, give them a big heal, or if it looks like they are doing fine, a regen may suffice!
Something to watch here also: make sure your Tank is using their mitigations! These are skills the Tanks have to lessen the amount of damage they take, and the skills will have many different names, but all of them will appear as a buff by their name and say they reduce damage. This is important because you are not expected to, and in some cases straight up cannot, heal through all the damage the Tank will take. This is a balancing act between you and the Tank and you both have to contribute for it to work! If you notice the Tank is not using mitigations, politely ask if they are/know about them.
4. Attack Whenever Possible
Remember, you also have attacks! FF14 wants all the players to be actively damaging foes. In fact they generally want the healer to be 30% of the DPS! If your party looks good and the Tank is not in immediate danger, be attacking as much as you can!
SGE this is why you pick the Tank to put Kardion on, for every attack you make it gives the Tank a bit of healing!
Again you are a caster class so most of your attacks will also require you to stand still! When you are fighting groups of enemies, stick to AoE attacks, when you are fighting single targets, use single target spells.
When you are using AoE attacks, some of them will also treat you as the center of the circle, forcing you to get close to your enemies. DO NOT stand next to the Tank. The Tank is only directing damage, they cannot actually shield you with their body. Attacks will go through them and hit you. This is called Cleave. A fair strategy is to follow the lead of the DPS who is experienced, as they also prefer not to die lol
Your DOTs or Damage over Time skills are instant cast! Which can come in handy, as sometimes you won't have time for much else. These are best saved for Bosses, but if you have time to throw them on a random enemy, don't hesitate! For bosses you want to try and reapply DOTs as often as possible.
AST, your Tarot Cards and Divination are specifically for buffing the attack power of yourself and other players, so keep whipping those out!
And remember, the slide-casting trick works on attack spells too!
5. Pick Up the Fallen
Despite your best efforts, someone has died. Don't panic! Even if it's the Tank, don't panic. Now is the time we learn how to play god!
All Healers have the ability to res: Raise for WHM, Resurrection for SCH, Ascend for AST, and Egeiro for SGE. Despite the different names these spell all function exactly the same and they have the same casting time. Which is long.
So when you need to raise someone in a pinch, you want to use the Role skill Swiftcast first! This skill makes it so the next spell you cast is instantaneous. Your priority if everyone else is dead will always be Tank first. If there is a need to raise more, you can use the res move again, but you will have to do it for the full cast time, until you are able to use Swiftcast again. So it's best to wait for a moment where everything is back under control, and you are out of harm's way so you won't be interrupted.
Keep in mind also, when you res someone, they will revive in the last place you were standing when you cast that spell, not where their body is. Also, players first have to accept the res in order to be revived, meaning there may be a delay between when you cast it, and when they actually get up.
6. Tank Busters
Every so often a Boss will think "well shit, if I just take care of this one mother fucker, the rest will fall like leaves!" and try to take out your Tank in one attack. This is the Tank Buster and you need to keep your eye on the Tank when this is happening!
You can tell when this is happening when the Tank suddenly has both a circular marker around their body, and an arrow over their head pointed directly down at them. This is usually coupled with a progress bar indicating a strong move is charging up.
Generally these moves cannot be stopped, your Tank will take damage. So do your best to make sure your Tank's health is at max before the attack hits, and once the damage is done, assess the amount needed to be healed after. Sometimes it's going to be a lot, sometimes they might just need a regen.
Making Good Choices!
As the Healer, you will in the end have to prioritize some Roles over others depending on your situation. There isn't any favoritism involved in these lists, it's purely from a "how do I get us back on track the fastest" standpoint. If it helps, think of it like you're a battlefield medic, they have to make choices based on the conditions!
For Light Parties
This will be most Dungeons and the early Trials. For the majority of in game content this will be the set up you will work with:
1 Tank, 1 Healer, and 2 DPS.
Heal Priority-
1. Yourself
2. The Tank
3. DPS
Res Priority-
1. The Tank
2. The DPS
For Full Parties
These will be Normal Raids and most trials after ARR.
2 Tanks, 2 Healers, and 4 DPS.
Heal Priority-
1. Yourself
2. The Main Tank
3. Off Tank/DPS
Res Priority-
1. One of the Tanks
2. Other Healer
3. DPS- Summoner [can help res at Lv12] or Red Mage [can help res at Lv64]
4. Other Tank/All other DPS
For Alliance Raids
These are Alliance Raid only. You will be part of an 8 player team, and there will be two other 8 player teams on the field. When you pick Healer in Alliance Raid, keep in mind that your skills will typically only affect those in your immediate party. For instance if you use an AoE skill. You can help players from the other parties, but only if you specifically select them, and only with single target skills.
Your Party-1 Tank, 2 Healers, and 5 DPS.
The Alliance- 3 Tanks, 6 Healers, and 15 DPS.
Heal Priority-
1. Yourself
2. The Main Tank [may not be your Tank!]
3. Your Tank [if not the main tank] and DPS
Resurrection Priority-
1. One Tank
2. Your other Healer
3. Healers from other parties
4. Any Summoner [can help res at Lv12] or Red Mage [can help res at Lv64]
5. Other Tanks/Your other DPS
6. DPS from other parties
General Tips and Etiquette
You will never need Repose. At this time, this skill is useful maybe in a few story instances, and if you're out in the field alone. But in any general dungeon/trial/raid run it has no use.
You can use the Role skill Surecast to ensure your next spell will not be interrupted by attacks, and it will also prevent most knock-back effects!
If you are having trouble managing MP consumption, you can use the Role skill Lucid Dreaming to steadily regain MP for a short amount of time. Likewise you can also use it after just having been revived to get your MP back quickly so you can use your stronger spells faster! Because your MP will be extremely low when you regain control.
Speaking of that, WHM and AST, once you guys get level up high enough to learn Cure II and Benefic II, stop using the first versions of these skills. Yes, there is a neat little bonus action combo that they do, but I'm telling you that is inconsequential. It is simply more time and cost effective to use the stronger Heal move, then to keep pumping out a tiny heal for a chance at something bigger. If you're having trouble just use Lucid Dreaming, or Presence of Mind/Lightspeed to help you out, it will be quicker I promise!
Don't forget about Esuna! Yes you could just heal through the DOT on your Tank, but that takes more time and MP than just cleansing them! Especially if the DOT is going to last more than 5 seconds. However, if the target has more than 2 status effects on them and they have short timers, it may be more cost effective to cleanse one and then heal. If ALL the DOTs have long timers, heal between cleanses.
On that note, let's talk about Doom [the in game debuff]. Cleansing Doom is not optional, as it can kill a player that has full HP instantly. Doom is not so much a DOT as a countdown to player death. On top of that, the way you must cure Doom is not always the same. Most of the time you can cleanse Doom by healing a player up to full HP before the timer runs out. Sometimes it has a bar over it, which means you can use Esuna to clear it. And then there's the ones that are completely out of your control, because it's a boss specific mechanic that required the afflicted player to do something [there's only one of these in main game content]. So yes when it comes to Doom, pay attention and do your best :')
For the Healers the use of the Limit Break is not common, but when it's time, it is crucial. For main game content with a 4 player party you will never need it, but in the Trials and Raiding content this is a potential tool to save your team if you need it. Because for the Healers the Level 3 Limit Break [LB3] results in a full party 100% heal and res. Meaning if you are the last man standing in the raid you have the power to turn the whole thing around! Keep in mind: You will still have a cast time for this move, and this move has a limited range. Make sure you are safe when casting, and be close to the party members you intend to res.
If a player has died and you didn't have time to res them before all the enemies/boss are dead, whatever the reason may be, it is better for them to teleport and run back. This might seem rude, but it's because when you res someone, they don't come back at full strength! They have a minute long debuff called Weakness that lowers their attack by 25%. If you've already ressed them in that time frame, doing it a second time will make it Brink of Death and then their attack is lowered by 50%. Some players don't know this and will just lay there. Politely explain it to them. If they stay there, then they can stay there :)
Rescue is a Role skill that you need to be the most careful with in its use. Yes, a timely rescue from the jaws of death is great and you love to see it! But this is also a move that can easily be used to cause grief in the wrong hands. Unless the player in question is actively in danger and they are aware of it, they are more often than not going to be a little bit terse with being literally pulled away from whatever they were trying to accomplish. Especially if they were in the right place and they just got pulled into death. You must be 100% sure when you use this move, that you are moving someone out of danger when you do it.
DO NOT pull for the Tank. Remember you and the Tank are a team! That means you both have to be comfortable with a big pull. Because you might be an awesome healer, but if they're still not familiar with all their mitigations, or even not familiar with the encounter, then they might die anyways. If you're feeling good about it, you can simply tell the Tank that they can grab more enemies. If they're not, then please continue to move at the pace they set. If the Tank wants to make a big pull they will either ask, or most just do it and see if you're able to keep up with their stride.
On that note, DO NOT use Rescue to make the Tank move forward faster. Do not use it to pull the Tank into mobs. The only thing this will accomplish is make the Tank mad at you. Again, this is a partnership, be considerate of the Tank!
NOW GO! PROTEC YOUR FRANDS FROM DANGAR ;3
#Final Fantasy XIV#Final Fantasy 14#FFXIV#FF14#FF14 Guide#FF14 Healer#FF14 Healing#FF14 Beginners Guide
14 notes
·
View notes
Text
youtube
Having trouble with Levinstrike? Like JP strat? Try using the JP Alt strat, and follow my guide to execute it flawlessly!
#ff14#ffxiv#final fantasy 14#ff14 ffxiv#savage#ffxiv savage#ff14 savage#savage strat#ffxiv raiding#video guide#savage guide#ffxiv guide#ff14 guide#levinstrike#lc1#jp levinstrike#Youtube
8 notes
·
View notes
Text
youtube
#ff14#ffxiv#ff14 lalafell#final fantasy xiv#ffxiv gil#ff14 gil#market board#vtuber#virtual youtuber#guide#gil guide#ff14 guide#Youtube
4 notes
·
View notes
Text
FFXIV Free Login Campaign - Quick & Easy guide on your return to Eorzea!
FFXIV Free Login Campaign – Quick & Easy guide on your return to Eorzea!
If you’ve been out of FFXIV and wish to return to the game, now is about the best possible time for you to do so. The Free Login Campaign is back, meaning that eligible players can play FFXIV for free for a limited time. This campaign will last until Dec 16, 2022 at 2:59PM GMT, and in this guide, I’m going over everything you need to know about it.
Prerequisites
There are certain conditions you…

View On WordPress
#ff14#ff14 beginners guide#ff14 free login campaign#ff14 guide#FFXIV#ffxiv beginners guide#ffxiv free login campaign#ffxiv guide#final fantasy 14#final fantasy xiv#final fantasy xiv free login campaign#ivona nikolic#moms den
1 note
·
View note
Text
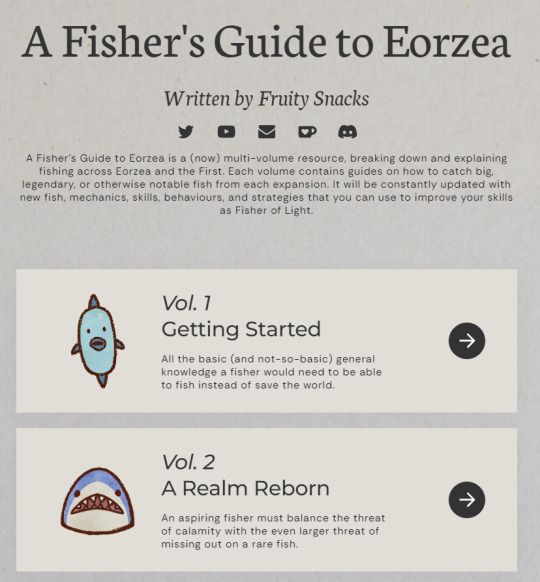
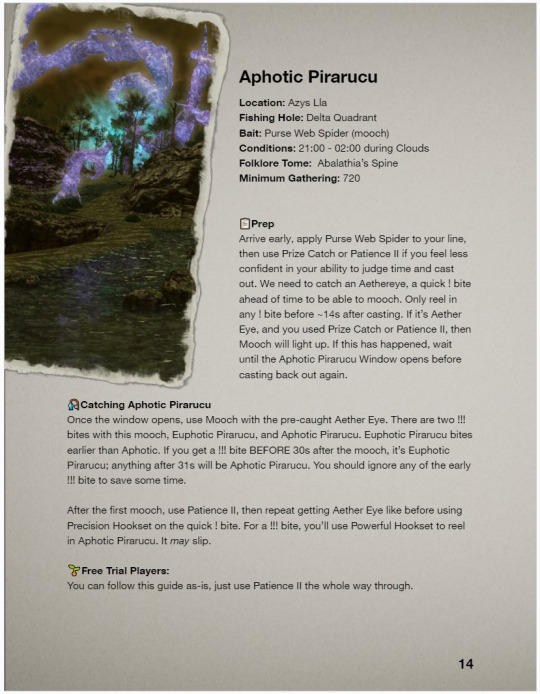
📢A Fisher's Guide to Eorzea - V.2.0.0!
No longer a single 303 page document, "A Fisher's Guide to Eorzea" has been sundered into SIX VOLUMES.
📚Faster Perf + Loading
🎨New guide art style
💧New Aquariums guide
🤯and more! 🧵
Check it out now:
https://afishersguidetoeorzea.carrd.co
The original single-doc book got so big that I had to break it up. Seems fitting. Examples of the new site and new art style below:

196 notes
·
View notes
Text
How to make a child model in Anam/Ktisis!
Disclaimer: I am NOT an expert in the use of these mods! I'm still very new and learning the ins and outs of them! This method worked for me, and maybe there are better ways to do it, but I'm just explaining how I created my baby Shiun. If you know of a better way, or have any tips and tricks, please feel free to comment or reblog with your advice for the sake of other gpose newbies! :D
Link to Ktisis's download page | Link to Anam's download page
Guide and Tips/Warnings below the cut! Hope this helps <3
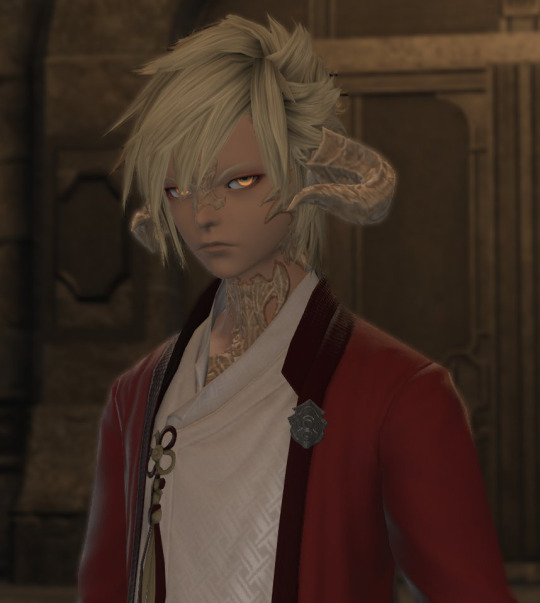
Summon your partner in crime. So first off, I equipped my summoner job stone and summoned my trusty companion, Carbie.
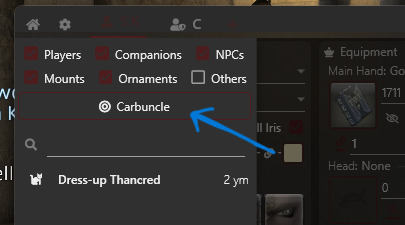
2. Add your Carbie to your actors. Open up Anam and add your carbie to your list of actors, by clicking the plus sign at the top of the menu next to your character's name (remember that with Anam, you can only edit appearances OUTSIDE of gpose). Click on the little button labeled "Carbuncle" to add them.
3. Turn your Carbie into a person. With your Cabie selected, go to the "Import NPC" at the bottom right and pull up the list. Find an NPC that is the same race as your desired character and select it. In this example, I just chose the first au ra NPC I saw in the list.
(You can also directly choose your desired race in the customize menu and start from scratch, but I just do it the Import way, lol)
⚠️As far as I've experienced, it's a 50/50 chance on whether or not you can alter the age of your character's actor directly. Every time I've tried this, it breaks the model and never works the way it should. For simplicity's sake, I've always just used my friend Carbie.


4. Change the age of your new actor. Now if you look at the top left of the Anam window, there's a series of dropdowns next to "Race."

What you want is the bottom right menu. Click it and you'll see "Old," "Normal," and "Young." Clicking "Young" will turn your carbie into the child version of the race it's currently disguised as!
5. Customize and boot up gpose! Now you can customize them to be the adorable mini version of your beloved WoL/OC!! The bones are compatible with Ktisis and should be as easy to manipulate and pose as adult models.
If you use the Carbie method as I have in this explanation, you can simply hide your main model in the default Gpose menu for pictures.
Some things to keep in mind! ----
⚠️Not every race has a child model. The only races that have child models are:
au ra - male & female
hyur - male & female
elezen - male & female
miqo'te - female only
⚠️It is very likely that the models will break or look a little funky when you first spawn them. They have a very limited number of faces, and a limited number of available hairstyles. If you choose an option the game does not have, it will create some... interesting results. Most other customizations beyond skin color, hair color, and eye color will also likely not work (tail type/length, jaw type, etc.).
Left: invalid face selected --- Right: invalid hairstyle selected
Usually, faces 1 & 2 are the only viable options, and hairstyles 1-5 are okay. (Note: the pictures of the hairstyle icons will NOT match the hairstyle on the model.)
⚠️Clothing is also fairly limited! I'm not sure what dictates what child models can and cannot wear, so as far as I know, it's just a game of trial and error. You'll know immediately if an article of clothing isn't compatible lmaoo. Hats... rarely ever work...
✨Don't forget that you can save your model's data! When your model is customized to your liking, click "Export" at the bottom right of the menu to save the data to Anam. That way, you can load the appearance immediately without rebuilding it every time!
It's a mixed bag of what will and won't work on the model. My best advice is to experiment and play around with it! It took me a little bit to figure all of this out, so hopefully this silly little explanation helps out all the other new gposers out there :)
If you have any questions, please don't hesitate to reach out and ask! I'll do my best to help! I may edit this as I go to correct things and/or add onto it!
#ffxiv#ff14#final fantasy xiv#ffxiv gpose#ffxiv resources#ktisis#anamnesis#hope this little guide is useful :)#make sure to read the comments/reblogs for extra info!!
138 notes
·
View notes
Text
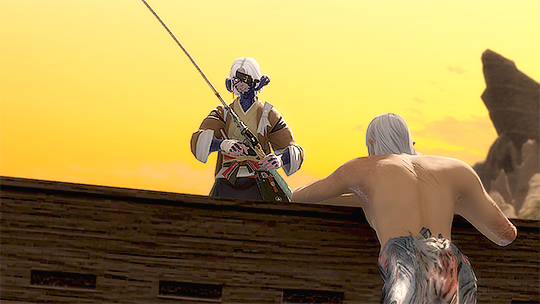

the fisherman and their catch
#ffxiv#au ra#estinien wyrmblood#final fantasy xiv#ff14#final fantasy 14#wol#saw the mermaid thing going around and thought...#estinien would be a great mermaid...#now here we are#⭐ mine#🎐 may the wind guide me back to you
40 notes
·
View notes
Text
Final Fantasy XIV Sidequest Guide: Heavensward Edition
When looking up which of FFXIV's many many sidequests were worth doing, I found that most of the lists were heavily focused on the rewards rather than whether the sidequest itself was interesting or added to the overall game experience. So I decided to make a guide myself :)
The sidequests listed here are selected based on their story, or their contribution to the worldbuilding or lore. CTRL+F for the relevant location (e.g. "Coerthas Western Highlands", or "Falcon's Nest"), take a look at the blurbs to see whether they appeal to you, and have fun!
This section is for the Heavensward sidequests, since that's where I started this whole project~ Click below for details!
Note: unlike A Realm Reborn, each settlement will have sidequest chains with a bit more effort put into them, as flagged by the quest pop-up notice having a cutscene screenshot (similar to the more significant MSQs). If you want to get a feel for a place but don’t have the time or inclination to do a lot of sidequests, I’d recommend doing those ones first – though note that they can definitely get quite long! I’ll refer to these as “flagged” below, for clarity.
Ishgard
Like previous cities, Ishgard has a number of sidequests to flesh out the city and get newcomers exploring. Here are some of the better (or at least more informative) ones.
(Foundation – The Forgotten Knight) Gibrillont ~ “Drinking the Pain Away” (Lvl 50) – a story which highlights the extent of Ishgard’s religious dogma, particularly the disastrous effects an accusation of heresy can have on a household
(The Pillars – Fortemps Manor) Torsefers ~ “Dinner for Four” (Lvl 50) – a delivery run on behalf of House Fortemps to the three other High Houses of Ishgard; highlights the connections and rivalries between the Houses
(The Pillars – The Jeweled Crozier) Mathye ~ “Landing a Stable Job” (Lvl 50) – leads you to the Lightfeather Proving Grounds, and gives some context to the culture around chocobos in Ishgard. Not terribly exciting
(Foundation – Aetheryte Plaza) Fury-fearing Elezen ~ “Remembering Ishgard” (Lvl 50) – a tour of some of the locations in Ishgard; outlines lore behind the statues gracing Saint Reinette’s Forum and Saint Valeroyant’s Forum. Not very exciting, but lore-lovers might want to check it out.
(The Pillars – The Jeweled Crozier) Mathye ~ “Landing a Stable Job” (Lvl 56) – leads you to the Scholasticate, and demands a rare bit of simple puzzle-solving
Coerthas Western Highlands
There aren’t a huge amount of sidequests here compared to the other regions, and the pace of them unlocking is not too overwhelming. If you want to give the main story just to give a bit more flavour and context, I’d recommend doing the five already-unlocked sidequests in Falcon’s Nest (+ The Anvil) before progressing with MSQ “At the End of Our Hope” near the end of the Artoirel questline.
Falcon’s Nest
Sigan’s questline (flagged); starts with Auriaune ~ “Stolen Goods” (Lvl 50) – the first quest isn’t all that interesting, but the questline overall deals with how there used to be a village at Falcon’s Nest before the Calamity struck, and how that is being dealt with now
(Not in Falcon’s Nest) Bohemondas “Homesick” (Lvl 51) – a story about a father and son who lived at Falcon’s Nest before the Calamity, and who have rather different viewpoints on its current state. Note that the questgiver is not based in Falcon’s Nest, but in Ishgard, specifically Foundation (X:9.5, Y:10.3)
The Convictory
Saintrelmaux’s questline (flagged); starts with Dominiac ~ “The Secret to Success” (Lvl 51) – this questline does give a bit of insight into life at the Convictory, as well as into Ishgardian high society. But more than anything it’s just a nice story about someone who, in learning more about dragons to hunt them, learns more about himself
Bonifoix ~ “Remember the Fallen” (Lvl 56) – about the sole survivor of a dragon-hunting expedition; a rare illustration of the dangers faced by the Convictors
Margyt and Ayleth’s questline (flagged); starts with Margyt ~ “Unknown Ultimatum” (Lvl 56) – initially a tale of revenge, but it doesn’t go the way you’d expect; this questline also touches upon into the otherwise-unexplored internal politicking and hierarchies at the Convictory. Honestly, I’m not sure whether to recommend this questline as it seems to undermine the ending of Saintrelmaux’s questline, and some plot points are frustratingly gendered (one of the characters is a female dragon-hunter unhappy about not being given opportunities by her male boss, but the story ends with her becoming his loyal subordinate, accepting that it’s better for her to be in a supporting position)
Other
(Located at Falcon’s Nest) Ingaret ~ “Grandfather’s Belongings” (Lvl 50) – gives a little more insight into pre-Calamity Camp Riversmeet area
(Located at the Anvil) Ysaudore ~ “Dances with Wolves” (Lvl 50) – pairs well with “Protecting What’s Important”, as it gives the Ishgardian view of Camp Riversmeet. Note that the questgiver is based at the Anvil (X:26.5, Y:27.9)
(Located at the Convictory) Wealdtheow ~ “For All the Nights to Come” (Lvl 51) – apart from being a must-play due to its completion being necessary to unlock flying in the region, this quest also contains the surprisingly elaborate backstory behind the Dusk Vigil, a tale which leans into the vicious politics of Ishgard
(Located at Falcon’s Nest) Well-mannered Widow ~ “Flower Mill” (Lvl 51) – explains the story behind Gorgagne Mills
(Located at Falcon’s Nest) Troubled Elezen ~ “The Old Man and the Lake” (Lvl 56) – about a man trying to persuade his uncle to move to Falcon’s Nest, away from his house in the middle of nowhere. Best when paired with “When the Ice Melts” (see below), which gives the other’s point of view
(Located at Oakum Landing) Emont ~ “When the Ice Melts” (Lvl 56) – a little vignette about the uncle of “The Old Man and the Lake”, who continues to live out by the frozen lake even after the Calamity. Note that the questgiver is based at Oakum Landing (X:36.4, Y:9.9)
The Dravanian Forelands
There’s a huge amount of sidequests in this area that unlock quite close together (nearly fifty, double that of the Coerthas Western Highlands)! As such, I would definitely recommend doing the minimum to unlock flying (i.e. collecting all the Aether Currents) in the region and maaaybe doing the flagged quest chains before proceeding with the other sidequests. In general, I found the Loth ast Vath and Anyx Trine sidequests more interesting than those at Tailfeather, as the former give you insight into the Vath and the dragons while the latter will feel quite familiar to anyone who’s done the Botanist or Carpenter job quests, or sidequests in the Shroud. If you’re picky, I’d say that the Anyx Trine sidequests are the most worth doing – many of them are cute and give more emotional weight to Ysayle’s position.
Tailfeather
Q’yantaa’s questline (flagged); starts with Loupard ~ “I Wanna Be the Hunter” (Lvl 52) – a tale of a young Miqo'te starting out as a chocobo hunter, and her trials in finding a suitable hunting buddy. One of the weaker flagged quest chain stories IMO, but the very first quest “I Wanna be the Hunter” is worth doing for the insight into the life of a chocobo hunter
Marcechamp ~ “Some Bad News” (Lvl 52) (Aether Current) – gives a little context on how the camps in the Chocobo Forest connect together and Tailfeather’s role as the central hub in the region
(Not in Tailfeather) Guanaret ~ “Why Does the Caged Bird Sing” (Lvl 52) – insight into a chocobo hunter’s everyday life, and one of the key tenets of chocobo hunting. Note that the questgiver is not based in Tailfeather, but at one of the camps (X:39.5, Y:21.7)
Remaclon ~ “What Remaclon Saw” (Lvl 52) – gives a bit of context to the ruins in the Chocobo Forest, and the typical Ishgardian perspective on it. Gives more flavour to the main story if you do this before MSQ “Mourn in Passing”, as it contrasts with Ysayle’s explanation
Hervoix’s questline (flagged); starts with Hervoix ~ “Getting a Legtrap Up” (Lvl 57) – following on from the tale of eager young hunter Q’yantaa is that of a wannabe hunter who shirks his duties, bristling at the menial tasks that his mentor gives him. (This is also a good illustration of what residents of Tailfeather busy themselves with, outside actual chocobo-hunting.) Eventually dovetails nicely with Q’yantaa’s story
Loth ast Vath
(Not in Loth ast Vath) Nonmind Drone ~ “Awakened” (Lvl 53) – a good illustration of how the Vath differ from the earlier beast tribes, in that Vath are not simply “the one good tribe” of that species but rather those of that species who separate from a larger whole. Shows Loth ast Vath’s importance as a sanctuary for nonmind Gnath. Note that for obvious reasons the questgiver is not based in Loth ast Vath, but at the Gnath Stronghold (X:31.8, Y:38.6)
Astute Vath ~ “Advanced Vathematics” (Lvl 53) – following on from “Awakened”, this sidequest illustrates how the line between Vath and Gnath is much more blurred compared to other beast tribes
Vath Storyteller ~ “The Naming of Vath” (Lvl 50) (unlocks Vath Beast Tribe Quests) – similar to “Awakened”, this quest deals with a newly-turned Vath developing a sense of identity, but is a bit more fleshed out and elaborates a bit on the interaction between Gnath, Vath, and the chocobo hunters. Results in a visual change to Loth ast Vath, which is cool! Note that it only unlocks after getting to a certain point in the main story (MSQ Lvl 53).
The Hungerer and Cibleroit’s quests; starting with “Low-hanging Fruit” and “To Each His Own” (both Lvl 52) – a few simple sidequests which do a good job illustrating the difference between Vath and Gnath. Also, the two of them are cute <3
Anyx Trine
Kal Myhk’s questline (flagged); starting with Gullinkambi ~ “When Mother Calls” (Lvl 53) – as a story about the WoL becoming friends with a young dragon, this would already be cute enough, but it’s also a good illustration of the how human-dragon relations were in the past and how they have been soured by the Dragonsong War. Definitely recommended for those who want to add a little more emotional context to the main story, as this gives players an opportunity to really understand where Ysayle is coming from in terms of dragons and humans being able to live in harmony
Toh Y Thrah’s questline; starts with “How to Feed Your Dragon” (Lvl 53) – you help a baby dragon try out some delicacies. The first two sidequests aren’t too exciting, though they do tell you what dragons like to eat if you’re interested, but the third and last one (“A Taste of the Peculiar”) is surprisingly sweet
Ess Khas ~ “A Lesson in Humility” (Lvl 53) (Aether Current) and “Back in the Game” (Lvl 53) – a cute set of sidequests about an old dragon trying to teach his sons humility
Indomitable Wyvern ~ “Blunders in Dragonsitting” (Lvl 53) – a cute story about a dragon looking out for his younger brother (also a dragon)
Sea of Clouds
I personally didn’t find the sidequests in the Sea of Clouds all that interesting; in particular, they don’t flesh out Camp Cloudtop or the Rosehouse beyond what can be gleaned from MSQ dialogue or talking to the NPCs. The Zundu’s sidequests generally weren’t as interesting as the ones for non-human questgivers in the Dravanian Forelands, either.
The Rosehouse
Gildon’s questline (flagged); starts with Gildon ~ “Bargaining Chip” (Lvl 50) – about a man eager to motivate the decidedly unmotivated troops posted to the quiet Camp Cloudtop and Rosehouse, but whose passion is mistaken for foolishness (sometimes correctly). One of the weaker flagged questlines in Heavensward, but the humorously hostile dynamic between Gildon and Camp Cloudtop provisioner Fabrellet is one of the more fleshed out amongst the expansion’s town NPCs
(Not in Sea of Clouds) Hyur on Hard Times ~ “Looking to the Future” (Lvl 51) – somewhat unexpectedly, minor NPC Marielle has a bit of a backstory. Note that the questgiver is based in Ishgard’s Foundation (X:12.5, Y:10.9)
(Not in Sea of Clouds) House Haillenarte Knight ~ “Honoring the Past” (Lvl 56) – goes a bit into some history regarding House Haillenarte, including Laniatte of the Rosehouse’s background. Note that the questgiver is based in Ishgard’s Pillars (X:11.5, Y:10.9)
Ok’Zundu
Gunu Vanu’s questline (flagged); starts with Guna Vanu ~ “Flying the Nest” (Lvl 57) – an amusing tale of a Zundu far past the threshold of adulthood who, due to his laziness, has failed the coming-of-age trial eight times… and counting. Better to leave for when you’ve unlocked flying in the region
Sonu Vanu~ “On Wings of Vanu” (Lvl 57) – a no-combat quest which encourages flying about the area; gives context to the woven orb-like objects you may have seen hanging from some of the islands. Requires flying
(Not in Ok’Zundu) Zundu Intelligencer ~ “For Your Spies Only” (Lvl 57) – a glimpse into the Zundu’s espionage network, which is a fancy way of referring to the scout who monitor the Vundu up close. Note that the questgiver is not based at Ok’Zundu, but at (X:23.0, Y:19.8). Requires flying
Hinu Vali ~ “Returning What’s Ours” (Lvl 57) – gives some context on the tense history between the Zundu and Vundu
Aanu Vanu ~ “Winds of Ill Omen” (Lvl 57) – some lore titbits regarding Vundu totems, and the totems’ significance to the Zundu. IIRC flying is required
Churning Mists
The sidequest unlocks were paced a bit strangely here; the initial round that unlocks when you’re in the area for MSQ reasons is (relatively) manageable in number, though on the whole not that interesting. However, if you for some reason decide to return after a certain point in the MSQ, then you’ll find a ton of sidequests waiting for you… and even more, after you’ve completed that round. Many of the later sidequests are actually part of separate quest-chains, so if you plan on completing most of them, I’d definitely recommend pacing yourself and unlocking flying first.
Moghome
Mogleo’s questline (flagged); starts with Mogleo ~ “A Pebble for Your Thoughts” (Lvl 54) – a cute little tale about a young moogle who dreams of joining the Pomsguard, and his adventures in helping other moogles across the Churning Mists
Mogomo ~ “Nut Job” (Lvl 54) – gives a little insight into life at Moghome; you get to pick kupo nuts!
Pomguard questline (flagged); starts with Mogloo ~ “Protecting the Pom” (Lvl 55) – follows Mogkul, second-in-command of the Pomguard, and his attempts to protect Zenith along with his fellow moogle soldiers. Outlines the arrangement between the moogles and Hraesvelgr, but isn’t particularly interesting as a story. I’m also not keen about how the sole female member of the Pomguard is portrayed as weak and easily-frightened compared to her male peers, especially when there are so few female moogles in the first place
(Not in Moghome) Maenne’s questline (flagged); starts with Unflinching Temple Knight ~ “Into the Mists” (Lvl 56) – a very by-the-numbers look at the work of the dragoon scouting party; basically, you do the entire squad’s work for them. I’d largely skip the story if you do this quest chain (it’s necessary for unlocking the moogle dailies), but the last quest “Laying the First Brick” puts a nice cap on the moogles’ attempts to preserve the ruins in the Churning Mists. Requires flying. Note that the questgiver is posted outside House Fortemps’ manor in Ishgard (X:11.4, Y:11.0)
Twelveswood moogle questline (flagged); starts with House Fortemps Knight ~ “Moogles in the Sky” (Lvl 59) – a story about some Twelveswood moogles who want to visit Moghome. This quest chain is a must-play for anyone interested in moogle lore, as it goes into the cultural differences between the Twelveswood and Moghome residents, as well as their shared ancestral history! But be prepared to spend a lot of time flying all over the Sea of Clouds – it’s to the point where those not interested in moogles may want to give this one a miss. Requires flying. Note that the questgiver is posted outside House Fortemps’ manor in Ishgard (X:11.4, Y:11.0)
Other
(The Monsterie) Mercurial Moogle’s questline; starts with Mercurial Moogle ~ “I Won't Leaf You Behind” (Lvl 55) – a set of three quests about a moogle trying to find herbs to help his sick friend; apart from being heartwarming, it also offers some insight into moogle medicine. Requires flying IIRC. Note that the questgiver is based in the Monsterie (X:34.1, Y:16.0)
(Tharl Oom Khash) Tharl Oom Khash questline; starts with Malingering Moogle ~ “Unwanted Attention” (Lvl 55) – a set of four quests about the moogle research expedition working at the ruins of Tharl Oom Khash (note that the first quest seems very unrelated). There is a lot of flying up and down trying to find the quest objectives, which can be annoying, so I’d mainly recommend this questline to those who are particularly interested in the ruins dotting the region, or in dragon culture. Requires flying. Note that the questgiver is based near Tharl Oom Khash ((X:17.4, Y:11.2)
The Dravanian Hinterlands & Idyllshire
Most of the sidequests in this region actually originate in Idyllshire rather than out in the field, but note that like the Dravanian Hinterlands themselves, the sidequests are unlocked in two phases – first, those that mainly concern the Eastern Hinterlands, and second, those involving the Western Hinterlands. Clearing all the sidequests is not too overwhelming if you do them as they come up (i.e. finish the first set before unlocking the Answering Quarter), but it’s probably quite painful to clear all at once post-Heavensward. Personally, I found that the first set of quests were generally better at fleshing out Idyllshire, but the real stars of the show are the three flagged questlines – two linked ones from Idyllshire, and the one at Matoya’s Cave – definitely focus on these if you can’t be bothered with the rest!
Idyllshire
Slowfix’s questline (flagged); starts with Slowfix ~ “The Pick of the Bunch” (Lvl 58) – about Slowfix’s leaderly struggles in setting up the administrative systems required to run a city; a classic tale of idealism versus practicality. Only this time, the story takes a rather more corporate bent – it’s definitely recommended if you feel strongly about policies and procedures (whether that feeling is positive or negative!). The questgiver is at X:7.0, Y:6.0
Midnight Dew ~ “Community Service” (Lvl 58) – gives a sense of everyday life at and the community of Idyllshire. The questgiver is at X:5.5, Y:6.6
Loudjox ~ “A New Leaf” (Lvl 58) – touches upon what kinds of things goblins trade, including filling for their masks. The questgiver is at X:7.1, Y:7.2
Halfsix ~ “Ebb and Aetherflow” (Lvl 58) – illustrates how recycled Sharlayan technology is crucial to keep Idyllshire running. The questgiver is at X:7.5, Y:6.7
Holepix ~ “The Vangob Job” (Lvl 58) – shows how Sharlayan technology can be reverse-engineered and recycled in less than peaceful ways. The questgiver is at X:7.5, Y:6.7
Notched Bone & Dedean’s questline (flagged); starts with Midnight Dew ~ “The New Arrivals” (Lvl 58) – a thematic continuation of Slowfix’s story, this quest chain explores the ideals behind Idyllshire from a different perspective. It follows two new arrivals who – thanks to bad experiences in Ul’dah – are suspicious of everyone and everything
Other
(Matoya’s Cave) Saro Roggo’s questline (flagged); starts with Saro Roggo ~ “Saro Roggo's Common Life” (Lvl 59) – if you are going to play one quest chain in Heavensward, make it this one. About a self-doubting enchanted frog who fears for his place among Matoya’s familiars, this questline delivers a simple but affecting story, fun (if very simple) riddles to solve instead of the usual “fetch this, kill that” objectives, and gives players a little more insight into the into the excellent Matoya (whose screentime is all too brief!). Flying recommended
Azys Lla
Yes, the final dungeon area has a bunch of sidequests while you wait for the duty to pop (though that’s no longer relevant thanks to NPC support). Unfortunately, said sidequests don’t do much to flesh out the area beyond what you can already learn – or infer – from the MSQ dialogue; there’s only one which might be of interest to lore-lovers. If you’re intent on doing the sidequests regardless, I’d highly recommend progressing with the MSQ first anyway as you’ll unlock all the necessary Aether Currents for flying by doing so.
(Gamma Quadrant) Auditing Node ~ “A Crude Facsimile” (Lvl 59) – touches upon the link between Allag and Garlean technology. The questgiver is based in the Gamma Quadrant (X:29.8, Y:37.6)
#final fantasy xiv#final fantasy 14#ffxiv#ff14#ffxiv heavensward#ffxiv hw#heavensward#eorzea#ishgard#game guides#recommendations#lore#worldbuilding#my writing
68 notes
·
View notes
Text
So uh... I haven't started grinding out the Yokai Event yet. Mainly because I've already done it on my Main and Main-alt and I'm trying to finish up other things, but I do intend to do it for Yuki (my catboi, aka Mari's brother).
There's also some complaints on various social media platforms that BLUs are roflstomping (for lack of a better term 😋) all of the FATEs with their 2-skills and to let them do their thing for a period of time until things return to "normal". (I don't play BLU so... 🤷🏻♀️)
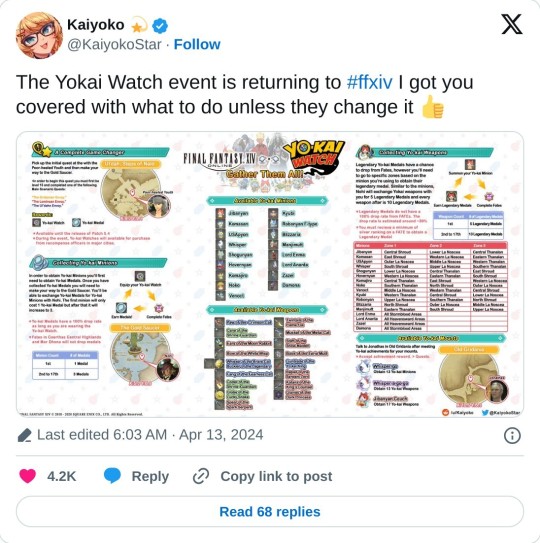
I just wanted to throw this out there (Kaiyoko's Guide from Twitter):
A friend of mine and I were trying to recall all the details of this event from when it was last ingame. There was some confusion around a specific detail and it's happening again now. It was all across Reddit last time, but this time I'm seeing it across Twitter, lol.
When you FATE grind in each respective zone/map, you need to have that Minion summoned/out in order to receive medals.
It's hard for me to remember because it was so long ago, but I believe what I did was- I just bought all of the minions in one go. Like, a wee bit of extra FATE grinding really wasn't going to kill me 🙃. (That's 49 medals, because the first minion is 1, and after that they cost 3. Unless they added more minions?)
The alternative is, you can get the first minion and then continuously return to the gold saucer and buy the necessary minion before you go to each zone. Just don't forget, lol 😅
For most zones, you can plan ahead. Like... Outer La Noscea: Blizzaria, USApyon, Noko (can all get Tokens from that map). That's 3 minions you can do on 1 map. So if you bought all 3, you wouldn't have to change maps, you can just FATE grind there and swap out your minions when you get the amount of medals you need. If that make sense? (I know my phrasing is awful sometimes)
(10 Tokens per weapon, except for the first weapon which is 5)
Another example would be, Central Thanalan: Komajiro, Shogunyan, and Jibanyan.
Take a look at Kaiyoko's Guide, it's absolutely perfect!
#I feel like I took notes on which maps I did or maybe even a blog post somewhere but 🫠 no idea where it went...#kaiyoko's yokai guide#ffxiv#ff14#final fantasy xiv#final fantasy 14#teku.ffxiv#teku.blog#ffxiv x yokai watch event#yokai watch
21 notes
·
View notes
Text
How to Curse Like an Ishgardian
I was coming up with ways to make my ishgardian characters swear and exclaim for my upcoming story and decided to share it =)
Some of these are my own, some are from the game itself and others are from others relevant media.
I read somewhere that when thinking of how to make curses and prayers think of what each culture values most and values the least. Whatever they value the most will be their prayer and the thing they least value will be their curses.
In Ishgard family name, religion and valor is valued the most. So, instantly, nameless people, bastard, orphans, heretics, rebels and cowardly people are looked down upon. This logic should help you make your own curses. You can also add some racist slurs against non-elezen and sometimes non-hyurian people. They also hate dragons, so pre-dragonsong war, a lot of dragon cursing would be common.
Small warning, some really foul language follows ahead. I will keep updating this list whenever I find new curses or come up with them.
1. Prayers, Exclamations and Blessings:
Halone, have mercy
Fury, save me
Halone, grant me strength
Halone's blessings be upon you
Halone/Fury, preserve me
Fury, guide me
Halone, shield me
Spear me, Halone!
Halone be praised!
By the Fury's fire!
By Her Lance!
By the Fury!
2. Insults:
Use these as an insult or add injury to another insult. For example, 'frostbitten whore,' or combine two insults like, 'nameless brume runt.'
frostbitten [insult]
'Greystone' in general can be used as an insult as bastards are really looked down upon. Haurchefant was very lucky to have a father like Edmont.
spoon ears; used against hyurs
Insults used against AuRi as superstitious Ishgardians believe them to be related to dragons:
wyrm fucker
scaled [insult]
dragonspawn
Mixed race couples are looked down upon in Ishgard so, their children face racism and bullying:
weakblood
mongrel
half-breed; all can be used to describe mixed blood.
knife ears; (stolen from Dragon Age) used against elezen
brume runt
street rat
highling; can be used to insult a highborn by a lowborn.
-your grandiosity; can be used to insult a highborn by a lowborn. You can be creative with these!
heretic
nameless [insult]; this is to imply that they do not belong to any house, not even a small one.
[ruling house name] leech; for example, a person sworn to house Durendaire to misuse their power, they can be called a 'Durendaire leech.')
[any house name] bootlicker; anyone who flatters and sucks up to nobles and those in power for their own benefit.
3. Exclamations and curses:
Shiva be damned!
voidspawn
Halone's tits!
Thordan's balls!
Fury strike you!
Holy Crozier!
wolves take you!
dragons take you!
Twelve curses upon you!
Fury's curses upon you!
Nophica be damned! ; Nophica and Halone didn't get along according to myth.
Godsdamnit!
Halone's cunt!
Please feel free to use them in your works! Happy writing! =D
#ffxiv#ff14#Ishgard#ffxiv writing#Ffxiv writing reference#heavensward#final fantasy xiv#warrior of light#Curses#writing guide#fanfic references#Ffxiv references#ffxiv lore#Aymeric de Borel#Haurchefant Greystone#estinien varlineau#aymeric x estinien#aymeric x wol#estinien x wol#ffxiv ishgard lore
391 notes
·
View notes
Text
🐶 Guide Dogs 250 Challenge Fundraiser Stream 5 🐶
twitch_live

We've 17 days left to raise as much more as possible, and we've already smashed our Level One goal of £250!!
Can we make it to £500 and add another sponsor dog!? Or maybe even £750 and collect the whole set!? I'm super excited to see. ★
So far, we've raised £355.00 for Guide Dogs!!
And we that means we hit (and passed) our Level One goal (£250), I'll also be sponsoring one of the puppies. Which means an extra £110 to the cause.
And, as it currently stands, I've 33 subs to my channel, which means I'll be giving (at least) an extra £33 on top.
I just can't thank you guys enough for all your support. ♥
#kiki streams#spoonie#vtuber#final fantasy xiv#ffxiv#viqo'te#final fantasy 14#ff14#viera#indie vtuber#vtuber uprising#vtubers are live#envtuber#vtuberen#lalafell#ffxiv streamer#fundraiser#fundraising#gd250#guide dogs#250 challenge
17 notes
·
View notes
Text
A Newbie Guide to Tanking
HALO~
I make this guide in the hopes that it helps out new players to Final Fantasy XIV, as the in game tutorial is um, bad. (-。-;
I also included a general etiquette guide, because when it comes to working with other players, a lot of these things you don't pick up unless someone tells it to you.
Suggestions welcome! However, remember that this is meant to be a general beginners guide, so I'm not likely going to add in anything that's specific to a single /dungeon/raid/boss and such.
Everything under the cut!
Basic Tanking and How it Works
Part 1: How to Pull
As the Tank it's your job to make everything in the room hate you the most! That way they punch your extremely durable face instead of everyone else's more squishy ones!
You do this by creating what the game calls "Enmity", aka the stat of creating enemy aggression, or "Aggro". There are three steps in which the Tank must do this.
PUT YOUR STANCE ON
Your stance is the thing that makes the bad guys turn their heads and go "Oh! You're a mother fucker!". You will generate enmity just by having it on. This is called a different thing depending on your job: Defiance [WAR], Iron Will [PLD], Royal Guard [GNB], and Grit [DRK]. You click it once to put the stance on, click it again to turn the stance off [there are a few instances you may need it to be off, they will be explained later].
It's important to put this on because if it's not, no matter how much you attack, other players WILL take aggro and get hurt.
USE AN ENMITY GENERATING SKILL
Unlike some other MMOs your mere presence does not make the enemies incensed enough to fully ignore your party members, you must encourage them to hate you and only you! You can do this in a couple ways. There is the Provoke skill, which has the longest range. All Tanks also have a ranged skill which works similarly to Provoke but slightly closer distance and slightly less enmity, Tomahawk [WAR], Shield Lob [PLD], Lightning Shot [GNB], and Unmend [DRK].
[While they are fun and look cool, none of the skills that rush the enemies actually generate enmity]
Using one of these once is enough to piss off a group or a boss.
ALWAYS BE ATTACKING
Enemies in this game are drawn to the player doing that are doing two things at once: generating the most enmity & doing the most damage. This is important to remember! Because even if you have your stance on and you use an enmity skill, if you are not also attacking with all your might, the enemies will think you are all talk and start attacking your DPS/Healers instead!
If you are fighting a group of enemies [and that is more often the case] make sure you are using attacks that are going to hit multiple enemies at once. These are called Area of Effect or AOE skills.
NOW THAT YOU HAVE DONE ALL THAT-look at the names of the enemies. There should be a little red square next to them, indicating that they are focused on and attacking you. If they are not, don't panic! A few things could have happened:
You might have just missed one
Your Healer used a Regen skill as you were engaging, and enemies just hate that.
Your DPS is doing some bonkers damage to start pulling enmity, good for them!
Regardless of the why, you can either use an enmity generating skill, or just hit them really hard a few times, and they'll be pissed off enough to turn around and hit you instead!
[and for reference, green circle means they are not focused on you at all, and yellow triangle means that your face is beginning to look punch-able!]
Part 2: Managing your Damage
OK, now everyone in the room wants you dead more than they want your DPS/Healers dead. Excellent! Now you move to Step two: STAY ON YOUR FEET. You are made to take all the blows from the enemy and laugh at them! It's time for MITIGATIONS.
All Tanks have several mitigation skills [or "mits"] that they can use to either reduce the damage they take from enemies, reduce the amount of damage their enemies are doing, or temporarily negate damage altogether [only one of these per Tank Job].
Ideally you want to be spacing these skills out, rather than using them all at once. These skills have a longer recharge time [or Cool Down] than your attacking skills, so if you use a bunch, you will more than likely end up halfway through the fight with nothing to shield you but the Healers skills and the speed of your DPS. ALSO, mitigations have a soft cap, that is to say, the game will only allow you to negate so much damage at one time. So at most you can use 2 of these skills at once while still effectively negating damage, anything past that goes to waste.
Now there are too many mitigation skills to go through all of them individually [most are unique to their Tank Job], I encourage you to read all your skill descriptions and get familiar with them. But I will touch on a couple Role ones and the full damage negation ones.
Reprisal: Great for groups and bosses, it will reduce the damage enemies do to your party
Arm's Length: This is not advertised as a mitigation from it's description, but it is in fact quite helpful for large pulls. Because every enemy that hits you [physically] will have their actions slowed by 20%, which means less time hitting you, and more time for the Healer to do their work.
The full damage negation mitigations are great! But a couple of them can be risky to use, and require your healer to be paying attention. They also have very long Cool Downs, so they're meant to be used sparingly.
[PLD] Hallowed Ground: You're impervious for 10 seconds, have fun.
[WAR] Holmgang: You will still take damage, but cannot be taken down past 1 HP for 10 seconds, and also root the targeted enemy in place.
[GNB] Superbolide: This will negate all damage for 10 seconds, BUT it will also take you down to 1 HP.
[DRK] Living Dead: You will still take damage, but your enemies cannot take you down past 1 HP for 10 seconds. HOWEVER, if while using this mit you would have been killed by your enemies, your Healer now has to heal an amount of points equal to your HP points in a limited amount of time, or you die. So say your HP is 5000, and you use Living Dead, and you would have "died" while using it, the Healer now has you heal you for at least 5000 points [within 10 seconds], or you die .
Some tanks like to use simple macros that announce when they are using the Superbolide and Living Dead mits in particular, to give their Healers a heads up. This is up to player preference.
Every so often a boss will decide they've had enough of you kicking them in the shins and will try to get you in one blow. This is called a Tank Buster and will be indicated by a red targeting marker on you [red circles around your character and a red arrow pointing down on them] coupled with a progress bar. Stay calm! So long as you have a mitigation to use when you see it coming, everything will be fine. The Healer will know to be watching your health. Some will of course hit harder than others though, so if you're worried or low on health use 2 mits to be safe!
Part 3: Stunning Enemies & Interrupting Attacks
Now you've got the enemy right where you want them and you're weathering their blows- but oh no! They're preparing to attack the party anyways! It's a huge AOE too. What do you do? You give them the finger and then kick them in the balls! [partly true, most of the time.]
Most enemies in the game have both an auto-attack, and attacks that can be stopped in some fashion by specific skills. There are two different ways to stop an attack, you can use a skill that will Stun the enemy [Tanks and Melee DPS], OR you can Interrupt it [Tanks and Ranged DPS]. Stun and Interrupt are not interchangeable in their use.
So! How can you tell which attacks can be stopped by players? They are the attacks that have a progress bar, showing the enemy has to charge them up before they are actually used. The normal progress bar indicates an attack that can be stopped by Stunning the enemy. For Tanks this is the Low Blow skill [also the Shield Bash skill for PLD]. The flashing progress bar indicates that the attack can be Interrupted. For Tanks this is the Interject skill.
Keep in mind that both these types of skills will also have longer cool downs, so you cannot spam them. This means sometimes you might have to be strategic about when you use them, as some attacks will be more dangerous or troublesome than others. HOWEVER, not all enemies can be stunned, and enemies that can be stunned will become impervious to it after a few uses. You cannot stun bosses period.
You And Your Healer
You may be the biggest baddest person in the room now, but you are not a one man show, and you certainly cannot stay alive without your Healer! Your mitigations can only do just that-mitigate, in the end you have to rely on the Healer to help keep you standing.
You and the Healer are partners in this system. You have to make sure that if you are going, they are following close behind. If you decide to pull a ton of enemies around the corner, your Healer now has to run around that corner first before their spells can effect you.
Most Healers are going to assume you will run and grab all the enemies you can, but if you're finding that you and your Healer are struggling to keep the party alive, you need to tone down your pulls! If the Healer tells you that they are new, or straight up asks you not to full-pull, be considerate of that! Remember, while they have their eyes on you often, they are charged with keeping the whole party alive too! Literally in their case lol
General Tank Etiquette
Dungeons & General Tips
As the Tank it is your job to protect the party and make sure you are the only one taking damage. This also means you set the pace, and lead the group into every battle. This is because it is much easier to pull enemies to you if you are the first thing they see, and are the first to attack. Most players will follow your lead and wait to attack after you have done so. Mostly. So! It's good to remember that your comfort level is important. Go at the pace you feel works for you, let people know you are new if you are worried. Most other players are understanding of this! Many are willing to explain mechanics even!
Additionally since you are the leader, most players will expect you to run in first and generally to keep running until you've decided you've gathered all the enemies you feel like pulling. But! Don't leave your party in the dust. You need you DPS to kill all the things you pulled and your Healer to keep your ass alive X'D
Remember to check that your stance is on before you run in! Most times when you enter a dungeon or a raid its turned off at the start, even if you had it on when you were in the field.
Also, while not a hard rule it's generally advised not to do big pulls in early dungeons anyways [like, Lv 40 or under]. This is mostly to do with the amount of enemies in some areas versus your mitigation options and your Healers healing options. Often at this stage there is simply not enough of these to go around between you and your Healer, and a big pull can sometimes result in a party wipe.
Whether engaging a group of enemies or a boss, common courtesy is to run through the enemy and tank them from the other side [or if you're out in the field, attack from the opposite side of the other players]. This rotates the enemy so that they face you and not the rest of the party, making it so no one else is caught in the majority of enemy attacks. [You do not prevent damage from happening to others by standing in front of them, so attacks can go through you and hit other players, this is called Cleave]
Generally speaking it is also best to keep enemies in one place and facing the same direction as best you can. This makes it easier for the DPS to do their job [especially if they are using casting skills] and easier for the Healer to keep track of you.
Many of the melee DPS have a thing usually referred to as Positionals, meaning they do more damage if they strike enemies from the flank or from the rear. When possible it is good to position bosses so that they can do this, and reposition bosses out of harmful terrain for the melee DPS to strike without harm to themselves.
Speaking of that, do not stand in bad things or perfectly dodge-able attacks! You might be the Tank, but you don't need to tax your Healer while you're at it. They have to worry about other people too!
One last note on movement and control of enemies: generally speaking it is also best to grab all the enemies you feel comfortable with and then stay put until all of them are dead, rather than pull a group and kill some and moving to the next one. It might seem like you are saving time by advancing slowly, but in actuality you are making everything harder for everyone else. This is because this forces all the other players to stop and start their actions constantly, which is bad. Why? Because now your melee DPS are having to chase after enemies they are trying to kill [meaning they are only hitting them half the time], and your DPS casters/Healers basically cannot do anything until the party stops again [because they have to stand still for 95% of their actions]. In the end it it more effective to stay until all the enemies are dead!
When it comes to the Limit Break [or LB], you as the Tank will almost never need to touch this button. The Limit Break is usually something the DPS will use to make a big attack on the boss, or in the case of a boss/raid not going well, the Healers can use a Limit Break Three/LB3 [when you have three full Limit Break bars] to revive the entire party. Thus far in the core game encounters, there are only a couple specific cases that utilize the Tank LB 3, and that will not occur until the ShadowBringers Expansion.
Provoke is not part of your attack rotation! If you have used an Enmity skill once in the fight, especially if you opened with it, you will not have to use it again to keep the enemy on you. While using Provoke consistently is not a big deal if you are the sole Tank, it is a bad habit to get into, as it will become a problem in situations where there are multiple Tanks.
Raids
In a Raid, be it a 8-player one [Normal Raid] or a 24-player one [Alliance Raid], you are not the only Tank on the field, making things slightly confusing and sometimes chaotic lol
When you are all facing mobs of enemies, all Tanks should have their stance on to ensure none of the Healers or DPS get hurt. Sometimes the mobs are spaced far apart when you find them, and its easier when Tanks work together to bring them in. Sometimes you may notice your Enmity being pulled, it is [hopefully] the other Tanks.
When you are facing bosses, generally the first Tank to put on their stance and engage the boss is now the Main Tank:
If that is you, cool! Have fun tanking boss!
If that is not you, DO NOT turn your stance on and try to provoke the boss away from the other Tank. That is rude. Keep your Stance off so you don't draw Enmity, you are now the Off-Tank and play the part of a beefy DPS.
If you are an Off-Tank, DO NOT stand next to the Main Tank to attack the boss. This makes you vulnerable to being Cleaved from boss attacks and unnecessarily overtaxes your Healers. Off-Tanks need to be attacking from the flank or the rear with the other DPS.
Main Tank is the Main Tank until they die.
Off-Tanks, if inclined, can help bring any extra enemies that appear on the field to the Main Tank so they do not have to move the boss around. This is helpful to the group because they can now attack all enemies together at the same time, rather than in small pockets. In this case it's okay to Stance On to get the enemies and then Stance Off so the Main Tank can take them.
IF the Main Tank dies for whatever reason, [one of] the Off-Tank[s] must put their Stance on and take control of the boss, they are now the Main Tank.
Some raids will also require Tanks to switch control of the boss off to each other, require Off-Tanks to manage their own mechanics or assist the Main Tank in some way, or even make all Tanks have to position themselves away from the group to take three-pronged Tank Busters that can cleave others! Raids are very diverse so it's a matter of learning the fights. There are many online guides for dungeons and raids you can use for this!
NOW GO! PROTECCA YOUR FRIENDS AND ATTACKA YOUR FOES!! >:3
#final fantasy xiv#final fantasy 14#ffxiv#ff14#ff14 guide#ff14 tank#ff14 tanking#ff14 beginners guide
8 notes
·
View notes
Text
youtube
For those needing to change over from GShade to ReShade I made a guide to simplify things. If you're having shader issues, check the video description for shaders files.
#ffxiv#ff14#final fantasy 14#final fantasy gpose#final fantasy xiv#gshade#reshade#guide#video#video guide#Youtube
175 notes
·
View notes
Text
youtube
#ff14 gil#ff14 lalafell#ffxiv gil#ff14#ffxiv#vtuber#virtual youtuber#final fantasy#ffxiv guide#ff14 guide#gil guide#gil#market board#mmo#Youtube
4 notes
·
View notes
Photo

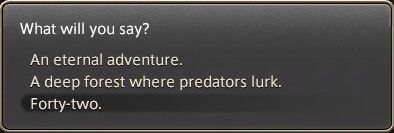

#42#the answer to the ultimate question of life the universe and everything#the hitchhiker's guide to the galaxy#ea ultima thule#ff14#endwalker spoiler#ffxiv amon#fandaniel#spoiler#ffxiv spoiler#The Aitiascope#amon#new-old-friend
71 notes
·
View notes
Text
All the fish in the Dawntrail Benchmark

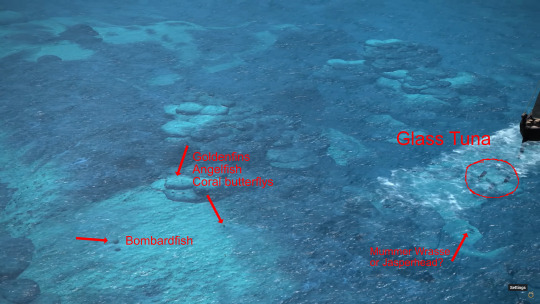
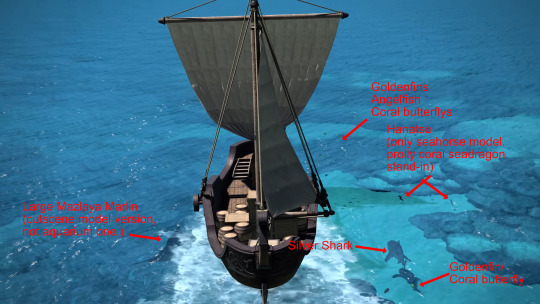
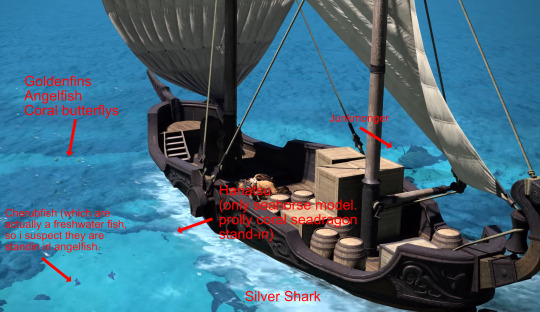
Here's the name of all the fish species seen in the FFXIV Dawntrail Benchmark.
⚠ Please note: DO NOT assume these are species of fish that will be in Dawntrail! These are just existing aquarium fish models probably added as fill-in for the benchmark. Nothing more!
194 notes
·
View notes
Last Seen Blogs


raventodd
★☆RavenTodd☆★

cinnamingyu
❀ f o r e v e r ❀

adammonter
Adam's Art Folder

urielsz
𝗝𝗲 𝘁’𝗮𝗶𝗺𝗲