#3 ingredients royal icing recipe
Text

A list of objects and technologies created by Myne
The gremlin has been busy.
Anything red was created by another, but without Myne creating something else, the creator would not have made it, so Myne's name is not listed as the creator but Myne was the reason it was made.
Anything blue was improved upon
VEHICLES
A horse-drawn carriage with suspension
FURNITURE
Spring mattress
spring upholstery - Zach
COSMETICS + ACCESSORIES
Rinsham - all-in-one shampoo
Hair Ornaments
Librarians armband
Tote bag - improved
FASHION
Bubble skirts
Halter-top dress
Tie-dye - previously existed
Wax Dyeing
Stencil Dyeing
Water ripple embroidery
EVENTS
Tasting party
Charity Concert
Dying competition
TOYS
Karuta
Reversi
Chess
Playing Cards
Baby Rattle
Educational baby toys - such as shaped blocks and holes implied other toys
FOOD
- Ingredients and condiments -
Compote
Tanieh Cream
Gelatin
Gnocchi
Gratin
Herb Dressing
Lage Sauce (Basil Sauce)
Mayonnaise
Yeast
Pasta
Ponzu Sauce
Pomme sauce
Rumptopf
Rutreb Jam
White sauce
- Savoury -
Capellini
Caprese Salad
Carbonara
Consomme Soup
Double Consomme Soup - Leise
Crispy-Crispy Launeide and Sujaru Salad (Vegetable Salad)
Crun-Crun Ju-Ju Farba (Chicken Salad)
Cappellini
Fikken - improved
Fluffy Bread
Sandwich - Improved with fluffy bread
Hamburg Steak
Lasagne
Macaroni Gratin
Osso Buco - Later improved by Leise
Parue Burger
Parue Okonomiyaki
Pizza
Potatoffel salad
Pomme Soup
Risotto
Steamed Potatoffel
Steamed Taschitz (chicken)
Quiche
French Toast
Salted Cucumber imitation
- Sweet -
Bavarois
Cookies
Langues De Chat
Crepe
Fallfold Tart - Nicola
Ice Cream
Mille Crepe
Mousse
Panna Cotta
Paru Cake
Pound Cake
Pudding
Short Cake
Tiramisu
Tanier Cream/Mont Blanc
TOOLS
Chopsticks
Clothes Hanger - improved
Hairpin
Herbal Candles
Crochet hook
Hand pump
Hide Glue
Steamer
Precision Knife
Roller
Starch Glue
Metal letter types
Round Bell
Safety Pin
MACHINES
Waxing Machine
Letterpress Machine
PRINTING TYPES
Woodblock printing
Stencil printing
Letterpress printing
STATIONARY
Clay Tablet
Mokkan
Faux Papyrus
Dipitch
Dipitch Stylus
Soot pencil
Linseed and soot Ink
Colour Ink
Folders
- Paper -
Plant Paper (Volrin paper)
Conjoining Paper (Nenseb paper)
Effon (Music) Paper
Fireproof Paper (Trombe paper)
Rinfin Paper - Illgner
Wax paper (Wax/Rinfin paper)
Trauperle Paper -Illgner
- Magic Paper -
Enhanced Conjoining paper - Drewanchel
Spellcasting Nenseb paper (Nenseb/Trombe with magic circle)
Spellcasting effon paper (Effon/Trombe with chant)
Maximum Quality Fey Paper (Effon/Trombe/Nenseb) improved by Ferdinand
MAGIC TOOLS
Music Box with Effon paper (technically made by Ehrenfest students)
Drivable Highbeast
Rainbow Highbeast
Stenluke
Disappearing Ink
Plush Toy with recorded messages
Magic tool to send books back to their shelves
MAGIC
Water Gun
Copy and Place
KNOWLEDGE
Salting Out
Lace knitting
Written Calculation
Decorative shaped vegetables
Origami
Introductory system
Tickets
Red seal Trading
Graphs
Myne Decimal System
Rosemyne Magic Compression Method
Female Crest
Copyright royalties
Questionnaire survey
PRINTED PRODUCTS
Black and white picture Book
Children's Bible - Supreme God and the Eternal Five
Children's Bible - Spring Subordinates
Children's Bible - Summer Subordinates
Children's Bible - Autumn Subordinates
Children's Bible - Winter Subordinates
Story Books
Knight's Tale (short stories 1-3) - Compiled and translated
Knight's Tale (short stories 4-5) - Compiled and translated
Mother's Bedtime Stories Collection
Unnamed Operation Grimm Book (Groschel) - Lutz
Etiquette and Noble Euphamisms Book 1 - Fran
Etiquette and Noble Euphamisms Book 2 - Fran
Rozemyne's Recipe collection
Knight's stories - Elvira
Royal Academy stories - Elvira
Royal Academy love stories - Elvira
A history of Dunklefelger - Compiled and translated
Knight stories Ahrensbach - Compiled
Ditter Story - Roderick
Royal Academy love stories 2 - Elvira
The tale of Fernstine Part 1 - 3 - Elvira
Sheet Music
Concert programs
Accounting report
Printed illustrations (created to promote a knight's tale)
Ferdinand illustations
Cinderella
Romance Novel (pornographic smut)
Songs
Tulip
Anime Song
Song for the concert
Movie theme song
"Under the chestnut tree"
A hymn for Eglantine (requested by Anastasius)
A couple classical songs
#ascendance of a bookworm#honzuki no gekokujou#I may have missed something#if you notice anything wrong or missing let me know
58 notes
·
View notes
Note
Would you write one about how the heroes would pamper you and take care of you while you're pregnant?
Here's your request! I hope that you like it!
All members / <3 - <3 /
Summary: Xdinary Heroes pampering you while you’re pregnant
WC:~1.2k
Warning:none

photo not mine credits to owner.
Gunil
The second Gunil finds out that you’re pregnant he goes into pampering mode. Any food that you are craving he will go and get it for you. Even if it’s the middle of the night and he has to go faraway to get it. He won’t even complain about it because it is for you, his beloved, and your guys’ child. Loves to give you massages. He takes one look at your swollen feet and his heart aches. He knows that it is normally part of pregnancy, but it makes his heart go out to you for all the hard work you’re doing. At the end of the day he makes it a part of his routine to massage your feet. Gunil will take over tasks like doing the dishes and anything else he has deemed as too much “hard labor” for you while you’re pregnant.
“Gunil, seriously I can rinse out this one glass,” you tell him as he takes the empty glass from your hand.
“No, I’ll do it.” He momentarily sers the glass down. “The only thing that should concern you is baking our little bun in the oven,” he says, placing a hand over your round stomach. He sends you away with a kiss on your forehead.
Jungsu
Becoming pregnant made Jungsu start treating you as if you were made of glass. He takes care of you so gently. Resting his hand on your lower back while you walk to support you. He helps you sit down and stand up. If you dropped something on the floor you don’t even have time to think about picking it up because Jungsu is already rushing to do it. He wants to make your pregnancy as easy as possible because he can only imagine how exhausting it must be to grow another human being inside of you. He either buys or cooks you very nutritional food to make sure that you’re getting all the vitamins that you need. Cuts up your favorite fruit or whatever fruit you're craving and serves it to you.
“Y/n ah,” he said, gesturing for you to open your mouth, so that he can feed you a piece of fruit.
“Jungsu, I can feed myself,” you chuckled, attempting to take the fork that had a piece of fruit stabbed onto it.
“Just let me feed you,” he slightly pouted, pulling back the fork. You sighed lightly, shaking your head, but still opened your mouth for him to feed you.
Gaon/Jiseok
Jiseok chaotically pampers you. He tries his best to look out for you and take care of you, but somehow things keep going askew. For instance, the two of you were taking a short walk when your shoe came untied. Naturally Jiseok went to do it for you. Your pregnant belly proved to be a good obstacle when it came to putting on let alone tying shoes. He securely ties your shoe, but somehow as he is on his way back up he ends knocking his head with yours. Another time you wanted some lemonade and Jiseok thought that surely he was capable of making it himself. Thinking that it would make it more special too. He looked up a quick recipe and went out to get the ingredients. Once it was made he served it to you on a tray, acting like he was your royal servant.
“M’lady.” He offers you the drink. You thanked him and grabbed the drink bringing it to your lips. However instead of a refreshing liquid meeting your tongue you are met with sourness.
“Jiseok, did you forget to add sugar?” you couched out. Jiseok's eyes widened in horror, he indeed did forget the sugar. He profusely apologies and goes to add the sugar.
O.de/Seugmin
Seungmin is already very caring and doting on you, however once you become pregnant he becomes even more doting. Your wish is his command. He will be at your service to get you anything that you need. You want ice tea with five ice cubes specifically then Seungmin is right on it, make sure that there is no more and no less than five ice cubes. He likes to brush your hair for you. Having you sit between his legs while is careful removes the tangles from your hair. He even learned a few basic hairstyles to do on you. Seungmin wraps his arm around your frame to give you extra support while walking. Sometimes he even lays a protective hand over your belly. Whenever you are out in public he always asks to make sure that you are doing ok. Telling you to let him know if you ever need a rest.
“Are you sure this isn’t too much walking? We can head back anytime,” Seungmin checks.
“Seungmin, I promised I’m ok. It’s nice to get out and stretch my legs for a bit,” you reassure him.
“As long as you’re sure,” he says. He repositions his arm around your back, taking on a bit more of your weight.
Junhan/Hyeongjun
After finding out that you were pregnant Hyeongjun instantly goes to look up how he can help you along with your pregnancy. He might even order a book about it. He wants to take care of you as much as possible. He wants to be able to rely on him for whatever your needs are. If you're craving a certain meal he will gladly cook it for you to your liking. Hyeongjun will also look up the best foods to eat during pregnancy. He wants you to be as healthy as possible. He can’t stand the sight of seeing your swollen ankles, so he gives you massages to help with the swelling. He will get you ice or a heating pack too. Anything that could help reduce your aches and pains. Hyeongjun will buy you some random, but thoughtful gifts to thank you for carrying your twos’ child.
“Here I got you something,” Hyeongjun told you as he handed you a small box. A smile graced its way onto your lips. You took the box from him and opened the lid. Revealing a beautiful necklace.
“Hyeongjun, I love it thank you,” you expressed, hugging him.
“And thank you for carrying our precious child,” he says, hugging you back and placing one hand over your stomach.
Jooyeon
After the initial excitement and happiness about finding out that you’re pregnant settles down, panic sets in for Jooyeon. He didn’t know the first thing about taking care of someone who was pregnant. His members still treated him as if he was a child. Now he had to take care of you, who was caring a child, your guys’ child. Still he is ready to step up to the plate and do everything that he can, so you don’t have to lift a single finger. You have a craving for some snacks in the early hours of the morning, he’s on his way to get them. Half-asleep, but still on his way. He helps you put on your socks and shoes everyday and refers to you as his Cinderella while he does it. One day Jooyeon came into the kitchen and saw you standing on your tiptoes in order to reach something from the top shelf. He quickly rushes over to you.
“I’ll get it! What do you need?” He gently pushes you away.
“The mug,” you pointed at the mug you were previously trying to reach. Jooyeon reaches for the mug, taking it down for you. Tell me if you need something, don’t stress yourself. The next day discover that Jooyeon has reorganized the entire kitchen, having nothing on the top shelves.
#xdinary heroes#xdh#xdh imagines#xdinary heroes imagines#xdh x reader#xdinary heroes x reader#xh gunil#xh jungsu#xh gaon#xh jiseok#xh o.de#xh ode#xh seungmin#xh junhan#xh hyeongjun#xh jooyeon#gunil x reader#jungsu x reader#gaon x reader#jiseok x reader#o.de x reader#seungmin x reader#oh seungmin x reader#junhan x reader#han hyeongjun x reader#hyeongjun x reader#jooyeon x reader#goo gunil#koo gunil#gunil
71 notes
·
View notes
Text
Boston Cream Cake Part 1

Hey everybirdy! Today’s recipe is not for any character or anything like that. It is for all of you. You all have helped me find a purpose in life. Helped me find my voice, when it was lost. Helped me at one of the lowest points in my life. I just want to share with you this recipe, because you all deserve it. You mean the world to me. Every follow, like, comment, and reblog helps me write more and more. And I can’t thank you all enough. So this post is a gesture of gratitude.

The recipe comes from my favorite cookbook “Good to the Corps: Westpoint Women’s Cookbook Club.” And the recipe is for a Boston Cream Cake. The recipe will be in the description down below.

For the cake, you will need
21 lbs. (pounds) of cake shortening
30 lbs. of cake flour
37 ½ lbs. granulated sugar
1 lbs. 14oz (ounces) baking powder
1 lb 2 oz salt
2 lbs. 10 oz milk powder
27 lbs whole eggs
19 lbs water
1 lbs Vanilla
1 lb butter

Put the cake shortening, flour, sugar baking powder, salt, and milk powder in a VERY LARGE Bowl.

Add water, vanilla, and butter flavor slowly until the ingredients come together.

Scrape down the bowl.

Next, you are going to add the eggs, slowly and mix for 3 minutes. Making sure to scrape the bowl and continue until the mixture is well mixed.

Use 1 Pound 8 oz pans.

Bake at 350F for 35-40 minutes.

Slice the cake in half horizontally.

Spread with a cream filling (recipe follows).

For the Boston Cream Filling You will need:
20 gal (gallons) milk
45 lbs. Granulated sugar
10 oz salt
14 lbs cornstarch
36 lbs eggs
1 lb. vanilla

Put all ingredients in a pan and cook until thickened. Ice cake with frosting.

For the Chocolate Fudge Icing for Boston Cream Cake you will need:
50 lbs dry ford sugar
5 lbs Karo syrup
4 oz salt
6 lbs water
3 lbs 8oz cake shortening
14 lbs royal fudge
8 oz vanilla

Put all ingredients in a pan, and heat until smooth. Ice cake on the top only.

And the most important thing about this recipe: IT SERVES 1000! Now every one of my followers will be able to have a piece of some yummy cake. Thank you so much for helping me reach 1000! I know that it might not be a lot for some people but I am the type of person who was surprised when I got to 10 followers. So thank you all so much for helping me. For supporting me through this journey. It took a few years to get here, but I wouldn’t change it for the world. I appreciate every one of you. The ones who like every post, the ones who reblog my posts, and even the ones who are just quiet and don’t interact that much. Each one of you is important to me and I thank you so much from the bottom of my heart.
Part II
Boston Cream Cake via USMA, Cadet Mess
21 lbs cake shortening
30 lbs cake flour
37 1/2 lbs granulated sugar
1 lbs 14oz baking powder
1 lb 2 oz salt
2 lbs 10oz milk powder
27 lbs whole eggs
19 lbs water
1 lb vanilla
1 lb butter flavor
Put the cake, shortening, flour, sugar, baking powder, salt, and milk powder in a very large bowl. Add water, vanilla, and butter flavor slowly until the ingredients come together. Next, add eggs, slowly mix for 3 minutes, scrape the bowl, and continue until well mixed. use 1-pound 8-ounce pans. Bake at 350 F for 35-40 minutes. slice the cake in half horizontally. spread with a cream filling (recipe follows).
Boston cream filling:
20 gal. milk
45 lbs granulated sugar
10 oz salt
14 lbs cornstarch
36 lbs eggs
1 lb vanilla
put all ingredients in a pan and cook until thickened. ice cake with frosting.
Chocolate Fudge Icing for Boston Cream Cake:
50 lbs dry ford sugar
5 lbs karo syrup
4 oz salt
6 lbs water
3 pounds 8 oz shortening
14 lbs royal fudge
8 oz vanilla
Put all ingredients in pan, and heat until smooth. Ice cake on top only. Serves 1000.
Thank you all so very much.
#baking#baking therapy#Boston Cream Cake#Good to the Corp#West Point Women's Club Cookbook#This is my favorite cookbook#Thank you so much for 1K#I love all of you so much
16 notes
·
View notes
Note
okay wait what are your thoughts on the royale high baking clasd cupcake recipe
this makes four cupcakes the size of a roblox characters head
all in one. fuckimg. bowl. we have
1 stick of butter (cut into thirds)
shake two cups of sugar out of the bag. not even like using a cup or anything
mix them with a stand mixer (unsure how long until it like. looks mixed ig)
2 eggs (presumably both the yolks and the whites)
3 cups of flour again directly from the bag
SLOWLY pour in one cup of milk
mix wuth a stand mixer again
add your flavoring (can be chocolate, strawberry, vanilla, lemon, orange, cherry, blueberry) and choose your cupcake liners
bake in oven for 15 minutes (not really sure about the temperature)
add your fucking icing and toppings and tada now you have. royale higj cupcakes
whata re your thoughts on this recipe
Alright! I'm gonna be making this recipe right now at almost 11 at night, and let me start off by saying: I don't have much hope. I'll be making some small adjustments to the recipe,primarily I won't be using a stand mixer - mostly because as I mentioned it's the middle of the night. Along with this, I'll sixth the recipe because! I am not making this much cupcake!
So the recipe is:
1/6 a stick of butter (1/2 cup butter)
1/3 cup sugar
1/6 egg (I'll use half of a small egg for this)
1/2 cup flour
1/6 cup milk (I used full fat lactose free milk)
Flavoring (I'll split this into two batches, using vanilla extract for one flavor and cocoa powder for the other)
So first off, the combination of sugar+butter and then stirring creams the butter - which is surprisingly important and I'm proud that exists in a recipe such as this
The butter and sugar had a good ratio; creamed well!
I added in the rest of ingredients as instructed and ended up with this batter:


Which, if you'll note, seems far too thick. I added some milk to the mixture.
Otherwise, the batter smelled great! It smelled like cake batter! I separated the cupcakes (a healthy yield of 4 normal sized cupcakes) into vanilla and chocolate, and I will admit at this step that I tasted both batters...
And they tasted delightful! As I type this, I'm waiting for the oven to preheat and I'll be danged if I don't lick the bowl. The cupcakes look fairly normal-
And I'll be cooking these puppies at a healthy 375 degrees. Since I don't know the exact makeup or size of these, I'll be checking in on their doneness with a toothpick regularly after 10 minutes. Keep you updated!
30 notes
·
View notes
Note
Can you do a Kendall and Stella blurb of them adopting a dog or cooking together or Stella taking Kendall to a Pilates class? Honestly just anything domestic between them would be so cute. Miss your writing!!
do i think stella is a good cook? no. but do i think she's 1000% better than kendall? yes.
without spoiling too much of my ending, i think stella eventually moves in with kendall in new york and they buy a place in los angeles. at first it's fun, but stella quickly realizes that kendall hires people to do literally everything. sure, it was nice to come home to a clean house and the fridge was always stocked, but it was just too much.
"you have to fire the chefs, ken. it's too much."
he pouts, but they agree to keep the chefs on staff for special occasions.
it's the first winter in the new los angeles house when stella teaches kendall how to make christmas cookies. she decides she's had enough of him not knowing how to cook anything. it's the twenty third and they both have off for a few days. she gets the recipe from her mom and tells kendall to clear his schedule for the night.
he's not sure what to think, but is slightly amused when he finds her in the kitchen surrounded by ingredients.
it's a mess, obviously. kendall doesn't know how to crack eggs that well, and frankly, stella's never been good at it either. he turns the mixer on too fast and flour goes all over the walls. they try to make royal icing but it's just way too fucking runny.
after a few different batches of experimental cookies, they finally nail the recipe.
kendall mostly watches, but stella still considers it a win.
hope you enjoyed <3 send me more! (my ass will do anything but write an actual chapter haha)
13 notes
·
View notes
Text

Adorable Woodland Soft-Sugar Cookies Recipe
Some tips for when making the cookies:
Keep these cookies thick, we recommend rolling to a thickness of around 1/2 an inch, never thinner as they will dry out when baking.
Never overcook, unlike normal cookies, you do not want the edges to turn golden. They will continue cooking a little when you take them out the oven so you want them to be just set when you take them out.
Once your cookies have been out of the oven for a few minutes seal them up in a container, this will keep in their moisture.
Recipe
Serves 12-18 cookies
Cookies:
¼ cup Unsalted Butter, room temperature
½ cup Coconut Palm Sugar
1 Large Egg
1 teaspoon Vanilla
1½ cups Almond Flour
¾ cup Tapioca Starch
½ teaspoon Baking Powder
½ teaspoon Salt
Royal Icing:
3 tablespoons Meringue Powder.
4 cups Confectioners’ Sugar
5 tablespoons warm water
Food colouring as choice
Instructions
Place the butter and coconut sugar in a mixing bowl. Beat with an electric mixer for 2-3 minutes until light and fluffy. Beat in the egg and vanilla.
Add the almond flour, tapioca starch, baking powder, and salt to the mixture and beat in until well combined. Dough should be thick. If dough is too sticky, stir in another tablespoon or two of almond flour.
Place the dough on a strip of plastic wrap. Flatten into a disc and wrap up with the plastic. Refrigerate for one hour.
Preheat the oven to 325 degrees. Line a baking sheet with parchment paper.
Unwrap the dough and place it between two sheets of parchment paper. Roll to a thickness of ½”. Do not roll any thinner, if you roll the dough too thin it will dry out quickly.
Cut shapes out of the dough and place on the parchment lined baking sheet. We love these woodland cookie cutters from Etsy, view here.
Bake in the preheated oven for 8-10 minutes. Watch closely – you want the cookies to be only just cooked. Don’t cook them to the point of browning. They should be just set and pale in colour. This will also ensure that your cookies are super soft.
Remove from the oven and let cool for 2 minutes. Place cookies in a large covered container – Placing them in a sealed environment before they have cooled will help with the soft factor.
Once the cookies are cool you can begin frosting!
Frosting:
Beat all ingredients together in a mixer until icing forms peaks, do this for around 7-10 minutes.
Separate the icing into individual dishes depending on how many colours of icing you want to decorate with.
Begin piping and filling until your cookies are beautifully decorated to your liking!
40 notes
·
View notes
Text
Queen Elizabeth's Favorite Chocolate Biscuit Cake

Just four ingredients
English rich tea biscuits
Look for English rich tea biscuits in larger supermarkets and specialty stores. Cost Plus World Market carries them as well. I used McVities Digestive Biscuits which are very similar to rich tea biscuits. These not too sweet wheat biscuits remind me a little bit of American graham crackers. (some say these are very similar to graham crackers)
butter
granulated sugar
if you happen to have superfine bakers sugar, that’s ideal, but otherwise, regular white sugar will do.
dark chocolate
melted chocolate is used in the filling and also as the icing on top. Honestly use whatever good quality chocolate you like, whether chips, or bar chocolate. Dark chocolate is specified in the original recipe and that’s what I used
Egg (not used is optional)
Method
1. Break or chop the biscuits into pieces. Beat butter and sugar together until fluffy, then beat in melted chocolate. At this point the British recipe has you beat in a raw egg, but I left that out.
2. Fold in the biscuit pieces so that everything is evenly blended.
3. Fill prepared cake pan, cover with plastic, and refrigerate until chilled and firm.
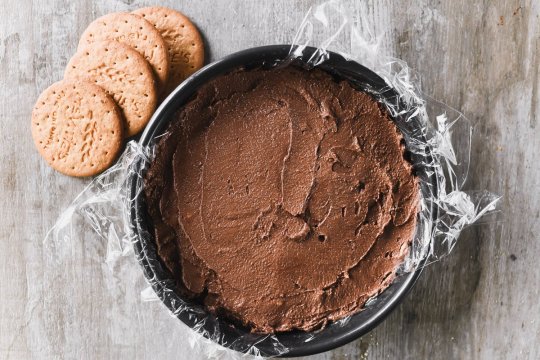
4. Invert cake out onto a rack. Remove plastic wrap.
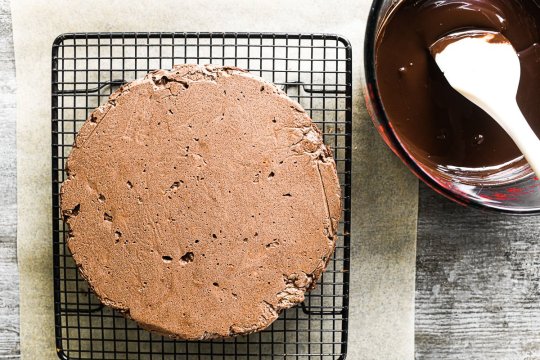
5. Pour melted chocolate over cake and spread over top and sides with an offset spatula.

6. Allow the chocolate to set up at room temperature, and slice.
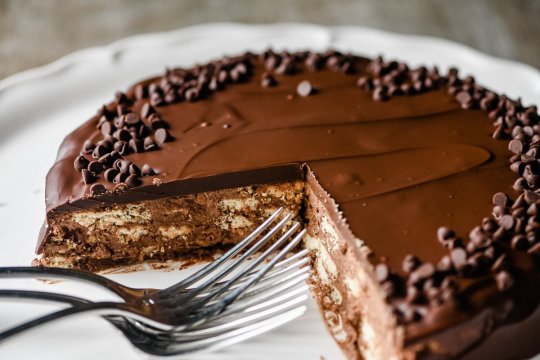
This cake is vey good, and unique, at least as far as American desserts go. It’s quite rich, so thin slices are best. It actually reminds me of a KitKat candy bar, in cake form! I hope you give it a try, I think you’ll love it like I did.
From the British royal kitchen
Chocolate biscuit cake is Queen Elizabeth’s favorite cake ~ she would take a small slice every day with her tea, until the cake was finished, and then she’d start on a fresh one! She reportedly had her chefs bring along this special chocolate cake wherever she traveled, and the cake was so popular in the royal family that it was Prince William’s groom’s cake at his wedding to Kate Middleton.
#Queen Elizabeth's favorite dessert#Queen Elizabeth's favorite food#Queen Elizabeth II#chocolate biscuit cake#recipe#yummy#kitkat
52 notes
·
View notes
Text
alright who wants to hear me ramble about aang & ty lee’s relationship
okay. so. during canon they obviously don’t interact much (other than fighting and even then they fight others from their respective groups) but after the war (and after ty lee has worked through her nationalism & imperialism etc) I think they have such potential to be besties.
they’re both cheerful optimists but while aang is genuinely like that, ty lee’s personality is just a façade, so I think it would be interesting to see how that would play out. would ty lee keep up her mask or would she just Be Herself? (whatever that self is. at what point can you still distinguish the mask from the wearer etc etc).
they would have a lot of fun together, pulling shenanigans and helping out people (aang asks ty lee to come along and, like with everything, she comes because it seems fun. her moral compass is surrounded by magnets and distributing food and supplies in a town hit by a natural disaster & causing chaos by manipulating people for laughs have the same place on the spectrum of “how likely is it for ty lee to do this”, which ranges from “listening to zuko rant about whatever has upset his royal majesty this time” to “less likely to bore her to death” (like listening to mai poke fun at said rants.) (words related to morality are not, in fact, to be be found on that spectrum.) aang tries to make sure her powers are used for good instead of Whatever she does when she’s bored, so asking her to help out with his restoration of the air temples it is.)
I also like to think that, post-canon, ty lee would get into spirituality a bit. aang teaches her meditation, and soon, their shenanigan-committing is moved to the spirit world. they befriend lots of spirits together. I think ty lee would also be interested in the stories of aang’s adventures before the war and air nomad culture and customs (this would be especially meaningful if you headcanon her as having air nomad heritage.) aang turns out to be a great storyteller, and he loves having somebody he can talk to about the past. not that others don’t, but ty lee is a good listener and loves asking questions.
they bake together (pies become their specialty; they always turn up at others’ doors with full boxes because they made too many). they go foraging, but vow to never go again when they almost die from eating poisonous berries (thank the spirits for the fact that sokka and katara were nearby). (they go again like a month after that. this time, though, they take toph and suki and sokka with them.) they have sleepovers & paint their nails together. they wake up early and go for hiking before breakfast because they are, unfortunately, Like That. ty lee is aang’s judge/food tester/guinea pig when he invents countless recipes with lychee nuts as main ingredient (leading, with sokka’s help, to the invention of sorbet ice cream.) they braid appa’s hair and do it all over again a week later, now complete with hair decorations. (they try to do the same to momo but he is, unfortunately, a less willing test subject. well, it’s not like he has much fur anyway.)
they have philosophical conversations at 3 a.m. and end up with notes only they can comprehend. they dress up as each other. they ride the elephant koi at kyoshi island (or maybe only aang does. ty lee lives there and has heard enough stories about the unagi, so she’s more than okay with standing off to the side just yelling encouragement at him.) aang is the guinea pig for ty lee’s make-up experiments. pranking zuko is one of their fave pastimes. they do acrobatics together. nobody can withstand the assault that is their combined puppy eyes when they’re trying to get something they want.
#this. turned out way longer than I intended lmao#aang & ty lee#aang&tylee#atla#aang#ty lee#elli rambles#r#long post#okay sure this counts as#to distinguish mask and wearer#<- more to give context for the tag than anything#I think I’ve used that phrase before but this is the first post I can find with it#a
23 notes
·
View notes
Text
Welcome to recipe 687 on the inter-universal cooking show! On todays episode we will be making Puppydough Icecream thanks to our sponsorship with Aftertale's Royal gaurd!
For the ingredients, your going to want to first find a young pup, 5 cups of ice, 1 bottle of whip cream, and 5 pieces of dog food.
First, your going to want to pour about 1/5 of the whip cream bottle in each cup of ice, along with 1 piece of dog food. Leave alone with the dog for 3 hours and once you return, voila, Puppydough Icecream!
Wait this... Actually tastes good? Someone get Aftertale on the line, this is the first recipe that actually tastes good!
4 notes
·
View notes
Text
grasshopper pie recipe!!
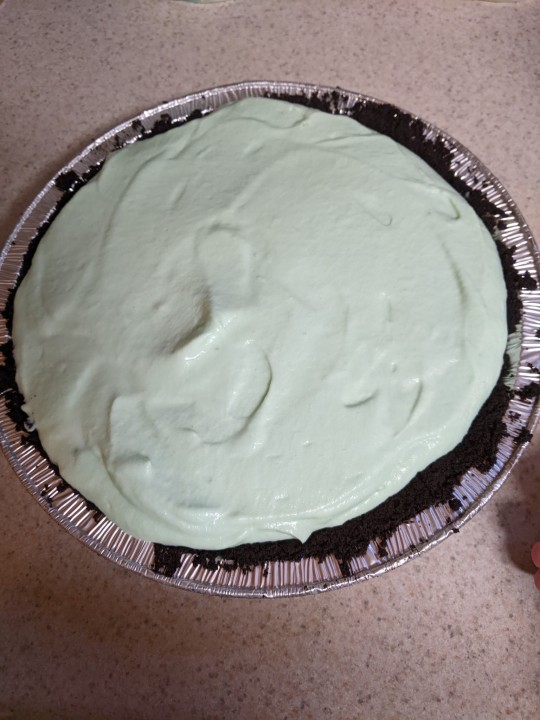
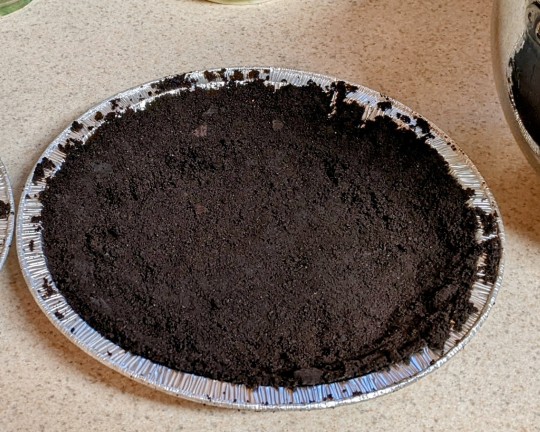
Hello friends, I would like to share with you this recipe that my mom got from god knows where, probably a newspaper in the 70s, which we make every year for Thanksgiving though it has literally nothing to do with Thanksgiving. It does not, in fact, contain grasshoppers, but is named after the cocktail of the same name.
You might be looking at this photo like hey Lita, wtf is this green goop, it does NOT look good! But this pie is made of chocolate cookies, marshmallows, whipped cream, and booze, and it has a texture kind of like ice cream, and it is DELICIOUS.
Ingredients:
1 1/3 C chocolate wafer cookie crumbs (we use Nabisco Famous Chocolate Wafers)
1/4 C melted butter
20 large marshmallows
1/2 C milk
1 C heavy whipping cream
3 Tbsp creme de menthe (the green kind!!!)
3 Tbsp creme de cacao (the clear kind!!!)
a freezer-safe pie dish (I use the disposable foil ones)
STEP 1: Make the crust! Smash up your cookies to measure 1 1/3 C of fine crumbs, and melt your butter. Mix them together to evenly moisturize and press into the bottom and sides of the pie pan. Put the crust in the freezer while you do the other steps!!
STEP 2: Combine the marshmallows and milk in a saucepan and heat over low heat. YOU MUST keep stirring it and keep the heat LOW or the marshmallows will BURN. (TBH even if you burn the bottom, you can just not use the burned part, but it's a royal pain to clean up.) Keep the heat low and keep stirring, until the marshmallows are fully melted and there are no lumps. This picture has too many lumps, you must keep going if it looks like this.
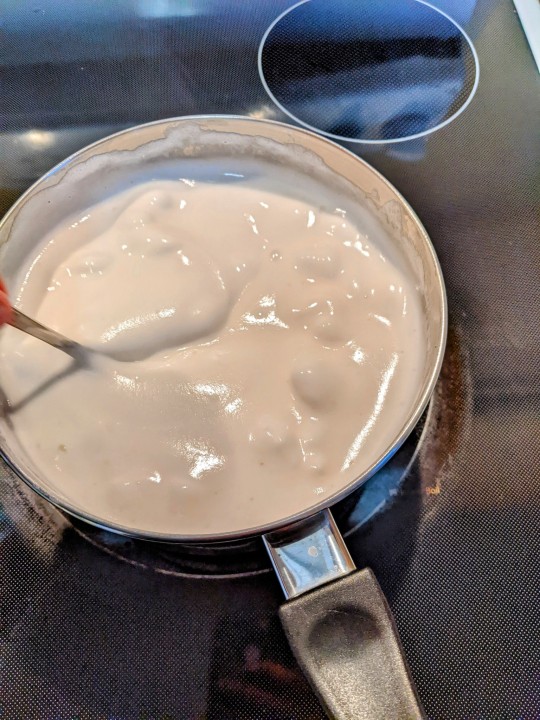
Let the marshmallow mixture cool off! If you heated it a little too hot and it's a little bit separated at the bottom that's fine, don't worry about it.
STEP 3: Whip the cream until it forms stiff peaks. Stiff peaks means if you dip a spatula into it and back out, then the little peak it makes stays sticking up and doesn't fall over.
STEP 4: Fold in the creme de menthe and creme de cacao. Fold gently!! You want the whipped cream to stay fluffy. Keep going until the color is consistently green.
STEP 5: Fold in the cooled marshmallow fluff! Again, go until it's a consistent color. It'll look like this.

STEP 6: Pour into the prepared crust and freeze until solid.
Take it out when you're ready to eat it, give it like, 3-5 minutes to slightly defrost, and dig in!
Notes on substitutions:
You can make this non-alcoholic by using mint extract and chocolate extract instead, but you'll have to add them to taste, I don't know the exact measurements.
I've made the crust using Oreos before! I scraped out the cream first and it worked fine.
You can make it with clear creme de menthe and/or brown creme de cacao, but it'll come out greenest with clear cacao and green menthe. I made it with green and brown once and it still looked okay. You can always add some green food coloring if you want it to be greener.
It's fine to substitute any sort of chocolate liqueur for the creme de cacao, just keep in mind the color!
#lita talks about herself#recipes#grasshopper pie#food#y'all please don't think I'm a recipe blog I just wanted to share this one#dessert
6 notes
·
View notes
Text
Homemade Oreos
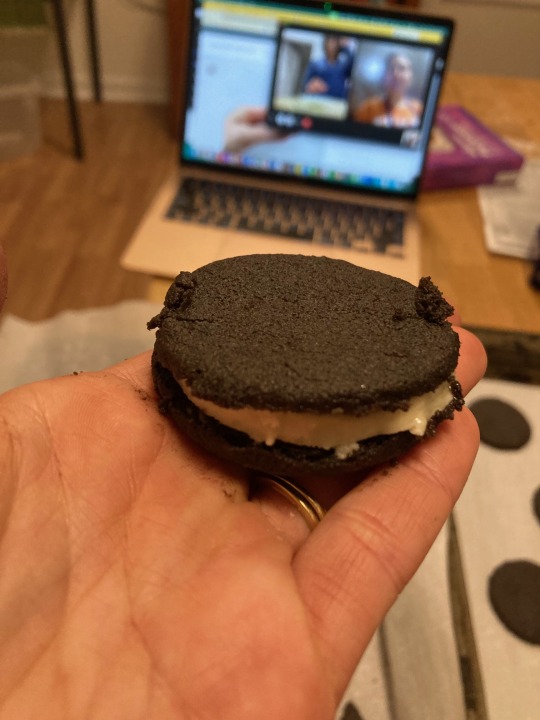
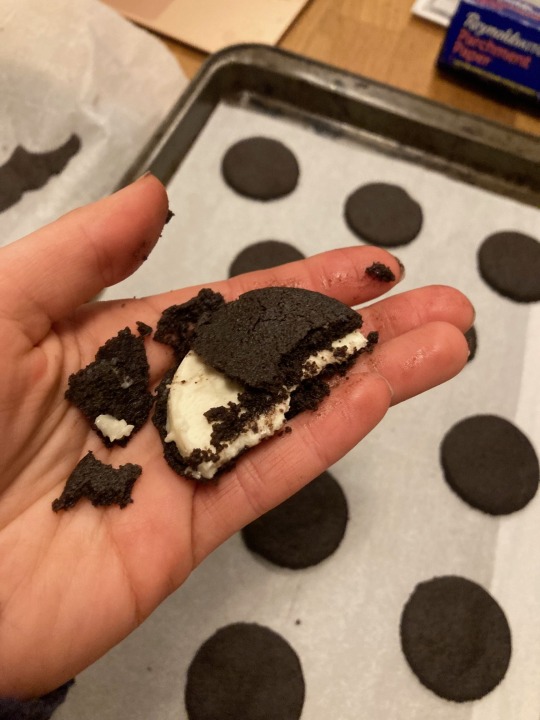
This recipe didn't work out so well. The recipe is from Claire Saffitz (transcript in the "Food" folder). The flavor of the cookies was wonderful, especially the browned butter element, but the butter weight was too high in proportion to the other ingredients and the cookies were greasy and crumbled and broke upon picking up (see left photo) and fell apart when bitten into (right photo). I think I'd like to make these again with a more traditional shortbread proportion of ingredients (3:2:1) and 15% cocoa powder for the cookies. Alternately I would try a royal icing cut out cookie proportion, because those hold their shape really well.
Because I felt that the filling was a bit too fatty and soft I would sub shortening for the coconut oil, only melt the cocoa butter, beat it into the shortening and confectioner's sugar, and roll that out, freeze and cut, or maybe pipe it on if it seems like the consistency would allow it.
#cookie#sandwich cookie#sandwich cookies#chocolate cookie#chocolate cookies#baking#desserts#oreos#oreo#homemade oreo#oreo cookies#oreo cookie#cocoa butter#browned butter#black cocoa#cocoa powder
0 notes
Text
Royal Icing
Ingredients
4 cups powdered sugar
2 tablespoons meringue powder
6 tablespoons water
¼ teaspoon almond extract
Instructions
First you need to find a great sugar cookie recipe. My favorite one HERE.
Gather all the equipment that you will need to decorate. Decorating bags and tips, food coloring, toothpicks, small bowls.
Before you start decorating, make sure that your cookies are completely cool.
Plan what kinds of designs that you are going to make on your cookies (inspo HERE and HERE). Make sure that you have enough decorating bags and small bowls for each color. Take note of what you want your flood color (or background color to be) and make sure you have enough squeeze bottles for each color.
In the bowl of a stand mixer fitted with the paddle attachment, combine powdered sugar and meringue powder. Add water and mix on low speed for 7-10 minutes. Add more water by the teaspoon if it appears too stiff. You want to be able to pipe it easily.
Evenly divide the icing into containers based on the number of colors you will be using. Cover with a lid or a wet paper towel when not using so that it does not dry out. I like to use a number 2 or 3 piping tip to outline my cookies. Transfer some of the icing into the prepared disposable bags and seal the top closed with a rubber band so it is less messy.
Outline the cookies with whatever color you want to flood (background) them. Outline the outside of the cookie using the prepared disposable bags. When you’re outlining the cookie, keep the tip at a 45 degree angle about about 1/2 inch away from the cookie, so that the icing just falls onto the surface. It is much easier to control your piping this way.
Let sit until dry, about 15 to 20 minutes.
Once the outlines are dry you can flood the cookie. Add a few drops of water to the remaining icing in the small bowls until you get the correct consistency. To check for the proper consistency, dip a spoon into the icing and lift it up. The ribbons of icing drizzling into the bowl should disappear and become flat again within 10 seconds. Fill each squeeze bottle with the thinned icing.
To flood the cookie, using the prepared squeeze bottles start at one area and quickly zig zag back and forth until you have almost completely covered the cookie.
Then take a toothpick and gently use it to distribute the icing to any empty spots. Shake the cookie gently to help settle the bumps if there are any. If you notice any small air bubbles, pop them with a toothpick. Once the cookies are completely flooded, let them sit 2 to 3 hours before adding any additional designs/details to the cookies.
Decorating Tips:
Glitter: If you want to decorate with glitter or sanding sugar, shake it over the flooded wet cookie. Let dry completely and shake off any excess glitter.
Marbling: sometimes called swirling or feathering is the process of adding one or more colors of icing through the wet flooded icing.
Then a toothpick is used to pull the icing into swirls creating the marbleized look.
Hearts: You can create hearts by piping dots into wet flooded icing and dragging the toothpick through the center of each dot.
Source: adapted from https://sweetpeaskitchen.com/how-to-decorate-with-royal-icing/ and https://www.allrecipes.com/recipe/230296/glossy-royal-icing/
0 notes
Text
4 Steps to Making Smoothies in a Food Processor
Smoothies have become a popular choice for a quick nutritious meal or snack. They're a great way to incorporate fruits, vegetables, and other healthy ingredients into your diet. While blenders are commonly used for making smoothies, did you know you can also use a food processor to make delicious and nutritious smoothies? In this article, we'll guide you through the steps of making smoothies using a food processor.
After reading this, if you want to get a high-quality food processor, please contact Royal to provide you with high-quality products!
Step 1: Gather ingredients
Before you start, you must gather all the ingredients you need to make your smoothie. This step allows you to make sure everything is ready without pausing in the process. Here's what you typically need for a basic fruit smoothie:
Fruit: Choose your favorite fruit such as banana, berries, mango or pineapple. You can also add some vegetables, such as spinach or kale, for extra nutrition.
Liquid: You need liquid to help mix the ingredients smoothly. Options include milk (dairy or non-dairy such as almond, soy or coconut milk), yogurt or juice.
Sweetener: Depending on your taste preference, you can add honey, maple syrup, or a sweetener of your choice.
Extra: For a boost of nutrition, consider adding ingredients like chia seeds, flaxseeds, protein powder, or green vegetable powder.
Step 2: Prepare ingredients
Once you've gathered your ingredients, you're ready to mix. You need to do the following:
Cut the fruit: If you are using whole fruits, cut them into small pieces. This will make it easier for your food processor to blend them smoothly.
Measure your ingredients: Make sure to measure the correct amounts of fruit, liquid, sweetener, and any other ingredients you want to include.
Step 3: Blend Your Smoothie
Now, it’s time to put your food processor to work. Here's how to blend your smoothie:
Add the fruit: Place the sliced fruit into the bowl of a food processor.
Pour in liquid: Add liquid (milk, yogurt, or juice) to the fruit.
Add sweeteners and additives: If you used sweeteners or any other ingredients (such as seeds or powders), now is the time to add them.
Blend until smooth: Place the lid on the food processor and pulse the ingredients until you reach a smooth, creamy consistency. You may need to stop and scrape down the sides of the bowl to make sure everything is well combined.
Step 4: Serve and enjoy
Your smoothie is now ready to enjoy. Pour it into a glass or portable container, and you can even add a straw for convenience. If you want to get creative, garnish your smoothie with extra fruit slices, a sprinkle of chia seeds, or honey.
Pro tip:
Adjust thickness: If your smoothie is too thick, add more liquid and blend again. If it's too thin, add more fruit or ice cubes.
Experiment with flavors: Don’t be afraid to get creative with your smoothie ingredients. Try different fruit combinations, add some vegetables, or add superfoods to boost the nutritional value.
Keep it cold: If you like your smoothie colder, use frozen fruit or add ice cubes to the food processor while blending.
Clean your food processor promptly: Be sure to clean your food processor immediately after enjoying your smoothie to prevent residue from drying out and making it difficult to remove.
All in all, making smoothies in a food processor is a convenient and versatile way to enjoy a nutritious and refreshing beverage. By following these four simple steps and experimenting with a variety of ingredients, you can create a variety of delicious smoothie recipes to suit your tastes and dietary preferences. So go ahead and put your food processor to work in your kitchen and blend up some delicious smoothies!
1 note
·
View note
Text
How to make My Arthritic Great Aunts' favourite cookies:
Makes approx. 42 cookies
Ingredients:
3/4 cup of butter
3/4 cup of cannabis flower (whatever strain is your favourite)
1 cup of sugar
2 eggs
1/2 tsp lemon extract
2 1/2 cups of flour
1 tsp baking powder
1 tsp salt
Unspecified amount of cannabis extract
Unspecified amount of royal icing mix
Unspecified amount of water
Recipe:
PART 1: The butter
1. Grind or finely chop the cannabis flower
2. Set slow cooker to low and toss in cannabis flower, allow 30 minutes to decarb
3. Add butter and let simmer for 6 hours, stirring occasionally
4. Pour melted weed butter through a cheesecloth into a container and allow to cool
5. Squeeze the cheesecloth. There's still zaza in there. Repeat until the zaza stops dripping out
(Author's note, you don't have to make EXACTLY the amount of butter you need for this recipe. It's best to make in large batches to use in anything. There are also a number of specialized tools you can buy that make this process faster and simpler)
PART 2: THE DOUGH
1. In a large mixing bowl, Add 3/4 cup of weed butter, (cut with regular butter if you want a lower dose) 2 eggs, 1 cup sugar, lemon extract and blend together
2. In a separate mixing bowl, add the flour, baking powder, and salt. Stir.
3. Pour bowl 2 into bowl 1, stir until smooth
4. Cut the dough into two balls, wrap your balls in cellophane and stick them in the fridge overnight
PART 3: THE COOKIES
Preheat your oven to 400 farenheit
1. Extract your balls from the fridge and roll out flat until about as thick as a piece of corrugated cardboard
2. With a cookie cutter (I reccomend one in a shape that can easily be broken in half for dosing) cut cookies from the dough
3. Bake for 6-10 minutes or until lightly golden (greenish gold but you get the point)
4. Let cool. Don't be an idiot
PART 4: ICING
(I'm sorry. I have no exact figures for the icing because there really is just a lot of math and guesswork at this point)
1. Count the number of cookies you have
2. Decide how much extra weed you want in them
(Author's note. I try to make my cookies ~35mg each. The cookies themselves should be 15-20 if you're using a 1-1 ratio of bud to butter so an extra 15mg in each)
3. Find the mg/ml on your bottle of weed extract
4. Do some math
5. In a cereal or pasta bowl (if you have as many cookies as the recipe says, the icing you need will fit in one of these) Mix as much water as you think you need into as much royal icing as you think you need. If you did it right, it should be the consistency of maple syrup
6. Add in your weed extract, whatever icing colouring you want (none is acceptable), and a tiny bit of lemon extract to kill the taste
7. Dip 1 cookie facedown in the icing until top is covered, let drip, place aside on wax paper
8. Repeat step 7 until out of cookies, out of icing, or, preferrably, both
9. Eat and become bluetooth compatible
0 notes
Text
How to Vegas Bomb: a Fun and Easy Cocktail Recipe
Looking to add some excitement to your gatherings? The Vegas Bomb is the perfect party drink that will have your guests buzzing with delight. In this article, we'll share an easy to follow recipe for the Vegas Bomb, ensuring you can whip up this crowd-pleasing cocktail in no time. Get ready to bring a taste of Las Vegas to your home with this sensational drink.

Ingredients
To prepare the Vegas Bomb, you will need the following ingredients:
1 ounce of Crown Royal Canadian Whisky
1 ounce of peach schnapps
1 can of Red Bull energy drink
1 splash of cranberry juice
Ice cubes
Instructions
Follow these simple steps to create your Vegas Bomb:
Step 1: Gather your ingredients Ensure you have all the necessary ingredients readily available. It's important to have everything prepared before starting the mixing process.
Step 2: Chill your glass Begin by placing your glass in the freezer or filling it with ice and water. Chilling the glass will help keep your Vegas Bomb refreshingly cool.
Step 3: Add Crown Royal and peach schnapps Take a shot glass and measure 1 ounce of Crown Royal Canadian Whisky. Pour it into your chilled glass. Follow this by adding 1 ounce of peach schnapps to the same glass.
Step 4: Prepare the Red Bull Open a can of Red Bull energy drink. Be careful not to shake it vigorously, as it may cause the carbonation to fizz excessively. Keep the Red Bull can close by.
Step 5: Splash of cranberry juice Add a small splash of cranberry juice to your mixture in the glass. The cranberry juice adds a touch of color and a hint of tartness, balancing the flavors of the Vegas Bomb.
Step 6: Ready, set, drop! Now, it's time to serve the Vegas Bomb in style. Drop the entire can of Red Bull into your glass. As it mixes with the other ingredients, it will create a delightful fizz and enhance the overall taste.
Step 7: Enjoy responsibly! Stir the mixture gently to combine all the ingredients. Take a moment to appreciate the vibrant colors and inviting aroma. Sip and savor the Vegas Bomb, but remember to enjoy responsibly.
Tips
The Vegas Bomb is a quick and easy-to-make drink that will undoubtedly impress your guests. With its combination of Crown Royal Canadian Whisky, peach schnapps, Red Bull, and a splash of cranberry juice, this cocktail offers a tantalizing blend of flavors that will transport you.
1 note
·
View note
Text
Mille-feuille recipe

INGREDIENTS
For the Pastry and Filling:
1 1/2 pounds frozen puff pastry, or 1/2 batch homemade pâte feuilletée
3 cups store-bought pastry cream (or homemade)
Optional: 1/2 cup heavy cream, whipped to medium peaks
2 tablespoons all-purpose flour
For the Royal Icing and Decoration:
80 grams bittersweet chocolate, melted
2 large egg whites, room temperature
2 teaspoons fresh lemon juice
350 grams confectioners' sugar
>>>>Get access to the tutorial video here<<<<
PREPARATION
Prepare the Pastry and Filling
Gather the ingredients. Preheat oven to 400 F / 200 C.
If using homemade puff pastry dough, have it ready and chilled. Or thaw store-bought frozen puff pastry dough according to the package directions.
If you want to lighten the texture of the pastry cream, fold the optional whipped heavy cream into it. Cover and refrigerate until assembly time.
Bake the Pastry Layers
On a lightly floured surface, gently roll out the puff pastry dough into an elongated rectangle, the thickness of a thin piece of cardboard.
With a sharp knife, cut the dough into three equally sized pieces.
Transfer the dough to a baking pan (or pans) lined with parchment paper and pierce the dough all over with a fork.
Cover the dough with another sheet of parchment paper and place a baking pan or pie weights on top to weigh down the dough as it bakes.
Bake the weighed-down dough, in batches if necessary, for about 18 to 20 minutes or until the dough is deep golden brown. The weights and the top layer of parchment paper pan can be removed for the last 5 minutes or so of baking to help crisp up the dough.
Transfer the baked pastry layers to racks to cool completely.
>>>>Get access to the tutorial video here<<<<
Assemble the Mille-Feuille
Gather the ingredients. If the baked pastry layers look unevenly sized, you'll have the chance to trim the edges for a uniform look after assembling the pastry.
Start by distributing half of the pastry cream over one layer of baked puff pastry.
Top with another layer of dough, pressing gently to adhere it to the pastry cream.
Spread the remaining pastry cream over the second layer of pastry, top with the third layer of pastry, and again press down gently. Reserve.
>>>>Get access to the tutorial video here<<<<
Decorate the Mille-Feuille
Melt the chocolate in a saucepan over very low heat and transfer it to a pastry bag or decorating tube fitted with a fine round tip. Alternatively, you can use a small plastic bag with a pierced or snipped corner to make a tiny opening. Reserve.
Using a standing mixer or mixing by hand, make the royal icing by beating the egg whites, lemon juice, and confectioners' sugar on low until the mixture is very smooth and glossy. This should take at least 7 to 10 minutes.
Add more confectioners' sugar or water, if necessary, to achieve a consistency so that when the icing is drizzled back into the bowl from the beaters, it will sit briefly on the surface of the icing before sinking back in.
Immediately pour the royal icing over the top layer of the assembled pastry and spread it evenly over the entire surface with the help of a spatula. Some of the icing might drip over the edges.
Working quickly before the icing sets, drizzle the chocolate across the icing in evenly spaced parallel lines. Don't worry if some of the chocolate drips over the edges or if your lines look sloppy. After trimming the edges the appearance will be very refined.
Drag the tip of a thin, sharp knife through the lines of chocolate, spacing them evenly from one side of the pastry to the other; go first in one direction and then in the opposite direction to make a chevron pattern. This creates the most classic mille-feuille decorative pattern.
Before trimming the edges or cutting into individual portions, refrigerate the assembled mille-feuille for at least two hours, or freeze for at least 30 minutes if pressed for time.
>>>>Get access to the tutorial video here<<<<
#cooking#foodie#recipe#cookingtips#homecooking#foodblog#frenchpastry#french pastry#patisserie#french baking#french dessert#french recipes#pastrychef#bakinginspiration#french cuisine#homemadepastry#french food
1 note
·
View note
Last Seen Blogs