#zdepth
Video
youtube
How To Use ZDepth Pass | Depth of Field | After Effects Tutorial
0 notes
Text
Sketchup rendering

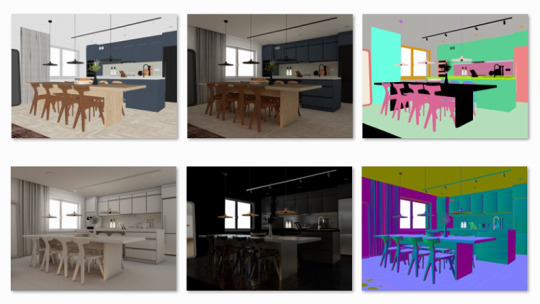
Close the preferences window and then click the green "LightUp" button to render the image. The sketchup users can apply this plugin to excerpt and export various rendering channels which range from Default, Alpha, Clay, Color, Color by Layer, Line, Profile, Shadow, Texture and Zdepth, for impregnating on their desired image editor. You will be amazed at your customer’s reactions when you show them a rendering of your 3D designs with lighting, shadows and reflections providing depth and realism. You can purchase and download it, or download a free 30-day trial.ĭouble-click on the LightUp for SketchUp installer icon to make it available for use with SketchUp.Ĭlick on the “Lightup Preferences” in the SketchUp menu and click in the “Lighting” check-box options to select a lighting source. To render within SketchUp and see a model as a high-resolution photorealistic image you will need to download and install a SketchUp rendering extension. apps such as Instagram, Facebook, Procreate, SketchUp, SolidWorks and more. Our rendering engine is of professional grade to give you the photorealistic look. uMake is the first design app to bring on-device rendering to iOS devices. Other features include interactive region rendering, advanced material editor, proxy creation from FBX, fog. It features state-of-the-art biased unbiased, and interactive render modes that enable you to render inside Thea window or SketchUp view (interactive render overlay).
Do everything within the interface and view the changes in real-time. Thea Render is a powerful rendering extension for SketchUp.
LightUp for SketchUpĭownload the Windows or Mac version of LightUp for SketchUp from the LightUp website. Fast, easy, powerful, affordable and fully featured free unlimited time trial. IDX Renditioner will launch and start rendering your image. You can purchase the full version and download it, or download a free 30-day trial of the full version, or a free version that limits render size.ĭouble-click on the IDX Renditioner to make it available for use with SketchUp.Ĭlick one of three icons in the toolbar for either “Preview Render,” “Standard Render” or “Presentation Render,” which are pre-sets of progressively higher resolution. IDX Renditionerĭownload the Windows or Mac version of IDX Renditioner from the IDX Design website. Later, you can adjust the height and width of the output image, decide what type of lighting to simulate in the image scene, pick background images, and other options.Ĭlick “Plugins” from the menu, then “Render Scene.” Your image will start rendering. for Autodesk 3ds Max & Maya, Trimble SketchUp, MAXON Cinema 4D, and Python. Click “File” from the SketchUp menu, then “Open” and pick the project you want to render.Ĭlick “Plugins” from the menu, then “Render Settings.” You can leave these on default to get an idea of what a basic image rendering will look like. I t reads the materials directly in scene when rendering rather than export.
0 notes
Text

#delaunay triangulation#zdepth#mapping#object videomapping#projectionmapping#random#origami#fake#artists on tumblr#ivo3d#media artist#visual#lightart#glitch#blackandwhite#peace
5 notes
·
View notes
Photo

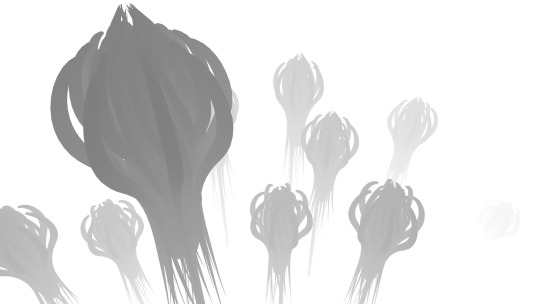
I have finally understood the concepts of ZDepth Sorting in Construct. These are the steps to follow to make a functioning ZDepth prototype.
1. Create a bunch of objects that needs to have ZDepth. They should all be on the same layer, else this wont work. In the animated gif above, the trees, and the car are the objects that will have ZDepth
2. Create a Family of those object you want to have ZDepth.
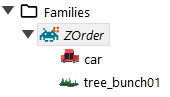
3. Assign a instance variable to the family.
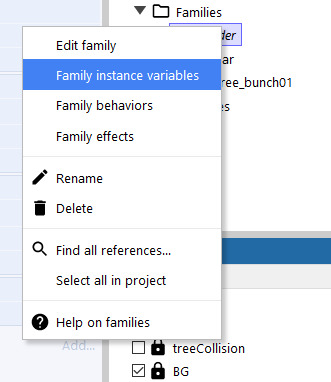
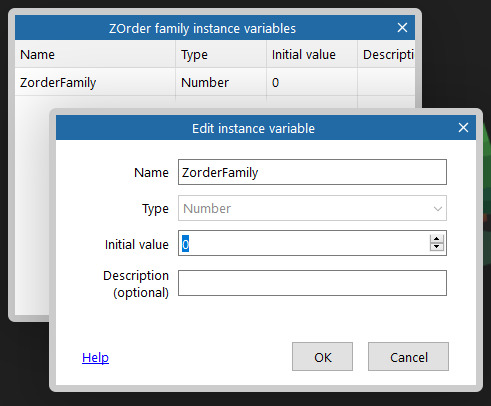
This variable has a value of 0. In the example above- the instance variable is called ZorderFamily.
4. Instruct the game system to check if the objects from that family are on-screen. If they are on-screen, assign their current Y value o the their instant variable.

5. If they are still on-screen, tell the game system to sort all objects in that family, that are on-screen by their new Y value.

----------------------------------------------------------------------------------------------
Refer: https://devilsworkshop.tumblr.com/post/176223060971/with-some-unconditional-help-from-a-construct3
#construct3#gameprototype#game project#Game Assets#low poly#car#tree#programming#prototype#zdepth#zorder#events#behavior#itchio#itch.io#side scrolling#sidescroller#gamedev#indiedev#scirra#construct 3#madeinconstruct#Visual Programming
2 notes
·
View notes
Text
2.5D zDepth Animations Tutorial
Due to the popularity of this post, I decided to write a simple tutorial for whoever wants to try the same thing with their favorite game. This method will work with every title that supports ReShade and Depth Buffer (and pretty much every static image you want to animate).
What is ReShade?
It’s more or less a mod that alters the original graphics, adding in more effects (like lens flare), different tones and fixing bad looking edges.
What is the 2.5D/Parallax effect?
2.5D is a method used by many editors to animate a completely still picture, from simple sceneries to characters. This creates a sort of 3D depth on your pictures, used a few times by many professionals to bring famous paintings and advertisements to life.
Note: This tutorial is mostly about scenery animation faking a camera movement and adding in a 3D space between layers. For the Parallax animation on characters I’ll write a separate guide.
What you need:
• The game (duh) (in this case I’ll use Assassin’s Creed Syndicate as example)
• ReShade (I find myself more comfortable with a previous version, because I somehow cannot achieve the same results with ReShade 3+ at the moment. This should easily work with the latest version too, but for any problem or if you want to follow the guide better, grab ReShade 2.0.4f from here)
• An editing program like Adobe Photoshop, anything that allows you to separate parts on layers and fill empty areas.
• Adobe After Effects
A basic editing knowledge is required, along with a good understanding regarding Adobe programs in general. If you make graphics and gifs you’re already a step ahead, but you actually don’t need to be familiar with AE to do the animation.
The tutorial will include four parts:
1) In-game screenshot w/ Depth activated
2) Editing/preparation for AE
3) Compositing
4) Animating
Part 1: In-game Screenshot with Depth Buffer
1) If you are using ReShade 3+ you can follow this tutorial regarding its installation, otherwise copy the ReShade folder, ReShade.fx and ReShade64.dll (or ReShade32.dll if the game is 32bit) into the main game path (where the exe is, so to speak), then rename ReShade64/32.dll as dxgi.dll.
2) With ReShade 2 go to ReShade directory > Presets > Default and drag Shaders_by_CeeJay.cfg into Notepad, then scroll down to the very last line where you see a shader called DisplayDepth. Next to #define USE_DisplayDepth change the value from 0 to 1. With ReShade 3 press Shift+F2 and look for the same name, if you properly downloaded it along with the other shaders of choice it will most likely be already activated. It is highly recommended to set a hotkey for this effect so that you can easily turn it on and off in game (for example, #define Depth_ToggleKey VK_F12).
3) Open Pipeline.cfg and look for the line #include EFFECT(CeeJay, DisplayDepth). Select it, cut it away and then paste it to the very top before any other shader listed. This will allow you to obtain smooth shapes instead of jagged edges (you should also play around with AA options, specifically SMAA and/or FXAA, both included in CeeJay.cfg). Sadly I’m not sure how the setup works in ReShade 3+.
4) Now that your options are properly set you can start the game. Find an area you like and want to shoot, then press F12 (or any other key you chose for it). If the game has a photo mode or custom made free camera tools, you should totally use those for the best results. You can check this post for a few listed titles and all their respective links.

ReShade allows you to automatically store your screenshots directly into the game’s folder by simply pressing the print screen key. This is how the scene looks normally, without UI and with the free camera activated.
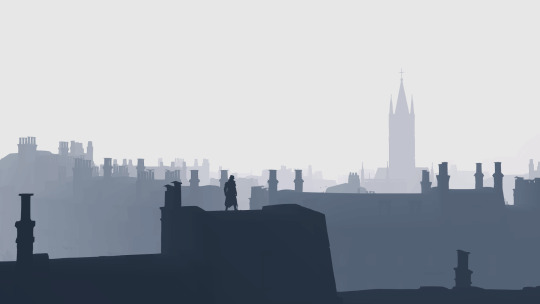
This is what happens when you turn DepthBuffer on.
Note: If all you get with Depth is a fully white or black screen, chances are you need to “reset” by simply entering the fullscreen mode (and switch back to borderless/windowed if that is what you usually like playing with). ReShade usually reloads whenever you apply a modification to the settings, but if even after this the effect doesn’t show up it probably means the game has no DepthBuffer support (or there is some incompatibility somewhere, which may be related to other shaders).
Part 2: Editing
1) Grab your depth screenshot and open it with your editing program of choice, I use Photoshop. In order to animate this, you have to create different layers (renaming them for an easier use in AE, but that is up to you) being sure each hole is covered, or else the empty part will definitely show up in your animation.
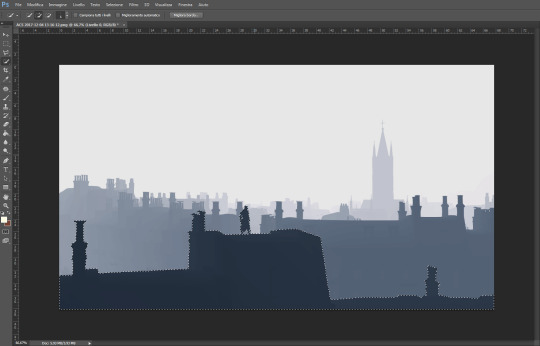
2) Make a selection around the areas you want to separate, I’m starting with what is close to the “camera”. Try to be as precise as possible to keep most of the details, especially around the character. Once you’re satisfied with your selection press CTRL+X to cut it out and then paste it into the same position, a new layer for it will be automatically created.
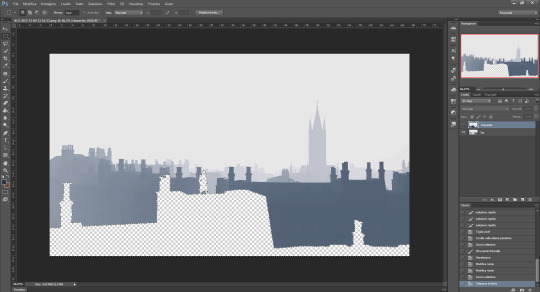
3) If you hide the layer you’ve just made, you will obviously notice an empty shape on the background right where you cut it. The easiest way to fill that properly is by selecting the layer (CTRL+LMB on it), inverting selection and going to Modify > Fill > Content-Aware.
As you can see the empty area has been filled completely, but a few fixes are required. You can use the clone stamp tool or the healing brush, in this case I choose the latter because it makes the process quicker.

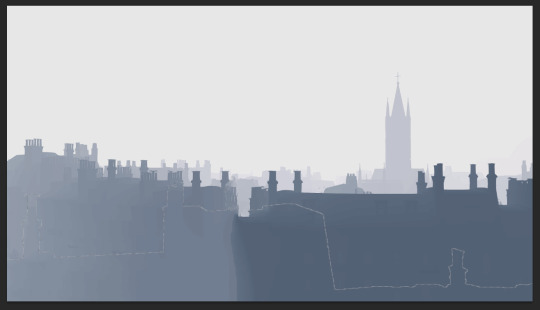
It can be a bit tedious in some places... especially if there are a lot of buildings or trees, depending on your scene. Photoshop covered the outline using the existing content to generate the missing parts as I dragged the brush over it, but you may want to use the clone tool as well and even draw here and there where the brush failed.
Repeat the process for all the other layers you want to separate and then rename everything to know what you’re gonna edit in AE (again, this is optional). You can also make the back layer bigger to hide imperfections behind the other layers, which won’t be too visible while animating. Further edits will be done in AE later anyway.
Part 3: Compositing
1) Save the PSD file and load Afer Effects. I’m currently using the CC 2015 one, but even if you have an older version this method will work without problems.
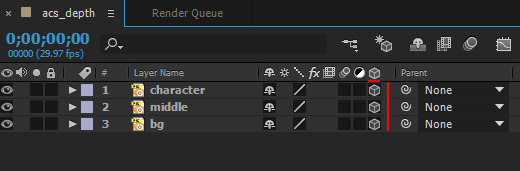
Go to File > Import > File and select your PSD.

Be sure the importer is set on Composition and Editable Layer Styles is checked, this is essential if you want to work on each layer.
2) Double-click on the left to preview the PSD and convert every single layer into 3D. To do so simply check the third square on the right, under the cube icon:
Now we need to add a Camera. Go to Layer > New > Camera and leave the options untouched (the default configuration should be okay for this).
3) Right under your preview you should see a button called Active Camera. Switch to Custom View 1 to move the layers and create depth between them.
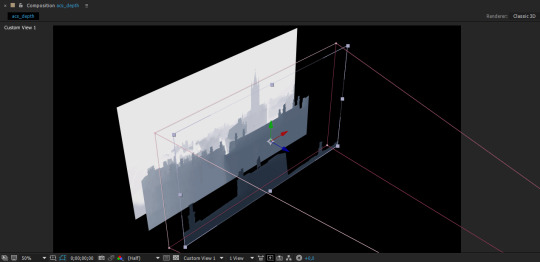
All you have to do is select each layer in the lower panel and move it using the blue arrow (z direction) to push it backward or forward. Use the order you’ve got as reference for the best result, then change the view to Active Camera again when you’re done.
4) Now that you have changed the original positions you need to fix their size to fit the composition. Select all layers at once, press S and activate the little watch icon that appears followed by the effect name (Scale). You will see three values then; place your mouse over the 100,0% one and drag it to the right or left in order to resize the layer(s). Use the directional arrows to also move them up or down eventually.
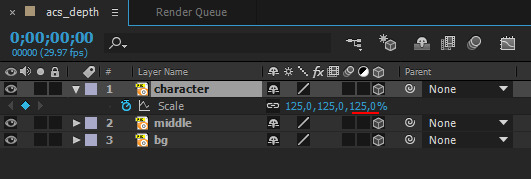
The stopwatch is absolutely fundamental, because it tells where to place each frame in the timeline. Whenever you apply an effect or any modification you need to be sure it’s recorded at the very start, this way it will affect the entire sequence and you won’t risk to only see it taking action in a few frames later instead.
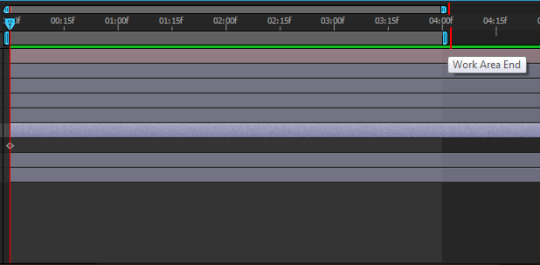
5) You can move the upper bars in your timeline to change the final time. A few seconds for this kind of animations will suffice, I always set it around 4s.
Part 4: Animating
1) Now we can finally animate, woo!!
It is highly recommended to make all the planes bigger than the composition, so that you can move them around without risking to get empty spaces. In this case we want to fake a camera movement with a sort of 3D perspective, like the gifs I’ve posted in that photoset.
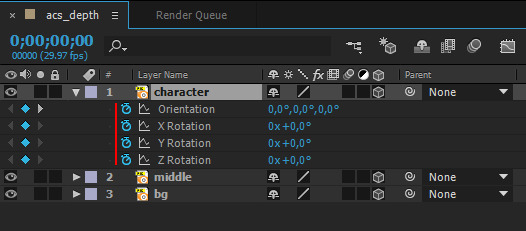
Let’s start from the first layer. Click on it and press P (position) to store the current location on the first frame, then move the time indicator at the end of your sequence. I want the main layer to slide horizontally, thus I will move the red arrow on X axes.

As soon as your first animation is stored, another frame will be generated at the end of the timeline. After Effects automatically creates all the frames between the first and the last one, if you are happy with it select the second layer and do the same, then the third and repeat.
You can also use the R (rotation) key to add more realism. Remember to ALWAYS check the stopwatch on frame 1 before doing anything else.
You can preview the animation with space bar, the rendering times change according to the amount of virtual memory installed on your PC.
For a nice camera shake you can follow this tutorial.
2) Once you’re happy with your animation you’re ready to export it. You can pick a simple video option, but that usually requires a second rendering in Sony Vegas or any other program for video editing to fix the bad-looking fps drop. I suggest you to export in frames instead, especially if you plan to make gifs. Go to Composition > Add to Render Queue, a new panel will appear on the bottom. Click on Lossless and pick PNG Sequence next to Format, then on Not yet specified (output to) and select a destination on your computer. Press Render, wait and it’s done!
Again, the rendering times will highly depend on your RAM and composition size. The bigger, the slower; if you play in 4k you should reduce the screenshot size to a common 1920x1080 at least, even smaller after that for the final gif (tumblr has a 3MB limit).
Result:

Questions? Send me a note!
#my graphics#ac syndicate#assassin's creed syndicate#assassin's creed#jacob frye#tutorial#depth buffer#zdepth#after effects#animation#guide#graphics#camera shake#reshade#2.5d#2.5d animation#parallax animation#parallax effect
29 notes
·
View notes
Photo

Lillian Without Shades Self portrait Can You draw Depth Of Field? The simple answer is: YES! The long answer in my previous post. You may be shock if you see the original! 😳 but thanks to @amrcg to make it easier for us to understand and wait to reach this fantastic results. _________ #paintingwithatwist #zdepth #acrylicpainting #amrcg #cretvostudio12 #cretvo #paintings #paintmixing #watercolor #vejle #denmark🇩🇰 (at Vejle, Denmark) https://www.instagram.com/p/B_7KBAyBRJN/?igshid=k3e3uzaa98ze
#paintingwithatwist#zdepth#acrylicpainting#amrcg#cretvostudio12#cretvo#paintings#paintmixing#watercolor#vejle#denmark🇩🇰
0 notes
Photo
Heyo Fine Folk of the Interwebs! I’ve been working on this painting started in @oculusmedium. These are zDepth and Clown render passes. I always kinda love them. They feel interesting and dynamic, and they rarely see the light of day. #render #zdepth #vr #oculus #oculusrift #oculusmedium https://www.instagram.com/p/BxogBxOlz7l/?igshid=1amw2qqc6qkhj
0 notes
Video
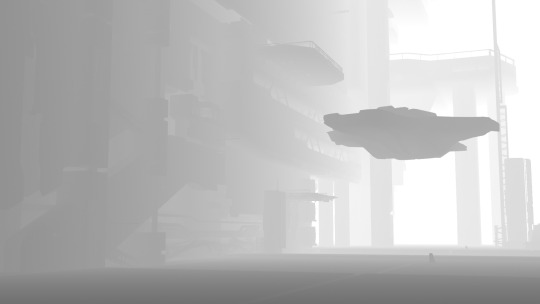
Vandaag een inleverversie gemaakt! Gisteravond om 21:25 een render aangezet in Houdini, en vanmiddag om 16:25 was hij eindelijk klaar! Nog wat laatste aanpassingen gemaakt in Nuke (Zdepth gebruikt voor atmospherisch effect).
Voor de versie die ik wil laten zien bij de presentatie wil ik nog Zdepth gebruiken voor Defocus. Ook moet ik nog mijn frame van de simulatie toevoegen (deze was nog net niet klaar dus die voeg ik later toe). Bovendien wil ik graag nog belichting toevoegen, aangezien ik hier nog geen aandacht aan heb kunnen besteden.
Over het algemeen redelijk tevreden maar ik wil toch nog wel wat dingen veranderen en toevoegen voor de Final versie.
~vrijdag 26 april
0 notes
Photo
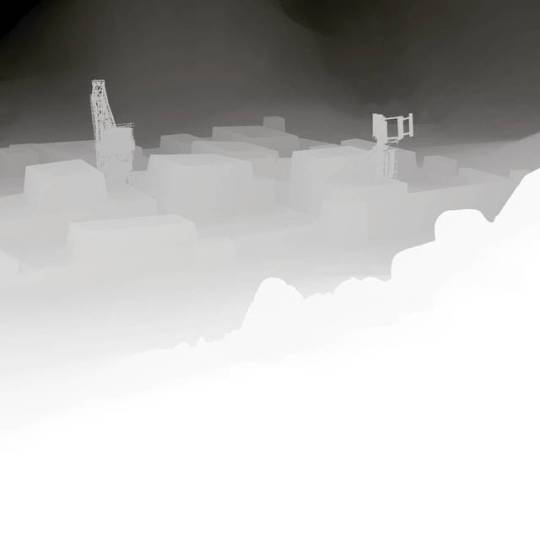
Depth maps are cool. Not investment art, as some artists will make you think, but still pretty neat. #BLACKSTARSTATE #art #artwork #3d #3dmodel #productiondesign #design #film #games #environment#fantasy #digital #landscape #conceptart #scifi #structure #architecture #zdepth
#scifi#games#artwork#productiondesign#zdepth#3d#structure#digital#blackstarstate#environment#architecture#fantasy#art#3dmodel#film#landscape#conceptart#design
2 notes
·
View notes
Text


Zdepth
https://makersplace.com/humanlaboratory/
6 notes
·
View notes
Photo

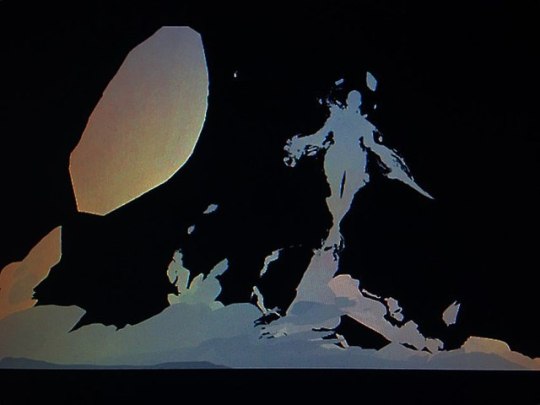
FOG ZDEPTH TRAINING – by Renaud Perochon
“Truth is not found in the light, but hidden in darkness.
It is the shroud that is the deception,
And the secrets found within are the greatest of all.”
—Vagabird
27 notes
·
View notes
Video
youtube
0 notes
Video
Compsite. . . . . . . . . . . . . #3d #2d #zdepth #2d_3d #anime #fusion #phtoshop #layout #background #compsite #rasoul_tasht_zarrin #kongfupanda #music #hanszimmer #ribbon #roc #antiwar #boy #hero #action
#phtoshop#anime#layout#kongfupanda#compsite#roc#3d#action#fusion#2d#zdepth#music#rasoul_tasht_zarrin#ribbon#antiwar#boy#2d_3d#hanszimmer#hero#background
0 notes
Text
Compositing
Last but not least is Compositing and matte painting with Nuke. To be honest I’m not great when it comes to comp work, so I keep it light and simple. I mostly use my AOVs from render to color correct my elements, add zdepth defocus, small camera shake. I tried my best to make sure the CG integrate well with the plate, but I think the render color could be better and the color matching in Nuke still have room for improvement (I think I’m just very tired at this point of the project).
0 notes
Photo

Lillian Without Shades Self portrait Artist: @amrcg Studio: @cretvo Follow: Can You draw Depth Of Field? The simple answer is: YES! The long answer: DOF might be tricky when you paint a freehand portrait, watercolor or acrylic since the main concept about Blur is not really exist and it is all about your imagination and your hand skills to translate what you can see in your mind to be projected correctly to your painting and be easy to translate to the audience. This complex network of trust not really easy to be achieved if you don't stress your lines to be a catch in the first touch, but it can be improve and reach a high level by believing that what you can see in your mind is relatively close to what you can draw. -Amr Moh- _________ #paintingwithatwist #zdepth #acrylicpainting #amrcg #cretvostudio12 #cretvo #paintings #paintmixing #watercolor #vejle #denmark🇩🇰 (at Vejle, Denmark) https://www.instagram.com/p/B_7H8AdhVln/?igshid=czsplybm8g6x
#paintingwithatwist#zdepth#acrylicpainting#amrcg#cretvostudio12#cretvo#paintings#paintmixing#watercolor#vejle#denmark🇩🇰
0 notes
Last Seen Blogs

jrogpenckalf
제목 없음

reeftopia
Untitled

nikitalolita
PINK LADY

pokkysurassyu
ROJIURA

literaetures
most ardently