#would it be better to get an external one or a new internal ssd?
Text
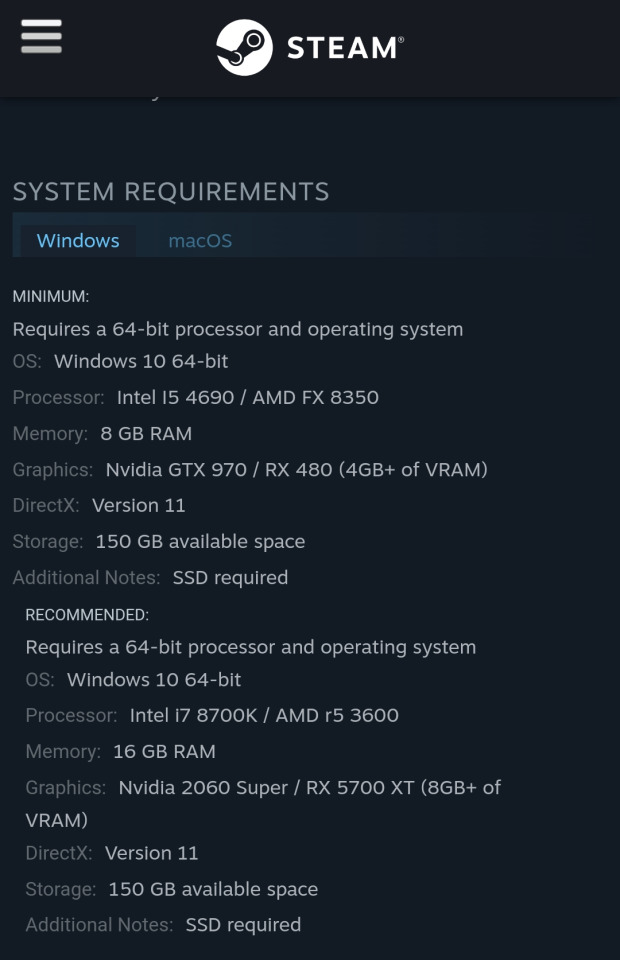
Oh hey, the system requirements for BG3 got updated: The game now needs to be installed on a SSD, even under minimum requirements.
Edit after release: The game is playable even on a HDD, I can confirm this myself. There even is a setting to compensate for the lack of reading speed (although some textures still take some time to load sometimes). In their launch preparation post Larian say they "highly recommend" playing with a SSD, though. I am very glad it's not a hard requirement!
#bg3#baldur's gate 3#system requirements#my ssd only has only the operating system and no space for games#all my games are installed on an hdd#ughhh#but maybe that's why I get those freezes :/#now what do to...#would it be better to get an external one or a new internal ssd?#sooner or later I will need to replace all of my PC parts but I have no clue about that stuff anymore#also thank you to everyone giving tips ❤️#but wow this is suddenly making the rounds 😅
931 notes
·
View notes
Note
Since some people might want a Mac, I'll offer a Mac equivalent of your laptop guide from the perspective of a Mac/Linux person.
Even the cheapest Macs cost more than Windows laptops, but part of that is Apple not making anything for the low end of the tech spectrum. There is no equivalent Mac to an Intel i3 with 4 gigabytes of RAM. This makes it a lot easier to find the laptop you need.
That said, it is possible to buy the wrong Mac for you, and the wrong Mac for you is the 13-inch MacBook Pro with the Touch Bar. Get literally anything else. If it has an M2 chip in it, it's the most recent model and will serve you well for several years. Any new MacBook Air is a good pick.
(You could wait for new Macs with M3, but I wouldn't bother. If you are reading these guides the M3 isn't going to do anything you need done that a M2 couldn't.)
Macs now have integrated storage and memory, so you should be aware that whatever internal storage and RAM you get, you'll be stuck with. But if you would be willing to get a 256 gig SSD in a Windows laptop, the Mac laptop with 256 gigs of storage will be just as good, and if you'd be willing to get 8 gigs of RAM in a Windows laptop the Mac will perform slightly better with the same amount of memory.
Buy a small external hard drive and hook it up so Time Machine can make daily backups of your laptop. Turn on iCloud Drive so your documents are available anywhere you can use a web browser. And get AppleCare because it will almost certainly be a waste of money but wooooooow will you be glad it's there if you need it.
I get that you are trying to help and I am not trying to be mean to you specifically, but people shouldn't buy apple computers. That's why I didn't provide specs for them. Apple is a company that is absolutely terrible to its customers and its customers deserve better than what apple is willing to offer.
Apple charges $800 to upgrade the onboard storage from a 256GB SSD to a 2TB SSD.
A 2TB SSD costs between $75-100.
I maintain that any company that would charge you more than half the cost of a new device to install a $100 part on day one is a company making the wrong computer for you.
The point of being willing to tolerate a 256GB SSD or 8GB RAM in a Windows laptop is that you're deferring some of the cost to save money at the time of purchase so that you can spend a little bit in three years instead of having to replace the entire computer. Because, you see, many people cannot afford to pay $1000 for a computer and need to buy a computer that costs $650 and will add $200 worth of hardware at a later date.
My minimum specs recommendations for a mac would be to configure one with the max possible RAM and SSD, look at the cost, and choose to go buy three i7 windows laptops with the same storage and RAM for less than the sticker price of the macs.
So let's say you want to get a 14" Macbook pro with the lowest-level processor. That's $2000. Now let's bump that from 16GB RAM and a 512GB SSD to 32GB and 2TB. That gets you to $3000. (The SSD is $200 less than on the lower model, and they'll let you put in an 8TB SSD for $1800 on this model; that's not available on the 13" because apple's product development team is entirely staffed by assholes who think you deserve a shitty computer if you can't afford to pay the cost of two 1991 Jeep Cherokee Laredos for a single laptop).
For $3000 you can get 3 Lenovo Workstation laptops with i7 processors, 32GB RAM, and a 2TB SSD.
And look, for just $200 more I could go up to 48GB RAM and get a 4TB SSD - it costs $600 to upgrade the 14" mac from a 2TB SSD to a 4TB SSD so you could still get three laptops with more ram and the same amount of storage for the cost of one macbook.
I get that some people need to use Final Cut and Logic Pro, but hoo boy they sure are charging you through the nose to use products that have become industry standard. The words "capture" and "monopoly" come to mind even though they don't quite apply here.
"Hostile" does, though, especially since Mac users end up locked into the ecosystem through software and cloud services and become uncertain how to leave it behind if they ever decide that a computer should cost less than a month's rent on a shitty studio apartment in LA.
There's a very good reason I didn't give mac advice and that's because my mac advice is "DON'T."
#sorry i swear i know you're being nice#i am incapable of being nice when talking about apple#i was a total apple fangirl until the unibody#which is the domino that started all the other companies pulling shit like soldered RAM#they said 'fuck you - users shouldn't service their own computers' and I say 'fuck apple - users shouldn't use macs'#and that has been my stance on the matter since 2012#which was the last time i bought a macbook because i knew i'd never buy a computer that would fight me to change my own battery
473 notes
·
View notes
Text
How To Find the Best Solid State Drive Supplier in India?
Finding the right internal SSD could be harrowing as finding needle in a haystack or could be a child’s play depending upon the technical know-how of the solid-state drive supplier in India. Before one jump into a conclusion to zero on one out of the many flooded in the market, they need to know how solid-state internal SSD, a boon for them can be, but all good things come for a price. Internal SSD is the current storage platform and consumes less of space in and is extremely compact delivers an exuberant performance each time.
Why switch to internal SSD is needed?
The need to replace and switch an internal SSD can be out of need to be in sync with the latest offering of the technological world OR to upgrade to an existing system if the external looks matter that much yet delivering a faster and smoother and did, I almost forgot to mention, a silent performer. Unlike, the old HDD, which would make gargling sound when booting or loading data, the mighty SSD does this at the blink of an eye as it’s based on flash storage technology and has no moving parts like a platter or spindle like HDD, so events of data crashing and failure are far less. A new system in India with internal SSD storage can range between INR 35k-80K or even cross the hundred thousand (lac) figures whereas, an internal storage SSD can cost between INR 7k-15k or even 20k depending upon the number of GB’s you wish to extend or even rake up to 1 or 2 TB to get some heads and eyes rolling.
Whom/who should upgrade?
Anyone who is not getting enough productivity from their existing portables or desktops and wish to upgrade without having to burn a hole in the pocket can do a legit, upgrade! A system upgrade is like, an organ transplant. You need to know the donor and receiver well before the actual operation. Only if there is a match, can the operation be successful and same goes for a system upgrade. If you have a SATA HDD in your desktop or laptop, a SATA internal SSD is all you need to upgrade and see your Windows OS booting with joy and almost experience a seamless transition with speed in data transfer, don’t believe me? Try it!
What size upgrade?
The rule of thumb is to go as high as you can and adjust your budget accordingly. For instance, if you have had a system running on 250GB, consider 2-3 folds higher the better!! Then comes the brand, a name that is to reckon with and is easily available and smoothly upgradable. We are one of the famous brands or famous suppliers of SSD in India.
Conclusion
So the moral of the story, get to know your system hardware well and its limitations (refer to the manufacturers website), choose the correct connector type based on the existing system SATA SSD, M.2 or NVMe, upgrade to a higher storage capacity than current one, set a budget for the upgrade and most importantly a toolkit if you are going to perform the upgrade or get a professional help by paying a bit for their kindness and helpful being. Most of the upgrades can be sourced online or offline depending upon one’s time and convenience. With all these upgrades your system will not only thank you for upgrading with latest technology, but one can always have that peace of mind which is so much the need of the hour and increasing of productivity.
0 notes
Text
Opensprinkler pi pump start relay

Opensprinkler pi pump start relay install#
Opensprinkler pi pump start relay serial#
Opensprinkler pi pump start relay pro#
Opensprinkler pi pump start relay software#
There are really only two required pieces for this project:Īdding the water can get tricky, but lucky for me the existing sprinkler system happens to run a water line right behind the waterfall of the pond. (In reality it's usually leaves and moss in the river that does it). Plus if I can make it do some sort of tracking of water loss, it could maybe warn me of excessive loss so I can go put a stop to that excessive loss. So it's definitely time to automate! Using the IOT2020, a sprinkler valve, and some clever sneaky wires here and there, I should be able to get this task under control. Or maybe it's those darn hummingbirds sipping incessantly!Īnd I'm not always too observant to notice the lowering water levels before the pump starts to show up out of the muck. Thanks Spruce! Check it out at it's due to the fish partying too much, racoons drinking it all, or thirsty plants, this is causing our fish to worry that one day they'll need to evolve to be desert creatures. This will save me a ton of money, AND ensure that the shrubs, flowers, and lawn get the right amount of water. This is 1000% percent smarter than my old Hunter controller, and even my somewhat newer Irrigation Caddy home automation sprinkler system, because with Spruce, it looks at the current moisture with the sensors, but/and also looks at historical data and weather forecasts. Why? Every morning, I see an email saying that either we had rain yesterday, we had an inch of rain over the last week, or that rain is expected today. In April/May, my system has not watered for the last four weeks. It really is the next generation in irrigation. I got a new irrigation controller from Spruce that includes moisture sensors that are put in the lawn. Note that this is TOTALLY different than my old irrigation caddy in that it uses moisture sensors and upcoming weather forcasts: Just posted this elsewhere on the board - a review for my new spruce system. Relating to the touchscreen interface I am currently using JPG drawings and can do live CCTV views of each of the 10 zones configured. It is not cloud dependent and mostly uses the weather station for ET calculations. I can remote control it via internal or external to my LAN interfaces. (I have one water meter attached for measuring irrigation and purchased but not installed a hard water switch for the irrigation lines).
Opensprinkler pi pump start relay pro#
It does today have external connections to my Davis Vantage Pro 2 via Cumulus, additional sensors via xAP, WeatherUnderground, et al and works fine. It is all inside of the original Rainbird box and has been running 24/7 with no glitches now for over 3 years. I upgraded my set up to running mcsSprinklers on a modded Seagate Dockstar running with two USB connected mini SSD drives. Here is a picture of the tabletop running the touchscreen interface where you could also run the software. My OpenPeak Jogglers / tabletop tablets would probably be better and faster with an integrated touchscreen.
Opensprinkler pi pump start relay install#
(easy m.2 sata drive configuration).Ī while back here did install Ubuntu on my Chumby's and it ran fine (a bit slow) but you could probably configure a Chumby as your irrigation controller. I personally like the new Intel micro PCs and this could work better than the RPi.
Opensprinkler pi pump start relay software#
I haven't touched the configuration of the software in many many years as it runs fine with no hand holding. I do not like to use wireless for my automation but you could configure an RPi3 and wirelessly connect to the software to make adjustments. I have now seen an mSATA GPIO card for the RPi's that would be OK to use. My only concern here is the use of an SD card for the OS and running software. Today you could get by with a RPi2 and a touchscreen for it on or inside of the rainbird box. I was playing a bit with the PogoPlug (had a few of these) and the Seagate dockstar debian devices. Over the last few years the author of mcsSprinklers and a number of users (I was one) tested a linux mono version of the application. Software wise used mcsSprinklers that existed as a stand alone or a plugin for Homeseer.
Opensprinkler pi pump start relay serial#
I used a long serial cable (catxx) to the other side of the house and in to the communications closet. Initially removed the Rainbird ESP controller (I had added wireless to it) and installed two serial controlled Rain8Nets. Here started with a Rainbird vendor Rainbird installation. I have since protected these two devices and they have worked fine. That said one lightning strike did trash my two Rain8Nets over the last 13 years. Here have never connected my irrigation to my OmniPro 2 panel for that reason.
0 notes
Text
2009 mac mini ram upgrade

#2009 mac mini ram upgrade upgrade#
#2009 mac mini ram upgrade pro#
#2009 mac mini ram upgrade plus#
#2009 mac mini ram upgrade mac#
To open the Mini up, you need the stupid putty knife method - the person who designed this case is a complete idiot. Touch some metal objects to discharge any static. Now shutdown the computer and remove all peripherals and power leads. Reboot the machine holding alt (the alt-key on the new keyboard works finally) and make sure you can boot from the external drive. Download Carbon Copy Cloner (CCC) or SuperDuper - I used CCC - and clone your internal onto the external drive. Format the external drive as GUID partition map (important!) and HFS+ Extended Journaled with disk utility. When you get all the parts, put the drive into the enclosure and plug it into your new machine, which you should have setup (don't setup Bootcamp yet though).
#2009 mac mini ram upgrade mac#
I also got a cheap Mac compatible 2.5" SATA enclosure from ebay for under £10: I opted for 4GB RAM (check Crucial for the right kind) and a 250GB 7200rpm Hitachi Travelstar hard drive (they are supposed to be quieter than Seagates and I can verify they are pretty quiet).
#2009 mac mini ram upgrade upgrade#
What you will need to do first of all is buy your upgrade parts.
#2009 mac mini ram upgrade plus#
What I did was upgrade to 4GB Ram and a 250GB 7200rpm drive for £630 plus I can get £50 back, which I'll explain so overall £580 The 4GB Ram upgrade costs £120 and a 250GB 5400rpm drive is £80. The base Mini is 2GHz Core 2 Duo for £499. If you're not sure about it, pay an Apple Certified Tech to do the upgrade for you but then you won't save much money.Īpple's upgrade prices on the Mini are quite expensive so this can save you some money. There are actually no stickers inside that you have to break to change the RAM or HDD and I didn't find it to be all that bad. If you plan on upgrading yourself, doing any damage inside can void your warranty. Learn more about the new iMac on the Apple site.I thought I would provide a few tips for upgrading the 2009 Mac Mini, which some guides don't cover fully. Delivery will begin the second half of May. You'll be able to pre-order the new 24" iMac next Friday at 8 AM EDT. It's an easy decision that will future-proof your system and deliver performance gains as well. For the top-tier iMac, which already has 512GB of storage, that means spending $200 to increase it to 1TB. That's why I recommend you spend your upgrade money on doubling your SSD storage. Also, if your SSD is full, that means your system can't swap out some of that memory to boost performance as needed. Sure, you can plug an external SSD into one of the Thunderbolt ports for fast transfer (and I'll have a list of excellent ones for you in the near future) but it's not as fast as on-chip storage. While upgrading your storage drive was possible (albeit difficult) with previous iMacs, it's impossible to do so with the new M1 chips. Even offloading storage to my iCloud Drive, I've still nearly filled the entirety of my 1TB SSD drive. While you might not need more than 8GB of unified memory in your new iMac there is one thing that you should immediately upgrade when you configure your new machine.Ĭhances are your current system's storage is already bursting with documents, images, movies, and apps. But your money could be spent better elsewhere. If you have the money, there's no reason to not upgrade. For most users 8GB is going to be more than enough for day-to-day computing tasks. With a unified memory upgrade being so cheap, you might wonder why I'd recommend not spending the money. This number is far from the wallet-blistering Apple-tax that upgraders used to pay for factory RAM. You can upgrade to 16GB for a measly $200. However, if you're editing large 4K videos or doing other extremely intensive tasks, you might benefit from additional unified memory in your system.
#2009 mac mini ram upgrade pro#
Reviews of the first M1 systems (the MacBook Pro and Mac Mini) show that Apple has finally been able to create a system with a base of 8GB of RAM that not only performs well but outperforms previous systems with twice as much RAM (also, it's called "unified memory" now). Everything just works together and borrows processing from each other as needed. The CPU and GPU aren't both trying to access data pathways on the logic board. There's no memory swapping or rewriting of data between your RAM and SSD. The M1 chip can dynamically use whatever it needs, from whichever component it needs, instantaneously. Having everything on a single chip changes that fundamentally. RAM is a system's short term memory and having lots of it means you can do more and larger tasks simultaneously without slowing things down. Traditional thinking has always said, add as much RAM as you can afford. But the more I researched the new M1 chip and how it's performed in the new MacBook Pro and Mac Mini, the less concerned I was. As someone who falls into that category, I expected to be more upset at the change.
0 notes
Text
7 Ways to Improve Your Computer Performance
Its inevitable that all computers will experience slower speeds at some point. As software becomes more demanding, the way in which your PC reacts to these changes can have a big impact on its performance. The operating system you have and whether you have chosen to upgrade to Windows 10 can also make a big difference.
While you can make some
upgrades to your laptop
to make it run faster, there are some improvements you can make that are more cost-effective and straightforward to do. These minor adjustments may not seem like they will speed up your computer performance, but combined they can make it possible to keep your PC functional for a number of years.
There are also several types of software available that can help you to get rid of old files while locating applications that you don’t use often and may want to uninstall. These programs can also alert you to files and software that may be the
causes for a slow computer
and may ultimately be worth deleting.Here are seven ways you can improve computer speed and its overall performance.
1. Uninstall unnecessary software
Your computer comes preloaded with a number of applications that many people won’t use but that can eat up system resources. You can usually identify these when you see a pop-up prompting you to update a program you’ve never used before.
Remove them from your computer and free up disk space
Click on the "Start" button and visit the “All apps” menu
Here you can view a list of the applications you have installed - and the ones you haven’t
Once you find the program you want to uninstall, right-click on the icon to see the "Options" menu
Or, you can right-click on Start and visit Programs and Features. Windows assistant Cortana can also be helpful because it can perform a search for “Programs” in its search box. From there, you’ll find a record of which apps you’ve used recently and which take up the most space. After surveying what’s installed, you can decide which programs can be deleted to help improve system performance.You’ll also want to know which programs are required for your computer to run properly and which can be discarded. One of the reasons these applications slow down your PC is because they often start up automatically when you boot up your computer.If you aren’t sure whether you want these applications permanently erased, you can take a more an in-depth look at the applications you want to remove within the aforementioned menus.
2. Limit the programs at startup
Along the same lines, you can also determine which applications run when your PC boots up. Windows 10 has an updated Task Manager that makes it easier to determine what you want running in the background and what you can start on your own.
To access Task Manager, press Ctrl-Shift-Esc
A box will appear that lists all the applications you have installed on your computer
It also gives you a detailed account of the amount of RAM each program uses when you start your PC
To make an adjustment, just right-click on the application you want to change to tell it not to run until commanded
You can always change the settings if you notice that a program is no longer running that impacts how you use your PC. If in doubt, you can always restart your computer and see how it runs without certain applications available at startup.
3. Add more RAM to your PC
In terms of memory usage, Windows 10 uses less RAM than previous versions, but
increasing RAM memory
has been a tried-and-true way to speed up devices for years.If you have a
convertible or detachable laptop
, you’ll likely need to settle for what came in the box. Some business and gaming laptops make it possible to add RAM, but it can still be tricky.It’s much easier to add more RAM to desktop computers, and it’s much cheaper, too. Anyone with a basic idea of the interior of a desktop tower is capable of installing more RAM in an hour or so.You can also take your computer into a professional shop to have more RAM installed. If you’re worried about potentially compromising your system or doing this incorrectly, then having an opinion from someone who knows what he or she is doing can ease your mind and make adding extra memory easy.
4. Check for spyware and viruses
It’s almost impossible not to pick up a virus at some point while browsing the web, but the new Windows Defender software has made it easier than ever to find malware that may be causing major issues on your PC. Third-party programs are also easy to install and can be just as effective in removing any spyware or viruses you may have picked up.Some applications are better than others and some can take up more space, which can then cause issues with speed. Ideally, you want to find software that is efficient and removes malware completely, but that doesn’t take up too much space on your PC.
Consider installing two types of software for computer performance monitoring. Malware cleanup programs can solve lagging or blatant issues with speed or popups. However, you should also look into applications that offer ongoing protection and run in the background. Again, keep in mind that these antivirus programs take up space, so you want to choose one that is designed not to affect performance. A little research can help you to find the software that works within your budget or with your specific type of operating system. There can be compatibility issues if you’re downloading free software, so double-check everything before installing it so you don’t run into additional performance problems.
5. Use Disk Cleanup and defragmentation
Every computer has a number of files and programs on its hard drive that haven’t been used in a while or are unnecessary. Disk Cleanup allows you to find which applications and files can be deleted from your computer, freeing up drive space for the programs you will use.It is incredibly easy to access Disk Cleanup.
From the Start button or Cortana search box, you’ll be sent to the program
A quick scan will show you the temporary files, installer applications, and web pages that you haven’t used or no longer need
From there, it will automatically delete them and clear up some space
Disk Cleanup’s effectiveness depends on how much RAM you have on your PC, which can also cause your computer to run slower than it normally would. If this is the case, it may be a good idea to install more RAM on your device.You should also schedule disk defragmentation on a semi-regular basis so you can be aware of how much hard-drive space you have. Windows has an Optimize Drives tool, which you can access from the Start button or your Cortana search box. There are also a number of third-party programs that can be helpful in clearing out files that you don’t use anymore.
6. Consider a startup SSD
When you want better performance, a startup
solid-state drive
(SSD) can go a long way toward taking some of the pressure off the processor when your computer boots up. If you tend to run a number of applications at one time or use photo and video editing software, then a startup drive can go a long way toward making these programs run smoother and load faster.While they’re most commonly installed on desktop computers, SSDs can be used on some laptop models as well. When you don’t have the option of using an internal SSD, you can always purchase an
external drive
that connects to your PC with a USB 3.0. This drive can give you the extra push you need at startup to accomplish tasks and give you a boost for apps that need more temporary memory to run properly.You can find a number of SSD options that work within your budget depending on how you use your PC. Storage review sites online can be valuable sources of information when you want to choose the right drive for your computer and you need to know that it is compatible with your operating system.
7. Take a look at your web browser
Minor adjustments can often make a difference with the speed of your PC. Something as simple as which browser you use can slow down or speed up the rate at which web pages, videos, and images load. If you have been using a certain browser and notice that there is a lag time, consider an alternative to see if the loading speeds are better.The type of browser you use is not only the thing that may be slowing down your computer when you’re using the web. If you have a full cache that has not been emptied in a while, then you’ll want to visit your settings and make sure that it’s empty.Your cache comprises what you pick up when you are visiting various websites. Many sites use cookies in order to figure out your browsing habits and the ads you may click when you visit a site will leave one too. A cache holds these files as information and if you spend a lot of time online, these files can accumulate and cause your computer to run more slowly. Fortunately, it’s an easy fix. There are two ways to do this in the more popular web browsers:
1 note
·
View note
Text
Samsung SSD 860 EVO 1TB
Samsung SSD 860 EVO 1TB 2.5 Inch SATA III Internal SSD (MZ-76E1T0B/AM)
Make sure this fits by entering your model number.
Innovative V-Nand Technology: Powered by Samsung V-Nand Technology, the 860 Evo SSD Offers Optimized Performance for Everyday Computing As Well as Rendering Large-Sized 4K Videos and 3D Data Used by the Latest Applications
Continuity Tester/Wire Tracer
Secure Encryption: Protect Data by Selecting Security Options, Including Aes 256-Bit Hardware-Based Encryption Compliant with TCG Opal and Ieee 1667
Warranty and Compatibility: 5-year limited warranty; Windows 8/Windows 7/Windows Server 2003 (32 bit and 64 bit), Vista (SP1 and above), XP (SP2 and above), MAC OSX and Linux
Included Contents: 2.5 Inches (7 Millimeter) SATA 3 (6 GB/S) SSD & User Manual (All Other Cables, Screws, Brackets Not Included); Reliability (MTBF): 1.5 Million Hours Reliability (MTBF)
Frequently bought together:
This item:Samsung SSD 860 EVO 1TB 2.5 Inch SATA III Internal SSD (MZ-76E1T0B/AM) INR 10,887.68
Corsair Dual SSD Mounting Bracket 3.5" CSSD-BRKT2 INR 388.35
Corsair SSD Mounting Bracket Kit 2.5" to 3.5" Drive Bay(Cssd-Brkt1), Black INR 621.82
Special offers and product promotions:
Amazon Business: For business-only pricing, quantity discounts, and FREE Shipping. Register a free business account
Samsung SSD 860 EVO:
The SSD You Trust
The Samsung 860 EVO is specially designed to enhance the performance of mainstream PCs and laptops. With the latest V-NAND technology, this fast and reliable SSD comes in a wide range of compatible form factors and capacities.
Enhanced Performance:
Speeds are consistent, even under heavy workloads and multi-tasking allowing for faster file transfer. The 860 EVO performs at sequential read speeds up to 550 MB/s* with Intelligent TurboWrite technology, and sequential write speeds up to 520 MB/s. The TurboWrite buffer size* is upgraded from 12 GB to 78 GB.
*Performance may vary based on SSD's firmware version and system hardware & configuration. For more information on the TurboWrite, please visit the manufacture website
Boosted Endurance:
Up to 8x higher TBW* than the 850 EVO. Feel secure storing and rendering large sized 4K videos and 3D data used by the latest applications.
*TBW: Terabytes Written:
Multiple Form Factors:
Whatever size your computer needs, there is 860 EVO for you. Choose among the 2.5-inch size for desktop PCs and laptops, and the SATA-based M.2 (2280) or the mSATA for ultra-slim computing devices.
Samsung Magician:
Management Software:
Samsung Magician software is designed to help you manage your SSD with a simple and intuitive user interface.
Firmware updates: Get notifications when new firmware is released, and easily install updates for enhanced performance, stability, and compatibility.
Performance benchmark: Check your SSD's sequential and random read/write speeds, so you can maintain superb performance.
Data security: The 860 EVO supports AES 256-bit hardware-based encryption and is compliant with TCG Opal and IEEE 1667.
Product description:
The SSD you trust: The newest edition to the world's best-selling SATA SSD series, the Samsung 860 EVO SSD is specially designed to enhance the performance of mainstream PCs and laptops. With the latest V-NAND technology, this fast and reliable Solid State Drive comes in a wide range of compatible form factors and capacities. Its enhanced performance delivers consistent speeds, even under heavy workloads and multi-tasking, allowing for faster file transfers. The 860 EVO performs at sequential read speeds of up to 550MB/s with Intelligent TurboWrite technology, and sequential write speeds of up to 520MB/s. The TurboWrite buffer size is upgraded from 12GB to 78GB (performance may vary based on user's system hardware and configuration). The 860 EVO also offers boosted endurance of up to 8x higher TBW (Terabytes Written) than the 850 EVO. Feel secure storing and rendering large-sized 4K videos and 3D data used by the latest applications. The smart compatibility of the SSD lets you benefit from faster, more fluid communication with your host system. The refined ECC (Error Correction Code) algorithm and a new JMX controller generate higher speeds, and the improved queued trim enhances Linux compatibility. The 860 EVO provides the reliability of 1.5 million hours (MTBF).
Warranty & Support:
Amazon.com Return Policy: You may return any new computer purchased from Amazon.com that is "dead on arrival," arrives in damaged condition, or is still in unopened boxes, for a full refund within 30 days of purchase. Amazon.com reserves the right to test "dead on arrival" returns and impose a customer fee equal to 15 percent of the product sales price if the customer misrepresents the condition of the product. Any returned computer that is damaged through customer misuse is missing parts, or is in unsellable condition due to customer tampering will result in the customer being charged a higher restocking fee based on the condition of the product. Amazon.com will not accept returns of any desktop or notebook computer more than 30 days after you receive the shipment. New, used, and refurbished products purchased from Marketplace vendors are subject to the returns policy of the individual vendor.
Product Warranty: For warranty information about this product, please click here
Question:
To clone the existing HDD, I connected as an external drive w/ USB cable. win10 Toshiba recognizes as 'as2105 USB mass storage device'. how to clone?
Answer: I used the “Apricorn Notebook Drive, Upgrade Kit”. It is available on Amazon under: “Apricorn SATA Wire Notebook Hard Drive Upgrade Kit with USB 3.0 Connection ASW-USB3-25 (Grey)”. Even though it says a notebook upgrade kit, it works for a PC as well. I used it to upgrade my laptop and my desktop. I like it because it is c… see more
By T. V. Meyer on August 6, 2018
I recently purchased this drive for my Asus laptop. This laptop uses Win 10 and had a 650GB drive
However, only 97GB was being used so I knew it would fit on the 250 GB of the Samsung SSD.
I downloaded Samsung Data Migration, installed it on my laptop (current hard drive). Connected the Samsung 860 to the laptop using… see more
By John F on June 5, 2019
"as2105' is the model # of your USB cable/adapter, and that is 100% correct. Once you download and install the Samsung "Data Migration" software from Samsung's web site (do a Google search), it will recognize the Samsung SSD connected to your as2015 adapter. Then just click the "clone" button and wait for 2 or 3 hours,… see more
By vacuumtubejazzpro on October 19, 2018Question: To clone existing HDD, I connected as external drive w/ USB cable. win10 Toshiba recognizes as 'as2105 USB mass storage device'. how to clone?
Answer: I used the “Apricorn Notebook Drive, Upgrade Kit”. It is available on Amazon under: “Apricorn SATA Wire Notebook Hard Drive Upgrade Kit with USB 3.0 Connection ASW-USB3-25 (Grey)”. Even though it says a notebook upgrade kit, it works for a PC as well. I used it to upgrade my laptop and my desktop. I like it because it is c… see more
By T. V. Meyer on August 6, 2018
I recently purchased this drive for my Asus laptop. This laptop uses Win 10 and had a 650GB drive
However, only 97GB was being used so I knew it would fit on the 250 GB of the Samsung SSD.
I downloaded Samsung Data Migration, installed it on my laptop (current hard drive). Connected the Samsung 860 to the laptop uses… see more
By John F on June 5, 2019
"as2105' is the model # of your USB cable/adapter, and that is 100% correct. Once you download and install the Samsung "Data Migration" software from Samsung's web site (do a Google search), it will recognize the Samsung SSD connected to your as2015 adapter. Then just click the "clone" button and wait for 2 or 3 hours,… see more
By vacuumtubejazzpro on October 19, 2018
Read reviews that mention:
Ken:
5.0 out of 5 stars Think you need a new computer because yours is slow?
Reviewed in the United States on May 31, 2018
Capacity: 250 GBStyle: SSDVerified Purchase
It used to be that adding RAM was the easiest and cheapest way to speed up a slow computer. That never addressed the real bottleneck of a computer, which is the hard drive. I had a customer complaining that they probably needed a new computer even though theirs was only a little over a year old. Knowing that they had a standard platter-style hard drive, I suggested this. The boy is glad that I did! Saved her hundreds of dollars on a new computer and likely thousands on lost time waiting for her computer to 'compute' as her entire business relies on her computer to make her money.
Gary Goodnow:
5.0 out of 5 stars Quick and hassle-free migration from HDD to Samsung EVO 860 SSD on aging desktop
Reviewed in the United States on March 4, 2018
Capacity: 500GBStyle: SSDVerified Purchase
I have a nearly 9-year-old CyberPower desktop with an Asus P6T Motherboard and wanted to eliminate a potential point of failure to eke out a little more longevity. And if I got some enhanced performance, all the better. Turns out it was a very good move.
Of course, the order came within the two day Prime window which one expects from Amazon. I also got the Corsair Dual SSD Mounting Bracket
that was an order option for another 6 bucks. I reviewed it separately but it's a must-have if you are installing into a 5 1/2 inch bay like I was. The SSD comes with an Installation Guide, which I didn't need other than to follow a web site link provided in order to install the Samsung Data Migration Software and Samsung Magician Software. Since I was installing the SSD to replace my C System drive, I needed to clone that drive onto the SSD. And the Data Migrations software works perfectly. After formatting the SSD (NTSF), I cloned 232GB to the SSD in just 31 min with a SATA 3.0 to SATA 3.0 connection. It would have been much faster has my PC supported SATA 6.0. Then removed the HDD and installed the SSD into the mounting bracket, connected the SSD to the SATA data cable and power cable (I used the same port as the C drive HDD was connected to), powered the PC up and it booted hassle-free, with no issues. It was indeed a perfect clone of the previous drive. There were no issues that required going into the BIOS screen. This will only be an issue if you do not use the same exact SATA data connection that was attached to your former C system drive.
I'm amazed how much faster the drive is. The Magician software not only carves out a bit of the drive for overhead, but it also has a cool performance test you can run on all installed drives. So I ran it on the SSD and a 6 TB WD HDD dedicated to pictures and the Random IOPS results were: for the SSD 8,789 read and 19,775 write vs for the HDD 178 read and 244 write. While that may sound unbelievable, it isn't. You actually experience this speed differential while working on the PC.
This was definitely $150 well spent!
Nestor Balleza G.
5.0 out of 5 stars Cumple lo que promete.
Reviewed in Mexico on February 13, 2018
Capacity: 500GBStyle: SSDVerified Purchase
Tenía instalado en mi PC un ssd Kingston V300 de 240GB. Todo iba bien pero sentía que podía ir mejor, utilicé una aplicación para medir las velocidades de lectura y escritura y me encontré con velocidades de lectura de 480 y escritura de apenas 120. Pensé que quizás algo andaba mal con la configuración pero después de revisarlo, todo estaba bien.
Investigando me di cuenta que ese modelo de Kingston es bastante lento, busqué en amazon y me encontré con el ssd que muchos especialistas lo consideran el mejor para usuarios en general, el nuevo samsung 860 evo de 500GB y al mismo o menor precio que otros de la misma capacidad. Lo compré, llegó en la mitad del tiempo prometido, lo instalé con la aplicación para clonar de samsung mucho mas amigable que otras y el resultado es extraordinario. Tasas de lectura y escritura de 550 y 520 respectivamente y más espacio para nuevos programas.
Muy recomendable samsung y más comprándo a través de amazon.
Nestor Balleza G:
5.0 out of 5 stars Cumple lo que promete.
Reviewed in Mexico on February 13, 2018
Capacity: 500GBStyle: SSDVerified Purchase
Tenía instalado en mi PC un ssd Kingston V300 de 240GB. Todo iba bien pero sentía que podía ir mejor, utilicé una aplicación para medir las velocidades de lectura y escritura y me encontré con velocidades de lectura de 480 y escritura de apenas 120. Pensé que quizás algo andaba mal con la configuración pero después de revisarlo, todo estaba bien.
Investigando me di cuenta que ese modelo de Kingston es bastante lento, busqué en amazon y me encontré con el ssd que muchos especialistas lo consideran el mejor para usuarios en general, el nuevo samsung 860 evo de 500GB y al mismo o menor precio que otros de la misma capacidad. Lo compré, llegó en la mitad del tiempo prometido, lo instalé con la aplicación para clonar de samsung mucho mas amigable que otras y el resultado es extraordinario. Tasas de lectura y escritura de 550 y 520 respectivamente y más espacio para nuevos programas.
Muy recomendable samsung y más comprándo a través de amazon.
45 people found this helpful
for buy click here
1 note
·
View note
Text
Tips for Buying Gaming Laptops
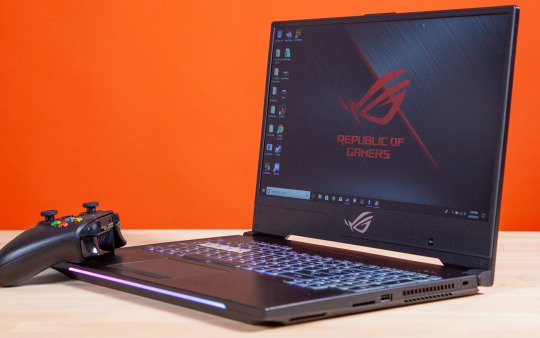
With so many gaming laptops on the market, I thought this would be a good time to create a general gaming laptop computer guide to help some of you choose the perfect gaming laptop.
Design
Image source: Tom's Hardware
The first thing to think about when buying a gaming laptop is the design. Are you going to with 15 or 17 inches? 15-inch laptops have reached a point where they are highly portable. They are light enough for you to use them every day. For example, I have two laptops here, the Razer Blade 17 below and the top one is the main gear vector. For example, the main gear vector has a lot of power in a chassis that weighs only four points one and six pounds and is lighter than the MacBook Pro. Below is the 17-inch Stealth Razer Blade Pro, which is very well built but weighs over 6 pounds. The advantage of portability is that you always have that laptop with you. The advantage of the 17-inch laptop is that it gives you more screen space, a desktop replacement, a larger chassis for better cooling, and more memory to increase the overall storage of the device. Ports would not worry me now. Most laptops have a good selection of ports.
Upgradeability
Next up is the upgradeability, and there are generally three things to upgrade on gaming laptops. Memory, RAM, and the Wi-fi card. These are important because they are the minimum requirements for your gaming laptop and allow you to upgrade your machine later. If you buy a 15-inch gaming laptop now, there are roughly two storage spaces. Sometimes you find three, but generally, the average is one or two. The 17-inch gaming laptop has 2-3 storage spaces, sometimes up to four, for example, I have a Helios 300. This is a 15-inch laptop. They decide to stick three here by sacrificing battery life. The sacrifice of battery life saved space for a 2.5-inch drive. This can be a mechanical drive or a standard SSD. If you buy the base model now, it will come with an NVME drive. But if I want to have more space later, I have two slots to two additional drives.
RAM
Next up is Ram. Most premium and mid-range laptops now have either two RAM sticks or Dual-channel memory. This is important because it improves performance. When you buy a low-cost gaming laptop, sometimes it comes with just one. If it comes with one, you'll want to buy another stick to put it in, as this will improve the performance of your laptop. Most laptops allow you to upgrade your RAM from 32 GB to 64GB.
Wi-Fi
The next thing I’m going to talk about is the wifi card. I think this is important now that Wi-Fi 6 is out now and I have updated my home to Wi-Fi 6, and I am confident it makes a huge difference in coverage and speed. Some of these gaming laptops don't have Wi-Fi 6 cards. So if you can upgrade on the go, your future Wi-Fi capabilities will be assured.
Thermal Management
The last is thermal management. This is the most important thing for your internal components. If you see a laptop with one fan, don’t buy it. Because it overheats and doesn't work as it should. If you see a gaming laptop with two fans on the other side of the laptop. It works well but warms up. Usually, you want to look for such a configuration.
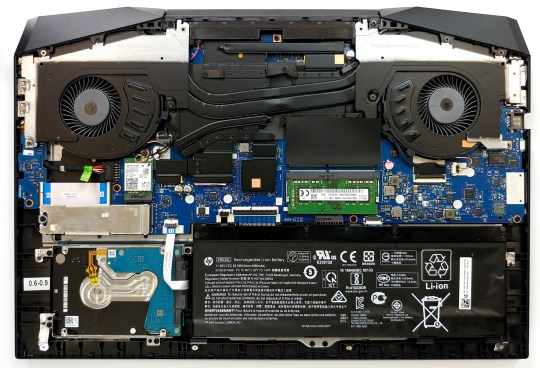
Image Source: LaptopMedia
There’s something better, but it’s more or less standard. You want the fans to be at opposite ends of the central heating pipes. In general, you do not want all heat pipes to be shared between the GPU and the CPU. You want some distinction, and this will give you a better chance of having better thermals.
Display
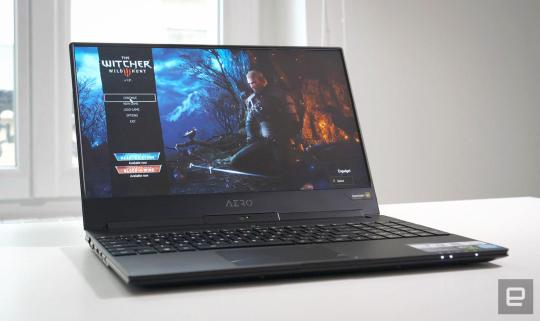
Image source: Engadget
The display is also very important because you want to take advantage of the new high refresh rate displays that are available today and the Sweet Spot of 2020 is typically 144 Hertz. If you buy a 15-inch laptop with Full HD, IPS, and 144Hz, most of these mid-range or premium gaming laptops have good color descriptions, good color gamut, and most of all 144 Hertz where you want them. Now I would no longer focus on 4k games. Because ideally, you want a GPU that runs fast enough to get 144 Hertz frame rates. If you really want to game at 4K, there are some 15-inch laptops that have 4K panels but most of them only have 60 Hertz. And I feel that you will only hurt yourself if you continue like this because the gaming experience will not be the same. If you need 4K, move up to 17 inches because computers like Razer Blade Pro offer 4K at 120 Hertz. I still think that even the new NVIDIA and AMD GPUs that coming out this year are still not that important for laptops. Perhaps more on desktops, but not on laptops. The sweet spot you want to be in 2020 is 1080p and QuadHD, but unfortunately, there are not many qHD panels with high refresh rates.
Sound
Then there is the sound and I would probably pay the least attention to it since every gaming laptop you are buying is very loud. When you play, the fans kick on so that the laptop stays cool, just overwhelm the speakers of these laptops. You should focus more on buying a good gaming headset because it gives you so much more value than the speakers on these laptops.
Keyboard and Touchpads
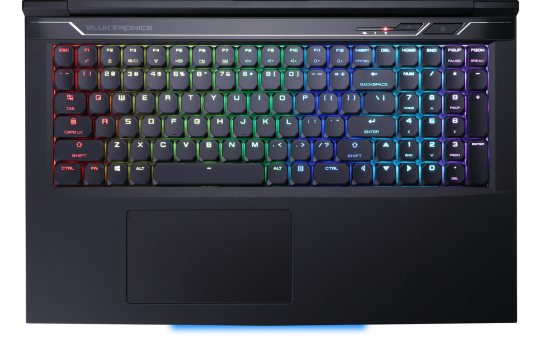
Image source: Eluktronics
I believe that game keyboards are one of the most important things for a gaming laptop. The hand interacts with it to move your character. Usually, you want a gaming keyboard with a good travel distance. The lowest value I want is 2mm, but ideally, you want to be at 2.5mm. Like the Razor Blade Pro 17, a beautiful laptop and my favorite 17-inch laptop, but does not have the best keyboard. Great RGB, but the keyboard shortcuts and touch experience aren’t the best. Other vendors with a SteelSeries keyboard, is a bit dated but feel tangible and have a good actuation force that works well; I feel the keys pressed while playing. I wouldn’t be worried about the touchpads because you would be using an external mouse while playing. However, if you want to do productivity work or use it at school, you want to make sure the touchpad is made of glass and it’s big enough. Ideally, you don’t want one with the real button but like one that looks a piece of glass and you also want to make sure that the touchpad is using Windows precision drivers.
GPU
So let's talk about performance, because I think most people will make the purchase decision based on it and the most important thing is the GPU for gaming. Whether you buy an i5 or the latest i7, it's all part of the GPU. I think today if you buy a gaming laptop the GTX 1660 Ti is the lowest you want. It is now the case that some cannot afford it and have to jump over a 1650. However, if you get a 1660 TI, this can guarantee that you can play most games comfortably in high settings at 1080p. It can still do VR, it'll not perform as good as an RTX card, but it can still do it. If you want to be at a nice sweet place, the RTX 2060 is more recommended, and if you want to play high-performance games, I would probably skip the RTX 2080 and chose the RTX 2070. I think it offers the best value for high gaming performance. I think I have practically completed my first laptop gaming guide. Let me know how I did it in the comments below.
If you want to buy gaming laptop under 500 dollars.
1 note
·
View note
Text
Computer upgrades incoming!
I was futzing around in Skyrim SE last night, taking some screenshots (which I’ll be uploading later). I’ve installed mods to the game to upgrade the graphics, but stopped short of installing an ENB because I figure the performance hit would be too big for my pc. But, I’ve been watching youtube videos of skyrim mods, and the skin on their characters looks SO much better, so I decided to bite the bullet and installed it.
My fps dropped to around 12. With about an hour of following guides and changing things, I got it up to around 28, which is barely playable. And then I broke and said ‘fuck this’.
So, I have a new video card and ssd hard drive coming today! It’s been awhile since I touched any hardware, so this will actually be fun. I can see two challenges going in:
My case has only one hard drive bay, and it has a 3.5 inch drive in it. If it was a 2.5 inch drive I could have ordered an adapter that would mount two drives in the same space, and had both drives in the computer at once. But, no. So, I need to decide, how am I going to copy over my files, and what to do with the old drive after. I could maybe unhook the dvd drive and mount the new ssd drive there. (literally never used that thing.) That would probably also help with issue two ...
My powersupply is 330 watts, which is maybe not enough power for my new GTX 1050 Ti (replacing a GTX 745). I’ve done power supply swaps before, but the problem is that my system (an alienware x51 r2) has an external power supply brick, like a laptop. I would have to either find a compatible external psu, or figure out how to install an internal one into this case. If neither of those work, I could maybe get a new case and move all my old components into it, but that’s honestly much more work than I’d like to put into this, and I like the looks of the alienware case.
Unplugging the dvd drive would save me some watts. The new ssd draws less power than the old drive, so if I don’t keep the old drive in that will save me some too.
1 note
·
View note
Text
Reformat a sandisk 3.0 usb for mac

#Reformat a sandisk 3.0 usb for mac full
#Reformat a sandisk 3.0 usb for mac portable
Sifting through all of your choices can be daunting, but consider any of the previous 10 choices as some of the most reliable flash drives you can buy. There are plenty of brands of USB 3.0 flash drives you can buy, and all of these drives operate on the same basic principles.
#Reformat a sandisk 3.0 usb for mac portable
These portable data storage devices are also compatible with USB 2.0 ports. Comparison of the fastest USB 3.0 flash drive speedĬheck out the speed comparison chart of the fastest USB 3.0 flash drives currently available in the market. These devices are 10 times faster than the previous standard of USB 2.0. Current USB memory stick are compatible with USB 3.0, a standard that came into new computers manufactured in 2011 or later. USB flash drives made with higher-quality components cost more versus competitors when it comes to similar memory capacity, and better components usually mean faster speeds. That being said, USB drives that have less memory and slower download/upload speeds usually cost less than those with higher memory and faster speeds. As a comparison, one terabyte of data would require around 40 Blu-ray discs for storage in a more traditional medium, and a 1 terabyte flash drive could store your computer’s entire digital files and still have room for more. The smallest USB flash drives store around 16 gigabytes of memory, whereas the most extensive reach up to 1 terabyte of memory. If you need the best photo stick for images and videos, you are definitely on the side of larger memory storage. If you need a flash drive just for transferring word processing documents from one computer to another, you can be safe buying a USB 3.0 flash drive with lower memory capacity.

In general, the type of flash drive you purchase depends on the files you want to save. Still, the flash drive comes in very handy from time to time for its convenient use. If the temperature increases, this can cause a failure in the memory unit. Also, Flash Memory is on data retention can vary depending on ambient temperature and the absence of regular updates.

If you want to make a backup of your information, then external hard drives and SSD (Solid State Drive) are a faster and safer bet than a USB Flash drive. The reality is that Flash USB Memory is much less reliable than external hard drives and SSD devices.
#Reformat a sandisk 3.0 usb for mac full
Works with macOS right out of the box, and Windows via reformat.Jump straight to our full list of best Flash Drive External hard drives, SSD device or USB flash drives: which is better?Īt some point, you wanted to make a backup of your data (because you’re going to reformat your PC or want to save them in a place without risk), and you’ve probably asked yourself: what is the best device to do this, an SSD, one external hard drive or USB flash memory? USB-C connectivity gives you plug and play storage with support for Thunderbolt 3, with an included USB-C to USB-A adapter for USB 3.0 compatibility. With rain, dust, and crush resistance for up to a 1000lbs, your irreplaceable footage can brave the elements on the way to your next destination.ĤTB of storage with transfer rates up to 135MB/s gives you a portable way to back up your photos, footage and files wherever your adventure takes you. The G-DRIVE ArmorATD helps shield your photos, footage and files from accidental drops with a premium aluminum enclosure, internal shock mounts, and an easy-grip rubber bumper for durability you can trust. With SanDisk Professional's G-DRIVE ArmorATD drive, you get an all-terrain drive with shock, rain, dust and crush resistance to protect your footage from out in the wild to back in the studio. You go through extremes to capture the perfect shot, so make sure your storage is as relentless as you are.
1 note
·
View note
Text
Capture One 20 Slow

You are here
Log in or register to post responses
Anyone else experience C1 catalogs taking forever to load? Once the app is open, then I can load/change catalogs with ease. But the first time I open the app and the catalog size is at least 40GB, it just takes f-o-r-e-v-e-r. Reminds me of Aperture 2. Just painful and my number one complaint. I’m still using the test version… but maybe things are better once I purchase???
Not noticing that here, and my machine is not overpowered.
Behind the scenes videos with our favourite photographers, tutorials, tips and guides to Capture One. Whether you are a beginner or an expert, prepare yourself for a dose of tips, tricks. This indicates what speed the camera is connected: 12Mb/s: USB 1.1. If the camera is connecting slower than it should be, reconnect it and refresh System Profiler (via cmd+R). If it persists, try a different port on the machine, preferably on a different USB bus. For our Capture One 21 launch, we challenged Polish food and still life photographer Maciek Miloch to tell us about his experience of the pandemic – using just one color. In this blog, he shares the inspiration behind his shoot. Customizing the Interface. Capture One is a popular RAW photo editor that caters to the professional photographer looking for full control over their craft. In a land of competing products, CO stands out as being one of the few to take the GPU seriously, which is exactly why we decided to take the application for a. Length: 60:00 minutes New Heal and Clone tools in Capture One's latest update are both easier and faster to work with, while providing the high image quality that Capture One is known for. Webinars Shooting and Editing with the Fujifilm X-T4 and Capture One.
“but maybe things are better once I purchase???”
That is never a good thing to assume. It’s rarely right. :-)
Apparently, it is a known issue. Received this from their tech support (which was pretty cool that they’d reply to a non-customer using their time-bombed app):
Hi
If you are on “All images” in the catalog, then CaptureOne is strating threads to open all images.
If you instead highlight a low count folder before closing, it will only start opening that folder and it will be much quicker.
We are looking in to things to improve this.
Kind Regards
Phase One support
Could also be linked to the size of the preview images?
I have a fast iMac, with a very fast thunderbolt drobo. My library contains 40k images. C1 opens in 2mins- 10sec. Holy Cow. I will try pre-selecting a low count folder as described above. Hope this works. So far C1 is the best alternative to Aperture. I tried LR… Really not happy with that program. It’s kindof a disorganized mess.
(Reply to #5)#6
Like I wrote in the other thread, try to relocate your masters out of the Aperture library. I think reading an Aperture managed library may slow C1 down (just an idea).
My catalog also opens quite slowly, taking about a minute with 63K images. This is with the catalog on an SSD and the referenced images on a Thunderbolt drive.
It was worse when I first created the catalog from my Aperture library (over 2 minutes, like you are seeing) but I used the command “File > Verify Catalog or Session…” and it found some problems which it was able to repair. That improved the file opening time from over two minutes to about a minute.
Also, selecting either a small folder of images to open at startup or the full “All Images” collection doesn’t make any difference in the performance.
Look at what part of your catalog you have selected in the left sidebar when closing C1. I've noticed that if I select All Images, then loading of the catalog upon next startup can be slow. Selecting an individual Album or Folder that has fewer images speeds up loading on next startup. I've given this feedback to PhaseOne. Don't know if they will find a way to improve that in a future update, but they do seem to be very interested in user feedback so tell them all of the quirks you experience using their Support Case system.
I am experiencing this very slow startup as well. When the catalog and referenced files are both on external HDD, I have extremely slow startup. I made a screen recording and provided it to PhaseOne. It is an 8 minute video. I have under 40,000 images and the catalog is about 64GB. I copied the catalog to an internal SSD and left the referenced files on external HDD. Startup was extremely fast by comparison (under 30 seconds vs 5-8 minutes).
I have a running case open with PhaseOne (case #215211 if anyone else wants to reference it in their own case).
I’m using Apple Photos to be my reference catalog because C1 was so slow. C1 is too good and I don’t waste my time editing with any other software. Then Photos is too good at cataloging. jpegs and raw files show as 1 file and the viewing modes are perfect. No need to catalog every single photo with C1.

(Reply to #10)#11
Milo, this seems like a brilliant idea. I would like to reference my growing iPhone images from C1. Are you able to comment on the following:
1) Did you create a new C1 catalog for the images in Photos?
2) By default, Photos does not download images to your computer. The pictures reside in the iCloud, unless you download them into the Photos application. Are you only referencing the downloaded images in Photos?
3) How are you organizing your images in Photos and how does that structure appear in C1?
Capture One 20 Slow Start
4) Is the metadata, favorites, tags, etc. recognized when referenced by C1?
Your idea of referencing your Photos library in C1 could be a great solution for those of us who increasingly use iPhone 7 Plus pictures from our travels, etc.
Sincerely, Alex
I haven’t seen the slow starting many have. My catalog is 82G, and opens in approx. 9.5 seconds either on the internal HD on my laptop, or the backup copy on an external raid 5 thunderbolt DAS. All files are referenced, there aren’t any stored in the catalog. Thats opening on a root folder with not thumbnails showing on start up. The time measurement is the best I can do with a stop watch.
absolutely. a pain in the butt
I had. a catalogue. at 70gb
it took 12 hours
it seems. that with Mac there is. a huge problem.
I have been. writing with them , they know there is a problem but will not. admit
and so far nothing has really changed.
I don’t think they know what the problem is
(Reply to #13)#14
What is your configuration? Memory? HDD or SSD? Catalog on internal or external disk? I get the best performance from placing the catalog itself on internal SSD and leaving images on external disk. I have a late 2013 MacBook Pro Retina, 2.6 GHz Intel Core i7, 16GB of RAM, 1TB internal SSD, 2TB external portable HDD. My catalog has 56,000 images now.
If I select “All Images”, it sends Capture One into a tailspin where it consumes all 16GB of RAM and then some (so says Activity Monitor). The app locks up for 5-10 minutes, but eventually the memory goes back down and the app becomes responsive again. I opened several cases with Capture One and provided them a lot of evidence of the issue. They agree there is an issue. I believe an update will addresses this. I can't say when that update will be released.
If I select any other folder or album with fewer images with under 1000 image, for example, Capture One is much faster.
With a few tweaks, Capture One is a fantastic Lightroom alternative.
…and shrink that enormous Capture One catalog file
» Scroll to step-by-step instructions
One of the most pleasant surprises of going 100% Adobe-free has been the switch to Phase One’s Capture One. It has long been a favorite among pros, but I have to admit that I overlooked it at first after being seduced by the slicker marketing and shinier interfaces of some other self-described Lightroom alternatives. None of those proved to be — or show any real progress towards ever being — a complete replacement for Adobe Lightroom, at least not for many professional photographers.
Capture One Pro 11, on the other hand, is an excellent Adobe Lightroom alternative. Capture One is faster, has more powerful tools (including layers), and does not require a subscription! If only Phase One’s marketing reach matched that of Adobe’s (or Luminar’s for that matter), more photographers might learn that they’ve had a wonderful Lightroom alternative just waiting for them all along.
Update November 29, 2018
Capture One 12 is here and it’s the best pro-level Lightroom alternative on the market.
I do have one issue, however, with the configuration options of Capture One. Although it is simple enough to import images into Capture One while keeping those big RAW files on my external RAID, the preview and thumbnail images that Capture One creates can only be stored in the catalog file itself, which is actually a macOS package. This is not unlike Apple’s Photos app, and it makes sense for smaller catalogs.
However, the size of the preview files is not trivial. For a large library, the catalog file can reach many gigabytes, even while the database file itself is only a few hundred megabytes. I would much rather store those preview files on the external SSD that I reserve specifically for caches. That way I don’t waste precious space on my internal SSD, and I can exclude that drive from my various backup services. There’s not much point wasting bandwidth and storage space by constantly backing up new preview files that can always be recreated if lost, and, in my particular case, the catalog file size had surpassed the single file size limit for syncing with iCloud Drive, which is a critical part of my workflow.
I was unable to find an answer in the Capture One user forum, but I eventually, and accidentally, stumbled on a solution while testing the Backup Catalog… command. For whatever reason, Capture One creates a standalone database file when exporting a backup and separates out the preview image cache into its own directory.
It occurred to me that this database file was the same type as that found within the contents of the default catalog package, which led to the following 10-step procedure to move the cache to an external drive.
Step-by-step tutorial:
1 Find the location of the Capture One catalog file in the Finder. The default path is Pictures ▸ Capture One Catalog ▸ Capture One Catalog.cocatalog.
2 Right click on the catalog file (extension .cocatalog), which is actually a package.
3 Select Show Package Contents. This will reveal a .cocatalogdb file, along with various directories, including Cache and possibly Adjustments. You may also see Originals if you have opted to store photos inside the catalog, although that would negate the space savings of storing the preview files in a separate location!
Capture One 20 Slow Cooker
4 Copy the .cocatalogdb file (along with the Adjustments and Originals folders, if they exist) to the directory where you would like to keep your new database file. An easy way to do this is to select the files/directories and press Command-C. Click the back arrow in the top left corner of the Finder window to exit the package. If you want to keep your new catalog database file in the same directory as the original catalog package, just press Command-V to paste right there, or navigate to another location and paste the files there. Personally, I choose to store my Capture One Catalog in a directory that syncs with iCloud.
Capture One 20 Sony
5 Copy just the Cache directory to the drive where you want to store all of your preview images. In my case, I keep the cache in a folder named Capture One on an external SSD.
6 Delete the Cache directory that you just copied (the one in the same folder as the .cocatalogdb file).
7 Here’s where the magic happens. Use the Terminal to create a symbolic link, also known as a symlink or soft link, in the location of the Cache folder you just deleted. This symlink will point to your external cache in a way that is transparent to Capture One. To do this, enter the following at the command line prompt, replacing the first path with the location of your external cache directory and the second path with the original location. Note the backslash escape characters before the spaces.
ln -s /Volumes/My External Drive/Capture One/Cache /Users/username/Pictures/Capture One Catalog/Cache
Hint: You can drag a directory from the Finder into the Terminal window to paste in the path.
8 Double-click your new, nice and slim .cocatalogdb file to launch Capture One. Et voila! Your catalog should load exactly as before.
9 If everything is cool (and all photos are backed up as always!), you can delete the original, bulky .cocatalog file.
10 I can’t end at step 9! So go take some pictures!
0 notes
Text
Sabrent Rocket Acronis

Like the other Rocket drives from the Sabrent line, 4 Plus comes bundled with software like Acronis True Image as well as the company’s handy SSD toolbox for easy access to the drive’s health and firmware updates.
The Sabrent 1TB Rocket Q4 Nvme PCIe 4.0 M.2 2280 Internal SSD With Heatsink delivers all the advantages of flash disk technology with PCIe Gen4.0 x4 interface. Based on TLC NAND Flash memory, its performance speeds can reach up to 4700 MB/s (read) and 1800 MB/s (write) when using a.
Sabrent Acronis Clone
Sabrent Rocket Acronis Pro
Sabrent Ssd Clone
Beginner
Kommentare: 2
I just bought a Sabrent Rocket NVME 4.0 drive, 2 TB. I want to clone my old NVME drive to it. Acronis wouldn't start, saying it doesn't recognize there's a connected Sabrent drive, so I initialized it and formatted it in windows disk manager.
Hello,
I've attached a pic of it but I've tried connecting a Sabrent Rocket 2TB NVME unit (TLC, PCIe3.0 variant) to my laptop with only one occupied NVME slot via usb 3.1 port. As per the picture the Acronis software they recommend doesn't recognise the Sabrent unit when connected via the enclosure.
I've tried two other methods via OS migration wizard (Minitool Partition Wizard) and Macrium Reflect clone disk but each time they complete and I try swapping out the drives, I get windows 10 boot errors (latest build etc.). I also tried repairing the boot sector via the Macrium tool. I'm a little worried about a couple of large read only partitions that have appeared too.
What is the best/recommended method to get the entire previous drive with all data/sectors/partitions onto the new drive? I didn't have this problem in the past with Samsung drives but have opened a support ticket with Sabrent before jumping to returning the unit to Amazon UK.
Thanks in advance for any help/advice. Funny this one still an issue and NVME still not very mature.
AnhangGrößeSabrent Acronis recognition issue via NVME SSD USB enclosure.jpg26.07 KBSabrent Acronis recognition issue via NVME SSD USB enclosure2.jpg219.62 KB
Legend
Kommentare: 24718
Lynton, welcome to these public User Forums.
See KB 2201: Support for OEM Versions of Acronis Products which applies to all OEM versions of ATI supplied with hardware purchases.
The core issue here is that using an external enclosure makes the Sabrent NVMe drive appear as something else due to the extra hardware it is connected via. This is a known issue when using such adapters.
Serial del 8. Del Serial Story This amazing Persian series is about two families who come together to celebrate the marriage between Arash and Rasta. But on the wedding night, the bride Rasta suddenly disappears and the wedding is. Enjoy watching Del Persian series episode 40. Del Series Story This amazing Persian series is about two families who come together to celebrate the marriage between Arash and Rasta. But on the wedding night, the bride Rasta suddenly disappears and the. Do you want to watch a Persian drama? Well, then Del series will be right up your alley! Grab your popcorn and be prepared to be entertained. With storylines that will leave you wanting more – this is a great series. It Looks Like You Have AdBlocker Enabled. Please disable AdBlock (& Refresh the page) to proceed to the destination page.disable AdBlock (& Refresh the page) to proceed to the destination page.
The second issue here is that cloning any laptop drive to an external drive will often cause that external drive to be non-bootable when installed inside the laptop, again because the connection method is no longer the same!
Please see KB 56634: Acronis True Image: how to clone a disk - and review the step by step guide given there.
Note: the first section of the above KB document directs laptop users to KB 2931: How to clone a laptop hard drive - and has the following paragraph:
It is recommended to put the new drive in the laptop first, and connect the old drive via USB. Otherwise you will may not be able to boot from the new cloned drive, as Acronis True Image will apply a bootability fix to the new disk and adjust the boot settings of the target drive to boot from USB. If the new disk is inside the laptop, the boot settings will be automatically adjusted to boot from internal disk. As such, hard disk bays cannot be used for target disks. For example, if you have a target hard disk (i.e. the new disk to which you clone, and from which you intend to boot the machine) in a bay, and not physically inside the laptop, the target hard disk will be unbootable after the cloning.
Personally I have not used cloning with my own NVMe SSD's as I have no suitable adapter to connect 2 with and have no systems with 2 slots for this type of drive, therefore I have always used Backup & Recovery to migrate to a new or larger drive.
The steps in outline are as follows:
Create the Acronis Rescue Media (use the Simple option for WinPE)
Test booting your laptop from the rescue media, ensuring you understand how to boot in UEFI mode and can 'see' your current SSD drive and an external backup drive to hold a full disk backup image.
Make a new full Disk backup of the working SSD to an external drive as a one-off backup action.
Shutdown the PC, remove the current SSD and install the new SSD.
Boot from the Acronis Rescue Media with your backup drive connected.
Recover the Backup from step 3. to the new SSD.
Check the Log messages before exiting from the rescue media (all logs are lost on exit) to check all is OK.
If all ok, disconnect the external drive, remove the rescue media and restart the PC normally from the new SSD.
When you have confirmed all is ok with the new SSD, make a new backup again to include any new device drivers installed for the new SSD.
Note: if your new SSD is larger than the original one, then you may find that ATI has not expanded the C: OS partition to use the full new size of the new SSD. If so, then this is quite simple to resolve as below:
First, download a copy of the free MiniTool Partition Wizard software, install this, then use it to move the Windows Recovery partition (that is shown after the C: OS partition) to the end of the available unallocated space.
Next, resize the C: OS partition to use the available unallocated space.
See KB 63226: Acronis True Image 2020: how to create bootable media and KB 59877: Acronis True Image: how to distinguish between UEFI and Legacy BIOS boot modes of Acronis Bootable Media
KB 63295: Acronis True Image 2020: How to restore your computer with WinPE-based or WinRE-based media
Beginner
Kommentare: 2
Steve, legend indeed and thanks for all of this. I'd seen your other forum posts but the bit about the enclosure not detecting as Sabrent makes sense. I did migrate my original Asus G14 SSD to a Samsung one via these methods however which is why I thought something was different this time with Sabrent.
I'll try some of these methods and get back to you. Something's got to work eventually :)
Beginner
Kommentare: 2
@Steve Smith reporting back:
So good news I have managed to achieve the migration by (eventually) finding the mediacreation tool (exe) in the Acronis win explorer folder and putting the tool on a spare usb drive. I then used the 'simple' option from the ui menu option when booting from the drive (after selecting in BIOS), and this did a very straightforward clone from source (now my 'original' drive connected in the external usb3.1 nvme enclosure) to destination/target Sabrent drive (now in the m.2 pcie slot in my laptop). I then shut down, did the swap. There was a blue screen startup error after this which then seemed to repair but only after I went into advanced startup and applied the 'startup repair' option. A reboot after that miraculously made it all the way through windows10 bootup, no data loss and as I was before but now with double the space via the 2tb nvme Rocket. A bit of a process though and someone not so confident with this stuff might have struggled. A couple of suggestions:
1. The information via a hyperlink or something re media creation tool for using external drives to migrate (rather than the simple error 'not-detected' as per my screenshot here would surely be a better user experience?
2. why not uplift the True Image tool to be able to detect beyond the enclosure's hw signature to recognise the inserted Sabrent drive?
should I mark your message above as 'solution' based on this?
Thanks, Lynton
Legend
Kommentare: 24718
Lynton, good to read of your successful migration.
You can use the Feedback tool to pass on suggestions to Acronis about hyperlinks etc.
With regards to hardware detection, that is only a limitation in the OEM versions which have been 'crippled' to have a requirement to identify a drive of the vendor make - this does not apply to the full commercial version, but that isn't given away for free with hardware purchases!
Acronis Links : Acronis Scheduler Manager : Acronis VSS Doctor : Backup Archive Compatibility : Cleanup Tool (ATIH 2010-2021) : Cloning Disks : Contact Acronis Support : Difference between Backup and Disk Clone
MVP Assistant (Log Viewer) & MVP Custom PE Builder available from Community Tools page.
Acronis True Image User Guides available from Product Documentation page.
imTranslator for quick translation of language posts.
Note: Please do not expect any instant reply for private messages as I am often unable to access these due to forum timeout errors!
Products: Acronis True Image 9.0 - 11.0, 2009 - 2021 Disk Director 12.5 Acronis Revive
Beginner
Commenti: 2
Hello,
I've attached a pic of it but I've tried connecting a Sabrent Rocket 2TB NVME unit (TLC, PCIe3.0 variant) to my laptop with only one occupied NVME slot via usb 3.1 port. As per the picture the Acronis software they recommend doesn't recognise the Sabrent unit when connected via the enclosure.
I've tried two other methods via OS migration wizard (Minitool Partition Wizard) and Macrium Reflect clone disk but each time they complete and I try swapping out the drives, I get windows 10 boot errors (latest build etc.). I also tried repairing the boot sector via the Macrium tool. I'm a little worried about a couple of large read only partitions that have appeared too.
What is the best/recommended method to get the entire previous drive with all data/sectors/partitions onto the new drive? I didn't have this problem in the past with Samsung drives but have opened a support ticket with Sabrent before jumping to returning the unit to Amazon UK.
Thanks in advance for any help/advice. Funny this one still an issue and NVME still not very mature.
AllegatoDimensioneSabrent Acronis recognition issue via NVME SSD USB enclosure.jpg26.07 KBSabrent Acronis recognition issue via NVME SSD USB enclosure2.jpg219.62 KB
Legend
Commenti: 24718
Lynton, welcome to these public User Forums.
Sabrent Acronis Clone
See KB 2201: Support for OEM Versions of Acronis Products which applies to all OEM versions of ATI supplied with hardware purchases.
The core issue here is that using an external enclosure makes the Sabrent NVMe drive appear as something else due to the extra hardware it is connected via. This is a known issue when using such adapters.
The second issue here is that cloning any laptop drive to an external drive will often cause that external drive to be non-bootable when installed inside the laptop, again because the connection method is no longer the same!
How to reboot a macbook air laptop. Please see KB 56634: Acronis True Image: how to clone a disk - and review the step by step guide given there.
Note: the first section of the above KB document directs laptop users to KB 2931: How to clone a laptop hard drive - and has the following paragraph:
It is recommended to put the new drive in the laptop first, and connect the old drive via USB. Otherwise you will may not be able to boot from the new cloned drive, as Acronis True Image will apply a bootability fix to the new disk and adjust the boot settings of the target drive to boot from USB. If the new disk is inside the laptop, the boot settings will be automatically adjusted to boot from internal disk. As such, hard disk bays cannot be used for target disks. For example, if you have a target hard disk (i.e. the new disk to which you clone, and from which you intend to boot the machine) in a bay, and not physically inside the laptop, the target hard disk will be unbootable after the cloning.
Personally I have not used cloning with my own NVMe SSD's as I have no suitable adapter to connect 2 with and have no systems with 2 slots for this type of drive, therefore I have always used Backup & Recovery to migrate to a new or larger drive.
The steps in outline are as follows:
Create the Acronis Rescue Media (use the Simple option for WinPE)
Test booting your laptop from the rescue media, ensuring you understand how to boot in UEFI mode and can 'see' your current SSD drive and an external backup drive to hold a full disk backup image.
Make a new full Disk backup of the working SSD to an external drive as a one-off backup action.
Shutdown the PC, remove the current SSD and install the new SSD.
Boot from the Acronis Rescue Media with your backup drive connected.
Recover the Backup from step 3. to the new SSD.
Check the Log messages before exiting from the rescue media (all logs are lost on exit) to check all is OK.
If all ok, disconnect the external drive, remove the rescue media and restart the PC normally from the new SSD.
When you have confirmed all is ok with the new SSD, make a new backup again to include any new device drivers installed for the new SSD.
Note: if your new SSD is larger than the original one, then you may find that ATI has not expanded the C: OS partition to use the full new size of the new SSD. If so, then this is quite simple to resolve as below:
First, download a copy of the free MiniTool Partition Wizard software, install this, then use it to move the Windows Recovery partition (that is shown after the C: OS partition) to the end of the available unallocated space.
Next, resize the C: OS partition to use the available unallocated space.
See KB 63226: Acronis True Image 2020: how to create bootable media and KB 59877: Acronis True Image: how to distinguish between UEFI and Legacy BIOS boot modes of Acronis Bootable Media
KB 63295: Acronis True Image 2020: How to restore your computer with WinPE-based or WinRE-based media
Beginner
Commenti: 2
Steve, legend indeed and thanks for all of this. I'd seen your other forum posts but the bit about the enclosure not detecting as Sabrent makes sense. I did migrate my original Asus G14 SSD to a Samsung one via these methods however which is why I thought something was different this time with Sabrent.
I'll try some of these methods and get back to you. Something's got to work eventually :)
Beginner
Commenti: 2
Sabrent Rocket Acronis Pro
@Steve Smith reporting back:
Sabrent Ssd Clone
So good news I have managed to achieve the migration by (eventually) finding the mediacreation tool (exe) in the Acronis win explorer folder and putting the tool on a spare usb drive. I then used the 'simple' option from the ui menu option when booting from the drive (after selecting in BIOS), and this did a very straightforward clone from source (now my 'original' drive connected in the external usb3.1 nvme enclosure) to destination/target Sabrent drive (now in the m.2 pcie slot in my laptop). I then shut down, did the swap. There was a blue screen startup error after this which then seemed to repair but only after I went into advanced startup and applied the 'startup repair' option. A reboot after that miraculously made it all the way through windows10 bootup, no data loss and as I was before but now with double the space via the 2tb nvme Rocket. A bit of a process though and someone not so confident with this stuff might have struggled. A couple of suggestions:
1. The information via a hyperlink or something re media creation tool for using external drives to migrate (rather than the simple error 'not-detected' as per my screenshot here would surely be a better user experience?
2. why not uplift the True Image tool to be able to detect beyond the enclosure's hw signature to recognise the inserted Sabrent drive?
should I mark your message above as 'solution' based on this?
Thanks, Lynton
Legend
Commenti: 24718

Lynton, good to read of your successful migration.
You can use the Feedback tool to pass on suggestions to Acronis about hyperlinks etc.
With regards to hardware detection, that is only a limitation in the OEM versions which have been 'crippled' to have a requirement to identify a drive of the vendor make - this does not apply to the full commercial version, but that isn't given away for free with hardware purchases!
Acronis Links : Acronis Scheduler Manager : Acronis VSS Doctor : Backup Archive Compatibility : Cleanup Tool (ATIH 2010-2021) : Cloning Disks : Contact Acronis Support : Difference between Backup and Disk Clone
MVP Assistant (Log Viewer) & MVP Custom PE Builder available from Community Tools page.
Acronis True Image User Guides available from Product Documentation page.
imTranslator for quick translation of language posts.
Note: Please do not expect any instant reply for private messages as I am often unable to access these due to forum timeout errors!
Products: Acronis True Image 9.0 - 11.0, 2009 - 2021 Disk Director 12.5 Acronis Revive
0 notes
Last Seen Blogs

statementlives
even fear is gentle here

noeantonio16
Antonio

abyssalgrey
I'm Grey (comms closed)

ambrosiasvault2
A's Character Vibe Storage

teachyouhowtodothesponge
I peed