#woodworking safety
Text
Tool Safety Series: Table Saws
Whether you're a professional woodworker or just a tool enthusiast, its never a bad idea to brush up on proper tool use and safety practices.
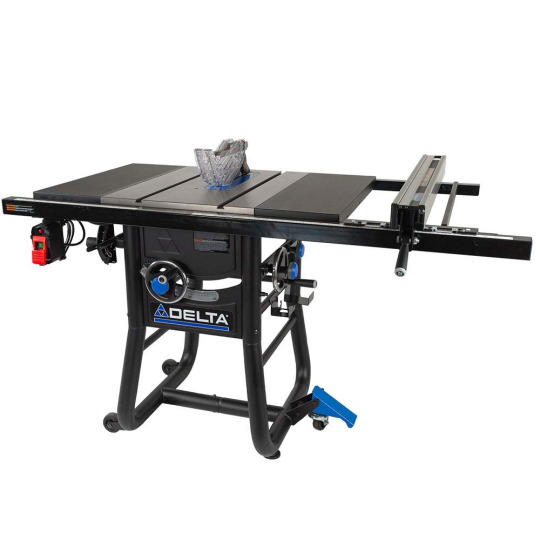

Pictured above are a contractor table saw (Left) and a cabinet maker table saw (Right). Despite their differences, the same standards and safety practices apply to both when hand feeding material.
Guard Requirements:
Blade guards
"Each circular hand-fed rip saw shall be provided with a hood-type guard that will cover the blade at all times when not in use. This may be accomplished by the use of a guard which will automatically adjust to the thickness of the material being cut, or by a fixed or manually adjusted guard"
"Each circular hand-fed rip saw shall be provided with a hood-type guard that will cover the blade at all times when not in use. This may be accomplished by the use of a guard which will automatically adjust to the thickness of the material being cut, or by a fixed or manually adjusted guard"

Above is an automatically adjusting hood-type guard which doubles as a dust extraction hood. These protect operators from small debris that may be thrown back during a rip cut such as dust, splinters, loose knots, and foreign materials such as nails. A guard like this required to be in place at all times if the cut being made allows it. The hood may be removed for special cuts that would otherwise be impossible with the hood in place.
Spreaders
"Each hand-fed circular saw shall be equipped with a spreader to minimize the possibility of material squeezing the saw"

Even the slightest horizontal force on a board in the middle of a cut can cause it to kickback at incredible speed. The spreader helps mitigate this hazard by providing a static surface for cut material to slide against.
These standards are established by ANSI O1.1-1961: Safety Code for Woodworking Machinery - Section 6.1 and are incorporated by reference by 29 CFR 1926.304(f).
General Operating Procedures:
Never start the saw if material is touching the blade. The blade needs time to accelerate to operational speed and will kickback anything touching it when it starts up.
Avoid standing behind the space between the blade and the fence. It is much easier for material in this area to kickback into an operator. When possible, it is safest to stand on the left-hand side of the saw blade. Keep a wide stable stance when hand feeding material and avoid bending or leaning as this may lead to falls.
Related to the previous point, always keep a hand/push-stick on the material between the blade and the fence. This where kickback is most likely to occur. Push-sticks should be used if making narrow cuts that could bring an operators hands close to the blade.
Never apply lateral or vertical force to material being cut. Material must only receive force from behind and above to keep it flat on the table top and moving smoothly forward. Be especially aware of this when cutting large sheets of material with a partner.
Use a roller stand or ask for assistance when cutting material that hangs off the edge of the table top. Hanging material may cantilever the rest of the material, causing it to lift off the table top and kickback.

In the picture above, the person in pink in assists the operator in blue. As the operator in blue pushes the sheet through the blade, the assistant keeps their hands on the material, slowly walking along side it. If they were to apply force in any direction (other than to counter gravity) it would almost certainly cause the saw blade to bite into the material and potentially kick it back in to the operator.
Due to the versatility of table saws, these guidelines are not exhaustive. Be sure to read the operators manual before operating machinery for the first time.
350 notes
·
View notes
Text
btw big shoutout to that woodworking class i took in my final semester of high school for allowing me to 1. not constantly sound like i'm talking entirely out of my ass and 2. hide some very niche secrets because of the like 2 full months of paperwork & osha training before i got to actually build anything
#dont click see all on the tags i accidentally went insane over woodworking Its Not Worth it#god that class was such a mess. it took so long bc we couldn't all go to the shop unless everybody passed the safety test#and. well i'm pretty sure only i and like 3 other kids actually wanted to be there . im still a bit angry about it yeah#i wanted to build a table for my mom for mother's day and didn't finish it til JUNE and then it fell APAAARRTTTTTTTT!!!!! but its FINE#I WAS GRADUATING LIKE A WEEK AFTER BUILDING THAT TABLE BUT ITS ///FINEEEEEE////#THE actual knowledge that i still retained from it is really funny tho tbh#the only thing you can call a guard on a bandsaw is the lil 2" radius circle printed around where the blade goes through the table#if you put your fingers inside of that circle they will be Swiftly Removed#i am more comfortable with that fucking thing than a hand drill#however drill presses are fine. kinda fun actually#walnut smells really good when it's being ripped but the dust gets fucking everywhere somehow even more than white oak#that was my last class of the day that semester and i would constantly go home with my black clothes having turned brown#and i'll say. most fulfilling class i've ever taken to be completely honest#ik i am not attending a trade school but WHYYYYYY DOESNT MY UNIVERSITY OFFER WOODWORKING AAAAGGG#WHAT IF I DROP OUT TO BECOME ONE OF THOSE YOUTUBER GUYS THAT MAKES TABLES THAT ALL LOOK THE SAME HUH. WAHT THEN!!!!!!!!!!!!!#WHAT IF I WANT TO MAKE 32 TABLETOPS OUT OF MINIMALLY TRIMMED SLABS AND EPOXY THAT ALL SOMEHOW LOOK BORING. WHAT IF I MAKE BANK ON THAT#ITS! BETTER!! THAN ALL THESE ESSAYS!!!!!!!!!#ahegm sorry folks. what i meant to say is that whenever ebony looks like he's creaming himself over furniture that's me talking through him#all that being said if i ever have to look at autocad ever again i will start huffing the polyurethane
3 notes
·
View notes
Text
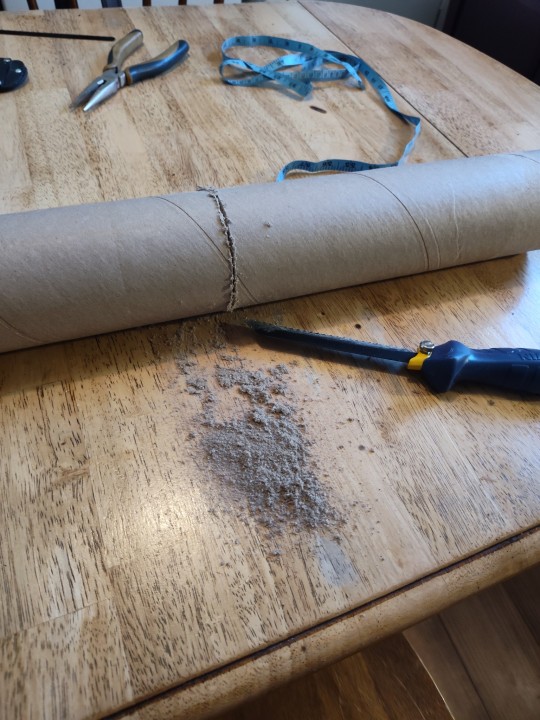
I don't have a proper dust mask but I'm still glad I decided to wear some type of mask 😭
#I don't have protective glasses either. but I have regular glasses 👍#do not come for me and my safety regulation rule breaks#I did woodworking in hs and this is cardboard
3 notes
·
View notes
Text
TME trans people who think that embracing masculinity means shunning and belittling the sisters they share space with are fools and cowards who punish trans women for the crime of pursuing comfort and happiness. Those who think being trans themselves absolves them of transmisogyny are active poison.
#my dash shows me everything my trans women friends deal with on this platform and#to just say “yikes” belittles how some of these dickheads are willing to put women's livelihoods and safety at stake#just to feel better about themselves#i have seen an uptick in trans men who espouse rhetoric identical of that to 2013 era MRAs#AND those who get cozy with transmisogynists if it means they get to feel tough#what woodwork did these idiots crawl out of and how can i talk sense into them??
4 notes
·
View notes
Text

Corner posts for the upper frame of the compost sifter cut on the table saw, then smoothed with a chisel.

Upper frame glued together with more of the milled 1x4s. 1/2” conduit used as slides. Sifter box mocked up to test for space to shake it.
Almost done!
#again-all pressure treated sawdust and shavings were separately bagged for safety#woodworking#gardening#composting#table saw#chisel#compost sifter
5 notes
·
View notes
Text
i wish id had a parent that was a woodworker i would KILL to learn woodworking for free. but alas my father was a sculptor and my mother was also a sculptor. i never had the head for sculpting
#they are 2 dimensional artists as well#my mom does and did more in 2d but she doesnt really do art much anymore#my dad is and always has been much more of a sculptor#and my step dad well. he doesnt do much but game#are there any single woodworkers out there looking for a nonbinary shop pet? :3#id make a joke abt playing w ur wood while u play w ur wood but i take shop safety very seriously.#power tools are like horses. and i KNOW they want to eat my fingers.
1 note
·
View note
Text
sorry i was thinking about the american death cult of masculinity again today because i watched the stumpy nubs video on how most table saw accidents could be prevented by using guard rails. the failure to do so resides entirely in the american death cult of masculinity. i think about the demon core and how the culture of safety was so scorned it got a death count and dismantled rather than, you know, basic safety precautions. i think about how reusable bags were too gay for men to use. i think about how electric hummers exist and are too heavy for residential roads. and like. being told men were the only rational and logical actors. and like. sorry but i think i may go a little insane.
1 note
·
View note
Text
Some Diy Hacks To Improve The Capabilities Of A Benchtop Planer
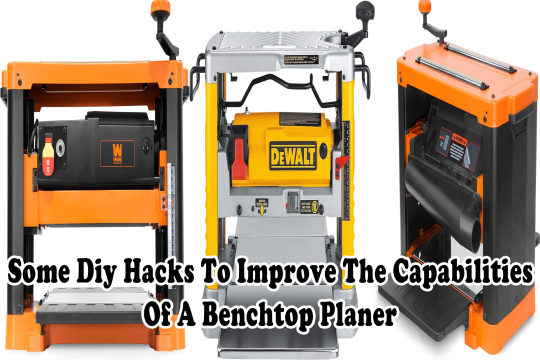

Are you looking for ways to upgrade your benchtop planer?
With a few simple DIY hacks, you can improve its power, cutting ability, safety, and accuracy.
Whether you're an experienced woodworker or a beginner just getting started, these hacks will give your planner the boost it needs to take on more complex projects.
From upgrading the table to installing a dust collector, we'll walk you through some popular DIY hacks that will help maximize your planer's capabilities.
So don't wait any longer - let's get started!
Key Takeaways
- Upgrading the planer table with thicker materials or adding support pieces can improve stability and durability.
- Enhancing the cutting ability by adding router bits, lubricating blades, and periodically sharpening them can result in intricate shapes, improved cutting, and smoother finishes.
- Increasing power by installing a higher voltage motor, using a heavy-duty belt, and connecting a dust collector can provide better performance.
- Improving safety through the installation of guards, dust extraction ports, emergency shutoff switches, support systems, guardrails, and anti-kickback devices is crucial for protecting woodworkers.
Upgrade the Planer Table
You can easily upgrade your planer by adding an aftermarket table - it'll make a huge difference! Customize the table to fit your needs and enhance stability. Consider using thicker materials for added durability, or add additional support pieces underneath to secure the planer's base in place. Adding router bits will also open up possibilities for creating more intricate shapes and designs when working with wood.
Be sure to follow all safety instructions when making these modifications as some of them could become hazardous if not done correctly. With this upgrade, you can now take on larger projects with ease and confidence knowing that your setup is secure and reliable.
Now onto increasing the planer's power...
Increase the Planer's Power
If you're looking to increase the power of your benchtop planer, a great place to start is with the motor. Installing one with a higher voltage will help deliver more power, and replacing the stock belt with a heavy-duty option will ensure it can handle it.
Not only that, but this upgrade should last you for years to come!
Install a motor with a higher voltage
Upgrade the power of your benchtop planer by installing a motor with a higher voltage, allowing you to maximize its capabilities. Here's what you need to do:
- Upgrade Motor:
- Unplug the existing motor from the wall outlet.
- Install the new motor and connect it to an appropriate voltage source.
- Secure all cables and wires for safe operation.
- Replace Belt:
- Measure the belt size needed for proper fitment.
- Cut away any excess belt material around its circumference.
- Fit and secure in place with appropriate fasteners or adhesives.
Doing this will give your planer more power while keeping it safe and reliable for future use - now let's look at how to replace its stock belt with a heavy-duty one.
Replace the stock belt with a heavy-duty belt
Replacing the stock belt with a heavy-duty one will give your planer an extra boost in power and performance. This is an easy upgrade that can be done quickly, without any special tools or knowledge.
When replacing the belt, it's important to make sure you get the right tensioning for optimal results. You should make sure the belt isn't too tight or too loose when installing it – that'll ensure maximum motor voltage and torque output. Furthermore, if you're using a standard two-motor system, you'll need to adjust both motor belts separately for proper tensioning.
With this simple upgrade, you can improve your benchtop planer's overall capability and efficiency. The next step is to install a dust collector for even better results.
Install a Dust Collector
If you want to improve the capabilities of your benchtop planer, one of the best things you can do is install a dust collector. Connecting it to the planer and installing a flexible dust hose will help ensure that all sawdust created while planning is drawn away from your workstation. This will make it easier and faster for you to clean up after each use. Additionally, these changes will reduce clogging in your machine, improving its overall performance.
Connect the dust collector to the planer
Connecting a dust collector to your benchtop planer is an easy way to keep your work area clean and improve the performance of your tool. First, you'll need to make sure that the motor voltage in both the dust collector and the planer match.
To connect the dust collector, install a heavy-duty belt between the planer's drive pulley and the dust collector's blower pulley. Securely fasten it with screws, bolts, or clamps.
Next, check that both the dust collector and planer motors have matching electrical requirements and are wired correctly for safety.
Make sure that the heavy-duty belt fits securely on both pulleys without slipping, as this could cause damage to either machine if not properly installed.
Once everything is in place, you'll be ready to install a flexible dust hose from your benchtop planer to your dust collection system for improved accuracy and airflow control.
Install a flexible dust hose
Installing a flexible dust hose from your planer to the dust collection system will help ensure maximum airflow and precision. This can be achieved by securely connecting the hose and making sure it is not kinked or blocked in any way.
Lubricating its blades with oil or wax regularly will also optimize airflow and improve cutting ability. Connecting a dust collector to the planer is an effective DIY hack that provides better visibility of the working area, helping you make cuts more accurately and safely. Additionally, it helps keep your workspace clean and free from airborne debris.
With these simple steps, you can easily improve your planer's capabilities and get professional-level results faster. To further enhance its performance, consider investing in additional accessories such as depth gauges or router bits for fine detailing work.
Improve the Planer's Cutting Ability
Replacing the planer's blades with sharper ones will let you glide through wood like butter. Invest in high-speed blades for a smooth finish, as they have fewer teeth than regular blades and therefore cut faster.
To ensure your planer produces precise, clean cuts every time, it's important to periodically sharpen the blades. You can do this by hand using a mill file or buy an electric sharpener for quick and easy blade sharpening.
With sharper blades on your benchtop planer, you'll be able to make perfect cuts over and over again with ease. With this upgrade, you'll feel like a pro as you work your way through projects.
Now that you've improved the cutting ability of your planer, it's time to upgrade its fence so you can make even more accurate cuts.
Upgrade the Planer's Fence
If you want to upgrade the capabilities of your benchtop planer, then consider replacing the stock fence with a longer one. Installing a parallel fence system will enable you to take advantage of more accurate cuts and improved precision when machining large pieces of wood. It'll also give you greater control over the angle and depth of each cut. So, don't hesitate - upgrade your planer's fence today for improved performance!
Replace the stock fence with a longer one
You'll be amazed at the difference a longer fence will make, allowing you to plane boards of any size with ease. Here are some key advantages of replacing your stock fence:
- More accurate cuts due to increased stability.
- No more struggling with shorter pieces.
- Improved dust collection and control.
- Increased speed and efficiency when working with larger pieces.
Installing accessories such as a parallel fence system or lubricating blades can also enhance the capabilities of your planer for different types of projects, so consider those options too!
With a longer fence you can easily tackle any job that comes your way—improving accuracy and precision while saving time and energy.
Install a parallel fence system
Adding a parallel fence system to your benchtop planer can dramatically enhance its performance, allowing you to cut boards of any length with ease. Installing the handle and wheel kit is straightforward and relatively inexpensive, but it pays dividends in terms of improved accuracy and increased cutting capacity.
The parallel fence system ensures that the board remains straight throughout the entire cutting process. This results in perfectly flat surfaces for all your projects. It also provides much better support than stock fences, which tend to be slightly wobbly.
With a parallel fence system installed, you'll be able to complete your work quickly and accurately with minimal effort. As a bonus, it'll also increase safety since there's less risk of kickback or other dangerous situations. This DIY hack is sure to make using your benchtop planer even more enjoyable - no wonder it's become so popular!
By taking this simple step, you'll be well on your way towards maximizing the potential of your planner. Now, let's look at how to increase the planer's feed rate.
Increase the Planer's Feed Rate
If you're looking to increase the feed rate of your planer, there are a few DIY hacks you can use.
Installing a power feeder is an effective way to improve the speed and accuracy of the material being fed into the planer. Additionally, installing a feed roller helps control the pressure applied when running stock through your machine, giving you more control and better results.
Both these hacks are easy to do with minimal cost and effort, allowing you to get the most out of your planner in no time!
Install a power feeder
Installing a power feeder to your benchtop planer can significantly enhance its capabilities. This device is driven by an electric motor and typically comes with a power switch for easy operation. With it, you can achieve smoother, more consistent cuts in the wood. You can also increase the feed rate up to three times faster than manual feeding. Additionally, you can improve accuracy while reducing fatigue from manually pushing the planer through the material.
By adding this simple yet powerful tool, you can increase efficiency and get better results from your benchtop planer - without having to invest in a larger machine. Moreover, you'll be able to keep up with larger projects without sacrificing quality or taking too long. That's why installing a power feeder is an ideal DIY hack for improving your benchtop planer's capabilities.
Install a feed roller
Now that you've installed a power feeder, you can take your benchtop planer to the next level by installing a feed roller. A feed roller can be adjusted to accommodate different materials and offer an improved speed for planning.
This DIY hack will make it easier than ever to get the perfect finish on your woodworking projects. The adjustable feature of the feed roller allows you to adjust its speed depending on what type of material you're working with. This ensures greater accuracy and precision in your results.
With this simple hack, you'll have better control over how quickly or slowly you plan your materials for a consistent outcome every time. It's an easy way to improve the capabilities of any benchtop planer significantly, so why not give it a try?
Next up: increasing the safety of your planer!
Increase the Planer's Safety
Adding safety features to your benchtop planer is a must to ensure you can use it safely and confidently. To protect yourself and the material being worked on, consider installing guards around all moving parts as well as dust extraction ports. Here are three of the most important safety DIY hacks for your benchtop planer:
- Installing guards: Guards shield operators from any loose particles or debris that may be kicked up by the blades.
- Dust extraction: Connecting your benchtop planer to a dust collection system helps keep the air free of sawdust, which can cause respiratory problems if inhaled.
- Emergency shutoff switch: An emergency shutoff switch gives an operator easy access in case something goes wrong during a project.
By following these safety DIY hacks for your benchtop planer, you will be able to work comfortably and confidently knowing that you are safe.
Now let's move on to how we can improve the planer's mobility.
Improve the Planer's Mobility
Improving the mobility of your benchtop planer is a great way to make it more convenient to use. Installing a wheel kit helps you easily move the planer around your shop. Installing a folding handle allows for easier portability and storage. With these two accessories, you'll be able to quickly maneuver your planer from one task to the next without any hassle.
Install a wheel kit
By equipping your benchtop planer with a wheel kit, you can effortlessly glide it around the shop to tackle larger projects. Now, instead of having to lift and move the planer every time you want to use it in another area, you can simply roll it around. This makes the process much faster and easier than before.
Upgrading Blades
Replacing Wheels
Easier Movement
Sharpening
Fixed Axles
Less Effort
Honing
Heavy Duty
No Lifting
Smoothing
Lockable
Quick Access
The wheel kit helps by upgrading blades that need sharpening, honing, or smoothing and replacing existing wheels with fixed axles that are heavy-duty and lockable for added safety. These features allow for easier movement of the planer as well as less effort during transportation since there's no more lifting involved. It also provides quick access to any part of your shop without having to carry the planner all over again. With this upgrade in place, you'll be able to work on larger projects in no time! Transitioning into installing a folding handle will make transporting and storing even simpler.
Install a folding handle
Installing a folding handle makes transporting and storing your planner simpler than ever, so you can focus on bigger projects with ease.
Here's what you'll need:
- Tools: Screwdriver, Wrench
- Parts: Handlebars, Upgraded pulleys
Installing the handlebars is easy. First, remove any existing handles and attachments from the planer. Use a screwdriver to loosen and remove screws that hold the handles in place.
Then, attach the new handlebars using the screws provided in the kit as well as upgraded pulleys for improved stability. Secure all screws tightly with a wrench before testing out your new setup!
With this upgrade complete, it's time to move on to improving your benchtop planer's support system.
Upgrade the Planer's Support System
Adding a wood or metal support system to the planer can help stabilize it and make sure it runs smoothly. To take full advantage of this upgrade, consider installing guardrails and anti-kickback devices. This will ensure that the material you're working with stays in place and doesn't cause any danger or damage to your work area.
Adjustable rollers Having these additional elements in place will improve safety and accuracy while using your benchtop planer for DIY projects. Additionally, they'll give you peace of mind knowing that your materials are secure during use. From here, let's look at how we can improve the planner's accuracy.
Improve the Planer's Accuracy
Improving the accuracy of your benchtop planer is an easy and useful way to upgrade its capabilities.
To start, you should install a dial indicator that'll help you make precise adjustments to the thickness of the boards. Additionally, you should add a digital readout that'll give you accurate measurements in real time.
With these two tools, you'll be able to make more precise cuts and ensure your projects come out perfect every time.
Install a dial indicator
A dial indicator can greatly enhance your planer's performance, so fit it for the best results. Take care to properly adjust before use, as it'll give a much more accurate cut. Here are three ways it'll help:
1) You'll be able to check the depth of the cut with precision.
2) It allows you to make necessary adjustments quickly and easily.
3) It provides additional blades for easy replacement when needed.
Installing a dial indicator will take some work, but it's well worth the effort. You'll enjoy improved accuracy in cuts and greater control over the planning process. And once installed, you'll have an even more accurate tool that serves all of your woodworking needs—without needing to purchase additional blades or replace them often.
The next step in improving your benchtop planer is installing a digital readout for easier measurement and tracking of settings from job to job.
Install a digital readout
Installing a digital readout to your planer can take it to the next level, giving you more precise measurements and control over every cut. With a digital readout, you get the benefit of installing software and displayers that can help you measure and monitor your cuts with accuracy. Digital displays give you the ability to see what is happening as you work, meaning less guesswork and fewer mistakes when cutting.
Benefits
Details
Cost
Accuracy
Precise measurements & monitoring
Moderate
Clear
See what's happening as work progresses
Low
Mistakes
Less guesswork & fewer mistakes when cutting
Low
Frequently Asked Questions
What is the best way to store a benchtop planer when it is not in use?
Organize and dust-proof your benchtop planer for proper storage. Place it on a shelf or table away from direct sunlight and moisture, with the blades covered in cloth to keep them sharp. Ensure that the surrounding area is kept clean to avoid any debris getting inside.
What are the potential risks of upgrading a benchtop planer?
Upgrading a benchtop planer can cause backlash prevention issues and require more frequent blade sharpening. Be sure to consider these potential risks before attempting any DIY hacks.
What type of maintenance should be done on a benchtop planer?
Maintain your benchtop planer with preventative care and regular blade sharpening. Keep it in top condition for the best results and longest-lasting use!
Read the full article
#accuracy#benchtopplaner#CuttingAbility#DIY#Mobility#Power#safety#SupportSystem#Upgrades#woodworking
1 note
·
View note
Text
Trying to take a break from weed cause I was overdoing it but now my overwhelming sadness is spilling into my day to day life and idk what to do about it
#Im not asking for a lot and yet it all feels impossible#and i know Im in the same boat as everyone around me we all just want to enjoy life#i wanna try to build some kind of community and safety net for me and my friends but this city is so isolating and it’s so hard#Im volunteering to fix bikes next Saturday at a program I used to help when I was a senior#and Im really excited about that#and i wanna find a kitchen to volunteer at as well#but also Im so tired#i work so much I just want to rest but if I actually rest enough I wouldn’t do anything with my life :(#i know this is all by design but fuck man#also I’ve decided I’m not going to college#rn it’s between carpentry cause one of my bar regulars husband owns a woodworking business so 🙏#that or mechanics school but I still need to see how much that’ll cost
0 notes
Text
adam sackler coded simon riley is plaguing my thoughts
simon ghost riley who starts out as your fuck buddy. you would swing by his flat when you were in the neighborhood, not leaving until he’d thoroughly fucked your brains out.
his flat was a twilight zone. he was always working on some new woodworking project. the entire place was a fucking safety hazard his neighbors must hate him.
you knew he didn’t sleep well. on the nights where he didn’t complain about your staying over, he revealed to you how he has trouble sleeping. you didn’t say much to that, just pressed your chest up against his back and spooned him, scratching your nails over his scalp.
he never complained about your extended stays after that.
in fact, he got a little needy. usually, you felt like the one intruding into his space, but lately he’s been asking you to come by. he never expressly asked, but you saw through his texts.
“you in the neighborhood?”
“send a text to—siri, operate! jesus fuck—”
*incoming call from simon*
anyways, one night you’re both invited to the same warehouse party by johnny. you honestly did not expect to see simon at a warehouse rave of all places. johnny, of course, fit right in.
you spot simon from across the hazy dance floor, leaning on the bar and taking occasional drinks from his beer. you’d never seen him anywhere besides his bedroom. it was kind of comforting to know he actually did exist beyond the walls of his home.
you smile, can’t help the laugh that spills from your throat. he seems to be at peace with himself, so you decide to leave him be for now.
you dance, for the first time in a long, long time. song after song plays, and you progressively get more lost in yourself and the liquor.
you’re pulled from your trance with a harsh tug to your arm. suddenly, simon is towering over you and leaning down to yell into your ear.
“wanna go down to the beach with me?”
you shrug. alright. why not. you need some fresh air, anyways. it’s getting a bit too stuffy in here.
you trust simon as he guides your warm, pliant body to the dock. the beach isn’t pretty, not many of those in the uk, but it gets the job done. besides, you’re too caught up in watching simon be simon to pay any mind.
he was inspecting a giant hunk of washed up wood, maybe he could use it for one of his projects. maybe he’d make you something one day.
“simon, wanna go back to yours?”
he grunts. you’ve known him long enough to know that is a no grunt. your buzz is wearing off and now you’re irritated. fine. maybe johnny is up for some fun.
you shove yourself up from where you’re sitting, promptly beginning your march back to wherever the fuck it is you’ve come from.
“where exactly are you going?”
so now he speaks. great.
“somewhere else!”
you shout back at him, already having put a considerable distance between the two of you.
“what do you want from me?” he shouts back, clearly agitated. “want me to be your fucking boyfriend? is that what you want?”
“yeah!” you scream.
“okay! i’ll be your fucking boyfriend!”
it feels childish, this back and forth. considering the two of you are fully developed adults, but it’s seemingly the only way you two could effectively communicate.
450 notes
·
View notes
Text
Crafting and Cooking the most enjoyable BTS Vlogs
Probably an unpopular opinion if the viewing figures on You Tube are anything to go by, but now we have seen all 7 member blogs I can honestly say that I preferred to watch when they were doing something creative and productive.
Jimin's blog was adorable and left us with the mystery (not a big one) of where the second slightly bigger bracelet would end up.

Jin had a blast with Chef Lee Yeon Bok making menbosha. I mean what's not to like when you can have a glass of good quality red wine at the end of the vlog.


He even managed to pay tribute to ARMY in his vlog.


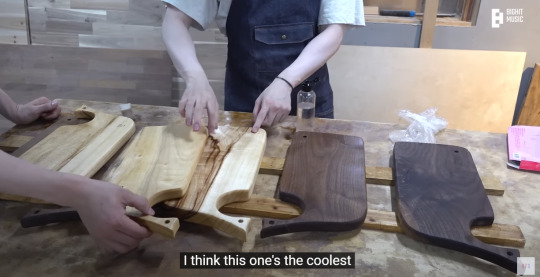
Then today, it was Yoongi's turn and it was great how focused he was upon the task and how that translated into a productive morning and 7 beautiful whale chopping boards for him and the other members.

He even created a brand name for his woodworking products.


Could it be Jimin who told him about silversmithing?

He has a great eye, I would have picked that board for myself as well.

On another note, all the members seemed to think about or talk about the other guys while doing their vlogs. The first time fronting up a vlog on their own after so much time together must have been daunting but I think they pulled it off for the most part and it will be easier next time.
Post Date: 20/08/2022
#jimin#silversmithing#cooking#woodworking#suga#yoongi#jin#worldwide talented#dipped his finger in hot oil#don't do that at home#safety first#nothing like a nice glass of wine with your menbosha#bts
1 note
·
View note
Text

Handrail project from the beginning of September: While my Pap was in home hospice, we needed to make the front walk safer for visitors. Two long steps never had handrails, and the lower rail was rotten.
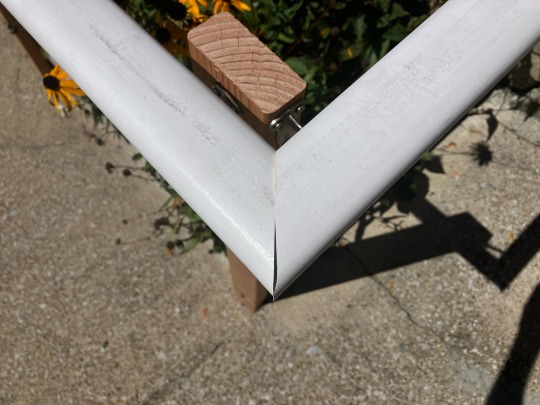

It didn’t have to be pretty, but I did want to blend the corner miter for a smooth transition. Both rails are slightly sloped to match the steps.

Both new railings ready for visitors!
0 notes
Text
They’re Not “Playersexual”, You’re Just Biphobic
(I was going to save this until September 23 because I thought that would be an appropriate date, but the Ask I got included in this essay just put me over the edge. So, here it is now. Buckle up.)
Bisexuality/Pansexuality is the attraction to people regardless of gender. About 4% of the USA alone (over 13.6 million people) openly identify as bisexual, according to Gallup’s latest polling. But unfortunately, bi/pan identities are so scary to some folks that they need to make up terms to avoid calling their favourite characters such. Thus, the term “playersexual” was born: a term to describe a game character who is attracted to the player character... regardless of gender.
If that sounds like it’s just a circuitous way of describing a bi/pan character, it’s because it is.
I first heard of the term “playersexual” almost a decade ago, from a Dragon Age fan complaining that Dorian was gay and thus it was “unfair” that she couldn’t romance him as female character. This fan said they wished BioWare would go back to Dragon Age II’s model of everyone being “playersexual” for “equality”.
Now, if you’ve actually played DA:2 and you’re not a bigot, you’re probably rolling your eyes just as hard as I did when I first read such a ridiculous statement. Well, prepare for this next one:
“When you make a male Hawke, Anders and Fenris are gay and Merrill is straight. Opposite is true if you make a female Hawke.”
These people are so afraid of bisexuality that they cannot even fathom its existence. They can believe in dragons and magic, but they cannot believe that a character is simply bi/pan. I find this especially hilarious for Anders, considering he had a canonical boyfriend, as confirmed both in-game and in The World of Thedas: Vol. 2 book.
I truly thought we were past this nonsense in 2023. I really, truly thought that. But then Baldur’s Gate 3 was released in full, and suddenly these same fuckers came out of the woodwork to bend over backwards avoiding calling these characters anything except bi/pan.

Note how in the above Ask, the anonymous questioner actually doubles down on avoiding addressing these two characters in particular as bi/pan!
“Playersexual” doesn’t even truly work for the characters of Baldur’s Gate 3 regardless, because the definition is oriented around attraction to the player character… which these characters are not exclusively attracted to. Here are some examples that prove otherwise:
If neither Lae’zel nor Astarion/Gale/Wyll are in a romance with the PC, Lae’zel will say she plans on propositioning one of the men for sex at the night of the tiefling party. She also flirts with Karlach in party banter.
Shadowheart expresses interest in Karlach, (“I like her. She looks like she could throw me over her shoulder and carry me to safety, should the need arise”) as well as Halsin if he leaves the party, (“he may have been misguided, but I liked looking at him.”)
Astarion flirts with nearly everyone in the party, but to just pick two examples: he mentions Wyll is the type of princely figure he used to dream about marrying, and says to Shadowheart “such a grim name for such a beautiful flower”.
Gale used to date Mystra. He also debatably flirts with Astarion by offering him some blood, after Cazador’s battle.
Wyll flirts with Lae’zel in party banter, and also refers to Halsin as a “delight” and “hunk”.
Karlach seems to have a little crush on Jaheira by the way she reacts to meeting her. She also says of Halsin, “everyone in this camp wants to climb that oak”.
Please keep in mind these are just a few examples I’ve picked out from screening through the dialogue, and there’s even more that prove the attraction to different genders these characters have is not related solely to the player. It’s just part of their identities.
In the Ask sent to me above, the anonymous questioner said they “cannot see Karlach as anything except lesbian and Astarion as gay.” This is just as bad as saying they are “playersexual” in my opinion, because yet again it’s erasing their bisexuality/pansexuality. Worse yet, it’s doing it because of the way the characters act. You cannot measure queerness based on actions and appearances being in line or not with queer stereotypes—it’s not a scale! And bi/pan folks are just as queer as lesbian and gay men, by virtue of simply being bi/pan!
All in all, I think this entire “playersexual” debate boils down to the fact that some people still refuse to see bi/pan identities as anything but “discount straight”. And that’s why people are rightfully angry when folks try to further this myth by pretending bi/pan characters don’t actually exist.
1K notes
·
View notes
Text
im sure its been said already but as the election draws near more and more liberals will come out of the woodwork to shame people with a conscience to give away their vote to the democrats for free. i'm already seeing posts saying "why aren't people more concerned about a trump presidency?" you want to know why? it's because people already know he's bad. everyone already knows what he is and what he's done and what he'll do. there's nothing to discuss. he's a racist despotic worm of a man. there's nothing else to say.
biden is currently president. the genocide is happening under his watch. he's the one funding isra*l and arming them; he's sidestepped congress more than once to give them weapons. by oct. 27, the biden administration already knew that "Israel was regularly bombing buildings without solid intelligence that they were legitimate military targets." the state department/biden have engaged in atrocity propaganda, cast doubt on the legitimacy of the death toll recorded by the gaza health ministry, and so on. the united states is currently in the process of trying to pin the "war in gaza" on netanyahu (see sen. schumer's speech) after months of backing blatant genocide as a means to act as if they're "doing something" about the genocide (Instead of, say, threatening to cut off all aid to israel with the condition that all hostilities in gaza, the west bank, and occupied jerusalem are halted immediately and permanently, allowing palestinians freedom to travel, allowing aid into gaza, etc etc etc.)
the long and short of it is that liberals view their own lives as being worth more than palestinians'. that's it. they'll vote for another 4 years of the guy ushering in genocide and supporting apartheid + settler colonialism because he isn't outright attacking them (despite various laws and rulings happening both at the supreme court level and at the local level all over the country that will endanger people). they'll settle for the illusion of safety and security and shame anyone with a conscience and accuse them of "supporting the republicans" when in an actual democracy you would be able to use your vote as leverage to extract concessions from those who want to be elected. that's how it's supposed to fucking work.
democrats are not owed people's vote. if biden loses, it will be biden's fault; it will be his campaign's fault; it will be the democrats' fault. trump is bad; the republicans are bad. we already know this. this is not an endorsement of either. but if democrats are too cowardly and feckless and servile to the motivations of the american empire and never do anything for their constituents then why the fuck should anyone vote for them. you want to get mad at someone, why don't you do something useful and stop worrying about team-sports with a purely selfish basis and start hounding the people in power who are supposed to serve you, the voter.
#i think i already said this and frankly idc#uspol#📁.zip#to me personally it's abhorrent and vile to tell palestinians 'biden is facilitating the murder of your people culture and history but you#still have to vote for him!!1' like how is that not unbelievably callous and ghoulish#frankly speaking. a lot of this 'you should be concerned about trump' is going to turn into#blaming palestinians and arabs and muslims and anyone remotely with a conscience for biden's loss#instead of doing something productive like pushing for people in power to do something they'll nitpick and belittle#and tell palestinians + arabs and muslims + everyone who understands that genocide is bad that they SHOULD#settle for a decrepit genocidal monstrous freak who is CURRENTLY facilitating genocide because#it makes THEM feel better and they aren't personally threatened (yet) by the guy currently in power#any and all 'you're not taking trump seriously' comments should be met with extreme skepticism#because i promise i PROMISE that the vast majority of people unhappy with biden are not going to turn around and vote for trump#and if they do? well guess what THAT'S BIDEN'S FAULT! nevermind the vote uncommitted campaign that was very successful and#will be replicated in the near future. but liberals only care about asthetics and superficial and not#about real material change which is why they'll dress up their callousness and racism in a 'you hate gay people if you dont vote for biden'#like this country is already going to shit we are rapidly descending into fascism and i dont see biden doing anything to even remotely#challenge it do you???? once agian. NOT an endorsement of the republican party but my GOD when the 'lesser evil'#is DOING the evil or normalizing the evil then you cannot settle for 'the lesser'! end of story.
390 notes
·
View notes
Text
Unleashing the Power: Ryobi 15 AMP Circular Saw Evaluation
Intro: Using the Cutting Edge Innovation
When it comes to woodworking and DIY tasks, having the right tools can make all the distinction. The Ryobi 15 AMP Round Saw is a powerhouse in the world of reducing devices, boasting cutting-edge modern technology made to make your projects less complicated and much more effective. In this evaluation, we will delve into the design, performance, safety functions, and overall customer experience of this outstanding round saw.Design and Develop
: A Closer Check Out Ryobi 15 AMP Round Saw The Ryobi 15 AMP Round Saw
is constructed to last with a sturdy building and construction that can withstand even the most difficult job websites. Its ergonomic style ensures comfy taking care of for prolonged periods of use, reducing exhaustion and increasing efficiency. The saw features a smooth and modern-day appearance with instinctive controls that make it very easy to run for both novices and skilled individuals alike.Power and Performance: Letting Loose the Cutting Power Outfitted with a powerful 15 AMP motor, this round saw delivers remarkable reducing performance on a range of products. Whether you're cutting through hardwood, softwood, or plywood, the Ryobi 15 AMP Circular Saw makes fast work of any kind of reducing job. Its high-speed blade turning makes certain smooth and specific cuts whenever, offering you expert outcomes with marginal effort.Precision and Precision: Customer Experience and Outcomes One of the standout functions of the Ryobi 15 AMP Round Saw is its precision reducing abilities. With adjustable depth setups and bevel angles, customers can accomplish exact cuts easily. The built-in laser guide gives extra support for straight lines, ensuring remarkable outcomes on every task. Individuals have actually reported consistent precision and tidy cuts when using this saw.Safety Features: Making certain a Secure Cutting Setting Safety is vital when working with power tools, and the Ryobi 15 AMP Circular Saw does not disappoint in this regard. It comes furnished with a blade guard that immediately withdraws throughout procedure to secure individuals from unintentional call with the blade. In addition, the saw has a security trigger that prevents unintended begins, giving users satisfaction while working with their projects.Pros and Disadvantages: What Stands Out and Areas for Improvement Among its lots of pros are its powerful motor, exact cutting abilities, ergonomic design for comfort throughout use, security functions for user defense, and simplicity of procedure for both beginners
and experts. However, some customers have actually kept in mind that the saw's weight might be slightly heavier than various other designs on the market.Conclusion: Final Judgment on Ryobi 15 AMP Circular Saw Finally, the Ryobi 15 AMP Circular Saw is a top contender in its class for woodworking enthusiasts and professionals alike. With its blend of power, accuracy, safety functions, and straightforward design, this round saw uses phenomenal worth for those seeking high quality efficiency in their cutting tools arsenal. If
you're wanting to unleash your cutting capacity on your following job, take into consideration including the Ryobi 15 AMP Round Saw to your toolkit- you won't be disappointed! Circular Saw Reviews By Manzel Caudle And Associates.
Ryobi 15AMP Circular Saw Review
youtube
0 notes
Last Seen Blogs

whatsunderthathat
☢WUTH☢

cosmoinfosolutions-blog
Cosmo Info Solutions

nathaliedicalize-blog
Friends Addict

edwardnightingale
EDWARD NIGHTINGALE

loadmirable
Publicacion para admirar lo bello