#which depending on if it's online or not means that you'll need to pay for my flights and accommodation in Dublin (most likely)
Text
Not people asking Celticists to do critical editions of texts because they asked us nicely to.
I would love to edit and translate manuscripts all day long, on top of working as a teaching assistant, my side job in the field that also pays me, preparing conference papers for presentation, which often includes translating Latin, Middle Welsh, Old Irish, Early Modern Irish, and Modern Irish myself, even when scholars before me have translated them (to ensure that the nuances are captured), adapting those papers to Powerpoints, arranging accommodations and flights for said conferences, playing Stardew Valley, organizing conferences/conference panels, working on my phd, working on projects that are actually publishable in the field, plotting the next Fomoire invasion of Ireland, as well as my various and assorted commitments to different groups and organizations that I am also doing without pay in order to bolster my CV so that there is a snowball's chance in Hell that I have a shot at employment, while even more senior scholars in the field have to struggle to justify their translation work. It reminds me of an article on the Celtic Students blog that talks about how the overwhelming amount of public outreach in the field, at the moment, is done by Grad Students, yours truly included.
In these digital spaces, students of Celtic Studies (predominantly graduate students) carry the brunt of the public's attention, and work to amend persistent pervasive errors or misunderstandings (such as 'did the Celts really fight naked in battle', 'were the Celts really matriarchal', and 'why did Saint Patrick commit a genocide against the pagans') that have found themselves deeply rooted in public consciousness. These misunderstandings appear to have been perpetuated by the rise of the internet giving the public access to wildly out of date scholarly publications, the Wikipedia articles on medieval Celtic literature being deeply inaccurate, and a small cottage industry of people producing exceptionally inaccurate self-published books (and ebooks) about 'Celtic Mythology' that dominate digital marketplaces such as Amazon and the Kobo storefront.
Despite this being important work, and entirely legitimate scholarly labor, it can be disheartening when this work is not recognized as legitimate or worthwhile by senior members of the field compared to standard scholarly activities.

#like it's a request but it's an inherently unreasonable one to ask of anyone#we KNOW there's a lot to be translated#we WANT to share it with the public#but we CAN'T#we're working on it as best as we can but we are GRAD STUDENTS#we are functionally amoebas in the field#amoebas with very uncertain futures#in a time when translation work isn't only long and tedious work#but also increasingly unfashionable#*I* wanted to do translation work for my PhD and I was basically told no#if you want me to do work that will not get me anywhere as far as my future career...pay me#per hour#Given that you're asking for the product of approximately 4-5 years of training I think that $25 is reasonable#Keeping in mind it can take me that long to translate a sentence...sometimes even a word#and of course in order to do a TRUE critical edition I'll need to see the manuscripts#which depending on if it's online or not means that you'll need to pay for my flights and accommodation in Dublin (most likely)#which if you know Dublin prices...*woo*#It's only a few thousand dollars or so#if it's that important to the public it's worth it
21 notes
·
View notes
Note
How does one go about getting a t prescription?
How long does it take + how expensive is it?
Where would you even start, what type of doctor do you have to contact, does planned parenthood give people T prescriptions?
Sorry for the ask, I just can't access this information anywhere else
I need to start this post by saying: I - the person answering - am a USAmerican. I have no experience with getting testosterone in other countries, but I have researched other healthcare systems that are in place for trans healthcare. In my country, testosterone is a schedule III controlled substance, and you need a prescription from a doctor to legally possess it (I could rant for hours about how much I hate this, but this is the reality of how the US operates, apparently). I'll be sharing my experience since I know it best with the hopes that it helps - I am not legal or medical advice.
In many places, you will typically be referred to an endocrinologist, someone who specializes in hormones. It isn't unheard of for your primary care physician to order scripts for testosterone, but if they do, it's because they would be licensed to. Not all PCs can even prescribe testosterone in the US because it's a controlled substance.
I personally went through an online clinic in order to get my testosterone - which was needed for me because at the time, I'd had very few positive experiences with healthcare.
In terms of price, that depends on if your insurance will even cover the cost. I pay out-of-pocket, and for those paying that way, that can run (typically) between $150-$300. This also depends on what type of testosterone you plan on administering. I've found that IM injectable testosterone is cheaper than cream or gel testosterone - each method has their own pros and cons, and the prices vary drastically at times.
Planned Parenthood can be a great path for those who have the Planned Parenthood facilities that offer trans healthcare. Not all Planned Parenthood facilities will offer trans healthcare. And, indeed, I was planning on using Planned Parenthood, but the closest one that offered trans healthcare was over an hour away and later seemingly ceased offering that care, which would mean I might have had to drive three hours to the next one. That's a huge contributing factor as to why I chose a virtual clinic.
If you are comfortable with your primary care physician, you might be best helped by asking them. I'm sharing my experience, but this is by no means a comprehensive look into how you would access testosterone. Your needs, the care available, and where you live all impact how you'll get care, and the last thing I want to do is tell you to do something you can't.
#ask#anon#trans#transgender#lgbt#lgbtq#ftm#nonbinary#trans advice#i don't want to come across like i'm insulting anyone's intelligence - i have no clue exactly where our knowledge differs...#...and i don't want to assume. if it seems like i'm being too specific it's because i don't want any miscommunication#and i know that that can/will still happen but i want to put in the effort to make sure we all know where we stand and my intentions
47 notes
·
View notes
Text

How to Make High Quality Gifs
A few people have asked me for a gif tutorial, so here we go! As a disclaimer, there are many parts of gif-making that are subjective, and this is just my personal process/preferences. If anyone is confused about a particular step, or wants more in-depth info about something, just message me!
Tools:
✧Laptop/computer
✧Adobe Photoshop 2024
✧External Hard Drive (mine is 250GB)
✧Video Downloader (I use the Video Downloadhelper extension on Firefox)
PHASE ONE: Make Animated Gif
1. Download high quality video
This is very important! You should download the highest quality of the video you can find. I use the free Video DownloadHelper extension on Firefox, but it doesn't download audio sometimes (it could be me not using it properly, or they want you to pay to get audio). No audio is fine for gifs, but if I'm doing a video edit, I either need to record the audio separately with Quicktime or use a free online downloader for youtube, twitter, or instagram videos.
For this gif, I downloaded an HD interview from the F1 website with the Video DownloadHelper extension on Firefox.
Tip: Make sure your video file is an .mp4 -> photoshop can struggle with .mov files bc they're larger
2. Import: Video Frames to Layers...
File -> Import -> Video Frames to Layers... -> Open your video -> Selected Video Range -> Make Frame Animation
If photoshop has to load a while to make the frames, it means you should select a smaller portion of the video to animate.
Tip: If you discover that there are duplicates of every frame or that there are way too many frames for the portion of video you want to gif, you may need to re-import and check the "Limit to Every _ Frames" box, and write in "2". This will import every other frame of the video and get rid of duplicates or too many frames.
Once your frames are imported, make sure you're working in the "Motion" workspace by going to the top to Window -> Workspace -> Motion.
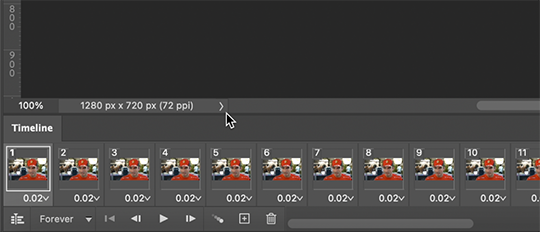
Now, all your frames should appear at the bottom in the Timeline. Make sure that the box in the left corner is set to "Forever", and now it should play the frames and loop back to the beginning each time.
3. Choosing your frames
I usually aim for around 60 frames total for a gif, but sometimes I'll go under or over that number. This particular gif is 55 frames in total. In general, I want my gif to be around 3 seconds in length bc under that feels too short and over that starts to be a large file size. Totally subjective, though! (edit: I have started to experiment with up to 80 frames for some gifs, which comes out to about 4 sec.)
Play through your frames and if you want to delete some, select them and click on the trashcan icon, which you can see in the screenshot above. (If you don't delete them this way, you'll have issues later.)
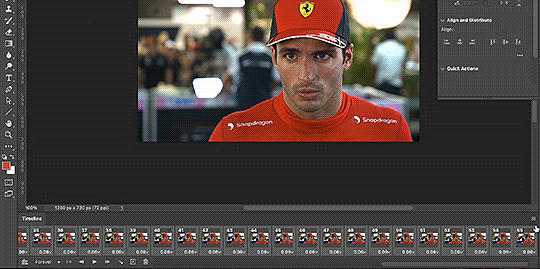
4. Set Frame Delay

Once you're happy with your frames, select all of them and click on the part that says "0.02", then go to "Other..." I usually choose 0.05 or 0.06, to land my gif around 3 seconds, but it depends on the video and how many frames you have. This particular gif is set to 0.06 because it looked good and brought me to around 3 seconds.
You can always choose a delay and if you don't like it, go back and change it! Just do what looks good to you.
5. Convert to Video Timeline
Click on the symbol that looks like 4 lines stacked, and choose "Convert to Video Timeline". Now is usually when I play through the gif to see what the speed is looking like/if I like the frame delay and it's landing somewhere around 3 seconds. If not, you can just Undo and adjust anything when it's still in the frame animation stage.
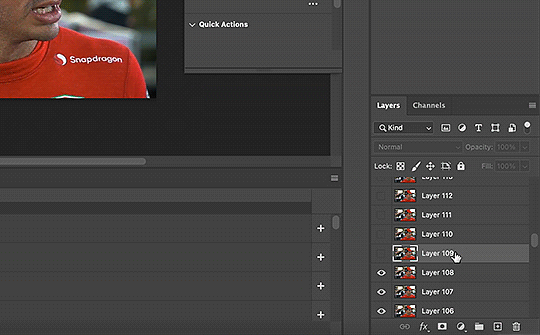
Next, scroll through the Layers on the right side and delete any layers that don't have the "eye" symbol next to them -> these are frames you deleted in the frame animation stage, but they need to be deleted in the timeline stage as well. Lastly, select all your remaining layers (which should all have the "eye" symbol) so they're all highlighted.
6. Convert to Smart Object
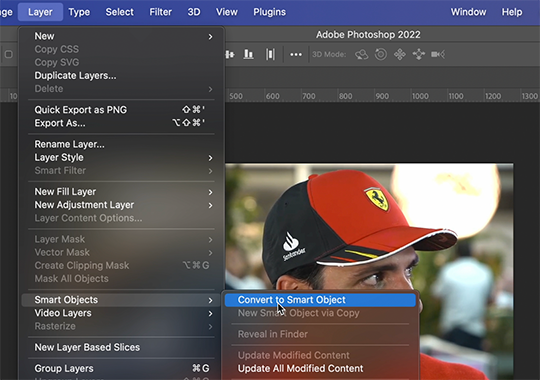
With all layers selected, go to the top to Layer -> Smart Object -> Convert to Smart Object. Ta da! You have a gif.
I always make sure to save my file at this point (you can do it before, but it just depends on how fast you work). Remember to frequently save your progress while gif-making: sometimes, photoshop gets overwhelmed and quits while you're mid-color correction 🥲. You never want to start over from scratch...
Now, some people like to crop & resize their gifs first. Or do sharpening before color. Or color, resize, then sharpen. It's really up to you. The order I like to do is Color, Sharpen, Crop, Resize, Export.
PHASE TWO: Color & Sharpening
(the fun part!)
1. Brightness/Contrast
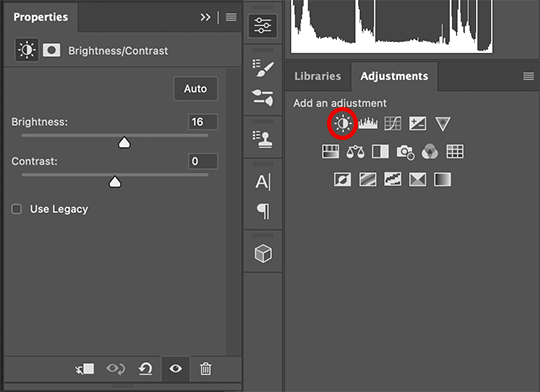
So here's where we start getting into the really subjective stuff. I always use the Brightness/Contrast and the Selective Color adjustment layers to do my coloring. I rarely touch the contrast bc that can be adjusted in selective color, but almost always, the gif needs overall brightening.
Tip: Even when I think a video looks bright to my eyes, sometimes I post the gif and they look dark once they're in the app. My advice is to always brighten a little bit, even when you don't think it's needed...

Here shows the very subtle shift in brightness I did for this gif. It can be a lot more intense depending on the video quality/lighting. The difference will also look a lot more stark after the color layer is applied.
2. Selective ColorNext is color. This is totally up to you and what looks good to your eyes. Make sure you have any software turned off that might change the color of your screen (like a nighttime filter or something that removes blue light).
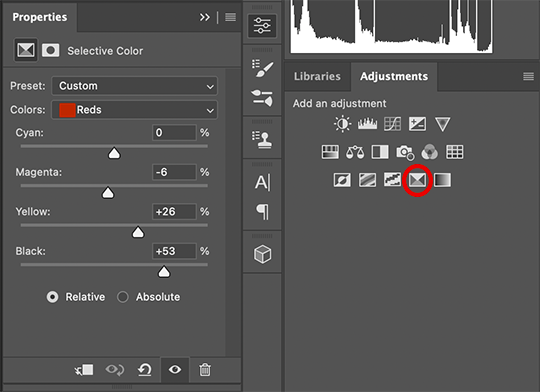
I use selective color bc you can adjust the levels of cyan, magenta, yellow, and black in each color channel independently. This is how I adjust the specific color of red that Charles and Carlos wear, or the amount of cyan in the blacks, etc. The "Neutral" layer effects the whole image, so I'll sometimes add some yellow there if I'm wanting a warmer image, or I'll add or remove black to brighten or darken the mid-tones.
Just play around! Sometimes, I'll take the slider from +100 to -100 back and forth just to see what it's doing to the gif. And I frequently turn on and off the color layer to see what the gif looked like before and after color. (I've found that most F1 content is really magenta-skewed, which you may not even notice until you've corrected it out).
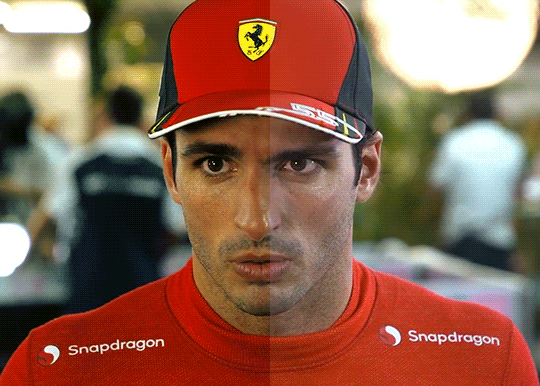
Above is Color vs. No Color.
It might look extreme to you presented this way, but when the whole gif is colored, no one questions it! As long as there's consistency across gifs, that's all that matters. I frequently copy and paste my adjustment layers onto another gif from the same interview/video so the look stays consistent.

Above is Color w/ Brightening vs. Without.
This gives you a better idea of how much of a difference that Brightness/Contrast layer makes.
3. Sharpening
I got my Sharpening routine of choice from this tutorial on gif-making. To be honest, I don't know if it's the best sharpening procedure bc I haven't taken the time to in-depth compare to other ways of doing it, but it looks good to me! So I've stuck with it. (edit: I've also added a Reduce Noise filter to my sharpening routine. But as always, just do what looks nice to you!)
I copy and past the sharpening from my other gifs onto new ones so I don't have to do all the steps again. There are quicker ways of doing this, like using quick actions and stuff, but how I do it is fast enough for me.
If you want to figure out your own Sharpening routine:
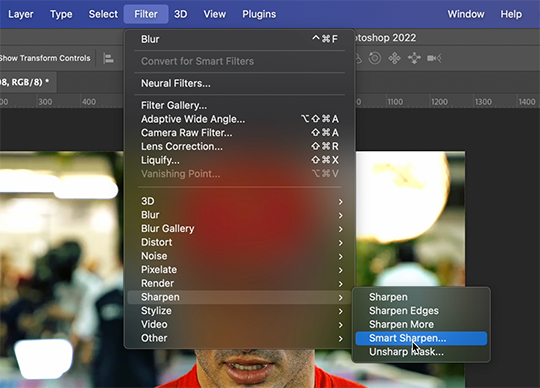
With the gif layer selected, go to the top to Filter -> Sharpen -> Smart Sharpen. It will bring up this window:
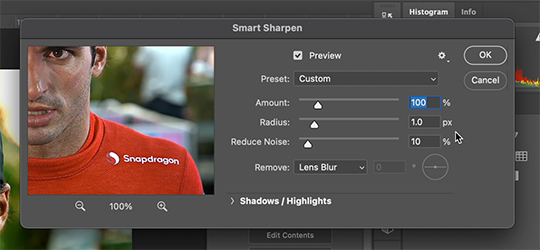
Here you can play around with the amount, radius, noise reduction, etc. and see what you like.
I also add a Gaussian Blur effect, which you'll find under Filter -> Blur -> Gaussian Blur.
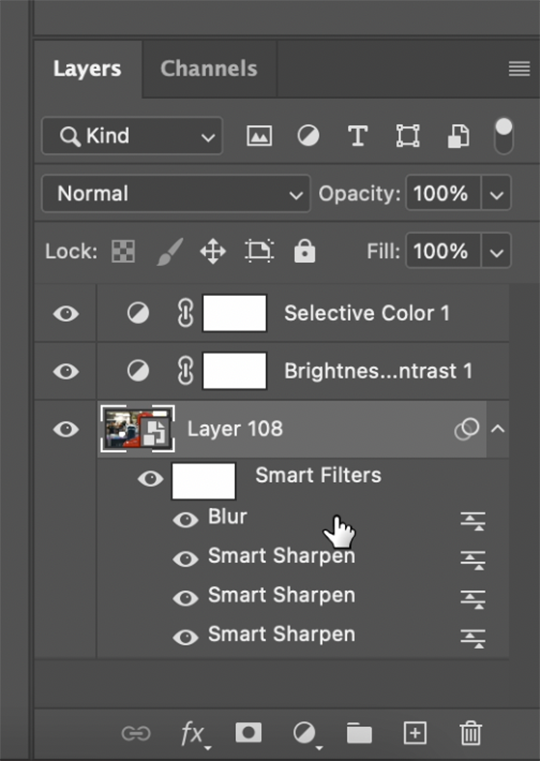
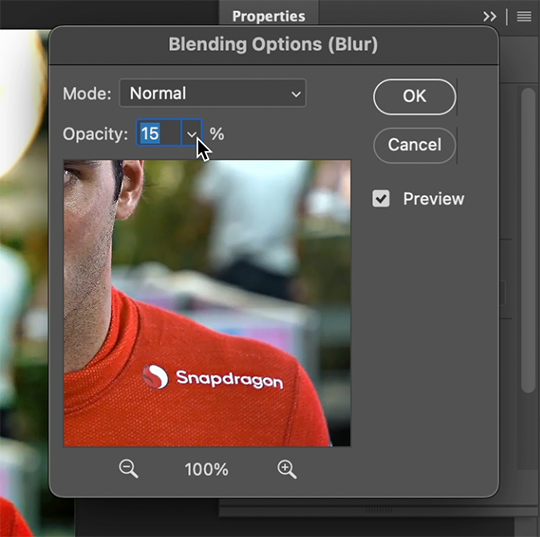
^All of your Sharpen and Blur effects will stack up underneath your gif layer like this. To adjust the opacity of one of these effects, double click on its adjustment/slider symbol to the right, and it'll bring up the Blending Options window.
If there's any sharpening or blurring layer you don't like, you can easily drag it into the trashcan symbol to get rid of it.
Above is a visual of Sharpened vs. None.
You can really tell with the difference in the Snapdragon logo on either shoulder. But I also personally love how much more Carlos' eyes pop to me on the Sharpened side.
As you can see, it's up to your preference. Sometimes, I really love gifs I see that aren't sharp, but rather really smooth and almost painterly. It's up to the gif-maker!
PHASE THREE: Crop & Resize
1. Cropping
Go to the toolbar on the left and choose the Crop Tool. Above where it says "Ratio", you can choose from preset ratios that photoshop has, or you can make your own. I like to use the presets, or at the very least, clear numbers that you can apply to a whole gifset. Free transforming without a ratio makes it nearly impossible to maintain consistency across a gifset.

If it isn't already, uncheck "Delete Cropped Pixels". This will allow you to move the gif around inside the cropped area later if you want to adjust what's in frame. It also gives you the option to increase the frame later, if you want. You can also click the gear icon next to "Delete Cropped Pixels" and change how you view the gif during cropping.
When you're done, click the check mark or hit Enter. Now, you've got a cropped gif!
2. Resizing
Go to the top to Image -> Image Size...
Make sure you have Pixels selected. For the Resample tab, I have it set to Automatic here, but sometimes I'll use Bicubic smooth or sharpen, depending on what I'm doing. Here's a cool post that compares the different settings. Just experiment with it.
(edit: I no longer change the resolution to 150. I've found that increasing the resolution, and therefore the size, before ultimately resizing down to 540 px means you are compressing even more (the larger something is, the more it has to be compressed within 540 px). I now leave the resolution at 72, which is what it's set at originally, and if the image composition allows it, try to crop in as close to 540 px as I can get so that when I resize, there's the least amount of compression happening.)
If I know a gif is going to be the full width of a tumblr post, I'll resize the width to 540 pixels (the height doesn't matter). But if I make a portrait-style gif which will be sharing a row with another gif, I'll resize anywhere from 270 px -> 350 px. If it's smaller than 270 px, tumblr will enlarge the gif and it'll look bad. If it's wider than 270 px, tumblr might reduce its quality a bit and it won't look as good. But personally, I prefer that if someone clicks on the gif to enlarge it, it looks better enlarged, so I usually will leave it around 345 px as long as the file isn't too big.
PHASE FOUR: Export (last one!)
Once you're happy with everything about your gif, it's time to export. (Remember to save your progress frequently!)
Go to the top to File -> Export -> Save for Web (Legacy)...
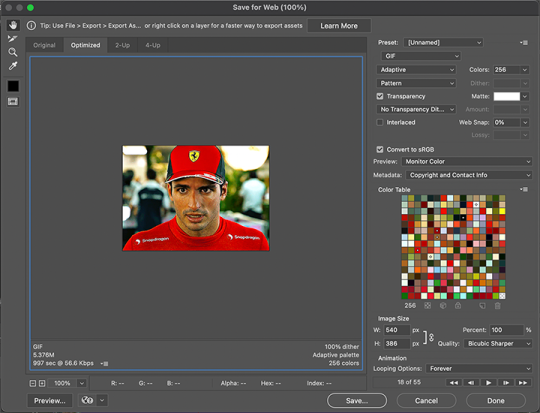
^It'll bring up this Save window.
These are the settings I like to use for gifs. You'll find a lot of differing opinions out there about Adaptive vs. Perceptual/Pattern vs. Diffusion, but you should always have "GIF" selected, "Transparency" checked with "No Transparency Dither" selected, Looping set to "Forever", and Colors set to "256". I like "Bicubic Sharper" for my Quality tab, but there are whole tutorials just about comparing those settings. The best thing to do though is to try them out and compare for yourself.
(edit: I've discovered that if a gif is slightly too large and I don't want to shorten it or resize it down, I can try to reduce the colors from 256 to 128 to get it under the limit. I'll never go below 128, and sometimes I will go to 200 or 170 to try to eliminate as little color variety as possible, but often there is not a noticeable difference in your finished gif. But always compare, of course, to make sure.)
On the bottom left is where the size of the gif is shown -> tumblr requires gifs 10MB and under, but in my experience, gifs load/play best on tumblr when they're around 6MB. I always leave a little growing room as well, bc it might say 5.8MB in this window, but after it saves, the file will have grown a little bit and will likely be over 6MB at that point. (edit: I now regularly post gifs that are around 9.5MB and tumblr seems to be able to handle it better.)

AND THAT'S ALL!
If you've made it this far...congratulations! haha
I know this is a whole lot of information and you might be feeling overwhelmed! But I hope, if anything, this shows you just how complex gif-making can be, and how it is absolutely an art! No one should be stealing anyone's gifs, as a lot of hard work and love goes into the process.
This doesn't include things like adding text to a gif, or more complex adjustments and corrections like masking or key frames. But I'm happy to do more of these if there are specific questions people have.

Let me know what you're curious about or if something is unclear! And happy gif-making! ❤️
#wooow this was a process to make lol#people can let me know if they're curious about adding text or more complex adjustments - i am at your service!#gif tutorial#ask
201 notes
·
View notes
Note
How do you become a professional cosplayer? Thnx :)
Hello there!
Short answer is: you don't lmao
Long answer is: it's complicated and incredibly difficult, and depends on what you mean by "professional."
If you mean "someone who judges contests and/or gets invited to cons," the VAST majority of those aren't professionals. They may or may not get an appearance fee, even, depending on the con. (Note to cosplayers: don't let cons take advantage of you by not paying you for your work for them! Always get per diem, travel, and hotel at BARE minimum, and preferably also an appearance fee.) This isn't that hard to do, but you need to have a portfolio that backs up why you would be a good guest, and a good reason why you'd be a good guest. It's just a matter of emailing and/or applying to cons. I've only guested once, but if you want tips, I can give them.
However, based on the phrasing, I'm assuming you are a newer cosplayer who isn't ready for that yet. I assume this because if you've been around a while, you know that this isn't a question. Not "this isn't a question you ask" (as in, we don't talk about it in polite society), but that this isn't really a *thing* in the way that people outside of the cosplay community seem to think it is.
(Side note: I remember this question being asked for at least 15, 20 years online lmao it's easier to make money cosplaying now than it was then, but it's still incredibly difficult to make a living wage and fully support yourself on cosplay.)
There are professional cosplayers out there, as in, people who make the majority or all of their income from cosplay. They tend to be few and far between, and one of the open secrets of the community is that some people who try to make a go at it are supported by a partner or family with money.
But! There are ways to make money as a cosplayer. It's difficult and unlikely, especially with how saturated the market is, but there are ways.
This is all from a USA perspective, which I assume you're from or at least a similar culture, since you're asking me and not, say, someone living in Japan.
Do commissions. This works once you have a high enough skill level to have a client base that wants to pay you for those skills. It's difficult to both get enough commissions and finish enough commissions to have a living wage, though, so it's really only recommended if you are fast at it and/or are okay with it being a side gig.
Start a business selling resources. Patterns, 3D models, resin kits, etc. You'll be operating on thin margins, there's competition out there, and you'll need to be good and fast at these things, but some business prowess, skill, and a bit of luck, and people have done it. Some people also sell tutorials and such, but I don't know how much they make.
Sell prints. This is going to be the hardest of these to make a living wage on. You can couple this with other things on this list to add supplemental income. Basically, sell pictures of yourself online and at cons, start a Patreon, become a booth babe (there isn't enough in the way of "official cosplayer" jobs to make a living on, and usually you aren't paid much and still have to make the costume), etc. This bullet point usually goes with the next two.
Become an influencer. Confession: I don't know quite how this works, but your money would be coming from sponsorships, paid posts, youtube ad revenue, etc. This is also a lot of work, and you would basically be hustling 24/7. Think of the direction you would want to take this and what specific thing you would offer that sets you apart, and.....figure out how to become an influencer lmao. idk if there are cosplay influencers that make a full living off of it since it's a somewhat newer field and far from what I do, but the margin of success is also pretty small, I'd imagine.
Sex work. This is even further from what I know about, so I have NO idea how much money you would make or how to get into it. I'm sure there are guides online. You can do anything from the extremely soft (think gravure modeling: sexy clothes, lingerie, sexy poses, light nudity) to harder stuff (depicting sex acts, whether solo or with toys or partners, catering to fetishes in addition to cosplay, camming, etc.). This is going to be difficult as well and while all of these are not for everyone, this one especially. (Honestly not my thing at all but so much respect for people who can handle it.) You'll want to keep yourself safe online for SURE if you go into this, and it will require stricter safety measures than the rest of these (which also require strict safety measures). Also think long and hard about whether you want the stigma following you: unfortunately, our society still stigmatizes sex work, and you can lose jobs, friends, etc. if people find out, and it'll be hard to physically get and keep your money because of banks and credit card processors not accepting sex work money. This isn't to say "don't do it" but it's something to really think about and look into. IDK where to get advice on the cosplay specific side of this, but Slate's How to Do It column has had a few letters about sex work generally over the years -- here's a few -- and usually Stoya points the letter writer to further resources. (Also tends to be only cosplay adjacent from what I've seen? You'll be dressing up but won't be wearing much in the way of costumes lmao)
There might be more ways that I can't think of, but these are the main ones you will encounter. Again, being a professional cosplayer isn't really like....a thing. Most people who have done it have had a long and difficult career of carving out space for themselves and finding income streams. There really isn't something, at least here, that is having someone pay you to exist in cosplay, unfortunately.
I'm also assuming you aren't talking about costuming generally as a career, which is a whole different ballpark. Actually, that might be something to look into as a career to fund your cosplay hobby (and possible cosplay side gig) if you are interested. Otherwise, enjoy it as a hobby, slowly build a business if you think you are up to it, and see where it takes you. :]
I hope that helps! Good luck
#professional cosplay#cosplay help#cosplay advice#cosplay tips#anon#fabrickind gives solicited advice#i don't meant to be discouraging!#but also like......it's not easy#and you aren't going to find openings for “cosplayer” on indeed#you need to create an income stream#and realistically? won't get anywhere#but you might and that's the fun of it!
17 notes
·
View notes
Text
Here's a thought on how the internet is forcing people in multiple fields to monetize their work online, in the process making the online experience worse for everyone. Here's what I was responding to.
When lamenting the "old Internet", a lot of people forget that the vast majority of the people creating content on it were gainfully employed with strong career security. Meaning that they didn't need to make money from their hobbyist online projects, so they didn't need to monetize it.
This is a lot different from today, where any sort of journalist/writer/artist/filmmaker is basically dependent on making content that sells ads or generates revenue, because their entire industries have gone online, or in many cases, been destroyed by the tech industry itself.
...and my response...
Interesting point. It makes me think of what happened to typesetters (including my mother) when desktop publishing came along. It was a bloodbath. Everyone was suddenly creating their own reports and newsletters, usually doing a terrible job, instead of paying professionals to do it right. Which is fine, actually, but it did lead to a lot of those skilled professionals losing their livelihoods. A few figured out ways to make it, either as a boutique business catering to those who still wanted work done to traditional standards or by teaching others how to do it themselves better, but most ended up leaving the profession.
This is what's happening to a lot of artists, musicians, essayists, and others right now - even more so with "AI" everywhere. Lots of people unable to make a living with their hard-won skills, and insult added to injury as they have to watch others do those same things poorly. And programmers, just you wait until your livelihood consists of rescuing projects that went south because someone insisted on having ChatGPT write it instead of a professional human. For a fraction of what you used to make. I'm sure each and every one of you thinks you'll be one of the winners, still getting paid top dollar to do innovative work, but most of you are wrong. You'll probably get left high and dry just like most of your colleagues, and - unlike the typesetting example - it will mostly be our own collective fault.
"Enshittification" already means something else, so we need a new term for when technology both drives people out of work and heralds a massive decline in median work-product quality. (So it's not just "disruption" which has become a word used mostly by tools anyway). Amateurization? Tyrofication?
8 notes
·
View notes
Note
I'll admit I haven't done that much research into this so sorry if this is a stupid question but how would an EA controlled modding platform be different than a Sims Store or more Add-Ons? I'm sure the mods will be free to start but in a couple years? :/
It would be pretty different, but it really depends on which way they take it. Let me explain.
So on one hand, the way that it's getting introduced makes it seem optional and for The Sims 4 it's likely going to stay that way. Think of it as a soft launch. They likely know that telling us about the concept wouldn't go over well so they'll make it as painless as possible.
The truth is, it's likely a way to get us used to the concept so that when TS5 comes out and it's required many players will go "Oh we're required to use it but we've already known about this, what's the big deal"
... or at least, that's what they're hoping for. I doubt that's going to happen because not enough people are going to use the platform of their own accord for it to seem like a seamless transition and not an overreach of corporate desire to clamp down on the modding community.
The truth is I'm guessing that it'll be a lot like many online gaming stores. I'd say "think SecondLife" but maybe the more common digital store front would be something like Roblox.
You'll get things for free. Probably a lot of things will be free. However, they'll allow people to charge which will legitimize the practice. While these may seem good to many Patreon creators. I bet this will come with EA skimming some off the top.
More than that, however, the entire modding community will be at the whims of TOU of Overwolf. That means anything they don't like gets taken down. That means only "trusted" creators GET to create. Who knows what trusted means in this context.
It's pretty much a slap in the face to the entire community but it makes sense they would do this. I've been saying for a while that while they tend to use us whenever they're trying to make the game's community look good
"Our AMAZING, TALENTED creators create AMAZING creations."
They've made in clear that they don't want us doing certain things. When one of the TS2 devs went on Twitter and explained that they didn't give us certain tools to mod TS2 because they didn't want us creating "anything to rival Maxis made content" I pretty much got the answer to my suspicion that I've been holding for a while.
The modding community to them is good but only if we're doing what they want, and we rarely are, they need us to sell the game but the minute they're done they'll delete everything we've made without a second thought.
Take the TS2 exchange. I know it was shit but that's not the point. Will Wright made a whole GDC discussion about the heartfelt stories people wrote using TS1.
Specifically he loved to bring up this one real life story about a girl who used the sims to tell the real life story about her sister experiencing domestic abuse.
But the minute they didn't need that shit to sell TS1 copies? Deleted. All the AMAZING CONTENT from our AMAZING CREATORS?? Gone. Of course, since Sims games were tied to one service we kept creating elsewhere, which is a problem.
Our content is bad for them if we aren't being used to sell game copies.
This way, when The Sims 5 is all said and done. They can delete the exchange (or whatever it will be called) and make us move to the next thing. And in the meantime, they can make sure we don't make anything that isn't "good for the brand." It also helps that they'll use the official modding platform to likely try and make pirates pay. No registration? Sorry, no mods for you.
People can call me cynical, but we've already seen this happen on smaller scales since the earliest games. This is just a way to make sure that we make enough AMAZING content to sell their game. But just nothing TOO amazing and they don't want us to have control over the content we make.
If this goes down how I suspect it will, it's going to be pretty much one of the most evil things they've done. Hopefully I'm wrong but I'm not holding my breath.
38 notes
·
View notes
Text
Can AI Replace Journalists?
I've tried AI with art and AI with journalism, and their results seem to be the same:
Beautiful, but wrong.
I put in "Mount Diablo in the summer with golden grass in the style of the Hudson River Artists." I get a beautiful image of a mountain that is not Mount Diablo.
Someone at the NorCal Science Writers Association got an AI to write about the NorCal Science Writers Association. The AI produced some lovely paragraphs that make perfect sense but half the facts are wrong.
So...is AI at least on the path to replacing journalists?
My opinion: It depends on what kind of journalism you mean.
TLDR:
Short articles with no original reporting: Maybe partially.
Real journalism: No.
Here's what my job was at N*wsweek:
Be forced to move so I could work in Manhattan for insultingly low pay
Pitch ideas
Editor says no, actually, she has a much better idea: the idea is something I had pitched yesterday so now we're a day late to the party
Find what is doing well online already
Read what others have written and regurgitate it into my article
Find the source and cite them (not sure whether the boss wanted me to do this but I did)
Find the author of the study, schedule a phone interview that is very inconvenient for both of us, and get a quote that is literally the same as what the press release said.
Write furiously, no time for fact-checking!
Find a picture and video that we have the license to go with the article. Most of the time they were completely unrelated.
Negotiate with my editor so the headline was technically true, even if it was grossly misleading. Most people took some terrible hit to their reputation for writing under a headline they didn't choose.
Check which potential words in the headline had the most google results, in a completely counterintuitive and made-up SEO idea
Not tweet the article or tell the sources about it, nor expect the outlet to tweet it
These are mostly things that not only could be done by an AI, but maybe should be, if the AI is advanced enough and was checked by a human. All the young journalists who had their reputations tarnished are real human beings who were burned out and broken by their time at N*wsweek. The robot doesn't care.
Alternatively, I'd consider discontinuing this type of content entirely. If you don't have anything new to say, or a new way to frame it, don't say it at all, you'll just introduce error, whether you're a human or a robot. Just get a content-exchange license and post the original article you're aggregating. This wasn't just make-work, this was actively damaging to all the writers and the readers.
On the other hand, here was my job at Bay Nature:
Find a topic by cultivating relationships with real humans, reading, exploring nature etc.
Discuss in a meeting whether the article is a good idea: Is it original? Is it important? Is there an ethical issue with reporting it? A lot of the ethical issues we considered were super niche: you probably wouldn't think they're issues at all unless you knew a lot about the bay area, nature, and journalism.
Consider interviews carefully: who is a stakeholder? Who has a significant bias? Whose voice needs to be represented?
Ask: What kind of questions are readers going to ask? Who is this for?
Interview people in real life. Include details that wouldn't have been in an email. Use your human brain to determine what is interesting and important. Sometimes things that seem irrelevant turn out to be relevant and engaging.
Cite all sources. A different staff member checks each fact.
I do not believe this type of journalism could ever be done by an AI. Go ahead, find me an AI that can meet up with a trail runner, learn her life story, and select the facts that relate back to the topic of dandelions in a way that engages readers. I don't think AI's can really get any information that doesn't already exist in text, although I know it can synthesize information and come up with new ways to say it.
And, I think this speaks to what the value of journalism really is. So many people think "I learned how to write an essay in high school, and my spelling and grammar are fine, so I'm basically a journalist, right?" No. That's like saying "I can put paint on a canvas, therefore I'm basically a professional fine artist." Yes, most people can do most jobs, but the value isn't in having something technically done, it's in putting your skills to work and doing something new, important, useful, and ethical.
That's just my experience and someone who knows AI better, and also knows journalism, would probably give you a better answer.
23 notes
·
View notes
Note
Do you have any advice / resources / ancient magics to make, like. Combat flowcharts or something of that nature to streamline decision making?
We're coming into the final battle of our campaign and the DM asked us to find ways to help make combat smoother – we're averaging an hour per round, with dozens of abilities and items each, and us DPS rolling upwards of 20 dice per turn. Obviously by now we've found ways to streamline (pre rolling, side chat, etc) but if we hit a snag on WHAT to do bc of a Counterspell or silence or someone going down, it comes screeching to a halt.
IDK you feel like someone who probably has an excel spreadsheet accounting for every possible scenario :P
funnily enough i have been toying with the idea of switching my own personal technique for combat tracking as a player to a spreadsheet which i recently did with encounter tracking from the DM side, but I haven't really dug into that at all because I know it would make me lose my mind trying to set up the automation while making it look aesthetically pleasing.
that being said, i have two pieces of commentary and i'll also share a few of my own strategies as well as two personal anecdotes to try to explain what i mean:
a) don't make a flow chart. no clue if you'll see these posts but as of writing this (12pm EST July 13th) I've just gone on a minor rampage talking about how I don't think flow charts are worth it even though that's the one of the current pieces meta in online TTRPG spaces because of aabria / laerynn, which is fine if it works for her and it IS fine if it works for other people.
however, in my opinion, i think flow charts will do a bad job of preparing anyone for the unpredictability of combat and will actually pigeonhole you into using the same strategies over and over again because they look good on paper and are written down in front of you. i don't think there's anything wrong with wanting to write down cool combos or have information in front of you (spoiler alert, i do that) but i think the term flow chart and the idea of an 'if/then' structure is going to be fundamentally useless and stress inducing.
b) speaking as someone whose been on both the player and dm side of this, if your rounds of combat are taking over an hour, this is an entire table problem. this is on the dm for their encounter design / the pace they take as the opposition (whether it's managing too many NPCS/monsters; too complicated statblocks, or indecision) as well as their need to keep things flowing at the table. It also largely depends on party size, if you're a big party, a longer round is normal, but everyone should be moving fairly fast. i'd ask your table as a whole what they think the issue is and and how to remedy it as a whole, not just one 'side' of the table.
now onto my strategies for both of these things. i'm going to explain my version of 'flow charts' last because it'll have screenshots and get long and i want to put something else before i slap in a readmore
my #1 tip for how to pay attention in combat and how to be better at combat is use other players turns to develop your strategy.
use their turns. pay attention to what they're doing so you can base your next turn off of the current state of the board, listen to what they're doing so you can remind them 'hey you've got a bardic' or if you can throw a reaction to counterspell, throw it then. otherwise: this is the time to look up your spells or other complicated abilities and make sure you've read the fine print. that way when it gets to your turn in combat you have the most informed, updated plan of what you can do.
now i'll throw my pc combat tracker under the cut as well as some personal anecdotes for why i think flow charts aren't the right choice
i've made an extensive post about how i think the best thing someone can do when designing a character's combat strategy and options is think about your action economy.
now, ignore anything that looks not RAW, this was a oneshot with funky combat rules (everyone had action surge and extra attack regardless of class; dm is insane for this) and i was using a homebrew warlock subclass, but the fundamental layout is the exact same i use for any character, I just like this example because it's not too crowded

fuck a flow chart, all you need is your abilities laid out in front of you. I think it is much more helpful to sort via action economy and leave shorthand for myself on what things do and use another document or something like 5etools to keep all of the fine print for when I need to look into them.
Then, the ability tracker is key. Not only does this help you keep track of what resources you've expended, it keeps everything super close together. i left the attacks / item information section in this screenshot because it shows that this is quite literally the only thing i'm looking at in combat 95% of the time. my health and AC is at the top of my sheet because that's how my sheets are structured but frankly, if i switch over to spreadsheet pc combat trackers they'll be smushed in here as well.
this gives you all of your fundamental information laid out in front of you so you can develop your strategy on the fly and make the most of every single piece of your action economy you have. I also enjoy having the miscellaneous actions section because again, sometimes i forget they exist and they're quite good. also occasionally i'll use item information or ability tracking to keep little notes for myself when i have something like bardic inspiration or want to remind myself to cast a spell.
why i find this more useful than a flow chart is that it lets you rely on your own intuition and the situation at play instead of a set strategy, which really just doesn't work for dnd in my opinion.
why i think flow charts aren't a great idea i've already talked about but here are two personal stories from recent combat that i think summarize it with an actual play example:
Curse of Strahd, Yester Hill Fight. The gimmick of which was that the druids were concentrating on summoning animals that were whooping our ass and were super spread out. we needed to crush their concentration as fast as possible. In one turn, I beat the concentration out of two different druids a bit over 150 ft. apart. How? I was hasted. A situational thing that you couldn't plan for in a flow chart. I also had no idea WHAT the encounter would look like to plan for it. I had to rely on what the circumstances were and what I had on my character sheet in front of me.
Ophelia uses Dhampir stats so i had a 35 ft. movement speed, with haste that's 70 ft. + a hasted action. I used blood cursed of the mark to deal extra damage and gain advantage (bonus action) and my first attack (action) to make a bite attack against one druid. It hit, and because I'm a mage slayer they have disadvantage on their concentration check. I also used bite empowerment (free action) to get a bonus to my next ability check or attack roll. I then used my hasted action to dash, moving 140 ft towards the other druid, to make my second attack (still of my attack action), with a +7 (i believe) additional bonus to hit, and used lunging attack (free action) on my chainwhip to get the 15 ft reach necessary to hit the second. The attack landed, and the druid again, had disadvantage on concentration. Both druids dropped concentration.
This is a turn you cannot replicate on a flow chart. There's no logical reason in a vacuum to take one attack, dash and move 140 ft away and take your second attack. There's no way to even know you could move that far. Why I was able to do this was because I was able to look at my action economy and all of my abilities in a condensed way and calculate how to use every single thing I possibly could to do what we needed to do to get control back over the encounter.
The Frayed Mind. This is an example from Gestalt game so ignore if the abilities sound absolutely bonkers powerful, they are, but the same theory of planning a flow chart around 'the most optimal choices' isn't helpful. Rualinn's build is primarily based around stacking upcasted shadow blade (psychic damage) and smites (radiant). The boss we were fighting, the Frayed Mind, as well as most of the enemies in this area, were immune to psychic damage. This meant my character's primary strength and what she was built to do wasn't going to cut it here. Which is fine, I love a challenge, and I think DMs SHOULD challenge what they know their players can do to make them think outside of the box. So what I had to do for this entire arc was realize: I could not play Rualinn optimally the way I built her to fight, however, I still had a ton of versatility and options to readjust as needed.
I started relying more on physical damage she could do as well as using her spellcasting for more than just smites. I used her radiant consumption for the first time, used my action surge to cast Fly for maneuverability on the battlefield instead of extra attacks, used Watchers Will for the first time as well. It was a super fun area and boss fight even though I was getting my ass kicked, it made me play to the other strengths of the build I put together.
If you put together a list of just the most optimal choices, you won't ever see what the unoptimized choices are. And frankly, most of the time you'll have to make 'unoptimized' choices. Combat is about making due with the situation and the the best you can do the moment.
tldr; i think using flow charts pigeonholes you into options that sound good but could end up not being applicable / keep you from being prepared for things going wrong, the individual challenges of boons of combat you can't predict, etc.
if you want to get 'good' at combat, know your action economy, track your abilities, and use other players turns to plan your strategy as the encounter changes and develops. your plan on the wizard's turn might change by the time you hit the cleric's turn because the fighter's now been knocked and you're the person who could get them up fasted instead of attacking, etc etc.
20 notes
·
View notes
Text
Income limits for food stamps: What you need to know
Income limits for food stamps can be a deciding factor in whether or not to apply for assistance. With a limited budget, it can be difficult to meet all of your food stamp needs. To make sure you’re getting the best possible deal, we recommend reading our guide on income limits for food stamps. In addition, we also have a few other tips on how to make ends meet if you need help with groceries.

What is the Income Limit for Food Stamps.
The income limit for food stamps is $11,550 per year. This means that you can only receive food stamps if your household income is below this amount. Food stamps are available to people in the United States who reside in one of the fifty states and Washington, D.C. The money you receive from food stamps depends on your gross income, which is calculated using a formula. Your total monthly benefits will be based on your gross income plus the applicable Social Security credits (if any).
How much Do Food Stamps Grant You Each Month
Your monthly food stamp allowance will depend on a number of factors, including your age, marital status, poverty level, and family size. However, generally speaking, the more severe your poverty level, the less money you will be able to earn each month to qualify for food stamps. Additionally, some states have higher partial benefits levels (meaning that even though you make a certain minimum amount each month), so it’s important to check with your state government before submitting an application for food stamps to see if there is any extra money you might need to bring along with you when receiving them.
How to Use Food Stamps
To use food stamps: First visit a Hobart or Melbourne location and ask for help or information about how to use their Supplemental Nutrition Assistance Program (SNAP). There are usually representatives available at these locations who can help you get started immediately. Once you have received assistance from someone at a Hobart or Melbourne location, follow their instructions carefully so that all of your applications are processed in the same time frame and as quickly as possible. If you cannot find someone who can helpyou online or through phone receptionist stations around the country--such as in Your state's Department of Human Services office--contact them directly at 1-800-USA-HIDE (1-800-829-4637).
How to get Food Stamps.
You must have a new card to get food stamps. To get a new card, you'll need to go through your local government and present your Identification Number (IN). You can also apply for a new card online at the government website, or by calling the number on the card.
Use Food Stamps to Pay for bills
To use food stamps to pay for bills, you'll first need to find out what type of bill it is and how much money it will cost you. Then, divide the amount of money owed by the amount of food stamps received into monthly installments, and pay those installments using food stamps.
Get Free Food Stamps in Some States
In some states, free food stamps are given out as part of a welfare program called Supplemental Security Income (SSI). To get free SSI benefits, you will need to file an application with your state government and show that you are living in poverty. You can also look up information about free SSI benefits in your state's Department of Human Services website or on the federal website known as The Web site: http://www.dhs.gov/~rps/.
Establish a New Household
If you are already living in an established household and want to add another person to that household through food stamps, you'll need to file paperwork with your local government and receive approval from them before starting to receive SNAP benefits from the USDA's Food Stamp Program office (known as "the office").
Get Food Stamps for the Elderly
Food stamp benefits can be used to buy groceries for elderly citizens who are not able to do so themselves or who live in a nursing home or other care facility where grocery shopping is not possible outside of hours or during special times such as Sabbath days or holidays.
How to get food stamps.
You must apply for food stamps online or in person. The application process can be completed in a few minutes. Once you’ve applied, your card will be ready to use. You can use food stamps to pay for bills, as well as to buy groceries and medical supplies.
Use Food Stamps to Pay for bills
If you want to use food stamps to pay for your bills, you’ll need to have enough money saved up so that you can cover the costs of your transactions without spending any of the money first. To do this, you’ll need at least $2 per transaction from your bank account or savings account. In order to get free food stamps for paying bills, some states require thatyou have a certain amount of money saved up before being able to receive them. Check with your local government office to find out what requirements are in place in your state.
Get Free Food Stamps in Some States
In some states, you may be able to get food stamps by submitting an application and waiting for a response. If the state doesn't have a specific program open when you apply, you may be able to find information on how to apply on the internet or inside a local branch store. In addition, many agencies offer discounts if you're part of a household that is receiving Supplemental Nutrition Assistance Program (SNAP). To find out more about this program, visit hungryhousesusa.gov or call 1-800- hunger-free (1-800-835-2747).
Establish a New Household
If you want to establish a new household and receive free food stamps along with other benefits from SNAP, it's important that you do so before July 1st of each year--unless there is an emergency with your family's financial stability that requires immediate action.(See " Subsection 3 . 5 Get Food Stamps for the Elderly.")
Get Food Stamps for the Elderly
Elderly citizens who reside alone may not be able to receive Supplemental Nutrition Assistance Program (SNAP) because they lack dependable income.(See " Subsection 3 . 5 Get Food Stamps for the Elderly.")
Conclusion
If you are looking for food stamps, there are a few ways to get them. You can apply for a new card, use food stamps to pay for bills, or establish a new household. Check out the website of each state in order to find out how to get food stamps.
6 notes
·
View notes
Text
Navigating Health Insurance: Choosing the Right Plan for Your Needs

Health insurance can feel like a complex maze, filled with unfamiliar terms and a bewildering array of plans. But fear not! This guide will equip you with the knowledge to navigate the world of health insurance and choose the plan that best suits your needs.
Understanding Your Needs is Key
Before diving into plan options, take a moment to assess your individual health situation and lifestyle. Here are some key questions to consider:
Age and overall health: Are you generally healthy, or do you have any pre-existing medical conditions? This will influence your need for specific types of coverage.
Frequency of doctor visits: Do you anticipate needing frequent doctor visits, medications, or specialists? Plans with broader coverage for these needs may be worth considering.
Budget: How much can you comfortably afford in monthly premiums and out-of-pocket costs?
Exploring Your Options: Where to Look for Health Insurance
Depending on your situation, you might have access to health insurance through several channels:
Employer-sponsored plans: Many employers offer health insurance as a benefit. This can be a convenient option with potentially lower premiums due to group discounts.
The Marketplace: The Affordable Care Act (ACA) established online marketplaces where individuals and families can shop for and compare health insurance plans. Depending on your income, you might qualify for subsidies to make these plans more affordable.
Medicaid: This government program provides health insurance coverage for low-income individuals and families.
Medicare: This government program provides health insurance for people aged 65 and over, as well as some younger individuals with disabilities.
Demystifying the Plan Details
Once you've identified your options, it's time to understand the key terms associated with each plan. Here are some crucial elements to consider:
Premium: This is the monthly cost you pay to maintain your health insurance coverage.
Deductible: This is the amount you pay out of pocket for covered medical expenses before your insurance starts sharing the cost.
Copay: This is a fixed amount you pay for certain covered services, like doctor visits or prescriptions.
Coinsurance: This is a percentage of the cost you share with your insurance company for covered services after you've met your deductible.
Network: This refers to the group of healthcare providers your insurance plan covers. In-network providers typically offer lower costs compared to out-of-network providers.
Choosing Wisely: Striking the Right Balance
Don't be intimidated by the details! Compare plans based on the following factors:
Monthly premiums: How much can you comfortably afford?
Deductible: A higher deductible typically means lower premiums, but you'll pay more out-of-pocket before your insurance kicks in.
Copay and coinsurance: Consider how much you're willing to pay for individual services and ongoing treatments.
Network coverage: Do your preferred doctors and hospitals fall within the plan's network?
The ideal plan strikes a balance between affordability and the level of coverage you need.
Additional Considerations:
Prescription drug coverage: If you take regular medications, ensure the plan covers your specific needs.
Preventative care: Some plans offer benefits for preventive care like checkups and screenings, which can save money in the long run.
Getting Help:
Employer benefits department: If you get insurance through your employer, utilize their resources for guidance.
The Marketplace: The Marketplace website offers tools and resources to help you compare plans and understand your eligibility for subsidies.
Insurance companies: Many insurance companies have customer service representatives who can answer your questions and guide you through their plans.
Making an Informed Decision
By understanding your needs, exploring your options, and carefully comparing plans, you can confidently choose a health insurance plan that provides you with the right protection at an affordable price. Remember, Health insurance is an investment in your well-being. Take charge of your health and navigate the world of health insurance with knowledge and confidence!
0 notes
Link
0 notes
Text
Top 8 Data Science Courses in Mumbai 2024

In Mumbai, there are many educational institutions and training centers are there where you can learn Data Science. These places have faculty who know a lot about technology and have been teaching for a long time. They also have good facilities and teach you using real projects, which helps you learn better.
Here are some good things about studying Data Science Courses in Mumbai:
Internship and Jobs: Mumbai has lots of chances for internships and jobs in Data Science. Many big companies, new businesses, and research groups are in Mumbai, giving students real experience to start their careers.
Many Uses: Data Science is used in finance, marketing, healthcare, and online shopping, among other areas. In Mumbai, students can learn how to use Data Science in different jobs.
Good Pay and Opportunities: Data Scientists earn a lot globally, and Mumbai gives good salaries to skilled people in this field.
Exciting Learning: Mumbai is a lively place that encourages new ideas, which helps students be creative in Data Science.
Choose the Best Data Science Course in Mumbai
Living in a fast-paced city like Mumbai means keeping up with technology upgrades. For professionals, learners, and business owners, staying competitive means upgrading skills, especially in fields like Data Science, Python, and AI.
Many top Data Science institutes in Mumbai offer Data Science courses, both offline and online. Choosing the right course depends on your needs, career goals, and how you like to learn.
Here are some things to consider when picking a Best Data Science course in Mumbai:
Course Content: Look for a course that covers a wide range of topics like statistics, machine learning, data visualization, and programming in Python or R.
Faculty: Check the teachers' qualifications, experience, and expertise in Data Science. Experienced teachers can give practical knowledge and valuable insights.
Hands-on Learning: Make sure the course includes practical projects. For example, Henry Harvin offers live projects, internships, and help with finding placements.
Flexibility: If you're working, consider courses with flexible schedules or online options.
Reputation and Reviews: Read reviews from past students to see if the course is good quality and effective.
Certification: A certificate from a respected institute adds value to your resume.
Cost: Compare costs and think about what you'll get in return in terms of learning and career growth.
Career Support: Check if the institute helps with placements or internships after the course.
Best 8 Data Science Courses in Mumbai
NMIMS Global Mumbai: Data Science Courses in Mumbai
NMIMS Global, part of the Narsee Monjee Institute of Management Studies, is a leading online and distance learning provider offering professional courses in Data Science. Teaming up with INSOFE (International School of Engineering), they offer courses with extensive Data Science knowledge, top-notch faculty, and modern learning tools.
Here's a brief look at their Data Science courses:
6-month Professional Certificate in Data Science:
Covers basics of Python and R programming, business communication, statistical modeling, and visualization.
Suitable for building a strong foundation in Data Science.
12-month Professional Diploma in Artificial Intelligence and Machine Learning Ops:
Detailed course with an industry-focused curriculum and hands-on experience.
Ideal for aspiring Data Science professionals interested in AI and ML operations.
24-month M.Sc. in AI and Machine Learning Ops:
A comprehensive program with in-depth industry knowledge and practical skills development.
Designed for future Data Science leaders looking for a deep understanding of AI and ML operations.
Eligibility Criteria:
Bachelor's degree (B.Tech or equivalent) in Maths, Computer Science, Statistics, Economics with at least 50% marks.
Basic knowledge of Mathematics concepts like Linear Algebra, Calculus, etc.
Familiarity with basic programming concepts such as looping, iteration, functions, and branching.
Minimum 2 years of work experience.
Course Duration along with Course Fees
Data Science Course fees- INR 1,75,000-Rs. 6,00,000/-
Location- Maharashtra
Website Link: https://online.nmims.edu/
2. DeveLearn Institute - Data Science Course in Mumbai
Looking for the best Data Science course in Mumbai with placement assistance? DeveLearn is your answer. We are one of the Best Data Science institutes in Mumbai, offering a comprehensive program designed to make you job-ready. Our curriculum is simple yet effective, taught by experienced instructors who ensure you receive the best training possible. Whether you opt for Data Science Course in Mumbai online or offline learning, our commitment to your success is unwavering. We regularly update our modules to include the latest technologies and relevant topics.
Here's an overview of Our Data Science Course in Mumbai:
Comprehensive Curriculum
Hands-On Projects
Access to Learning Resources
Expert Faculty
Industry-Relevant Skills
Placement opportunities
Certificate
Here are the main subjects covered in our Data Science Course in Mumbai:
Python Programming
Statistics
Machine Learning
Data Visualization
Big Data Technologies
SQL and Database Managemen
Project Work: Gain hands-on experience through real-world projects, enhancing practical skills and job readiness.
Eligibility Criteria:
No minimum criteria are required.
However, having a working knowledge of mathematics and some programming experience in any language will be beneficial for the course.
For more information visit - Data Science Course in Mumbai
Read more - Best 8 Data Science Courses in Mumbai
0 notes
Text
Navigating the Process: How to Apply for a Canadian Work Permit
Are you considering a move to Canada for work opportunities? Canada is known for its thriving job market, diverse culture, and high quality of life. However, before you can start your Canadian adventure, you'll likely need a work permit. Navigating the application process can seem daunting, but with the right guidance, you can smoothly apply for a Canadian work permit and take the first step towards your professional goals.
Understanding Canadian Work Permits
A Canadian work permit is a document issued by Immigration, Refugees and Citizenship Canada (IRCC) that allows foreign nationals to work legally in Canada for a specified period. There are different types of work permits depending on factors such as the nature of the job, the duration of employment, and the applicant's country of origin.
Eligibility Criteria
Before applying for a Canadian work permit, it's essential to determine if you meet the eligibility criteria. While the requirements may vary depending on the specific permit you're applying for, some common eligibility factors include:
Job Offer: You typically need a job offer from a Canadian employer before applying for a work permit. The employer may also need to obtain a Labour Market Impact Assessment (LMIA) in some cases.
Proof of Financial Stability: You must demonstrate that you have enough funds to support yourself and any accompanying family members during your stay in Canada.
Health and Security Clearances: Depending on your country of origin and the nature of your work, you may need to undergo medical examinations and provide police clearance certificates.
Admissibility: You must be admissible to Canada, which means you have no criminal record and meet other immigration requirements.
The Application Process
Once you've determined your eligibility, you can proceed with the application process. Here's a general overview of what you'll need to do:
Gather Documents: Collect all the necessary documents, including your passport, job offer letter, proof of qualifications, and any other supporting documents required for your specific permit.
Complete the Application Form: Fill out the appropriate application form, either online or through a paper application. Ensure that you provide accurate and truthful information to avoid delays or rejection.
Pay the Fees: There are usually processing fees associated with work permit applications. Make sure to pay the required fees online and retain a copy of the payment receipt.
Submit Your Application: Once you've completed the form and gathered all the necessary documents, submit your application to the designated IRCC office or visa application center either online or by mail.
Wait for Processing: The processing time for Canadian work permits can vary depending on various factors such as the type of permit and the volume of applications. You can check the status of your application online through the IRCC website.
Biometrics and Interviews: Depending on your nationality and the specific requirements of your application, you may need to provide biometric information or attend an interview.
Receive Your Permit: If your application is approved, you will receive your Canadian work permit either by mail or through a visa office. Make sure to review the permit carefully and take note of any conditions or restrictions.
Conclusion
Applying for a Canadian work permit is a crucial step towards realizing your professional aspirations in one of the world's most welcoming and vibrant countries. By understanding the eligibility criteria and following the application process diligently, you can increase your chances of success and embark on an exciting journey in Canada's diverse and thriving job market. So, if you're ready to take the plunge, start your application today and pave the way for a rewarding career in the Great White North!
0 notes
Text
From Mumbai to the Desert: Your Gateway to Jordan
Introduction to obtaining a Jordan visa for Indians
Are you an Indian traveler dreaming of exploring the captivating landscapes and rich historical sites of Jordan? If so, you'll need to obtain a visa before embarking on your journey. This article will guide you through the process of obtaining a Jordan visa, ensuring that you have all the necessary information to make your trip a smooth and memorable one.
Why visit Jordan?
Jordan is a mesmerizing country that offers a unique blend of ancient history, natural wonders, and warm hospitality. From the ancient city of Petra, one of the New Seven Wonders of the World, to the stunning desert landscapes of Wadi Rum, there is something for every traveler in Jordan.
The country is also home to the magnificent Dead Sea, where you can float effortlessly in its salty waters and indulge in rejuvenating mud baths. Moreover, Jordan boasts a rich cultural heritage, with vibrant markets, delicious cuisine, and friendly locals who are always eager to share their traditions and stories.
Types of visas for Indians visiting Jordan
Before applying for a Jordan visa, it's important to understand the different types available for Indian travelers. The most common visa types for tourists include:
Single-entry visa: This visa allows you to enter Jordan once and stay for a specific period, usually up to 30 days. It is suitable for most tourists planning a short trip to the country.
Multiple-entry visa: If you're planning to visit Jordan multiple times within a specified period, a multiple-entry visa is the right choice for you. This visa allows you to enter and exit the country multiple times without the need to apply for a new visa each time.
Transit visa: If you're transiting through Jordan on your way to another destination, you may be eligible for a transit visa. This visa allows you to stay in the country for a short period, usually up to 72 hours, before continuing your journey.
Requirements for a Jordan visa for Indians
To obtain a Jordan visa as an Indian citizen, you will need to fulfill certain requirements. These requirements may vary slightly depending on the type of visa you are applying for, but the general documents and information you will need to provide include:
Passport: Your passport should be valid for at least six months from the date of entry into Jordan.
Visa application form: You will need to complete a visa application form, which can be obtained from the Jordanian embassy or consulate in India or filled out online.
Passport-sized photographs: You will need to provide recent passport-sized photographs that meet the specified requirements in terms of size and background color.
Proof of accommodation: You will need to provide proof of your accommodation in Jordan, such as hotel reservations or a letter of invitation from a host.
Proof of financial means: You may be required to show proof of sufficient funds to cover your stay in Jordan, such as bank statements or traveler's cheques.
Travel itinerary: It is advisable to have a detailed travel itinerary showing your planned activities and destinations in Jordan.
Step-by-step guide to applying for a Jordan visa
Now that you are familiar with the types of visas and the requirements, let's walk through the step-by-step process of applying for a Jordan visa as an Indian traveler:
Gather the required documents: Collect all the necessary documents mentioned in the previous section, ensuring that they are complete and up to date.
Find the nearest Jordanian embassy or consulate: Locate the nearest Jordanian embassy or consulate in your city or region. You can find this information on the official website of the Embassy of the Hashemite Kingdom of Jordan.
Submit your application: Visit the embassy or consulate and submit your visa application along with the required documents. Pay the visa application fee, which may vary depending on the type of visa you are applying for.
Wait for processing: After submitting your application, patiently wait for the visa processing time. The processing time may vary, so it is advisable to apply well in advance of your intended travel dates.
Collect your visa: Once your visa is approved, you can collect it from the embassy or consulate. Make sure to check the validity dates and any specific conditions attached to your visa.
Tips for a successful Jordan visa application
To increase your chances of a successful Jordan visa application, consider the following tips:
Apply in advance: Begin the visa application process well in advance of your planned travel dates to allow ample time for processing.
Ensure accuracy and completeness: Double-check all your documents and information to ensure accuracy and completeness. Any errors or missing information could lead to delays or rejection of your application.
Follow the instructions: Carefully read and follow the instructions provided by the embassy or consulate regarding the visa application process. Failure to comply with the instructions may result in your application being rejected.
Be prepared for an interview: In some cases, you may be called for an interview at the embassy or consulate. Be prepared to answer questions about your travel plans and intentions in Jordan.
Consider using a travel agency: If you find the visa application process overwhelming or confusing, consider using a reputable travel agency that specializes in visa services. They can guide you through the process and handle the paperwork on your behalf.
Processing time and fees for a Jordan visa
The processing time and fees for a Jordan visa can vary depending on the type of visa and the embassy or consulate where you submit your application. It is advisable to check the official website of the Jordanian embassy or consulate in your country for the most up-to-date information regarding processing times and fees.
In general, it is recommended to apply for your Jordan visa well in advance of your planned travel dates to allow for any unforeseen delays in the processing time. The visa application fee is non-refundable, even if your application is rejected, so it is important to ensure that you meet all the requirements and submit a complete and accurate application.
Common mistakes to avoid when applying for a Jordan visa
When applying for a Jordan visa, it is essential to avoid common mistakes that can lead to delays or rejection of your application. Some common mistakes to avoid include:
Incomplete or inaccurate information: Double-check all the information provided in your visa application form and supporting documents to ensure accuracy and completeness.
Missing or expired passport: Ensure that your passport is valid for at least six months from the date of entry into Jordan and that it has empty visa pages.
Insufficient financial documentation: Provide sufficient proof of funds to cover your stay in Jordan, such as bank statements, traveler's cheques, or a letter of sponsorship if applicable.
Lack of supporting documents: Include all the necessary supporting documents, such as hotel reservations, travel itinerary, and proof of accommodation, to strengthen your visa application.
Late submission: Apply for your Jordan visa well in advance of your planned travel dates to avoid any last-minute rush or delays.
Frequently asked questions about the Jordan visa process for Indians
Do Indian citizens need a visa to enter Jordan? Yes, Indian citizens need a visa to enter Jordan. However, there are certain exemptions and visa-free entry options available for Indian passport holders. It is advisable to check the official website of the Jordanian embassy or consulate in India for the most up-to-date information.
Can I obtain a visa on arrival in Jordan? No, Indian citizens are not eligible for visa on arrival in Jordan. You must obtain a visa before traveling to the country.
How long does it take to process a Jordan visa? The processing time for a Jordan visa can vary depending on the type of visa and the embassy or consulate where you submit your application. It is advisable to apply well in advance of your planned travel dates to allow for any unforeseen delays.
Can I extend my Jordan visa if needed? It is possible to extend your Jordan visa if needed. However, this process is subject to certain conditions and requirements. It is advisable to contact the Jordanian immigration authorities for more information.
Conclusion: Enjoying your trip to Jordan with a valid visa
Obtaining a Jordan visa as an Indian traveler may seem like a daunting task, but with the right information and preparation, it can be a smooth and straightforward process. By following the step-by-step guide, fulfilling the requirements, and avoiding common mistakes, you can ensure a successful visa application.
Once you have your visa in hand, you can embark on a journey of a lifetime in Jordan. From exploring the ancient city of Petra to floating in the Dead Sea and camping under the starry skies of Wadi Rum, the wonders of Jordan await you. So, pack your bags, obtain your visa, and get ready to create unforgettable memories in the mesmerizing land of Jordan.
#visa#visaservices#visaconsultants#visa consultancy services#travel#traveling#trip#btw#tourism#vacation
0 notes
Text
Ireland Study Visa - Collegepond
Ireland, with its rich cultural heritage, stunning landscapes, and world-renowned educational institutions, has emerged as a sought-after destination for international students seeking quality education and unforgettable experiences. However, before embarking on your academic journey in the Emerald Isle, one crucial step must be taken: obtaining a study visa. In this guide, we'll delve into the essentials of securing an Ireland study visa, ensuring a smooth transition into student life in this captivating country.
Understanding the Basics
Before diving into the application process, it's essential to understand the different types of study visas available in Ireland. The most common categories include:
Short Stay Study Visa (less than 90 days): Suitable for short courses or language programs.
Long Stay Study Visa (more than 90 days): For full-time academic courses such as undergraduate or postgraduate degrees.
Depending on the duration and nature of your course, you'll need to apply for the appropriate visa.
Preparing Your Application
Step 1: Choose Your Course and Institution
Research extensively to select the course and institution that best aligns with your academic and career goals. Ensure that your chosen institution is recognized by the Irish government, as this is a prerequisite for visa approval.
Step 2: Gather Necessary Documents
Compile all required documentation for your visa application, including:
Valid passport
Letter of acceptance from an accredited Irish institution
Proof of tuition payment or evidence of scholarship
Evidence of financial means to support yourself during your stay
Health insurance coverage
Passport-sized photographs
Academic transcripts and certificates
English language proficiency test results (if applicable)
Ensure that all documents are up-to-date and translated into English, if necessary.
Step 3: Financial Requirements
Demonstrate your ability to cover tuition fees, accommodation, and living expenses while studying in Ireland. This may involve providing bank statements, sponsorship letters, or scholarship documentation.
The Application Process
Once you have gathered all required documents, you can proceed with the visa application process:
Online Application: Visit the Irish Naturalisation and Immigration Service (INIS) website to complete the online visa application form.
Biometric Information: Depending on your nationality, you may need to provide biometric data at a designated application center.
Visa Fee: Pay the applicable visa fee, which varies depending on the type and duration of your visa.
Submission: Submit your application along with the required documents to the nearest Irish embassy, consulate, or visa application center in your home country.
Wait for Processing: The processing time for Ireland study visas can vary, so it's advisable to apply well in advance of your intended start date.
Post-Approval Arrangements
Once your visa application is approved, it's time to make final preparations for your journey to Ireland:
Travel Arrangements: Book your flights and arrange transportation to your accommodation upon arrival.
Accommodation: Secure suitable accommodation either through your educational institution or private rental agencies.
Orientation: Attend any orientation sessions offered by your institution to familiarize yourself with campus facilities, academic requirements, and student support services.
0 notes
Text
I'm doing a refresher on Dutch and maths since I'll be going back to school this year, and I've always been critical of the school system since it is highly impractical, but teaching this to myself just highlights how absolutely HORRID it truly is. And I'm absolutely convinced it's a class-issue.
Let me paint you a picture. In the Netherlands children go to school once they turn four years old. Depending on their progress, they are between the ages of six and seven by the time they'll start at basisschool (primary/elementary school). Around their twelth/thirteenth year they graduate, and they go to highschool. During basisschool the teachers prepare you for a test called CITO, and depending on how you score you are grouped into several levels of "cleverness." When you have a high score you're in luck! You go to a good high school, you get a lot of support. Afterwards you can go straight to university. Doctors, scientists, professors...
Now, if you get a lower score you might need to work harder for it. You first go to college after highschool which will take four years. You can become a plumber, a cleaner, a nurse, a hairdresser, etc. Then if you want to continue studying you can get your HBO-Bachelor, which is another four years (or two, if you manage to get a shortened course due to having the right pre-education). Which means that if you just so had the misfortune of having scored low on CITO you need to study an additional six to eight years.
But wait, that is not all.
What if you want to go to university? Well, often universities will not accept students who didn't go to the right type of highschool. You can still apply and get seperate certificates, but you do need those certificates. Sometimes they will ask for several. If you want to be a doctor you will often need Dutch, Maths, Biology, Chemistry, and more. You can follow a course for those online, but those cost money and will take a while to graduate from them all, and they are often only available for self-study. There are no teachers to guide you.
Which now brings me back to CITO;
If you do badly on your CITO, you'll most likely be lower income for the rest of your life unless you want to study for an additional six to eight years. There is the assumption that children who do worse on the CITO are better at working with their hands and it's better to give them that oopportunity.
I'll paint you another picture.
What if the teachers are understaffed and overworked? What if the classes are too big? What if most of these schools that can't help individual students are in poor neighbourhoods with mainly immigrant families? What if learning disabilities go undiagnosed?
I scored low. My maths and Dutch were bad. I struggled all through highschool. Then, why, now when I study on my own I taught myself more in two months than my teachers did all throughout basisschool and highschool? How do I score almost perfectly on everything now, and why didn't I score that way when I had teachers that were supposed to help me?
When I was in basisschool two clases were often fused together. Instead of focussing on what each class had to learn the teachers had to teach both classes at once, with vastly different course work. When you didn't speak up, you didn't get help. When you weren't outwardly struggling, you were told to do some independent study because other children were struggling more. You got told to ask your parents for help with maths and Dutch. But what about parents who don't know maths and who don't know Dutch?
It's no surprise that many, many of these children failed their classes and scored low on their CITO. These children then are only able to find jobs that pay minimum wage. They are kept poor. The entire country looks down on the people who went to "lower" education.
It's hard to look at this and see anything else but to keep poor people poor and keep them from getting into higher education. After all, who can spend eight years extra on school when there are bills to be paid? The middle class parents can afford tutors and private schooling, but poor people cannot. If you graduate high school at eighteen years old, it's easy to imagine you can stay with your parents if you can go straight to university for six years and come out a doctor. If you aren't working class, you can afford that.
But who can really afford to study fourteen years to become a doctor without income? Who can afford to be without a job at 26 years old and remain without a job for six more?
It's hard to look at this and think this wasn't done on purpose.
#I'm tired and pissed off while writing this so might not make much sense#but I fucking hate Dutch schooling#honey speaks#dutch#middle class#lower class#education#classism
1 note
·
View note
Last Seen Blogs

ampdme
American Medical Products

opaquephotog-raphy
transition..

alexandrelasprilla
Alexandre Lasprilla

nikkilee20
dOm THE fLoRiDiAn

thoratricalloki
♡Valhalla I'm coming♡