#cosplay tips
Text
Also, for people who want to start a Halo cosplay and don't quite know how to work with foam and where to find templates or 3D models for your 3D printer, the 405th Infantry Division forum is your friend.
If you want something premade, Etsy is full of people who sell armor parts and props. Even blank kits you can customize.
39 notes
·
View notes
Text
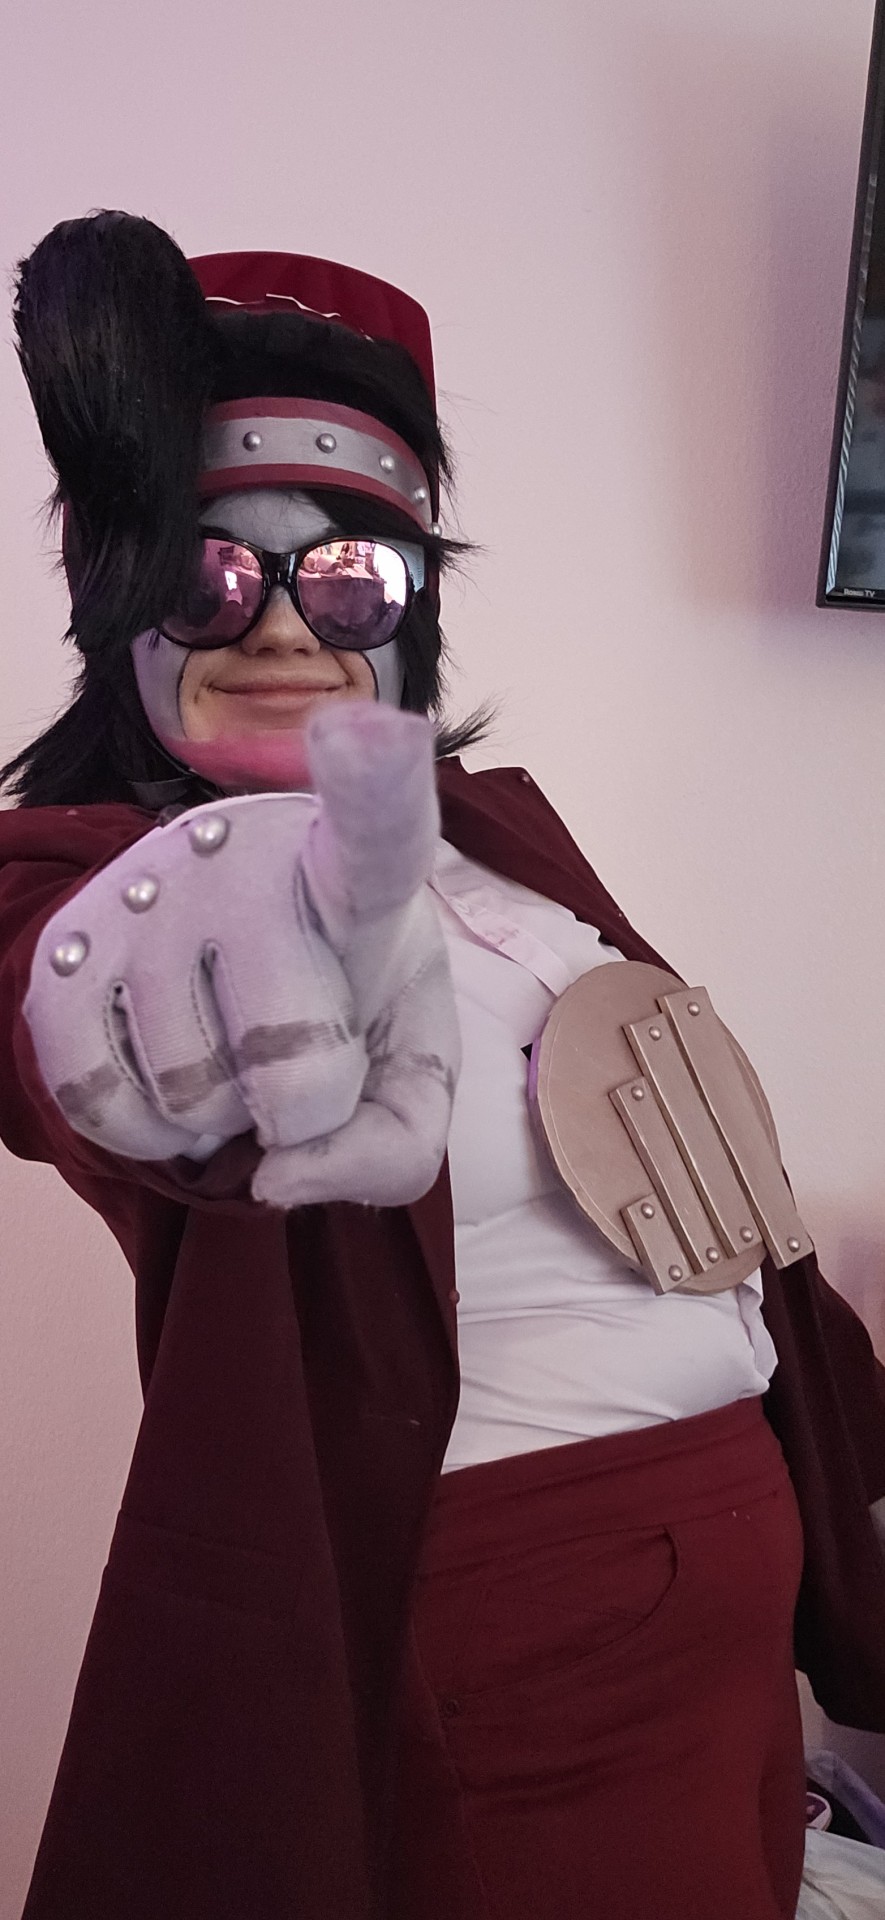
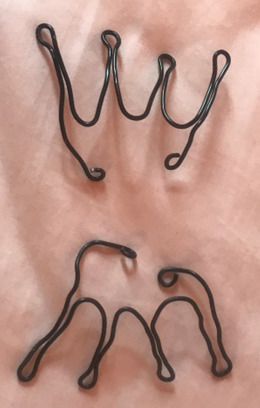
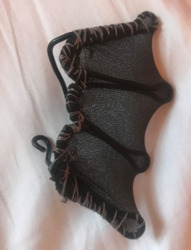
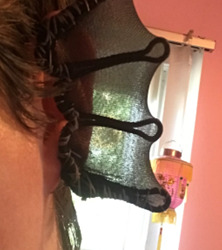
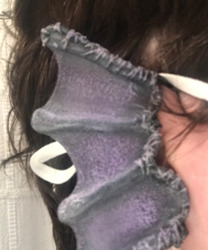
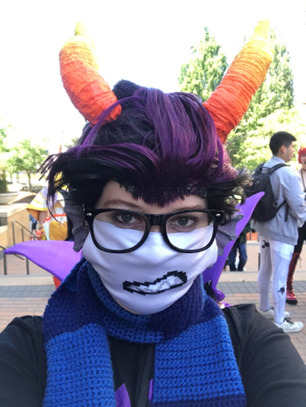
Hehe wanted to share on here that I upgraded my pace wig!! Since I don't like gatekeeping info about cosplay (its silly tbh) ill tell you guys how I made it! It's a bit long, so it'll be under here v v v
Also if you're interested in more of my cosplay updates and photos, I post cosplay stuff more on my insta (same username as here)! I also go live in cosplay or while making a cosplay on occasion ;)
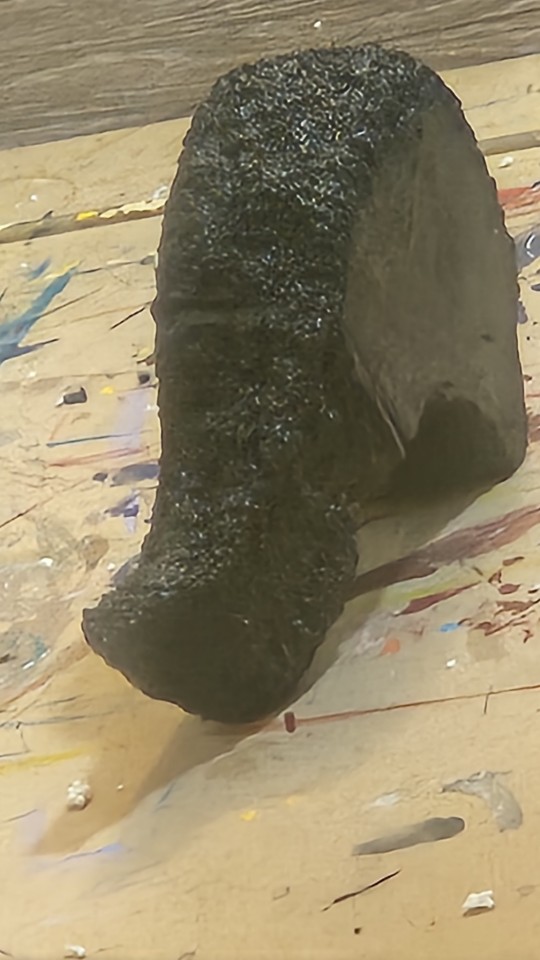
it's actually a clip on piece that is made with a styrofoam base (seen above, it was originally white but I painted it black to match the color of the wefts I added over it). The hair is on it is black hair wefts that I hot glued on and then used gel to help further shape a bit (also gives it a nice shiny coat, perfect for a robot!!) also for any spots where hot glue was visible I painted over the hot glue with black acrylic paint. It's attaches with a metal hair clip so that was it doesn't interfere with the headband when I put it on. I also love that I was able to make his hair look more like an actual mullet after I styled this hehe :)
Also if you ever have questions about cosplay (pace or otherwise) feel free to send an ask here! As I mentioned before, gatekeeping is unfortunately common in the cosplay community and while I'm not a master or an expert (I've only been cosplaying seriously for a year) I'm always open to help other people out :-)

#this got a lil tangent-y but oh well lol#ttcc#graham payser#toontown corporate clash#cosplay#cosplayer#pacesetter#graham ness payser#my art#my cosplay#cosplay photography#cosplay tips#toonblr#cogblr#cogs#toontowm cosplay#also if you don't watch my lives you miss on graham payser eating an entire craniac combo in one sitting asmr and thats really sad
25 notes
·
View notes
Text

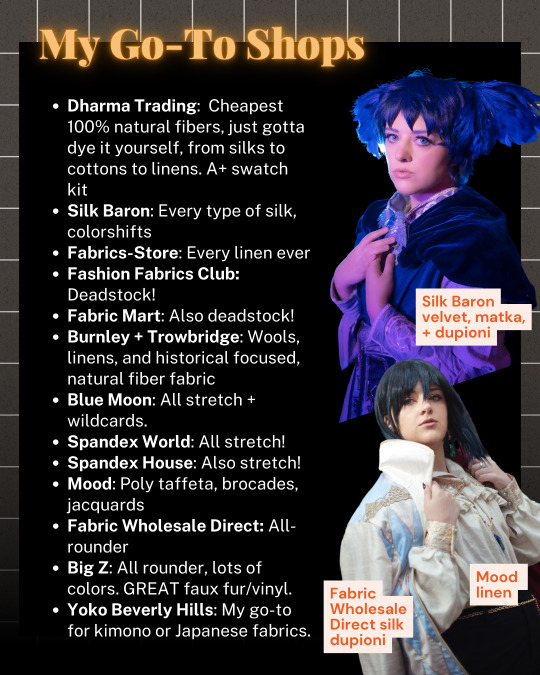

FABRIC STORE MASTERLIST [REVISED]
many of you may remember my original, OG fabric store masterlist -- and now i'm BACK, with a much more visually nice, updated list, with a few new items and examples of some of the fabrics!
enjoy! <3
19 notes
·
View notes
Text
Yo cosplayers have you got any tips on how to make Francis Mosses's hat?

I'm very new at cosplay btw be kind
#cosplay#tagging every possible cosplay tag cause I'm desperate sorry for spam#cosplay tips#cosplay help#cosplay tutorial#help#cosplay reference#cosplay newbie#thats not my neighbor#that's not my neighbor#francis mosses#that's not my neighbor milkman#milkman
19 notes
·
View notes
Text
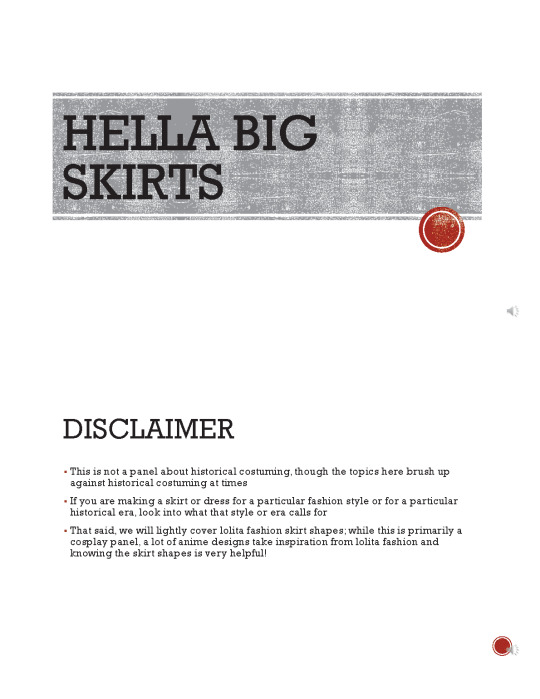
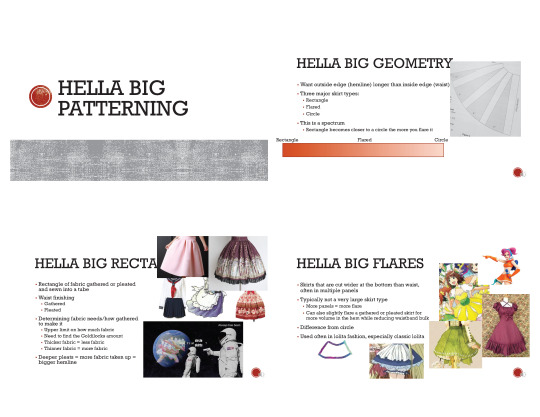
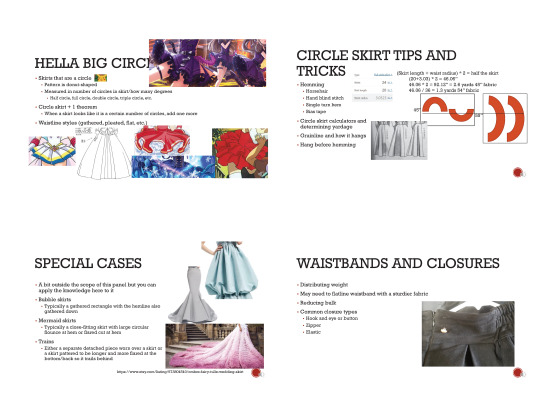
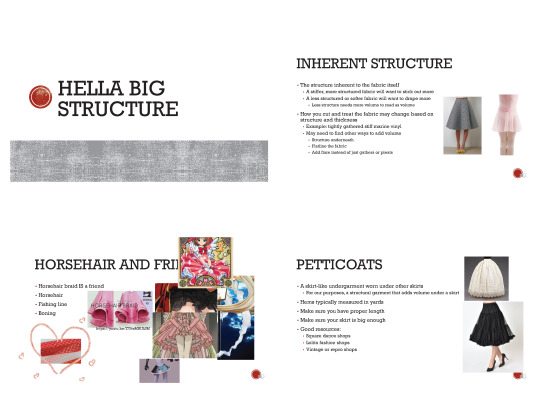

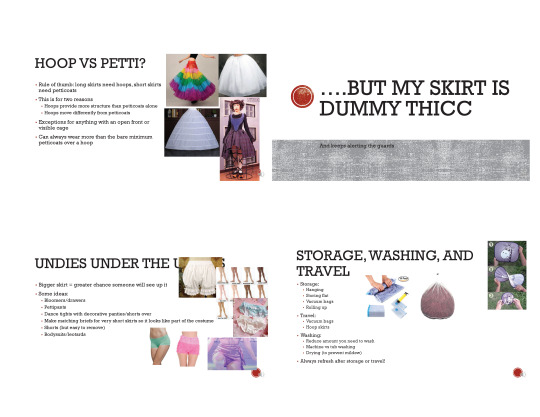

Hella Big Skirts panel
Ever wanted to make a hella skirt? Wondering how to keep your hella big skirt puffy? Join cosplayer fabrickind to learn the ins and outs of patterning, sewing, and supporting the large, fluffy skirts of your dreams!
This is just the bare bones of the panel, as many of the examples were elaborated on in-person, and it is just the slides, not any of my notes. It is not meant to be exhaustive or definitive, and is just meant for general advice and suggestion purposes only. If anyone has feedback they would like to give, feel free to do so. That said, I hope that people find this information useful.
Here is a link to a pdf of the presentation. You may download for personal use, but please do not alter the presentation, repost without permission, or do any sort of other unauthorized use. (If you have a question about how you can use this presentation, please send me a message with your question and we can work it out. I promise I’m not scary. ;]) Feel free to reblog this post as much as you want, though. I do these panels and post them because I want the information to be shared.
I hope someone finds this helpful! :]
#cosplay#cosplay help#cosplay advice#cosplay tutorials#cosplay tips#cosplay tip#skirts#hella big skirts#cosplay panel#cosplay panels#sewing#sewing skirts
439 notes
·
View notes
Text
hi I’m a very long time cosplayer (20+ years experience) who has chronic headache and migraine problems and this is a post about how to prevent your cosplay wigs from giving you painful headaches! Nobody likes wandering around the con in blinding pain and so hopefully this post will help you reduce the chances of this happening.
1. If your wig is way too tight, don’t use it. Get something with a bigger cap. tbh I often wear slightly too big wigs to reduce the pressure! Find out what brands and sellers sell wigs that are comfy on your head and prioritize buying wigs from them! I made a big master list of cosplay wig sellers a while back so here’s a few you might not have known about. Arda (and its Canadian and European sites) sells by far the biggest wigs, but I personally find Classe the most comfortable for my specific head. It’s all very YMMV and it’s totally possible for a wig to not actually be too small but fit your head in an uncomfortable way (Blue Beard on taobao does this to me every time), so just don’t buy from suppliers that do that. Also consider resizing wigs to be larger! For wig clients with extra large heads I like to nip the edge of the wig right behind the ear where your ear and hair from above will cover it and add in a little godet of elastic.
2. Reduce weight! A heavy wig will make head pain much more likely, so here’s a few tips on wig weight reduction!
A) if your wig doesn’t need a ton of volume and is already very dense, rip out some wefts in the bottom half. Anything on the part of your head from the ridge where your head starts going in towards your neck won’t really show unless your wig is very short and it’ll obviously reduce weight instantly! You can replace any missing volume with light crimping or light heat and tease, or leave the wig as is for a natural and silky look without the unnatural volume of a cosplay wig.
B) if you need more volume in your wig, instead of going straight to adding wefts for more volume, see first if combining crimping with heat and tease at the roots will give you the extra volume you need! Crimping or heat and tease adds volume and if you straight up destroy the fiber in the first two inches from the scalp by doing both repeatedly, it’ll add huge volume without you needing to add extra hair! When I do this I like to heat the fiber near the roots, tease it, let it cool, crimp the teased part, let THAT cool, and then brush it out. You can flat out double the perceived volume in the back of the wig this way!
C) if your character has a high ponytail or high pigtails, consider using clip on ponytails that you can easily remove if you need the weight off your head right the fuck now. here’s two tutorials I swear by for making a short wig + clip on combination look more natural! They’re in Japanese but easily comprehensible if you use machine translation thanks to the clear photography. They also help with spreading out the weight on the wig itself, and if your hair is long enough, using a clip on with a fishnet wig cap and clipping through the wig and into your real hair will also he lp make it more secure and distribute weight more evenly.
if your character has high pigtails
if your character has a high ponytail
D) when you need extra wefts, opt for sewing in wefts rather than gluing whenever possible. Glue doesn’t seem heavy but enough of it can make a wig get real heavy REAL fast.
E) redirecting the weight to your entire head and not just the front hairline will feel lighter and give you less forehead tension, which is one of the biggest causes of wig headache. Toupee clips sewn evenly around the edges and a Wig Fix https://therenatural.com (the name brand one, the knockoffs genuinely don’t work half as well) can help with doing this. A Wig Fix will also let you use fewer pins to keep your wig on, which is another cause of wig headache. Can’t suggest trying those enough. There are also some velvet wig grips out there but I find those don’t work quite as well, but they’re by far better than nothing.
3) make sure your wig is easy to remove. A lot of characters have horns or veils or other head things on top of the wig so make sure those can easily come off if you need a wig break! I’m a big proponent of using wig glue or double stick tape to glue strands (face framing layers etc) to your face for a more natural and more flattering look, but if you get headaches from wigs, keep that glue or tape in your bag so if you have to de-wig for a bit, you can get it back on!
4) take the ibuprofen or whatever BEFORE you put the wig on, and not when your wig is already making your head miserable! It’s like taking the ibuprofen before you wear the horrible shoes for a special event; it’s more effective in advance.
5) what are your normal headache triggers? Make sure you’re doing the work to EXTRA avoid them before wearing a cosplay wig. Stay hydrated. Keep up with your electrolytes. If you have any food triggers, make sure you’re managing them properly.
6) try multiple types of wig cap before deciding which ones to use! I’m a big fan of the fishnet kind because I’m in agony every time I try to use the stocking kind. Some people find relief in doing pin curls under their cap, and @/battleangelgif on twitter suggested doing this with damp hair the night before you wear the wig. There are tons of methods! Stretching out fishnet caps can be done more effectively when they’re slightly damp and that’ll make them pinch less. Experiment with what you like best to keep your irl hair in place and once you find a method you like, go for it! Make that your go-to!
7) always remember: wearing a short wig is less miserable than wearing a wig to your ankles. consider very carefully whether or not you can actually handle that wig that’s as long as you are tall. sometimes you just can’t and that’s okay! reduce the length of any super long haired character to hip length and it’ll be FINE. I swear. It’ll still read as super long and it won’t be as terrible.
8) always remember you can just. take the entire wig and cosplay off if you’re in agony. it’s not worth it. don’t do that to yourself. If the migraine hits anyway, just take it off.

Hope some of this might help you out! Focusing on reducing and redistributing weight is what helps me out the most 😌 feel free to reply or reblog or message with questions and I’ll try and get back to you ASAP!
#cosplay#cosplay tutorial#wigs#wig tutorial#cosplay tips#reducing wig weight#I just want to save everyone from blinding cosplay wig induced migraine#nobody likes head pain at the con#hope I was clear enough hhhhhh#yes this is an expansion of a twitter thread I wrote#y’all get the better version
567 notes
·
View notes
Text
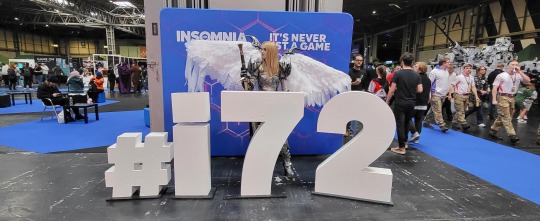
How to Make: Electronic Wings for Cosplay
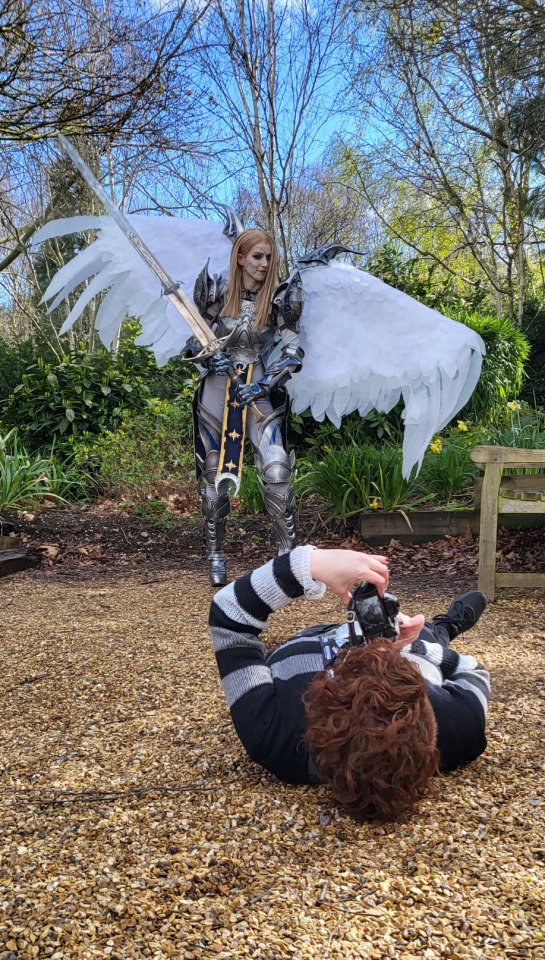
Hello Everyone! It's been a while since I last uploaded a written tutorial on here and since I just finished and wore my Dame Aylin cosplay this last weekend it seemed appropriate to jump back in with a tutorial on one of the costume pieces!
Her wings were the star of the show this weekend and I know a lot of people were curious about how I made them! A huge source of knowledge and inspiration behind these wings was this video by Axceleration, I made a few changes to the frame shape and electrical circuitry for mine but her tutorial was a huge stepping stone to give me the confidence to tackle them myself!
Health and Safety:
When working with Sintraboard (as well as other thermoplastics) it is incredibly important you wear a respirator as well as goggles when heating, moulding and cutting it. The fumes this plastic will give off when heated up are no joke! Make sure you're in a well-ventilated space!
Basic tool safety knowledge is also really important! wearing gloves when using power tools can be more dangerous in most situations, so always be aware of where your hands are vs where the tools are. Always cut away from yourself and take things slowly, don't panic.
Electrical safety! You're working with live wires and circuitry! make sure your hands are dry, you aren't touching the bare wires at any point when they are connected to a power source, and if you choose to solder anything, make sure you're wearing heat-proof gloves and a mask in a ventilated space!
Tools
Wire stripper
Screwdriver and wrench
Dremel - I recommend the Dremel 3000 rotary tool personally! Some essential Dremel bits you'll need for this include, a sanding bit, drill bit (smaller or same size as your screws/bolts), and a small/narrow cutting bit. These will usually come with the Dremel!
Heat Gun (A hairdryer will not get hot enough to heat the Sintraboard!!)
Pipe cutter (alternatively you can use a hacksaw for this!)
Hacksaw
Ruler
Scissors (for cutting fabric straps)
Materials
Heat shrink Tubing
2 core electrical wire
switch (you want a three position, six pin switch, like this one, even better if it has the Screws on the pins! otherwise you'll need a soldering kits to solder the wires to the pins.
2x 8AA 12v Battery Holders
2x 12v Linear Actuators (Mine had a stroke length of 100mm)
21.5mm PVC Pipes (I got 2x 3m Lengths)
2x 21.5mm PVC Pipe straight couplers
6mm 8"x12" Sintraboard
Nuts/Bolts/Screws (I used M5 bolts for the base & Actuator connectors and M6 screws to attach the hinges to the pipes! You'll need Washers for every Nut & Bolt!)
Hinges (I used 2.5cm wide hinges that were skinny but long so they would just about fit along the PVC pipe! 3" gate hinges would work!)
50 metre Polythene Jiffy foam roll (in retrospect this was ALOT of foam, you could definitely get away with maybe a 20-30 metre roll! I now have a load leftover XD)
16 AA Batteries (I used 16 and had enough for the whole day with them on, I think They'd probably be enough for another half a day-full day too! but have spares just in case!)
Webbing strap ( I went for grey to match my base suit colour!)
Buckle - as wide as the webbing strap you use!
3 metres of white cotton fabric (or whatever colour wings youre going for!)
Optional
Zipties (for cleaning up the wires)
Lets Go!
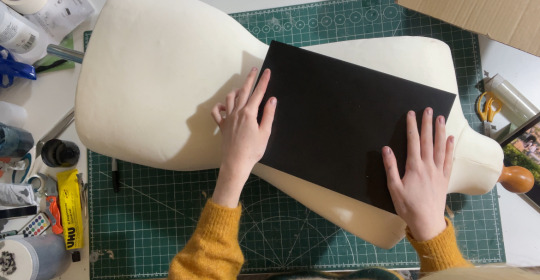
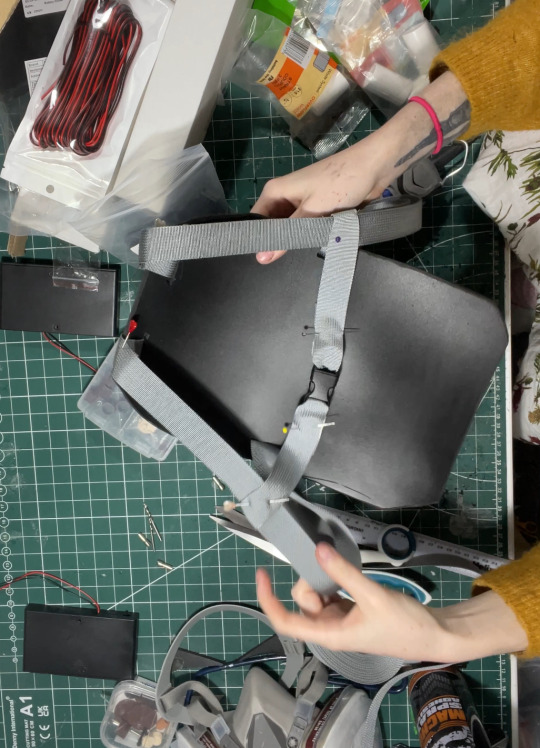
Sintraboard is this wonderfully stable thermoplastic that is relatively easy to cut into (with the right tools) and when heated allows you to mould its shape! I started by using a mannequin and heating the Sintraboard with a heat gun for a few minutes to make it pliable, I recommend using gloves for this part as the materials gets VERY HOT! Press the board into the shape of the mannequin's back, taking note of the edges especially! you want this board to sit as comfortably to your body shape as possible as it makes a huge difference to how long you can wearing the wings for in this backplate is comfy!
Once shaped, I placed it against my back to make sure it was a good fit, heating again and making any alterations I needed (again don't place bright hot plastic to your bare skin! wear protective clothes and wait till its slightly cooler to do this, with the help of a friend!). I then took a hacksaw and rounded the corners, before sanding the edges with my Dremel! Try to avoid cutting off loads, just enough to make things less likely to snag.
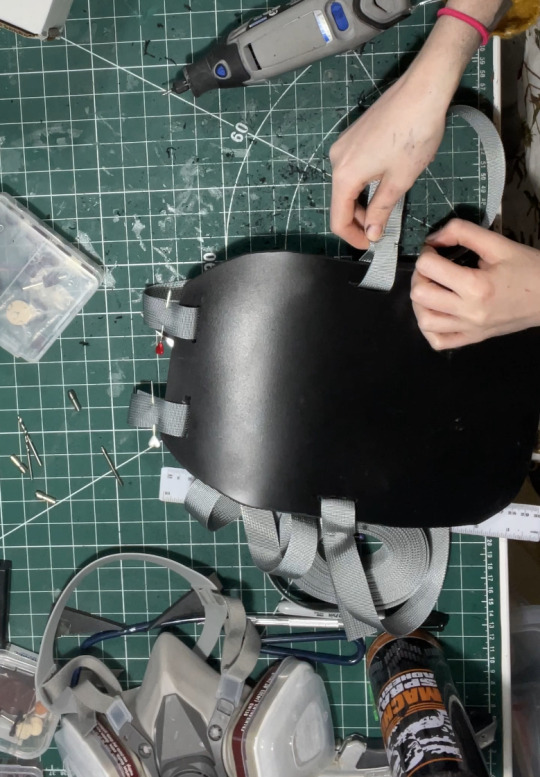
3. I then cut in four holes, wide enough to feed my webbing strap through, two at the top and one on either side below where my arms would sit! I measured the webbing strap by firstly feeding them through the top holes and pinning them, and then bring the strap over my should to everything sits where it should and seeing where the strap hits the side hole and cutting the length there! you'll also want a strap that attaches across the chest, meeting in the centre with a buckle!
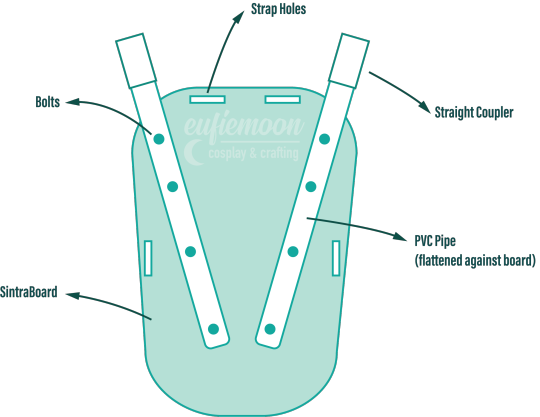
4. After sewing the straps closed I was able to move onto the PVC pipe structure! This may change slightly depending on the finished shape you want but I needed the PVC pipes to come out from inside a breastplate so had a particularly angle as well as character references to work with! I began by heating the pipe over my heat gun and flattening a portion of it under a heavy object so it would sit much more flush against the backboard and sit better underneath my breastplate before moving onto securing the first portion of the structure to the backplate. This mainly involved lots of try-ons and measuring to make sure the angles were correct and symmetrical and was quite fiddly but well-worth the effort! I'll include a diagram of the general shape I went with below:
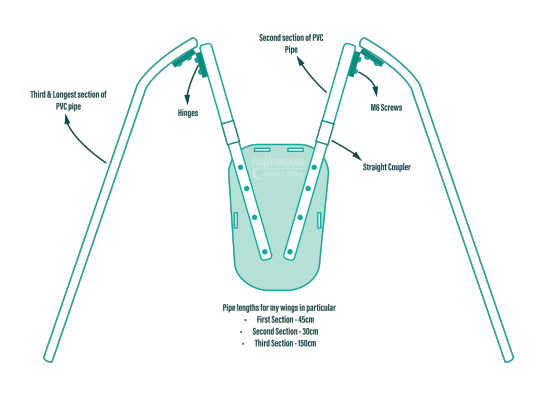
5. I wanted my wings to be relatively modular for ease of travel so I needed to make sure certain portions of them could come away from other parts easily, so I popped a straight coupler on the top of the pipes that were attach to the breastplate, this also meant I could slot the breastplate over these shorter pipes and wear everything correctly! Then these second pipes slot on and at the other end they are attached via hinges to the longest portion of the pipe 'skeleton', Diagram below:
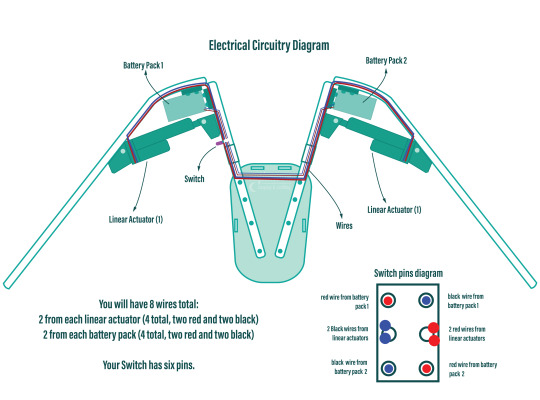
6. Now that the skeleton was put together, it's time for the electrical stuff! It's a good idea to figure out where your circuit is going to lay on the skeleton - consider if you want the battery packs mounted the the backplate or, like me, put them inside the actual wings in removeable pockets for easy access and removal for battery changes. all your wires will go through the switch so deciding where you want to place that is very important! Mine was placed just over my shoulder on the front side, mounted to the PVC pipe with a metal cover I drilled a hole into to slip the switch through and then drill through the pipe.
I've included another diagram below that explains all the electrical circuitry, including which wires go on which pins on the switch!
Important to note: The linear actuators need to be placed and bolted into the PVC pipes at *exactly* the same angle on each side, any slight deviation will lead to the wings going up wonkily! So take your time and make as many adjustments as necessary.
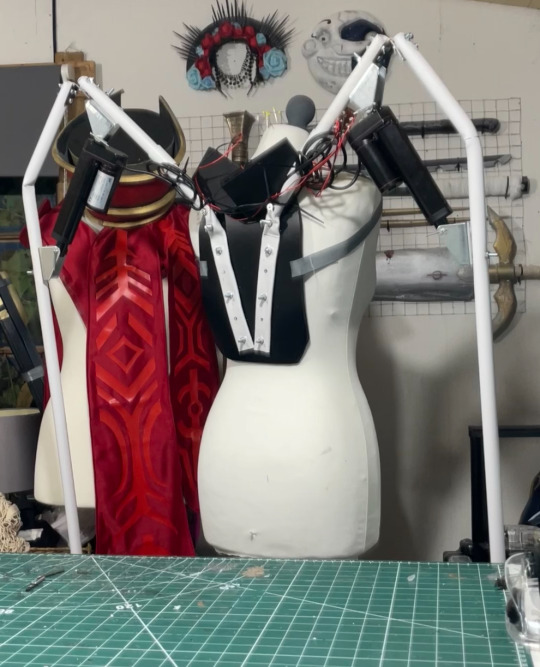
7. You can extend your wires by adding on the electrical wire, just match the colours, and put heat shrink tubing over the connections to hide the live wires! I ended up zip-tying the wires into organised bundles once the wings were done to help keep everything safe from snags.
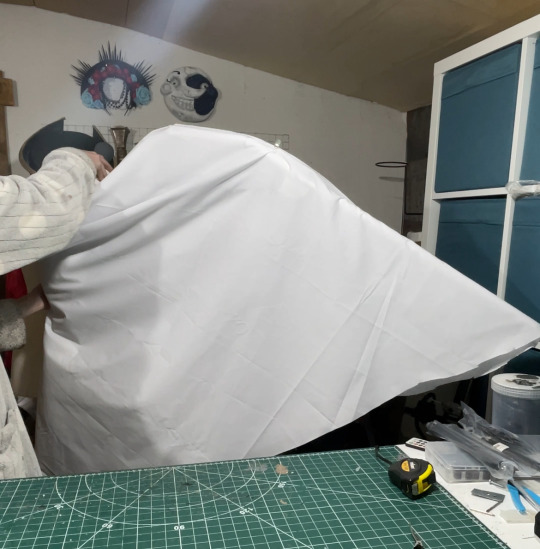
8. Now its time for the Wings themselves! I drafted my base pattern by just draping the white cotton fabric I had over the wing when it was fully extended. I then pinned the wings to the shape I wanted them to be along the bottom before cutting along the pins. I ran the fabric through my sewing machine to close the bottom edge, leaving a gap wide enough by the wing base so I could slip the wing on and off, closing it with velcro. I also added little fabric pockets inside of these to hold my battery packs, which also connected via velcro for easy removal!
9. Now that I had a wing base I was able to begin making feathers! I cut out a total of 800 feathers out of polythene jiffy roll for these wings, in 6 different styles and using real life bird wings to dictate the shapes I used and where I placed them. I ended up hot gluing every individual feather onto the white fabric base, going row by row until every side was covered, the wing covers themselves are super light because of the foam feathers and they shine light through them in a really magical way!
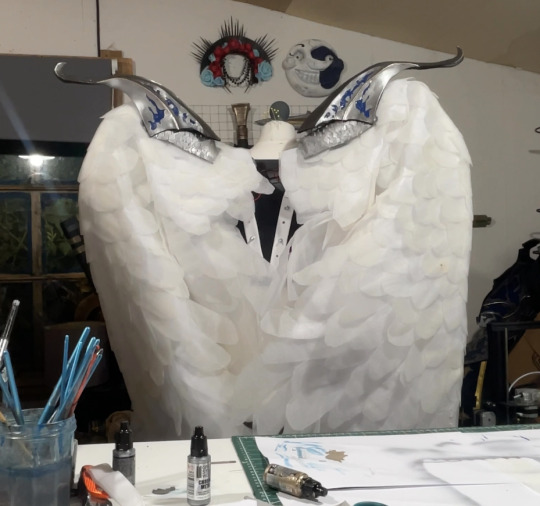
Optional: I also ended up going over these feathers with my airbrush and some super light beige paint to help darken the shadows, this is entirely optional and may change depending on the wings you're looking to make!
When in neutral position and in extended position the wings looks like this:

Mine had a wingspan of about 7ft total when fully extended but when in neutral position they were fairly close to my own proportions! mainly staying behind me and weren't much of a problem in a packed con hall!
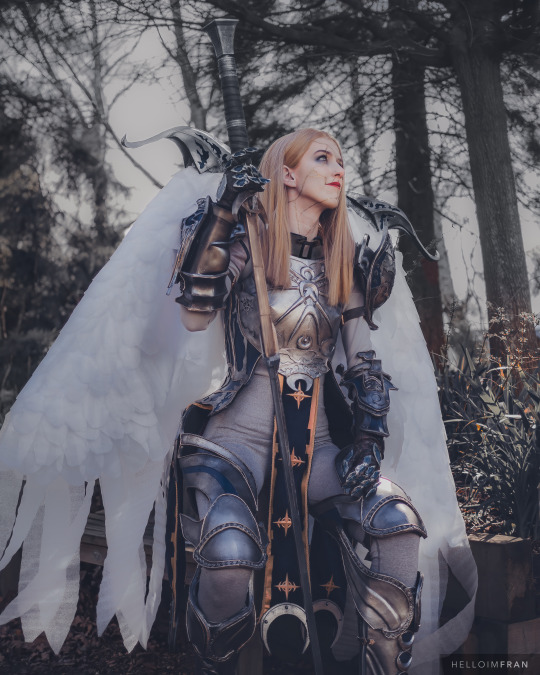
Photo by: Helloimfran (on Instagram and Twitter)
I hope this tutorial helped and if there are any questions about anything in specific don't hesitate to reach out at [email protected] or on my instagram or twitter (@eufiemoon)
Happy Crafting!

#cosplay#cosplayer#cosplaying#baldurs gate iii#baldur’s gate 3#baldurs gate 3#bg3#dame aylin#aylin x isobel#bg3 aylin#cosplay tutorial#Wings#fantasy#tutorial#cosplay help#cosplay tips
98 notes
·
View notes
Text


One of the most essential parts of my costume process: design sketches!
Even if I’m only copying a design and not inventing my own, it is absolutely invaluable for me to sketch out the different layers and pieces. Reference photos are important, but our eyes can’t see everything at once, so the physical action of drawing out these costumes forces me to acknowledge every detail and seam!
I usually do back and front at minimum; sometimes I also do side views or separate accessories if I need to be more purposeful in how I’m thinking about a piece. I used to do these sketches only on paper, but now I have a kind of hybrid method where I do some digitally as well (this is especially useful for inventing designs elements because I can play with ideas more readily without a lot or erasing and redrawing).
If you struggle with visualising a costume, I highly encourage sketches! You can easily download design templates if it helps to have a base to work from, and I promise it will help when layers are overwhelming! (And frankly you don’t need to be an incredible artist—the point is communicate to yourself how the costume will be made, so as long as you understand what the lines mean, that what matters ☺️)
48 notes
·
View notes
Text
to anyone who cosplays or makes clothes:
what are some good and reputable websites to order fabric from, and what are some of best kinds of fabrics to use for cosplay making?
where are good places to get patterns from? (im specifically looking to make a danmei cosplay, manhua mu qing)
and any other tips that might be able to help me out!
i love to make things and I really want to try this (and there's like nothing out there for cosplaying mu qing so i kinda have to do it myself) but i have like no experience actually making a full outfit so anything helps!
#jae’s thoughts#cosplay#cosplay tips#danmei#tgcf#tgcf cosplay#heaven official's blessing#mu qing#mu qing cosplay#mxtx#mxtx cosplay
54 notes
·
View notes
Text
I'm not a social media manager, I can't keep up with trends. So, if I'm going to make videos, I'm going back to what I can do sustainably, which is to make short little videos about different techniques.
In this video, I'm doing an old hack that maybe some people might not be aware of. You can use a fork to make even quick pleats in fabric that are even width. You insert the fork into the fabric, curve facing away, and on the lowest slot. Then, twist the fork like you were putting spaghetti on it while sliding the fold up to your preser foot. Finally, hold the edged neatly in place as you remove the fork. Then sew!
There are definitely limitations to this technique. The size of your fork determines your width, so it doesn't always fit a pattern. But it can be faster than manually measuring and pinning, which is great when you have to make a lot of pleated ruffle trim. Which is me with Wailord. There's soooo many to make @-@
64 notes
·
View notes
Text
Cosplay help
I'm looking to get back into cosplaying after many years of not doing it. I was just hoping for some help finding sites to get stuff, or finding good tutorials to make stuff etc
I'm currently wanting to cosplay as Blackbeard and Stede Bonnet from OFMD
And Nandor and Laszlo from WWDITS
Theres others too but this atm is what I would like to do, and I need to have at least one ready for August for a convention local to me so any help would be greatly appreciated <3
#cosplay#cosplay help#wwdits#ofmd#laszlo cravensworth#nandor the relentless#blackbeard#stede bonnet#what we do in the shadows#our flag means death#wwdits cosplay#ofmd cosplay#cosplay tips
28 notes
·
View notes
Text
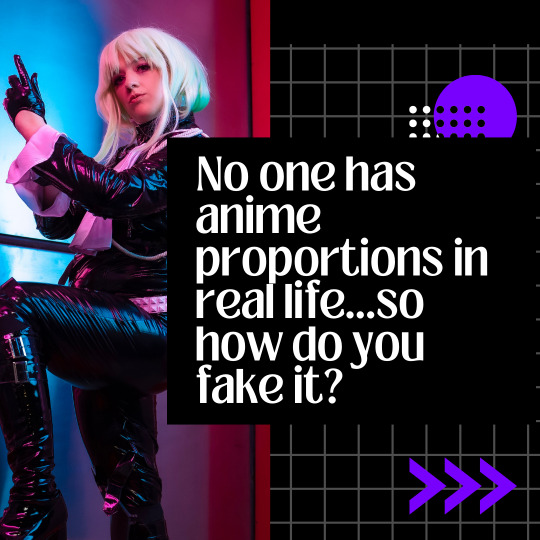
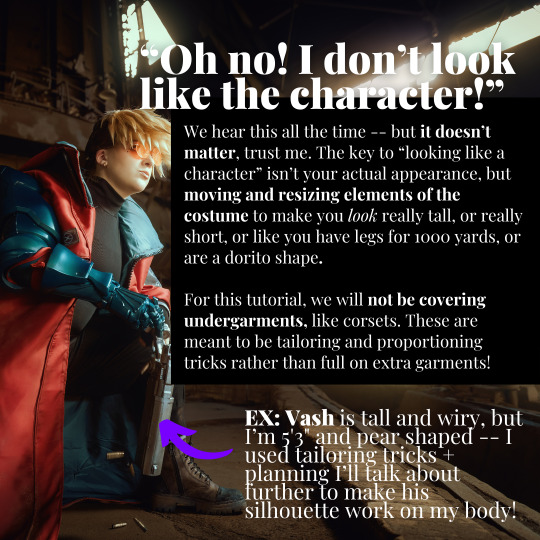
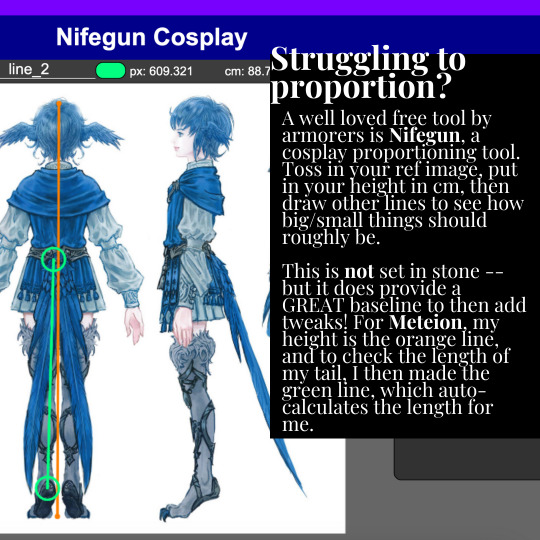

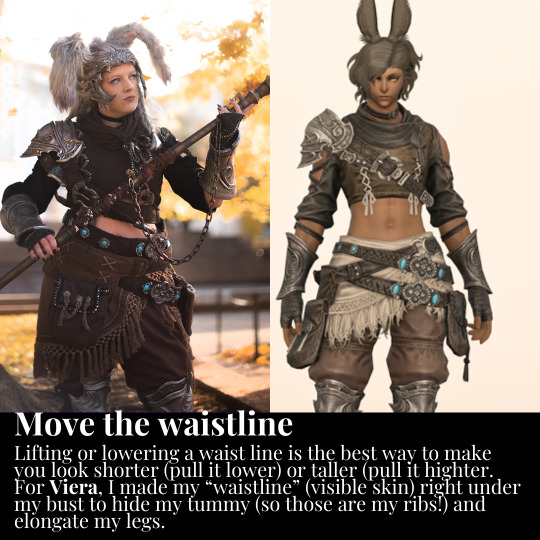


Tutorial on how I proportion cosplays on my very short body!
941 notes
·
View notes
Text
Cosplay ear fins tutorial
I made ear fins for an Eridan cosplay, and a lot of people asked how I made them. I haven’t seen anyone else doing the same method I used, so I thought I’d share.
I started out with some wire. I don’t know the exact gauge off the top of my head, but I don’t think it particularly matters as long as it’s thick enough to hold its shape but thin enough to shape with your hands/pliers. Cutting up a sturdy wire coat hanger would probably give you workable material.
Here are the bases I made. I put some paper over my ears first and sketched a loose outline to get the size I wanted, but I didn’t end up following it too closely. It was mostly a lot of trial and error. I decided on four tines for each ear fin, but you could do a different amount or longer tines if you want. I used round nose and needle nose pliers to shape the wire, but I mostly used my hands and you could probably do this project without pliers if you don’t have them. The ends are curled to avoid stabbing myself in the ear with wire. You want the ear fins to go in front of your ears, and then the wire at the ends loops around the back of your ears to hold them in place. Getting this right took a lot of trying them on and adjusting them, but I eventually got them to where they would stay on without any adhesive but didn’t squeeze my ears too badly.
Next, cut up some old pantyhose/tights to get nylon material. You don't need too much material for this, so sock-style pantyhose would be enough. I happened to have some old tights with holes in them so I just cut out some non-holey pieces. I used black tights since it was the closest I had to gray. You’ll color over these later, but try to get a base shade as close to your desired ear color as possible to make things easier later on. I wouldn’t recommend buying new tights in the exact color you want since that’s expensive and wasteful, so you’ll probably be choosing between black, beige, and maybe white, but just keep in mind that you’ll have to color over it and the coloring method isn't completely opaque. Like, don't use black tights if you want white ears.
Stretch the nylon over the wire bases. I used a roughly square piece of nylon for each ear and folded it in half, then scrunched the excess to pull it tight and used binder clips to hold the material in place. Then use a thread in the color you want the ears to be and sew along the whole open edge of the nylon, anchoring it to the wire frame as shown below. Keep the nylon stretched tight over the tines while sewing so it has those divots in between tines. Cut off excess material and sew the raw edges down.
Try the ears on again and adjust as needed.
Paint the fabric with Mod Podge (I used matte but I think other finishes would work too.) Take extra care to spread the Mod Podge around the sewn edges to really glue things in place. Wait for the Mod Podge to dry on the nylon. This creates a hard, chalkboard-like surface that you can color on, but keeps some of the transparency of the nylon. I used a combination of chalk, pastels, and eyeshadow powder to color the ears. If you’re going for ears that match your skin tone, foundation powder would probably work. I was just using whatever art supplies I had around, but any powdery pigment should do the job.
I started with white chalk all over the surface to lighten the black color into grey. Then I used white pastel to make highlight lines on the top of each tine and black pastel to make shadow lines below each tine. This added some definition and made the tines look more three dimensional. I filled the spaces between tines with some purple pastel, which I blended into the grey shade with my finger. I then put a layer of shimmery purple eyeshadow over it to give it a nice sheen.
Once you’re done coloring the ears, seal the whole thing with some hairspray and you’re ready to go! You could probably also add some earrings to them if that’s the look you’re going for.
Here’s my final result! I was able to wear a mask with them and they were relatively comfortable to wear all day. Let me know if you have any questions and if you try this tutorial, definitely send me pictures of the results!
#cosplay#cosplay tutorial#cosplay tips#mermaid#sea dweller#eridan ampora#feferi peixes#the condesce#meenah peixes#homestuck cosplay#my posts#ear fins#undyne
75 notes
·
View notes
Text
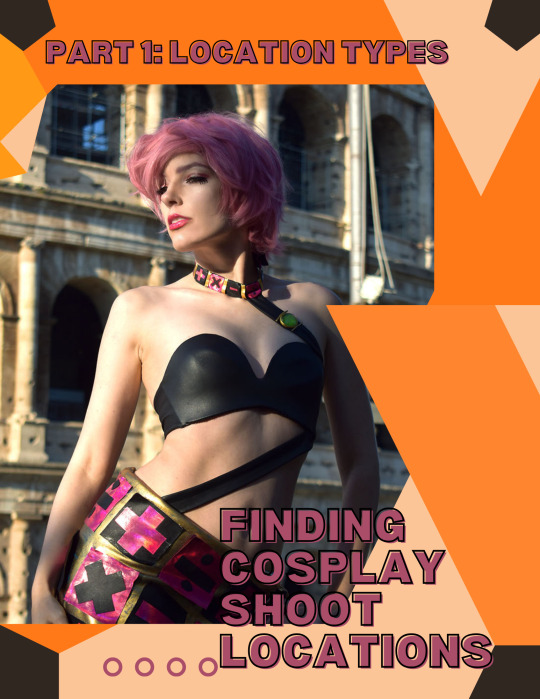
Finding Cosplay Photoshoot Locations: Part 1


📸Want to do cosplay photoshoots but don't know how to find that perfect place to shoot? This tutorial covers how to brainstorm a location for your shoot, logistical and cost concerns with shoot locations, and how to actually find your dream location.
📸This tutorial can be applied to shoots of all types, including but not limited to self shoots, shoots with friends, and shoots with hired photographers. Self shooting or shooting with friends only requires a camera (a phone works!) and possibly a tripod.
Part 1: Location Types
Coming up with the general type of location you want requires some brainstorming about what you want from the shoot. Think about your specific goals and types of photos you want and how certain types of locations would work for your goal. Remember you can always do multiple shoots for the same costume with different concepts!
For example, if you want big, sweeping shots, you will need a location that allows for wider framing and still looks good, while if you are primarily after shots with closer framing, you can go with a location with only a small usable portion. If you are looking to primarily showcase the costume itself or your posing, a flatter and simpler background works better than a busy background, but if you want cinematic shots or shots where you are existing in the environment as the character, somewhere that can show off the location itself as well as how you exist in it would work better.
Types of Locations
There are three main types of locations for cosplay shoots in relation to the cosplay itself. Of course, you can combine these types and there is a lot of overlap, but thinking of these three location types will help you conceptualize your shoot.
The first type is locations that are similar to something in the series, or an exact location from the series. My cover image is an example of this, where I took photos at the location of the climactic battle of the manga. Most fictional locations don't exist in real life so exactly, however, so think of locations that look similar to where this character might be found. The example on this slide shows a cosplay at a nature preserve with grassy fields and oak trees, which is similar to the locations the character traverses several times throughout the game she is from. This category can also include locations with similar vibes, such as a studio made up to look like a fancy European castle for a character from a series about European royalty, or a shoji screen backdrop for a character who lives in a Japanese-style house.
The second location type is locations with symbolic meaning. These locations showcase something about the themes or character arcs present in the series, and this can be accomplished with anything from specific props and setpieces to the entire background. One shoot I'd love to do with this concept is of Lady Blackpearl staring into a mirror -- this would symbolize her dual personality nature -- or of Lady Oscar wrapped in thorns, with the rose thorns symbolizing her glorious but fragile life. I chose to represent this location type with Ultimecia, a sorceress who wants to compress time so she is the only one who can live in the combined past/present/future, set among ruins. The ruins aren't accurate to the game, but show her crumbling reign marked by the passage of time.
The third location type is locations chosen for pure aesthetics. Obviously all locations are chosen for aesthetics, but these are locations with no deeper meaning and may not represent anything from the series at all. These can range from a simple colored wall backdrop to a sweeping landscape that simply looks good with the colors of the costume. Some examples are the Yasuho Hirose ocean shoot on the slide, where it doesn't represent a particular scene or location in the series but simply looks good with the cut and colors of the costume and the sailor theming, or my Princess White Rose milk bath photoshoot, where again the character never takes a milk bath, but a bathtub full of milk and roses shows off the detail of her floral hat and showcases the opulent nature of a rose-themed princess.
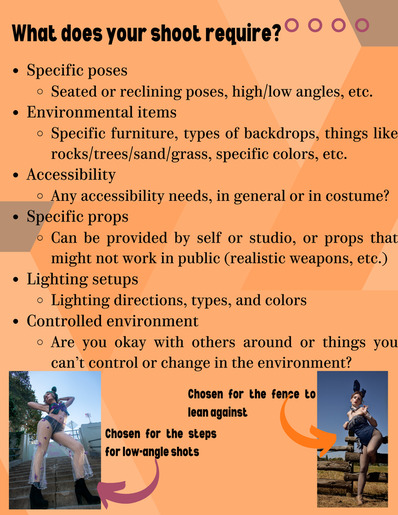
Requirements of your Shoot
Once you have a general concept, think of what is required to fit that concept. This can be as general as specific backgrounds or types of backgrounds to as specific as particular items at the location or particular lighting setups. Some shoots might need specific props, such as furniture to sit or lounge on, and props that won't work in a public location, such as realistic weapons that may cause panic or worse. Also keep in mind any accessibility needs, whether it is an accessible location in general to accommodate a disability or a need that is caused by the costume itself. Check not just the specific area you want to shoot, but how to get there from the parking lot or transit stop. Finally, keep in mind that unsecured outdoor locations, such as a park or beach, are locations where you can't change things about the location and you may encounter other people. Discussion of how to be respectful of such locations is in part 5.
Stay tuned for the rest of the parts~!
Links to other parts: 1 Location Types, 2 Discovering Locations, 3 Indoor vs Outdoor Locations, 4 Location Permissions, 5 Location Logistics
91 notes
·
View notes
Text
I’ve now tried three of the new Heroine Make mini mascaras that are black tinted with A Color and I regret to inform y’all, especially the cosplayers, that these things are certifiably incredible.
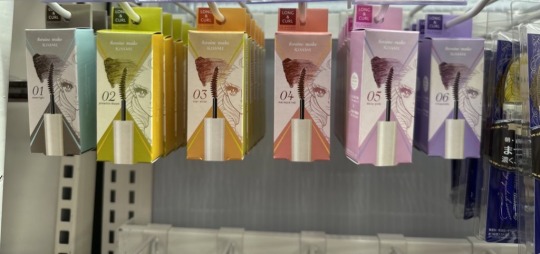
I’ve tried out the grey, the pink, and the purple, and they’re all incredible. They’re dark enough to enhance lashes just like a regular mascara but the hint of a color makes them SO GOOD for wearing with cosplay wigs or if you dye your hair!!! The pink in particular is one of the prettiest mascaras I’ve ever worn. And these things are waterproof. Big time waterproof.
I wish they were sponsoring me for this but god they’re just so good I have to tell everyone about it instantly.
I’ve been buying them locally from a store that sells Japanese cosmetics but apparently they have a US only online store! (I’m sure you could find them other stores but this is a fair price).
#cosplay#cosplay tips#makeup#it has been ages since I’ve been this in love with a product#heroine make sponsor me challenge
305 notes
·
View notes
Text
How To Cosplay On A Budget
As someone who is starting cosplay or has been cosplaying for awhile you’ll notice that it can be an expensive hobby, even the cheapest cosplays can be up to $100 in supplies, but with this list you’ll be able to save a little money on your cosplays!
Closet cosplays
Closet cosplays are cosplays consisting of clothes in your closet, they’re super easy and an interesting way to get into the mind of the character your cosplaying and seeing what they would wear casually, now it’s not as popular as normal cosplays, but if your cosplaying a character that has a lot of costume changes or dresses like you this can be your best bet, with closet cosplays you can add accessories that can tie into the character like colors or something that symbolizes them so people can recognizes you, this is honestly the cheapest way to cosplay and an easy start to cosplay too
2. Buy second-hand
There are many cosplayers that either scrap their cosplays or have old cosplays they would like to sell. You can find second-hand cosplays on etsy, facebook groups, and websites like lumikha, whose sole purpose is selling scrapped or old cosplays! Now I dont have too much experience buying second-hand cosplays, but friends have told me it's a great way to save money. Prices may vary depending on the seller and the make of the cosplay, whether that be handmade or bought previously, so I would keep that in mind.
3. Borrowing cosplays from friends
If you have friends who cosplay as well, you can ask them if it would be ok to borrow their cosplays. If they say yes, congrats, you have a cosplay! Just keep in mind that it's borrowed, so it might not fit well and take good care of it.
4. Recycling old cosplays
Now if you have older cosplays that you dont wear anymore you can totally recycle it into something else, if two characters have a similar style or have the same articale of clothing like a shirt or pants, you can definitely resuse it, cosplay is about being crafty, so working with what you have is all apart of the craft.
5. Thrifting
Thirft stores are going to be your heaven as a cosplayer. I've thrifted so many pieces for my cosplays throughout my cosplay journey. As long as you have a photo of the character, you can find pretty much anything that your character needs, if your character has a specific piece that you can't thrift you can diy a clothing item into it, for example if a character has a vest that has a specific pattern on it you can buy a vest thats the base color and paint on the details, almost every cosplayer does this for every cosplay.
Thank you for reading! If you have any questions, feel free to ask me!
29 notes
·
View notes
Last Seen Blogs
odaccy-sls
Odaccy with Steamer lane studio

jadewdesigns01
Just Another Girl

meisenth
www.meisenthailand.com

sonicdecrocs
vargas

90snamkook
𓄼fᥲιrყ ιᥴ᪤ᥒs