#the things i would create if i had any talent at photoshop!
Text
Because apparently I can't let anything go...
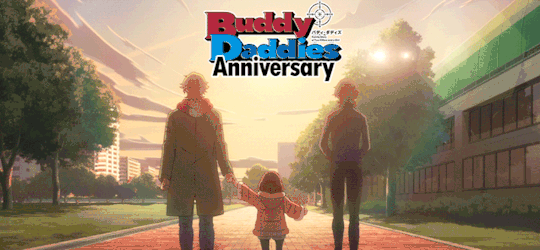
So a few days ago I made a post about Buddy Daddies' first anniversary coming up and I wasn't going to make something "official" but the brainrot is too strong so here we are...
This Sunday, January 7th, it's exactly one year since the first episode of Buddy Daddies was released! And I think that calls for a celebration!
I put everything under a cut because this got really long
I came up with a few things that the fandom could do to celebrate this adorable family! Of course these are not exclusive things! If you want to contribute anything that's not listed below, go for it!
1. A weekly rewatch of the episode that aired a year ago
Starting Sunday January 7th, we rewatch the episode that aired on that date last year. Nothing is stopping you from binging the rest of the episodes that day, of course! It would just be fun that a lot of us watch the same episode on the same day (or through a watch party if anyone knows how to do that)!
2. Create!!
This is literally what it says: create! Just anything related to the episode of that week!
There are so many options, but I'm just giving a few things I could come up with
- Fanfics surrounding that week's episode. Dive into a scene you wished had more details. Write a scene you feel should've happened in the episode but didn't. Write a scene for a headcanon that you have. Really anything you want (it would be fun if it had something to do with that week's episode, but no one's going to punish you if it isn't).
- Make a gifset for that week's episode. Make a set about your favourite character from that episode, your favourite moment, favourite quotes, favourite outfits,... Anything goes really!
- Make fanart! There are so many talented artists in this fandom who make amazing pieces of art! It would be fun to see you make something that links back to that week's episode. I'm thinking about redrawing your favourite screenshot in your style. Draw your favourite moment. Draw a scene that you wish happened in the episode. Redraw your favourite piece of Lily art in your style! (I know this last one is less linked to the episodes but who cares). You brilliant people can probably come up with other things still!
- Write a theory/headcanon/character analysis/... I have seen so many people write insightful posts about things that weren't explicitly shown on screen. There are characters we get very little background info over. Characters that we know a few things about but it feels like there can be so much more written about them! Write about your headcanons, both for past and future versions of the characters. Write your theories about certain things. It feels like there's still so much to say about this anime and a lot of people out there who know how to put those things into words!
- Make an edit! This can be a video edit, a literal photoshop edit. Make wallpapers, phone backgrounds, profile pictures, memes,... Anything you want really!
3. HAVE FUN!!
I know it sounds like it, but there really aren't any rules to this! Just have fun! It would just be fun that whatever you decide to post is in some way linked to the episode, but that's not set in stone, obviously! Just enjoy!
I think it would be fun to dedicate a week to each episode (so a 12/13 week event if we count the recap episode), starting on the day that episode first aired last year and ending the day before the new episode aired (ex. for episode 1: starting on Sunday, January 7th and ending on Saturday, January 13th). You can decide if you just want to post something about your rewatching the episode or if you want to create something. If you want to make something, you can do multiple things if you want.
And again: no one is going to punish you if you posted something from episode 1 during episode 2's week! We're all busy and don't always manage to get something done in time, so don't stress about not being able to finish something "on time".
Lastly, I think it would be fun to make this into a hashtag as well! I thought of using the tag #Buddy Daddies Anniversary (very on the nose, I know, so if someone knows something more fun, please share it with the group).
And like I said before: HAVE FUN!!
#Buddy Daddies#Rei Suwa#Kazuki Kurusu#Miri Unasaka#KazuRei#Buddy Daddies Anniversary#Me 2 days ago: I'm not making this anything official#Also me the past 2 days: but what if I did#It really doesn't matter what you make#It would just be cool if it was linked to that week's episode but again not an obligation!#We're just celebrating this family!
84 notes
·
View notes
Text
A little bit late, but I'm gonna jump in on the recent "RC uses AI art" bandwagon. I understand where you're coming from — I'm an aspiring translator and even before the whole AI craze I had no idea how tf I'm gonna look for a job once I'd graduate, but now the situation's even more dire. That being said, I think we really really REALLY shouldn't jump to conclusions about in this case because
do we actually have any proof that it's AI generated art besides "it looks like that"? Because AI... doesn't really have a "style", it's literally gonna look like the art you feed to it/what it finds on the web. I've already seen at least one instance of artists being told that their art is actually AI generated just because it looks similiar. CGs in all stories are usually more realistic-looking, imo, and showcase the biggest differences between different artists' styles. All of this is speculation is conjecture, but like, so is the whole thing about RC using AI art in the first place. So I'll just move on to more solid argument
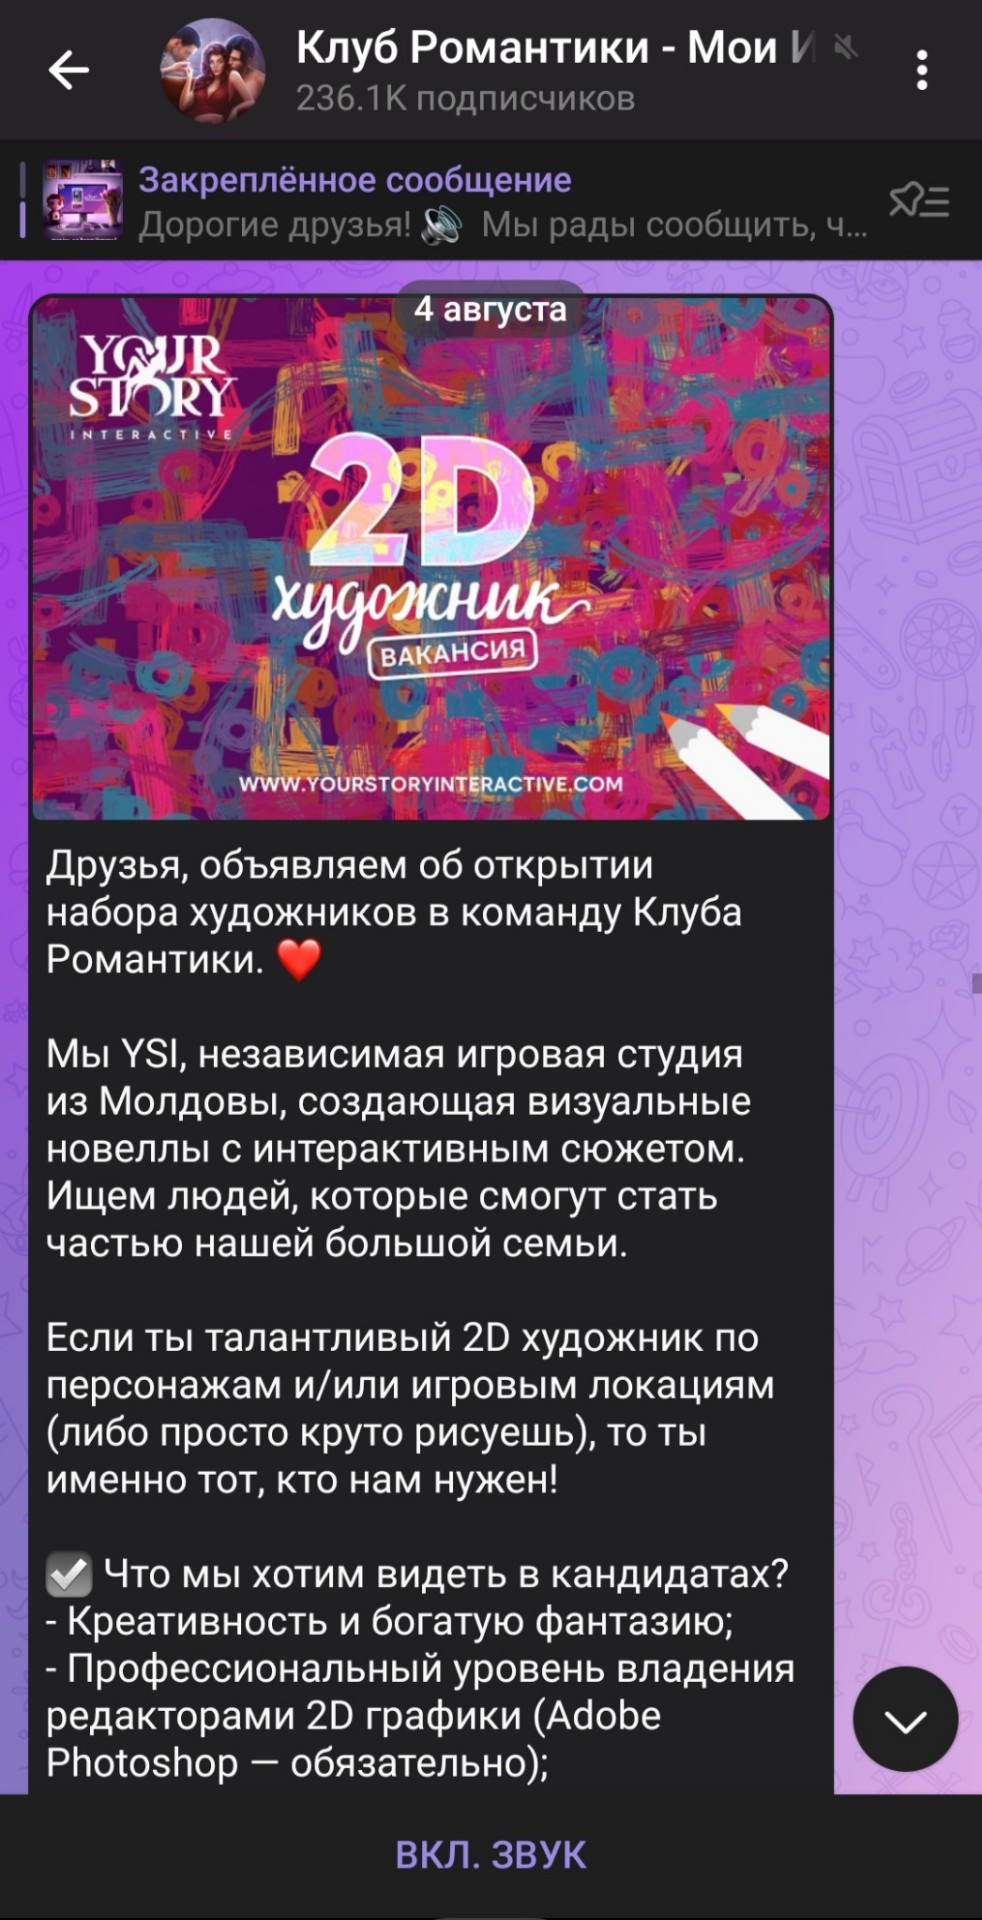
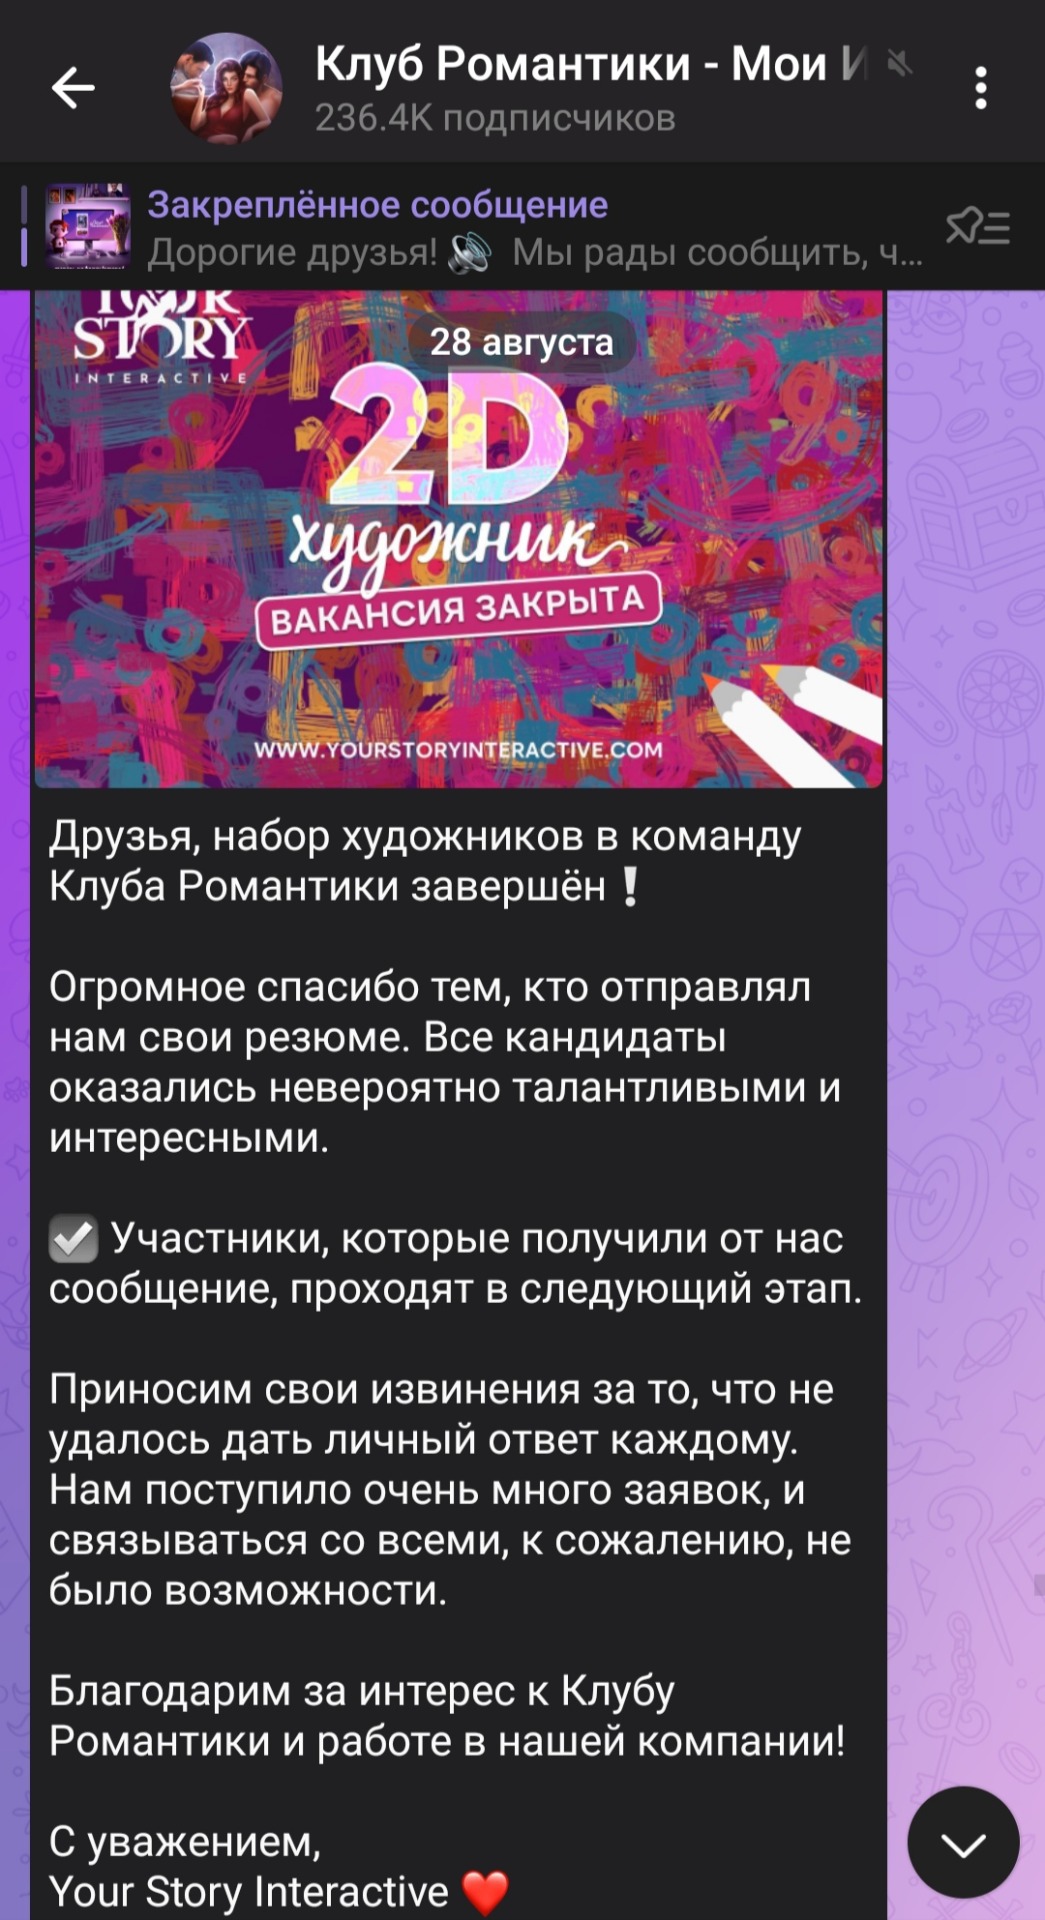
just last month, on August 4th, RC announced an open call for hiring artists. I guess this vacancy was targeted at CIS countries since as far as I'm aware they didn't crosspost it to Facebook or Twitter or anywhere besides VK and Telegram channel. On 28th they stopped accepting applications from artists and are, most likely, currently continuing the tryouts. My point is: what kind of company would resort to using free AI and then go and hire real humans you actually have to pay? It just doesn't make sense
Here is my translation of these posts about the whole hiring business and screenshots. I'll send you links via another submission or ask because I'm afraid tumblr might nuke this one
translation, if anyone knows russian and thinks I made a mistake of some sort feel free to correct me, after all there's a lot of artist argot I'm not too sure about:
august 4th:
2D artist vacancy
Friends, we announce that we started hiring artists to Romance Club team. ❤
We're YSI, an independent game development sudio from Moldova, that creates interactive visual novels. We're looking for people who may become a part of our big family.
If you're a talented character and/or game locations 2D artist (or you're just great at drawing), then you're exactly who we're looking for!
✅ What do we want from the applicants?
- creativity and rich imagination;
- to be professionaly versed in 2D graphics softwares (experience with Adobe Photoshop is necessary);
- to be able to draw by hand using a graphic tablet;
- your portfolio is necessary.
❗All of the applicants will be given a test assignment❗
✅ Why you should choose Romance Club:
- friendly young team as well as modern office in the capital of Moldova;
- to work with experienced professionals in informal and inspiring environment;
- opportunity to realize your own creative ideas;
- exciting long-term projects;
- fair wage + bonuses;
- possible career development;
- game dev is cool!
If you're interested, send us your portfolio at jobs @ yourstoryinteractive. com and briefly tell us about your skills
August 28th:
2D artist vacancy, applications closed
Friends, we finished the hiring process for artists❗
Huge thanks to those who sent us their resume. Everyone turned out to be incredibly talented and interesting.
✅ Candidates that received an e-mail from us move on to the next stage of tryouts
Our apologies for not being able to reply to everyone personally. We received a great deal of applications and, unfortunately, couldn't possibly contact everybody.
Thank you for showing interest in Romance Club and working for our company!
With all due respect,
Your Story Interactive

As a side note, it is possible that some of the artists may use AI without their hire-ups and writers and so on even knowing that — unlikely, I don't have any proof of that, but it's a possibility. But I feel that the only thing we're doing here is treading muddy waters of conspiracy theories. I'm repeating myself, but it just seems unlikely that there's actually any AI involved when the company in question just started hiring new artists. You may argue that they had to use AI for the most recent update because of the staff shortage but once again: let's not dive into conspiracy theories. Okay, I took longer than I needed to, but I rest my case
_____________________________________________________________
I agree with you on some points, it could be the artist using it without the company knowing and it is a possibility (although I think would be naive of them). But I believe that hiring artists and using AI is something that can happen simultaneously, in the beginning. One thing may not have to do with the other either. That said, it has caught our attention because the style has changed drastically from one update to the next and is very similar to how AI-generated images look. The public used to complain that the characters didn't have realistic poses and out of nowhere they change some to something ultra-realistic (without being able to see a real evolution until reaching this point), almost like a painting which happens to be very similar to how the AI works with images. It's something to be suspicious of, we shouldn't straight accuse them, but being suspicious and sharing our distrust is valid, given that many companies have recently been doing this. And if an employee is using AI and they know about it, It has to be approved by someone at the company, and it carries the company name. I don't think they're that naive (an artist's style changes suddenly and no one wonders why).
Since when they see that using AI is cheaper (or costs almost nothing) and it's fast, they have to make a decision, ethical or not.
Let's see what will happen, but I hope for a good outcome! I love RC stories and would be shame if they go for this path.
And of course, this is absolutely my opinion on this, you can agree or not and that's ok for me.
29 notes
·
View notes
Note
hi! do you have any tips on sharpening? my photoshop cs5 is messing with my old settings a bit and i'm looking for new ways of sharpening so it looks clean, and i loved your last snw gifset! thank u! <3
oh, hi!! thank you <3
oh god, the terror of sharpening. i recently had to create new sharpen settings cause i've started to use 2160 rips for my snw gifsets and it took me a while to find something that didn't make their faces look way too smooth, or, worse, overly sharpen it!!
i'm not the best at explaining things, so i wanted to see if i could find the tutorial i used to build my sharpen settings but i can't! i did however find this one here from @completeresources which seems similar and very easy to follow! i like to both sharpen and add a bit of blur to my gifs so they look crisp without looking grainy.
there are my current settings:

i recommend choosing a scene that you've colored before and isn't too hard so you can play around. i made various versions of the same gif as i was trying to find what i needed.
to give you a feel of what this does, i thought i'd remake one of the gifs of my last gifset as i still had the screencap folders on my desktop!
i choose the uhura scene cause i thought it was the gif which looked best.
here is the gif without any sharpen, only my coloring:

now let's look at the final result, using the action i screenshotted above:

look how better it looks! see how her eyes look very clear, and so does her skin. compare her lips, her cheeks, the gleam of her eyeshadow! look at her eyelashes!!
sharpen makes a huge difference!
but, take a look at the original gif! it already looks kind of good. why? cause i'm using 2160 and that's a game changer! that is what truly makes my gifs look so clear, not any special talent or trick!
cause i'm insane i also have the 1080 version saved, so i thought i'd take a look at the difference.
i ended up using the same sharpen settings as the one i posted above (i have a different action for 1080 gifs, but the 2160 action honestly looked better this time).
1080 rip using the same sharpen settings as above:

it looks pretty! i would post this without any problem and cry about how happy i am with the result because i am proud of it! but go back and look at the 2160 sharpened version, look how clearer the pixels look!
so yeah!! this my sharpening process, hope this helped you somewhat, i know i'm not the best at explaining things, so if you have any questions, please feel free to yell at me in the dms!!
7 notes
·
View notes
Text


@yukikorogashi Asked. HELLO MY FRIEND! ❤️ Before this year ends, I just wanna start by saying-- MAN! I'm just so, so glad that I got to meet your wonderful self??? I will say it's certainly one of my highlights during these last few months, meeting a fella as splendid as yourself!
I already mentioned all of this before to you through our IMs, but you bring so much life to my boy here, and just do him so, so much justice! And I thank you, with my hands holding yours, for giving him the love that he so long since deserved! And of course, I absolutely look forward to him and Itsuki interacting, in developing their hilarious lil' Looney Tunes relationship, overtime! It's gonna be so fun, and another thing to look forward to this coming year!
You are just such talented individual too, Mt Beast, like omgoodness??? Your writing, your art, your graphics-- not to mention the fact that you have been such a pleasant chap to get to know. You really are a marvellous bean, and again I'm so glad I found your blog when I did, and look forward to interacting with you more in the near future!
May next year treat you well, my friend. As you so rightfully deserve! Here's to you! 🍷 AUEHAUWHE!!!!
↳ 2023 is almost over! // 𝐀𝐂𝐂𝐄𝐏𝐓𝐈𝐍𝐆
𝐎𝐔𝐓𝐎𝐅𝐂𝐀𝐒𝐇. Y'know, I do not think there are even words to describe the amount of joy and gratitude I felt when reading this. I am SO VERY glad I had the pleasure and opportunity to meet you too Yuki⸺ I can say with much certainty that the feeling is absolutely mutual!
I can't even construct my words right but just that I'm literally grinning from ear to ear! WHWUAHAHA Hearing you say that and think that for my interpretation // portrayal of Wario means so much more than you think it does for me. It's honestly an honor to hear that I am doing him justice. So thank you⸺ Thank you VERY much. I too cannot wait for Itsuki and Wario to interact. I still think about the plot in my head and the things we spoke about with their possible bond, depending on how things go in RP, but it kills me EVERY time. I may not KNOW who Itsuki is, but shoot I dont think I need to. All I know and need to know is you make her an outstanding joy of a character! You give her such personality that if she acted any other way I don't know if I'd enjoy it as much as I do when she's in your hands HWUWHAHAA!
I appreciate you enjoying my writing and my art, I do take a great deal of time in it, especially my writing. Drawing comes more naturally for me so to speak its a lot less brain power as opposed to writing. So to know you favor both and not just one over the other is an honest to god best compliment for me to hear If I'm being honest HAHAAHAH. Also I must give credit where credit is 1000% due, @sangdelune did my graphics, I'd commissioned them to do it. They brought my ideas to life in ways I cannot describe. I do not know the floor from the ceiling when it comes to photoshop or anything remotely in that area, I cannot do that. I'm a writer and an artist--NOT a designer. Best editing I do and can do are my reaction icons. THOSE I DO edit. But that's just the most basic bare minimum knowledge one needs to know to edit the reactions; its nothing supreme or outstanding I'd say. I actually plan on bringing them up in a near future post; once I hit my 100+ follower's count ( which seems to be nearing...) give them a segment because since I was/am so new here in this RPC, I felt me doing it with not much of a following would make them go unnoticed. i.e. no on taking the time to go back to read my first post(s) I made here about them. But for anyone who DOES need anything with graphics GO TO THEM. They were a blessing to work with, I had very VERY specific ways I wanted things done and created to really emphasize how I viewed and seen Wario and I wanted my blog to really exert that. So even if you dont read my writing, you still get the FEEL // aura, per say, that Wario emits when youre on my page and they hit it all on the nail and BLEW my expectations away. Very communicative, quick with getting back to you, good with keeping you in the loop of things, and is just an INCREDIBLE designer and an amazing person to work with. I honestly am grateful and LUCKY to of found them.
SALUTI MY FRIEND! I cannot wait to see what the year to come brings, but I hope whatever it is, it brings a lot more interactions with you!

#。*゚+.*。🧄— $𝐎𝐔𝐓 𝐎𝐅 𝐂𝐀𝐒𝐇;; ooc#。*゚+.*。🧄— $𝐌𝐄𝐌𝐄;;#。*゚+.*。🧄— $𝐒𝐀𝐕𝐄;;#// This made my ENTIRE night.#// saving this for when I wanna look back at it...#// You're far too kind of a person Yuki
3 notes
·
View notes
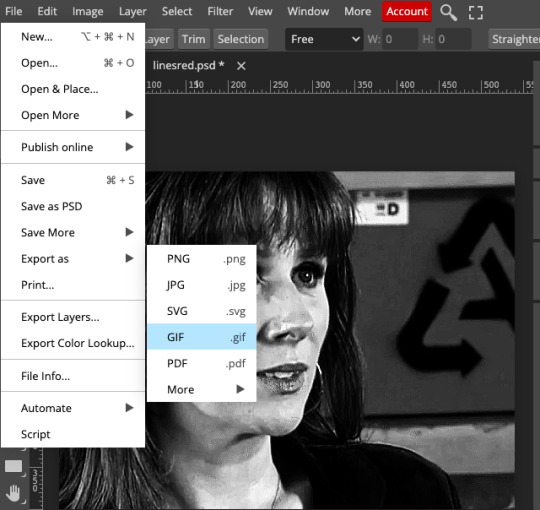
Photo
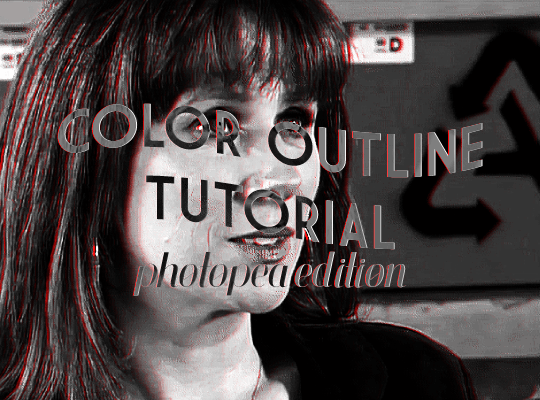
@lightasthesun requested a tutorial for how to create the colored outline effect on black and white gifs, so i am here! this was heavily inspired by @usergif’s wonderful tutorial for the same effect on photoshop, which you can find here. i am constantly in awe of the whole team over at usergif. they’re crazy talented.
onward!
so to start off, you first want to make and upload your gif to photopea, then sharpen, crop, and resize. i cover how to do all of this in my intro to photopea tutorial, which you can find here.
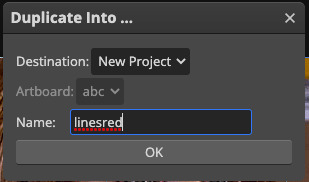
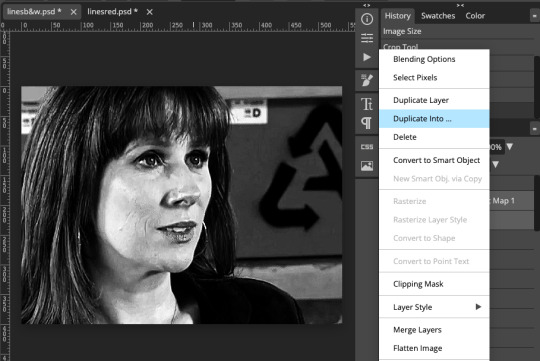
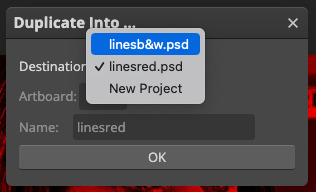
now that you’ve done this, you want to make a second copy of your gif. right-click (or two-fingered click for mac users) the gif folder in the workbar, then select “duplicate into”:

now choose “new project” as the destination and name it something fun and funky.
go back to your original gif. next up is coloring! you’ll want to do some very basic coloring here (i literally only did a levels layer), then add a black & white gradient map layer.
once you’ve finished your coloring, duplicate your coloring into your second gif by selecting all your coloring frames. click the first frame, then hold shift and click the last frame. you then want to right-click one of the frames, select “duplicate into”, then select your second gif. click okay.

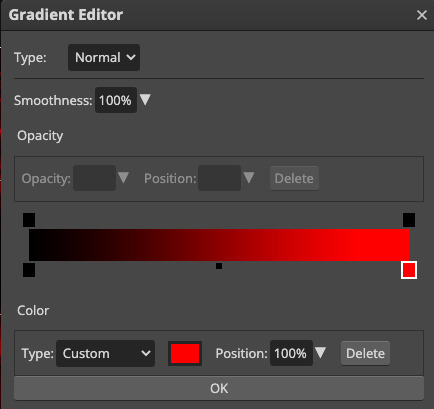
now we have our black and white layer ready to go. in order to make your color layer, go into your second gif. select the gradient map layer, then adjust the coloring so that the map is black and whatever your color is (instead of white). you can do this by double-clicking the white rectangle on the gradient scale (it’s the highlighted red one in the image below) and then selecting your new color. i chose red. click okay.
now both our layers are done! export both gifs at 100% speed by going to file, then choosing “export as” and following through to “gif.” repeat for both gifs.
now- and this is super important- reupload both gifs to photopea. you can even close out of the two you had open if you’d like, although i would recommend leaving them up just in case you have a download/upload issue in the future. from here on out, i’m going to refer to the completed two gifs you just reuploaded as gifs one (b&w) and two (color).
go to your second gif (the color one). we now want to duplicate the color gif on top of the black & white one. select the folder in the work bar, then right-click, select “duplicate into”, and choose your b&w gif as the destination.
if you go to your b&w gif, you should now have your color gif on top. make sure you ONLY have gif frames and not adjustment frames, and that the gifs are in two separate folders in the same workstation, or else these next steps won’t work!
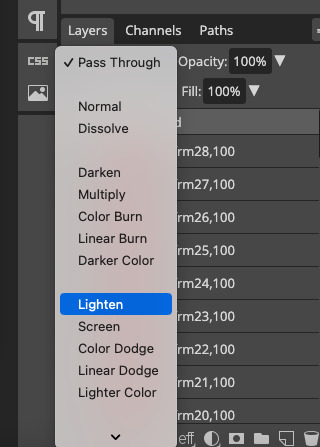
we’re almost done! next, you want to change the blending mode of the color gif. select its gif folder, then go to the blending mode dropdown just above it (it’ll likely say “pass through” or “normal”). scroll until you reach “lighten”, then select it.
you’re now going to move the color gif to form the outline. it’s VERY important that you make sure you have the arrow selected in the toolbar on the left (it’s at the top). select all of the frames in the color gif by clicking the top frame, then holding shift and clicking the bottom frame. use the arrow keys on your keyboard to move the color gif a few pixels to the left or the right. i don’t have a picture for this step because it’s kind of hard to actually show, lol.
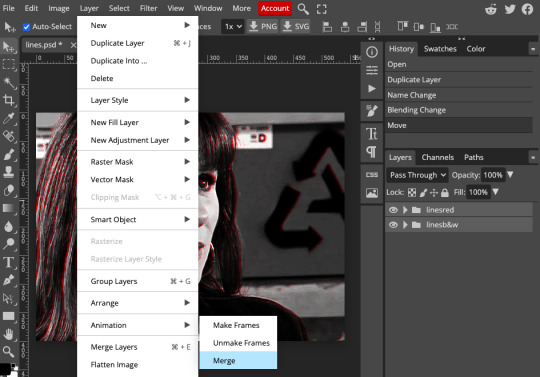
finally, you want to merge your two gifs into one gif. close both gif folders by clicking the arrows next to the eyes in the workbar, then select both as you’ve been selecting multiple things all throughout this tutorial. go to layer in the master menu, then scroll to “animation” and select “merge”. DON’T select “merge layers”. that only helps you if you’re not dealing with animation.
export gif, and you’re done! as ever, let me know if you have any questions!
#arwen.text#resources#tutorials#photopea tutorials#completeresources#allresources#dailyresources#gif tutorial
89 notes
·
View notes
Text
Internet culture project work by Jaime Hernandez
No Gods, No Masters, Everywhere.
Ever since I've decided to pursue a career in animation, the internet has become a very "big" thing for me. Exploring and discovering all kinds of people and witnessing the art they each create. It's amazing, inspiring, and overwhelming. I think my favorite thing is to hear about the joy people get from creating and from taking in creations. I love "seeing" evidence of craft. Things like fingerprints, smudges, stray lines, and rough, sketchy art. It's a real great feeling seeing someone else's movements and life in their art, music, anything really. On the other side of that, Access to that practically infinite pool of creation, talent, and skill, leaves you in a very compromised state sometimes. Art is an incredibly accessible thing. I believe any artist of any skill has an incredible well of potential. You could pick two rocks up from the ground and smash them against each other and create sculpture, you could burn, break, build, glue things together and it's art! So, to see what others are capable of makes you take inventory of your own strengths and weaknesses. My biggest problem is that, not stacking up next to my peers or "idols". It's hard. It makes things feel impossible.
My piece is a mix of traditional and digital media. I used Clip Studio Paint to draw the figure and computer and desk, Photoshop to edit the smaller "icons" I inserted into the screen, and a GIF making website to arrange the frames and set a good timing for them. Making this took me to a few more tutorial pages than I'd be happy to admit. I had to learn about auto processes, and I had to relearn how to use masking layers in Clip Studio since Photoshop kept crashing on my laptop. I'm still not quite learned on how to use my software's animation features, hence the gif making site. If I had managed my time better, I'm sure it would have made quite the difference in terms of the way I arranged everything. I probably would have also been able to take my concept a bit further, as this piece is scaled down from the initial idea I had. I had wanted to draw a lot of figures of "internet icons" in the background, but for the idea I wanted to convey, it just didn't make much sense.
0 notes
Text

AI Generators and testing the quality with prompts.
First I must say I still have an issue with the ethics of AI generators for visual arts. As many if not all, according to my research were trained on other’s copyrighted work, it’s an ethical issue that is not going away. Yes I know that now many have stopped doing this but it’s too late as these AI’s already grabbed the art of others and it’s probably still in their data sets.
Also when someone used an AI generator you have no way of knowing if they put in a handful of words or the longer prompts that some artists say are needed to create truly amazing pieces.
Having said all this and personally not having used any AI generators at this point, other than to play with them as a toy, I thought let’s do a test to see how well they generate a visual piece.
I do this because I know that others of less skill and talent than I for digital drawing and painting, will easily surpass me using these tools and I still need to compete. As a digital artist who uses Photoshop and an Xppen graphics tablet, I would never claim my work is done on paper. And I have never claimed that. I am always very honest about how my work process goes. And if you are wondering yes I know that Photoshop has AI filters, and while I have played with them to see how they work not one has EVER made it into my finished pieces. Usually, they are too much of one thing or another and I end up creating effects on my own.
So I decided to channel my inner writer and create some prompts. Back in my 20s I wrote sci-fi short stories and had some interested editors but I had to get a paying job and drop the writing. So this was a chance to test AI generators and see the results.
I am writing three prompts of increasing detail and word count. While I will not be sharing the exact words I will tell you the word count.
Read the rest and see the results here.
1 note
·
View note
Text
Artist Interview - Jessica Durrant - Strathmore Artist Papers

Who are you and what do you do?
My name is Jessica Durrant, I am an illustrator based out of Atlanta, Georgia. I specialize in watercolor & gouache fashion and lifestyle illustrations.
Why do you do what you do?
I have loved fashion and drawing women in particular since I was a child. My mom had a big influence on my love of fashion and in particular dresses because she is a talented seamstress and would make me dresses when I was a young girl. I would accompany her to the fabric store and learning about creativity from her had such an impact on me from the start.
What made you decide to focus on fashion as a subject?
Fashion is such an art form to me. It has this power to change how you feel about yourself, and your confidence, and that can not only change your day but your life. I also am so inspired by fashion photography, and vintage fashion magazines and just going to a designer's store-it all calls out for me to create.
What are your favorite subjects (live fashion shows, weddings, awards shows, etc.)?
I think I will always love books/magazines the most. There is something about sitting down with something that is not digital or electronic that makes me feel like I am a kid again, and that is the best mental state to be in with my creativity. Flipping through old issues of Vogue (which I go to libraries and visit archives pretty much every quarter) is one of my greatest sources of constant inspiration. I think no matter how much I might reference the past, because I live in the future, it creates this hybrid of past meets present that I love.
Are there any trends that have been your favorite to sketch?
I love seeing the use of color and volume in fashion. I love Valentino’s use of color and the color combinations feel very fresh and new. Which is hard to do with fashion. That has helped me in my latest pieces to use colors and different combinations to see how they can bring a fresh take on my work.
Which designer’s shows do you look forward to every season & why?
Valentino of course, and McQueen’s use of structure and silhouette.
How and when did you get into art?
I started drawing when I was three, and always felt a spiritual connection to my gift. That made it easier to study it, and believe in myself-even when the world didn’t always. I got my degree in illustration, and after traveling and having real life set in I started creating meaningful work that I began selling in an online store. That became my full-time job within a couple of years and then I began getting freelance work regularly.
How has your practice changed over time?
I’m def more efficient, because of the demands of illustration. The biggest changes have been now I have an archive of all my existing work from the last decade and I know how to digitally reconfigure, and edit all my pieces to make new collections and changes constantly. That is perfect for licensing, and also for all the editing I have to do with illustrating for clients. Such as, say I have a client asking for a collection of floral themed dresses, I can take existing patterns I have painted and apply those to new pieces and old pieces and present them with a ton of options. In the beginning, I made everything by hand and didn’t know how to edit things digitally. It made my work that much harder to revise for clients. Now I can easily change a million things in Photoshop. Phew! And it’s fun for me.
What’s your favorite piece of art that you’ve created? Why?
Trees as Veins. This piece has the most meaning to me because it reflected what I was going through at the time. I was ending a decade-long relationship, so the dead trees within the painting represented that. I use a lot of symbolism in my work with nature when I want to express an emotion without being literal. I was proud of not only how technically good the work was, but that it felt like I was being a true artist with the emotion conveyed in the piece. It was cathartic for me.
What’s the best piece of art advice you’ve been given?
I think Andy Warhol said it best, “Don’t think about making art, just get it done. Let everyone else decide if it’s good or bad, whether they love it or hate it. While they are deciding, make even more art.”
What’s one art tip/technique you can share with us that you find really helpful?
The wet-on-wet technique is my favorite, you can see me use it in my reels on my Instagram @jessillustrator. It is the foundation of most of my pieces. The way the paint dries is incredible. I use a wash of water, then drop in India ink, and let it flow. I try not to touch it too much. Overworking in watercolor will kill your piece.
Do you have any secret tips or techniques you use to salvage a piece when you make a mistake?
I try not to throw away things too quickly. I say, keep a stash of paintings you aren’t sure about. Then keep them on standby for impromptu painting sessions. Painting over something, or adding something without giving it too much thought can actually incite an idea you would not have thought of.
What is your favorite Strathmore paper? Why?
I love the 300 series cold press 140lb watercolor paper. I have been using it from the very start! In fact, I think all my earliest work I created (the work that got me my career) was all on that paper. Because not only is it affordable, but it does the job. The bleeding and color effects I get on it are great. I always recommend this paper to my students when I teach workshops.
What art materials could you not live without?
Paper, India ink, and a liner brush and flat angle bright brush. Those are what I use pretty much every day.
What types of colors are you drawn to for your art and why?
Blue and green, they are the most emotive and striking colors to look at for me.
Who are your biggest influences (or who were when you started doing art)?
So, so many, it’s a mix of people like Rene Gruau, David Downton, and many Swedish and Scandinavian designers. My all time favorites are Henri de Toulouse-Lautrec, and Frida Kahlo.
What’s the most common art-related question you get from your followers?
What paper am I using? And how did I get to work with the clients I have?
Website/social media links:
This content was originally published here.
0 notes
Text
Anime studio debut 9

#Anime studio debut 9 how to#
#Anime studio debut 9 pro#
#Anime studio debut 9 free#
Talented artists have the potential to use their drawing skills to create some really badass looking comic style characters and create some really amazing looking animations by individually creating the various limbs, body parts, facial features and so on within their own unique layers so that they can be animated without warping or affecting the other body parts. After an hour or so of frustration with not being able to find the correct tools that I require, I eventually figured out this minor annoyance and then was on the right path towards animation heaven. One time where I swear I didn’t have any blame was when I was unknowingly operating in the “Beginner” interface while the instructions were for the “Advanced” interface but did not state this anywhere. Where the hell are my bone tools, they should be here? Whoops, my bad, I’m working from the wrong layer”. “Why can’t I change the drawing now when before I could? Oh, I’m in the wrong frame. I experienced several issues during my tutorial where I stuffed up a step, thought I was doing it properly, and then automatically assumed the program or the tutorial instructions were flawed, all because of my own foolish mistakes. The thing about this program is that any time something isn’t working properly or a command isn’t responding the way you expected it to, it is almost always going to be your fault for failing to correctly follow the instructions. Other sweet features that exist are the ability to copy and paste keyframes to quickly create animation loops, quickly inserting or copying across various mouth positions for fast and simple lip synching, as well as the fantastic ability to import your pre-existing Photoshop masterpieces as layers into the program to be animated however you please. During my spelunking session I stumbled across certain cool features such as a character wizard that allows you to easily tweak a pre-existing character template by changing height, colours and so on, which was cool because this also featured being able to see the character from different angles (in front, behind, from the side etc) while also including a looped walking animation.
#Anime studio debut 9 pro#
The overall concept is very straightforward and easy to grasp, but is an incredibly powerful device for making some sweet animations (have a look at these examples here).Īfter an hour or so of following the instructions step by step, I decided to go exploring for myself (which may not have been the wisest idea, as if I had have followed the tutorial all the way to the end I would undoubtedly be a pro at animations by now instead of being the mildly enthusiastic amateur that I currently am). In a nutshell, the most basic way of creating an animation in Anime Studio Debut 9 is to draw out your character, place bones into each of its limbs, and then move the various bones at different points in your timeline to create movement. So far, so good! Next up I was introduced to “bones”, which basically act as an anchor from which motion and movement takes place.
#Anime studio debut 9 how to#
My very first hands-on test whilst being instructed by the included beginner’s tutorial was as simple and successful as could have been hoped for, as I was guided through various drawing tools, introduced to keyframes, shown how to manipulate the shapes for motion and so on. Thankfully, this is not the case with Anime Studio Debut 9. This is a great way to begin a program such as this, for too many times in the past have I installed a new program only to be bombarded with an interface and tools that are foreign and scary to me, resulting in me being overwhelmed and rage quitting because I did not know where to begin.
#Anime studio debut 9 free#
Upon first opening this program, a popup menu appears that presents you with various options such as viewing an introductory tutorial and downloading free bonus content and so on. Please hold all applause until the end of the review. Following in my new found tradition of reviewing things that I have no previous experience or skill with (check out my review of Manga Studio Debut 4 to see what I mean), may I now proudly present my noob’s review of Anime Studio Debut 9 by Smith Micro.
0 notes
Note
hi! hope you're doing well! I wanna start by saying you're so talented and your creations are stunning! and this set is amazing! /post/683067137451048960/emoji-association-challenge-anonymous-asked I was wondering if it would be okay to explain how you did that effect with the emojis? thank you so much!
thank you so much, that's so sweet of you to take the time to say!
i'm currently away and i only have my work laptop with me, so i won't be able to provide any screenshots (sorry!), but i will do my best to explain with words.
so the first thing you'll want to do is find outlines for each emoji. these are actually not specific to the actual emoji, but i just wanted to find ones that fit fairly close. so let's take jesper's for example: i just searched 'goat outline', made sure i was looking at results which either have 'stock' or 'clipart' in them (these are free for use) and picked one i like! additionally, you can look specifically for .pngs with clear backgrounds to skip the next step, but this can limit your choice a bit. once selected, load your image into photoshop! if it has a background, you can use the magic wand tool to select white areas and delete them, this means you're left with just the outline.
now make sure your outline is resized to the size that you want it, and place it on the same canvas as the gif you are trying to place within it. for this gif, make sure the entire gif (+ colouring) is in it's own separate folder. now, use the magic wand tool to select the very centre of your outline (if it is completely cleared and there is no gap in the outline this should be very easy! but more intricate outline designs may mean you need to take more care), this should mean that just that inner area is selected! now, via the layers panel select the folder your gif is in and hit the layer mask button. this should create a layer mask which only reveals part of the gif that is within your outline!
keep your outline on top of the gif so that it outlines it. i changed the colour of mine to match the overall colour of that gif and then set it to 'exclusion' so it had a bit of texture. and that's it! i hope this helps, again sorry i can't provide screenshots right now but if you have any further questions do feel free to ask :)
1 note
·
View note
Note
Thoughts on lightning wearing any of cloud’s fabulous dresses?
I wish I had photoshop skillz so I could make manips of her wearing them because she would look FABULOUS
especially in the blue/black one
someone do this please lol

3 notes
·
View notes
Note
I was wondering if you could do a tutorial on this gifset that you did i really like ittt
Thank you for sending this in, anon! I’m glad you liked it and wondered how it was made :) Fun fact: the day before you sent this, I had just started working on my next set in that “Select Filmography” series. I hope you like that one too when it’s ready!
I think I should start by saying I’m pretty new to giffing myself and there might be more efficient ways of getting to the same result. However, the point here is to show you the process I went through to make this gifset and hopefully help you understand how to make a similar one.
To follow this tutorial, you will need some version of Photoshop and some giffing knowledge. I know there are multiple ways of making gifs so I’m just letting you know I’m using the timeline and the “Convert for Smart Filters” option (I don’t really know how else to call it).
Now let’s get started!
STEP 1 - CHOOSE THE SCENES
It might sound obvious but, in my opinion, this is the most crucial step. It’s also the one that takes the longest (along with step 7, aka the coloring).
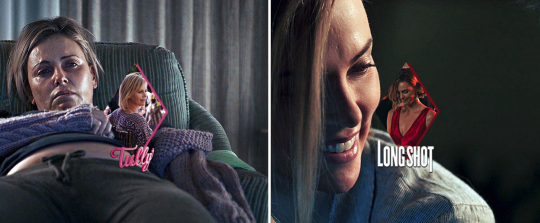
At this stage, you need to have a general idea on how you want your set to look like so you can choose the scenes accordingly. In my case, I knew I needed two types of shots for each movie: one close-up for the main gif and one mid shot for the shape. I also needed to take two other criteria into consideration: the movement (because of the shape) and the lighting (because darker scenes are such a pain to color). Last but not least, I didn’t want the characters to be talking (but that’s just a personal preference).
With all of that in mind, you can start saving a few screenshots of scenes that meet your criteria (or at least some of them). In the end, there won’t be that many to choose from so be prepared to make compromises.
STEP 2 - MAKE A DRAFT
Now that you’ve preselected a few scenes, you can make a first draft. This will help you turn your general idea into something more concrete.
Basically, this is your opportunity to organize your thoughts. What size do you want your gifs to be? What shape are you going to use? On which side do you want the close-ups to be? Do you want all of them to be on the same side or do you want to alternate from one gif to the other? Do the scenes you chose work together (gif-wise but also set-wise)? Are you happy with the way it looks, overall?
By answering all of the questions you might have now, you’ll save yourself a lot of time, trust me. Of course, you can totally skip this step if you already know exactly which scenes you’re going to use and how you’re going to present them together.
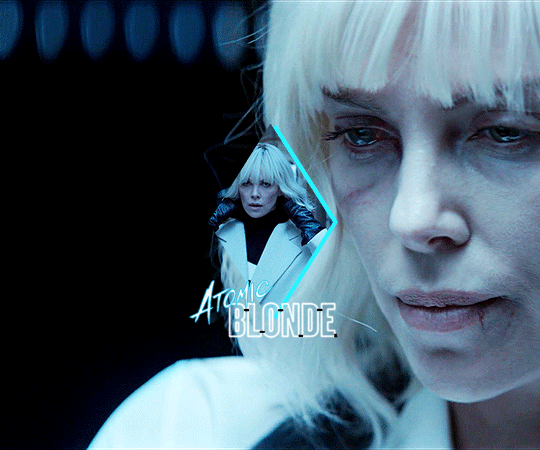
To give you an idea, this is what my draft looked like for Atomic Blonde.
STEP 3 - PREPARE YOUR GIFS
Once you have a clearer view on how you want your set to look like, you can finally start giffing like you usually would (i.e. importing, cropping, resizing, etc.).
It should then look something like this.
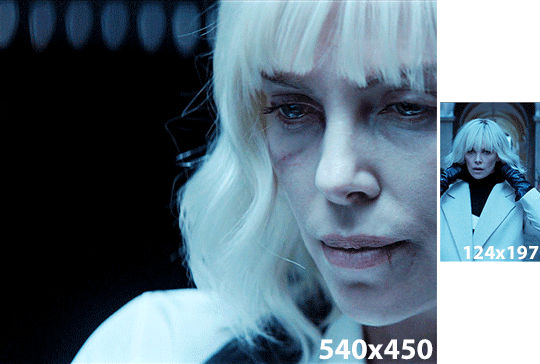
The important thing to mention here is that you want both of your gifs to be the same number of frames (32, in my case).
Ideally, you should also aim for the ~same~ coloring (especially for the skin tone, since both gifs will be so close to each other). This bit is particularly difficult when you chose scenes which have opposite lighting (see my two uncolored gifs below). Remember how I insisted on steps 1 and 2? It was to help you avoid this. So my advice would be not to choose these types of contrasted scenes, unless you can’t do otherwise and you’re ready to suffer!
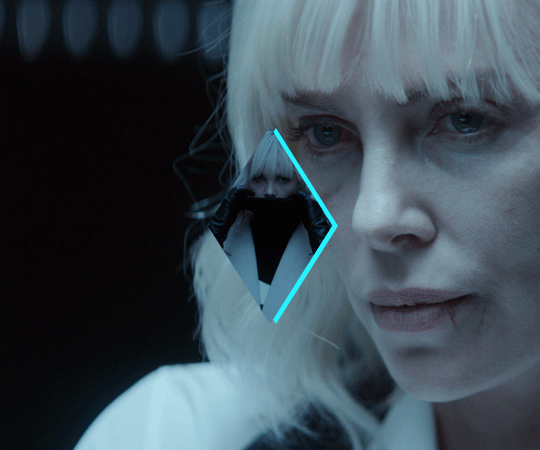
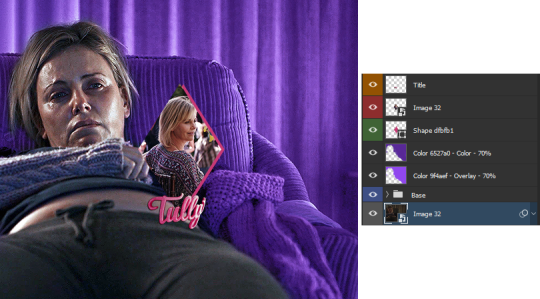
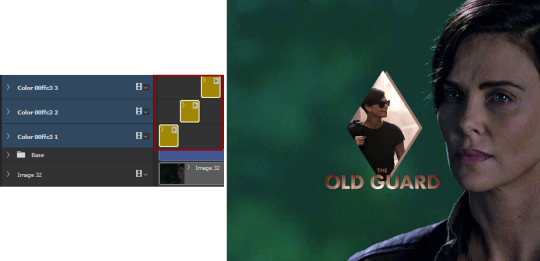
STEP 4 - MAKE YOUR SHAPE
To make your shape, you can click right on the Shape Tool (U) and select the last one, Custom Shape Tool. From the Shape menu appearing on top, you will be able to choose the shape you want from the drop down list and start drawing on your gif.
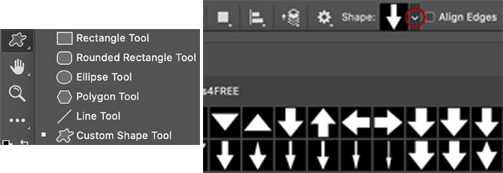
To be more precise with the dimensions, you can manually adapt the length and height from the Shape menu itself. I decided to go with the same ones as my gif.
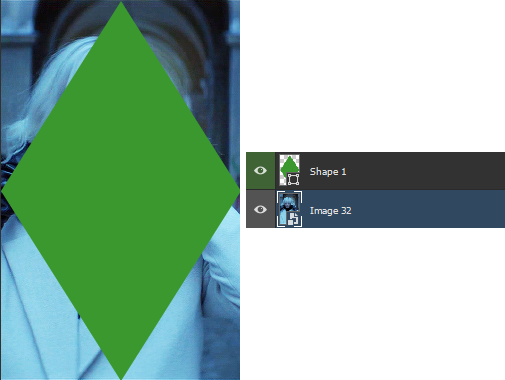
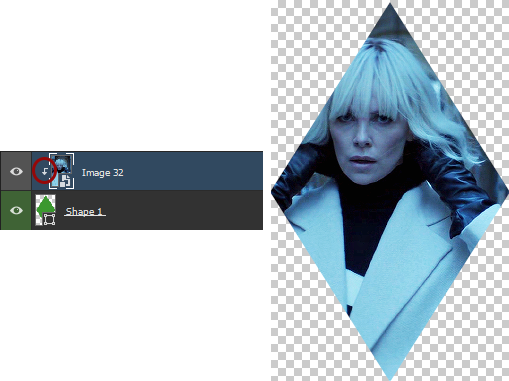
Once your shape is positioned like you want it to be, you can drag and drop the shape layer under your gif. Next, you will have to click right on the gif layer/smart filter and select Create Clipping Mask. The result is as below. Note that if the size of your shape was smaller than your gif, you would still be able to reposition your gif with the Move Tool (V).
You can now export your shape gif, reopen it in Photoshop and convert it again to the video timeline and to a smart filter. This is where I’m not sure it’s the most efficient way of doing things but it’s the only way I found to keep the coloring of each gif separate. I also find it easier to work with a smart filter.
STEP 5 - COMBINE YOUR GIFS
To add your shape gif to your main gif, you can simply click right on the shape gif you just reopened and select Duplicate Layer. You can then choose the project which contains your main gif to duplicate it in there. Now go to your main gif and reposition your shape gif where you want it to be (how many times did I say gif here?). Finally, you can draw a new shape, using the same dimensions as in step 4, reposition it and choose any color you want from the Shape menu.
Since you will be repeating this process with your following gifs, I suggest you add a few guides so you know exactly where you should place everything to make all of your final gifs look the same.
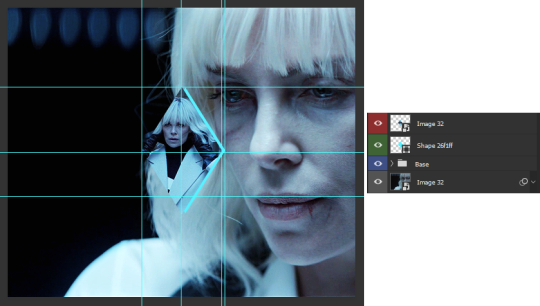
(In case you’re wondering, the “Base” folder contains my adjustment layers/basic coloring for the main gif.)
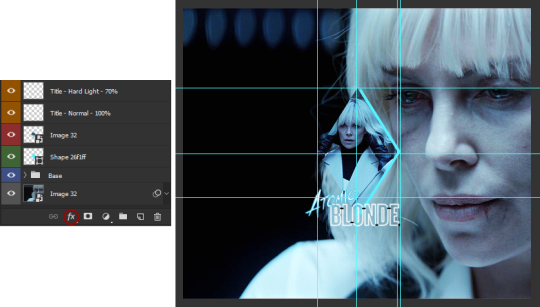
STEP 6 - ADD THE TITLE
This step is pretty simple: go on the web and type “[name of the movie] title”. Download the png you like most, open it in Photoshop and resize it to a length of about 150-200 pixels. Next, duplicate the layer to your main gif and reposition it. In case you need to resize it again, select the title layer and go to Edit > Free Transform (Ctrl+T).
This is optional but in case you want to change the way it looks, know you can always duplicate the title layer and play with the blending options (see below). The good thing with a png is that you can also add some effects by clicking on the “fx” button.
STEP 7 - ADD COLORING (OPTIONAL)
To be honest, I had not planned on coloring my gifs. But I had already spent so much time on them and I was still unhappy with the way they looked. I mean, see how grey-ish they are? Not great...
So the only thing left for me to do was to add some colors. Now, since coloring is worth a tutorial on its own and it already exists, I suggest you read through becca’s mega coloring tutorial (and especially steps 3 & 5). Seriously, shoutout to her for making this incredibly useful tutorial. She is so talented and I love everything she makes!
My Atomic Blonde gif barely even needed coloring so I’ll show you what I did for my Tully and The Old Guard gifs.
For the first one, once I had found which colors to use with which blending option and opacity level, I only had to remove the colors from the left side of the gif because there was barely any movement in that scene (phew!). For the second one, on the other hand, I decided to color frame by frame because there was way more movement, in comparison. This is quite a tedious process, which is why you want to limit yourself to a certain amount of frames.
I’ll conclude by saying there are so many things you can do with coloring and what works with one scene might not work with another. So experiment with it: try different colors, play with the blending options and opacity levels, add some gradients and/or gradient maps, etc. Just know it will take some time to get to a somewhat satisfying result!
And that’s it... I hope this tutorial made sense and was somehow helpful. Of course, don’t hesitate if you have any questions! Also, if you do end up making a similar edit, pleeease send me the link or tag me in the replies or something ‘cause I would definitely love to see it!!
#asks#anonymous#tutorials#resources#completeresources#allresources#itsphotoshop#putting all of this process into words took so long i really hope it makes sense#also i can't help but wonder if it was my before/after post which prompted this ask...#gifs#gifs: tutorials
368 notes
·
View notes
Text
IMPORTANT NOTICE
[Please read this, it’s important.]
//Hey everyone, it’s the mod here.
//In case it wasn’t already obvious, I need to make a very relevant announcement, because it relates to the future of this blog.
//I did mention beforehand that I would be making this announcement, and whether or not it’s good or bad remains to be seen.
//I will say outright that I don’t plan on stopping the blog. I am determined to see this series all the way to the end, even if it takes me ages. And I know there have been many times that I’ve had to delay, or cut short posts because of personal reasons, and I cannot thank the people who follow this blog enough for continuing to read my stuff, despite all of this.
//Hence why today’s announcement is so important. I don’t know exactly how long ago it was, but between a few weeks and a month ago, I said I was going to delay the start of the current arc because of a personal thing I was dealing with. I then had to delay it longer because I got sick with COVID-19.
//I didn’t really shed any details about what that was, because I didn’t think it relevant, and thought it quite personal, but now that I’m officially in this phase, my situation is now going to affect my writing, so I’d rather make clear what it is to the followers of the story, so that we can all be on the same page.
//Tomorrow, I will be starting university.
//This is a big deal. My life is transitioning into a new phase, and with it comes many more challenges, but also many more opportunities.
//I’ll be studying animation for those who are curious. Perhaps I may be able to use some of the things I’ve learned on the blog? Who knows?
//Anyhow, the point is that I received my timetable, and in case it wasn’t already obvious, I am going to be very busy and jam-packed with assignments right from Day 1.
//So in order to make time for the blog, I have to rearrange some things relating to the schedule, and I would like to very quickly talk about this. I will be implementing some new rules for the followers and askers.
//THESE ARE SUBJECT TO CHANGE. Since I have yet to start Uni, I don’t actually know the full proceedings of my timetable, or what times I have available to myself. But for now, let’s go with it.
1: IT’S LIKELY I WILL NEED TO TAKE THURSDAY’S OFF AS WELL.
//As most of you know, I don’t do anything relating to the blog on Tuesday’s. The reason was because I started this blog back when I was in college, and Tuesday’s were days where I got home late in the evening, and couldn’t write because I didn’t have the energy.
//My current university timetable tells me that BOTH Tuesday’s AND Thursday’s will be the same case. My classes supposedly end at 9pm on those days, which I think is extraordinarily late to get out of class, but all the same, it’s usually the time that I write things for the blog.
//I simply won’t be able to make time for blog stuff on these days, so unless I get any further notice about my timetable, I won’t be able to do anything for the blog on Tuesday and Thursday.
2: CHANGES ARE GOING TO BE MADE TO SPRITE EDIT REQUESTS.
//As most of you probably already know, I’m not against creating sprites or sprite edits for the blog. Doing so is not only fun, but also helps enhance my drawing and ability to use programs like Photoshop.
//However, it’s become unfortunately clear to me that many people overestimate my ability, and send through requests that require me to completely change the characters outfit, hairstyle, just basically everything about it.
//To be honest, I simply do not have the time to go through all of these sprite edits I’ve been sent and make them. It’s far too much effort for something that happens way too often.
//As of such, I’m making some new rules regarding sprite edits, and that rule dictates if I deem a request for an edit too arduous, or too time consuming, I will delete it, and not answer the question.
//I know it’s not fair, and I know it’s hard to tell what edits are and aren’t low effort for me, but I am a single person with a limited range of talent and capability. I cannot handle to dubious amount of work I’m given, especially now I’m going to be crushed under assignments and everything of the like thanks to my new school.
3: TIME I SPEND ANSWERING ASKS IN THE EVENINGS WILL DECREASE.
//Usually, when I answer asks in the evenings, I tend to start at 9pm and answer asks until 10:30pm. On days where I’m tired, I usually knock that down to about 1 hour instead.
//Now, I feel the 1 hour mark will be a permanent thing I need to implement, meaning on most days I will only be doing 1 hours worth of answering.
//Emphasis however on MOST days. As I said already, Thursdays are out of the question depending on how my timetable shapes up in the end. I will probably do my regular format on Friday’s and weekends.
//This one probably matters the least, I just wanted to let people know in case they were curious.
//That’s all for now. I’ll repeat again, if it ends up being that my timetable goes through any last minute changes and we can simply go through the format we’re going through now, then I will make a future post explaining that.
//I apologize greatly if this ends up being an inconvenience for some. I know I’ve done this a lot, and I hope you can find it in you to understand that living two kinds of life is difficult.
-Mod
7 notes
·
View notes
Text
a love letter to the rpc.
dear rpc,
i haven’t made a gif in nearly two years and that kinda breaks my heart.
i learned how to use photoshop from tumblr tutorials, creating graphics for this blog, and making gifs & rps. and now all these years later i get paid to make graphics for a non-profit with something like 200k followers. last week my boss asked me how i learned photoshop. i tell her i’m self taught. she says i must be really smart. i tell her the internet is a wonderful place.
i think i’m half right.
i left this blog and left tumblr during a really, really hard time in my life. (tw: death, tw: car crash) a very close family member of mine was killed in a car crash at just 29 years old and it turned my world upside down. how do you cope when someone so young, so full of life, i’m talking the person who painted your nails for the first time is just gone? what do you know when her grieving mother hands you a plastic bag chock full of glittery nail polish and says she would have wanted you to have this? people don’t tell you how to deal with grief. my method of coping: disappear from what i love.
over these past few months, i’ve stalked and lurked around the rpc. i even made a new account and a new identity where i could start fresh, i tried to write a little but nothing new really stuck. something kept bringing me back here.
i started this little blog something like 5 years ago. those 5 years and this community made me who i am. the rpc is filled with some of the most incredible, beautiful, talented, creative, kindest, warmest people i’ve known. the writing we produced here, the graphics we make, it’s honestly some of the most special art, i’ve ever had the pleasure of knowing.
the rpc has taught me more about being a functioning adult that much else. rping has taught me disciplined writing, so when i had to write a 75-page paper in a semester, i somehow churned it out with high honors. admining an rp taught me how to be a leader and manager. it taught more about workplace dynamics in a virtual environment and working with team than probably any other internship i had.
i know i’m coming back to a different community than i left. but i miss it. i miss the person i was before the grief. i miss who i was before covid. i miss writing and making things and talking with people from all over the world, because we all just wanted to create something beautiful together.
so idk, maybe this is my long way of saying i’m back (not that anyone cares)? or maybe i’m just nostalgic for something that doesn’t even exist anymore. tbh, i probably just needed to scream into the internet void.
somehow i’m 22 now. i finished my thesis. i’m graduating college and headed to my absolute DREAM law school in the fall. for the first time in very long time i feel like myself again. i feel happy. i feel like rach.
for those of you in the community that know me, i love and miss you. for those of you i don’t, i can’t wait to get to know you.
all the love in the world,
rach
#rpc#rph#rach talks#//ive been in a weird mood lately#//i just needed to get this off my chest#tw: car crash#tw: death
2 notes
·
View notes
Photo
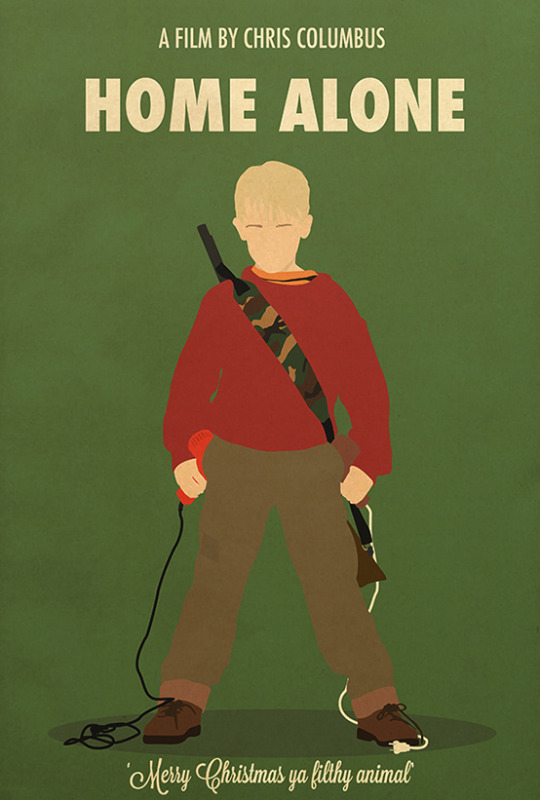
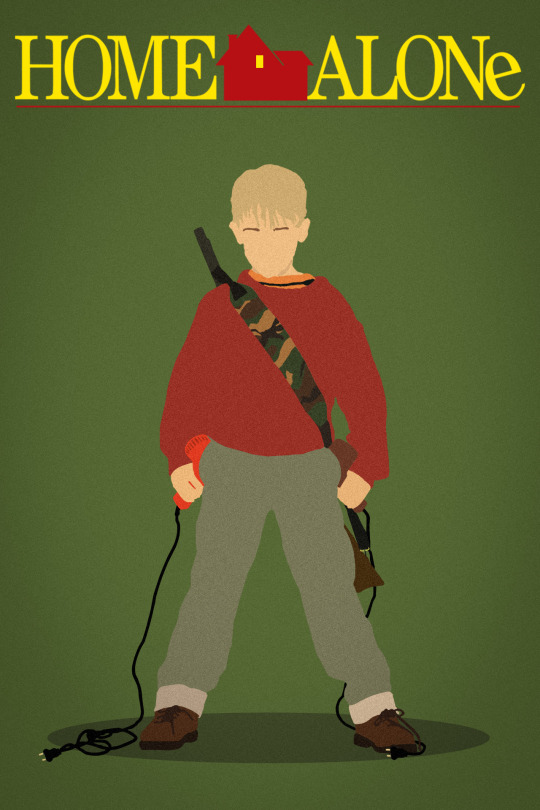
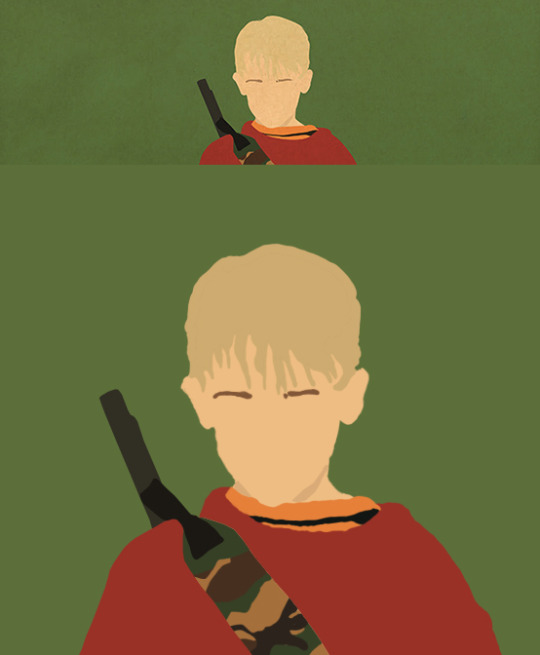
One of my recent hobbies has been remixing movie posters for my Plex media collection. Above is the before and after of a Home Alone poster I found.
I am trying to fix two main issues. First, a lot of the posters that I find are low resolution. They look like garbage upscaled to a 4K screen. Second, many of the titles and details are very small. In Plex, you see most of your movie posters as a thumbnail when searching for something to watch.

Which means you want the title to be legible in thumbnail form. And if there are any small details (like the “Merry Christmas, ya filthy animal”), those can end up looking like weird scribbles. So even if I like that saying on the big version, I leave it out so the thumbnail doesn’t have distractions. And I will redo any titles or details to make sure they can be clearly seen, even when small. Like with this Avengers poster.
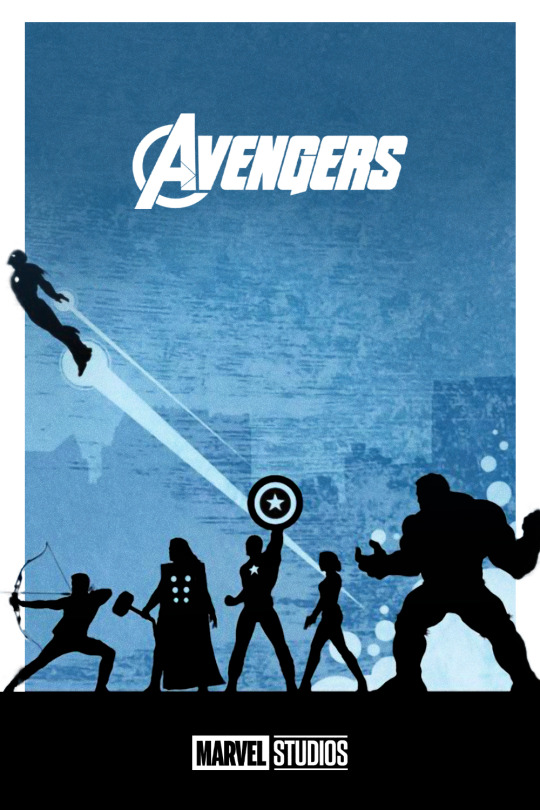
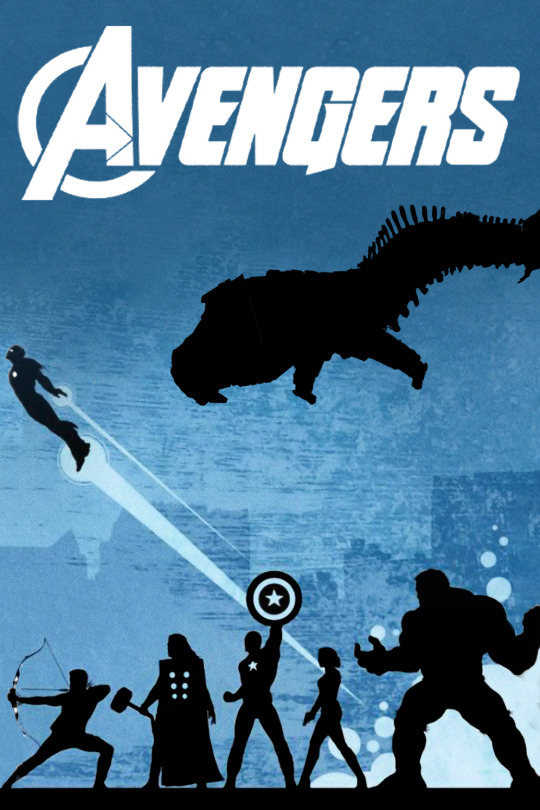
(I added a space whale too.)
Basically, I make the posters look good when they are big and small. Which is a fun challenge and I have been really enjoying putting my photoshop skills to use in a creative, slightly artistic way.
For the Home Alone poster, I found this minimalist version that I really liked. But it was only 550 pixels wide. So I basically had to redraw and recolor the entire thing at a higher resolution.
Recoloring is a bit like paint by numbers. But before I do that, I give sections false color so I can better see what I am doing compared to the layer underneath. Which creates an interesting version of the poster.
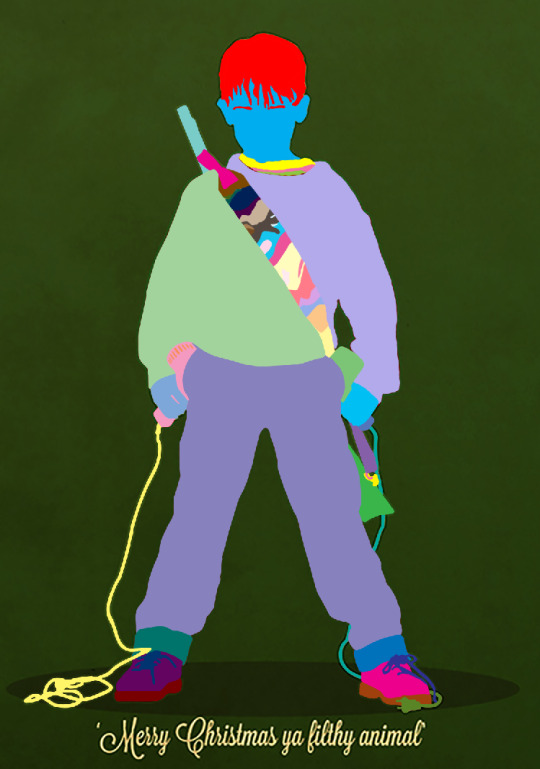
Merry Christmas, ya pastel nightmare.
That is all within my capabilities.
But sometimes I forget I am not a traditional artist and I accidentally go beyond my talents.
I wondered what it would look like with simplistic facial details. So I tried tracing those from a photograph of young Mac.
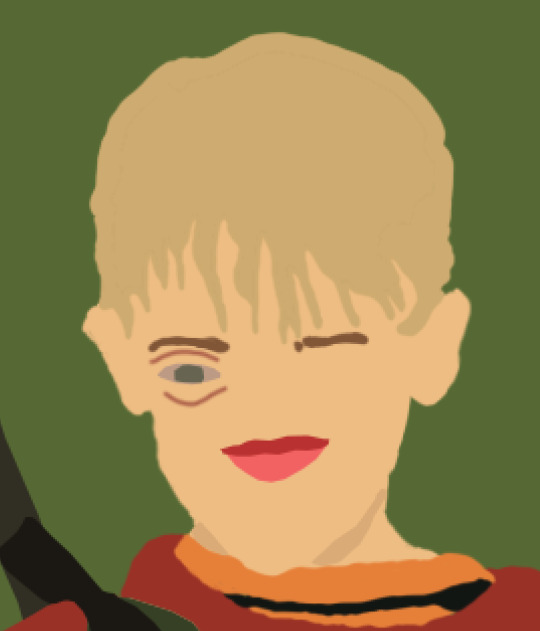
Umm... maybe if I resize them.
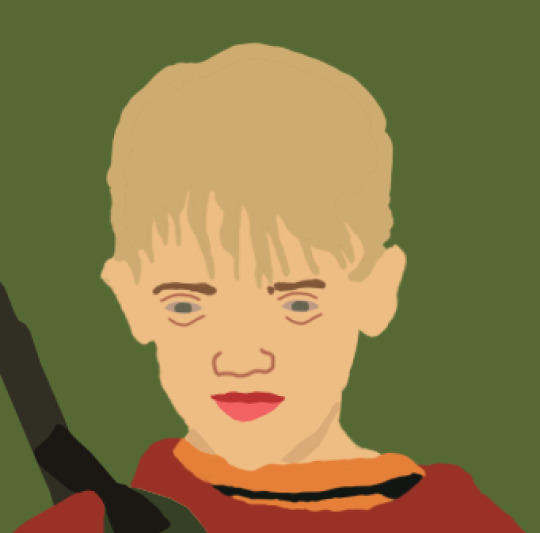
And I’ve turned him into a sad old man wearing lipstick.
I found it best to just leave him blank faced like the original.
I’ve made quite a few remixes and I am proud of some of what I’ve accomplished. I might post a few of them here when I have the energy. And you are all free to use them for your own movie collections... if they don’t suck too bad.
83 notes
·
View notes
Note
46-49 for the ask game 💗
46. ever gotten a really sweet compliment over a set?
YEAH!! i mean i read all the tags on my gifsets so i know if someone just said “pretty!” in the tags and that alone means a lot to me. but then sometimes people also send me direct asks to my inbox complimenting a set and i’m like. *laughs nervously* stop that lest i fall in love w you. uhh i honestly got incredibly overwhelmed last time this happened after i posted the triple rainbow set that’s pinned rn LOL. yall are so amazing and supportive it’s genuinely super heartwarming for me.
47. any advice for novice gif makers/people who want to start making gifs?
mm so vilma @maxguevra posted a nice lil post on this earlier this morning and imma just link hers.
but in addition to everything vilma said, i gotta be honest about patience and time being the best teacher. i think a lot of gifmakers are like under pressure to constantly create or may feel this way, but it’s genuinely okay to take a long time to make something and take the time to add in more complicated effects. idk how many times i’ve thought to myself that ppl on here complimenting me by saying like “i could never do that!” actually most definitely CAN bc they are wayyyyy more talented than me, it just might take a shitton of patience. my longest gifset took over a week and a half to make but it was worth it bc i learned a LOT.
also an underrated tip: program keyboard shortcuts!! it saves a lot of time. i literally gif with my left hand on the keyboard and right hand on the trackpad/mouse. i have keyboard shortcuts programmed or reprogrammed to better fit my hand and also bc for some reason ps 2021 didn’t keep a lot of the same shortcuts from the last version of ps i had, ps 2018. some good keyboard shortcuts to program or get familiarized with: duplicate layer, merge layers, group layers, transform layer, warp, convert to smart object, repeat last filter, undo, redo, select all, etc.
48. how would you describe your giffing style?
WELLL..... to me i don’t really have one. i guess i want to try a new style with every gifset i make? idk i’m always trying new things so it’s hard for me to say if i have a definitive style (yet).
however when i said this last week @nuntox was like “ur style is 100000000 layers” so idk make of that what u will.
49. how much would you say you’ve improved since you first started giffing?
GOD. LIKE. SO MUCH???
my first gif didn’t even loop. that’s how bad it was flkajsdlkjasd bc i took screenshots manually and then put them into a .gif file. i didn’t even have photoshop!!! obv i never posted it, i was just trying to make a gift for a friend. and even when i did get photoshop and learned how to gif properly, the gifs i made were really bad lol
gif making asks
i’ll get to the rest of these when i make more progress on this cursed assignment flaksjdklasjd
#the rage i felt when command-f stopped working in ps 2021 and i was like. NO!!! must reprogram#flkajsldkjkasdd i am a dumbass#anon#a#ps
8 notes
·
View notes
Last Seen Blogs
dauntlessengineer
archived
moemoetclown
The Soy Sourserer
coral-lolz
coral

keepersecurity-blog
Once more an IT breach.