#the new editor makes it hard to add the alt text the way I used to do it and it annoys me lmao.
Text


Long time no redesigns! As I continue to plan AUS8 I decided to get these done since these three will play some role in it. BEHOLD, THE YOUNGER SISTER SQUAD! Miele, Chimera and Sapphira (Sapphire).
Miele Robledos: we know her, canon cannot settle on her goddamn age, Miele! As you probably know from the summaries, she's the Witch of Soil, around 4-5 years younger than Flora, and has to deal with Flora's constant overprotectiveness, clashing with her reckless, adventurous, rebellious teen behavior. Her Source is Earth, which she has lightly mixed with Metal and even Water, letting her use the entire ground in whichever way she pleases.
Carmilla "Chimera" Mirthos: once more, roughly 3-4 years younger than Stella, and while they got on better terms in AUS5 they're still not super close. She's still dealing with some toxic competitive issues but she's getting better! As Fairy of the Lunar Winds, her Source is obviously Wind, with she has mixed with Water and a bit of Fauna recently as she has started helping Radius with his aviary. Her nickname of Chimera came from her childhood, where she would mix and match clothing that did not go together in the slightest, and after her transition to goth/alt styles she kept the nickname, as it sounded edgier than her actual name to her.
Sapphira Anemone Hiver: Icy's lil sis! Canon to the AU, She's around Miele's age and roughly 6-7 years younger than Icy. She still loves her sister despite her constant, constant war crimes, but she's stuck in a rebellious phase of her own and chose the path of Fairy, against her family legacy of Witches and Hexers. Outside of that she's a fairly sweet girl, though the family resemblance comes out when sufficiently angry. She's the Fairy of Auroras, with a Light Source aided by Wind and Ice.
#Drops's Art#Winx Club#Winx Redux AU#Miele#Chimera#Sapphira#the new editor makes it hard to add the alt text the way I used to do it and it annoys me lmao.
50 notes
·
View notes
Text
How to build an art website
My first attempt at building an art website was in 2016. Back then I didn't know how to write a single line of code. I bought a year's hosting with Bluehost, tried setting up a wordpress site, struggled, decided it wasn't worth it, and got a refund.
One and a half years later, in 2017, I taught myself how to code for a summer internship. I first learnt Python for data analysis, but soon realised that I could also learn HTML, CSS, and the rest while I was at it.
I finished the Codecademy course for website building in three days. Half a year later I tried coding my own Wordpress site. And, at the start of this year, with Wordpress completely revamping their website editor, I fled to GitHub Pages.
Currently my site (quietdistance.net) costs me 15 USD per year since I pay only for my domain name. That's a far cry from my first venture with Bluehost, which would have cost me 120 USD a year!
If you have no coding knowledge, and are interested in making a simple website, here are some steps I would suggest.
Learn some basic website coding. It's not as hard as some might think! Codecamy has a free course which holds your hand through the entire process: https://www.codecademy.com/learn/paths/learn-how-to-build-websites
Learn Git version control. There's another Codecademy course for that, and it can be completed in an hour!
Push your website onto Github. Github Desktop makes the process much simpler.
If you're serious about this art website endeavour, register a domain name and point that to your Github site. This step is entirely optional! Your website will already be accessible via its Github URL.
The entire process is free except the very last step, which costs less than 20 bucks. This is how I wished I had set up my site in the first place -- it would have saved me lots of money anxiety and frantically phoning technical support when I accidentally broke my Wordpress site!
Many artists these days make websites with Wix or Weebly. While these drag-and-drop, what-you-see-is-what-you-get website buiders are popular, I don't like them because:
You have to pay 5 USD every month to remove the website builder branding which is kinda ugly :( And that adds up to 60 USD a year!
Their code is clunky, bloated and slow.
Your creativity is limited to what editing options they offer you. Want links that flash rainbow when you hover over them? Cool transitions? Extra plugins? They're much easier to achieve with raw code.
If they revamp their site builder you'll need to check that your design still works the way you want it to. Since their site builders are constantly being worked on, you never know if an update might break your site.
And why Github is cool:
Github doesn't use your site to advertise themselves. They're run by Microsoft and have other revenue streams, so they don't resort to using your website as their billboard.
Unlimited sub-sites! In addition to your main portfolio site, you can easily make a separate site for every new creative project -- at no cost.
It loads super fast because it's used by professional geeks. My old Wordpress site took 10 seconds to load, and would sometimes not load at all. After moving to Github, everything could load in under 3 seconds.
You can test all changes on your computer before syncing it onto the online repository. No more accidental website breakages! Github Desktop records every file change, and you can undo them at will.

And why make a website at all?
If you post art to more than one platform, you'll realise that the number of likes/shares/comments is rather arbitrary, influenced by how long you've been active on the platform, your posting schedule, whether you've been featured, and other factors.
Instead of reflecting the quality of what you create, these numbers reflect how much value you are to the platform's advertising business. These two criteria can overlap, but often they don't. Yet these numbers can affect how other people perceive your work.
Your own website creates a safe space where you have control over how your work is presented to the world. Instead of conforming to platforms designed to maximise views and advertising profits, you have the power to create a place as weird and wonderful as you want.
It'll serve as a reminder that you're not just a data point, not just a cog in the wheel. That you should draw to make yourself happy, not just to please other people. That you're a precious and irreplaceable human being.
So sally forth and create! And may it bring you joy.
171 notes
·
View notes
Link
In today’s world, a strong online presence means more business, both through online sale and higher brick-and-mortar sales due to greater creditability and online awareness.
How can you increase and enhance your online presence? Here are five proven ways to do it, either yourself or hiring someone to do it.
1. Create concise, informative press releases that announce your online site.
The press release should provide useful information (you can find many of these on Google Trends which gives you an idea of what people are interested in right now), contact info, the site name and its features, and should be submitted only to publications that are generally read by your target market or a very broad, general segment like women, businesses, or families, for example. This is also a good way to build rapport with journalists and editors. (NOTE: Submit to multiple publishers and get even more exposure and links.)
2. Author blogs on your website.
Once you set up the blog, use it. For even greater online presence, utilize a service like Hootsuite, Buffer, or SocialOomph (also using IFTTT is good, but you might want to hire someone on Fiverr or SEOClerks to set the accounts up for you). Having a blog isn’t the end-all, it’s posting to that blog on a constant, periodic basis, i.e., once a week that creates the value and builds your online profile. You can write general blogs and then in the last paragraph relate it to your business. Having that last paragraph of relevant content is important for SEO purposes, as well as including keywords for your business in the blog. Also, commenting on other blogs related to your website's niche can be a good SEO technique. Many of the highest authority blogs are only too willing to let you comment. (Blogs are a great way to get higher rankings in the search engines. Search engines are always crawling your site, so “fresher” content, more content, and visitors linking to that content signal the search engines that there is something of value on your site, so they should direct others there. Backlinks are the strongest signa; to the search engines that your site has value.
3. Think videos.
Posting a video on YouTube that is properly tagged can help grow your business because YouTube is pulling millions of viewers in every day. You can also post on your website using the YouTube code. Videos are not hard to create: i) there are numerous free sites where you can grab a video and post on your site (while claiming ownership and being able to tag: Archive.org and Pixelbay.com are two sites that offer free videos (Shutterstock has tens of thousands of videos available on a one-time or subscription basis); ii) use Fiverr, SEOClerks, or another online vendor to create (they can b had for as little as $5); iii) your vendors may have clips they will make available to you; iv) you can create on PowerPoint and record right on PowerPoint; or, you can subscribe to Adobe Photoshop or another photo/video editor software package (or use the free alternative, Gimp); these software packages take some time to learn and some skill to use; and, v) hire us or a local vendor. Cost will usually run $400 or so for one minute, including voiceover. SALES SPECIALS CAN BE TURNED INTO A VIDEO. Properly tagged, not only will you attract traffic and businesses but also the search engines.
4. Email Lists.
Emails can be very effective as long as they are: i) directed at a target audience that has some interest in your products or services; and, ii) you send them periodic messages, i.e., every month. Once bought a direct mail marketing package after seeing an infomercial. Most important point emphasized was that repeated contact was important; they estimated average sale took nine contacts (obviously, will vary by industry but in all cases one contact ain’t going to do it. What can you say so many times: new products; personnel changes; special sales; special pricing; local events; interaction with vendors, community, church; charitable giving/events; etc. Doesn’t have to be product-specific, in fact more effective campaigns are not but your name and visibility will be enhanced. Are you capturing the email address of your visitors? You should try; that list is valuable.
5. Product feeds are valuable.
A product feed can help draw traffic and business to your site. The feed will show details that the search engines like, i.e., descriptions, images, and prices of your services and products. Submit them to sites which compare prices and to the major search engines. Add an RSS feed icon on your site or blog and suggest to readers that they should subscribe to your site's feed for the latest updates. (For most retail businesses, if you’re not selling on Amazon, think about doing it. Amazon will promote you at no cost to you.)
Every blog, video, email, or product feed should have proper SEO tagging, i.e., sub-URL, title tag, embedded keywords, keywords in the content and images with alt text tags.
OK, now you’ve attracted traffic and rankings. Is your website ready to handle, i.e., is the site visually attractive, have strong “call to action” prompts (telephone number, “Contact” button, and contact form, easy navigation, and have good content supporting the products and keywords? If not, update it. We can evaluate your site and redesign it (sometimes lonely slight changes are needed, i.e., add the phone number to the top, add visual boxes that click-through to the right page/section).
Make sure to avoid duplicate content. Each tag and written paragraph should be unique. If you cannot avoid them all together, avoid them in the index. Duplicate content and pages can lower your ranking on search engine result pages (SERP’s).
A good online marketing plan and proper execution of that plan will help enhance the company’s online profile, products, and services, as well bring more business to the site whether a national brand or a small local business. These programs and steps will help a business of any size. Contact us and we’ll help devise an effective, efficient plan and budget that works for you.
The post How to Create A Superior Online Profile/Presence for Your Business appeared first on Best SEO Company.
1 note
·
View note
Text
Scott Hanselman's 2021 Ultimate Developer and Power Users Tool List for Windows
Can you believe it's been 6 years since my last Tools list? Tools have changed, a lot are online, but honestly, it's just a LOT OF WORK to do the tools list. But here's one for 2020-2021. These are the tools in my Utils folder. I made a d:\dropbox\utils folder and I added it to my PATH. That way it's on all my computers and in my path on all my computers and I can get to any of them instantly.
This is the Updated for 2020-21 Version of my 2003, 2005, 2006, 2007, 2009, 2011, and 2014 List, and currently subsumes all my other lists. I’ve been doing this for over 17 years. Wow. I need to do better, I guess.
Everyone collects utilities, and most folks have a list of a few that they feel are indispensable. Here's mine. Each has a distinct purpose, and I probably touch each at least a few times a week. For me, "util" means utilitarian and it means don't clutter my tray. If it saves me time, and seamlessly integrates with my life, it's the bomb. Many/most are free some aren't. Those that aren't free are very likely worth your 30-day trial, and very likely worth your money.
These are all well loved and oft-used utilities. I wouldn't recommend them if I didn't use them constantly. Things on this list are here because I dig them. No one paid money to be on this list and no money is accepted to be on this list.
Personal Plug: If this list is the first time you and I have met, you should subscribe to my blog, and check out my podcasts, and sign up for my newsletter of Wonderful Things.
Please Link to http://hanselman.com/tools when referencing the latest Hanselman Ultimate Tools List. Feel free to get involved here in the comments, post corrections, or suggestions for future submissions. I very likely made mistakes, and probably forgot a few utilities that I use often.
THE LIFE AND WORK-CHANGING UTILITIES
"If everything was perfect, you would never learn and you would never grow." - Beyoncé
Windows Subsystem for Linux - It really can't be overstated how WSL/WSL2 has put the cherry on top of Windows 10. It runs on any build 20262 or higher as it was recently backported and it's integration with Windows is fantastic. It's also WAY faster than running a VM. Go learn more on my YouTube
Windows Terminal - Finally Windows has a modern terminal. You can run shells like Command Prompt, PowerShell, and Windows Subsystem for Linux (WSL). Its main features include multiple tabs, panes, Unicode and UTF-8 character support, a GPU accelerated text rendering engine, and the ability to create your own themes and customize text, colors, backgrounds, and shortcuts. It also includes a pseudo-console so 3rd party Terminals like hyper, conemu, terminus and more work better!
Windows PowerToys - They are back and they should be built into Windows. Install them here and get a color picker, fancy zones, file explorer addons, image resizers, keyboard manager and remapper, an Apple Spotlight-like running in the form of PowerToyrs Run, the Shortcut Guide and more!
Also check out Ueli as a great launcher/spotlight for Windows!
VS Code - Visual Studio Code is hella fast and is my goto text and code editor. I still use notepad sometimes and I'm in full Visual Studio a lot, but VS Code is like the Tesla of code editors. Check out my Favorite VS Code Extensions below.
PowerShell/OhMyPosh/PoshGit/Cascadia Code - I've had a blast this year taking my console prompt to the next level. Try these out but also look at Starship. Whatever you do, play! Don't accept the defaults!
ZoomIt - A true classic but also the answer to the #1 question I'm asked. How do you draw on the screen when you're sharing your screen? ZoomIt has been THAT TOOL in my toolbox. Really take some time and learn how to do boxes, arrows, colors and more and you'll be a more effective screen-sharer. In fact, just go get the whole SysInternals suite and put it all in your PATH.
Winget - It's apt-get for Windows. Similar to choco which I've used in the past, WinGet is going to be included in Windows 10 and has a ton of nice features. I use it to setup a machine in an hour from the command line, versus a day before doing it manually. Just add your MSA (Microsoft login) to the Package Manager Insiders Program and get it from the Store. It's bundled with the Windows App Installer. Then just "winget search <tool>" and winget install whatever!
QuickLook - Free in the Windows Store, just highlight a file in Explorer and press Space to get a preview!
Amazing .NET and Developer utilities
"Power means happiness; power means hard work and sacrifice." - Beyoncé
CodeTrack - CodeTrack is a free .NET Performance Profiler and Execution Analyzer. It works on basically every version of .NET and will give you massive insight into how your code is running! The flamegraph view is fantastic. It's free but you should donate as it's a one-person amazing app!
LINQPad - Interactively query your databases with LINQ with this tool from Joseph Albahari. A fantastic learning tool for those who are just getting into LINQ or for those who want a code snippet IDE to execute any C# or VB expression. Free and wonderful.
WinMerge - WinMerge just gets better and better. It's free, it's open source and it'll compare files and folders and help you merge your conflicted source code files like a champ. Also see Perforce Visual Merge which free and also can diff images, which is pretty amazing.
WinDbg - Low-level and classic but also new and fresh! WinDbg (Wind-bag?) is now in the Windows Store with ALL NEW VISUALS and more!
Insomnia and Nightingale are great alternatives to Postman for doing REST APIs!
NuGet Package Explorer - This app allows browsing NuGet packages from an online feed and viewing contents of the packages
WireShark - What's happening on the wire! WireShark knows!
GitHub Desktop - Gits, ahem, out of the way! Watch my Git 101 on YouTube!
Useful Windows Utilities that should be built in
"I love my job, but it’s more than that: I need it" - Beyoncé
Ear Trumpet - Fantastic advanced volume control for Windows! If you have ever wished that volume on Windows could turn their UI up to 11, Ear Trumpet is that app.
Teracopy - While I use the excellent built in copy features of Windows 10 the most, when I want to move a LOT of files as FAST as possible, nothing beats TeraCopy, an app that does just that - move stuff fast. The queue control is excellent.
AutoHotKey - This little gem is bananas. It's a tiny, amazingly fast free open-source utility for Windows. It lets you automate everything from keystrokes to mice. Programming for non-programmers. It's a complete automation system for Windows without the frustration of VBScript. This is the Windows equivalent of AppleScript for Windows. (That's a very good thing.
7-Zip - It's over and 7zip won. Time to get on board. The 7z format is fast becoming the compression format that choosey hardcore users choose. You'll typically get between 2% and 10% better compression than ZIP. This app integrates into Windows Explorer nicely and opens basically EVERYTHING you could ever want to open from TARs to ISOs, from RARs to CABs.
Paint.NET - The Paint Program that Microsoft forgot, written in .NET. It's 80% of Photoshop and it's free. Pay to support the author by getting the Windows Store version AND it will auto-update! It's only $7, which is an unreal value.
NimbleText - Regular Expressions are hard and I'm not very smart. NimbleText lets me do crazy stuff with large amounts of text without it hurting so much.
Markdown Monster - While I love VSCode, Markdown Monster does one thing incredibly well. Markdown.
Fiddler - The easy, clean, and powerful debugging proxy for checking out HTTP between here and there. It even supports sniffing SSL traffic.
NirSoft Utilities Collection - Nearly everything NirSoft does is worth looking at. My favorites are MyUninstaller, a replacement for Remove Programs, and WhoIsThisDomain.
Ditto Clipboard Manager - WindowsKey+V is amazing and close but Ditto keeps pushing clipboard management forward on Windows.
TaskbarX - It literally centers your Taskbar buttons. I love it. Open Source but also $1 in the Windows Store.
If you really want to mess with your Taskbar, try Taskbar Tweaker.
ShellEx View - Your Explorer's right click menu is cluttered, this can help you unclutter it!
OneCommander and Midnight Commander and Altap Salamander - As a long time Norton Commander user (google that!) there's a lot of great "reimaginings" of the Windows File Explorer. OneCommander and Altap Salamander does that, and Midnight Commander does it for the command line/CLI.
WinDirStat - A classic but still essential. What's taking up all that space? Spoiler - It's Call of Duty.
Also try SpaceSniffer!
FileSeek and Everything - Search it all, instantly!
I like Win+Share+S for Screenshots but also check out ShareX, Greenshot, and Lightshot
For animated Gifs, try screen2gif or LICEcap!
Alt-Tab Terminator - Takes your Alt-Tab to the next level with massive previews and search
PureText - PureText pastes plain text, purely, plainly. Free and glorious. Thanks Steve Miller
I still FTP and SCP and SFTP and I use WinSCP to do it! It's free or just $10 to get it from the Windows Store and support the author!
VLC Player - The best and still the best. Plays everything, everywhere.
PSReadline - Makes PowerShell more Bashy in the best way.
Yori and all Malcolm Smith's Utilities - Yori is a reimagning of cmd.exe!
Visual Studio Code Extensions
"I use the negativity to fuel the transformation into a better me." – Beyoncé
There's a million great Visual Studio Extensions. The ones I like won't be the that ones you like. But, go explore.
GitLens - Glorious. Just makes Git and VS a joy and adds a thousand tiny lovely features that will make you smile. You'll wonder why this isn't built in.
Version Lens - Do you have the latest package versions? Now you know
CodeSnap - Screenshots specifically tailored to make your code look nice.
.NET Core Test Explorer - Makes unit testing with .NET on VS Code so much nicer
Arduino for VS Code - The Arduino extension makes it easy to develop, build, deploy and debug your Arduino sketches in Visual Studio Code! So nice.
Coverage Gutters - This amazing extension highlights what code is covered with Unit Test and what's not. Ryan is looking for help, so go see if this is a great OSS project YOU can get started with!
Docker for VS Code - Container explorer and manager and deployer, directly from VS
GitHistory - Another nice add-on for Git that shows your Git Log
HexDump - I need this more than I would like to admit
LiveShare - Stop screen-sharing and start code and context sharing!
PowerShell for VS - A great replacement for the PowerShell ISE
Remote Containers - This is an AMAZING EXTENSION you have to try if you have Docker but it has a horrible non-descriptive name. But must be seen to be believed. Perhaps it's "Visual Studio Development Containers," I'm not sure. Open a folder and attach to a development container. No installs, just you debugging Rust, Go, C#, whatever whilst installing NOTHING. Amazing.
Remote SSH - Another in the VS Remote Family of Extensions, this one lets you use any remote SSH Server as your development environment.
Remote WSL - Edit and debug and build code from Windows...using Linux!
And finally, Yoncé, my current VS Code theme. Beyoncé inspired.
Things I enjoy
“We all have our purpose, we all have our strengths.” – Beyoncé
RescueTime - Are you productive? Are you spending time on what you need to be spending time on? RescueTime keeps track of what you are doing and tells you just that with fantastic reports. Very good stuff if you're trying to GTD and TCB. ;
Carnac - This wonderful little open source utility shows the hotkey's you're pressing as you press them, showing up as little overlays in the corner. I use it during coding presentations.
DOSBox - When you're off floating in 64-bit super-Windows-10-Pro land, sometimes you forget that there ARE some old programs you can't run anymore now that DOS isn't really there. Enter DOSBox, an x86 DOS Emulator! Whew, now I can play Bard's Tale from 1988 on Windows 10 in 2021! Check out Gog.com for lots of DOSBox powered classics
Oh yes, and finally Windows Sandbox - You already have this and didn't even know it! You can fire up in SECONDS a copy of your Windows 10 machine in a safe sandbox and when you close it, it's gone. Poof. Great for testing weird tools and utilities that some rando on a blog asks you to download.
Sponsor: IDC Innovators Report: Multicloud Networking--Read the latest from IDC and discover one of the premier platforms addressing the rise of multicloud architectures and cloud-native apps. Download now.
© 2020 Scott Hanselman. All rights reserved.


Scott Hanselman's 2021 Ultimate Developer and Power Users Tool List for Windows published first on https://deskbysnafu.tumblr.com/
0 notes
Text
Scott Hanselman's 2021 Ultimate Developer and Power Users Tool List for Windows
Can you believe it's been 6 years since my last Tools list? Tools have changed, a lot are online, but honestly, it's just a LOT OF WORK to do the tools list. But here's one for 2020-2021. These are the tools in my Utils folder. I made a d:\dropbox\utils folder and I added it to my PATH. That way it's on all my computers and in my path on all my computers and I can get to any of them instantly.
This is the Updated for 2020-21 Version of my 2003, 2005, 2006, 2007, 2009, 2011, and 2014 List, and currently subsumes all my other lists. I’ve been doing this for over 17 years. Wow. I need to do better, I guess.
Everyone collects utilities, and most folks have a list of a few that they feel are indispensable. Here's mine. Each has a distinct purpose, and I probably touch each at least a few times a week. For me, "util" means utilitarian and it means don't clutter my tray. If it saves me time, and seamlessly integrates with my life, it's the bomb. Many/most are free some aren't. Those that aren't free are very likely worth your 30-day trial, and very likely worth your money.
These are all well loved and oft-used utilities. I wouldn't recommend them if I didn't use them constantly. Things on this list are here because I dig them. No one paid money to be on this list and no money is accepted to be on this list.
Personal Plug: If this list is the first time you and I have met, you should subscribe to my blog, and check out my podcasts, and sign up for my newsletter of Wonderful Things.
Please Link to http://hanselman.com/tools when referencing the latest Hanselman Ultimate Tools List. Feel free to get involved here in the comments, post corrections, or suggestions for future submissions. I very likely made mistakes, and probably forgot a few utilities that I use often.
THE LIFE AND WORK-CHANGING UTILITIES
"If everything was perfect, you would never learn and you would never grow." - Beyoncé
Windows Subsystem for Linux - It really can't be overstated how WSL/WSL2 has put the cherry on top of Windows 10. It runs on any build 20262 or higher as it was recently backported and it's integration with Windows is fantastic. It's also WAY faster than running a VM. Go learn more on my YouTube
Windows Terminal - Finally Windows has a modern terminal. You can run shells like Command Prompt, PowerShell, and Windows Subsystem for Linux (WSL). Its main features include multiple tabs, panes, Unicode and UTF-8 character support, a GPU accelerated text rendering engine, and the ability to create your own themes and customize text, colors, backgrounds, and shortcuts. It also includes a pseudo-console so 3rd party Terminals like hyper, conemu, terminus and more work better!
Windows PowerToys - They are back and they should be built into Windows. Install them here and get a color picker, fancy zones, file explorer addons, image resizers, keyboard manager and remapper, an Apple Spotlight-like running in the form of PowerToyrs Run, the Shortcut Guide and more!
Also check out Ueli as a great launcher/spotlight for Windows!
VS Code - Visual Studio Code is hella fast and is my goto text and code editor. I still use notepad sometimes and I'm in full Visual Studio a lot, but VS Code is like the Tesla of code editors. Check out my Favorite VS Code Extensions below.
PowerShell/OhMyPosh/PoshGit/Cascadia Code - I've had a blast this year taking my console prompt to the next level. Try these out but also look at Starship. Whatever you do, play! Don't accept the defaults!
ZoomIt - A true classic but also the answer to the #1 question I'm asked. How do you draw on the screen when you're sharing your screen? ZoomIt has been THAT TOOL in my toolbox. Really take some time and learn how to do boxes, arrows, colors and more and you'll be a more effective screen-sharer. In fact, just go get the whole SysInternals suite and put it all in your PATH.
Winget - It's apt-get for Windows. Similar to choco which I've used in the past, WinGet is going to be included in Windows 10 and has a ton of nice features. I use it to setup a machine in an hour from the command line, versus a day before doing it manually. Just add your MSA (Microsoft login) to the Package Manager Insiders Program and get it from the Store. It's bundled with the Windows App Installer. Then just "winget search <tool>" and winget install whatever!
QuickLook - Free in the Windows Store, just highlight a file in Explorer and press Space to get a preview!
Amazing .NET and Developer utilities
"Power means happiness; power means hard work and sacrifice." - Beyoncé
CodeTrack - CodeTrack is a free .NET Performance Profiler and Execution Analyzer. It works on basically every version of .NET and will give you massive insight into how your code is running! The flamegraph view is fantastic. It's free but you should donate as it's a one-person amazing app!
LINQPad - Interactively query your databases with LINQ with this tool from Joseph Albahari. A fantastic learning tool for those who are just getting into LINQ or for those who want a code snippet IDE to execute any C# or VB expression. Free and wonderful.
WinMerge - WinMerge just gets better and better. It's free, it's open source and it'll compare files and folders and help you merge your conflicted source code files like a champ. Also see Perforce Visual Merge which free and also can diff images, which is pretty amazing.
WinDbg - Low-level and classic but also new and fresh! WinDbg (Wind-bag?) is now in the Windows Store with ALL NEW VISUALS and more!
Insomnia and Nightingale are great alternatives to Postman for doing REST APIs!
NuGet Package Explorer - This app allows browsing NuGet packages from an online feed and viewing contents of the packages
WireShark - What's happening on the wire! WireShark knows!
GitHub Desktop - Gits, ahem, out of the way! Watch my Git 101 on YouTube!
Useful Windows Utilities that should be built in
"I love my job, but it’s more than that: I need it" - Beyoncé
Ear Trumpet - Fantastic advanced volume control for Windows! If you have ever wished that volume on Windows could turn their UI up to 11, Ear Trumpet is that app.
Teracopy - While I use the excellent built in copy features of Windows 10 the most, when I want to move a LOT of files as FAST as possible, nothing beats TeraCopy, an app that does just that - move stuff fast. The queue control is excellent.
AutoHotKey - This little gem is bananas. It's a tiny, amazingly fast free open-source utility for Windows. It lets you automate everything from keystrokes to mice. Programming for non-programmers. It's a complete automation system for Windows without the frustration of VBScript. This is the Windows equivalent of AppleScript for Windows. (That's a very good thing.
7-Zip - It's over and 7zip won. Time to get on board. The 7z format is fast becoming the compression format that choosey hardcore users choose. You'll typically get between 2% and 10% better compression than ZIP. This app integrates into Windows Explorer nicely and opens basically EVERYTHING you could ever want to open from TARs to ISOs, from RARs to CABs.
Paint.NET - The Paint Program that Microsoft forgot, written in .NET. It's 80% of Photoshop and it's free. Pay to support the author by getting the Windows Store version AND it will auto-update! It's only $7, which is an unreal value.
NimbleText - Regular Expressions are hard and I'm not very smart. NimbleText lets me do crazy stuff with large amounts of text without it hurting so much.
Markdown Monster - While I love VSCode, Markdown Monster does one thing incredibly well. Markdown.
Fiddler - The easy, clean, and powerful debugging proxy for checking out HTTP between here and there. It even supports sniffing SSL traffic.
NirSoft Utilities Collection - Nearly everything NirSoft does is worth looking at. My favorites are MyUninstaller, a replacement for Remove Programs, and WhoIsThisDomain.
Ditto Clipboard Manager - WindowsKey+V is amazing and close but Ditto keeps pushing clipboard management forward on Windows.
TaskbarX - It literally centers your Taskbar buttons. I love it. Open Source but also $1 in the Windows Store.
If you really want to mess with your Taskbar, try Taskbar Tweaker.
ShellEx View - Your Explorer's right click menu is cluttered, this can help you unclutter it!
OneCommander and Midnight Commander and Altap Salamander - As a long time Norton Commander user (google that!) there's a lot of great "reimaginings" of the Windows File Explorer. OneCommander and Altap Salamander does that, and Midnight Commander does it for the command line/CLI.
WinDirStat - A classic but still essential. What's taking up all that space? Spoiler - It's Call of Duty.
Also try SpaceSniffer!
FileSeek and Everything - Search it all, instantly!
I like Win+Share+S for Screenshots but also check out ShareX, Greenshot, and Lightshot
For animated Gifs, try screen2gif or LICEcap!
Alt-Tab Terminator - Takes your Alt-Tab to the next level with massive previews and search
PureText - PureText pastes plain text, purely, plainly. Free and glorious. Thanks Steve Miller
I still FTP and SCP and SFTP and I use WinSCP to do it! It's free or just $10 to get it from the Windows Store and support the author!
VLC Player - The best and still the best. Plays everything, everywhere.
PSReadline - Makes PowerShell more Bashy in the best way.
Yori and all Malcolm Smith's Utilities - Yori is a reimagning of cmd.exe!
Visual Studio Code Extensions
"I use the negativity to fuel the transformation into a better me." – Beyoncé
There's a million great Visual Studio Extensions. The ones I like won't be the that ones you like. But, go explore.
GitLens - Glorious. Just makes Git and VS a joy and adds a thousand tiny lovely features that will make you smile. You'll wonder why this isn't built in.
Version Lens - Do you have the latest package versions? Now you know
CodeSnap - Screenshots specifically tailored to make your code look nice.
.NET Core Test Explorer - Makes unit testing with .NET on VS Code so much nicer
Arduino for VS Code - The Arduino extension makes it easy to develop, build, deploy and debug your Arduino sketches in Visual Studio Code! So nice.
Coverage Gutters - This amazing extension highlights what code is covered with Unit Test and what's not. Ryan is looking for help, so go see if this is a great OSS project YOU can get started with!
Docker for VS Code - Container explorer and manager and deployer, directly from VS
GitHistory - Another nice add-on for Git that shows your Git Log
HexDump - I need this more than I would like to admit
LiveShare - Stop screen-sharing and start code and context sharing!
PowerShell for VS - A great replacement for the PowerShell ISE
Remote Containers - This is an AMAZING EXTENSION you have to try if you have Docker but it has a horrible non-descriptive name. But must be seen to be believed. Perhaps it's "Visual Studio Development Containers," I'm not sure. Open a folder and attach to a development container. No installs, just you debugging Rust, Go, C#, whatever whilst installing NOTHING. Amazing.
Remote SSH - Another in the VS Remote Family of Extensions, this one lets you use any remote SSH Server as your development environment.
Remote WSL - Edit and debug and build code from Windows...using Linux!
And finally, Yoncé, my current VS Code theme. Beyoncé inspired.
Things I enjoy
“We all have our purpose, we all have our strengths.” – Beyoncé
RescueTime - Are you productive? Are you spending time on what you need to be spending time on? RescueTime keeps track of what you are doing and tells you just that with fantastic reports. Very good stuff if you're trying to GTD and TCB. ;
Carnac - This wonderful little open source utility shows the hotkey's you're pressing as you press them, showing up as little overlays in the corner. I use it during coding presentations.
DOSBox - When you're off floating in 64-bit super-Windows-10-Pro land, sometimes you forget that there ARE some old programs you can't run anymore now that DOS isn't really there. Enter DOSBox, an x86 DOS Emulator! Whew, now I can play Bard's Tale from 1988 on Windows 10 in 2021! Check out Gog.com for lots of DOSBox powered classics
Oh yes, and finally Windows Sandbox - You already have this and didn't even know it! You can fire up in SECONDS a copy of your Windows 10 machine in a safe sandbox and when you close it, it's gone. Poof. Great for testing weird tools and utilities that some rando on a blog asks you to download.
Sponsor: IDC Innovators Report: Multicloud Networking--Read the latest from IDC and discover one of the premier platforms addressing the rise of multicloud architectures and cloud-native apps. Download now.
© 2020 Scott Hanselman. All rights reserved.


Scott Hanselman's 2021 Ultimate Developer and Power Users Tool List for Windows published first on http://7elementswd.tumblr.com/
0 notes
Text
Chrome Extensions You Must make use of! 14 Best Chrome extensions Reviewed

Chrome Extensions
You Must make use of! 14 Best extensions Reviewed
Chrome extensions are simply computer programs, meant to be embedded on chrome browser, they are designed to achieve specific targets and achieves high results, their efficiency makes life a lot easier, especially in the promotion. And you know what?
To get better results in less time you need 14 Chrome extensions that'll save you hours on your SEO work and help you get your results faster.
Have you ever heard of the saying; the craftsman is only as good as his tools? Well, that's especially true when it comes to marketing. And when it comes to marketing, if you don't have amazing tools that are giving you amazing information, it's going to be a lot harder for you to do your job.
So let's dive right in and go into the extensions that I love using on a regular daily basis. So tools for content.
https://www.youtube.com/watch?v=KXEM3KOVwgE
01 Grammarly
The first extension that I love using is Grammarly. Grammarly is a one-stop-shop tool for marketers who are looking to perfect their writing and grammar skills. I have terrible grammar, so what do I use?
Grammarly, it's so much cheaper than paying an editor. It tells me all the errors and what I need to fix and it's much better than the spelling correction within Microsoft Word.
And it's free, so check it out, use it and whenever you write articles, even if it's in WordPress,
There’ll be a little green Grammarly icon and it tells you if there are any errors within your content that you need to fix.
That way when you publish more content and get that traffic from Google, it'll tell you if something is wrong. It does the same when you're doing your posts on LinkedIn or Facebook or any other social site. So as marketers, you can make sure you're publishing spelling and grammar-free information and text on all these sites.
Back to Top
02 BuzzSumo
The second extension that I love is Buzzsumo. It's a tool that shows you a detailed breakdown of how content pieces and topics perform online. The extension, it does the same thing, but just in fewer clicks. It will allow the user to visit any page of the choice and see current performing data and metrics.
This allows you to create a real-time content strategy, or brainstorming content topic ideation. That way when you're reading some random article around the web, you're like, Wait, oh, this is good, I have a lot of social shares, oh, wait, eh, not so much, not doing as well, right?
This will all help you improve what you're doing so that way you can create the best information out there.
Back to Top
03 Keyword Surfer
Let's look at some tools for SEO. One of my favourite extensions is Keyword Surfer. Remember the days when Keyword Everywhere was free?
I love Keyword Everywhere. If you pay for it, great. But now there's something new and different, Keyword Surfer. It doesn't give you all the data, but it still tells you volume for global, or your country and it tells you other related keywords that you could be going after as well.
Now it also provides domain estimated traffic so that way you know what the traffic to each domain is and it shows you backlinks for each URL that's ranking in the top 10.
Back to Top
04 MozBar
It's a valuable tool that allows you to see how popular your competitors are. MozBar allows you to run a quick SEO overview on any page that you're on or pages listed in the SERPs.It takes a look at on-site content, social media engagement, technical SEO, backlinks, domain authority, even page authority.
Back to Top
05 SimilarWeb
This tool takes all the traffic sources into account during a site analysis so you can get more than basic SEO information. It allows you to look much deeper into engagement metrics such as traffic, time on site, bounce rates, and much more. What's more, is it allows you to see a company's target audience demographic and the amount of money that they spend on paid content.
Back to Top
06 Redirect Path
This tool is much more than a just broken link checker. It also helps you find other technical issues on your site. If you run into any errors, you'll see a red notification like this. Once it's fixed, it'll change to green so you know that you're good to go.
Your site could be dropping in ranking due to some redirect issues you have on your site without you even knowing that it exists. But this extension will help you spot and fix it.
Back to Top
07 Google PageSpeed
We all know that page speed is a huge ranking factor. But, if you have a slow page speed time yours will bounce right away and your rankings will suffer. This extension lets you see how fast your site is loading with a single click.
Not only that but it also gives you suggestions on how to fix the page speeds. Another plus is, this tool works well for both desktop and mobile page speeds.
Back to Top
08 SEO META
This extension shows detail for any website on any one of these four categories, headers such as each H1, H2, H3 tags, images such as how many are on a page, the alt tags and titles, links, total number of internal and external links, and last but not least, social data such as a Facebook open graph, Twitter information on the page as well.
Now for backlinks, there are a few extensions that I love.
Back to Top
09 Hunter.io
One of them is hunter.io. We all know that, Hey, when you're doing outreach to get backlinks it's really hard to find the people's name and information.
Hutner.io provides all of that to you.
Back to Top
10 Majestic
Another extension is Majestic backlink analyser.
We all know how much a pain it can be to build backlinks, but the Majestic backlink analyser can help you with this with ease. The tool lets you find out the total quantity and quality of the backlinks that point to any given page.
Back to Top
11 Boomerang
Now, for email marketing, one extension that you got to use is Boomerang. Since the beginning of email marketing, marketers have always wanted to know the perfect time to send their emails and Boomerang is the answer.
Because the last thing you want to do is send an email at the wrong time so that way when someone loads up their inbox you're the 100th email at the bottom 'cuz no one's going to go down that far.
The cool thing about Boomerang is, not only does it show you the right time, but it allows you to also schedule the emails at the right time.
Back to Top
12 Linkclump
If you're a research junkie like me, you know how annoying it could be to have to hop from tab to tab back and forth is time-consuming. Having 15 tabs open is normal for me. With Linkclump you can quickly open multiple links in the SERP in just one click.
Back to Top
13 Liner
The next extension I want you to try out is Liner. If you come across a great piece of content but you want to remember a specific line, Liner lets you highlight that portion of the article. It keeps you organized, allows you to keep track of all the relevant information in a big article. Not only that but you can save your highlights as well.
You can refer back to them in blog posts later on as well.
Back to Top
14 OCD marketer
Now for the OCD marketer like me, I want you to check out the One-Click Extension Manager. If you made it this far, you're probably worried, Hey, you got all these toolbars and extensions, it's a lot. Well, this lets you manage everything really easy, not get overwhelmed.
It allows you to quickly see what's important, what's not. It creates a one-click extension tab.
You can drop down a list of each of your extensions and quickly remove, add more, and see where you're missing gaps.
Back to Top
Conclusion Chrome Extensions
They are the best tools available in the form of Chrome extensions and must be used to scale up SEO of your on-page SEO. This 14 Chrome Extensions That Will Save HOURS of Marketing Work.
Back to Top
Read the full article
#DigitalMarketing#bestchromeextension#bestseotips#ChromeExtension#chromeextensions#digitalmarketing#makeuseof#ManojAgarwal#seo
0 notes
Text
things I would like @throne3d and @marrinikari to fix about tumblr, please:
give me a way to reblog-to-queue directly from dash, the same way you can reblog directly from dash with alt+reblog, so I don’t have to open up the reblog pop-up each time
an option on my queue page to enter a tag or set of tags and have all queued posts automatically tagged with those
right now if I accidentally add something to my queue and then realize I want to edit or delete it, I have to scroll through my entire queue to reach the post. instead, give me an option to view my queue in reverse chronological order.
just ... get rid of chat posts. no.
for some reason unless you’re specifically making an image post, you can only add images from your computer, not from the web? surely it can’t be too hard to fix this, given that we do have the functionality for image posts.
while we’re on the topic: give me the functionality from image posts where I can click and drag images to put them next to each other, but on all posts
when I try to upload a gif but it’s too big, actually give me an error message? indicating that? and telling me what the maximum size is? this will take you like FIVE MINUTES to implement okay? if you want to be really fancy you could offer to resize it automatically for me but I understand if that’s too hard
stop making ( c ) automatically convert to (c). if you won’t do that, at least have it do that in the rich text editor too, instead of doing so without warning when I actually make the post.
when posts get beyond a certain length, the little pop-up with options to add an image or horizontal line or read-more stops appearing on new lines. this is an annoying interface in the first place, can it just be always visible instead of appearing when I go to a new blank line? otherwise, can it at least do that reliably?
if I try to preview a post with a read-more, it shows me the stuff above that fine, but if I try to click on the read-more link, it tells me there’s no such post, so I can’t actually preview that part of it. please fix.
if I’m binge-reading someone’s infinite-scrolling blog and decide I want to reblog a post, clicking “reblog” will take me to my dashboard, pull up the reblog interface pop-up over that, and then when I’m finished reload the page I was originally on, of course losing my infinite-scrolling place in the process. can this please be fixed? can the reblog pop-up just come up over the page I’m already on?
for that matter, instead of having a reblog pop-up at all, could we have a “quick reblog” option or something that just opened up a text field within the page, let us enter commentary and/or tags, and then could be reblogged just like that? this would be a vast improvement on my experience
have some kind of “default page theme” with an option available to toggle any tumblr you’re reading into that theme, for when tumblrs have terrible themes. bonus points for letting us customize our default page theme. please make sure it has like, reblog, and comment buttons available for every post, a bizarre number of themes don’t have those.
let me view all posts with a certain tag including reblogs. I get that most of the time I don’t want to see a thousand copies of the same post tagged “pretty” or w/e but sometimes I really do want to see reblogs too. please.
a straightforward way to “orphan” a tumblr, like you can do with works on ao3, for when you don’t want to have it on your list anymore but also don’t want to delete it altogether. (this can be achieved OK via workarounds at the moment but it would be nice not to have to use them.)
an option to choose the preview image for link posts
maybe go through some tumblr extensions and think about adding some of their functionality? like. an option to only play gifs when you hover over them/click on them. a “block this post and all reblogs thereof from my dash” option. a “hide all posts with this tag from me” option. a way to reply to comments. you get the gist.
between submissions/comments/asks/messages the “talk to other people” system is a mess. this is a bad thing on a social platform. please consolidate
if I’m making a post and switch to another tab and then come back, my cursor always goes to the beginning of the post. why does it do this and can you make it stop please
the user settings are all over the place in different locations in a completely unintuitive matter. please consolidate
can we have some kind of master changelog?? please??
a way to view all posts on a tumblr in chronological order
is there a reason that in order to add tags when replying to an ask you have to save it as a draft first. could we just. not have that be how it works
a “jump to the oldest unread post on my dash, let me read forwards from there” option would be p cool if you could implement it
notes. just ... everything about the notes dropdown. can we rethink this please
when I’m on a post’s page and viewing notes, and I get to one where someone has reblogged it, there’s no way to just go to their reblog and see what they’ve said. the only option is to go to the main page of their tumblr and scroll down and hope it hasn’t been too long since they reblogged it. why.
when there’s a little pop-up on my dash to let me know someone reblogged my post, clicking on it takes me to ... my original post? not their reblog? why
the little social-map thing that shows you how reblogs have spread for a given post is cool! but one most often wants to see it for one’s own posts, and can only do that when they happen to show up on one’s dash. maybe make it possible to access directly from one’s blog?
honestly I just. can’t believe you guys on this overall. what went wrong? the constellation is so great, and then ... this? step it up please
17 notes
·
View notes
Text
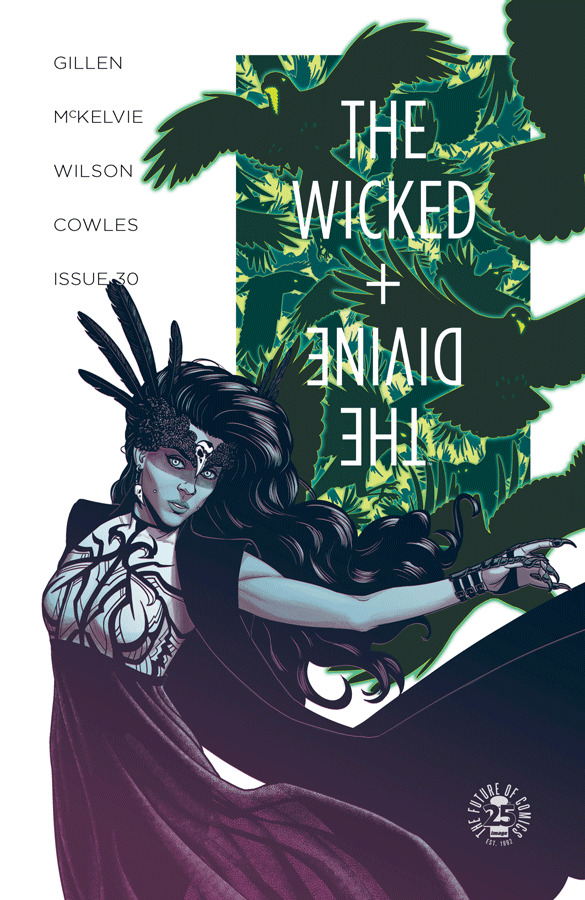
Writer Notes: The Wicked + the Divine 30
Spoilers, obv.
And another quieter issue, where we primarily delineate the other other half of the issues of 28's reveals, while putting those final few dominoes in position. It's also, art wise, a relatively undemanding one. The rest of this arc is brutally hard, so an issue where the team could take a breath is also worthwhile. A comic series like WicDiv is a marathon made of marathons. You make it all uphill at your own peril.
It's also one of the more classically structured issues for a while. The issue's effective lead is Dio, and his 3-encounters-in-the-underworld structure the backbone which everything else is built around.
I suspect notes on this one will be short, by the way, but whenever I say that, I'm always wrong.
Jamie/Matt's cover:
That this isn't the best cover in the arc only speaks to exactly how great issue 32 is. Some startling design elements here.
Meredith's Cover:
She's always been great, but seeing her cover for East Of West was the thing which prompted us to go and try and talk her into one. It was a pleasure to work with her – all her design ideas were smart and interesting. We ended up here, because frankly, who can resist hot pink? Not us.
Jonathan Hickman's Cover
Talking about East of West. I've always been envious of Jonathan's designer string to his creative bow, so when we were asked if we wanted to be part of the month of his variants, we jumped at it, if only to see how he'd reinterpret our mythology. This is very much the cult-sci-fi novel alt dimension take on WicDiv.
Page 1-3
I'm always interested in the history of the second page reveal. Old school comic writer guides normally suggest opening with the big image, to throw people in the world. That – and, I feel, especially in the 00s – got changed into the delayed reveal. Enter the world in a quieter way, and then do the big reveal. That means you can create some context quickly, and use that big impact for something a little more complicated.
(It also means if you go to a 2-3 page splash, you can make the image bigger. If I remember correctly, almost all the New 52 books hand that rhythm, which I have to presume was an editorial guideline. I may be misremembering though.)
It's worth noting I say “a little more complicated.” I don't say “sophisticated” or even talk about effectiveness – complicated says nothing about a piece of work's quality. I just mean there's more moving parts involved before the reveal. Look at someone like BKV and his love of the opening splash to see how effective the HELLO, HERE I AM, LOOK AT THIS THING! Can be.
In our case, we have this little conversation between Woden and Cass, and then show what we've done to Valhalla. We've been talking about the plans for this gig for a long time, so we really needed to show what that means. Clearly, the gig is going to be key to the back half of Imperial Phase II, so we really let people have a good stare.
The best thing Jamie did here was make sure there's a stage built into Valhalla, as he correctly guessed they'd be one required for next issue. SMART MAN, THAT MCKELVIE.
This is the sort of page which is primarily expositionary, but by having the characters get together and basically scheme it out hopefully carries it. As you can imagine, there's going to be a statement of exact goals next issue in a similar mode.
(Why not say them here? Efficiency. Don't need to know it yet, and we'd have to repeat it next issue anyway. Why burn the page count twice?)
Cass speaks my own frustration at how people use facebook, I suspect.
The idealist/realist exchange on the first page is a good example of what happens when you have the broad strokes of what's going on, and then let the characters respond to each other. Woden has the Valkyries back? How does he act now? How does Cass respond? Where does that take us?
Page 4
I wrote this with no interstitials, and decided to add them later, when we saw how the issue was working. I looked at the page turns, and decided pushing everything forward one page would be most effective. Plus that the black of the interstitials does lead us into the underworld.
Page 5-6
And we show Dio where we left him last time. There was even the option to use the same panel if Jamie wanted to cut a corner. He didn't.
The page sets up the rhythm that runs through the issue, which happens three times. This is pure fairy-tale, folklore myth structure. It's also joke structure, in the rule of three way. First statement shows a situation. Second statement shows it is a pattern. Third statement subverts the pattern. It's just a very efficient way of doing basically everything... and that natural rhythm being used everywhere means that it always feels part of some longer, primordial sort of storytelling. I think the six panel is leaning into that – I only want five beats. Establish/show Dio's current state/arrival of Morrigan/Dio's response to Morrigan/Morrigan's final statement. Throw away everything which isn't needed for the folk tale.
(The final “Yeah, you won't” leans into the folklore. Dio signals that this is not just stubbornness, but a plan.)
Have I mentioned the Underworld being the inverse of Young Avenger's mother dimension? I probably have. It serves a similar purpose in terms of a direct thing which allows us to strong arm an atmosphere while also being relatively “cheap” to do in terms of Matt and Jamie's resources. I've done 32 of these. I'm sure I'm repeating myself all over the place. These really off the cuff.
Despite knowing everything I knew about the Morrigan at the start, I found it hard to articulate the key difference between her and Dio succinctly. Eventually, it hit me. Dio wants what's best for people. Morrigan thinks she knows what's best for people. Morrigan will sacrifice a lot, as long as they obey her entirely. When I had that in my head, Morrigan became easier. Easier, anyway. She's never easy.
7-8
Another two page scene – the issue very much runs off those short scenes. The hard cut rhythm is a key part of Imperial Phase II, I think.
I wrote the bottom of Page 7 with three panels, in a “Write minimum numbers of panel.” Jamie adds one to really sell it. He actually does a similar thing next issue as well, which proves he must like eight panel grids more than he claims.
The trick of this scene is signalling to the reader that Woden has done fuck all to any of the equipment. A reader would remember that Woden has a camera on Amaterasu from way back in issue 14, but this confirms it's more general than that.
(There's clues elsewhere – his timing when he turned up in issue 12 was more than a little suspicious, right?)
Of course, lying and sarcasm is one of the hardest things to pull off in comics. Comics, for some reason, lends into credulity in the reader. I'm not sure why, though have my theories. In which case, we really push it – look at all the “Er” and the bolded ADDED in the first panel of page 7.
Oh god. Page 8 had me really fuck up in lettering. I originally wrote Cass being snarky here, and glaring at Beth... having failed to remember Cass wasn't in this scene. Beth basically just teleports Cass to where she is. My brain, it no good.
Page 9-10
I basically said everything in the first iteration, right
Hmm. Badb is oddly unsweary here.
Jamie's working the shadows fascinatingly here – the last panel of Dio is also one of the best.
Page 11-12
This is the one sacrifice to the earlier interstitial – that the instagram pages don't appear on a spread. The loss is solely a visual effect.
These are the “two pages I comic but half a page of work for Jamie”. Clearly, Persephone is absent this issue, and we needed to keep her absence a presence, if you see what I mean. Plus the instagram is a way to do the montage-of-time and events. Its placement here is a lot to do with selling how long that Dio has been down this hole.
I actually wrote considerably more comments for each instagram, but there wasn't room to include them in the framing. It's okay. Don't read the comments.
When wrote Amaterasu's Instagram text and then put my fist in my own mouth out of embarrassment. My next career move may be bullshit internet motivational sentences.
Page 13-14
Third iteration.
As I've said, WicDiv is that conflict between this over-planned structural thing and also the discovery you undergo as a writer when exploring these people. Throughout, I couldn't quite work out why I never had a place for Gentle Annie in the story. I actually like writing her – it has the added bonus of her voice really annoying Chrissy, and I'm very pro annoying my editor. But no – Annie's just not around much.
Clearly, thinking about that leads to this scene, where it's the part of Marian that isn't really getting much play any more. It's probably my favourite Annie scene, which is lucky, I guess, considering where the issue goes. The mixture of twee and utterly scary motherfucker was always the line I wanted to walk with her.
Page 15-16
As much as this scene flirts with total disaster, in this ominous fucker of an issue, it's a relative moment of light. Also a chance for Matt to really push the palette. I will never get bored of his Baal lightning.
The Sakhmet cosplay is delightful.
The reds of Amaterasu's lightbeam form, and the blue of Minerva's chair is another great choice.
There was an editorial discussion over whether Amaterasu appearing in the final panel was too much or exactly the amount of too much. We clearly went that way. This is a playful scene.
Page 17-19
Yeah, this isn't. I'm kind of amazed this is only 3 pages. This issue is tightly wound – there's no scene longer than 3 pages, and the majority is 2 pages – but this feels especially so. It's telling that it's here we move to the eight-panel, that most Phonogram of structures.
(A modified eight panel)
I originally had a different idea for the flashback, bringing Leila back to essentially insert scenes into issue 16, but the space wasn't really there, and felt like formalism would be distracting around here. This is complicated stuff, so let's keep it clean. Notice how Jamie changes the panel shapes to separate the sub-narrative from the main narrative – obviously the blue-greys of Matt do most of the work, but it can't be underestimated.
Let's call out some panels – Baph in the seventh panel of 17, hiding behind the shades and the wise-crack. The fifth panel of 18, which in its blissed certainty, the possible single scariest panel of Morrigan in WicDiv. Oh – and Dio's heartbreaking on the third panel of page 19.
Anyway – boys, sitting in the dark, and trying to talk.
Page 20-23
The second interstitial I added, and a little annoying. I thought I had to add 2 to maintain the final page, and in fact I only needed to add one. As in, my first draft didn't end on a left, and I needed to correct that. I suspect I'll drop this interstitial for the trade, and regain the page turn.
In the end, the reveal that Sakhmet is waiting for a chance to strike at Morrigan isn't a huge reveal – it's a telling one, but not one which breaks the scene in a huge way. And of course, people on digital have all movement between pages be page turns.
I didn't actually have any dialogue in the second panel on 21 at script, which is very much me in a “I have no idea why I would do that – that panel clearly needs a sign that Persephone is rushing to the door or something similar.”
“Beware the Honest – they will hurt you just to feel clean” is one of those lines that has been lying around in my notebook since the start of WicDiv waiting for their scene.
The warm browns of the room and Morrigan's cold blues seem really interesting to me here. Strong choices, Matt.
The final page was also an awkward one – I knew the images, but the actual exact nature of the dialogue refused to be wrestled down precisely until the last lettering pass, where it coalesced.
We do kissing, and it's depressing kissing. WicDiv takes the fun out of everything.
Anyway – next issue is at the printers now and will be with you soon.
Thanks for reading.
104 notes
·
View notes
Text
Combine selections and masks
1. Select with colour range
Go to File>Open an image of a ferris wheel. Now go to Select>Color Range. In the dialog box, check the Localized Color Clusters box, choose the Grayscale Selection Preview. Grab the plus eyedropper and click to sample the blue colour around the sky.
2. Adjust the range settings
Adjust the Fuzziness to 30, Range to 100% and check Invert. If necessary, use the plus eyedropper to sample the blue colour again until you have a clean background or try different settings, then click OK. Now create a layer mask. Go to Layer>Layer Mask>Reveal Selection.
3. Enhance the mask
Press Cmd/Ctrl+D to deselect the image. Now, press Opt/Alt and click on the layer mask thumbnail. Grab the Dodge tool (O). In Options, set Range to Highlights and paint over the white areas. Grab the Burn tool, set Range to Shadows and paint the black areas. Save as a .png file.
4. Select and Mask command
Let’s mask another image. Open an image of a dinosaur. Now, go to Select>Select and Mask. In Properties, change the View Mode to Overlay and leave the Opacity at 50%. Grab the Quick Selection tool (W) and select the dinosaur.
5. Clean up the edges
To clean up the edges, grab the Brush tool (B) and start painting the areas that are not properly selected. Press and hold Opt/Alt to toggle between Add to Selection or Subtract From Selection. Use the Global Refinements to adjust the image further, then click OK. Save as a .png file.
6. Use the Channels
Let’s mask the roller coaster. Press Cmd/Ctrl+O and open a roller coaster. Go to Window>Channels. In the Layers panel, right-click on the Blue channel and choose Duplicate Channel. Press Cmd/Ctrl+L to open the Levels and drag the Input sliders to create a high-contrast image and then hit OK.
7. Refine the mask
Grab the Polygonal Lasso tool (L), select the areas that need extra work and then fill with black. Also, use a hard brush (B) to refine the mask. Now hit Cmd/Ctrl+I to invert the mask. In the Channels panel, click RGB.
8. Create a mask
Press F7 to return to the Layers panel. Now, go to Select>Load Selection. In the dialog box open the Channels menu and choose Blue Copy, then click OK. Go to Layer>Layer Mask>Reveal Selection to create a layer mask and save the image as a .png file.
9. Make a sign
Press Cmd/Ctrl+N to start a new document. Set Width and Height to 1200 pixels, and Resolution to 300 pixels/inch. Add a new layer (Shift+Cmd/Ctrl+N) and grab the Lasso tool (L). Draw a rectangular selection and fill it with black.
10. Add depth
Keep the image selected and go to Layer>Layer Style>Bevel/Emboss. Choose style: Inner Bevel, Technique: Chisel Hard, Depth: 160%, Direction: Down, Size: 15 pixels, Soften: 0 pixels, Angle: -60o, Altitude: 25o, Shadow/Highlight Opacity around 75%. Click in Texture and choose a nice pattern, adjust the settings and click OK.
11. Insert text
Go to www.dafont.com/african.font and download and install the new font. Type ‘Jurassic Island’ and apply the Bevel/ Emboss layer style. Choose the emboss style, Direction: Down and then tweak the settings to adjust the effect. Set the blending mode for the layer to Soft Light.
12. The columns
Create a new layer (Shift+Cmd/Ctrl+N). Grab the Lasso tool (L) and draw a column. Fill it with black and apply the Bevel/Emboss layer style. Tweak the settings to fine-tune the effect. Duplicate the layer (Cmd/ Ctrl+J). Place the columns in each side and save as a .png file.
13. Set the stage
Now it’s time to create the island. Create a new document. Go to File>New or press Cmd/Ctrl+N. Name it ‘Jurassic Island’. Set Width to 230mm, Height: 180mm, Resolution: 300 pixel/inch and click OK.
14. Apply a gradient
Grab the Gradient tool (G). Open the Gradient Editor and set the first colour stop to #427897 and the second colour to #7da8c, click OK. In Options, choose the Radial Gradient. Place the mouse cursor at the centre of the canvas and then drag outward to apply the gradient.
15. Create the base
Create a new layer (Shift+Cmd/Ctrl+N). Name it Base and click OK. Grab the Elliptical Marquee tool (M) and draw an ellipse measuring around 60mm in height and 180mm in length. Fill it with black and then press Cmd/Ctrl+D to deselect.
16. Place the terrain
Place some terrain. Now clip the layers, press Cmd/Ctrl+Opt/Alt+G. Move the image around to find the best angle. Open the Levels (Cmd/Ctrl+L). Click on the Preset menu and choose Increase Contrast 2 or set the Inputs to 20, 1.00, 235, then click OK.
17. Build the topography
Now it’s time to create some hills and valleys. Place a valley. Resize the image and press Return/Enter. Create a layer mask. Go to Layer>Layer Mask>Reveal All. Grab a hard brush (B) and hide the sky and part of the landscape. Try to create some elevations.
18. Bring in more images
Add a waterfall. Resize the image and press Return/Enter. Add a layer mask and grab a soft brush (B). Hide the vegetation partially and the river, blending the images in a way to make the waterfall appear distant at the back.
19. Add more water
Place a lake. Resize and place on the hill in the foreground. Mask the image, leaving only the lake visible. Now place another waterfall. Resize and add a layer mask, then blend with the lake. Use the Free Transform tool (Cmd/Ctrl+T) to adjust the angle.
20. Make a cliff
Place a rock. Grab the Quick Selection tool (W) and select the rock. Add a layer mask. Go to Edit>Transform>Flip Horizontal. Resize the image and place near the waterfall_2. Paint the mask to blend the images. Duplicate it (Cmd/Ctrl+J), flip the image and place on the other side.
21. Place more images
Place an ocean’ Resize the image and add a layer mask. Use a soft brush (B) and start painting over the mask to blend the ocean image with the rocks and the river.
22. Add trees
Create a new layer (Shift+Cmd/Ctrl+N). Go to Filter>Render>Tree. Choose any tree type you like. Tweak the settings to customise the image and then click OK. Use Levels (Cmd/Ctrl+L) to increase the contrast and Hue/Saturation (Cmd/ Ctrl+U) to reduce the saturation.
23. Group layers
Place the trees into a group, press Cmd/Ctrl+G. Now duplicate the trees and create different types. Vary the size and add a layer mask, then distribute around the island. Create new trees with dense leaves and place on top of the Background layer to create the vegetation behind the hills.
24. Preset Manager
Open the Preset Manager to add new custom brushes. Add wave brushes and cloud brushes. Click Load, then press Done.
25. Apply custom brushes
Create a new layer on top of the Background layer. Name it Brushes. Grab the Brush tool (B) and press F5 to open the Brush panel. Choose a wave brush, reduce the size and using a white colour, paint the wave. In a new layer, paint the cloud.
26. Place more images
Let’s place the .png. images you created earlier. Place the dinosaur on top of the cliff, the Ferris Wheel and the roller coaster behind the trees and then transform the perspective of the sign and place near the lake.
27. Adjustment layers
Make a quick colour adjustment to each image. Click on the layer you want to make the adjustments to and then open the Levels (Cmd/Ctrl+L). Drag the Input sliders to increase the contrast. Use Hue/ Saturation (Cmd/Ctrl+U) to adjust the Saturation or the Lightness.
28. Complete the composition
Find extra images to complete the composition. Place them over the canvas and use the techniques you’ve just learned to select and create masks. Resize and apply adjustments to enhance the images.
29. Create a snapshot
Create a new layer on the top of the layer stack. Press Shift+Cmd/Ctrl+Opt/Alt+E to create a snapshot. Go to Layer>Smart Objects>Convert to Smart Object. Now go to Filter>Camera Raw filter. Tweak the settings to enhance the colours and also add more details by increasing the Clarity option. Click OK.
1 note
·
View note
Note
hello! sometimes i see people putting image descriptions under read mores so it takes up less space, and in theory i like this for a few reasons (my own neurodivergence included) but i've been wondering recently: is putting it under a read more less accessable? i feel like it could be for several reasons but i'm worried about overextending the ask limit if i try to list them all, heh... point is, is it more convenient for those who need descs to leave them out from under a rm or does it matter?
This is one of those “you can do it several different ways and your approach will be wrong for somebody” questions, which is why, I think, there is no hard answer.
It would be nice if there were a magical bullet-point list one can check off to Make A Post Accessible for Everybody, but the truth is often that one person’s accessibility feature can be one person’s barrier to that same content. It’s not as simple as “a ramp helps everybody so just put one in” when it comes to text design/formatting, especially on a site as dodgy as Tumblr.
(There’s an image post of Ways To Make Your Site Accessible For Different Disabilities floating around Tumblr and the net in general, and a few of the requirements for various categories of access needs directly contradict each other. I’ll be honest: I need image descriptions for GIFs, but image descriptions make a post longer to scroll through, and that’s bad for my hands. So my own needs clash, and I am absolutely not the only disabled person in this situation.)
Note: I’m going to rant for three paragraphs about why Tumblr sucks on this point before I get to the actual point of answering your question.
The truth, the truth that frustrates me no end, is that this shouldn’t even be a conversation. Tumblr should allow you to do what we all do on WordPress: upload a photo, add a description in the alt text, and then post your image on the page. (You don’t need HTML to do this; it’s part of theWYSIWYG/rich text editor experience sites like WordPress and Tumblr provide.) Screen readers can access the alt text; those who don’t need it have nothing to scroll past. The whole issue on whether or not you tuck descriptions under a read more cut should not be a thing, because Tumblr should give us an option, after uploading the photo, to add a description via alt text. It lets us provide an image source, so providing alt text isn’t difficult.
(And those who need the alt text for processing reasons can access the alt text in other ways - right click on the image and selecting Image Info in Firefox will bring it up, for example - alt text is displayed on the line “Associated Text”.)
Tumblr is failing its disabled userbase by not allowing alt text. I can use images with alt text I’ve uploaded elsewhere inserted into a text post, but Tumblr won’t show them on dashboard view because they’re an external image. (In other words, it won’t give even those of us with HTML skills the ability to employ a workaround.) When you upload a photo yourself to Tumblr as a photo post, even if you change to HTML from rich text, you have no access to the photo’s HTML to add a description as alt text.
@staff: give us alt text!
Actual answer to your question:
Factors to consider in whether or not something goes under a cut largely include post length and how easy it is for someone to click on the “read more” link. (This could be hard for visual accessibility reasons; it can also be hard for physical/movement accessibility reasons.) I’ll be honest: things tucked under a read more cut here on Tumblr are not often read, even by able-bodied people. (Contrast to WordPress or LJ/DW, where everything is cut for convenience, but the norm is that one clicks on a post to read it fully. One’s dashboard is a very different thing in pacing and content.) This is why I don’t tuck anything more than the Extremely Ridiculously Absurdly long posts under a cut. I tag, which doesn’t help app users, but I don’t read more cut unless my length is absurd.
(Forgive me, but if I’ve spent this long on a post, I want people to read it. I know how hard it is to scroll through long posts, especially if they’re off topic or don’t interest me, but I’m a writer. Wanting people to read my words is kind of the point.)
This is why I dislike pricing or sourcing information under a cut, something often done by stim blogs. That information should be accessible, and text under a cut goes unseen by most followers. Know that, whenever you cut text. People won’t see it. We do not take the time to click the read more and open the post in a new window (especially on mobile). Important information should never go under a read more.
So. Personally, I only cut long descriptions, knowing that most people aren’t going to bother to check out the cut text (myself included). Yes, this makes posts longer and less accessible in one way, but more accessible in another. If a description takes up more than an eight-line paragraph - because anything more than that won’t be read or is too hard to skip past - then I break it up into multiple paragraphs and toss it under a read more. As one long paragraph, it isn’t readable anyway, so I don’t think I’m doing more harm by cutting it and making it readable, if harder to access. If it’s a short paragraph, though, and it doesn’t make the post itself too long, I think it is slightly more accessible to go uncut, even if it adds extra scrolling or extra text to skip past (knowing that some of us aren’t capable of extra scrolling or skipping text).
(Additionally, it’s a rough Tumblr trend to put a description immediately under the image where possible, and descriptions under a read more break that trend. The autistic in me dislikes the inconsistency. My brain is already trained to skip over the text immediately under an image if it’s wrapped in square brackets, and I like sticking to that brain training where possible.)
However, to tuck all descriptions under a read more cut isn’t wrong. The truth is that we’re in a bad situation, and any way of approaching it is flawed because the fix that would better tackle the problem (alt text) has been denied us.
Honestly, it’s just a matter of preference. I have reasons for doing it my way, but they’re not hard and fast rules, and I expect people to disagree with me (and hard) on some of my preferences.
As long as you’re doing your best (within your limitations) to be accessible and you’re reasonably consistent in what and how you’re doing it, anon, I think you’re okay.
Does that help you at all? I know it’s a lot of words for not a lot of answer!
- Mod K.A.
#ask#text#off topic#not a toy#accessibility discussion#discussion post#anon#mod K.A.#long post#very long post
5 notes
·
View notes
Text
The Perfect Documentation Storm
Let’s be clear. Nobody likes writing documentation. Writing good documentation is also hard. Making it look visually pleasing can be even more challenging. I’ve been involved with a project aimed to make user documentation easy to consume but also easy for anyone to contribute to. My north star for good documentation is the Ansible documentation. It’s visually very pleasing, easy to find stuff and it’s all there. Google does a damn good job indexing it so whatever you need is three keywords away. The project at hand is not capable of leveraging some of magic sauces behind the Ansible documentation project but I found a middle ground that completely blew my away. From here on forward this is the toolchain I will recommend for all and any documentation project: MkDocs and GitHub Pages.
Requirements
The bulk of our starting source docs today is all written in markdown and we were not interested in converting to a new “language” or learn a new one. It has to be version controlled, human readable and reviewable markdown. It disqualifies a bunch of different popular tools out there, but hear me out her. So, GitHub is an excellent place to store, version and review markdown files, let's start there.
Next, there needs to be a way to edit and review the markdown rendering locally (or remotely) efficiently before submitting pull requests. It should not be counter-productive with multiple tools, renders and manual refresh/walkthrough navigation to get visual feedback. As we sniffed around other successful documentation projects we learned about MkDocs as we investigated the capabilities of Read The Docs. Little did we know that MkDocs lets you render and edit docs locally very efficiently, it’s widely used, extensible and looks beautiful out-of-the-box. Just add markdown!
Also, MkDocs can deploy directly to GitHub Pages by putting the rendered output in a separate branch and all of a sudden you have everything in one place. That alone makes it very convenient as we don’t have to interact with separate services to host the documentation. One might think we’re done here but it leaves one big gap in the solution, that is the reviewing of pull requests part. In the event of a pull request, the person who merges to master needs to render the pages after the merge. You may quickly resort to readthedocs.org for this reason but what if I told you that there is a GitHub Action available that does this for you already? That changes the game. Full control end-to-end through GitHub. Let's do it!
Hello World
Since it wasn’t glaringly obvious to me on how to piece everything together, I thought I share my findings in this blog. Let’s walk through a Hello World example where we start with nothing.
First, create a new empty GitHub repo and clone it (you need to create your own repo as my demo repo won't work).
$ git clone https://github.com/drajen/hello-docs Cloning into 'hello-docs'...
Next, we need to install mkdocs if you haven’t already. Acquiring Python and pip is beyond the scope of this tutorial.
$ sudo pip install mkdocs
Change dir into the hello-docs directory and run:
$ cd hello-docs $ mkdocs new . INFO - Writing config file: ./mkdocs.yml INFO - Writing initial docs: ./docs/index.md
The mkdocs command creates the docs directory, this is where your source markdown lives. A skeleton index.md is populated with some MkDocs metadata. There’s also a starter mkdocs.yml file that allows you to configure your project. I want to use the Read The Docs theme, so, let’s configure that:
$ echo 'theme: readthedocs' >> mkdocs.yml
Next, we want to visually inspect what the documentation looks like:
$ mkdocs serve INFO - Building documentation... INFO - Cleaning site directory [I 200311 16:29:05 server:296] Serving on http://127.0.0.1:8000 [I 200311 16:29:05 handlers:62] Start watching changes [I 200311 16:29:05 handlers:64] Start detecting changes
Browsing to http://127.0.0.1:8000/ should now present the following website:
In an attempt to try illustrate how the local editing works, I generated a GIF from a screen capture. Simply edit text in your favorite editor (vi) and hit :w. The content will automatically be rebuilt and reloaded based on your markdown edits.
This is awesome!
Publish!
Not quite done yet. To demonstrate the next steps, we need to publish our site. Let’s add site/ (where the local build lives) to .gitignore and push our content.
$ echo 'site/' >>.gitignore $ git add . $ git commit -a -m 'Initial hack...' $ git push origin master
Next, have MkDocs publish to the gh-pages branch.
$ mkdocs gh-deploy INFO - Cleaning site directory INFO - Building documentation to directory: /Users/mmattsson/code/hello-docs/site WARNING - Version check skipped: No version specificed in previous deployment. INFO - Copying '/Users/mmattsson/code/hello-docs/site' to 'gh-pages' branch and pushing to GitHub. INFO - Your documentation should shortly be available at: https://drajen.github.io/hello-docs/
Visiting the URL MkDocs spits out above should be rendered in a few moments. It’s possible to tweak the URL by setting a custom domain for GitHub Pages under the repository settings. You’ll need a DNS CNAME pointing to <user/org>.github.io for that to work properly.
Action!
Now the skeleton is published. How do we accept pull requests and have the gh-pages branch rebuilt on merge to master? This GitHub Action does that exact job for you.
It only works reliably with personal tokens. A token is generated on your user account and a secret is part of the repository settings.
So, in the middle bar you’ll find an “Actions” tab, create a new workflow and paste in the YAML from the Deploy MkDocs GitHub Action. Don’t forget to change the token attribute!
Now, this GitHub Action will run for each merge to master, that makes it easy to accept pull requests for markdown. If big navigational changes is in the PR, it could make sense to clone the pull request and render the branch locally. That will allow visual inspection of the navigation and check for errors in the MkDocs build log.
Happy documenting!
0 notes
Text
Throughout January I worked, off and on, on something of a private project, to make an ebook of Ellery Queen’s long-out-of-print anthology, The Misadventures of Sherlock Holmes.
An anthology of Sherlock Holmes parodies, sprinkled with a few genuine pastiches and two play scripts, essentially a survey of non-Doyle Sherlock Holmes literature to mid-century, The Misadventures of Sherlock Holmes was published in 1944 then allowed to go out of print, due to legal threats from the Arthur Conan Doyle estate. Never reprinted — twenty-five years ago in The Game Is Afoot, which contains about a third of The Misadventures, editor Marvin Kaye says there was (then) movement toward a reprint, but nothing ever came of it — The Misadventures has been a kind of Holy Grail, something I’ve long sought (and once held in my hands, in a college library) that I’d never own. That’s not to say that one can’t find them for sale, but I have better things to do with my meagre income than to spend several hundred dollars on a rare book.
A decade ago, someone uploaded a scan of the entire book to the Internet along with a very rough OCR of the book’s text. I found it, pretty much by accident, one day, and downloaded the files, assuming they might quickly disappear. (Which they have not, but I won’t point you in their direction. They are quite easy to find.) Whereupon they languished on my hard drive for several years.
Around Christmas 2013, after reading an article about it in The Atlantic, I began to use the now-defunct ebook reader software Readmill. This line in Robinson Meyer’s article intrigued me: “I’m nearly certain it has the best digital typography among e-reading software today. On Readmill, digital books look like books, not text files foisted into an extensible reading environment.” I sideloaded the software onto my Kindle Fire tablet and quickly discovered that, yes, Readmill had great typography, and then I began thinking about what I wanted to read with it.
I’ve been making ebooks for myself since 2000, when Microsoft released the Reader ebook software. (Though the software has been long unsupported, to this day I regularly use Berling Antiqua, the font that came packaged with Reader.) One of the first things I did was to download Overdrive ReaderWorks, a software package for making the LIT files that Microsoft Reader used. Even then, twenty years ago, nascent ebooks were simply containers that contained HTML files, CSS files, and images — essentially, the components that drive the Internet to this day. When I got a Nook, I downloaded Calibre, an ebook management package that can convert ebooks from one format to another, even let you build them from scratch.
Making an ebook of The Misadventures, then, was a deeply intriguing idea.
The first thing I noticed when looking through the scanned PDF of The Misadventures of Sherlock Holmes was that it was a beautiful book. I fell in love with the typography, the heavy use of small caps, the old-style numerals.
#gallery-0-16 { margin: auto; } #gallery-0-16 .gallery-item { float: left; margin-top: 10px; text-align: center; width: 25%; } #gallery-0-16 img { border: 2px solid #cfcfcf; } #gallery-0-16 .gallery-caption { margin-left: 0; } /* see gallery_shortcode() in wp-includes/media.php */
It was a book I wanted to look at and savor, not only because of its words but because of its beauty. I wanted to recreate, as much as possible, the look and feel of the original book, and I wanted my ebook to be just as beautiful.
I worked intently for about two weeks in early 2014. I would go to the text file — which was very, very bad — and copy out a story and paste it into Notepad. Then, comparing it to a printout from the PDF, I would correct the errors and lay my HTML tags. I even created CSS code so the story introductions would be formatted correctly.
Then, in mid-January, after completing a clean-up of about a third of the book, I stopped. To this day, I don’t know why. Did I lose passion for the project? Was I overwhelmed at work? Whatever happened, my working files sat, unwanted and unloved, in a directory on my desktop, and at some point I moved them off of my desktop, out of sight and out of mind. I’d think about The Misadventures from time to time, and do nothing.
Around Christmas, I said to myself, “Dude, why don’t you finish it?” And a few days after New Year’s, I picked it up again.
I had new ideas. I’m a big fan of Standard Ebooks, a project that makes free, professional-quality ebooks from public domain texts. Their books look great, they’re coded well, the CSS produces beautiful typography. Essentially, they made exactly what I wanted my ebook of The Misadventures of Sherlock Holmes to be, so, using Calibre, I took a Standard Ebooks book apart and decided to use its code as my foundation, adding my chapters and my CSS code on top of the basic CSS typography.
I started with what I’d done six years earlier — the introduction and dozen stories I’d cleaned up — and added them to the Calibre project. Most stories started with a block at the top that indicated its detective and its narrator, side by side on the opposite sides of the page. I experimented with CSS code to make that work — I settled on using two SPANs and floating the text left or right — but most of it was fairly straightforward. The advantage to working in Calibre in this way was that, as I finished proofing and polishing a story, I could add it to the ebook file and see how it worked, building the book one story at a time.
There were challenges. Footnotes don’t work in ebooks, so I moved all of the footnotes in The Misadventures to an Endnotes section. There’s an index, which I wanted to keep, so I coded internal hyperlinks to the stories or, in some cases, endnotes that the original index would have. In so doing, I discovered one entry in the index that actually wasn’t in Ellery Queen’s manuscript, and there were two Wastonian characters that should have been in Queen’s index that weren’t. These I silently corrected.
#gallery-0-17 { margin: auto; } #gallery-0-17 .gallery-item { float: left; margin-top: 10px; text-align: center; width: 25%; } #gallery-0-17 img { border: 2px solid #cfcfcf; } #gallery-0-17 .gallery-caption { margin-left: 0; } /* see gallery_shortcode() in wp-includes/media.php */
One thing I was keen to do was to retain the illustrations by Frederic Dorr Steele. Sidney Paget is considered the definitive Sherlock Holmes artist, but I have a distinct preference for Steele.
#gallery-0-18 { margin: auto; } #gallery-0-18 .gallery-item { float: left; margin-top: 10px; text-align: center; width: 33%; } #gallery-0-18 img { border: 2px solid #cfcfcf; } #gallery-0-18 .gallery-caption { margin-left: 0; } /* see gallery_shortcode() in wp-includes/media.php */
One thing I did not do was to retain the dropcaps that led off each story. Dropcaps don’t work well in ebooks. But I did retain the way the original book began each story with a few words done in small caps.
It took about two weeks of work to complete the book. The two play scripts were probably the most difficult part of the book to format correctly. After assembling the finished book, I did a proofread on my Kindle, highlighting things that looked like they were wrong, comparing those highlights to the manuscript, and editing my files to make corrections. Doing so, I believe I’ve fixed a couple of typos from the original book. There was one howler of a fact error in a single story that I silently corrected by changing a single word, and I thought about adding one note to explain the reference to “32mos” in John Kendrick Bangs’ The Adventures of Shylock Homes, as that’s a term I don’t believe I have ever encountered (it’s an old publishing term, today we’d call it a “trade paperback”), but that I left alone.
Whether it looks the way I want it to is due to the ebook readers software, not my work. Different ebook readers implement the CSS3 spec incompletely or inconsistently. I thought the finished ebook would look fantastic in Moon+, which is considered one of the best ebook reader apps out there, but there were parts of my CSS that it simply ignored in favor of its own way of formatting. Small caps and old-style numerals are, shall we say, edge cases that aren’t always implemented. I tried various epub plugins for Chrome in Vivaldi and got exactly what I wanted in a desktop browser. On a phone or tablet, Gitden Reader did the best, but it’s not a particularly user-friendly piece of software.
Readmill did well with it. I discovered that I had implemented the detective/narrator block leading off each story badly. When I replaced the SPAN tags with P tags and a display: inline; rule in the CSS, they formatted correctly. But it can’t do the small caps or old-style numerals at all. Six years ago I might have driven myself mad trying to figure out why it wasn’t doing those things. Now I understand that it’s not Readmill, it’s simply how ebook readers work.
My decade-old Nook Simple Touch, poor thing, did better than I thought it would. The Nook has a well-known problem with centering images — it can’t handle the simple CSS rule margin-left: auto; margin-right: auto; display: block; at all — nor does it do the small caps and the old-style numerals.
My Kindle Fire and the Kindle app on my phone do very well with it, as you can see from the screenshots above. It does the small caps correctly, but for old-style numerals I need to use the Georgia font instead of my preferred Palatino.
It’s unfortunate that The Misadventures has been out of print for the last seventy-five years as it’s rather entertaining and provides a nice overview of the state of Sherlock Holmes literature at the time of its publication. There’s an Arsène Lupin story (“Holmlock Shears Arrives Too Late,” the first meeting of Lupin and “Shears”/”Sholmes,” which you can read in Standard Ebooks’ Arsène Lupin collection), Vincent Starrett’s classic “The Unique Hamlet” makes an appearance, as does Mark Twain’s A Double-Barrelled Detective Story. There’s a Solar Pons story from August Derleth, there’s a story that a serious Raffles story and a Holmes parody at the same time, there are stories from Anthony Boucher and Manly Wade Wellman that place Holmes in a World War II setting, there’s even two stories about Sherlock Holmes’ children, one played for humor (his three year-old son is even better at deduction than his father, but with the maturity and discretion of a three year-old), one a serious mystery (with a Joan Watson, no less!). Many of the pieces are parodies and burlesques that poke fun, sometimes gently, sometimes savagely, on Sherlock Holmes. The script from The Adventures of Ellery Queen radio show with a Sherlock Holmes theme is really the only self-indulgent inclusion, but the story introductions by the Queen gestalt are fascinating, warm, and chatty in their own right. It’s a nice collection, one that, if someone brought back into print, I’d happily add to my bookshelf.
In spite of the limitations of the ebook reader software, I achieved what I set out to do. I created an ebook of Ellery Queen’s The Misadventures of Sherlock Holmes, one that looks professionally produced and maintains, as much as possible, the formatting of the book as originally published in 1944. Sometimes I will open the book on my Kindle, just to flip through and look at it. It’s a good looking book, an attractive book, and I’m glad I spent the time, picked up the project again, and finished it.
The Misadventures of Sherlock Holmes Throughout January I worked, off and on, on something of a private project, to make an ebook of Ellery Queen's long-out-of-print anthology, The Misadventures of Sherlock Holmes.
0 notes
Text
[SOLVED] How Do I Share A Tweet To Instagram?
SocMedSean - Social.Media.Sean
[SOLVED] How Do I Share A Tweet To Instagram?
Another great question from a reader via my contact form. This one continues on my previous posts where I explain how to share a tweet to Facebook and how to share a Facebook post to Twitter.
Hey Sean,
Thanks for the great tip on sharing a tweet directly to Facebook. Along that topic, is there a good way to share a tweet to Instagram? I see quite a few tweets (usually humorous ones) on Instagram, but it looks like they are images. Is there a better way than sharing the tweet as an image?
Thanks!
Mike
As always, I appreciate the questions from my readers. Rather than just respond via email or in a comment, I find it helpful to others to turn the response into a blog post.
So, here goes.
Why Share A Tweet To Instagram?
I have been asked on numerous occasions whether there is an easy way to cross-post content from Twitter to Instagram.
To be honest, my response is usually with the question “why?”. With Tweets often being text and Instagram being a much more image-focused social network, it seems (at first glance) that the two networks aren’t really sympatico.
The responses, to my question, however, often shed light on why people find it useful to share a tweet. The responses often include replies like:
I like to share funny images with my audience and Twitter is a good source for humor.
Sometimes a great quote is shared on Twitter and I want to add it to my Instagram account.
There’s a lot of humor on Twitter, but it’s hard to sift through. So, I’d rather add it to Instagram where I feel like I’ll get more engagement.
Sometimes, a quote is a fun thing to share on Instagram. Even though it’s text, it still resonates with an Instagram audience.
I’m not on Twitter, but I do find valuable content there that my Instagram audience would probably like.
All valid reasons…especially considering that there appear to be a lot of users who love to see tweets as part of their Instagram content.
While I’m not a huge ‘grammer, I do post occasionally on Instagram and have been known to post text-based images such as the one below that I posted on #NationalCoffeeDay.
View this post on Instagram
#livingthedream #coffee #nationalcoffeeday
A post shared by Sean R. Nicholson (@socmedsean) on Sep 29, 2017 at 5:11pm PDT
One Note Before You Start Sharing Other People’s Tweets To Instagram
Before we get into the steps to share a tweet to Instagram, I feel obligated to remind folks that grabbing other people’s tweets and posting them to your Instagram account can get you into hot water. Copyright laws may apply to the content that was originally tweeted and you don’t want to expose yourself to legal issues by just copying and pasting content that others have created.
Even if legal issues aren’t a problem, if you are swiping other people’s tweets and posting them, you might run into a public PR issue. Just ask the folks who run the @FuckJerry account on Instagram, a popular account with more than 14 million fans and is running into a PR crisis because they repeatedly screen capture tweets from popular comedians and post them as their own content.
The growing #FuckFuckJerry hashtag movement is raising awareness about the fact that they are essentially “pirating” content from sources with attributing them or seeking their permission and sometimes using them in promoted content (aka ads) to sell their card game or their tequila. As you can imagine, comedians are a bit upset at the fact the account is appropriating their content, profile picture, and name to sell merchandise.
So…a word the wise, just re-post your own content, unless you have permission from the original author and/or attribute them accordingly.
Steps To Share A Tweet From Twitter To Instagram
Option 1 – Save It As An Image To Your Mobile Device And Then Share It To Instagram
This one can vary slightly, depending on whether you want to share just an image that was tweeted or whether you want to share the tweet itself.
If you want to share only an image:
Navigate to the tweet that contains the image. So, for example, this tweet by me sharing 10 ways to justify the use of social media for business.
If you are using a desktop browser like Chrome, Firefox, or Safari then right-click on the image and choose Save Image As….
Save the image to your desktop and remember where you save it, like your desktop.
If you are posting from your desktop, then you’ll need to follow the instructions in this post to share your image to Instagram from your desktop.
If you are saving the image from a mobile device, then long-press on the image and save it to your device.
To save a Twitter image to your mobile device, try long-pressing on the image and choosing to save it.
Open the Instagram app and share the image from the location on your mobile device.
BE SURE to attribute the source of the image in your Instagram post. That ensures that the original author gets some credit for the image.
NOTE: Some Twitter clients have disabled the ability to long-press and save the image to your local device. If you run into this, try opening the tweet in a browser like Chrome. You should be able to long-press and save the image from there.
Option 2 – Screen Capture The Tweet And Post It As An Image To Instagram
If, on the other hand, you want to share the tweet and the image, you will need to screen capture the image and then share it.
If you’re using a desktop browser, you can screen capture by pressing Alt + PrtScr on your desktop for Windows or Shift-Command-5 on a Mac.
On a mobile device, there is a combination of buttons or motions that you can use to capture the screen. Since mobile devices vary, I’ll let you look up how to capture the screen for your specific device.
NOTE: If you captured the entire screen, then you need to crop the image down to only show the tweet prior to posting it. You can do that with a simple photo editor like Paint.NET (not Microsoft Paint).
Once you have the tweet captured and cropped, you can either post it from your desktop using the process outlined in step 4 above, or you can post it to Instagram using the mobile app if you captured it on your mobile device.
AGAIN, BE SURE to attribute the source of the image in your Instagram post. That ensures that the original author gets some credit for the image.
Can Sharing Tweets To Instagram Help Drive Traffic To Your Blog?
One more question that I hear quite a bit related to Instagram is whether the channel can actually drive any traffic to a blog or website. Unlike channels like Facebook, YouTube, Pinterest, and Twitter, Instagram doesn’t allow any clickable hyperlinks in their images (other than tags to other Instagram users) and hyperlinks aren’t even allowed in the description of the image or comments.
As a result, finding ways to drive traffic to a Web destination can be tough.
There are two primary ways to generate clicks from your Instagram photo to your Web site:
Option 1 – Customize your profile link and drive traffic through it
While Instagram doesn’t allow for hyperlinks in the posts/photos, each member is provided with the ability have one URL in your profile. As a result, you can post a photo to Instagram and add a note in your photo description to “click the link in bio to learn more”.
You can use the website link in your Instagram profile to drive traffic to your blog or website.
The upside to this is that people can click through to your site. It’s handy in those cases where the URL doesn’t ever need to change.
For instance, when I publish a new blog post, I could post an Instagram photo and ask people to “check out my posts by clicking the link in my profile”. I would then link to the homepage of SocMedSean.com where they could browse through the posts.
The downside is that you can’t change the link. If you updated the link to your newest post every time you publish something, then the links in your previous Instagram posts wouldn’t make sense anymore.
One of your followers might see the old post and click through the link, expecting to see that old post. What they get, instead, is your newest post.
Not the greatest user experience.
Option 2 – Use “Swipe Up” in Instagram Stories to drive traffic
The other option to drive Instagram traffic to your blog is to use the “Swipe Up” feature in Instagram stories. When a user views the story and swipes up, they are directed to your URL.
The upside is it’s a great way to grab traffic from your diehard followers….those who watch your Instagram stories. Arguably, these are your most devoted fans.
The downside is you have to have access to the “Swipe Up” feature. To get access to that feature, you have to either have a verified account OR have 10,000 followers of your business account. Not really an option for 99% of the Instagram community.
The other downside is that the story only lives for a short period of time. After 24 hours, the story, and the associated link, will begin to disappear from Instagram.
Not exactly a way to create ongoing, long-tail traffic links to your blog or Website.
So, there you have it. Some options and reasons for posting a tweet to Instagram.
I hope that helps some folks who want to share a post from Twitter to Instagram. If you have a better way or have had an experience with sharing tweets on Instagram, be sure to share your thoughts in the comments. Those comments are often really helpful to other folks out there.
Cheers!
–Sean
Share This Post With A Pin!
[SOLVED] How Do I Share A Tweet To Instagram?
Sean R. Nicholson.
This post originally posted at SocMedSean.com - SocMedSean – Social.Media.Sean http://bit.ly/2UaJAWz
0 notes
Text
Volusion SEO Best Practices: 5 Traffic Boosting Tips That Work
Volusion is a relative ‘newcomer’ for ecommerce websites & shopping cart software.
They might not be as notable as Shopify, but they pack Shopify-level features at competitive pricing.
Plus, their SEO options are no joke and can help your store bring in more traffic and sales.
As an ecommerce brand, you need organic traffic for your business to thrive.
Sure, you can get away with paid traffic for a while, but as you scale, that simply becomes a losing, uphill battle where you have to spend thousands upon thousands a week to see bottom-line impact.
Here is why Volusion is a great platform for ecommerce SEO and five different ways you can bring in more traffic from your store by using it.
What is Volusion? Why Should You Use It?
Volusion is an ecommerce hosting platform with over 180,000 online stores being hosted using their technology.
With a focus on the small business, they represent amazing startups like Notch, Tiny House Coffee and Capital Teas.
Get Your Free Volusion SEO Cheatsheet
Enter your email and instantly get a Volusion SEO Cheatsheet to ensure that your store is following SEO best practices.
If you are human, leave this field blank. Get Cheatsheet
If you aren’t familiar with building websites or coding and want a DIY-approach, Volusion has solid themes that rival Squarespace in beauty and BigCommerce in functionality:
Like most other ecommerce platforms out there, Volusion has you covered on integrations. Want to connect your email marketing, PayPal, Shippo, Stripe, or anything else? With Volusion, you can.
With inventory management, payment collection options, and unlimited product listing, you can host a store that sells a few products or a few hundred products.
So, what’s the pricing?
Volusion’s pricing is a bit different than other platforms. It’s meant to scale as your business grows, ensuring that you aren’t paying exorbitant fees while you are still in the startup phase.
As you can notice, payment options, product listings, storage, and many other features come included in all packages. Pricing will increase as your online sales increase.
As you scale up in revenue per year, you unlock more critical features with the better plans, like reviews, a dedicated success team, and more.
And the beauty of it is that Volusion’s success teams want you to succeed due to their pricing model.
Compared to BigCommerce, Shopify, and 3dcart, the pricing is very competitive.
One of the biggest selling points of Volusion is their themes. Not just because they are good looking, but because they have numerous in-house ecommerce CRO experts that have helped build them for sales-focused entrepreneurs.
While they only have a limited selection of themes, each is customizable with countless elements.
So, is Volusion any good for SEO?
Is Volusion a Good Ecommerce Platform for SEO?
Volusion is an optimization-focused ecommerce platform. It’s why their themes are designed for conversion rate improvement and why they have put time and effort into their tool stack.
With Volusion, standard SEO features you can expect are:
Metadata customization
Sitemaps
Robots.txt
Custom product page and blog URLs
In-depth guides on SEO
Search engine optimization is constantly changing.
Get Your Free Volusion SEO Cheatsheet
Enter your email and instantly get a Volusion SEO Cheatsheet to ensure that your store is following SEO best practices.
If you are human, leave this field blank. Get Cheatsheet
There are between 500 and 600 algorithm changes to Google a year.
Volusion does a fantastic job of keeping their guides up to date, providing expert knowledge on almost any topic in ecommerce and SEO:
With over 200 existing guides on topics from data analysis to PPC to SEO to holiday marketing, you always have access to detailed information on improving your growth.
Plus, Volusion has a great track record of SEO success when you look at client case studies. In fact, Volusion actually offers professional marketing services beyond general hosting packages if businesses need help taking their sales to the next level.
For instance, one Volusion-backed store Boat Lift and Canopy was struggling to optimize their site’s product pages, metadata, and navigational UI with a conversion focus.
To combat this, they focused on on-page optimization to rank higher in search for their target keywords. Optimizing FAQs and articles on their site, they could drive huge increases in organic traffic.
The final nail on the head was implementing a content strategy on their blog to build brand awareness in their niche.
The results? They speak for themselves:
Volusion’s offering made it easy for Boat Lift and Canopy to implement SEO. Using Volusion Blog they easily started their own content machine that could pull organic traffic. With metadata optimization, targeting the right keywords and increasing organic click-through rates was a piece of cake.
Here is how you can utilize Volusion’s SEO features with five tips to improving your organic performance.
5 Tips to Improve Organic Performance Using Volusion
Volusion packs impressive SEO features and a focus on optimizing pages for traffic.
Here are five critical ways to improve your organic traffic with a Volusion store.
Establish a Blog on Your Volusion Store to Drive Traffic
Blogging and content marketing are still king. While the market for content becomes more saturated, it’s still important to produce top quality content that can rank.
HubSpot found that B2C companies that blog more than 16+ times per month generate significantly more leads and sales than those that blog less than 16+ times per month. Simply put, the more blog posts you have, the more traffic and ranking potential you have:
(Image Source)
Get Your Free Volusion SEO Cheatsheet
Enter your email and instantly get a Volusion SEO Cheatsheet to ensure that your store is following SEO best practices.
If you are human, leave this field blank. Get Cheatsheet
Blogging in your niche should focus on building your brand. For online shoppers using Google to find products and companies, brand recognition was the number one factor that drove clicks in organic search.
(Image Source)
Known retailer is the number one thing that users look at when deciding whether or not to click on your organic listing for products.
To build your brand, there is nothing better than starting a blog and writing on topics that your customers care about. With good keyword research, you can uncover great blog ideas to jumpstart your traffic.
To create a new post on your Volusion store, head to the Pages section of your dashboard:
From here, create a new page using the “Blog Post” selection from the templates list:
Here you can start to write directly within the Volusion blog post editor, or simply copy and paste from an outside Google Doc or wherever you decide to write the blog post:
Before publishing your blog posts live, be sure to create SEO friendly URLs just like you would on product and category pages for your store. On your Volusion blog post, scroll down past the text editor and you will see an SEO section to add your URL string.
For instance, if your next post is on ecommerce SEO as your keyword and topic target, use that for your URL string:
This keeps the focus on your target keyword, and when users are looking on search results they will see your URL string and be reaffirmed that you are covering the topic they searched for, helping to improve your organic click-through rates.
If you prefer an outside blogging platform like WordPress or Blogger, you can link it to your Volusion-hosted store. To do this, follow Volusion’s guide to setting up your WordPress or Blogger with your store.
Get Your Free Volusion SEO Cheatsheet
Enter your email and instantly get a Volusion SEO Cheatsheet to ensure that your store is following SEO best practices.
If you are human, leave this field blank. Get Cheatsheet
Meta Descriptions
With algorithm changes coming every single day, it’s hard to know what SEO factors can really make an impact on your organic traffic.
But the latest data shows that meta descriptions are still impactful for increasing CTR.
One company was able to increase their organic traffic by 48% through writing better meta descriptions.
On your online store pages, you will see the same SEO box that appears on your blog posts at the bottom of each product and category page:
This is where you can enter meta description and title tag information for each page.
The key to success here is making every single title tag and meta description unique. Duplicating them will only lead to penalties with Google and bad rankings.
Follow these best practices when writing meta descriptions and title tags:
Create unique descriptions and titles for every page
Include main keyword in your title + meta description naturally
Craft a meta description that is enticing to click for searchers
Link Google Analytics For Data
Google Analytics is a treasure-trove of data that any ecommerce store can benefit from.
Stores looking to produce blog content and drive organic traffic shouldn’t go a day without Google Analytics installed.
GA can help you understand what content pieces resonate well with your audience, traffic levels, referral sources, and even on-site search keywords that can give you easy content wins:
Can’t I just use Volusion’s store analytics? Absolutely…not. While it’s nice that platforms like Volusion offer integrated Analytics, they aren’t in-depth enough to help you improve performance at a high-level.
To integrate Google Analytics, you can paste your Google Analytics code directly into the <head> section of your live editor.
For more details on this, follow Volusion’s guide directly on your store.
Get Your Free Volusion SEO Cheatsheet
Enter your email and instantly get a Volusion SEO Cheatsheet to ensure that your store is following SEO best practices.
If you are human, leave this field blank. Get Cheatsheet
Optimize Image Alt tags
Search engines can only scan your text for information and contextual relevance. Images without alt tags give search engines no additional information, and they can also impact disabled persons when browsing who can’t see your image.
Optimizing image alt tags takes just a few extra seconds of time and can help you boost relevance and SEO.
To add alt tags to your images on Volusion, simply hover over them in the editor and it will reveal the following toolbar:
Click on the “i” info button to pull up image alt editing.
Be sure to follow these best practices for Volusion alt tags:
Limit the text 125 characters or less
Describe the image you are showing
Only use keyword if it naturally fits, DO NOT keyword stuff
Don’t use “image of” to describe, that’s already a given
Optimize Product Pages
Optimizing category and product pages on your ecommerce store are critical components of good SEO.
Targeting the right keywords and including the right content tapping into pain points can help you bring in more organic traffic that is qualified to buy from you.
When adding new products on your Volusion store, start by naming your product and providing the product image, as well as editing the alt tags like we discussed earlier.
The key section here will be optimizing your content on that page. This includes the text you write about the product and category itself.
Where most go wrong is thinking that more is always better. But on product pages, you want to keep the description short and sweet, focused on the benefits of the product for customers.
A great example of this is from from Bolthouse Farms:
Keeping content short and to the point, they focus on a small description of the product and its benefits, like increasing your vitamin intake.
Using semantically related keywords they can help provide more context to search engines.
On your category pages you can start to offer more content and descriptions that are long-form compared to individual product pages, like Beyond Pet Food’s natural dog food category:
On this category page, they communicate tons of value to customers and also improve their SEO by writing more relevant content on the topic.
Expand your category and product pages to include your keywords and relevant information.
But remember: don’t add content if it isn’t helping your brand or SEO.
Conclusion
Volusion may be a lesser-known ecommerce hosting platform in a market dominated by Shopify and BigCommerce, but that doesn’t mean it’s devoid of features and a pricing scale that work.
Volusion is backed by high-level marketers who have helped the company design CRO focused themes, easy SEO measures, and a world class content guides to help anyone from the new store to a thriving giant.
When optimizing your store with Volusion, the first step you should take is to initiate your blog. This is the meat and potatoes of SEO and is one of the best ways to start bringing in new traffic.
Link your Google Analytics to get insights on blog success and your market.
Optimize your product pages for target keywords and don’t forget to tag those images for an added SEO boost.
Volusion is a fast growing ecommerce hosting platform with great features. Now it’s up to you to put them to use to grow your online store.
The post Volusion SEO Best Practices: 5 Traffic Boosting Tips That Work appeared first on HigherVisibility.
from The SEO Advantages https://www.highervisibility.com/blog/volusion-seo-best-practices-5-traffic-boosting-tips-that-work/
0 notes
Text
Volusion SEO Best Practices: 5 Traffic Boosting Tips That Work
Volusion is a relative ‘newcomer’ for ecommerce websites & shopping cart software.
They might not be as notable as Shopify, but they pack Shopify-level features at competitive pricing.
Plus, their SEO options are no joke and can help your store bring in more traffic and sales.
As an ecommerce brand, you need organic traffic for your business to thrive.
Sure, you can get away with paid traffic for a while, but as you scale, that simply becomes a losing, uphill battle where you have to spend thousands upon thousands a week to see bottom-line impact.
Here is why Volusion is a great platform for ecommerce SEO and five different ways you can bring in more traffic from your store by using it.
What is Volusion? Why Should You Use It?
Volusion is an ecommerce hosting platform with over 180,000 online stores being hosted using their technology.
With a focus on the small business, they represent amazing startups like Notch, Tiny House Coffee and Capital Teas.
Get Your Free Volusion SEO Cheatsheet
Enter your email and instantly get a Volusion SEO Cheatsheet to ensure that your store is following SEO best practices.
If you are human, leave this field blank. Get Cheatsheet
If you aren’t familiar with building websites or coding and want a DIY-approach, Volusion has solid themes that rival Squarespace in beauty and BigCommerce in functionality:
Like most other ecommerce platforms out there, Volusion has you covered on integrations. Want to connect your email marketing, PayPal, Shippo, Stripe, or anything else? With Volusion, you can.
With inventory management, payment collection options, and unlimited product listing, you can host a store that sells a few products or a few hundred products.
So, what’s the pricing?
Volusion’s pricing is a bit different than other platforms. It’s meant to scale as your business grows, ensuring that you aren’t paying exorbitant fees while you are still in the startup phase.
As you can notice, payment options, product listings, storage, and many other features come included in all packages. Pricing will increase as your online sales increase.
As you scale up in revenue per year, you unlock more critical features with the better plans, like reviews, a dedicated success team, and more.
And the beauty of it is that Volusion’s success teams want you to succeed due to their pricing model.
Compared to BigCommerce, Shopify, and 3dcart, the pricing is very competitive.
One of the biggest selling points of Volusion is their themes. Not just because they are good looking, but because they have numerous in-house ecommerce CRO experts that have helped build them for sales-focused entrepreneurs.
While they only have a limited selection of themes, each is customizable with countless elements.
So, is Volusion any good for SEO?
Is Volusion a Good Ecommerce Platform for SEO?
Volusion is an optimization-focused ecommerce platform. It’s why their themes are designed for conversion rate improvement and why they have put time and effort into their tool stack.
With Volusion, standard SEO features you can expect are:
Metadata customization
Sitemaps
Robots.txt
Custom product page and blog URLs
In-depth guides on SEO
Search engine optimization is constantly changing.
Get Your Free Volusion SEO Cheatsheet
Enter your email and instantly get a Volusion SEO Cheatsheet to ensure that your store is following SEO best practices.
If you are human, leave this field blank. Get Cheatsheet
There are between 500 and 600 algorithm changes to Google a year.
Volusion does a fantastic job of keeping their guides up to date, providing expert knowledge on almost any topic in ecommerce and SEO:
With over 200 existing guides on topics from data analysis to PPC to SEO to holiday marketing, you always have access to detailed information on improving your growth.
Plus, Volusion has a great track record of SEO success when you look at client case studies. In fact, Volusion actually offers professional marketing services beyond general hosting packages if businesses need help taking their sales to the next level.
For instance, one Volusion-backed store Boat Lift and Canopy was struggling to optimize their site’s product pages, metadata, and navigational UI with a conversion focus.
To combat this, they focused on on-page optimization to rank higher in search for their target keywords. Optimizing FAQs and articles on their site, they could drive huge increases in organic traffic.
The final nail on the head was implementing a content strategy on their blog to build brand awareness in their niche.
The results? They speak for themselves:
Volusion’s offering made it easy for Boat Lift and Canopy to implement SEO. Using Volusion Blog they easily started their own content machine that could pull organic traffic. With metadata optimization, targeting the right keywords and increasing organic click-through rates was a piece of cake.
Here is how you can utilize Volusion’s SEO features with five tips to improving your organic performance.
5 Tips to Improve Organic Performance Using Volusion
Volusion packs impressive SEO features and a focus on optimizing pages for traffic.
Here are five critical ways to improve your organic traffic with a Volusion store.
Establish a Blog on Your Volusion Store to Drive Traffic
Blogging and content marketing are still king. While the market for content becomes more saturated, it’s still important to produce top quality content that can rank.
HubSpot found that B2C companies that blog more than 16+ times per month generate significantly more leads and sales than those that blog less than 16+ times per month. Simply put, the more blog posts you have, the more traffic and ranking potential you have:
(Image Source)
Get Your Free Volusion SEO Cheatsheet
Enter your email and instantly get a Volusion SEO Cheatsheet to ensure that your store is following SEO best practices.
If you are human, leave this field blank. Get Cheatsheet
Blogging in your niche should focus on building your brand. For online shoppers using Google to find products and companies, brand recognition was the number one factor that drove clicks in organic search.
(Image Source)
Known retailer is the number one thing that users look at when deciding whether or not to click on your organic listing for products.
To build your brand, there is nothing better than starting a blog and writing on topics that your customers care about. With good keyword research, you can uncover great blog ideas to jumpstart your traffic.
To create a new post on your Volusion store, head to the Pages section of your dashboard:
From here, create a new page using the “Blog Post” selection from the templates list:
Here you can start to write directly within the Volusion blog post editor, or simply copy and paste from an outside Google Doc or wherever you decide to write the blog post:
Before publishing your blog posts live, be sure to create SEO friendly URLs just like you would on product and category pages for your store. On your Volusion blog post, scroll down past the text editor and you will see an SEO section to add your URL string.
For instance, if your next post is on ecommerce SEO as your keyword and topic target, use that for your URL string:
This keeps the focus on your target keyword, and when users are looking on search results they will see your URL string and be reaffirmed that you are covering the topic they searched for, helping to improve your organic click-through rates.
If you prefer an outside blogging platform like WordPress or Blogger, you can link it to your Volusion-hosted store. To do this, follow Volusion’s guide to setting up your WordPress or Blogger with your store.
Get Your Free Volusion SEO Cheatsheet
Enter your email and instantly get a Volusion SEO Cheatsheet to ensure that your store is following SEO best practices.
If you are human, leave this field blank. Get Cheatsheet
Meta Descriptions
With algorithm changes coming every single day, it’s hard to know what SEO factors can really make an impact on your organic traffic.
But the latest data shows that meta descriptions are still impactful for increasing CTR.
One company was able to increase their organic traffic by 48% through writing better meta descriptions.
On your online store pages, you will see the same SEO box that appears on your blog posts at the bottom of each product and category page:
This is where you can enter meta description and title tag information for each page.
The key to success here is making every single title tag and meta description unique. Duplicating them will only lead to penalties with Google and bad rankings.
Follow these best practices when writing meta descriptions and title tags:
Create unique descriptions and titles for every page
Include main keyword in your title + meta description naturally
Craft a meta description that is enticing to click for searchers
Link Google Analytics For Data
Google Analytics is a treasure-trove of data that any ecommerce store can benefit from.
Stores looking to produce blog content and drive organic traffic shouldn’t go a day without Google Analytics installed.
GA can help you understand what content pieces resonate well with your audience, traffic levels, referral sources, and even on-site search keywords that can give you easy content wins:
Can’t I just use Volusion’s store analytics? Absolutely…not. While it’s nice that platforms like Volusion offer integrated Analytics, they aren’t in-depth enough to help you improve performance at a high-level.
To integrate Google Analytics, you can paste your Google Analytics code directly into the <head> section of your live editor.
For more details on this, follow Volusion’s guide directly on your store.
Get Your Free Volusion SEO Cheatsheet
Enter your email and instantly get a Volusion SEO Cheatsheet to ensure that your store is following SEO best practices.
If you are human, leave this field blank. Get Cheatsheet
Optimize Image Alt tags
Search engines can only scan your text for information and contextual relevance. Images without alt tags give search engines no additional information, and they can also impact disabled persons when browsing who can’t see your image.
Optimizing image alt tags takes just a few extra seconds of time and can help you boost relevance and SEO.
To add alt tags to your images on Volusion, simply hover over them in the editor and it will reveal the following toolbar:
Click on the “i” info button to pull up image alt editing.
Be sure to follow these best practices for Volusion alt tags:
Limit the text 125 characters or less
Describe the image you are showing
Only use keyword if it naturally fits, DO NOT keyword stuff
Don’t use “image of” to describe, that’s already a given
Optimize Product Pages
Optimizing category and product pages on your ecommerce store are critical components of good SEO.
Targeting the right keywords and including the right content tapping into pain points can help you bring in more organic traffic that is qualified to buy from you.
When adding new products on your Volusion store, start by naming your product and providing the product image, as well as editing the alt tags like we discussed earlier.
The key section here will be optimizing your content on that page. This includes the text you write about the product and category itself.
Where most go wrong is thinking that more is always better. But on product pages, you want to keep the description short and sweet, focused on the benefits of the product for customers.
A great example of this is from from Bolthouse Farms:
Keeping content short and to the point, they focus on a small description of the product and its benefits, like increasing your vitamin intake.
Using semantically related keywords they can help provide more context to search engines.
On your category pages you can start to offer more content and descriptions that are long-form compared to individual product pages, like Beyond Pet Food’s natural dog food category:
On this category page, they communicate tons of value to customers and also improve their SEO by writing more relevant content on the topic.
Expand your category and product pages to include your keywords and relevant information.
But remember: don’t add content if it isn’t helping your brand or SEO.
Conclusion
Volusion may be a lesser-known ecommerce hosting platform in a market dominated by Shopify and BigCommerce, but that doesn’t mean it’s devoid of features and a pricing scale that work.
Volusion is backed by high-level marketers who have helped the company design CRO focused themes, easy SEO measures, and a world class content guides to help anyone from the new store to a thriving giant.
When optimizing your store with Volusion, the first step you should take is to initiate your blog. This is the meat and potatoes of SEO and is one of the best ways to start bringing in new traffic.
Link your Google Analytics to get insights on blog success and your market.
Optimize your product pages for target keywords and don’t forget to tag those images for an added SEO boost.
Volusion is a fast growing ecommerce hosting platform with great features. Now it’s up to you to put them to use to grow your online store.
Volusion SEO Best Practices: 5 Traffic Boosting Tips That Work was originally posted by Video And Blog Marketing
0 notes
Text
How to Create A Superior Online Profile/Presence for Your Business
In today’s world, a strong online presence means more business, both through online sale and higher brick-and-mortar sales due to greater creditability and online awareness.
How can you increase and enhance your online presence? Here are five proven ways to do it, either yourself or hiring someone to do it.
1. Create concise, informative press releases that announce your online site.
The press release should provide useful information (you can find many of these on Google Trends which gives you an idea of what people are interested in right now), contact info, the site name and its features, and should be submitted only to publications that are generally read by your target market or a very broad, general segment like women, businesses, or families, for example. This is also a good way to build rapport with journalists and editors. (NOTE: Submit to multiple publishers and get even more exposure and links.)
2. Author blogs on your website.
Once you set up the blog, use it. For even greater online presence, utilize a service like Hootsuite, Buffer, or SocialOomph (also using IFTTT is good, but you might want to hire someone on Fiverr or SEOClerks to set the accounts up for you). Having a blog isn’t the end-all, it’s posting to that blog on a constant, periodic basis, i.e., once a week that creates the value and builds your online profile. You can write general blogs and then in the last paragraph relate it to your business. Having that last paragraph of relevant content is important for SEO purposes, as well as including keywords for your business in the blog. Also, commenting on other blogs related to your website's niche can be a good SEO technique. Many of the highest authority blogs are only too willing to let you comment. (Blogs are a great way to get higher rankings in the search engines. Search engines are always crawling your site, so “fresher” content, more content, and visitors linking to that content signal the search engines that there is something of value on your site, so they should direct others there. Backlinks are the strongest signa; to the search engines that your site has value.
3. Think videos.
Posting a video on YouTube that is properly tagged can help grow your business because YouTube is pulling millions of viewers in every day. You can also post on your website using the YouTube code. Videos are not hard to create: i) there are numerous free sites where you can grab a video and post on your site (while claiming ownership and being able to tag: Archive.org and Pixelbay.com are two sites that offer free videos (Shutterstock has tens of thousands of videos available on a one-time or subscription basis); ii) use Fiverr, SEOClerks, or another online vendor to create (they can b had for as little as $5); iii) your vendors may have clips they will make available to you; iv) you can create on PowerPoint and record right on PowerPoint; or, you can subscribe to Adobe Photoshop or another photo/video editor software package (or use the free alternative, Gimp); these software packages take some time to learn and some skill to use; and, v) hire us or a local vendor. Cost will usually run $400 or so for one minute, including voiceover. SALES SPECIALS CAN BE TURNED INTO A VIDEO. Properly tagged, not only will you attract traffic and businesses but also the search engines.
4. Email Lists.
Emails can be very effective as long as they are: i) directed at a target audience that has some interest in your products or services; and, ii) you send them periodic messages, i.e., every month. Once bought a direct mail marketing package after seeing an infomercial. Most important point emphasized was that repeated contact was important; they estimated average sale took nine contacts (obviously, will vary by industry but in all cases one contact ain’t going to do it. What can you say so many times: new products; personnel changes; special sales; special pricing; local events; interaction with vendors, community, church; charitable giving/events; etc. Doesn’t have to be product-specific, in fact more effective campaigns are not but your name and visibility will be enhanced. Are you capturing the email address of your visitors? You should try; that list is valuable.
5. Product feeds are valuable.
A product feed can help draw traffic and business to your site. The feed will show details that the search engines like, i.e., descriptions, images, and prices of your services and products. Submit them to sites which compare prices and to the major search engines. Add an RSS feed icon on your site or blog and suggest to readers that they should subscribe to your site's feed for the latest updates. (For most retail businesses, if you’re not selling on Amazon, think about doing it. Amazon will promote you at no cost to you.)
Every blog, video, email, or product feed should have proper SEO tagging, i.e., sub-URL, title tag, embedded keywords, keywords in the content and images with alt text tags.
OK, now you’ve attracted traffic and rankings. Is your website ready to handle, i.e., is the site visually attractive, have strong “call to action” prompts (telephone number, “Contact” button, and contact form, easy navigation, and have good content supporting the products and keywords? If not, update it. We can evaluate your site and redesign it (sometimes lonely slight changes are needed, i.e., add the phone number to the top, add visual boxes that click-through to the right page/section).
Make sure to avoid duplicate content. Each tag and written paragraph should be unique. If you cannot avoid them all together, avoid them in the index. Duplicate content and pages can lower your ranking on search engine result pages (SERP’s).
A good online marketing plan and proper execution of that plan will help enhance the company’s online profile, products, and services, as well bring more business to the site whether a national brand or a small local business. These programs and steps will help a business of any size. Contact us and we’ll help devise an effective, efficient plan and budget that works for you.
The post How to Create A Superior Online Profile/Presence for Your Business appeared first on Best SEO Company.
from Best SEO Company https://ift.tt/2z4XBfP
via IFTTT
0 notes
Last Seen Blogs