#sorry if the quality is not very good i think tumblr compresses the file
Text

early morning sunlight at Bag End
#at this point i think y'all might be tired of seeing my drawings of bag end#since i admittedly am not very creative at thinking of new ways to draw/portray it lol#but this IS like. the one thing that always breaks me out of a long dry season of Not Drawing#clarisse doodles#sorry if the quality is not very good i think tumblr compresses the file#tolkien#lotr#bag end#frodo baggins#illustration#procreate
10K notes
·
View notes
Note
Hello! :) I am sorry for this very non-art specific question - I just don't know who else to ask and Google isn't helping me either. Every time I try to post my art on Instagram it looks soooo bad... as if I saved my own art from a dubious forum somewhere and it got fried afterwards. The quality really makes me want to cry :/ I tried to lower the image size and only post in 1080p to avoid file compression, but it's no help. How do you keep such good quality on Instagram? As always love your art
Hi friend,
I found this article that should help you understand what’s happening with the compression of images on Instagram. My quick solution to this issue is that I always export a compressed file from photoshop and make sure to upload to Insta from my phone and never from my PC.
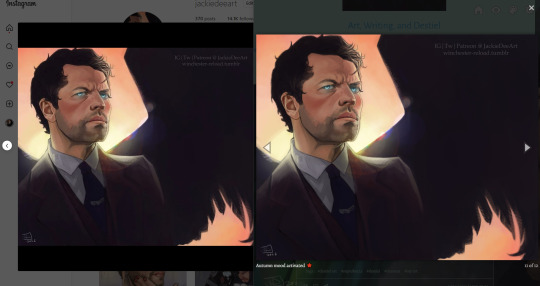
But, honestly, some days art seems to upload better than others. For example: this Instagram vs Tumblr side-by side of my “Saint” piece degraded quite a bit, while my latest #suptober22 piece looks about the same (a little blurrier).

But typically, I just assume things will look a little worse on Instagram than everywhere else. And, honestly, I think as the artist, we notice the compression more than other people do. I mean, regardless of platform, the art never looks as detailed as it does in person, or in our drawing software, and I think we’re just kinda sensitive to that.
I feel like this isn’t all that helpful, but I thought I’d throw it out there anyway. Maybe someone smarter than me can give us both some suggestions or hacks I don’t know about, but at the very least, I promise you you’re not the only frustrated Instagram user re: this topic.
39 notes
·
View notes
Note
Do you use vapoursynth for all your gifs? Sometimes I see that no matter what time you set up it becomes very slow? Does that happen to you?
i dont, i only use it occasionally on youtube videos as youtube heavily compresses videos. these x x x are some sets i have used it on recently, but other than that i try to stay away from it and just screencap things because i dont really like how much detail it removes from the gif and the textures it gives to skin, or lack thereof.
when i giffed jhope on ius palette recently i used vapoursynth on this set but not on this one. in the one that i did use vapoursynth u can see theres less detail in his face and it is overall really smoothed over which i personally dont like but i did it because i didnt think the video quality was as good during the parts when he was performing. but i also often gif lower quality videos without using vapoursynth such as this x. in that one especially theres a lot of detail in his face that would have been lost if i had used vapoursynth which is why i dont like it usually!! sorry thats not really what u asked but i feel very strongly about the overuse of vapoursynth on kpop gifmaking tumblr.........
anyway on to what u asked! the time it takes for vapoursynth to encode the video has to do with the size of the video and also fps! things like 4k youtube videos or uhd music show files can take like 10+ minutes especially if its a longer clip, but things like 1080p youtube videos shouldnt take more than like 4 minutes, depending on the length of the clip u input. and also if the video is 60fps rather than the typical 30fps that can also make it take twice as long! in general vapoursynth uses a lot of cpu so it was also slow the rest of your computer down while its running :/
3 notes
·
View notes
Note
how are you making such hd quality gifs of dragon quest 9?
sorry in advance for my long explanation, i like to make sure i get every detail
i’m running the game on an emulator, i wanted to replay it but didn’t wanna reset the save file on my original cart bc i got it like 9 years ago and it has over 700 hours.
on desmume (which i think is the most popular ds emulator, it’s what i’m using anyway) go to config > 3d settings > gpu scaling factor. i’ve got mine set to 4, i’ve also set texture scaling to 4x which scales up textures and smooths them about although it may make some things look weird (i know it affects some text but not all which does look kinda odd) that one’s just a matter of preference. i also turned gpu colour depth up to 24-bit but if that makes a difference it’s not noticeable. (if you’ve got a less powerful pc try scaling at 2, honestly it still looks way better)
just warning you tho, emulation can be very demanding, i was getting very bad lag even which a powerful pc, you’ll want to chang the 3d rendering engine in the 3d settings to opengl instead of the deafult softrasterizer. softerrasterizer. renders the graphics with your cpu whereas opengl uses your graphics card, which eliminated the lag for me except for a tiny bit in some areas and scenes (although, emulation is still demanding on the cpu even without the graphics part)
by default it renders every frame but that will means lag will slow the game down (annoying but worst of all it makes the music sound awful when it’s slowed down to match) so i would also go config > frame skip and and turn it up to the highest (9) but also enable auto-minimize skipping. that will stop it slowing the game down and just lower framerate instead when it needs to
oh and one last note, i uploaded a clip of a pre-rendered cutscene the other day, the quality was awful bc there’s not much you can do about those, they’ve already been made in awful quality to fit on the ds and not consume much battery life
as for capturing footage, i did try desmume’s built in ‘record avi’ but i had issues with all the available compression codecs and the uncompressed footage has an absurd file size so just use the recording software of your choice, personally i’m using obs. the downside to this is anywhere those frames are dropped, that’s recorded in the footage whereas desmume captures every frame but eh it’s not that horrible, i consider it a necessary sacrifice. - plus if you’re just gonna make the footage into gifs, you’ll probabtly have to lower the framerate to reduce the file size to get it under tumblr’s limits anyway, then it might not even matter

(if you saw the version of this gif i uploaded a few days ago, that was before i realised i could improve the quality, here’s a ncier version and with default female nine. there’s some dithering in the gif bc i had to reduce the file size but other than that it looks good)
7 notes
·
View notes
Note
i’ve never made gifs before and i have absolutely no idea where to start T-T can you share your process or is that top secret lol? and dw i’m not using you instead of google lol it’s just i’m very picky about what looks good and your gifs have such a nice frame rate and sharpness and stuff so i was wondering how you go about making them (i have photoshop which i’ve heard is what most people use i think? idk) sorry if you get this question all the time feel free to ignore!
hi!! dont worry i had no idea where to start either and it took me a while and looking at several tutorials to figure out what i was doing cus its unfortunately not something u can just google and find all the steps to lol,, but anyway no my process is definitely not top secret!! i think most people use mostly the same process and then things like sharpening + coloring are all about personal preference! but heres some things that might help u out!! 🥺
heres a couple tutorials that could help u get the hang of the actual technical process and steps of converting a video file to a gif which for most people is about the same, kookyjin’s tutorial, sugajimin’s tutorial
you don’t have to use vapoursynth but it does make the process a little easier by cropping and resizing the video for u, and it also has a denoise filter which will make your gifs look smoother, it can be a little tricky to install but heres the link for that
as for my personal way of sharpening i use smart sharpen, and sometimes unsharp mask if i want it just a little bit sharper. the basic sharpening for tumblr gifs is 500% at 0.3px, but u can use more or less depending on the quality of the video. lower quality videos (like youtube videos) usually cant take more sharpening before they start to look oversharpened so u can lower it to 0.2px. but for things like my music video gifsets where the source video file im using is higher quality and hasnt been compressed the way youtube videos are (i get them from other websites where people have access to higher quality versions of the mv), for those i’ll often use 0.4 or even 0.5px, so it really depends! i also sometimes change the opacity of the sharpening filter to fine tune it a bit more. what i like to do lately is start off at an amount thats like obviously too much and oversharpened, and then gradually work my way down until i think it looks ok! i think its just something you have to build up a sense for over time :] but yea those r just some tips
as for coloring, its even more up to personal preference than sharpening is! i personally like a really natural coloring that just brings out the colors that were already in the video. so i cant give tips about other coloring styles but if u like mine id say the most important thing is creating contrast. and the best layers ive found to do so is with levels and curves. i ALWAYS start my coloring with a levels layer and darken the shadows and brighten the highlights as much as i think looks natural. this creates a good base to make the rest of the coloring on, gets rid of the “gray cast” (you’ll notice it if you click the little eye next to the levels layer and turn it on and off and see the difference with and without it), and makes the colors in the gif look more vibrant and saturated without actually using a vibrance saturation layer. i rarely ever use a vibrance saturation layer and if i do its actually to lower the saturation. after a levels layer ive been using (in order) two curves layers (its kinda hard to explain how to use those u just have to mess around with it until it does what u want), a brightness contrast layer, an exposure layer, sometimes a selective color layer (just to darken the blacks a little which is another good way to create contrast), and a gradient layer at about 10% opacity of just the white to black one to add a little bit more contrast :)
for frame rate i also prefer it to look natural and almost as fast as the original video. i will usually do 0.01 seconds above what the frame rate was when i originally imported the frames. so for 25 fps videos i would use 0.05, for 30 fps 0.04, and 60 fps 0.03
i hope all of that made sense and u find at least some of it helpful🥺 if u have any questions please feel free to send me another ask id be happy to answer!! even if u think it might be a dumb question i probably had it too at some point and might be able to help<33 good luck i promise giffing is really fun n worth sticking thru the first little bit of confusion!! ^_^
#mail#gif help#oh and yes photoshop is what most people use i think there might be alternatives out there but everything i said here is about photoshop!
10 notes
·
View notes
Last Seen Blogs


sarahmcbrides
LODGE

crazedmind-sexcrazed
Learning to accept myself!

plush4bunny
🔞plush4bunny🔞

notellesblog
Elle:3