#sims 3 how to
Text

Tutorial - Extracting the assets from Shining Nikki for conversion for Sims games (or anything, really)
Finally! In advance I'm sorry for any errors since english isn't my first language (and even writing in my actual language is difficult for me so)
And first, a shoutout to The VG Resource forums, where I found initially info about this topic 😊 I'm just compilating all the knowledge I found there + the stuff I figured out in a single text, because boy I really wanted to find a guide like that when I first thought about converting SN stuff lol (and because there's a lot of creators more seasoned than me that could do a really good job with these assets 👀)
What this tutorial will teach you:
How to find and extract meshes and textures (when there's any) for later use, and some tips about how stuff are mapped etc on Shining Nikki.
What this tutorial will not teach you:
How to fully convert these assets for something usable for any sims game (because honestly neither I know how to do that stuff properly lol). It is assumed that you already know how to do that. If you don't know but has interest in learning about CC making (specially for TS3), I'd suggest you take a look at the TS3 Tutorial Hub, the MTS tutorials and This Post by Plumdrops if you're interested in hair conversion. Also take a look on my TS3 tutorials tag, that's where I reblog tutorials that I think might be useful :)
What you'll need:
An Android emulator (I recomend Nox)
A HEX editor (I recomend HxD)
Python and This Script for mass editing
AssetStudio
A 3D Modeling Software for later use. I use Blender 2.93 for major editing, and (begrudingly) Milkshape for hair (mostly because of the extra data tool).
Download everything you don't have and install it before starting this tutorial.
Now, before we continue, a little advice:
I wrote this tutorial assuming that people who would benefit from it will not put the finished work derivative from these assets behind a paywall or in any sort of monetization. These assets belong to Paper Games. So please don't be an ass and put your Shining Nikki conversions/edits/whatever behind a paywall.
The tutorial starts after the cut (and it's a long one).
Step 1:
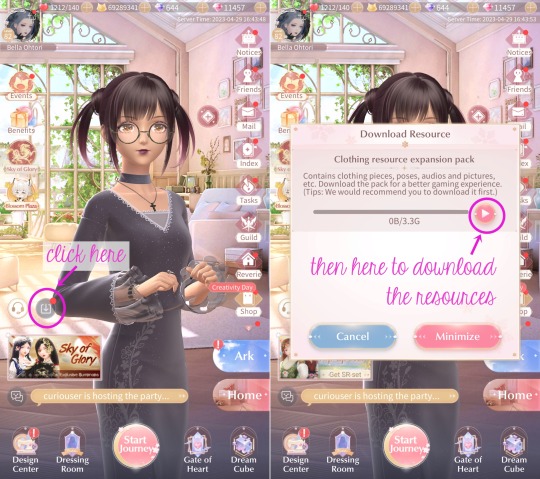
Launch Nox, then open Play Store and log in with a Google account (if you don't have one, create it). Now download Shining Nikki from there.
After downloading the game, launch it. It will download a part of the game files. After that, log in on the game, or create a new account in any server (the server is only important if you want to actually play the game. For extracting it doesn't really matter since the game already has the assets for the upcoming events and chapters. It also doesn't matter if you actually own an item in game, you can extract the meshes and textures even if you don't have it in game).
If you're creating a new account, the game will lead you through the presentation of it etc (unfortunately there's no way to skip it).
After that, click on that little arrow button on the main screen. There, you can download the actual clothing assets. Wait for the download to finish (at the date I'm writing this tutorial, it is around 13GB). When finished, close the game (not the emulator).
Step 2:
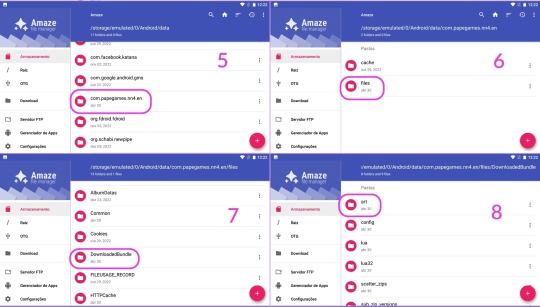
Now we're going to copy the assets to our computer. Click on Tools, then on Amaze File Manager. Navigate to Android > data > com.papergames.nn4.en > files > DownloadedBundle > art > character. This is the folder where (I believe) most of the assets are stored.
Now, where the stuff is located respectively:
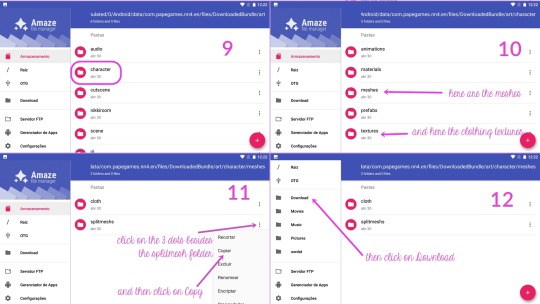
Meshes are on the meshes > splitmeshs folder
Textures are on the textures > cloth folder
Tip: Want to really data dump everything? Just select the folders you want and copy to your PC! 😉
Click on the three dots on the side of the wished folder, then in copy. Then click on the three lines on the left upper corner to open the menu, and then click on Download. Now just pull the header of the app to show the Paste option and click on it. It might take a while to copy completely (the cloth folder might take longer since it's bigger, so be patient).
If you're confused, just follow the guide below:
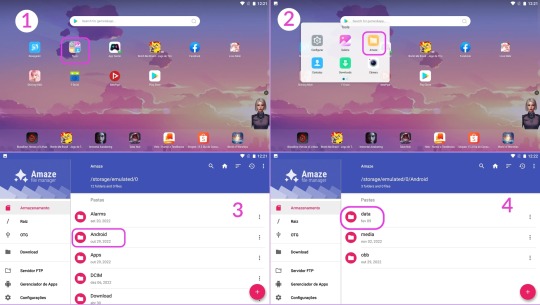

The copied folder will be located at C:\Users\{your username}\Nox_share\Download
Step 3:
Now that we got the files, we need to make them readable by AssetStudio.
For this, we need to open the desired .asset file on a hex editor, and then delete the first 8 bytes of the file, and then save.
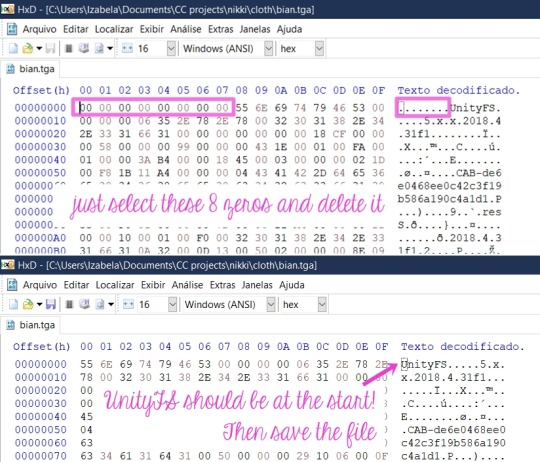
You can see it is a pain to do that manually to a lot of files right? This is why I asked my boyfriend to create a script to mass edit them. (I only manually edit when I'm grabbing the textures I want, because afaik the script won't work with .tga and the .png files, more about that forward this tutorial)
How to use the script:
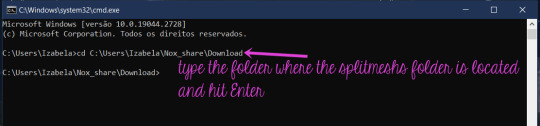
Make sure Python is already installed, grab the nikki-fix-headers.py file and place it on the folder where you copied the folder from the game (mine is still the Nox_Share Download folder).
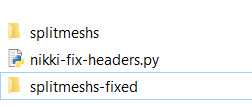
It should look like this, the meshs folder and the script.

Let's open the Command Prompt. Hit Windows + R to open the Run dialog box, then type in cmd and hit Enter.

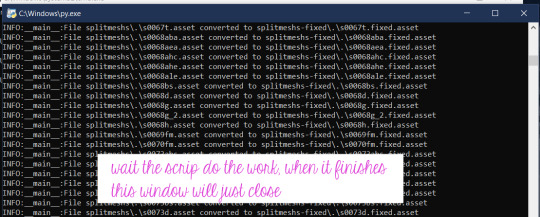
Now follow the instructions pictured below:

The folder with the edited files will be at the same location:
Now, we finally can open it all on AssetStudio and see whats inside 👀
Step 4:
Open AssetStudio. Now click on File > Load Folder and select the folder where your edited meshes are (mine is "splitmeshs-fixed"). Wait the program load everything. Click on Filter Type > Mesh, and the on the Asset List tab, click twice on the Name to sort everything by the right order, and now we can see the meshes!
To extract any asset, just select and right-click the desired groups, click in Export selected assets and select a folder where you wish to save it.
Stuff you need to know about the meshes:
Step 4-A: Everything is separated by groups.
Of course you'll have to export everything to have a complete piece. Only a few pieces has a single group. When exporting, you have to select every group with the same name (read below), and the result will be .obj files of each group that you have to put together in a 3D application.

Step 4-B: The names are weird.
They're a code that indicates the set, the piece, the group.
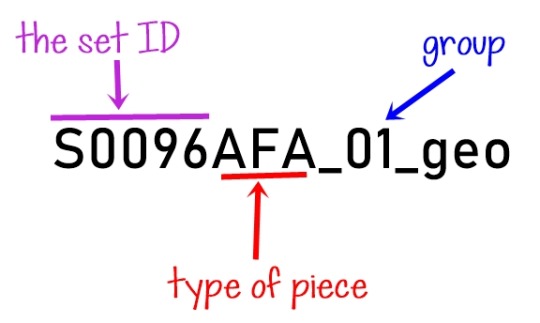
Items that doesn't belong to a set won't have the "S...something", instead they'll have another letter with numbers, but the part/piece type and group logic is the same.
As for the parts, here are the ones I figured out so far:
D = Dress
H = Hair
AEA = Earrings
ANE = Necklace
BS = Shoes
ABA = Handheld accessory
AHE and AHC = Headpieces/hats/hairpins
AFA = Face accessory (as glasses, eyepatches, masks)
(maybe I'll update here in the future with the ones I remember)
Step 4-C: The "missing pearls" issue.
Often you'll find a group that seems empty, and it has a weird name like this:

I figured out that it's referent to pearls that a piece might contain (as in a pearl necklace, or a little pearl in a earring, pearls decorating a dress, etc). The group seems empty, but when you import it to Blender, you can see that it actually has some vertices, and they're located where the aforementioned pearls would be. I think that Unity (SN engine) uses this to generate/place the pearls from a master mesh, but I honestly have no idea of how the game does that. So you'll probably have to model a sphere to place where the pearls were located, I don't know 🤷♀️ (And if you know how to turn the vertices into spheres (???) please let me know!)
Step 5:
Now that you already extracted a mesh, we're gonna extract the textures (when any). Copy the textures > cloth folder to your PC like you did with the splitmeshs folder.
Open it, and in the search box, type the name of the desired item like this. If the item has textures, it will show in the results.

Grab all the files and open them in HxD (I usually just open HxD and drag the files I want to edit there), and edit them like I teached above. Then you can open them (or load the cloth folder) on AssetStudio, and export them like you did with the meshes.
Stuff you need to know about the textures, UV map, etc:
Step 5-A: The UV mapping is a hot mess (at least for us used to how things works in sims games).
See this half edited hoodie and the UV map for a idea:
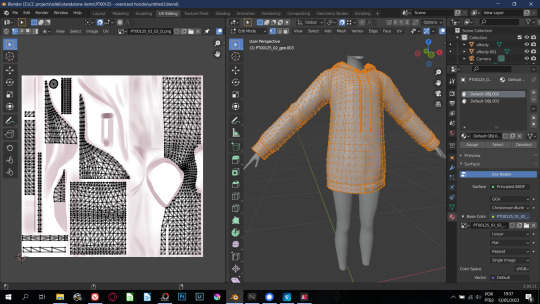
So for any Sims game, you'll have to remap everything 🙃 Also, stencil-like textures all have their own separated file.
As for hair, they all use the same texture and mapping! BUT sometimes they are arranged like this...

Here's the example of a very messed one (it even has some WTF poly). Most of them aren't that messy, but be prepared to find stuff like this.
Shining Nikki just repeat the texture so it end up covering everything, for Sims you'll need to remap, and the easiest way is by selecting "blocks" of hair strands, ticking the magnet button to make your seletion snap to what is already placed (if you have familiarity with blender, you know what I'm saying). Oh, some clothes are also mapped with the same logic.
Regarding the hair texture, I couldn't locate where they are, but here is a pack with all of them ripped and ready to use. You can also grab the textures from any SN hair I already converted :)
The only items with a fine UV map are the accessories, at least for TS3 that the accessory has a UV map independent from the body.
"But I typed the ID for the set and piece and couldn't find anything!"
A good thing to do is to search with only the set ID and edit all the files with it, because some items (especially accessories) share the same texture file. But if even then you can't find anything, it means that there's no texture for this particular item/group because Shining Nikki use material shaders* to render different materials like metal, crystal, some fancy fabrics, etc. So you'll have to bake or paint a texture for it.
*I believe that those shaders are located on the other cloth folder in the game files. This one is way bigger than the other one and once I copied it to see what it was, AssetStudio took ages to load everything, almost used all my 16GB of RAM, and then there was only code that the illiterate me didn't know what it was 🤷♀️

So that was it! I hope I explained everything, although it is a little confusing.
If you have any questions, you can comment on this post or send me a PM!
#sims 3 tutorial#converting stuff for sims#honestly idk what else to tag#reblog so your fave cc creator sees this!#sims 3 how to#sims 3 cas tutorial#sims 3 clothing tutorial#sims 3 hair tutorial
16 notes
·
View notes
Text

cleo's post-grad apt in san seqouia
#build by alerion!#sims4#the sims 4#ts4#sims#simblr#maxis match#*pacheco gen 3#*cleo#*main save#*pacheco legacy#trying to remember how to take pics again LOL#bare w me
3K notes
·
View notes
Text
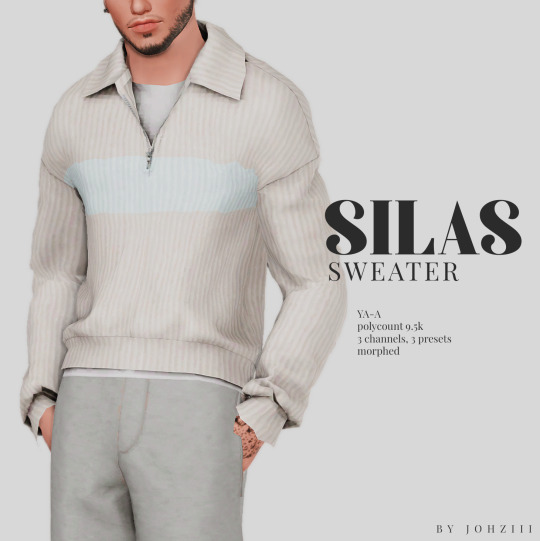
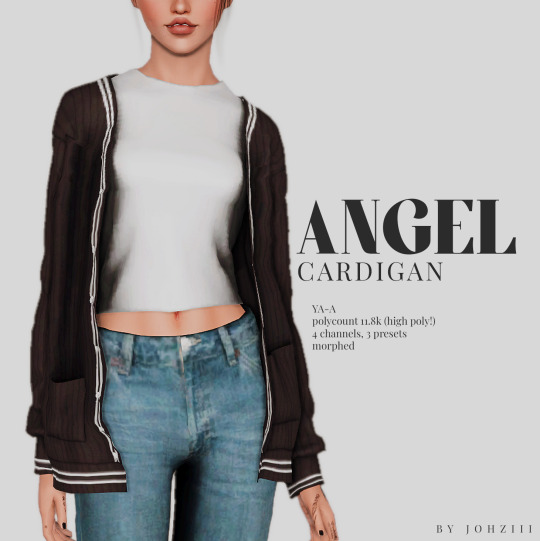
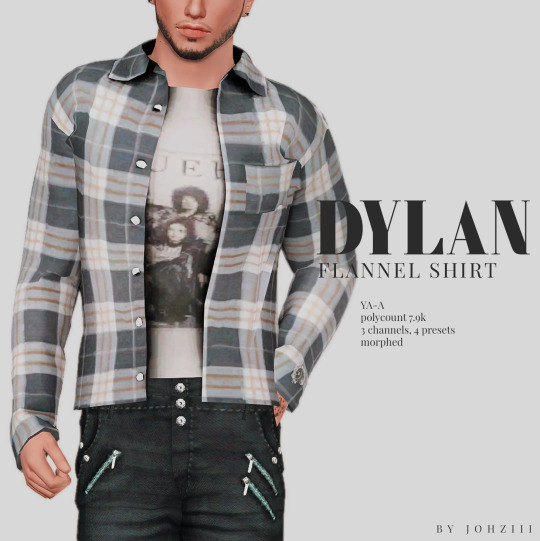
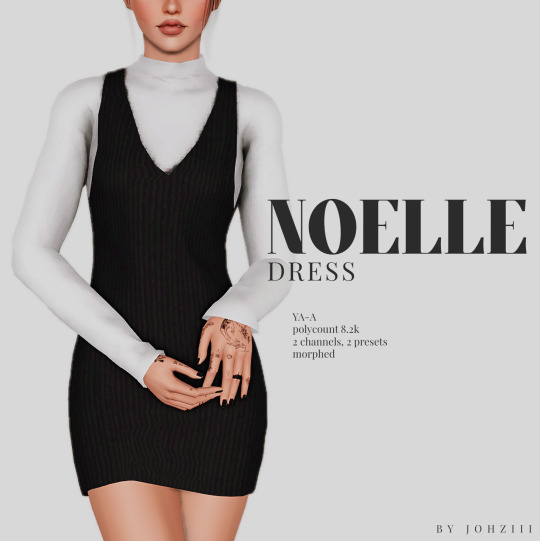
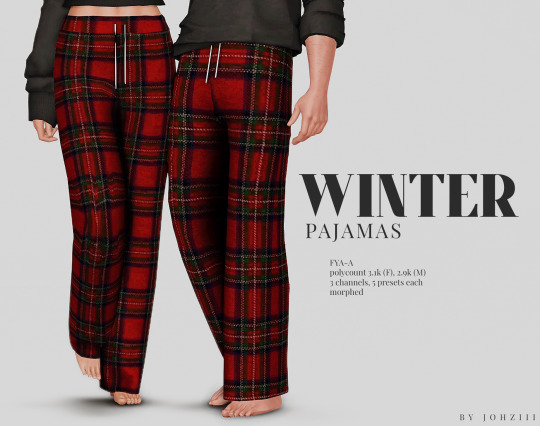
COMFY HOLIDAYS SET - christmas 2023
here's a gift for you <3 merry christmas and happy holidays to you all!
pls lmk if there’s any problems & feel free to tag me if you use them in your gameplay and post to tumblr! <3
TOU ♥ CC PAGE ♥ MY KO-FI ♥

sfs | google drive
#ts3#sims 3#ts3cc#s3cc#sims3cc#johziii's cc#mine:clothing#first male clothing ive ever made#proud of how they turned out tbh :D
3K notes
·
View notes
Photo


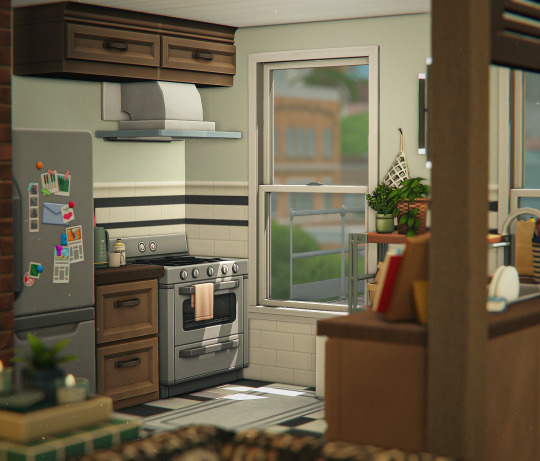
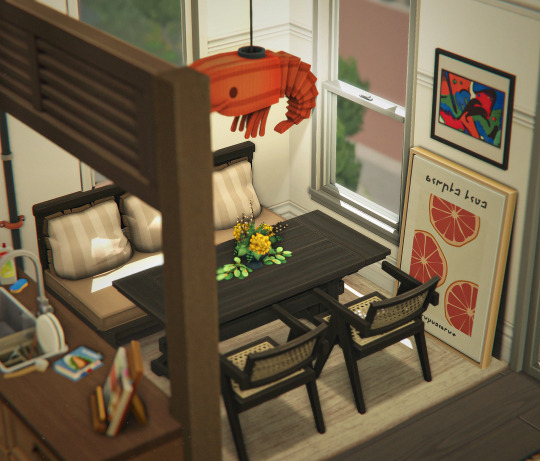
yume’s kitchen, in four parts. 🕊️
#aashwarr#ts4#the sims 4#sims 4 aesthetic#simblr#ts4 simblr#yume in komorebi#now i see why no one uploads gifs to tumblr#they're such a hassle omg#but i love how this turned out <3
5K notes
·
View notes
Text
leona and her soon to be dead husband
before!!!!
#oc: leona#mysims#ts4 edit#ts4#simblr#the sims community#sims 4#i think if i knew how to edit hair id be unstoppable#leona's so hot it makes me SICKKKKKKK#CURRENTLY TEARING MY SKIN OFF#leona wearing black to her own wedding to represent the death of her life shes so dramatic i love her#leona's family forced her to marry salvatore who audra and her eventually kill and fuck like freaks while covered in his blood <3#they've never had control over their lives so them murdering salvatore was their first taste of having real power#their addiction for it started from there#murder wives i love you#enzo edit on the agenda next ENZO FANS RISE UP!!!!!!!!!!#i never usually post the before picture but i think the lighting is a little delicious#i made this photo so much harder to take i forgot relight existed and was using a lamp to try and get the right lighting </3
483 notes
·
View notes
Text

Ebonix- Deji Locs
All credits goes to@ebonixsims! Original here!
Hair for For Teen ➜ Elder Males
27.5K Poly
2048x texture
Under Hats, 1 channel
Fully recolorable rubber bands at the top and end of each loc
Texture: Ebonix
Custom Thumbnail
includes all LODS and is disabled for random
The rubber bands on the end of the hair cast weird shadows on the face in CAS but they're fine in game.
Larger Pics and color channel breakdown under the cut
tagging: @pis3update, @sssvitlanz, @kpccfinds
[DOWNLOAD]
#ts3cc#s3cc#ts3 cc#ts3 download#ts3#s3 cc#ts3 dl#s3 dl#sims 3#4t3#black simblr#ebonixsims#black sims cc#elite posts#[mine]#for the love of god please ignore how bad this new reshade preset washes out my baby Virgil#look how they massacred my boy#also color channels on this are ASS bro😭 I'm genuinely so sorry#i have to make custom controls for pretty much everything i convert and this texture WOULD NOT PLAY NICE#hopefully the retexture girlies can figure it out cuz i sure as shit couldn't 😔
776 notes
·
View notes
Text

Hey y'all! I've really felt like making more cc lately, but I'm determined to upload some more of my completed recolors before I hop into any new projects. Here we have two summer themed recolors, a dress and a jumpsuit! Details, credits and download links below the cut.
DETAILS:
These are recolors of @joliebean's jungle dress and @akalukery's plunge halter jumpsuit. Mesh is included thanks to the original creators generous tou's, but I recommend you check out and download the originals as well.
the dress has 15 swatches and the jumpsuit has 12, various summer themed patterns for both.
Both have custom thumbnails for the first swatch.
You can see an unedited in-game photo of some more swatches right here.
these definitely aren't perfect recolors, but honestly I think they work just fine and I liked how they ended up so I figured I'd share.
P.S sorry that i'm never going to use any other preview style for CAS cc, it's just too easy to use this template and I do not have the energy to do proper previews anymore especially if i'm going to be uploading a bunch of stuff, which i plan to!
CREDIT:
thank you to joliebean and akalukery for their generous tou's and for the original meshes.
Patterns found via freepik, vecteezy, spoonflower, maybe a few from colourlovers/google. All credit goes to the original creators for their lovely patterns!
DL: MF / SFS
@mmfinds @alwaysfreecc
#ts4#ts4cc#s4cc#the sims 4#ts4 cc#maxis match#s4 custom content#mycc#s4mm#literally what is my aesthetic. love how i use gothic fonts and upload really bright colorful stuff most of the time lmao#i love having this template. this only took like an hour to take previews and thumbnails#pls reblog if you like i appreciate it so much <3 love u all
566 notes
·
View notes
Text
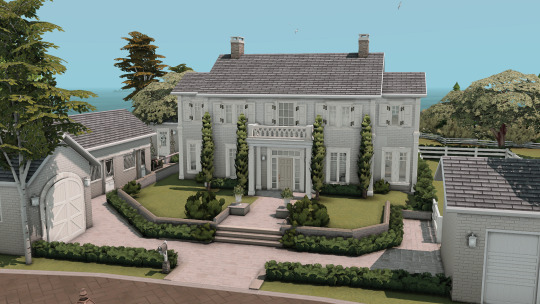

The White Oak Estate
Complete with a beautiful stable, a pool with a view onto the ocean and a lovely garden, this Estate is one of the most coveted properties in Brindleton Bay. Now owned by the Darnell Family, it is sure to make the most wonderful home.
#this is my favorite build yet! I am so proud of how it turned out#it was soo much work to put all the landscaping and walls with the tool mod but it was so worth it <3#this is a personal build since I'll be using it for valerie#ts4 simblr#pixelglam#ts4 build#the sims 4#ts4#sims 4#the sims 4 simblr#sims 4 screenshots#ts4 builds#mybuilds
1K notes
·
View notes
Text

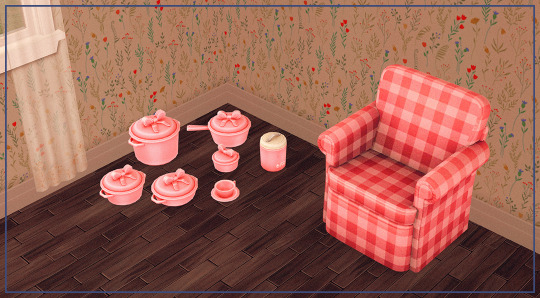
🪑 4t2 kkb's my cherish things ☕
hi everyone, happy wednesday! as promised, here is kkb's my cherish things set converted for ts2. i thought i was more finished than i truly was, there ended up being lots of little fixes. anyway, i was finally able to complete it over the holiday break! i do apologize for being fairly absent the past few months, i hope to get back into the sims again. that is if my game will stop crashing but we all know how that story goes- as always, please lmk if you run into any issues. enjoy!~⋆ ˚。⋆୨୧˚
addt'l photos + object list under the cut. files are compressed.
update 2/24/2024: fixed sink cutout, no longer linked to veranka's vanadium sink. download the file separately here.
download: [sfs] | [box] ♡
credits: @kkbsmm, veranka's vanadium sink as a base.


OBJECT LIST:
Cushion Chair
Induction Burner
Iron Basket
-> Pastel Teacup + Powder Case Repo'd
Kitchen Towel
Pastel Fridge [Functional + Animated]
Pot Hanger
-> Bread Box, Drink Box, + Cushion Stool Repo'd
Ribbon Kettle
-> Ribbon Bowl, Low Pot, Pan w Handle, Pasta Pot, Stew Pot, + Teacup Repo'd
Kitchen Sink [Functional]
Tablecloth Table
-> Wooden Chair Repo'd
Three-Tier Lunch Box
-> Two-Tier Lunch Box Repo'd
Two-Tier Dish Dryer
note: there is no dirty state, i cloned from veranka's which didn't include one. also, i didn't include the cupboard, idk i guess i spaced it out sry!
#ts2 download#ts2cc#4t2#s2cc#4t2 conversion#sims 2 cc#s2mm#ts2 object#ts2 clutter#embarrassed by how long i dragged my feet to finish this#im not kidding every time i thought i was done i ran into another thing needing to be fixed#okay disappearing into the silent hill mist again <3 cya
940 notes
·
View notes
Text

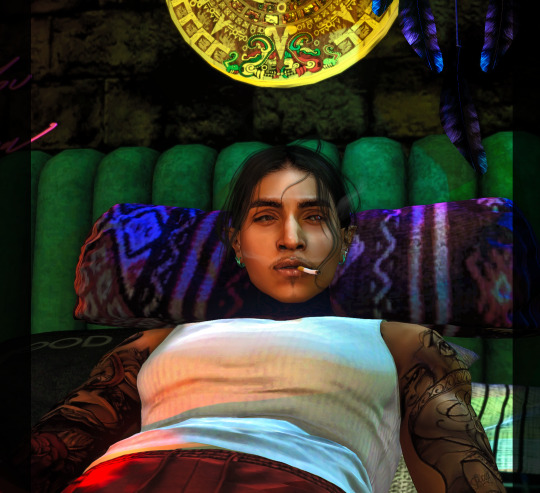
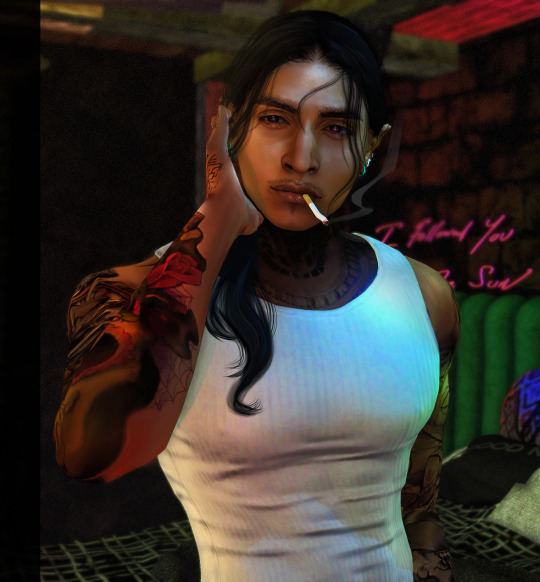
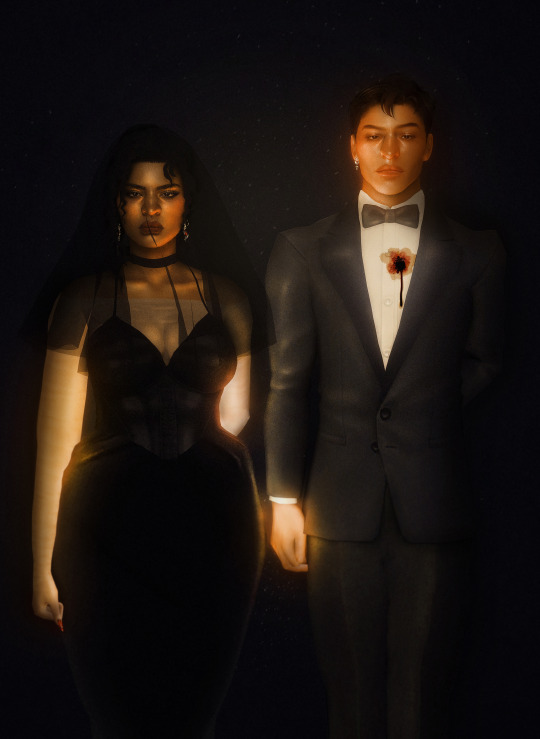
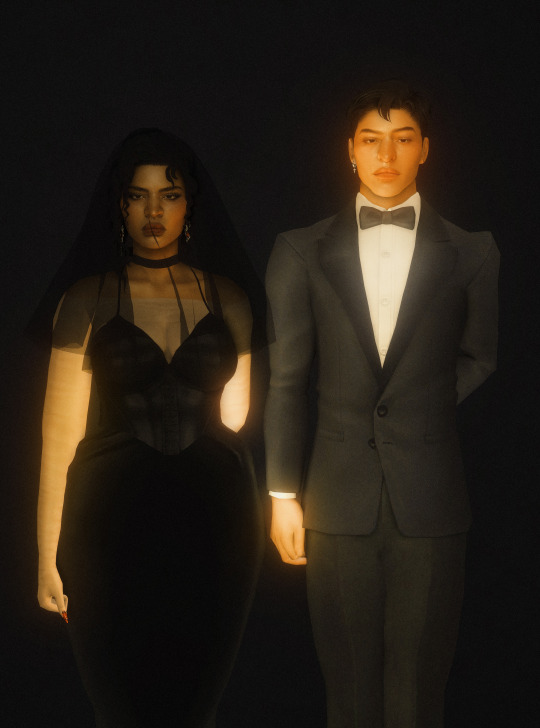
𝑺𝒂𝒏𝒈𝒓𝒆 𝑨𝒛𝒕𝒆𝒄𝒂 🩸
D Santana
#Model#D Santana#The Sims#The Sims 3#TS3#Sims Of Color#Simblr#GShade#Relight#Yes I finally got to remake him from scratch and he looks how I want#So happy#I couldn't stop taking pics of him lmaoo
409 notes
·
View notes
Text
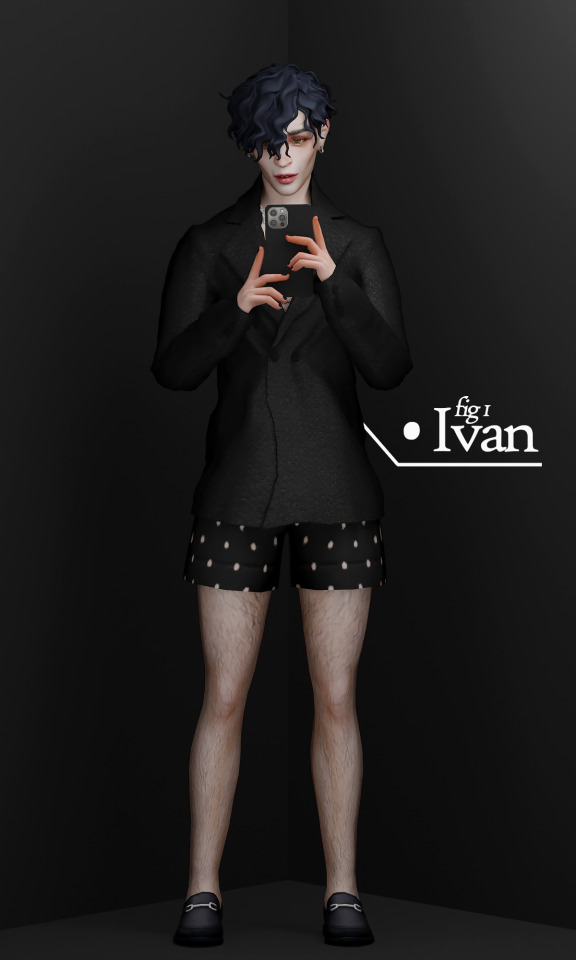
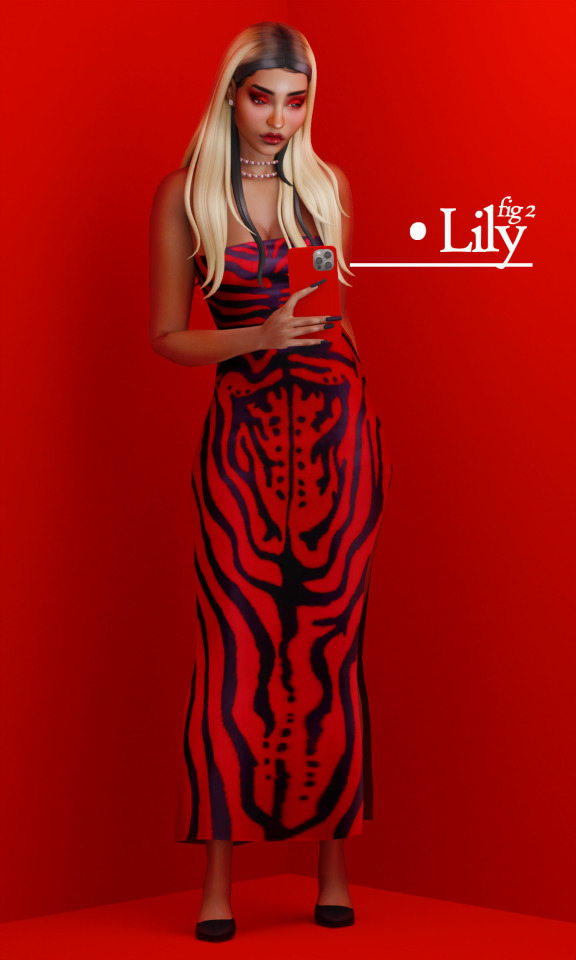
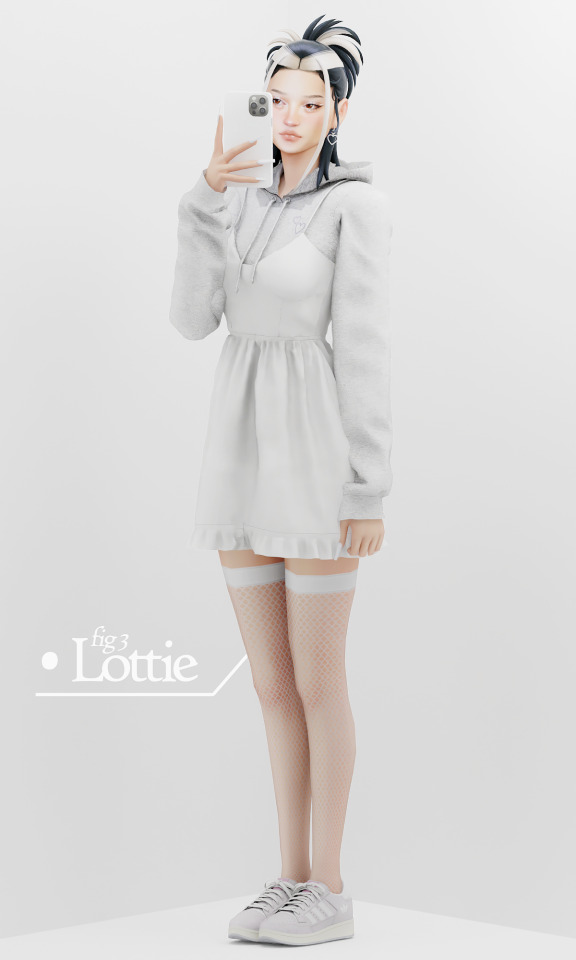

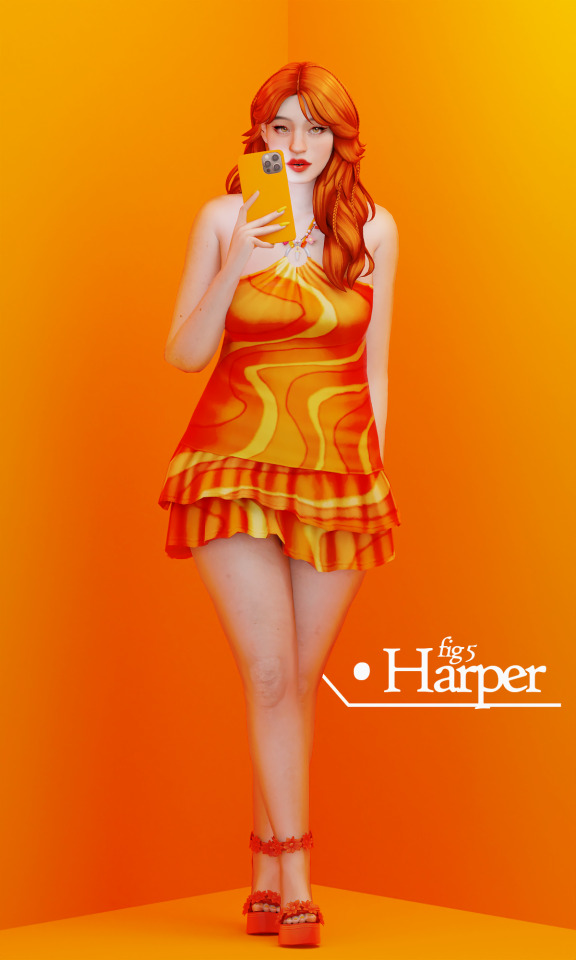

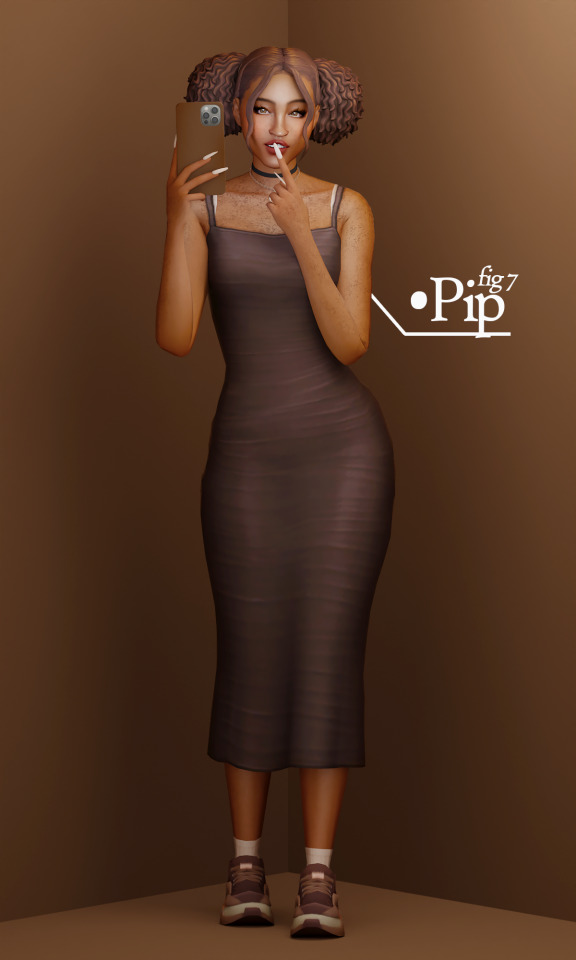

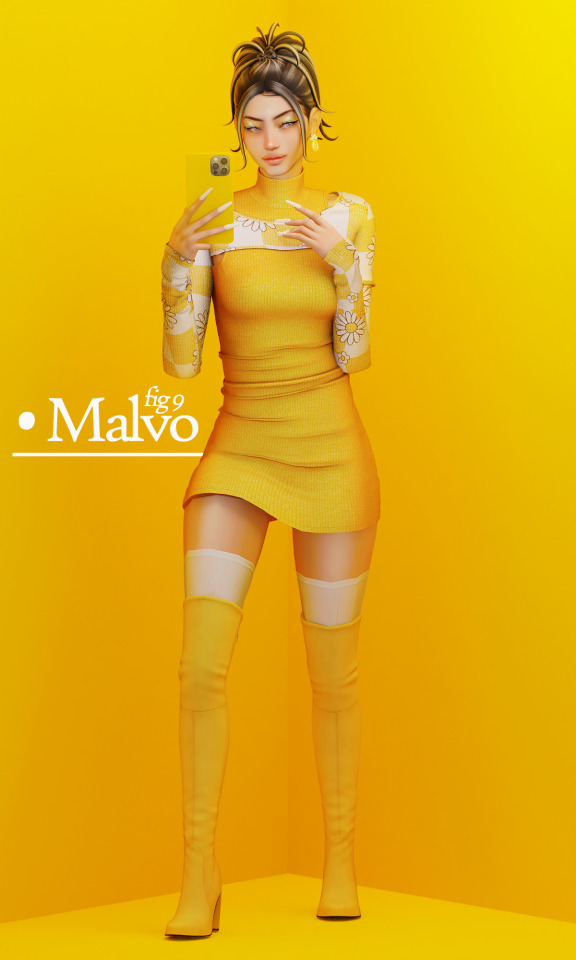
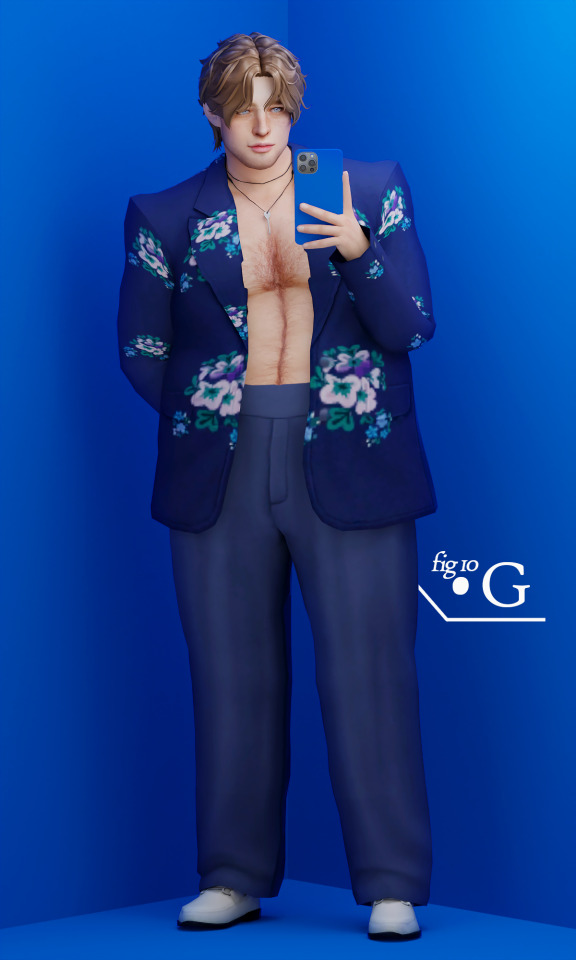
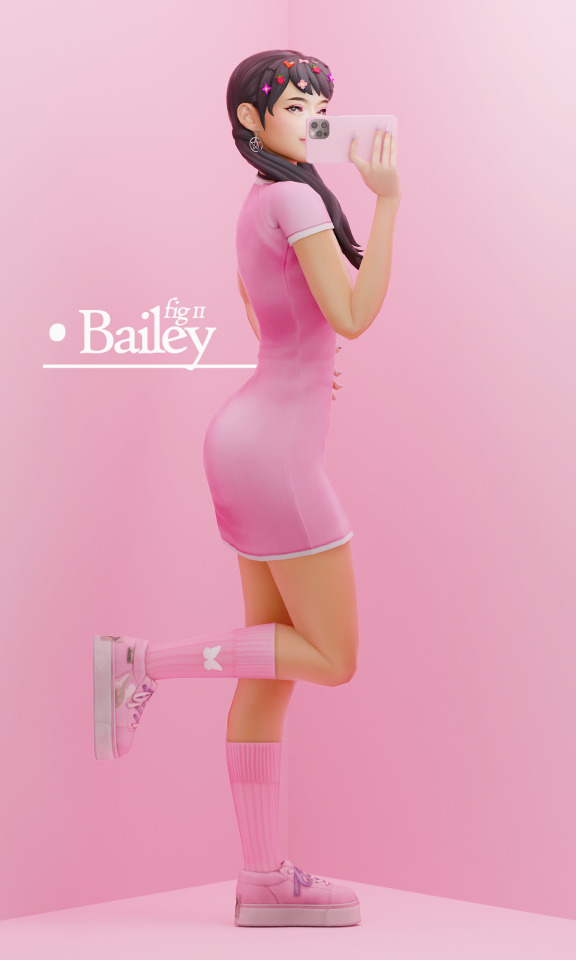
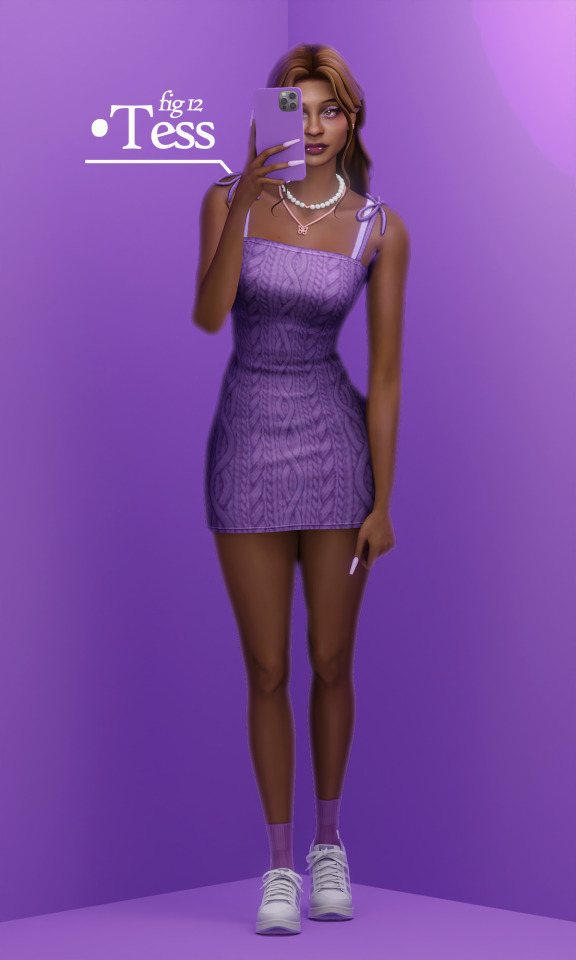
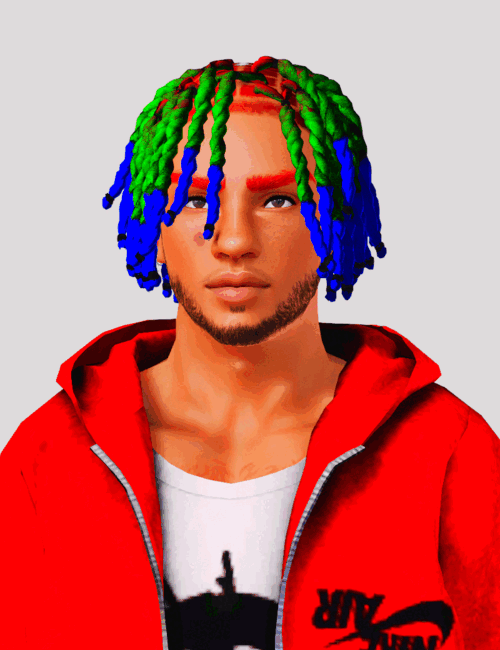
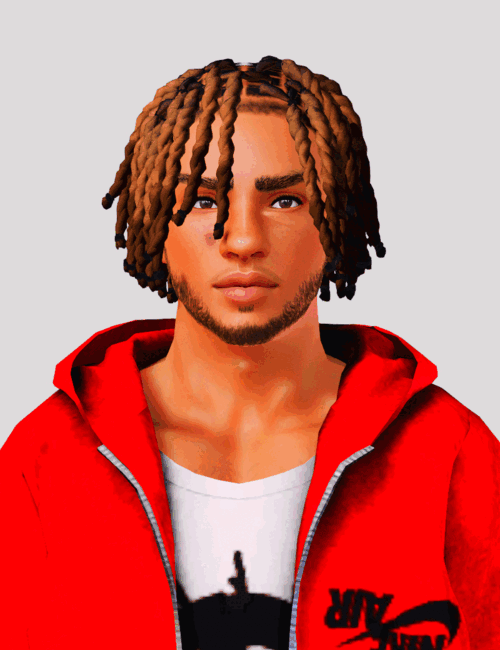
FIGURES 🏳️🌈 JUNE 2023 CC HAUL
tradition... tradition!!!!! yes june is my favorite theme i wonder why. anyway happy pride month, demons! kisses, credits, and due appreciation below the cut.
big shout outses to the creators featured this month! @gorillax3-cc @azertysims @breezygardensofficial @simandy @trillyke @serenity-cc @daylifesims @sentate @rimings @jius-sims @joliebean @rustys-cc @simstrouble @johnnysimmer
as always i'm hestitantly wcif friendly but please check @fakeyfinds and check my wcif tag before inquiring, thank youuu 💖
IVAN: hair. blazer. shorts. loafers.
LILY: hair. dress. shoes. acc.
LOTTIE: hair. dress. sneakers.
FIFI: hair. top. bottoms.
HARPER: hair. dress. heels.
NELSON: hair. jumpsuit. sneakers.
PIP: hair. dress. sneakers. socks. acc.
RYAN: hair. top. skirt. sneakers. socks. acc.
MALVO: hair. dress. boots.
G: hair. blazer. pants. loafers.
BAILEY: hair. dress. sneakers. socks. acc.
TESS: hair. dress. sneakers. socks.
#sims 4 lookbook#sims 4 edit#ts4 lookbook#ts4 render#ts4 edit#idk how tags work on this webbedsite anymore :3#happy pride everyone!!!!!#💌
2K notes
·
View notes
Text
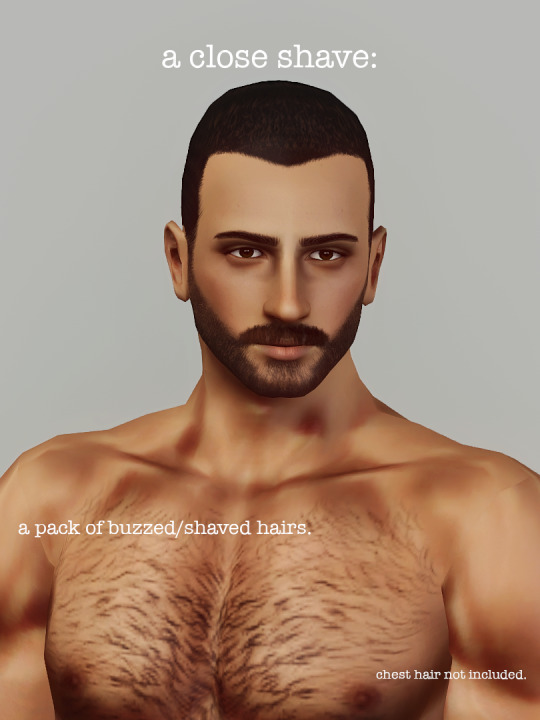


A Close Shave: Buzzed/Shaved Hairs Pack
I extracted the scalp and hairline textures from a bunch of EA hairs to create these buzzed/shaved hairstyles. There is no mesh, they are painted directly onto the sim's head.
There are seven (7) of them, all with custom thumbnails, so just keep only the ones you like. (I like 01, 02 and 06 the most.)
They are not enabled for female sims to avoid clogging up the hair section but you can easily enable them by editing the package in S3PE.
Feel free to use these textures in other hair projects you may have.
I have plans to convert these into accessories/makeup to be worn with other hairstyles but I don't know when I will actually have time to do that, so I'm just gonna post these working hairs now.
Credits:
@/imamiii - for texture 03 which I want to put on all my undercut/fade hairstyles 😍
modishkitten - for the control texture used
the folks who commented asking for this kind of hair to be made
Complementary mods:
@simtanico beta head sliders to make the forehead smaller
modishkitten scalp hairs
Download: simfileshare / mega
#s3cc#ts3cc#ts3#the sims 3#dl: cas#dl: hair#HOW'S YOUR HEAD?#my beard model finally made it out of the Gay Strip Club Lighting Room
458 notes
·
View notes
Text
seasons 2 and 3 of tma are just everyone trying to calm jon down and pet him like he's a wild horse and they're going "shh shh shh it's okay shhhhhhh" with a carrot in one hand and he just keeps kicking kicking kicking kicking BITING kicking k
#love how he's just. insane. for two seasons <3#tma#the magnus archives#magpod#jon sims#jonathan sims#bs.txt#I know this post makes no sense. don't worry about it
782 notes
·
View notes
Text
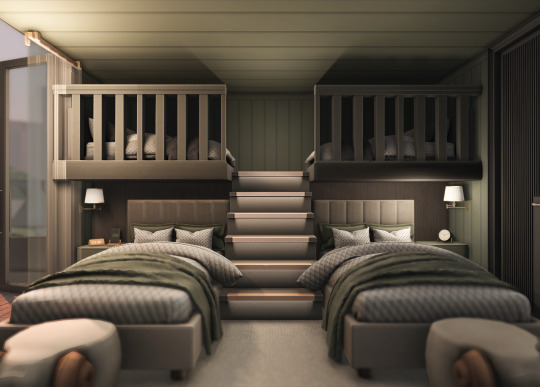
A functional bunk room for kids and toddlers - Magnolia Residencies
#ts4#sims interior#ts4 interior#simblr#ts4 maxis mix#this took 3 hours to figure out how to make it functional/routable#and i hate short walls but hey#pixelplayground lots
575 notes
·
View notes
Text


playing with dionte's hair bc i'm procrastinating
#river dipping#dionte duval#lykos#ts4#i do really love how dionte and nicholas kinda have a b4b (bald for bald) thing going on.... but that first hair........#he looks so good... the urge to keep it is gonna make me develop a twitch under my eye...#i love the shadows the locs add btw like i personally loveee when hair creators add shading#like the DRAMAAA it adds!!!#also don't look too closely at him here bc i actually haven't updated him yet hence no proper edit of him (tho i probably won't change much#i'm really just supposed to be cleaning out the hundreds!! of duplicate households in my library dkhjnkfgh i just. get so distracted#i also have to fix mattodore's households bc i think i accidentally deleted the updated version of them at 20...#like there are multiple other saves?? but they're all with matthias's old chin??? like literally WHERE did the updated version go#so i need to clean out my library from the top down and fix their sims#i really messed my sleep schedule up the day before yesterday when i was working on those edits of delphi btw#but i did enjoy rewatching secretary and watching charade while staying up all night to do them <3#also listened to the first two chapters of freedom is a constant struggle! editing may take me forever but i do do other things as i do it#...........talking a lot in these tags bc i'm seriously procrastinating jdkhnf i do NOT ! want to clean through my library it's a mess#OH. ALSO GOOD MORNING I FORGOT TO SAY THAT ‼️#seeing this again two days later and seeing the amount of notes....... y'all weren't meant to reblog this kjhdkfjhndkjgnh#now i'm like damn... is there any reason to make his intro edit like i did for ria and delphi 😭😭😭😭😭
332 notes
·
View notes
Last Seen Blogs

socollectiongoatee
Untitled

arsenal-has-me-depressed
The Art Of Whaattt
phvtnix
Yateman

pokemonfighter5
The Real Pokemon Fighter

mspizzahut
ms.pizzahut