#sims 3 hair tutorial
Text

this was requested by @chrissybrown1127, who was struggling to retexture skysims 050, which, like many skysims hairs, does not actually have a gray recolour for elders. so, here is a tutorial for how to make your hair retexture have elders go gray!
it was particularly intended for chrissy, who does struggle with tutorials and prefers visual learning. the hair that i retextured for this can be found here. and for people who struggle to retexture my volatile bases, the process is exactly the same for them as it is for this 🎊
TUTORIAL: GOOGLE DOCS | PDF 👱🏻♀️
if there are any tutorials that you need and feel i can provide, lmk! i'm still learning myself, so there's probably a lot of easier ways to do the things i do than my ways 🥰
74 notes
·
View notes
Text

Tutorial - Extracting the assets from Shining Nikki for conversion for Sims games (or anything, really)
Finally! In advance I'm sorry for any errors since english isn't my first language (and even writing in my actual language is difficult for me so)
And first, a shoutout to The VG Resource forums, where I found initially info about this topic 😊 I'm just compilating all the knowledge I found there + the stuff I figured out in a single text, because boy I really wanted to find a guide like that when I first thought about converting SN stuff lol (and because there's a lot of creators more seasoned than me that could do a really good job with these assets 👀)
What this tutorial will teach you:
How to find and extract meshes and textures (when there's any) for later use, and some tips about how stuff are mapped etc on Shining Nikki.
What this tutorial will not teach you:
How to fully convert these assets for something usable for any sims game (because honestly neither I know how to do that stuff properly lol). It is assumed that you already know how to do that. If you don't know but has interest in learning about CC making (specially for TS3), I'd suggest you take a look at the TS3 Tutorial Hub, the MTS tutorials and This Post by Plumdrops if you're interested in hair conversion. Also take a look on my TS3 tutorials tag, that's where I reblog tutorials that I think might be useful :)
What you'll need:
An Android emulator (I recomend Nox)
A HEX editor (I recomend HxD)
Python and This Script for mass editing
AssetStudio
A 3D Modeling Software for later use. I use Blender 2.93 for major editing, and (begrudingly) Milkshape for hair (mostly because of the extra data tool).
Download everything you don't have and install it before starting this tutorial.
Now, before we continue, a little advice:
I wrote this tutorial assuming that people who would benefit from it will not put the finished work derivative from these assets behind a paywall or in any sort of monetization. These assets belong to Paper Games. So please don't be an ass and put your Shining Nikki conversions/edits/whatever behind a paywall.
The tutorial starts after the cut (and it's a long one).
Step 1:
Launch Nox, then open Play Store and log in with a Google account (if you don't have one, create it). Now download Shining Nikki from there.
After downloading the game, launch it. It will download a part of the game files. After that, log in on the game, or create a new account in any server (the server is only important if you want to actually play the game. For extracting it doesn't really matter since the game already has the assets for the upcoming events and chapters. It also doesn't matter if you actually own an item in game, you can extract the meshes and textures even if you don't have it in game).
If you're creating a new account, the game will lead you through the presentation of it etc (unfortunately there's no way to skip it).
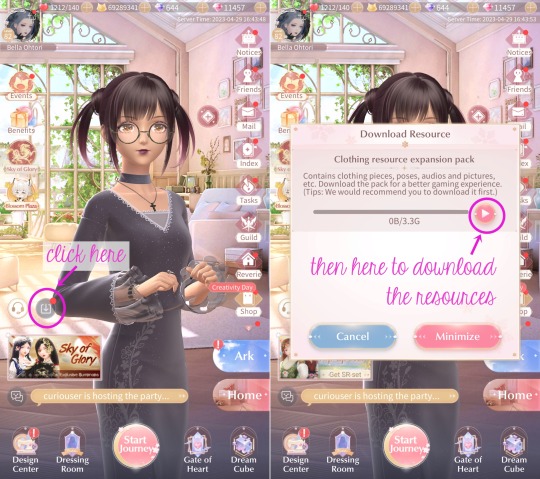
After that, click on that little arrow button on the main screen. There, you can download the actual clothing assets. Wait for the download to finish (at the date I'm writing this tutorial, it is around 13GB). When finished, close the game (not the emulator).
Step 2:
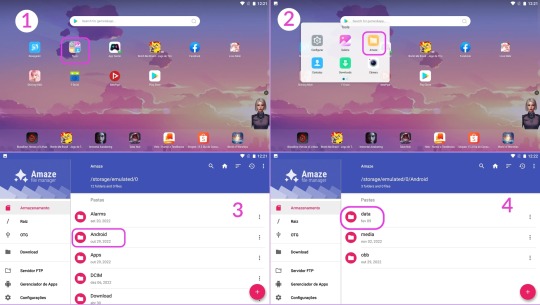
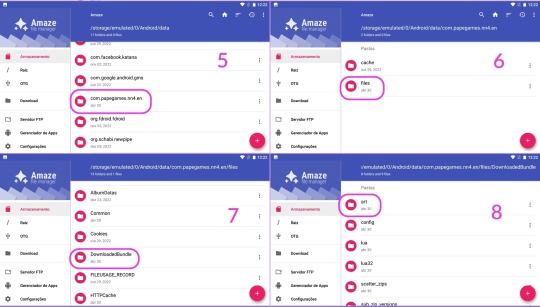
Now we're going to copy the assets to our computer. Click on Tools, then on Amaze File Manager. Navigate to Android > data > com.papergames.nn4.en > files > DownloadedBundle > art > character. This is the folder where (I believe) most of the assets are stored.
Now, where the stuff is located respectively:
Meshes are on the meshes > splitmeshs folder
Textures are on the textures > cloth folder
Tip: Want to really data dump everything? Just select the folders you want and copy to your PC! 😉
Click on the three dots on the side of the wished folder, then in copy. Then click on the three lines on the left upper corner to open the menu, and then click on Download. Now just pull the header of the app to show the Paste option and click on it. It might take a while to copy completely (the cloth folder might take longer since it's bigger, so be patient).
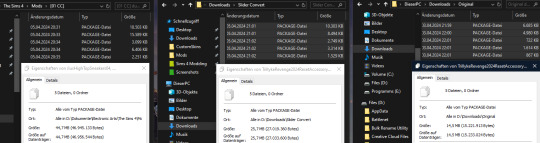
If you're confused, just follow the guide below:
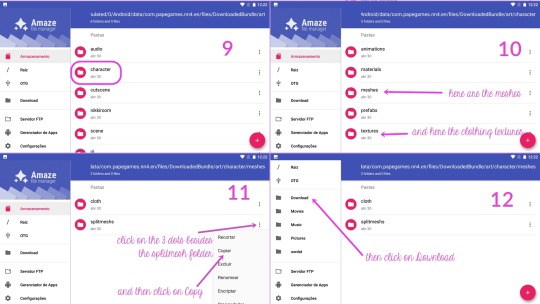

The copied folder will be located at C:\Users\{your username}\Nox_share\Download
Step 3:
Now that we got the files, we need to make them readable by AssetStudio.
For this, we need to open the desired .asset file on a hex editor, and then delete the first 8 bytes of the file, and then save.
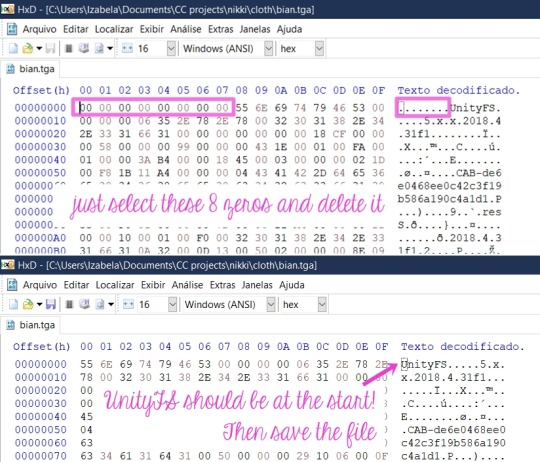
You can see it is a pain to do that manually to a lot of files right? This is why I asked my boyfriend to create a script to mass edit them. (I only manually edit when I'm grabbing the textures I want, because afaik the script won't work with .tga and the .png files, more about that forward this tutorial)
How to use the script:
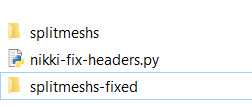
Make sure Python is already installed, grab the nikki-fix-headers.py file and place it on the folder where you copied the folder from the game (mine is still the Nox_Share Download folder).
It should look like this, the meshs folder and the script.

Let's open the Command Prompt. Hit Windows + R to open the Run dialog box, then type in cmd and hit Enter.

Now follow the instructions pictured below:
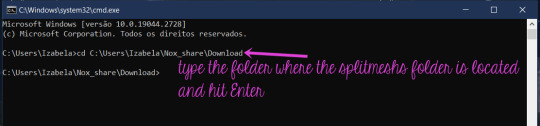

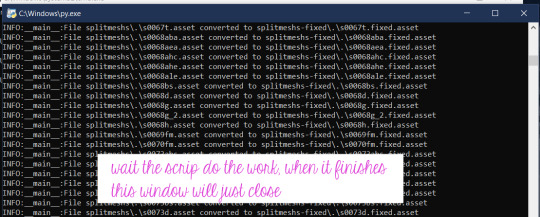
The folder with the edited files will be at the same location:
Now, we finally can open it all on AssetStudio and see whats inside 👀
Step 4:
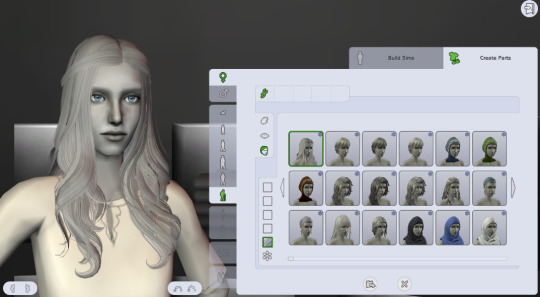
Open AssetStudio. Now click on File > Load Folder and select the folder where your edited meshes are (mine is "splitmeshs-fixed"). Wait the program load everything. Click on Filter Type > Mesh, and the on the Asset List tab, click twice on the Name to sort everything by the right order, and now we can see the meshes!
To extract any asset, just select and right-click the desired groups, click in Export selected assets and select a folder where you wish to save it.
Stuff you need to know about the meshes:
Step 4-A: Everything is separated by groups.
Of course you'll have to export everything to have a complete piece. Only a few pieces has a single group. When exporting, you have to select every group with the same name (read below), and the result will be .obj files of each group that you have to put together in a 3D application.

Step 4-B: The names are weird.
They're a code that indicates the set, the piece, the group.
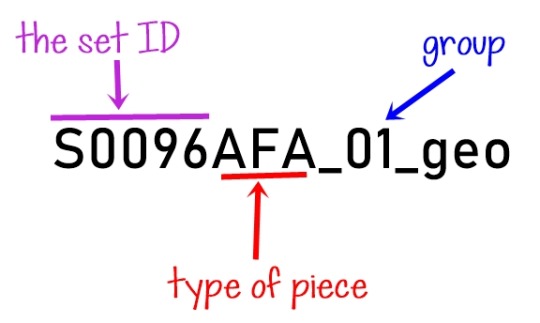
Items that doesn't belong to a set won't have the "S...something", instead they'll have another letter with numbers, but the part/piece type and group logic is the same.
As for the parts, here are the ones I figured out so far:
D = Dress
H = Hair
AEA = Earrings
ANE = Necklace
BS = Shoes
ABA = Handheld accessory
AHE and AHC = Headpieces/hats/hairpins
AFA = Face accessory (as glasses, eyepatches, masks)
(maybe I'll update here in the future with the ones I remember)
Step 4-C: The "missing pearls" issue.
Often you'll find a group that seems empty, and it has a weird name like this:

I figured out that it's referent to pearls that a piece might contain (as in a pearl necklace, or a little pearl in a earring, pearls decorating a dress, etc). The group seems empty, but when you import it to Blender, you can see that it actually has some vertices, and they're located where the aforementioned pearls would be. I think that Unity (SN engine) uses this to generate/place the pearls from a master mesh, but I honestly have no idea of how the game does that. So you'll probably have to model a sphere to place where the pearls were located, I don't know 🤷♀️ (And if you know how to turn the vertices into spheres (???) please let me know!)
Step 5:
Now that you already extracted a mesh, we're gonna extract the textures (when any). Copy the textures > cloth folder to your PC like you did with the splitmeshs folder.
Open it, and in the search box, type the name of the desired item like this. If the item has textures, it will show in the results.

Grab all the files and open them in HxD (I usually just open HxD and drag the files I want to edit there), and edit them like I teached above. Then you can open them (or load the cloth folder) on AssetStudio, and export them like you did with the meshes.
Stuff you need to know about the textures, UV map, etc:
Step 5-A: The UV mapping is a hot mess (at least for us used to how things works in sims games).
See this half edited hoodie and the UV map for a idea:
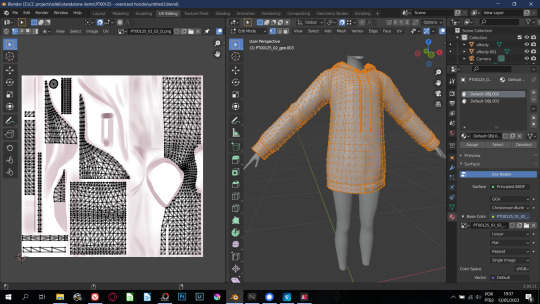
So for any Sims game, you'll have to remap everything 🙃 Also, stencil-like textures all have their own separated file.
As for hair, they all use the same texture and mapping! BUT sometimes they are arranged like this...

Here's the example of a very messed one (it even has some WTF poly). Most of them aren't that messy, but be prepared to find stuff like this.
Shining Nikki just repeat the texture so it end up covering everything, for Sims you'll need to remap, and the easiest way is by selecting "blocks" of hair strands, ticking the magnet button to make your seletion snap to what is already placed (if you have familiarity with blender, you know what I'm saying). Oh, some clothes are also mapped with the same logic.
Regarding the hair texture, I couldn't locate where they are, but here is a pack with all of them ripped and ready to use. You can also grab the textures from any SN hair I already converted :)
The only items with a fine UV map are the accessories, at least for TS3 that the accessory has a UV map independent from the body.
"But I typed the ID for the set and piece and couldn't find anything!"
A good thing to do is to search with only the set ID and edit all the files with it, because some items (especially accessories) share the same texture file. But if even then you can't find anything, it means that there's no texture for this particular item/group because Shining Nikki use material shaders* to render different materials like metal, crystal, some fancy fabrics, etc. So you'll have to bake or paint a texture for it.
*I believe that those shaders are located on the other cloth folder in the game files. This one is way bigger than the other one and once I copied it to see what it was, AssetStudio took ages to load everything, almost used all my 16GB of RAM, and then there was only code that the illiterate me didn't know what it was 🤷♀️

So that was it! I hope I explained everything, although it is a little confusing.
If you have any questions, you can comment on this post or send me a PM!
#sims 3 tutorial#converting stuff for sims#honestly idk what else to tag#reblog so your fave cc creator sees this!#sims 3 how to#sims 3 cas tutorial#sims 3 clothing tutorial#sims 3 hair tutorial
16 notes
·
View notes
Text
How to install TS3 for the ✨chronically TS4✨

Getting back into TS3 posed a challenge for me as compared to TS4. It's a 10+ year old game and of course requires some extra TLC as compared to TS4. So I hope this guide will help y'all to get everything set up cleanly and smoothly! It took me three separate tries and if I can help the next person struggle less, then that's great. Happy simming!
You'll need a copy of TS3 and these resources:
The Sims 3 Performance & Bug Fix Guide 2023 by anime_boom
This lovely post from TS3 community extraordinaire @nectar-cellar
How Use CCMagic YouTube video by @florydaax
No Intro mod edited for 2023 (original by retired creator EllaCharmed)
The original mod from Ella does not work for current patch 1.69. I fixed it in s3pe with the help of some commenters on MTS so that it does actually remove the intro. If the creator happens to see this and would like this modified version removed, let me know.
How to clear cache by Carl's Guide
Got everything pulled up? Great! You're ready to start.

1. Download a FRESHLY INSTALLED copy of TS3 to your computer. If you're able, I'd highly recommend having all the packs you're wanting to own already so you don't have to do all of this again.
If you are redownloading the game for any reason (like me bc I was struggling lol), remove the existing TS3 folder in your documents and save it somewhere so you can keep all of your mods or worlds there. Back up any reshade stuff from the bin folder. Completely uninstall the game through the EA app/Steam. You may lose your saves and sims due to a change in script mods through this tutorial. This cannot be avoided, trust me I tried. But it's worth it for a smooth game.
2. Do a test launch so that the game generates a new TS3 Folder in your documents. DO NOT, I REPEAT DO NOT INSTALL ANY SIMS 3 PACKS THROUGH THE LAUNCHER! NO WORLDS, NO CLOTHES, NO HAIR COLORS, NOTHING. This will be very important later on when you merge your CC using CCMagic. If you need worlds or other CC there are alternative ways to obtain them.
3. CLEAR THE GENERATED CACHE
4. If you use EA and open to test anywhere between steps (which you shouldn't really need to after step 1 of the Bug Fix Guide) or after playing at any point, open up task manager and ensure that you end the tasks "EA" and "EA Background Services" before continuing. It doesn't really use much memory but I noticed that it caused stutters if it's open when launching using your shiny brand new Smooth Patch. It will look like this:

5. Begin following the steps in the Performance & Bug Fix guide. The first thing you'll do is set up your mods folder. Follow those steps exactly as they are in the guide, except use the No Intro mod I linked above instead of the one you get in that folder if you actually want the intro removed.
6. Continue to FOLLOW ALL REQUIRED STEPS IN THE GUIDE UNTIL YOU'RE DONE. I mean it, all of them one by one. Heck, if you're open/able to do the bonus and optional ones, I'd suggest doing those too.
7. Once you've completed that, go check out nectar-cellar's excellent post for tips and a fix to make the smooth patch to compatible with Master Controller. I will not be providing an edited version of this as LazyDutchess who created the Smooth Patch is still active and I want to respect their work.
8. If you've made it this far, you're doing great sweetie. Do another test launch through the patcher and if everything runs correctly it means you've done everything RIGHT. You're ready to start playing or downloading mods if you want!
If you do start downloading mods merging them will 100% be a must do if you want to maintain any sanity. You can use CCMagic to do so. I linked that handy lil video above!
Keep in mind script mods, overrides, patterns, and CC counters should NEVER be merged. Always check the creator's notes, yada yada. And always clean up your cache on a regular basis. Have fun y'all!

421 notes
·
View notes
Text

mariela afro puffs 🦋
my first cc ever! it’s not perfect but i love it 😇 it’s named after one of my first sims i made when i wanted to become a simblr, mariela (my lovely model ⬆️). i had this idea of making afro puffs back in january but i couldn’t figure out how to operate both blender and gimp so i gave up. but luckily, i saw @powluna youtube tutorial and it was sooo easy to follow as a beginner. so, a big thanks to @powluna and to all my amazing testers especially kayla and mori <3
base game compatible (bgc)
maxis palette (24 swatches)
teen-elder
fem frame
not hat compatible (but some hats will fit on sims with noticeable clipping in the back)
minor ear clipping
custom thumbnails
disallowed for random
all lods
please tag me if you do use my cc! i would absolutely love to see it! also, please let me know if you encounter any issues with my cc! here’s my tou. i hope y’all enjoy it <3
download via simsharefile (sfs) or on patreon - ALWAYS FREE!
tysm to cc rebloggers! @public-ccfinds @maxismatchccworld @alwaysfreecc
** i know that there is a small line around the hairline that is slightly visible. im new to this so idk how to fix it for now but i will update this hair once i find a solution! thanks again 🫶🏾
#ts4#sims 4#the sims 4#ts4cc#ts4 cc#s4cc#black simblr#black simmer#s4mm#ts4mm hair#sims 4 maxis match#publicccfinds#🪐 cc#saturngalore#mari rowland
822 notes
·
View notes
Text
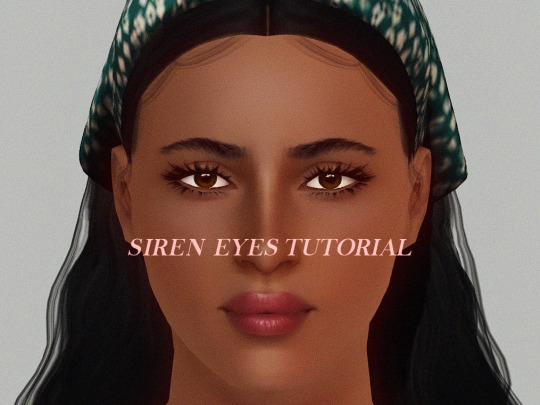
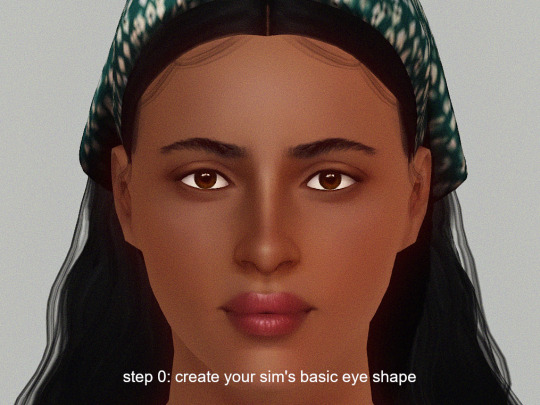
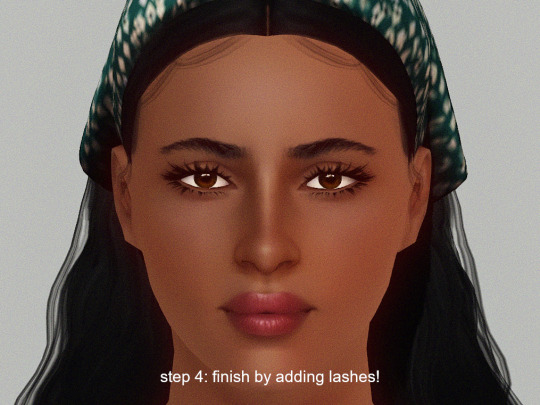
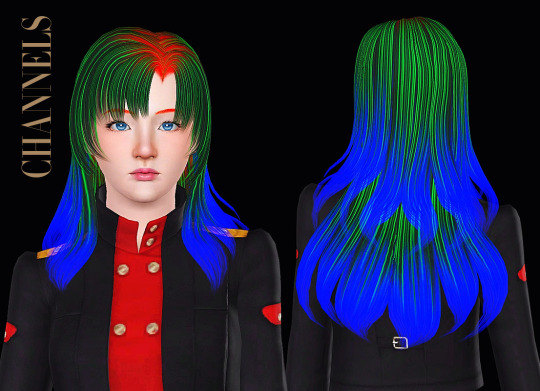
Siren Eyes Tutorial - TS3
Trying something new on the blog!
I wanted to share a mini tutorial + slider recommendations about how to create a sultry "siren eye" shape in CAS. This is my go-to method for shaping my sims' eyes. It's really quick and simple.
Step 0: Create the basic shape of the eye like the rotation, eye depth, eye corner height, scale, etc.
Step 1: Use the Eye Stretch slider to elongate the eyes a bit. I like to use around 50 to 100.
download it here
with NRAAS Master Controller, you can shift + click on sliders to edit the number values.
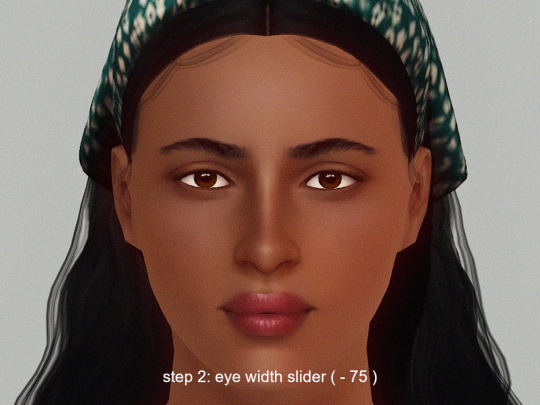
Step 2: Use the Eye Width slider to make the eyes narrower. I like to use both sliders below, at around -25 to -50 for each.
download them here: eye width / eyelids width
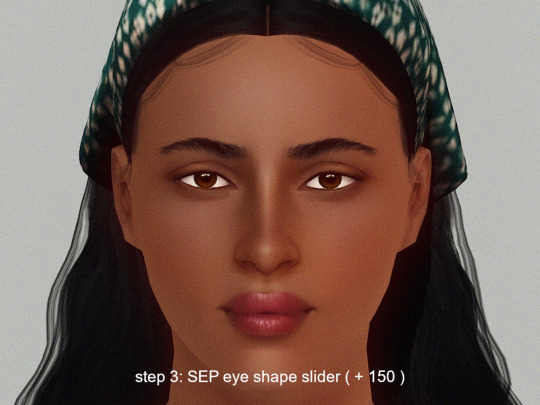
Step 3: Use the SEP Eye Shape slider to shape the eyes. I like to use around 100 to 200.
download it here
in CAS, it's located in the head section, not the eyes section
Step 4: Add eyelashes and makeup to complete the look.
That's it! I hope you enjoyed reading my mini tut. I feel like CAS tutorials for TS3 are rare so I wanted to try writing a short one. 🤍
Step by step pics and CC list:
Eyebrows: not sure which set but it's by @sourlemonsimblr
Contacts: Anva Anette by brntwaffles
Lashes: S-Club and w0esies
Lipstick: Angels Kiss lipstick by Pralinesims
Skin: Gardenia by me
Hair: Simpliciaty Ruby, by ifcasims
CAS Lighting Mod: Pure V1 by Criisolate

282 notes
·
View notes
Text
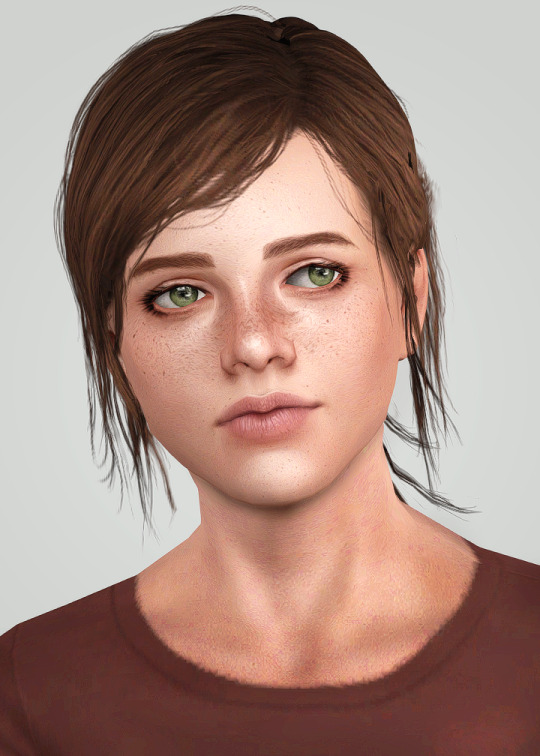
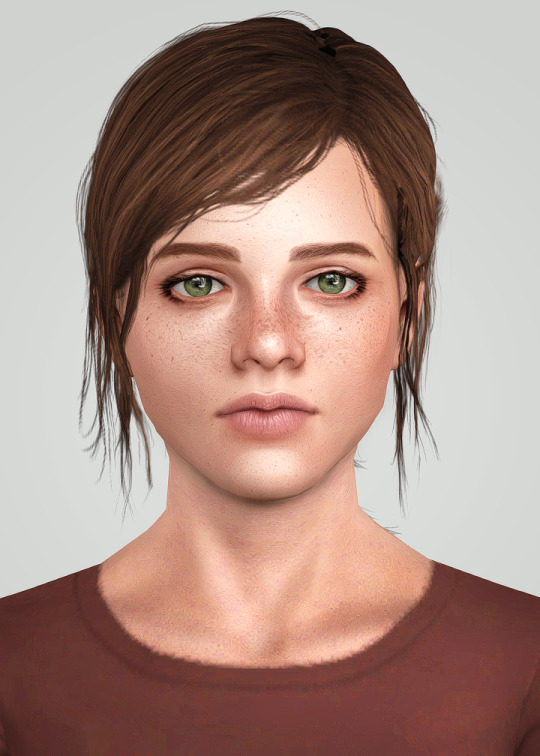
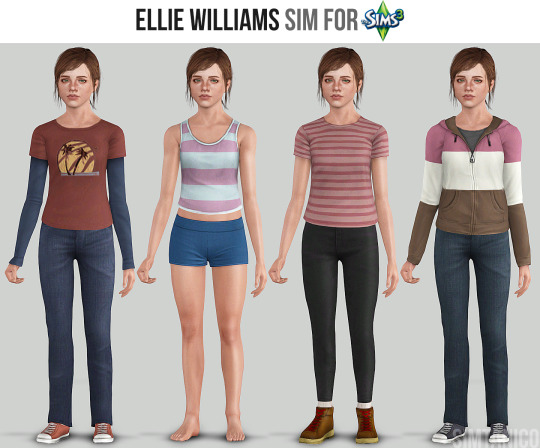
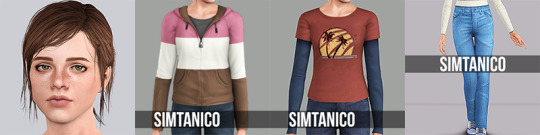
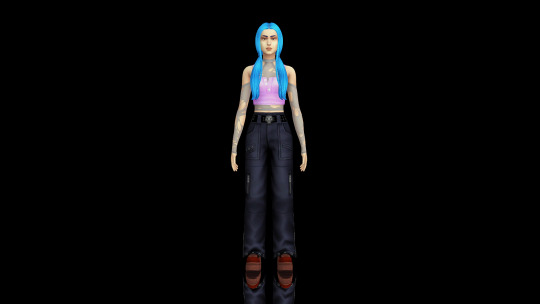
Ellie Williams (inspired by The Last of Us) for The Sims 3
Teen | Brave, Loner, Artistic, Animal Lover
Behold: my pride and joy. You could say that this character is the reason I started creating CC in earnest.
Now it's been almost 10 years since I first saved a version of her in CAS and here she finally is! A whole depressing heart-wrenching sequel to her story and a live action adaptation has come out since then!
So maybe this is the opportunity to give her the fun-filled tragedy-less life she deserves?????? Perhaps???????
If you're up for it, Ellie comes with brand new CC including her hair, Fall Hoodie, Summer Top and an edit of the Diesel High Kee jeans I recently released and a soft-launched slider that is soooooooo niche that I don't think merits its own post. You can find it at my sliders page and in the download. :)
And her being a sim of mine, she has a LOT of CC requirements and uses a ton of sliders. You've been warned!!!
The rest of the details below!
The List (and credits):
Skin: @kurasoberina Primer Skin HD+ (Default) with @chinsims Extra Tones [She will probably do well with another skin, as most of her features are slider and makeup reliant.]
Eyebrows:
@simmillercc Low Full Tweezed brows from the EA Female Eyebrow Overhaul (Non-Default) collection
(MTS archive.org link, current Patreon link does not have the non-default version of the eyebrows, afaik)
Face Details: Gosik Subtle Freckles v2 // v3 // v5 | @pralinesims Delicate Freckles for the Nose // Delicate Freckles for the Cheek
Makeup:
NOTE: ALL MAKEUP THAT WASN'T ORIGINALLY ENABLED FOR TEENS WAS MADE SO. This tutorial covers how to do that with s3pe.
Eyeshadow:
1. Base Game Eyeshadow (w/ lavsm's default replacement alpha fixes)
2. mochi029 inner eyelid make06 [reuploaded by @hyperkaos]
3. @sk-sims Natural Eyebag
4. Ephemera E121228eyeshadow [hosted by me here]
Eyeliner:
1. @sclub-privee Eyelash 3NA
2. Eyelid 2 by me [included in download]
3. Base Game Top Eyeliner
Blush:
1. @gramssims Contour 2 and Contour 5 [Link inactive. Click here for official archive link.]
2. mochi029 plainMakeSet A
3. Tifa Shading Line Blush // Nose Mask V2 [creator inactive, shared by @simdreams]
4. ModernLover Nosemask
5. @agnelid Bloodland Blush N1 Part 3
Lips:
11 IN3S Dry Lips [re-hosted by @villesims] |
2. Lip Definition III by me [included in download]
The Riding Pants in her athletic outfit (with the striped shirt) are by @sweetdevil-sims!
*** she does require a slider that I have not been able to find reuploaded anywhere, Ottershell's Chin Tallness. Link here. ***
For any other defaults and mods installed please visit my newly-updated resources page linked on my page!
Last thing: Feel free to change her up as you need. Simplify her slider usage, use her as a base, whatever.
Just, please, do not claim you made her all on your own OR make money from reposting her or subsequent sims.
I've spent years making her and worked very hard to compile all this.
If you've made it this far, thank you!!!!!!!!!!
Download .sim and included CC (and leave a 💖): https://simfileshare.net/download/4512068/
Please tag me in any photos you might take!
She will also eventually be hosted on simblr.cc!
#s3cc#the sims 3#ts3cc#dl: sims#the last of us#this is actually making me super nervous sdfhafhewfsd#i'll scurry back from whence i came#mysims: Ellie
241 notes
·
View notes
Text

ginko G121 Hair (For The Sims 3)
forgot to upload the hair from my hair conversion tutorial. here it is!
available for tf - ef
custom thumb
20k poly
♡ DOWNLOAD ♡
Patreon (free)
or mediafire
♡ CREDITS & TAGS ♡
this belongs to ginko, it's not mine! original post
@xto3conversionsfinds @katsujiiccfinds
♡ LINKS ♡
♡ Support Me (Ko-fi) | All Downloads | TOU ♡
#nightodl#ts3 cc#ts3cc#the sims 3 cc#sims 3 cc#ts3 hair#sims 3 hair#4t3 hair#4t3 conversions#the sims
504 notes
·
View notes
Text
✨ ts3 resources
default replacements:
skin
sarhra eyes
pet eyes
lighting mod
brows
beards
fairy wings
little wisps
cas screen (latte)
skintones:
neiuro
brntwaffles
pyxis
noodlesims
fawkes
sectumsimpra
svmblr
hair retextures:
poisonfireleafs
pandelabs
chazybazzy
plumblobs
plumdrops
ifcasims
brows:
brntwaffles
makeup:
lashes set 1 / set 2 / eyelash sliders
eyeliner
blush 1
blush 2
blush 3
lipstick 1 / 2 / 3
dry lipstick
nose makeup
makeup set
skin details:
freckles part 1 / part 2
moles
birthmark
body birthmarks and freckles
cheek shadows
sliders:
slider masterlist
shoes:
pixicat
accessories:
septum piercings
braces
patterns:
cathilark
nraas mods:
careers
debug enabler
dreamer
error trap
go here
master controller (+ cheats, integration)
overwatch
register
saver
story progression
tempest
woohooer
portrait panel
traffic
other mods:
traits enabled for all ages
taxi charge
no fridge shopping
sims drinks
pregnancy controller
scolding + punishment tweaks
supernatural babies
random genetics
super hampers
sleep on sofa
faster toddler training
only important memories
lose fat / gain fitness slower
retuned attraction system
deep conversations
fewer credits for degrees
cas details 8x2
misc:
smoothness patch
reshade preset
rabbit hole rugs
poseplayer
poses
screenshot backdrop
world fixes
regul save cleaner
worlds:
fairy realm
magic town
roseward
mairin
hylewood edit
deery meadows
shigeria
hidden springs retextured
riverview redux
challenges:
random legacy
awesomesauce legacy
midnight sun
zombie apocalypse 1 / 2
youtube:
acottonsock (tutorials + let’s plays)
cjplays (world reviews)
#time to post my resources#tysm for the welcomes and follows <3#yall have amazing blogs#the sims 3#ts3#ts3cc#sims 3#ts3 resources#maxis match#ts3 maxis match
880 notes
·
View notes
Text
MY CAS RESOURSES
WHELP HERES THE LONG AWAITED CAS RESOURCES!!! everything listed will always be in my recourses tab with my other fav cc links and tutorials!! i will try to update as much as i can!!!
GENETICS
m skin skin N10
f skin 1 kiko
f skin 2 jimi
f skin 3 skin N11
-
face shadow spotlight
mouth corners 1 N3
mouth corners 2 N2
nose mask 1 N1
nose mask 2 N4 upd
eyebag 1 OS-Eyebag 01
eyebag 2 N7
freckles 1 N1
freckles 2 naomi
moles 1
moles 2 N1
moles 3 N2
hairline 1 N1
hairline 2 TASHA HAIRLINE
hairline 3 PIXELORE ORGANIC HAIRLINE RECOLOR & FIX BY QWERTYSIMS
LIGHTING
gentle cas lighting
PRESETS
m body 1 ir7770_ElezenPreset01
m body 2 David male body
m body 3 N3
m body 4 DARK ELF M PRESET E2
m body 5
f body 1 N2
f body 2 pear
-
eye 1 fox eye preset
eye 2 MMSIMS Preset AM Eyes 1
eye 3 01
eye 4 02
eye 5 eyes v1
nose 1 button nose
nose 2 Female Nose Presets 04-09
nose 3 Male Nose Presets 04-06
nose 4 male preset 1
lips 1 ghostly
lips 2 puffy pt2
lips 3 puffy pt1
lips 4 jamie
lips 5 lips presets #10-32
jaw/chin 1
SLIDERS
anything by obscurus-sims, Dumbaby, Luumia, and Teamoon
SHADERS
sept 2022 shaders
heavy rain
TUTS BY ME
alpha hair recolor tut
FAVS
sept 5th 2022
hair acc
f skinblends
overall hairs
m hairs
glasses
330 notes
·
View notes
Text
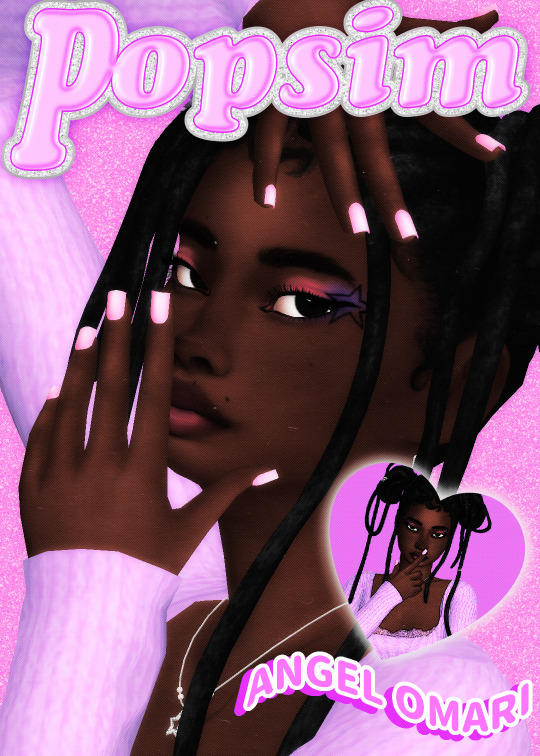
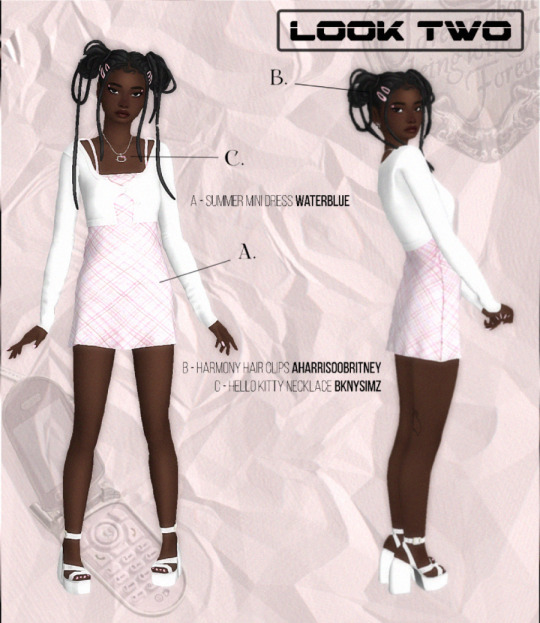


. ° ☆ angel omari | they/them . .✿
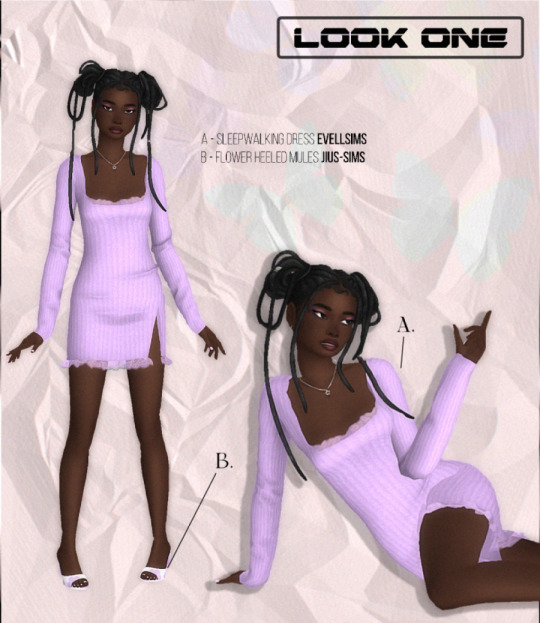
───── complete lookbook under the cut 💫 ⋆。˚
00 ✩ hair, bellybutton ring, psd + editing tutorial
01 ✩ dress, heels // nails (square matte), earrings, necklace (arctus), eyeshadow*, blush (daisy), lipstick
02 ✩ dress (+ cardigan), clips, necklace // heels, nails (jelly), earrings (kingdom), heart liner, eyeliner (elegant wing), blush (#1), gloss
03 ✩ top, pants, heels, bag // nails, earrings (butterfly), necklace (von dutch), eyeshadow, eyeliner, gloss (vcr)
04 ✩ top + skirt, necklace + earrings // sandals, waist chain, nails, eyeshadow, eyeliner**, lipstick
05 ✩ top, pumps, belly chain // nails, earrings (arctus), necklace, eyeshadow (fireworks), eyeliner (one and only), blush (purpose), gloss**
06 ✩ cardigan, pants, earrings (arctus) // heels, undershirt, thong, nails, eye gloss (dainty), liner 1 (amusement park) + liner 2 (eyeshadow #4) + liner 3 (showtime kit), gloss (shine)
┆ * = tsr link; ** = creator deactivated
→﹐ thank you to all cc creators! @aharris00britney @alexaarr @amelylinaa @arethabee @b0t0xbrat @babyetears @backtrack-cc @bknysimz @breezytrait @christopher067 @cosimetic @crypticsim @dream-girl @enriques4 @eunosims @evellsims @ikari-sims @jius-sims @joliebean @kamiiri @madlensims @pralinesims @saruin @serenity-cc @sims3melancholic @simstefani @thepeachyfaerie @twisted-cat @uxji @vanilasimscc ﹒⟢
#themedcafe#lookbook#ts4#ts4 lookbook#ts4 cas#ts4 edit#maxis mix#ts4 maxis mix#sims 4#sims 4 lookbook#sims 4 cas#sims 4 edit#sims 4 maxis mix#the sims 4#the sims 4 lookbook#the sims 4 cas#the sims 4 edit#the sims 4 maxis mix#s4#s4 lookbook#s4 cas#s4 edit#s4 maxis mix
309 notes
·
View notes
Text
Tutorial: Converting all types of CAS CC to work with color sliders (+ how to disable it)
This enables CAS CC to work with Color Sliders for Hair, Clothes, & Accessories by thepancake1 and @mizoreyukii.
Since S4 Studio only let's you batch convert hairs and update makeup for compatibility, I present to you: TS4AlphaConverter_2_2_0_0 by CmarNYC.

Keep in mind that enabling CAS CC for color sliders will increase the file sizes of your .package files!
Sliders will also always affect all the texture, i.e. you can't exclude accessories like buttons or zippers, so some textures might not work well.
Also check out this tutorial: Fixing slider compatible CAS CC with broken textures

💜 Requirements:
Color Slider mod
TS4AlphaConverter_2_2_0_0
CAS CC you want to enable
Featured CC by @trillyke @daylifesims @jius-sims @magic-bot
💜How to enable CC for color sliders
1. Download the required program, mod and CC you want.
This is my outfit before sliders:

2. Open up Alpha Converter
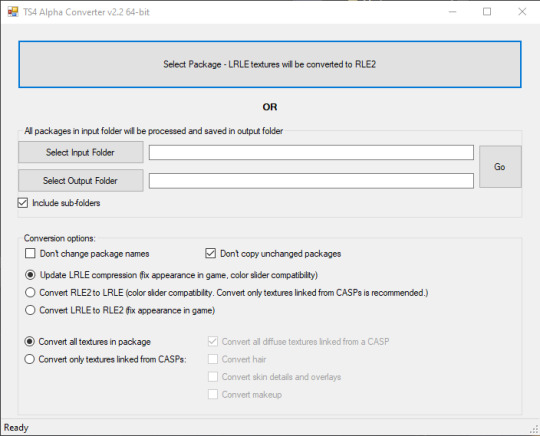
3. For enabling sliders, you can only use the folder option and not single files:
Select your input folder which contains the .packages you want to enable.
Then select your output folder where you want to save the new files.
"Include subfolders" is handy if your CC goes into more folders inside your input folder. It will reproduce the same file structure.
4. I would recommend enabling "Don't change package names" so you can just replace your input files directly, otherwise it adds "_Fixed" at the end of the filename.
I will also leave "Don't copy unchanged packages" checked.
5. Next we will select "Convert RLE2 to LRLE" to enable color sliders. I will explain the others later.
It then enables "Convert only textures linked from CASPs" which is good, e.g. it will only target actual CAS CC textures then and no Build & Buy for example.
Leave "Convert all diffuse textures linked from CASP" checked if you want to convert all types of CAS CC.
6. These are my finished settings:
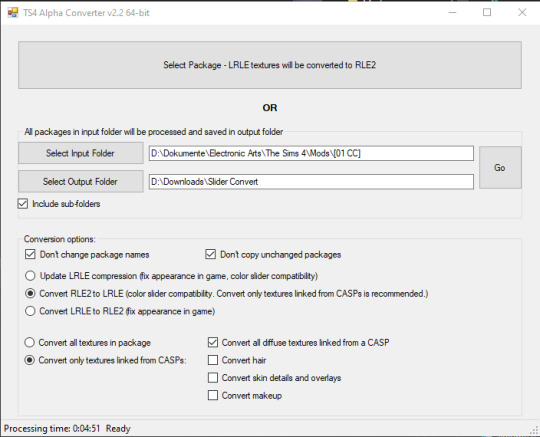
7. Press "Go". It will then take a while depending on file amount and swatches, as it will have to go through textures one by one.
8. Check your finished files. The file size should be bigger, in this case it went up by 30 MB for only 5 files.
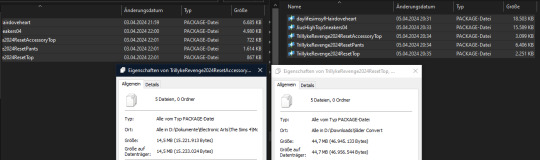
This is how the outfit looks after applying sliders to all pieces:
💜 How to disable CAS CC for color sliders
This time select "Convert LRLE to RLE2". You can leave "Convert only textures linked from CASPs".

2. Press "Go" and let it do it's thing.
3. As you can see, the file size went down again (middle), but it is not the same size as from the original file (right).
You will no longer be able to use sliders on the CAS CC piece, except transparency, which always works.
💜 Fixing slider compatible CAS CC with broken textures
If some of your CAS CC displays huge areas of missing, pixelated textures there is an issue with compression.
I don't know how and why this happens, but check out * this tutorial * on how to fix it.
@thefoxburyinstitute @maxismatchccworld @emilyccfinds @sssvitlanz
#yoru tutorials#ts4 tutorial#ts4 resources#tutorial#Sims 4 tutorial#s4 guide#ts4 guide#Sims 4 studio#Sims 4 cas#ts4 cas#color slider#cmarnyc#thepancake1#mizoreyukii
56 notes
·
View notes
Text
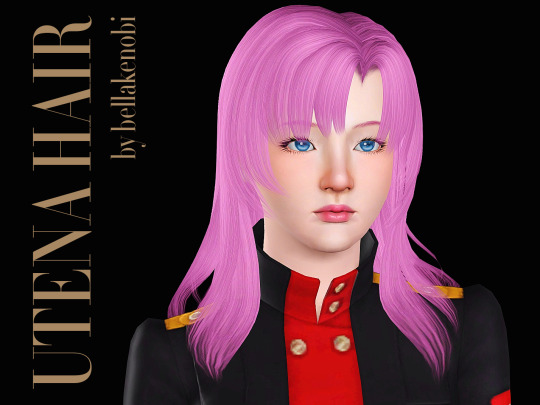
Utena Hair
It's alive!!!
Revolutionary Girl Utena is my favorite anime of all time, and when I stumbled upon a hair cards tutorial on youtube, instead of testing it with a easy simple bob, of course I went to do something complicated as Utena's hair. And here it is 😊 I'm quite astonished I was able to put this together, even with its own issues etc.
For female, teen - elder, not valid for random
EA highlights
No morphs, but won't clip in fat sims
Polycount: 6k lod0
Known issue: it has some tiny transparency issues on the sides and in the back, mainly caused by the undersides, because you know, one does not simply makes a hair for The Sims 3 '-'
Download at:
Mod The Sims | Simblr.cc | Sim File Share | Mediafire
Credits: Mesh by yours truly, texture Pooklet with hand painted alpha by me, control by Anubis.
Read my TOU here.
Control Preview and links to the stuff used on the hair below the cut.
Stuff I used to create this hair:
Blender, Milkshape (ugh), Photoshop CC 2015, DABOOBS, Dynamic Hairy Brushes by Arrsistable,
Tutorials that helped me to create this hair:
- Blender 3.0 Easy Hair Cards with Curves by ELIZA
- Hair Creation Start to Finish by @CardinalSims
- Smooth Bone Assignment in Blender by RedSimmer
#sims 3#ts3#simblr#the sims 3#s3cc#sims 3 download#sims 3 hair#utena#shoujo kakumei utena#revolutionary girl utena#sims 3 anime cc#s3 female hair#bellakenobi hairs#bellakenobi hair
126 notes
·
View notes
Text
RESOURCES
resources tag | tutorials | challenges
RESHADE
my own preset
MODS
MCCC
UI Cheats
TOOL
POSES
ts4-poses
helgatisha
ratboysims
rebouks
mel-bennett
sciophobis
BB
peacemaker-ic
illogicalsims
maxsus
brazenlotus
harrie-cc
felixandresims
pierisim
imfromsixam
CAS
eyes
mausmaus eyes & addons
pralinesims DIY eye kit & addons
skin
luumia vanilla skin
skindetails
pyxiidis about face
miiko face-kit no.1 & no.2
miiko mouth-corners
sammi-xox skindetail pack & dump & belly overlay
peachyfaerie FLORAL skindetail pack
nesurii little details
okruee misc. face details
obscurus-sims maxis match genetics set
northern siberia winds mm overlays
ratboysims kiwi eyebags
pralinesims maple syrup freckles
littledica nipple skindetail
makeup
pralinesims
pyxiidis
eyebrows
twisted-cat eyebrow set 2 | 3 | 4 | 5 | 6 | 7
rheallsim eyebrow pack 1 & 2 | 3 & 4
eyelashes 2D
s-club eyeliner 12 (tsr)
s-club eyelashes conversion 01 & 02
eyelashes 3D
radeu mm (3D) eyelashes v2
tattoos
wrixie
valhallansim blackwork tattoos
eirflower blackwork tattoos v1 & v2 (tsr)
hair
simandy
okruee
simstrouble
clumsyalienn
simtric
sheabuttyr
marsosims
facial hair
igorstory
clothing
aharris00britney
trillyke
pixelunivairse
nucrests
its-adrienpastel
serenity-cc
sentate
solistair
joliebean
sliders
obscurus-sims esotropia and exotropia
miiko eyebrow slider 1 & 2
teanmoon mouth scale slider
presets
vibrantpixels a body preset
OTHER
northernsiberiawinds better in-game lighting
squea realistic cas room lighting
simandy spotlight v1 & v2
joshseoh lighting overlay 1 & 2
ravasheen ISO Love Photo
67 notes
·
View notes
Text
How To Convert Eyelashes
I was asked to make a tutorial on converting eyelashes. Well, here it is. Dirty, badly explained tutorial by Rollo. I'm assuming you know how to work with required programs, it won't teach you the basics, just a process of converting eyelashes from ts4 to ts3.
Requirements:
S4Studio
s3pe
TSR Workshop
Sims 3 Pack Multi-Extracter
These files (full credit goes to @gruesim)
Graphical program that works with .dds files
Let's go:
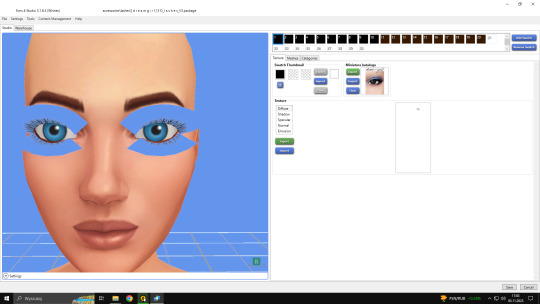
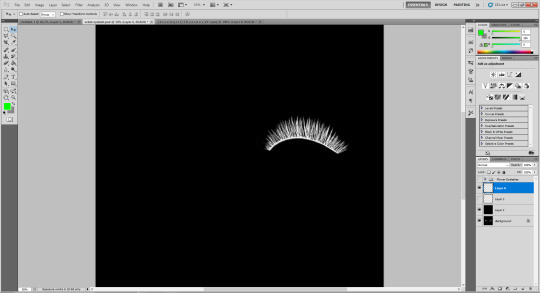
Open the desired lashes in S4Studio. Export diffuse of the ones you want to convert (you only need the black ones). You can also export the thumbnail. Close the program.
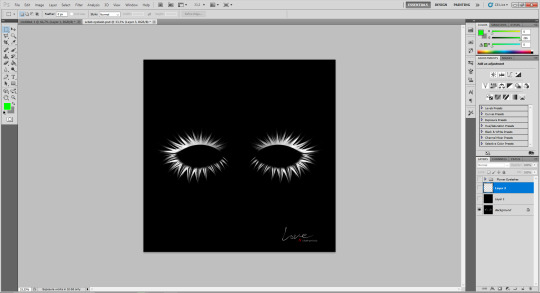
2. Unzip the folder that you downloaded from this tutorial. You will find a .dds files called "sclub eyelash". Open it up in the graphical program. Make a black layer above it and hide it for now.

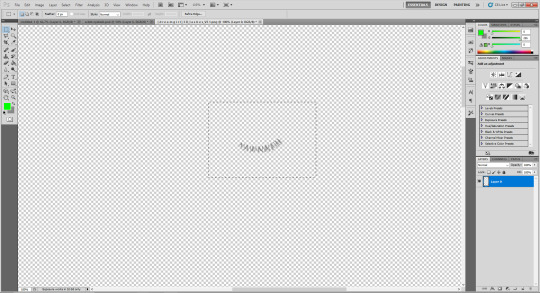
3. Now open up your ts4 eyelashes file. Start from the upper eyelash, crop it and go to the sclub eyelash.
4. Paste it, click ctrl+i, it will make ts4 eyelash white.

5. This is the worst part. You have to make the ts4 eyelash fit to the sclub one as close as possible. Use every method possible!
6. Unhide the black layer and see if your eyelash look alright. It may need some sharpening.
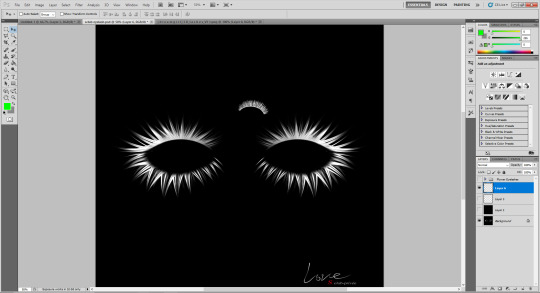
7. Now crop the bottom eyelash and follow the exact same steps as for the upper eyelash.
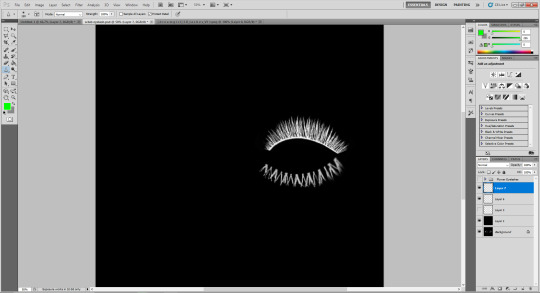
8. It should look more or less like this. Bottom eyelashes are always harder to adjust and may need even more sharpening.

9. Merge your upper and bottom eyelashes, duplicate the layer. Click ctrl+a, ctrl+t, then right mouse button and choose "Flip Horizontal".

10. Voila. You should have a complete set of your new shiny eyelashes! Save them as .dds. You can close the program. We're moving to TSR Workshop.
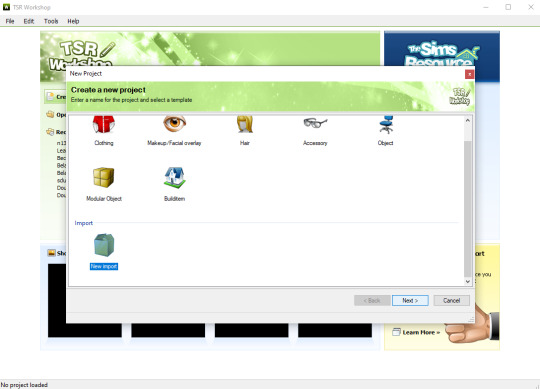
11. New Project -> New Import. Import Eyelashes AFBase from the downloaded folder.

12. Name your project, name your file and click "Next".

13. You should see this. Go to Texture tab and click "Edit" on the Transparency Map.
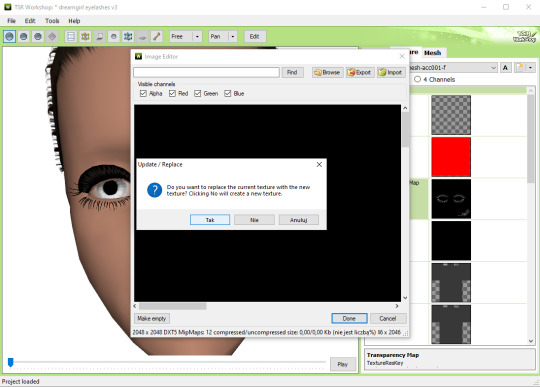
14. Import your eyelashes and click "Yes" when asked.
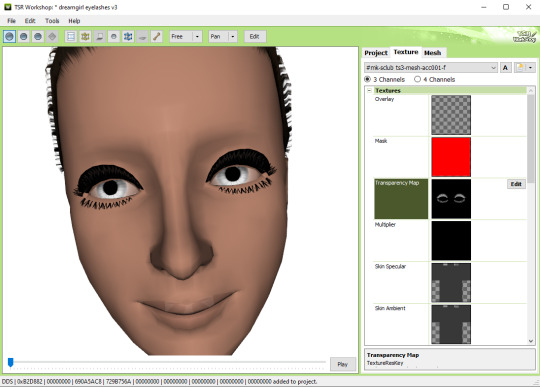
15. You should see your lashes, yay! But this is TSRW, they won't look exactly the same in game, as they look here. If you want a set of eyelashes, add more presets.
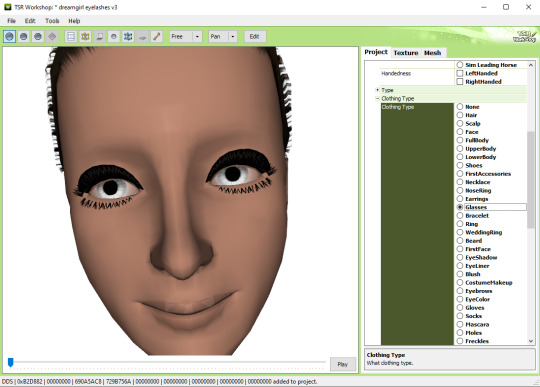
16. Now this is important. If you want to see your eyelashes in Accessories, go to Project tab, Clothing Type and change it from eyeliner to glasses. You also have to do this if you have more than one preset in one file. They won't show up in Eyeliner section. If you want to have set of eyelashes in Eyeliner category, you have to make each preset into seperate file. Also, eyelashes are recolorable ONLY in Accessories section. Don't forget to check Categories section to see which outfit has the eyelashes available.
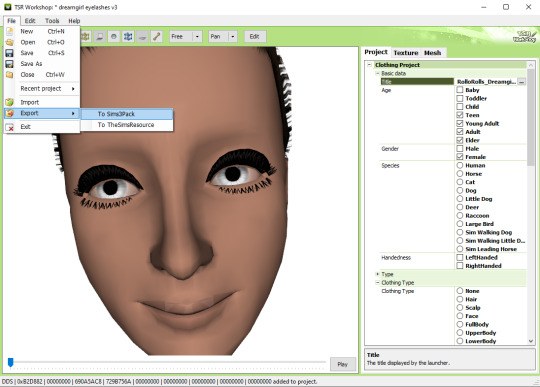
17. Now you're ready to export your file! Export -> To Sims3Pack. Use the Sims 3 Pack Multi-Extracter to convert your sims3pack to package file. We're moving to s3pe.
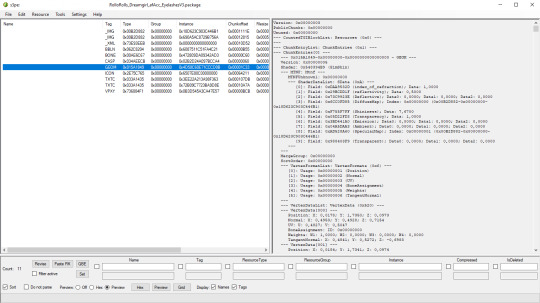
18. THESE STEPS ARE ESSENTIAL! Open up your shiny new package in s3pe. Click on the GEOM with the right mouse button.

19. Click Replace and choose AUID.simgeom from the downloaded folder. AUID is for adults, CUID for kids and PUID for toddlers. We have one more step to do.
20. Now click on the CASP normally (left mouse button) and click Grid on the bottom of the program.
21. A small pop up window appears. Scroll to the very bottom and find a line called OverlayPriority.

22. Change the 8 to 2. This will make eyelashes not being visible through hair that's covering eyes.
23. Save your package. You're ready to test your converted eyelashes in game!

Here they are. Nothing fancy, it was a quick conversion :D They're also compatible with S-Club eyelash sliders ^^
Btw, you don't necessarily have to convert both upper and bottom eyelashes. You can have upper or bottom only. Play with the lenght, not all eyelashes have to be very long. Convert it for males, kids, toddlers. You just have to remember to change the options in TSRW and replace the correct .simgeom file in s3pe. There is a lot of possibilities and you'll probably get better in this than me :D
Good luck! ♥
142 notes
·
View notes
Text
making default replacement CAS - TS3
hi i'm writing a rough outline of one way to make default replacements. i discovered this method recently on reddit as shared by 80sBabyGirl and it's worked well for me so far, so i want to share with other creators out there.

a disclaimer: i'm no expert on how to do this so please read w a grain of salt. please also feel free to add further comments and correct me on any errors. i'm sharing this post not as a 100% foolproof tutorial but more of a guide or outline of the basic steps.
i like this method because you can easily turn any CC package into a default replacement package, without exporting a bunch of textures meshes etc that beginners may not be comfortable doing. also great for lazy people like me.
i have had success using this method to make default replacement hairs, beards, and clothing. i assume the principle is the same for most other CAS items although i'm sure there are more complicated exceptions out there.
so with those disclaimers out of the way, let's start:

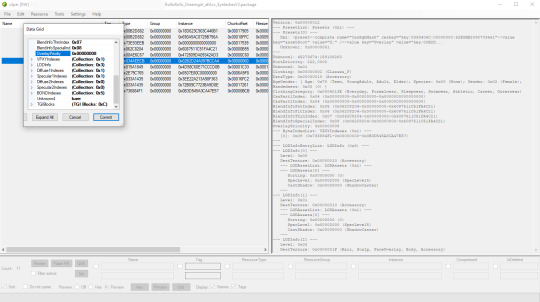
first, you will need to download Sims 3 Package Editor (S3PE) and Sims 3 Object Cloner (S3OC)
next, you will use S3OC to clone the in-game item you want to replace, such as a hairstyle.
make sure to "deep clone", include the thumbnails, and do not check "renumber internally".
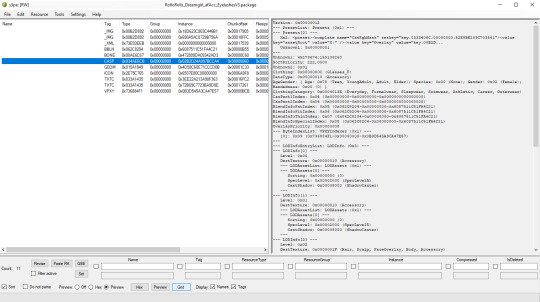
next, you will open the cloned in-game hair using S3PE. you will also be opening and editing your cc hair package in S3PE, so make a backup of that somewhere before proceeding with the edits.
80sBabyGirl on reddit:
"First, export the Maxis hair's CASP resource to a folder, and close the file. Then, export the CC hair's CASP resource to a different folder. Go back to the Maxis hair folder. Don't open the CASP file, don't copy the file either, just copy its name. Go to the CC hair folder and paste the Maxis hair's name to replace the CC hair's name. Then import the renamed CC CASP resource into the CC hair file. Delete the original CASP resource to avoid duplicates. Then you can do the exact same process with thumbnails. For hairs with accessories, you can retrieve thumbnails for all 3 swatches inside the CASThumbnails.package file that's in the Thumbnails folder."
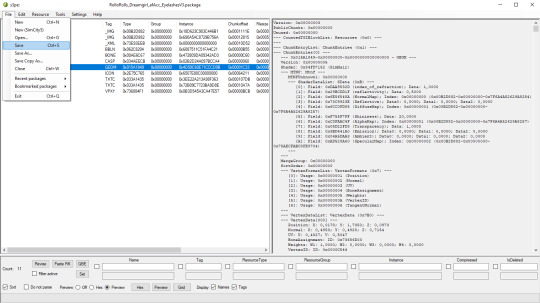
finally, save the cc hair package, close it in S3PE, and put it in your overrides or packages folder to test in-game. it should now function as a default replacement.
thumbnails
another way to make the cc item's thumbnail into the default replacement item's thumbnail:
in your cloned game item, double-click on the thumbnail resource. click on "copy rk".
in your cc item, double-click on the thumbnail resource. click on "paste rk".
this will make the game read the cc item's thumbnail as the default item's thumbnail.
handy reference for which thumbnail codes are for what
in summary
ultimately you are just editing 2 resources in the cc package to turn it into a default replacement.
the CASP resource
the thumbnail resource
testing in game and the textures are fucked up??
whenever you default replace anything, you usually have to delete your caches and re-apply the item in CAS for it appear properly.
the textures are still fucked ?
if this happens, it may be because the default textures and the cc textures need to be properly linked in S3PE.
in your cloned game item, double-click on each "_IMG" resource. click on "copy rk".
in your cc item, double-click on the corresponding "_IMG" resource. click on "paste rk".
you will need to do this for the multiplier, mask, specular, and normal map textures.
this will make the game read each texture as the default item's texture.
in conclusion:
70 notes
·
View notes
Text
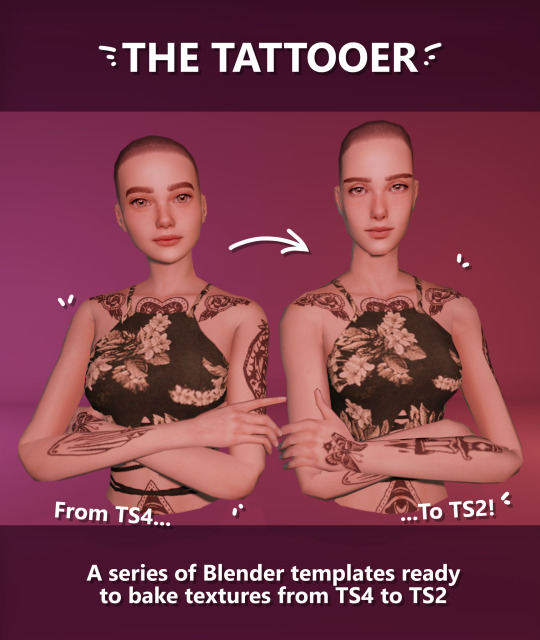
Introducing... The Tattooer!
[This version is OUTDATED! Please, check the new version here. I updated the workflow, skipping a lot of unnecessary Photoshop editing. It's way faster! I'll leave this old version and files up though, for archiving purposes. But yeah I still totally recommend you use the new version!]
Finally! I’ve been working on this for so long and I couldn’t wait to share it. This is a series of Blender template files already set up to quickly bake textures from The Sims 4 to The Sims 2. Really neat for cc creators! The different Blender files will allow you to:
-Bake body textures from TS4 to TS2 (Female)
-Bake body textures from TS4 to TS2 (Male)
-Bake body textures from TS4 (Female) to TS2 (Male)
-Bake body textures from TS2 (Female) to TS2 (Male) [Bonus!]
-Bake head textures from TS4 to TS2 (Face + Scalp) [Experimental]
Check the file names to see which one is which, and the resolution of the baked texture it will give.
Download! SFS / GD
Everything you see in the render above was converted using those Blender files. I only did a couple tiny edits to the eyes and lips to fix them.
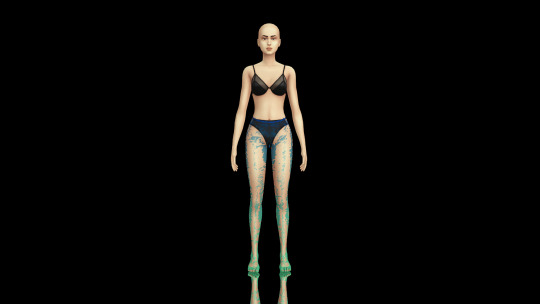
These templates were made mainly to bake and convert tattoos, but there’s more you can do with them if you get creative. I have to say, these are NOT perfect. Check out the eyebrows on the render above. They look a bit wonky compared to the original, don’t they? I left them as is to keep your expectations with these as realistic as possible. Results may vary depending on what you are trying to convert, so! With that in mind, this is all the stuff you will be able to convert almost seamlessly from TS4 to TS2:
-Tattoos.
-Other body details such as body hair, scars, freckles, supernatural/occult details…
-Body painted underwear and swimwear, as well as some other clothing that’s mostly painted on the body.
-Socks, stockings and maybe leggings.
-Even skintones! In some areas they will look weird, so I recommend editing and blending them with other existing TS2 skins.
-Makeup. Kinda bad but hey it works! Eyeliner and anything that is around the eyes looks terrible for now, but other stuff like blush may look just okay.
-Eyebrows and maybe beards. A bit of hit or miss with those.
-Hair scalps. Very useful when converting some hairs! Although keep in mind part of that texture might also need to be baked on the face mesh, you know, that hairline makeup stuff.
Got your attention? Nice! Editing some of the textures from TS4 to match the UV mapping in TS2 using a 2D editing program can be incredibly hard. That’s where texture baking in Blender comes to the rescue!
It is recommended you download Blender version 2.91.0, which is the one I use. Don’t worry, it’s free! There’s also 3 Photoshop actions you will need to set up the textures for baking and then putting them back together, because unfortunately Blender doesn’t support transparencies in that baking process, so that takes a couple extra steps to make it work, but I think it’s still pretty fast and easy. And just in case Tumblr manages to blow up or something, I decided to include a pdf with the upcoming tutorial that will guide you step by step with all this process, so if this post gets deleted somehow (I really hope not!), you will still have that pdf as a backup archived.
You can download Blender here. Personally I recommend picking the fourth option, “blender-2.91.0-windows64.zip”, which is a portable version and doesn’t need to be installed.
You will also need Sims 4 Studio to extract the original Sims 4 CC textures you want.
As for Photoshop… I’m not going to tell you to buy that subscription service and give Adobe some undeserved money, so… yeah, there might be some other options out there to get it (very legit, yes yes).
So, before we begin, let’s clear out some questions you might have. What the heck is this texture baking thing and what does it do? Well, let’s imagine you have a projector and point an image into a blank wall. Then you pick up some brushes and start painting and copying that projected image in that wall. Texture baking is kinda like that when it comes to 3D models. You align two models and match them as closely as you can in shape and form, and once you adjust some parameters and values, Blender does the rest for you: it will give you a new texture for a new model with a different UV map. These files I’m sharing have everything already set up, so it’s a matter of plopping in that Sims 4 texture and you will get that new texture for TS2 in just a few clicks.
This tutorial assumes you know literally nothing about how to use Blender, so if you feel uncomfortable with it, worry no more! This will guide you with pictures showing where you need to click and explaining what is happening. For Sims 4 Studio and Photoshop the process might be a bit less detailed, but still this should be pretty beginner friendly. For this tutorial, I will use some tattoos as an example. Alright, enough with the rambling. Let’s get started!
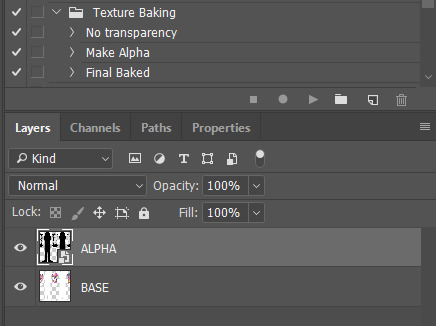
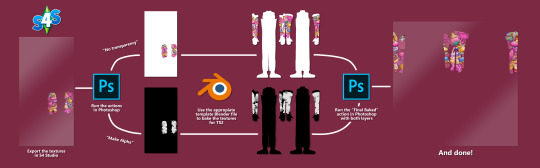
·EXTRACTING TEXTURES AND EDITING THEM WITH PHOTOSHOP:
First things first, you will need to extract as pngs all the textures you want to convert from TS4 using Sims 4 Studio. Once you’ve done that, open them up one by one in Photoshop and run the “No transparency” action. This will remove the alpha channel from the image, getting rid of all the transparency. Go ahead and save a png copy of it. Then run the “Make Alpha” action on those same swatches (from the beginning, make sure you’re not running the action on an already edited swatch!), which will only show the alpha channel of the image in black and white, and save another copy of that. You should have 2 textures for each tattoo swatch. For the “No transparency” action I like to name it BASE (And your swatch number or name), and for the “Make Alpha” action I usually name it ALPHA (And that same swatch number/name). I recommend saving them in different folders named BASE TS4 and ALPHA TS4 respectively to keep it organized. If you want to make this much faster in Photoshop, there’s an automation option in it that allows you to run an action through a batch of files in a folder and then saves it all. I won’t cover how to do it in this tutorial, but you should be able to find it easily on Google by searching something like “Photoshop automate batch”. It’s really powerful and will make your workflow with actions much faster. Definitely recommend learning about that!
·BAKING THE TEXTURES IN BLENDER:
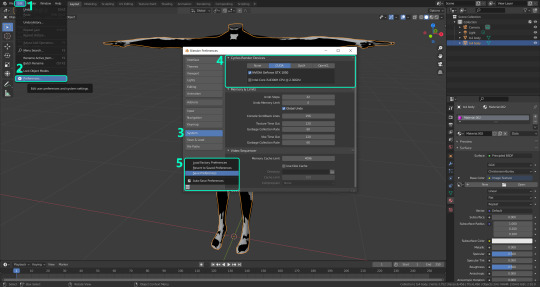
PRELIMINARY STEP 1: CONFIGURING BLENDER’S GRAPHICS SETTINGS:
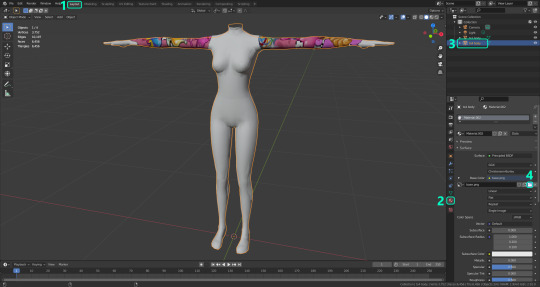
Open your preferred Blender file depending on what you’re going to bake and the desired resolution (in this example I’m going to use the AF-body-4t2-1024 file). Before we start messing around in Blender, there’s one thing you should set up. It is a onetime step, and once it’s done, you won’t need to do it again. So, does your computer have a dedicated graphics card? If you don’t know or you’re not sure, just skip to the next step. Configuring Blender so it uses your graphics card instead of your CPU will make the baking render much faster, so it is recommended you set it correctly.
If your computer has a dedicated graphics card, click File (1) > Preferences (2) > and on the window that pops up click System (3) > and select CUDA and make sure your graphics card is there and tick it (4). I have an Nvidia Graphics card but your case may vary. Once you’re done, click on the tiny button on the bottom left corner and Save Preferences (5).
PRELIMINARY STEP 2: CHOOSING THE RENDERING DEVICE:
Click on the tiny camera button on the right, called Render Properties (1), and on Device (2) select GPU Compute if it’s not already selected. If you’re not sure if you have a graphics card or not, just select CPU. Then select the Material Properties tab (2) and Save your changes, either by pressing Ctrl + S, or clicking File (4) > Save (5). Okay, time to get into the good stuff!
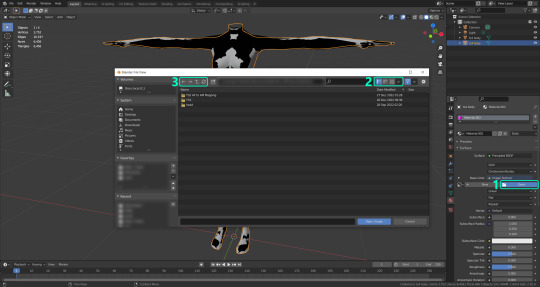
·STEP 1: LOADING YOUR TS4 BASE TEXTURE:
In the Material Properties tab, click the folder icon that says Open (1) and on the window that pops up, navigate through your folders and select your first texture. For now we’re going to bake the BASE texture, so go to that folder where you saved the edited “No transparency” image. To navigate easily, the 3 buttons on the top right (2) are for the display mode. They will show your files in list mode, vertical and horizontal, and the one on the right will display the file thumbnails, pretty useful if you want to easily see your images. And the icons on the left side (3) will let you go one folder back and forward, go to the parent directory, and refresh the folder in case you just dropped something new in there. Double click on the image you need and that will load it into the Sims 4 body model, named “ts4 body”.
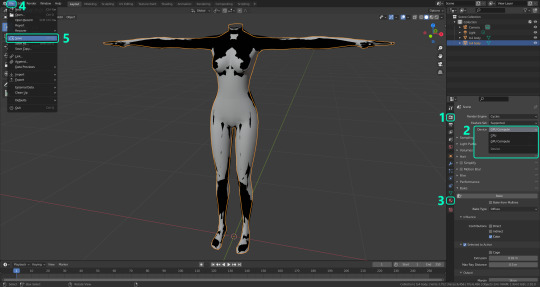
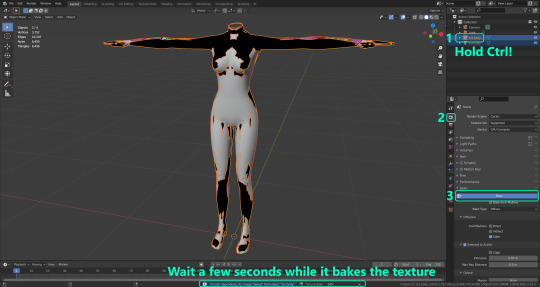
·STEP 2: SETTING UP YOUR SELECTION AND BAKING THE TEXTURE:
On the top right of the screen, you will see the names of the 2 models in the scene. Hold the Ctrl key in your keyboard and left click on the “ts2 body” model (1). If you did it correctly, you should see “ts2 body” in a yellowish orange color, and right down below, “ts4 body” should look more like a red orange. If not, try again by clicking first on ts4 body, and then while holding Ctrl click again on ts2 body. Then switch to the Render Properties tab by clicking the tiny camera icon (2) and click Bake (3). Depending on your screen resolution, you might need to scroll down a bit with your mouse to see the Bake button. Wait a few seconds for it to finish. You will see the progress percentage down on the bottom of your screen. Don’t panic if you notice your computer fans start ramping up, that’s completely normal! As I said in the beginning, using your GPU will bake the textures much faster than the CPU.
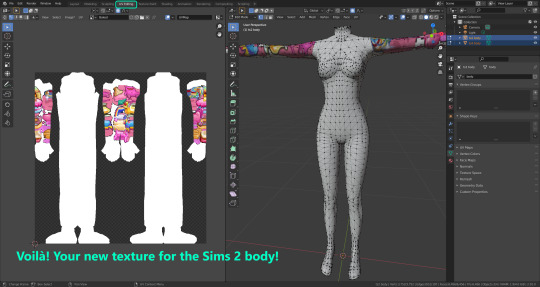
·STEP 3: SAVING YOUR NEW TS2 TEXTURE:
Once it’s finished, switch to the UV Editing Mode by clicking “UV Editing” on the top of your screen. And there it is: your new texture! You might have to scroll up your mouse wheel a bit to zoom in and see it in all its glory on the left side of the screen. We’re still not done yet though. You need to save it to yet another new folder (always try to keep your stuff organized!).
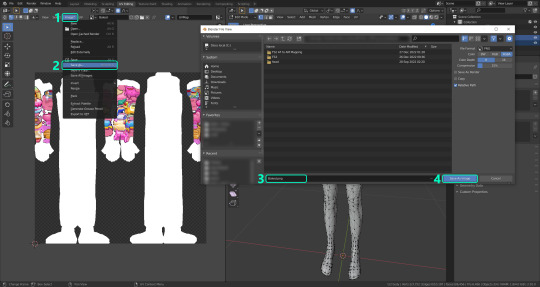
You can save it by pressing Shift + Alt + S, or clicking on Image* (1) and then Save As… (2). That will pop a window where you’ll need to navigate again and save it somewhere. Give it a proper name (3) and hit Enter to save it… well, Enter doesn’t always work for me for some reason, so if that happens just click Save As Image (4). In this case, I personally like to call it something like “BASE TS2”.
·STEP 4: GOING BACK TO STEP 1:
Alright! So you have your new baked base texture, but we still need to bake the alpha channel to give it its transparency. In order to go back to step 1 and start the process once again, click Layout (1), go back to the Material Properties tab (2), select “ts4 body” (3) and click on the folder icon (4) to open and load the alpha texture you did in the beginning in Photoshop.
Then it’s just a matter of repeating the process from step 2: bake the alpha channel and save it again as a new image (watch out, don’t overwrite your previous image!). This one I like to name “ALPHA TS2”. When you’re ready to move on, close Blender without saving. If you see a small check telling you it will save some images, make sure you uncheck it, so you will be able to use it again in the future from the starting point with no issues. I don’t think it really matters if you accidentally save your progress in these files, but I like to keep it clean and fresh so I can do the process where I left it from the beginning the next time I open it. And in case you mess up and save somewhere, you can always just delete the .blend file and download the template files again.
·FINAL STEP: PUTTING EVERYTHING BACK TOGETHER IN PHOTOSHOP:
We’re almost done! Open Photoshop and drop in both your 2 new baked textures, “BASE TS2” and “ALPHA TS2”. Keep both layers on top of each other and aligned. For that you can enable the snapping in View > Snap to… > All. Rename these layers so the Alpha layer is “ALPHA” and the Base is “BASE”, and make sure ALPHA is on top.
Then run the “Final Baked” action and now for real, it’s finally over! You just fully baked and converted these new textures. Congratulations!
So, to summarize, here’s a small guide with all the steps of the workflow I developed. Once you get the hang of it, baking and converting one swatch of a texture just takes a couple minutes. It really is that easy!
One small note though, some of the baking blend files save the textures with a resolution of 2048x2048 pixels, as clearly stated at the end of their file name. That’s way too overkill, because TS2 only properly supports up to 1024x1024 for most of its textures and you should always resize your final product to that max resolution. I just made those 2048 versions because there might be some really tiny and slim details on some tattoos that may look a little too blurry when baked into a 1024 resolution, so for those cases use that if you want and then resize them in Photoshop. In the Resample mode of the Image Size menu, there are a few options to choose. For the fine details, I like the Nearest Neighbor (hard edges) option, which, even if it looks a bit pixelated, it still preserves most of the texture and quality.

For anything else, I would just directly bake them using the 1024 versions in Blender.
And for the folks who feel comfortable playing around in Blender, this is just the beginning! Texture baking opens a LOT of possibilities, so feel free to move stuff around and edit the models to your liking! If you notice the baked textures look warped or stretched somewhere, or don’t like where some textures are placed in the S2 body, poke around that area moving stuff and then give it another try. The main objective of the baking process is keeping both overlapping models as close in shape as possible. You may also edit and save new copies of the templates, or make new ones from scratch using mine as a reference (keep a close look on those Baking settings and values, I think they work pretty well) and share them if you want to. Go ham, do whatever you want with them! I have plans on making templates to convert body textures from Sims 3 to Sims 2, but for now it’s not on my priorities, so we’ll see when that happens.
Whew! Hope none of this was too confusing. Need help or have any issues with these? Please ask/message me and I’ll be glad to help when I’m able to!
Credits for the CC used in the render demonstration:
-Skin by Sims3Melancholic
-Eyes by Northern Siberia Winds
-Eyebrows by PeachyFaerie
-Tattoos by xtc
-Top by SerenityCC
And the Tattoo I used for the tutorial can be found here, by ValhallanSim
Last but not least, a huge, special thanks to @elvisgrace for all her help testing this for me. I’ve never shared Blender files, so hopefully everything works as intended and everyone can use them with no weird issues. Fingers crossed! And thank you for reading! Hope you have fun playing with this new toy hehe.
#ts2 tutorial#ts2 resources#ts2 blender#ts2 overlays#ts2 texture baking#4t2 conversion tutorial#i swear blender is the coolest thing ever#yes you can consider this post as blender propaganda
304 notes
·
View notes
Last Seen Blogs

trendyandworthynewsbybob
Trendy & Worthy News
loverofsexwomen
WE ARE WATCHING YOU

imgns
super sex and funny person
riet-co
R.I.E.T .co

btyciqohxytud
Untitled