#shitty astrophotography
Text


tried taking pictures of the eclipse through my telescope (using a lens made for this — it was safe).
#eclipse#astrophotography#i REALLY need to start remembering to charge the digital lens for the scope so i don't have to take shitty phone pictures like this#they Never turn out very well#solar eclipse#upl#id in alt text
36 notes
·
View notes
Text

I have been looking for Lyra for months now. Ever since I went to see Hadestown. But now, I finally was blessed with clear skies and I got to see it! The four 3:00-4:00 AM stargazing trips were totally worth it!

#lyra#lyra constellation#constellations#astrophotography#astronomy#stars#orpheus and eurydice#hadestown play#hadestown#stargazing#astro community#space#my shitty pics
5 notes
·
View notes
Text
4 notes
·
View notes
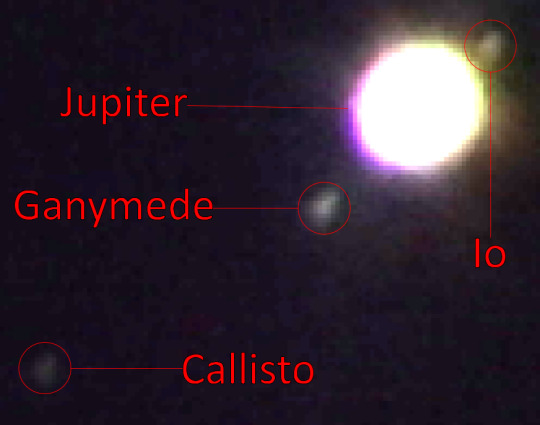
Text
Would my shitty Astrophotography go here too?
Maybe

Taken on a Google Pixel Pro 7 with a Orion StarBlast II 4.5 Equatorial Reflector Telescope || 25mm eyepiece
Pointed South toward Orion +50 degrees before cloud cover settled in.
Not on a computer guided scope so my exposure is about 6 seconds.
I do accept critiquing! I've been trying to get this damn set up to work for a while.
67 notes
·
View notes
Text
More ideas for this one shot that I’m throwing around in the process of attempting to write:
(looking for context? all of my headcanons & updates for this fic are tagged under #in the dirt !)
House coping with his grief and leg pain by obsessively rotating between every hobby known to man (cooking again, home renovation, woodworking, raising chickens, astrophotography, canning his own jams and preserves, pastry making, et cetera). When Thirteen first comes, the house is in shambles more often than not because of this
Thirteen convincing House to show her how to drive his bike before her Huntington’s gets too bad
House teaching Thirteen how to play the piano
House and Thirteen watching a shitty medical drama together in the evenings and making corrections every five seconds
Thirteen dragging House on an impromptu trip somewhere exotic and far-away because she can tell he’s sad (missing Wilson) and needs to get out of the house
(Oh my god that just made me imagine the two of them in Vegas. They’d rob everyone blind w their poker skills)
Thirteen definitely broke up with Amy to save them both from the pain of her Huntington’s before House finds her alone. House makes it his personal mission to get them back together by whatever means necessary as soon as he realizes this. Shenanigans ensue.
#writing update#headcanons#in the dirt#these headcanons make it seem like it might be sort of cracky but just to warn y’all the main one shot will be hurt-comfort with#a melancholy/bittersweet ending#but i would definitely write more scenes/oneshots that are more fun as moments that don’t end up in the main fic#remy thirteen hadley#greg house
21 notes
·
View notes
Text
Questions I have been asked about photography
... and some answers I have given which may or may not help you.
I haven't been coding much, instead I've been enjoying nature photography, and sharing it on twitter. It's why I haven't been blogging here as much as I used to.
As a result, I find myself being asked about photography far more than I am about coding, and so much like with coding, I decided to write up my answers into a longer essay.
In some ways, it's a return to form. I didn't start this blog to talk about computers, I started this blog to capture the discussions I was having, to avoid repeating myself. It just so happens I talk a lot more about cameras than computers now.
I know this isn't about programming, but I do hope that some programmers may find this useful.
Anyway:
What's the best way to learn photography?
Practice.
I'm sorry, but it's true. You need to abandon the idea of taking perfect photographs and give in to the numbers game.
Now, there's some photographers who like to spend three hours measuring light before taking a picture, there's other photographers who like to spend three hours processing negatives before making a print, and there's always someone who enjoys using a computer and post-processing the fuck out of a picture. That's fine and good, but it's not the best way to start out.
Yes, these are all useful skills to have, but at the end of the day, good photography often comes down to luck, as much as it comes down to preparation, experience, and equipment. If you get one good shot out of every ten, then you'll get a lot more good shots if you take a couple of thousand pictures.
So grab a camera and just take a bunch of shitty photos. If you don't have fun sucking at it, you'll never invest the time to be good at it.
What's the best camera for a beginner?
The one you're carrying.
Sometimes this means buying a camera you'll want to take with you. A camera you enjoy using is always going to be better than a camera you leave at home, no matter the specs. This is how I and many others have justified a more expensive piece of equipment, but if it makes you happy, and you can afford it, why not?
On the other hand, mobile phones are incredibly good point and shoot cameras, and will continue to get better. I have a lot of fancy digital and film cameras but I still use my phone for those everyday moments.
A phone camera is a great camera, and anyone who tells you it's not "real photography" is one of those people who bought a camera to take photos of, rather than photos with. A collectable over a tool. Dorks.
Will a better camera improve my photos?
Theoretically, yes. In practice, not significantly. I've seen incredible photos from disposable cameras, and marvels from phone cameras. I've also seen some of the most dull pieces of shit out of the most expensive gear.
A good photo has good lighting first and foremost. A good photo has good framing too. A good often photo has some emotion, expression, or action, and sometimes a good photo was taken on a good camera.
There are exceptions. If you want to do astrophotography, you'll want a camera that works in low light. If you do nature photography, you'll want a camera with snappy autofocus. If you do portrait work, you may end up picking the lens you want and then settling on a camera that fits.
Even so, you'll still need to get the hang of lighting, framing, and expression before you need to worry about equipment.
What about video?
Ask a video person.
All I know is that most stills cameras overheat very quickly if you're shooting video, that, and things like managing focus breathing, or autofocus tracking speed become very important very quickly.
In other words: Although you can shoot video on a stills camera, they vary greatly in how good they are at it.
I do have one piece of advice for those of you using a fancy camera as a webcam:
If you're annoyed by your glasses reflecting light in your webcam (or showing everyone on zoom that you've switched tabs), see if you can find a circular polarizing filter. They rotate in place and eventually you'll find the right adjustment to hide reflections.
So... what camera should I buy?
It depends. [Audience sighs]
You buy one that makes you happy, and I can't begin to guess what that might be.
It is worth nothing that price, weight, and size usually factor into that decision, but there are a lot of different cameras out there, and frankly, there is no "magical best camera", film or digital. Some cameras are better at video, some are better at stills. Some cameras are great at low light, some are tiny little marvels, and some are huge gigantic slabs of metal that have broken out in a pox of knobs, dials, and switches.
The other thing worth noting is that with some cameras, you're buying into a system—so you should factor in the cost of alternative lenses into your calculation. Even if the body is cheap, it doesn't really matter if all the lenses you want are out of your price range.
If you're looking for video, or lightweight, micro four thirds can be a good choice. M43 is especially good for nature photography on a budget. If you're wanting vast amounts third party lenses, and great autofocus, Sony might be for you. If you've already got a bunch of Canon or Nikon lenses kicking around, then the choice will already be made for you. On the other hand, if you're wanting a good all-round camera that's not too big, not too expensive, and gets you excellent JPEGs out of the box, Fujifilm might be just right.
It really does depend.
Ok, ok, what about the lens?
Lenses come in two basic types. Zoom and Prime lenses. A zoom lets you, well, um, zoom in and out, and change the framing without having to move around, and a prime, well, you gotta move your feet if you don't like what you're seeing.
Primes are usually better at low light, usually lighter than a zoom, and often are better at autofocus and overall image quality. Some people prefer using prime lenses, and some people prefer the convenience of having one or two lenses to cover a whole range of potential shots. For example, Nature people tend to like zooms, street and portrait people tend to like primes, but there's no hard or fast rules about which lenses you have to use.
Usually the more expensive the lens, the sharper it is, and the better at low light it is, but sometimes you will be just be paying for a brand name. Lenses by the same manufacturer as the camera usually work a lot better than third party ones, but not always. Once again, it depends.
All lenses, zoom or prime, have a focal length (or a range of lengths) which gives you an idea of the angle of view you'll get. Unfortunately, once again, it depends. The actual angle of view you get from a lens depends on how big the sensor is on a camera.
This is why i'll be talking about "35mm equivalent" or "full frame equivalent" focal lengths, so if you're thinking about a micro four thirds camera or APS-C camera (smaller sensor), the numbers might look a little different.
Anyway:
A lens below 20mm is a "super wide" lens, and they're great for night sky, landscape or architecture shots. A 14mm lens makes a tiny cupboard shaped room feel big and breezy, and they can be great for crowd shots at events too.
A 28mm lens is what your phone already has. It's great for selfies. If you're doing video, you probably want something between 20mm and 28mm, or stand quite far back from the camera.
A 28-75mm kit zoom is the sort of lens you get with your camera, use once or twice, and then buy a lens you enjoy using, after working out which focal lengths you tend to shoot at. You won't regret buying one, and they're often very useful for event photography.
A 35mm, 40mm, 50mm (full frame equivalent) lens is a solid investment. Most camera makers have a cheap 50mm and you really won't regret buying one. A so called "normal lens" is good for landscapes, portraits, and casual photography.
A lens between 65mm and 135mm is really good for portraits, but they're often much bulkier and more expensive than shorter lenses. You can get zoom lenses that cover 70-200mm and they're usually quite good for event photography.
Any lens longer than 200mm is for nature photography. You probably want a zoom lens like 100-400mm or 200-600mm if you're serious about taking pictures of birds. The longer the lens, the heavier the lens, and eventually you'll end up lugging around a tripod just to keep the damn thing stable.
It's a minor note, but technically these big lenses are called "long lenses". A telephoto lens is one where the focal length is longer than the actual lens itself. You also can get a variety of special purpose lenses, like fisheyes, soft-focus lenses, or even things like "smooth trans focus" lenses. You probably don't need to worry about any of this, but it is worth mentioning.
Anyway: If you don't know, buy the kit lens (a 28-75mm), and a 'nifty fifty' 50mm. You'll work out the rest as you go along. We'll get to what those f-numbers on lenses mean in a little moment, but if you're impatient, scroll down, I'm not a document cop.
Do I shoot in Auto? JPEG? Raw?
Auto is fine. JPEG is fine. Raw is often overkill, despite all the posturing men online saying otherwise. You have my permission to ignore any and all advice about photography online, including the advice here.
There is one thing worth mentioning though: White Balance.
Digital cameras don't always know warm or cold to make a photograph look. If you've ever tried taking a picture at sunset and wondered why everything turned out blue, then white balance is what's caused it.
The problem with JPEG and Auto is that it doesn't always get things right, and in some cases (weird lighting), it can get things disastrously wrong, and it can be very hard to edit a JPEG to fix these issues. This is why people who do weddings and events regularly shoot in RAW, they have no second chances to take a photograph, and RAW is the only way to ensure you can fix whatever went wrong.
On the other hand, if you're not at a wedding, you can just take another shot, tweak the settings, and try again. You can just cheat and avoid white balance issues by shooting in black and white. If you have a JPEG that's too warm or too cold, changing it to monochrome often leaves you with a better picture.
Still, it's nice to get it right the first time around.
You can set white balance from presets (Sunny, Cloudy...) as well as setting the direct color temperature in Kelvin. You can also use a test card, or a special lens filter to configure the color temperature from a reference, if you really want to get things right.
For the most part, leaving things on AUTO will work most of the time, but it useful to know how to adjust it when things go wrong.
The other big problem with AUTO is when someone is backlit, but we'll get on how to fix that in a moment.
I want to shoot manually.
You probably don't.
Light meters have been around for almost as long as photography, and professional photographers use light metering to ensure the shot comes out perfectly. Your camera is just saving you some time and effort by putting in the settings the light meter recommends.
Then again, sometimes you do want to shoot manually. Sort-of.
First, we'll have to get some understanding of what the settings do. ISO, Shutter Speed, and Aperture control how the camera handles light, and what tradeoffs it makes when there isn't enough light to go around.
ISO is the easiest one. A lower ISO (like 50) gives a darker image, but with less noise. A higher ISO (like 3200) gives a brighter image, but far more noise as a result. If you're using a film camera, you can pretend I said "grain" instead of noise, but it's pretty much the same thing.
This is why all punk rock gig photos look like a grainy mess. There's just not enough light to take a clear picture.
Shutter speed is also pretty easy to understand. If you have a slower shutter speed (like 1/30s), it lets more light into the camera, but you get more motion blur as a result. A faster shutter speed (1/2000) gives a darker, but sharper image. This is why ye-olde cameras needed people to sit still for several minutes, to gather enough light to get a decent photograph.
Aperture is a little more difficult to understand, because the scale is weird and the terminology is confusing. The aperture is the little iris inside the lens that opens up and closes down, to let more or less light inside. It's measured in f-numbers, which go on a scale of root-2 (2, 2.8, 4, 5.6, 11, 16), but a low aperture means a large opening, and a large aperture means a small opening.
Which is why I tend to talk about an "open" or "wider" aperture (a small f-number, and a big opening) and a "closed" aperture (a big f-number, and a small opening), because I get confused when people say "a larger aperture" and I'm never sure if they mean "a larger opening" or "a larger f-number" (and thus a smaller opening).
Anyway.
An open aperture lets more light in, but gives you a smaller depth of field. Only a small section of the image will be in crisp focus, and the background will be blurry. A closed aperture lets less light in, but you get a much wider depth of field, and if you close it down enough, you can get almost everything in focus.
I find this a little counter intuitive because you let in less light to see more of the image, but physics isn't my strong suit.
To recap:
ISO trades light for noise. A higher ISO is a brighter image, but has more noise.
Shutter trades light for motion blur. A slower shutter has a brighter image, but more motion blur.
Aperture trades light for background blur. A wider aperture (low f-number) has a brighter picture, but only some things will be in focus.
Sometimes we use fast or slow instead, but it's a little confusing. A faster ISO lets more light in, and a faster lens lets more light in, but a faster shutter lets less light in. I'm sorry about that.
Any change to one of these must be reflected in the other. You let more light in with the aperture? You need to use a faster shutter or lower ISO to compensate. You use a higher iso? You need a faster shutter or to close up the aperture. It doesn't help that each one is in a different scale. ISO goes 50, 100, 200. Shutters go 1/500, 1/250, 1/125. Aperture goes f/8, f/5.6, f/4, f/2.8.
Your camera knows all of this and can help you. This is why you don't want to shoot manually.
If you want to shoot on automatic, but control the motion blur you can use shutter-priority, and your camera changes the other settings to match. If you want to control the depth of field, you shoot on aperture priority, and once again your camera will pick the right settings. If for some reason you want to control aperture and shutter, but not ISO, you can do that too but it's often a little more involved.
There's also a third mode: Programmed Auto. It's like full auto but when you spin the dial, it lets you pick which shutter and aperture combination you want. Spin it one way and get a thin depth of field, spin it the other and avoid motion blur.
In summary: Auto is great, but Aperture Priority and Shutter Priority are great too.
If you are wanting to learn to shoot manually, it is a lot easier to try using aperture priority first, and seeing how the settings change.
How do I learn to shoot manually?
Ok. Ok.
You know how I said "all the scales are different". Well I lied. Somewhat. They are all different, but they all measure the same thing, the amount of light the camera receives.
When you double the ISO (say 50 to 100), it can see twice as much light as before. When you double the shutter (say 1/125 to 1/250), you half the amount of light that gets into the camera. When you, uh, multiply the aperture by the square root of two (i.e f/2 to f/2.8, or f/2.8 to f/4) you double the amount of light being let in.
Thinking about doubling and halving the light is so common in photography that we have a special term for it. A stop. For example, one might say "Stopping down a lens" to mean going from f/2 to f/2.8. Going up a stop or down a stop is doubling or halving the amount of light.
Which is useful because you can't say "double the aperture" in the same way you can say "double the shutter speed", but you can say "going up a stop" and "down a stop" across any of the settings. So if you stop down the lens by one stop (halving light), you'll need to open up the shutter by a stop to compensate (doubling light). Or change the ISO.
There's often a "Exposure Compensation" dial on cameras, or a setting buried in a menu somewhere. It lets you over or underexpose a shot by a few stops, which comes in handy when you have an extra dark scene, or more commonly, you're taking a photo of someone who is backlit.
Anyway.
How do you learn to shoot manually?
You use a light meter to measure the thing you're going to photograph. You read off the settings it gives you, put them into your camera, and then adjust them together to ensure that the exposure remains the same.
If it sounds a lot like "Shutter Priority", "Aperture Priority", or "Programmed Auto", well, you're not wrong. For the most part, on a digital camera, and many analogue cameras, you can lean on the inbuilt light meter to do the work for you.
Unless you've decided to be a dork and bought yourself a fully analogue camera.
I can't blame you, I'm that dork too. You will want to get a light meter, and you may want to learn about the "Sunny 16 rule." Estimating the level of light in a scene is something you get better at doing from practice, and managing the exposure in a photo is one of those "real photographer skills" boring men on the internet keep banging on about.
It is useful, sure enough. Sometimes Auto doesn't do the right thing and you need to compensate. Sometimes you want to mess around with the settings by hand to see what's right, but taking well exposed boring shots the hard way doesn't make you a better photographer. Hopefully you'll have fun doing it, at least.
You've talked a lot about lighting, but nothing about framing, or expression
Thats because lighting is the most important detail. Framing is often more personal taste. Expression is often more being in the right place in the right time. Equipment is just something you buy to fill the void in life, telling yourself that it won't depreciate in value.
Lighting? Lighting is the most important thing. Understanding white balance will give you the tones you want in an image. Understanding exposure and understanding stops means you can trade one quality for another, and take a little more agency over what the photo looks like.
That said: Although lighting means you can take a photograph, what makes a photograph good is highly subjective. I have some blurry ass shit photos that capture a moment, show an emotion, and I love em to pieces.
Photography is a numbers game. Good photos happen because you're in the right place, and take a whole bunch of photographs. If you're not happy with your photos, you simply aren't taking enough of them.
he best way to take a lot of photos is to have fun. If this means using a cheap ass camera, go for it. If it means using some german fancy pants camera that makes funny noises, sure, burn your disposable income. If it means using the phone in your pocket, that's great too.
It's about having fun, that's the secret of taking a good photo.
That said, I do have some framing advice: If you're taking a photo of something with eyes, try and get on their eye-line to take a photo. In other words, crouch down if you're taking a picture of a duck. It looks way better.
I want to shoot film.
I congratulate you on having a lot of disposable income.
In theory, film photography is cheap. You can pick up a crappy camera for almost the same price of a roll of film, and get it developed for the same price. This is the lie you tell yourself when you get started.
Film is always more expensive in practice. If you shoot more than 1000 shots on a decent digital camera, it'll be cheaper than shooting on film. If you shoot one roll of film every month, after two and a bit years, you'll be spending more per shot than you would have with digital.
Let me be clear. You don't get into film because it's "cheaper", you get into film for one of two reasons.
You're an unbearable hipster, and you'd rather shoot Portra than use a film simulation preset. Nothing I can say will change how you feel, and you probably already know which Leica and/or Hasselblad you want. Go for it. I won't stop you. I hope you enjoy posting phone pics of the view through the waist level viewfinder, or posting videos of you loading expired film into the camera.
The other option is that you're looking for a mechanical stim toy. In which case, congratulations, you are about to make the investment of a lifetime. There are a lot of old cheap cameras out there, and they make some incredible noises.
Now, wait. You might tell me there's a third reason, or even a fourth. You are welcome to indulge in this cognitive dissonance, talking about "grain" you can simulate, talking about constraints you can impose yourself, but truthfully you're getting into film for telling people you're getting into film (the vibes), or you're getting into film because whirr click box make good noise (the stims).
Maybe I am being a bit mean. Sure enough some people get into it because of nostalgia, or they enjoy the process. Darkroom chemistry is fun, and making something happen without a computer is kinda magical after staring at the bad screen all week. Even so, you stick around for the vibes or the stims.
Anyway, if you're getting into film, let me give you some free advice.
You want to use 135/35mm film.
Medium format (120, not 120mm), large format (4x5 and higher), and subminiature formats can be harder to obtain, harder to process, and often more expensive than plain old 35mm film.
Black and white film is also a great place to start if you're unsure of which film to go for. Something like Tri-X, HP5, will cover a wide variety of uses, and is substantially cheaper than color options. Slide films (Velvia, Provia, E100, etc) are much less forgiving than any other type of film. Try them out, sure, but after you're comfortable.
The best film to start with might be XP2 Super. It's black and white, but you can send it to any lab that handles color film (It's chromogenic, and gets processed in C41 chemicals). XP2 can be shot at any iso between 50 and 800, and you can under and overexpose shots by a significant margin and get away with it.
It's great for using in those toy plastic cameras you bought on eBay while drunk.
At home development doesn't need a darkroom.
You need a tank, a changing bag, and some chemicals. Black and white film is very forgiving, unless you develop it in a DF96 monobath, in which case any slight variation of time, temperature, or the phase of the moon can give wildly different results. Really.
Don't be tricked by a monobath. It is not simpler, it is harder to get reproducible results, and it's more expensive than re-using fixer and stop bath in the long run. I've seen more rolls ruined by monobaths than I have by any other method.
Old cameras are janky as fuck, unless you buy from Japan.
The shutter won't always fire at the right speed, and the light meter will probably be broken or not work entirely. That is unless you buy from a Japanese eBay vendor.
It's a bit more expensive, but if you want a camera that's been tested, cleaned, and inspected, Japanese camera vendors are at the top of their game. There are some western stores with similar quality, but they're more few and far between.
An ideal first camera has aperture priority.
This is more of a personal opinion, but I think it's a lot easier to shoot film when you can lean on the camera to handle exposure at first. Built in light metering can take a lot of the spontaneity out of photography, which can be a bit clumsy when you're starting out.
You don't want a camera with a Selenium (battery free) meter. It won't work. You want a cadmium sensor (uses a battery) and you want a camera that takes batteries still in production.
Ideally, you'll want a camera that accepts LR44 batteries. Cameras that take silver cells require a constant voltage, which can lead to fun results when your batteries start to fade. Cameras that require mercury batteries require an expensive adaptor, or just ignoring the light meter and hoping for the best.
Find something made after 1980 and you should be fine.
It's worth remembering that a camera with cheap lenses is going to be more fun.
You can buy into old Nikon, Canon, or Leica gear, but you don't have to. Minolta, Konica, Kodak, Olympus, and a number of Russian companies made as good and in some cases better equipment. If you do decide to buy a SLR with interchangeable lenses, check around for the lenses first.
It may help you pick and choose what you want. I'm hesitant to recommend any cameras directly, as I don't want the hipsters to pick up on it. It's nice that there's still some affordable starter cameras out there.
Hipster cameras are often overrated. Rangefinders especially.
Rangefinder users are often about the vibes, and who can blame them. Nice small chunks of metal that are small enough to carry, and make a pleasing but subtle click as the shutter fires. The prices however are driven by collectable status, rather than practical experience.
Rangefinders suck ass when the light disappears. They're good for normal lenses (35-50mm), but aren't as good for very wide or very long lenses. Some rangefinders require you to focus and compose separately. Some rangefinders require you to cut the film in a specific way to load it. Some rangefinders don't even have a nice winding crank, and the stim just ain't as good.
On the other hand, a lot of SLRs have their bad points. Often the weight, and always the size, but if you're looking for a more general purpose film camera, an SLR is the right choice.
I say this as someone who owns several rangefinders, enjoys them, and even nails a shot at f/0.95 now and then: If you're getting into film, don't get a rangefinder.
Zone focusing is the ultimate point and shoot experience.
Focusing a lens comes in many forms, and it'd be worth explaining the different kinds.
Guessing.
That looks about 3 meters away, so I dial 3m into the lens and pray. Sometimes it works.
Ground glass.
You put a bit of glass in the back of the camera, and move the lens until the image appears in focus, and then swap it out for film. Large format and some medium format cameras handle this.
Twin lens reflex
You put another lens on the camera, and look through it to focus the other lens. Gears are involved. They're kinda quirky and cute, but much much bulkier.
Rangefinder.
There's a little device inside the viewfinder that has an overlapping image. As you adjust the focus on the lens, it adjusts the overlapping images. When you see no overlap, that's what the lens is focusing on. Some people love it, almost religiously.
Single lens reflex
There's one lens, a mirror, and a view finder. The mirror slaps out the way when you hit the shutter. Good times.
Zone focusing / Hyperfocal distances.
This is basically guessing, but by stopping down the lens, you get a wider depth of field. You can assume something is either 0.7m-1.5m away, 1.5-3m away, or 3m or over, and mostly get things right.
There is something liberating at just going "fuck it" and hitting the shutter. If you just want a chill time, find a camera with zone focusing. You select "Portrait", "Group" or "Landscape" and hope for the best. A zone focusing camera is a real fun party camera, one that other people can use without thinking.
Hyperfocal distancing is the posh version of zone focusing. Many lenses come with a little scale above the focus dial that says how wide the depth of field is at a given aperture. It's pretty much the same deal, but you're doing zone focusing by hand rather than a three mode selector.
Rangefinder camera owners regularly use zone focusing in order to capture shots quickly, because as it turns out, even with sufficient german engineering, manual focusing is slow.
Nighttime, indoors, and the tyranny of silver halides.
If you want to shoot at night time, or under artificial light, don't bother trying to shoot film. I mean, you can. You buy expensive film, learn how to push film, and get a lovely punk rock grainy mess. That, or you end up being the dork blinding everyone with a flashgun.
Analogue film just isn't great at low light shots. It's fun, but your bad photos will look terrible, and your good photos won't look great. I still enjoy it though, but I wouldn't recommend it to someone getting started.
Flash especially is hard to get right.
You point the flash directly at someone and you get the least flattering picture of them you'll ever see in your life. It's better to use bounce flash, a diffuser, or a soft box to light someone's face up.
In a pinch, you can use a cigarette paper over the flash as a cheap-ass diffuser. This works really well with phones too.
Anyway, if you really want to get into flash photography, well, you'll probably want a camera that supports TTL metering. That gets expensive, quickly. Old cameras and lenses have very slow flash sync speeds, often as bad as 1/30s, which can lead to a blurry mess if you're shooting handheld.
Flash photography is honestly such a deep subject that it deserves a whole other write up, but I'm not the right person to do that.
Scanning your own negatives is pain and suffering.
Really. It's bad. Awful. You dust and dust and dust and still there's specs on the film. Black and white film can't use automatic dust removal tech, but color film can. Now you have to calibrate your monitor and your scanner to ensure there's accurate colors coming through.
The suffering never ends with scanning. Pay someone else to do it.
Are you saying I should avoid film?
In the end, no-one cares if you shoot film, except for other film nerds. You should just know you're getting into an expensive, time consuming hobby.
I've no regrets.
17 notes
·
View notes
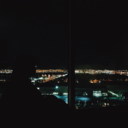
Text
distant cities

distant stars
9 notes
·
View notes
Text
trying to look into how to do astrophotography with a phone camera and so i need some sort of mount thing to hold my camera to the lens (which can be like $50 thru the website i got my telescope from but that makes me want to cry so maybe there are like cheaper third party things?? but also is it worth it to get a 3rd party one that might suck ass. god) AND then in order to actually resolve the detail i’ll need some filters which are actually pretty cheap!!! $30 or less, i was concerned that they’d be way more LMFAO
which mKes me -_- bc why is a simple camera mount more expensive than literal filters ... but maybe i just dont know anything about manufacturing </3
#the camera mount is something i need first#i’m fine taking shitty overexposed pics for now i just want to like#actually be able to GET the thing in view to take pics yknow#then i’ll worry abt actually resolving detail#BUT ITS LIKE. is the $50 investment worth it#i mean i dont even know how to find a 3rd party kinda thing and like#all this stuff is so technical i dont know if like#if it just worth it to go with an official one ??#goddd#its killing me tho bc its literally just a mount for my fucking camera like WHY is it $50#and i dont even know if there are any 3rd party ones but like#i went onto amazon and the only person selling it was selling it for $250!!!! LIKE WHAT!!!!!#THATS ALMOST AS EXPENSIVE AS MY ACTUAL TELESCOPE?????? for a CAMERA MOUNT??#so $50 is wayyyyy better thru the actual official retailer BUT ITS STILL LIKE .... $50 FOR A PHONE MOUNT ...???#i have much thinking to do#brot posts#why is astrophotography so MUCH . i swear to GOD
3 notes
·
View notes
Photo
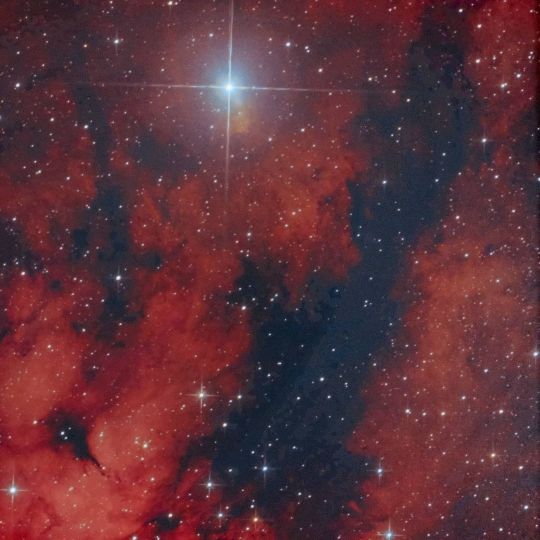
A small section from the Sadr region. I took this a while back but never bothered to edit it because my stars are a little oblong and I only got about 2 hours of data. But with all these clouds around I figured I'd dust off the shitty stuff and have a play around. #astrophotography #sadr #astronomy #universe #space @skywatcheraustralia https://www.instagram.com/p/CWzrL_TJ3y6/?utm_medium=tumblr
0 notes
Photo
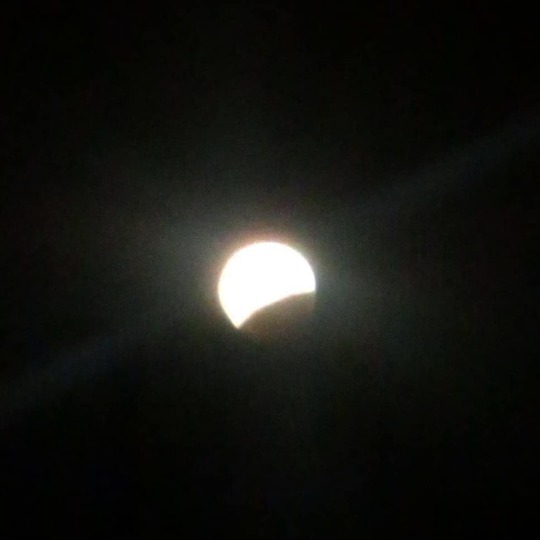
A shitty shot of a spectacular sight.
Super Blood Blue Moon eclipse! 😮
My cameras are all too shitty plus I need to learn how to take proper night time shots and astrophotography but it’s pretty stunning. Hopefully I’ll have a better camera and knowledge the next time this rolls around, however long that is. :P
#superbloodbluemoon #fullmoon #moon #space #astronomy #月亮 #超級月亮 #天空 #天文學(在 Perth, Western Australia)
0 notes
Photo

Steffen Eisenacher in the Dolomites — REPOST: @steffenvisuals from http://ift.tt/1WIhwba chosen by @tracyleephotos --- #milkywaychasers to be featured or post on http://ift.tt/1WIhwba. Tag a friend who might enjoy this Milky Way image and journey! --- From Steffen about this image: --- STACK/ BLEND http://ift.tt/2imlKEw steffeneisenacher.com Hey guys! So here is my first upload from Italy! This was a trip made only to shoot Astrophotography, and I had a blast! I had planned this for two months and the weather had been shitty the whole time, but on those exact two days I was in the alps for, the sky was absolutely clear and humidity was on the lowest for months. Talk about luck.. I didn't go to sleep that night and shot right through to sunset. What I didn't plan was that I would be at 2400m (7900ft) and that the temperature would drop to a cold -1 degrees (30F) . All I had was a shirt, some shorts and a pullover. But I quickly forgot how damn cold it was when I was looking at this beautiful nightsky! EXIF: • Sky: 12 Frames stacked at 25 sec f2.8 ISO6000 • Foreground : 1 Frame at 5mins f8 ISO 640 -> stacked in Starry Landscape Stacker and blended in Photoshop! Hope you like it and have a nice day y'all ! --- http://ift.tt/2sRYIuA
0 notes
Text
i do not care about instagram as a social media website i just post pretty pictures there for my own sake but i follow a few astrophotographers and one of them followed me back a while ago and anyway i posted my first moon telescope pic months ago back before i even got a filter so it was totally utterly shitty and he COMMENTED and was like "oh i remember my first photos like these haha" and like SCREAMS so now if i post my gradual learning curve with astrophotography im like SWEATING that this guy with super super good photos is gonna be like. staring at mine and judging them... he was super encouraging in the first one but like STILL lol...
#he did not comment on my 2nd one which had vast improvement but . welp#he posts such like high res photos of like actual nebulae like bro . omg#like idk i do not care about ~mutuals~ on instagram im just here to post pics and LEAVE#so its like. i dont want to be like Conscious of this guy but also like#knowing an actual professional astrophotographer follows me definitely freaks me out with my#very very amateur photography LOLL#brot posts
1 note
·
View note
Photo

A small section from the Sadr region. I took this a while back but never bothered to edit it because my stars are a little oblong and I only got about 2 hours of data. But with all these clouds around I figured I'd dust off the shitty stuff and have a play around. #astrophotography #sadr #astronomy #universe #space @skywatcheraustralia https://www.instagram.com/p/CWzmQncpXD7/?utm_medium=tumblr
0 notes
Last Seen Blogs

shyphantomdonut
Shyphantomdonut

mirinconsad
Necesito un vodka, un tequila y un te quiero...

taylorstreasuretrove
Taylor’s Treasure Trove

darkficsyouneveraskedfor
the thickness
rythmedelanuit
Rhythm Of The Night