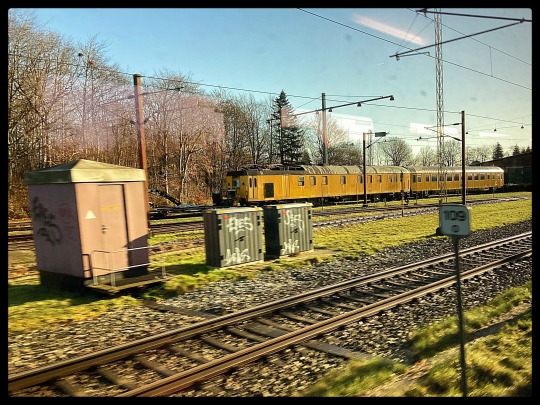
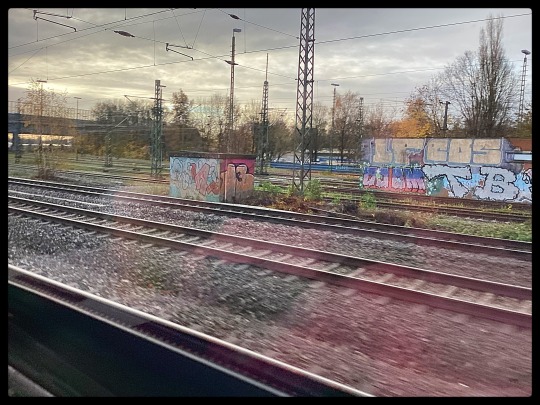
#ringsting
Photo

The face you pull when you get the One Ring sting from a good curry with Po-tay-toes. #avinaloffayi #whysoserious #ringsting #facepulls #positivevibes #positivewaves #metalhobbit (at Birmingham, United Kingdom) https://www.instagram.com/p/CloR_RBo8eo/?igshid=NGJjMDIxMWI=
0 notes

Text
WANNABE - The Spice Girls Show - Ringsted, Denmark | 7 Mar, 2024.
Find out more / Get Tickets now.
0 notes
Text

From Hamburg to Kolding to Odense to Ringsted
1 note
·
View note
Text
Eugen Onegin - Oper Zürich 16.02.2023
EUGEN ONEGIN - OPER ZÜRICH 16.02.2023 #tschaikovsky #barriekosky #gianandreanoseda #russland #puschkin #rezension #oper #operalover #operzürich
Die sehr schöne Zürcher Produktion von Tschaikowskys “Eugen Onegin” in der Regie von BARRIE KOSKY ist wieder im Spielplan, noch dazu mit BENJAMIN BERNHEIM als Lenski, nichts wie hin!
(more…) “”

View On WordPress
#Alexander Puschkin#Amin Ahangaran#Barrie Kosky#Benjamin Bernheim#Ekaterina Sannikova#Eugen Onegin#Gianandrea Noseda#Igor Golovatenko#Iréne Friedli#Kritik#Liliana Nikiteanu#Musicwasmyfirstloveanditwillbemylast#Nathan Haller#Oper#Oper Zürich#opera#operalover#Pjotr I. Tschaikowsky#Rachael Wilson#Rebecca Ringst#Rezension#Russland#Vitalij Kowaljow
1 note
·
View note
Text
Hurtig el-cykel krævede kørekort
Hurtig el-cykel krævede kørekort
Torsdag Kl. 08.57 bemærkede en patrulje, at en mand uden styrthjelm kørte på en hurtigkørende el-cykel ad Jernbanevej i Ringsted i østlig retning. Under kørslen fortsatte manden frem mod rødt lys i et lyskryds lige ved patruljebilen, så føreren af el-cyklen blev standset. Føreren blev identificeret som en 18-årig mand fra Ringsted, som blev sigtet for de to overtrædelser af…
View On WordPress
0 notes
Text
„Sehnsucht ist, wenn dein Körper von Innen verbrennt und du nach Luft ringst. Wenn du draußen auf der Bank sitzt und der Wind an dir vorbeizieht. Wenn die Zeit rennt, aber deine Welt still steht - und dir jede Sekunde schwer fällt.“
-Monsterohnenamen
#monsterohnenamen#gedanken#vergissmeinnicht#depressiv#liebeskummer#herzschmerz#eigenes#einsam#txt#txt post#deutsches tumblr#sehnsucht#vermissen#ich vermisse deine nähe#ich vermisse dich
193 notes
·
View notes
Text


Communal Crematorium, Ringsted, Denmark - Henning Larsen
#Henning Larsen#architecture#design#building#modern architecture#interiors#concrete#minimal#brick#brick architecture#crematorium#civic#beautiful buildings#cool architecture#scandi#scandinaviendesign#denmark#danish design#chimney#landscape
148 notes
·
View notes
Text
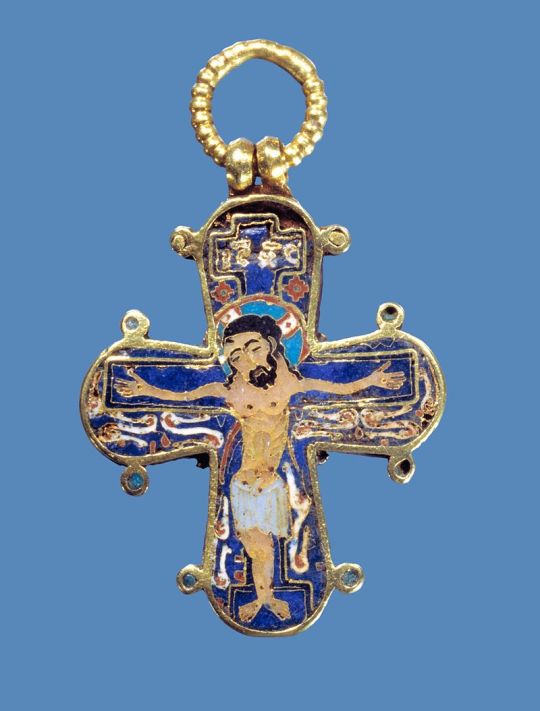
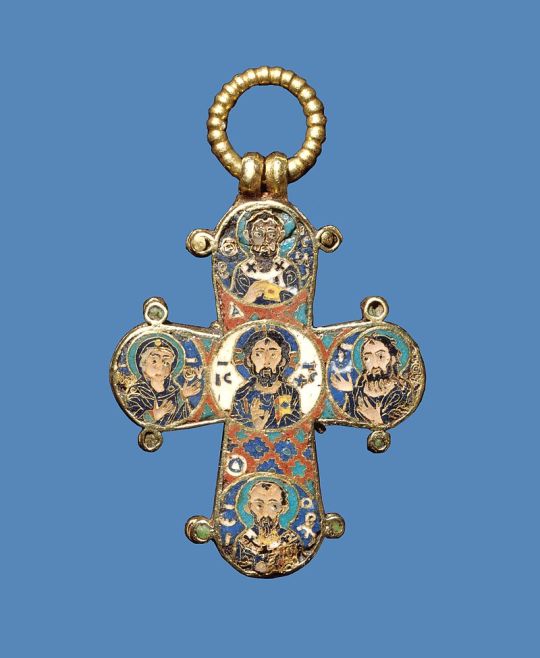
The Cross of Dagmar, a gold and enamel reliquary cross crafted in the Byzantine Empire that dates to 12th century AD. Was discovered St. Bendt's Church in Ringsted, Denmark in 1683 when two royal tombs were excavated.
Currently housed at the National Museum of Denmark
286 notes
·
View notes
Text

Tiny Bronze Portrait of Alexander the Great Found in Denmark
The miniature bronze portrait depicts Alexander the Great with his wavy hair and crown of ram horns.
Metal detectorists have unearthed a miniature bronze portrait of Alexander the Great on an island in Denmark.
Finn Ibsen and Lars Danielsen made the discovery while conducting survey work in a field outside Ringsted, a city on the Danish island of Zealand, and surrendered the artifacts to Museum West Zealand, Danish news outlet TV2 Øst reported.
The bronze fitting, known as a bracket, measures approximately 1 inch (2.7 centimeters) in diameter, is cast of bronze alloy and includes an engraved portrait of a wavy-haired man wearing a crown of twisted ram horns, according to a statement from Museum West Zealand.
Based on the imagery, archaeologists immediately knew they were looking at the face of Alexander the Great, the legendary leader of the ancient kingdom of Macedon whose empire stretched from the Balkans to modern-day Pakistan by the time he died at age 32.
The piece "has the typical attributes of Alexander the Great, such as his distinct, wavy hair and ram horns," Freerk Oldenburger, an archaeologist at Museum West Zealand. "The image is almost identical to another bracket portrait found years ago that contains the same stylized image."

That piece, also a metal bracket, was found by a different group of archaeologists in Jutland, Denmark. It was hidden among a stockpile of weapons and likely served as an "ornament worn on a silver shield mount — it was a way to show off," Oldenburger said.
"It's quite a remarkable piece," Oldenburger said. "When it showed up on my desk, I nearly fell out of my chair because it's almost the exact same portrait as the other, but this one is a little more coarse and is made of cast bronze and not gilded silver. The bronze alloy also contains a high lead content and was made using an alloy often found in [Roman] bronze statuettes. It's possible that a statuette was melted down to make this portrait."
While researchers remain unsure of the piece's function, they know that the fitting dates to around A.D. 200 and could have been worn as a "decorative disc for a shield" or as a bracket affixed to a sword belt, according to the statement.

A portrait of Caracalla, a Roman emperor who often emulated Alexander the Great. He is depicted with a shield containing a portrait of Alexander the Great.
"This was around the same time as Caracalla," a Roman emperor who reigned from A.D. 198 to 217, Oldenburger said. "We know that he was completely obsessed with Alexander the Great and was interested and inspired by him, since he was the greatest conqueror of that time period," he added.
In fact, Caracalla was so enamored of the Greek ruler that he often "dressed with the same style and believed he was Alexander the Great reincarnated," he said. "Caracalla is also the only emperor of his time to be depicted with a shield containing a portrait of Alexander the Great."
By Jennifer Nalewicki.

#Tiny Bronze Portrait of Alexander the Great Found in Denmark#Danish island of Zealand#metal detecting#bronze#bronze sculpture#Roman emperor Caracalla#Alexander the Great#ancient artifacts#archeology#archeolgst#history#history news#ancient history#ancient culture#ancient civilizations#roman history#roman empire#roman emperors#ancient art
20 notes
·
View notes
Photo

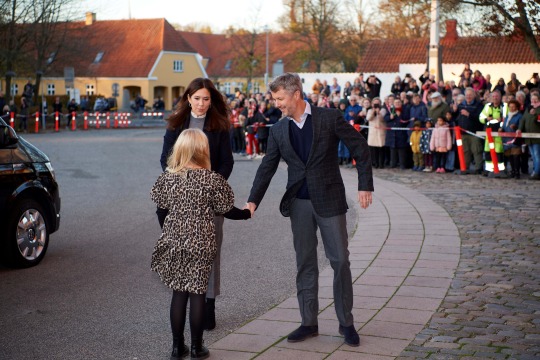
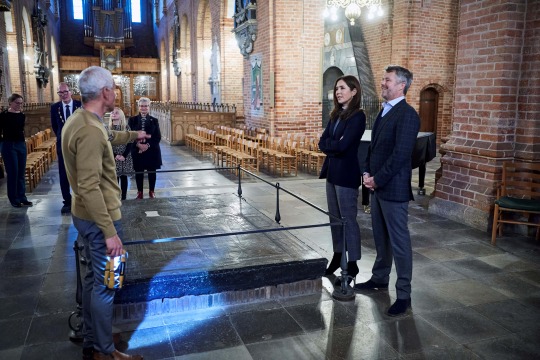
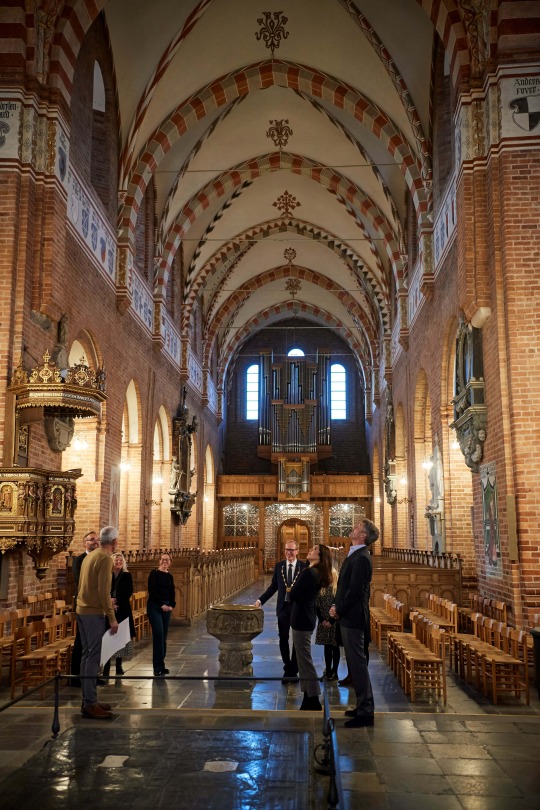


Crown Prince Frederik & Crown Princess Mary paid a visit to St. Bendt's Church in Ringsted ahead of the Crown Prince Couple’s Awards 2022
#crown princess mary#crown prince frederik#danish royal family#royaltyedit#cpc awards#cpc awards 2022#mine
65 notes
·
View notes
Text
Cirkus Arena 2024 m. Bubber og Malene - Ringsted, Denmark | 4 Jul, 2024.
Find out more / Get your Tickets Now.
0 notes
Text
From Hamburg to Kolding to Odense to Ringsted
1 note
·
View note

Text
redrabbitcrochet's Buneary pattern: Post 1
Disclaimer: Pokémon and its characters belong to Game Freak and Nintendo.
Remember to give credit as well.
I will post my pattern in four different posts, and each will contain the following:
Post 1: Materials, Tools, Abbreviations and the ears and puffs for the ears (Parts 1-4)
Post 2: Head, body and Tail (Parts 5-7)
Post 3: Feet and Arms, Sole Spots (Parts 8-10)
Post 4: Assembly: Joining the parts together and embroidering the facial features.
Materials: -8 ply acrylic (100g each) yarn in the following colours: -pale yellow (Pink if making the shiny version) -Brown
light pink (grey if making the shiny version)
Black (for embroidering the eyes)
white (for eyes)
-Fiberfill/Polyester toy stuffing (you can also use yarn scraps for a firmer feel)
Tools: -I used a 1.60mm hook for this pattern, but this pattern is made so that you can use any hook you like (though I recommend 2.00mm to 2.50mm, to tighten those stitches)
-Sewing needles to sew up and for embroidering facial features.
Abbreviations: The instructions for this pattern are written in US abbreviations:
-SC (Single crochet) -HDC (Half Double Crochet) -DC (Double Crochet) -TR (Treble Crochet)
The following abbreviations are also used for this pattern Ch - ChainMR - Magic RingSt/sts - Stitch/StitchesDec - Decrease (For this method, we are using the invisible decrease method or a simple plain decrease method if you are having trouble)Inc - IncreaseFLO - Front loops onlyBLO - Back loops onlysl st - Slip Stitch
Special Stitches: Puff - Puff Stitch (this is completed by making 5 incomplete dc stitches: yarn over and insert into stitch, then pull through two stitches but don’t complete the stitch. You will need to repeat this * * four more times, then pull through all loops on your hook. 3in1- three single crochets in a single stitch.
Part 1: The Puff (or Hair for the Ears) x 2:
In your pale yellow yarn (pink for shiny), start with a magic ring;
6 sc in a magic ring (6)
In each of the 6 sts, you’ll need to crochet 1 puff stitch and then 1 sc in the same stitch (12)
Then inc in each stitch (24)
(sc, puff) x12 times (24) (You should have 12 sc + 12 puffs in total)
(Sc, inc) in each st (36)
(Sc, puff) x 18 times (36) (You should have 18 sc + 18 puffs in total)
sc all around for 1 round (36)
(Sc, puff) x 18 times for the next round
9-10. Repeat rounds 7-8 one more time.
(Sc, dec) x 12 times (24)
(Sc, puff) x 12 times (24)
Dec for all stitches (12)
Dec for all stitches (6)
Fasten off and weave in the ends. Make two of these for each ear. Leave a long tail for stitching.
Part 2: Ear 1/Right Ear: In your brown yarn;
Ch 24, then sl st to the end chain, creating a ring.
2-15. Sc all around, for a total of 14 rounds.
Dec in both every 3rd and 4th st. (18)
17-20. Sc all around, for a total of 4 rounds.
21 dec for every 2nd and 3rd st (12)
22-23. Sc all around, for a total of 2 rounds.
Fasten Off with a slip stitch. Leave a long tail for stitching.
Part 3: Inner Ear for Ear 1: In your light pink yarn (grey for shiny)
Ch 13,
Then, from the 2nd chain, sc until you reach the bottom, 3 sc in the next stitch (3 In1), and until the last st, then inc. Leave a long tail for stitching.
Inc, sc to the 3n1, then inc in the next 3 stitches. Sc to the last 2 Stitches, then inc in the last 2 stitches.
Part 4: Ear 2/Left Ear: In your brown yarn, make a magic ring;
6 sc in a magic ring (6)
(Inc) in each of the 6 Sts (12)
(Sc, inc) x 6 times (18)
(Sc 2, inc) x 6 times (24)
5.(Sc 3, inc) x 6 times (30)
6.(Sc 4, inc) x 6 times (36)
(Sc 5, inc) x 6 times (42)
(Sc 6, inc) x 6 times (48)
9-14. Sc in each stitch for 6 rounds (48)
Stuff as you go along
(Sc 6, dec) x 6 times (42)
(Sc 5, dec) x 6 times (36)
(Sc 4, dec) x 6 times (30)
(Sc 3, dec) x 6 times (24)
(Sc 2, dec) x 6 times (18)
(Sc, dec) x 6 times (12)
(Dec) x 6 times (6)
Fasten off and weave in the ends using the front loops. Leave a long tail for stitching.
Check my blog for the other parts to this pattern!
Image 1: Puff and Left Ear

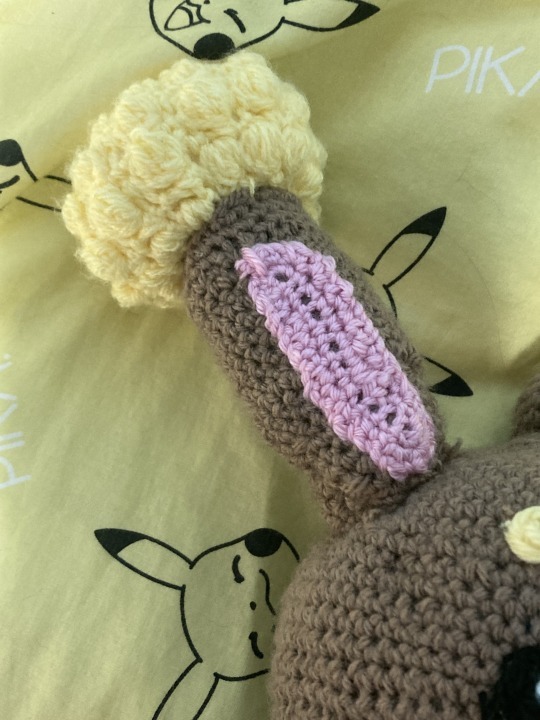
Image 2: puff and Right ear
10 notes
·
View notes
Note
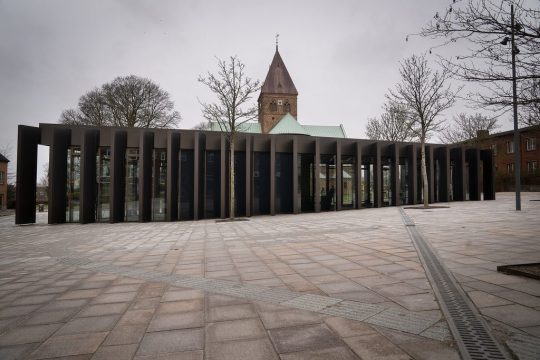
In Dänemark gibt es jetzt anscheinend eine Serie über architektonische Entgleisungen. Einige der Gebäude waren hier schon aufm Blog, aber ich hab noch was Neues! Peak 12 Hotel in Viborg.
Der Charme einer nach der Wende abgehängten ostdeutschen Kleinstadt. Wenigstens scheinen laut den Rezensionen die inneren Werte besser zu sein.

Der Verband Arkitekturoprøret (Zu Deutsch etwa: "Architekturrevolte") kührt jedes Jahr den hässlichsten Neubau Dänemarks. Dieses Gebäude landete dieses Jahr auf dem zweiten Platz, musste sich aber dem neuen Pavillon in Ringsted geschlagen geben.
24 notes
·
View notes
Last Seen Blogs

omgumskelingstuff
Untitled

allthebellsay
'cause i'm working for the knife

stanthreads
🕊 𝐞𝐫𝐢𝐧 🕊

lle-abe
abelle ❀

sketchestosketches
Sketches2Sketches