#permission error in wordpress
Text
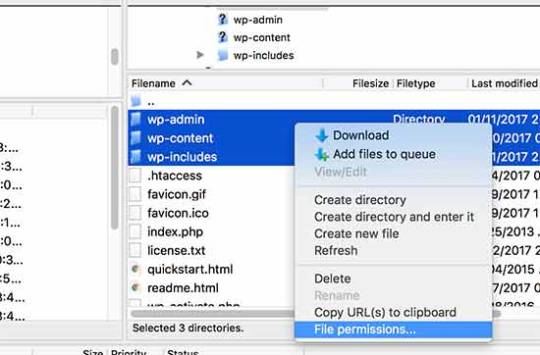
How to Fix File and Folder Permissions Error in WordPress
How to Fix File and Folder Permissions Error in WordPress
File and Folder Permissions Error in WordPress.
Are you worried about how to fix file and folder permission in your WordPress website or blog? Getting errors while uploading images, videos or any other file is a common problem in WordPress.
If you have incorrect file and folder permissions on your WordPress site, it can cause errors as soon as you upload files.
There are many reasons behind…
View On WordPress
#file and folder permissions#file and folder permissions error in wordpress#fix file and folder permissions#fix file and folder permissions error#How to Fix File and Folder Permissions Error in WordPress#permission error in wordpress
0 notes
Text
2nd June: Mr. Knightley’s suspicions grow
Read the post and comment on WordPress
Read: Vol. 3, ch. 5 [41]; pp. 224–225 (“When he was again in their company” to “Frank Churchill and Jane”).
Context
Mr. Knightley is again in the company of Jane Fairfax and Frank Churchill; his observations seem to support his suspicions that Frank and Jane like each other.
We know that this occurs soon after the beginning of “June” (vol. 3, ch. 5 [41]; p. 224).
Note that this write-up contains spoilers.
Readings and Interpretations
Coo-Coo for Cowper
As Mr. Knightley once again observes the two in company together, he could not “avoid observations which, unless it were like Cowper and his fire at twilight, ‘Myself creating what I saw,’ brought him yet stronger suspicion of there being something of private liking, of private understanding even, between Frank Churchill and Jane” (pp. 224–5). The allusion is to William Cowper’s 1785 blank verse poem The Task (Book IV, “The Winter Evening,” 25–9):
Me oft has fancy, ludicrous and wild,
Sooth’d with a waking dream of houses, tow’rs,
Trees, churches, and strange visages, express’d
In the red cinders, while with poring eye
I gaz’d, myself creating what I saw.
Mr Knightley uses this “image of Cowper seeing shapes of things in the fire, to express the idea of looking at events in such a way as to make the interpretation of them entirely fanciful. […] This becomes a superb symbol, accentuating the mystery surrounding Jane Fairfax” (White, p. 68). William Deresiewicz argues that, though this is “more obviously [an] allusion[]” to Cowper, it is also an allusion to William Wordsworth’s Lines composed a few miles above Tintern Abbey. This “double allusion sets Wordsworth against Cowper” in terms of their approach to imagination, “precisely as Wordsworth himself does in the passage to which the allusion points”:1
while Knightley is thinking of Cowper, Austen knew that her readers would be thinking of Wordsworth, of the use he makes of Cowper’s famous line in “Tintern Abbey”: “ . . . eye, and ear,—both what they half create,/ And what perceive” (106–107). For what Knightley is doing at that moment, after all, is precisely “half-perceiving, half-creating”—observing signs and imagining, correctly, what lies behind them. This is not quite the kind of imaginative half-creation Wordsworth has in mind, but it does offer the same contrast to Cowper’s (and Emma’s) creation-from-whole-cloth—a responsible use of the imagination, grounded in careful observation, to discover hidden truths. And this is exactly the use of the imagination Austen demands of her readers throughout the novel, both through the many puzzles and riddles she has us play along with her characters and, more important, through the very structure of the novel itself, a grand mystery story or puzzle-text that continually forces us to read clues and guess at the hidden truths that lie behind them. (p. 9)
Allusions to and quotations of widely read and respected literature were a common and even “obligatory” feature of contemporary writing; Austen, however, tends to ridicule this convention, “surrounding allusions with ripples of irony” (Stabler, pp. 46–7). Here, “Austen, in making her Wordsworthian reference, plays a complex and sophisticated double game” (Deresiewicz, p. 8).
For Alistair Duckworth, the usage of the quote represents Knightley’s appropriately cautious attitude towards his own “well-grounded suspicions”:
By allowing us access to Knightley’s rational consciousness, we [sic] are granted an awareness of the permissible use of the imagination. Careful to avoid the errors of the undisciplined imagination (even as he speculates, Knightley reminds himself of Cowper’s line, “Myself creating what I saw”), he is able to intuit a “something of private liking, of private understanding... between Frank Churchill and Jane” (344). […] Secrecy and concealment, the scene allows us to see, are not invulnerable to the intelligent and responsible mind. (p. 173)
The fact that these observations take place over multiple occasions is worthy of note—Knightley first feels a suspicion based on certain observations, then pays attention on subsequent occasions to see if further observation confirms his suspicion. Michael Suk-Young Chwe writes that Knightley, as one of “Austen’s strategically thoughtful people,” “tr[ies] to be self-critically aware of potential bias”; his calling up of the Cowper quote shows him to be aware of the danger of “confirmation bias” in this instance (p. 157). This passage as a whole is also notable for being a meta-analysis of perception, observation, drawing conclusions, and cognitive bias from the perspective of a character in a novel that is concerned (motivically and on the level of structure) with all of these things.
Footnotes
Scholars largely hold The Task to have influenced Wordsworth’s Tintern Abbey: see for example Jones.
Discussion Questions
What is the utility of calling up a quote with which a contemporary audience would be familiar? Is there any sense in which the usage of this quote is not straightforward?
How is Mr. Knightley characterized in this section?
Bibliography
Austen, Jane. Emma (Norton Critical Edition). 3rd ed. Ed. Stephen M. Parrish. New York: W. W. Norton & Company, [1815] 2000.
Chwe, Michael Suk-Young. Jane Austen, Game Theorist. Princeton: Princeton University Press (2013).
Duckworth, Alistair M. “Emma and the Dangers of Individualism.” In The Improvement of the Estate: A Study of Jane Austen’s Novels. Baltimore, ML: John Hopkins Press, 1971, pp. 145–78.
Jones, Myrddin. “Wordsworth and Cowper: The Eye Made Quiet.” Essays in Criticism 21.3 (April 1971), pp. 236–47. DOI: 10.1093/eic/XXI.3.236.
Stabler, Jane. “Literary Influences.” In Jane Austen in Context, ed. Janet Todd. Cambridge: Cambridge University Press (2005), pp. 41–50.
White, Gabrielle D.V. “Emma: Autonomy and Abolition.” In Jane Austen in the Context of Abolition: ‘A Fling at the Slave Trade’. Houndmills: Palgrave Macmillan (2006), pp. 52–72. DOI: 10.1057/9780230506138_3.
11 notes
·
View notes
Text
EA App unknown error when downloading DLC to an external drive
Hopefully this will be be fixed relatively quickly:
If you receive this error message when trying to download Packs and Kits to an external drive it is because EA App does not have the necessary permission to access the drive. You can easily fix this:
Open System Settings > Privacy & Security > Full Disk Access
click the toggle next to EA app to enable Full Disk Access. If you have EA App open…

View On WordPress
1 note
·
View note
Text
From Confusion to Clarity: Resolving Java Error Code 1603 Step-by-Step
Understanding Java Error Code 1603:
Java Error Code 1603 typically occurs during the installation or update of Java Runtime Environment (JRE) on Windows systems. It indicates that the installation process has encountered an unexpected error and has failed to complete successfully. The exact cause of this error can vary, ranging from issues with system permissions to conflicts with existing…

View On WordPress
#App Development#Application Development#E-commerce Software Development#Java Error Code 1603#Software Development
0 notes
Text
The Future of PHP and Securing PHP-Built Applications
PHP, a server-side scripting language that has been the backbone of web development for over two decades, continues to evolve. Despite facing stiff competition from newer programming languages, PHP's role in the development of dynamic websites and applications remains significant.
This blog post explores the future of PHP and offers insights into securing PHP-built applications, ensuring they are robust against modern cybersecurity threats.
The Future of PHP: Adaptation and Evolution
PHP 8 and Beyond
The release of PHP 8 marked a significant milestone in the language's evolution, introducing features such as JIT (Just In Time) compilation, attributes, and union types, which have substantially improved performance and developer experience. The continuous development efforts by the PHP community signal a bright future, with PHP 8.x versions focusing on optimizing performance, enhancing security features, and introducing type systems that are more strict to reduce coding errors.
Frameworks and CMS Dominance
Frameworks such as Laravel, Symfony, and CodeIgniter, and content management systems (CMS) like WordPress, Drupal, and Joomla, play a crucial role in PHP's ongoing relevance. These tools have significantly abstracted the complexity of web development, enabling developers to create sophisticated applications more efficiently. The future will likely see these frameworks and CMS platforms adopting new PHP features faster, thus providing a more secure and robust ecosystem for developers.
Community and Open Source Contribution
The PHP community remains one of its strongest assets. With a vast ecosystem of developers, contributors, and enthusiasts, PHP benefits from a continuous influx of ideas, plugins, and extensions that enhance its functionality. The open-source nature of PHP fosters innovation and collaboration, ensuring the language adapts to new web technologies and trends.
Securing PHP-Built Applications: Best Practices
In an era where cybersecurity threats are ever-present, securing PHP-built applications is paramount. Here are essential practices to enhance the security of PHP applications:
Regular Updates and Patch Management
Keeping PHP and its libraries up-to-date is the first line of defense against vulnerabilities. Developers should regularly check for and apply updates to PHP itself, along with any frameworks or libraries used in the application.
Use of HTTPS
Encrypting data in transit using HTTPS prevents man-in-the-middle attacks and ensures data integrity and confidentiality. This is especially critical for applications handling sensitive information.
Data Validation and Sanitization
Input validation and sanitization are crucial to protect against SQL injection, cross-site scripting (XSS), and other injection attacks. If businesses hire PHP developers, they should ensure all user input is properly validated against expected patterns and sanitized before processing.
Secure Authentication and Authorization
Implementing strong authentication mechanisms, such as two-factor authentication (2FA), and ensuring proper session management can significantly reduce the risk of unauthorized access. Additionally, applications should enforce strict authorization checks to ensure users can only access resources they are permitted to.
Error Handling and Logging
Proper error handling prevents the exposure of sensitive application internals to attackers, while comprehensive logging aids in the detection and analysis of security incidents.
Regular Security Audits and Penetration Testing
Conducting regular security audits and penetration testing can help identify and mitigate vulnerabilities before they can be exploited by attackers.
Secure Configuration
PHP and server configurations should be optimized for security. This includes disabling unnecessary services, using secure PHP settings (e.g., expose_php = Off, open_basedir restriction), and configuring proper file permissions.
Conclusion
The future of PHP is promising, fueled by continuous improvements and a vibrant community. As PHP evolves, so do the strategies for securing applications built with it. By adhering to security best practices and leveraging the latest PHP features, businesses leveraging php development services can create secure, efficient, and scalable web applications. As we look ahead, the trajectory of PHP suggests it will remain a critical component of the web development ecosystem, adaptable to new challenges and technologies.
0 notes
Text
500 Internal Server Error: Solved! Learn What it Means and How to Fix it

Encountering the pesky 500 Internal Server Error can be quite the headache for any website owner.
If fortune favors you, it might be accompanied by a helpful hint like "Connection Timed Out" or "Kindly verify your internet connection and give it another shot."
Alas, if there's no such clarification, you might be left staring at a blank page, unable to proceed.
As a WordPress aficionado, the infamous "500 Internal Server Error" will eventually cross your path.
This pesky error pops up on your WordPress site when an underlying issue arises.
If your site falls victim to this error, it's a sure sign that your web hosting provider's server configuration has hit a snag.
Stumbled upon a website and been greeted by the dreaded 500 Internal Server Error message?
Keep calm and carry on!😎
This typically implies the server is struggling to handle the request appropriately.
Fear not, for there are ways to mend this issue.
Solutions await you right here.
Eager to unravel this mystery? Alright, let's start by grasping the mistake, deciphering why it's a server issue, and discovering the solution.
What is a 500 Internal Server Error?
Common 500 Internal Server Error Window
To kick things off, it's crucial to understand that the notorious internal server error 500 is, in fact, an HTTP error, and it's just one of the numerous status codes linked to the delightful world of Hypertext Transfer Protocol, AKA HTTP.
Feel free to feast your eyes on the comprehensive list of status codes right here:
10 Status Code Definitions.
Today we will deal with one of the worst status codes: the status code 500 Internal Server Error. This HTTP status tells you that the server hosting the website you are accessing is unable to process such a request. There are many causes for this error, but in general, it is best to investigate the server itself.
What causes a 500 Internal Server Error?
There are many reasons why a 500 Internal Server Error may occur, some of which are:
- No permission to access the website
- You cannot connect to the server hosting the website
- There is a configuration problem with your network
- Excessive PHP timeout
- PHP memory limit exceeded
- Incompatibility with the PHP version
Fixing 500 Internal Server Error WordPress
Fixing 500 Internal Server Errors can be a challenge, even for an IT professional. They occur when the server is busy or can not handle all your requests at once, and they are usually caused by problems configuring the hosting server that runs most websites.
To fix this 500 HTTP protocol server error, we first need to locate it. This requires a troubleshooting strategy. So let us begin.
Troubleshooting 500 Internal Server Error in WordPress.
Learning all About the 500 Internal Server Error
Troubleshooting 500 Internal Server Error in WordPress can be a daunting task, to say the least. The first thing you should do is check that your server is working and operational. If the server is up and running, you should check if your hosting provider has a customer support hotline. The problem is that sometimes the hosting provider's support team takes too long to respond and you need to fix the 500 error now. That's why we created this 500 Internal Server Error Troubleshooting Guide.
In this guide, we will troubleshoot your 500 Internal Server Error in five steps:
- Check if plugins are causing the problem
- We will check the installation of the theme
- Check if the .htaccess file is corrupted
- Ask help to the support of the hosting provider
- Reinstall or reset WordPress
1. Checking WordPress plugins
Checking Plugins on WordPress!
A clever method to uncover the sneaky plugin causing that pesky 500 status error is to give them all a timeout by disabling them. Then, like a detective, activate each one individually to catch the troublemaker in the act. Fixing the issue becomes a breeze! Deactivating those plugins is a piece of cake, and here's the recipe:
3 Steps to disable all WordPress Plugins:
- Log in to your WordPress dashboard.
- Under Appearance, find the "Plugins" section. Hover over the word "Plugins" and click on "Installed Plugins".
- In the plugin dashboard, click on "Bulk Actions", select "Disable" from the list of drop-down options and click on "Apply".
All installed plug-ins should now be deactivated.
Now it is time to find the culprit!
For this, you need some patience because you have to go through one plug-in after the other until you find the plug-in that is causing the 500 Internal Server Error.
The best way to find out which plugin is causing the HTTP 500 Internal Server Error:
- After you have deactivated all plug-ins, keep the normal browser open in which you have deactivated all plug-ins. Then open an incognito browser and open your website or the web page that triggered the Internal Server Error Code 500.
- Go back to the normal browser (not the incognito browser) and activate the first plugin in the list.
- Clear the entire cache, wait 1-2 minutes and press Ctrl+Alt+Sup on the incognito page.
- Check whether the error occurs again. If it does, you have found the culprit. If the error does not reoccur, continue troubleshooting all other plug-ins until you find the one causing the error.
Alright, completed all those steps and the issue is resolved?
Fantastic, you can get back to business!
If not, though, additional testing is in order.
There's another potential situation where you're unable to access your website entirely, thanks to a pesky 500 internal server error.
When this occurs, you'll need to sneak into your cPanel and head over to the "File manage" section.
Look for the folder housing all those plugins and give them a little time-out by disabling them right there.
Here's a handy guide on how to disable all plugins using cPanel.
Steps to disable all WordPress plugins using cPanel:
- Log into your cPanel and click on the file manager folder.
- Navigate to your WordPress installation folder. Example - Public HTML/your-website
- Locate the plugins folder, which you can find here: Public HTML/your-website/wp-content/plugins. There are all plugins you were using in your WordPress website.
- Now rename the plugins folder, to something like "faulty-plugins". To rename the folder - > simply right-click on it - > Rename
At this point, all the plugins in your WordPress have been deactivated.
Give your site a whirl in your browser's incognito mode to check if the issue has vanished.
If it has, it's time to play detective and figure out which plugin was the culprit.
First things first, whip up a new folder and christen it "plugins".
Now, stealthily open your website in an incognito tab.
The smart move is to enable the plugins one by one, checking for the problem's return after each addition.
The beauty of this method is that you won't be bombarded with error messages if a plugin is playing up.
No need to scrutinize which one is causing the chaos - just nix the renamed plugin folder, and bid adieu to that pesky 500 Internal Server Error.
500 Internal Server Error: Conquered!
Still no luck?
Yikes!
Let's soldier on with our troubleshooting quest!
2. Check the WordPress theme installed
Themes are prone to internal server errors that can be fixed with the right know-how.
There are many reasons why your website is not working properly, but some of them point to your installed themes. WordPress is a popular content management system that often has issues with themes. With the right know-how, you can rule out your theme as the culprit for the 500 Internal Server Error by deactivating the theme marked as "active" in your theme's dashboard. These are the steps:
- - Log in to your WordPress dashboard
- - Hover over the "Appearance" left menu item and click on "Themes".
- - Deactivate the active theme and activate a default theme. (WordPress currently comes with three default themes: Twenty Nineteen, Twenty Twenty and Twenty Twenty-One).
After performing this method, you should open an incognito tab again and try to load your website. If it works, you have found the culprit. 500 Internal server error fixed!
But what if you can no longer log into the WordPress backend dashboard because of this 500 Internal Server Error?
Then you need to follow these further steps to manually deactivate the themes via cPanel.
Disabling WordPress Themes Using cPanel:
- Log in to your cPanel and click on "File Manager".
- Double-click on the "public_html" folder and navigate to the "wp-content" folder and click on the "themes" folder.
- You should then see the list of installed themes. It is best to rename your main theme folder to "testing-theme".
After completing the task, give your website a whirl in a stealthy incognito tab to see if it's up and running!
Should it falter, fear not!
We'll advance to the third and delightfully uncomplicated approach to tackle that pesky 500 Internal Server Error.
3. Check if the .htaccess file is corrupted
The pesky internal server error on your WordPress site it's more common than you think and often stems from a troublesome .htaccess file.
You know, the one that might've been tampered with during some site updates or tweaks that went awry.
Fear not!🏆
You can combat the 500 Internal Server Error by repairing, restoring, or even recreating your .htaccess file.
This little gem lets you modify your website's configuration without digging into the server's nitty-gritty files.
But be warned ��- with great power comes great responsibility.
Mishandling this file can wreak havoc on your site, causing the dreaded 500 Internal Server Error and other unpleasantries.
Corrupted Htaccess files can be quite the headache, leading to broken links, internal server errors, and those annoying, unexpected redirects.
So, handle with care!
If your .htaccess file becomes corrupted, it is usually because you have installed a faulty plugin (often nulled plugins) or tried to customise the file by adding commands that are not supported by your web server.
The most common cause is themes that are not coded correctly (or trying to install nulled themes). In any case, you need to fix this 500 Internal Server Error (and stop using nulled plugins and themes). So let us try to fix this server error by correcting your .htaccess file.
The best option you have is to use a backup that you or your hosting provider may have.
If you replace your current .htaccess file with a backed-up file, most websites that experience this 500 Internal Server Error due to a corrupted .htaccess file will be back online and the error fixed!
Where can you find the .htaccess file?
Oh, you do not know how to find your .htaccess file? I do not know that either! XDDD. Just kidding, here are the steps to find the .htaccess file:
Typically, the elusive .htaccess file can be spotted hanging out in the root directory - you know, the same neighborhood where the cool kids like wp-admin, wp-content, and wp-includes reside.
Now, some hosting providers play a sneaky game of hide-and-seek with the htaccess file, since it's quite the VIP for your website's operation. If it's playing hard to get, ensure all hidden files are visible by tinkering with your WordPress hosting account's file manager settings. Wink, wink.
How to find an Open .htaccess File?
- Go to your file manager folder - > you will find the folder public HTML. (root folder)
- If you cannot see the .htaccess file, navigate to the top-right menu, there you will see the word "Settings", click on it and activate the option Show hidden files.
- Now activate the display of all hidden files so that you should now be able to see the .htaccess file.
Here's your chance to either erase the file and whip up a new one or revamp the present one.
Take a look at how to execute these two missions:
Mission one: Obliterate the .htaccess file:
Simply give the file a click and hit delete!
Piece of cake, right?😎
Mission two: Write a new .htaccess file:
Alright, this one's a breeze too, and it's best to do it straight from the cPanel control dashboard.
Follow these steps to generate a spanking new .htaccess file:
Hit the New File button at the pinnacle of the menu.
You've got to label the file .htaccess, yup, with the dot leading the way.
Slap in the code I've provided below, as that's the standard setup your WordPress site requires, then click "Create" to seal the deal.
Which are the .htaccess file default settings?
The default settings of the Htaccess file are:
# BEGIN WordPress
RewriteEngine On
RewriteBase /
RewriteRule ^index.php$ -
RewriteCond %{REQUEST_FILENAME} !-f
RewriteCond %{REQUEST_FILENAME} !-d
RewriteRule . /index.php
# END WordPres
How to use an FTP client to upload the .htaccess file
Additionally, you have the choice to utilize an FTP client.
An FTP Client is a program that handles files on a distant server.
Thus, if you're employing an FTP Client for uploading your website content rather than using WordPress' integrated editor, follow to these instructions:
Head to the Server menu and activate the "Force showing hidden files" feature.
Now, the previously concealed .htaccess file should be visible.
You might be curious: Are these procedures identical across all hosting services? They might differ slightly, but overall, the discrepancies are minimal.
Alright, let's put this to the test! Is the salt sweet? Does your website load flawlessly? Fantastic, you've successfully resolved the 500 Internal Server Error. Cheers!🏆
No? Are you saying the error persists? Well, then it's time to seek assistance!
4. Ask for the support of your hosting provider
If you have come this far and your 500 Internal Server Error still persists after all of the above, it is time to ask the support team at the company providing your hosting service to reset your site to the last working version from which a backup was made.
Some unusual problems can trigger these 500 internal server errors in WordPress, but at this point, it may be best to ask your host. The problem may even be a genuine server issue that they can at least confirm, and they can also investigate things like file permissions errors and other causes.
The problem with this method is that hosting providers sometimes have very poor customer support. To fix the error today, try contacting the provider, preferably via live chat. If there is no such thing as live chat, change hosting providers. 😛😛, Nah, just kidding, send them an email or give them a call.
However, at this stage, these assistance aspects serve as a gauge for your hosting provider's prowess, and if they're subpar, it's high time you migrate to a superior one.
Plenty of choices abound, and I'll gladly share with you 4 of the finest:
- SiteGround
- Hostinger
- WPEngine
- Namecheap
Now for the last method, which I list last because it should be your last option, namely resetting your WordPress installation.
5. Reinstalling your WordPress site
Imagine that none of the earlier solutions have succeeded, and even your hosting provider's support hasn't gotten back to you, but resolving that 500 Internal Server Error is an absolute must today. Drastic times call for drastic measures!
In this article, we'll meticulously attempt to rectify everything, lending you a helping hand. So, let's dive in and do it correctly.
First off, securing a backup of your files is crucial. You've got a few delightful options to consider for this task:
This are the two best options to backup your website
- Download the backup created by your hosting provider.
- Manually create your own backup.
Whatever you decide, these are the steps to create a backup of your website:
How to download a backup from your hosting provider:
- Log in to your cPanel dashboard.
- Look for an icon labelled Tools & Utilities. There you should see an option called Backup Manager.
- Then click on the appropriate icon for the backup file you want to download and save the file to an easy-to-find location on your computer.
Manually create a backup of your website's files.
There are two options here, depending on how serious your 500 Internal Server Error is.
- If you are able to log into your WordPress backend dashboard, you can simply export a backup using the "Export" option you see when you click on the "Tool" option in the left side menu of WordPress.
- If you do not have access to your WordPress dashboard at all, you'll need to go to the cPanel dashboard or use an FTP client. Let us take a look at how to do this properly.
Create a backup of your website via the WordPress dashboard:
https://youtu.be/GFh2Bk5GHAQ
Backup Your website for FREE
Creating a backup of your website thru cPanel and FTP Client
https://www.youtube.com/watch?v=5UH7F_tGyRs
Backing up Your Website using cPanel
Finally, and no less importantly, once you have backed up all your files, you can simply reinstall your WordPress, preferably from your cPanel dashboard. If you need help reinstalling WordPress, here is another nice video:
Uninstalling & Reinstalling WordPress to Troubleshoot.
https://youtu.be/yo9iLnBS5Hw
Reinstalling and installing WordPress
How does the 500 Internal Server Error impact SEO?
By now, you've grasped the concept of an internal server error and the steps to mend it. It's high time we delve into the impact this glitch may have on your website's search engine optimization.
An internal server error could be a major headache, resulting in lost visitors, dwindling revenue, and even a plummeting search engine ranking. For this reason, putting resources into website optimization services is a wise move.
If you dawdle, it could take months to bounce back. So, it's crucial to tackle this issue before your website takes a hit.
A nifty way to pinpoint potential 500 server errors on your site is by carrying out weekly technical audits, catching problems before they snowball into monstrosities.
You definitely don't want your digital venture to bear the brunt of 500 server errors for an extended period.
Feeling overwhelmed? Don't fret! Just shoot us a message in the comments below, and we'll swoop in to save the day.
Fixing the 500 Internal Server Error Final Words.
Thus, we've covered all the highly efficient remedies for an incredibly frustrating issue that often tests our patience each time it occurs. Should you have any inquiries, don't hesitate to reach out to us, and we'll be more than happy to assist!
I've put in my finest effort so that folks of all expertise levels can comprehend.
Fingers crossed, this piece proved valuable to you - do spread the word to your buddies and, of course, your feline friend.
Best of luck!
Read the full article
0 notes
Text
ORA-15260: permission denied on ASM disk group
ORA-15032: not all alterations performed
Error: While operating from the grid user in the EXADATA, We are getting this permission denied error.
[grid@qr01dbadm01 ~]$ sqlplus / as sysdba
SQL*Plus: Release 19.0.0.0.0 - Production on Thu Jan 25 06:43:24 2024
Version 19.9.0.0.0
Copyright (c) 1982, 2019, Oracle. All rights reserved.
Connected to:
Oracle Database 19c Enterprise Edition Release…
View On WordPress
0 notes
Text
#space
How to update a tool if “The installation path is not writable” error is shown? FOLLOWNot yet followed by anyoneEvgeny ShmakovUpdated Monday at 23:23The Toolbox App is unable to update tools installed in directories that the current user lacks write permissions for. In such cases, an “Update” button becomes inactive. There are two ways to resolve this issue and restore the ability to update the…
View On WordPress
0 notes
Text
[solved] Wordpress plugin install: Could not create directory
[solved] Wordpress plugin install: Could not create directory
When installing a WordPress plugin, you may encounter the error message “Could not create directory” which can be frustrating and confusing. This issue usually occurs when WordPress is unable to create a new directory for the plugin due to permission issues or incorrect file path configurations. However, this error can be easily resolved by following a few simple troubleshooting steps. In this…
View On WordPress
0 notes
Text
Optimizing Workflow: Connecting Contact Form 7 to External Databases
In the realm of website development, efficiency and seamless workflow are paramount. As businesses strive to capture and manage user data, the integration of Contact Form 7 with external databases emerges as a powerful solution. In this blog, we delve into the intricacies of optimizing workflow by seamlessly connecting Contact Form 7 to external databases, exploring the benefits, the process, and the impact on overall web development efficiency.

The Power of Contact Form 7
Contact Form 7 is a popular WordPress plugin that simplifies the creation and management of contact forms. Its user-friendly interface, customization options, and seamless integration with WordPress have made it a go-to choice for website owners. However, to truly harness its potential, businesses are increasingly looking to extend its functionality by integrating it with external databases.
Why Connect Contact Form 7 to External Databases?
Centralized Data Management: By connecting Contact Form 7 to external database, user submissions are no longer confined to the WordPress backend. Instead, they are stored in a central database, streamlining data management and providing a unified view of user interactions.
Advanced Data Analysis: External databases often offer advanced querying and reporting capabilities. Connecting Contact Form 7 to such databases allows businesses to analyze user data comprehensively, gaining valuable insights for strategic decision-making.
Enhanced Security: Storing sensitive user data in an external database can enhance security measures. With robust security protocols in place, businesses can ensure the confidentiality and integrity of user information.
Scalability: As businesses grow, so does the volume of user data. External databases are designed to handle large datasets efficiently, ensuring scalability without compromising performance.
Step-by-Step Guide: Connecting Contact Form 7 to External Databases
Step 1: Choose the Right Database
Select a compatible external database for integration. Common choices include MySQL, PostgreSQL, or MongoDB. Ensure that the database supports the necessary data types and features required for your specific needs.
Step 2: Install and Configure Contact Form 7
If you haven't already, install the Contact Form 7 plugin on your WordPress website. Create the forms you need, customizing them according to your requirements.
Step 3: Set Up Database Connection
Utilize the appropriate connection method based on your chosen database. This might involve configuring database connection details, setting up authentication, and ensuring the necessary permissions are granted.
Step 4: Use Hooks and Actions
Contact Form 7 to external database provides hooks and actions that allow developers to extend its functionality. Utilize these hooks to capture form submission data and trigger actions that send the data to the external database.
Step 5: Implement Error Handling and Logging
Develop robust error handling mechanisms to capture any issues that may arise during the data transfer process. Implement logging to keep track of successful submissions and identify potential areas for improvement.
Step 6: Test the Integration
Before deploying the solution on your live website, thoroughly test the integration. Check for data accuracy, submission speed, and ensure that the integration does not adversely impact the user experience.
Benefits of Optimizing Workflow with Contact Form 7 and External Databases
Efficiency: With user data seamlessly transferred to an external database, the workflow is optimized. There's no need to manually export and import data between systems, saving time and reducing the risk of errors.
Automation: The integration allows for automation of various tasks, such as updating customer records, triggering follow-up emails, or populating analytics dashboards in real-time.
Customization: External databases provide greater flexibility in data storage and retrieval. Businesses can tailor their database structure to align with specific reporting requirements or industry regulations.
Improved Analytics: The ability to perform advanced analytics on user data stored in external databases opens doors to deeper insights. Businesses can track user behavior, preferences, and trends with greater precision.
Scalability: As the volume of user interactions grows, external databases can handle the load more efficiently, ensuring a smooth and scalable workflow.
Challenges and Best Practices
Challenges:
Data Synchronization: Ensuring data consistency between the WordPress database and the external database can be a challenge. Implementing robust synchronization processes is crucial.
Security Concerns: Handling sensitive user data requires stringent security measures. Employ encryption, secure connections, and regularly audit access controls to mitigate security risks.
Best Practices:
Regular Backups: Schedule regular backups of your external database to prevent data loss in the event of unforeseen circumstances.
Optimization: Regularly optimize your database by removing unnecessary data and ensuring that queries are efficient to maintain optimal performance.
Conclusion: Elevating Web Development Efficiency
Connecting Contact Form 7 to external databases is not just a technical enhancement; it's a strategic move towards optimizing web development workflows. By streamlining data management, enhancing analytics capabilities, and ensuring scalability, businesses can stay ahead in the competitive online landscape. As technology continues to evolve, this integration serves as a testament to the adaptability and efficiency that businesses can achieve by harnessing the power of Contact Form 7 and external databases. Through careful implementation and adherence to best practices, the journey towards an optimized workflow is within reach for every web developer and business owner aiming to make the most of their online presence.
0 notes
Text
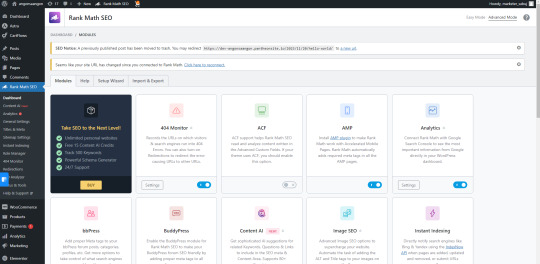
Rank Math SEO is a popular WordPress plugin designed to help website owners optimize their content for search engines. Using an SEO plugin like Rank Math can provide several important benefits for your website:
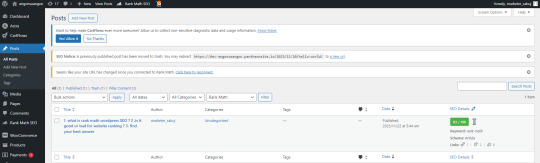
On-Page SEO Optimization: Rank Math assists in optimizing individual pages and posts for search engines. It provides recommendations for improving titles, meta descriptions, headings, and other on-page elements, which can enhance your content's visibility in search engine results.
XML Sitemap Generation: The plugin automatically generates XML sitemaps, making it easier for search engines to crawl and index your website. Sitemaps provide a roadmap of your site's structure and content, helping search engines understand its organization.
Schema Markup Support: Rank Math supports schema markup, allowing you to add structured data to your content. This can result in rich snippets in search engine results, providing more information to users and potentially increasing click-through rates.
Redirection Management: The plugin includes a redirection manager, allowing you to set up and manage 301 redirects. This is important for maintaining a smooth user experience and preserving SEO value when URLs change.
404 Error Monitoring: Rank Math monitors your site for 404 errors, alerting you to broken links. Fixing broken links is crucial for user experience and can prevent negative impacts on SEO.
Integration with Google Search Console: Rank Math can be integrated with Google Search Console, providing valuable insights into how your website is performing in Google search. It allows you to identify issues and track the performance of your content.
Social Media Optimization: The plugin provides options for optimizing your content for social media platforms, such as Open Graph and Twitter Card support. This helps control how your content appears when shared on social media.
Role Manager: Rank Math includes a role manager feature, allowing you to control which users have access to SEO settings. This can be useful for managing permissions and ensuring that only authorized users can make changes.
Local SEO Features: For businesses targeting local audiences, Rank Math offers local SEO features, including settings and integration with Google My Business.
By using Rank Math SEO or similar plugins, you can streamline the process of optimizing your website for search engines, potentially improving its visibility and performance in search engine results pages. Keep in mind that while plugins like Rank Math are valuable tools, they should be used as part of a comprehensive SEO strategy that also includes high-quality content creation, proper site structure, and other best practices.
#digitalmarketing#dropshipping#tech#advertising#marketing#developers & startups#entrepreneur#business#fashion#travel#rankmath#wordpress
0 notes
Text
Financial Statements & Compliance Notices Overview
The purpose of this article is to provide some insight into the various issues that might arise when an insured depository institution or its parent company prepares its FR Y-6 annual report to the Federal Reserve Board.

As a reminder, the illustrative management reports and cover letter (when complying at the holding company level) in Appendix B to Part 363 are meant to assist an institution's or its parent company's management in meeting their annual reporting requirements under SS 363.2 and guideline 3, Compliance by Holding Company Subsidiaries, of Appendix A to Part 363. Institutional management should feel free to tailor the wording of these illustrative forms to suit their particular circumstances when reporting on material weaknesses in internal control over financial reporting or noncompliance with designated laws and regulations.
For example, if an institution concludes that its historical accounting for warrants was incorrect (e.g., classified as equity when terms consistent with an SEC Staff Statement require liability classification), it will need to evaluate whether the error was material to its previously filed financial statements and disclosures, and if so, amend its filings to reflect the corrections. Additionally, the registrant may need to disclose its assessment of the error's materiality in MD&A and in the critical accounting policies section of its Form 10-K.
In addition, a registrant should consider whether the nonattest services that its audit firm performed in connection with the preparation of its regulatory financial statements (e.g., assisting the institution with its internal control over financial reporting assessment and preparing its attestation of those controls) are permissible under the AICPA's and PCAOB's independence rules.
youtube
SITES WE SUPPORT
Direct Mail & Address Autocomplete API – Wordpress
SOCIAL LINKS
Facebook
Twitter
LinkedIn
Instagram
Pinterest
0 notes
Text
What is cPanel and How to Use it - A Complete Guide

What is cPanel?
cPanel is a Linux-based web hosting control panel that provides a graphical user interface (GUI) for managing your website and server. It is one of the most popular control panels in the world, and is used by millions of people to manage their websites
c, short for control panel, is a web-based graphical interface designed to simplify the management and administration of websites and server functions.
It is widely used by website owners, web hosting providers, and system administrators to easily manage various aspects of their websites and servers.
cPanel allows users to perform a variety of tasks, including:
Managing files and folders
Creating and managing email accounts
Installing and managing applications such as WordPress and Drupal
Configuring security settings
Managing DNS settings
Creating and managing backups

Here is a step-by-step guide on how to use cPanel:
Access cPanel:
To use cPanel, you first need to access it. Usually, you can access cPanel by typing "yourdomain.com/cpanel" into your web browser. Alternatively, you can ask your web hosting provider for the login URL and credentials.
2. Enter your credentials:
Once you access the cPanel login page, enter your username and password provided by your hosting provider.
3. Navigate the cPanel interface:
After logging in, you will be redirected to the cPanel control panel. The interface is divided into different sections, including Files, Databases, Domains, Email, Metrics, Security, Software, and Advanced. Each section provides a range of tools and options.
4. Manage files:
In the "Files" section, you can upload, modify, and manage your website's files and folders. You can also use the File Manager tool to perform tasks like creating new directories, uploading files, editing code files, and managing permissions.
5. Configure domains:
Under the "Domains" section, you can manage domain-related settings. You can add new domain names, redirect domains, create subdomains, manage DNS records, and set up domain aliases.
6. Set up email accounts:
In the "Email" section, you can create and manage email accounts associated with your domain. You can add email accounts, set up forwarders, configure autoresponders, manage spam filters, and access webmail.
7. Configure databases:
For managing databases, you can use the "Databases" section. Here, you can create new databases, manage existing ones, set up database users, and use tools like phpMyAdmin for database administration.
8. Install software and scripts:
The "Software" section offers tools to install various applications and scripts. You can use the Softaculous Apps Installer to quickly install popular CMS platforms like WordPress, Joomla, or Drupal. This section also includes options to update software versions, perform backups, and manage SSL certificates.

9. Monitor website metrics:
Under the "Metrics" section, you can monitor your website's performance by accessing statistics like visitors, bandwidth usage, error logs, and resource usage. This helps you analyze your website's traffic and make informed decisions regarding optimization.
10. Configure security settings:
The "Security" section includes tools to enhance the security of your website. You can manage SSL certificates, set up password-protected directories, enable hotlink protection, and manage IP blocklists.
11. Advanced features:
The "Advanced" section provides additional features for experienced users and developers. Here, you can access tools like Cron jobs for scheduling tasks, manage PHP settings, access server logs, or customize error pages.
Some common tasks that you can perform using cPanel:
Create an email account:
Click on the "Email Accounts" icon and then click on the "Create" button. Enter the desired email address and password, and then click on the "Create Account" button.
Install WordPress:
Click on the "Softaculous Apps Installer" icon and then search for "WordPress". Click on the "Install" button and follow the on-screen instructions.
Manage your files:
Click on the "File Manager" icon. You can then browse through your files and folders, and upload, download, or delete files as needed.
Create a database:
Click on the "MySQL Databases" icon and then click on the "Create Database" button. Enter the desired database name and username, and then click on the "Create Database" button.
In summary, cPanel is a comprehensive and user-friendly control panel that provides a range of tools and features to effectively manage your website and server.
Its intuitive interface makes it easy to perform various tasks, from managing files and databases to configuring email accounts and monitoring website performance.
0 notes
Text
Building a Polished, Quality Website with WordPress
WordPress is the world's most popular content management system, powering over 43% of all websites online today. With its open-source core, a robust ecosystem of plugins and themes, and ease of use, WordPress enables anyone to create professional-grade websites on a budget.
Follow these essential tips for crafting a polished, high-quality WordPress site:
Select a Responsive Premium Theme
Premium commercial themes like Astra, GeneratePress, and OceanWP offer an extensive feature set and elegant design that competes with custom builds. While pricier than free themes, the difference in polish, speed, and capability is substantial when working with a cheap web designer.
Customize the Design Stylings
While premium themes look great out of the box, take time to further adapt the design to your brand. Tweak the color palette, fonts, logo size, spacing, layout, header design, and other elements to create a consistent, customized look and feel.
Set Up User Roles and Permissions
Take full advantage of WordPress's robust user management functionality to define specific user roles like author, editor, admin, etc. Configure granular permissions based on needs for a smooth workflow as your team expands. Get help from a cheap web designer.
Extend Functionality via Plugins
One of WordPress's strengths is its library of over 55,000+ free plugins to add features from contact forms to galleries to SEO. Do research to find the top-rated plugins for each required function, rather than paying a developer to custom-build.
Optimize Images for Fast Load Times
Unoptimized images drag down site speed substantially. Use a specialist image optimization plugin to automatically compress and scale images for faster page loads. This significantly improves both UX and SEO when working with a cheap web designer.
Simplify the Navigation Layout
Consolidate the links in your main menu and avoid deep dropdown submenus. Follow best UX practices to make it easy for visitors to navigate. If using many links, consider adding a secondary utility-focused menu.
Create Custom Brand Assets
Invest in creating unique visual brand assets like your logo, color palette, custom fonts, icons, and graphics. While stock imagery has its place, custom assets are crucial for conveying professionalism. Provide these to your cheap web designer.
Choose Complementary Fonts
Finding the right font pairing requires trial and error. Combine both formal and casual fonts for contrast, limit to 2-3 families, and verify readability by previewing real text samples before publishing.
The beauty of WordPress lies in its balance of power and simplicity. With some strategic theme customizations and wise plugin choices guided by a cheap web designer Singapore, any small business can achieve a polished website presence that rivals custom-built alternatives at a fraction of the cost.
0 notes
Text
How to Fix "Roblox Does Not Support Admin Installation" Error
Are you encountering the “Roblox does not support admin installation” error message when trying to launch an experience on Roblox? This guide is for you.
The “Roblox does not support admin installation” error message often appears alongside another message that says, “Please rerun RobloxPlayerInstaller without admin privilege.”
This error occurs due to issues related to permissions or conflicts…

View On WordPress
0 notes
Text
500 Internal Server Error: Solved! Learn What it Means and How to Fix it

Encountering the pesky 500 Internal Server Error can be quite the headache for any website owner.
If fortune favors you, it might be accompanied by a helpful hint like "Connection Timed Out" or "Kindly verify your internet connection and give it another shot."
Alas, if there's no such clarification, you might be left staring at a blank page, unable to proceed.
As a WordPress aficionado, the infamous "500 Internal Server Error" will eventually cross your path.
This pesky error pops up on your WordPress site when an underlying issue arises.
If your site falls victim to this error, it's a sure sign that your web hosting provider's server configuration has hit a snag.
Stumbled upon a website and been greeted by the dreaded 500 Internal Server Error message?
Keep calm and carry on!😎
This typically implies the server is struggling to handle the request appropriately.
Fear not, for there are ways to mend this issue.
Solutions await you right here.
Eager to unravel this mystery? Alright, let's start by grasping the mistake, deciphering why it's a server issue, and discovering the solution.
What is a 500 Internal Server Error?
Common 500 Internal Server Error Window
To kick things off, it's crucial to understand that the notorious internal server error 500 is, in fact, an HTTP error, and it's just one of the numerous status codes linked to the delightful world of Hypertext Transfer Protocol, AKA HTTP.
Feel free to feast your eyes on the comprehensive list of status codes right here:
10 Status Code Definitions.
Today we will deal with one of the worst status codes: the status code 500 Internal Server Error. This HTTP status tells you that the server hosting the website you are accessing is unable to process such a request. There are many causes for this error, but in general, it is best to investigate the server itself.
What causes a 500 Internal Server Error?
There are many reasons why a 500 Internal Server Error may occur, some of which are:
- No permission to access the website
- You cannot connect to the server hosting the website
- There is a configuration problem with your network
- Excessive PHP timeout
- PHP memory limit exceeded
- Incompatibility with the PHP version
Fixing 500 Internal Server Error WordPress
Fixing 500 Internal Server Errors can be a challenge, even for an IT professional. They occur when the server is busy or can not handle all your requests at once, and they are usually caused by problems configuring the hosting server that runs most websites.
To fix this 500 HTTP protocol server error, we first need to locate it. This requires a troubleshooting strategy. So let us begin.
Troubleshooting 500 Internal Server Error in WordPress.
Learning all About the 500 Internal Server Error
Troubleshooting 500 Internal Server Error in WordPress can be a daunting task, to say the least. The first thing you should do is check that your server is working and operational. If the server is up and running, you should check if your hosting provider has a customer support hotline. The problem is that sometimes the hosting provider's support team takes too long to respond and you need to fix the 500 error now. That's why we created this 500 Internal Server Error Troubleshooting Guide.
In this guide, we will troubleshoot your 500 Internal Server Error in five steps:
- Check if plugins are causing the problem
- We will check the installation of the theme
- Check if the .htaccess file is corrupted
- Ask help to the support of the hosting provider
- Reinstall or reset WordPress
1. Checking WordPress plugins
Checking Plugins on WordPress!
A clever method to uncover the sneaky plugin causing that pesky 500 status error is to give them all a timeout by disabling them. Then, like a detective, activate each one individually to catch the troublemaker in the act. Fixing the issue becomes a breeze! Deactivating those plugins is a piece of cake, and here's the recipe:
3 Steps to disable all WordPress Plugins:
- Log in to your WordPress dashboard.
- Under Appearance, find the "Plugins" section. Hover over the word "Plugins" and click on "Installed Plugins".
- In the plugin dashboard, click on "Bulk Actions", select "Disable" from the list of drop-down options and click on "Apply".
All installed plug-ins should now be deactivated.
Now it is time to find the culprit!
For this, you need some patience because you have to go through one plug-in after the other until you find the plug-in that is causing the 500 Internal Server Error.
The best way to find out which plugin is causing the HTTP 500 Internal Server Error:
- After you have deactivated all plug-ins, keep the normal browser open in which you have deactivated all plug-ins. Then open an incognito browser and open your website or the web page that triggered the Internal Server Error Code 500.
- Go back to the normal browser (not the incognito browser) and activate the first plugin in the list.
- Clear the entire cache, wait 1-2 minutes and press Ctrl+Alt+Sup on the incognito page.
- Check whether the error occurs again. If it does, you have found the culprit. If the error does not reoccur, continue troubleshooting all other plug-ins until you find the one causing the error.
Alright, completed all those steps and the issue is resolved?
Fantastic, you can get back to business!
If not, though, additional testing is in order.
There's another potential situation where you're unable to access your website entirely, thanks to a pesky 500 internal server error.
When this occurs, you'll need to sneak into your cPanel and head over to the "File manage" section.
Look for the folder housing all those plugins and give them a little time-out by disabling them right there.
Here's a handy guide on how to disable all plugins using cPanel.
Steps to disable all WordPress plugins using cPanel:
- Log into your cPanel and click on the file manager folder.
- Navigate to your WordPress installation folder. Example - Public HTML/your-website
- Locate the plugins folder, which you can find here: Public HTML/your-website/wp-content/plugins. There are all plugins you were using in your WordPress website.
- Now rename the plugins folder, to something like "faulty-plugins". To rename the folder - > simply right-click on it - > Rename
At this point, all the plugins in your WordPress have been deactivated.
Give your site a whirl in your browser's incognito mode to check if the issue has vanished.
If it has, it's time to play detective and figure out which plugin was the culprit.
First things first, whip up a new folder and christen it "plugins".
Now, stealthily open your website in an incognito tab.
The smart move is to enable the plugins one by one, checking for the problem's return after each addition.
The beauty of this method is that you won't be bombarded with error messages if a plugin is playing up.
No need to scrutinize which one is causing the chaos - just nix the renamed plugin folder, and bid adieu to that pesky 500 Internal Server Error.
500 Internal Server Error: Conquered!
Still no luck?
Yikes!
Let's soldier on with our troubleshooting quest!
2. Check the WordPress theme installed
Themes are prone to internal server errors that can be fixed with the right know-how.
There are many reasons why your website is not working properly, but some of them point to your installed themes. WordPress is a popular content management system that often has issues with themes. With the right know-how, you can rule out your theme as the culprit for the 500 Internal Server Error by deactivating the theme marked as "active" in your theme's dashboard. These are the steps:
- - Log in to your WordPress dashboard
- - Hover over the "Appearance" left menu item and click on "Themes".
- - Deactivate the active theme and activate a default theme. (WordPress currently comes with three default themes: Twenty Nineteen, Twenty Twenty and Twenty Twenty-One).
After performing this method, you should open an incognito tab again and try to load your website. If it works, you have found the culprit. 500 Internal server error fixed!
But what if you can no longer log into the WordPress backend dashboard because of this 500 Internal Server Error?
Then you need to follow these further steps to manually deactivate the themes via cPanel.
Disabling WordPress Themes Using cPanel:
- Log in to your cPanel and click on "File Manager".
- Double-click on the "public_html" folder and navigate to the "wp-content" folder and click on the "themes" folder.
- You should then see the list of installed themes. It is best to rename your main theme folder to "testing-theme".
After completing the task, give your website a whirl in a stealthy incognito tab to see if it's up and running!
Should it falter, fear not!
We'll advance to the third and delightfully uncomplicated approach to tackle that pesky 500 Internal Server Error.
3. Check if the .htaccess file is corrupted
The pesky internal server error on your WordPress site it's more common than you think and often stems from a troublesome .htaccess file.
You know, the one that might've been tampered with during some site updates or tweaks that went awry.
Fear not!🏆
You can combat the 500 Internal Server Error by repairing, restoring, or even recreating your .htaccess file.
This little gem lets you modify your website's configuration without digging into the server's nitty-gritty files.
But be warned 💥- with great power comes great responsibility.
Mishandling this file can wreak havoc on your site, causing the dreaded 500 Internal Server Error and other unpleasantries.
Corrupted Htaccess files can be quite the headache, leading to broken links, internal server errors, and those annoying, unexpected redirects.
So, handle with care!
If your .htaccess file becomes corrupted, it is usually because you have installed a faulty plugin (often nulled plugins) or tried to customise the file by adding commands that are not supported by your web server.
The most common cause is themes that are not coded correctly (or trying to install nulled themes). In any case, you need to fix this 500 Internal Server Error (and stop using nulled plugins and themes). So let us try to fix this server error by correcting your .htaccess file.
The best option you have is to use a backup that you or your hosting provider may have.
If you replace your current .htaccess file with a backed-up file, most websites that experience this 500 Internal Server Error due to a corrupted .htaccess file will be back online and the error fixed!
Where you can find the .htaccess file?
Oh, you do not know how to find your .htaccess file? I do not know that either! XDDD. Just kidding, here are the steps to find the .htaccess file:
Typically, the elusive .htaccess file can be spotted hanging out in the root directory - you know, the same neighborhood where the cool kids like wp-admin, wp-content, and wp-includes reside.
Now, some hosting providers play a sneaky game of hide-and-seek with the htaccess file, since it's quite the VIP for your website's operation. If it's playing hard to get, ensure all hidden files are visible by tinkering with your WordPress hosting account's file manager settings. Wink, wink.
How to find an Open .htaccess File?
- Go to your file manager folder - > you will find the folder public HTML. (root folder)
- If you cannot see the .htaccess file, navigate to the top-right menu, there you will see the word "Settings", click on it and activate the option Show hidden files.
- Now activate the display of all hidden files so that you should now be able to see the .htaccess file.
Here's your chance to either erase the file and whip up a new one or revamp the present one.
Take a look at how to execute these two missions:
Mission one: Obliterate the .htaccess file:
Simply give the file a click and hit delete!
Piece of cake, right?😎
Mission two: Write a new .htaccess file:
Alright, this one's a breeze too, and it's best to do it straight from the cPanel control dashboard.
Follow these steps to generate a spanking new .htaccess file:
Hit the New File button at the pinnacle of the menu.
You've got to label the file .htaccess, yup, with the dot leading the way.
Slap in the code I've provided below, as that's the standard setup your WordPress site requires, then click "Create" to seal the deal.
Which are the .htaccess file default settings?
The default settings of the Htaccess file are:
# BEGIN WordPress
RewriteEngine On
RewriteBase /
RewriteRule ^index.php$ -
RewriteCond %{REQUEST_FILENAME} !-f
RewriteCond %{REQUEST_FILENAME} !-d
RewriteRule . /index.php
# END WordPres
How to use an FTP client to upload the .htaccess file
Additionally, you have the choice to utilize an FTP client.
An FTP Client is a program that handles files on a distant server.
Thus, if you're employing an FTP Client for uploading your website content rather than using WordPress' integrated editor, follow to these instructions:
Head to the Server menu and activate the "Force showing hidden files" feature.
Now, the previously concealed .htaccess file should be visible.
You might be curious: Are these procedures identical across all hosting services? They might differ slightly, but overall, the discrepancies are minimal.
Alright, let's put this to the test! Is the salt sweet? Does your website load flawlessly? Fantastic, you've successfully resolved the 500 Internal Server Error. Cheers!🏆
No? Are you saying the error persists? Well, then it's time to seek assistance!
4. Ask for the support of your hosting provider
If you have come this far and your 500 Internal Server Error still persists after all of the above, it is time to ask the support team at the company providing your hosting service to reset your site to the last working version from which a backup was made.
Some unusual problems can trigger these 500 internal server errors in WordPress, but at this point, it may be best to ask your host. The problem may even be a genuine server issue that they can at least confirm, and they can also investigate things like file permissions errors and other causes.
The problem with this method is that hosting providers sometimes have very poor customer support. To fix the error today, try contacting the provider, preferably via live chat. If there is no such thing as live chat, change hosting providers. 😛😛, Nah, just kidding, send them an email or give them a call.
However, at this stage, these assistance aspects serve as a gauge for your hosting provider's prowess, and if they're subpar, it's high time you migrate to a superior one.
Plenty of choices abound, and I'll gladly share with you 4 of the finest:
- SiteGround
- Hostinger
- WPEngine
- Namecheap
Now for the last method, which I list last because it should be your last option, namely resetting your WordPress installation.
5. Reinstalling your WordPress site
Imagine that none of the earlier solutions have succeeded, and even your hosting provider's support hasn't gotten back to you, but resolving that 500 Internal Server Error is an absolute must today. Drastic times call for drastic measures!
In this article, we'll meticulously attempt to rectify everything, lending you a helping hand. So, let's dive in and do it correctly.
First off, securing a backup of your files is crucial. You've got a few delightful options to consider for this task:
This are the two best options to backup your website
- Download the backup created by your hosting provider.
- Manually create your own backup.
Whatever you decide, these are the steps to create a backup of your website:
How to download a backup from your hosting provider:
- Log in to your cPanel dashboard.
- Look for an icon labelled Tools & Utilities. There you should see an option called Backup Manager.
- Then click on the appropriate icon for the backup file you want to download and save the file to an easy-to-find location on your computer.
Manually create a backup of your website's files.
There are two options here, depending on how serious your 500 Internal Server Error is.
- If you are able to log into your WordPress backend dashboard, you can simply export a backup using the "Export" option you see when you click on the "Tool" option in the left side menu of WordPress.
- If you do not have access to your WordPress dashboard at all, you'll need to go to the cPanel dashboard or use an FTP client. Let us take a look at how to do this properly.
Create a backup of your website via the WordPress dashboard:
https://youtu.be/GFh2Bk5GHAQ
Backup Your website for FREE
Creating a backup of your website thru cPanel and FTP Client
https://www.youtube.com/watch?v=5UH7F_tGyRs
Backing up Your Website using cPanel
Finally, and no less importantly, once you have backed up all your files, you can simply reinstall your WordPress, preferably from your cPanel dashboard. If you need help reinstalling WordPress, here is another nice video:
Uninstalling & Reinstalling WordPress to Troubleshoot.
https://youtu.be/yo9iLnBS5Hw
Reinstalling and installing WordPress
How does the 500 Internal Server Error impact SEO?
By now, you've grasped the concept of an internal server error and the steps to mend it. It's high time we delve into the impact this glitch may have on your website's search engine optimization.
An internal server error could be a major headache, resulting in lost visitors, dwindling revenue, and even a plummeting search engine ranking. For this reason, putting resources into website optimization services is a wise move.
If you dawdle, it could take months to bounce back. So, it's crucial to tackle this issue before your website takes a hit.
A nifty way to pinpoint potential 500 server errors on your site is by carrying out weekly technical audits, catching problems before they snowball into monstrosities.
You definitely don't want your digital venture to bear the brunt of 500 server errors for an extended period.
Feeling overwhelmed? Don't fret! Just shoot us a message in the comments below, and we'll swoop in to save the day.
Fixing the 500 Internal Server Error Final Words.
Thus, we've covered all the highly efficient remedies for an incredibly frustrating issue that often tests our patience each time it occurs. Should you have any inquiries, don't hesitate to reach out to us, and we'll be more than happy to assist!
I've put in my finest effort so that folks of all expertise levels can comprehend.
Fingers crossed, this piece proved valuable to you - do spread the word to your buddies and, of course, your feline friend.
Best of luck!
Read the full article
0 notes
Last Seen Blogs

dwgif
Doctor Who Gifs

crimpyff
"Maybe, I should quit..."

lexyscross
Kirsch Family's Defensive Lawyer.

modify-and-sever
be nonchalant with screws :)