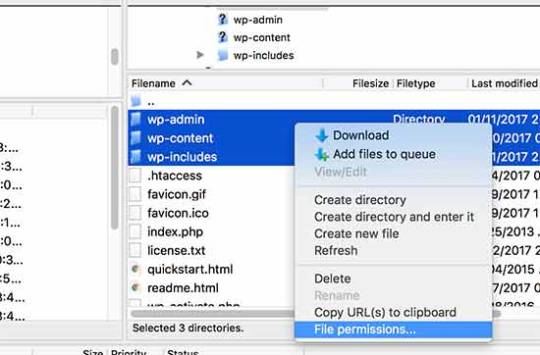
#fix file and folder permissions error
Text
How to Fix File and Folder Permissions Error in WordPress
How to Fix File and Folder Permissions Error in WordPress
File and Folder Permissions Error in WordPress.
Are you worried about how to fix file and folder permission in your WordPress website or blog? Getting errors while uploading images, videos or any other file is a common problem in WordPress.
If you have incorrect file and folder permissions on your WordPress site, it can cause errors as soon as you upload files.
There are many reasons behind…
View On WordPress
#file and folder permissions#file and folder permissions error in wordpress#fix file and folder permissions#fix file and folder permissions error#How to Fix File and Folder Permissions Error in WordPress#permission error in wordpress
0 notes
Note
Hello! Uh, I'm not sure if this is the right place to ask, but I'm having some trouble with Blackout Hospital.
The save files don't work for some reason. You can save in the game perfectly fine, but they don't actually "save" outside of the game, so all the files are lost as soon as you exit. Also, when I pulled up WinRAR with the game open it gave an error saying it couldn't find the "save" folder in the "www" directory, but it was there when I checked.
Do you know why this is happening and how to fix it? I can't tell if it's a glitch in the game or something with WinRAR, maybe it's because I didn't unpack the zip file?
Thank you in advance, love your games! :D
Definitely unpack the zip file!! Have you been playing the game without unzipping it? Unless I'm misinterpreting this that's kinda...baffling to me! I hope that doesn't sound like I'm trying to embarrass or shame you or something, but I thought zip files often came with a warning that features might not work properly if you didn't unzip them?
If I'm just being Booboo the Fool right now and completely misunderstanding that part, then slap a big red nose on my face but also check if you're using Windows 11 (after having unzipped the game of course) . Windows 11 can be kinda persnickety with the way it goes about reading files.
I asked on a forum for some help regarding this issue, and received this response from user ATT_Turan:
"That sounds to me like an issue with permissions. If your players put the game in a directory where they don't have write permissions, the save files wouldn't be created.
Windows 11 does some screwy things with permissions, I've found. The Program Files folder, which is the default for a lot of programs, has write permissions disabled by default and it can be difficult to change (I found it impossible with a moderate amount of effort).
You can ask them to right-click on their saves folder and see if the read-only box is filled in. They can try unchecking it and seeing if the change saves, otherwise they might need to try putting the game in a different directory.
It could also be an issue with an overly aggressive anti-virus/malware software."
Does this sound relevant to you? Are you using Windows 11? Is it possible to take your saves folder off read-only? Are you able to move the game out of your Program Files folder?
Lastly, if none of the above work, I was also informed it could be an issue with a very aggressive antivirus system on your computer.
Let me know if any of these help you!
8 notes
·
View notes
Text
How to create t3x textures for 3DS VNDS LOVE ports
I spent forever trying to figure out how to make t3x textures for a VN port that could be played using vnds love on the 3ds. There was barely any information on it, and the information I did find was either hard or impossible for a beginner to understand, so I decided to make this.
This will probably be part of a larger post on how to port a VN into a VNDS format
You will need:
A PC
An image editor (if your images are larger than 1024x1024 pixels)
Italicized words will indicate that you don’t type those words into the command prompt/terminal word for word, italicized words mean they depend on the situation
1. download and install devkitpro pacman
Find the right installer for your using these instructions. This contains built versions of tex3ds (which can create the t3x files)
2. add tex3ds to path
Once you’re done installing and setting it up, add tex3ds (specifically its location, which should be where-ever-you-put-it\devkitPro\tools\bin\tex3ds) to path. If you don’t know how to do that, just google “how to add to path”
3. decide which method you prefer/check if your images are pngs or jpgs
This is the part where you can convert each one manually or get the .py files that let you convert an entire folder’s worth with a single command. Unfortunately the .py file only convert pngs. If you got a lot of png images you need converted and want that second option, go to step 4.
If you only have one or two images to convert or need to convert a jpg, then type ‘tex3ds location-of-image/image-name.jpg-or-png -o location-of-where-you-want-the-image/image-name.t3x’ into command prompt (Windows)/Terminal (Mac). If simply typing tex3ds doesn’t work for whatever reason you might have to type the specific location of tex3ds.exe for it work
4. download the .py files
Download all three .py files from https://github.com/TurtleP/Convert3x. Since there’s no public releases, you need to click on the “code” dropdown box and download zip file. Unzip the downloaded folder and you should have file.py, log.py, and main.py.
5. open command prompt/terminal and type main.py and the folder you want converted
Type ‘file location of downloaded files\main.py file-location-of-images-you-want-converted’ into the command prompt/terminal. It might take a little while to convert, just give it some time. If it didn’t create a t3x file and says the image width or height is too big, that’s because it needs to fit on a 1024x1024 texture. So you’ll need to scale down the image until it fits that.
When I did this, some images that were the right size said the ‘invalid width’, but still converted them anyway. So be sure to check if there’s a new t3x file.
And remember to go into the script file(s) and change any .jpg or .png to .t3x
Issues I had while trying to figure this out that you might have too:
DON’T TYPE TEXT3DS INTO THE COMMAND PROMPT - I kept doing this on accident. It’s tex3ds. No second ‘T’.
You get “PermissionError: [WinError 5] Access is denied:” while running main.py - I got this issue because I’m on a PC I share with my family and tried to run main.py on the root of the drive. Because main.py tries to go into every file in the directory you specify, it might be trying to get into a file it doesn’t have permission to go in (at least as far as I understand it). Either mess around with the permissions or change the target directory to one that doesn’t have any other folders in it
VNDS LOVE suddenly gives you a “lib/lip.lua:40: attempt to call field 'lines' (a nil value)” error - I don’t know what caused this, but deleting log.txt and config.ini in the novels file fixed it
I hope this helps
3 notes
·
View notes
Text
Welcome to the Felis catus Hypoallergenic Experimental Efficiency unit user manual; FHEE. Also referred to as the Fi-Line Prototype.
As you may know, since building our 2.0 model, HARMONITECH LABS has begun to test the Fi-Line's capacities in the areas of Safety and Protection of property, lending the unit to our faithful sponsors who had requested to oversee its actions.
With the outstanding success of the tests within civilization, we are announcing the beginning of an open beta project, where any user may afford the safety of being within the Fi-line's watch, booking its reliable security-related services.
All funds will be used to further robotics research and even the construction of better prototypes in the future. This annual inky covers the current model 2.5n.
1. REGISTERING AS AN ADMINISTRATOR
Though the Fi-Line is always ready to accept new tasks and jobs, certain information or requests may be locked behind administrative permissions over the model. If you have already purchased a time with us, please refer to the Department of Credentials for the adequate procedure. Remember that each extra credential with special perms needs to be paid for.
If there has been an error, please call the HARMONITECH LABS Help Center and we'll get it fixed as soon as possible.
2. FEATURES
Initially envisioned to be simply an alternative for those wishing to own a pet cat, yet allergic to them, the Fi-Line is capable of everything a real Felis Catus is capable of. It can survey high places, hide in unexpected locations, hoard objects, be loud. Everything a pet cat should be able to do.
On top of the expected features, the retractable wheels attached to the bottom of its limbs, as well as the retracting ability of those limbs themselves may make the Fi-Line unit a hard-to-catch/hit target. Its robotic shell has been constructed anticipating falls and collisions, being strong enough to deter high-caliber bullets without a notable dent or damage to internal components.
Thieves will flee at the Fi-Line's warding capability 𐌀𐌔 𐌉𐌕𐌔 𐌉𐌍𐌕𐌄𐌐ꛈ𖣠𖦪 ꛕ𖣠ꛘꕷ𖢧𖦪ꚶꛕ𖢧ḯ̶̧͎ơ̲̙͖̥͔͚͎̾́ͪ̾̄͋͑̇̎͘͢n̞̮̖̘̯̼͔̪͐̎̀̎͋ͥ̓̀̉ͨͥ̚͢͡͞͝ͅ v̵̶̡̰̱̖̟̬̰̱̬̥̫͔͙͔̘͖͎͓̩̓̏̐̄̇̀̋̃͛̀̓͐ͣ͑̊̈́ͨͭ͘͟͟͜͡͡x̴̡̻̝͔͕̟̲̤̘̪̩̠̤̤̼̻͈̐̌̊͌ͨ̉̓̄͒ͩ̐͊̽̆̍̔̚̕͟͝͞ḡ̷̵̷̶̦̬͖͚̩̲̓̆ͮͦͣͨͨ̈́͌̈́̀̾́͠͝͡͝ḡ_̛͔͊̓ȩ̺͓͇͓ͥͥ̍̾̏̎ͦ̐͐ͨ͠͠g̴̸̵̸̟̭̱̠̬̖̩͔̲ͧ̊̃̈̇ͤͣͭͪͪ̓͑́ͨͪͬ͠͞g̴̷̡̛̮̤̣̤̪̘͇̬̯̟͍̯͉̝̦̈͛̈́̃̌ͥ͛ͪ͑̿̄ͮͧ͗̋ͧ̐̾̄ͮ̿̓̊̕͜d̡̗͚̬͈͎̼̘͙͉̬̦ͨ͌̀ͪͯ͗ͣ̈́̒̈́̚̕͘͟͢͠͝ḩ̵̵̴̢̛̹͉͓͉̥̩̘̼̹̫̰̬̣ͪ͛ͦ͑ͯ̽͗͒͛́ͧͯ͜͜͜d̝̜͎͊ẏ̮͙̱͍̖͎̥̫̘̲̹͉͉͙ͯͭ̌̌̈̌̎ͪ̈́̈́̒ͣͬ̓́ͫ͑͂͛̎̕̚͜͢͝͡ͅḍ̢̹̏_̷̛̻̘͖̣̙̝̬͖̈͊͐̍̈̇̈ͭ̚͢͝_̃h̸̷̷̡̨̟̱͙̣̯͕̰̣̤̠̐́̑͐͛ͨ͆̑̉͐̋ͤ̋ͫ̓̏̑͛̊̌ͯͬ̈́̒̂͜͡s̶̴̨̧̡̛̘͚̲̟͖̞̟̜̣̫̱̽ͦ̅ͫ͗̔ͫ͐̇̑̇̓͆̋̆ͫͭ̔͘͜͟͟͢͡͝͡h̰͎͓̱̮͑̾̔͋̉̎̌͛̐͐͟ heat gģ̨͙̖̱̪̟̼̪̹̞̳͚̟̙̜̰̘̎́̈͗̇̊̍̍̇̀ͥ̆͛̋͊ͭ͌̀͌͒͘̕̕͞͡ene̷̡̢̞͚̻̯̖̝͈̮̤̬̪̠͔̝͉͚̍̌̄̌̑ͨ̏ͤ́̈̒͊ͥ̊͗̇ͫͭ̃̚͞͠͡͡b̷̸̘̜͓̹͖̠̻͇̬͂͐ͮ͠e̖̭̭̞̼̪̳͇͕̱̔ͣͪ͋̽͂̋̇̿͠ͅr̴͉̫̈̕ͅ_̧̛͉̥̦̥̬̆ͣͦͣ͢͝͠_̜̤̇ṣ̵̨̛̺̫ͪ̏ͬ̀̏ͬͮͭ̆ḩ̨̨͚̗̰̬͖̌͋̒ͭ͌̿̅ͣ͌͡͞͠͝ḑ̶̴̵̸͈͈͓̯̻̮̲̥̖̙̞̝̹ͬ̽͊̌̀̾́ͯͤ̍́̄ͪ̑̓̊̓̒̅͘̕̕͠͡h̶̯̘̖͉̳̫̠͇̣͈͔̥͕͓̤̩͋̀̿ͥͩͯ͗̓̅ͤͤ̐͊̋̆͑́͠͝͞d̴̛͕̦͕̼͚̻̘͓͛ͬ̑͑̓̓̓̂̏͘͢ͅͅű̶̶̢̧̨̯̪͙͙͍͚̘̫̦ͥ̇͛ͫͧ̐̇ͭ̾̾͊͛̒͌̕͟ͅh̝_̉h̸͕͚̹̯͒͆ͦͦͯ̌̽̐͊ͪ́ͭ͟͠͠ď̛̥̲̻̝̮̪̙̜̮̺̖̠̩͈͋̈́̈̏͊̌̔ͭ̏͛͂̀̀̇͗̿̄ͯ͢d̢̡͒̀͘͡_̨̨̥̪̮͚̮͖͎̰ͮ̄̍̀͐̏͛͐̆ͭ͒͋͐̓ͭh̸̸̴̵̨̡͔͍̺̠̦̭͕̭͔̼͚̯̰ͫ́͌̀ͨ̓ͪ͆͋ͭ̍̉̊ͬͣͥ̐ͬͨ̉̾͞ͅͅd̡̩̰̳̣̠́͌́̓̑̌̉̾̊̃ͯ̒́͌ͭͫ͂̚͘h̨̧̛̼͈̠̖̞̮ͪͤ͛ͮ̎̚̚͜_̱̫̮̖̙͕̼̩͎͚̖͙̒ͥ̆ͥͫ̆ͪͯ̈͝͡pḑ̷̶̡̹̩̬̤͔͓̺͍̤̼͕̹̺ͮ̀ͧ̀ͯͩ̈́̒̍ͫͧ͒̿̑̅͛̿̈́͢͝͡ͅh̸̝͙̽d̨̧̟̭͍̬̘̳͚̠̤̳͓͔̰̣̔͛̌͆̊̇̽ͤ̓̒̐ͫ̎͗͆͋̕̕͜h̵̸͚̞̭̳͍̗͉͕͇̒̎̂̉̔ͧ̈̚͡͡ͅwḑ̶̡̧̛̞͕̯̙̹͔̝͖̙̣͙̫̳̆̀ͥ̅̐ͨ́̔̌ͪ̔͌͝͝ḩ̴̷̸̢̢̮̳͉̫͎͔̖͈̖̮̪͉͖́ͦ̈́ͥ̀ͭ́́̀͗͒ͨ͒̎̕̚͜͠͠_̗̰ͤͣͭd̸̷̢̛̼͈̹̙̳͕̩̥̍͆̓̑ͯ́̋̒́̆̓̓ͣͣ̐̋̑̓ͣ͂̈̽̊̾͘͝f̵̻̹͎ͥͩͤͪͮ̚͝b̛̼̜̲̞̮͔̙̱͕͖͒̉̾͊͆̇͒́̈͂̋͛͌͛͢͠d̛̜̬̹̪̗̥̼̞̻̣̞̩̮͔ͦ͐̅͐ͩ̅ͫ̌̍ͣ̂ͮ͜͢h̸̴̶̡̡͇̥̩̜̬̲̗̤͕͔̮̥̻́͗ͪ͑͊̂̊́̿͝h̸̡̟̩͚͍̪͔͔͖̟̞͉͍̣͈͖̺̣̦̊͌ͦ͊̽̉̒ͦ͗͆ͦͬͩ͘͘̕͢͜͢͞h̶̵̡͔͕̱̘͉̼̙̬͖̬̦̅̌͊͌̏ͣ̈́͛̿̓ͥ̍͢͟͟͟ͅ██████████████████████████████████████████████████
ERROR!
VIDEO PLAYBACK CANCELLED
VIDEO FILE IS NO LONGER AVAILABLE AT THE GIVEN LOCATION, PLEASE RE-LOCATE FILE TO CONTINUE.
"Oh, oh my-"
████████████████████████████████████████████████████████████████████████████████████████████████████████████████████████████------------------
THE FOLDER HAS BEEN PERMANENTLY DELETED.
"..."

"...I hope none of this was important."
The unit is now active and receiving commands at the terminal.
#Φ ━#INSERT INTRODUCTORY POST;#(Art of my OC by a discord user that I've lost contact with#All that remains is their Spotify account named 'krait'#I just remember they were obsessed with The Riddler from the 2022 Batman movie#If that is you reading this I'd love to reconnect! <3)
0 notes
Text
can't connect to mapped driver through vpn
🔒🌍✨ Get 3 Months FREE VPN - Secure & Private Internet Access Worldwide! Click Here ✨🌍🔒
can't connect to mapped driver through vpn
VPN connectivity issues with mapped drives
Title: Troubleshooting VPN Connectivity Issues with Mapped Drives
In today's interconnected world, Virtual Private Networks (VPNs) play a vital role in securing remote connections for businesses and individuals alike. However, despite their benefits, VPNs can sometimes encounter connectivity issues, particularly when accessing mapped drives.
Mapped drives are network locations that are assigned a drive letter on a user's computer, allowing for easy access to shared folders and files. When VPN users experience problems accessing mapped drives, it can disrupt workflow and productivity. Here are some common issues and troubleshooting steps to resolve them:
VPN Connection Drops: One of the most common issues is the VPN connection dropping unexpectedly. This can occur due to network instability, server issues, or misconfigured VPN settings. To address this, users should ensure they have a stable internet connection, update their VPN client software, and verify their VPN configurations with their IT department.
Authentication Errors: Sometimes, users may encounter authentication errors when trying to access mapped drives over VPN. This can happen if there are discrepancies between the user's credentials and the permissions set on the network drive. Users should double-check their login credentials and ensure they have the necessary permissions to access the mapped drive.
Firewall Restrictions: Firewalls and security settings on the VPN server or client-side may block access to mapped drives. Users should review their firewall settings and configure them to allow traffic for mapped drive access over the VPN connection.
DNS Resolution Issues: If the VPN client is unable to resolve the hostname of the network drive, users may experience connectivity problems. Ensuring proper DNS configuration and resolving any DNS issues can help resolve this issue.
VPN Client Compatibility: Incompatibility between the VPN client and the operating system may also lead to connectivity issues with mapped drives. Updating the VPN client to the latest version or using a different VPN client can sometimes resolve compatibility issues.
By addressing these common issues and following the troubleshooting steps outlined above, users can overcome VPN connectivity issues with mapped drives and ensure seamless access to their network resources from anywhere in the world.
Troubleshooting mapped drive connection over VPN
Troubleshooting Mapped Drive Connection Over VPN
Mapped drives are a convenient way to access network resources, but issues can arise when trying to connect to them over a VPN (Virtual Private Network). Here are some troubleshooting steps to resolve common connectivity problems:
Check VPN Connection: Ensure that your VPN connection is active and stable. Sometimes, a weak or intermittent VPN connection can cause mapped drives to disconnect or become inaccessible.
Verify Network Permissions: Confirm that you have the necessary permissions to access the mapped drive over the VPN. Network administrators may need to adjust permissions or firewall settings to allow VPN traffic to pass through.
Update VPN Software: If you're using VPN client software, make sure it's up to date. Updates may include fixes for connectivity issues or compatibility with newer operating systems.
Restart VPN and File Server: Sometimes, simply restarting the VPN client and the file server can resolve connection problems. This clears any temporary glitches or conflicts that may be affecting the connection.
Check Drive Mapping Configuration: Review the drive mapping configuration to ensure that the correct network path is specified. Typos or incorrect paths can prevent the mapped drive from being accessed over the VPN.
Test Connectivity with Other Resources: Try connecting to other network resources (e.g., shared folders, printers) over the VPN to determine if the issue is specific to the mapped drive or a more general network problem.
Disable Firewall or Antivirus: Temporarily disable any firewall or antivirus software that may be blocking VPN traffic or interfering with network connections. Be sure to re-enable these security measures after troubleshooting.
Consult IT Support: If you're unable to resolve the issue on your own, contact your organization's IT support team for further assistance. They can provide additional troubleshooting steps or make configuration changes as needed.
By following these troubleshooting steps, you can diagnose and resolve connectivity issues with mapped drives over VPN, ensuring seamless access to network resources from anywhere.
Accessing mapped drives via VPN problems
Accessing mapped drives via VPN can sometimes present challenges for users. When trying to connect to mapped drives over a VPN connection, various issues may arise that hinder the seamless access to shared network resources.
One common problem users face is slow connection speeds when trying to access mapped drives through a VPN. This can be due to bandwidth limitations, network congestion, or even the physical distance between the user and the network server. Slow speeds can cause frustration and impede productivity, especially when working on files stored on shared network drives.
Another issue that users may encounter is authentication errors when attempting to access mapped drives via VPN. Incorrect credentials, expired passwords, or misconfigured permissions can prevent users from successfully connecting to the shared drives, leading to access denials and disruptions in workflow.
Furthermore, network configuration issues on either the user's device or the VPN server can also cause difficulties in accessing mapped drives. Incorrect VPN settings, firewall restrictions, or outdated network protocols can all contribute to connectivity problems when trying to reach shared network resources over a VPN connection.
To troubleshoot these problems, users can start by ensuring they have the correct credentials, updating their VPN client software, checking network settings, and contacting their IT support team for assistance. By addressing these common issues methodically, users can improve their experience when accessing mapped drives via VPN and maintain uninterrupted access to essential network resources.
VPN mapped drive connection failure
When working remotely or trying to access files on a network from a different location, using a Virtual Private Network (VPN) is a common practice to establish a secure connection. However, sometimes users may encounter issues with connecting to mapped drives over a VPN, leading to frustration and hampered productivity.
One of the primary reasons for VPN mapped drive connection failure is related to network or firewall settings. In some cases, firewalls can block the necessary network ports needed for the VPN to establish a connection with the mapped drives, resulting in a failure to access the files. Additionally, network congestion or unreliable internet connections can also contribute to connectivity issues when trying to connect to mapped drives over a VPN.
Another potential cause of VPN mapped drive connection failure could be due to misconfigured VPN settings or outdated VPN software. It is crucial to ensure that the VPN client is up to date and properly configured to allow seamless access to mapped drives on the network.
To troubleshoot VPN mapped drive connection issues, users can try restarting the VPN client, checking network settings, ensuring proper authentication credentials are used, and contacting their network administrator for further assistance. Additionally, selecting the option to reconnect network drives upon login or manually remapping the drives while connected to the VPN can also help resolve connectivity issues.
By understanding the common reasons for VPN mapped drive connection failures and following appropriate troubleshooting steps, users can overcome these challenges and establish a secure and reliable connection to access their network files remotely.
Resolving VPN inability to connect to mapped drives
Title: Troubleshooting Guide: Fixing VPN Inability to Connect to Mapped Drives
In today's digital age, Virtual Private Networks (VPNs) play a crucial role in ensuring secure remote access to company networks and resources. However, users sometimes encounter issues where their VPN connection fails to connect to mapped network drives, causing frustration and hindering productivity. Let's explore common reasons for this problem and how to resolve it.
Network Configuration Discrepancies: One of the primary reasons for VPNs failing to connect to mapped drives is inconsistencies in network configurations. Ensure that both the VPN and the network hosting the mapped drives are properly configured to allow seamless communication. Check firewall settings and ensure that necessary ports are open for VPN traffic.
DNS Issues: Domain Name System (DNS) resolution problems can also lead to connectivity issues with mapped drives over VPN. Verify that the DNS settings on both the client and server sides are correctly configured. Consider using fully qualified domain names (FQDNs) for mapping network drives to avoid DNS resolution conflicts.
Authentication and Permissions: Often, authentication or permission issues can prevent VPN users from accessing mapped drives. Ensure that users have the necessary permissions to access the shared folders on the network. Additionally, check VPN authentication settings to ensure they align with network security protocols.
VPN Client Software Updates: Outdated VPN client software may not be compatible with the latest network configurations, leading to connectivity issues. Encourage users to regularly update their VPN client software to the latest version to ensure compatibility and security patches.
Network Latency and Bandwidth: High network latency or insufficient bandwidth can also impact VPN performance, resulting in difficulty connecting to mapped drives. Consider optimizing network infrastructure or upgrading bandwidth capacity to improve VPN connectivity.
By addressing these common issues and following troubleshooting steps, users can resolve VPN connectivity problems with mapped drives, ensuring seamless access to essential network resources from anywhere, anytime. Remember to document solutions and provide user education to minimize future occurrences of similar issues.
0 notes
Text
can not enable shared acces error 87 pure vpn
🔒🌍✨ Get 3 Months FREE VPN - Secure & Private Internet Access Worldwide! Click Here ✨🌍🔒
can not enable shared acces error 87 pure vpn
Shared Access Error 87
Error 87, also known as "Shared Access Error 87," is a common issue that many users encounter while trying to access shared files or folders on Windows systems. This error occurs when there is a problem with the configuration of shared resources or when the user does not have the necessary permissions to access the shared files.
One of the main causes of Shared Access Error 87 is incorrect network settings or misconfiguration of shared folders. This can happen when the network location is not correctly identified or when there is a mismatch in network protocols. To resolve this issue, users can check their network settings and ensure that the shared resources are properly configured.
Another common reason for Shared Access Error 87 is insufficient permissions to access the shared files or folders. Users need to have the appropriate permissions set by the network administrator or the file owner to be able to access shared resources. It is essential to verify the permissions and make sure that the user has the necessary rights to access the shared files.
To fix Shared Access Error 87, users can also try restarting the network devices, such as routers or switches, to reset the network connection. Additionally, disabling and re-enabling the network adapter on the system can help refresh the network settings and resolve the error.
In conclusion, Shared Access Error 87 is a typical issue that can be easily fixed by checking network settings, verifying permissions, and refreshing the network connection. By following these simple steps, users can troubleshoot and resolve this error to regain access to shared files and folders on their Windows systems.
PureVPN Troubleshooting
PureVPN Troubleshooting Guide
If you are facing connectivity issues with PureVPN, fret not, as we have compiled a troubleshooting guide to help resolve common problems you may encounter.
First and foremost, ensure that you have an active internet connection. PureVPN requires a stable internet connection to function properly. If your internet connection is spotty, it may hinder the VPN's performance.
Another common issue users face is related to server selection. If you are unable to connect to a specific server, try switching to a different server location. Sometimes, servers may be temporarily down for maintenance, so choosing an alternate server can help resolve the issue.
Clearing your browser cache and cookies can also help improve PureVPN's performance. Cached data can sometimes interfere with the VPN connection, causing it to malfunction. By clearing your browser's cache, you can eliminate any unnecessary data that may be causing the problem.
If you are still experiencing difficulties, you may try reinstalling the PureVPN app. Sometimes, a corrupted installation can lead to connectivity issues. By uninstalling and then reinstalling the app, you can ensure a fresh installation, which may resolve any underlying issues.
Lastly, reaching out to PureVPN's customer support team can provide additional assistance. Their support team is well-equipped to handle a variety of issues and can offer personalized solutions to help you resolve any problems you may be facing.
By following these troubleshooting tips, you can effectively address common connectivity issues with PureVPN and enjoy a seamless VPN experience.
Enabling Shared Access PureVPN
PureVPN is a leading provider of virtual private network (VPN) services that enable users to secure their internet connection and protect their online privacy. One of the key features offered by PureVPN is shared access, which allows multiple users to connect to the VPN using a single account simultaneously.
Enabling shared access on PureVPN is a straightforward process that offers a range of benefits for individuals, families, and businesses. By allowing multiple users to connect to the VPN at the same time, shared access enables seamless and secure browsing for everyone using the service. This is particularly useful for households or small offices with multiple devices that need to be protected.
To enable shared access on PureVPN, users simply need to log in to their account and navigate to the settings menu. From there, they can activate the shared access feature and set the number of devices that will be allowed to connect simultaneously. This flexible approach allows users to tailor their VPN usage to their specific needs, whether they are sharing with family members, colleagues, or friends.
In addition to providing convenience and flexibility, enabling shared access on PureVPN also helps users save money by allowing multiple users to share the cost of a single subscription. This makes PureVPN an affordable option for individuals and groups looking to protect their online privacy without breaking the bank.
Overall, enabling shared access on PureVPN is a convenient and cost-effective way to ensure secure browsing for multiple users. With its user-friendly interface and robust security features, PureVPN continues to be a top choice for individuals and organizations seeking to protect their online activities.
Error Code 87 Fix
Title: Resolving Error Code 87: A Comprehensive Fix Guide
Error code 87 is a common occurrence encountered by users across various Windows platforms. Typically, this error signifies a malfunction or misconfiguration in the system, leading to issues with executing commands or running applications. While encountering error code 87 can be frustrating, there are several troubleshooting steps that users can take to resolve it effectively.
One of the primary causes of error code 87 is incorrect command-line syntax. When attempting to execute a command via the Command Prompt, even a minor error in syntax can trigger this issue. To address this, double-check the command syntax for accuracy, ensuring that all parameters and options are correctly specified.
Another potential culprit behind error code 87 is system file corruption. Over time, system files may become damaged or corrupted, leading to various errors, including error code 87. To tackle this, users can utilize the System File Checker (SFC) tool, which scans for and repairs corrupted system files automatically.
Moreover, outdated or incompatible device drivers can also trigger error code 87. Ensuring that all device drivers are up-to-date and compatible with the operating system can help prevent such errors from occurring. Users can manually update drivers via the Device Manager or utilize third-party driver update software for convenience.
Additionally, malware or virus infections may result in error code 87. Conducting a thorough scan of the system using reputable antivirus software can help identify and eliminate any malicious threats.
In conclusion, error code 87 can stem from various underlying issues, including command-line syntax errors, system file corruption, outdated drivers, or malware infections. By following the aforementioned troubleshooting steps, users can effectively resolve error code 87 and restore smooth operation to their Windows systems.
VPN Configuration Issues
When it comes to using a Virtual Private Network (VPN), configuring it correctly is essential to ensure a secure and stable connection. However, users may encounter various VPN configuration issues that can disrupt their online activities. Understanding these common issues can help users troubleshoot and resolve them effectively.
One of the most prevalent VPN configuration issues is related to compatibility. Different VPN services may require specific settings or software versions to work correctly. Users should ensure that their device and operating system are compatible with the VPN service they are attempting to use.
Another common problem is connectivity issues. Users may experience difficulties connecting to the VPN server, which can be caused by network interruptions or server downtime. Troubleshooting steps such as switching to a different server location or restarting the VPN connection can help resolve this issue.
DNS leaks are also a concern when configuring a VPN. If the DNS requests are not routed through the VPN tunnel, users' online activities may not be fully protected. Enabling the DNS leak protection feature in the VPN settings can help prevent this issue.
Moreover, firewall or antivirus software settings can interfere with the VPN connection and cause configuration issues. Users should ensure that the VPN application is whitelisted in their security software to prevent any conflicts.
Overall, being aware of these common VPN configuration issues and following troubleshooting steps can help users mitigate disruptions and enjoy a secure and reliable VPN connection. By addressing these issues promptly, users can maximize the benefits of using a VPN for their online privacy and security needs.
1 note
·
View note
Text
Windows 10 KB5001716 Download error 0x80070643 (solved)
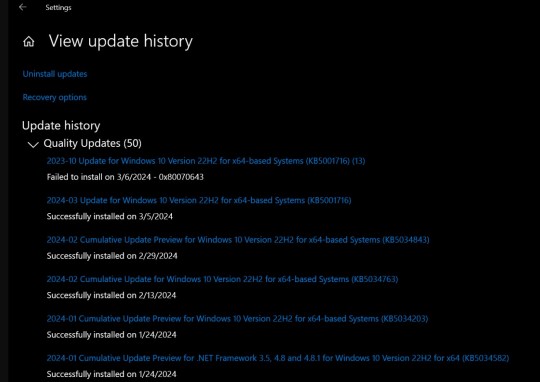
Microsoft released a new KB5001716 for Windows 10 that helps keep your device secure and upgrades Windows versions nearing the end of the support cycle. This is a small service package downloads and installs quickly, However, a few users report download error 0x80070643 when installing KB5001716.
Even when I check for updates to install KB5001716, it fails with 0x80070643. The error message states:
There were some problems installing updates, but we’ll try again later. If you keep seeing this and want to search the web or contact support for information, this may help: (0x80070643).
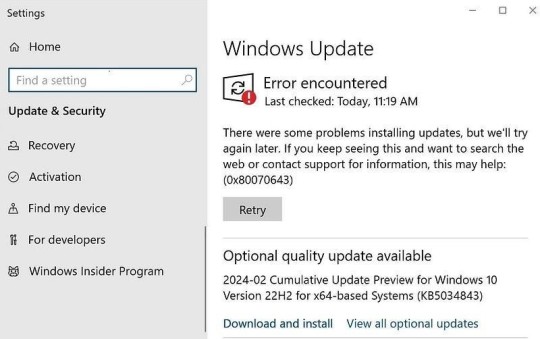
Failed to Install KB5001716 Error 0x80070643
There are several reasons why Windows updates may fail to install, slow internet to corrupted update cache, system file corruption or low storage space are common. But for this particular problem what I found that Windows 10 KB5001716 was already installed on my device on October 2023.

For some reason, Microsoft reissued the update, and devices having already KB5001716 update installed causing conflict. For me uninstall the KB5001716 update from Windows settings and check again for update help resolve the Windows 10 update error 0x80070643.
Uninstall Windows 10 KB5001716
Press the Windows key + I to open the settings app
Go to Apps then Apps & Features, scroll down to locate Update for Windows 10 for x64-based system (KB5001716) select it and then tap on Uninstall option.
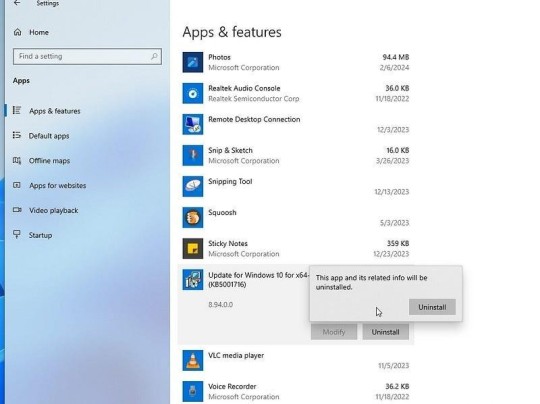
Reboot your device, and check for updates again. The update will smoothly install without errors.
youtube
Check Internet Connection
A stable internet connection is crucial for downloading Windows updates. If the above solution didn't help, you need to check and ensure that your internet connection is working correctly.
Open a web browser and navigate to a website to check if you can access the internet. Or you can run online speed test tools like speedtest.net or fast.com
If you’re unable to access the internet, troubleshoot your network connection by restarting your router, checking cable connections, or contacting your internet service provider for assistance.
Run Windows Update Troubleshooter
The Windows Update troubleshooter automatically detects and fixes common issues that may prevent updates from being installed. It checks for problems such as corrupted update files, misconfigured settings, or issues with the Windows Update service.
Press the Windows key and type "Troubleshoot settings," then press Enter.
Click on “Additional troubleshooters,” then locate and click on “Windows Update.”
Click “Run the troubleshooter” and follow the on-screen instructions to complete the process.
Restart Windows Update Related Services
Also, you can try Restarting Windows Update-related services to ensure that they are running properly and can resolve issues related to update installation.
Press Windows + R to open the Run dialog box.
Type services.msc and press Enter to open the Services window.
Locate the following services:
Background Intelligent Transfer Service (BITS)
Cryptographic Services
Windows Update
Right-click on each service, one at a time, and select “Restart” from the context menu.
Clear Update Cache
The update cache stores temporary files related to Windows updates. Clearing the cache can resolve issues caused by corrupted or outdated update files.
Press the Windows key + R, and type services.msc and click ok,
Locate “Windows Update,” right-click on it, and select “Stop” to pause the service.
Open File Explorer (Windows + E) and navigate to C:\Windows\SoftwareDistribution/download Select all files and folders there then press Delete to remove them.
Confirm any prompts for administrator permission. Maximize the Services window, right-click on “Windows Update,” and select “Start” to restart the service.
0 notes
Text
10 Popular Tech Windows Commands

Introduction:Understanding the Essence of Windows Commands
Benefits of Mastering Windows Commands
Getting Familiar with Essential Windows Commands
Advanced Windows Command Line Techniques
Summary
FAQs
Introduction:
Thanks for reading our comprehensive guide to learn how to use Windows commands! Whether you're a tech fan or just someone who needs to use the maximum capacity of your Windows working framework, understanding and dominating Windows commands is a fundamental expertise. In this blog, we will explore the essential parts of Windows commands and the advantages of conquer them.
Understanding the Essence of Windows Commands
Windows commands form the backbone of the command line interface; allowing users to work together with their operating system efficiently. Unlike graphical interfaces, which may have limits, windows commands recommend supreme control, flexibility, and speed. By using specific commands, you can perform a wide range of tasks, from simple to advanced even from file management to system maintenance.
Conquering Windows commands gives you the power to find the way through the depths of your operating system, troubleshoot networking issues, automate repetitive tasks, and even customize your Windows environment according to your preferences.
Benefits of Mastering Windows Commands
Becoming an expert in Windows commands comes with many benefits. Here are just a few:
- Efficiency: These tech commands enable you to complete tasks rapidly and effectively, saving you important time and energy.
- Full System Control: You can complete control over your operating system, enabling you to complete tasks by using Windows commands that may not be accessible through graphical interfaces.
- Troubleshooting Capabilities: Mastering Windows commands provides you with the tools to identify and fix system errors, smooth and error-free computing experience.
- Automation: Discover batch scripting and automation techniques, you can get rid of recurring tasks and simplify your workflow for maximum productivity.
- Customizability: Tech commands allow you to personalize your Windows environment to suit your individual needs, making your computing experience truly your own.
Benefits of Mastering Windows Commands
Getting Familiar with Essential Windows Commands
A. Navigation Commands
The ability to navigate through your directory structure seamlessly is the foundation of Windows. Here are the essential navigation commands you need to know:
1. Introduction to Directory Navigation
Mastering commands such as cd (change directory) and dir (directory) will enable you to move effortlessly through your file system, access different directories, and locate specific files or folders.
2. Moving Between Directories
Learning how to change directories effectively, whether it's navigating up one level or traversing through multiple levels will significantly enhance your productivity and efficiency when working with Windows tech commands.
3. Listing Directory Contents
Understanding commands like dir and their various parameters will allow you to view detailed information about the files and directories within a specific directory, including file sizes, dates, and permissions.
Navigation Commands
B. File Management Commands
Managing files efficiently and in a directory is a key skill in any Windows command line user's weapon.
1. Creating and Deleting Files
After learning how to create and delete files in the command line using commands such as touch and del. This will allow you to manage your files quickly and effectively.
2. Copying and Moving Files
Master the art of file manipulation by discovering commands like copy and move. These commands allow you to copy files to different locations or move them between directories effortlessly.
3. Renaming and Searching Files
Understand how to rename files using commands such as ren. Additionally, learn how to search for files based on specific criteria using commands like find or grep. These commands will make locating and managing your files a breeze.
File Management Commands
C. System and Network Commands
Windows commands offer a range of functions when it comes to system management and networking.
1. Managing System Processes
Discover how to manage system processes using commands like tasklist and task kill. This knowledge will allow you to monitor and terminate processes, ensuring optimal system performance.
2. Networking Commands for Efficient Communication
Learn key networking commands, such as ping and ipconfig, to troubleshoot connectivity issues, check network configurations, and ensure smooth communication between devices on your network.
3. Troubleshooting and Diagnosing Network Issues
Master tracert and netstat commands to identify and troubleshoot network problems. By understanding these commands, you can diagnose and resolve network-related issues swiftly and effectively.
D. Text Manipulation Commands
Text manipulation commands offer a dominant technique to work with text files and data. Here are the essential text manipulation commands
1. Working with Text Files
Find out how to create, view, and edit text files using commands like echo, type, and edit. With these commands, you can manage text files directly from the command line, enabling well-organized text processing.
2. Finding and Replacing Text
Learn how to search for specific text patterns in files using commands such as find and findstr. Additionally, understand how to replace text in files using commands like replace. These commands enhance your ability to work with text data efficiently.
3. Sorting and Filtering Text
Master commands like sort and filter to organize and filter text data in meaningful ways. These commands enable you to sort and extract specific information from large datasets, saving valuable time and effort.
Text Manipulation Commands
E. Access Control and Security Commands
Windows commands provide robust features to manage user accounts, enhance system security, and protect sensitive data. Here are the essential access control and security commands:
1. Managing User Accounts and Permissions
Discover commands such as net user and icacls that allow you to create, modify, and manage user accounts and permissions. With these commands, you can ensure proper access control and user management within your Windows environment.
2. Enhancing System Security with Firewall and Antivirus
Learn how to configure and manage Windows Firewall using commands like netsh. Additionally, explore commands like sfc to scan system files for integrity, ensuring a secure and reliable computing environment.
3. Encrypting and Decrypting Files and Folders
Learn how to use commands like cipher to encrypt and decrypt files and folders, providing high security for your sensitive data. These commands permit you to protect your information from unwarranted access.
Encrypting and Decrypting Files
Advanced Windows Command Line Techniques
Once you've mastered the essential Windows commands, it's time to explore more advanced techniques.
- Batch Scripting and Automation
1. Introduction to Batch Scripting
Find out the world of batch scripting and learn how to write batch files using commands like echo, if, and for. Batch scripting permits you to automate recurring tasks and complete them easily.
2. Automating Repetitive Tasks
Becoming an expert in how to automate recurring tasks using batch scripts. By leveraging loops, conditional statements, and variables, you can save time and increase productivity in your daily workflow.
3. Writing Conditional Statements and Loops
Discover the power of conditional statements and loops in batch scripting. With the capability to make decisions and carry out actions based on specific conditions, you can generate dynamic and well-organized batch scripts.
Writing Conditional Statements and Loops
B. PowerShell Commands for Power Users
PowerShell is an adaptable and powerful scripting language that combines the capabilities of Windows commands with advanced automation and management features.
1. Overview of PowerShell
Explore PowerShell and understand its advantages and matchless features compared to traditional Windows commands. PowerShell's wide command set and scripting capabilities make it vital for power users.
2. Utilizing PowerShell Modules
Learn how to leverage PowerShell modules, which provide additional functionality and pre-built commands for specialized tasks. Daily Tech Ace covers various PowerShell modules that enhance your productivity and expand your command repertoire.
3. Combining PowerShell with Windows Commands
By combining PowerShell's more scripting capabilities with the speed and flexibility of Windows commands, you can explore even greater potential.
Comparison Operators in PowerShell
C. System Maintenance and Performance Optimization
To keep your system running smoothly, understanding system maintenance and performance optimization is crucial.
1. Disk Cleanup and Defragmentation
Learn how to perform disk cleanup and defragmentation using built-in Windows commands. These maintenance tasks ensure better disk performance and keep your storage running efficiently.
2. Monitoring System Performance
Explore commands like tasklist and perfmon, these commands allows you to monitor system performance and identify potential resource usage issues. Keep an eye on system performance helps keep your system running at its best.
3. Troubleshooting and Repairing System Errors
Understand how to diagnose and repair system errors using commands like sfc and chkdsk. These commands help identify and resolve issues that may arise within your system, ensuring a smooth computing experience.
Repairing System Errors
D. Advanced Networking and Remote Access
For users who rely on networking and remote access, mastering advanced networking commands is essential.
1. Configuring Network Interfaces and Protocols
Learn how to configure and manage network interfaces and protocols using commands like netsh. Understanding these commands ensures smooth and efficient network communication.
2. Remote Desktop and Remote Assistance Commands
Discover commands like mstsc and msra that enable you to establish remote desktop connections and offer remote assistance. These commands provide convenient ways to access and support remote systems.
3. Securing Remote Access to Maintain Data Privacy
Understand how to secure remote access to your system using commands like gpedit. These commands allow you to configure Group Policy settings to control access and protect your data from unauthorized users.
Data Privacy with Securing Access
E. Customizing and Personalizing the Windows Environment
Windows commands offer a unique way to personalize your computing environment.
1. Tailoring Command Prompt Settings
Learn how to customize the Command Prompt, including changing colors, font sizes, and other settings. Personalizing the Command Prompt increases your experience and permits you to work efficiently.
2. Customizing PowerShell Configuration
Understand how to customize your PowerShell environment, including modifying profile settings, adding aliases, and smoothing your workflow. These customization options make working with PowerShell a personalized and helpful experience.
3. Writing Custom Scripts for Personalization
Take your customizations to the next level by writing your scripts to automate tasks or enhance functionality. By combining your creative ideas with the power of Windows commands, you can truly make your computing environment your own.
Summary
In this guide, we've delved into the world of Windows commands, exploring their core, benefits, and different techniques for mastery. Command line mastery allows you to discover the full potential of your Windows operating system, efficiency, control, and customization like never before. We inspire you to continue learning and practicing Windows commands, understanding & exploring the untapped potential that lies within your reach.
FAQs
1. Difference between Command Prompt and PowerShell?The primary distinction lies in their capabilities and scripting capabilities. While Command Prompt is simpler and commands are often specific, PowerShell is more robust, offering advanced scripting and automation features.2. Usefulness of Windows Commands for Everyday Tasks?Yes! Windows commands are very useful for everyday tasks, from file management to diagnosing systems. They provide fast and easy ways to perform different operations without depending on graphical interfaces.3. Learning and Practicing Windows Commands Effectively? To master Windows commands, start with basic commands and gradually progress to more advanced ones. Practice regularly through real-world tasks, use online resources, and explore virtual labs or sandboxes for a hands-on learning experience4. Using Windows Commands with Other Programming Languages?Yes, Windows commands can be integrated with other programming languages. Batch files, for example, can incorporate commands and scripts, enhancing the functionality and automation of tasks within a broader programming context.5. Risks Involved in Using Advanced Windows Commands?While advanced commands offer powerful capabilities, they come with risks. Misuse or incorrect commands can lead to data loss or system instability. It's crucial to understand the commands thoroughly and exercise caution, especially when dealing with sensitive operations.
Read the full article
0 notes
Text
How to Fix Cricut Design Space Not Working Issue?
While I was working at Cricut as a customer support, I dealt with many customers having almost the same issue, such as Cricut Design Space not working. This issue is one of the common errors found in Cricut software. At the same time, I also noticed the main reasons such as corrupted errors, local data files, and many others. However, the common reason was outdated software. Therefore, I am going to provide you with in-depth solutions to tackle the issue.
Moreover, I will mention four standard solutions that have always helped my customers during my tenure at Cricut. So, if you are here looking for how to solve this error, then just relax! Since I have solved this issue multiple times, I can very well assist you with easy solutions. Ensure you try the first method, and if one doesn’t work, then move to the next one. Let’s begin!
Fix 1: Delete Local Data Files
If you are also facing the same problem, such as Cricut Design Space not working, then don’t worry! In this solution, I will show you how to delete the local data files of Design Space. This step will not only help you launch the app but also resolve the black screen issue that occurs while opening the app.
Here’s how to delete the local files:
First, press the Windows logo + E keys to open the file explore app.
Then, navigate to the Local Disk C and then move to the Users file.
After this, you will find a folder with your username.
Next, you need to double-click on the .cricut-design-space folder.
Here, double-click on the LocalData folder and delete the available content.
Lastly, go to the Recycle Bin and delete everything permanently.
After following the steps above, you need to reboot the computer. Then, open the Design Space app to confirm whether you get rid of the “Cricut Design Space not working” issue.
Fix 2: Reinstall the Software
Sometimes, the app gets corrupted, and this is the reason why the Cricut Design space is not working. However, you can uninstall the app to fix this issue. Later, you need to install it again.
Here’s how to uninstall the Design Space software on Windows 10/11:
First, you have to open your computer Settings.
Then, move to the Apps section and then go to Apps & Features or Installed Apps on Windows 11.
After that, you will need to search Cricut Design Space.
For Windows 10 users: Choose the App and then hit the Uninstall button.
For Windows 11 users: They need to click on the three vertical dots and hit the Uninstall button.
Lastly, press the Uninstall button again to confirm the action.
After successful uninstallation of the app, you have to visit the official website of Cricut to download the Cricut app, i.e., Design Space. .
Fix 3: Use the Cricut App as an Administrator
During my work at Cricut, the most frequently asked issue was Cricut Design Space not working. As a solution, I always recommended them to use the app as an administrator.
Actually, some apps need administrative privileges to access some files, which is not possible without adequate permissions. Thus, you can also try doing the same.
Here’s how to run the Cricut App as an Administrator:
You first need to right-click on the Design Space app and choose the option Properties.
After that, navigate to the Compatibility tab.
Now, check the box saying Run this program as an administrator.
Finally, click the Apply tab and press the OK button.
Now, launch the software and check whether it is working now.
Fix 4: Allow the Cricut App Through the Firewall
Sometimes, the Windows Firewall blocks our software, which stops it from connecting to the network and launching on the computer.
Here’s how to allow the Cricut app via Windows firewall:
First, you need to press the Windows key and type Windows Security.
Then, navigate to the Firewall & Network Protection and click on Allow an app through the firewall.
Next, you need to click on the Change Settings tab.
Afterward, you have to allow your Cricut Desing Space through a Public and Private network.
If you are unable to find the app in the available list, then select Allow another app and move to its location, where you can add the executable file.
Finally, you have to allow the app through both networks and confirm if the issue is fixed.
Final Thoughts
There are 4 effective solutions I have mentioned in this blog. These fixes will help you resolve the issue regarding Design Space if it is not working. In my experience, I have seen the common solution that often works is running the app as an administrator. However, you can try any solution that works for you. Moreover, these solutions will be helpful for both Windows 10 and 11 users. I would suggest you follow each step carefully. If nothing works, then you should contact the Cricut support team.
Frequently Asked Questions
Question 1: Will my Windows 10 be compatible with my Cricut Design Space?
Answer: Yes, Cricut has designed its software to work with all platforms that support almost every version. The app is available on Cricut’s official website to download for Mac, Windows, iOS, and Android. In addition, you can also download this software from Microsoft Store. Thus, you can use the Design Space on Windows 10.
Question 2: Is Cricut Design Space compatible with all computer devices?
Answer: No, all computer devices, including Chromebooks or Unix/Linux computers, do not support the Cricut software. However, this software is compatible with Windows and Mac computers. Moreover, you can also use this Cricut app on mobile devices (iOS and Android). Despite this, you should ensure the minimum system requirements, such as 4 GB RAM, 2 GB free disk, bluetooth connection, and CPU should be 1.83 GHz.
Question 3: Why is my Cricut Design Space not working properly?
Answer: Sometimes, your Cricut software doesn’t work properly due to many reasons. However, you can easily fix the issue yourself on your computer.
Below are the causes stopping your Design Space from working.
Outdated Firmware or Software
Calibration issues
Corrupted local data files or fragments
App blacked by Windows Defender
Read more: Cricut New Machine Setup
install cricut design space app
cricut.com/setup mac
Source: Cricut Design space not working
#Cricut Design space not working#cricut.com/setup mac#cricut new machine setup#cricut.com/setup#cricut.com/create#cricut.com sign in#cricut setup#install cricut design space app#Cricut Design Space#cricut design space login#cricut design space download#cricut design space app#cricut design space for mac#cricut design space setup#Cricut Design Space is not working
0 notes
Text
New Post has been published on Michel Tanguy
New Post has been published on http://micheltanguy.com/choosing-a-business-data-room/
Choosing a Business Data Room
Whether it’s to share data with clients or potential buyers, a business info room is considered the most convenient way to organize and control document sharing. Nevertheless , it’s critical to keep in mind that a virtual offer room can be used for a wide range of scenarios, therefore it’s essential to choose the right application to meet your specific needs.
The very best business data rooms give you a variety of equipment to ensure safeguarded file sharing. For example , business-tips.info/audio-renderer-error-fixed some of them have security features just like data security, customizable NDAs, and personally-identifiable watermarking to remind users that the papers they’re looking at may contain confidential details. They also let you monitor activity and set accord so that only the right people may access selected files.
To narrow down your alternatives, start with looking at customer feedback on individual software assessment platforms. Consequently, compare every provider’s price tag to its features to see how well they align with your business’s specific requirements. It’s the good idea to evaluate the software out before choosing it for your business by using it within a free trial period of anywhere from a week to a month.
Finally, make sure your business info room is structured to enhance the task you’re working on. This includes separating files in folders depending on their importance and producing sure everyone has the suitable permission level. Several providers also have group rights settings, which in turn simplify granting access to whole departments or perhaps groups of pros. You can also use version control to ensure that users are taking a look at the latest release of a file.
0 notes
Text
How To solve this warning error “Warning: Unprotected Private Key File” in AWS EC2
The warning message "Warning: Unprotected Private Key File" is related to the permissions set on your private key file (.pem) used to connect to your AWS EC2 instance. This warning appears when the permissions on the private key file are too permissive, potentially allowing unauthorized users to read the file.
To solve this warning error in AWS EC2, you need to set appropriate permissions on your private key file. The recommended permission setting for the private key file is 400, which means that only the file owner has read and write permissions, and no one else can read the file.
Here's how you can set the correct permissions on the private key file:
Open your terminal or command prompt.
Locate your private key file (.pem). By default, it might be in your home directory under a folder like .ssh/, and its name is often something like key.pem.
Change the permissions of the private key file using the chmod command. Run the following command:vbnetCopy codechmod 400 /path/to/your/private/key.pem Replace /path/to/your/private/key.pem with the actual path to your private key file.
Verify the new permissions using the ls -l command. The output should show that only the owner has read and write permissions, and the group and others have no permissions.For example:vbnetCopy code$ ls -l /path/to/your/private/key.pem -r-------- 1 user_name user_group 1679 Jul 26 10:00 /path/to/your/private/key.pem
Now, try connecting to your EC2 instance using the private key. The warning message should no longer appear, and you should be able to log in successfully.
For example, if you are using the ssh command to connect to your EC2 instance, you can specify the private key with the -i option:
vbnetCopy code
ssh -i /path/to/your/private/key.pem ec2-user@your-ec2-instance-public-ip
Replace /path/to/your/private/key.pem with the actual path to your private key file, and your-ec2-instance-public-ip with the public IP address of your EC2 instance.
Suggested Read: How to fix the EC2 error “Warning: Unprotect Private Key File
By following these steps, you should be able to fix the "Warning: Unprotected Private Key File" error and securely connect to your AWS EC2 instance using the private key.
0 notes
Text
Where Did My Web Site Menu Go? Cals Wordpress Hosting
Where Did My Website Menu Go? Cals Wordpress Hosting

Have you ever thought, what would happen if unexpectedly the header section of your WordPress website simply gets disappeared, what's going to you do? By default, Rank Math makes use of the present post/page URL because the canonical URL, so you'll only need to alter this setting should you want to change it to something else. If you may have deleted your website totally, it's going to no longer seem in Google search results. However, If you might have just lately migrated your web site, the best factor to do is wait a few days and see if it reappears in Google search results. If it doesn’t, you have to re-submit your website to Google using the Search Console. Once you've fixed the security points on your website, you presumably can submit a reconsideration request to Google to have your website re-indexed.
If you find that your WordPress menu disappeared, you may wish to know why to find a way to determine the way to get it again. We occasionally hear from clients who use WordPress and report that lots of their posts, pages or images suddenly disappeared. There are instances by which the plugins were updated, but not the platform or theme and vice versa. In some cases an old plugin model along with an up-to-date theme/platform can cause faulty performance. Just head over and open an incognito/private window in your internet browser, then enter your web site URL. You have successfully restored the missing header part in your WordPress web site as I did with my shopper's website which you'll find in the below screenshot.
It's not been replaced in the /public_html folder, but without me noticing a .htaccess file was created within the /public_html/blog folder (where the blog is kept). WordPress Development Stack Exchange is a query and reply web site for WordPress developers and directors. I suspect that there's a collision with the theme or one other plugin that may trigger this downside. A minimal surroundings means switching to a default WordPress theme like TwentyTwenty-One and no plugins activated besides WPML.
WordPress updates that won’t end are most common on inexpensive shared internet hosting plans. Shared internet hosting signifies that your site shares assets with other websites on the identical server. Shared servers are sometimes overcrowded and, as sites grow, they begin pulling sources from each other. This may cause issues when you’re performing resource-intensive operations in your website like updating multiple plugins at once.
While this isn’t widespread, by chance deleting your menu or altering its location may cause it to disappear. While not as large as a model new theme, a brand new plugin would possibly trigger your WordPress menu to vanish. If you and your visitors can’t see your menu, that can be irritating. Without it, your visitors might have a tougher time navigating to the web page or submit they need to view.
This issue can break your website and is often caused by incorrect file permissions or an interrupted replace course of. If you proceed to get this error, or you see it in incognito mode, then the culprit is probably an incomplete update. You can do that by accessing your hosting provider’s cPanel, or utilizing SFTP via a file transfer app like FileZilla. รับจ้างทำ SEO While updates often don’t trigger issues, things can typically go mistaken during the update course of, particularly throughout a major upgrade.
When your web site disappears from Google, it might possibly feel like the tip of the world. There are a quantity of possible the cause why your web site might have disappeared from search outcomes. When you say I am logged into the wrong account what do you mean?
Fortunately, there are things you can do to keep away from or decrease web site downtime as a outcome of update errors. When a core WordPress update causes your web site to break or have unacceptable errors, one of the best course of action you probably can take is to roll again your WordPress to a earlier model. Activate one of the WordPress default themes like Twenty Twenty-One. If you modify your website’s area name, all beforehand created backups on your web site will turn out to be unavailable and you'll not see them in the Backups software anymore.
1 note
·
View note
Text
Hogwarts Legacy Corrupt Disk error on Steam Fix

Hogwarts Legacy is an action RPG game of the year, and it's no surprise that it has fans worldwide. Unfortunately, some users have reported experiencing a "corrupt disk" error while trying to play the game on Steam.

Although the issue is not observed by the developers, there are a few solutions available for the users, who are facing this issue. In this article, we'll discuss some methods to fix the corrupt disk error in Hogwarts Legacy.
How to fix Hogwarts Legacy Corrupt Disk error on Steam?
What is the Corrupt Disk Error?
The corrupt disk error occurs when a game file is corrupted or damaged, preventing the game from running properly. This can happen due to a variety of reasons, such as a faulty hard drive, a virus or malware infection, or an incomplete installation of the game.
Verify the Integrity of the Game Files
Steam has a built-in feature that allows you to verify the integrity of game files, which can help fix errors like this one. To do this, follow these steps:
- Open Steam
- Go to Library
- Right-click on the game that’s giving you the error
- Select Properties
- Go to the Local Files tab
- Click on Verify Integrity of Game Files
- This process will check your game files and replace any that are corrupted or missing. It may take some time to complete, depending on the size of the game and the speed of your computer.
Repair Steam Library Folder
Another solution is to repair the Steam Library folder. If the Steam Library folder is corrupted, it can cause issues with game downloads. To fix this, follow these steps:
- Open Steam
- Go to Settings
- Click on the Downloads tab
- Select Steam Library Folders
- Right-click on the Steam Library Folder (or custom library folder) and select Repair Library Folder
- Steam will then scan the folder and try to repair any problems that are found. This can take some time depending on the size of your library, so be patient.
Run as Administrator
You can also try running Steam as an administrator. This can help resolve issues with Steam that are caused by restrictions or permissions. To do this, follow these steps:
- Right-click on the Steam shortcut
- Select Properties
- Go to the Compatibility tab
- Check the box next to Run as administrator
- Click Apply and then OK
- Repair Hard Disk
Repair Hard Drive
Another solution, you can try repairing your hard disk drive. If the drive where the game is installed is corrupted, it can cause the “corrupt disk” error to appear. To fix this, follow these steps:
- Press Windows key + E on your keyboard to open Windows Explorer
- Click on This PC at the left pane
- At the right pane, right-click on Drive C and click Properties from the drop-down menu
- At the Properties window, click the Tools tab
- Under Error checking, click the Check tab
- Wait for the scan process to complete
- If the scan process detects any problems with the drive, you’ll be shown the options to fix the issue. You can either choose to automatically fix the problems or you can manually select which issues to fix.
Contact Steam Support
If you continue to experience the error after trying these solutions, you may need to contact Steam support for further assistance. They can help you troubleshoot the issue and provide you with additional solutions.
Also read: Hogwarts Legacy Error Code CE-108255-1 PS5
Conclusion
The "corrupt disk" error in Hogwarts Legacy can be frustrating for gamers who are eagerly waiting to play the game. However, there are several solutions available that can help fix the issue. By following the steps outlined in this article, you can easily resolve the issue and get back to enjoying the game.
Read the full article
#HogwartsLegacy#HogwartsLegacyCorruptDiskerroronSteamFix#HowtofixHogwartsLegacyCorruptDiskerroronSteam
1 note
·
View note
Text
Easy Solutions To Fix Portable File Creation Errors in QuickBooks

When creating a portable company file in the program, you may encounter a portable file creation error in QuickBooks. When the error occurs, it shows up an error message on your screen with the text:
You may not have sufficient permission to create a portable company file from this computer. Please try creating the portable company file from the server: (server__name).
There is a myriad of possible reasons that can bring forth the file creation issue in the program. Insufficient Windows permissions are one of the most apparent reasons behind this issue. When the error occurs, you are left with no option, but error resolution to accomplish an erroneous task. This post elaborates on some crucial aspects of this error along with its troubleshooting solutions.
What Are The Possible Reasons Behind QuickBooks Portable File Creation Error?
A portable file creation error in QuickBooks is the error that occurs when a regular user tries to create or open a portable company file in QuickBooks with the .qbm extension. When the error occurs, it gives an error message on your screen with the text:
Some of the main reasons behind the arrival of the portable file creation error are stated in the below-given list:
When multiple workstations are connected to host the company file.
If the company name is flawed (includes special characters, such as @, !, $, #), an error can take place.
A damaged or corrupt company file is also one of the main reasons behind a failed file creation.
A Windows user having insufficient permissions to access the company file can’t accomplish this task, thereby evoking this error message on the screen.
How To Troubleshoot The Error?
Now that the possible reasons behind the error are known to you, below are some effective solutions for the error resolution:
Solution 1: Verify Windows Folder Permissions
First things first, you need to check your Windows folder permissions by implementing the below-given steps:
QuickBooks software and move to the folder containing the company file.
Here, you need to right-click on this folder and then click on Properties from the drop-down menu.
Thereafter, click on the Security tab and choose User among the Group or user names.
Moving ahead, click the Edit option, which will allow you to change user permissions.
Now, checkmark the Full Control option.
In the end, click Apply >> OK to finish the procedure.
If the portable file creation error in QuickBooks continues, try the next troubleshooting solution.
Solution 2: Utilize Quick Fix My Program From Within The Tool Hub
QuickBooks Tool Hub is an efficient utility that acts as a launcher for the various troubleshooting tools in QuickBooks. Quick Fix My Program is also an amazing utility that can help you in fixing the concerning error. Below are the steps:
Close QuickBooks and visit Intuit’s official website using your Internet browser.
Now, locate and download the latest version of the QuickBooks Tool Hub on your device.
Save the file to a location that can be accessed conveniently.
Now, run the executable file and follow the instructions carefully to install the Tool Hub.
Once installed, you can put it to use after agreeing to the terms and conditions.
When in QuickBooks Tool Hub, you can see a list of the program error categories.
Here, choose Program Issues and then select Quick Fix My Program.
The tool will look for the potential factors causing the issue and troubleshoot them.
Once the tool finishes its task, check again if the error is resolved or not. If it persists, try the next solution.
Solution 3: Make Sure That The Company File Name is Free From The Errors
In this solution, you need to make sure that your company file is correct and doesn’t contain any special characters. If not, rectify the file name using the below-given steps:
Close QuickBooks in the first place, if active.
Now, move to the folder that contains the QuickBooks company file.
Next, right-click on the company file and select Rename option.
Here, you can remove any space or special characters from within the company file name to eradicate the portable file creation error in QuickBooks.
However, if none of these solutions can put this error to an end, follow the next solution.
Solution 4: Make Sure That Hosting Settings Are Properly Configured
Here, you need to verify that the hosting is configured properly in QuickBooks multi-user mode. In multi-user environment, the hosting should be enabled on the server computer; whereas, workstations shouldn’t host the company file. To check it:
When on your workstation, open QuickBooks application.
Next, go to the File and choose Utilities option.
Here, if you see the option Stop Hosting Multi-User Mode, it means that the hosting is enabled and you need to click this option.
However, if you see the option Host Multi-User Access, it shows that the hosting is disabled and you don’t need to do anything.
After the first workstation, you need to verify the hosting on all the workstations in the network by considering the above-explained steps.
Solution 5: Repair Company File Using Verify & Rebuild Data Utilities
Verify & Rebuild Data Utilities detect and repair the data damage issues.
Steps To Run Verify Data Utility
In the first place, you need to run the Verify Data utility to determine if the data file is damaged or not by following the below-given steps:
First of all, open the QuickBooks Desktop application.
Thereafter, go to File and select Utilities to move ahead.
Here, you need to choose the Verify Data option.
After that, click OK and it will close all the QuickBooks windows.
Now the tool will verify if the data integrity is intact or not.
If no data integrity issues are found, you can simply move ahead.
However, if the tool detects issues with the company file, click Rebuilt Now option.
Steps To Run Rebuild Data Utility
From within the File menu, select Utilities.
Thereafter, choose the Rebuild Data option and click OK button.
It will create a data backup to save your file against the loss.
Now choose Local/Online Backup and click Next button.
Next, you need to select the backup location using the Browse option.
Click OK and then hit the Use this Location option.
Here, clicking the Save option will back up the company file and starts to rebuild the data file.
In the end, click Review Now to check the company file Rebuild results.
Summing It All Up!
The solutions described in this post can help you in eliminating the portable file creation error in QuickBooks. If further assistance is required in this matter, you can connect with our Help Desk and get relevant assistance.
1 note
·
View note
Text
Sage 50 Unable To Open Company File
If your Sage 50 software message text is "Error loading current company file," this could mean one of two things. One, there may be an issue with the company file itself. Or two, there could be the possibility that your system is unable to open the company files and the company files are missing after a server update. Before troubleshooting this error, it's important to know what caused it.
Causes of Sage 50 Error Loading Company File
It's often difficult to identify the true cause of a Sage 50 error. In some cases, it may be that you just need to take the right actions in order to fix the error. This is why it's helpful to know what could have caused the error, so you can get your business moving again and keep customers happy.
In order to open a company file, this error may occur. When this occurs, the system can't find the file that you're trying to open.
The error occurs when you try to start the system, without installing an update first.
If a system is not updated with service release on time, sage error may occur.
If you still have the issues after restoring your backup, make sure that the release is in line with the original.
PC build or release is not the same across all PCs on a network.
How to Solving Sage 50 Unable to Open Company File
If the software is unable to open your company file, it may be because you have used Sage 50 software to open it.
Here is a list of solutions to Sage 50 not being able to open the company files.
Steps 1: Incorrect Icon:
If you're not currently using the correct application icon, completely replace it with the one below.
If you are currently using the Taskbar to access the program, you need to uninstall it. However, the program will use the same settings and versions. This is because the software was replaced by a newer one with updated features.
Step 2: 1) Run the program in administrator mode. Here are the steps you must take:
First, close Sage 50.
Go to the Sage 50 software gear icon and select Properties.
Now select the Run as Administrator option.
Then, open the Company File.
Now, move the content to a new location on the hard drive and assign the appropriate rights. Then, click the Add Permissions button.
The.SAJ folder and the.SAI files must be copied to the C drive.
In the user permissions settings, add "Everyone."
Make sure that you have the latest revision of the file folder by comparing the date in your SAJ to the date on your RSJ.
Close the file and reopen it.
Steps 3: Verify that the MySqld.exe file is not locked in Task Manager
Double-check that you have the right coverage and that all users are signed out.
To find the Task Manager, go to the Windows folder and look for "Taskman."Check that you have selected the show process from all users.
Discover a way to end all of Mysqld.exe processes below.
After any of your processes have failed and closed, they will now be retried on all workstations.
First, check to see ifmysqld.exe is locked. The following steps are the steps you must take in the Task Manager window.
Make sure Sage 50 is closed and the Task Manager is open.
Check to see if the all-users' id checkmarks are present; if so, start processes.
Steps 4: Look for corrupted files
To begin, go to the backup of the document and restore it from there.
If the company file doesn't open, the first thing to do is make a backup of it..
It is then recommended that you seek assistance from experienced aspirants in order to fix the data.
Steps 5: The missing files or hidden file
Navigate to the location of your Sage 50 company file.
Locate the .SAJ folder and then examine the required files and folders.
Steps 6: Make sure you have the most recent version of Sage 50
First, download the most recent updates.
Manually install the update on the system. It would be in the following directory DIR: Download Sage Software Simply Accounting from C: Users/Public\Documents\Sage Software\Simply Accounting\ Download.
How to Fix Sage 50 Error Loading Current Company File?
If you are getting the "Sage 50 Error Loading Current Company File" message when opening your company file, there are a few things you can do to try and fix the problem.
First, make sure that you have the latest version of Sage installed. If you are using an older version of Sage, or if your computer is not up to date, then you may experience this error.
Second, make sure that your company file is in the correct location on your computer. You can find your company file by going to:
Documents -> Sage 50 -> My Documents -> sage50 -> companies
If the file is not located in this location, then you may need to copy it over to this location.
Third, you may be experiencing errors due to compatibility issues between Sage and your computer. If you are not sure whether or not compatibility issues are causing the error, then you can try running a scan with Spybot S&D to see if any malware is preventing Sage from opening your company file correctly.
If none of these solutions work for you, then you may need to contact customer support for help troubleshooting the issue.
1 note
·
View note
Text
Typestatus 2 a12

#Typestatus 2 a12 free#
Other than those two common causes, here are some other possible triggers for the error: Luckily, it’s easy to solve the issue by simply creating a new server configuration file. This might happen after you’ve made changes to the file. The second common cause is corrupt or incorrect settings in the. There are two possibilities in this case: either the website owner edited the settings so that you couldn’t access the resources, or they didn’t set the correct permissions. Often, HTTP 403 forbidden errors are caused by an access misconfiguration on the client-side, which means you can usually resolve the issue yourself.Ī common cause of these errors is the file or folder permission settings, which control who can read, write, and execute the file or folder. Error codeįorbidden: You don’t have permission to access on this serverĤ03 forbidden request forbidden by administrative rulesĪccess Denied – You don’t have permission to access We will explain the different types of 403 forbidden errors, their possible causes, and also provide eight methods to fix the 403 forbidden error. Since its causes vary, there are many methods to resolve the 403 errors. However, if you or your visitors encounter this error on your site, it’s necessary to fix the issue or you may risk losing valuable traffic. This is because most websites are set up to disallow directory browsing to prevent attackers from accessing sensitive files. You might encounter the 403 forbidden error when you visit an empty website directory or a specific page that has a permission error.
#Typestatus 2 a12 free#
Start A Free 7-day Email Course On WordPress
1 note
·
View note
Last Seen Blogs

idkjustsupersonic
Supersonic

bluehourjjk
BLUEHOURJJK

freesidexjunkie
professional simp hours

sadbbe
🧿

brunosource-blog
HOOLIGANISM