#file and folder permissions error in wordpress
Text
How to Fix File and Folder Permissions Error in WordPress
How to Fix File and Folder Permissions Error in WordPress
File and Folder Permissions Error in WordPress.
Are you worried about how to fix file and folder permission in your WordPress website or blog? Getting errors while uploading images, videos or any other file is a common problem in WordPress.
If you have incorrect file and folder permissions on your WordPress site, it can cause errors as soon as you upload files.
There are many reasons behind…
View On WordPress
#file and folder permissions#file and folder permissions error in wordpress#fix file and folder permissions#fix file and folder permissions error#How to Fix File and Folder Permissions Error in WordPress#permission error in wordpress
0 notes
Text
What is cPanel and How to Use it - A Complete Guide

What is cPanel?
cPanel is a Linux-based web hosting control panel that provides a graphical user interface (GUI) for managing your website and server. It is one of the most popular control panels in the world, and is used by millions of people to manage their websites
c, short for control panel, is a web-based graphical interface designed to simplify the management and administration of websites and server functions.
It is widely used by website owners, web hosting providers, and system administrators to easily manage various aspects of their websites and servers.
cPanel allows users to perform a variety of tasks, including:
Managing files and folders
Creating and managing email accounts
Installing and managing applications such as WordPress and Drupal
Configuring security settings
Managing DNS settings
Creating and managing backups

Here is a step-by-step guide on how to use cPanel:
Access cPanel:
To use cPanel, you first need to access it. Usually, you can access cPanel by typing "yourdomain.com/cpanel" into your web browser. Alternatively, you can ask your web hosting provider for the login URL and credentials.
2. Enter your credentials:
Once you access the cPanel login page, enter your username and password provided by your hosting provider.
3. Navigate the cPanel interface:
After logging in, you will be redirected to the cPanel control panel. The interface is divided into different sections, including Files, Databases, Domains, Email, Metrics, Security, Software, and Advanced. Each section provides a range of tools and options.
4. Manage files:
In the "Files" section, you can upload, modify, and manage your website's files and folders. You can also use the File Manager tool to perform tasks like creating new directories, uploading files, editing code files, and managing permissions.
5. Configure domains:
Under the "Domains" section, you can manage domain-related settings. You can add new domain names, redirect domains, create subdomains, manage DNS records, and set up domain aliases.
6. Set up email accounts:
In the "Email" section, you can create and manage email accounts associated with your domain. You can add email accounts, set up forwarders, configure autoresponders, manage spam filters, and access webmail.
7. Configure databases:
For managing databases, you can use the "Databases" section. Here, you can create new databases, manage existing ones, set up database users, and use tools like phpMyAdmin for database administration.
8. Install software and scripts:
The "Software" section offers tools to install various applications and scripts. You can use the Softaculous Apps Installer to quickly install popular CMS platforms like WordPress, Joomla, or Drupal. This section also includes options to update software versions, perform backups, and manage SSL certificates.

9. Monitor website metrics:
Under the "Metrics" section, you can monitor your website's performance by accessing statistics like visitors, bandwidth usage, error logs, and resource usage. This helps you analyze your website's traffic and make informed decisions regarding optimization.
10. Configure security settings:
The "Security" section includes tools to enhance the security of your website. You can manage SSL certificates, set up password-protected directories, enable hotlink protection, and manage IP blocklists.
11. Advanced features:
The "Advanced" section provides additional features for experienced users and developers. Here, you can access tools like Cron jobs for scheduling tasks, manage PHP settings, access server logs, or customize error pages.
Some common tasks that you can perform using cPanel:
Create an email account:
Click on the "Email Accounts" icon and then click on the "Create" button. Enter the desired email address and password, and then click on the "Create Account" button.
Install WordPress:
Click on the "Softaculous Apps Installer" icon and then search for "WordPress". Click on the "Install" button and follow the on-screen instructions.
Manage your files:
Click on the "File Manager" icon. You can then browse through your files and folders, and upload, download, or delete files as needed.
Create a database:
Click on the "MySQL Databases" icon and then click on the "Create Database" button. Enter the desired database name and username, and then click on the "Create Database" button.
In summary, cPanel is a comprehensive and user-friendly control panel that provides a range of tools and features to effectively manage your website and server.
Its intuitive interface makes it easy to perform various tasks, from managing files and databases to configuring email accounts and monitoring website performance.
0 notes
Text
Where Did My Web Site Menu Go? Cals Wordpress Hosting
Where Did My Website Menu Go? Cals Wordpress Hosting

Have you ever thought, what would happen if unexpectedly the header section of your WordPress website simply gets disappeared, what's going to you do? By default, Rank Math makes use of the present post/page URL because the canonical URL, so you'll only need to alter this setting should you want to change it to something else. If you may have deleted your website totally, it's going to no longer seem in Google search results. However, If you might have just lately migrated your web site, the best factor to do is wait a few days and see if it reappears in Google search results. If it doesn’t, you have to re-submit your website to Google using the Search Console. Once you've fixed the security points on your website, you presumably can submit a reconsideration request to Google to have your website re-indexed.
If you find that your WordPress menu disappeared, you may wish to know why to find a way to determine the way to get it again. We occasionally hear from clients who use WordPress and report that lots of their posts, pages or images suddenly disappeared. There are instances by which the plugins were updated, but not the platform or theme and vice versa. In some cases an old plugin model along with an up-to-date theme/platform can cause faulty performance. Just head over and open an incognito/private window in your internet browser, then enter your web site URL. You have successfully restored the missing header part in your WordPress web site as I did with my shopper's website which you'll find in the below screenshot.
It's not been replaced in the /public_html folder, but without me noticing a .htaccess file was created within the /public_html/blog folder (where the blog is kept). WordPress Development Stack Exchange is a query and reply web site for WordPress developers and directors. I suspect that there's a collision with the theme or one other plugin that may trigger this downside. A minimal surroundings means switching to a default WordPress theme like TwentyTwenty-One and no plugins activated besides WPML.
WordPress updates that won’t end are most common on inexpensive shared internet hosting plans. Shared internet hosting signifies that your site shares assets with other websites on the identical server. Shared servers are sometimes overcrowded and, as sites grow, they begin pulling sources from each other. This may cause issues when you’re performing resource-intensive operations in your website like updating multiple plugins at once.
While this isn’t widespread, by chance deleting your menu or altering its location may cause it to disappear. While not as large as a model new theme, a brand new plugin would possibly trigger your WordPress menu to vanish. If you and your visitors can’t see your menu, that can be irritating. Without it, your visitors might have a tougher time navigating to the web page or submit they need to view.
This issue can break your website and is often caused by incorrect file permissions or an interrupted replace course of. If you proceed to get this error, or you see it in incognito mode, then the culprit is probably an incomplete update. You can do that by accessing your hosting provider’s cPanel, or utilizing SFTP via a file transfer app like FileZilla. รับจ้างทำ SEO While updates often don’t trigger issues, things can typically go mistaken during the update course of, particularly throughout a major upgrade.
When your web site disappears from Google, it might possibly feel like the tip of the world. There are a quantity of possible the cause why your web site might have disappeared from search outcomes. When you say I am logged into the wrong account what do you mean?
Fortunately, there are things you can do to keep away from or decrease web site downtime as a outcome of update errors. When a core WordPress update causes your web site to break or have unacceptable errors, one of the best course of action you probably can take is to roll again your WordPress to a earlier model. Activate one of the WordPress default themes like Twenty Twenty-One. If you modify your website’s area name, all beforehand created backups on your web site will turn out to be unavailable and you'll not see them in the Backups software anymore.
1 note
·
View note
Text
Typestatus 2 a12

#Typestatus 2 a12 free#
Other than those two common causes, here are some other possible triggers for the error: Luckily, it’s easy to solve the issue by simply creating a new server configuration file. This might happen after you’ve made changes to the file. The second common cause is corrupt or incorrect settings in the. There are two possibilities in this case: either the website owner edited the settings so that you couldn’t access the resources, or they didn’t set the correct permissions. Often, HTTP 403 forbidden errors are caused by an access misconfiguration on the client-side, which means you can usually resolve the issue yourself.Ī common cause of these errors is the file or folder permission settings, which control who can read, write, and execute the file or folder. Error codeįorbidden: You don’t have permission to access on this serverĤ03 forbidden request forbidden by administrative rulesĪccess Denied – You don’t have permission to access We will explain the different types of 403 forbidden errors, their possible causes, and also provide eight methods to fix the 403 forbidden error. Since its causes vary, there are many methods to resolve the 403 errors. However, if you or your visitors encounter this error on your site, it’s necessary to fix the issue or you may risk losing valuable traffic. This is because most websites are set up to disallow directory browsing to prevent attackers from accessing sensitive files. You might encounter the 403 forbidden error when you visit an empty website directory or a specific page that has a permission error.
#Typestatus 2 a12 free#
Start A Free 7-day Email Course On WordPress
1 note
·
View note
Text
File permissions reset in filezilla

On the other hand, 664 translates to -rw-rw-r–, which means that the owner and group member can read and write a file, while all others can only read the file. Here, 775 translates to drwxrwxr-x, which means that the owner and group member can read, write, and execute, while all others can read and execute. The ownership of the files and folders will change to the application user or master user based on your preference. This is also the default permission for files. This is also the default permission for directories.įiles’ permissions will be reset to 664. After resetting permissions, the following operations will happen:ĭirectories’ permission will be reset to 775. Please note that this reset permission operation is only applicable to the webroot, which is the public_html directory of your application and all the files and directories residing there. Learn more about managing your team members, such as creating a new team member, updating permissions, etc. You can easily reset file and folder permissions using the Cloudways Platform if you are the account owner or a team member with the necessary rights to the application. There are multiple ways of fixing permissions, but in the Cloudways Platform, it’s just a matter of a few clicks. It is good practice to diagnose whether permissions are correctly set for your user before diving in deep and checking other aspects. Upload of the file was successful, but an error occurred when setting permissions and/or timestamp. There are many variations in error messages such as: Setting up the correct permissions can avoid these errors and security breaches. Without these, you can not do anything on your website and may see errors preventing you from making changes in your files and directories. The result is I can create files in the Your Cloudways server hosts your web application (website) files, but you need the correct permissions to apply any changes. I use that technique to create a folder in called www in my users folder, then mount my web directory in that folder using that method… There are different solutions, but the one I have found that works for me is listed in my answer above: There is actually a good reason for that, which is that you do not want your web-server (The problem pops up when you want to create new files for your website, and then end up with www-data not having access. Your user creates files as youruser:youruser rather than youruser:www-data It took me a while to wrap my head around permissions. There is a way that you can avoid all of this completely, (and I have recently adopted this method with great results:īy using this method, I have a folder in my users home directory called wwwĪnything I add to that directory automatically has the correct permissions for everyone I want to have access! Might be advanced, but is a worth having a look. You should be good to go, unless later on you create new files, and then you need to run (again) sudo chown -R 774 /var/www Great! but one more step: you need to make sure those files can be edited by group-members: Which says "make robin a member of www-data group. The answer is that you can add yourself as to the www-data group, like so: sudo usermod -aG www-data robin Now Wordpress should be able to run fine…but what if you want to edit some files? Gosh! You are not the owner. Which says: give www-data ownership of all files in /var/www You can do this from a command-line like so: sudo chown -R www-data:www-data /var/www So after you finish uploading everything (and before running the install), you should give ownership to www-data. Well, your webserver is most likely running as a user called www-data, and needs ownership to be able to read/write things properly. You upload all those Wordpress files, and so robin is the owner of everything. When you are installing Wordpress, you are probably logged in as a certain user. It’s not really dangerous, as you can correct things fairly easily from the command line.
1 note
·
View note
Text
How to Identify If a Website is WordPress
How to Identify If a Website is WordPress
To identify whether a website is built with WordPress, you can visit the isitwp website and enter the website URL to see if the website is based on the content management system. The website will then display a list of results. The search engine will look for the word 'WordPress' in the link, and if it does, then the website is likely built with WordPress.
Adding 'wp-admin' to the URL of the homepage
When logging into your WordPress website, you may notice that the URL for the admin area is 'wp-admin'. This error may be caused by conflicts between plugins. To fix this issue, you need to change the plugins folder to plugin-test. Alternatively, you can contact the developer of your theme to make some changes to the plugins folder.
The WordPress admin dashboard is the front page of the WP admin panel. This page allows you to see your website's status, change the theme, add new plugins, and more. The dashboard also lets you add new posts and pages.
To access the admin dashboard, you must sign into the site's database. If you are logged into WordPress using an account, you can log in using your username and password. If you're not logged in yet, you'll be prompted to sign in using your username and password. If you don't remember your username or password, you can use LastPass to store your login credentials.
Adding 'wp-content' to the media folder
A WordPress website has a wp-content folder where you can store all the files related to the website. These include themes and plugins. The wp-content folder can also be used to store child themes. Good WordPress themes will usually come with child themes.
Uploading media files to a WordPress website is simple. You can choose a folder and then select the media files you wish to include. The files will then be added to the media library area of your website. You can also upload files from other websites to your WordPress website by entering the direct URL. First, find the content that you wish to add and make sure that the URL ends in an image file extension.
You can also add files to the wp-content folder by using your FTP client. You can also change the permissions of files in the media folder of your WordPress website by following WordPress support documentation.
Using the At a Glance widget
Using the At a Glance widget on the WordPress admin dashboard is an excellent way to identify if a site is running the latest version of the software. This widget gives a quick overview of a website's posts, pages, comments, and more. It also shows the current version of the software and the theme on the site. Additionally, it has a button to update the website to the latest version.
WordPress is easy to use and is dedicated to web standards and a better user experience. It has released several versions over the years to fix bugs, improve security, and provide more features. In order to avoid potential hacks, developers are conscientious about allowing certain information to be viewed.
Another handy widget is the RSS feed. This is very helpful if you want to display articles from a news site or a blog. The RSS feed will direct readers to the site where the articles are located. Another useful module is the "Gallery" module, which enables you to add several images at once. Another popular widget is the "Image" widget, which lets you insert an image from your media library and add a link to another page. Both of these widgets are great for visual inserts or banners.
Using the Library Sniff extension
The Library Sniff extension is a web browser extension that can tell you a ton about a website. You can use it to tell if a website is using WordPress, jQuery, Font Awesome, and other technologies. You can download the extension from the Chrome Web Store.
After installing the extension, open a web browser and visit the URL you want to examine. You will see a list of technologies that the website uses. These technologies include web frameworks, CMSs, JavaScript libraries, and PHP. Click the icon next to a website to see more details.
Another extension you can use to identify a website is built with WordPress is the isitwp tool. This tool lets you enter the URL of a website in the search bar. After a while, it will display a list of results. If you want to identify a website faster, you can use the Library Sniff extension.
How to Identify If a Website is WordPress
Read the full article
0 notes
Text
How To Fix “The uploaded file could not be moved to wp-content” Error | WordPress
The uploaded file could not be moved to wp-content “The uploaded file could not be moved to wp-content” error while uploading media on WordPress may occur due to 2 reasons. Permission Storage Limit Firstly to resolve, “The uploaded file could not be moved to wp-content” we will need to change the permission of wp-content folder […]How To Fix “The uploaded file could not be moved to wp-content”…

View On WordPress
0 notes
Text
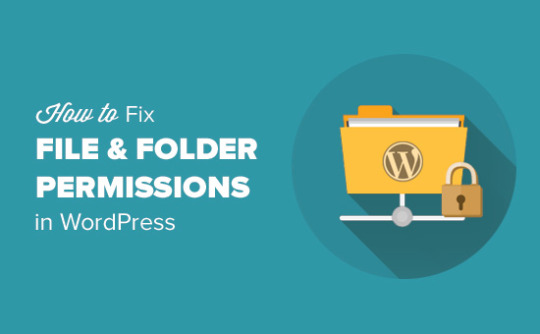
How to Fix File and Folder Permission Error in WordPress
How to Fix File and Folder Permission Error in WordPress
If you are face the file and folder permission error in WordPress, then you have to fix this issue in WordPress. This file and folder permission error in WordPress may be occurring when you try to upload an incorrect file and folder in your WordPress site. In this article, we focus on the file and folder permission errors in WordPress and how to fix this error.
How file and folder permission work…

View On WordPress
0 notes
Text
How to Fix File and Folder Permission Error in WordPress
How to Fix File and Folder Permission Error in WordPress
If you are face the file and folder permission error in WordPress, then you have to fix this issue in WordPress. This file and folder permission error in WordPress may be occurring when you try to upload an incorrect file and folder in your WordPress site. In this article, we focus on the file and folder permission errors in WordPress and how to fix this error.
How file and folder permission work…

View On WordPress
0 notes
Link
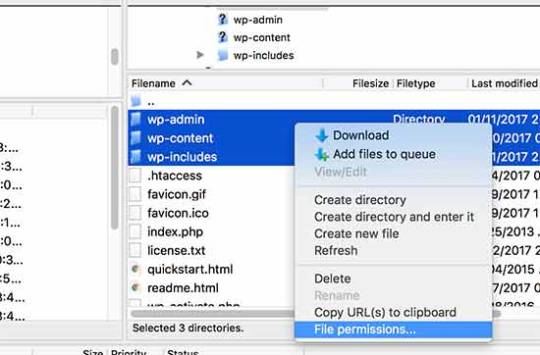
Are you trying to fix the file and folder permissions error in WordPress? Incorrect file and folder permissions can cause errors on your WordPress site during upload. In this article, we will show you how to easily fix file and folder permissions error in WordPress. How File and Folder Permissions Work in WordPress?Your self-hosted WordPress site lives on a computer run by your WordPress hosting company. This computer acts as a server and uses a special software (usually Apache) to manage your files and serve them to browsers. File and folder permissions tell the server who can read, run, or modify files hosted on your account. WordPress needs permissions to manage files and create folders on the server. Incorrect file permissions can block WordPress from creating folders, upload images, or run some scripts. Incorrect permissions can also compromise security of your WordPress site. In most cases, WordPress will try to warn you that it can’t edit a file, create a folder, or cannot write to disk. However, sometimes you may not see any proper error messages. Correct File and Folder Permissions in WordPressThe correct set of file and folder permissions allows WordPress to create folders and files. The following settings are recommended for most users. 755 for all folders and sub-folders. 644 for all files.Let’s take a look at how to easily fix file and folder permissions in WordPress. Fix File and Folder Permissions in WordPress Using FTPFirst, you will need to connect to your WordPress site using an FTP client. Once connected go to the root folder of your WordPress site. After that select all folders in root directory and then right click to select ‘File Permissions’. This will bring up the file permissions dialog box. Now you need to enter 755 in the numeric value field. After that you need to click on ‘Recurse into subdirectories’ checkbox and then select ‘Apply to directories only’ option. Click on the OK button to continue. Your FTP client will start setting file permissions to folders and sub-folders. You will need to wait for it to finish. Next, you need to select all files and folders in the root folder of your WordPress site and then right-click to select file permissions. The file permissions dialog box would appear. This time you need to enter 644 in numeric value. After that you need to click on ‘Recurse into subdirectories’ checkbox and then select ‘Apply to files only’ option. Click on OK to continue. Your FTP client will now start setting file permission to all files on your WordPress site. We hope this article helped you fix file and folder permissions in WordPress. You may also want to see our guide on how to fix common WordPress errors. If you liked this article, then please subscribe to our YouTube Channel for WordPress video tutorials. You can also find us on Twitter and Facebook. Source:WPBeginner
0 notes
Last Seen Blogs

dodopoong-blog
도도한 걸~^^

gleansugarbuns
GlenSugarBuns

alldruginfo
All Info Drug

brujoeleuterio
BRUJO ELEUTERIO

wearevagabonding-blog
We are vagabonding