
cricutnewmachinesetup
cricut new machine setup
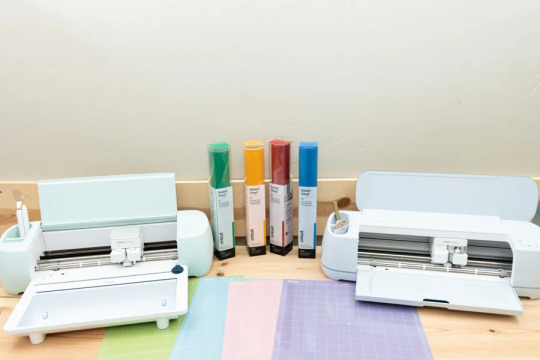
Hey! I am Leilani lawrence, a passionate freelance crafter who finds joy in creating unique home decor. The journey from beginner to pro-level DIYer has been quite thrilling. Cricut machines are my go-to for cost-efficient and trustworthy crafting. Whether you're a pro or a newbie, Cricut brings your projects to life. For easy setup, visit Cricut New Machine Setup.
42 posts
Don't wanna be here? Send us removal request.
Last Seen Blogs

ificanlivethruthis
If I Can Live Thru This

weightgander2
The Love of French 685

evilboy2007
EVIL Marco

raddragonhideout
제목 없음

nohu90pro
Nohu90 - Cổng Game Quốc Tế Hàng Đầu Năm 2023
Text

Begin your crafting career enthusiastically with Cricut. Crafters will have endless ideas to work on, from a robust machine like the Cricut Maker to a portable Cricut Joy. A companion app runs the Cricut machine smoothly on computers and smartphones. The Cricut Design Space software is required to setup the Cricut machine. Download it by simply navigating to Cricut New Machine Setup.
#Cricut Design Space#cricut design space app#design space signin#Cricut New Machine Setup#cricut.com/setup#install cricut explore air 2#cricut explore 3#cricut.com/setup mac
0 notes
Text
How Do I Connect Cricut to Computer: A Step-by-Step Guide
How do I connect Cricut to computer? This was a question I got on one of my blogs a week ago. Not only this, but I also received similar questions regarding connection from many readers. Since none of my posts has a complete guide to Cricut connection in one single guide, I tried to write this.
Without thinking twice, dive into this blog and explore the steps one by one. In this blog, I have answered how do I connect my Cricut to my computer via Bluetooth. Let’s start now!
What Do I Need to Connect My Cricut to a Computer?
In order to learn how do I connect Cricut to computer, you have to first understand what you need before connecting to your Cricut. As we know, the connection is a part of the Cricut setup, meaning we are actually setting up our machines. So, there are things that are required before setup. Let’s get a look into it:
Cricut machine
Power cable to connect your Cricut to a wall outlet
A flat surface like a table for keeping the machine on
A Windows/Mac computer with the following system requirements:
For Windows
Operating System – Windows 10 or later (64-bit)
RAM – Minimum 4GB
Disk – 2 GB free
CPU – Intel Dual Core or equivalent to AMD processor
Display – 1024px x 768px screen resolution
Connectivity – A USB port/Bluetooth connection
For Mac
Operating System – macOS 11 or later
CPU – 1.83 GHz
RAM – Minimum 4GB
Display – Minimum 1024px x 768px screen resolution
A USB port or Bluetooth is required
Disk – 2GB
How Do I Connect Cricut to Computer (Windows)?
You will need to set up your Cricut on a Windows PC, which requires a connection. Since the connection is part of the Cricut setup, you must use a compatible Windows PC, such as Windows 10 or a later version. I have explained the easy steps I followed to connect my Cricut to a Windows computer.
Here are the easy steps to connect your Cricut to a computer on a PC:
First, you need to look for a flat surface to place your Cricut.
Here, ensure the distance is no more than 15 feet from the PC.
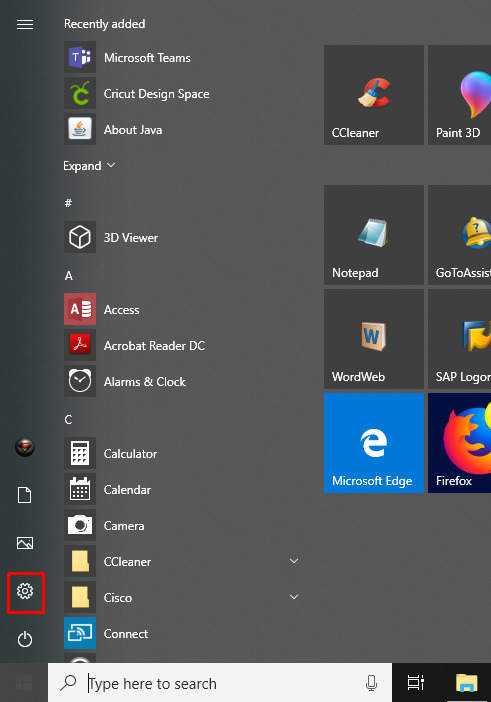
Afterward, go to the Start menu and select a gear icon to open Settings.

As you click on Settings, you will move to another screen, where you need to click on Devices.

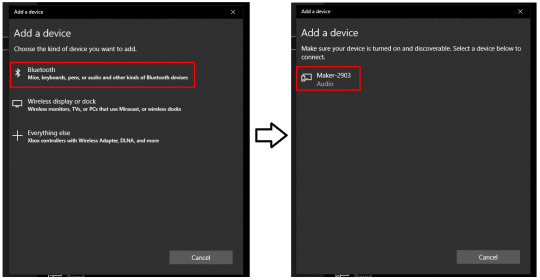
Verify if your Bluetooth is ON, then go to Add Bluetooth or other device.
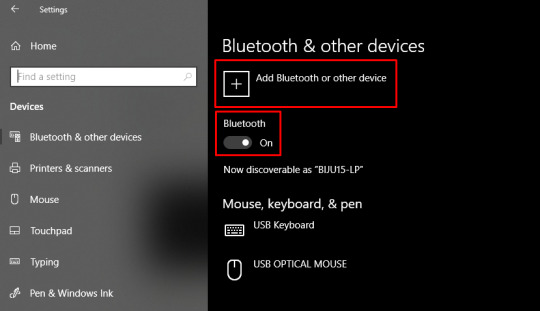
Next, select the Bluetooth option and wait for your PC to detect your Cricut machine.
Select it as it is visible in the open list, and your pairing will be done.
How Do I Connect Cricut to Computer (Mac)?
Mac users need to follow the following steps. However, the placements of Cricut and your computer are almost the same as for Windows. Here are the easy steps to connect your Cricut to a computer on a Mac:
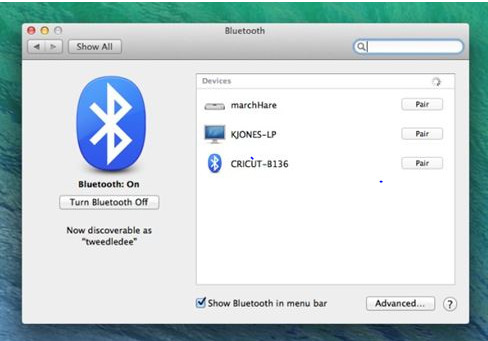
Review if your computer is powered on or off.
After that, move to the Apple menu and choose the System Preferences option.
Now, go to the Bluetooth app on your Mac computer.
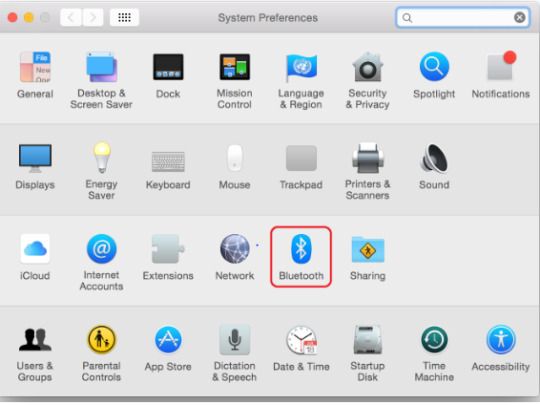
Afterward, turn on the Bluetooth.
Next, select the detected Cricut model from the available list.
Last but not least, you have connected your Mac computer to your Cricut.
FAQs
Question 1: What is the “Connect to Computer via Bluetooth” screen on Cricut?
Answer: The “Connect to Computer via Bluetooth” usually appears during the setup of Cricut Maker 3 or Cricut Explore 3. It happens because the Cricut Design Space app has detected an AMD Ryzen chip on your desktop. Actually, there is a problem with some Windows AMD Ryzen chips that may cause problems when you try to connect your Cricut via a USB cable. Therefore, Cricut recommends you use a Bluetooth connection for these computers.
Question 2: What should I do if my Cricut won’t connect?
Answer: If your Cricut is not connecting to your device, then you need to try the following useful tips:
You need to clear the cache and history of the web browser.
Run a scan on your computer for potential malware.
Defragment the hard disk.
Ensure your firewall or antivirus is blocking Cricut connections.
Question 3: Are all Bluetooth dongles compatible with Cricut machine?
Answer: According to Cricut’s official website, CSR (Cambridge Silicon Radio) Bluetooth dongles are incompatible with the Cricut machine. However, if you want to use a Bluetooth dongle, you need to use one that supports audio devices. Cricut doesn’t guarantee that all dongles will connect to your machine, but those that support audio devices are more likely to be able to connect.
Conclusion
To learn how do I connect Cricut to computer, I have explained all the steps carefully. Before that, I also mentioned things that were required before the Cricut setup. In it, I have especially discussed the system requirements. Make sure your Cricut meets the requirements so that you can do the setup in no time. To have an error-free, smooth connection with the Cricut software, go to this write-up and follow the steps mentioned above.
Read more: install cricut design space app
cricut.com/setup mac
Cricut Design Space
Cricut New Machine Setup
Source: How Do I Connect Cricut to Computer
#How Do I Connect Cricut to Computer#Cricut New Machine Setup#install cricut explore air 2#cricut design space#cricut explore 3#cricut.com/setup#design space signin#cricut.com/setup mac#cricut.com/setup windows
0 notes
Text

Musicians have instruments to help them progress; similarly, if you're searching to make music in a limited space at home, you will need a machine. Enter the Cricut machine, a versatile crafting tool that facilitates various projects such as T-shirts, decals, labels, stickers, mugs, hats, keychains, tote bags, and many more. Operating with the Cricut Design Space app, you will only need to download and install it from Cricut New Machine Setup and set up your Cricut machine, and then you are good to go.
#design space signin#Cricut New Machine Setup#install cricut explore air 2#cricut explore 3#cricut.com/setup#cricut design space
0 notes
Text
Cricut Maker Software Download: Easy Guide for Beginners
Hey, Cricut folks! Are you looking for a guide on Cricut Maker software download? If so, then you have come to the right page! Do you know when I have to download Cricut Maker software? I get very excited. I don’t know why, but I love easy steps that I can perform again and again. Downloading is quite satisfying for me. Sounds weird, right? I can understand, but it is what it is.
In this write-up, I will explain how to download Cricut Design Space on Windows, Mac, iOS, and Android. This post will be helpful for new crafters who want to get started with their Cricut Maker machine!
Cricut Maker Software Download on Windows
Cricut Design Space is the best software to create, modify, and personalize your projects. However, if you are a Windows user and want to download Cricut Maker software, then you need to follow the steps described below:
Open your browser on your PC and type the URL design.cricut.com on the search bar.
Then, click a checkbox saying, “I agree to Cricut Terms of Use and Privacy Policy.”

After that, the Download control will be clickable to download.
Once you finish the download, navigate to the Downloads folder.

Get the file you downloaded.
Then, double-click on it to install the Cricut Design app.
Once you complete the installation, you need to register to a Cricut account.
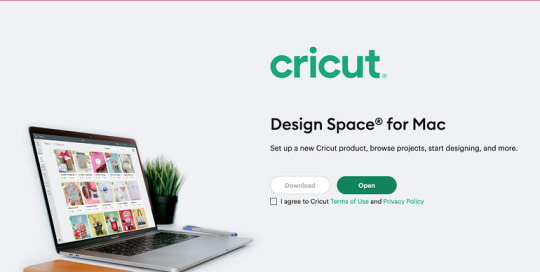
Cricut Maker Software Download on Mac
Okay, here comes the other computer, i.e., a Mac. Downloading from the browser is completely the same as downloading from the Windows computer, but the only difference you will notice is in installation. Let’s see how to download and install the software below:
Enter the URL — design.cricut.com on your browser and check the box to accept Cricut’s Terms & Conditions.
Second, you will be asked to go to a page where to select the location to save the file.
After saving, you will see that the download has started.
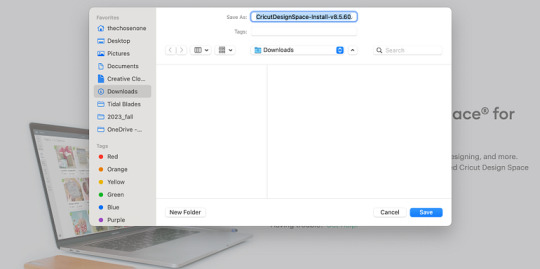
Then, head to the Downloads folder to discover the .dmg file.
Double-click on it to install.
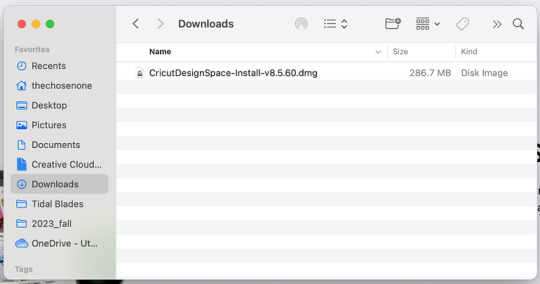
When installing, drag the Cricut icon to the Applications folder.
Finally, your Cricut software will be added to your folder.
To open the app, you have to double-click on the app and then start creating what you love.
Cricut Maker Software Download on Your iOS Device
Now, let me show you the steps to download the Cricut app on your iOS devices. The app is fully compatible with your iOS device, and you don’t need to download it using your browser. All you need is a pre-installed App Store app. So, without giving it a second thought, let’s begin downloading:
Launch the App Store app.
On the App Store, enter Cricut Design Space on the search bar.
Now, hit the Get button to download the app and verify your download with your iTunes password (if prompted).

When you have the application on your device, you need to open it.
Afterward, you can start a Machine Setup or Sign In to proceed with crafting.

Cricut Maker Software Download on Android
Last but not least, we are going to download the Cricut app on an Android machine. To download the software, head to the Google Play Store. Now, follow the steps described below to install the software:
Go to your Android phone’s home screen.
And find the Google Play Store icon on your device.
On the Play Store, search for Cricut Design Space.
You will find a Cricut app in the suggested apps below.
Select the app from the suggested results.
Then, press the Install button given below to begin installing the app.
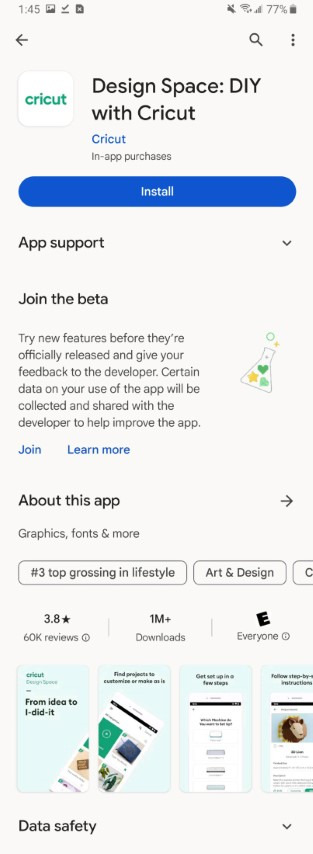
After installation, the Cricut software will be added to your phone’s home screen.
Open the application and set up your machine right away.
FAQs
Question 1: Which software does Cricut Maker use?
Answer: The Cricut Maker is a robust machine in the Cricut lineup that cuts more than 300 materials in no time. However, the software used with this machine is the same as that used with others. This is nothing but a Cricut Design Space, which is a companion app to all Cricut cutting machines.
Question 2: What are the Windows system requirements for Cricut?
Answer: In order to run the Cricut software on a Windows computer, you will need to meet the following needs:
● Windows 10 or later (64-bit) operating system
● Disk: 2 GB free
● A USB port/Bluetooth
● Minimum 4 GB RAM
● CPU with Intel Dual Core or equivalent to AMD processor
● The display should have a minimum 1024px x 768px screen resolution
Question 3: How to use the Cricut software to setup the machine?
Answer: To set up your Cricut machine on your computer, you have to follow the steps below:
Plug in the machine and power it on.
Then, you need to connect your Cricut to the computer via Bluetooth.
Now, download and install the Cricut Design app.
After that, open the Cricut app and sign in to your Cricut account.
Select the Menu and select Machine Setup.
Finally, choose the model and follow the instructions on your screen.
Read more: Cricut New Machine Setup
install cricut design space app
cricut.com/setup mac
Cricut Design Space
Source: cricut maker software download
#design space signin#cricut maker software download#install cricut design space app#install cricut explore air 2#cricut.com/setup#cricut explore 3#how to setup cricut maker#cricut design space
0 notes
Text
Best Selling Cricut Projects to Make Extra Income
Hey crafting enthusiasts, I hope you all are doing well! Do you know what the best selling Cricut projects are at peak times? Well, there are many projects that you can create in no time and earn a good amount of money by selling them.
If I talk about categories in Cricut projects, there are a huge number of them. However, I would like to mention some of them, such as jewelry, home decor, apparel, etc. I have tried to mention all types of DIY projects that are not only easy to make but also save you time. Lastly, the number of sales that you will receive will be quite enough. So, are you ready to explore these crafts? Let’s delve into it!
1. Jewelry
This spider web-themed earring is made with faux leather and a Cricut machine. Surprised? Yes, I can understand, but it was fun creating it. Also, I was a little intimidated before listing it in my online shop, but I received many orders from my customers.
The idea of making web-themed earrings using faux leather was really cool. Hence, it worked really well. Thanks to Cricut, it offers the pro-quality that you can do yourself.
2. Cards
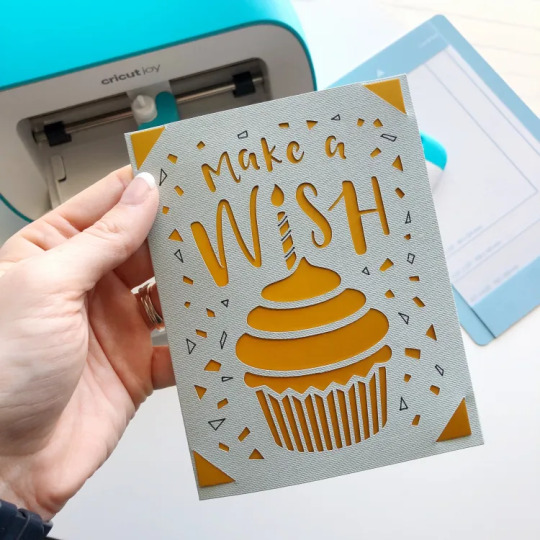
A minute birthday card can be helpful for those who will celebrate their loved one’s birthday. You can design it in Design Space or cut it in a Cricut Joy machine. I personally prefer Cricut Joy, as it offers a great tool for making cards. Whether it is birthday cards or anniversary cards, Cricut will let you create many cards in no time.
3. Felted Flowers
Felted flowers are the best Cricut projects to sell on your online store. If you have also set up your offline shop, it can be sold easily. You can buy Cricut felt material at an affordable price, and it is easily available on its official site. Felts are soft and must be handled with care, so you can try them if you want. But, It can be profitable for you if you want to sell it.
4. Hello Sign
Everyone wants to decorate their house to spread the vibes of a real home. The more beautiful the house looks, the more it spreads the home-like feeling. So, if you want something to sell on your Etsy or Shopify, you should go for this home signboard I created with my Cricut Maker. You can also make it on your other Cricut machine model, but creating and selling online is easy.
5. Custom Mugs
The Custom mugs are easy to prepare. I made these mugs using Cricut infusible ink transfer sheets, pens, and markers. You can sell ready-made mugs in your shop or offer a personalized mug service.
However, I have observed that mugs are the best selling Cricut projects as they are considered the best gift options for birthdays or anniversary gifts. So, what are you waiting for? Create amazing mug designs and sell them hassle-free.
6. Stickers
Stickers are useful, and if you have ideas to make them customizable, they’d be great for buyers. Many people want stickers to stick to their journals and diaries and prepare their fitness or diet plans. I have made various categories for stickers from which buyers can choose their type of sticker. The stickers are really sold in large numbers and do not take much time to make.
7. Labels
Pantry labels can be the best selling Cricut projects as they are very useful for everyone. I have sold many labels, and they are highly sold at my local store. Even many women customers buy these labels for their kitchen containers. All you need is to use vinyl, cut the text, and paste it directly on the container wherever you want.
It is helpful not only for kitchen wares but also for your stores. I even use it at my local store.
8. Wedding Cards
This is an acrylic place card used in weddings, and it is made up of acrylic. Acrylic has become a classic choice for everyone, especially when it comes to weddings. The versatility of these cards makes them perfect for most wedding themes.
Use your Cricut Explore or Maker model to create this beautiful card uninterruptedly. I used removable vinyl materials because they give acrylic a new life after the wedding day ends.
9. T-shirts
Who doesn’t like personalized Cricut shirts? So, try listing them on your Shopify or any other online e-commerce platform. However, I am pretty confident about your sales numbers. As you can see, I have made this using iron-on vinyl and see how fantastic the result it has given.
Since I wanted a black design on my T-shirt, I chose black vinyl. This is my favorite, and I have sold more than 10 copies of these T-shirts in various colors.
FAQs
Question 1: What are the best Cricut projects to sell?
Answer: Numerous projects with Cricut can help you make projects that sell really best. Also, the Cricut provides the pro results you will need to sell it via online or offline mode. To know what are the best selling Cricut projects, have a look at the following list:
Stickers
Decals
Baby Items
Cake Toppers
Wedding Invitations
Leather key chains or jewelry
Paper Flowers
Coasters
Question 2: Where should I sell my Cricut projects?
Answer: Although there are multiple platforms for selling your Cricut projects, I know many platforms that are suitable for this. For example, these are Etsy, Shopify, and Amazon. So, try these platforms to sell your DIY projects and make money hassle-free. In addition, if you are using Shopify, you can customize your shop there and sell anything you have created.
Question 3: What supplies are needed to sell Cricut projects?
Answer: Cricut supplies are needed whenever you are making any projects with Cricut. Also, these are supporting items that help you create anything hassle-free. Thus, the useful Cricut supplies that you need to use for best selling Cricut projects are as follows:
Cricut mats
Cricut tools
Weeding tool
Cricut BrightPad
Brayer
Cricut Joy tote
XL Scraper
Read more: cricut.com/setup mac
install cricut design space app
Cricut Design Space
Source: best selling Cricut projects
#design space signin#best selling Cricut projects#Cricut Design Space#cricut design space login#cricut design space app#cricut design space setup#cricut.com/setup#cricut explore 3#cricut maker bundle#cricut design space for mac#cricut accessories#cricut.com#cricut design space download
0 notes
Text
How to Set up Cricut Maker: A Step-by-Step Guide
Are you overwhelmed after adding the Cricut cutting machine to your art collection? Setting it up can be challenging, but if it is done successfully, you will fall in love with the overall process. Undoubtedly, a new user might find how to set up Cricut Maker topic alittle hectic, but that can be done without much help.
This ultimate machine will take your decorative arts and crafts to the next level. This Cricut product delivers a next-level crafting experience by cutting 300+ materials with its advanced suite of tools. Cricut Maker is compatible with Windows, Mac, Android, and iOS devices and connects with the Design Space app. The blog will solve any doubts about this Cricut machine setup and connection process on a computer.
How to Set up Cricut Maker on a Computer?
Whenever I think of creating a craft with Cricut Maker, the first thing that comes to mind is setting it up with the computer. To get the desired project out of the cut-die machine, all the DIYers must conclude the setup successfully. For that, they need to follow the steps given below:
Initiate the process by unboxing this Cricut machine along with other supplies.
After that, plug in the power cable inside the machine and switch it on.
Following this, take the USB cable and connect the Cricut Maker to your computer.
On the other hand, you can also pair both devices via Bluetooth.
Next, open your device search engine & go to cricut.com/setup.
Now, press Download to install the Cricut Design Space app on your device.
After getting the app, create your account or sign in using your login credentials.
At this point, you need to follow the instructions and start setting up your Cricut Maker.
Lastly, you will know the set-up was complete when called for a test cut.
With the help of the content mentioned above, you must have gotten the idea about the steps that revolve around how to set up Cricut Maker with PCs.
How to Connect Cricut Maker to Computer via Bluetooth?
After setting up the Cricut cutting machine with the computer, it’s time to make progress and connect devices via Bluetooth feature. Below are some instructions that will help you finish the wireless connection quickly without any issues:
Windows
All the Windows users who’ve completed the how to set up Cricut Maker process are instructed to have a look at the steps given below:
In the opening stage of the process, you need to check whether your cut-die machine is on and within the range of 10-15 ft of your computer.
After that, open the Menu section and tick the Settings icon (it will look like a gear icon).
Now, press the Devices option and check whether your computer’s Bluetooth is on.
Next, select Add Bluetooth or other device and tick the Bluetooth option.
At this time, you need to wait for a few seconds till your computer detects Cricut Maker.
Further, choose your Cricut machine name from the list before you.

Here you go! Your Windows system and Cricut Maker wireless connection process has been done.
Mac
If you are a Mac user and want to connect your system with this Cricut cutting machine, then have a look at the steps written below:
First, you must ensure that your Cricut Maker is on and within 10-15 feet of your Mac.
Next, open the Apple menu and choose the System Preferences option.
Afterward, click the Bluetooth icon and enable Bluetooth on your computer.
Now, select your cutting machine name from the list appearing under the Devices section.
After a few minutes, the connection process will come to an end.
Finally, you have connected your Cricut Maker machine to your Windows and Mac computers.
Frequently Asked Questions
Question: Why Is My Computer Not Connecting to Cricut Design Space?
Answer: The reasons that you might be facing while connecting your computer to the Design Space app are given below:
Check that your computer has a strong internet connection.
Cricut Design Space servers might be down, which might cause connection issues.
You must have the older version of Cricut Design Space so it doesn’t connect to your computer.
Question: How Can I Connect My Cricut to a Device via a USB Cable?
Answer: The steps that will help you connect your Cricut to the device via USB cable are as follows:
Start the process by unboxing your Cricut machine and USB cord.
After doing that, turn on your device & Cricut machine simultaneously.
Next, slowly put one end of the cable at the USB port of your Maker machine.
Repeat the same process by setting the cable on the other end inside the computer USB port.
Finally, press the power button to see that the connection has been made successfully.
Question: Can I Use My Cricut Machine With Design Space App?
Answer: No, you can’t use the Cricut machine without the Design Space app because it runs together with the cut-die machine. Without Cricut Maker, users won’t be able to send any designs to the craft plotter and cut any material during the cutting process. Besides, the app is the only way to interact with the Design Space app.
Read more: Cricut design space
install cricut design space app
how to setup cricut explore
Source: how to set up cricut maker
#how to set up cricut maker#how to setup cricut explore#design space signin#Cricut design space#cricut design space login#cricut design space download#cricut.com/setup#cricut design space setup#cricut design space for mac#cricut design space app#cricut maker bundle#cricut explore 3#cricut.com
0 notes
Text
5 Best Cricut Machine Reviews: Which One is Worth the Pick?
A few years ago, you asked me what the Best Cricut machine is. I probably wouldn’t have answered. Back then, I was unfamiliar with each Cricut machine model, so I couldn’t give the best Cricut machine reviews. But today, after many years of crafting experience, I have tried almost all Cricut machine models.
On the contrary, I am only talking about the Cricut cutting machine, not the Heat Press. Since I have dedicated half my life to crafting, I think I am the perfect person to give YouTube Cricut craft machine reviews. Therefore, I would like to introduce you to different Cricut machine models and their key features through this blog. Also, I would like to share its pros and cons to help you decide before buying it. Let’s get into this blog to explore these models in detail.
1. Cricut Explore Air 2
The Cricut Explore Air 2 is one of the oldest models in Cricut’s lineup. Also, this particular Cricut model is the most suitable one for beginner crafters. I always recommend novice crafters to start with Explore Air 2, and then further they can advise with the latest version. With this machine, you can easily craft stickers, and it is also affordable for everyone.
Pros:
Cuts 100+ materials
Compatible with 6 tools to score, foil cut, write, and more
Bluetooth wireless technology
Built-in tool holder
Extra storage to hold extra tools and accessories
Decent performance
Beginner-friendly
Cons:
Noisy
Unsuitable for pro crafters
2. Cricut Explore 3

In all these best Cricut machine reviews, I can’t miss this amazing Cricut Explore 3 machine, which is one of the best machines available at an affordable price. However, the main difference I know about this model is its compatibility with Smart Materials. So, let’s see why you should consider it as the best option and why you shouldn’t.
Pros:
Works with 100+ materials + Smart Materials
Best fit for home inkjet printer for Print Then Cut feature
Cuts complex designs with accuracy
Bluetooth wireless technology
Cricut Manufacturer Warranty
Performs operations such as writing, drawing, foiling, scoring, and more
Smooth and quiet
Has adaptable cutter
Cons:
Can cut up to 100 materials only (less than Cricut Maker 3)
Less powerful than Cricut Maker 3 but better than its predecessor
Extra investment for extra attachments
3. Cricut Maker
Here comes an advanced model, or we can say it is better than all Explore models. But it is suitable for those crafters who have a good budget and want something advanced. I don’t think the Cricut Maker model is the right investment. Let’s explore the best Cricut machine reviews to learn more about the Maker model.
Pros:
Works with 300+ materials
Performs different operations, including writing, drawing, foiling, scoring, and more
Works with 13 tools to cut, write, score, foil, engrave, deboss & more
Cuts complex designs with preciseness
Best for Print Then Cut projects
Seamless customer support via phone or chat
Cricut Manufacturer Warranty
Bluetooth wireless technology
Cons:
Outdated technology, meaning Cricut no longer supports it
Can’t cut Smart Materials
Slow performance and less power
4. Cricut Maker 3

Cricut Maker 3 is an updated version of its predecessor. In addition, it uses the same process, and the Cricut app and attachments are similar. Only one thing makes it different from other Cricut models: it can cut, score, and engrave Smart Materials without using the cutting mat.
As a result, you can cut up to 12 feet. Also, in terms of speed, it cuts much faster than the original Cricut Maker.
Pros:
Works with 300+ materials + Smart Materials
Cuts complex designs with precision
Best for a consistent outcome
Compatible with Bluetooth wireless technology
Writes, engraves, embosses, draws, foils, and more
Suitable with a home inkjet printer for the Print-Then-Cut feature
Cricut Manufacturer Warranty
Online courses & beginner’s cheat sheets
Seamless customer support via phone or chat
Cons:
Expensive
Materials are costly
Too much investment for beginner crafters
5. Cricut Joy

Okay, here are our Cricut Joy machine reviews to help you determine why this is best for you. Ever since I decided to write about the best Cricut machine reviews, Cricut Joy was at the top of the list. This is compact and looks really cute! In addition, it is designed for crafters who travel a lot and want a portable cutting machine.
Thus, let’s see why it could be the right choice for you!
Pros:
Works with 50+ materials
Writes, draws, and foils
Seamless customer support via phone or chat
Bluetooth wireless technology
Cuts design in detail with precision
Cricut Manufacturer Warranty
Compact and portable
Adaptable
Ideal choice for paper crafts
Cons:
Weak and small size
No USB connection
Extra investments for pens, blades, and engraving tips
FAQs
Question 1: Which Cricut machine is the best?
Answer: My overall best pick is the Cricut Explore 3. It is because I know Cricut Maker models are the best and most robust. But still, I’d say Explore 3 because it is also robust, and you can get this cheaply. It is a great tool for intermediate crafters, including beginners. So, if you want something cheap and basic, you should go with Cricut Explore 3.
Question 2: Which Cricut machine is apt for beginners?
Answer: If you want a Cricut machine for beginners, then you will need to use the Cricut Explore Air 2. This machine is designed for beginners and doesn’t cost too much. So, start using the machine and create anything with Explore Air 2 when you have no time. Overall, Cricut Explore Air 2 is the best for beginner crafters.
Question 3: What do I need when buying a Cricut for the first time?
Answer: If you are buying a Cricut machine for the first time, you will need to gather many other accessories. Thus, below are the items you will need with your Cricut machine:
StandardGrip Mat
T-shirt
Weeding Tool
BrightPad (optional) or Light Box
EasyPress or Heat Press or Iron
EasyPress Mat
Everyday Iron-on
Conclusion
Finally, this write-up covers all the best Cricut machine reviews. Be it Cricut Explore models Maker or Joy; I have given my honest reviews about all of them. So, the main aim of writing this blog was to help you decide which Cricut model is the best from others. As you move further into the blog, you will find a lot of pros and cons. Explore them in detail and make purchases accordingly.
Source: best Cricut machine reviews
#best Cricut machine reviews#Cricut machine for beginners#Cricut Joy machine#Cricut Explore Air 2#design space signin
0 notes
Text

Show your artistic skills with Cricut cutting machines. Whether you want to work on intricate designs or personalized projects, Cricut has various models to meet all crafting styles. Setup your Cricut machine today with easy-to-follow steps by visiting the site Cricut New Machine Setup and exploring the wonderful features of the Cricut Design Space app. Now, only bring your artistic visions to life with Cricut’s advanced cutting machine.
#design space signin#Cricut Design Space#cricut design space for mac#cricut design space setup#cricut design space app#cricut design space download#cricut design space login#cricut.com/setup#cricut.com
0 notes
Text
How to Make Wall Decals With Cricut: A Stepwise Guide
Isn’t it a great feeling when you buy a house with your savings? If yes, then you will also agree that decorating it with yourself adds a personal touch. Last year, I bought a house for my family, and I still remember the tears of pride in their eyes. If you’ve recently purchased or plan to renovate it, you must learn how to make wall decals with Cricut.
Ever since I started using the Cricut machine, I have learned a lot of things related to crafting, which has not only brushed up my skills but also increased my knowledge. But the customized wall decals are a project I would love to create from my Cricut machine. These wall stickers are made of removable adhesive vinyl in any size, shape, and color.
Inside this blog, you will find all the primary details about supplies and the process of designing a Cricut wall decal.
Which Cricut Supplies Do I Need to Make Wall Decal?
Before diving into the crafting world on how to make wall decals with Cricut, let’s talk about the supplies required to make this craft. As a crafter, I advise you to be careful while using each tool in this project. Have a look at the below pointers to know about the names of the supplies:
Cricut cutting machine
Cricut Design Space
Roll of vinyl
Cutting mat
Weeding tool
Scraper tool
Transfer tape
It’s time to introduce you to the method in which all of these supplies are going to play a vital role for the crafter.
How to Make Wall Decals With Cricut: 5 Basic Steps
In this section of the blog, you will learn about the steps included while performing how to make a wall decal with Cricut. Ensure that you don’t jump any step while going through the information:
Step 1: Creating a Design on the Cricut App

Step 2: Cutting the Cricut Vinyl

When the cutting process ends, unload your material from your cut-die machine and keep it aside.
Step 3: Weeding Out Your Flower Design

Step 4: Apply Transfer Tape to the Design

Step 5: Applying Your Design to the Wall

Conclusion
Wasn’t it fun to learn how to make wall decals with Cricut and redesign your wall with something new? Keep growing by learning something new, and take advantage of opportunities to show off your talent. Apart from that, you can also make and sell various sizes of wall decals and make lots of money with them. I wish you all the best for your future and keep doing new projects that can increase your knowledge and make you touch the skies.
Frequently Asked Questions
Question: What Kind of Cricut Vinyl Should I Use for Wall Decals?
Answer: Most crafters recommend using removable vinyl while making customized wall decals. They are temporary, can be removed easily without damaging the wall, and can be made quickly. Besides that, these vinyls are cost-efficient and can be placed on the wall without hassles. You can buy this Cricut material from Cricut’s official portal or nearby stores.
Question: Does Cricut Removable Vinyl Stick to the Wall?
Answer: Cricut removable vinyl easily sticks to the wall and comes with strong adhesive. These vinyls are water-friendly, long-lasting, and don’t leave any stain on the wall. They are perfect for functions or applying it on the wall. The removable vinyl can be used for projects such as wall decals, labels, stickers, etc.
Question: Is It Compulsory to Make Wall Decals in Cricut Design Space?
Answer: Yes, all the DIYers must make their respective devices on the Design Space app. Since all the cutting machines are compatible with this software only, without this software, the Cricut cutting machine won’t work and make your design on the materials. Other than that, while using the software, you will also get to choose various images, fonts, and customized projects.
Read more: cricut.com/setup mac
install cricut design space app
Cricut Design Space
Source: how to make wall decals with cricut
#design space signin#how to make wall decals with cricut#Cricut Design Space#cricut design space for mac#cricut design space app#cricut design space login#cricut design space download#cricut design space setup#cricut.com/setup
0 notes
Text
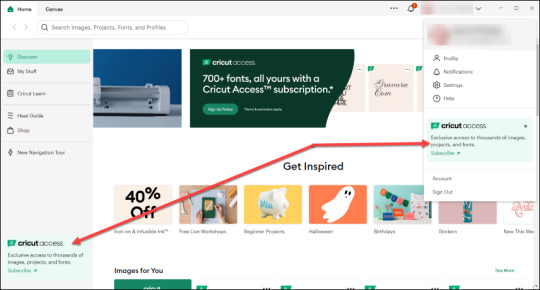
How to Get Free Cricut Design Space: A Complete Guide
If you want to unleash your creativity, the Cricut cutting machine will help you on this crafting journey. During each turn of the path, the free Cricut Design Space will be the best passenger. It is the company’s registered designing software that assists in creating and personalizing projects. Besides, the Design Space app supports all Cricut machines and is compatible with Windows, Mac, Android, and iOS devices.
This easy-to-use app helps users simplify complex designs with its tools and other features. Plus, it has unlimited images, fonts, and pre-made projects to turn ideas into reality. The Cricut software is undoubtedly available, but it also offers a subscription plan called Cricut Access. This monthly or yearly plan allows users to use thousands of images and text fonts.
This blog will give you full details about the app system requirements and installation process on your respective device (computer or mobile phone).
System Requirements for Downloading Cricut Design Space
You must fulfill the system requirements if you look forward to getting free Cricut Design Space on your desktop computer or mobile device. The reason why it is essential to know about the requirements is that you will get to understand whether your device is going to support this software or not. Go through the details and come across with the minimum system requirements:
For Windows
Operating System
Windows 10 or later
Intel Dual Core or similar AMD processor
4GB RAM with 2GB free disk space
Available USB port or wireless Bluetooth connectivity
Display: Min 1024px x 768px screen resolution
Internet Connectivity
Download: Min 2-3Mbps
Upload: 1-2Mbps
For Android
Operating System
Android 10 or an upgraded version
Mobile devices or tablets that don’t support Chromebooks
Performance entirely depends upon chipset, processor speed, and manufacturer
Internet Connectivity
Download: At least 2-3Mbps
Upload: At least 1-2Mbps
How to Download Free Cricut Design Space on Windows?
After collecting details about the Cricut software system requirements, it is time to learn how to get it on the Windows system. Have a look at the steps that you need to take to get the software on your computer system:
Initiate the process by opening the web browser of your choice and then go to Cricut Design Space’s official portal.
Next, tick the box given next to Terms & Conditions and click the Download option.
After the download ends, double-click the file available in your device download folder.
A small window will open, sharing your PC’s free Cricut Design Space installation status.
Next, go to your computer’s home screen and open the installed app.
Then, create your account by entering your first name, last name, email address, and country.
Now, tick the Sign-In button to enjoy the app on your Desktop.
How to Install the Cricut App on Android Devices?
If you are an Android device user and want to get this easy-to-use app on your mobile, then install it by reading the details below:
First, switch on your mobile device and go to the Google Play Store app.
Afterward, enter Cricut Design Space inside the search box, and the app will appear at the center of your mobile screen.
Now, tick the Install option to start the app installation process.
Next, you will see the free Cricut Design Space app next to other installed apps.
Finally, open the app, sign in, and create your canvas design.
Since you’ve become aware of the Cricut app system requirements and the installation process, it is time for you to dive in and create your DIY projects. If you are a beginner, you should make paper cards, stickers, decals, cake toppers, banners, and so much more. I wish you luck while making your first project on the software.
Frequently Asked Questions
Question: Can I Download Cricut App on My Device for Free?
Answer: You can download the Cricut app for free on your respective computers and smartphones. Craft lovers can get the Design Space for their PCs from Cricut’s official website and install it on their smartphones via the App Store or Play Store. But this designing software comes with a subscription plan called Cricut Access.
Question: What Projects Can I Make With Cricut App?
Answer: Since the Cricut app has various tools, it can easily make different projects from different materials. The names of the crafts are written here:
Greeting cards
T-shirts
Tumblers
Wall decals
Custom-made mugs
Tote bags
Question: How Do I Install Cricut App on My iOS Device?
Answer: Follow the below steps to get the Cricut designing software on your iOS devices:
You need to start the process by opening the App Store on your mobile phone and searching for Cricut Design Space.
After getting the app, click the downward arrow and double-click your power button.
When the app is installed on your device, open it and create your Cricut ID.
Finally, you can start making new projects anywhere and anytime on the app.
Source: free Cricut Design Space
#design space signin#free Cricut Design Space#install cricut design space app#cricut new product setup#cricut.com sign in#cricut.com/create#setting up your cricut maker#cricut explore air 2
0 notes
Text
How to Create a Cricut Account: Beginner’s Guide
Before you can create custom-made crafts, you must create a Cricut account, which allows you to log in to Cricut Design Space at any time. Simply put, it will give you a unique identity and register you as a regular user. Your Cricut machine won’t start working on any project unless you have a Cricut Design Space account. Once registered, you will get full access to the available features. This software will save your projects and designs and keep updating by launching new features.
The Design Space app works with a Cricut machine and helps crafters make new designs with their tools. Plus, it is compatible with computers and smartphones. If you are a new user and don’t know how to create an account, then stick to this blog till the end.
What Are the Minimum System Requirements for Cricut Design Space?
To make the app run smoothly on the computer system, all users must ensure that their devices meet the basic system requirements. In this blog, you will learn about the system requirements for Windows & Mac as well:
Windows
Operating System: Windows 10 or it’s latest version
Internet Connectivity: At least 2–3 Mbps for downloading & 1–2 Mbps for uploading
Offline: Can work without internet
Mac
Operating System: macOS11 or updated version
Internet Connectivity: Min 1–2 Mbps for uploading & 2–3 Mbps for downloading
Offline: Can work without internet connectivity
How to Download Cricut Design Space on a Computer?
Before you create a Cricut account, getting the app on your respective devices is essential. Get the app free of cost on your device by considering the below steps:
First, open your web browser, go to Cricut’s official website, and press the Download box in the middle of the page.

After the download ends, go to your device’s Downloads folder and double-click it.

Now, a pop-up window with installation progress will appear on your screen.
Following this, you will notice the Design Space icon on your device’s home screen.
You need to double-click it and sign in by entering your Cricut ID & password inside the specific area.

How to Create a Cricut Account on Your Computer?
After installing the designing software on your device, it is time for you to learn about how to create a Cricut Design Space account. If you are new and don’t have a clue about the process, then refer to the following pointers:
Start the process by going to the Cricut Design Space official website and tick the Let’s Get Started option.
After that, enter your email address, first name, last name, and country.
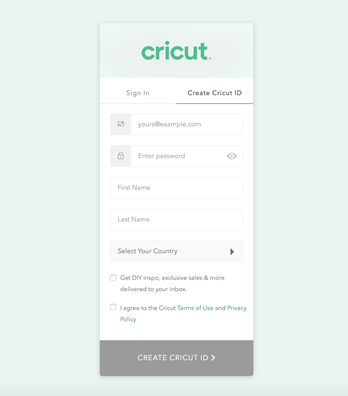
Next, go through Terms & Conditions and tap the box given next to it.
Now, press Send Me Cricut Tutorials, inspiration, and deals via email.
Following this, tap the Create Cricut ID option to get a confirmation message.
Afterward, click the Continue option and answer the questions asked.
Lastly, you will get the login credentials and start creating designs on the app.
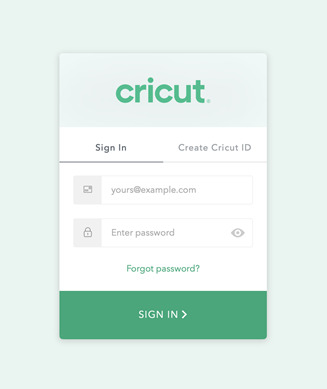
How to Login to Cricut Design Space Account?
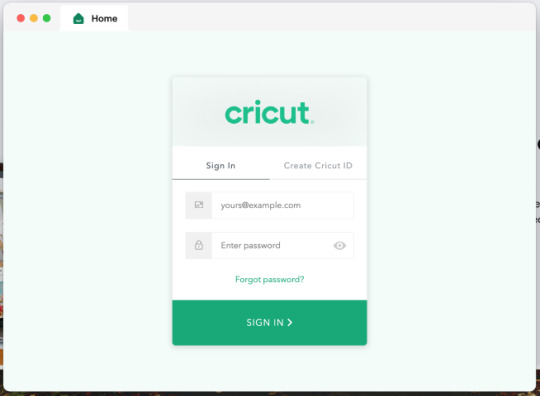
Once you are done with the create a Cricut account process, you can now start creating the design on the canvas. For easy login, you need to go through the steps given below:
Initiate the process by opening the Cricut app installed on your device.
After the app opens, you will land on the Cricut Sign-in page.
Now, fill in your Cricut ID & password inside the blanks and press the Sign In option.
Here you go, all set to create new projects on the app by using its respective tools.
Once you are done finishing all the above activities, you will be eligible to do many customized projects with cutting machines within a few minutes. Besides, this design app is compatible with smartphones.
Frequently Asked Questions
Question: How Do I Install Cricut Design Space on My Android Device?
Answer: The Cricut app is compatible with smartphones also, so to get the app, have a look at the steps given below:
First, you need to switch on your device and open the Google Play Store.
Afterward, type Cricut Design Space inside the search box.
Now, to get the app on your device, hit the Install button visible on your screen.
Next, go back to your home screen and open the installed app.
After the app opens, sign in or create a Cricut account by submitting your Cricut ID & password.
Question: How to Update Cricut App for Desktop?
Answer: Whenever the new version of the Cricut app is available, the app will instantly begin to update itself once it is connected to the internet. If you are already connected to the internet, then you will get a small pop-up notification asking for permission to update the app before using a new canvas to make new designs.
Question: How Can I Change My Cricut Design Space Login ID?
Answer: Any reasons if you want to change your Cricut login ID, then follow the below steps:
Start the process by going to your Cricut profile and pressing the Here option.
After doing that, tap the Edit Profile, enter your email address, and tick the Save button.
Now, you can log in to Design Space by entering this email ID on the sign-in page.
Read more: cricut.com/setup mac
Cricut design space
install cricut design space app
how to setup cricut explore
Source: create a cricut account
#create a cricut account#how to setup cricut explore#Cricut design space#design space signin#cricut design space download#cricut design space login#cricut.com/setup#cricut design space setup#cricut design space app#cricut design space for mac#cricut.com
0 notes
Text
How to Make a Bookmark With Cricut: A Stepwise Guide
Hey, Cricut enthusiasts! Are you in search of a tutorial on how to make a bookmark with Cricut? Be patient, as I have covered everything in this write-up. I always need a bookmark to keep track of my reading progress in books. Without it, I can’t continue reading books. Since I forget things a lot and can’t remember which page I read last time, it becomes essential for me to keep a separate bookmark for each book😅.
But don’t you think it costs so much to buy a new and small bookmark from the store🤑? Damn, its price is really high! I couldn’t afford that much, so I thought I’d create one myself. Yes, being a crafter, if we can’t make a bookmark using Cricut, then what’s the point of crafting? If you want to create a glitter bookmark with me, hop on a board with me!
Step 1: Start a New Project on the Cricut App
Before we delve into how to make a bookmark with Cricut, you need to ensure that Cricut Design Space is installed on your compatible computer device. After that, follow the steps in the section below:
You have to open up your Design Space app and start a New Project.
Go to the left toolbar menu and select Images.
Then, open the Art Type menu and choose Draw Only.
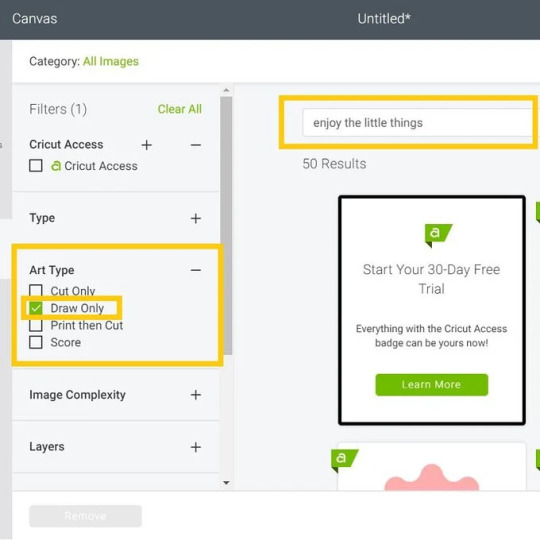
Afterward, you will need to type “Enjoy the Little Things” on the search bar and press Enter on the keyboard.
After that, you have to select the design that you are looking for and click on the Insert option.

Step 2: Edit the Bookmark Image

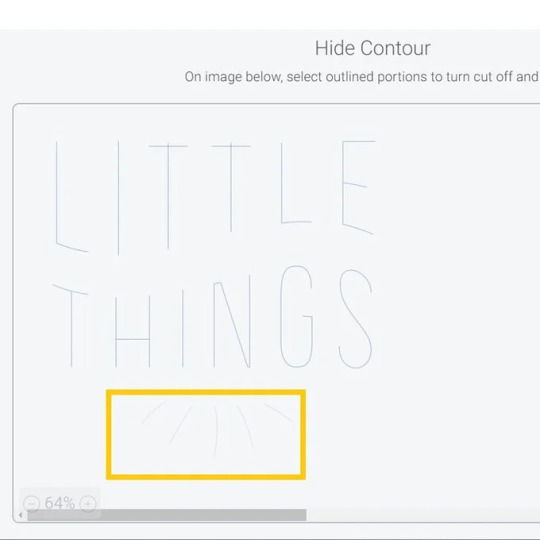

Step 3: Adjust the Shape and Size
Now, we need to adjust the width of a rectangular bookmark as per the required size. For this, go to the Shapes menu, and you will need to insert a square. Hit the Padlock icon so that you can adjust the width and height of the shape.

Step 4: Arrange Your Shape


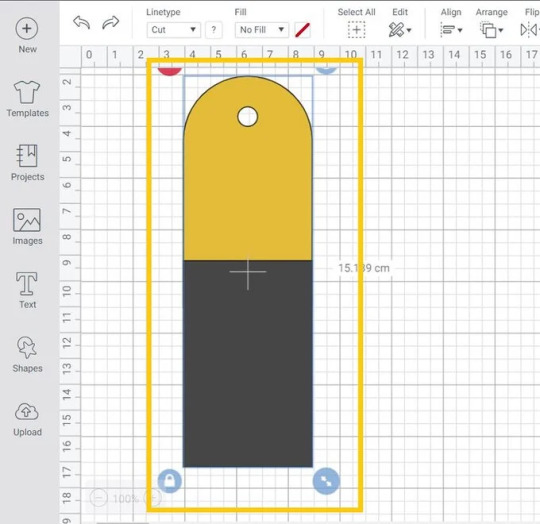
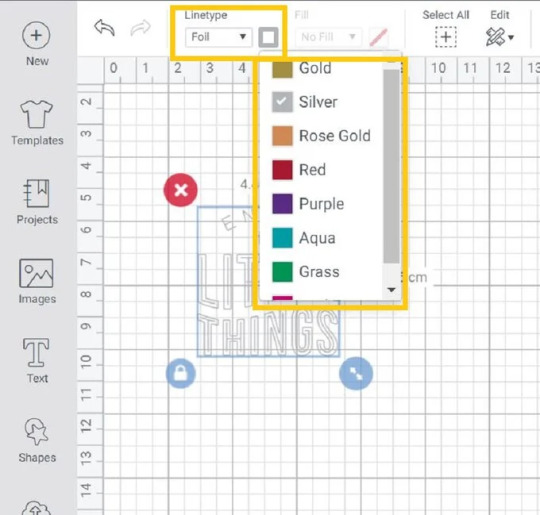
Once you are satisfied with the placement, you should drag the selection box over both shapes and select Weld to join both shapes together. Then, you need to weld the design to join both shapes together. Furthermore, you have to add color to the shapes.
You have to go to the Shapes and then click the Score Line. After that, you have to change the line type to Foil and select the same line.
Step 5: Start Cutting Your Material
On the next screen, you will move to the Mat Preview screen. Then, hit the Continue button and proceed.
Place the faux leather on your cutting mat and then use a brayer to adhere it to the mat properly. Install the foiling tip into the housing. Move the white stars on the right side. Perform the instructions to cut the design. Before you unload the mat, you need to remove the foiling sheet.
After that, install the Fine-Point blade and cute bookmark shapes. Finally, you have learned how to make a bookmark with Cricut. Follow the instructions carefully to create your own.
FAQs
Question 1: What do I need to make a bookmark on Cricut?
Answer: Basic supplies are required for making bookmarks with Cricut. Besides, you must install your Design Space on a computer or mobile device. Here are the supplies needed for your bookmark:
● Cricut Machine (Maker or Explore or Joy)
● Brayer
● Faux Leather
● Foil sheet
● Tape
● Cricut StrongGrip Mat (Purple)
● Fine-Point Blade
Question 2: What materials can I use to make my bookmark on Cricut?
Answer: In my experience, you have various materials that you can try for making beautiful personalized bookmarks. For example, you can use
● Cardstock: It can be easily cut, engraved, embossed, or curled.
● Faux Leather: Available in multiple patterns and easy to cut on Cricut.
● Resin: Make decals and use resin to top them to seal them.
Question 3: Can I make bookmarks on Cricut Joy?
Answer: Yes, of course! In fact, the Cricut machine is the most suitable device for making small projects such as cards, bookmarks, and so much more. So, there is no doubt about it. The Cricut Joy is compatible with 50 materials, meaning it can cut up to 50 materials hassle-free. Moreover, you can use specialty papers to create an extraordinary bookmark.
Final Words
In this tutorial, I have explained how to make a bookmark with Cricut. From step-by-step instructions, I have tried to make it easier for everyone, including beginners. Making bookmarks with Cricut will require you to use some materials or supplies that I have already mentioned in this blog. Make sure you get all of them to make everything smooth. Start your journey to make a bookmark with me and keep tracking your reading progress.
Read more: install cricut design space app
cricut.com/setup
cricut.com/setup mac
Source: how to make a bookmark with Cricut
#design space signin#how to make a bookmark with Cricut#cricut.com/setup mac#install cricut design space app
0 notes
Text

Discover your creativity with robust Cricut machines from the popular Cricut lineup, including the Cricut Maker, Explore, Joy, and Venture, offering endless crafting possibilities. To get started in minutes, you must navigate to their website, Cricut New Machine Setup, and finish the setup within a couple of seconds. The easy-to-follow on-screen commands will let you set up your Cricut machine hassle-free. Now, get your machine and start exploring the limitless crafting opportunities!
#design space signin#Cricut Design Space#cricut design space login#cricut design space setup#cricut design space for mac#cricut design space download#cricut design space app#cricut.com/setup
0 notes
Text
How to Get Cricut Design Space Subscription: Ultimate Guide
Looking forward to learning about Cricut Design Space subscription? You are all familiar with the Cricut Design Space, are you? It’s Cricut’s personalized software for designing. It includes various top-level fonts, images, ready-to-make designs, and lots of exclusive features that you can enjoy while doing your projects on the Cricut machine.
If you are a Cricut user and often wonder how to get a Cricut Access plan, then this guide is just for you. Many users confuse subscription and Cricut Access, so I want to tell you that the two are the same, and Design Space subscription is a synonym for Cricut Access.
In this guide, you will find steps on getting a Cricut plan. So, let’s get started with my full guide. Here we go!
How to Download Cricut Design Space Subscription on Desktop?
If you have a desktop and you want to get your Cricut subscription on it, you can do it easily by following these steps.
First of all, sign in to the Cricut Design Space software.
And then, choose any Cricut Access ads.
Otherwise, you can also choose the Menu on the top of the software and then choose Settings.

Now, choose Subscribe under the General tab.
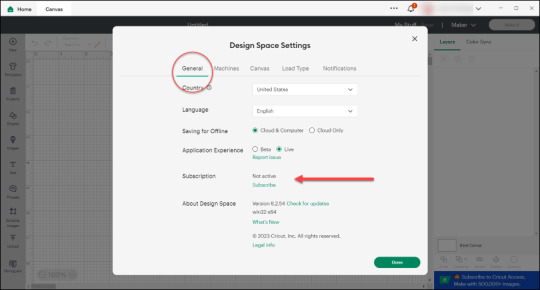
After that, you can get a trial, depending on your eligibility.
You will see a Start Free Trial option if you are eligible for the free trial.
If you have purchased the free trial already, choose the Subscribe option.
Next, select the duration for your subscription — Monthly or Yearly and then choose the Continue button.
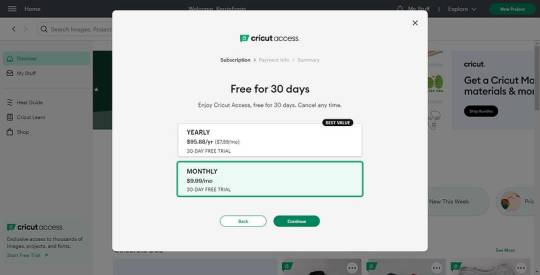
Then, put your payment details in the required fields, agree to all the Cricut Terms of Use, and choose the Submit option.

Now, your plan for Cricut Access will activate immediately and will be available on the Design Space software.
That’s how you’ll get the Cricut plan on your desktop. Well, if you are an iOS user, the steps will be slightly different. Look at them.
How to Download Cricut Design Space Subscription on iOS?
If you want to get the Cricut Access subscription on an iOS device, look at these steps:
Head to your Cricut Design app and sign in to it.
Then, go to the Design Space menu and choose Cricut Access.
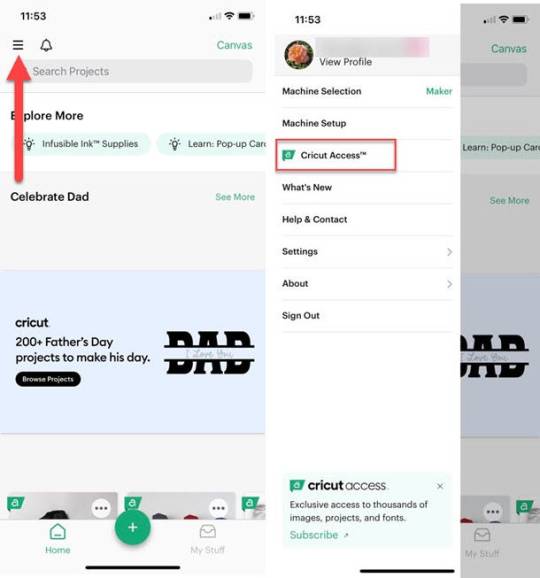
Now, choose Subscribe.

Next, choose the Monthly or Yearly plan option and hit the Subscribe option.
Your in-app purchases will be processed via your iTunes account. And you will see your order summary within the app.
After that, choose the Subscribe option.
Input your Apple ID and then password. Now, choose the Sign In option to start the subscription purchase.
Your Cricut Access plan will activate immediately and will be available on the platform.
So, these are the final steps to get the Cricut subscription on an Android device. Finally, you are ready to use your Cricut plan.
How to Get a Cricut Design Space Subscription on Android?
If you are an Android user, you can also get a plan to Cricut. Below are the steps to get the Cricut plan.
First of all, you need to Sign in to your Design Space account.
Then, choose the Menu and then select yourCricut Access account.
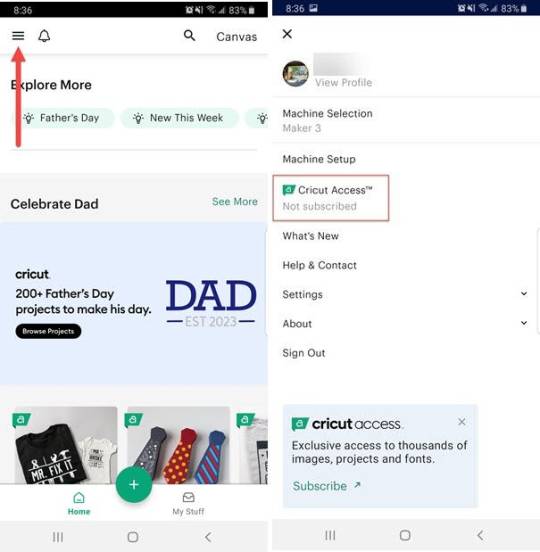
After that, choose the Subscribe option.

Next, choose either the Yearly or Monthly subscription option and hit Subscribe.

Now, the in-app purchase will be processed via the Google Play account.
After that, your Google Play Store will show your order summary.
Next, choose your payment method, supply your Google Play password, and hit Subscribe to proceed with the purchase.
Now, your Cricut Access will activate and then will be available on the Cricut Design app.
Finally, your Design Space will have the Cricut plan, and you’ll be able to use the amazing things from your subscription, such as images, designs, templates, and also various fonts.
How to Get a Cricut Design Space Subscription From cricut.com?
You can get Cricut Access from cricut.com, too, by following my easy steps. Let’s have a view of them.
In the first step, browse shop.cricut.com on your browser.
Then, you need to Sign in to the Design Space account.
After that, choose and add a suitable plan to your Cricut cart.
Next, continue with the checkout process and finish your purchase.
Now, once your order is submitted successfully, your plan will activate and will become available on the Cricut account.
That’s how you will get the Cricut Access subscription on your device. Finally, you have learned how to get the Cricut plan. Now, you can move forward to manage Cricut subscription.
Conclusion
I have shared with you how to get a Cricut Design Space plan and use the amazing Cricut Access features, including images, fonts, ready-to-make projects, and various amazing templates. Luckily, you can get this subscription on any operating system easily. So, you can also get a Cricut Access trial membership for 30 days if you don’t want to purchase it. Most of the users prefer a free trial to make projects with premium fonts, images, and designs.
Read more: Design Space Signin
Cricut Design Space
cricut.com/setup mac
install cricut design space app
Source: Cricut Design Space subscription
#Cricut Design Space subscription#install cricut design space app#cricut.com sign in#cricut new product setup#www.cricut.com/setup login#cricut explore air 2#setting up your cricut maker#Design Space Signin
0 notes
Text
How to Use a Cricut Joy: Quick and Easy Guide
A few days ago, I went to my cousin’s house and saw a new Cricut Joy collecting dust in the corner. Being a crafter myself, I couldn’t resist asking her why. She replied that she was confused about how to use it. With a smile, I offered to help. From unboxing the machine to setting it up, I guided her through each step, even teaching her how to create her first project.
Then, I realized that some beginners may not have even opened the box and could use my assistance. That’s why I have prepared this guide for you all. Just like I helped my cousin, I will tell you how to use a Cricut Joy from scratch. However, it is necessary to follow this guide till the end because every piece of information is important for using your Cricut Joy.
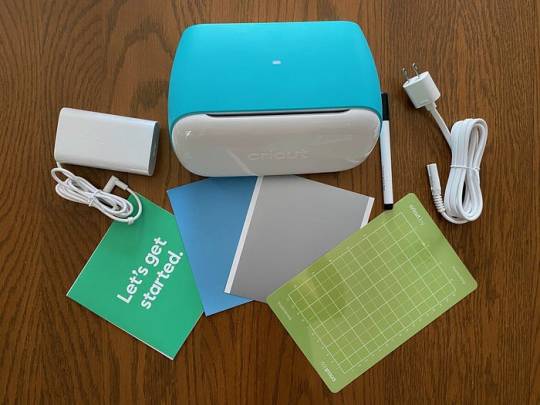
Step 1: Unboxing the Cricut Joy
If you have already unboxed your Cricut Joy machine, you can continue to the second step below. If not, let’s take a look at what you’ll find inside the box:
Welcome card
Cricut Joy machine
Power adapter
Fine Point pen (0.4 mm)
StandardGrip mat
Sample of smart vinyl
Around 50 pre-made projects
Free Cricut Access for 30 days
Step 2: Setting up Your Cricut Joy Machine
Setting up a Cricut Joy is a crucial step in learning how to use a Cricut Joy machine effectively. Let’s start by setting up the machine first.
Prepare Your Cricut Cutting Machine
Place the Cricut Joy machine on a flat and clean surface near the electric outlet.
Assemble the machine’s power cord and insert one end into the machine and the other end into the electrical outlet.
After that, turn the power button on, and a light will illuminate the machine.
Connecting a Cricut Joy to Your Computer
The Cricut Joy does not have a USB cord, so you have to connect the cutting machine to a computer via Bluetooth.
Turn on the Cricut Joy machine 10–15 feet away from your desktop computer.
Next, locate the Bluetooth option, turn it on, and wait for the computer to detect your machine.
Now, select Cricut Joy from the list, and if asked for a PIN, enter 0000 and hit Connect.

Downloading and Installing Cricut Design Space
Downloading and installing Design Space on your desktop computer is necessary to complete the process of how to use a Cricut Joy machine.
Go to cricut.com/setup, agree to Cricut’sterms and conditions, and download the file.

After downloading Design Space, locate the file you see on the screen and install it.
Once the software is installed, launch it, create a Cricut ID and password, and sign in.
Note: If you want to access Cricut Joy from mobile (Android or iOS), download the Cricut app from the Play Store or App Store.
Adding Your Cricut Joy Machine in Design Space
Once you have installed and signed into the Cricut software, it’s time to set up the Cricut Joy. To do this, launch the Cricut software, click on the drop-down menu, and select New Machine Setup > Cricut Cutting Machine > Cricut Joy. Also, make sure the connection is established.
Step 3: Using a Cricut Joy to Make a Project
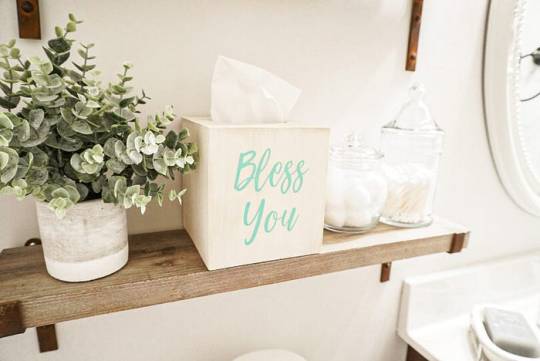
You will need to cut vinyl with Cricut Joy to personalize a wooden tissue holder. Here’s what you need for this project:
Cricut smart vinyl
Unfinished wooden tissue box
Cricut Joy machine
Computer or transfer tape
Design
Create a Design in Design Space
Open the Cricut Design app and select the New Project tab.
After that, use the Text function and a text and change its font.
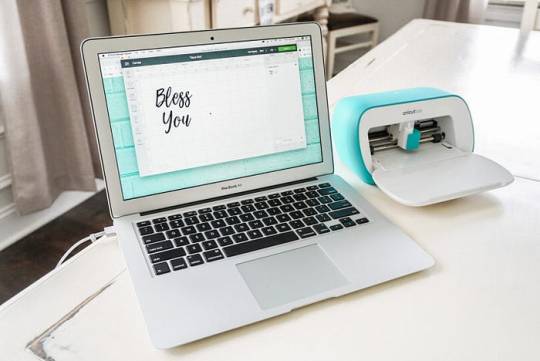
Once you have the design ready to cut, click the Make It option to move on to the next page.
Then, select the mat page. There is no need to mirror this project. Click Continue.
From the All Browse Material option, search for vinyl and select it as a material.
Now, load the green vinyl into Cricut Joy without using a mat.
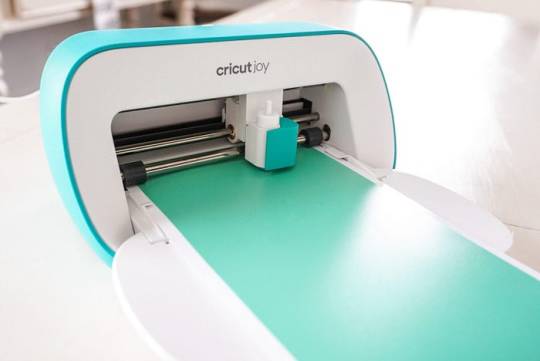
Cut & Weed Out the Vinyl Design
Once everything is ready, go back to Design Space and hit Continue to begin cutting.
Once the machine completes cutting, it automatically stops. Now, unload the smart vinyl and weed out unwanted designs.

Next, cut the transfer tape to the size of the vinyl and apply it to the design.
Apply Your Design
Frequently Asked Questions
What can you make using a Cricut Joy?
Cricut Joy is a smart, compact, and portable machine that can be used to create different projects. Below, I have listed some of the Cricut Joy projects.
Vinyl mug
Greeting cards
DIY pillow
Leather earrings
Wall art
Tumblers
Cake toppers
Stickers
Labels
Banners
T-shirts
Jewelry
How does Cricut Joy work?
The Cricut machine works with the user-friendly Cricut Design Space or Cricut Joy app. Users need to install one of these and start a project. Also, the Cricut Joy connects to devices via Bluetooth. Once everything is set up, the user designs it and sends it to the machine. Finally, the Cricut Joy will cut or write according to the selected settings.
Do I need a computer to use a Cricut Joy?
That’s not necessarily true; you can also use your mobile device to use Cricut Joy. All you need is a device where you can download and install Cricut Design Space to command the Cricut machine. However, all of this can also be done from a mobile phone or tablet. So, it depends on the user’s preference and their comfort level.
Conclusion
The Cricut Joy is a beginner-friendly crafting tool that is compact yet versatile. Setting up the Cricut Joy and learning how to use it may not be too difficult for beginners. I have discussed everything in detail in the blog post above. If you followed the instructions exactly, you can now use your Cricut Joy without any hassle.
Read more: install cricut design space app
cricut.com/setup
cricut.com/setup mac
Cricut New Machine Setup
Source: how to use a Cricut Joy
#how to use a Cricut Joy#Cricut New Machine Setup#cricut software app#cricut design space download#cricut explore air 2#cricut.com/setup#cricut project ideas#design.cricut.com/setup#cricut.com/register#cricut.com#cricut.com/create
1 note
·
View note
Text
How to Use Cricut Explore 3: A Complete Tutorial

Cricut Explore 3: Introduction
Cricut Explore 3 is one of the latest models from Cricut. As this machine is bigger, faster, and smarter, it can be a nice addition to the workspace of passionate crafters. Also, this excellent machine can cut Cricut Smart Materials (those materials that don’t need a cutting mat) to make bigger projects. Its sharp blades can cut 12 feet of material completely without a mat. This latest machine comes with the necessary accessories for setup and making a better first project.
How to Set up Cricut Explore 3 on a Desktop?
To get started with an Explore 3 machine, you need to set it up on a PC. As a full-time blogger and a Cricut hobbyist, I want to tell you that the best way to use a Cricut machine is through a desktop. Therefore, if you want to create a nice project out of it, read our complete blog. Go through the steps given to set up your Explore 3 machine.
First of all, unbox your Cricut machine and connect it to your wall outlet.
Then, turn on the machine and connect it to your PC through Bluetooth.
Now, download and install the Cricut app or the Cricut Design Space app from its official website.
After that, sign in to the Cricut account and start the machine’s setup.
At last, when the setup is finished, take the first cut.
By successfully performing all the above steps, you can start creating your very first project
with this lovely Cricut machine that now has multiple users.
How to Use Cricut Explore 3 to Create a Project?
Finally, you are all set to learn how to create a first project with the Explore 3 machine. With this advanced Cricut machine, you can create any project using simple steps. Look at the step-by-step procedure.
Step 1: Essential Materials and Tools
While starting a project with your brand new Explore 3 machine, you will need to gather all the necessary items listed below.
Cutting mat
Cardstock
Smart vinyl
Transfer tape
Weeding tool and scraper
Cricut pen and markers
Apparel or blank to design (tote bags, shoes, hoodies and coasters)
Step 2: Use the Cricut Software to Create a Design
In the first step, you can create a design according to your project. The Design Space has unlimited options for designs, templates, fonts, and images. You can easily select from them to make a unique design for your project.
Step 3: Choose Your Cutting Material
When you complete your design, choose the materials that you need to design. Then, place your material on a mat. After that, load your cutting mat into your Explore 3 machine and hit the Go button. Now, your machine will cut your material as per your instructions.
Step 4: Select Your Material Under Settings
When you are learning how to use Cricut Explore 3, select your material under the settings before cutting it through the machine. The Design Space will ask you to choose a specific material. Once you have selected the material, it will be sent to your cutting machine.
Step 5: Allow the Cutting Process
Once you have selected your material and set all the settings, allow the cutting process to happen and press the flashing button on your machine. Then, your Explore 3 machine will cut your material according to your design.
Step 6: Take off the Material
When the cutting is over, you need to remove the cutting mat from your machine. Then, use the weeding tool to remove the extra material from the design. However, if you are working on an iron-on project, you can place your design on the blank apparel and transfer your design using a Cricut Heat Press.
Finally, you have understood how to use Cricut Explore 3 to create a good-looking project. If you are a Cricut admirer and want to create something unique, this blog might be helpful.
Conclusion
We have discussed creating a project. You can create various projects with your only Explore 3 in your spare time as a hobby or start a part-time business by selling your best creations. Cricut Design Space is significant here as it’s the key to using all the Cricut cutting machines. So, better use your creativity in the Design Space and create something out of the box, as you know how to use Cricut Explore 3 now.
FAQs
What Type of Projects Can I Make With Cricut Explore 3?
A Cricut Explore machine opens a room for opportunity to many crafters and allows them to create many projects. Here are some of the best pieces of projects you can create.
Cake toppings
Vinyl Stickers and decals
Banners
Stencils
Metal and wooden sign
Decorative items
What Supplies Do I Need to Create a Project With Cricut Explore 3?
Well, the supplies for your project will vary depending on the project type. But, there are certain supplies that are basic, and you will use them in almost every project. Here is a list of them.
Weeding tool
Materials
Transfer tape
Cricut markers and pens
Cutting mat
Materials such as cardstock, HTV, shirts and shoes
Scraper tool
Adhesives
How Can I Get Cricut Design Space on My Computer?
If you want to install the Cricut app on your computer, you need to visit Cricut’s official website at cricut.com/setup to download and install this smart app. On Cricut’s website, you need to select your Cricut machine and then accept the terms and conditions to download the Design Space. Then, move to the Downloads folder on your computer, click on the downloaded file, and allow the installation.
Read more: install cricut design space app
how to setup cricut explore
cricut.com/setup mac
cricut setup for explore 3
Source: how to use Cricut Explore 3
#how to use Cricut Explore 3#cricut setup for explore 3#cricut.com/setup mac#cricut explore air 2#cricut new machine setup#cricut project ideas#cricut software app#cricut design space login#install cricut design space app#cricut design space download#www.cricut.com/setup login
0 notes
Text
Cricut Explore 3 vs Maker 3: Which Machine Is Best for You?
Are you in a dilemma and unsure which one is better: Cricut Explore 3 vs Maker 3? You don’t have to worry about it, as I will clear all your doubts through this blog. Do you know both machines are robust and suitable in their own way? Yes, the Cricut Explore 3 might be fit for some, or for some, the Maker 3 could be their first preference.
But how do I decide if I want a Cricut Maker 3 or Explore 3? Well, that is what I am going to discuss in this blog. As a pro crafter, I have noticed many people need clarification about buying craft machines. And I understand their confusion because Cricut has many different models for its cutting machines.
Now, let’s delve into this blog together to learn more about the difference between the Cricut Explore 3 and Maker 3.
Cricut Explore 3 vs Maker 3: Performance
During operations, I found both machines quiet and quick. Also, I noticed Explore 3’s cutting pressure is standard. It can easily cut materials up to a thickness of 2 mm. On the other hand, Cricut Maker 3 is ten times ahead in terms of pressure; hence, it can cut up to 2.4 mm in thickness.
Overall, the Cricut Maker 3 is a more powerful and versatile machine than the Explore 3. However, Explore 3 is a decent crafting machine that serves the basic needs of crafters.
Cricut Explore 3 vs Maker 3: Tool Compatibility
Okay, so let’s talk about tool compatibility. Tool compatibility means how compatible your tools are with the cutting machine. If you don’t know, Cricut Explore 3 and Maker 3 both work with 6 basic tools to meet your crafting needs. Below is the list of 6 tools compatible with Cricut Explore 3:
Fine-Point Blade
Pens & Markers
Scoring Stylus
Bonded-Fabric Tool
Foil Transfer Tool
Deep-Point Blade
Below is the list of 7 tools compatible with Cricut Maker 3:
Rotary Blade
Knife Blade
Scoring Wheels (Single & Double)
Engraving Tool
Debossing Tool
Wavy Blade
Perforation Blade
All the tools mentioned above are designed to perform specific operations.
Cricut Explore 3 vs Maker 3: Adaptive Tool System

The incredible features, such as the adaptive tool system, are only available in the Cricut Maker 3 and not in Explore 3. This feature is unique to the Cricut Maker model. But why did Cricut add this unique feature to Maker models?
With these unique features, your Maker 3 can manage the location of the blade to the most optimal position for upcoming cuts by lifting and rotating the blade.
Thus, you get high-quality, precise cuts on intricate projects even when you are working on thicker materials. Cricut Explore 3 has Cut Smart Technology, which enables you to cut the materials by dragging the blade across it.
One more advantage of this Adaptive Tool System is that it makes the Cricut Maker 3 compatible with the QuickSwap Housing System, making it easy to swap the tools by snapping on the desired tip you want.
It also includes the single and double scoring wheel, debossing tip, wavy blade, engraving tip, and perforation blade.
Cricut Explore 3 vs Maker 3: Cutting Force and Materials
The cutting force in my Cricut Maker 3 is 10x compared to my Explore 3. This is the only difference that makes the Maker 3 cut more materials. On the other hand, the Cricut Explore 3 can cut more than 100 materials, including various types of lightweight & specialty materials.
However, Maker 3 can cut more than 300 materials, including basswood, leather, and matboard.
Final Words
That’s all in this blog. By now, you might have understood the basic difference between Cricut Explore 3 and Maker 3. They both vary in terms of operation, performance, and ability to cut a large amount of materials. However, when comparing both machines, Cricut Maker 3 is always one step ahead of Explore 3. Before making a purchase, you can also check the Cricut Maker 3 price or the Cricut Explore 3 price. Despite these, both are amazing machines that cut the material precisely.
FAQs
Question 1: Is Cricut Maker 3 better than Cricut Explore 3?
Answer: Although both of them are cutting machines and can cut materials such as vinyl, cardstock, and Infusible Ink. However, you can cut more materials on Cricut Maker 3 than on Explore 3. Also, Maker 3 cuts more materials and handles thicker materials. Since it is the robust machine in Cricut’s lineup, it is indeed better than Explore 3.
Question 2: Can I cut Smart Materials on Cricut Explore 3 and Maker 3?
Answer: Yes, you can! You can easily cut Smart Materials on Cricut Explore 3 and Maker 3 without a cutting mat. There are many benefits to using Smart Materials, as you don’t need to use the cutting mat, and hence, you can make larger projects quickly. Besides, Smart Materials include Smart Vinyl, Smart Iron-On, and Smart Paper Sticker Cardstock.
Question 3: How many materials can I cut on Cricut Maker 3 and Explore 3?
Answer: Well, Explore 3 can cut materials up to 100, including cardstock, vinyl, and Smart Paper Sticker. Meanwhile, Maker 3 can cut over 300 materials, so Cricut Maker 3 can cut three times more materials than Explore 3. So, if you want to try different types of materials for your crafts, go with the Maker 3 cutting machine.
Read more: install cricut design space app
Cricut New Machine Setup
cricut.com/setup mac
Cricut Design Space
Source: Cricut Explore 3 vs Maker 3
#Cricut Explore 3 vs Maker 3#Cricut Design Space#cricut design space for mac#cricut design space download#cricut design space setup#cricut.com/setup#cricut explore 3#cricut design space app#cricut design space login#cricut accessories#cricut new machine setup
0 notes