#overlock needles
Photo
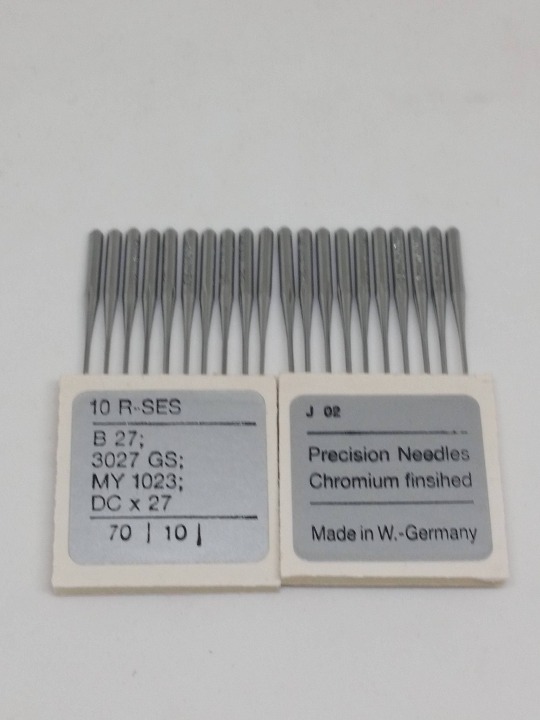
DCX27 B27 Size 10/70 Ball Point Point Needles Muva made in Germany
Overlock Serger DCX27 B27 Size 10/70 Ball Point Needles
This listing is for 10 needles B27#10 BALLPOINT
B27, DCX1, DCX27, RIM27, RMX27, MY1023, SY6120, 3027GS
Babylock : BL3-318, BL3-407, BL3-408, BL3-416, BL3-418, BL3-426, BL3200, SL600, SL660, SL700, SL800
Brother : B511, B531, B551, B561, B571, B611, B621, B641, B651, B661, B671, B672, B681, B682, B691, B692, B901, B952, B958, B959, B971, B959
Feiyue: FY737, FY747, FY757, FY2000, FY2100
Juki : MO-800 Class, MO-2400 Class, MO-2500 Class, MO-2400N Class, MO-2500N Class, MO-3300 Class, MO-3600 Class, MO-3700 Class, MO-3900 Class, MO-6700 Class, MOR, MOC, MOF
Mauser : DC, DCP, DC-MS
Pegasus : E22-730, E22L-730, E32, E32L, E52, E52L, ETB32, ETB52, ETF32, ETF52, F32, F52, L32, L52
Rimoldi : 27, 28, 29, 227, 228, 229, 230, 327, 329, 527, 627
Willcox & Gibbs: 101-E14, 401-02, 401-04, 401-013, 401-E32, 503-04, 503-E, 503-52, 503-ETB 52, 503-ETF 52, 504-4, 504-E 52, ETB 52, ETF 52, 512, 514, 516, DC, DCP, DCR-942, E32, E52
Yamata: FY737, FY747, FY757, FY2000, FY2100
Yamato : AZ8000 Class, AZ8500 Class, AZ8600 Class, DC, DCY, DCZ-200, DCZ-203, DCZ-204, DCZ-206, DCZ-216, DCZ-220, DCZ-220W, DCZ-221, DCZ-263, DCZ-264, DCZ-270, DCZ-290, DCZ-292, DCZ-293, DCZ-296, DCZ-500, DCZ-503, DCZ-515, DCZ-520, DCZ-521, DCZ-525, DCZ-545, DCZ-553, DCZ-554, DCZ-700, DCZ-703, DCZ-711, DCZ-715, DCZ-724Y, DCZ-725Y, DCZ-726YZ, DCZ-727Y, DCZ-745, DCZ-746, Z-100, Z-361, Z-362, Z-365, Z-366, Z-367, Z-368, Z1000, Z1003, Z1006, Z1016,Z1020, Z1036, Z1037, Z1045, Z1046, Z1056, Z1057, Z-5000, Z-6000, ZF-1020, ZF-1500
We stock many different types of sewing machine needles, parts,
and supplies for the cutting, sewing, finishing, and embroidery industry.
Feel free to contact us anytime.
You can typically expect a response within 1 - 2 Hours
All orders are carefully packaged and shipped through USPS
LOC193
https://www.etsy.com/listing/281745498/dcx27-b27-size-1070-ball-point-point
#DCX1 needle#B27 needle#DCX27 needle#serger needles#overlock needles#Brother#Babylock#Juki#Rimoldi#Yamato#Willcox Gibbs#Mauser#German needles
0 notes
Text
I am sewing two patterns I love and am familiar with, but configured slightly differently than usual. I have already put at least six hours of work into both ofdresses.
...
Only another half hour or so of ironing before I am at a stage where I could cut the first pattern piece.
#sewing#hobby#prep#I needed new sewing scissors#and took ages picking fabric#I needed to pick a patchwork pattern#I had to go pick up the fabric I ordered for the second dress#then I realized I should probably get some more thread for my overlocker#fabric needed washing and drying#my fabric came from a sale on bedsheets so that needed undoing#i iron really really slowly#I have sewn without pre-washing my fabric and gotten away with it#I have never regretted ironing my fabric before starting#this is why those “only takes two hours to sew!” patterns are fucking liars#I forgot to hydrate I'm sorry tumblr#my body hurts#I need to pee#people who tell you sewing is mainly needle and thread are either ignorant or don't have your best interests at heart and you deserve bette#rant in tags
0 notes
Note
Hey I just saw your beeswax post and Kim fascinated. What does thread conditioning mean? (If you don’t mind explaining, I know I could Google it but I enjoy listening to people talk about stuff that they enjoy)
I do like talking about sewing! Though lately I've been using my hands for it so much that they're sore for typing sometimes. I need to strengthen my arms so the ligaments stop bitching. >.>
There's an exploration in the last reblog here. Basically: Conditioners are substances you put onto thread to make it stronger and more manageable.
Sometimes that's done in the manufacturing process, like for the creation of hand-quilting thread. It's already stiffer and smoother than usual cotton thread. But even then, once I've got it on the needle, I pull the thread over a lump of wax to add a thin coating to it. This is hugely to get the thread to forget the tight curls it has learned on the spool, which make it likely to snarl and be a pain.
There's also a whole thing where like... most modern thread isn't made for handsewing. A hand-sewn seam has one length of thread, two if it's doubled back. A sewing machine has two threads, twined together in a way that's really strong. (Technically it's "couched", not sewn, which takes people a bit of work to understand sometimes.) Overlock machines use three or four or five threads to make a seam. All of this leans the balance of demand in mass-produced thread towards stuff that is thin and lightweight, won't create a seam that is too bulky, but not particularly strong or smooth. If you buy cheap thread, that's what you'll probably get. If I want thread in a very specific colour, polyester thread gives me more choices, but is much less nice to sew with.
(There's also a whole thing about polyester, a petroleum byproduct, being way cheaper and easier to produce than natural fibers like cotton, silk, linen, or wool.)
I'm guessing professionally manufactured thread conditioners avoid some of the pitfalls of my beeswax, which responds to me coating the thread too thickly by shedding wax along the fabric as I sew, in a way that kind of looks like dandruff. But meh, I can live with that.
265 notes
·
View notes
Text
Clothing repair is not a moral imperative and you shouldn't feel bad for not doing it
One of the most frustrating things about the whole 'just repair your clothes!' thing is that so many clothes just aren't easily repairable, and yet so many of the takes I've come across act like anyone not repairing their stuff are either lazy or stupid and Contributing To Climate Change.
My favourite pair of jeans was three years old when they ripped along where the back pocket was attached. I darned it. The first time I wore them again they ripped along the edge of the darn line.
I patched and redarned them. They ripped along the other pocket. Patch and redarn. They ripped where I'd sewed the patch on, even though I'd tried to weave in every stitch from more than an inch away
Every time I tried to repair them the denim basically disintegrated, because it was incredibly cheap and thin, so the repairs were stronger and just ripped free
One of my favourite dresses got mangled in a washing machine incident because it was a jersey knit stretch fabric and I have no idea how one goes about patching something that needs to stretch in every direction
I wanted to lightly modify the pocket situation on a denim jacket but couldn't, because I physically couldn't get a needle through the four layers of denim I needed to
One of my favourite t-shirts failed at the underarm seam and I couldn't fix it because they'd cut off and overlocked the majority of the seam allowance, and that had frayed when the seam failed
Another pair of trousers came entirely unseamed up one leg the first time I wore them because the (almost certainly overworked and underpaid) person who sewed it had failed to catch the thread in the hem, so the whole thing just unraveled. I did manage to resew that seam, but it took four weeks and three tries, and it's a bit wonky to this day
I have a favourite hoodie that's hanging up, unwearable, with almost an entire sleeve missing, because it got eaten by mice but I'm too attached to it to bin it, but I have no idea how to even START fixing damage like that.
'Twelve cool visible repair designs!' cool cool so that four colour embroidery over a one inch hole is going to cost approximately as much as just replacing the item cheaply and take how many hours to complete? And how many hours to develop the skills to make it look good?
I don't own a sewing machine. I don't particularly want to own a sewing machine, because they're expensive and take up space and require an entire skillset to use effectively. I have to repair or modify everything by hand. I don't have time for that, generally.
There's so much out there that's treated like a moral choice (clothing repair! Food delivery!Plastic straws!) without any examination of the barriers preventing people from doing the (please note the quote marks) '''right thing'''.
The people who most need to be able to repair their clothing are also the people most likely to only be able to afford the cheapest and therefore least repairable clothes. And also least likely to have the time and/or equipment to do so.
#i have no idea how to tag this#squid speaks#uhhhhh#Why Social Justice Needs Nuance#i hate primark it's evil#but where else am i going to get an emergency pair of jeans for a tenner?
51 notes
·
View notes
Text
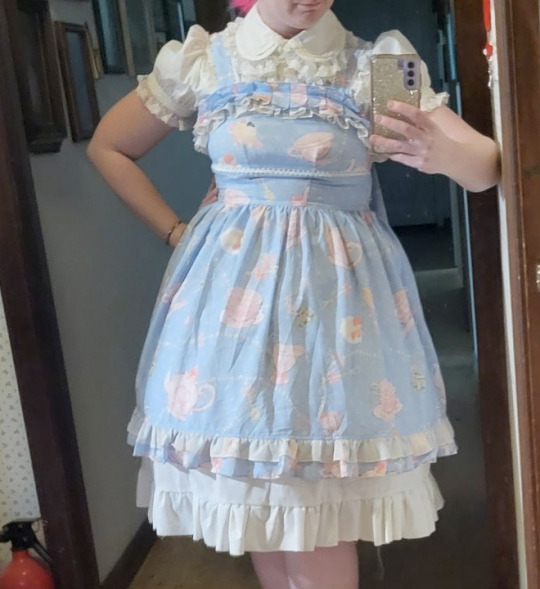
Fun day walking around the mall with my friend from my lolita comm.

Blouse and wrist cuffs are ETC and MAM, respectively. Headbow is BTSSB. All three were bought on wunderwelt.com and then repaired by me. Shoes are Bodyline (and repaired by me...repeatedly). JSK was in a Souffle Song lucky pack I got almost 8 years ago and never wore.
You know when you see all the pictures of the "lucky pack may contain" on them? I saw that JSK on that and said, "Yeah, as long as I don't get that one, it'll be fine." And then that's the one I got.
This coord actually started with me texting my friend at 11:14AM with "I'm actually co-hosting a lolita meet at 2pm, so obviously I'm making an entire garment from scratch right now."
Very early in my lolita career, probably 2012, I made myself a longer underskirt to wear with shorter JSKs. I never ended up actually wearing it, because the construction was bad and the proportions are off. This was definitely made post 2012, because the bottom hem was just a raw overlock. The skirt itself is a little bit too long, and then the ruffle is too short. In addition, the basic fabric its' made out of it very low-detail.
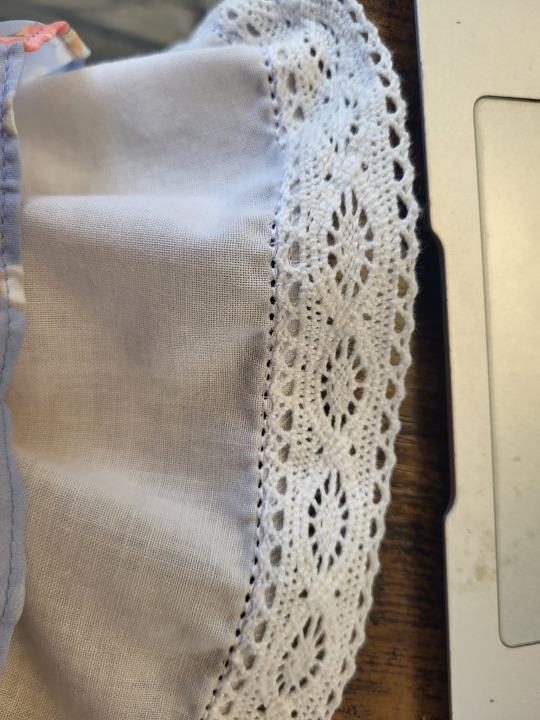
Quick fix number 1 was to sew some lace onto the hem. In addition to adding necessary detail, this added about an inch to the ruffle length.
I did something new where I sewed the lace on with a wing needle. A wing needle is a sewing machine needle that punches giant holes in your fabric as it sews. You pair it with a very thin thread, and it gets you a sort of cute vintage look.
The second fast adjustment was to slap two big 1" wide tucks onto the skirt, shortening its full length by 4".
Very excited to now have a workable underskirt for shorter dresses. It's not perfect and the waistband needs some help or some love or both, but it'll work for under things.
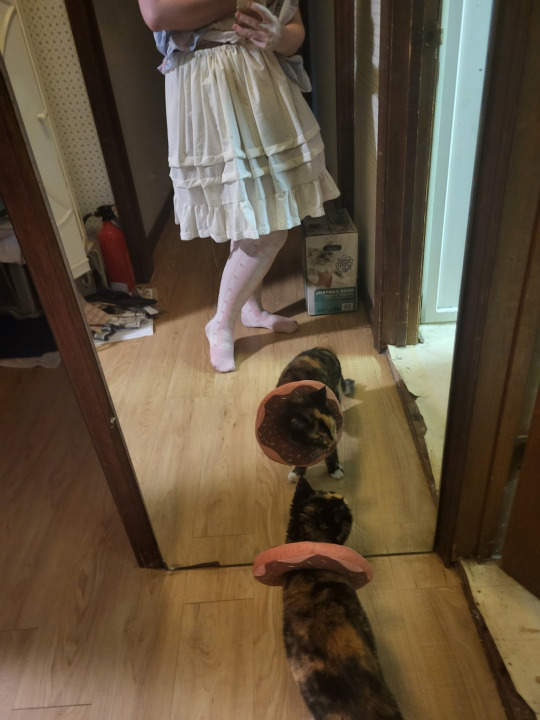
Carhartt had a little booboo on her chin, which she proceeded to scratch until all her hair came off and it became a giant booboo, so she's wearing the donut until her vet appointment on the 3rd. Carhartt has discovered that wearing the donut means she has a pillow with her at all times, and seems to genuinely enjoy the donut.
And, for everyone who asked, the cane just came with the blue tip. It glows in the dark, actually. No idea if that'll be useful, but it looks cute. I'm in the process of testing how well Angelus Glitterlites will bond to a black cane tip, though, so everyone keep eyes out for that tutorial.
85 notes
·
View notes
Text
Pros and cons of hand vs machine sewing, based on my personal experience
Hand sewing pros:
very high precision is possible
awkward angles and junctions easier to manage
extremely portable!
low barrier of entry for equipment: needles, thread, scissors, measuring tape
invisible/nearly invisible seam/hem finishes possible
Machine sewing pros:
Stitching looks neat from both sides
Smooth straight lines may be easier
Easier on hands
Fast!
Can do zigzag and overlocking stitches on some machines
Hand sewing cons:
Stitching usually only looks nice from one side
Can be tough on wrists/hands
Slow (compared to machine)
Machine sewing cons:
Weird angles/tight spaces difficult to maneuver.
Typically not portable, even portable machines require stable flat work surface
Expensive to get started!!
Expensive to repair machines
Seam/hem finishes typically visible.
Can be a bit dangerous if you’re clumsy
So which should you learn?
Regardless of whether you want to use a machine to do the bulk of the work, you should know how to do basic handsewing in order to repair your own clothes and to baste your work when making something from scratch. Other than that, it’s up to personal preference and your own needs.
14 notes
·
View notes
Text
Went to the free class to learn how to use my serger and now me and Edith (serger's name) are besties. She's got Personality because she is almost 30 years old (aka she doesn't function on default settings and takes tinkering to get anything other than a 4 thread overlocking stitch out of her BUT that is OK cuz I basically just bought her for four thread overlocking). She's so old she has to have a different plate for rolled hems but that's okay. I don't need rolled hems tbh. I don't like how they look. And! Luckily for me! Her bottom knife is super easily accessible so I should be able to replace it myself! Also! She takes regular sewing machine needles! She sews nice and slow, too which is nice because I was a liiiiittle bit scared of her.
Anyway, we're besties. Now I just gotta finish embroidering the green linen pant leg so I can start sewing those pants together!
12 notes
·
View notes
Text
Underbust Corset for My Mom

It's my mom's birthday today. We like to go to Ren Faire together, and she really liked the leather underbust corset belt that I have. I told her I could make her one like it for her birthday if she didn't mind it being synthetic materials rather than real leather, and she said yeah, so I went for it!
This is 2 layers of vinyl with one layer of interfacing sandwiched within. The interfacing is stiffened with 2 layers of brushed on glue. I used an overlock stitch to stitch them all together. The sewing was 6 strands for durability, done with an embroidery needle. I drilled holes through for the lacing with my Dremel and hardened the holes with heat. Used a regular tan cord for the lacing.
Mine laces in the front and back, but she wanted a side lacing one, so I redid the pattern to make it like that. I think it came out pretty good, and she's really happy with it!
The materials were about 30 dollars.
I'm considering making myself a vinyl "leather" vest too.
#ren faire#ren fest#renaissance#bodice#corset#underbust corset#costume#costuming#fantasy#faire#starchbean#medieval
3 notes
·
View notes
Note
OK so I know you're afraid of sewing machines
Have you heard of sergers (overlock machines?)
They have TWO needles AND a knife!!
And I managed to thread mine without injury, that's not my proudest achievement
What?
Murder machine.
7 notes
·
View notes
Photo
St Georges WIP stitched by Jan. Pattern (£5.40) designed by Julia Line of Long Dog Samplers.
Let me introduce you to one of my family. This is my cousin Jan, twice removed but she always comes back.
Jan can be found at all the major needlework exhibitions around these islands because SHE IS Babylock UK and what she doesn't know about overlockers isn't worth knowing. She's even got a machine that threads its own needles with a current of air. I thread mine with a torrent of abuse on about the fifth attempt.
She's on holiday at the moment on the shores of Loch Lomond in Scotland and stitching a Long Dog, of course, in between sips of whisky and deep fried Mars bars from the McChippy. It's St Georges that my old dragon is currently fighting with. Perhaps I should design her a St Andrew for next year which would be far more in keeping.
Where's everyone stitching their Long Dogs this holiday season now that most of us are allowed to travel again. Quill took his to the pub but someone used it to mop up beer and that was an end to it. The Great Colin will be taking his Queen of Hearts to a yoga retreat in August. Bless him, he's really excited about it.
—Julia Line, designer
5 notes
·
View notes
Photo
Organ ELX705-SUK Ball Point Portable Serger & Cover-stitch Machine Needles Size 80/12
ELX705-SUK Ball Point 80/12 Portable Serger & Cover-stitch Machine Needles ORGAN
This listing is for 10 needles ELX705 Size 80/12
ELX705 needles are made specifically for home serger & cover-stitching.
for multi-purpose sergers that do the cover stitching, overclock, and safety stitches. If your serger takes flat shank needles, then these needles will fit your serger.
Babylock Serger Models:
BLE8 (Evolve), BLE8W-2 (Evolution)
Elna Serger Models:
444, 604E, 614DE, 624DSE, 686, 704DEX, 744, 904DCX, 905DCX, 925DCX, 945, F3, F4, L1, L2, L3, L4, L4D, L5, L5D, PRO4DC, PRO4DE, PRO5DC, PRO5DE, T3, T33, T34, T34D
Janome Serger Models:
1000CP Coverpro, 1000CPX CoverPro, 900CP Coverpro, 900CPX CoverPro
Juki serger models:
1000CP, 1000CPX, 2000CPX CoverPro, 900CP, 900CPX Guaranteed to fit Pfaff Serger Models:
cover lock 4862, cover lock 4872, 4874
Simplicity Serger Models:
SL370
Alternate Part Numbers: SY2922, 2022, 795802005, 795808300,
29-924993-81/310, 29-924993-81/308, 396001-51, 60692, 291490-10, 396001-52, ELX750, B2013-05A, 1820, 1821
We stock many different types of sewing machine needles, parts,
and supplies for the cutting, sewing, finishing, and embroidery industry.
Feel free to contact us anytime.
You can typically expect a response within 1 - 2 Hours
All orders are carefully packaged and shipped through USPS
LOC198
https://www.etsy.com/listing/1052658566/organ-elx705-suk-ball-point-portable
#sewing needle#needles#Organ Needles#Babylock#Flat needles#Portable Serger#overlock needles#flat shank#ELx705#Ball point#SY2922#Bernina#Brother
0 notes
Text
It's insane how much just mending things here and there extends the life of your clothes.
Especially true if you're wearing mass-made low quality garments off the rack from cheaper chain stores, where you'll often get seams that start to come undone or hems that come out of their half-hearted overlock or whatever.
But also very true that if you take a few minutes to sew your escaped underwire back into an expensive sports bra, you can extend its life for a couple of months, giving yourself those months of pay to insulate you from your next instalment of the titty tax bra purchase.
Even if you don't really know how to sew, just, like. Thread a needle and put it through some scrap fabric. See what happens. It's pretty intuitive. And it's worth getting some neutral coloured thread and a needle (which you should be able to get at any grocery, just on your way through regular shopping) and just giving it a shot, especially if you're mending in spots or on garments that aren't usually visible. Like, what exactly do you have to lose here anyway? The $3.99 of needle and thread? Ten minutes? If you don't already... just give it a go.
I'm not saying you can extend the life of cheap garments indefinitely. I think if you go down that route, you'll end up a) pretty uncomfortable in your clothes and b) looking like a pre-Warbucks Annie.
But it is really wild how easily you can turn "ugh those leggings need to be replaced for work tomorrow," into "I can probably get through another month with these leggings, at least."
#Buttonholes are horrible though. If you have to put a new buttonhole in something.#I'm not saying it's not worth it. but. It's not worth it.#sewing#tozette.txt#unsolicited opinions
17 notes
·
View notes
Note
So is there, like, a limit to what *kind* of stitches you can take out with a seam ripper? When I try to mend something, usually one of two things happens--either I try to yank a big snarl through the fabric, tear it, and have a new place to fix, which I usually do by just sewing the edges of the hole *to* the snarl since it's already there; OR if I'm being especially painstaking I will manage to catch the huge snarls *before* pulling them through, and then I pass the next few stitches through the snarl to hold it together and down and keep all the loops from unraveling. In either case, while I can usually manage to keep the outside of the garment looking reasonably clean the inside doesn't so much have seams as it has keloids--basically a big running knot of stitches looped back on each other, that I just keep doubling back on and stabbing until the needle won't go through it anymore because that's the only way I know to secure it.
Am I just stuck with them? Or if I ever learned to sew properly, would I be able to unpick those mends and redo them? (Or, more likely, get an actual seamstress to redo them?)
(If it matters--most of the garments I've tried to mend by actually sewing are jersey knit; woven fabrics I usually just use those iron-on patches on the inside.)
Oh boy JERSEY. It's a lovely spoilt brat devil of a fabric. I love it so but it's very prone to problems. I myself have absolutely done the overlapping row-on-row of raddled fabric bunched into a seam. I'm going to go backwards, starting with the assumption that holes will happen, before talking about unpicking methods that might prevent the formation of holes to begin with.
Because I mean, sometimes it is all such a pain in the ass that I just sew a new seam further into the fabric and cut the old seam off with scissors, if that won't mess up the thing I'm repairing. Alas, it often will mess it up, and then getting fancy is required.
The simplest answer is to get a stretchy fusible interfacing that will work like an iron-on patch. Your search terms here are "knit fusible interfacing" and "weft fusible interfacing"; you can buy it off the bolt at fabric stores. I use it when my t-shirts get random little holes in the fabric and I want to prevent them from getting any larger--I just cut a little circle of interfacing and iron it onto the back of the fabric. You could cut pieces big enough to cover your keloid areas, iron them down, and then sew through the interfacing with more confidence.
It is possible to darn knit garments, using thread to catch the loops that have been dropped and create a bridge of new stitches that hold it all together. People absolutely do darn T-shirts and fine fabrics like jersey; I personally only do it for knitted items that are extremely precious to me and have large yarn and a big gauge, because I find it a pain in the ass. There's traditional darning where you catch the loops at the perimeter of the hole, then create a woven web of threads over the gap, and Swiss darning, where you duplicate the knitted structure.
A lot of the problems with knit fabric originate with the needles used to sew them. Ordinary sharp needles have the unfortunate habit of piercing and breaking the threads of the fabric they're sewing, and those broken threads can begin to unravel and create holes. If the thing you're unpicking was originally sewn with sharp needles, you might be SOL and have to accept the holes as inevitable. Avoiding this problem requires ball point needles, whose tips have been carefully blunted so they merely push threads aside as they move through fabric. This is way more likely to be a problem with sewing machines, since they punch down with more force than handsewists generally use to push the needle through the fabric, but, you might benefit by doing your hand-mending with ballpoints.
So, with unpicking, one major secret is serger or overlock stitches. These are made by machines that use three or four threads all at once to completely encase the seam in thread. They're used a lot in modern sewing because they're quick, easy, and make garments machine-washable. Hoowever, if you want to unpick the seam, you might find yourself thinking, "Where do I start?"
There is a secret to it. Here's a tutorial on the process, and here's another. Once you know which threads to focus on, the whole process gets much easier.
Which finally brings us around to unpicking seams, full stop.
The biggest problem with unpicking seams in knit fabrics is the extreme likelihood that you will not just catch the thread of the seam, but the thread of the fabric itself. In that case, your best bet is actually to turn the item out to its "good" or "right" side, pull the seam gently apart until the stitches are visible, and carefully pick them out from there. Here's a tutorial. This works with seams made by serger, sewing machine, or by hand. You just have to be wary of cutting the fabric itself when you're coming in to cut the stitch.
Whew! I don't know about you, but now I don't feel like sewing again for a week. (Lies. I will sew again after lunch.) This is as much as I think is useful. If you have more specific questions, I think I'd need to see photographs of the thing to give any more helpful answers.
50 notes
·
View notes
Text
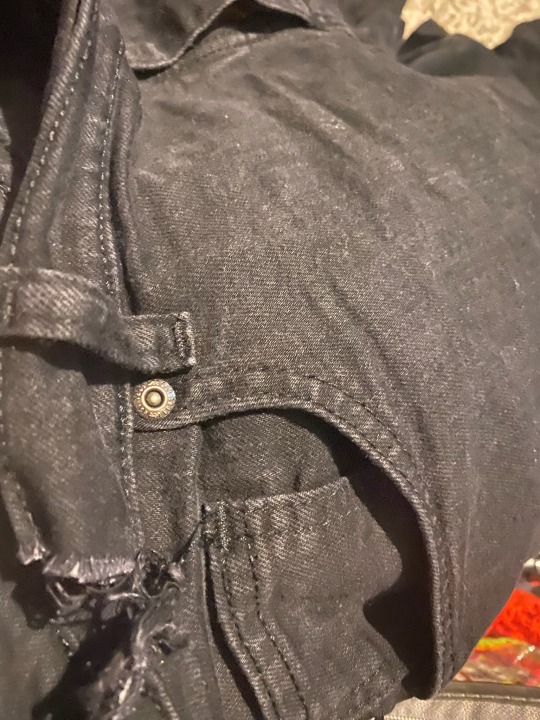
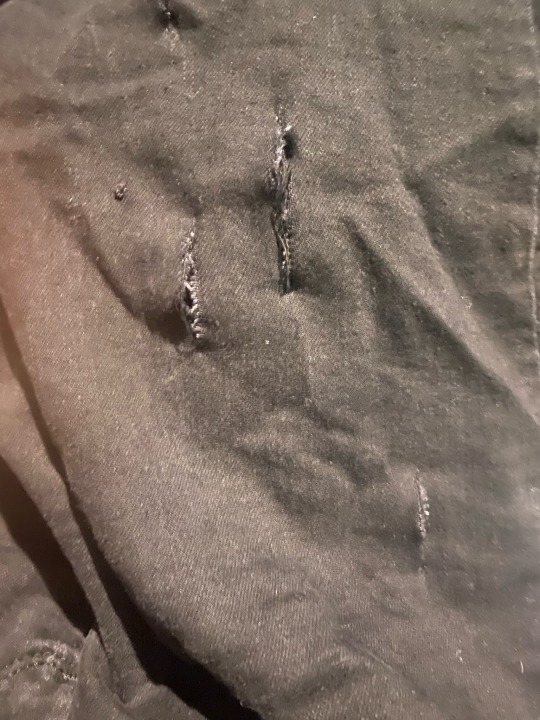
Post two ✌️: Black jeans a little too tight and cut up.
Let’s get started!
Now unlike the last one, there is quite a bit to be done here. Many rips, an attempt to make the jeans slightly bigger without previous knowledge of any kind of knowledge, as well as the actual alteration itself. Whoookay.
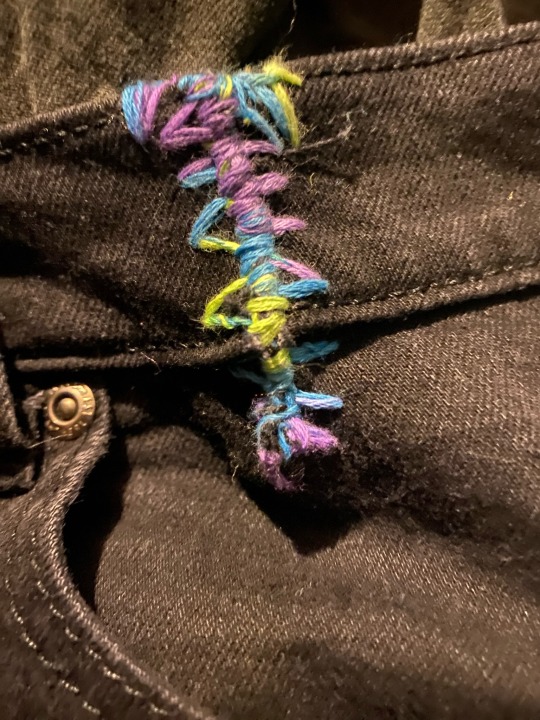
I wanted to go for a centipede look, so I used the overlock stitch again and joined them together. It’s almost buglike?
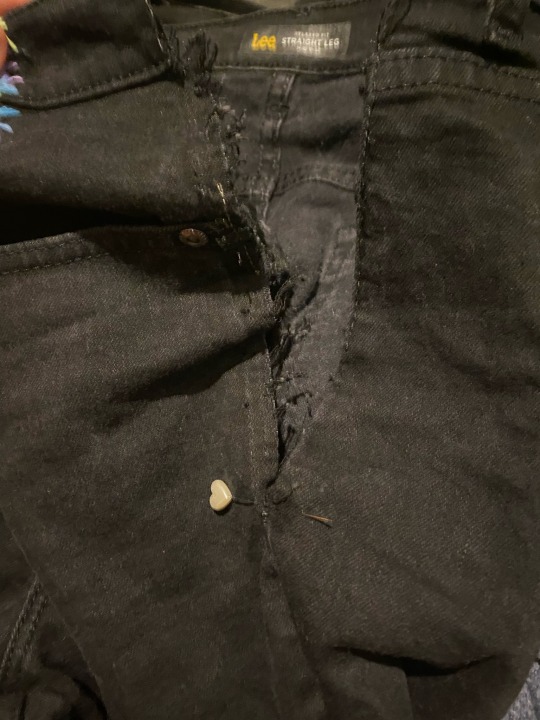
Then I decided to rip both seams that go down the outer sides of the pants. A needle being kept there as a mark so I won’t accidentally rip too much apart.
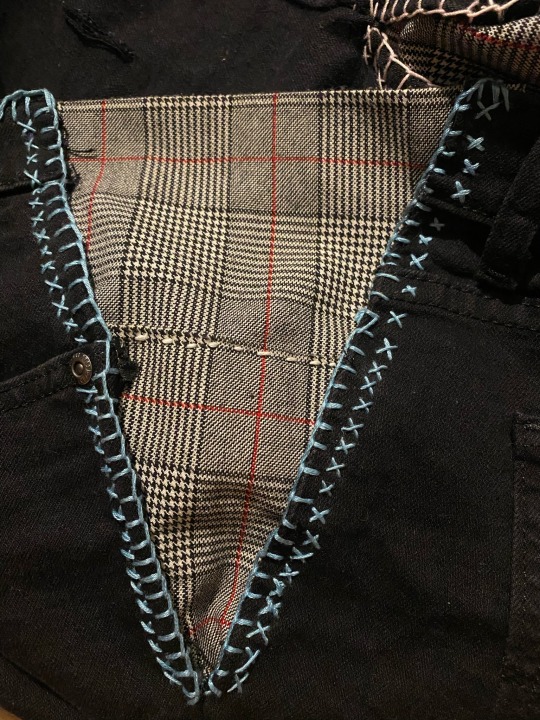
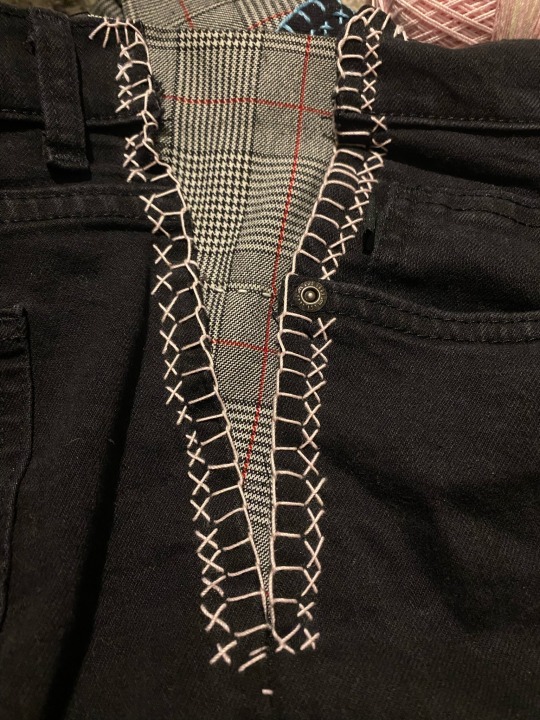
Put the pants on and get something to measure how far the fabric of the pants needs to be from itself to comfortably fit your waist. Use an overlock/blanket stitch on the edges of the jeans to give your pants a nice edge that prevents fraying. Then use a sturdy stitch of your choice to stitch together your fabrics.
Stitching the fabrics together was so tedious and I am so sad I didn’t get a picture of the process.
With the holes at the bottom I tried the ladder stitch and darning. I’m not sure I did either completely right but it ended up really pretty.
3 notes
·
View notes
Text
I'm going to rant about ball point pins for a second.
Maybe longer than a second. I never know how long these things will be when I start out.
So, what is a ball point needle?
In terms of modern sewing, we don't really use ball point needles anymore. The ball point needle has largely been replaced by the universal needle and the stretch needle.
See, back in the days, needles were either sharp or ball point. You'd use a sharp needle (modern needles are either denim/jeans or microtex, depending on the size) for woven fabric, and a ball point needle for knit fabrics.
You use a sharp needle for woven fabric to avoid snags. This is when you're sewing a woven and the needle hits a thread. If the needle is dull, instead of breaking the thread, it will push the thread forward, yanking it out of place. Since woven fabrics are many individual threads interlinked, that thread will pull out and making a loose thread on your project. Woven fabrics don't stretch so it's incredibly hard to put it back in place. You use a sharp needle on a woven so that if it hits a thread in the fabric, it will break, leaving no snag.
You would use a ball-point needle to avoid runs. This is when you're sewing a knit and your needle hits a thread. If the needle is sharp, it will break the thread in half. Because knit fabrics are more one continuous thread instead of multiple interlinked threads, breaking a thread in a knit fabric can cause it to make a run, the same way you often find runs in your favorite tights. If you use a dull needle, it will push the thread out of the way, but not break it. Since knits are stretchy, that snag can then be stretched back into place.
Modern needles are often sold as "universal." This has absolutely nothing to do with how many different kinds of machines the needle fits in, since the 15x1 shape was the standard sewing machine needle long before the invention of the universal point needle. The universal needle tries to hit that sweet spot. It's sharp enough to break a thread on a woven and avoid a snag, but dull enough to not break a thread on a knit. Universal needles are often marketed as "sews both wovens and knits".
A stretch needle is not the same as a ball point needle. A stretch needle has a different kind of scarf on the needle. The scarf is a groove that guides the thread in. All sewing machine needles have scarves on the front of the needle. Much like an ELx705 overlock needle, a stretch needle has an extra scarf on the back, which reduces skipped stitches by better controlling how far away from the needle the thread loops can get. Stretch needles also have a dull/ball point, but not all ball point needles are stretch needles.
Did you know that ball point needles didn't really exist until the invention of the sewing machine? People would own needles that they knew were sharper or more dull, and would prioritize the sharper ones for certain subjects, and intentionally dull needles like tapestry or yarn needles existed. But the idea of "you must use a ball point needle for knits" didn't exist until sewing machines were a thing.
Why? Because hands are smart and sewing machines are big dumb. When you sew by hand, you use a pretty small piece of wire and you guide it through your fabric with pressure from your hands. When you use a sewing machine, you have a much larger diameter of a wire being repeatedly stabbed by a large machine. Your fingers can feel when you're about to hit a thread, and you can very easily and quickly change the direction or pressure of your hand so that you pass the needle around the thread, instead of through it.
The sewing machine does not think or feel. It only knows stab. This means that you select a hand sewing needle knowing that you can make it avoid hitting the threads of the fabric, and you select a sewing machine needle knowing that it absolutely will hit the threads of the fabric at some point. Sewing machine needle point is about choosing what will do the least amount of damage when a thread collision happens, because not having a thread collision isn't an option.
So every once in a while I see people talk about ball point pins. I think ball point pins are among the least necessary sewing tools out there. Unless you're using some kind of mechanical setup to use springs to force wires through fabric (like if you use your stapler for pinning), your hands are not going to insert a pin into a fabric hard enough to break a thread on 99% of fabrics (The Joann Fabrics "jet set" knit is an exception and will run if you look at it for too long, and should not be counted). You use pins in a similar way to hand sewing needles. You're inserting your pin with your hands, which are relatively weak and are also full of nerves. If you're going to hit a thread, you feel resistance, and your hands will automatically try to correct this by trying a slightly different kind of pressure on the pin and moving it out of the way of the pin. You are a human and do not make the mistakes that a machine does, and you don't even need to think about doing it. The thing that is so hard for a machine that we have to completely reshape part of it to accommodate its inability to do it, is also something that is so easy for a human that you don't even realize you're doing it! Isn't that the coolest thing???
Anyway, that's not to go the other direction and say silk pins are useless. Silk pins are extra sharp and extra fine, because they need to leave as small of a hole as possible. The extra sharp tip is actually there so that they can more easily find the hole between the threads, not to break a thread. This is because silk is really unforgiving and whatever hole you put in it will be there forever, so you want to do the smallest hole you possibly can.
100 notes
·
View notes
Note
What sewing machine do you use?
Hi, anon! I use a brother SQ9185. It is a computerized machine, but on the low end of the scale. So no computerized embroidery or anything. Mainly the stitch selection, needle position/ stitch width and stitch length, back stitch are controlled by the machine (though the hand dial still works). It’s not great at button holes, and it is difficult to actually use the letter stitches but it has lots of basic decorative stitches. I mainly use the straight stitch and zigzag with an overlock foot.
If you are looking to buy a machine, I recommend keeping an eye out for sales or checking local pawn shops and secondhand stores. That’s how I upgraded to this machine from a manual machine that was my starter.
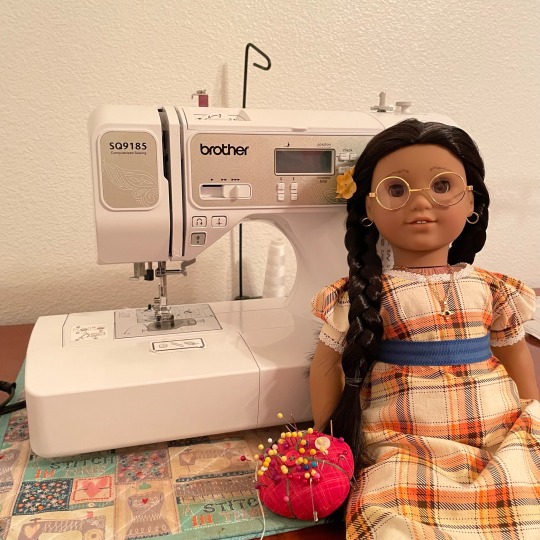
I love my machine. I have tried to use other manual machines since, but the way the machine handles the needle is great. It makes it so the foot has to be down to start stitching, and it always puts the needle down unless you press the needle up/down button. Very convenient in my opinion.
10 notes
·
View notes
Last Seen Blogs

valentina-vmv
Valentina

wickcdgreen-blog
DEFYING GRAVITY !

marinasima
Без названия
erotic-imagery-blog1
Hortense Schmidt

fabricecondemi
Sans titre