#mp4 devices
Text

The evolution of technology... sort of
#technology#phones#music#music players#cd players#cassette player#mp4 devices#devices#tetris#90's#nostalgia#digital camera#radio#i really need to stop keeping everything#walkie talkie#ipod touch#mp3 players
27 notes
·
View notes
Text
why is stream audio such a gigantic pain in the ass to get working right
#successfully solved why there was 0 audio when i tried to stream movie last week (had selected the wrong audio device)#BUT. after selecting the correct one in both obs and discord; you can hardly hear the audio because there’s STATIC playing over top of it#i WOULD just stream it directly to discord without obs (bc the audio is normal if i do it that way) buuut the movie has a 1-2 second delay#that can be easily fixed through obs#i suppose i could just manually fix the movies audio delay but it’s going to take a full day to export it to mp4 and then export the mp4 to#webm. and that’s hoping i get the delay timed right on the first try -_-#rambles
1 note
·
View note
Text

Last week I got to sit in on an introductory course/sales pitch for the new Q8 and U5 Pro by didn't share. Very cool ecosystem and 1 hell of a box. Thing weighs like 160 lbs all packed.
#cowmmunist#pixelhue#novastar#video engineering#wizard-mp4#what i do for my job#this thing is cheaper than the E2 from Barco and that's cool#but this product hasn't been on the market for more than like 6 months?#so like there's still a lot of questions on the redundancy and reliability of the device and the software#the e2 when it first came out was full of weird quirks and bugs#so i think as long as the developers listen to engineers and people in the industry who use these in the field#they'll stay on track and make something actually competitive with the big names
1 note
·
View note
Text
words for users !
ideias de palavras aleatórias para ajudar você a criar seu próprio user;
random ideas of words to help you to create your own user.

core -> aesthetic core
vlog -> daily videos
logs -> daily facts
mp3 -> audio file format
m4p -> apple audio file format
mp4 -> video file format
txt -> text format
jpeg -> image file format
jpg -> image file format
png -> image file format
gif -> animated file format
raw -> uncompressed file format
zip -> compressed archive file format
rar -> compressed archive file format
web -> internet file format
doc -> document file
pdf -> document file
vinyl -> phonograph record
film -> motion picture; photography
user -> person who utilizes a computer or network service
i2 -> "keeping it real"
self -> a person's essential being
itself -> a person's essential being
priv -> private
luv -> love's short form
tale -> a fictitious or true narrative or story
archive -> to place or store (something) in an archive
list -> connected items
tier -> a type of hierarchy
talk -> speak in order to express something
chat -> to have a conversation
post -> to announce or publish something
zone -> a subject to particular restrictions
vie -> life in french
tie -> to form a knot or bow in
on/online -> connected to a network
byte -> a group of binary digits
bits -> a small piece, part, or quantity of something
ram -> hardware in a computing device
8bit -> computer term used to designate either color depth
pixel -> a minute area of illumination on a display screen
data -> things known or assumed as facts
series -> a number of things, events, or people of a similar kind
village -> a self-contained community within a town or city
lab -> a laboratory
lady -> a woman
miss -> a form of address to a woman
mister -> a form of address to a man
error -> something not found
art -> the various branches of creative activity
petit -> small in french
poet -> a person possessing special powers of imagination or expression
thing -> an object without a specific name
stuff -> a vague reference to additional things
vogue -> the prevailing fashion or style at a particular time
tv -> taylor's version and/or television as a system or form of media
media -> the main means of mass communication
topia -> an imagined place or state of things in which everything is perfect
saur -> forming names of extinct reptiles such as dinosaurs
tune -> a melody, one that characterizes a particular piece of music
deun -> melody in deutsch
off/offline -> disconnected from the Internet
gloss -> shine or luster on a smooth surface
fae -> a fairy, in modern fantasy fiction
#random users#cute usernames#tumblr users#twitter users#usernames#user ideas#aesthetic usernames#soft users#users#aesthetic url#messycore#messy aesthetic#alt aesthetic#messy packs#aesthetic core#user#user name#random#random user ideas#random user#random ideas#text post#masterpost#masterlist#long post#long list
2K notes
·
View notes
Text
I have gifs turned off to avoid lag. Finally, i can scroll on this damn app again
#ngl#i dont see the difference between gifs and mp4#quality appears exactly the same to me#maybe its my device or something weird idk#but i trust gifmakers to know what theyre talking about#but literally no difference to me
0 notes
Text
Star Friends Live Wallpaper is out! ^o^ It will work on Android devices only ( mp4 for iOS soon! ) Download LINK!
310 notes
·
View notes
Text
✦✧ YONDERLAND (MP4 DVD RIP) - ALL SEASONS + BONUS FEATURES + XMAS SPECIAL (GDRIVE) ✧✦
PLEASE DO NOT REDISTRIBUTE. you are welcome to save/copy these to your own gdrives, but if you want to share, PLEASE LINK TO THIS POST.
if you want to update your own six idiots/them there resources page/post with these, you have permission provided you link to this post and give me credit via @. do not link directly to the gdrive. a heads-up would also be appreciated.

for the best quality, download the files to your own device. watching via the drive is at reduced quality.
Series 1 + bonus feature,
✦✧ Making Yonderland
Series 2 + bonus feature,
✦✧ Yonderland: Behind the Scenes
Series 3 + bonus feature,
✦✧ YonTV music video for “Twice as Fine” by Hot Eagle
The Christmas Special,
✦✧ “It’s the Thought That Counts”
[ GDRIVE ]
if you download these, a reblog would be appreciated 💙💚
the only versions of yonderland i've seen floating around are copies of copies, taken from tv recordings which have developed glitches. i'm so happy to be able to provide these & want as many of us to have access to better quality eps as possible.
any issues, please send me a message and i'll fix it as soon as i can.
#yonderland#yonderlandedit#them there#six idiots#horrible histories troupe#mathew baynton#mat baynton#simon farnaby#martha howe douglas#jim howick#laurence rickard#larry rickard#ben willbond#*
527 notes
·
View notes
Text
☆ UPSCALING LOW QUALITY FOOTAGE
what i used:
• 2021 macbook pro with m1 chip (390/500gb storage used she's hanging in there)
• photoshop 2020
• mpv (for screencaps but this isn't needed!)
• handbrake (available for linux, mac and windows here)
• video source to gif
what is handbrake?
basically its a software that helps you change the format of videos, such as for certain devices or screens, or in the case that we're going to utilise, quality and frame rate!
disclaimer:
handbrake is super easy to use and very beginner friendly for this procedure and it can make a video go from 30fps to 60fps however it does not replace the quality of true 4k/blue/master-pro res files. in the gif below, this is the level of detail in a master pro-res file.

getting started
it's easiest first to note the timestamps of the video you want to encode, and keep in mind that unless your computer is incredibly powerful, i wouldn't try to encode an hour worth of footage in one run! my laptop could handle about 30 seconds in one go before she started toasting.
using handbrake:
once you've downloaded the software, open the software and it will come up with a pop up window asking you to open the video source (that is presumably saved within your folders) and go ahead and do so!
in the range section, use the drop down button to navigate to seconds and enter your timestamp. the duration on the side will show how long of the footage you're gonna encode is!

then go down to the save as, and give your footage 'to be snipped' a name. this isn't necessary but useful because if you're planning to say, encode 3 or 4 small parts of footage in one sitting, each encoding instance will overwrite the previous one. so i just call mine 'cut 1', 'cut 2' and so on.

next go to preset, and there you'll see such a wide variety of options that you can play around with, with differing qualities, frame rates, sound options, and so on. for the sake of this tutorial, i'm using 'superhq 2160p60 4k av1 surround' and i've used the drop down menu to select it! then go ahead and press start! the time taken to complete depends on the duration of footage that you sent to encode! you'll find your encoded video as an .mp4 file in your designated folder (which you can change via browse at the bottom)
what next?
• if you prefer to open footage directly into photoshop (my ps can't handle it), then go for it!
• if you screencap as i do, then just use mpv or whatever screencapping program you prefer to make the screencaps and open in ps in your usual manner.
• you can use the timestamps to further process the video through vapoursynth to denoise, but i've yet to try that!
the results
for this first set of example footage, i used footage from the be the sun concert file, which is almost 2 hours in length and 4gb in file size.


you can see the difference in the smooth frame rate of the footage, as well as the quality of the sharpening!
and to utilise the bane of gifmaking, a gose episode, notorious for dodgy pixelated frames and less hd quality in 1080p on youtube, i ran it through the same settings!

these are the exact same files, downloaded using 4k video downloader and with the same sharpening, but see how on the original file, the sharpening looks a bit more harsh and 'outlined' while it seems to sit softer on the encoded 4k version!
so i mainly use handbrake for dvd files, or not-so-hd 1080p youtube videos or videos that seem a bit clunkier but i had never tried them on a tv/film file so take a look below! i used a 1gb (so not very good quality) of a show (as compared to its 4gb files).
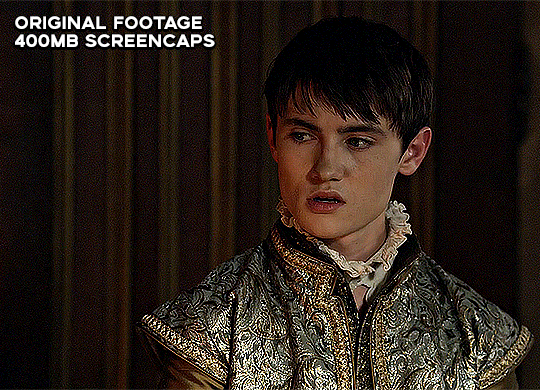
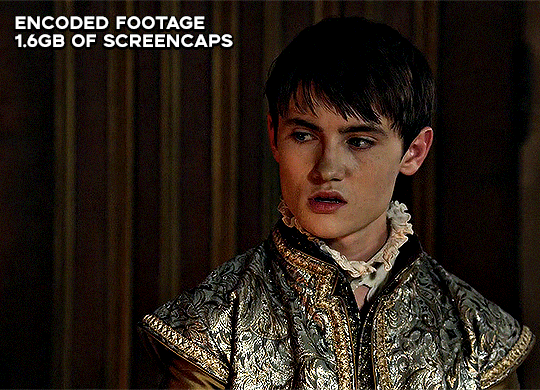
as i said at the start in the disclaimer, handbrake can't replicate true file quality, as you'd expect to see in a proper hd bluray/t*rrent file of a show but there's an interesting difference in the frame rate. personally it's not something i would utilise much there but its all up to individual preference on how someone prefers to have their gifs <3
this is a very basic run-through of how i used handbrake, as i haven't really explored all its features and i use this as a quick process when i'm running through seventeen dvd/dl files but i feel like it would work well on general youtube videos (such as interviews, episodes, behind the scenes) and feel free to send an ask/message for any help/clarification! <33
#ps help#usergif#gif tutorial#kpop gif tutorial#seventeen#completeresources#2605#userace#niniblr#emification#usershreyu#heymax#arieslofi#tusermlee#userbloomingwarrior#uservivaldi#userzil#userfanni#userrozza#usermoonchild#userraffa#tuserjen#usernik
284 notes
·
View notes
Text
How-to: Orbit Camera
Today we'll escape the boundaries of the game and use a mix of recording and editing tools to create a neat orbiting camera video!
For this recipe, you'll need:
1 x PC (these instructions were tested on Windows 10)
1 x FFXIV Client
1 x screen recording tool (Geforce Experience, Radeon Adrenaline, etc.)
1 x Avidemux (https://avidemux.sourceforge.net/)
GShade to taste
1 - Setup
Let's open the Character Configuration under Settings. in the General tab, locate the Camera Speed (Keyboard) slider, and set it to zero. This will give us that smooth, slow camera movement.
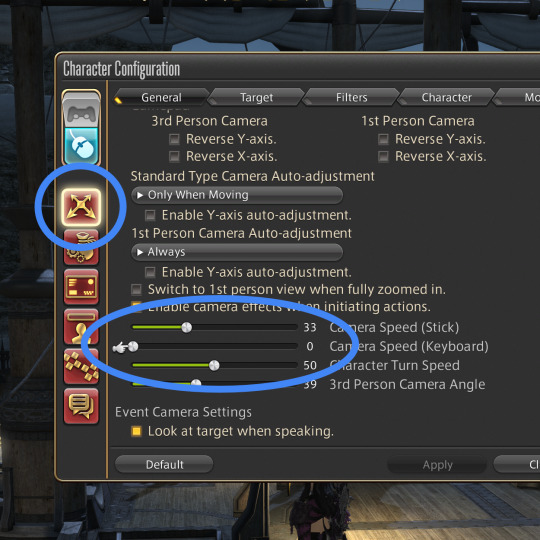
At this point, you need the screen recording tool ready. I have GeForce Experience, so I'm using the Instant Replay function to save the last 5 minutes of gameplay; YMMV.
2 - Capture
Let's enter GPose. Position the camera so your character takes most of the screen while leaving some padding around, turn off the UI (Scroll Lock or LB+Back), and move your cursor to a corner.
Start recording, and use the Left/Right arrow keys to orbit the camera around your character. If your character is frozen (Target Motion toggled off) a couple of full circles are enough. At this point, you can stop the recording.
3 - Editing
Launch Avidemux and open the raw video. Now we're going to adjust some values.
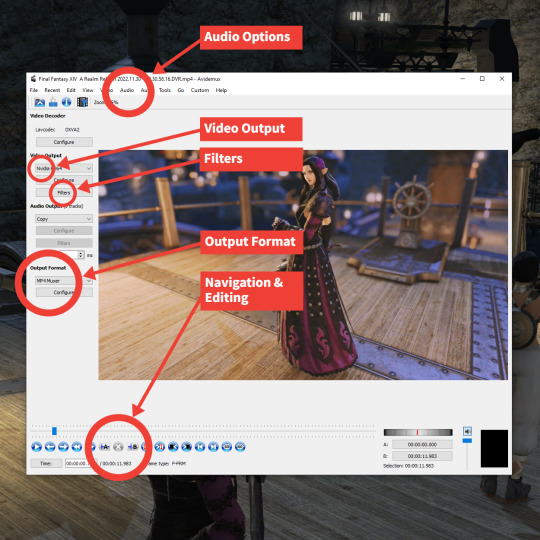
First, let's disable the audio. On the top menu, select Audio > Select Track, then uncheck all the Enabled checkboxes. This will mute the video.
Filters are how we'll modify the original video. By default, the Video Output is set to Copy; in order to enable filters, we need to select a custom encoder. Let's pick one that's pretty common and compatible across most services; in my case, I selected NVidia H264.
Now the Filters button should be enabled. Click it; the Video Filter Manager interface should open.
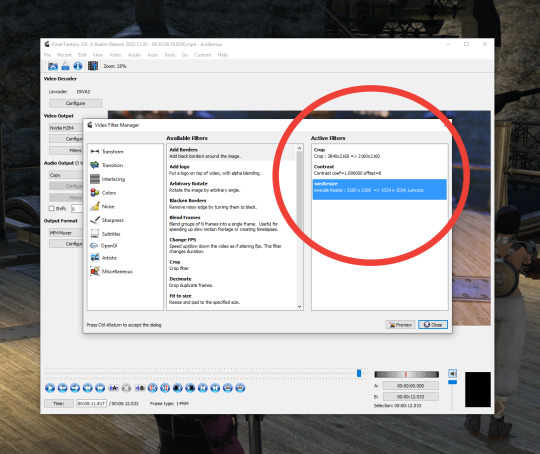
These are the filters I'm using for this video:
Crop (to eliminate the unwanted background, bring attention to the character and set the target 1:1 aspect ratio)
Contrast (to prep it for devices with better luminance range, like phones)
swsResize (to create a smaller video file)
4 - Trimming
Now, the tricky part: In order to create a seamless, cycling orbit movement, the first frame of your video must match nicely with the last.
The way I do this is by browsing the video (Click the slider at the bottom, then use the Left/Right arrow keys) for a frame with a clear feature (say, a light source coming behind the character), clicking Set End Marker (Control + PGDOWN), then Delete Selection (DEL). This will eliminate all frames up to that point.
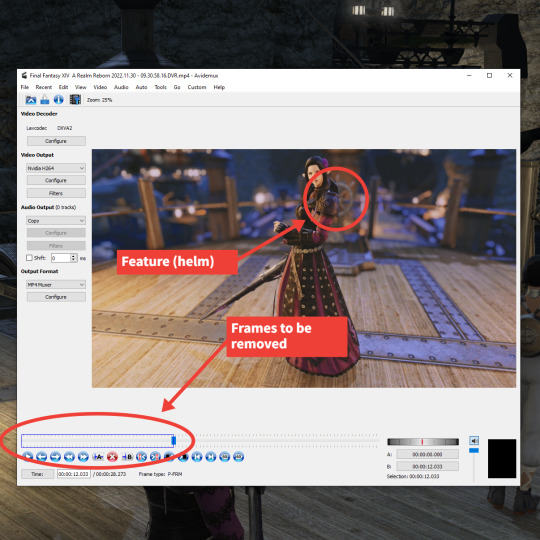
Now, I locate the exact same frame later in the animation once the character is spun around once, click Set Starter Marker (Control + PGUP), then Delete Selection (DEL). If done correctly, now you have a full cycle!
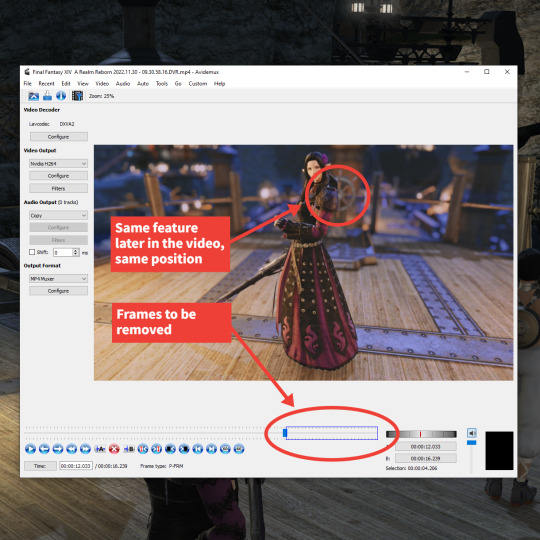
Finally, the output format: Select MP4 Muxer, again a compatible format that'll work nicely with services like Twitter and Tumblr.
And… that's it, really! Now click Save Video and give the new file a name.

And so, a new orbit camera video is born. Enjoy!
593 notes
·
View notes
Note
you and me both going insane over dedf1sh
BUT HER NAME it looks like it's said "yacht" just spelled without the Y to me but i looked up the word acht and it's 8 in german WHAT DOES THAT MEAN??
it could mean something but it could also mean absolutely nothing and i wouldnt be surprised if its nothing bc everything in octo expansion had that 8 theming. its a whole thing so if theyre just naming ahato ''acht/eight'' because of that then thats what it is. however if theres something more well... (👁️_👁️)
OE's 8 theme. directly from the wiki 👇🏾
The number eight is a recurring theme throughout the expansion. For example:
Splatoon 2: Octo Expansion is eight syllables long.
Agent 8 (subject No. 10008) is the main protagonist.
The CQ-80 device is used to navigate Deepsea Metro.
Octo Expansion has exactly eighty levels. If the escape phases are counted, it has 88.
The tubes on the sides of the checkpoints resemble the number eight.
Each line of the poems on the mem cakes has exactly eight syllables.
Some levels require the player to push an 8-ball to a goal.
Track #8 regret plays during these levels.
Some levels require the player to collect eight data-points.
If the player goes through the lines in alphabetical order, the last thang is on the eighth line.
The escape has eight phases if the final boss fight is counted.
After the final boss fight, when Pearl uses the Princess Cannon against the NILS Statue, the turf covered for the "Good Guys" goes up to 888.8%.
The five music tracks from the Octo Expansion are numbered from 80 to 84 in Squid Beatz 2.
The locker that has Agent 8's memories in it, which are used to enter the secret boss fight, is locker #8.
In the Diaphragm Phase of the escape, eight locks need to be unlocked to get to the energy core.
The Squid Bumpers that appear at the entrances to the missions have eight stubs at the base, as opposed to the squid dummies in the Shooting Range which have ten.
The music files in Marina's chat room are saved as 'mp8' files as opposed to mp4.
There are eight main characters: Agent 3, Agent 8, Pearl, Marina, Cap'n Cuttlefish, C.Q. Cumber, Iso Padre and Commander Tartar.
The DLC was announced on March 8th, 2018, and released in 2018.
While Dedf1sh's songs are numbered, a few numbers appear to be skipped. These include numbers 3, 7, 10, 15, 17, and 18. When adding the numbers from the title of each song and then dividing the total by the number of songs Dedf1sh has composed (in other words, taking the average of the remaining numbers plus an extra 0 to represent Splattack! (Octo)), the result is eight.
43 notes
·
View notes
Note
Hi! Happy 4k celebration 🥰 Can you share how you make your gifs or make a gif tutorial?
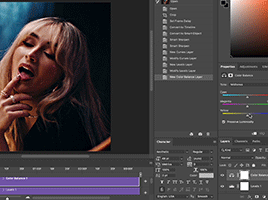
hi !! tysm <3 i'm more than happy to give you a little tutorial on how i make my gifs ! of course, my process is not the same to other gifmakers and may not always work for everyone but i hope it helps !
for this tutorial, i'm using the most recent edition of photoshop (2023) on my mac. full explanation under the cut.
full disclaimer: most of what i've learnt about photoshop and the giffing process is through pure trial and error. this won't work for everyone and others may think it's a little weird, but this is just how i make my gifs !!
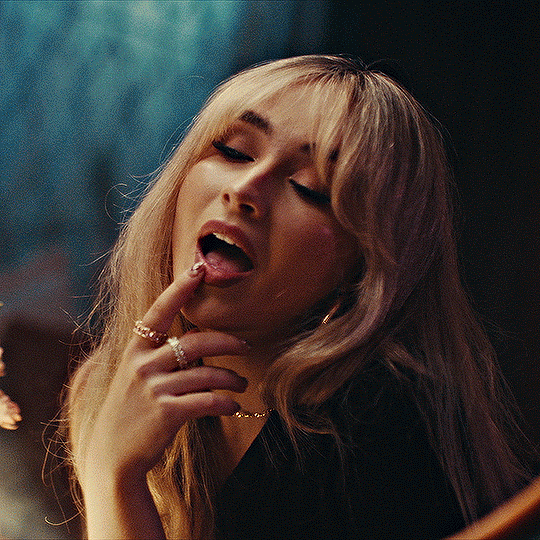
1.find your scenes.
finding your scenes is sometimes very time consuming but you want to get it right the first time !! for this tutorial, i'm using a music video in mp4 format.
2. loading your scenes.
to load your scenes, you want to go: 'file' > 'import' > 'video frames to layers'. i know that this step varies on the user because some people like to go to timeline first, but i'd advise starting in frames first !
after that, a screen like i've depicted below will pop up. i've also annotated everything for you as well.
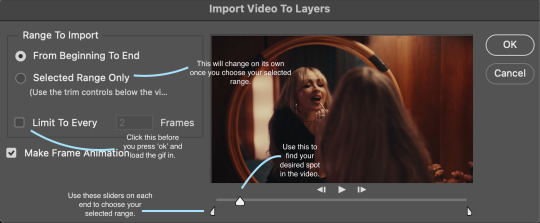
so, select your desired range, press 'ok' and then it will all load into ps !
3. setting up your gif.
i'm grouping this all into one step, but it's broken down into a few things.
the first part of this is: cropping. the recommended dimensions i follow are on this guideline here, but for the sake of this tutorial i'm just going to crop my gif 540x540 (as a w x h setting). the crop tool is on the left hand tool bar.
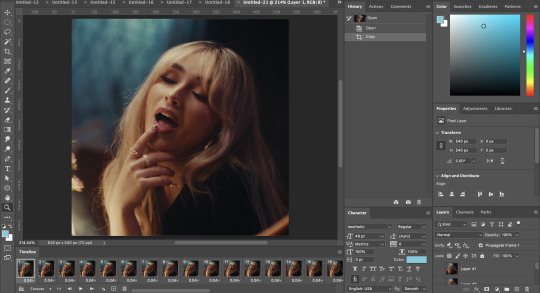
now, my gif looks like this. from here, i'm going to click on the timeline (the space along the bottom that has every frame). from there, click on the three lines to get this menu (i've circled where to go + what you'll click):

from there, go 'select all frames' and then click on any of the frames NUMBERS (where it says 0.04 with an arrow besides it, or whatever yours says) then change the frame rate. with most youtube videos i will use 0.08 as my desired frame rate, but when i'm gifing a show or something, it loads in as 0.02, so i change it to 0.05. 0.05-6 on any normal screen cap should be fine, but obviously you can change it depending on if it looks right or not.
from there, you've basically done the first half of the basics. now, you'll want to click on this button:
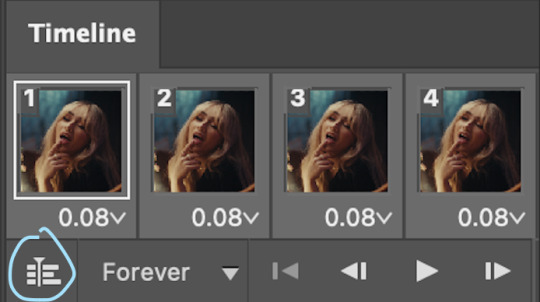
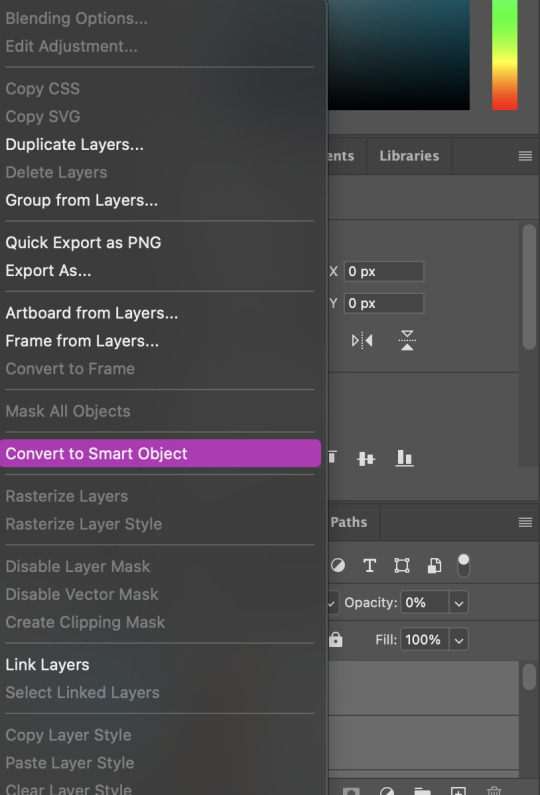
and now you'll be taken to the video timeline ! from here, select command + option + a (this is for mac, i think it would be control if you're on another device) then, right click on your layers and go 'convert to smart object'.
from here, i'll sharpen my gif before i colour. for this step i have two alternative sharpening settings first one by anyataylorjoy (rb to download !) and the other by maygrant (please ask !). the first one is tuser maygrant's and the second one is tuser anyataylorjoy's. i typically use morgan's for all my basic gifs but anyataylorjoy's for creative sets. every user has a different preference but just find what's good for you !

4. colouring your gif.
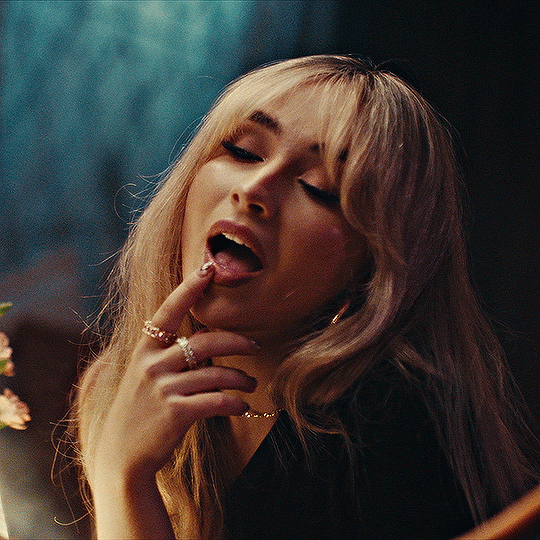
definitely the most tedious, this can be a little bit of a hassle depending on the scene. if the colouring isn't riddled with heavy yellows or cyans, colouring is usually a breeze but if it is, it can be hard.
CURVES

the circle with the arrow dropdown and that's half grey-white is the circle you want to click on to find curves. it'll open a menu and curves will be at the top.
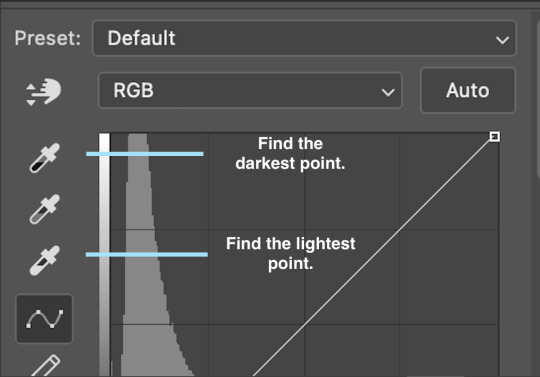
you'll see a little menu like above appear. now, select the dropper i've indicated as being the "light point" and then, using the zoom tool, we're going to zoom in and find the brightest point on the gif. this is typically where the light source is.
in this section here, i can see a couple of bright points. using the dropper, i'll click on the closest to white (note: i find that white rarely changes the colouring of the gif, so if there's like, a really really light yellow, for example, click on that) and then i'll do a similar process with the "dark point" dropper, finding the darkest spot, which is usually in shadows or in the corners. unlike with the light dropper, you want the closest to black, whether that's a dark dark brown or dark dark blue.
now, we can see how the colouring has changed:

optional: you can change the white line on the curves menu, which can make it lighter, or darker in different points of the gif.
LEVELS
levels is an optional step, but i recommend it on very light gifs, or if you want to add a little more depth. probably don't do it on an already very dark gif.
the levels menu looks like this:
the far left slider adds shadows and the far right slider makes it lighter. on this particular gif, i only need a little bit of depth to her face and i only need to contrast that a little bit. by just dragging the slider a little bit:
this is the result:

with levels, it can very quickly alter skin tone/make your gif look bad !! with levels, i don't think you need to go above 1-12 in adding depth.
OPTIONAL: BRIGHTNESS/CONTRAST
brightness/contrast is optional !! only add it if it's necessary :)
COLOUR BALANCE
a colour balance layer is great for fixing the tones for the gif !!

this one's pretty self explanatory. if you want it to be more yellow, slide it towards yellow. if you want it to be more red, slide it more towards red, etc etc. i've attached some gifs showing how i change tone:
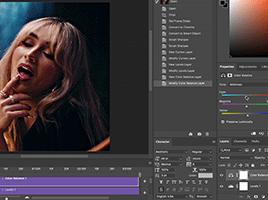
but just play with it until it looks right. be very careful with skin tone !! colour balance can very easily whitewash/colour wash and that is not something encouraged, in the slightest.
SELECTIVE COLOUR
a selective colour layer is basically a "final touch" to colouring. where colour balance just kind of does an overall change of the gif, selective colour allows you to alter your specific tones, ie. reds, magentas, blues, etc. for me, i'll do the bulk of getting my desired colouring with colour balance, but if it overcorrects reds, for example, i'll add some cyan to red tones in selective colour, to diffuse that.
currently, in my gif, it's very red/yellow heavy. to balance that out, i want to add cyans. so, on the drop down list of the selective colour menu, i'll select 'red' and then i'll ADD cyans (so move the slider to the right, not the left to decrease) and then repeat that on other tones that i want to correct, with different colours.
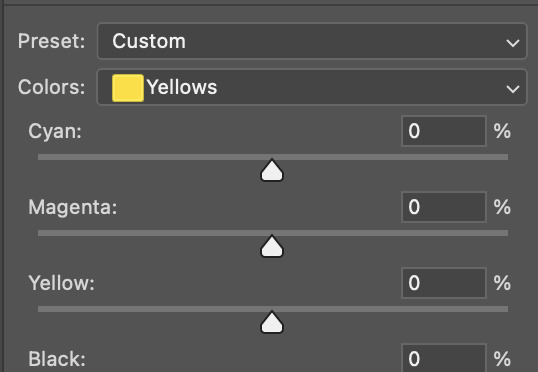
with each of the sliders, just add or decrease how much of that colour is in that tone. once again, be mindful of skin tone and whether it is appropriate or not.
with selective colour, if there are any standout colours (eg. in my gif, there's a big patch of cyan) that don't interrupt their face (eg. reds and yellows are always in faces) and change the way the subjects look, you can change those colours to make it more vibrant. so, in this gif, i'll enhance the cyans and blues and magentas to make the colours pop more.
5. saving your gif
once your happy with the colouring of your gif and done what you need to do with it, save it as a smart object with all your colouring layers, then go to 'file' > 'export' > 'save for web (legacy)...' . play back your gif, and it should be all good !! congrats on making your gifs !
i've included a playback of each layer, which is staggered to show each layer come into effect.
in order: nothing -> curves -> levels-> brightness/contrast -> colour balance -> selective colour.
hope this helped !!
#*tutorial#gif tutorial#ps help#ps tutorial#userriel#userautie#userraffa#usernorah#userrsun#usercats#thingschanged#**l.myeditss
89 notes
·
View notes
Text
Thirty minutes and 9 paragraphs into an excited list of alternatives to Spotify's monopoly re: music, videos, podcasts, audiobooks, for weenies like me who are nervous about pirating, and my app crashes.
Well now I'm on a laptop and I swear to god if this crashes too I'm calling it a conspiracy.
LEGAL ALTERNATIVES TO SPOTIFY:
Music: There are virtually limitless options here. Buy music directly from the musicians/band! If they don't sell mp3s directly from their site, they almost certainly have CDs for sale, so buy those and rip the mp3s to your computer (if your computer doesn't have a CD slot, you can buy an external one for fairly cheap). Go to a new/used music store, they still exist!, and buy albums there. Buy old albums from ebay! Go to goodwill or other thrift stores and browse there collection of cast-off music for cheap, you never know what you'll find. Hell, browse their cheap vinyl if you prefer their sound and get a vinyl-to-MP3 conversion device if you like. They even have conversion devices for cassette tapes, if you find a treasure that was only ever released on tape. Once upon a time I would have said Bandcamp for MP3 or even physical albums (I once upon a time got an AUTOGRAPHED TO MY NAME CD of Lauren Ruth Ward's Well Hell album), but they recently union busted and a lot of artists pulled their stuff from them. I don't really know anything about 7Digital's business practices, but they are another seller of MP3 music, as well as MP4, FLAC, and WAV.
Music DEVICES: If you just want to manage everything on one device, your phone, get the free VLC app! It's open source and is absolutely wonderful. I only ever used it for music, but it's capable of much more than I realized, and it's open source and ad-free! And the audio files are tiny, even when I was running out of room on my sixteen gig old phone, I still had a substantial music library on it before before I got a dedicated music player.
Which brings me to my next point: MP3 PLAYERS STILL EXIST! I own two! My first one is a twenty-dollar SanDisk Clip Jam (an established and sturdy brand), my current is a thirty-dollar Phinistec Z6 (that just came out of nowhere it seems). Each have their pros and cons, and there are so so so many options out there. Some are smart, some don't even have wifi (neither of mine do). Some have expandable card slots for even more music. Some are extremely basic, some have a plethora of features. Some are cheap but still decent in sound, some are high-end for that true audiophile experience. Some have touch screens, some have buttons, some have no screens at all. Some only use wired earphones, some only use bluetooth, some (like the Z6) can use both! There are so many brands out there even in Twenty Twenty-four. Even the random brands cropping up online are some really good shit, and I bought both of mine used bc I have concerns about the lithium industry. Oh, and some are regular battery powered. And you don't need iTunes or anything, I just use the basic Windows Media Player to rip my CDs or put mp3s music on my player. In fact I've been avoiding Apple players because I'm worried they'd brick older devices, especially ones with wifi. But there are so many options out there, it's impossible to name them all.
Audiobooks: YOU DON'T HAVE TO USE AUDIBLE! Libro.fm has a similar business model (an optional subscription fee with a free credit every month, or the option to buy book without a subscription for a little bit extra price), and you can direct the profits to the indie bookseller of your choice! I have mine set to go to Baltimore's anarcho-feminist bookstore, Red Emma's. How to listen to the audiobooks you buy? Libro has an app you can listen to directly from! AND they have the option to directly download from the site (meaning no program you have to install) the book in non-proprietary mp3/mp4 files so you can listen to it on any device that can use those files! THAT INCLUDES MP3 PLAYERS! Almost every music player on the market now not only plays audiobooks, but has sections on the device specifically for them! Some, like the Clip Jam, are even proprietary audible-compatible if you still use or already have books there (check audible's site, and you'll have to go thru a registration process). I was listening to audiobooks on both my CJ and the Z6 (the Z6 doesn't have a section for them, but still played them), but I recently bought an e-ink/e-paper (meaning no backlit LED screen causing eye strain or insomnia) ereader, a Pocketbook Touch HD 3, and that is mp3/mp4 capable for audiobooks, and is easier to maneuver books with since it's meant for books. ALSO: the library apps Hoopla and Libby also have audiobooks you can listen to via phone or computer/browser, depending on your library's catalog. Some ereaders can even have the apps for them, and if they have audiocapabilities you can use the ereader for that too.
Podcasts: There are so many apps for this. I have Podcast Addict (I don't remember off the top of my head if it's on apple, I use android, but there are still so many apps). Literally I only had to sacrifice one podcast when I stopped using spotify, PodcastAddict has everything else I've ever listened to or want to listen to in the future. You can download them for offline use on your phone, and, you guessed it, MOST MP3 PLAYERS HAVE PODCAST SECTIONS TOO. MINE DO! There are still ads at the beginning and end, but I usually skip over them without care.
Video: This one is a bit trickier as YouTube is also a monopoly, but what I do is just watch yt on my phone's Firefox browser with UBlock Origins adblocker installed. Sometimes yt gets into a hissy fit with adblocker, but UBlock usually gets ahead pretty quickly thus far. And if in the periods Origins is losing, I just find something else to do. I'm sure someone else has recommendations for videos, they're just not a big part of my life right now.
Anyway, don't let the horrid beast that is spotify monopoloize the audio industry OR your time! There are options, and even if you're not a luddite like me that hates having everything on my smartphone bc I'm worried about privacy or companies yoinking their stuff off my devices via wifi (like Amazon did once with their copies of, of all things, Nineteen Eighty-four about a decade ago) at the whim of corporations. You HAVE OPTIONS! YOU HAVE THE POWER TO CONTROL YOUR MEDIA AND REJECT MONOPOLIES!
#i'm very passionate about this#ily physical media#for a certain definition of physical media since it's all mp3 and such. but I have the power and can hold the device it's all on in my hand#and I own everything on it and they can't take it away from me#spotify#music#audiobooks#podcasts#monopolies#edit: bolded the beginnings for ease of browsing/reading
15 notes
·
View notes
Note
Hi, I saw your offer to help in locating access to I Cannot Reach you and I've been unable to locate it in the US. I wish Japan would offer more international distribution because I would definitely be willing to pay for streaming access. Anyway, you don't know me and I don't have anyone here to vouch for me so I totally understand if you'd rather not share the info. The offer was very kind and I don't want to overstep. Thank you!
Hello yes I am here to help! Okay, so this show requires a little extra effort but it is deeply worth it. Unfortunately you will not be able to find it on any streaming service, but you can download the video and subtitle files and watch it on your own devices.
If you’re not familiar with how to watch shows this way, here are the steps to living that pirate life:
Google search and locate the show on a website hosting the raw video files (I will DM you a good one for this show, I try not to spread around exact locations because it will be taken down at some point as this is not legal).
Download subtitle files from lovely fansubbers who are doing this work on their own time and are generous enough to share. @kiminaisubs is providing subtitle files for this show and you can find all the currently available ones on that blog. Please mind their request not to repost.
Once you have both sets of files saved in the same folder on your computer, you’ll want to give the video (in mp4 or mkv format) and the matching sub file (in ass or srt format) for each ep the same name. I suggest the following format: I Cannot Reach You S01E01. So for ep 1 for example, you’ll end up with two files: I Cannot Reach You S01E01.mkv and I Cannot Reach You S01E01.ass. Do that for every episode.
Once your files are named properly your device will automatically play the subtitle file when you click play on the video. If you’re watching on a computer VLC media player works well; when you are ready to level up and be a bougie pirate you can make yourself a Plex server to make everything extra beautiful and be able to easily watch on a television.
Those are the steps! I’ll send you a link to grab the videos (if others want it comment or DM me).
21 notes
·
View notes
Text
i just bought a battery to fix my phone.
I have not opened and fixed a device since high school when I mcguivered the jack of my mp4 player.
Anyway. Right to repair forever.
7 notes
·
View notes
Last Seen Blogs

cooldspring
H E R E

missoneminute
love in the trenches

shubhamkwebmarts
Blossom Travel Services

babybinko
Sillygirl Swag

jemelle
couldn't live without you, i guess