#embroidery tutorial
Text
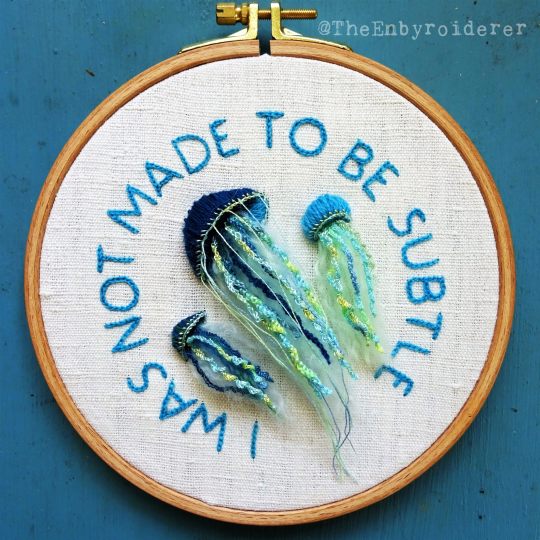

One more tutorial. I think this is the last one I have for now.
Here's how you stitch a 3D jellyfish. This is a more advanced tutorial. Prior experience with most of the stitches is recommended.
Materials: You'll need several needles, at least one shorter and one really long. I've used sashiko needles in three lengths, 4 cm, 5.5 cm and 8.5 cm. As for yarn, I think you can use whatever you have. Most of it can be done with six-stranded floss, but you'll need some thicker woolen yarn for the fluffy turkey stitch. I used fine d'aubusson (a fine wool embroidery yarn) for the body, six-stranded floss (2-3 strands) for most of the tentacles, a shiny silky embroidery floss for the edge of the body and a couple tentacles, and knitting yarn scraps for the turkey stitch.
Stitches: satin stitch, bullion stitch, padded satin stitch, buttonhole stitch, drizzle stitch and turkey stitch. Please look up stitch instructions on youtube, and do a bit of practice beforehand. This project is probably not a good practice run for these stitches.
Time: depends on the size of your jellyfish. I made quite a large one and it took me about 5 hours to complete.
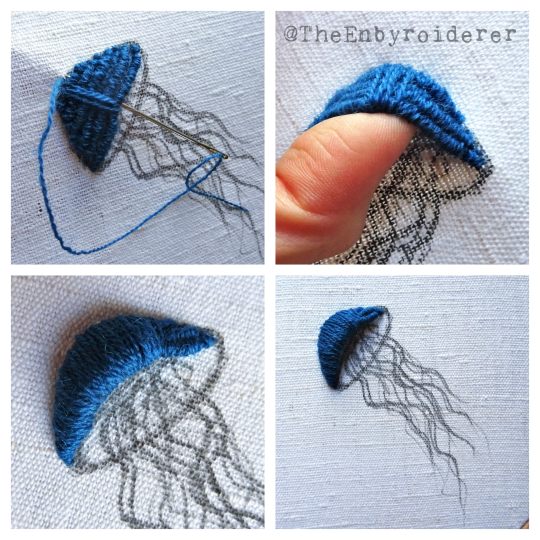
1. Make a sketch of your jellyfish. At least of the body. Fill this body from edge to edge with bullion stitch, make them a bit longer than the body is wide so that they are somewhat loose. You should be able to get a finger underneath the bullion, depending on the size of your jellyfish.
2. Then it's time to satin stitch the body. For this part it's important that the needle goes through the fabric as close to where it came up as possible. The goal is not just to make a 3D body, but to make it a hollow 3D body. Don't just stitch over the bullion, stitch around it. It's also important to not pull too tight. Bullion stitch of this lenght is rather malleable, so it's a bit tricky to keep the satin stitch even. Hold a finger in the hollow underneath the bullion as you pull the thread tight. This will stop it from getting to tight, as well as make sure you keep the hollow. As the stitching gets thicker the hollow will get smaller, but that's ok.
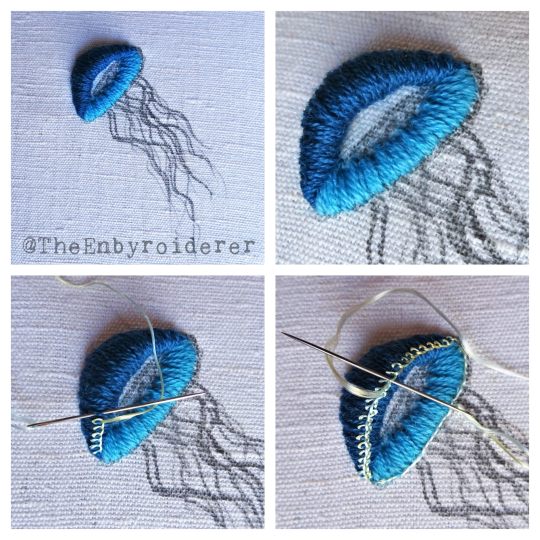
3. When the top part of the body is fully stitched it's time to do normal flat satin stitch for the bottom part, the inside of the body of you will. Leave an opening in the middle though, you'll need some space for the drizzle and turkey stitch later.
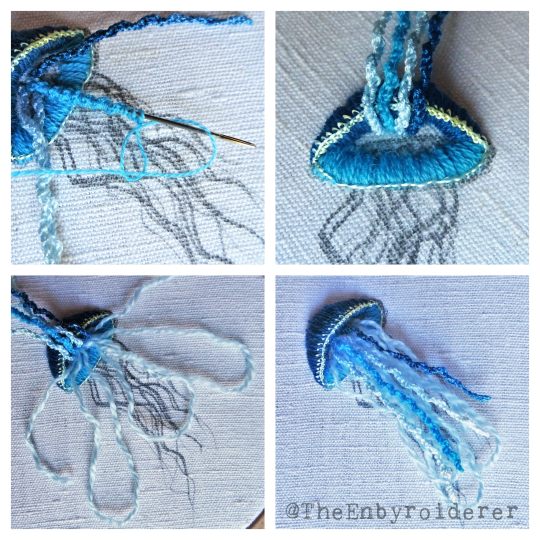
5. Now it's time for the tentacles. Start with the drizzle stitch, because the turkey stitch will just get in the way if you start with that... but do remember to leave space for the turkey stitch underneath the drizzle stitch. This is where you need the loooong needle. Pack as much drizzle stitch on that needle as you can. You'll notice that the drizzle stitch wants to rotate around your needle as it gets longer, do let it, that will just help you fit more stitch on there, as well as give the finished stitch a nice curl.
6. When you think you have enough drizzle you can move on to the turkey stitch. You will not need to do a lot of it. You'll probably overestimate how much you need, but that's ok, you can always give the fluff a bit of a haircut later. Do a few looong loops of turkey stitch, a little bit longer than your drizzle stitch. Cut the loops to slightly different lengths, otherwise you'll get a very blocky bit of fluff... tapered is better. Untwist the yarn and separate the strands, draw a needle through the strands to fluff them up.
7. As a finishing touch you can add some long and thin strands around the edge of the body.
#embroidery#3d embroidery#fiber art#needlework#embroidery tutorial#fiber art tutorial#3d embroidery tutorial#tutorial#jellyfish art#theenbyroiderer
756 notes
·
View notes
Text
102 notes
·
View notes
Text
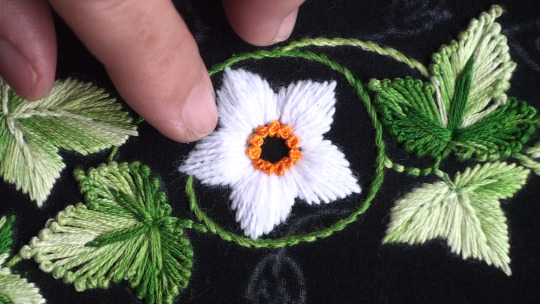
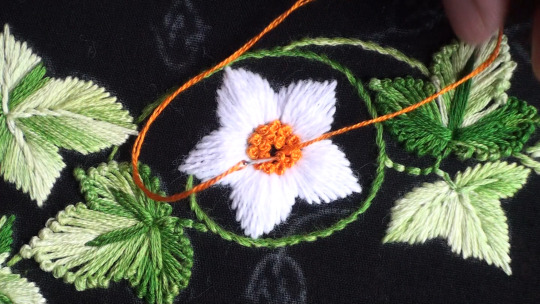
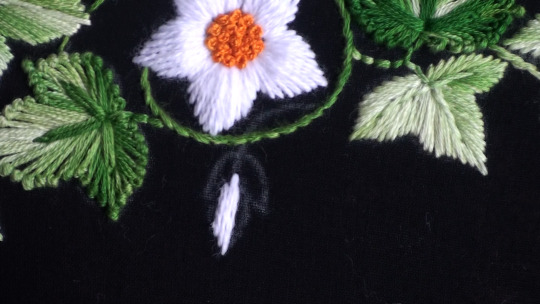
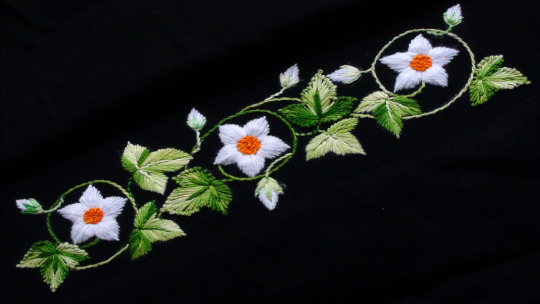
Needle, Thread, and a Dash of Magic. 😇
youtube
#threadskalakari#crafts#diy#embroidery pattern#embroidery tutorial#embroidery#knitting#creative#handmade#youtube#Youtube
112 notes
·
View notes
Text
Embroidery tutorial!
How to transfer your drawings onto paper:
Talking about pencils, pens, Paper Solvy, water soluble film and Magic Paper
31 notes
·
View notes
Text


#youtube#embroidery#embroidery design#handembroidery#embroidery tutorial#needle work#flower embroidery#design#miss anjiara begum
22 notes
·
View notes
Video
youtube
EVER WANTED TO LEARN HOW TO EMBROIDER YOUR COSPLAYS?? THIS IS THE VIDEO FOR YOU!! Wow this is such an old video but I still get questions about embroidery al the time, so might as well try to continue to share the information around.
#cosplay#cosplay help#embroidery#cosplay embroidery#cosplay details#cosplay tutorial#cosplay guide#embroidery tutorial#embroidery guide#cosplay tips#cosplay tricks#cosplay tips and tricks#hand embroidery#cosplayer#cosplay youtuber#telekineticmaniac
48 notes
·
View notes
Text
The mighty french knot - or, as some folks from my neck of the woods call it, the colonial knot.
4 notes
·
View notes
Text
My first bead embroidery DIY tutorial 🥳 Delicate and light weight monstera leaf earrings or pendant💚 Step by step PDF tutorial (+video of most difficult moments) for beginners. I also made 2 kits (each contains materials for 3 leaves) . Welcome to my small store of handmade jewelry and .... tutorials now☺
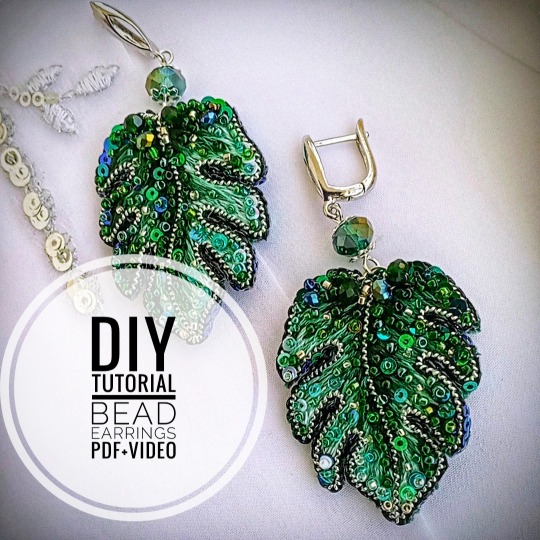

#bead embroidery#diy#jewelry making#fashion#jewelry#handmadejewelry#earrings#embroidery pattern#embroidery tutorial#beading#monstera#diy jewelry#diy kit#embroidery kit#beading kit#tutorial for beginners#giftideas#patterns#plants
14 notes
·
View notes
Text


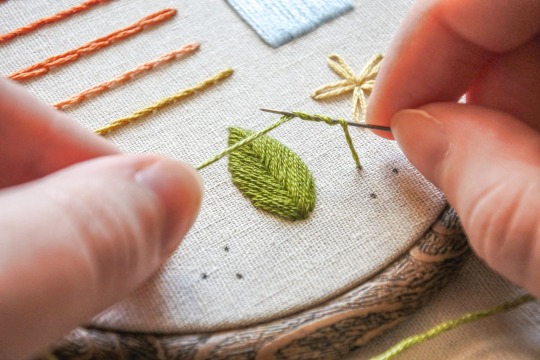
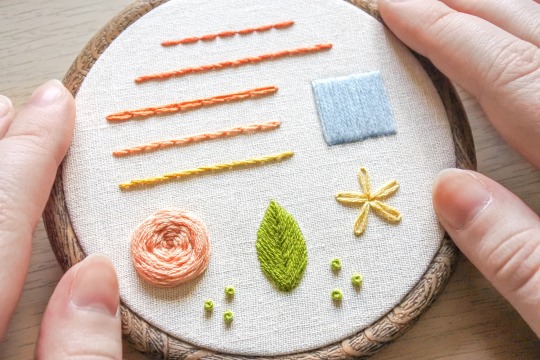
If you want to learn hand embroidery but don’t know where to start, I’ve made a stitch guide that’s perfect for you! You can start stitching today!
#embroidery tutorial#embroidery#crafts#arts and crafts#crafting#embroideryart#hand embroidery#embroidery stitches#embroidery pattern#embroidelicious#art tutorial#textile art#fiber art#craft tutorials#diy tutorial#diy embroidery#diy craft
14 notes
·
View notes
Video
youtube
#embroidery tutorial#handembroidery#embroidery#cottage life#cottage kitchen#strawberies#needlecraft#needlework#diydecor#DIY Projects
11 notes
·
View notes
Text
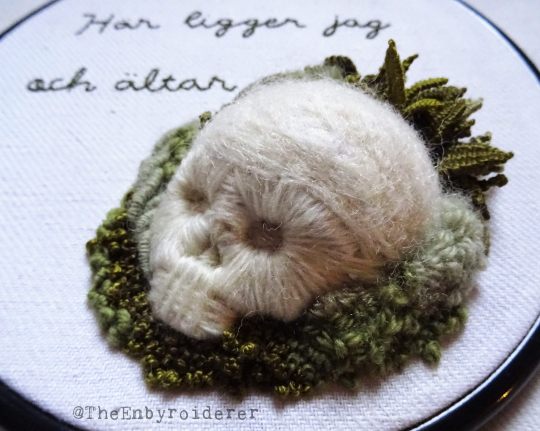
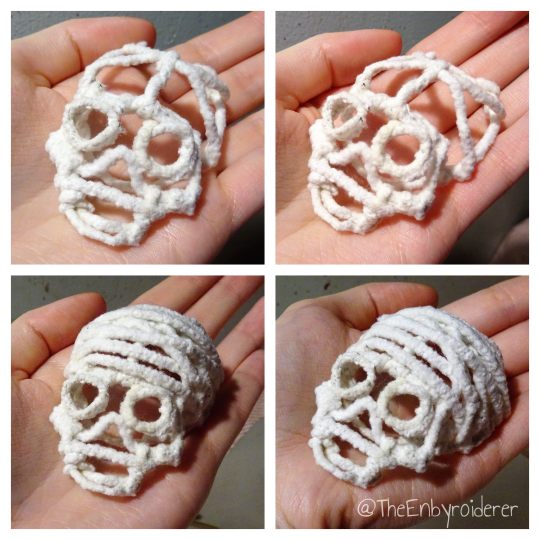

In the lull between fiber projects I'll just post another tutorial. Though this one is less a tutorial and more vague guidelines. There are parts that I can't really tell you how to do and I'm sure there are details that I don't have photos of... but I'll try to describe the process as best I can, and just hope that my words can fill in the gaps. Just ask if you have any questions and I'll try to answer them.
Materials: Cotton fabric, durable, not too thin. Pipe cleaners. Off white cotton thead. Off white wool yarn, a couple different thicknesses is preferable. One shorter and one longer needle, both sharp. (I used sashiko needles, one ~4cm and one ~6 cm.) Felting needles, for the top of the skull. Various green shades of wool yarn, perle, and other threads, for the foliage.
Step by step instructions:
1. Make a skull out of pipe cleaner. Just do it, I can't tell you how.
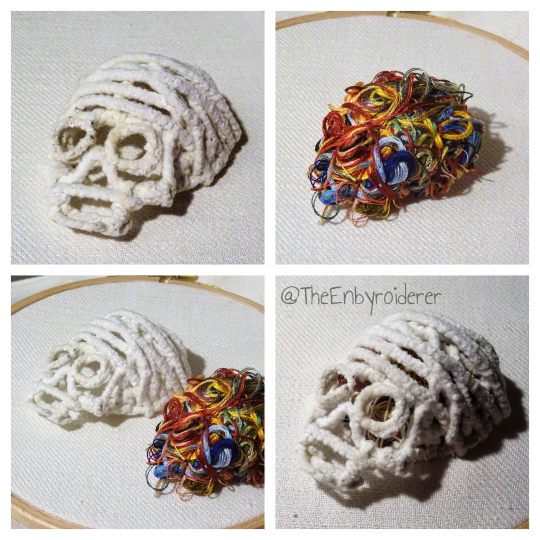
2. Find something to fill your skull with. I filled mine with a bundle of orts (thread scaps), so in my mind this skull will forever be known as Ort-For-Brains. I stitched around and through the bundle of orts a bit so that it was less a random tangle and more of a solid round shape. Then I tucked the orts into the skull and stitched the skull to the fabric with just a few stitches (using a durable cotton thread) around the edge. Make sure you fill the space inside the skull completely. Underneath the face of the skull the brains poked out a bit, so I did some stitches with the cotton thread there to hold the orts down. Another filler may be easier to work with, but I just couldn't resist the though of using colorful orts as brains...
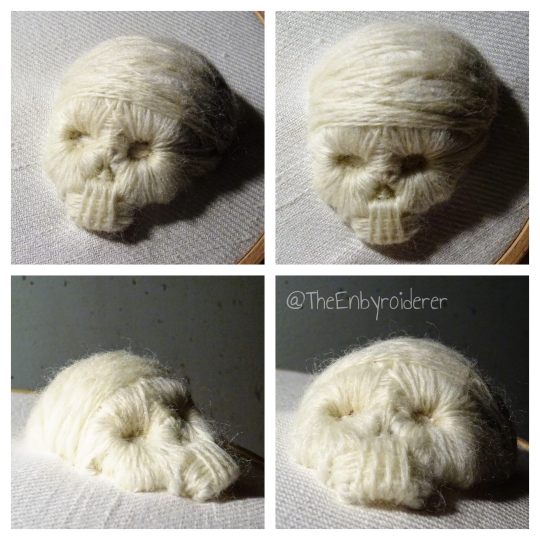
3. Stitch over the pipe cleaner scaffold using wool yarn. I can't tell you exactly how to do this either, and depending on the shape of your scaffold you might encounter different challenges. Just be methodic, and don't overthink it. Use a thicker yarn, or more strands, on the top of the skull, and thinner/fewer strands when you are doing the face. When doing the face I'd say start with the eye sockets because they dominate the face. Stitch outwards from them, as if the sockets are suns and the thread sunbeams, if you get what I mean.
4. When you have stitched to your heart's content you may want to felt parts of the skull to make it smoother. I did anyway. I took bits of wool yarn and carded them a bit to make them less yarn-shaped and more like little sheets of wool, then I used felting needles to poke them into place on the top of the skull. If you have actual rowing wool, use that, it's probably better.
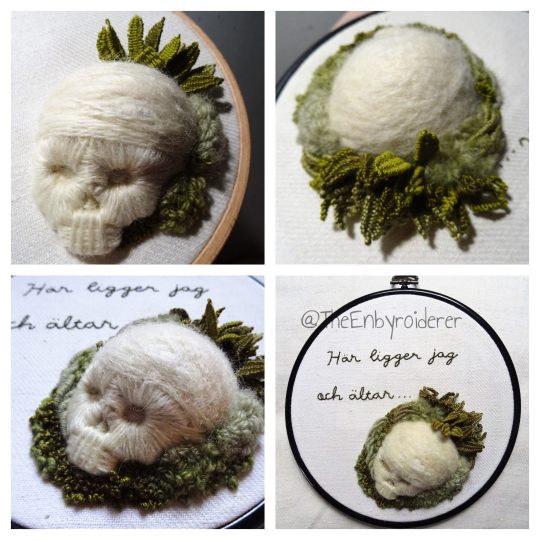
5.When you are satisfied with the skull you can do whatever you want with it of course. I added foliage. Techniques I used for that include: turkey stitch, drizzle stitch, woven picot stitch, bullion stitch and french knots.
#embroidery#3d embroidery#fiber art#3d embroidery tutorial#embroidery tutorial#fiber art tutorial#tutorial#kind of anyway#skull art#memento mori
417 notes
·
View notes
Text


13 notes
·
View notes
Text
Blossoming Threads: Where Art Meets Needle and Thread 🌼✨
#threadskalakari#crafts#handmade#diy#youtube#creative#embroidery#knitting#embroidery tutorial#embroidery pattern#flower embroidery
30 notes
·
View notes
Text
#tv cover embroidery#embroidery#embroidery design#embroidery pattern#youtube#embroidery for beginners#handembroidery#design#knitting#sewing#embroidery tutorial
34 notes
·
View notes
Last Seen Blogs

strategypillar
SOUSA

fox-planeswalker
Лис Мироходец


jetline-marvel-blog-blog
Jetline Marvel

todaystoriesclub
Stories