#satin stitch
Text
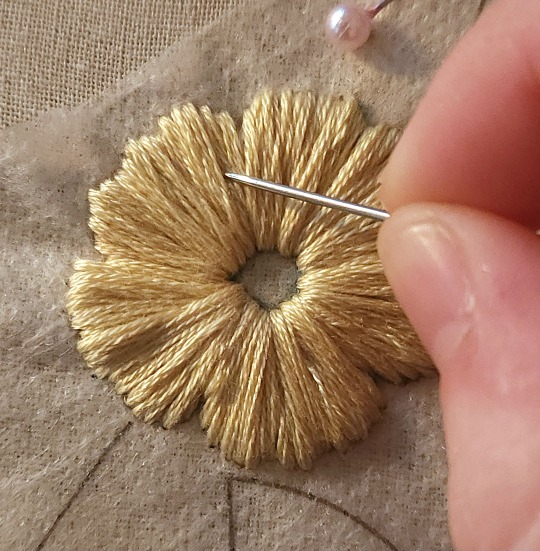
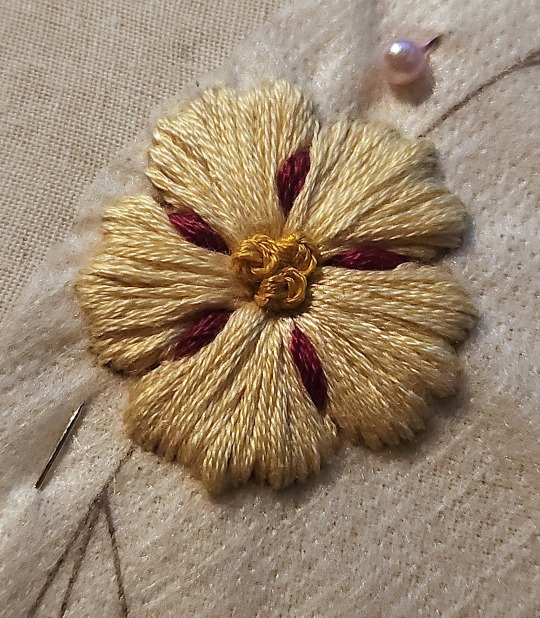
spidergwen embroidery :))
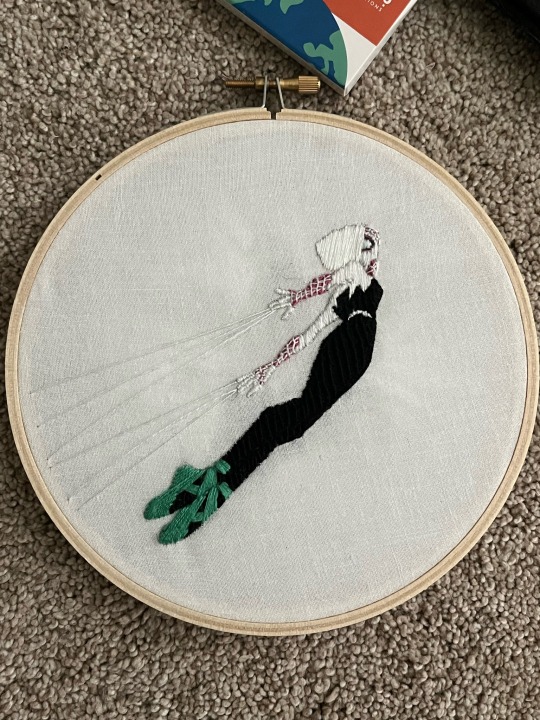
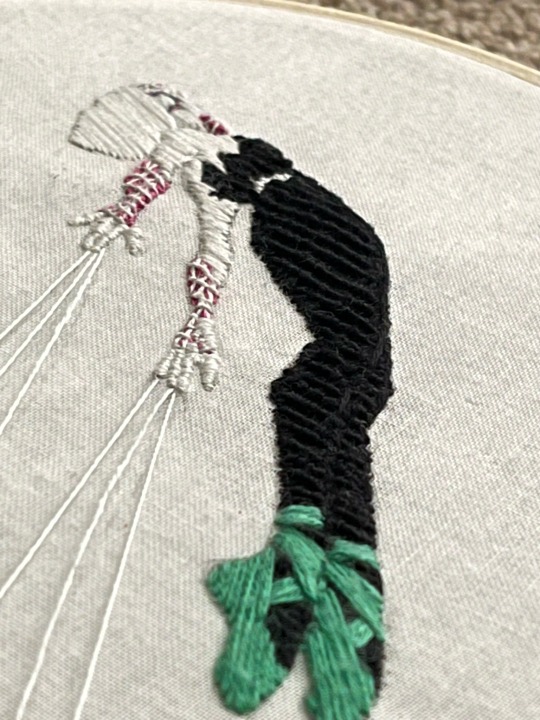
i took that weird slant picture so you can sort of see the texture of this new stitch i was trying for the black, it’s called the web stitch so you can probably guess why i used it :3
#i still suck at satin stitch. i hate it#and also i made her wear the ballet shoes even though in this frame she is wesring converse just because i love the ballet shoes as part of#her design :(((#and though the converse are cool because it matches miles’ shoes part of me wishes they’d kept the pointe shoes#cathy says words#embroidery#across the spiderverse#atsv art#atsv#spiderverse#into the spiderverse#spider man: across the spider verse#gwen stacy#spider gwen#spiderman#spiderman embroidery#needlecraft#needlepoint#needleart#satin stitch#web stitch
663 notes
·
View notes
Text
My first attempt at an embroidery project that I actually finished, and my first time trying satin stitching!
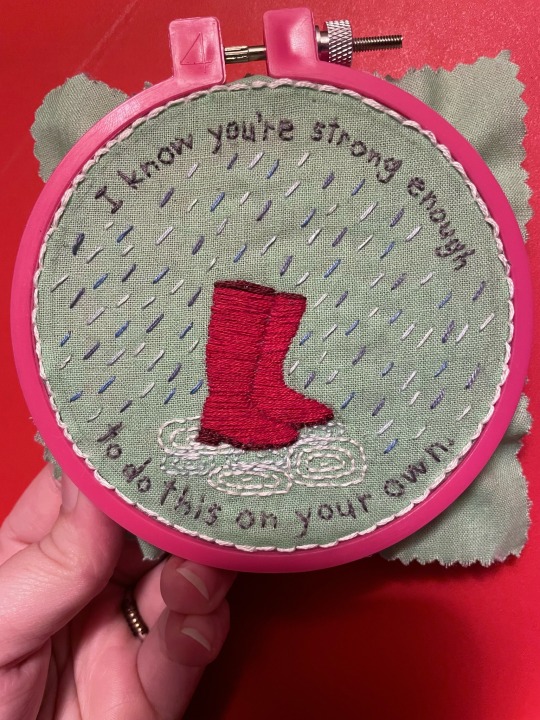
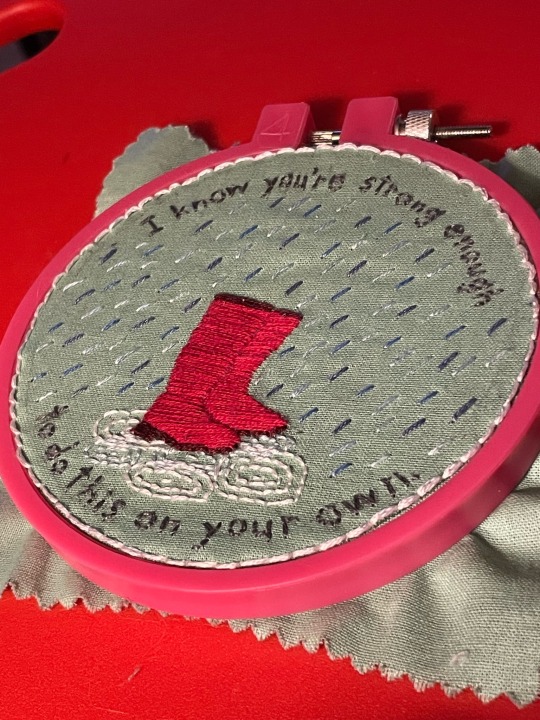
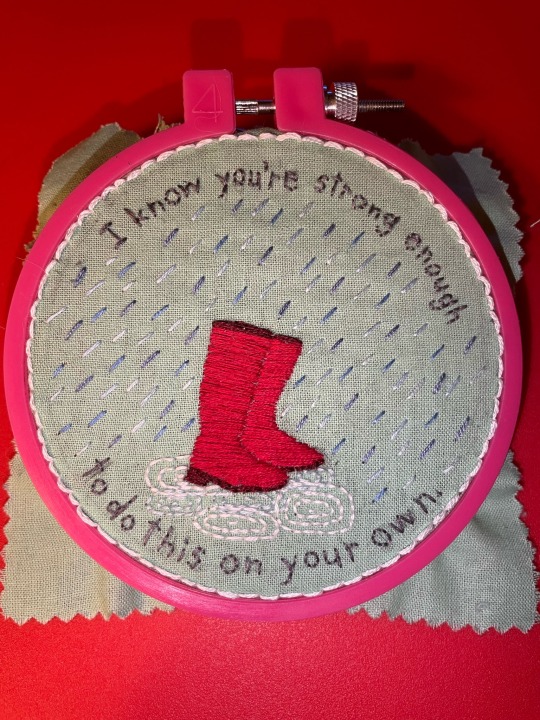
I wanted to try something small for my first time trying this again in so long, and I think it turned out pretty well! Also, the fabric is more of a greenish blue than the photos are making it seem, I couldn’t quite get the camera to cooperate with it.
Inspired by and lyrics from “Welly Boots” by The Amazing Devil! (My TAD blog is over at @showerday )
599 notes
·
View notes
Text
Around a year ago I started an embroidery project which I had no fucking clue what I was getting myself into. "Van Gogh-inspired Halloween-y Cat In The Moon" as a surprise for @theintrovertinthetower (who has a magnificent black cat)..."if I can draw it, how how hard could it be?" i asked myself, incorrectly.
well. It took me a long fuckin time. But it turned out!?! well, even??

I went so insane over this that I even braided the cord for the border. I think the whole thing took me around 90 hours. If I had known the needle eye size I used for most of it was a terrible decision any earlier it might have only taken me around 30 hours! The last two thirds took me significantly less time than the first third. Super fun, and I learned so much!
I'm gonna do something easier next
#bullion knots#embroidery#fiber art#cat in the moon#french knots#rip my fingers and sanity#van gogh#impressionism#night sky#couching stitch#satin stitch#macrame#craftblr#woodsfae
160 notes
·
View notes
Text
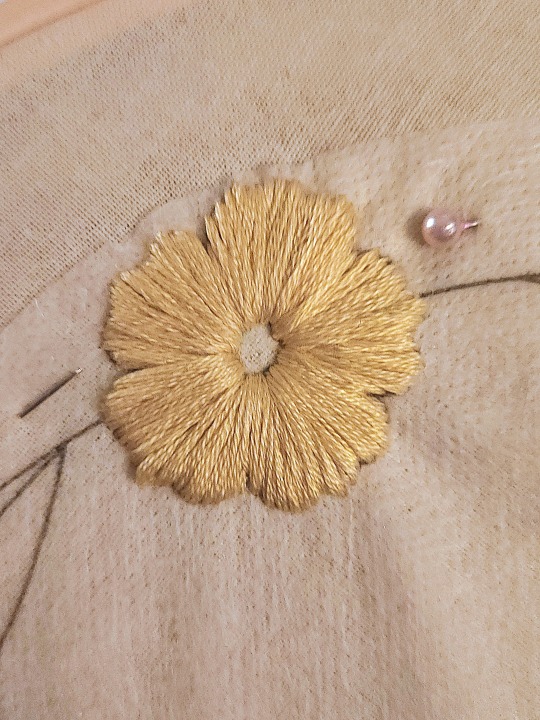
Tutorial: Tips & Tricks to Making the Satin Stitch
The satin stitch is probably my most used stitch, aside from perhaps the leaf stitch. I use it for filling in most small shapes. It works best with geometric shapes, but can be applied to organic shapes as well. It's a relatively basic stitch, but it's taken a little time for me to develop a good technique that results in well defined shapes and smooth textures. Here's a little look at how I actually do it
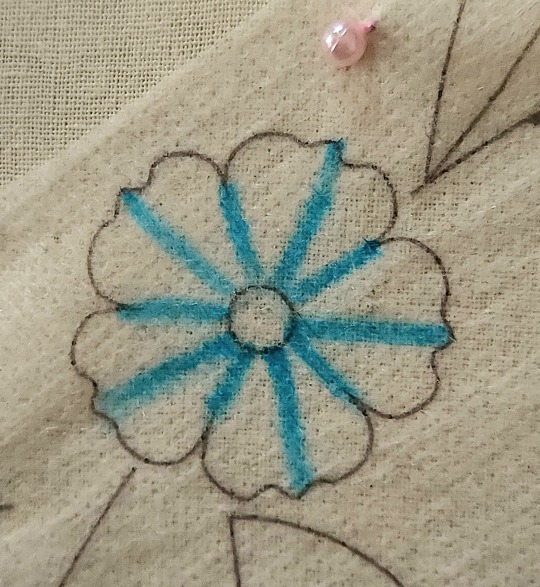
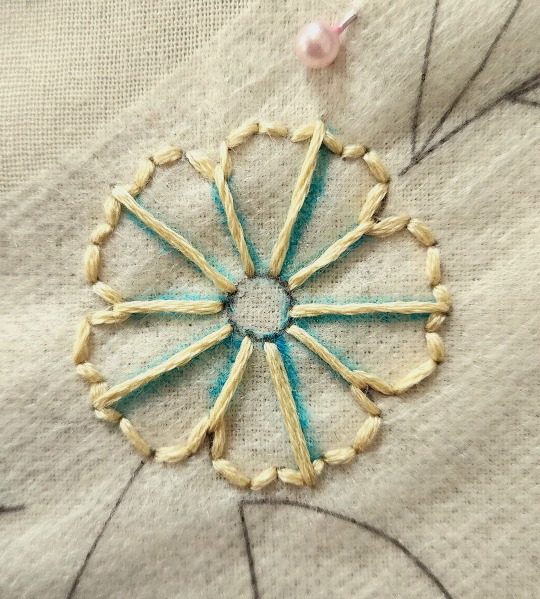
I start with the shape I want to make and then mark with which direction I want the stitches to go in. Next, I take my thread and outline the shape using a back stitch. Outlining helps to keep the shape looking clean and even. When the outline is done, make some straight stitches following the directional lines you’ve marked out. Make sure to bring your needle up just outside the outline and work your way in this way the outline gets covered up properly.
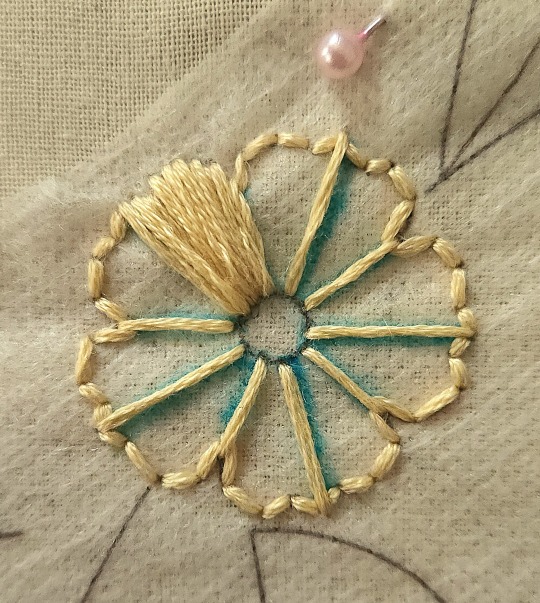
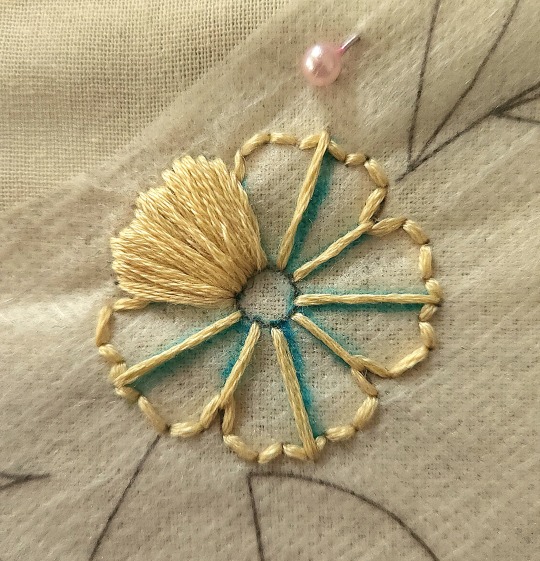
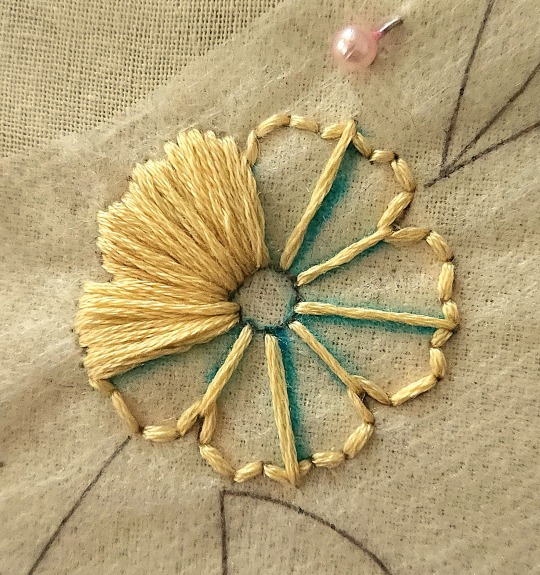
Next, I start making more of those directional stitches, working section by section until the whole shape is filled in. Working in small pieces like this helps to keep the overall shape looking uniform and feels a little less overwhelming especially when filling in bigger or more complicated shapes.
When the shape is completely filled, I take the sharp end of my needle and gently run it through the stitches to separate and distribute the threads so they have a softer, less bulky look.
And here's a look at what the finished product looks like after adding a couple minor details. This here is a rockrose that gets made in my piece inspired by "The Rockrose and the Thistle”
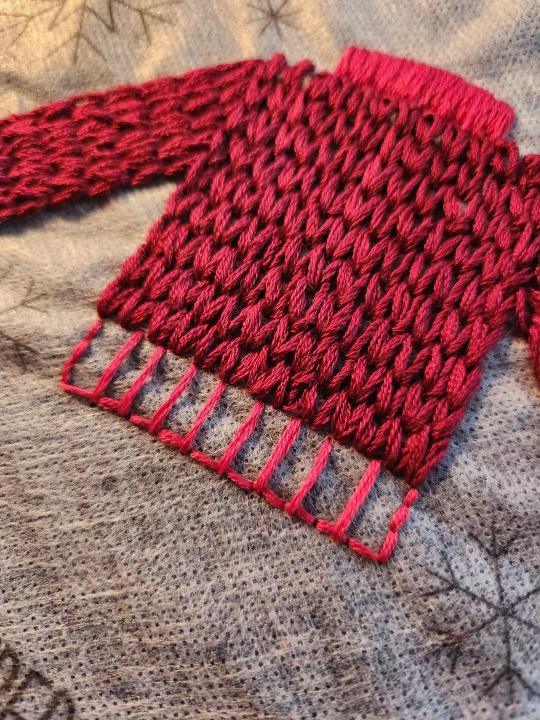
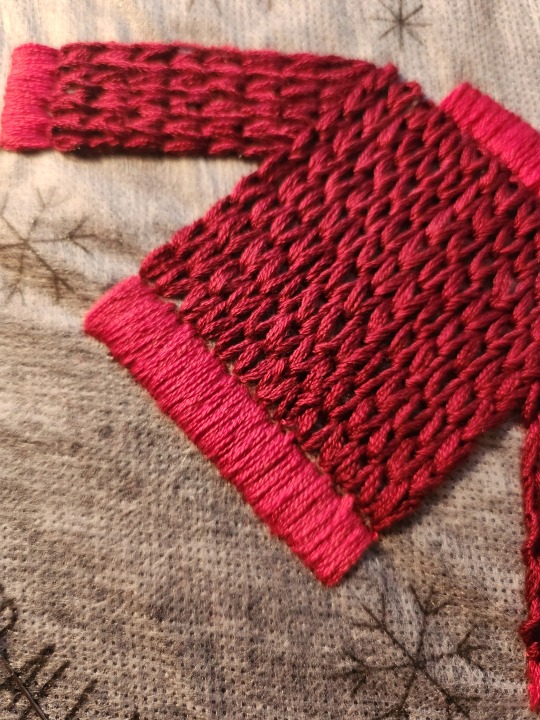
You can use this technique on a variety of shapes. Here's another example of how I used it for the hem of the sweater in my “Wild Blue Yonder” piece. I have used this technique time and time again whenever I have needed the satin stitch and I am always pleased with the result. Hope this helps you dear hearts in your own crafting journeys. Happy stitching!
397 notes
·
View notes
Text

“The more that you read, the more things you will know. The more that you stitch, the more better it grows!”
#books#embroidery#diy#stitching#hand embroidery#read books#stitch books#satin stitch#embroiderykit#modernembroidery#colourful#etsy#etsyuk#diycrafts#embroideryart#handmade#bordado#you can stitch#embroiderypattern
79 notes
·
View notes
Text
Time to learn to do satin stitch (only ever done cross stitch before)
Because ain't nobody gonna make me a changeling boy jacket if I don't do it myself
12 notes
·
View notes
Text
Breaking up the trend of visible mends here, I just had an idea for something nice and went for it! So, originally, I was out west seeing Razz while target had their pride collection out, and we spotted a purple crop top with this super fresh bi flag finger guns design on it. Lamenting ensued, because I'm not anywhere NEAR confident enough in showing off my gut to be wearing that.
However! I did prevail! I got a few blank white fabric masks from my then-parent company when the plague came down in earnest the first time, and I'd been keeping them around in case I run out of decorative fabric masks to wear over the good 95% filter ones. Anyway, time passes, I'm up in Boston by the time of this tale, and Pride rolls around once more. I go "hm. Should wear something fun to pride, what if I embroidered one of those masks?" Rustled up a picture of the design, and set to it!

Step 1: hey, these little pink thumbs are pretty easy, I'll have this done in no time! The stitches are pretty even and straight, too, I'm doing great for never embroidering before!

Step 2: "oh jeez these ones took approximately forever and I had to redo the outline as I went and AAAA the stitching has gaps in it!" I say, barely getting the purple section done with few hours to spare before pride tomorrow.

Step 3: "there's no WAY I'm gonna finish the blue stitching in enough time to not be tired for pride tomorrow, quick, switch to satin stitch!", thinks Nester! I really did almost run out of time here, just barely got to sleep in time to catch my alarm the next day to head to pride! Glad the few little black lines to define the fingers were really simple and quick stitches!
Just for fun, here's the back, which is MUCH cleaner than my projects usually are.
Overall I really dig how this one came out, and it made such a fun statement piece to wear to pride!
#embroidery#bi pride#facemask#satin stitch#outline stitch#decorative embroidery#queue.queue#a thousand words#nesterian lifestylings#solarpunk#slow fashion
17 notes
·
View notes
Text
Project completed for @fuckyeah-itme and headed out in the mail on Monday!
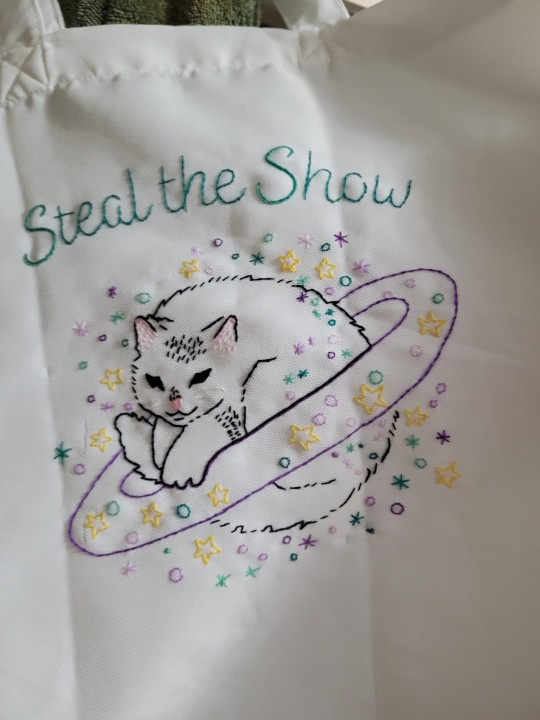
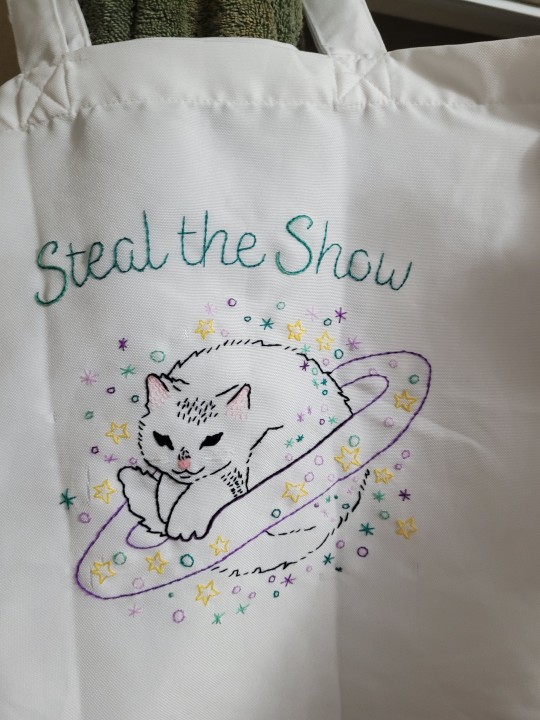

#embroidery#needlepoint#satin stitch#jeff satur#steal the show#studio on saturn#SATs#Saturdayss#saturdayss are for the boys#the clown car#🤡 my friends#caturn#fiber art#fiber crafts#embroidery project#jeff satur fanart
77 notes
·
View notes
Text
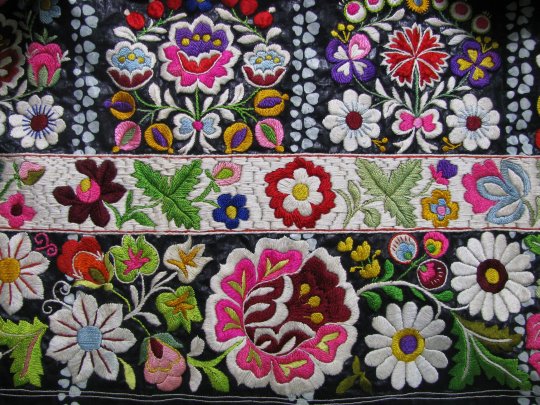
Author: Helene Cincebeaux
"Moravian Slovak wedding apron; satin stitch embroidery on batik chintz, made about 1920 possibly in Milotice near Kyjov.
My great aunt said it took a whole winter to make such an apron; she said they made a sketch on paper and then just started embroidering. Each one is a masterpiece made by village women who were true artists - bringing the flowers of their garden to bloom on their aprons all year long.
The white band is intricately embroidered and I love that nothing has to match - they just tossed in what felt right!"
#Folkways#Ancient Ways#Culture#Tradition#Slovak#Moravia#Moravian Slovak#wedding apron#satin stitch#embroidery#chintz#ca 1920#masterpiece#village women#art and soul#heart and soul#SymbolSpeak#AdoraFlora#flowers#blooms#apron#What is Remembered Lives
20 notes
·
View notes
Text
youtube
In This Video You Will Learn 15 Basic Hand Embroidery Stitches.This Video Is For Absolute Beginners
Stitches Included In This Video are#Runningstitch#Backstitch##stemstitch##Splitstitch#Buttonholestitch#Crossstitch#herringbonestitch #satinstitch #frenchknots #featherstitch #frenstitch#chevronstitch#Cretanstitch
#lazydaisystitch
#Mordern craft#solarpunk#embroidery#how to#how to embroider#diy#do it yourself#embroidery stitches#embroidery for beginners#running stitch#back stitch#stem stitch#split stitch#Buttonhole stitch#cross stitch#herringbone stitch#satin stitch#french knots#feather stitch#fren stitch#chevron stitch#Cretan stitch#lazy daisy stitch#Youtube
146 notes
·
View notes
Text

I have decided to move on to my next project. (I got a set of three off of Amazon, so this is the second of that set.)
I also made the decision to leave all French knots for dead last. As in, I will do everything else, but the French knot, then once all three only have that left, I will attempt them again.
Those knots still have one up on me. I need to reassess.
#artist#self care#cross stitch pattern#cross stitch#embroidery#celestial cross stitch#celestial#cross stitch art#arts and crafts#textile art#french knots#straight stitch#satin stitch#amazon finds#diy craft#needle and thread#needlework
10 notes
·
View notes
Text
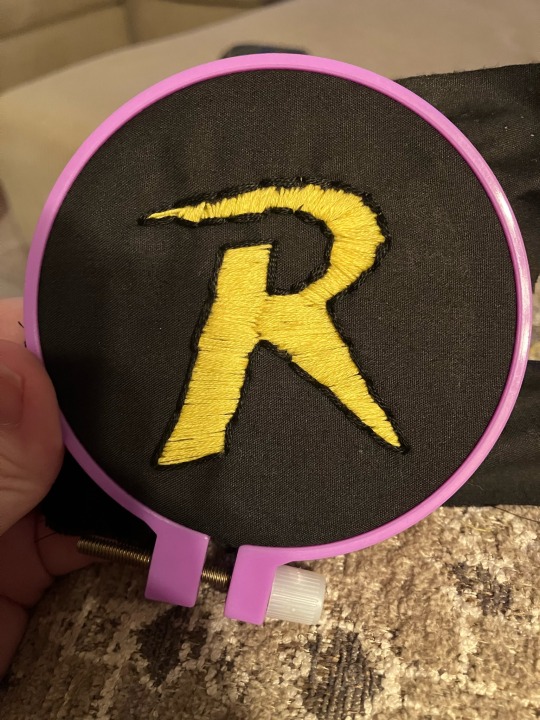
Started embroidering a Robin patch for Robin cosplay I plan to do. Specifically planning to do Tim Drake’s Robin, am doing the “R” stylized like his. Plan to also embroider in the black oval.
#dc#robin 1993#embroidery#tim drake#robin#cosplay#my embroidery#nerd embroidery#satin stitch#this much took me 3hrs….which was not long enough?#this was the only embroidery project I brought with me on vacation and it’s only the 1st proper day and I’m already nearly done#wish I’d packed the other embroidery project too#I read an entire book today then was just doing the embroidery in evening while watching tv I embroider too fast#I literally only brought the 2 colors of embroidery floss I can’t do other things#I didn’t even bring the interfacing fabric so I won’t be able to complete the patch & border it#I still do need to complete the black oval but that will likely only take one more evening#my tags are long#also the back of it is super neat too I was so efficient with my embroidery floss#my post
11 notes
·
View notes
Text
Grumpy Bear (utm) embroidery!

#utm#care bears utm#care bears unlock the magic#care bears#grumpy bear#utm grumpy bear#satin stitch#backstitch#embroidery#fiber art#fiber arts#needle arts#cbutm#fanart
44 notes
·
View notes
Text

Working on a train embroidery project
It's supposed to be a generic diesel-electric locomotive usually used for cargo transport.
I'm using a satin stitch for the inner parts and a backstitch for borders
3 notes
·
View notes
Text
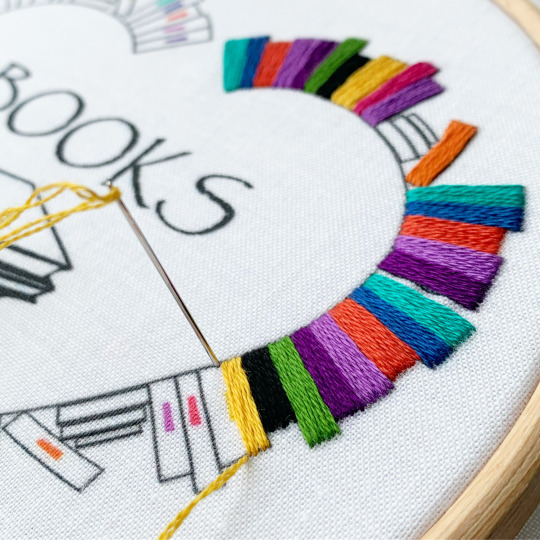
“Beautiful things come together one stitch at a time!”🪡📚
#onestitchatatime#satin stitch#books#stitchbooks#booksembroidery#colourful#embroiderykit#embroidery#doitfortheprocess#bordado#handembroidery#broderie#modernembroidery#embroiderydesign#embroiderylove
16 notes
·
View notes
Note
Hello, I saw your snake embroidery and I was inspired to start learning how to do it myself so that I could make koi fish with that same shimmery effect on the scales. I know a lot of this is practice, but I just can't seem to get as tight of a weave as I saw in yours. Right now I'm using the bulky cotton thread so I can get used to the stitches, and I saw in another post you used satin for the snake, but what kind of thread is that exactly? And what are some threads I could look into for this, since right now I just went to the local jo ann
Hi! These are great questions!
The thread I use is regular cotton DMC brand embroidery floss. (This floss itself has a sheen to it, so it's very lovely I find. There are other brands, like Anchor, that have this sheen too! But I find dollar store embroidery floss does not, it's very dull.) Embroidery floss is neat cause if you take the end of a thread and spread it out you'll notice it's actually 6 strands in 1. For my snake embroidey what I did was cut off a lenght of floss, pull 1 strand from it and I use that single strand to embider with. This is what allows me to lay the stitches so tight and uniform that lay snuggly next to each other and blend together.
When you saw 'satin' mentioned its actually in refrence to a specific stitch, called the 'satin stitch'. If you look this up on youtube there should be good tutorials that show how to do it, probably mixed in with a bunch of other stitch styles as well! You might need to look up "embroidery stitches"? Im not sure. I'm on moble right now and I cant format this with links or pictures lol
But what the satin stitch is, really, is just laying down the threads parallel to each other and having a sharp, defined, start and stop point. For me that start and stop is the beginning and end of each scale. That accuracy is really the most important cause the start and stop points are where the threads turn under the cloth so its where the light catches and how you get that scale defined shimmery depth when it's moved!
I hope this has helped! Wishing you luck in your embroidery journey!
(Oh and one more thing I see a lot of beginners miss, no fault of their own! For tight stitches- make sure your hoop fabric is TIGHT in your hoop. I am constantly retightning my fabric as I embroider. If there are any wrinkles or dips in the fabric before u start, get rid or em! Pull that fabric taut!! It will make your life and embroidery so much easier and better!)
39 notes
·
View notes
Last Seen Blogs

mangaandanimerecommendation-blog
漫画 と アニメ

lonewolfs-beauties-98
Untitled
fishcore
the soft flesh and abstractness of a fishing lure

grayziller
I'm Gray, and that's okay.