#definitely best animation app i have found for ipad
Text
test animation |ω・)ノ
#procreate dreams is pretty aight#definitely best animation app i have found for ipad#procreate team rules#homestuck fankid#gif#if the quality is bad its bc i had to convert it from a video to gif OTL
106 notes
·
View notes
Note
Hihi
Can I ask you what program do you use for the animatic? And can you recommend any good program for practice? (I never used any of these programs, and they look pretty hard, so I don't want to pay yet for one, but I want to make something :c)
Hello! This might be a bit long but I hope I can help you with this (I'm holding your hand because this is also my first time doing an animatic so I have no idea on what kind of good pipeline there is to follow...) I apologize in advance if this won't be the most helpful answer :,))
okay so for the software. I use the ipad for most of my work nowadays... unfortunately, both apps that I use are paid—RoughAnimator and Procreate. I'll walk you down with how I do it. It is not the most efficient way but here's how it goes for me... :,))
Storyboard
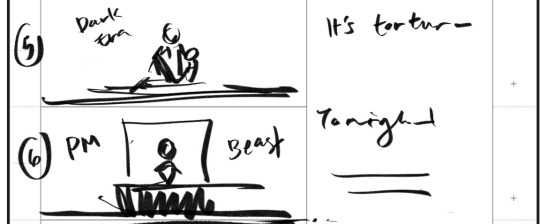
I think the most important thing for planning something like this is having a clear vision of what you want to see. I started this animatic by brainstorming in my storyboards what I want to see in timing with the song and its lyrics. Here's an example of what I previously shared... [disclaimer: I did not follow the template so yeah, feel free to ignore the kanji characters]
you can see the outline I roughly made to tell myself what scene I want to show to what lyrics (I got lazy to write the whole lyrics down lol) and also added some notes like the movement of the character and camera pans etc.

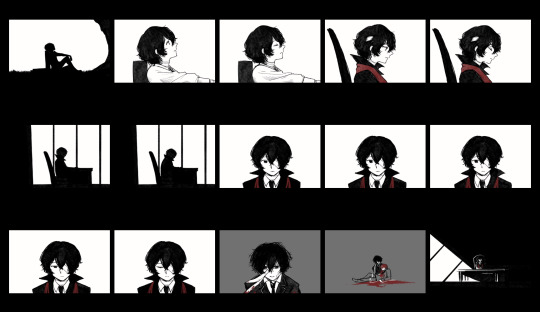
here are the corresponding drawings to it (sorry if the quality is bad, I just screenshotted this from my gallery ><;;)
Drawing the Cuts
All of the drawings are done on Procreate. I use this software for most of my drawings now, mostly because I like the texture of the brushes there. At this point, I am not worrying about timing these drawings to the music yet but I am reassured since I already made my guide of that in the storyboards. Procreate also has an animation feature that helped me draw the breathing sequence.
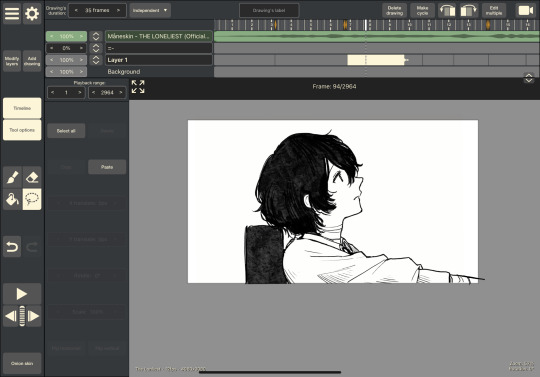
Compiling and Timing the Drawings
Once I've saved my drawings to my photos, I move them to RoughAnimator. Here is where I time the drawings with the song. What I like about RoughAnimator is that it has its own drawing tools (I don't really like the brushes tho... hence, me using Procreate instead), it has a camera tool that allows me to pan across my drawings and also shows the sound wave thingy of the song that helps me with timing. It also allows me to easily adjust the exposure or how long a drawing flashes on the screen at my chosen framerate.
I would sometimes be unsatisfied with my initial drawings, leading to me going back and forth between Procreate and RoughAnimator to revise stuff. (which in my opinion is not efficient but I can't really think of any other way to do this...)
So yes. That's pretty much how I'm working with it so far. I am currently stuck because both Procreate and RoughAnimator have very limited features when it comes to panning images... I'm still figuring out how to do that but I'm thinking of moving to video editors for these kinds of stuff instead of relying on RoughAnimator...
I hope you aren't discouraged by this,, I know it isn't the best solution... If you are to follow this kind of workflow, I think a good combination of any drawing software (hopefully with an animation feature) and a reliable video editor to time it to the music (I recommend finding ones with camera pan and motion tween features) is sufficient enough for this.
If you're using an ipad like me, iArtbook is a good free alternative to Procreate with a good animation feature. I have yet to check it out properly but Filmora or Capcut might be a good video editor... If you're using a desktop, I think Krita is good for drawing and animating!
I'm so sorry again if this wasn't really helpful. I will definitely share it if I were to find a better workflow for this. If you'd like to have some storyboard templates, here are some I found on the internet!


I wish you all the best in your plans and practices!
(feel free to ask again if you have any questions, I hope this helps somehow :,))
#pls dont be like me and I hope you do your best making cleaner storyboards aksjdhfalskjdf#my workflow is a mess i am so sorry#i genuinely hope this helped more than discourage#inbox#art progress#wip jail
28 notes
·
View notes
Text
Random Headcanons

|→ A/N: These aren’t romantic and they really aren’t x Reader stuff but instead just some random headcanons I’ve come up with.
Magical world where Stelle and Caelus exist at the same time maybe they’re twins in this universe idk.
Isn’t a modern Au but alot of modern stuff and technology etc.
|→ More works here

|→ Caelus, Stelle, March, and Dan Heng have sleepovers in March’s room and they treat it like a girls party in a coming of age movie, meaning face masks, gossip, phone games, Ouijia boards, etc.
| One time Himiko heard screaming and walked in to see them cowering against a wall thinking they saw a ghost while Dan Heng tries to calm them down.
|→ March set it up so that once a month the crew leaves Welt and Himeko alone to have a small tea party and have a moment to stop being responsible and goof off.
|→ When visiting new planets and they have free time March will drag Dan Heng and the twins to an arcade where they play games, stuffed animals she got from claw machine’s making up most of her plush collection.
| She’d try her best at the games until she runs out of game points where then she goes to Dan Heng to help her, and theres a 50/50 chance he’ll win.
| In the event he doesn’t win Dan Heng will give March some of his points to let her get something from the shop.
|One time Stelle broke the machine trying to win something so she just took the prize and ran off dragging Caelus along, ending with a small scolding from Himeko and Stelle paying the owner back for the damages.
|→ Dan Heng owns some plants since they add life to a room while also not needing much attention to take care of.
| One time while he was away March accidentally knocked over a plant and helped him regrow a new one as a way to say sorry.
|→ Caelus is an ipad kid. Always has been and always will be. For his birthday the crew probably got together to but him a new device so he would use it instead of an old tablet he found in the very back of an abandoned room the in the Herta Space Station.
| He probably would be sitting in bed eating chips watching someone play adopt me roblox and genuinely find it interesting /pos
|→ Stelle can sleep through anything and I mean anything. The train caught on fire? No problem Stelle is still fast asleep. There’s a murderer loose? Stelle’s still fast asleep as March screams across the train running.
| Caelus on the other hand will wake up to the slightest noise or disturbance. Someone could just simply be walking by and all of a sudden Caelus is wide awake.
|→ Stelle used to be a gacha kid and had an Oc named Flurry Stars. At one of their sleepovers Stelle showed Dan Heng and March the music videos, mini movies, memes, etc.
| Dan Heng surprisingly finds them entertaining in a way leading Stelle to show him the app where the two make gacha videos for fun.
| Dan Heng definitely has made a Oc with wolf ears and red eyes probably named Jackson or something who he adores, it’s really sweet to be honest.
|→ Sometimes Himeko will read the group bedtime stories while everyone drifts to sleep under the stars.
| Her personal favorite would be Cinderella, simple and a classic.
|→ When March first met PomPom she thought they were a stuffed animal and nearly squeezed the life out of them.
|→ Every Friday they have a game night playing a mix of board games and games on Nintendo. Caelus does the best, Stelle and Dan Heng following after, March and Himeko after, and Welt just sucking at it, but he makes it up when he beats everyone in monopoly.
©rayisalive 9/16/22 None of my work is to be translated, plagiarized, or reposted without my knowledge. Reblogs are appreciated too!
#honkai star rail#honkai star rail x reader#honkai star rail x you#honkai star rail x gender neutral reader#honkai star rail himeko#honkai star rail welt#honkai star rail dan heng#honkai star rail march 7th#honkai star rail caelus#honkai star rail stelle#honkai star rail trailblazer#fanfic#headcanons
36 notes
·
View notes
Text
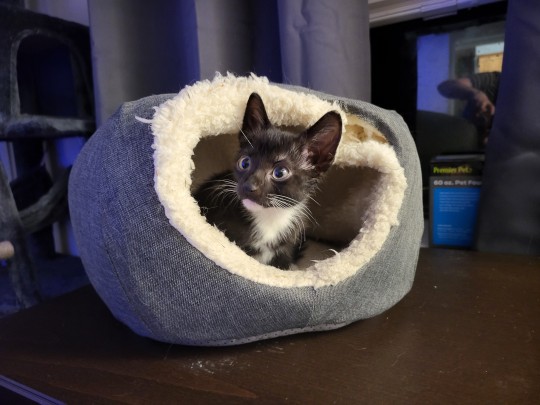
New kitten Nicatine (always cat pun names) has been given a scrunchy for a collar. We thought he'd hate it but he actually seems to be attached and cried when we took it off 🥺

Nik was found injured with two siblings at about 3 weeks old by a friend of my neighbor's. My neighbor took them in despite a severe cat phobia, because she has a big heart (and isn't scared of kittens so much as grown cats). After running into me outside one day and finding out we are registered kitten fosterers for the county, my neighbor came to me for advice and I helped her out with the kittens. Sadly, by that point the three of them had come down with a mysterious illness, suspected to be parasite-related. Despite our best efforts, by 7 weeks of age, he was the only survivor of his litter.
She became deeply attached to little Nik, even more so because she couldn't save his sister and brother, but knew she couldn't take care of him. He'd grow up, and she would struggle with her phobia despite her love for him. And besides, she struggles with mental and physical health issues as is, and is going through some challenging life stuff right now on top of it all.

She's been having a difficult time finding an adopter for him - and is very worried about ensuring whoever adopts him will take proper care of him and shower him in love and spoil him. At the same time, our roommate has moved our since we got married, and took his two cats with him, leaving us with "only" three cats and two dogs. So we had been discussing possibly adopting another cat. And it would be so great for her to have this bundle of joy she loves so much be directly across the street where she can visit or even borrow him any time she likes....


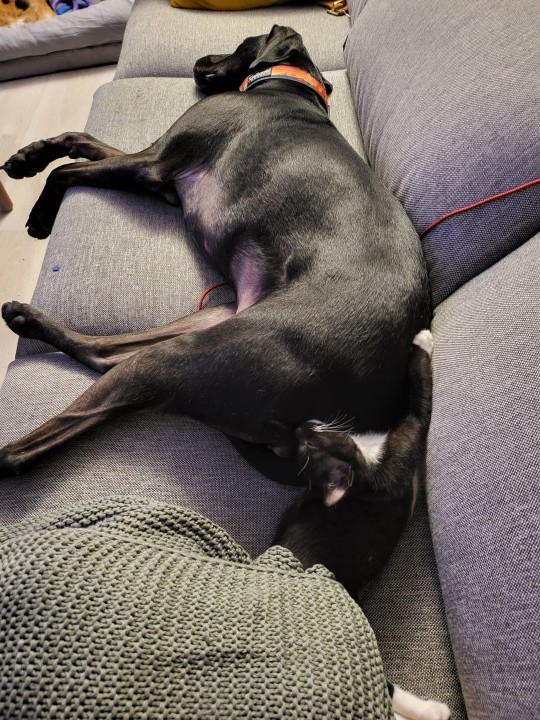
So we did! And he's adjusted so incredibly well. Everybody loves Nik and Nik loves everybody (though I'm missing a pic of him and Cleo, our calico). He is super sweet and snuggly, and loves to play-fight with both the dogs and the cats. He did have scabies when we got him, but we fortunately already had medication for it (one of the upsides of having so many animals - we have a home vet pharmacy at this point). So we treated it immediately and it hasn't spread despite our being far too soft to keep him quarantined (well, it wasn't just our softness - we also didn't want him to miss out on crucial weeks of learning, development, and socialization).
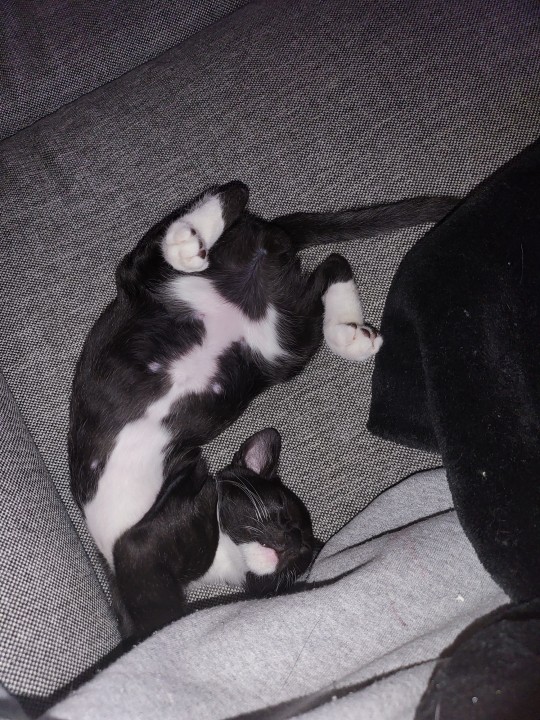
He's just the best. I have to admit, while we have a male dog we adopted in early 2018, I always said I'd only adopt female cats. I've just always had the sweetest, best female cats, and the male cats I've known have generally been unfriendly, if not outright aggressive. But the circumstances were just too perfect. The only complaints I have so far are that, 1, despite being litter box trained, he's been shitting under our bed because he's so attached he doesn't want to leave our room. So of course I did what anyone would do and bought a litter box for the bedroom. And 2, he's definitely got some attachment issues and screams endlessly if I kick him out of the bedroom so we can sleep. Fortunately, this is easily solved by making sure I don't just kick him out, but take him all the way out to the rec room where the other cats are so he's not lonely.
Also... he's definitely an ass man 🤣


And my last little gem for you all is this: I have turned my poor Nik into yet another iPad baby. If you have cats, especially young kittens, and haven't heard of the app Cat Alone... girl have I got a TREAT for you! Just look at him. This is a tame video, but he usually goes nuts hopping all over my phone chasing the beetles. They make fun noises when he gets 'em.
And it's not just beetles - you can pick from other bugs, a finger, or a green laser pointer-style dot of light. I usually let him pick now, and he actually knows which ones he likes and clicks them! And to top it off, he's started asking for my phone when he wants to play by jumping on it and biting at it, then sitting up and staring at me until I get the message.
I'm sure I'll be reblogging this and posting a ton more Nik content (tagged Nik & in my catposting, petposting, and mine tags). Let me know if you have any specific requests for content of him or any of our other 3 cats and 2 dogs! I love sharing the immense love and comfort we get from our zoo with the rest of the world.
And lastly, since he knows how to use the phone, if you comment or reblog and say hi or welcome home to Nik, I'll let him type out a personalized reply for you 😋
74 notes
·
View notes
Text

Alright so!! I got some requests from people for me to make a post with tips on how I self-study my languages, so here we are! It’s not perfect and everyone studies differently, but I hope some of these tips can help you out.
Personally I study Korean & Thai so this list is aimed at those but a lot of the study tips are pretty general and can be applied to whatever language you’re learning.
I’m an energetic puppy in human form - I simply CANNOT sit still and study for longer than 20 minutes before getting insanely restless and distracted, so I tend to only actually sit down and actively study once a week. If you’re expecting something clever and insightful this is absolutely the opposite of that... I basically trick myself into learning! So here is my silly little guide, let’s go!
General Tips:
★ Get ridiculous with sticky notes. Seriously, do it. If you’re just starting out and don’t know the words for all of those household objects then go ahead and scribble them down on those post its and stick them EVERYWHERE. It might drive your family members/roommates crazy but hey... you’re doing it for a good cause, right?
★ Don’t rely on romanization too much - if your language has its own writing system, focus on that using as much as you can. Romanization seems helpful but in the long run you’ll rely on it too much. It’s better to get familiar with the native writing system asap!
★ Pick out a word/phrase of the day and write it somewhere you’ll see it often. I have a whiteboard in my room that I’ll scribble a few phrases onto and then every time I walk past it, I’ll say them. Or if I’m not gonna be home all day then I write something on my wrist and glance at it throughout the day! This one is the most fun because when people see it they’re like “ooh that looks pretty!” or “ooh does it mean something deep and profound?” when in reality you have the phrase I like cheese written on your arm and it never stops being entertaining. Bonus points if someone native to that language reads it and looks at you like you’re crazy.
★ Say the words in silly voices. It sounds weird but if you’re sitting there repeating words (like the word banana, for example) from an app in a monotone voice you’re definitely less likely to remember it than if you’re yelling out “BANANA!!” in an opera voice or squeaking out “b an a n a” dramatically as you let go of Jack’s hand and let him sink into the ocean.
★ Don’t isolate vocabulary. Learning new words is great, but it’s useless and you’re more likely to forget it if you don’t learn to use it in a sentence.
★ Keep a diary! One of the absolute best ways to practice your writing and improve your skills is to just jot down a few things every now and then. It’ll be rusty and you won’t have much to say at first and will definitely keep needing that dictionary every 2 seconds, but after a few weeks you’ll really notice the difference. Buy pretty pens and stickers to motivate yourself to write in it! It’s also fun to do this around people who can’t speak it as they’ll look at it in awe and you can show off when in actual fact your writing is usually a clumsy scribbled “today I snacks eat and go sleep” but hey what they don’t know can’t hurt and it’s always fun to look like a genius.
★ Talk to your pets in that language. They’re not going to judge you, they actually don’t even care what you say as long as you say it in that entertaining pet voice. I don’t have any friends that speak Korean or Thai so the majority of my speaking practice is hurled at my dog. If you don’t have a pet, then plants or stuffed animals work perfectly too!
★ Listen to language podcasts while you do household chores, heck if you’ve gotta do something boring, might as well yell foreign words while you do it!
★ Change your phone settings to your target language. That way you’re literally forcing yourself to use it, and it becomes second nature and you pick up key words so quickly. Only do it if you know how to get back into your settings and change it back if you have to... or else you’re stuck and lost.
★ Listen to music and sing a lot. Just scream those lyrics! A little off-key screeching never hurt anybody!
★ Get comfortable with numbers. They’re something that is dominant in ALL languages and you’re going to use them on a daily basis. Start with learning how to count to ten and get comfortable with it, and then go higher. Once you’re used to numbers individually, make it harder. I used to get my mum to write out 10 random numbers between 1 to 10,000 in the morning and I would translate them, and then I would do the same for myself in the evening. After a while you get quicker at them and before you know it you don’t have to awkwardly translate them in your head anymore, the numbers are just there ready in your brain.
★ Don’t only watch dramas! Watch more natural stuff too - variety shows, vlogs, instagram lives... anything where people are just chatting like they normally would do. That way you’re subconsciously learning more casual speech patterns and casual language too!
★ Don’t just study at home! Always make sure you have a dictionary handy (like on your phone, for example!) and keep your brain busy while you’re out and about. Buying some groceries? Try to name everything in the fruit and vegetable aisles and if you don’t know the name of something, look it up! You’re more likely to remember vocab this way as your brain has a situation to associate it to.
★ Be mean and make yourself work for things you normally do - check your horoscope on a regular basis? Read it in your new language instead! Want to check out the weather forecast? Do it the hard way.
★ Don’t feel like studying? Not in the mood? Then don’t do it! Instead put on your favourite show in your study language of choice. Not every study session has to be a hard one. Just relax and watch a foreign movie! You have no idea how much your brain picks up without you even noticing, chilling out and watching a drama absolutely counts as studying. Don’t force yourself to study if you’re not feeling it, you’re more likely to learn if you’re having a good time.
Advanced Tips:
★ Get keyboard stickers - if your new language has a different alphabet and you use your laptop to study it a lot then you’re definitely gonna need these! You can buy them SUPER cheap on ebay!
★ Change the language on your Netflix account and get ready to binge watch your faves! If you change your profile language to the one that you’re studying, you’ll notice that a lot of the shows available will now show subtitles in that language too. If you’re pretty advanced then now is probably the time to drop your native subs and start watching with the original subtitles in the original language.. good luck!
★ Play Pokemon. When the latest Pokemon games started coming out with Korean language options I JUMPED at the chance - what better way to study than to just laze around playing video games? This is great for any other kinds of games you can snatch up in your target language too.
★ Read a favourite book in your new language. A common one is Harry Potter! It’s pretty much available in every language at this point and it’s a story you probably already know, which means you never get too lost because you know the plot already.
Resources:
Here are a bunch of apps and things that I use for studying that I find super helpful (and all of these are free!)
Drops (for Thai and Korean - available in both the apple store and the google play store)
- I use this app every single day without fail. It’s brilliant for expanding your vocabulary (there are TONS of languages available on there too!) HOWEVER: It only lets you study for 5 minutes and then you have to wait around 9-ish hours before you gain another 5 minutes to work with unless you want to pay for more. But honestly? That’s a good thing. You only need 5 minutes of vocab study before your brain wants to dissolve into mush anyway. I get up, do my morning stuff (usually just involves rolling around and blinking in confusion before grabbing a coffee) and then sit and do 5 minutes of drops, and then by the evening my 5 minutes have replenished and I do it again. Rinse and repeat, and you’ll be learning more words in a week than you even realise!
Duolingo (I use this for Korean, there is currently no Thai option)
- This app is fantastic. I don’t recommend it for beginners as it should be used as more of an aid alongside your natural studies, rather than as a study resource itself. This app expects you to already know the basics so I’d dig into this one once you’re starting to get a little comfortable with your language!
Naver Dictionary (for Korean)
- I use this every single day! Not only does it help me when I need to find a certain word, it also gives me lists of example sentences which is PERFECT and super helpful when I’m trying to memorize words!
And for Thai I use Thai-English Dictionary (I can only find it in the Apple store sadly) and that’s incredibly handy too, I wouldn’t be able to cope without it! I also use this website as a Thai dictionary when I’m not on my iPad!
Talk To Me In Korean (for Korean)
- This has been a core element to my Korean studies. They have tons of lessons available on their website, they do regular YouTube videos (usually only 5-10 mins long, perfect for just a mini casual study session!) and they also sell textbooks and do podcasts too. If you learn best from textbooks then these are by far my favourite ones I’ve found, give them a try! They’re not too pricey.
Lingodeer (for Korean)
- It’s cute, it’s friendly and it’s helpful!! I learned a bunch of new phrases using this one and it’s perfect for casual study!
Memrise (for Korean)
- Fantastic if you’re a beginner! There are tons of languages available on here too. Although, there are only 3 levels in Korean so I got through this one pretty fast.
Eggbun (for Korean)
- An app that encourages you to learn using a texting format! I haven’t really used it much but I have friends that have said it’s really useful!
Ling (for Thai and Korean)
- This one was pretty good, once again though I wouldn’t use it if you’re a beginner, it’s probably a lot more helpful if you know the basics before you attempt this one! I’ve only used it for Thai but there’s a Korean option you could try checking it out!
Mondly (for Thai and Korean)
- This app is cheeky and it wants your money. You get a bunch of free lessons to start with which are GREAT but that’s it. Then it reduces you to one free lesson a day but honestly? Still useful so go ahead and use it. They also have speaking practice available too!
Thai2English (for Thai)
- This website is an absolute LIFESAVER!! If I’m ever browsing and come across a sentence that just throws me, I simply copy and paste and this legend of a website just breaks it down for me word for word.
Extra Korean links:
Children’s books in Korean
Learning Korean through fairytales - a textbook used in Korea for children who are learning to read, it’s helpful as a Korean language learner too! You get a little story and then it’ll ask you questions about what you just read.
TOPIK previous exams - these are so good for practice and if you want to get a general idea of what academic level your Korean skills are at.
Learning to type in Hangul - this one was fun and I now type Korean pretty comfortably on my laptop so if you know you’re gonna be typing a lot, I recommend this program!
#the way I learn languages is so weird I am so SORRY#I kinda just implement my language into my daily life and it works perfectly for me... I hope this is helpful to at least ONE person djgsjk#thai resources are sadly not that common but I'll add more if I find them!#language studies
235 notes
·
View notes
Text
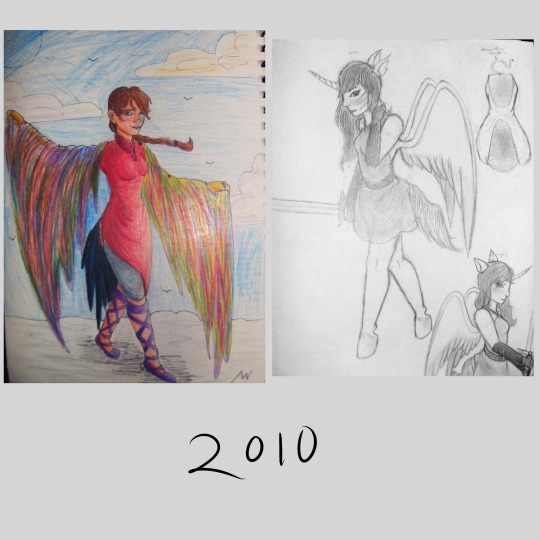


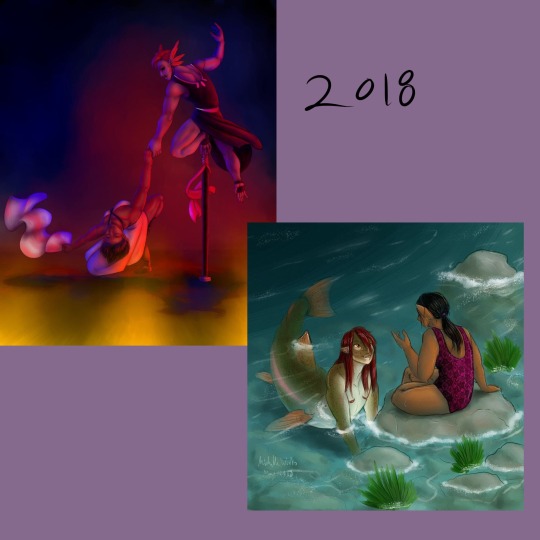
Instead of a summary of my art from each month of 2019 I’ve compiled a summary of my art from every year of this decade! Finding some of that old art was incredibly difficult.
And making an exact image description of all this would be too long to write or read so I’m going to do my best to describe all this in a concise and interesting way.
2010: I was a sophomore in high school, so about 15 years old. These two drawings are in pencil and colored pencil, one of some random girl character wearing brightly colored clothes and a rainbow shawl thing (??) walking on clouds it seems. No idea what that was meant to be about. The other is a reference for my old oc, the very first one I ever had, based on myself. She looks human but with unicorn ears and a horn, plus wings and a tail. I hadn’t figured out animal legs yet either so she has perfectly normal human legs that just end in hooves.
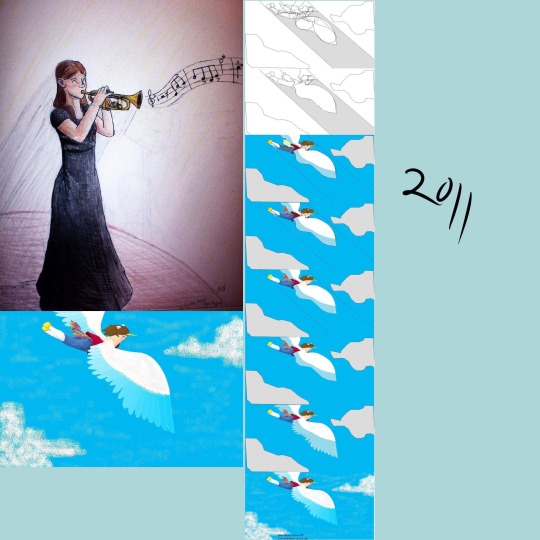
2011: still mostly pencil, colored pencil, I don’t remember if I had a laptop yet. I would have been 16 years old at this time. I picked a self portrait here, a coloreddrawing of myself in black concert dress playing the trumpet because I got to do a solo in jazz band and I was very happy about it. The other art I picked for this year is digital but in the old ms paint program (you know before it tried to be fancy with a few more realistic tools and was only pixel art tools) I do believe I was still using the family computer for this, with a mouse. I was really creative with the tools. It’s my unicorn girl oc again, flying through the sky. I included a progress image, showing how I made it. I’m so glad I saved the steps and posted them it’s really cool to see my old art process for that.
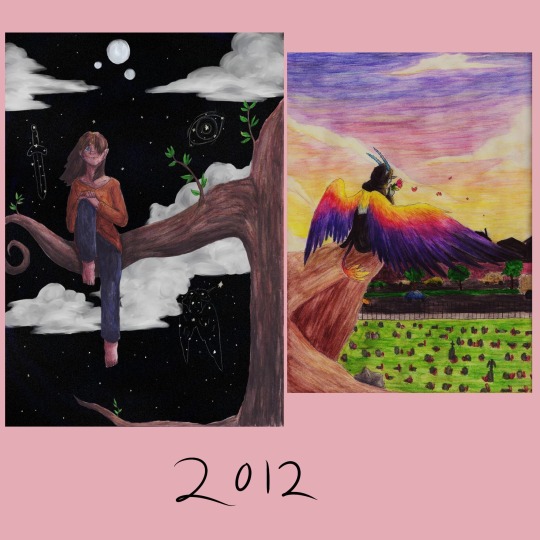
2012: 17 years old, and I think I finally had a laptop with a good art program on it by this time but I still did mostly traditional art, lots of colored pencil work. I found this old experimental art I did that year, a colored pencil drawing of a girl sitting on a tree branch, but the background is all digital, a painting of a fantasy night sky with three moons. It actually looks kinda good, the edges of the colored pencil drawing are crisp and smooth and the digital background doesn’t look out of place. I mean the shading is a bit of a mess and I used white clouds on a black night sky which is a bit funny looking but it isn’t that bad. The other image is a colored pencil drawing that was really ambitious for me at the time. I had this cool idea to draw Death with sunset colored wings, all poetic and stuff. Why did I also draw death with blue skin and horns? I don’t know. Why is death sitting on an ambiguous brown cliff overlooking a cemetery? Well I guess I just was having trouble finding any other way to make a nice background and have death above a cemetery. I should redo this one, it’s a really good concept.
2013: my last year of high school, 18 years old. I was doing digital art a lot more often this year and expanding the diversity of my ocs. One of these images is a digital drawing of two of my first characters of color, two male black elves (black as in African-based) smoochin. My first black oc was also my first queer oc, jayvyn. A gay elf. There are a lot of issues with the way I originally conceptualized his story but even when I was thinking he was the only queer person in his town and there was homophobia towards him (I was only just dipping my toes outside the mindset I grew up in) I gave him a whole massive group of friends (a boys' lacrosse team he was on don’t ask me why lacrosse I have no idea I don’t even know much about lacrosse it was a weird choice) and those friends were extremely loyal and supportive of him, even to the point of going on dates with him just to make him happy. and again, he was the only gay character I had so I was writing a bunch of straight dudes taking their one gay friend on dates in a town full of people who were at least vaguely homophobic, I definitely had a lot of growing to do in my writing and my own mindset but I’m kinda proud of myself for doing that? I could have done so much worse with my first queer oc and my first real step into characters of color, but I made the whole story about this tight knit group of boys who were all such close loving friends. (Gee I wonder if this had anything to do with my being ace and not knowing it yet). Oh yeah, the other image is also there, that one is from a photoshop class I took. We had a three-way folding mirrors the bathroom at the time so I put on a hoodie, turned out the bathroom lights, folded the mirrors in and shoved my face into the gap and then took a photo with the flash while holding my mouth open in a silent scream. The result is this really cool series of screaming faces at different angles, which I then ran through a few filters and major contrast adjustment. Could be an edgy generic horror movie cover lol
2014: 19 years old, and I just finished a year of community college and then left on a church mission for 18 months. I probably should have used some of my first college art class drawings for this year's summary but I was using my old deviantart gallery to collect these old images so I forgot I had all that college art too. These two digital images are pretty dynamic in different ways. Dynamic lighting and dark skin, an experiment I was doing to figure out lighting better for my characters of color. That’s Jayvyn again I think, with lightning shooting out of his hand because I sure love making characters with lightning powers. The other is dynamic in the posing and I’m still incredibly happy with it, it’s a drawing of a grey centaur from behind, bucking in panic because a kitten pounced on its foot. Definitely still one of the best centaur drawings I have ever made.
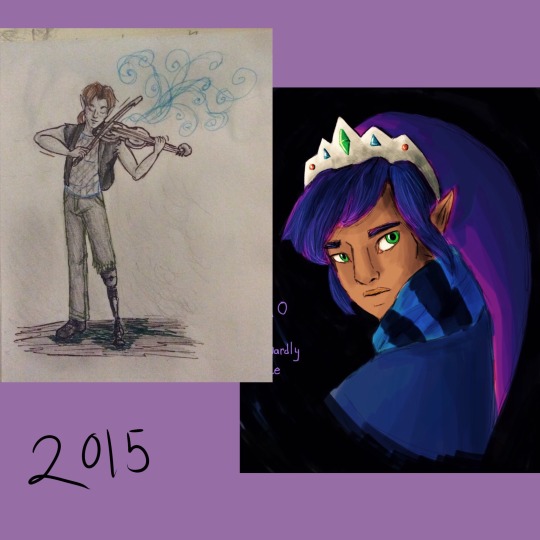
2015: 20 years old, I was actually on my church mission for this entire year so finding art from that year was very very tricky. One is just a small pencil drawing on another oc, Ronan with his cool mechanical leg playing fiddle I guess? I was doing a lot of synesthesia doodles that year so there are lots of swirly lines coming off the fiddle. I was also surprised to find this really neat digital art I made of Ravio from link between worlds, I almost forgot I did find a way to make digital art on my mission (no access to my laptop, limited apps we were allowed to use, super limited access to normal computers except for emails and such, always busy doing important stuff) I discovered the drawing function in the iPad notes app and every time I had time I would use it until I figured out how to make it work for me, using only my fingers, the limited color palette options, and this marker tool that had one size and only multiplied (except when using white) this is definitely one of the best ones, but I don’t know where the rest went. I had a lot. I was stunned to find this because it really looks like I could have done it on a laptop, can’t believe I forgot I did that.
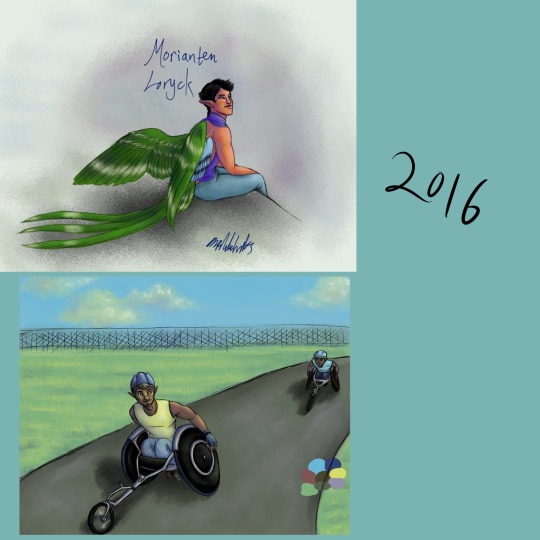
2016: 21 years old. Had to get used to a laptop again. Also I created my current main oc Morianten during my church mission so here I have the very first full body digital art of him! I’ve definitely changed his anatomy a lot since then, made him much more bird like. Kinda funny to look at this old one and see just how differently I draw him now, only three years later. I also have here a digital painting of some other members of morianten's adoptive family, his dad and little brother having a father son race in nice racing wheelchairs. I still struggle with proportions when I draw characters in wheelchairs.
2017: 22 years old, and back in college. I really had a focus on figure drawing that year, I was back in college art classes and I found posespace.com which is just full of professionally shot art model photos. I’ve got one digital figure drawing of my oc Talib, another practice in lighting on dark skin. The other image is a charcoal drawing of my oc Parva, I think I did that one in a 30 minute time frame where I was taking pictures at different points to show my process but I’ve lost the process images.
2018: 23 years old, and really getting into color depth with my digital art. I found a really old pencil drawing of a dynamic dancing scene and redid it as a digital painting with extreme colored lighting dynamics and new characters. I also got super into mermay so I’ve included one of my favorites, a rainbow trout gal and her elf girlfriend having a chat after a nice swim. I’m super proud of the colors and proportions here, and the shading is pretty great too.
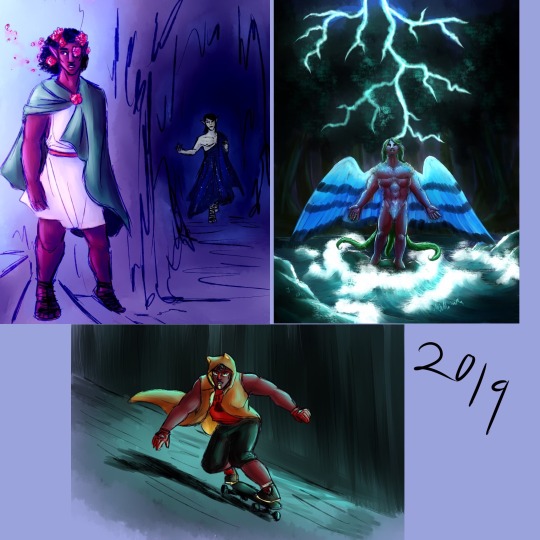
And then it’s 2019! This year! I’m 24! For this one I used three images instead of two, all digital. My ocs Talib and Kouto as persephone and hades in a really quick painting I did but the colors and lighting are intense and fun. No outlines painting of Morianten with some pretty intense lightning lighting. That one took ages and I’m still not entirely pleased with the way I drew his face there but I’m proud of it. And I never actually posted this last one, it’s a new oc created exclusively for the DC superheroes au I dabbled in with @askmissbernadette, a young hero called Lion riding a skateboard in a dark city with a long coat on because that’s a fun way to replace the common superhero cape design.
Overall, it was really fun to go through my art for the entire decade and see how much it’s changed over time. And to see how much my characters have changed. Hope 2020 is a good year, hope the 20s in general are good. Here’s to another 10 years of change and progress!
1 note
·
View note
Text
Interview with Miena
Miena is one of the more successful gif artists I have observed in my year of writing this blog and posting gif artists to Cross Connect, and so I asked them some in depth questions about life as a Gif Artst, and Miena was generous enough to respond with honest and in-depth answers.
Your work seems to be quite popular, and I see you take commissions. Are you able to make a living doing that?
Thankfully I have been able to make an income by making illustrations and animated illustrations for others, but not quite yet as to completely make a living out of it. I would certainly love to, and I already feel so honoured and beyond blessed to be able to do what I love now, but I’m still relying on other things and other people to be able to do this, so this aspect of my journey is still a work in progress.
I think about a year ago you had a fairly small presence on Instagram, but now you seem to be doing quite well. Was that a difficult transition?
It honestly was a tricky transition! I actually grew up using Tumblr - I’ve been using Tumblr since 2011/2012, and I have a few other blogs besides ‘mienar’ currently, and am in a fandom myself. I also don’t really use other social media as often as I have of Tumblr too, so having to learn and understand Instagram as a platform, learning about the community, and learning different ways to interact with others definitely took me way longer than I’d like to admit.
Do you display your work on just Tumblr and Instagram?
I display my works both only on Tumblr and Instagram, but some contents can be more or less suited in one platform than the other. For example, I find Tumblr to be more suitable for completed and polished artworks as well as finished commissioned artworks, while I’ve found Instagram to be more suitable of quick, regular paintings with the occasion of completed artworks.
What changes did you have to make to adjust to Instagram after being on Tumblr for a long time?
There are a few changes that I needed to make while adjusting to Instagram.
Technically speaking, the biggest change would have to be converting my animated GIFs into videos. Unfortunately, Instagram doesn’t give you the ability to just post GIFs, so my workflow now includes having to convert my animated GIF into video via a mobile app, add sounds and SFX (which is something that helped elevate my works actually), and sharpen my final artwork because my gifs tend to get blurry after all the final conversions and editing.
Another change is a mentality change, which was somewhat fascinating, though in a negative way, is how I’ve been treated by other people due to the number of followers that is displayed on my account. I didn’t really have to go through this problem on Tumblr since Tumblr never shows your follower count, unless you install a widget for it, and I was treated all the same from when I began up until now.
On Instagram though, I have been a target for some people to look down upon me and my worth due to my ‘smaller’ audience more times than I’d like to speak of, and when my audience grew, the same people have begun treating me ‘nicely’ and as ‘equals’. Fortunately, it’s not something I’m that fazed by nor that I care too much of, but it was certainly something unpleasant that I just had to get used to.
Did moving to Instagram really help you gain commissions and followers?
I do believe moving to Instagram has helped in gaining more commission requests, but not so much at a bombastic and drastic rate. It more so just felt like ‘a gradual and natural increase of commission requests as my audience base grew’ kind of thing.
Are your followers on Tumblr the same, or have you seen that drop off at all?
Admittedly, there actually has been a drop off, not in followers, but in activity and engagements.
Last year, Tumblr announced and made a huge and very drastic change in their policies and rules as a platform, which caused a lot of anger, discontentment and platform-migrations from so many of the Tumblr users. This has actually impacted my blog too - although the number of followers I have has maintained/increased, many of my older followers' blogs have been abandoned due to that outrage, which results to my posts not getting as much reach.
This has actually caused an internal turmoil if Tumblr was a strong enough platform for me to continue on (and this was also what led me to expand my Instagram in the first place). It was something that I had to debate internally for a really long time, but I came to the conclusion rather recently that although there aren’t as many people engaging in my posts, I realised that what matters most is that there are still people on Tumblr who are present, have chosen to stay and engage in the content I share, and I want to stay on Tumblr with them and for them.
What have you been trying to do as an artist to grow your gif work?
One of the things that has been really helping me a lot in terms of elevating my works, both in terms of illustrating it and animating it, is by watching more movies, TV shows and basically consume other forms of media. I know it sounds like an excuse for me to watch more movies and shows, but I promise you that most of it is for research purposes!
Through the consumption of different media, it actually helped me build newer and fresher understandings and ideas for lighting, colour schemes, different moods and atmospheres.
Besides that too, learning what techniques actors, directors, cinematographers, editors, etc. do and use to create a particular scene and what they’ve done to achieve a certain feeling helps me put more thought into what I do rather than just ‘hoping for the best’ or having to always rely on trial and error, like for most of my older works.
I’m not sure how prominent this new change has been translated through the final look of my recent art, but I know for sure it had helped me a lot in regards to the process and the behind-the-scenes upon making them.
Have you used the same tools? Or have you tried new techniques?
The tools I use have still been the same from when I began ‘mienar’ until now. (Devices: Wacom Intuos Pro Medium and iPad Pro, Softwares: Photoshop CS6 Extended and Procreate.)
Though I have been using Procreate so much more now as I nowadays prefer to work directly on a screen tablet, but besides that, nothing has changed.
How do you feel about the future of gif work? Are you confident moving forward that you will be able to keep making a living (if you are) or do you feel like you will need to expand into other areas?
I really can’t say much about the future of gif work and gif artists, as futures are really unpredictable in itself, but what I would like to say is that I’m always so amazed, and in a way, really touched, at the responses that gif artists get of their works, despite their works being intangible towards the viewers, especially of those who have chosen to get one of their own (via commissions).
I’m admittedly not the most confident that my gif work future, or just the future of gif works in general, will be solid or that there’s a guaranteed increase of works or engagement, but I want to hope so and I want to believe that it will be more recognised sooner or later, but I’ve also learned to just enjoy and experience as much as I can in the present, and also observe and learn as to why gif works are received in the way it does.
15 notes
·
View notes
Photo
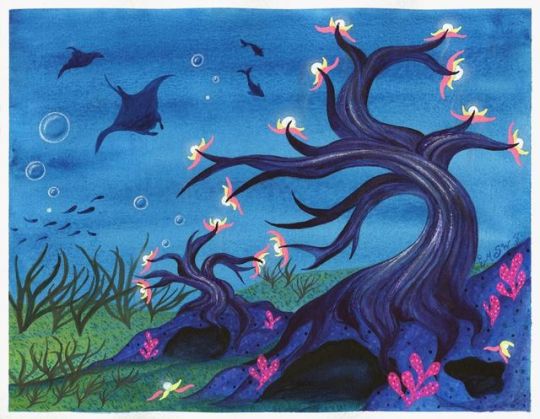
Nightlights in the Deep
At last, I can finally show you guys what's been with the tree fever in my last couple of posts (Terrarium Nova and WIP Wednesday: Oops all Trees)
So the art supply company Arteza madea post on their Instagram a few days ago where they announced a contest to make art featuring trees and post it on Instagram with all the appropriate tags, open until September 26th (with prizes of course) and I thought it would be fun, especially since one of their suggestions was to design a tree.
And I also decided to add a little extra challenge to myself to stick primarily to the Arteza supplies that I have, since it's their contest. That meant I had their watercolors, colored pencils, and woodless watercolor pencils to pick from and play with. Although I did end up using quite a bit of gel pen (Sakura gelly rolls and a little of my white Uni-ball Signo) to get the bright pops of color I just couldn't get with the other supplies. The gel pens felt fairer to supplement with since I usually accent pretty much all my work with gel pen in some form or another.
Naturally, after I gave myself a few minutes to ponder how to stand out among a crowd of trees but also fit right in, my imagination ran wild with my own fictional tree species.
I pretty immediately landed on the idea of an underwater/deep-sea/bottom-of-the-ocean tree and also something with bioluminescence (things that naturally glow in the dark) and from there I starting searching for various tree and water-themed things on Pinterest to flesh out my ideas. From that, I very quickly arrived at the idea of a winding, twisting trunk like you might find on a bonsai tree. And while originally I really liked the idea of having wispy drooping petals and/or leaves like Wisteria or willow trees, after a few tests that didn't turn out as nicely as I wanted (as seen on the WIP Wednesday mentioned above) I decided maybe it would be best to go without this time around.
So the final concept I've ended up with for my trees here goes roughly as follows, although I'm no botanist or marine biologist so there's a good chance a lot of this doesn't check out scientifically:
The Nightlight tree, named for its bioluminescent fruits--called "moon fruits" for their whiteish glow, pale bluish color, and spherical shape--is a species of aquatic tree that is found growing anchored to rock formations and cave systems in the greatest depths of the ocean. As these trees exist in oceanic depths with minimal or no sunlight, they perform chemosynthesis rather than photosynthesis to make their own food until they reach maturity and can produce their own artificial light as a food supplement.
Nightlight trees root systems can reinforce and stabilize the rock formations they anchor to in order to grow, which provides a more sound home and environment for the species of fish that will eat the "moon fruits," attracted by their bright glow, produced by the tree and aid in the tree's reproduction. Because of this, nightlight trees may grow in clustered groups or may grow so closely together that multiple trees twist and wind around each other, which can put strain on the trees' root systems and may cause development problems and may cause the younger of the trees to die.
The bark of mature nightlight trees may also have a faint glow where the tree is thickest, as the bark is stretched more thinly around the nutrient carry "veins" found within the trunk of the tree, where the chemical process that causes the tree's fruit to glow begins.
Nightlight trees attract and feed a variety of deep sea creatures and other bottom-dwelling vegetation, many of which feature bright flourescent colors or bioluminescent traits and may camoflodge with the moon fruits or the few brightly colored flower-like leaves that the moon fruits emerge from four times a year, peak season typically being in the spring. This provides these other species with a largely safe place to settle and reproduce while the tree is at its most forthgiving.
Moon Fruits once detached from the tree will retain their glowing properties for approximately 7-10 days. Fruits that in that time find themselves on or around suitable growing conditions may then begin to take root and grow. Fruits that are not in suitable growing conditions within the time frame will then begin to decay and detoriate.
Certain deviations or subspecies of nightlight trees may also be found in the depths of brackish or freshwater, but the most common sigular variety is the "White Light" variety found in oceanic saltwater.
Excuse me if that's a little all-over-the-place for a faux "knowledgable source about trees" article, but I think I managed to get the bulk of my ideas for how these trees work in there.
For a while, I also had the idea that if one of the trees ever did grow tall enough to reach the water with plenty of sunlight and/or poke out of the water that the exposed parts of the tree would die and/or become sicker with more sunlight exposure, so you'd have this really tall tree that's dead at the top but as you follow it down becomes progressively healthier until you reach the bottom and find this beautiful natural undersea garden with all these neon plants and animals it's supporting in its ecosystem. And while I do still like that idea, I don't think it's terribly realistic and I definitely couldn't fit all that would entail into this one artwork.
That said, I think you can probably see my reasoning for a lot of the artistic decisions I made here, so hopefully, I won't have to stop every five seconds to explain how the tree works while I go through what my artistic process was.
After some sketching to think through my ideas of the tree structure and possible fruit/foliage things and the practice/failed attempt pieces, I decided my best bet for the pseudo-vision I had in my head would be to make lines from the sketches I'd done as a base (as in my practice pieces where I attempted to free-hand everything things really got away from me pretty easily), and so I lifted the lines for the two trees, the caves, and some of the ground/sand from my sketches and transferred them to a piece of Canson XL watercolor paper, since I knew I wanted to work primarily with the Arteza watercolors and maybe (at the time but this ended up not being the case) the woodless watercolor pencils too.
And if I may, I'd like to take a moment here to say that while on some levels I do understand why some more versed in watercolor than I absolutely loathe the Canson XL watercolor paper, to me, it much like the premise of cheaper watercolors is not strictly terrible--it's a matter of what you're used to and what you learn to work with. If you can learn to work with what you've got, and that's what you get used to, then to a point it the quality almost doesn't matter. This paper does work differently from the more expensive/nicer watercolor papers I've tried, but it's so much more accessible that I have more of it, so I use it more, and by now I've learned a lot about how to work with it to get the results I want, so I'm less likely to encounter some of the problems other people seem to have with it. It all just depends on you, your taste, and how you work.
But enough of my paper mini-rant. Back to the artwork:
I knew from my practice pieces that part of the mistakes I kept making was not laying down layers further in the background first so that I wouldn't have to attempt to paint around/right up to them later, as well as layering up more would help me better achieve the darker, moodier undersea look I was aiming for. So after taking a picture of my lines and very quickly and sloppily doing a color mockup in one of the few drawing apps that still work with a Gen 4 iPad to figure out which paint colors to squirt onto a palette, I went in with an all-over layer of a darker blue for the background first, and I layered that up 2 or 3 more times to get it to a darker intensity.
It's still a little bit brighter than I was originally hoping for, but it still came out pretty nicely. Though I couldn't tell you how much of the ocean-ish texture is just textural properties of the particular paint color and how much of it was how I laid down the paint between all the strokes I did to even out the coverage and the additional layers.
After that was dry, I made a faux-pas (in that I would have to paint around them a little later) and moved on the stars of the show; the trees themselves.
The trees were probably the slowest and most methodical part of this piece. I very carefully went in and would do lines and then blend them out slightly when possible, trying to use the transparent nature of watercolors to my advantage. This was a slower process, especially as I would work my way up the trees and get to smaller branches (especially with the smaller tree) and had to switch to a smaller brush just to make sure I was staying within my lines. But I and my dark, moody purple did eventually get through it, and even with only the trees the background painted, I was really pleased with how they turned out.
Then I moved on to my little rock-cave things and the ground. The caves started out as a lighter ultramarine color, but it looked kinda weird so I did even up going back and adding a couple of additional layers and shading to try and add more depth, as well as I tried to stick with a dark blue only for the insides of the caves, but they ended up really seeming to need the addition of some black. The end result is a little too close in value between the trees, the caves, and the caves' insides, but there wasn't really a better way to remedy that beyond starting over, and after everything I'd been through to get to this point, I did not want to do that. So it stays as is.
The ground was actually relatively simple. Since I already had a blue background and I had decided a greenish color would be the best route to go, I just layered some yellow paint in the areas I wanted to look more like sand/ground and did the same kind of semi-blending as I did on the cave rocks and trees. And it worked just as well when I added the sand/ground moving towards the back that I hadn't pre-drawn in.
Now, I was trying to hold off doing the little moon fruits (which at this point were just bioluminescent orbs to me, I did all the naming after I finished the piece so I would know exactly what I was trying to name) until I had all the painting done, since the plan was to do them with the colored pencils, and I just kinda wanted to be able to say I was done and put all the painting stuff away before I moved on to that. That's how I usually work with my mixed media projects; I prefer to have a plan and get the majority of one medium or section done before moving on to something else. (Usually to have more desk space available but it also helps me keep things organized.)
And it was at this point that I realized my plans didn't look very under-water-ish. It kinda just looked like a moody dry-land landscape painting. Which is fine, but that's not what I wanted/was going for.
To remedy this, I started by adding some seaweed/kelp like plants to the ground. Which still looked largely just like funny grass or weeds.
It was at this point that I deviated from the actual artwork and moved back to my watercolor sketchbook to do some toying around. The main thing I did was practice trying to make coral or coral-like plants since I figured that might help with the whole ocean thing. And on the page where I ended up doing a lot of the practicing, I actually ended up taking a little extra time, later on, to make into kind of a bonus art piece, which I'll be posting by itself at some point in the future.
But I also practiced making bubbles and some other details we'll get to in a moment.
I tried doing the coral a few different ways but ultimately went with the way I see coral in my mind when I think of the word; this rounded cartoony kinda thing, even though that's not what real coral usually looks like. (I looked up pictures during the process out of curiosity) I don't know where this very specific imagery got implanted into my brain other than maybe Spongebob, but that still doesn't seem quite right, so I don't know.
And I have to say that the Neon Pink Arteza watercolor continues to be a favorite of mine, while we're here. It held up over the dark colors and compared to the gel pens infinitely better than I thought it would. Arteza, if you see this by chance, this is my plea--please make more neon watercolors if you can make them as good as this pink one!
*Ahem* Anyway...
After all that, I did step back from the watercolor and come in with the colored pencils. I didn't think I was almost done, but at the moment I didn't have much else in mind for the watercolors and figured it would be best to move to the pencils and then I could come back to the watercolors if I felt like I needed to.
I'm not sure if the Arteza colored pencils just don't like watercolor paper or something, but I had kind of a hard time applying the pencils and getting them to pop the way I wanted to, particularly in areas that had thinner paint coverage. This was the most notable in the bare ocean areas where I was trying to do the moon fruits, as the pencils worked a little better when I hit those darker patches of blue, and they liked working over the truck bark a lot better. To be fair, I know some of this is because most colored pencils have a hard time going over darker colors, as even my Prismacolor and Polychromos can have a hard time over my toned gray paper sometimes, but it still seemed like these were falling more flatly on that front than I had anticipated.
Either way, by this point it was late and I was exhausted, so I finished up what I wanted to do with the pencils--finally coloring the moon fruits, adding some additional texture to the sand, caves/rocks, coral, and trees--and decided to leave it until morning.
As I was cleaning up for the night, I was looking at that bonus art piece/practice page I talked about earlier, and I noticed a spot where the paint had done a kind of texture thing again (this time definitely more from how I applied it and less from the paint itself) and the shape, combined with me thinking of things I could do to continue to play up the "ocean" imagery and make my seascape look more lived in, made me think of sting or manta rays. More specifically that one would look really good in that spot, and about the time I completed that thought was when it dawned on me the key component I had been missing the whole time:
It's an ocean life scene. Where's the life part?? Do you know what lives in the ocean? FISH!
And I still couldn't tell why that just hadn't occurred to me until then.
So I went to bed knowing exactly what I was going to be looking up and practicing the next day to add to and hopefully complete my tree painting.
The next day, after many minutes spent prowling Pinterest for marine life silhouettes and having added a few rays to my practice piece, (and some nonspecific fish to the other couple of failed attempts since the practice-piece-turned-art was getting a bit crowded) I was off and added a manta ray, a small school of fish, and two other fishes just hanging out. Then I couldn't help myself and added a smaller ray in the leftover space that was just kind of begging for a little something more behind the other ray.
And I could have very well stopped there, but it was bothering me in the fresh daylight just how much the colored pencils had seemingly sunk back into the artwork. My bubbles I added the night before were so hard to notice! And the moon fruits...they just weren't popping at all the way I wanted them to.
I tried not to; I really did. I wanted to stick to just using the Arteza supplies that I had and maybe some white gel pen. But I had to do something to get the color to pop more, and the alternative was to pull out the white and neons from my Prismacolor pencils and between the two options, pulling out my Sakura Gelly Roll Moonlight pens, as I said earlier, felt less like I was deviating from the challenge. And for all I know, the Prismacolor pencils might not have popped as much as I wanted either, even if they popped more than the Arteza pencils. So gel pens it was!
I used my white Uni-ball Signo for the actual moon fruits themselves, and the gelly rolls for their little leaf-petals and some extra dots/texture on the coral. I also used the white gelly roll to add some additional "glow" to the tree bark and to revive the poor bubbles that had gotten so lost before. And then I went back later at different points to add the two moon fruits that fell, partly to fill in space and partly because it just made more sense to my brain to have at least some that weren't still on the trees.
Also, I'm not sure how well it reads, but I did go back and try to add more of a proper "glow" effect to the moon fruits with the white colored pencil, but I feel like I lost a lot of the minimal pigment I was getting by the time I used a blending stump to soften the edges.
It's funny to me; this was one of those pieces where I spent so much time with it and meticulously going over the details that at first I actually wasn't sure it was finished. It's one of those where I had to step back and let it settle in that I had seen my vision through to the end before I could properly "accept" it.
And you know, for as many challenges as I had with trying to invent my own tree species and the problem-solving I had to do throughout the process, I am really proud and happy with how the final piece turned out.
It's different; it's out of my comfort zone because I don't do landscape type things, and it challenged my creativity in a different way. And I feel like I was able to achieve what I set out to do with the piece.
And thanks to my hesitance to dive right into the final piece without testing, I also got a bonus art piece out of it, so yay two birds with one stone?
This may have started out as just another contest entry, but in the end, I'm really glad for the mini art journey this piece took me on, and even if I don't win anything in the giveaway (which realistically I probably won't), I'm happy just to have made the artwork. And that's kinda the most important thing, right?
Now, I have some commission work to do, but I also have a certain supply that's been sitting on my desk all week just begging to be used, and some other pieces in the works, so stayed tuned for that and that bonus art piece I keep talking about that came out of this piece.
____
Artwork © me, MysticSparkleWings
____
Where to find me & my artwork:
My Website | Commission Info + Prices | Ko-Fi | dA Print Shop | RedBubble | Twitter | Tumblr | Instagram
2 notes
·
View notes
Text
April 7, 2022
Today was the first day of classes. On the way to the subway station, I saw lots of little kids walking together with their parents. It seems like it was the first day of school for them as well. It’s so cute how excited the really young ones are to wear their uniforms for the first time.
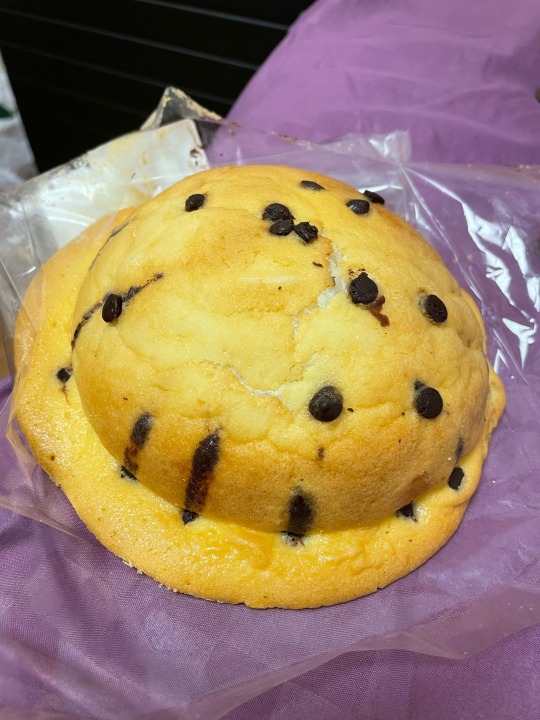
Of course, I fueled up appropriately for the first day of classes. I ate a 豊かなブール (great/bountiful boule), which looked like a giant muffin top but definitely was less sugary than a muffin would have been. Breakfast of champions.
Upon arriving at school, I found out my class lucked out with the best teacher. He’s funny and energetic, which should make things fun (though we only have him two days a week, we’ll have to see how the other two teachers come across). Shockingly, I was able to understand a ridiculous amount of what was said, and the kanji we were given to study today were ones I already knew! (Thank you, WaniKani!)
The other students in my dorm are really sociable and apparently made a really good impression on the teachers during their online classes, and I’m benefitting a lot from it, too. Chatted with the teacher for like 30 minutes after class.
Unfortunately (or maybe fortunately), this school is very serious about learning. The unfortunate side of that is realizing that I had multiple homework assignments the very first night. After grabbing a quick lunch (カレーライス for me), we went in search of the nearby public library to knock out said homework. Turns out the library was closed today (or maybe just this afternoon? I didn’t read the chart too carefully), so we made our way back to the dorm instead.
A train car on the way back was decked out in ads for a Netflix anime about a time traveling ancient Roman ending up in a modern Japanese bathhouse? I’m intrigued and terrified. (It’s called Thermae Romae Novae, just as a note.) If I get some free time, I might indulge my curiosity and watch it. It promises to be absurd. Seriously, though, who came up with this concept?
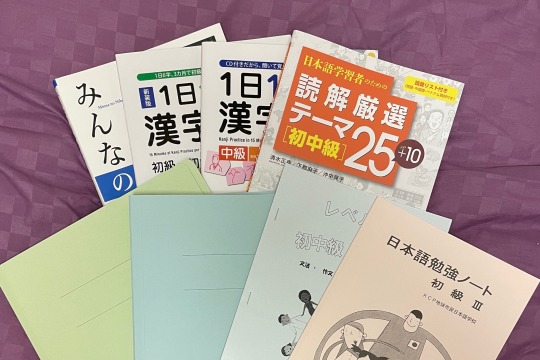
But that will have to wait a bit. Today’s homework took me about four hours (with brief break in the middle to hit up the 7/11 for a pencil and a snack). To be honest, though, it probably took that long partly because I am exhausted. And because the school’s technology sucks. I had work from two different books with handouts in two separate files (physical, paper files—pictured below alongside all the textbooks they threw at us) which I then had to photograph to turn in online. And they set it up to only accept jpeg, not pdf. And it’s drag-and-drop only, no file browser. That means that today I learned that, yes, you can drag-and-drop from the Files app into Safari on iPad. I also learned that Apple photos are natively heic files, not jpeg and how to switch that over. Anyway, I somehow got everything turned in in the end. I think.
It’s only about 9:30pm now, but I think I’ll be calling it a day soon.
0 notes
Text
I Don't Want To Spend This A Lot Time On Discord. How About You?
Octave is another excessive-high quality music Discord bot. You'll be able to link the bot to music streams from various sources. The popular sources of music streams include YouTube, SoundCloud, and Spotify. The bot can also be capable of ship alerts to the server about Twitch, YouTube, or Reddit. Users get the option to customise commands for server moderation. Modular Discord bot. Its primary functions embrace auto-response, function-project, and chat moderation. Online communication channels used to include easy chat and video features. Configuration instruments for chat support. It has loads of chat assist features which might be needed for conversing on-line. It seems as if this chatbot has sufficient features to cover all of your chat assist needs. It also options a Pokemon recreation the place you'll be able to catch different Pokemon. 5. Mudae is a multiplayer sport. Anime Discord bot. The bot options an array of authentic multiplayer video games. This implies you can count on even more options to come back. JBL The JBL Live Free 2 even have energetic noise canceling however function a more traditional bud design. Owned by the identical builders of Dank Memer, the bot has been around for more than 4 years. Lastly, developers of this bot have included a slightly quirky collection of cat info for cat lovers!
On this work we show how one specific definition of unusual time series, the time collection discord, might be found with a disk conscious algorithm. It may possibly log events, create polls, and fee restrict spammers. There’s also a moderator log to facilitate the server. You'll be able to personal or battle the random Pokemon that seems in your server. Equally the CID may be found proper clicking the voice channel and selecting Copy ID. To personal a Pokemon, you should key in the fitting title using Pokecord commands. If you make your own personal mattress in your own home, literally, then you definately likely have to choose where can be the best sort of headboards for beds. But really, I hope that it compels individuals to need to ask questions of their very own relations or relations, particularly if they've come from other countries. You may also create your to-do lists, check the weather, and rank your fellow members.
An example of this could be assigning new roles to all new members. This is just an example of its auto-moderation capabilities. An instance of this would be rewarding active users with stage and XP upgrades to maintain them energetic. The primary goal of the bot is to present customers full control over their respective servers. Pokecord is a Discord bot that runs Pokemon video games on the Discord servers. These embrace word-based video games. The flexibility to use apps while gaming is something we perhaps take with no consideration, but the Oculus Quest 2’s newfound skill to run Discord during VR games might assist players link up with buddies playing on Computer, console, and cellular. For instance, a patch you chose may add scrolling to the st terminal, and also you must run a command to merge those changes to the actual supply code. But now all users have been locked out of those servers fully on the iPhone and iPad app.
You can also kick somebody out from the server if they’re not following the rules. United Traders discord server try out whether you’re new to the day trader house or you’re a seasoned professional. It’s additionally potential to create commands to assign new roles to users and to offer out rewards. If you wish to put on your geekiness in your sleeve, take a look at our Full Nerd merch! People who smoke are usually suggested that actual withdrawal coming from cigarette smoking can be so raw that you may desire a 12-week involving patches or perhaps gum to have the ability to put on your self away that. They wish to take Asian food to school in their lunchbox. Customers can also create their memes and share them with pals and household. Put up humorous or dark memes from the web. So principally you cant run the program which you made for 24x7 and 365 days, so we'd like a server to do this. Another option for locating Discord servers is to look for servers run by your favourite websites or tech influencers. Users may assign single or multiple roles to themselves at once on the servers. Customers can catch, battle, and stage up their Pokemon.
0 notes
Text
Filmora New Registration Code

Wondershare Filmora Crack 9.5 Full Registration Code Mac 2020 Windows Key
Filmora Registration Code For Free
Wondershare Filmora New Registration Code
Filmora 9 Activation Code Windows
Wondershare Filmora Crack is an expert video editor manager to express your creativity and surprise with pleasant results. Filmora Keygen has all the video changing devices to make titles, effects, and changes of each traditional video, audio and photo, and home theater photos similar to Hollywood.
Wondershare Filmora X Registration Key and Code offers a color correction feature that is very easy to use. It works, but the filter offers support to get the shade you want. You can also upload your video clips directly to any site such as Twitter, Facebook and Vimeo, which saves you a great deal of time uploading your projects on social media. Here are the latest Wondershare Filmora Crack 9 Plus Registration Code - Serial Key - Product Key 2020. Wondershare Filmora 9.1.3.21 Crack 2019 Registration Code is a video modifying software. Now, Get pleasure for the lifetime. Filmora Crack by Wondershare is one of the best video editing software you can use.
The Filmora crack switch allows you to cut, replace, combine and trim buckles. Plus, you’re ready to add your favorite music directly to your movie to create the ideal climate. You can also create great live messages from the content and title library. Downloading Filmora crack in a similar way allows you to get video buckles of different arrangements, at this point back up the board as an alternative recording type. iPhone, iPad, iPod, etc. for better video security. You can back up your recordings or rip DVDs for playback on such versatile devices.
you may also like Comic Life Crack.
Key Features:

What’s New in Wondershare Filmora Scrn 2.0.1 Registration Code 2021! Pretty GUI for the users. You can change the cursor as you want. Color your cursor easily. Giving professional editing suite including all in one function. Giving 2 Device video capture for more in detailed video creations. You can export your videos more than 50 File formats. Also Check - Filmora 9 Registration Code + License Key and Email 2020 Moreover, you can save your videos in ISO format too. From this, you can increase the quality of your video. Wondershare Filmora 2021 Crack Incl Registration Code Download. Awesome editing features already remain ready for the addition of extra effects in videos. Likewise, Wondershare Filmora Full Crack helps a lot in the merging of video clips. Also, you can cut or paste the video into diverse arrangements.
With this software, effects, filters, titles, music, etc. You can add.
This video editor is easy for anyone to learn, even if they have never edited the video before.
Filmora has a wide variety of effects that make it beautifully visible on the timeline. Our results were enjoyable, and we had a hard time distinguishing them from editing software, which was many times more expensive.
Filmora Action Cam, Full Feature, Instant Breaker, and Easy Mode. Unfortunately, once you enter, you cannot switch to one of the other modes; you should restart the app
With its well-defined functions and hidden buttons and graphics, you will definitely like the fresh-looking black and purple interface. Although there is no dramatic departure from the common NLE designs, we have found our way incredibly quickly since playback and timeline panels are always kept constant – only the top left panel takes the shape of every function or effect.
Filmora can export your edited video in common Internet video formats, burn to DVD or even send it directly to your mobile device.
Share to popular video sites like YouTube in one click.
Filmora can import files from four different SD / HD sources that are easily processed. Export options are rich for novice users, each with their own sub-options, easy to understand device, format, social network, or DVD decisions.
Filmora can edit and edit these items on a magnetic timeline.
Import video, audio, and images in various formats.
Screenshots:
What’s New in Filmora 9.5.2.9?
This version comes with cross-compatibility support for PC / Mac.
The new version of Filmora 9.5.2.9 comes with new video format support and improvements to make organizing music easier by automatically adding rhythm markers to sound clips.
This version allows you to import and create media at a higher speed.
This version comes with the ability to edit up to 100 full video tracks.
You can now flip, rotate, scale, and move any video clip or image in the preview window.
Now you can save a lot of time by adding LUT 3D as effect layers and spreading over multiple clips for a professional look in true Hollywood style.
It comes with an improved stabilization tool to repair shaky shots.
It also comes with a green screen tool that gives you more control.
The new Filmora Cracked has 120 new animated title templates and 50 new transitions.
You can now preview your video more clearly and capture high-resolution frames.
Filmora 9.5.2.9 Full Working Registration Code/Key (Latest):
CHDT2-ZRSIT-84FX9-RC3Z2-BJGX4
NFTX8-KDIXP-YZFI1-HOR3X-BFAXR
NHV63-ZEF96-GCTSJ-62CTZ-J736E
GXTAFILN6CZJXP97C3ZTF5CE1
FUN6L7NHO3RMT4XQ5XFIOE84F
IT7VFL9XRZF9TNG4XPIZ3XQ1F
GYDR4-BGD4F-YGX4K-UHFVU-IHCR5
BGD2X-ZRCH7-HVF3A-LIN3X-WDP9N
FRZ78-NUDE7-JGSI9-EDCM6-GTZR5
BGSTU-7CDZ2-KHDTB-5FXBK-YC5XD
BHAI9-9FACZ-WBCA4-L8B4X-2VSYF
Filmora 2020 Activation Code:
FZELRSA639VZ6DVE19GSRXDIF
XHI7ZFA6BTDKF2ZE9$BDTX7H3
V5DRZ-HUNR4-KO5PN-WEXG8-NVX1Z
BGDAQ-EX6SX-SGI8C-HLO3P-NJVX4
BAZO7-D2CXA-EDB6F-EFGT7-GRSQ0
VASF0-WSV79-BGDS3-EFXA6-BLV5X
System Requirements:
OS: Mac + Windows XP, Vista, 7, 8, 8.1, and 10.
CPU: Intel or AMD Processor.
RAM 512MB.
10GB Free Hard Disk Space.
How To Crack?
First of all, download the Crack.
Uninstall the old version if you have.
Click on the download folder to extract the files.
Install this software on your PC.
Click on crack and run it normally.
Copy the instruction and paste it where it required.
That’s all!!!! Enjoy
Download Link:
Link 1 | Link 2
Filmora 9 Complete Effect Packs:
Link 1 | Link 2
Currently, there are two ways to activate Filmora9 after purchase.
I. Activate by a Wondershare ID
What is Wondershare ID?
It is your Wondershare account. Wondershare ID provides you with an easy way to activate your software, manage your device, access Filmstock (effects store) and more. You can create a Wondershare ID account in the Filmora9 video editor or sign up at filmora.wondershare.com or Filmstock.com.
If you haven't created a Wondershare ID before your payment, the email you used to purchase a Filmora9 license will be your Wondershare ID account. All users should log in to their Wondershare ID first before exporting videos.
Once you updated your old Filmora version to Filmora9 or your Filmora version is 9.0.0 or above, here are the steps to activate Filmora9:
1. Open Filmora9, select Create New Project to enter the editing mode
2. Click the Avatar icon in the top right corner and a login window will pop up
3. Log in with your Wondershare ID account (the email you used to place the order). You can find your Wondershare account and password in your confirmation email after purchase.
4. Once you log in successfully, click the Avatar icon in the top right corner again, to check your account activation status in the pop-up account panel.
Or here is another way to activate Filmora9 by Wondershare ID. You can go to the Help menu – Activate Filmora9.
Then choose 'Activate Filmora9', then you will be directed to log in to your Wondershare ID to activate Filmora9.
After login, it will show your Wondershare ID activation status, including plan type and expires date.
II. Activate by a registration code
If you have a registration code(The registration code is sent in the confirmation email after purchase. If you don't know your registration code or forgot it, you can click here to retrieve your registration code.
You can also follow the steps to activate your Filmora9 License:
1. Open Filmora9, select Create New Project to enter the editing mode.
2. Go to Help, and click Activate Filmora9.
Filmora Registration Code For Free
3. You will be asked to log in with your Wondershare ID. Please click the 'click here' link, which will open a window to input your License email and registration code.
4. You can copy and paste your licensed email and registration code to the box (Make sure you have entered the right registration code. Please do not leave any spaces; otherwise, it will show your code is invalid.)
Wondershare Filmora New Registration Code
5. Finally, it will show your Filmora9 has been activated successfully.
Filmora 9 Activation Code Windows
Tips: If you are using a version older than 9.0.0, please follow the steps on the 3rd article How to activate Filmora on an old version (Filmora 8 and 7) under Activation and Account column.
0 notes
Text
Keefox For Mac

Keefox For Macbook Pro
Keefox For Macbook
Keefox For Mac Os
So LastPass has been sold to LogMeIn and as we can see, not many LastPass users, including me, are happy about it. LogMeIn reputation is hunting them now and no amount of assurance from the company can fix the trust that was broken.
My friend Khamosh recently covered an article on top password manager services you can use as a LastPass alternative and KeePass was the only one which was free. However, it’s true that it’s a bit difficult to use. Especially when there’s no official support for browsers and smartphones.
So here’s a detailed guide on how to configure KeePass on Windows and use it on browsers like Chrome and Firefox.
KeePassX (for Linux / Mac OS X) KeePassXC (for Linux / Mac OS X) Note that KeePass 2.x runs under Linux / Mac OS X, too; see Running KeePass under Mono. For developers: KeePassJava2 (library for Java) Icons: No trailing icon = compatible with both KeePass 1.x and 2.x. = compatible with KeePass 1.x only. = compatible with KeePass 2.x only. Alternatives to Keefox for Windows, Mac, Android, iPhone, iPad and more. Filter by license to discover only free or Open Source alternatives. This list contains a total of 25+ apps similar to Keefox. List updated: 5/13/2020 10:50:00 AM.
KEEBOX Updates Sign up today for periodic updates and product news. We will email updates at most once every three months.
Password Management: It’s not as easy as it looks, which is why we have a dedicated guide for it, which you should definitely check it out.
Setting Up KeePass on Windows
After you have installed KeePass and activated your vault, we need to install a plugin. The plugin will help the desktop app to communicate with the extension we are going to install on Chrome or Firefox. The name of the plugin is keepasshttp and can be downloaded from the GitHub page.
The zip file will contain a lot of files. But don’t let that confuse you. Simply extract the fileKeePassHttp.plgx to C:Program Files (x86)KeePass Password Safe 2 directory. Users on 32-bit can use the usual Program Files directory. Having done that, restart KeePass.
After the KeePass restarts, click on Tools—>Plugins. Here, you should be able to see the KeePassHttpplugin in the list. Everything is set, it’s now time to install the Chrome extension from the store.
chromeIPass for Chrome
There are a few KeePass extensions available for Chrome, but chromeIPass is one of the best performer out there. After you install the extension, click on the Connect button to connect the plugin to the desktop app. Having done that, you will get a confirmation dialog box on the KeePass desktop app.
No need to enter the master password here. Just enter any keyword and it will be used to identify your connection. That’s all, you will get a notification on the Chrome plugin as to which database it’s connected to.
Any login page you visit now, the credentials will be supplied from KeePass to the browser. Initially, you will get regular popups on KeePass desktop app to allow the transfer of information. You can set it to always allow from KeePassHttp plugin settings found under Tools–>KeepPassHttp Options–>Advanced.
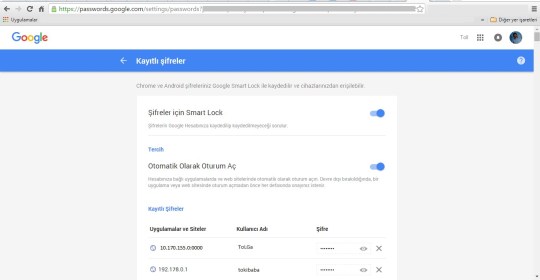
On some page, if the browser is not able to auto-detect the credential fields, open the plugin and click on choose own credential fields for the page. You can now pinpoint the username and password field and the settings will be saved in the extension. These can later be deleted from the extension settings.
KeeFox for Firefox
Firefox users can go ahead and install the KeeFox plugin on the browser and restart it. After the browser restarts, you will be asked to connect to the KeePass database on your computer. Once you hit the connect button, the browser might become unresponsive for a few seconds. Just wait for it to detect KeePass and read your database file.
Next thing, you will be asked to enter generated code from Firefox and the master password to connect the database. This makes it look like the connection is more secure than the Chrome plugin.
That’s all, you can now use the KeeFox to seamlessly login to the websites while browsing on Firefox.
KeeeFox, the plugin for Firefox is more comprehensive than the chromeIPass. There are a lot of settings you can configure, but you should know what you are doing. The best thing is, the extension allows hotkeys for frequently used commands.
Keefox For Macbook Pro
KeePass on Smartphones is Up Next
So that was how you can use KeePass on Chrome and Firefox. If you have any doubts, you can ask them in our forum. As a heads up, I am currently testing different third-party KeePass apps we have on iOS and Android. If they are worth it, would definitely share them in one of my upcoming articles.
The above article may contain affiliate links which help support Guiding Tech. However, it does not affect our editorial integrity. The content remains unbiased and authentic.Also See
Keefox For Macbook
#Firefox #Google Chrome
Did You Know
The first animated Google Doodle was made in honor of Sir Isaac Newton.
More in Windows
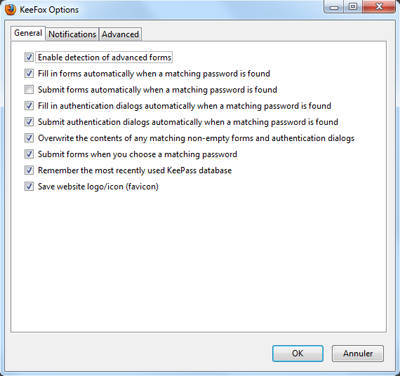
Keefox For Mac Os
Top 3 Fixes for Camera Not Working on Windows 10 PC
0 notes
Photo

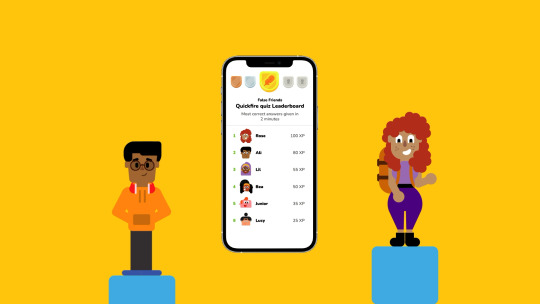


D&AD: Final Video screenshots and Evaluation
In order to inform my design decisions throughout this project, I researched the brand of Duolingo itself. Starting with exploring their brand guidelines, I wanted to understand their illustration process and focused on the basic shapes of circles, squares and triangles which they use to form their characters. As well as discovering their illustration guidelines, I researched more broadly into their existing campaigns and adverts. I found their most recent campaign, ‘Language learning is hard’ set an energetic tone for the brand and emphasised how the language learning app is something educational but doesn’t have to be boring. This quirky video inspired the pace of my own animated video, as the enthusiasm and use of bright colours help to highlight the positive elements of language learning which I believe is important to emphasise especially to the target audience’s age demographic. Once I had established a clear route for my project to follow, I continued to use Duolingo’s brand to guide my visual designs by revisiting their social media platforms regularly and track how they best communicate with their audience. I wanted to create an interactive campaign on a social media platform, and so this led me to research interactive films and series where the viewers no longer assume the role of an ‘audience’, but instead become active participants in the narrative. Netflix’s ‘Black Mirror: Bandersnatch’ and ‘You vs Wild’ both present viewers with decisions which alter their path and give them unique viewing experiences. As I started to develop the touch points for my campaign, I found ‘choose your own adventure’ twitter threads and instagram stories to use as references when creating my own.
I had the idea of using ‘false friends’ as a way to engage with the audience fairly early within this project. The brief specifically mentions that young adults are known for viewing knowledge as ‘cool’ and so this prompted me to highlight how easy it is to miscommunicate words in everyday situations if you lack language skills. I wanted this to encourage the audience to learn more about how they can stop embarrassing scenarios playing out in their own lives. I developed a set of three new Duolingo characters to use throughout my campaign proposal which I wanted to be relatable specifically to young adults instead of simply using pre existing characters Duolingo use more generally. The touch points of my campaign definitely changed as I progressed, as I had been focused on using instagram stories as the main campaign platform. After more research into interactive social media campaigns, I found this was not the most appropriate platform to host a ‘choose your own adventure’ narrative. I then introduced the idea of an in app game that can be played with friends, in classrooms and on the go. This then led to the issue of getting completely new users involved with the campaign if they had not already downloaded the app. As a solution, I began looking into QR codes which could be located around public buildings to get everyone interacting with the campaign.
I believe my time management throughout the project was reasonable, though could always be improved. I could have used my time more efficiently if I had generated a storyboard for my final campaign proposal video earlier on. However, I did try to do this and had no success, so although it set me back slightly with the project, I think the time was needed in order to clarify my idea and work on creating all the visuals I needed to include within the video.
In each group tutorial I had throughout the project, I was given useful feedback to improve my work and each time was left with new ideas to improve my campaign proposal. I took a lot of the feedback on board as I found discussing my work beneficial, especially with not being on campus at all for this brief. As well as feedback from tutors, I showed final stages of my work to friends and family in order to get feedback from those with no prior knowledge of my campaign idea or with experience in design work. I found this useful as it highlighted areas I hadn’t explained clearly and I was able to adjust my video accordingly.
I believe that with this project, I could have definitely explored several ideas before deciding on my final direction, but as I had a clear vision of the ‘False friends’ campaign proposal, I began developing it further almost immediately. I spent a lot of this project feeling overwhelmed as I was focused on having to produce a two minute long animation, of which I had no storyboard or structure until the late stages of the project. As a result of this, a fair amount of time was spent panicking and therefore hindered my productivity as I avoided starting the video. I believe if I had re-read the requirements of the D&AD submissions before planning my final outcomes, it would have made the process a lot easier.
For my visuals, I wanted to ensure I captured the style of Duolingo by following their illustration guidelines as much as possible. Due to this, I pushed myself to use Adobe Illustrator to create all my visuals, where I would normally prefer using Procreate on an iPad to create more hand drawn elements. This allowed me to greatly improve my own skills and knowledge of the software and I will definitely be more inclined to create work using illustrator in future projects.
I would have liked to design my app concept in adobe XD to create a more functioning mockup of how the game would work, as this would have been useful in the final campaign video to fully showcase my idea. I also would like to develop the Duolingo Poll poster designs to appear more exciting and engage the audience to take part.
0 notes
Text
Rotating speakers on Vizio's Elevate soundbar aren't just a gimmick
New Post has been published on https://appradab.com/rotating-speakers-on-vizios-elevate-soundbar-arent-just-a-gimmick/
Rotating speakers on Vizio's Elevate soundbar aren't just a gimmick
Ty Pendlebury/CNET
Soundbars capable of reproducing the atmospheric effects of Dolby Atmos soundtracks have been around since 2016, but until now they haven’t been very innovative. To work well, Atmos devices need extra speakers to reproduce those height effects, and usually they’re small, static drivers aimed at the ceiling. The Vizio Elevate costs a bundle but it tries something radically new: motorized speakers that rise up and revolve according to whether you’re listening to music or a compatible movie. The craziest part is, it actually works!
Like
Motorized speakers work well.
Excellent sound for movies and music.
Plenty of connections
Includes rears and wireless sub.
Don’t Like
Not as easy to use as Sonos Arc
No Apple AirPlay support
Somewhat short surround cables
The Vizio Elevate is expensive for a soundbar, but Atmos bars in general have always tended toward the high end. The Samsung HW-Q950T comes close in terms of specification but that system is also $1,700. The Sonos Arc ($799 at Sonos, Inc.) offers the simplicity of a single bar and includes a voice assistant, but it doesn’t sound as good as the Vizio. With its moving speakers, the Vizio Elevate really is its own animal.
Newbies beware however: The Vizio Elevate’s manual setup can be complicated and isn’t helped by the confusing remote. Some users may also find the wired surround speakers a pain depending on where they choose to place the subwoofer — the cables are probably too short for large rooms.
The rotating speakers reek of gimmickry, but in practice they work well, adding oomph to music and spaciousness to true Atmos soundtracks. If you don’t mind plunking down the money for a fully featured, great-sounding soundbar, the Vizio Elevate is a very serious contender. If the Elevate is too rich for your blood, however, the Vizio SB36512 is our Editors’ Choice winner and an excellent alternative at less than half the price.
Build quality: A step above

Ty Pendlebury/CNET
The Vizio Elevate is a 5.1.4 soundbar which offers compatibility with both immersive standards: Dolby Atmos and DTS:X. In addition to the main speaker itself, the Elevate’s setup includes rears, a large subwoofer and a remote. If you wanted to deck out the Arc with a similar array of speakers, namely the Sonos Sub and two Symfonisk for the rear channels, it would cost about $1,700.
The Vizio Elevate may be a plastic soundbar at heart but its design is… ahem… elevated. The main bar feels sturdy and comes in a two-tone finish — part thick vinyl wrap and part gun-metal aluminum. This is a big speaker at 48 inches wide and a table-swallowing 6.5 inches deep. The ends are covered in a matte-black material, which makes it hard to see the matte-black controls, but the raised buttons are actually easier to use by touch. The front of the soundbar includes a colored LED that makes it relatively simple to tell which input you are on, as well as a white LED level meter.
The main speaker features a whopping 13 drivers, including a dedicated center channel and 5 tweeters in total. The swiveling speakers are situated at each end and rotate when the system detects a Dolby Atmos/DTS:X signal, revealing the Atmos logo on one side and DTS:X on the other.

Ty Pendlebury/CNET
The subwoofer is one of the largest I’ve seen on any system, measuring 11 inches wide by 14 inches deep and 16 inches high. The rear speakers feature both forward-facing and upward-firing drivers and are tethered to the sub by a 30-foot cable (the connection between the soundbar and the sub is wireless). The cable was long enough to drape behind my couch and along the side of the living space to the sub at the front, but the length could be an issue for some installations.
Vizio claims the system is capable of 107 decibels, and I did find it was quite loud, so no worries about filling even the largest living spaces. The Elevate includes a wall-mount bracket in the box (BYO screws, however), and Vizio designed the bar to mate seamlessly with the Vizio OLED TV.
A mountain of features
Connectivity is excellent with two separate HDMI inputs, as well as a third, labeled “HDMI Out,” which supports eARC. There’s also an optical digital input, a 3.5mm analog audio and a 3.5mm “voice assistant” input, USB and Bluetooth. The Elevate connects to your network via Wi-Fi and supports Spotify Connect and Chromecast built-in. Unlike the Arc, it lacks Apple AirPlay support but its physical connectivity is far better than the Arc’s.

Ty Pendlebury/CNET
The Elevate also lacks a built-in voice assistant, found on the Arc and other soundbars, but I don’t see this as a major disadvantage. Using Alexa or Google Assistant on a soundbar can be annoying as the volume will mute if it hears the wake word, which means you could miss some of your show. If you want to use a voice assistant to listen to music through the Elevate it’s easy to set the soundbar up as the default speaker for an inexpensive Google or Echo speaker nearby.
Ty Pendlebury/CNET
The remote looks like the ones that come with cheaper Vizio soundbars but differs in two important aspects. There’s an LCD display at the top, and four buttons which help with setup at the bottom. Having both Effect and EQ options is a little confusing because they perform very similar tasks, and navigating menus via the different buttons takes a little getting used to.
Adjusting the volume of the subwoofer was easy enough with the Level button but not everything was intuitive, and you will need to know to download the Vizio SmartCast app to complete the setup of Wi-Fi, for example. I also had some issues updating the firmware from the website, but Vizio told me it was because one of the files was misnamed and assured me it was now fixed.
In comparison the Sonos Arc was a simple pleasure to use, install and update, although that speaker’s setup does heavily favor iPhone ($599 at Apple) users — Sonos’ TruPlay calibration app is not available on Android. I had some issues with the Arc initially and these were helped by using TruPlay (on an iPad ($385 at eBay)).
High and mighty sound
The Elevate is twice the price of the existing SB36512, but you can’t expect twice the performance. I was unable to test the two models side-by-side, but in my experience there are always diminishing returns when going from an excellent, affordable speaker to a much more expensive one.
For these tests I compared the Elevate side-by-side against the Sonos Arc, because the two are roughly the same price. The Vizio acquitted itself very quickly with authoritative sound quality across all kinds of material. Unlike the Arc, which performs better at home theater than music, the Elevate was equally capable with both — a rare feat among soundbars.
I started my tests with music, Radiohead’s My Iron Lung to be precise, and I found that the Arc wasn’t quite as accomplished as the Vizio. The Arc played the song at a remove, slightly boxy and distant. By fiddling with the EQ I was able to improve definition to the percussion, but Thom York still gave the impression he was phoning it in. The Vizio was the opposite, lively and punchy thanks to that subwoofer. It wasn’t quite perfect, though, as I needed to back off the treble a little, but much more listenable overall.
I moved to something more ethereal with Yulunga (Spirit Dance) by Dead Can Dance, and the Arc improved somewhat, with a crispness and presence in the stereo shaker eggs for example, even if it wasn’t able to dig deep on the larger drums. The Vizio’s authority was evident from the first few bars of the song. Lisa Gerrard’s voice floated free of the speakers, and the string accompaniment was easier to hear. The sub was able to let the drums and gong sounds fully resonate in my testing room.
I moved to movies and TV next, starting with the infamous egg-stealing Chapter 10 of The Mandalorian. The episode features a chase scene through clouds and an inevitable canyon run (it wouldn’t be Star Wars if you couldn’t flip your ship vertically or had to contend with guard rails on gang planks). During this scene the Arc was able to convey a real sense of height as the Razor Crest descended into the frosty planet’s atmosphere, pursued by two X-wing fighters.
As lovely as the Arc sounded, it was the Vizio’s dedicated rears and sub which really helped anchor the action. The Elevate’s surround effects were much more pinpoint and the metallic thud of the ship as it skidded across the floor of the icy canyon sounded impactful and scary. It didn’t have the same vertiginous feeling of height as the Arc however.
The sub and rears again helped the Vizio convey a sense of space in my next test, the Thanator chase scene from Avatar. Insects buzzed around the listening position, dialogue was clear and explosions bombastic. In comparison with the Arc, it could occasionally send an insect-like click to my right that made me think the Elevate’s rears were somehow still working, but the sense of surround was much less palpable.
The revolution starts here
Are revolving, motorized speakers going to become a trend? Probably not. The up-firing speakers of the Vizio Elevate add some impact when in stereo mode it’s not really enough to justify a potential moving-part weak point down the road.
The Elevate may not be as easy to use as the Arc, but it’s the better performer, and that’s really what matters. The Vizio soundbar is also a better value, due to its enhanced connectivity and dedicated subs and rears. The Vizio SB36512 still offers the best value of any Atmos soundbar I’ve tested, but if you want an upgrade, the nifty Elevate is a more refined and home-theater-ready speaker.
0 notes
Text
Tested: Krakeln

#Developer: Claus Schunk
#Website: https://krakeln.eu/
#Purchase: https://itunes.apple.com/us/app/krakeln/id1337094156?mt=8
#Version: 1.1
#Cost: Free to play Demo, $0.99 to unlock all levels (at time of review)
Please note that we received a donation to review this released app.
#Support: Requires iOS 8.0 or later. Compatible with iPhone, iPad, and iPod touch.
#Size: 40.3 MB
#Screenshots:

#Developers Description
The family-friendly child's play for pre-school age without advertising!
Playful family game for learning letters, words and pictures.
The free multilingual app is designed to allow older children to learn foreign languages or to grow up in a bilingual environment.
The child-friendly application is characterised by the fact that there is no advertising in the application and complicated operation has been dispensed with.
A special feature are the ascending water bubbles with all elements of a level. The bubbles can be brought to bursting, so a lot of fun is pre-programmed.
Playful learning is suitable for primary school or preschool. Full offline capability eliminates the need for an active Internet connection during game play
Accompany Krakel on a journey with many adventures. There are some surprises waiting for you on your way. You will know them when they appear.
You will be able to name them when you see them.
But the most important thing is - you will learn to literally describe them.
Alone or together with your parents you will learn how to use the alphabet in a playful way. If it's too boring for you, you can prove what other language you've got. Soon you'll be playing in a league with the big players and maybe you'll learn something from them soon. Be ready, face the challenge and be ahead of others.
#The Review
Krakeln is a fun way to help your child with spelling in a super friendly ‘no-pressure’ environment. 16 great levels covering all aspects of life (Food, Clothes, Farm Animals, Sea Creatures, Music, Jobs, Transport, Household objects, Bugs, Safari, Wildlife, Colours, Vegetables and Fruit) with lots of recognisable visual clues to help the child solve the puzzles. The child gets to take their time, and if they make a mistake, it simply highlights the incorrect letter by flashing ‘red’ and allows the child to try again, thus building up to the answer, and seeing the finished word. At the end of the level, the child is presented with pictures in cute little bubbles for them to pop, before moving on to the next set of word puzzles.
The great thing about this spelling app is that it supports English and 3 other popular foreign languages (French, Spanish and German). The child is able to toggle to the country of choice and select and attempt the same puzzle sets. A heads up, parents will definitely get a chance to test their own language skills, whilst assisting their child to help with the translations. if all else fails, the child can work through the spelling in a trial and error wy, where the child benefits from seeing the completed word alongside the picture, which provides great language learning.
#The Test
This app was thoroughly enjoyed ‘lots’ by Poppy, and was a great way to challenge her spelling, which definitely needs improving. She enjoyed playing through all the levels over and over again, each level having a large set of cute illustrations with all the required letters available, yet all jumbled up, ready for her to solve the puzzle.
Poppy found the English words fairly easy, but there was definitely lots of challenging and fairly long words mixed within the sets. One of the best features of the app is that each time you load the puzzle set, you get a different order of the words, which provides a more enjoyable experience.
Now trying the foreign languages was a different story for both of us! I never was a great languages student, and we both had to focus hard to build out the words, and this is an area where the app definitely needs a helpful little feature adding that would highlight clues, like the ‘starting letter of the word’, as this was something that we struggled with German and Spanish.
Poppy found herself playing mainly in English, especially if I wasn’t there to help. Her favourite set of puzzles were what she called ‘under the sea’, which included lots of favourites (Sharks, Mermaids and Whales).
In its current form, the app is great, however, we would love to see the ability to toggle through the languages during play or even to be able to toggle the language of the completed word, allowing the child to complete the word ‘Monkey’ in English, and then have the ability to display the word in French ‘singe’. That said it didn’t take anything away from our experience and Poppy’s enjoyment. I felt that the app was a big hit!
#The Verdict
‘Krakln’, a wonderful word puzzle app for pre-schoolers.
#The Rating
Overall: 5/5
Look & Feel: 5/5 - Delightful pictures and pleasing themes
Enjoyment: 5/5 - The ‘no-pressure’ environment and simple interface really encouraged repeat play with varying levels of difficulty.
Playability: 5/5 - Easy for your child to navigate and plenty of sets and images to choose from.
Value for Money: 5/5 - This app is ‘free’ to play with a great demo, and only 99c to unlock all the levels.
2 notes
·
View notes
Text
♡ Preparatory Task
𝒰𝒩𝐼𝒯 𝟪: 𝒟𝑒𝓋𝑒𝓁𝑜𝓅𝒾𝓃𝑔 𝒶𝓃 𝒶𝓇𝓉 𝒶𝓃𝒹 𝒹𝑒𝓈𝒾𝑔𝓃 𝓅𝓇𝑜𝒿𝑒𝒸𝓉
26 / 02 / 2020
♡ Select an image of an object that inspires you. This could be something in your home/garden/room/journal. Take a photo; tell us why you selected it?
In preparation for our final major project, we were required to undertake a research activity in order to help us generate ideas and themes for our project.
The first thing assigned for us to do was to find an object or image that inspired us. When I first saw this task, I was confused as to how I could find an ‘inspiring enough object, but once I had found something and experimented with angles and perspective, I began to understand why referencing from real objects in a 3d space like this was so useful. Why were we looking at inanimate objects with no obvious meaning to them? Especially if they had no expressions to work with or human-like features. Why would they be useful to producing a narrative, animation or character? Only after taking some pictures did I begin to understand the significance of this task. Using the glass diamond shape from my window sill and some glittery nail polish in my room I took pictures of them with my phone from different angles. I’m no photographer but I tried to look at close up angled and perspective where I could use the shapes, colours and detail to my advantage. I wanted to highlight each objects best qualities; such as the diamond’s glassy, clear material and the polish’s small detail and iridescent colours. I was drawn to these objects because I noticed the sunlight filtering through them from my window.
The way that light interacts with these inanimate objects intrigued me the most. In the dark, they look completely ordinary and lifeless almost, but when the sun hits them, colour springs out of them and then they become aesthetically pleasing to look at. The glow in the gif below reflecting off of the smoot glass surface is only possible when a light source is involved.

There are many things in this gif that inspire me, one of them being the way the light has filtered through the diamond and painted a shiny pattern on the surface on which the diamond sits. The shape of the pattern looks sharp, like real shards of glass with hard edges. The immediate thought that came to my mind was the pattern of a snowflake and a scene from an animated movie were a large, sharp looking, almost crystallised snowflake is under the feet of an ice queen.
There's a specific scene where during the characters music number, she stamps her foot on the ground and a icy, crystal snowflake forms from the middle outwards. I love the smooth way that the camera pans out to show off the rest of the snowflake forming under her feet. This sort of perspective and camera work is something I would like to achieve in an animation, if I decided to make one for this project.

[Source: Disney’s 2013 Frozen Movie.]
Another thing I liked about this gif is the way a pinpoint of light is being reflected straight into the viewer's eyes. As I watch it, I realise I'm only concentrating on that beam, as it draws my eye the most. This has taught me how to influence where the viewer looks first. The way it shines reminds me of a common Japanese anime trope where weapons will glint menacingly in sun/moonlight when unsheathed. This is likely to get the point across how dangerous of an object it is and to emphasise its deadly sharp make.
This gives me lots of ideas for potential scenes where I can use this to my advantage, perhaps using it to draw the eye of the viewer somewhere else on the screen so that they can notice something before the character does. This leads me onto questions such as: what could the glint be coming from? Something like treasure? Or a knife hurtling out of a dark spot? Is there an attack? How would a character react in a situation like that, depending on their personality type?
Iridescent Definition:
- showing luminous colours that seem to change when seen from different angles.
‘Iris’ means rainbow in Latin. ‘Escent’ is an English word.
Synonyms:
Shimmering, glittery, sparky, gleaming, multi-coloured, kaleidoscope, opalescent, prismatic, colourful, rainbow-like, glowing, shining, dazzling, opaline, many-hued, lustrous.
Antonyms:
Colourless, dull, plain, faded, bleached, dark, bland.
What I really like about the diamond shaped object I chose was the different shapes I could get, my favourite perspective being the very zoomed in picture. At this angle, to me it looks like the dark lines of glass are tall skyscrapers and the glitter at the bottom are the details of people, cars and streets below. I personally really like the way it almost looks blurry, because it leaves the viewer’s brain to fill in the blanks. This is an effect that inspires me to use something similar like this in this project, leaving my illustrations up to the viewer’s interpretation.
The glassy effect that it has as well leads me to think about what a city would look like if it were entirely made out of glass. Fragile and delicate, what would that mean for the people living there? Can the world I set my story in have similar fragile qualities? Should I consider a city aesthetic?

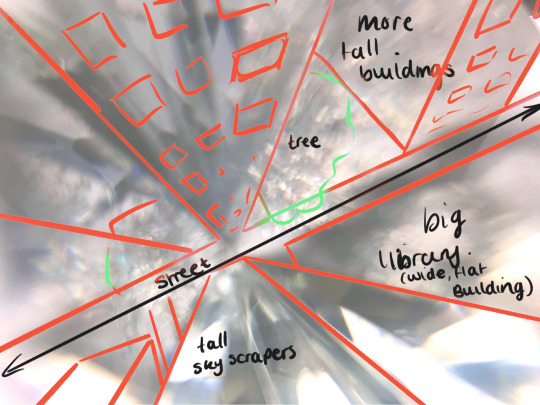
If I were to create a world based around a fragile material such as glass, light would be an extremely important aspect to research. Ways I could do this is study how professionals use it to convey a meaning or feeling in animation. I could also examine light and how it interacts with surfaces in real life, plus the absence of it. The way that shapes can also be twisted and changed through curved glass is something I would feel important too, as in a glass world idea inspired by these pictures, I wouldn’t want to use too many straight lines, as I would want to make the most of all of the properties that glass has.

As I filmed this gif on an open sketchbook page, the way that the end of the page seems to tilt and bend upwards was unintentional but interesting. If I were to animate this, most of my attention should be focussed on how lines and objects behind something like this.
Light Animation Test:
Using procreate, an app on the ipad pro I am very familiar with, I decided to test out a quick animation of a light moving along a surface, reflecting up to the viewer when it got to the middle as its brightest point. I used the gif at the beginning of this post as a reference for this. Although there is no object in this test, it made me think of how I might put this sort of animation on something shiny. Immediate ideas that come to my mind the glint of a sword/shiny barrel of a gun or sunlight traveling across the surface of a tall, glass building. I used 19 frames for this and the frame rate is at 12 per second. I feel like the light might be moving along the line a little too quickly, and it would look better if it were slowed down slightly, just s that the viewer can notice the effect for longer and for it too ave a slightly longer lasting effect.
Using a shine effect like this in an animation, depending on the context of which it is being used, could invoke different emotions.

After this preparatory task, I can really see the benefits of it. Whereas before I found it hard to imagine trying to take inspiration from an object, now I have far more ideas about what to do for the FMP than I did at the beginning. Although nothing is final yet, this research has helped me to see that inspiration and research does not just have to come from the work of other artists, and how important primary research is to development of ideas.
0 notes
Last Seen Blogs

itzsana-kiddingmenow
.・she knows the power of her mind.・

tia-ray
I Feel Right, The Music Sounds Better With You

ilprossimosecolo
Il prossimo secolo

thuocmy
Thuốc Mỹ

the-pure-cloud
𝓽𝓱𝓮 𝓹𝓾𝓻𝓮 𝓬𝓵𝓸𝓾𝓭