#crochet stitch tutorial
Text
Photo Tutorial – How To Crochet: Triple Interlocking Block Stitch!
Photo Tutorial – How To Crochet: Triple Interlocking Block Stitch!
❈ ❈ ❈ ❈ ❈ ❈ ❈ ❈ ❈ ❈
Thanks for visiting my page! Here is a written tutorial with photos on how to make the Triple Interlocking Block Stitch!
First, with any project you’ll need a crochet hook and yarn. Any yarn or hook will do for learning this stitch
For this tutorial you’ll need to know how to make Chains (CH), I have a tutorial here! How to make the Single Crochet Stitch (SC), tutorial…

View On WordPress
https://crochetml.com/photo-tutorial-how-to-crochet-triple-interlocking-block-stitch/
#beginner crochet tutorial#block stitch how to#block stitch tutorial#crochet blog#crochet blogger#crochet handmade#crochet me lovely#crochet pattern#crochet patterns#crochet photo guide#crochet photo tutorial#crochet photo tutorials#crochet stitch#crochet stitch pattern#crochet stitch tutorial#crochet stitch tutorials#crochet stitches#crochet Triple Interlocking Block Stitch#crochet tutorial#crochet tutorials#crochet video#crochet video tutorial#crochetmelovely#diy crochet tutorial#double crochet stitch#double crochet stitch pattern#double crochet stitch tutorial#double crochet stitch tutorials#double crochet tutorial#easy crochet tutorial
27 notes
·
View notes
Text
not to be FUCKING dramatic, but crochet is intuitive and logical and knitting is of the devil and feels like every step is just made up on a whim
#with crochet the difficult bit is building the muscle memory to move the hook and hold consistent tension in the yarn#but once you get that its like you can do anything#you go from beginner to extremely competent very quickly#but this knitting like. i understand how to do the knit and purl stitche#im not particularly fast but i can do the#them*#but then i go watch a youtube tutorial thats allegedly for beginning knitters and its just like.#im that meme of the woman trying to do complex math#like what the fuck are you talking about
56 notes
·
View notes
Text
Crochet patterns be like:
*incomprehensible gibberish of abbreviations and numbers*
Ok and now repeat this until the end of time and you have the first front part for your jacket. Do it again to make the second one. The pattern for the back is the same thing but this time you have to repeat everything until the sun explodes.
Have fun! uwu
#if I tell you I was struggling to understand the pattern I MEAN IT!#i get it now but I needed three youtube tutorials to understand the stitches they use#and I am still not sure why needed to make 130 stitches only to use half them in the end#because I had to skip every other stitch#what was the point of that??#crochet
16 notes
·
View notes
Text
current mood: cursing out craft youtubers while undoing all of my knit stitches
#yelling at the void#literally this time!#the good tutorial folk are blurry and i cant see what rheyre doing#the folk in high quality are talking to me like im 5 and my hands are cramping while i wait for them to FINISH SHOWING HOW TO DO THE FUCKING#STITCH#hi i decided it was a good idea to take a shot before learning how to knit#'i can crochet how hard can it be'#realtalk the crochet experience IS helping but this is fucking frustrating#college stitch n bitch club that only taught me to make single crochet chains without turning. i miss you
6 notes
·
View notes
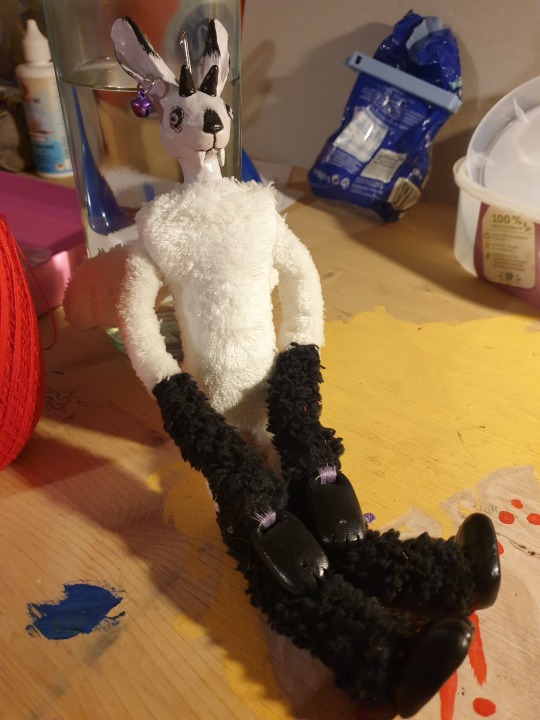
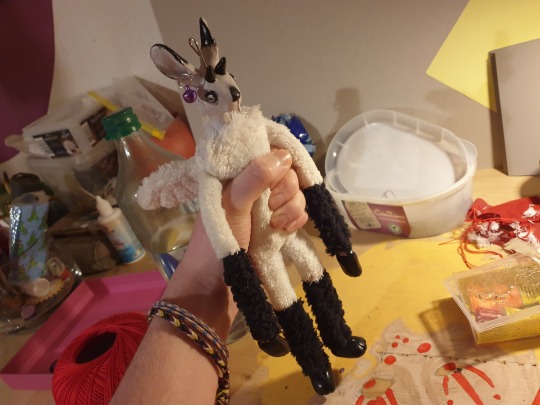
Text
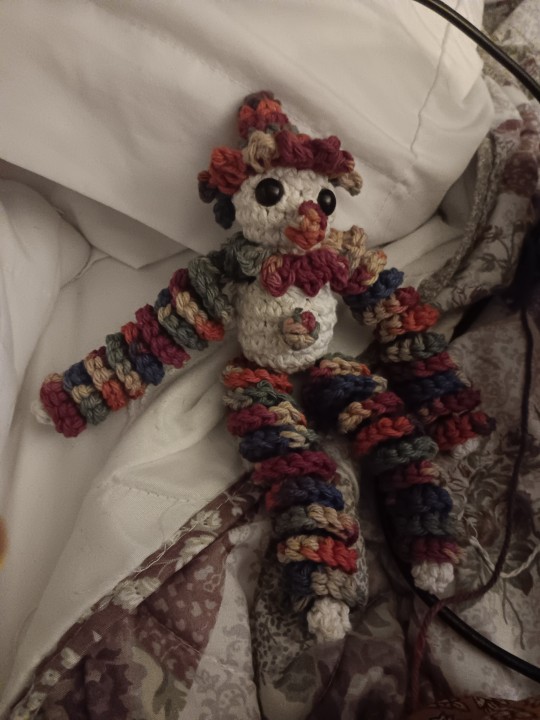
My attempt at a little clown doll inspired by the lovely @minkerverse 's clown sons!! Thank you for letting me try my hand at a take on ur clowns I think this little guy is my favorite creation yet :D
Bonus under the cut ;)
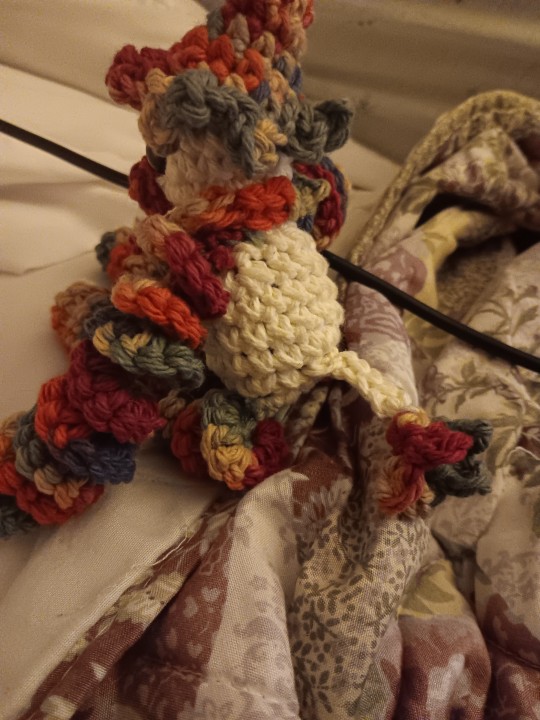
Tail!!!!!!!!
#im so so glad to have a use for this yarn it is so pretty#eventually i may redo the nose and the button but im not sure how yet#i think i struggled the most with the ruffles im still figuring that part out but this shell stitch did ok as a substitute haha!!#for context i eyeballed this so it was also an awrsome exercisr to see how far ive come in crochet to be able to aply what i know#without following a pattern or tutorial#i think it will help a lot making my own plushies in the future#crochet#art#amigurimi#clown
19 notes
·
View notes
Note
hey, sorry if this isn't very clear, english isn't my first language, but do you know if this can be fixed and, if so, how? the sleeve of my sweater got like unknit in this part

[ID: the sleeve of a sweater knit in variegated yarn in shades of red, green, and purple. Part of the sleeve has unravelled, creating a large hole.]
Fixing unravelled knitting
No worries, English isn't my first language either.
The yarn must have broken somewhere, or maybe a woven-in end came loose. Either way, there's bound to be a loose thread in there. It would be helpful if you could locate it without undoing any more stitches.
Judging by your picture, it looks like most of the yarn is still fine. One thing you could try is to grab a crochet hook and to pick up those dropped stitches. Check out The Spruce Crafts for a written tutorial and VeryPink Knits for a video tutorial on how to do this.
Start from the bottom and work your way up line by line: you've got a lot of loose threads in the middle of the hole and those will be difficult to work with if you don't fix the stitch structure (the V-shaped stitches) below the large hole first.
Once you reach that last stitch, or the broken end, you'll have to secure it in place. As there's no working yarn since you're mending a finished item, you may have to get some extra yarn or thread to do this. Knitted fabric is basically a bunch of loops: when one loop comes loose, the rest follows. The idea is to fix that last loop in place so it can't unravel and cause a chain reaction in the future.
You'll have to work very carefully as to avoid unravelling more stitches.
If that doesn't work, check out my post outlining techniques on how to mend knit fabrics to see different methods on how to fix something like this. Darning or patching are also good methods to fix something like this, but your mend will be visible.

(Image source) [ID: a drawing of a piece of knitting that's still in progress. A crochet hook is used to pick up dropped stitches at the centre of the work.]
#wasteless crafts#ask#diy#how to#tutorial#mending#knitting#knit fabrics#visible mending#invisible mending#fashion#fast fashion#slow fashion#sustainable fashion#sustainability#zero waste#unravelled knitting#picking up stitches#crochet hook#sweater#sleeve
209 notes
·
View notes
Note
Hiii do you have any tutorial on how to translate manga panels to tapestry?
absolutely!! the most straightforward way is probably using stitchfiddle or other similar sites, all u gotta do is upload ur image and mess with the settings!

this is what it looks like when u upload an image, and the sliders on the left will allow u to change the size of the project, amount of yarn colors, and the brightness/contrast of an image
from here you can also manually edit all the pixels if you'd like but to do that I think you need to make an account and save the chart first
my issue with stitchfiddle is if you're using a manga with thin or sketchy lines it's not gonna translate well and you may have to make it as large as possible to even make out the lines properly (also conversely if you want to make something truly ginormous, stitchfiddle only goes up to 300 stitches max, so... no king-sized blankets with luffy's face)
BUT if you have any sort of drawing program you can do this yourself with a bit more work! I use clip studio paint but free programs like krita and firealpaca work just as well... longer tutorial under the cut for brevity's sake

i make a canvas with the size equivalent to the number of stitches i want (1 pixel = 1 single crochet, but u can also change the ratio to fit whatever stitch and project ur doing), so here i'm making a 150px x 150px canvas. I usually guess the number of stitches I want and change the canvas size later if I think a different size would work better
I then upload the image I want and scale it to fit the layer, and turn opacity down pretty low. if your drawing program has a grid display it's also super helpful to turn that on so you can see the individual pixels
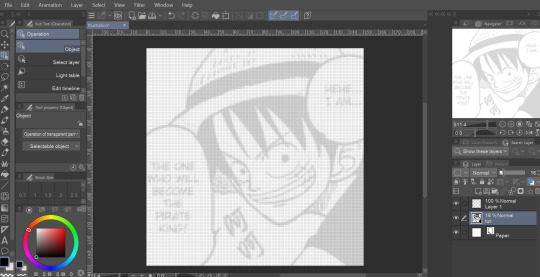
from there it's just a matter of tracing using a 1 pixel brush! the great thing about doing it this way is that you can also add some flare or change things up on the fly much easer (i tend to replace crosshatched shading with flat gray since it translates much better to crochet that way... and i like adding some extra shadows to make things pop)
you can also number the grid by making the canvas a bit larger and adding the numbers along the sides, it's helpful to have the numbers as a guide to keep track of where u are but im lazy and tend to just go without them lmao
and for anyone who read this whole thing have a luffy on the house

i hope this helps! i believe in u and ur crocheting journey
(disclaimer I haven't crocheted text yet so i have no clue how well these speech bubbles will translate since the words are quite small)
#if ur looking for advice on the actually crocheting part i recommend looking up tutorials on youtube!#watching someone do the stitches in real time is super helpful and theres lots of videos on switching colors n carrying yarn#crochet#tapestry crochet#fiber art
4 notes
·
View notes
Text
Stitch and
I formerly thought that the term “stitch-n-bitch” referred to a gathering of ladies who sew/knit/crochet and use their time together to vent, humorously or otherwise.
I NOW know that one lone teenager, trying to learn a new crochet pattern from a Youtube tutorial, can stitch-n-bitch all by herself with occasional dramatic flourishes of the crochet hook.
Ah, the allure of the fiber arts.
#crochet#fiber art#a stitch in time#might still be the wrong stitch#alas poor youtuber#one crucial moment of your tutorial was missed
23 notes
·
View notes
Text
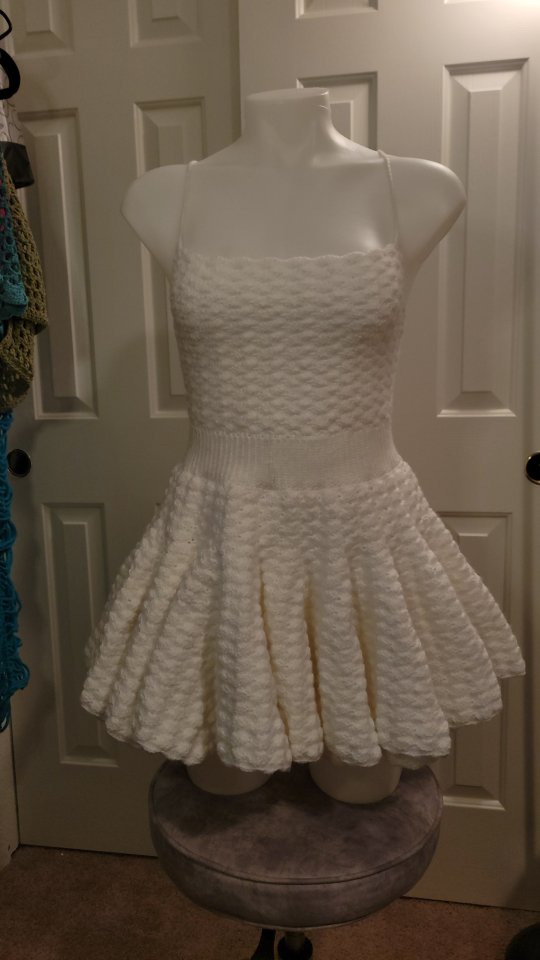
Crochet Shell Stitch Dress Part 2
This is a two-part tutorial series in which you can learn to make this crochet bralette and continue to convert it into a crochet shell stitch dress. Below you will see the free crochet pattern and tutorial to make the skirt part of this dress in this post.
You can find the Part 1 pattern and tutorial here, where we will be making the bralette top. Also, I wanted to mention that the free pattern…
View On WordPress
29 notes
·
View notes
Text
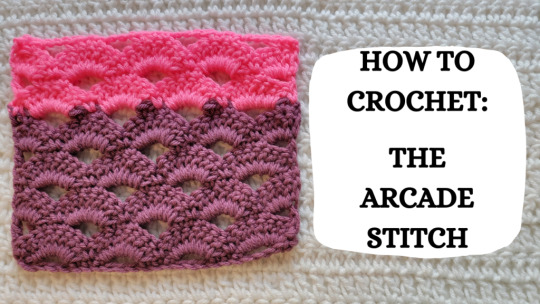
Photo Tutorial – How To Crochet: The Arcade Stitch!
Photo Tutorial – How To Crochet: The Arcade Stitch!
❈ ❈ ❈ ❈ ❈ ❈ ❈ ❈ ❈ ❈
Thanks for visiting my page! Here is a written tutorial with photos on how to make the Arcade Stitch!
First, with any project you’ll need a crochet hook and yarn. Any yarn or hook will do for learning this stitch
For this tutorial you’ll need to know how to make Chains (CH), I have a tutorial here! How to make the Single Crochet Stitch (SC), tutorial here! And how to make…
View On WordPress
https://crochetml.com/photo-tutorial-how-to-crochet-the-arcade-stitch/
#Arcade Stitch#Arcade Stitch photo tutorial#Arcade Stitch tutorial#Arcade Stitch video#beginner crochet tutorial#crochet Arcade Stitch#crochet blog#crochet blogger#crochet handmade#crochet me lovely#crochet pattern#crochet patterns#crochet photo guide#crochet photo tutorial#crochet photo tutorials#crochet shell stitch#crochet stitch#crochet stitch pattern#crochet stitch tutorial#crochet stitch tutorials#crochet stitches#crochet tutorial#crochet tutorials#crochet video#crochet video tutorial#crochetmelovely#diy crochet tutorial#double crochet stitch#double crochet stitch pattern#double crochet stitch tutorial
23 notes
·
View notes
Text
learning to crochet has made me unbelievably angry these last 2-3 days
#beef trimmings#the blinding rage of trying to follow a tutorial and the website keeps crashing and youre sitting there trying to make a magic loop like.#4 times in a row cause oyu keep fucking up and then you finally manage to make one and then you have to attach it to the big crochet ball a#then you fucking CUT OFF. the string you were supposed to use to stitch it to the ball BECAUSE#THE WEBSITE#CRASHED. AGAIN. AND YOU JUMPED TO CONCLUSION ABOUT THE NEXT STEP#BECAUSE WITH THE BALL YOU CUT THE STRINGS OFF#AND NOW YOU HAVE TO MAKE A NOTHER MAGIC LOOP.#AND ITS NOT WORKIGN.#AND YOURE GOING TO SET YOUR LITTLE CROCHET CHICK ON FIRE#bashing my head against the wall#i just want to make a little guy it doesnt have to be this hard. im so angry
8 notes
·
View notes
Text

#handcrafted#crochet shell stitch#crochet jewelry#crochet pattern#pattern#shoulder wrap#etsy#collar pattern#crochet tutorial#wedding collar#yellow collar#medium crochet#dıy project#warm and cozy#beautiful collar
2 notes
·
View notes
Text
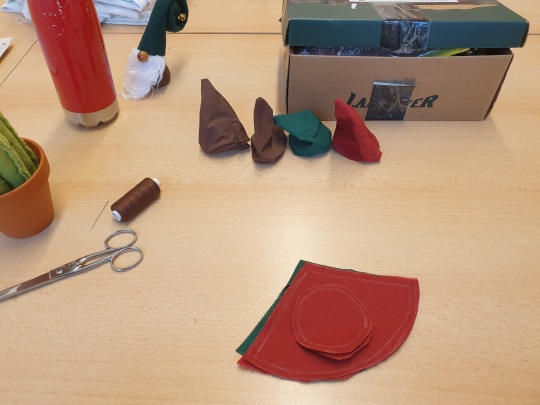
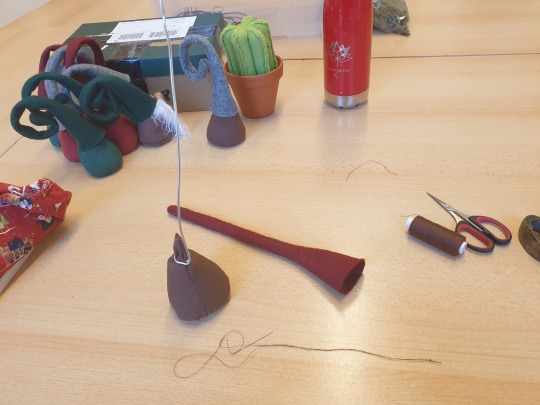
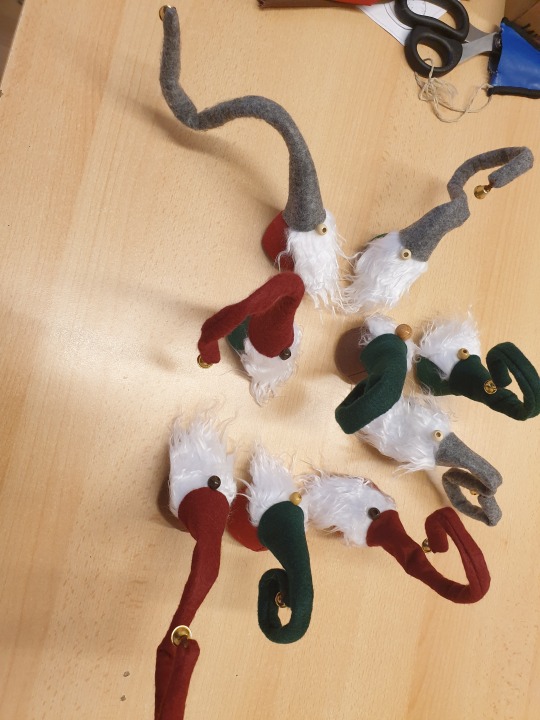
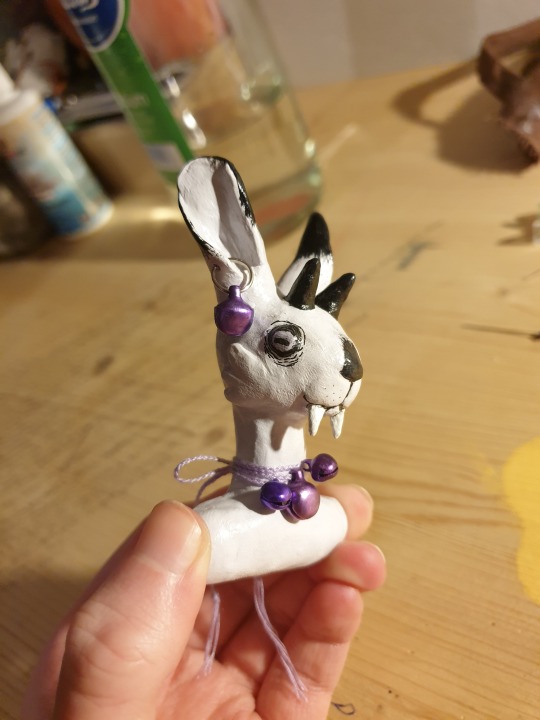
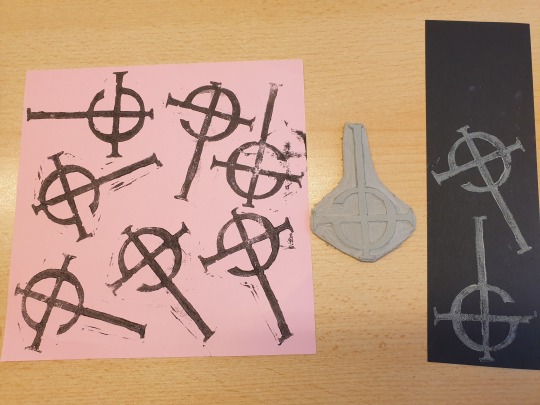
i havent really been drawing at all for a bit now, but i have been crafting :)
lots of photos under the cut vvvvv
gnomes:
continued my marionette fursona project from last year:
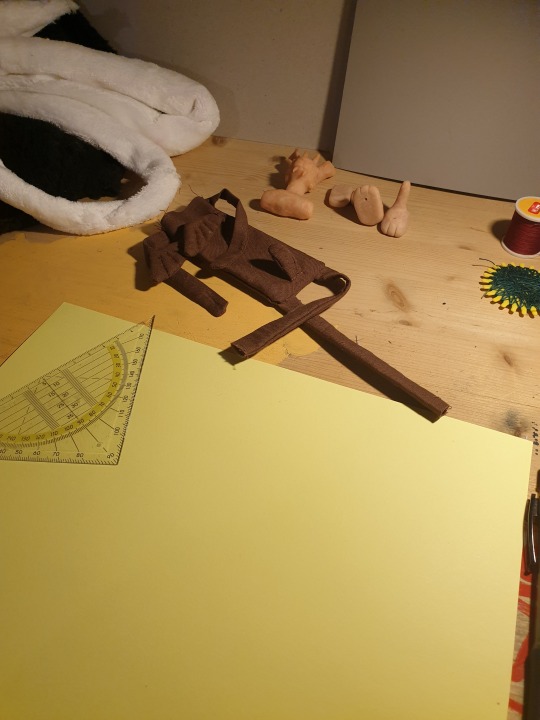
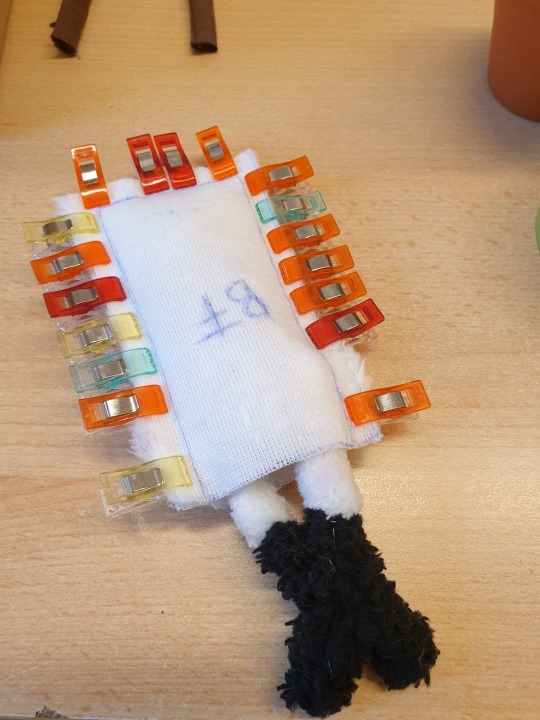
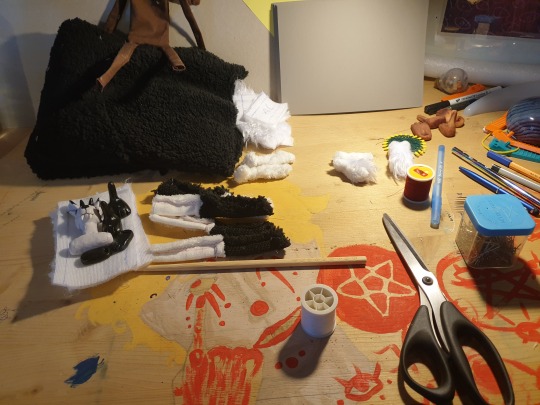
(i still need to make the wooden cross thingy and string the doll up)
linocut:
crochet bunnies:

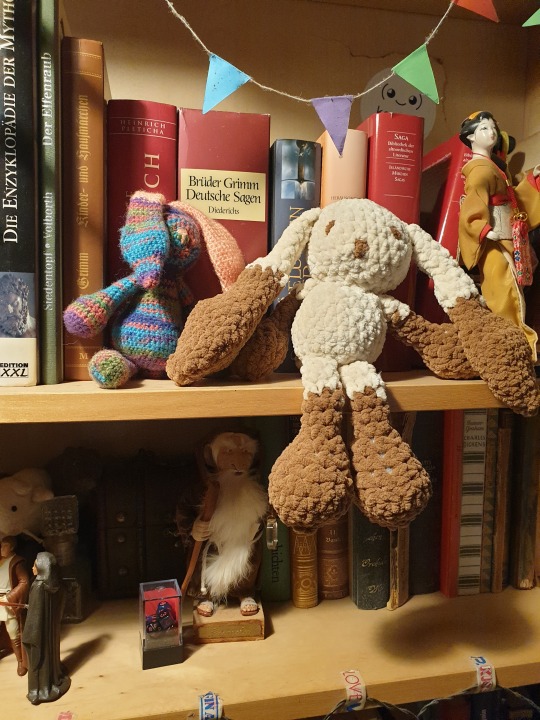
#crafting#crochet#gnomes#bnnuy#fursona#furry sfw#the gnomes were for a christmas market thing and i also made some for my relatives on my mother's side#the marionette doll is hugely inspired/based on/copied from a furry marionette doll that went viral on tiktok last year#since that tiktok furry doesnt/didnt have any sort of tutorial i had to work out alot of the process myself which took a while lol#i also got into ghost last year and finally decided to try a bit of linocut printing/cutting again :)#and a couple of weeks ago i got rly into crocheting and made a bunch of granny square swatches and those two bunnies#i also wanna make a granny square blanket but i havent decided on a design yet since there are alot of granny square designs i wanna make#but they dont all fit together thematically#so instead of making a decision i made the two bunnies#the smaller one was the first one and i ran out of the multicolored sock yarn towards the end as you can see lol#the second bunny i made with much larger yarn than what they used in the pattern and if id had followed the pattern i dont think id have ha#enough yarn and i didnt wanna buy more yarn for just the bunny so i tried downsizing the pattern#which is probably part of why it looks quite wonky#other than my less than stellar sewing job lol#tbh amigurumi type patterns are more boring than granny squares in terms of stitch variety (so. many. single crochets.)#but there are more full amigurumi type projects i wanna do compared to granny square projects since im not interested in anything made of#granny squares other than like blankets#and a whole blanket of a decent size is also alot of yarn#and i dont wanna use scratchy but cheap acrylic yarn for a blanket so my color options are currently a bit limited since i dont wanna buy#any online (atleast for now)#anyways i also made some cardweaving patterns for bookmark ribbons for fanfic bookbinding but im rly procrastinating that#im just not rly ready yet for the frustrations that i had with cardweaving a year ago
2 notes
·
View notes
Text
me: I need art tips please
friend: just practice
me:
me: practice what, exactly?
#like#If someone asked for crochet help I wouldn’t be like ‘just practice :]’ I’d be like ‘here’s the tutorial for beginners that helped me!’ Or#‘Here’s videos on basic stitches’ or ‘yarn first then get the hook that goes with it’
8 notes
·
View notes
Text
2 notes
·
View notes
Text
NEW Bean Stitch Corner to Corner C2C Stitch
Looking for a stitch that looks like a bubble wrap? The Bean Stitch Corner to Corner feels just like it. The stitch that Mikey has developed creates thick beans between the gridwork of the corner-to-corner concept.
The bean stitch used has 5 steps, but you can reduce your bean stitch that is talked about in the tutorial not to be as thick. Once you get this concept, making the beans is pretty…

View On WordPress
#4 Yarn#Bean Stitch#Bean Stitch C2C#Bean Stitch Corner to Corner#C2C#Corner to Corner#Crochet Bean Stitch#Crochet Blanket#Crochet Throw#Crochet Tutorial#intermediate
15 notes
·
View notes
Last Seen Blogs

baldguy50
Untitled

cascadeofdreams
As Night Cascades ...
Stars & Lights Ascend

curosoplumbing
Curoso Plumbing Services

lozriftsintime
Rifts in Time
k00269440
Roisin Lawlor