#click or enlarge for high quality
Text

37 notes
·
View notes
Note
Every once in a while, I reread one of your stories and I can’t help but check your website for any updates for One Day 😇 Just curious: are you still working on it? No pressure whatsoever of course!! I love the way you portray Carlisle in that fic & am already super thankful for those first 8 or so chapters! Anyways, hope you are doing well & thanks for providing us with so many high-quality fics!
- Sannehale
Ah, this ask made my year. (Also now I realize your two blog names. Sneaky!)
Yes., yes I am. It was actually open on my laptop even as this ask came in. My prereader is asking about it too--I stopped giving her chapters because I was realizing that I got a lot of enjoyment out of sending them to her and that was filling enough void that it cut off my writing mojo. I'm thrilled though, that she can't see where it's going.
I'm stuck on chapter 16 (of likely 23-25) at the moment because a whole bunch of dominos have to fall in order to get to several reveals that are going to happen in very fast succession to move the story out of the second act. Also the second act/B story was hard because I am not a romance writer! 😆 It's not the genre I read and I'm not very good at writing it, but the middle of this story called for a romance and so there is one. Or so I hope.
I've also gone back and shored up some things that needed shoring--introduced a few of the characters who turned out to be important earlier on, and added another character in Bella's research mentor, Amy Jackson. I'm worried that I'm under-utilizing her at the moment.
This ask, though, prompted me to back out to the card view in the Scrivener project and I realize I actually did leave myself the breadcrumbs necessary to get myself out of here. Maybe I'll put my shoulder to the wheel and see what happens if I just follow the outline I laid out.
Anyway. I feel like I shouldn't end an ask without giving a little bit of some of the over 40,000 words that are written and not posted. So here's a tiny bit. This actually may not stay in, and in any event doesn't spoil anything--it's also the headcanon behind this chapter of Montage, though this scene was written years ago and my headcanon about Carlisle's name and his parents' names goes back over fifteen years now.
Of course, I knew a lot more than most people who were hunting down a relative from the 1600s. I clicked on the link for church records, and then delimited my search. If Carlisle was 367, that put him in 1644. That seemed reasonable. I filtered the results by the location, London, and then 1640 to 1650.
CULLEN, I typed. CARLISLE.
Zero hits. I frowned at my screen for a long moment and then practically slapped myself in the head. Of course there were no hits for Carlisle Cullen. Wasn’t this the very thing we’d been arguing about for months, now? I backspaced over the first name, and changed it to WILLIAM.
There were only three hits. Astonishing. I had assumed that Carlisle would have done his due diligence. He’d had hundreds of years to track this information down—why hadn’t he? William Cullen number one was in the baptismal records of St. Luke’s Catholic Church. He had been baptized in 1642. That would make him nearly the same age as Carlisle, no luck there. William Cullen number two, however, was on over seventy pages of documents—the records of St. James Aldgate, listed as parish pastor. And William Cullen number three almost caused my heart to stop.
Born 17 February 1644. Died 8 August 1667.
Twenty-three years old.
My heart, pounding, I clicked on the church register, enlarging it so that it filled my screen. The handwriting was old, faded and pixelated, but it was tidy and easy to read. Carlisle Cullen, it read, with William crammed onto the line before the first name, in the same handwriting but obviously a different pen—the lines were narrower, slanted slightly differently. Born and baptized on February 17, 1644. Father, William Cullen number 2. And mother…
My heart sped. There, in the same scrawly hand—his father’s hand, I realized, it must be—was written the words, Sarah Cullen (Crawforth).
A quick “Open in New Tab” allowed me to pull all the records from the 1600s from St. James Aldgate and in five minutes, I had a birth date of November 15, 1620. And a death date, which was of course expected, of February 17, 1644. But it was the annotation here which was breathtaking—in a different handwriting, written by the midwife? Some other member of the parish?
Died babe in arms.
Tears sprang to my eyes, and with blurry vision, on a hunch, I ran one last search. Then I printed the pages with the documents, shoved them in a folder, and headed for my car.
10 notes
·
View notes
Photo

HOW TO: Make an Animated Sound Wave Overlay
In this tutorial, I’ll show you a quick and easy way to get this animated sound wave effect that’s unique to any song you choose! (You can check out a similar effect in my Obi-Wan Kenobi and Miles Morales gifsets too.) Disclaimer: This tutorial assumes you have a basic understanding of gif-making in Photoshop.
PHASE 1: Make Sound Waves Using VEED.IO
You can do this using several methods like downloading sound wave videos on YouTube and making them into gifs (which I’ve done before too!). But I’m going to show you how to make sound waves specific to the song of your choice using a free site called VEED.IO
1.1 – Upload a YouTube link of your song to VEED.IO
Open VEED.IO and click Choose Video! Try to find a studio recording if you can, instead of a clip of the film/tv scene which might have distracting background audio that could influence the sound waves.


UPDATE 09/17/23: At the time of writing this tutorial, VEED.IO allowed you to upload a YouTube link directly. However, I’ve been made aware that this doesn’t always work with the new version of VEED.IO. As an alternative, you can instead download the YouTube video using any video downloader and use the “Upload a File” method instead!
1.2 – Make the video a black screen.
If the video you used isn’t already fully black, click on your media in the timeline and toggle over to the Adjust tab. Pull the Brightness slider all the way down to -100 until the screen is completely black. This black background is key to getting a seamless blend on your gif later!

1.3 – Insert sound waves.
Click Elements in the left sidebar and navigate to Sound Waves. Select any sound wave design you prefer! I like the vertical, rounded orange bars. Don’t worry about the color when you choose, we’re going to change it to white later!

1.4 – Trim your audio clip.
It’ll depend on the amount of frames in your gif, but you shouldn’t need more than 10 seconds of your song. You can choose to trim based on the scene of your gif, the lyrics you’re going to type on the gif, or even just choose a section where the music goes wild and the sound waves move a lot. In this Max gif, I took a clip toward the end where the lyrics are: “I’d be running up that road, running up that hill, with no problems” because it matched the main clip I giffed.
Use the white parallel lines to drag the clip where you want it to start and end:

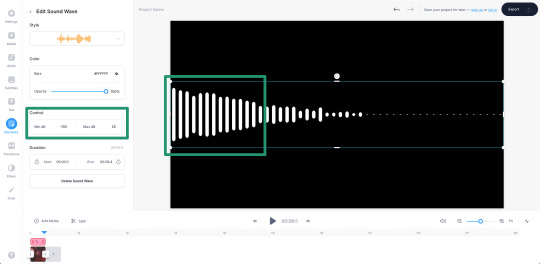
1.5 – Adjust the audio decibel controls.
(Disclaimer: As with most things, I know almost nothing about what I’m doing here. 🤡) I just know that I don’t want the bars of my sound wave to be clipped like they are below, so I have to change the decibel range so the loudest part of my audio doesn’t go “outside the lines.”
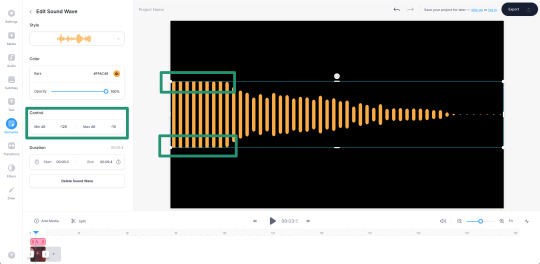
I changed my minimum to -100 and my maximum to 25:
1.6 – Make your sound wave white.
Still in the Edit Sound Wave window, change the color of the bars to white. It doesn’t matter what color you want your sound wave to be in your final gif — we’ll change it later! White is the best base for any color, especially if you want the gradient/exclusion effect in the overlay.

1.7 – Resize the sound wave to your liking.
Use the corner sliders to enlarge the sound waves. I always prefer making a big gif smaller than trying to make a small gif bigger (and grappling with a low quality image). So I like to resize my sound wave as big as possible, cutting out any bars that don’t move so I can have a high-quality animation in the end. :)

1.8 – Export as a gif.
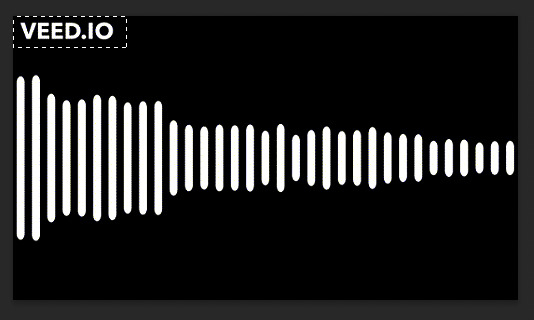
One of the most convenient things about VEED.IO is that you can export the sound wave as a GIF! So you don’t have to screencap it yourself. Click the export button in the top right corner, select Export Video, and then download it as a GIF.


And here’s the sound wave gif I got:

Don’t worry about the watermark, we’ll take care of that in Phase 2. :)
PHASE 2: Overlay Sound Waves On Your Gif
Note: I’ll be working in Video Timeline for the most part of this section! If you want to see my process in Video Timeline, here’s my step-by-step gif-making tutorial.
2.1 – Make your base gif.
This is all up to you and your style! I like to make my sound wave gifs color-focused and I think blending adds a nice touch. Also, my gif is 540x540px.
Now, one of the most important things to remember is this: make sure your frame delay starts out at 0.05 seconds, even if you work in Video Timeline like me. This is crucial to make sure you don’t get duplicate frames when adding the sound wave gif.
2.2 – Import your sound wave gif.
Create a new file by opening the gif you exported from VEED.IO. Change the gif’s frame delay to 0.05. This is to match the base gif so that when you convert to Timeline, you don’t get duplicate frames! (Note: I also deleted the first frame of mine because all of the waves weren’t moving.)
2.3 – Resize the VEED.IO gif and convert to Video Timeline.
For my gif, I resized the sound waves to 505px width and then I used the Sharper action in this action pack to convert to Video Timeline. (You can read more about how I use these actions in the gif tutorial I linked above!) You can also remove the sharpen filters if you feel you don’t need them!
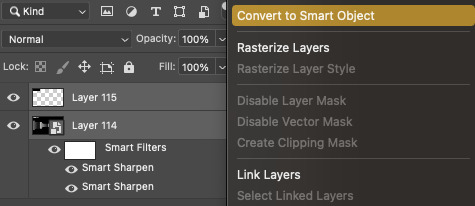
2.4 – Hide the watermark.
Create a layer on top of the gif layer and use the Marquee tool to make a box around the watermark. Use the Paint Bucket tool to fill that box with black so the watermark disappears.
Select both layers (the black box layer and your gif layer), right-click, and select Convert to Smart Object to merge the layers together.
2.5 – Drag/duplicate the sound wave gif over to your base gif.
Either click and drag the sound wave layer into the tab with your base gif OR right-click the layer, select Duplicate Layer, and choose the document you want to paste the gif to! Make sure the sound wave layer is above your base gif!
2.6 – *OPTIONAL* Create a music player overlay.
This is just a style I came up with because I’m currently obsessed with rounded shapes. But you don’t need to have the semi-circle music player for the sound waves! I just like how it looks. For my design, I just made a white ellipse, created my own shapes for the play and skip buttons and masked them out, set the blending mode to difference, and added a gradient overlay.
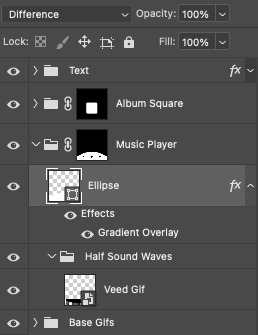
I won’t go into my design in a lot of detail here because this is a style choice that’ll be unique to how you want your gifs to look. Plus, this is just a tutorial on how to make animated sound waves. But if you have specific questions about my gif style for these kinds of sets, feel free to ask me at my main @sith-maul :)
2.7 – Set the blend modes.
Put your sound wave gif in a folder and set the folder’s blend mode to Exclusion. Put that folder inside another folder, and set this folder’s blend mode to Pass Through (it should do this by default). Here’s a screenshot that hopefully explains this clearer:

Now, your sound waves should have gone from looking like this:

To this:

You can totally stop here if you like this look! But I want my sound waves’ color to match the rest of my gif, so...
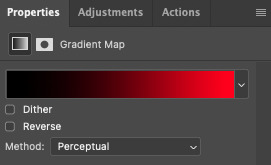
2.8 – Add a gradient map.
Within the sound wave gif folder (the one set to Exclusion), add a Gradient Map layer above the sound wave gif:

I recommend going for a Black to Color gradient because the black will help the background of the sound waves stay dark and fully blended with the rest of your gif. I went with this Black to Red gradient:
Now my sound wave gif looks like this:

But I don’t like how there’s now some cyan peeking through where the bars touch the lighter gray parts of my gif. So, let’s add one more adjustment layer.
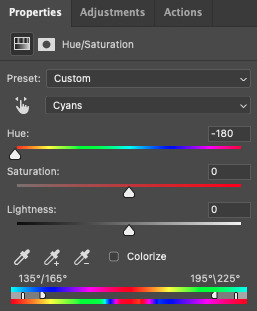
2.9 – Add a Hue/Saturation layer.
In the outer folder (the one set to Pass Through), add a Hue/Saturation layer so it’s above the other Exclusion folder:

Decide what color you want to get rid of (in my case, cyan), go to that color channel, and adjust the hue slider until that color matches your main color as best as possible!
PHASE 3: Export Your Gif!
As always, when you convert your gif back to frames, do a quick double-check that you didn’t end up with any duplicate frames before saving your gif. Again, you can read more about how I do these steps in my gif tutorial here.
Finally, with just a little extra nudging layers around, my gif looks like this now:

Of course, for my actual gif, I created a music player design — so I decided to only use the upper half of my sound waves to fit inside the half circle.
I’m sure you know how I did this already, but in case you don’t, just move the sound wave gif down the canvas to your liking until only half of the waves are visible! I like using this method where my sound wave gif is under a gradient overlay because of how dark it makes the sound wave bars and how I don’t have to get rid of any cyan colors:

But that’s it! I hope you found this tutorial helpful and easy to follow! If you have any questions, my main inbox is open @sith-maul. If you decide to try out this effect, feel free to tag me with #usernik or tag us with #usergif ! Thanks for reading :)
#gif tutorial#completeresources#userkosmos#usershreyu#uservalentina#useralison#usernums#tuserkay#usercim#userannalise#useryoshi#userelio#tuserabbie#uservivaldi#userstar#usernorah#usersole#*usergif#*tutorial#by nik#stranger things spoilers#flashing gif
448 notes
·
View notes
Text
Neteyam High Quality photos

Neteyam 🏹
a collection of Neteyam HD and 4k photos
Avatar The Way of Water
you can view more images in my masterlist
"=⌕ Click on images to enlarge ꒱


#neteyam#neteyam sully#awow#avatar the way of water#avatar 2#avatar james cameron#avatar 4k#neteyam 4k#neteyam hd#avatar hd#omaticaya#awa'atlu
46 notes
·
View notes
Text
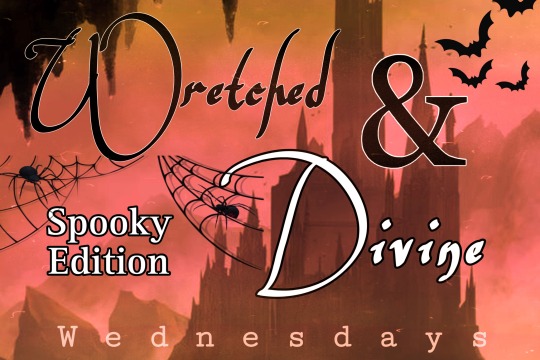
In Every Universe: Caught

Spooky season is the perfect time to announce a lil mini series I’m doing with my OCs where I draw them in different AUs ☺️
First up:
Rishida in this cute mermaid AU with a twist. The fisherman goes out hunting, but is caught instead…very similar to the real thing right? 🫢😉
Hope you like it! Please click to enlarge image…Tumblr quality is the worst 😑

Tag List: @littleturtle95 @magnus-the-maqnificent @elettralightwood @high-warlock-of-brooklyn @my-archerboy @sassybookworm2020 @khaleesiofalicante @radisv @raziyekroos @spotsandclawsthings
#can you guess what fish I used as inspiration for Ishida#my art#wretched and divine wednesdays#rishida#ryuji zenko#ishida tetsui#emsart
23 notes
·
View notes
Note
hi joan i would love if you could talk about espresso clarity more!! or like more in general what you look for in an espresso calibration/dial in THANKS!!!!!!
Simplist answer I can give:
Espresso clarity is more than anything else a way to talk about the detectable flavours in a beverage. High clarity means that you can taste more nuanced flavours, like blueberry and milk chocolate for example, while a lower clarity drink would just taste muddled/muddy and indistinct. You will get higher clarity by reducing the amount of solids in your coffee by either filtering more out or increasing the ratio of water to coffee used to dilute what you've already pulled out.
Now here's some more detailed information, it will probably only make sense if you have some experience with dialling in coffee already and know what changing grind size and ratios do:
Clarity is something often put on charts like these ones as an opposite to body (as in thickness of the beverage)
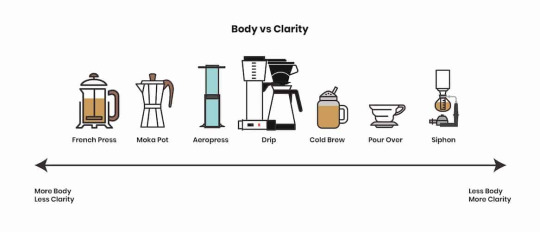
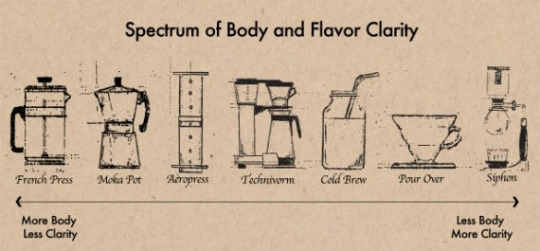

While I dont think that's a perfect summation (and that also these charts are out of order over simplifications that don't actually really make any sense) I think it's fair to say that most often when making a coffee drink, you are probably going to be choosing to lean towards one end or the other.
To illustrate that, here's a quick chart I made that focuses on 1. grind size, and 2. filtration (click to enlarge):

This ignores a lot of other important parts of making coffee (agitation, contact time, temperature, pressure applied, immersion vs percolation, yadda yadda yadda), but for our purposes it gives a smaller window to put our expectations into. If we're talking strictly about espresso it means we're sitting somewhere in here:

We know espresso has some filtration due to the metal basket trapping most (but not all) of the coffee grinds in the portafilter, but because of the tiny holes it will likely never be as clear as a coffee filtered through a paper filter which catches all of the grounds except what has literally been dissolved into the water, creating the flavour and colour of the final brew (if you want to understand more about that google "coffee TDS", its a lot to explain on top of this).
With this expectation of flavour clarity and body we can now get to work dialling in and figure out exactly how we want to balance the two.
My preference generally is a shot that sits at or around a ratio of 2.5:1 water in the final cup to the amount of coffee in the portafilter, so a pretty standard shot would be something like 17.5g dry coffee in, 44g liquid espresso out (in about 30s). I know this recipe will probably be decently high clarity, while lighter in body than a traditional 2:1 because the extra water dilutes the amount of solids that have been dissolved into the liquid, meaning I will have a thinner body coffee, while hopefully being able to get a higher clarity of flavour.
If it tastes sour and strong, like all I experience is a gross, sharp flavour on my tongue, and there's no distinctly pleasant flavours present, I would want to improve the clarity by either increasing the ratio of water to coffee or by fining up my grind to pull more out of the beans.
If it tastes somewhat clear at the beginning, but its super limp and weak and leaves a bitter, chalky taste in my mouth, I would want to do the opposite of above.
Either way im aiming to move out of the fringes of gross coffee and into the central sweet spot. Its also never this simple though, and you have to make sure you're using the right water makeup, a good quality grinder, consistent measurement and techniques, all that jazz.
I also find compass tools to be very helpful for finding a more basic dial, not specifically trying to accentuate anything in the coffee but just to get a good, sweet shot, with a healthy mixture of body and clarity.
These are my two favourites to glance at when I forget what I'm trying to do:
please let me know if you have any questions this is honestly kind of a ramble but I'm hapy to go into detail about anything specific that's confusing this post is just getting very long lol
78 notes
·
View notes
Text
Dearest Tumblr…
Now what the funk have you done?
I know you need to make money and pay bills, I appreciate that, but it seems to me you could save a fortune by simply not paying people to constantly ruin this place!!?? Just a thought.
I love that you’re “working hard” on replacing the TumblrMart link back with our own Blog link, but honestly, please just do it already! …(EDIT…I spoke too soon…THANK YOU!!)… It was a most annoying obnoxious and user unfriendly move, and I’d honestly love to see the take up figures on your little anti ergonomic experiment.
And speaking of ergonomics and the user experience, do the people you pay to spoil things actually use this place? What have you done to the Lightbox/viewing experience in the iOS App? What is that?
Where I used to click once to view a post larger/in full quality, I now just get something small and not really enlarged that doesn’t display in high quality.
It is especially terrible on iPad.
Where I used to double click to zoom in/expand I’m now accidentally Liking posts.
Where I used to swipe to close I’m now greeted with a pile of scrolling posts that almost exclusively have no interest to me or any semblance of relevance to what I was just trying to look at.
I won’t look at things just because you want me to. My feed is so long sometimes it takes me half a night just to get to where I left it as it is!
Everything you’re changing at the moment is bad design and bad ergonomics, which is bad for the user and their experience.
If some things now take several/extra unnecessary clicks to achieve what was once possible in one then that’s not progress or improvement, that is just a negative impact on the user experience.
So guess what, if we don’t like something, or if something gets harder, we tend not to use it as much, and as far as I’m aware, all you have is your users, and if we use this place less often, that can lead to not using it at all way quicker than if you hadn’t changed something for the sake of changing something, or trying to copy someone else.
We are here because we like Tumblr. We are not here because we hope you become just like the places that we aren’t using.
Please don’t make this horrid little new Lightbox feature permanent.
Loves ya though, despite myself X
11 notes
·
View notes
Note
hiya if you have a spare minute could you maybe do a quick summary on the process you use to make gaming gifs? 😭 i cant seem to get the capturing and frame rates right when im trying to make them and yours are so smooth and pretty and some of my fave!! no pressure at all if you dont have the time or dont want to then please feel free to just ignore this!!! 🧡
hey hey! first of, thank you so much!! i'll quickly walk you through my process!
Making gaming gifs - from PS5 (or PS4)
I'm not sure what platform you're on, I'll be showing you how I capture footage on my Playstation 5 (PS4 is kind of similar!) and how I transfer it to Photoshop on my PC - after that I'd refer you to one of the many gif tutorials on this website!
This first section is about capturing footage on PS5. If you're on a different platform, I'm not sure what the best way of recording is, on PC i usually use the built-in xbox game bar screen recorder (windows button + alt + R). I'll be telling you step-by-step what I do from gameplay to a finished gif, so whatever you already know you can just skip.
Firstly, take a look at the settings on your PS5. Specifically, the Captures & Broadcast settings. Mine are like this:

(Click to enlarge images!) If you have a 4k tv, you can also record games in 4k - I do not, I make do with 1080p, which is fine imo! (this specific method on PS4 will give you 720p footage, which is still ok but gifs won't be as crisp)
To record on your Playstation, use the share button:

On both PS4 and PS5 you can choose to save the last seconds/minutes as a video (depending on your settings), on PS5 you can also start a recording using this button. I usually press this right at the beginning of a cutscene, and then again when it ends, to perfectly fit a cutscene in one video file. After doing this, go to the Media Gallery on your home screen:

If you're not familiar with it, this where you will find all your clips and screenshots! At this point, make sure to have a USB drive with plenty of space, because that's what we're using to transfer the files to PC. You can also upload clips straight to youtube for example, but it does diminish the video quality quite a bit in my experience. Once you find the footage you want to transfer, click 'Select Multiple':

And then select all the clips/screenshots you want, and then press '...' and then 'Copy to USB Drive':

Then your PS5 will copy the selected files to your USB drive! This allows you to get your footage in the best possible quality.
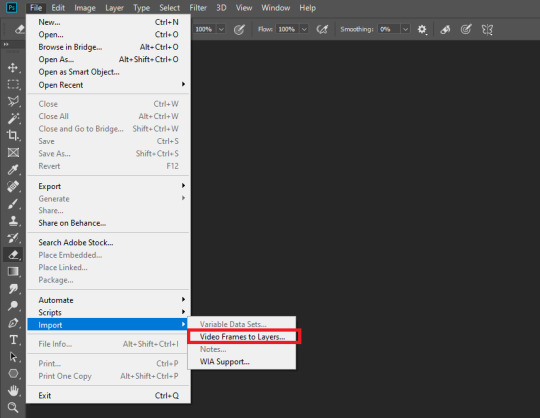
As long as the game your record is running at 60fps, you should be getting 60fps clips as well. Once you insert the USB drive in your PC, you can start importing files into Photoshop using File -> Import -> Video Frames to Layers to import every frame as a layer. From here the process is the same as importing any other video file (TV, movie, etc.)
Then, select the part of the video you want to make a gif of by adjusting the sliders:

and press OK. For the smoothest gif, do not tick 'Limit To Every ... Frames', because that will make Photoshop skip frames.
After this, you can do all your coloring and such - plenty of tutorials on that on Tumblr and I'm also always urging people to try out the many options for themselves - but the last part I want to touch on for you is the framerates. After inserting this video file, the Frame Animation framerate is 0,02 seconds per frame:

Generally when you make a gif, you end up sharpening it using the Timeline and saving it. What I usually do is save the gif (File -> (Export ->) Save For Web), then open in again in Photoshop, and change the framerate there. The nicest looking framerate depends on the footage, and, of course your own taste. This is my gif right after sharpening and saving (this is 0,03s per frame):

This is a high framerate, which looks okay for this gif because there isn't a lot of movement. For 60fps footage like this, I recommend setting the framerate to 0,04s, so open the gif again and change it on every frame by pressing the option I highlighted below, and pressing 'Other':

And then set the frame delay to 0,04s. That's the setting I usually use, while for 30fps footage I set the delay to 0,05s. But, again, it might depend on the footage which looks best. This is the same gif with a 0,04s frame delay:
To illustrate the point of it depending on footage even more, I'll show you a gif with more movement with frame delays of 0,03s and 0,04s respectively, which hopefully shows you the difference quite clearly (I have to add to this that the speeds tend to look quite different on mobile and PC. 0,03s delay looks fine to me on PC, but way too fast on mobile):

That is basically it for my process. As for your specific problems, if you use this capture method and the same options in Photoshop, you should be getting a pretty smooth gif. I hope there is some info in here that helps, if you have any other questions I'd be happy to help, but I think the most important things are using high framerate footage, importing these into Photoshop as layers and saving them for web correctly! 💗
7 notes
·
View notes
Text

i missed him
35 notes
·
View notes
Text
Eli Lilly’s $5.3B Boost for Mounjaro, Zepbound Supply

Eli Lilly has announced a monumental investment of $5.3 billion to expand manufacturing capabilities at its Lebanon, Indiana, site. This substantial investment, which more than doubles their prior commitment of $3.7 billion, brings the total investment to an impressive $9 billion. The expansion aims to address the overwhelming demand and current supply shortage of Mounjaro and Zepbound, as documented in the FDA’s drug shortage database. According to CEO David Ricks, this move signifies the largest manufacturing investment in synthetic medicine API in U.S. history, geared to significantly increase the supply of these vital, tirzepatide-based drugs. Furthermore, the project promises job creation, adding around 200 new positions and generating over 5,000 construction jobs, fortifying the regional economy.
Key Takeaways
Eli Lilly’s enlargement of the Indiana manufacturing site involves a $5.3 billion investment.
The overall investment in the site now totals $9 billion.
This expansion addresses the high demand and present shortage of Mounjaro and Zepbound.
Enhanced efficiency, safety, and quality control through advanced technologies and automation.
Creation of around 200 new jobs and more than 5,000 construction jobs expected.
To Read More >>> Click Here
Reference Links:


#news#gold#silver#trendtracker360#stock market#eli lilly#mounjaro#zepbound#corporate investments#investing stocks#drug manufacturing#healthcare#indiana plant#investment news#pharmaceutical
0 notes
Text
what is ISO Certification in Cyprus|ISO 9001|ISO 14001|ISO 45001

ISO Certification in Cyprus
ISO Certification in Cyprus ISO (International Organization for Standardization) is an independent body bent to enlarge requirements for ensuring the exquisite, safe, and standard overall performance of the goods or services supplied with the aid of your groups or corporations. ISO Certification in Cyprus Is completed so you can certify your corporations or groups with the famous ISO Certification in Cyprus, which is well-known for assuring powerful and inexperienced products or services. Nowadays, achieving ISO Certification in Cyprus is a minor deal; it can be achieved with a few clicks on the net. If you want to get certified, select Online ISO Certification in Cyprus.
ISO Certification and its gain
International Organization for Standardization(ISO) Certification can take your employer from one diploma to three exceptional ones by enhancing the overall performance of your strategies.
It lets you reduce painting-related risks and environmental threats in your business enterprise.
It puts an emphasis on balancing the power and encourages saving in the agency.
It helps to meet and fulfil all the requirements of the clients.
It continues environmental, fitness, and safety measures within the companies.
It permits to offer a foundation for the powerful and inexperienced shipping of products and services.
ISO 9001 Certification in Cyprus
Quality is the handiest thriller recipe for the success of any enterprise. With ISO Certification in Cyprus, the global high-quality practices for putting in an excellent control tool to your agency and making specific the superb of your product and techniques are implemented.
ISO 14001 Certification in Cyprus
A healthy environment is essential to a sustainable destiny. With ISO Certification in Cyprus, businesses can enforce environmental management structures and ensure a powerful interaction between commercial agency organizations’ sports activities and the environment.
ISO 45001 Certification in Cyprus
Your commercial enterprise company can take advantage of heights even as your workforce is average. With ISO Certification in Cyprus, enforce occupational fitness and safety management structures (OHSMS) ISO 45001 for your organization and ensure the protection and fitness of your body of people in the direction of any painting-associated injuries or contamination.
ISO 27001 Certification in Cyprus
CeSecuringon, securing our statistics will become fair in the age of digitalization. Any breach or loss of records has big implications for privacy and national safety. With ISO Certification in Cyprus, implementation placed into impact statistics safety control prevents and saves you the misuse of statistics.
ISO 13485 Certification in Cyprus
ISO Certification in Cyprus offers a framework for implementing a splendid manipulation system for scientific devices. It ensures consistency within the splendid right from manufacturing to transportation, garage, and retail of scientific gadgets.
ISO 22000 Certification in Cyprus
The top-notch safety of the meals we consume is vital for our fitness. For any food supply chain organization, ISO Certification in Cyprus holds enormous significance. It may be used by producers, manufacturers, companies, storage facilities, shops, or perhaps restaurant owners to ensure that clients can devour the food regularly.
CE Mark
CE Mark is undoubtedly a massive certification frame. He shows conformity with health, protection, and environmental protection for gadgets, services, and minds artificial or produced, designed, packed, and furnished in the inner territory of the EEA (European Economic Area). Though com, panties beyond the vicinity of the European Union also can accumulate the mark. However, it’s miles compulsory for the goods provided within the European Union, as laid out in 25 directive necessities.
CE mark is apt for electric devices. The electric-powered device furnished within the UK and Europe can accomplish CE Marking following the Low-Voltage Directive. Since 1997, electric machines ought to be CE-marked to flow in the European market.
CE mark for scientific gadgets is a statement through the manufacturer that the device meets the regulatory necessities. The product has been synthetic, proudly owning competencies of reliability and self-assurance—the favoured claims to fulfil all the requirements of European Medical Devices Directives. SIS Certifications work licitly to deliver the super consequences globally. We at SIS offer one of excellent services for CE marking and loads of various certifications.
We gather talents such as reliability, overall performance, and coherence. For the accreditation of CE Mark in Cyprus, contact our income or an organization.
Conclusion:
Embarking on the path to ISO Certification in Cyprus requires dedication and resources, but the long-term benefits far outweigh the initial investment. By prioritizing quality, safety, and environmental responsibility, you build trust with stakeholders and pave the way for sustainable growth and success in the vibrant Cypriot market. Take the first step today and construct a future of excellence for your organization.
Why Factocert for ISO Certification in Cyprus
We provide the best ISO consultants in Cyprus, Who are very knowledgeable and provide the best solution. And to know how to get ISO certification in Cyprus. Kindly reach us at [email protected]. ISO Certification consultants work according to ISO standards and help organizations implement ISO certification in Cyprus with proper documentation.
For More Information Visit: ISO Certification in Cyprus
RELATED LINKS
ISO Certification in Cyprus
ISO 9001 Certification in Cyprus
ISO 14001 Certification in Cyprus
ISO 22000 Certification in Cyprus
ISO 27001 Certification in Cyprus
ISO 45001 Certification in Cyprus
ISO 13485 Certification in Cyprus
CE MARK in Cyprus
0 notes
Text
Ronal High Quality photos

Ronal 🌊
a collection of Ronal HD and 4k photos
Avatar The Way of Water
as always, this will be updated when I get more pictures
you can view more images in my masterlist
"=⌕ Click on images to enlarge ꒱


#ronal#ronal avatar#awow#avatar the way of water#awa'atlu#avatar 2#avatar james cameron#metkayina#ronal hd#ronal 4k
25 notes
·
View notes
Text
Ultimate Guide on How to Blow Up Pictures For Free in 1 Click!

Some of you may get annoyed when you always get blurry images when enlarging them in some image editors. Now, this guide is going to introduce you ways to blow up images without quality loss! Actually, when AI-powered tools are occupying the market at an amazing speed, it no longer is a trouble to get high-quality image outputs even if you need to enlarge your images to a much larger resolution.
Now, let's just dive in and get some practical guides that can significantly help you blow up images and greatly enhance the visual impact of your work.
What Does It Mean to Blow Up A Picture?
To blow up a picture refers to the process of enlarging an image to a larger size than its original one. This is a frequent demand that many of you probably meet in daily life. For example, some of you need to blow up banner images to make your marketing materials suitable to be uploaded on different platforms to boost sales; while others may want to resize the images to make them look more attractive and get more views while uploading to social media platforms. However, blowing up a picture can mean a quality loss in the past days and you may get blurry outputs. That's also why so many users are trying to do it with image upscaling at the same time in order to maintain good image quality.
Best Practice to Blow Up Images - iFoto Photo Enhancer
If you wish to maintain lossless quality while blowing up an image, iFoto Photo Enhancer can definitely be the best option to consider. With the AI techniques integrated in the tool, iFoto Photo Enhancer is able to accurately detect the object details and process image upscaling to achieve a higher resolution (best at 4K) in one shot. No matter for old pictures or those blurry ones you just resize to larger sizes, iFoto Photo Enhancer can guarantee the best enhancing quality to display natural outputs.
Highlights of iFoto Photo Enhancer
- Precise object detection - ensuring the tool can outline object details clearly in order to serve with the best upscaling effect;
- Perfect image refining ability - iFoto Photo Enhancer can smartly deal with image refining according to the surrounding parameters and elements of the images, in order to guarantee natural outputs.
- Fast resolving speed - to improve image resolving efficiency, iFoto Photo Enhancer is embedded with multi-core acceleration techniques to blow up images in batches for you. It only takes seconds to complete a batch of image upscaling at once at a pretty quick speed!
- 100% secure platform - iFoto Photo Enhancer is developed with encryption techniques to enhance data security. All your uploaded images will not be kept on the server, and there won't be any messy ads bringing in malicious viruses, malware at all.
- Cross-platform supported - the image upscaler is equipped with an online service and also iOS, Android versions, availing users of different device systems to blow up images efficiently.
Step-by-step Guide to Blow Up A Picture Online via iFoto Photo Enhancer
Also designed with an intuitive interface, iFoto Photo Enhancer only takes you several taps to blow up images at lossless quality online. Now, walk through the steps below and learn how to use it effortlessly:
Step 1. In a web browser, go to iFoto Photo Enhancer
Step 2. Click on the Enhance Photo Now button to select or directly drag and drop the picture you want to blow up to the online tool.
Step 3. Once uploaded, select size and confirm blow it up by clicking on the Upscale button.
NOTE: You can further adjust the image effects with iFoto's other provided image editing functions as well.
Step 4. Finally, simply click on Download to get the upscaled image saved on your computer again.

Extra Tip: How to Blow Up A Specific Part of A Picture?
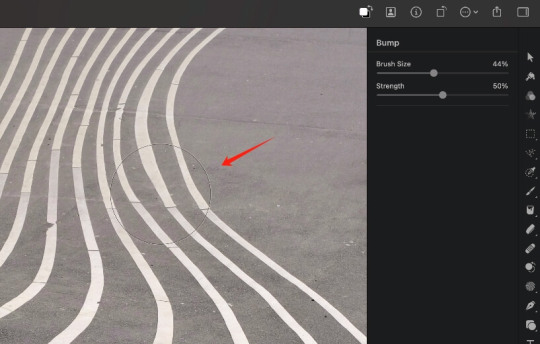
If you only want to blow up a specific part of a picture but not an entire one, another helpful program can definitely meet your demand - which is Pixelmator Pro.
This professional image editor is developed with a "Bump" tool, which mainly performs to move the central areas away toward the edges of the brush, so that make the object larger easily. Now, you can follow the steps below to blow up only parts of an image with the help of Pixelmator Pro:
Step 1. Open Pixelmator Pro and import the image to the program.
Step 2. You need to go to Tools > Reshape to find the Bump tool.
Step 3. Customize the Brush Size and also Strength according to your demands.
Step 4. Now, move the brush to the object you want to blow up. Hold it and then drag the area, and you can successfully enlarge it without hassle.
Final Words
If you are still getting annoyed by the blurry outcomes while trying to blow up images for any purpose, iFoto Photo Enhancer can definitely be the best helper to overcome this obstacle and bring you perfect high-quality image outputs without sacrificing quality at all. Its advanced AI algorithms have ensured efficient and have been tested for thousands of practices to guarantee the best output condition. In addition, it is a 100% secure platform you can trust and use without worrying about data disclosure. iFoto Photo Enhancer is also free to get started! Now, navigate to the tool and blow up your images in a cost-free and quick way!
Read the full article
0 notes
Text
Supporting Prostate Health with Prostadine
I used the Prostadine supplements for several weeks, and I am pleased to share my experience with this exceptional product. As someone who values maintaining optimal prostate health, I was drawn to Prostadine for its promises of supporting prostate function and relieving urinary symptoms. After incorporating it into my daily routine, I can confidently say that it has become an essential part of my health regimen, offering a range of benefits that have improved my overall well-being. click here
Promotes Prostate Health
One of the standout benefits of Prostadine is its ability to promote prostate health. The carefully selected blend of natural ingredients in this supplement works synergistically to support prostate function and reduce inflammation. Since starting on Prostadine, I've noticed a significant improvement in my urinary symptoms, including reduced frequency and urgency. I no longer experience the discomfort and inconvenience that often accompanies prostate issues, allowing me to enjoy a better quality of life.
Relieves Urinary Symptoms
Urinary symptoms associated with prostate enlargement can have a significant impact on daily life, affecting everything from sleep to social activities. That's why I was delighted to discover that Prostadine effectively relieves urinary symptoms, providing much-needed relief and comfort. The combination of herbal extracts and antioxidants in this supplement helps reduce inflammation and improve bladder control, resulting in fewer trips to the bathroom and better sleep quality. Prostadine has truly made a difference in managing my urinary symptoms and restoring normalcy to my life.
Supports Hormonal Balance
Maintaining hormonal balance is crucial for prostate health, especially as we age. Prostadine contains ingredients that help support hormonal balance, including saw palmetto and pumpkin seed extract. These natural compounds work to inhibit the enzyme responsible for converting testosterone into dihydrotestosterone (DHT), a hormone linked to prostate enlargement. By promoting hormonal balance, Prostadine helps reduce the risk of prostate enlargement and supports overall prostate health.
Improves Sexual Function
In addition to its benefits for prostate health, Prostadine also supports sexual function and libido. Many men experience a decline in sexual function as they age, which can have a significant impact on their quality of life and relationships. However, the ingredients in Prostadine help improve blood flow to the genital area, resulting in better erectile function and increased sexual desire. I've noticed a significant improvement in my sexual performance and satisfaction since starting on Prostadine, which has enhanced my overall well-being and confidence.
Natural Ingredients, No Side Effects
One of the things that impressed me most about Prostadine is its natural formulation and lack of side effects. Unlike some prescription medications for prostate health, Prostadine is made from high-quality herbal extracts and botanicals, making it safe for long-term use. I experienced no adverse reactions or unwanted side effects while taking this supplement, which gave me peace of mind knowing that I could support my prostate health without any risks or complications.
Conclusion: A Trusted Solution for Prostate Health
In conclusion, Prostadine has proven to be a trusted solution for supporting prostate health and relieving urinary symptoms. With its natural ingredients, lack of side effects, and impressive results, Prostadine has become an indispensable part of my daily health regimen. Whether you're looking to maintain prostate health or alleviate urinary symptoms, I would highly recommend Prostadine as a safe and effective supplement.
#weight_loss_journey#weightlossmotivation#fitnessgoals#fitfam#fit#livehealthy#loss#mealprep#weight#weights#weightwatchers#healthycoach#healthyfoodadvice#looseweigth#lossingtheweight#personcentredcounselling#weight_loss_diet#weightlosstracker#weightsforweightloss#healthyme#keto_diet#weightlossjournal#weightlossmeals#مايا#accept#weight_loss_tips#weight_losschallenge#weightlossblog#healthynotskinny#eatbetter
0 notes
Text
Generator Installers In South Coast Kzn Supply And Match Home And Commercial Generators
These are just some benefits of getting backup energy at your house or place of business. Get in contact with Solar Power Pros right away, and we’ll put you in touch with a leading generator installer and provider in . All electrical circuits is fitted with inner breakers, additionally the main breaker is on board of the gen set. Auto mains failure panel is Deep Sea Electronics, and is thought for reliability and is consumer friendly. This panel system is programmable to your wants and supports all the necessary wants for gen set monitoring.
They have a noise operation of between 65dB and 84dB with some of them providing an open body design. At Goscor Power Products we offer a spread of reliable and inexpensive inverter turbines from Rato. They are excellent for a wide range of functions, particularly in environments the place you need a relentless current flow. Generators for house use in South Africa at the moment are obtainable in a variety of sizes.
By around 9am on Tuesday morning MPL, visitors, including Amabutho (Zulu regiments) have been beginning to arrive for the King’s address. Click here to see other advantages and to sign-up to our reader neighborhood supporting high quality, unbiased journalism. We issue Section 18A tax certificates for all donations made to Daily Maverick.
The control system’s major module DSE7320 is designed by DEEP SEA ELECTRONICS PLC. The DSE7320 is an Auto Mains (Utility) Failure Control Module suitable for a extensive variety of single, diesel or gas, gen-set applications. Monitoring an in depth number of engine parameters, the module will display warnings, shutdown and engine standing info on the back-lit LCD screen, illuminated LEDs, distant PC and through SMS textual content alerts (with exterior modem). The DSE7320 will monitor the mains (utility) provide and includes USB, RS232 and RS485 ports in addition to dedicated DSENet® terminals for system enlargement. Regular moveable turbines mounted on an open steel body take advantage of noise starting at about seventy five dBA and up to about eighty five dBA, relying on the dimensions of the generator and the model.
Diesel Innovations (Pty) Ltd has equipped, put in and commissioned quite a few generators various from 10kVA to 2500kVA over the previous 19 years. Some of those electrical installations and emergency power plant control philosophies are thought of to be of the most sophisticated of their type in Southern Africa. Modern diesel mills are particularly designed to watch electric current repeatedly, allowing them to start automatically once energy interruption happens, and to routinely change off once utility service has been restored.
An computerized changeover switch will activate during energy interruptions, ensuring a gradual provide of electricity. This installation ought to be undertaken by a professional electrician and a certificate of electrical compliance (COC) be issued. Kwa-Zulu Generators is an skilled and reliable supplier of commercial generators required to handle the facility calls for of our prospects. We supply options with a variety of economical, semi-silent diesel generators rated between 30 kVA and 1400 kVA, which have been designed to meet the unique requirements of the setting present in Africa. We provide a wide range of customised generator options and unique providers for several markets including the residential, business and industrial sectors.
As a precautionary measure, determine which electrical items require probably the most electrical energy and add the amount to your complete. This is to help be positive that your generator can serve larger items that require extra electrical energy to prevent system overload. In South Africa, any generator installation ought to adhere to the South African National Standard (IS0 SANS 8528 series of standards). With load shedding continuing to take a heavy toll on the country, residential generators are a permanent function in the properties of many South Africans. The problem is that these devices are loud and can be dangerous, particularly if they do not seem to be looked after correctly or installed incorrectly. Our V500 COMAP GENSET CONTROL SYSTEM is a model new built-in management system for gen-sets operating in single standby mode.
As a provider of those prime generator manufacturers, we're capable of offer significant financial savings in comparison with other suppliers. Browse our vary of FAW, SDEC, Baudouin, Volvo Penta, and Scania mills by clicking a link or the brand emblem below for more information. An electrical converts motive power into electrical power by using mechanical power to produce electrical expenses which will then move through an electric current. A generator works on the precept of electromagnetic induction and can be used as a standby energy supply or a major provider of electrical energy. An electrical generator makes use of mechanical energy to supply electrical charges which will then move by way of an electrical present. We are a registered licensed supplier of LP Gas, we do refills and gasoline exchanges.
#generator installations#generator installation#diesel generator installation#industrial generator installation#generator installation companies#generator connections#generator installation kzn
1 note
·
View note
Text
Understanding this printing method, the results exceed your imagination...
Waterless offset printing eliminates the use of damping solution during the printing process, liberating the printed materials from issues caused by ink emulsification. Due to the absence of paper expansion and contraction caused by water, the registration accuracy is improved, and color stability is maintained throughout the printing process. Additionally, waterless offset printing meets the requirements of eco-friendly printing as it generates no waste liquid during prepress development and printing processes. Based on practical experience in the industry and market research, I will elaborate on the advantages, disadvantages, and challenges in the actual printing process of waterless offset printing.
Advantages of Waterless Offset Printing Compared to Traditional Offset Printing:
Color Stability: Waterless offset printing maintains consistent color density and tone, unaffected by ink emulsification. It reduces preparation time by approximately 40% compared to traditional offset printing, reducing both printing hours and material waste. The stability of ink during printing minimizes paper waste caused by ink variations, ensuring high efficiency and ease of operation.

Environmental Friendliness: Waterless offset printing does not require the use of damping solution, reducing VOC (Volatile Organic Compounds) emissions during the printing process. Studies indicate that waterless offset printing emits 60% to 80% fewer VOCs compared to traditional offset printing, aligning with environmentally friendly printing practices.

Improved Registration Accuracy: The absence of water-induced paper expansion allows for significantly improved registration accuracy.
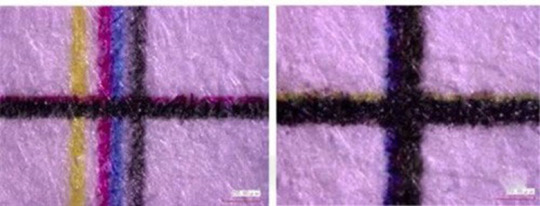
Enhanced Dot Reproduction: Waterless offset printing exhibits better dot reproduction with fuller and more vibrant dots. The process eliminates water involvement, effectively preventing dot enlargement, resulting in clear and subtle reproductions of fine details. The larger color gamut of waterless offset printing allows for the production of more saturated colors, making high-quality printing achievable.

Disadvantages of Waterless Offset Printing Compared to Traditional Offset Printing:
Higher Costs: The materials, especially plates and inks, for waterless offset printing are more expensive than those used in traditional offset printing. Imported waterless offset printing plates, often from Japan, contribute to the higher costs.
Environmental Control Requirements: Waterless offset printing requires a controlled printing environment with constant temperature and humidity. Fluctuations in temperature and humidity can affect ink viscosity and create challenges such as static electricity, making paper handling difficult.
Issues and Solutions in Practical Waterless Offset Printing:
Regular Maintenance: Regularly maintain and check the cooling equipment of the offset printing machine to ensure proper functioning and avoid overheating issues.
Pressure Adjustment: Confirm and adjust the pressure values between the plate cylinder, blanket cylinder, and inking rollers to ensure uniform pressure distribution.
Click to learn more about book printing, sticker printing, medicine box, hardcover book printing, PE bag, Bible printing, paper bag printing, catalog printing, and printing in China.
Optimal Pressure Settings: Adjust the pressure on the plate/blanket rollers according to the printer's specifications, considering the resilience of the silicone layer on the waterless offset printing plate.
Avoid Solvents: Minimize the use of solvents during waterless offset printing, thoroughly clean the rollers before printing, and ensure they are completely dry to prevent dirt on the plate.
In conclusion, while waterless offset printing faces challenges such as higher material costs and environmental control requirements, its advantages are expected to gain recognition and promote further research and development. As the method becomes more widespread, the associated material costs are likely to decrease.
0 notes
Last Seen Blogs

shaban-shah-11
shaban__shah

extensionsofgold-blog
ExtensionsOfGold

yourparanormalbf
Tips on Your Paranormal Boyfriend

ronaldc2
Untitled

trash-queen-sass-queen-blog
Elisha