#adobe illustrator optical illusion tutorial
Text
youtube
#cover designer#how to create b&w letters#how to create block letters#how to create a font logo#how to create letter logo#s optical illusion tutorial adobe illustrator#adobe illustrator optical illusion tutorial#optical illusion adobe illustrator#how to create an optical illusion in adobe illustrator#op art tutorial illustrator#how to create optical illusions in illustrator#optical illusion in illustrator#how to make optical illusions in illustrator#s#blend tool tutorial#adobe illustrator#blend tool in illustrator#how to use blend tool in illustrator#3d type in adobe illustrator#Youtube
2 notes
·
View notes
Text
How to Create an Amazing Optical Illusion 3D Striped Ring in Illustrator | Easy Tutorial
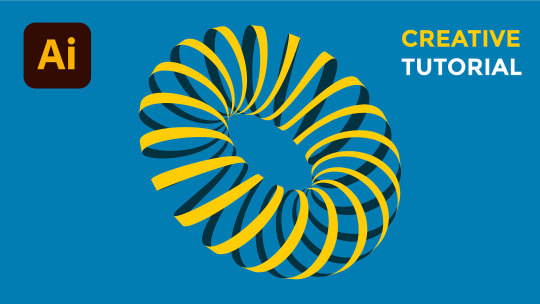
In this video, you will learn how to create an amazing optical illusion 3D striped ring in Illustrator using simple shapes and 3D Revolve Effect. You will also learn how to create and use custom symbols in Illustrator using the Symbols Panel. This is a fun and easy tutorial that anyone can follow regardless of their skill level. Watch this video and impress your friends with your optical illusion 3D striped ring!
youtube
Download Graphic Design Freebies
#optical illusion#3D shape#striped ring#illustrator tutorial#3D revolve effect#symbols panel#adobe illustrator#opticalillusion#3Dshape#stripedring#illustratortutorial#3Drevolveeffect#symbolspanel#adobeillustrator#Youtube
1 note
·
View note
Link
0 notes
Video
youtube
Optical Illusion 3D Logo Design Tutorial: Abstract Geometric Shapes in Adobe illustrator.
Learn how to create an Optical Illusion 3D Logo Design using Abstract Geometric Shapes in Adobe Illustrator 🤩 This tutorial is perfect for graphic designers and anyone interested in logo design! Join me as I walk you through the step-by-step process of creating this stunning logo design.
#logo#logodesign#logodesigner#logomaker#logomaster#freelogomakingapp#kavucreative#adobeillustraor#illustrator#vectorart#vector
2 notes
·
View notes
Video
https://www.youtube.com/watch?v=fPYCRi501MM
#illustration#illustrator#vector#opart#op art#opticalar#optical illusion#today i learned#adobe#adobeillustrator#adobe illustrator#tutorial#graphic design#youtube video#design#video tutorials#3d#3d effect#vectorart#3dart#designtips#youtube#how to design
7 notes
·
View notes
Video
Quick Technique Optical Illusion Art in Adobe Illustrator Tutorial cc
#OpticalIllusionArt #graphicdesign #graphic #graphics #design #art #adobe #artwork #logo #design #videomaking #videoeditor #video #videoadvertising #videoeditingskills #videocorporativo #motiongraphics #motiondesigner #motiongraphicsdesign #motioncapture #stopmotion
0 notes
Photo

Op Art in Adobe Illustrator. Tutorial link : https://www.vividesigning.com/2020/06/how-to-create-op-art-in-adobe.html #vividesigning #adobeillustrator #graphicdesign #opticalart #opart #opticalillusion #optical #visualart #visual #illusion #illusioneffect #adobeeffects #vectorart #artwork #artist #artistoninstagram #artoftheday #postoftheday #illustratorart #art #abstractart #GraphicDesignersGroup #graphicdesigner #IAClub #designer #indianartist #3d #3deffect https://www.instagram.com/p/CA8ck-rjGGl/?igshid=1rbyxxworf8l
#vividesigning#adobeillustrator#graphicdesign#opticalart#opart#opticalillusion#optical#visualart#visual#illusion#illusioneffect#adobeeffects#vectorart#artwork#artist#artistoninstagram#artoftheday#postoftheday#illustratorart#art#abstractart#graphicdesignersgroup#graphicdesigner#iaclub#designer#indianartist#3d#3deffect
0 notes
Text
Quill Quasar’s Reel
vimeo
Quill Quasar’s Reel
(917)526-3544
Directors Rep:
Tracey Hicks
Purely Amateur Studios
(347)495-0195
activism, advertising, alcohol, alternative-news, ancient-history, animals, animation, anime, architecture, arts, astronomy, atheist, bizarre, blogs, books, buddhism, business, cars, cartoons, cats, celebrities, christianity, classic-rock, clothing, comedy-movies, comics, computer-graphics, computer-hardware, computers, cooking, crafts, crime, cyberculture, dogs, drawing, drugs, ecommerce, environment, fashion, fine-arts, firefox, geography, graphic-design, guitar, guns, hacking, health, history, humor, illusions, interior-design, internet, internet-tools, iraq, liberal-politics, liberties, linguistics, linux, literature, mac-os, mathematics, movies, multimedia, music, nature, network-security, news, online-games, open-source, painting, philosophy, photography, physics, poetry, politics, programming, psychology, quizzes, relationships, religion, satire, science, science-fiction, self-improvement, shopping, software, space-exploration, stumblers, stumbleupon, tattoos, travel, tv, video, video-games, web-design, windows, writing, actors, america, apple, art, aviation, blog, blogging, bush, california, car, cartoon, cat, celebrity, charity, children, climate-change, college, comedy, comic, community, dance, death, debate, design, diet, diy, dog, economy, election, elections, energy, entertainment, exercise, facebook, film, finance, flash, flowers, food, football, funny, gadgets, game, games, gaming, global-warming, god, google, graffiti, green, home, humour, illustration, images, internet-marketing, life, living, love, mac, marriage, math, media, medicine, microsoft, money, music-video, obama, oil, online, paintings, pakistan, peace, photo, photos, photoshop, pictures, pirates, president, quotes, recipe, recipes, republican, rock, sculpture, security, social-media, social-networking, society, space, star-wars, tech, technology, television, tips, tools, tutorials, ubuntu, vegan, video, videos, vintage, war, water, web, web-development, weird, wordpress, youtube, sex, sexy, hot, love, porn, president, 2008, 2009, winter, secret, omg, no, way, amplafitesttag, art, arts, bank, barackobama, bi, bisexual, blues, broadway, business, c, canvass, children, classical, college, comedy, community, communityservice, concert, conference, convention, country, county, dance, debatewatchparty, design, development, drive, election, election08, entrepreneur, event, events, fair, family, festival, field, filmfest, florida, football, for, free, fun, fundraising, halloween, haunted, indie, iowavoteearlyforchangeweekofac, jazz, kids, league, live, local, localfieldoffice, london, management, marketing, media, meeting, music, musicals, mybo, national, networking, new, nfl, nyc, obama, of, office, organizing, party, performance, phone, phonebank, pop, pride, prideevent, pridefest, registration, rock, service, show, shows, social, sport, sports, startup, technology, theater, tour, voter, voterregistrationdrive, w, web, western, women, women for obama, workshop, free, money, cash, movie, download, horny, quickscope, free, lobby, hard, scope, barrett, intervention, high, ******, 1600, microsoft, points, 10th, prestige, ak47, montage, sniper, m9, acr, m16, you, tube, rawr, lol, mp3, download, hillary, clinton, ohio, indiana, apple, banana, modern, warfare, leaked, info, gameplay, ninja, defuse, mw2, snd, optic, h3cz, sniper, montage, mp5k, 50cal, acog, Modern, Warfare, M16, footage, Sniper, Montage, by, OpTic, H3CZ, .50cal, m200, copycat, steady, aim, pro, nation, gaming, hecz, dtreats, hutchisyodaddy, zzirgrizz, topnotchmultimedia, waw, dogs, infinity, ward, tutorials, 3ds, max, song, vegas, adobe, photoshop, cs4, ps3, xbox, 360, hack, exooutsider, nextgenupdate, search, and, destroy, hood, thug, jake, brandon, retard, hangove, hill on, a, the, as, an, how, to, tags, pavelow, harrier, knife, too, damn, good, for, you, nuke, chopper, gunner, scary, zombie, exploits, tuts, views, sir, mix, a, lot, baseball, basketball, football, hockey, unban, sony, camcorder, ipod, orange, purple, haze, blue, pineapple, microsoft, never, get, patchaed, banned, loser, halo, left, dead, argentina, australia, evolution, of, dance, potter, book, puppet, pals, paper, airplanes, pregnant, quagmire, soundboard, springboard, blackra1n, jail, break, touch, iphone, grabber, nano, itunes, lag, keyboard, escape, search, keyvault, drive, hoops, goal, net, celtics, magic, lakers, los, angeles, sorry, if, words, are, in, twice, eminem, cent, ludacris, gucci, boobs, belt, saint, video, garden, chicken, steak, cow, liger, tiger, zebra, trees, garden, urban, random, :), will, jordan, sick, nasty, gross, lazy, insect, pursuit, happiness, romantic, spelling, humming, birds, eachother, microwave, japan, malaysia, africa, vietnam, indians, elephant, lone, these, were, all, thought, up, by, myself, carpol, tunnels, stewie, fat, man, lois, cartman, suprise, aperance, go
Likes: 1
Viewed:
The post Quill Quasar’s Reel appeared first on Good Info.
1 note
·
View note
Text
How to Add a Glowing Photo Effect to a Portrait in Photoshop
What You'll Be Creating
With Photoshop actions, you can create your own Photoshop filters to use with a single click on any image. In this tutorial, I'll show you how to create a Photoshop portrait action to add a glowing effect to a photo. This photo effect can be later applied to other photos as well! Follow me to learn how to create this cool Photoshop effect of a glowing pattern on the skin.
The effect we'll be working on here is based on African tribal makeup. Rather than being only a decoration, it has a deep meaning in the cultures that created it. The pattern may mark a person as a member of a specific tribe, show their status in the tribe, or have a special religious meaning. By creating a glowing effect for this makeup, we're going to accentuate its significance.
If you're interested in tribal-inspired effects like this one, you may also like the work of our author Kaylan Michael:
Photo Collage
How to Create a 3D Floral Collage in Adobe Photoshop & Lightroom
Kaylan Michael
Photo Collage
How to Create a Vintage Photo Collage in Adobe Photoshop & Lightroom
Kaylan Michael
Patterns
How to Create a Tribal African Inspired Pattern in Adobe Illustrator
Kaylan Michael
This tutorial was inspired by Evgeniya Osipova's rendition of Raquel Trave's character.
Follow along with this tutorial over on our Envato Tuts+ YouTube Channel:
How to Add a Glowing Photo Effect to a Portrait in Photoshop
Step 1
Open your photo. It's best to use a dark-skinned model for better contrast. I used this one.
Make sure that your image is on the Background layer. If not, go to Layer > New > Background from Layer.
Create a New Layer and paint the areas that you want to make glow. You can also select them with a tool of your choice and fill the selection with color. Name this layer mask 1.
Step 2
Create another layer. This time, select the eyes of the model. This way, we will be able to keep them bright, but not glowing. Name this layer mask 2.
Step 3
Click under the layer to deselect them. Then open the Actions panel and create a New Action. Give it a name. From now on, everything you do in Photoshop will be recorded.
Step 4
Go to Image > Image Size and round the top value. This will allow us to use a similar size for every photo that this Photoshop action will be applied to.
Step 5
Hide both masks. Hold Control and click the thumbnail of mask 1 to make a selection out of its contents. Go to Select > Inverse, and add an Exposure adjustment.
Step 6
Lower the Exposure to darken everything except the selection.
Step 7
Let's brighten the eyes now. Take the selection from mask 2 and click the mask of the adjustment layer. Then go to Edit > Fill and fill the selection with black to reveal the eyes. Deselect.
Step 8
Take the selection from mask 1 and create a New Layer. Go to Edit > Fill and fill it with white. Deselect. Name this layer white.
Step 9
Duplicate the white layer by pressing Control-J, and go to Filter > Blur > Gaussian Blur. Adjust the strength of the blur to create a subtle glow.
Step 10
Duplicate the layer and add a Hue/Saturation adjustment to it. Clip it and check Colorize. Change the color to a highly saturated red.
Step 11
Change the Blend Mode to Color. Now the skin looks as if it's glowing from the inside as well.
Step 12
Duplicate the white layer. Go to Filter > Blur > Gaussian Blur and add a little blur, to create a concentrated glow.
Step 13
To make this effect subtler, add a Layer Mask to it. Select it, and then go to Filter > Render > Clouds.
Step 14
Duplicate the white layer. Go to Filter > Blur > Motion Blur. Create a strong blur that makes an optical illusion of a shining effect. Change the Blend Mode to Soft Light.
Step 15
Make the effect subtler by adding a Layer Mask with Clouds.
Step 16
Duplicate the original background layer and drag it to the top. Go to Select > Color Range and select Highlights.
Step 17
Hide the layer and add a Curves adjustment. Change its Blend Mode to Overlay and drag the curve to accentuate the highlights that could have been lost by the darkening of the whole picture.
Step 18
Let's add a yellow glow now. Duplicate the white layer and double click the original to access its Layer Style panel. Check Outer Glow and change its Blend Mode to Vivid Light. Adjust the settings to add a concentrated glow.
Step 19
To make the glow more variable, go to Blending Options and drag the lower black marker to the right. Hold Alt to split it for a more gradual effect. By dragging this marker, you remove the effect from the darkest parts of the photo. You can adjust the intensity of this effect by changing the Opacity of the whole layer.
Step 20
Duplicate this layer and make the glow wider. Experiment with the settings to keep the effect eye-catching, yet still natural.
Step 21
Duplicate the layer once more to strengthen the glow if you want. Change the Blend Mode of the glow to Normal and create a more visible glow with it.
Step 22
Now that we've achieved our desired effect, click Stop Recording.
If you want to apply the same effect to other photos now, it's very simple. Just paint the masks, selecting the eyes and the pattern, and click Play. Everything you did earlier will be done to these new photos, and you just have to wait for the end result to appear.
Photoshop Actions With Photo Art Effects
Photoshop Glowing Photo Effect
If you want to add other cool effects to your photos, you can save a lot of time by using Photoshop actions created by experts on Envato Elements. For example, this complex action turns your photo into a greyscale artwork with glowing elements. Just think how long it would take to create something similar on your own! But since it's an action, you just have to click Play.
Photoshop Glowing Photo Effect
Photoshop Storm Photo Effect
This Photoshop action adds a raging storm to your photo, with lightning and extreme color correction. Despite it being so automatic, the effect is very realistic and powerful. You can create an amazing poster this way in a matter of seconds!
Photoshop Storm Photo Effect
Photoshop Magical Light Photo Effect
If you want to turn your photo into art, this Photoshop action will be perfect for you. It adds unique magical effects, changing the colors, adding textures, and modifying the lighting. It's hard to believe that it can all be done with a single click!
Photoshop Magical Light Photo Effect
Photoshop Glowing Eyes Photo Effect
But there are also simpler, more specific actions like this one. It changes the eye color, offering a few different effects. For example, you can make the eyes glow, or make them shiny black.
Photoshop Glowing Eyes Photo Effect
Now you know how to create a Photoshop action with a glowing photo effect. If you're interested in photo manipulations, you may also like these tutorials:
Fan Art
How to Create a Black Panther Movie-Inspired Photo Manipulation in Photoshop
Melody Nieves
Photo Manipulation
How to Create an Egyptian Goddess Manipulation in Adobe Photoshop
Melody Nieves
Photo Manipulation
How to Create an 80s-Inspired Double Exposure Manipulation in Adobe Photoshop
Melody Nieves
Photo Manipulation
Make a Trendy Double Exposure Effect in Adobe Photoshop
Yulia Sokolova
from Envato Tuts+ Design & Illustration http://bit.ly/2VBABBB via http://www.webmasterforum.ws/rankwyz-discount-code-2015-coupons/
0 notes
Video
Adobe Illustrator – Design a Interlaced Star Vector || Impossible Star Vector Tutorial Adobe Illustrator - Design a Interlaced Star Vector. Adobe Illustrator - Design a Interlaced Star Vector || Impossible Star Vector Tutorial
#adobe illustrator tutorial#Design a Interlaced Star Vector#draw impossible star in adobe illustrator#draw interlaced star illustrator#draw penrose shapes illustrator#impossible star vector illustrator design#Impossible Star Vector Tutorial#interlace star vector art#interlaced star vector logo design#optical illusions logo design illustrator#penrose impossible shapes#penrose star design#penrose star vector design#penrose star vector illustrator design#vector art
0 notes
Text
What did you do this week?
Today, we’ve looked up to program called Adobe Illustrator, which is a program similar to Photoshop, but offers you different options much more interface in my opinion. We were task to experiment and create random shapes using “Op Art” techniques.
What did you learn?
I have learned interesting facts about “Op art” and how it’s used to create an optical illusion.
How do you feel about the work you have produced?
In fact, this was my first experience using this program, so I do not feel as confident as if I was familiar with it, It was just the first lesson though, I will get better next time. the more time I spend using it the better I get.
What is left do?
As it was just disposable task, I am not sure what is there left to do.
How could you add to this /what extra work or research could you do?
My favourite YouTube tutorials are always pretty helpful and educative in terms of this section.
0 notes
Text
“Place of Words” project evaluation
When first being given my two words: “play” and “political” my initial research was kick started by an exercise used to join ideas for the separate words. I came up with three main pathways- mind games, optical illusion and different types of politics. I swayed towards different types of politics and began to start looking at an idea I came up with called “playground politics”. This was the idea of children opinions on Politics and how humorous it is. When I started to look into this, I found so many videos online of specifically children’s opinions on Trump. This is what sparked my whole project- I wanted to ridicule Trump just like the children were through my book. I then started conducting research on Trump and his presidency, as well as children opinions, Celebrity opinions and shocking statements Trump has made himself in order to inform the content I was going to use in my book. As well as academic research I conducted visual research into an artist called Hannah Hoch who really informed my image making style for my book (photomontage). Moreover, I used Pinterest to influence my layout ideas and I also gathered inspiration for my handwritten typography that worked well in the end.
My project has gone through many changes and development over the term, it originally started off as a book of children’s opinions on Trump and his choices. However, as I began to collect more articles about him that had a more serious undertone- I chose to change my content idea to a serious book on the issues of Trump reinforced by his own absurd comments which instantly made the book more shocking opposed to just funny. Visually, my book has changed, the layouts were untidy and the titles all varied in alignment. I changed more larger quotes to hand written quotes as I felt it communicated the message more effectively. I also experimented with two types of image making: illustration and photomontage- in the end I chose photomontage as it looked creepier and more disturbing and illustration was better suited to my previous book idea. Lastly, towards the end of the project I was constantly changing the page layouts of my book, colour images or black and white images, colour of the typography etc.
I think I did manage my time well throughout the project, completing my book to the best of my ability a couple days before the deadline and always providing new and exciting content for the tutorials throughout the unit. I made sure to keep the project moving at a steady pace without rushing my work.
Overall, I believe I responded well to my feedback given to me in tutorials, whenever issues with the typography handling were made obvious to me I understood why it was wrong and was quick to make the changes. For example, I believed that the small insert page was going to work well however, once printed it was highlighted by the course leaders that it in-fact wasn’t that effective and after taking a closer look at it, I realised this too. Moreover, one huge piece of feedback that I had was that the black type was hard to read on the red paper. I personally really liked the black on the red and even though I didn’t want to change it, I did experiment with white, grey and a different type face providing alternate solutions. I came to the conclusion that despite the feedback, the black worked best and I was going to stick with it as ultimately I am the one who must be happy with the book.
I think there definitely are areas of my design process that need more work. For me, even though I did conduct both primary and secondary research into my ideas, I think I could have done a little more to inform my design designs that little bit better. Maybe I could have took a look into more scholarly articles about Politics as I didn’t know much about the topic before my project and still think there is much more I could learn. As well as this the actual creation of my book on indesign could use improving but that will occur with practice and time- for my first time properly using Indesign as a software I think I picked it up quite quickly.
This project has taught me a lot along side the use of Adobe software. It has introduced me to new skills such photomontage / collage, book binding, Typographic handling, using a grid effectively as well as other skills learnt in the workshops, for example how to convey emotion through type. Overall, this project really has allowed me to pin down the most fundamental skills a visual Communicator needs in order to engage and effectively convey messages to an audience.
On reflection, I think I could have possibly experimented with a few more completely different book designs, I seemed to be slightly set on an idea I wanted to create and although I was focused and have produced something I really feel proud of. It would have been good to see some drastic differences between mock ups as it would have allowed me to get more experimental with my design. However I think the final book has a nice aesthetic and if there was one thing I would change it might be the type of pen I used to write the hand written quotes as a more rough and patchy marker pen may signify harshness and character better. I also think I could have experimented with the book being square, despite this I really like the size I chose as it appears formal but shocks the readers with its design inside.
I am really pleased with the outcome of my book and the journey I took to get there, I think I have learnt a lot of skills during this project that I will be able to use throughout the three years at uni and later life. It has been really nice to have an idea of what I wanted to create and actually be able to produce that image to the best of my ability.
0 notes
Text
How to Create Optical Illusion 3D Striped Shape in Adobe Illustrator

How awesome is this optical illusion 3D ring that I created in Illustrator? It looks like it’s jumping out of the screen, doesn’t it? In this video, I will show you how to create this 3D ring using simple shapes and the 3D Revolve Effect. You will also learn how to create and use custom symbols in Illustrator, which will make your work more creative and faster. This is a cool and easy tutorial that anyone can do. Watch this video and reblog it!
Watch Now
0 notes
Text
3D Graphic Designer in Dubai How to draw 3D artwork Shadow by http://www.jojitdelapena.com/3d-graphic-designer-in-dubai-how-to-draw-3d-artwork-shadow/
3D Graphic Designer in Dubai How to draw 3D artwork Shadow by http://www.jojitdelapena.com/3d-graphic-designer-in-dubai-how-to-draw-3d-artwork-shadow/
3D Graphic Designer in Dubai How to draw 3D artwork Shadow
3D Graphic Designer in Dubai How to draw 3D artwork Shadow
3D Graphic Designer in Dubai How to draw 3D artwork Shadow
3D Graphic Designer in Dubai How to draw 3D artwork Shadow
It’s very common for painting tutorials to treat light as an addition to the picture, an atmosphere-maker. We can easily get the impression that the object has a universal form, and then with proper lighting we can change the mood of the picture. The truth is without light there would be nothing to paint! Until you realize that, you’re shooting blind.
In the first tutorial of this short series, I’ll introduce you to the art of seeing light, shadows, reflections and edges.
How Can We See?
3D Graphic Designer in Dubai How to draw 3D artwork Shadow
As an artist, have you ever tried to answer this question? If not, that’s a big mistake. Everything you draw is a representation of seeing, just like the laws of physics are a representation of real processes. There’s even more to it—what we draw is not reality, or an objective image of reality. It’s an image created by your brain, an interpretation of signals caught by your eyes. Therefore, the world as we see it is only an interpretation of reality, one of many—and not the truest or most perfect of them all. Only good enough for our species to survive.
Why am I talking about this in a painting tutorial? Painting itself is an art of darkening, lightening and coloring certain parts of paper (or screen) to create an illusion of looking at something real. In other words, an artist tries to recreate an image that could be created by our brain (it makes it easy for us, since we think in patterns—we tend to look for familiar shapes in abstract pictures).
If a picture is similar to what we see in our minds, we say it’s realistic. It may be realistic despite not having any recognizable shapes or outlines—all you need are a few patches of color, light and shadow to bring something familiar to mind.
To create a convincing picture similar to one created by the brain, first you need to know how the brain does it. When reading this article you’ll find most of the processes quite obvious, but you may be surprised at how closely science can relate to painting. We tend to see optics as a part of physics, and painting as a part of metaphysical art, but that’s a mistake—art is a reflection of reality seen through our eyes. In order to imitate reality, first you need to know what our minds find real.
So What Is Seeing?
3D Graphic Designer in Dubai How to draw 3D artwork Shadow
Let’s go back to the fundamentals of optics. A light ray hits an object and bounces to your eye. Then the signal is processed by your brain and the image is created. That’s pretty well-known, right? But do you realize all the consequences that stem from that process?
Here comes the first, the most important rule of painting: light is the only thing we can see. It’s not an object, not a color, not a perspective, not a shape. We can see only light rays, reflected from a surface, disturbed by the properties of the surface and our eyes. The final image in our head, one frame of the never-ending video, is a set of all the rays hitting our retina at that one moment. This image can be disturbed by differences between the properties of every ray—every one of them comes from a different direction, distance, and they may have hit a lot of objects before hitting your eye last.
That’s exactly what we’re doing when painting—we imitate rays hitting different surfaces (color, consistency, gloss), the distance between them (the amount of diffuse color, contrast, edges, perspective), and most certainly we don’t draw things that don’t reflect or emit anything to our eyes. If you “add light” after the picture is almost done, you’re doing it wrong—everything on your painting is light.
What is Shadow?
3D Graphic Designer in Dubai How to draw 3D artwork Shadow
To put it simply, shadow is an area untouched by direct light. When you’re staying in shadow, you’re not able to see the source of light. That’s obvious, right?
Article: 3D Graphic Designer in Dubai How to draw 3D artwork Shadow
http://www.jojitdelapena.com/designer-dubai-background-manipulation-and-blending/
http://www.jojitdelapena.com/10-great-free-mac-applications-for-graphic-designers/
http://www.jojitdelapena.com/10-adobe-illustrator-tricks-and-tools-to-know/
http://www.jojitdelapena.com/top-5-hidden-features-of-adobe-illustrator/
Jojit Dela Pena | Graphic Designer in Dubai | Graphic Designer Dubai
http://graphicdesignertipsonline.blogspot.com
https://jojitdelapena.blogspot.com
via Graphic Designer in Dubai
#3D Designer in Dubai#Filipino Graphic Designer in Dubai#Freelance Graphic Designer in Dubai#graphic design companies in dubai#Graphic Design Jobs in Dubai#graphic designer jobs in dubai
0 notes
Video
youtube
Designing the Impossible Triangle: Unlocking the Secrets of Optical Illusions in Adobe Illustrator.
Embark on a mesmerizing journey into the world of optical illusions with this Adobe Illustrator tutorial. Discover the secrets behind designing the Impossible Triangle, an intriguing and mind-boggling optical illusion. Unleash your creativity as we delve into the techniques and tools of Adobe Illustrator to bring this captivating illusion to life. Get ready to unlock the hidden depths of perception and create stunning designs that defy expectations!
1 note
·
View note
Last Seen Blogs
find-her
Find Her🔍
hugs4sieun
aubrey

chiefbirdpainter
Untitled

double-ds-hat
Sockhead
richpeopleshi
The Shit I’d Have If I Was Rich