#Vertical Assembly Building
Text

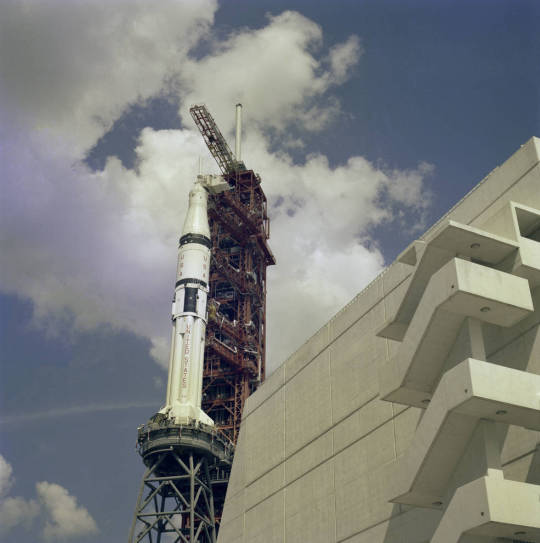
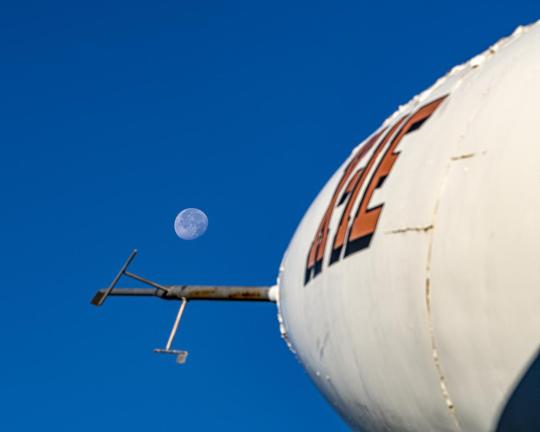
"The Saturn IB space vehicle for the Apollo-Soyuz Test Project mission, with its launch umbilical tower, rides atop a huge crawler-transporter as it moves slowly away from the Vehicle Assembly Building on its 4.24-mile journey to Pad B, Launch Complex 39, at NASA's Kennedy Space Center."
Date: March 24, 1975
NASA ID: S75-24007, S75-24009
#Apollo–Soyuz#Apollo Soyuz Test Project#ASTP#CSM-111#Apollo Block II CSM#Docking Module#Saturn IB#SA-210#Rocket#NASA#Apollo Program#Apollo Applications Program#Vertical Assembly Building#VAB#Kennedy Space Center#KSC#Florida#rollout#March#1975#my post
99 notes
·
View notes
Text
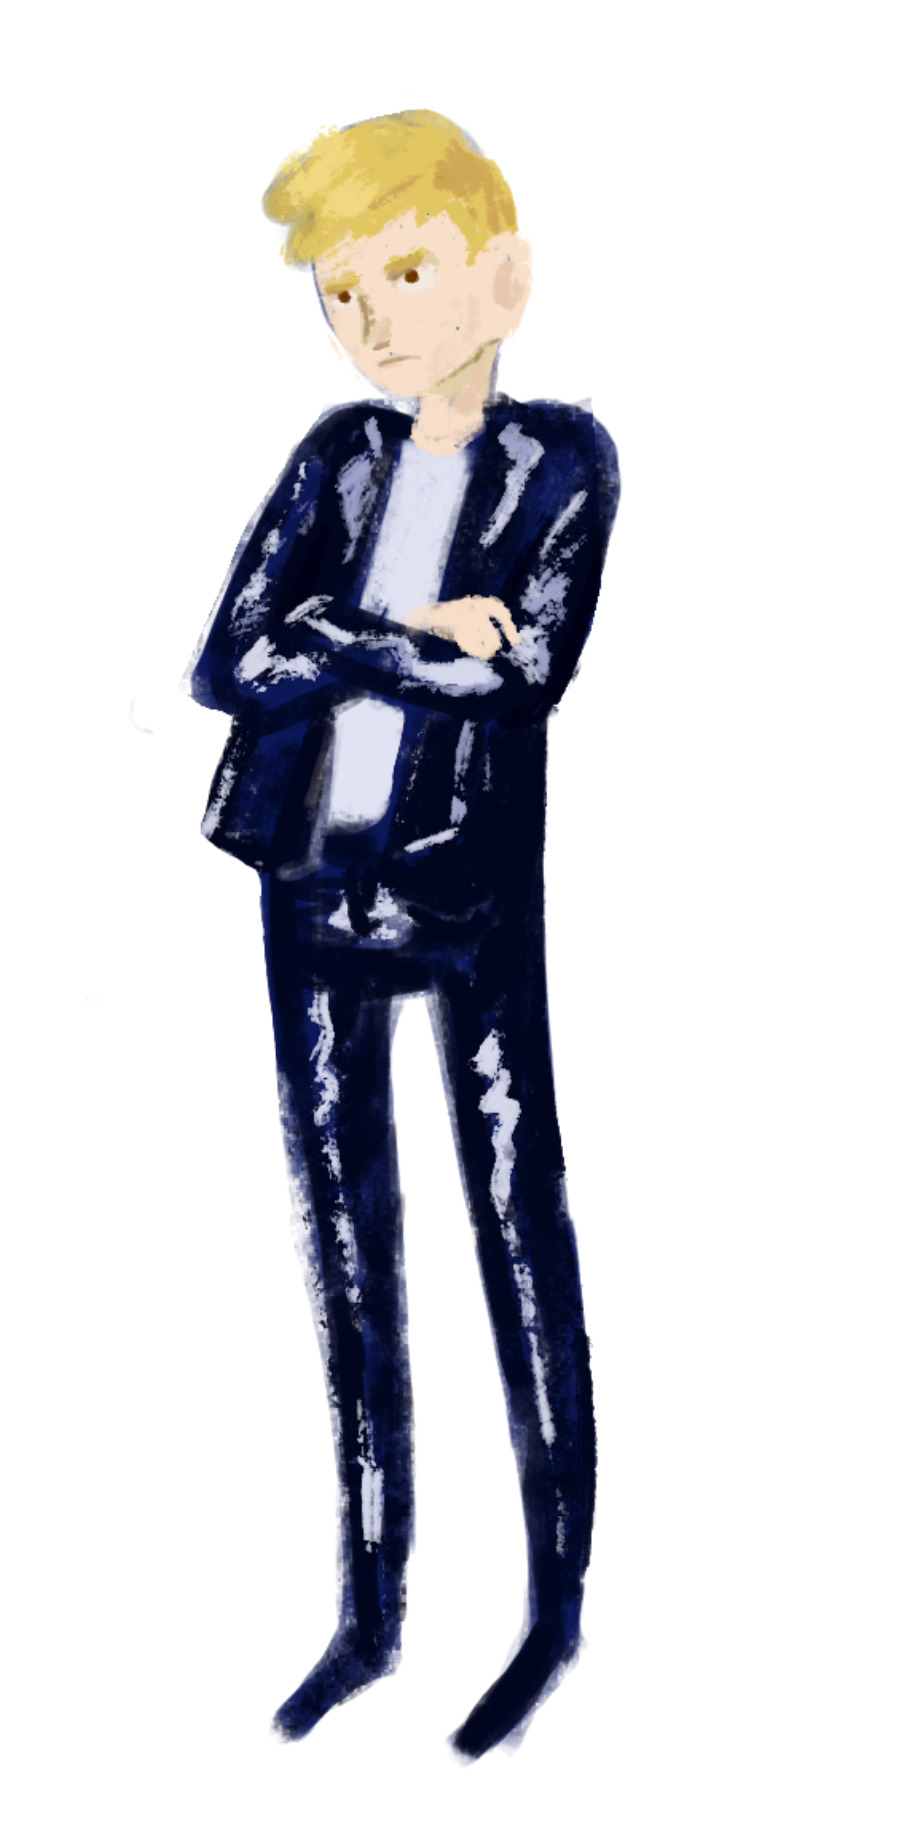
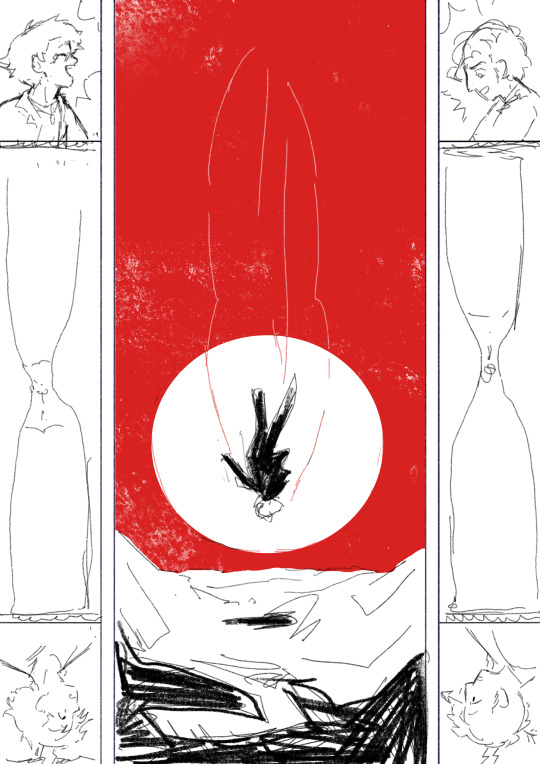
A Canary’s Final Flight

My piece for @trafficzine 4th edition! Get it for free here! 200 pages of excellent art and fics, incredible work from all participants and from the mods especially!! huge shoutout to the mods for real
Process notes under the cut! (I struggled a lot so it's a bit of a novel)
So the entire process was a Ride. I knew when I picked this prompt that I was going to have a hard time, because Jimmy’s final death had been illustrated a billion times over by extremely talented artists. But I had a Vision of the snapshot of the second before the impact, when everything is still but you know what’s about happen. It was very much inspired by the clip of Fog by Jabberwocky, bu the thing is, they have the advantage of all the build up of the fall, and that’s when the trouble started.

This was my first version, and obviously it wasn't working. And I was trying so hard, with so many iterations! Small wings, big wings, no wings, different poses, less backgrounds elements. I'd done compositions were everything seemed peaceful but something is Wrong, but it wasn't working this time.

So instead I focused on what rendering I'd like to do - I tried a painterly approach, for that visceral feeling, but it wasn't working either (but hey, I did keep the red sky, so, progress)
At this point I'd been doing back and forths for weeks and I was just as lost as at the start. Now that's my tip for people who make art of any kind, in situations like that, stop thinking about how you can make the best piece possible, and think about you can have fun with it (because when you aren't it's visible). And for that was, 1 - going back to using ink and pen nibs and doing way too detailed inking, and 2- looking at Dave McKean's covers for Sandman (which, funnily enough, was also a reference for my previous trafficzine piece)
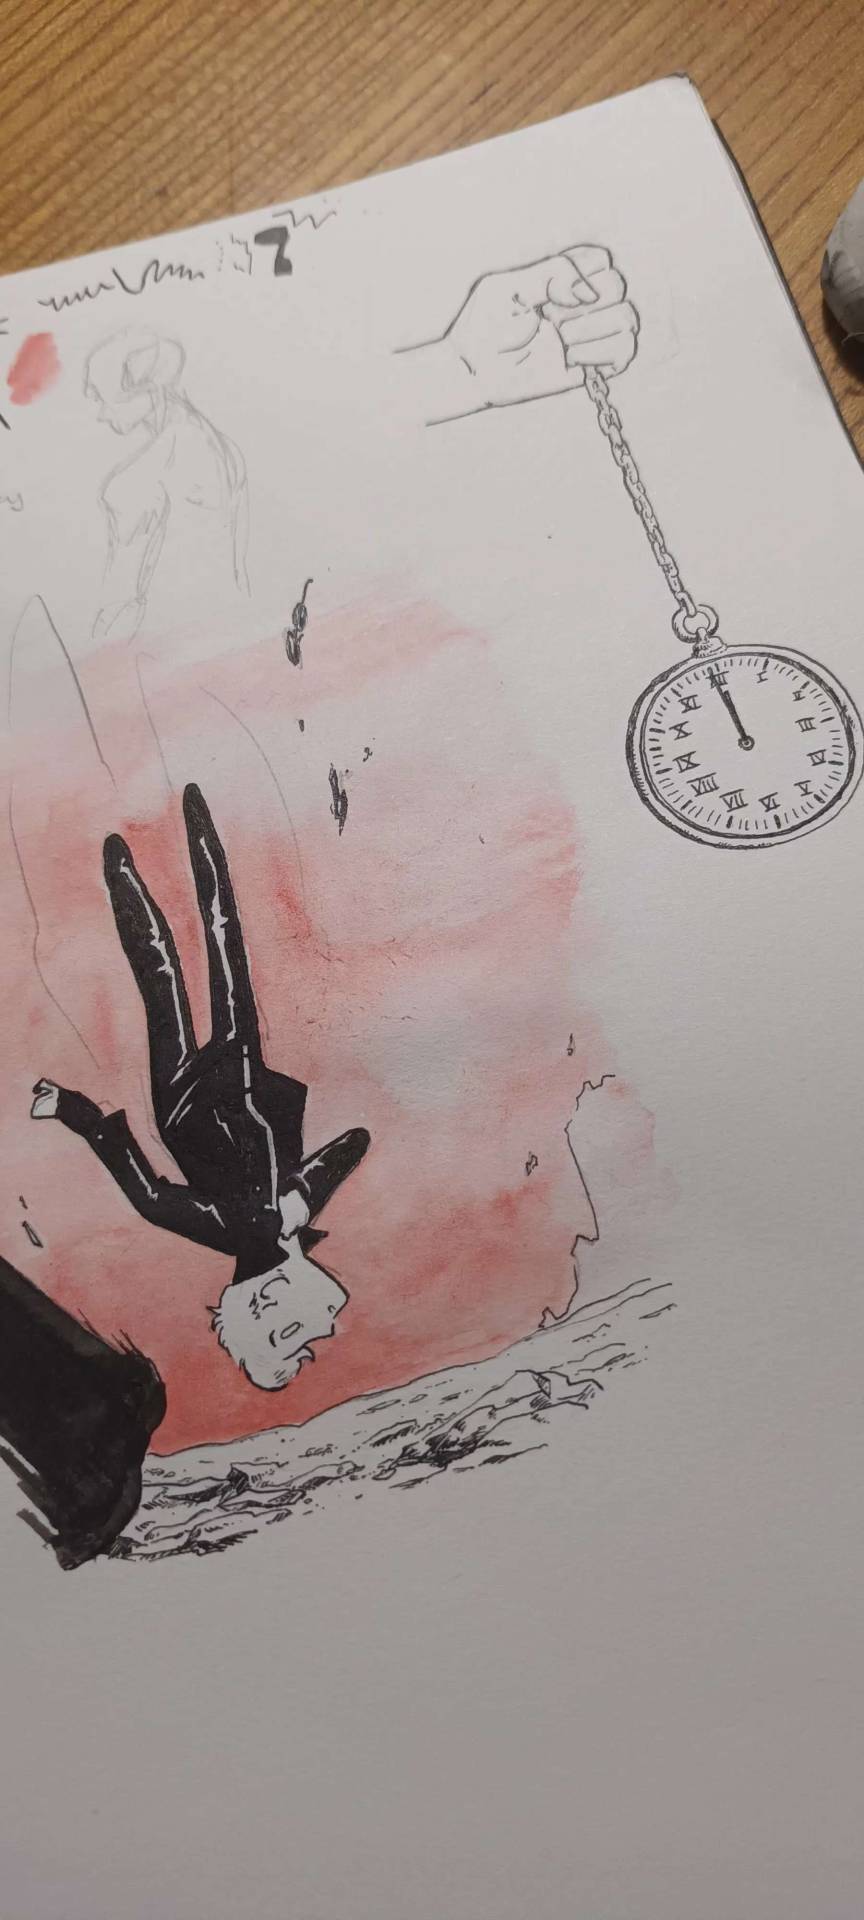

And from there I was actually going somewhere! Between the jagged rocks, the red sky, and the increased verticality with the borders, I had hit the vibes I wanted.
I did some experimentation with the border, and even though I really liked the bad boys I drew they were taking too much away from the lonely desolation, so I actually used Red (Unecessary Redstone)'s idea of all of Jimmy's worldy's possessions scattered on the ground post impact, with the idea to make it looks like the central image is his grave being dug.

(and yes for a short amount of time the were supposed to be clock markings on the sun, but there was already enough going with the wings so I scrapped that) (also fun fact the reason why the wings aren't fully material but more ghostly is because my toddler cousin was watching me draw the very first draft and asked why he didn't just use his wings and i went :( so the wings are a metaphor now)
So from there I found a bunch of picture and took some myself, cut and assembled everything together, added shadows in all the appropriate places, and repainted some elements so that everything would look better intergrated (some of the wheats are basically 100% handpainted, the cardboard as well). This took a suprisingly long amount of time, but I was done!

Well I wasn't expecting to have that much to say, but I hope if you're still reading, it was at least interesting!
#trafficzine#limited life#limlife#limlife fanart#jimmy solidarity fanart#solidaritygaming#i forgot all the tags augh#curse of not posting often#mcyt fanart#mcyt#zine illustration#zines#my art
1K notes
·
View notes
Text
NASA Photographers Share Their #NASAMoonSnap
We’re getting ready to launch Artemis I, the first test flight of the rocket and spacecraft that will take future astronauts to the Moon! As we prepare for the lunar voyage of the Space Launch System (SLS) rocket and Orion spacecraft launching as early as Aug. 29, 2022, we would like you to share your excitement with us. Share all types of Moon-inspired content with us with the hashtag #NASAMoonSnap, and we will choose some entries to share on our social media platforms and during the launch broadcast. Get creative! We’re looking for Moon paintings, Moon poetry, Moon pottery, Moon latte foam art — the sky is not the limit.
Since we have the full Moon coming up on Aug. 11, we wanted to share our handy dandy Moon photography guide and inspire you with some of our NASA imagery experts’ stories on capturing the Moon.

"The first rollout of the SLS rocket with the Orion spacecraft aboard was a really exciting moment to capture. I was photographing at Kennedy Space Center in an area where many of the employees that had worked on different parts of the SLS were watching. It was so great to hear some of their stories and see their pride in helping to build this amazing rocket and spacecraft. Once the mobile launcher with SLS passed the crowds to head toward the launchpad, people began to line up in their cars to leave. I decided to stick around and try to get a closer image of the Moon with SLS. It was fairly dark by the time I made this image, so there isn’t any detail in the moon, but it’s still moving to see them next to one another and know that SLS will be closer to the Moon than Earth very soon, and will one day enable humans to land on the lunar surface again!" — Aubrey Gemignani, NASA contract Photo Archivist/Photographer, NASA Headquarters
“I set up this shot when I saw the Moon was lined up perfectly with the X-1E in front of the main entrance to Armstrong Flight Research Center one morning last year. What captured my eye about this scene was that it showcased the past and the future of NASA in one image. The X-1 was a key piece of early NACA/NASA history, and it is pointing to the Moon showing us where we are going next with Artemis. I still remember walking around on my first day at NASA and seeing all the places where history was made. I was in awe as I walked these hallowed grounds. I know that there is still a great deal of history to be written here as we strive to go higher, further and faster and I’m glad that I get to be here to document it.” — Joshua Fisher, Photographer, NASA’s Armstrong Flight Research Center

“While out capturing images of the Moon, the memories of my first day as a photographer for NASA came flooding back. One of my first memories is going to the exhibits department and getting to hold an actual Moon rock sample. That day changed my perception of the Moon forever. That moment made the Moon more than just something in the sky. It became tangible and real, and my part in all of this became clear. The honor and privilege I feel everyday is overwhelming.” — Jef Janis, Still Imaging Specialist, NASA’s Glenn Research Center

“When I can, I like my Moon photos to have a sense of place. The trick is finding a shooting position and a landmark that will fit in with the Moon’s very stringent plans for rising. I went out to shoot the Sturgeon Moon, which was also a rare blue moon, last August. As I was shooting the moonrise from the riverbank in downtown New Orleans, I was lucky to have one of the city’s iconic riverboats turn a bend and head upriver to pass beneath the Moon. Happily the river was low and I was able to scramble down the high bank to reduce the vertical distance between the quickly rising moon and the slowly passing riverboat.” — Michael DeMocker, Photographer, NASA’s Michoud Assembly Facility

“I was excited to try to capture a waning crescent Moon at dawn, even though it was late February, 20 degrees Fahrenheit and 6:30 in the morning…Nonetheless, I decided to photograph on-site at Lewis Field, and ended up using my telephoto lens to really zoom in on the Moon. In a race against the sunrise and the Moon disappearing, I was able to capture a cool shot of the Moon with a couple planes making an appearance as well (The Cleveland Hopkins Airport is right next door). Although is it me, or does one of the planes look like a rocket taking off…?” — Jordan Salkin, Scientific Imaging Specialist, NASA’s Glenn Research Center

“I have worked at NASA’s Glenn Research Center since 1990 and have enjoyed every second doing what I do to support NASA’s mission. On my first day back to work onsite after 22 months of telework I saw this beautiful sunrise with the snow, the Moon, and the hangar. It felt good to be at work seeing the landscape I was so used to seeing. I had to take these pictures to share with my colleagues. ” — Jeffrey F. Abbott, Media Support Specialist, NASA’s Glenn Research Center

“In creating this Moon image, I almost felt pressured to find the ‘perfect location.’ The more that I thought about that prospect, the more I was drawn to using only natural elements, in my own environment. I wanted to find an image in my own backyard. This image was captured just as the Sun dropped below the horizon. I had a very short window of time when these colors would be possible. Two minutes earlier or later would have produced a totally different image. The almost abstract lines of a Maple tree in the earliest stages of budding seemed to be in concert with the waxing crescent Moon, both preparing for full bloom. Nature on display in its simplicity.” — Marvin Smith, Still Imaging Specialist Lead, NASA’s Glenn Research Center

“The lighthouse in Lorain, Ohio, has been photographed by amateur and professional photographers for decades, but I have never photographed it before. When I calculated that the path of the Moon was going to go over and past the lighthouse with a reflection over the water, I decided to give it a try. I encountered four other photographers on the same pier with me that early morning. They were huddled in the middle of the pier and I was at the end. I think I got the best photo.” — Quentin Schwinn, Scientific Photographer, NASA’s Glenn Research Center
Make sure to follow us on Tumblr for your regular dose of space!
#NASA#NASA MoonSnap#Moon#Moon photography#space photography#Artemis#mega Moon rocket#photography#full Moon#lunar#Orion#Space Launch System#space#astronomy#nature photography
1K notes
·
View notes
Text
The Search for the Fuel: The Elephant’s Foot
From the first days of the accident, locating and monitoring the 190 tons of nuclear fuel that had been in the fourth reactor at the time of the explosion was a top priority for the commission overseeing the cleanup. They wanted to ensure that no further disasters would unfold at Chernobyl; with the Soviet Union's international prestige already significantly battered, it was critical that they felt in control of the situation once more. After the initial plume of radionuclides from the burning reactor declined significantly in the early days of May 1986, it was established by the scientists assisting the Commission that the nuclear fuel had three distinct hazards that it could present. These were a radioactive hazard, a nuclear hazard, and a thermal hazard.
Perhaps the most obvious, the radioactive hazard was that of the aforementioned radioactive cloud rising from reactor 4. Although it had decreased significantly, it was still a danger and could potentially flare up again unless measures were taken to prevent it.
The nuclear hazard was the fear of a new uncontrolled nuclear chain reaction like the one that had initially destroyed the reactor. The state of the core was unknown at this time, and scientists had to determine if any of the reactor assembly was still in place and if it or any other mass of fuel had the necessary elements to sustain another catastrophic reaction. Basically, it was a possibility that the fuel could gather in such a way that a new nuclear chain reaction would start.
Finally, the thermal hazard was that of the hot nuclear fuel melting through the concrete of the unit block and into the Earth below. This is known as the “China Syndrome” after a movie of the same name. It was also feared at the time that the fuel could melt down into the bubbler tanks below the reactor, which stored a large reservoir of cooling water, and cause a significant steam explosion. This was the main concern of the government commission and the most effort was put in place to reduce this hazard first.
Having established the potential dangers of the fuel the Commission wanted absolute assurance that the hazard was not an immediate threat to the safety of the workers at Chernobyl and the world at large.
This undertaking was assigned to the team of experts assembled by the Kurchatov Institute, a scientific institute for the study of nuclear physics. It was established early on that most fuel was somewhere within the ruins of the fourth unit, since very little was ejected by the explosion. The building itself was enormous, with winding passages known only to those who worked for years in its labyrinthine walls.
Below: A schematic diagram of the fourth unit block seen from the west. The dimensions of the building are marked in meters. Note the enormous region of rooms located below the reactor core (Closed Reactor Space on this diagram). The area at the bottom of the building with the large vertical pipes are the bubbler tanks that held emergency cooling water for the reactor. This was the area scientists feared a steam explosion if the fuel lava gained access.

Adding to the problem of the scale of the search area was the fact that the building was potentially unstable due to the explosion of the fourth reactor. Rubble filled hallways and walls and ceilings sagged dangerously. Radiation levels fluctuated wildly within the building, with some areas almost entirely safe and others able to cause sickness and death in minutes. Even more pressing was that starting in the spring of 1986, the lower levels of the fourth unit began to slowly fill with fresh concrete. The Ministry of Medium Machine Building unit US-605, who were building the Sarcophagus to cover the radioactive remains of the unit, poured concrete into the structures of the Sarcophagus 24 hours a day. However, huge gaps and sinkholes existed in their work area, and a good portion of the concrete pumped into the Sarcophagus ended up deep in the lower levels of the block. This concrete blocked hallways, doors, and even (as they would later come to learn) covered up some of the melted fuel.
It was not until late spring of 1986 that exploration of the fourth unit block began. In June of 1986, two men were probing a steam distribution corridor in the southeast corner of the block from another corridor just below it using a powerful dosimeter which could detect radiation levels of up to 3,000 roentgens per hour. Since radiation levels in the stairway up to the corridor they were probing were already quite high (~25 roentgens per hour) they decided to send the detection head of the device up the stairs ahead of them via an assembly of metal rods. As soon as the device entered the corridor above, it went off the scale and burnt out. From this result the team was able to pinpoint a source of extreme gamma radiation.
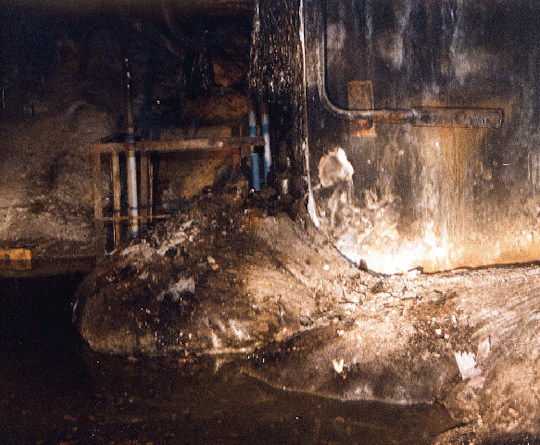
In December of 1986, and expedition was mounted to room 217/2 to make visual contact with the suspected fuel concentration. Moving along the steam corridor this time, the team spotted a large metallic gray mass sitting neatly within the corner of the room. This formation was dubbed the "Elephant's Foot" (though some source translate it as"Elephant's Leg") due to its similarity to the leg of an elephant. The black glassy mass emitted over 8,000 roentgen an hour, deadly after just one and a half minutes (this is the maximum recorded emission, the levels would decrease significantly in the months after the disaster). For the first time, the theory of fuel lava was visually confirmed. The team branded the materiel "lava-like fuel containing masses" (LFCM).
Below: A picture of the Elephant's Foot from the direction which it was first observed. The railings just behind the main formation (Label 1) is the railing around the metal stairs from which the formation was first detected via dosimeter. Note the streaks of fuel above the formation showing where the fuel had dripped down from above. Label 4 denotes the "fresh" concrete that made its way into the building during the construction of the Sarcophagus.

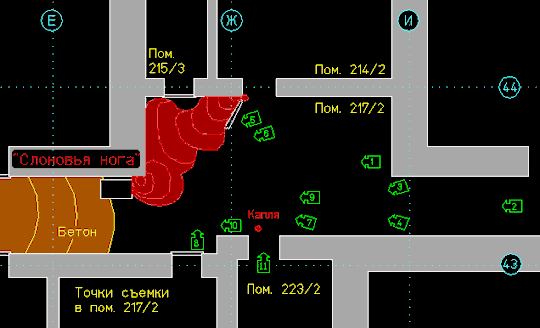
Below: a view of room 217/2 from above. The red is the Elephant’s Foot, the orange is the fresh concrete, and the gray are the walls of the block. The Foot itself is the accumulation closest to the bottom left of the photograph. You can see there is more lava in an unnamed formation next to it.
After locating the fuel and taking some pictures, the team was tasked with analyzing what the lava was composed of. This may seem kind of obvious, but really it was not known what was in the LFCM. Presumably the fuel of course, but what else? It had been debated from the early days of the accident if the efforts to douse the fire and melting fuel with lead, boron, and sand had been effective (I refer here to the April 26th-May 12th aerial bombardment campaign of the reactor via helicopter- I will make a post on this effort at a later time and link it here). The contents of the fuel is an interesting topic which I will not go over more in this post. You can find more info on the quest to get a piece of the LFCM here.
After procuring a sample, one issue remained. They had found some of the fuel, but nowhere near the total amount. The grand majority of the fuel had yet to be located. By the summer of 1987 the fresh concrete that had run into the lower levels of the block began to cause real obstacles to the scientists. Many rooms suspected to contain fuel were inaccessible or could not be reached safely. A new approach was needed.
At the end of 1987 the Kurchatov team was reassigned to be part of the adventurously named Chernobyl Complex Expedition (CCE), an enormous liquidation effort that was tasked with exploring the interior of the Sarcophagus and locating the rest of the fuel in the years after the disaster. The CCE was composed to representatives from all the major Soviet scientific institutions, as well as builders and engineers. At its peak over 3,000 people worked as part of the Expedition. Through it all, the main core of this group was the scientists from the Kurchatov Institute.
Backed by resources of the entire CCE, the scientific team sought new approaches for searching for the fuel. After extensive discussion, the scientists came up with a rather ingenious solution. They would use coring drills like those used in oil drilling exploration set up in specially decontaminated rooms in the fourth unit block to drill so called ‘wells’ into inaccessible rooms. Through these they would send specially built monitoring equipment. These included thermometers, periscopes, and radiation sensors. Not only could they monitor the LFCM with this equipment, they could also obtain information about the building and the LFCM via analysis of the cores made by the drill. This allowed them to remotely locate, monitor, and sample the LFCM with minimal risk to personnel.
Below: A schematic of the wells drilled at the 9 meter mark below the reactor containment vessel. The purple lines are the wells themselves, with the gray being the concrete walls of the block. The large blue cross is the metal support Scheme S. I provided this as an example of how the wells were drilled and laid out. For more info, feel free to contact me.

Below: a member of the CCE operates a drill in the bowels of the fourth unit block. Note the protective clothing he is wearing to prevent the spread of airborne radiological contamination.

Between 1988 and 1992 a total of 134 wells were drilled between the 9 and 16 meter marks (the method by which levels of the plant are identified) and at the 20, 21, and 25 meter marks. It was eventually determined that over 180 of the 190 tons of fuel remained in the reactor block. The missing ten tons had either been blown out of the active zone and into the area around the reactor by the explosion, or had vaporized into the radioactive column that had emerged from the reactor in 1986. The remaining fuel within the block took the form of the LFCM, as well as dust. The dust created by the fuel is the main radiological enemy post 1986 and continues to be an issue to this day. Primarily composed of plutonium, the dust has thankfully remains mostly within the Sarcophagus. The LFCM, initially almost indestructible, has started to crumble and decay. As time goes on this creates even more dust, and the formations slowly erode away. This has contributed to a significant drop in gamma radiation emissions from the fuel masses and allowed for further study of the premises of the fourth unit block.
In 1994, the Complex Expedition used data collected from these wells to compile an official report on the status of the fourth unit block. With their findings published (and the Soviet Union dissolved) the CCE disbanded. Many of the scientists who worked on the expedition (and even some who were on the original Kurchatov Institute team) continued to work at Chernobyl for years. Expeditions are still sometimes mounted into the Sarcophagus, but they have not been carried out with any regularity since the early 2000s. However, visual inspection remains the only way to accurately monitor the condition of the LFCM.
You may be left wondering: how exactly did these men navigate such a radioactive environment without adverse effects? Once again I shall make a post on this in the future, but the main answer is: speed! Defense against radiation (with some exceptions) is as simple as not lingering in high radiation areas. To facilitate safe movement through the block, the scientists located and marked safe areas of reduced radiation levels (such as the room in this post) as well as dangerous areas to avoid. In the end, only a select few “Stalkers” actually set foot within the ruins of Reactor 4.
This post serves as the (admittedly lose) historical context for the exploration of the fourth unit block and the location of the LFCM. I will be making another post about the fuel rest of the fuel soon. I always feel bad for the other fuel formations because the Elephants Foot gets all of the attention. This will be a lot more technical, with locations and diagrams (joy of joys!) of the fuel as well as more context to its identification.
#chernobyl#elephants foot#radiation#history#autism#nuclear#nuclear power#reactor#china syndrome#chernobyl complex expedition#accidents and disasters#kurchatov institute#LFCM#chnpp#soviet union
92 notes
·
View notes
Note
Im planning on making a (possibly bioactive) vivarium for a future corn snake, I have roughly 1m72 x 70cm free space on my floor which feels a bit small for me, is there a way I can compensate by adding more vertical space (I have about 60cm free and I can maybe have it be more of an L shape if I build it around the window, allowing me to make one section taller) and will that cause any issues for the snake and for the vivarium
Oh this sounds like fun!
Adding vertical space is always an option for corn snakes. They can be quite active climbers, given the opportunity, and I could definitely see adding basking shelves and climbing branches as being a great way to maximize enclosure space. The question of whether that would cause issues for the vivarium, though, is dependent on a number of variables. It sounds like you're building this from scratch, which gives you the opportunity to trial-and-error a bit with a planted bioactive setup before you add a corn snake.
My areas of concern would be moisture proofing, air flow, humidity gradient, heat gradient, light gradient, weight of the vivarium, ease of maintenance and cleaning, security against tipping, and security against snake escape.
If you're a handyperson or you're working with a handyperson to ensure that a snake's needs are being met while keeping the build sturdy, and you are patient enough to dial in your settings for a while while the viv cycles, I think this could be a very rewarding and beautiful project.
I wish you the very best time assembling and filling it!
(please send pictures if you do it I wanna seeeee)
#snake#snakes#reptile#reptiles#reptiblr#vivarium#snake enclosure#answers to questions#text post#diy projects
11 notes
·
View notes
Text
ROY G BIV tag
Thank you for the tag, @druidx. This looks like a fun new one.
Passing the (entirely optional) tag to @rickie-the-storyteller, @on-noon, @yourlocalboredprocastinator, @ghost-town-story. @broodparasitism, @itusebastian, @void-botanist, and an open tag for anyone else.
Rules: Search your your writing for the colours of the rainbow and post the excerpt
Red: Empty Names - 14 - Down Low
When Ashan finds her some ten minutes later with a satiated smile on her face and watching the spider pull in their stygian catch from the lake, the cut on Eris’s forehead has already healed. None of the blood painting her new armor red is hers.
Orange: The Archivist's Journal, Day 78
As long as I’m writing, I suppose I ought to take a moment to describe the landing area. It was another jutting cliff with an arch on the end, like Siren Overlook and the one we encountered to the west. Twice could be a coincidence, but three times and I’m convinced the whole formation is artificial, not just the arch, columns, and pool. It wasn’t nearly so overgrown as the western dock – if anything the columns were in better shape than at Siren Overlook – but whereas Siren Overlook was mostly covered in short grass with the occasional tiny white flower or stubborn shrub this was a veritable field of bright orange flowers broken only by the water lily filled pool running down the center.
Yellow: The Archivist's Journal, Day 60
Doffing my boots and carrying them in one hand, I waded in a short ways as I walked the perimeter of the spring. It’s curious how unafraid the fish and turtles swimming the shallows were of me. Most I could practically get within arm’s length before they darted away, and if I stood still for a few minutes, small schools of finger-length yellow fish would congregate in my shadow.
Green: The Archivist's Journal, Day 9
Hurrying to catch up with my young companion I pushed my way through the crooked door only to nearly trip over her. The morning light had transformed the interior space from a surreal void to an awe-inspiring expanse. Light filled the central nave. As green leaf-filtered streams on the high side windows. As vertical golden rays replacing the prior night’s columns of rain from holes in the roof. As an iridescent wave coming in from the bare remains of a curved stained glass window backlighting the statue of the Reader. All this reflected off the broad leaf and moss-filled puddles that stretched across much of the floor, still not evaporated days later. The side aisles were a tangle of roots from the trees above, quite possibly doing as much to hold the structure up as the pillars separating aisle from nave.
Indigo: Witch's Testament: The Fighter
Weapons are raised and aimed. The crowd begins to back away. Someone above cracks a joke about how they should have just skipped to waving guns around if it was going to be this easy to solve the problem.
The crowd only backs off so far though, most that made it through the outer gate are still on the inside of it. Those still stuck beyond push one another over the wall so some might get a better view. A lone figure left behind by the receding sea of people remains standing in the middle of the reef of broken and smoking drones, tens of meters from the protesters behind him and the forces before him. His dark clothes are long and billowing. His pointed hat is wide brimmed to hide his face. His serpentine familiar, assembled from scavenged and stolen parts, coils up one arm, over his shoulders, and down the other.
Someone in the line of hired guns makes an incredulous remark under his breath about cosplaying wizards.
The man corrects him to say that he’s a witch and his voice echoes through every loudspeaker, portable device, and auditory implant in the building.
The witch strides forward, his eyes glowing indigo from the shadows beneath his hat and matched by those of his slowly uncoiling familiar.
Someone gives an order to fire and an electrified dart wizzes past the unperturbed witch. Six more darts miss. Rubber bullets are loaded and combat implants lock in firing trajectories.
To the eyes of the security personnel, every shot should be a hit but impossibly passes through their target and out the other side. To the eyes of the protestors the witch is walking through a hail of bullets that are all miraculously going astray. To the eyes of the witch, every implant-assisted firing solution coming from the soldiers before him is being outlined in indigo and nudged to exactly where he wants it.
The witch has already crossed the security line and is on the steps of the building behind them by the time someone catches on and spins around to aim and fire manually. His familiar rears up and hisses. The shot goes wide as the entire security contingent seizes up, spasms, and falls to the ground.
The moment the witch crosses the threshold, every light in the building goes out, every door unlocks save for those to the roof and underground garage, and every camera becomes a witch’s eye.
Violet: A Dream About Purple
We are all too busy watching the game to notice anything wrong until a third team tries to take the field. Their uniforms are purple and their hair appears to be dyed to match. All of them wear the same vacant smile that crawled its way out of the uncanny valley and speak with offputting singsong voices.
It is only then that we all look up and see the storm rolling in, stretching across the horizon with clouds of that same unnaturally vibrant violet. Eerie music rides the wind ahead of the storm, heralding its imminent arrival.
#tag game#writeblr#my writing#writers on tumblr#writing tag games#empty names#the archivist's journal#The Witches' Testaments#roy g biv tag#in retrospect this is just#find the word tag#That snippet for Indigo was actually written with this tag game in mind
10 notes
·
View notes
Photo


“Martin Luther Church”, Hainburg, Austria [2008-2011] _ Architects: Wolf D. Prix / Coop Himmelb(l)au.
“ The building consists of four main elements: a sanctuary, a community hall, a sacristy, and a sculptural bell tower. The shape of the building derives from that of a huge table, with its entire roof construction resting on the legs of the table — four steel columns. The play with light and transparency has a special place in this project. The light comes from above: three large winding openings in the roof guide it to the interior. The church interior itself is not only a place of mysticism and quietude but also an open space for the community. The correlation of the number three and the concept of Trinity in Christian theology can be interpreted as a ‘deliberate coincidence’.
The church interior itself is not only a place of mysticism and quietude — as an antithesis of our rather fast and media-dominated times — but also an open space for the community. The sanctuary has direct access to the glass-covered children’s corner, illuminated by daylight, which also accommodates the baptistery. The community hall is situated behind it: folding doors on the entire length of the space between the two main chambers allow for combining them into one continuous spatial sequence. A folded glass facade on the opposite side opens towards the street.
On the interior ceiling, the suspended frame structure was covered with several layers of steel fabric and rush matting as a carrier layer for the cladding of the stucco ceiling, whose geometry follows the three-dimensionally curved shape of the roof with the skylights. Another key element of the church is the ceiling of the prayer room: its design language has been developed from the shape of the curved roof of a neighboring Romanesque ossuary — the geometry of this centuries — old building is translated into a form in line with the times, via today’s digital tools. The roof structure was delivered in four separate parts to Hainburg, assembled, welded, and coated on site. The whole structure was then mounted with a crane into the designated position, on the solid concrete walls of the prayer room.
The implementation of the intricate geometries required specific technologies of metal processing and manufacturing only available in the shipbuilding industry. The reference to shipbuilding is at the same time also reminiscent of Le Corbusier who served as an important role model, not least because of his La Tourette monastery. Due to its shape with three skylights, the roof was designed as a self-supporting steel construction with a stucco ceiling. The structure was assembled in a wharf at the Baltic Sea. The exterior skin is made of 8 mm thick three-dimensionally curved steel plates welded on frame construction. In turn, this structure of steel plates and the frame sits on a girder grid. The compound of the grid, frame, and steel skin transfers the total load of the roof (23 tons) on four steel columns which are embedded on the solid concrete walls of the prayer room. The 20-meter high sculptural bell tower in the forecourt is a vertical self-supporting steel structure, that completes the building ensemble and makes it a highly visible landmark.”
https://coop-himmelblau.at/projects/martin-luther-church/
https://arquitecturaviva.com/publicaciones/av/obras-surreales
#Martin Luther Church#Hainburg#Austria#Wolf D. Prix#Coop Himmelb(l)au#2008#2011#Surrealism#Arquitectura Viva No152
52 notes
·
View notes
Text

Rocket propellant tanks for NASA's Artemis III mission take shape
As NASA works to develop all the systems needed to return astronauts to the moon under its Artemis campaign for the benefit of all, the SLS (Space Launch System) rocket will be responsible for launching astronauts on their journey. With the liquid oxygen tank now fully welded, all of the major structures that will form the core stage for the SLS rocket for the agency's Artemis III mission are ready for additional outfitting.
The hardware will be a part of the rocket used for the first of the Artemis missions planning to land astronauts on the moon's surface near the lunar South Pole. Technicians finished welding the 51-foot liquid oxygen tank structure inside the Vertical Assembly Building at NASA's Michoud Assembly Facility in New Orleans on Jan. 8.
The mega rocket's other giant propellant tank—the liquid hydrogen tank—is already one fully welded structure. NASA and Boeing, the SLS core stage lead contractor, are currently priming the tank in another cell within the Vertical Assembly Building area called the Building 131 cryogenic tank thermal protection system and primer application complex. It completed internal cleaning Nov. 14.
Manufacturing hardware is a multi-step process that includes welding, washing, and, later, outfitting hardware. The internal cleaning process is similar to a shower to ensure contaminants do not find their way into the stage's complex propulsion and engine systems prior to priming.
Once internal cleaning is complete, primer is applied to the external portions of the tank's barrel section and domes by an automated robotic tool. Following primer, technicians apply a foam-based thermal protection system to shield it from the extreme temperatures it will face during launch and flight while also regulating the super-chilled propellant within.
"NASA and its partners are processing major hardware elements at Michoud for several SLS rockets in parallel to support the agency's Artemis campaign," said Chad Bryant, acting manager of the Stages Office for NASA's SLS Program. "With the Artemis II core stage nearing completion, the major structural elements of the SLS core stage for Artemis III will advance through production on the factory floor."
The two massive propellant tanks for the rocket collectively hold more than 733,000 gallons of super-chilled propellant. The propellant powers the four RS-25 engines and must stay extremely cold to remain liquid.
The core stage, along with the RS-25 engines, will produce two million pounds of thrust to help launch NASA's Orion spacecraft, astronauts, and supplies beyond Earth's orbit and to the lunar surface for Artemis III. SLS is the only rocket that can send Orion, astronauts, and supplies to the moon in a single launch.
IMAGE....All the major structures that will form the core stage for NASA’s SLS (Space Launch System) rocket for the agency’s Artemis III mission are structurally complete. Technicians finished welding the 51-foot liquid oxygen tank structure, left, inside the Vertical Assembly Building at NASA’s Michoud Assembly Facility in New Orleans Jan. 8. The liquid hydrogen tank, right, completed internal cleaning Nov. 14. Credit: NASA/Michael DeMocker
youtube
4 notes
·
View notes
Text


“Dreamland,” the new book by Peter Merlin, is full of interesting new information that is so exciting I will share as I read.
Three AF-12 prototype interceptors were built in place of the A-12 in the production line. The seventh, eighth, and ninth in the production line were AF-12, then the 10th and so forth were all A-12s, except for two M-21s. The AF 12s were not modified A-12s in the sense that they were built to be an A-12 and then later changed. They were created to be AF-12, The Interceptor Blackbird, which was later known as the YF 12. Confusing, I know; please ask questions.
A separate work area was made for personnel cleared on plan 3A (AF-12); only people who needed to know were allowed inside a walled area in Burbank where they were working building A 12s. I wonder if it was a secret that everyone was aware of.
Significant differences were between the A-12 and the AF-12, later called the YF-12.
They raise the pilot seat along with the canopy for better visibility. This added a slight hump to the airplane profile. Wind tunnel test, which showed the necessity for more control of the aircraft because of the profile change so they added three vertical fins. Two fixed strakes on the underside of the engine nacelles the third was a single hydraulic activated thin beneath the back fuselage it was so large that had to be folded during takeoff and landing. The A-12s and the AF 12s were more alike than not.
The overall configurations and structure of power plants and so forth were the same. Construction of the first AF-12 designated article 1001 was completed by July 1963, and the airplane was convoyed to Area 51 for final assembly and check out. Jim Eastham flew the maiden flight on August 7 with Lou Schalk flying chase in an F104 flight testing proceeded with no unpleasant surprises.
The nose was changed to accommodate a conventional conical radome Hughes AN/AS6-18 radar system. Because this airframe was built to be an interceptor it lacked the anti-radar treatment in the A-12. Protecting the radar cross-section was not a factor in making this airplane. The first YF 12 had a camera pod to record the launching of the air-to-air missiles stored in the aircraft. But the second YF-12 product did not have one. Of course, the biggest difference was that this Blackbird was armed! And had a second cockpit to accommodate the fire control officer. Launch bays for three air to air missiles.
This book is available at Amazon.
Linda Sheffield
@Habubrats71 via X
2 notes
·
View notes
Photo
Duskvol is a very vertical sort of city. Teetering heaps of architecture, connected by a cobwebbing of bridges, rails, raised roads, ladders, ducts, pipes, wires, cobblestones, catwalks, scaffolds, improvised elevators and, beneath it all, the canals. In the wealthier districts, the buildings are stacked and assembled with something resembling a plan. But the city grows and grows, and with the protective boundary of the lightning towers constraining its expansion, there is nowhere to build but up. Or down...
30 notes
·
View notes
Text
The Vampyr Combine are the backbone of Lemuria, building and maintaining the Lemurian Merchant Aerial, and ensuring a steady supply of goods onto and off of the island. Founded and headed by Vampyr, the Combine was intended to progress Vampyric culture in a modern world, instead of stagnating with a veneration of a forgotten past.
The Combine is a loose confederation of several disparate Lemurian factions, and their respective cultures and traditions have blended into a chaotic, functional mix. Gremlins, Goblins, Vampyr, Fae, and human alike live and work together for mutual gain and defense.
The Privateers may run the Docks, the Assembly the Shipyards, and the Goblins repurpose defunct airships into useable parts in the Scrapyard, but the Merchant Aerial of the Vampyr Combine runs the Ports, bringing materials for the Assembly, materiel for the Privateers, and providing a steady business to the Scrapyards.
Their ships are not flashy, fast, or powerful, but when it comes to rugged dependability and long-term functionality, Combine Merchant Aerials simply cannot be beaten. If a thing can be found by coin or cutpurse, the Combine will find a way to get it. The markets, both Black and Legitimate, have unmatched selections and prices.
The Port District rises sharply up from the pastoral landscape of Lemuria. Massive landing platforms squat atop massive vertical warehouses. Massive Merchant Aerials plow through the local airspace to their joint docking/repair slips atop these incredible feats of engineering. Smaller warehouses can generally handle either one massive Aerial, or up to four smaller ones. The largest can handle up to five mammoth Aerials, or up to forty smaller Aerials.
The massive Towers are arranged in several long, straight rows along broad avenues dedicated solely for the smaller, local air and ground travel, with Commercial Districts popping up in the alleys between towers, perpendicular to the Port Avenues.
Atop the Towers, Combine techs work, live, and breathe. Luxury accomodations for the repair Techs and Merchant Aerial crew alike lie just below the loading/unloading floors, between massive fuel tanks and maintenance bays, and the low, eternal rumble of heavy equipment and the loud squeal of single-man speeders used to traverse the vast distances of the Warehouse itself.
The Symphony of the Aerials.
Below the living and maintenance levels are dozens, if not hundreds, of floors dedicated to nothing less than the storage of the titanic amounts of materials that are either waiting to be sent out on a Merchant Aerial or fresh off a Combine airship waiting to be retrieved by Lemurians in need.
And finally, in the lowest reaches of the Aerial Warehouses, lies the public sectors. Massive doorways that rarely close, measured in stories rather than yards, yawning open into a cavernous honeycomb of docking slips and designated landing spaces serviced by an eternal and chaotic caravan of workers, conveyors, and loaders.
Food service, small stores of quiet necessity, and beds to let on demand are all available here, owned and operated by the owners and operators of the entire massive Warehouse. The availability tends to be limited to bare essentials, but any and everything you might ever need (and much that you won’t) can be found elsewhere in Lemuria if you know where to look and can afford it.
Between the peaks of the warehouses, in the valleys where natural light arrives for only a short time per day, the Port’s commercial district has sprung up.
Built vertically of up to a dozen levels layered haphazardly on top of each other, the Commercial Alleys have risen up between the massive Warehouses. Built directly into the sides of adjacent Warehouse Towers, parking is serviced directly by the Towers. Even the tallest of the Commercial Alleys is dwarfed many times over by the smallest of the Towers.
Mostly lit by neon and harsh artificial lighting, even when the sun is at its zenith, the Commercial Alleys never sleep. There is a constant stream of commerce and life, no matter what time of day it is.
Alleys tend to each have their own personality. Some are lit by neon and garish signs. Others have a more natural look, full of growing things with natural bioluminescence.
Temmas’ Alley appears to be no more or less than a giant, free-roaming zoo, with creatures of every possible type and shape lounging and living more or less as they wish. The crafty old Goblin and his band of misfits take great pains to make their animal guests as comfortable as possible, from the artificial waterfall the splits the middle of the Alley to the large watering hole that runs down the Alley’s center. Foregoing their cultures’ tendency to tinker with mechanicals, Temmas and his motley crew instead have focused their attention on pampering biologicals.
Qtleska’s Alley is a natural haven in a city of steel and concrete. Trees, impossibly old and thriving for its location, grow up and around the Towers beside it, cradling shops and inns and restaurants alike in its branches. But the crown jewel of Qtleska’s is the namesake Qtleska’s Library. Not of books, but of plants. Flowers beyond number, shrubs and bushes as far as the Alley can stretch. Trees, vines, mosses, and far more, carefully curated and tended by a small resident Gnoll population. Qtleska and his fellow Gnolls are a common sight in the Port, slowly coming and going along their mute pathways, floral raiment in various stages of blooming upon and into their backs. And somehow, despite the heavy traffic near Qtleska’s Alley, beneath the branches the sounds of airships are somehow muted in this natural oasis amongst the Port’s artifical mountain range.
Entalen’s Alley, meanwhile, is a sharp departure from some of the more natural alleys. Lit by buzzing neon billboards advertising their services, everything is a dull, dark gray. Thin, rickety catwalks criss-cross Alley, and thin walkways along the edges of the Alley service the shops reinforce the feeling of cramped paranoia. Harsh, white spotlights eternally shining down from the ceiling in irregular arcs leave deep shadows between their blasts, while dull, if colorful, light spills from shopfronts, slicing the gloom of Entalen’s into smaller if somehow more intense pools of shadow. The sizzle of frying food is everywhere in this Alley, punctuated by calls of shopkeeps to each other and to prospective clients that hurry from one patch of light to the next, staying together in tight groups if they need to venture down this particular section of the Port.
Roberto’s Alley is softly lit, colored all in white, with smooth, organic curves. Minimalism would be the name of the game, if such a thing would not sound vulgar to the disgustingly wealthy that is Roberto’s Alley’s clientele. Few things are actually sold here, but when they are, enough money to buy small countries are exchanged. No wares are on display, and far from the hawkers in other alleys, every store here has armed security to keep out anyone until they have proved they have a sufficient bank balance. If you need to ask what sort of things are available here, you will be quietly if efficiently frog-marched out of the Alley and warned not to return on pain of pain, because you clearly cannot afford even a sip of water from the most pitiably pedestrian of the shops here. Those that can afford what resides in Roberto’s, well. They know where to go and whom to talk to. But if you’re reading this it clearly isn’t you, so it’s best you move on before security is called.
9 notes
·
View notes
Text

Workers in the VAB replace the fins on the ASTP Saturn IB’s (SA-210) first stage.
Date: March 11, 1975
NASA ID: S75-23780
#Apollo–Soyuz#Apollo Soyuz Test Project#ASTP#CSM-111#Apollo Block II CSM#Docking Module#Saturn IB#SA-210#Rocket#NASA#Apollo Program#Apollo Applications Program#stacking#Vertical Assembly Building#VAB#Kennedy Space Center#KSC#Florida#March#1975#my post
62 notes
·
View notes
Text
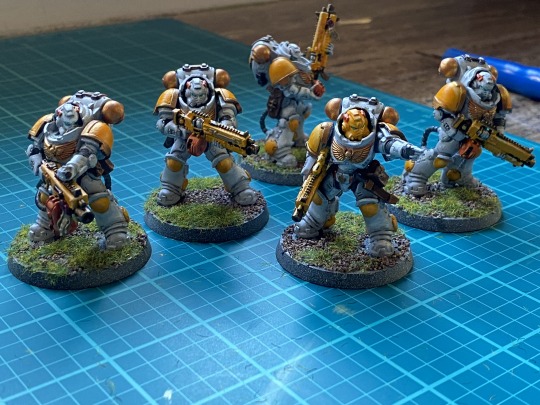
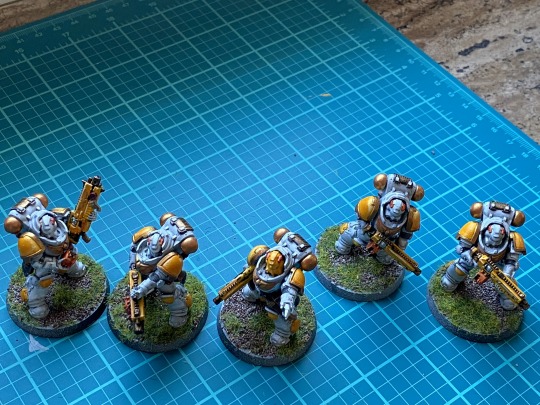
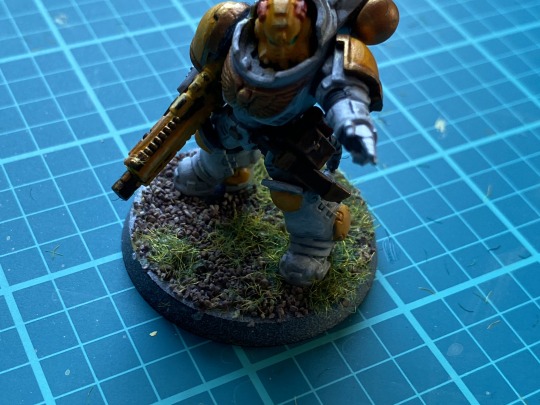
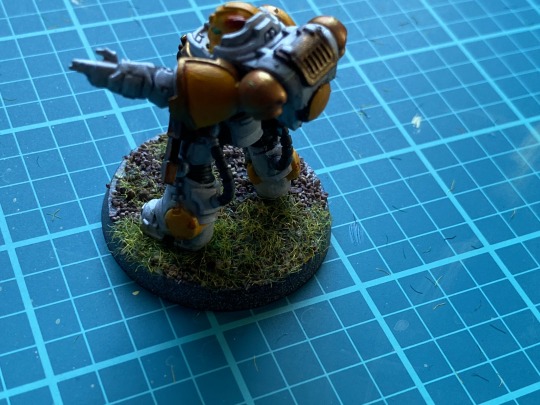
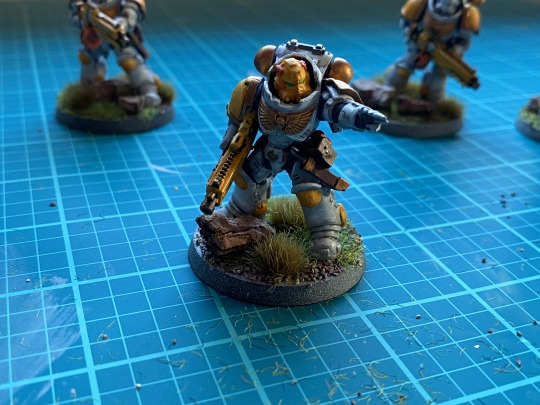
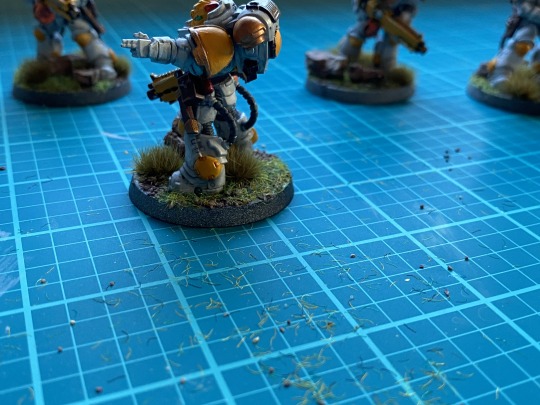
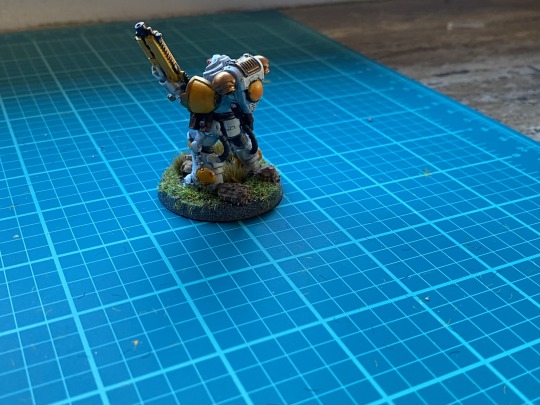
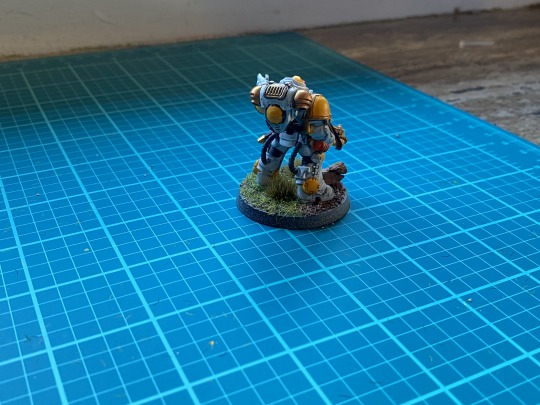
Paintbrush, PlasGlue, and Holy Clippers: Sparse Marns: Part VII: Basing
The End!SO CLOSE to The End!! All that's left is to do SOMETHING with their bases and then varnish the minis to protect the paintjob!
Ok so TECHNICALLY, you really don't have to do anything to the base.
I mean I've never really been in the gaming part of the fandom as I said at the start, I only ever played by myself or with my sibs, so maybe some ppl would hassle you for leaving them with just your basic black+primer bases, but really: Who Cares? So What! If you didn't want to do anything with the bases you could just leave them as is, and if you wanted to do SOMETHING but not anything crazy, you could just paint them a uniform color: black, or grey, or a nice terrainy green or brown. Allot of folks do basically this:, painting the sides of the base brown and the tops green. Most mini-hobby companies also make "basing pastes" and terrain-paints meant to simulate particular terrain environments which you can apply with a brush and maybe schnazz up with a few licks of paint once they dry.
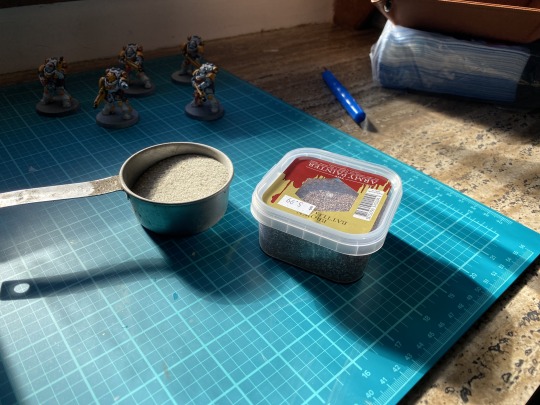
BUT! The point of all this was for me to practice skills, old and new, so I decided to do some flocking. "Flocking" just means "gluing terrain-like Stuff to your mini bases". SO! I went to the gamestore and bought some Army Painter flocking materials
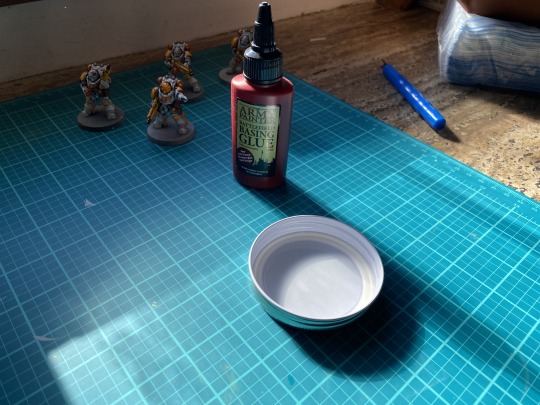

Lots of folks call Basing Glue "PVA Glue", which is basic wood glue or Elmers to most USians, so Im assuming that's what that is: it certainly looks, smells, feels, and behaves like it. I used the lid from one of my water jars to hold the glue, and This Brush

to apply it.
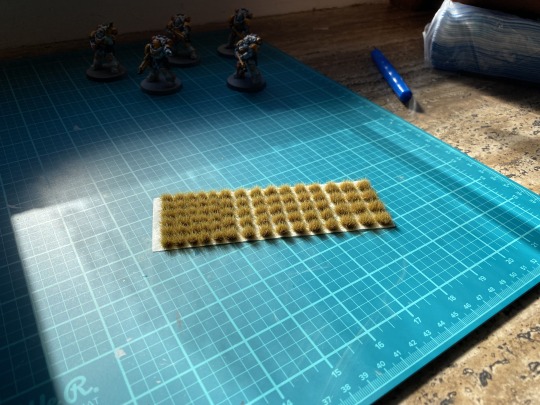
The flock itself is some Paver's fill I had lying around, plus Army Painter's Brown Battlefield(a sort of gritty rubble-sand), Green Field, and Battlefield Rocks, which I found those tweezers I didn't like much from assembly to be PERFECT for manipulating, placing, and holding secure. The shrubbery is Army Painter's Highland Tufts which I LOVE! I LOVE THEIR TUFTS SOMUCH!! Seriously after I got done with the basing I immediately went out and bought, like, 3 more packs of different varieties. The Flocks cost ~$15 total and the glue was, I think, another 5 or so, so it was about 20 bucks. The Paver fill didn't really do a super great job which was unfortunate, but now I know sand isn't a great flocking material(at least: not how I used it. I'll get to that later).
Working one base at a time, I brushed the glue on, held it at a tilt, then sprinkled the gravel and sand down it, adjusting and turning to til I was satisfied with the coverage. Then I let it sit for 30 minutes to dry, held it vertical and gently tapped to knock loose any excess, and did that again with the grass, only applying it in patches where I thought grass would Look Neat, letting it dry for another 30 minutes. Here's how that looked


Swag!
Then I applied glue to the bottom of the rocks and stuck those wherever I thought a rock should live on the bases, letting dry for another 30 minutes, then did the same with the BEAUTIFUL Tufts My Beloveds uwu Here's how they looked after all that!


I love how this looks!
Unfortunately, the brown battlefield and green field flocking doesn't stay on so well X| This may be my fault: I might have not used enough glue. But, I decided to go looking for a way to lock it down and found some videos about "sealing" your flock to keep it from doing that, and decided to try covering the flock with a layer of VERY watered-down glue, to hold it in place, then decided to paint the wee skull on Sarge's helmet white, to stand out more. Here's how that looks
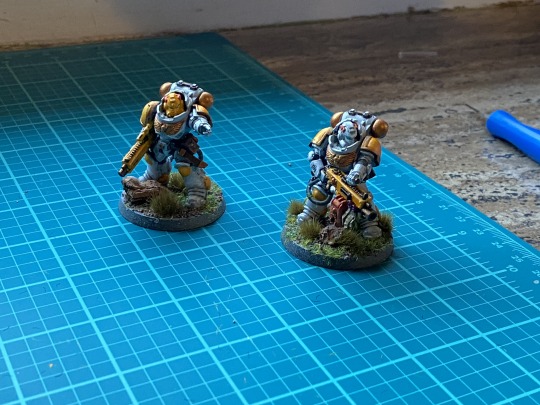

Oh: and once the flocking was dry, I painted the rim of each base in Mournfang Brown with a #2 brush, taking the time to fill in any empty spaces on the edge. I think it's fine, but it's definitely less charismatic than with the grass standing up all willy-nilly. When I went to get the tufts last time, I saw they also sold spray cans of "Terrain Sealer". Now, I KNOW this is for actual terrain pieces you build and paint, and for sealing gameboards you might create, but I figure that, with sufficient distance, it'd probably work well at sealing base-flock, too.
In general I think the flock-experiment went well, but I think I probably made a few mistakes in it. Next time I'll fully paint the bases in a ground-color before applying any flock, and I'll use a thicker layer of glue and see if that changes the stickability. Another option is to use the flock purely for texture and paint over it once it's dry. It's allot more work, and it requires prepping the basing substrate before you attach the minis and some VERY careful painting of said substrate at the finish, but most of the painting tutorials I've been watching lately do something like this, often using cheaply or freely available materials like sand, pebbles, and chopped up Ephemera instead of branded flocks. I could also use branded basing-pastes which, again, allot of video I watched prepping for this used. I'd like to give all those options a go sometime in the future just to see how it works out, though I worry about weight; one benefit of the Army Painter flocking is that it's pretty light and doesn't really impact the handling of the mini.
All that's left now is applying the varnish, going over my thoughts on the project, what I think I need to work on, and discussing my next one! Seeya then ^v^ ^v^
#zA Paints#zA Hobbies#Basing#GamesWorkshop#Space Marines#Heavy Intercessors#Nova Paladins#Hobbyposts
8 notes
·
View notes
Video
Maybe I’ll post a better video of this later, but probably not; it took months for me to even bother to post this one.
So I think I mentioned this before here when I was starting, but now it’s finished (and has been for a while now): My own 8x8x8 LED cube. This is a purely decorative electronics project; I’ve seen some people on Youtube build theirs, so I figured, I can do that as well. As you can see, it has a lot of blue LEDs (512, or 8x8x8, to be precise), and it uses those to display whatever patterns I like.
Building this was honestly kind of annoying; 512 is a lot of LEDs to solder together. Weirdly enough, getting that many LEDs is actually dirt cheap, I paid like 10€ with shipping (I ordered in China). The most expensive thing is the acrylic case.
In technical details, all the hardware and software is custom. You don’t have to do that, you can download finished software, but for me, that would have been less fun. The control board uses an STM32, specifically an STM32F030C8T6, because that’s one of the only ones that were available. It still has far more than enough power for this, though; I’m running it at 48 MHz, which is frankly ridiculous, but it means I never have to think about performance. It can be controlled via an iPhone app, and uses an ESP8266 module for connectivity… or it will, once I’ve written the software for both sides of that. The whole assembly is powered by a 3.3 volt small power supply from Amazon, which is plenty.
The trick to controlling that many LEDs is to not control them individually. The LEDs are divided into eight horizontal layers and 64 vertical columns. The cathodes, that is the minus sides, of all LEDs in a horizontal layer are connected, and the anodes, the plus sides, of all LEDs in a vertical layer are connected.
In practice, I only ever have one layer of LEDs turned on at the same time, by connecting it to minus. I set the pattern that layer displays by connecting the columns of the LEDs that are to be lit to positive voltage, and then I connect the layer that is to be lit to negative voltage, so current can flow. The LEDs above and below also get positive voltage, but their negative side isn’t connected, so they stay dark. The LEDs on the lit layer that are dark all have their negative sides connected, but not their positives, so they stay dark as well.
Then I simply switch which layer I’m showing faster than the human eye can see (I think currently at 8 kHz, which is frankly ridiculous, but the microcontroller and the shift registers I use as column drivers don’t complain).
Overall, I’m really happy with how it turned out. I also learned a lot for how I’d do it if I ever did this again, but it was so much work that I’m not really in any hurry to try.
33 notes
·
View notes
Text
The Engines of the Cronk & Harwick Railway
This is a continuation of a previous post in which I gave a basic overview of my rather silly headcanon for the Cronk & Harwick Railway (or as they're frequently refered to The Old Crooked and Horrible), a railway which is briefly mentioned in the IOS Book and appears on a few RWS maps.
This post is about the fleet of engines which run this obscure, backwater, and largely illegal railway.
No.1 - Queen Anne:
The C&H’s first engine has been through several changes over the years. She was originally built as a box tank for the Sodor and Mainland Railway. When first acquired by the C&H in 1900 she was given the name ‘Queen Anne’ by the line's owner. She was immediately set to work, despite being in poor condition from her previous working life on the S&M, but managed to keep going without any major repairs for about 10 years. By 1910 however, she was completely worn out. Instead of sending her off to an actual railway workshop however, the C&H decided they could do the necessary repairs in-house. While she was being repaired, the railway also took the opportunity to make some modifications, and Queen Anne emerged with a set of trailing wheels as well as a cab. It is, however, made of wood, and is said to leak so much that crews wonder why the railway even bothered.
During World War II Queen Anne was stored in an abandoned mineshaft along with the rest of the C&H’s fleet. After the war, she emerged from the mine with yet another change to her design. Her old box tank had completely rusted through and had been replaced with a more conventional saddle tank crudely bolted in its place. Where the railway got this saddle tank from is unknown, though Crovan’s Gate Works reported sometime during the war that one of their spare tanks for NWR number 6 ‘Percy’ had gone missing. There was an interesting continuation of this mystery a few years after the war, when the NWR’s Chief Engineer walked into the works one morning to find a rusty old box tank tucked amongst Percy’s spare parts. Needless to say, Percy was not at all happy about the suggestion, but the big engines laughed about it for a whole week!
Below is a sketch of Queen Anne in her post war form:
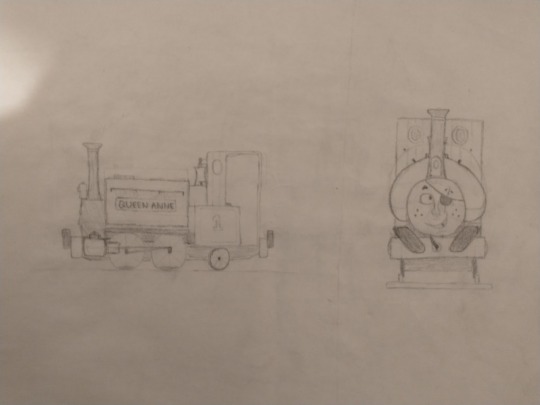
No.2 - Surprise:
By 1909 Queen Anne was quickly becoming worn out, and would shortly be going for overhaul in 1910. Another engine was needed quickly. The owner of the C&H had an idea. Taking inspiration from the Coffee Pots then being built for the TK&ELR, he decided to build his own engine right there in Harwick.
Salvaging a vertical boiler from an old riverboat, as well as several parts from various unknown sources (given this guy's track record this engine is almost certainly at least 90% stolen), he assembled a rather unusual engine. The engine was named ‘Surprise’ as in, it’s a surprise whenever he’s actually functioning properly! From the start Surprise was beset with mechanical and steaming issues, but the need for another engine saw him put to work anyway, and within a year a rather unorthodox workaround had been found for his reliability issues. A mast and sail was fitted as an alternative means of propulsion! Amazingly this worked, and Surprise has kept this addition ever since, using his steam for shunting and for starting heavy trains, and then gliding along the line by sail.
This is not always ideal, especially along the ballaswein branch which operates as a tramway for much of its length. Many a motorist and pedestrians have been forced to swerve or leap out of the way at the last second, as a train under power of sail has crept silently up behind them with little warning until it is nearly too late (Huh… I guess the name ‘Surprise’ is quite fitting in that regard as well)!
Below is a sketch of Surprise:

Railmotor No.1 Units A&B - Chitty and Bang:
The C&H has provided a passenger service since the switch to steam power in 1900, when a handful of old S&M 4 wheeled coaches had accompanied the purchase of Queen Anne. This had never really been satisfactory however. The coaches were by all accounts already falling apart before they had even arrived, and the C&H had a reputation of sparing every expense when it came to the upkeep of… well, pretty much everything. Nothing was done about the matter however, for several years, despite repeated requests, complaints, riots and death threats from passengers.
At last, after the rotting coaches and their bare board seats gave passengers one too many splinters where the sun don’t shine, the passengers rallied together, demanding the railway provide a better service for their paying customers!
So one late night break-in to a scrapyard later the C&H had acquired a pair of broken old buses, which they soon set about converting into railmotors as their newest passenger stock. As an additional modification they were also fitted with roof-top storage racks for carrying a light amount of goods and supplies.
The brother and sister pair of railmotors were named ‘Chitty’ and ‘Bang’, and they are… admittedly not much of an improvement over the old carriages… in fact in some ways they’re kind of a downgrade… but at least the seats have cushions now, and coupled back-to-back (as neither has a reverse gear) Chitty and Bang continue to be the mainstay of the C&H’s passenger service.
Below is a sketch of Chitty and Bang:

And that's all for now. As you can see, the C&H's fleet is a rather unusual bunch, in keeping with the ramshackle nature of the railway as a whole. But just as every ship needs a good crew to stay afloat, so to does a railway need a good fleet of engines, so I guess The Old Crooked and Horrible must be doing something right to still be around!
7 notes
·
View notes
Text
Drawing Class M/W - 1/30/23 Working with gesture & Contour
We are meeting in person for Monday’s class.
Class begins at 9:40am in room 5204 building Five.
As a class we will be going over the following assignments below.
I have included drawing vocabulary . You are responsible for learning and memorizing these words to incorporate those terms in your writing and communication skills
Materials Needed for this week:
Newsprint Pad 18 x 24
Charcoal Sticks / Soft
Charcoal Pencils
Kneaded Eraser
Drawing Pad holder
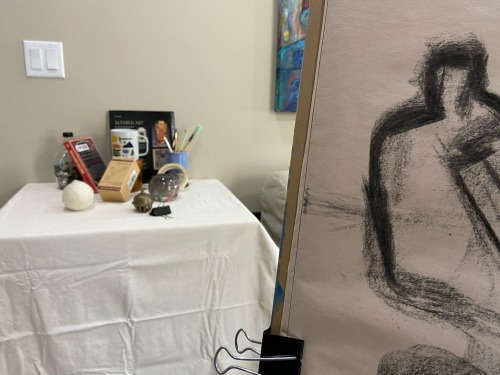
In this post I will review once more how to set up the still life both in class and at home.
In the event that any time during the semester you become sick during the seemster always get in the habit of reading the class blog to keep up to date with the class assginments.
*GESTURE and *CONTOUR DRAWING
There is a difference between what the eye sees and what the mind thinks you see. In this class you are going to learn how to draw from observation.
First we must set up a Still Life.
In class I usually do this before students arrive.
But at home you should get in the habit of setting up in manner writen below.
I like to set up about 7- 9 objects on a platform.
When working from home, find an area of your home or studio and set up a table pressed against a wall.
You will see in my time lapse that I improvise with a box, chair and a wooden board that I use for my ceramic projects.
Improvise with areas of your home that can provide a quiet eye level surface to set up the props for you class assignment.
Watch the video to see how I set up in the link below.
https://youtu.be/iwwVn5ocvko
You need to be at eye level to your still life.
I am covering the platform in my space because i do not like to see the components below it. In doing so I am able to mute all that activity below with a neutral textile that I happen to have in my studio.
Now that I am all set, I will gather my objects.
For the first day see if you can choose simple geometric objects.
I will place some objects in the back then assemble from there to have objects in three spaces:
*Background
*Middle ground
*Foreground.
With the Still Life all set now we will find a comfortable place about three to four feet away from the assembled objects and at at eye level.
You do not want to be above or below as this will change the perspective of what you are observing.
Now grab a charcoal stick and the Newsprint pad attached to the board.
You want to draw in the same vertical format as what you are looking. Do not place your pad on the table as this changes the ease of observation.
Using loose and broad strokes you are now going to work on doing several quick drawings called gestural drawings. I like to do several of these at the start of the class as warm up excercises.
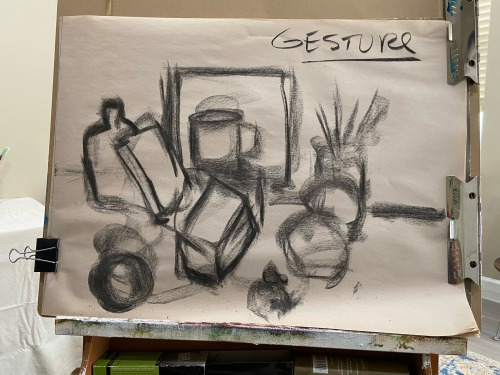
GESTURE drawings are rapid , loose, fast strokes that try to get the gist of the still life.
The charcoal stays on the paper at all times and your eyes are looking at the still life at all times.
This creates a connection between the eye and the hand, in other words eye-hand co-ordination.
Think of it like when you are driving or riding a bike your eyes are set on the road (Still Life) and your hands follow the road.
If you look away, by the way I do not recommend you look away when driving or riding, then the hands will follow.
So, back to your still life, for about TEN minutes in the same paper continue doing Gesture drawings.
Start on the LEFT side of the Still Life I like to begin at the line where the platform and the wall meet and then I draw the first object that my eyes find.
(You are working quickly and drawing over the previous drawing. It is ok , it will look like a mess but thisnis just an exercise right now to warm up.)
I keep working from LEFT to RIGHT until all the objects are represented in the drawing.Ex.
This type of drawing is what is called a warm up exercise , it gets your creative juices going.
Next ,
You will work doing a contour drawing of the still life.
To do the Contour drawings you can use either charcoal sticks or charcoal pencils.
Where gesture drawings are quick the contour drawing should take you around 20 mins.
You want to be accurate so go slow .
Again starting on the LEFT side of the picture plane draw slowly.
Start at the *Horizon Line then draw the object immediately next to it.
When you are doing contour drawings you want to try and capture the true margins of an object.
Do not generalize , all bottles are not created equal , try and draw as accurately as possible.
You will also notice a size relation between one object and the next, pay attention to that and correct as needed.
Here is an example of a Contour drawing:
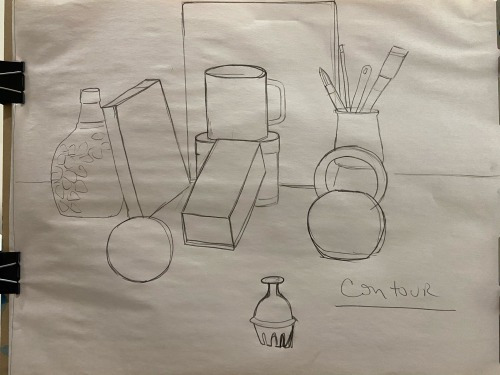
Contour
Today is the first day we will be working in person.
We will be working big in the 18 x 24 Newsprint pad.
You are working big and for some of you this might be the first time in ages that you grab paper and charcoal to draw so let’s just have fun and enjoy this return to your creative self.
In class assignment for Monday & Weds:
1) We will work doing continuous GESTURE drawings.
2) We will work with both left and right hands.
3) *Blind Contour Drawing ,
4) Final part of the class, students will work doing Contour Drawings, use the next 30 minutes to do a contour drawing.
You are working slow and trying to capture the true and correct contour of the forms in your still life. Remember to draw and include the horizon line in your drawing.
Homework:
In your sketch book create 16 squares measuring 1.5 inches with and 1/8 inch separation between them .
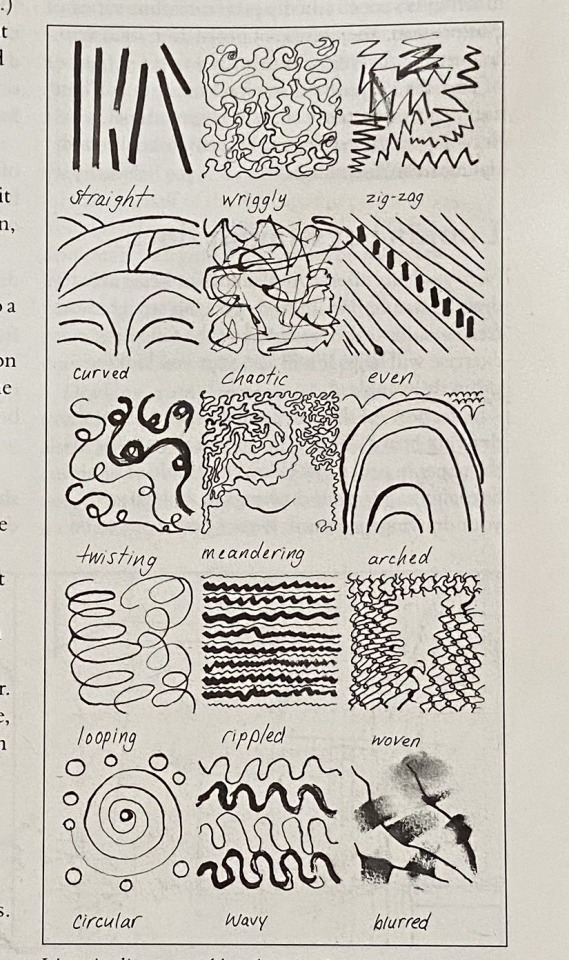
Fill each square with a variety of lines to include, thick thin , broken, dotted , zig zag as many varieties as YOU can come up with.

Example of how to create squares in sketchbook
See how you will break up your squares to do the line assignment above in your sketchbook.
DO NOT COPY ANYTHING FROM THE PICTURE SHOWN BELOW.
How many types of lines can you come up with?
BE as creative as possible.
You will work on this HW assignment Tues& Thursday. All Homework is due on Thursday 2/2/23 at 5pm.
2 notes
·
View notes
Last Seen Blogs

boygirlbowie
rook

tarka-illustration
Claire Murigeux Illustration


yuvantech
yuvantech

jewbreaker
surf nazis must diet