#I used 4 cans of tomatoes and 2 small zucchini and a pound and a half of ground beef
Text
a fun thing you can do when you're a grownup is buy a bunch of ingredients and make 6 litres of spaghetti sauce in a big pot and divide it up into a bunch of containers and put it in the freezer!
#food#I used 4 cans of tomatoes and 2 small zucchini and a pound and a half of ground beef#and 3 bell peppers and a bulb and a half of garlic and 2 thingies of mushrooms and I think 5 onions?#I'm spaghetti sauce rich! I can have easy spaghetti occasionally for many weeks to come!#I was going to make it yesterday when I bought most of the ingredients#but then I realized the 2 cans of tomato I had in the cupboard were probably not enough#highly recommend making a lot of a freezable thing and freezing it! future me is going to be glad to have so much sauce!#cooking#I wish I had a cheese grater. I must get one
532 notes
·
View notes
Text
Cheap Lunch - Soup and _____
*** I am using prices from the Walmart in the college town my sister lives in. Your area may be different***
I’m going to put two recipes for the soup, one that includes fresh vegetables, one that is ONLY canned. Both recipes are vegan but can be made with meat products added.
This should be eaten with another food. Simple salad, a basic pasta, or a sandwich.
Basic Minestrone -Makes 7 servings
2 tsp Olive oil - 3.94 Whole bottle
1 onion diced - $.85
2 Celery stalks sliced - $1.87 Whole bundle
3 medium carrots peeled and sliced - $.98 pound
3 tsp minced Garlic -$2.83 jar (45 servings)
1 (28 fluid ounce) can crushed tomatoes - $.98
4 cups Vegetable Broth - $1.94 for a carton of broth OR 1 Jar Better than Bullion $3.97(makes 3 cartons worth of vegetable stock for $1.33 each)
1 Small Zucchini halved then sliced - $.81
1/2 pound fresh green beans - $.86
1 Can red Kidney Beans - $.72
1 Can Canellini Beans - $.72
1 Tbsp Italian seasoning - $.98 whole container
1 Cup small shells -$.92 whole box
$17.79 for the recipe the first time making it. $10.21 in the weeks using the leftovers from the first week. Or $2.50 a meal week 1 and $1.46 a meal weeks you use leftovers
Can Vegetable Soup 14 servings
1 28 ounce can of Crushed Tomatoes -$.98
1 6 ounce can of Tomato Paste - $.62
1 15 ounce can of sliced Carrots - drained -$.58
1 15 ounce can of Green Beans - drained - $.54
1 15 ounce can of Peas - drained -$.54
1 15 ounce can of Corn - drained -$.54 Regular $1.82 Fire roasted for more flavor
2 15 ounce can of Potatoes - drained -$1.56
2 32 ounce cartons of Garden Vegetable Broth - $1.94 each
2 Tbsp of Italian Seasoning - $.98
2 tsp Minced Garlic -$2.83
$13.59 for the recipe the first time making it. $9.78 in the weeks using the leftovers from the first week. Or $.98 a meal week 1 and $.70 a meal weeks you use leftovers(recommended to freeze half and thaw it out the second week.
#Cheap lunch#cooking#budget cooking#Fresh vegetables are cheaper at other store in the area#But using Walmart for simplicity purposes#This is to show healthy foods at different price ranges#And at different levels of availibity#frozen vegetables can also be used in either recipe
89 notes
·
View notes
Text
Just made the most bomb ass lentil soup because it is rainy and wimdy af boi!!!! So perfect weather for a hearty soup!!!
Beaky’s Lentil Bacon Soup
Serves idk people I guess
1 onion of choice (I like red) chop it
5-6 garlic cloves you’ve chosen with your soul roughly chopped with love
3 roasted in the flames of hell red bell peppers cut them to pieces
A can of dragon fire roasted diced tomatoes
3 carrots cut into half moons
1 zucchini for the bit, diced into quarter moons (you can add more if you like I wish I had but I only had one!)
1/2 pound of green beans nipped and chopped
4-5 stalks of celery scrubbed of sins and sliced
1 can of black lentils because that is what I had or 1 cup of dry if you have that
3 cups of dry green lentils because this is a lentil soup you want all the lentils!
(If you have red lentils add those in too! Canned or dry idk)
4 measures of chicken broth I used the low sodium because that was what was available.
And a package of bacon that you have roasted in the oven till crisp but not over crisp!
Use some of the bacon grease from baking the bacon in the bottom of the pot to cook the garlic and onion.
Once translucent add in the rest of the veggies give a stir, a small lecture on the virtues of being sautéed. Then add your lentils canned or otherwise, and chopped bacon give another stir and add your liquids plus five and one half measures of water (I use cups).
Add in a few bay leaves you forgot to mention in the ingredients above. Along with salt (I used seasoned salt), pepper, white pepper, cumin, and chili powder! I added these and measured with my heart, and tongue to taste. Get to a rolling boil and drop to a simmer for hours stirring it with a rousing tale and a spoon till the vegetables and lentils are cooked to your liking doneness. Adjust seasonings as you need and then serve with bread or crackers or whatever you like!
You can omit the bacon and use olive oil instead same with the chicken broth for veggie broth/stock for a vegan/kosher/halal option!

10 notes
·
View notes
Text
A few years ago I visited friends from Washington D.C. who had relocated to Morocco. They live in Rabat, Morocco’s capital city, where they had a housekeeper who was also a good and generous cook. Although Fatima spoke only Arabic and French while I speak English and Spanish, we both understood the language of food. I would sit at the kitchen table or stand by her, taking notes as she worked her magic with fresh ingredients from the local market.
True to Moroccan cuisine, Fatima was skilled at cooking in a tagine, that wondrous North African earthenware pot with the conical lid that creates tender, flavorful dishes of the same name. Tagines always involve lots of vegetables, and sometimes meat. The shape of the tight-fitting lid traps the rising steam as the food cooks, which condenses into drops of liquid flavor.
Like most of you, I don’t have an actual tagine. But after returning from Morocco, I discovered that a Dutch oven or heavy-bottomed pot can work as a stand-in, provided it has a tight-fitting lid. Many enameled Dutch oven lids have condensation rings, which are helpful. Try not to lift the lid as it will break the steam-condensation process. This recipe is inspired by Fatima’s cooking. Imitating the tagine method, vegetables are added in layers, with the ones needing the longest cooking time at the bottom.This dish is perfect for Shabbat, being both special and comforting. Serve it the traditional way with steamed couscous and pretend for a little while that you’re far away, enjoying the delights of Morocco.
Cooking notes:
Usually only about a cup of broth or water is added to the tagine, but I’ve doubled the liquid as a bit of insurance against burning the bottom. If you want it to be more like a stew, add 2 additional cups of broth or water.
Be sure to leave a couple inches between the top of the vegetables and the lid of your pot.
There’s a lot of flexibility in the ingredients. No carrots in the house? No worries. Got green beans or eggplant you want to use up? Add the eggplant, cut in 1/2-inch cubes, before the zucchini, and the whole or cut green beans after. Turnips and other squashes also work well.
I have included a recipe to make your own simplified Ras el Hanout, a spice blend so important in North African cuisines that its means “head of market.” You can also buy it pre-made from Middle Eastern markets, specialty vendors like NY Shuk or even on Amazon. Keep in mind that, like all store-bought spice mixes, the combinations, taste and color can vary.
This spice mix will freeze well for up to two months.
Ingredients
For the Moroccan spice blend:
1 Tbsp paprika
1 Tbsp cumin
2 tsp ground ginger
1 tsp turmeric
<1 tsp cinnamon
1 tsp coriander
1/2 tsp allspice
1/4 tsp cloves
For the tagine:
2 Tbsp olive oil, divided
1 large onion, diced
3 large cloves garlic, minced
2 Tbsp Moroccan spice mixture (below) or store-bought Ras el Hanout, divided
1 butternut squash or pumpkin (2-2 1/2 pounds), peeled, seeded and cut into 1-inch cubes (3-4 cups)
1 can (15 ounces) chickpeas, drained with chickpeas and liquid (aquafaba) reserved separately
peel from 1 small preserved lemon, diced or cut into very thin strips, or 2 tsp grated fresh lemon zest, divided
2 medium sweet or yellow potatoes (1-1 1/2 pounds), unpeeled and cut into 1/2-inch slices
2 medium carrots, cut 1/2 inch wide
2 medium zucchinis, cut into 1/2-inch half moons
1 large tomato
1/2 small green cabbage, cut into 6-8 thin wedges
2 cups hot vegetable stock or water
1/2-1 tsp salt
1 cup green or black olives (optional)
chopped cilantro or parsley (optional)
Directions
To make the spice blend: Whisk all the spices together in a bowl until well blended. Store mix in an airtight glass or stainless-steel container in a cool, dry place.
To make the tagine: In a heavy-bottomed 6- or 7-quart pot or Dutch oven with a tight-fitting lid, heat 1 Tbsp oil over medium heat. Add onions with a pinch of salt and sauté, stirring occasionally, for about 10 minutes, until tender but not browned. Add garlic and 1 Tbsp of the spice mixture. Cook, stirring, for about 2 minutes, until aromatic.
Add the liquid from the chickpeas (aquafaba) and the squash cubes to the pot, and stir.
Turn the heat as low as possible while you layer the vegetables, building a domed shape as you go. Sprinkle about a third of the preserved lemon or lemon zest over the squash or pumpkin, then cover with potato slices. Add a layer of carrots, a third more lemon. Layer the zucchini on top. Lean wedges of cabbage against the sides of the vegetable mound.
In a small bowl, whisk together the hot broth or water with the remaining 1 Tbsp each of oil and spice mixture. Pour over the vegetables. Cover the pot and turn the heat up to medium.
While the tagine heats, use a small knife to peel the skin from the bottom of the tomato. Holding onto the top or stem, grate the tomato flesh on the large holes of a box grater into a dish, leaving discarding the skin. Add the grated tomato and juices to the pot, on top of the zucchini.
As soon as the tagine starts to simmer, reduce heat to low and let cook undisturbed until the vegetables are almost tender, about 25-30 minutes.
Add the chickpeas, olives and remaining lemon. Add a little more stock or hot water if the pot looks dry. Cover and continue to cook for another 10-15 minutes.
Serve in the pot, or the vegetables can be carefully moved and arranged on a large serving platter, taking care with each layer of vegetables and serving on top of couscous or rice. Garnished generously with chopped cilantro or parsley.
5 notes
·
View notes
Text
CSA WEEK 8
P i c k l i s t
Blueberries - cabbage - tomatoes - cucumbers - summer squash - patty pan squash -
wax beans - dill - potatoes - peppers - eggplant - fennel
This week in farming…
The past week has been extremely chill compared to the past few weeks of fury. While we are still figuring out what comes next and what takes priority, it is a bit of a relief to usher in cooler, drier weather. This allows the crops to hold their horses and slow down production. This is especially helpful in cucurbit land (summer squash, zucchini, cucumbers, etc) where it is more often than not that we are culling caveman club sized zucchini from the fields, then picking the more epicurean faves. Thankfully, it is not just our crew coming in for harvest. Willing Hands- the awesome organization that assists in food security for the Upper Valley has been dropping by weekly with their own crew to glean from the fields. To glean, is to pick from a field post initial harvest. Gleaning is an excellent opportunity for farms to share the literal fruits of their labor. These crops are known as “seconds” on our farm- still great stuff, but not necessarily the most supreme picking. Typically in July, we host a strawberry glean for you all, our dearly beloved CSA crew. However, this July was met with the most extreme rain that brought the season to a real hard stop. Super fun times for all, amiright?
As far as the current veg situation goes, we are delighted to welcome potatoes to the team. Prior to our big potato harvest that will start in about a month, we hand dig these cuties. Digging for potatoes is like searching for buried treasure. Rather than an x marking the spot, you hone in on the potato plant. Once you pull the plant, you can get an idea of how glorious the potatoes will be underground by the resistance the plant gives. The Harder to pull, the more potatoes you reap. There is also a very satisfying plucking sound that occurs when potatoes leave the plant- pop-pop-pop-pop. Anyhow, once the aboveground plant has separated from their babies, you dig until every last sphere is found. After last year’s drought that culminated in a very small potato harvest, it is a real joy to pluck these beauties from the earth, wash them off, and make some dynamite potato salad.
Another veg to geek out about are the wax beans. However, a big heads up to you all, we did not wash the bagged beans. Because there is so much rot in the fields from the very damp weather, we opted to keep them dirty to avoid ushering in any unnecessary rot. They should keep for a hot minute, but absolutely wash before use. No one likes a gritty bean salad.
That is all from the fields. Melon is on the horizon friends!
FARMY FOODIE PRO-TIPS:
THINGS TO GRILL THIS WEEK:
EGGPLANT! SUMMER SQUASH! PATTY PAN SQUASH! PEPPERS! FENNEL! Just add salt! Also shaved parm takes all the above grilled crops to the next level.
This clever wax bean dish is a cross between a salad and a side dish: it's served warm but loaded with the bright, fresh flavors of tomatoes and basil.
By Jody Williams Updated on March 31, 2014
2 pounds yellow wax beans, trimmed (UNFORTUNATELY, you only have .75lbs of these beans, but i STILL think the recipe is worth downsizing the rest of the ingredients for…)
3 tablespoons extra-virgin olive oil
4 ounces thickly sliced bacon, cut into lardons (1 cup)
2 tablespoons sherry vinegar
10 ounces halved cherry tomatoes (or chopped regular tomatoes!)
1 small shallot, very finely chopped
2 garlic cloves, very finely chopped
1/3 cup chopped dill
Kosher salt
Freshly ground pepper
Cook the beans in a large pot of salted boiling water until crisp-tender, about 5 minutes. Drain the beans and cool them under cold running water. Drain well and pat dry; transfer the beans to a large bowl.
In a large skillet, heat the olive oil. Add the bacon and cook over moderate heat, stirring, until golden, 7 to 8 minutes. Remove the skillet from the heat and stir in the vinegar, tomatoes, shallot, garlic and dill. Scrape the bacon vinaigrette over the beans, season with salt and pepper and toss to evenly coat. Serve warm.
SOUR CREAM SLAW WITH FENNEL
From my second favorite cook book, START SIMPLE by Lukas Volger
1 small cabbage
1 medium fennel bulb, cored and very thinly sliced, fronds reserved
¼ cup sour cream
1 tablespoons olive oil
1 tablespoon fresh lemon juice
1 teaspoon or more herbs de provence (thyme!!! Oregano, rosemary, etc)
½ teaspoon salt, or to taste
¼ teaspoon sugar
Pinch red pepper flakes
In a serving bowl combine the cabbage (kale) and fennel.
In a small bowl, stir together the sour cream, olive oil, lemon juice, herbes de provence (thyme etc!), sugar, and red pepper flakes. Taste and season with salt. Add most of the dressing to the cabbage (kale) and fennel and taste, adding more if needed (you may have some dressing left over). Coarsely chop about 3 tablespoons of the fennel fronds and stir them in. You can eat this slaw immediately, but the flavors will meld a bit after and hour or so at room temperature.
A crisp salad of pole beans, fennel, and parmesan cheese
From my tried and true old standby eating bible, TENDER by Nigel Slater
Wax beans
Medium fennel bulb
Small, salad leaves (chop up your savoy!) 4 double handfuls…
White bread- 2 thick slices
Oil for frying the bread
For the dressing:
Tarragon vinegar- a tablespoon
Dijon mustard- a teaspoon
An egg yolk
Olive oil- a scant ½ cup
Grated parmesan cheese- 3 tablespoons, plus a block of parm for shaving
Lemon juice- 2 teaspoons
Trim the beans and boil them in lightly salted water or steam them, until tender. Drain them under cold running water. Cut the fennel bulb in half and shred finely. Make the dressing by whisking the vinegar, mustard, and egg yolk together with a little salt and black pepper, then beating in the oil followed by the grated cheese. It should be thick and creamy. Squeeze in the lemon juice, stir, then set a side for a few minutes.
Put the “salad” leaves in a large bowl with the cooked beans and the fennel. Cut the bread into small squares and fry in shallow oil until golden on all sides. Drain the croutons on paper towels. Toss the leaves and beans lightly with the dressing. Pile the salad into two plates and shave pieces of parmesan over with a vegetable peeler. I usually do at least 8 per salad, depending on my dexterity with the peeler. Tip the hot croutons over the salad and eat straight away while all is fresh and crunchy.
POTATO SALAD!
I have no real recipe, but for crunch and flavor, add your fennel!! Also dill :)
1 note
·
View note
Link
0 notes
Text
SOUP TIME, Party Edition: Minestrone
Monday is my birthday (!!!!!), and as such I thought it would be excellent to post PARTY SOUP. This, of course, means soup that makes enough for a party--not that most of us are doing very much partying, at this juncture, unfortunately. But one can dream of a future time when such a thing might be more advisable.
Minestrone is one of those extremely versatile soups that everybody makes slightly differently. This particular recipe, from the Bakery Lane Soup Bowl cookbook, is one I am VERY fond of, and can only make when feeding a crowd. Even halving it produces more minestrone than one can feasibly eat in a week--even myself, battle-hardened leftovers-for-lunch veteran that I am--and unfortunately it doesn’t freeze very well. Once, memorably, one large-ish batch of this soup and a loaf of bread fed four hungry college students for a week straight.
Alas, I will stop reminiscing. Recipe for minestrone under the cut. Warning: it’s a long one. Party soup involves Many Ingredients.
- 1/2 pound (8 oz) great northern beans. You can use canned or dry. If you’re using dry keep in mind that you’ll need to 1) soak them overnight and then 2) cook them just covered in FRESH water until they’re tender. I just use canned, because that’s a lot of mind load for a soup that also includes so many other ingredients.
- 1/4 cup olive oil. You can sub butter for this
- 1/4 cup butter (half a stick, in the US). You can sub olive oil for this.
- 1 1/4 cups chopped carrots (I recommend chopping baby carrots. One of the half-sized packages will give you enough for this. You can also use regular-sized carrots but they require peeling, and...again, a lot of mind load)
- 2 1/2 cups chopped celery. This will be the equivalent of 4-5 stalks. WASH YOUR CELERY WELL, MY CHILDREN.
- 1 1/12 cups chopped onion (1 large onion should work for this. Again, watch out for onions at this point in time. You’re going to be cooking the shit out of these but there’s no use tempting fate.)
(At this juncture, may I make a suggestion?? If you have a food processor or a blender, this is its time to shine. Cut your baby carrots in half, cut your celery into 2-3 inch sections, and quarter your onions. Throw them all into your chopper of choice. Pulse until they’re as small as you like. Et voila.)
- 3-4 cloves garlic, crushed or chopped very finely
- 16 oz can chopped tomatoes
- 4 quarts beef/chicken/veggie stock, or equivalent water&bouillon combo of your choice
- 2 cups diced potatoes. This is usually about 2 large potatoes.
- 1 1/2 tbsp salt
- 1/4 cup roughly-chopped parsley, or 2 tbsp dried parsley
1 tbsp dried basil leaves
1/2 tsp dried oregano
1/2 pound diced cooked ham. You can use deli ham, which often comes in a handy dandy pre-apportioned container, or honestly any other ham you like. You could also use chicken or turkey in this, although if you do this you’ll probs want to add another 1/2 tsp or so of salt at the end. You can also use a 1/4 pound prosciutto if you’re feeling Decadent.
- 1 pound frozen green beans (or, like, fresh!!! I make this in fall & winter when there’s No Fresh Produce so frozen it is.)
- 1 pound zucchini or other summer squash (or eggplant), diced
- 1/2 cup dried elbow macaroni. The original recipe specifies macaroni, but you could use any type of sufficiently small noodles. Wheels would be SUPER fun in this.
- 2 cups shredded cabbage (coleslaw mix is *chef’s kiss* for this)
- Black pepper to taste
Grated parmesan cheese, for garnish
Heat your fat/oil combo in a medium saucepan over medium heat until it’s JUST hot enough to not want to hold your hand near. Add all your veggies & cook until the onions are translucent. Add garlic and toss around a little until it’s toasty.
Add tomatoes and bring to a boil. Simmer 10 min.
In a BIG soup pot (I once used a lobster pot for this and it filled it 1/3 of the way full) combine stock and potatoes over high heat. Bring to a boil, turn down the heat to medium and simmer until potatoes are just tender.
Add your simmering vegetables, beans, seasonings, ham, and green beans. Bring to a boil and simmer 20 minutes.
Add zucchini, macaroni, cabbage, and pepper. Simmer another 15 minutes.
Serve garnished with grated parmesan cheese. You can also eat this with grilled cheese, if you like, or put croutons in your bowl or dip crusty bread into it. Or just eat it plain. It is a VERY substantial meal on its own so no need to worry about getting extra food groups in there.
Makes 24-ish cups of soup. PARTY TIME.
#the wonderful world of food#soup season#soup#minestrone#news now: local cryptid chirps info the void
9 notes
·
View notes
Text
Keto Lasagna Recipe I Just Made Up
One large zucchini or two medium
Shredded cheese
Can of crushed tomatoes
Heavy cream (3 tbsp-ish)
Ground beef (one pound? Maybe less? Up to you)
Seasonings (I used thyme, basil, pepper, salt, garlic and onion powder, and paprika)
With the stove on medium heat, pour the tomato can into a saucepan that is large enough to contain it and be able to stir around. Add the heavy cream and season it, minus the paprika. Allow it to bubble up and mix occasionally so it all comes together.
In another pan, add a tbsp of oil and your ground beef and mix it around until it is small chunks. Add seasonings minus basil and thyme. Cook until brown.
Preheat oven for 350°
While sauce simmers and beef cooks, cut the zucchini into thin slices (1 cm to 1/2 cm thick).
Get a glass baking dish (like a casserole rectangle) and add one layer of zucchini onto the bottom. When the sauce has cooked for like 10 mins, use a large spoon to add a 1/3rd on top of the zucchini. Then add a 1/3 of the beef. Then add a layer of cheese. Repeat two more times. On the top at the end, add a little(little!) bit of heavy cream before putting cheese.
Put in the oven and bake until the cheese is as toasted as you want; i did like 30 mins.

She ends up looking likethis ^_^
For the size I made, which is like what 13x9 baking dish, 1/4 is something like 10-12g carbs. So yay:) it fills you up a lot too. You could go with less tomato for fewer carbs if desired.
12 notes
·
View notes
Text
Disney goes Veggie!

Hi Guys
How many of you have a favorite Disney movie? Or have been to Disney land? Or have imagined yourself as a Disney channel star?
The Walt Disney company is one of the largest, most prolific companies in the world and chances are you’ve interacted with them in some way. Most of us watched their movies as children and dreamed about a day at an amusement park in a pair of mouse ears.
Now as adults, or almost adults, Disney world may not be as available a dream but you can always get nostagelic with some food directly from Disney movies.
Here is a list of foods to recreate from your favorite Disney movies

Ratatouille
Ratatouille was an obvious addition to this list. This is personally my favorite Disney movie. I even got a Remi plush for my birthday the year it came out. Ratatouille it’s self is an inherently herbivore friendly dish. However what Remi actually makes is not traditional ratatouille. But you can still make it. The following recipe is courtesy of onesweetappetite.com
Ratatouille
Ingredients
1/2- 8 oz can of tomato sauce
1/2 onion chopped
2 tsp garlic past
1 small eggplant sliced
1 small zucchini sliced
1 small yellow squash sliced
1 red pepper sliced
1 yellow pepper sliced
4 Tbsp. olive oil
1/4 C. fresh grated parmesan cheese
salt and pepper to taste
Instructions
Preheat your oven to 375 degrees.
Thinly slice all your vegetables using a sharp knife or a mandolin
Stir together your onion, garlic paste, and tomato sauce. Spread into the bottom of a 9 inch pan.
Line all of your chopped veggies in your dish. I started on the outer edge and worked my way in. Drizzle with olive oil and sprinkle with salt and pepper.
Cover your veggies with a piece of parchment paper slid just inside your baking dish. Bake for 30-45 minutes, or until your veggies are tender. Sprinkle with cheese and serve.

Gopher’s Succotash
Winnie the Pooh, Winnie the Pooh, dah duh dah dah...
Ok so I don’t actually know all the lyrics but if the general tune doesn’t start playing in your head then you didn’t have enough Winnie the Pooh in your childhood. Now Gopher’s Succotash may not be the food that comes to mind when you think of Winnie the Pooh but gopher seemed to be the only one with any kind of workable diet. No friends, you cannot live off honey alone. Recipe courtesy of camillestyles.com
Summer Succotash
Ingredients
1 red bell pepper, chopped
1/2 red onion, chopped
1 1/2 cups fresh or frozen corn kernels
1 cup shelled edamame
1 small avocado, peeled and chopped
1/2 cup cherry tomatoes, halved
6 sprigs thyme
2 tbsp mint, minced
2 tbsp fresh lemon juice
3 tbsp olive oil
salt & pepper, to taste
Directions
In a cast-iron or nonstick skillet, heat 1 tablespoon of the olive oil.
Add the bell pepper and red onion, and cook over medium-high until crisp-tender, about 3 minutes.
Add the corn and edamame, and cook until the corn starts to caramelize, about 2 minutes.
Turn off the heat, and add the cherry tomatoes, avocado, thyme and mint.
Toss with olive oil, lemon juice, salt & pepper.

Kronk’s Spinach Puffs
Well Fuck you Ezma. Kronk may not have much but he has those spinach puffs. Spinach puffs are and have always been a party favorite. Make this and enjoy before tossing a meddling old man out a window for throwing off your groove. Recipe courtesy of handletheheat.com
Spinach Puffs
Ingredients
1 (10-ounce) package frozen chopped spinach, thawed
1/2 cup crumbled feta cheese
1 small onion, minced
1 garlic glove, minced
1 tablespoon olive oil
1 teaspoon chopped dill (I omitted because I dislike dill)
Kosher salt and freshly ground black pepper
2 large eggs
1 sheet frozen puff pastry (from a 17.3 ounce package), thawed, rolled out into a 12" square, kept chilled
Directions
Preheat oven to 400°F. Spray a standard size 6-cup muffin tin with nonstick baking spray.
Squeeze out as much water from the thawed spinach as possible, too much water will make soggy puffs. Mix the spinach with the feta, onion, garlic, olive oil, and dill (if using). Season to taste with salt and pepper. In a small bowl beat the egg to blend before gently stirring into the spinach mixture.
Cut the puff pastry into 3 equal strips. Reserve 1 strip for some other use (such as Nutella Palmiers). Cut each remaining strip into 3 squares for a total of 6. Place a square in each muffin cup, pressing into the bottom and up the sides, leaving the corners pointing up. Divide the filling evenly among the pastry cups. Fold pastry over filling, pressing the corners together to meet in the center. The pastry cups can be covered and refrigerated up to 3 hours ahead of time.
Beat the remaining egg to blend in a small bowl. Brush the pastry with the egg wash. Bake until the pastry is golden brown and puffed, about 25 minutes. Transfer the muffin tin to a wire rack to let the puffs cool in the tin for 10 minutes. Run a sharp paring knife around the edges of the puffs to loosen before turning the puffs onto the rack to cool slightly before serving.

“Hi Dad” Soup
How could I have chosen this over the leaning tower of Cheese-ah? The world may never know. Nothing will ever top the dancing Bigfoot from A Goofy Movie but the comforting taste of this soup may give it a run for its money. Recipe courtesy of serenabakessimplyfromscratch.com
Vegetable Alphabet Soup
1 tablespoon Extra Virgin Olive Oil
1/2 whole Large Onion, Diced Fine Or 1 Small
3 cloves Garlic, Minced
6 cups Vegetable Stock
2 cups Water
5 stalks Celery, Diced
2 cups Carrots, Diced
1 1/2 cups Potatoes, Peeled and Diced
1/3 pound Green Beans, Cut In Bite Sized Pieces
1 cup Peas (Fresh or Frozen)
1 cup Corn (Fresh or Frozen)
29 ounces Stewed Tomatoes, Diced
1 teaspoon Granulated Garlic
1 tablespoon Italian Seasoning
1 teaspoon Rosemary, Chopped
1/4 teaspoon Sea Salt
1 cup Alphabet Shaped Pasta
Salt and Pepper to Taste
Directions
Heat olive oil over medium-high heat and add onion. Sauté onions until starting to caramelize. Add garlic and stir until softened and fragrant.
Add all remaining ingredients and stir until well combined. Bring soup to a simmer and reduce heat to low. Cover and cook for 20 minutes or until potatoes, carrots and pasta are tender.
Season with additional salt and pepper as needed.

Cheese Soufflé
This one was really tough. I mean you have porridge, you have the mysterious “grey stuff”, you have a whole musical number to pick from. But Cheese Soufflé seems to be the internet’s most commonly copied dish from the movie so who am I to disagree. To bad I can’t get you a recipe for a dancing candle stick to go with it. Recipe courtesy of thekitchykitchen.com
Cheese Soufflé
Ingredients
6 tablespoons (3/4 stick) unsalted butter, plus more to butter a 6-cup gratin dish
6 tablespoons all-purpose flour
2 cups cold whole milk
1/2 teaspoon salt
1/2 teaspoon freshly ground black pepper
5 extra-large eggs, beaten
2 1/3 cups grated Swiss cheese, preferably Gruyere (about 6 ounces)
3 tablespoons minced fresh chive blades
Directions
Preheat the oven to 400 degrees
In a medium sized pot over medium heat, melt the 6 tablespoons of butter and add the flour, stirring and cooking for about a minute, until it smells nutty.
Add about 2 tablespoons of milk at a time, whisking to combine. At first it’ll be super thick, but just keep adding liquid and stirring. You should end up with a thick, velvety sauce. If a little thin, cook and stir it for a few minutes until it reduces, or if too thick, add a little more milk.
Take the sauce off the heat and season with salt and pepper. Taste and adjust if needed.
Add the eggs, the cheese and the chives to the white sauce, and mix well to combine.
Pour into the buttered dish and bake for 30 to 40 minutes, or until the soufflé is puffy and well browned on top. Serve immediately.

So there you have it, I’d love to do more so let me know if you’d like a part 2. I could also do some studio Ghibli food or anime or whatever you guys would like to see.
Let me know!
#disney#disney cooking#vegetarian disney#vegan disney#disney food#disney mock#walt disney#vegetarian#vegan#plant based#health#vegetables#nutrition#crueltyfree#healthy body#healthy diet#healthy#movie#movie food#disney movie
466 notes
·
View notes
Text
Chicken en Papillote with Zucchini and Tomatoes

I wanted to try out an aluminum foil packet recipe for potential travel to game! I think this one has merit for people who may want to do a little more cooking at gathering, as opposed to at home ahead of time. I’m not sure this one will ever travel with me (it’s a little fussy for my tastes), but it’s absolutely delicious and could be a good option for someone else.
Ease to Make: 3 of 5
Once everything is together, it’s fairly easy, but there’s a lot of vegetable prep to be done ahead of time. You also may need to pound your chicken breasts, depending on how plump the breasts you get are. I would vote this is a make at home and reheat at game dish -- but it does have merit as a make directly at game option.
Ease to Transport: 4 of 5
If you cook in advance, you can keep the dish in the aluminum foil pack and store it in a big Tupperware for travel, then reheat at game over a gas stove. If you decide to cook at game, I would make the oil mixture at home and take it with you in a small screw-top container. The rest can be prepped on site fairly easily.
Ease of Cleanup at Game: 5 of 5
This assumes you’ve pre-prepped the dish and stored it in the foil. Reheating will be done in the foil, and the foil can just be thrown out after everything is said and done. Obviously, if you elect to prep everything at game, you will need to clean your cutting surfaces and knives.
Taste: 4 of 5
This is a very simple recipe. A part of me wants something for the top like guacamole or sour cream. With the basil and tomato, I’m thinking fresh mozzarella and a drizzle of balsamic vinegar wouldn’t go amiss.
I haven’t decided what the perfect additive would be, but if you try this recipe out and come up with the topper -- let me know what you try.
Healthiness: 5 of 5
Low calorie, great protein, plenty of vegetables -- this is easily one of the healthiest recipes you can make!
Recipe taken from the magazine Best-Ever Recipes for Two, published June 2019. I made a few adjustments, but nothing serious.
Ingredients (Makes two Servings):
2 (6 to 8 ounce) boneless, skinless chicken breasts, trimmed and pounded
Salt and Pepper
1 tbsp extra-virgin olive oil
1 garlic clove, minced
1 tsp dried oregano
Red Pepper Flakes (to taste, I used about 1/4 - 1/2 tsp.)
2 Roma tomatoes, cored, seeded, and chopped.
1 zucchini, sliced 1/4 inch thick
1 package fresh basil, chopped

Directions (assumes home cooking):
Heat your oven to 450 degrees. Pat chicken dry, and season with salt and pepper. If your chicken breasts have a very thick part, and they taper into very thin parts, consider pounding the breasts gently to smooth them out, so they cook more evenly.
Combine oil, garlic, oregano, red pepper flakes, 1/8 tsp salt, and 1/8 tsp pepper into a bowl. Give it a good stir. Toss tomatoes with half of the oil mixture, and zucchini with the other half.
Get two foot long sheets of aluminum foil, split the zucchini into two piles, and lay the zucchini in the center of the aluminum foil, overlapping them like roofing tiles. Put the chicken on top of the zucchini, and then top with the tomatoes.
Crimp the foil tightly into packets. Make sure that you fold the edges down to keep the moisture in.
Set the foil packets in a rimmed baking sheet (in case they leak!) and bake in the oven for about 25 minutes, or until the chicken is cooked through (measures at 160 degrees).
Open the packets carefully, so the steam doesn’t burn you, and let them cool for a minute before smoothing the edges of the foil down and sliding a spatula underneath the zucchini to transfer to a plate. I tried to catch all of my zucchini in one scoop, but it didn’t really work, so I decided on a bowl to catch everything.
The recipe in the magazine called for the juices to also be added to the dish, but I felt there was too much in there. I poured the extra juices down the drain.
Sprinkle the top with basil, and serve.
Notes:
If you decide to make this entirely at game, there’s a few things you want to consider. Make sure you have a good place to wash your cutting board. Raw chicken is always a salmonella risk. Also, either way, I would make the oil mixture at home and put it in a small, screw top container for carrying to game.
You can make the foil packets in advance and cook at game, for a half and half option. Set the packets over a gas stove (I would put the packets into a dutch oven or another large pan with a lid, and put a little water in the bottom to trap the heat around the packets -- and to catch any juice drippings so you don’t have to clean your camp stove.
I would take a pre-cooked packet to game in the foil pack, and reheat (same as if you were cooking it) it in the packet, then serve. At least if you cook it at home, you’ll know the chicken is cooked through, and all you’re trying to do at that point is get it warm.
As I said under the taste section, I think this dish could use a little something, I think when I reheat the rest of this for myself at home, I may sprinkle some shredded mozzarella on top at the end, and drizzle it with balsamic vinegar, just to see what I think.
But hey, it’s a fun idea for camping, and may give you ideas for other recipes!
Nutrition (per serving):
Calories: 426
Fat: 20.1g
Carbohydrates: 9.1g
Protein: 51.7g
1 note
·
View note
Text
This is a story about farming. It is quite long. I think it may be worth reading anyway, but unfortunately I have no way to prove it. I’ve also tried my best but I still don’t know if it actually makes perfect sense in every way? But it did all actually happen; so it all kind of has to make at least a little bit of sense, even if doesn’t really seem like it.
The trouble all started in 1901, when my great great grandfather emigrated to the United States from the modern-day Czech Republic and later, in 1911, bought a 90-acre farm there. Many years later, most of that farm came to belong to my grandfather, and roughly 10 years back he retired from his job selling tires at the tire store and started making the 40 mile drive north to the farm to spend his summer days there and plant a garden (in the area that wasn’t already rented out to be planted with soybeans.) Not long after that, he had enough produce to start selling stuff at a nearby farmers’ market in an upscale town, physically not far from the farm, although psychogeographically immensely distant from that chunk of desolate, isolated, fairly representative rural Ohio.
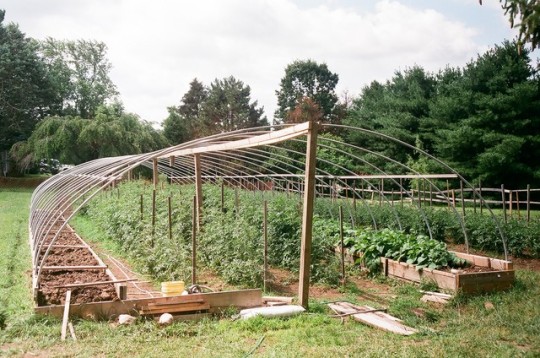
I was dragged in in the summer of 2015, from the end of June to the beginning of July, mostly pounding stakes into the ground so that the roughly 1000-1500 tomato plants that my grandfather had planted that year (with occasional help from my grandmother and uncle) could be tied up between them and the fruit wouldn’t lay on the ground and rot easily. I hated it there (in fairness, I probably would’ve hated anything that involved leaving the house during that time in my life) and when my dad got me out of it (by hiring me to help him paint a house) I quickly divested myself of the money I’d received there to wash my hands of the place and resolved never to go back. My dad was never in favor of me going to the farm, knowing as he did that the work could be dangerous (operating old, large, and unreliable tractors and backhoe with minimal training or safety precautions; running large, dangerous power saws in creative ways without the proper guards, gear, or safety precautions, mostly to put points on stakes; operating saws in an unsafe manner while standing in the raised bucket of the old and unreliable backhoe in order to trim trees; etc) and probably also suspected that I personally (especially then) was fairly vulnerable to being psychologically manipulated into performing difficult tasks that I was unhappy doing over a long period of time while being underpaid under some circumstances. Hmm.
I returned to the farm for the entirety of the summer of 2016. After barely surviving/graduating my senior year of high school that year I had given up on life and settled pretty quickly back into the routine of the daily back-and-forth farm trips. It is true that I was getting paid; it was also true that I was being challenged and learning things, mostly the basics of planting vegetables, like which plants were cold-season crops and which were warm-season and how far apart to space the transplants, and how a PTO works on a tractor; and it’s certainly a fact that on a personal level, I was still completely taken in by my grandfather’s wit and farm wisdom and overpowering managerial confidence. I made myself completely subordinate to him, and blamed myself when his ideas for what we should be doing next were completely obvious to him but rather opaque to me; I remember it frequently happening that he would tell me what to do and I would reflexively go off to do it, and then realize I was unclear on what he meant and have to timidly re-approach him for further instructions. This kind of slowed down the learning process. Much later I would also realize how superficial his constant confidence could be, and how it was often less the natural attitude of someone who knew what they were doing and more a tool he used to impress people into doing things without thinking too much about any of the potential alternatives. Also, according to my admittedly fallible memories, I was getting paid $35 per day for what were generally between 7 and 8 hour days. I was, in fact, 18 years old that year and probably could have gotten a different job that for one thing paid a better hourly wage and for another left me less reliant on the caprices of my family; but this was neither a thing that happened nor a thing that was expected from me, least of all by me. My internal world hadn’t expanded as I’d grown older; my universe of possibilities was limited to the things that were already present in my somewhat simple life. This was probably symptomatic of some larger problem or problems with the functionality of my brain at that point in my life.
One can become trapped in many different ways. You can be trapped in a specific city, or a zip code, or in a geographic region sorely lacking in cities, or one which they are considered entirely strange and outlandish things; in a job, in a career, in a lifestyle, or in a set of lifestyles considered realistic given your high school grades, ability to connect with others, and standing in society and life; in a friend group, or in an identity, or in a lack thereof, or in any number of the various rules and regulations that govern how one is allowed to interact with the rest of the human race; in a comedy, a tragedy, a pastoral narrative, or in any combination of the above kinds of story that one no longer wishes to be part of. For all I know, thanks to the stereotypical farm benefits of character building, meaningful work experiencing, and nature connecting-with, working at the farm for that year may have actually been good for me; nevertheless, I wish that it had been my last full summer there. I had showed up, learned some stuff, earned a small amount of money, and, in retrospect experienced at least the majority of what this particular 90 acre area of the planet had had to offer. Alas.

2017! This year, we had a pretty consistent schedule that I can remember clearly to this day: we left at 9:30 AM, when my grandfather would pull into my driveway and blow his horn, and got back between 7 and 8 o’clock at night. Built into that schedule is a one hour commute each way (we both lived about 40 miles away from the farm, which was actually inhabited by my uncle, who was often around and occasionally helped with the work but frequently made fairly abrasive and critical comments (if often correct) comments about it (for example, about the fact that our work day started so late in the morning)) and a daily grocery store stop for drinks for the cooler. I was the driver (once my grandfather’s problems with what I suspect is undiagnosed narcolepsy had almost killed us a couple of times) which you would think give me control over the stereo, but I quickly learned that my grandfather had pretty specific taste in music (country from the 50s and 60s) and a temperament unsuited to most podcasts. Obviously, most of that time in the daily schedule was taken up by the work day (so generally either planting tomatoes (which gets a little less rewarding after about the 500th one, which that year only put us at about a quarter of the way through the tomato plants, not counting the hundreds of eggplant, cabbage, and zucchini plants or the miscellaneous corn, squash, and beans), pounding stakes and tying string for the tomatoes, or harvesting tomatoes) which lay at the end of the lonely highway on a lonely work site at which the same 2-4 people showed up every day. (It became four people once you counted my younger brother, who came up to the farm that year until the start of marching band season got him out of it, and who fortunately made it his main job to get everyone to pack up and leave promptly at the end of the day. Once he stopped showing up, and even though I persuaded my grandfather to move the schedule up an hour so that we could get home earlier, we never left as consistently as we did when he was there; I didn’t have the stamina to find my grandfather (who didn’t carry a phone or a watch) and tell him what time it was at the end of the day every single day so that he could start to think about leaving.) I was being paid $40 a day, with a $20 bonus for market days once they started, which with our theoretically 35-hour work week ends up being about $6.29 an hour? Huh. In addition to the extra $20, the market season was nice because picking stuff is less tiring and more rewarding than planting stuff, and because I got to see way more people every day in the form of our market customers, even if I was interacting with them mainly through the intermediary of my grandfather.
Another nice thing is that this is the first year I have a decent photo album for! I started experimenting with old 35mm film cameras in late June and by early July I had my first interchangeable-lens digital camera, which I relied upon to keep my brain alive for large parts of the summer. I have… a lot of pictures from this season.


Finally, at the end of the year, I ended up in college. Any criticisms of my grandfather that I might offer up here have to be tempered by the fact that he did in fact drive me to the local (relatively) cheap higher-education dispenser and basically registered me for me (technically, I applied but there’s a 100% acceptance rate.) This was something I desperately wanted to do but was unable to make happen by myself. I won’t say that my grandfather every really understood the problems I went through while experiencing formal education, but as perhaps the member of my family least comfortable himself with the concept and culture of higher education, he was the most willing to notice and accept that I needed help getting started with it.
However, I did do quite badly that semester (I started out enrolled in 4.5 classes and ended enrolled in 2, with a C average) and going to the farm to work 4 days a week still (after morning classes and also on Saturday) did not help that except in that it provided a convenient distraction from it; an opportunity for me to distract myself from my frustrations by wearing myself out.

Why did I come back to the farm for 2018? I wasn’t happy there in 2017, I have the journal entries to prove it. Reasons: it was the path of least resistance, it was something I was more already familiar with than any other job, and my grandfather remained a very difficult person for me to say no to. (Also, he asked me (and my brother) to commit in midwinter, when it still seemed non-threatening and pretty far away.) The schedule was pretty much the same as I described for last year except that for some reason we went up 6 days a week as often as 5 (weather permitting.) My brother went up with us for the same period of time as he had previously, but was even more ornery this year than he was the last, which was an accomplishment; this didn’t stop me from being grateful for his presence. Mostly, I recruited him to work on whatever I was working on during the day, whenever I had a specific project: like building a fence around the second patch, or digging drainage ditches on the lawn, or moving the rainwater collection tank trailer to water stuff before Grandpa could realize that something that he didn’t plan for us was happening. My uncle became extremely fond of complaining that we were getting less done working on the same thing together than we might have working on different things far apart; this may have been true, but I was unwilling to test the theory.
As I implied above, I had a lot more freedom this year to pick projects that I thought needed to be done instead of following instructions all day, as long as I could seem confident about it under scrutiny later. I responded in two ways: I started wearing earbuds and listened to music and occasionally podcasts for most of the day, which was great except that it ruined earbuds and made me feel slightly spacey like I wasn’t even physically there sometimes, given that it was the main input that was actually making it to my brain, and I gave myself three new jobs. The first was to pick, display, and sell produce at a roadside stand that I set up back home (ideally without attracting too much attention from my uncle, who was doing the same thing); the second was to start picking for and selling at a new weekday farmers’ market; and the third was to fix an old dump truck that had been sitting in the back barn for the better part of the decade with a broken brake line, with the help of my dad, who came up to the farm a few days to show me what to actually do. The stand was very successful but 20% went to my mom for stocking it during the day and another 20% went to my grandfather for owning the farm; the new farmers’ market only required me to pay off my grandfather but had too many vendors for the customer base and was generally very slow; and the truck project was a huge disaster that consumed countless hours and brain cells: one brake line burst after another, we ended up having to remove and replace the two brake cylinders in each of the back wheels (which necessitated jacking the 12.5 ton vehicle up and removing both rear wheels and axles), the wiring for the lights was fucked from a previous botched repair job by a person or persons unknown, the bed needed to be attacked with the farm’s one working boom truck to get it to even move, and even after it was going up and down smoothly the hydraulic pump was occasionally leaking fluid, which I was neither qualified for or willing to try to fix; then, during the first test drive with a potential buyer, the radiator apparently exploded, and he convinced my grandfather to sell it to him for $1000, which was split between him, me, and my dad and uncle for helping (more or less.) I eventually calculated that with those three extra projects in addition to my regular salary (up $5 a day but without the weekly bonus, resulting in a net raise of $5 a week) I nearly made minimum wage working there that summer. (Hey, if Quinn is going to read this, I should probably note that minimum wage in Ohio was $8.15 an hour, at least when I wrote this, it’s up to $8.55 an hour now.)

Also, after going on three years of the whole “pull into Mitch’s driveway and blow the horn for a while” routine, the horn on my grandfather’s F-150 finally gave out and he locked the keys in my car while climbing inside of it to use its. (He did admit to this but also told me that I should never have left the keys inside of a car with “automatic locks.”) I had a much better spring semester this year, but it still wasn’t made easier by my 28 hours a week at the farm (plus the commute) right up until October 25th, when I finally quit.

Performance review:
Another part of my feelings about the farm that I have to mention is that the whole time I was there, I was pretty well aware that it was not nearly as productive as it should have been. One large part of this was just flawed soil management practices; by the time I got there, my grandfather had been planting mostly the same plants in mostly exactly the same spots for nearly 10 years, which is absolutely not how any of that is ever supposed to work. He sent soil samples away for analysis, got back reports prescribing long lists of fertilizers to be applied in massive quantities to help production, and then went back to using what he was planning on putting down anyway (mostly starting fertilizer (which we dragged around in 5 gallon buckets for the entire planting season), calcium spray to try to prevent previous years’ blossom end rot epidemics, and some poorly labeled sacks of miscellaneous stuff that he had gotten at a farm auction and that had been taking up space in a barn for years.) My grandfather’s managerial attitude was that all ideas were suspect unless they occurred to him first, which meant it sometimes required some stamina to get certain things done; he would ride up on the lawn mower and stare at you suspiciously if he wasn’t sure of exactly what you were doing.
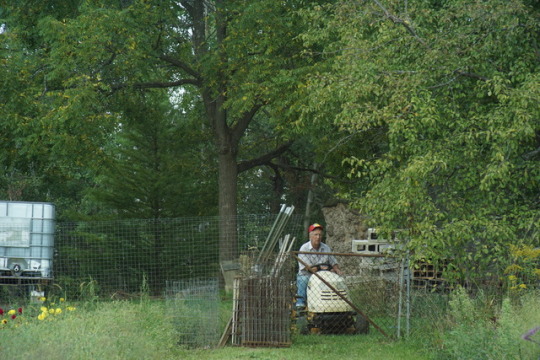
Like this.
(Of course, the farm was not really run with the purpose of maximizing production, anyway. My grandfather kept it going year after year initially because he was retired, and wanted something to take up his time, and because he wanted to turn himself into a farmer; later, he got the idea that he was going to turn me into one.)
The other main obstacle to growth was the fact that we were surrounded by 80 acres of soybean fields that were at a slightly higher elevation than our plants, which meant that 2 inches of rainfall was more than enough to flood the place. This is not actually a good thing for any plant’s growth (except for cucumbers, and I guess sometimes zucchini.) I ended up (with my brother) digging hundreds of feet of drainage ditches in 2018 to try to combat this. Like, with a shovel. We had a trencher, but its hydraulic pump leaked fluid like a sieve, which had prevented it from being used for years, kind of like that dump truck I mentioned fixing earlier. Other broken down equipment included two boom trucks (one of which was specifically designed just to lay railroad ties), two full-size tractors (an Oliver and a Farm-All), a handful of mechanical tractor attachments that lay scattered throughout the barn-adjacent grass, a smallish red Troy-Bilt riding lawn mower, and a 1963 Buick Riviera.

On a personal level, going to the farm every day felt like dying? It was long hours of difficult, tedious, low-paid work in a desolate and isolated location. It was sort of like a sensory deprivation chamber, but for thoughts and feelings instead of for senses. On one hand, I regret every single miserable second of it, and hope to never see the place again for as long as I somehow manage to live (sadly unlikely); on the other hand, I do think it made me more appreciative of the moments when I do feel like I’m alive in the world, even when they’re not exactly easy ones. I have more enthusiasm for certain types of fear now, like driving to a strange and distant city to see a band play by myself, actually talking to the host in the AirBNB there, and descending into a strange subway system without really knowing how I’m going to get anywhere I’m trying to go from there; or signing up for classes for next semester without knowing exactly what they’ll be like, and talking to the strange person sitting next to me, or even just emailing the professor to ask for an explanation of an assignment that I don’t understand. It reminds me that I’m not as trapped anymore.
This contradicts what I want to be true, which is that the farm was just a background event in my life, instead of something that defined it for all of those years. The things that I was doing in the background of this, the story about farming, were the things I now realize were actually important to me at the time: taking those pictures, going back to school, the music I was listening to while I was out in the field, pounding in tomato stakes… I was also re-learning the piano in the evenings when I still had the energy. Unfortunately, the farm did define that part of my life to a large extent because of the way it served as an obstacle to me pursuing those things. The thing is, I wasn’t really trapped there, in any real physical or consequential sense; the farm took over my life because I was unable to recognize and act on the fact that I did have access to real sources of happiness.
Also, I guess the whole time I was technically committing tax evasion?

Anyway, whenever I see one of those posts about how nice it would be just to leave society and go live on a farm or something, this is what I’m thinking of.
#yes. long. maybe save this for when you already know that you're going to be bored#if anyone actually makes it to the end please interact
2 notes
·
View notes
Text
layered mocha cheesecake
Last Friday at 3 pm, when we had dinner plans at 6, I decided it had been too long since I’d gotten myself into a right mess of a baking project and decided to make my husband a cheesecake for his birthday — which we were already 14 hours into. I’d been dawdling because despite having 11 cheesecake recipes on this site, I find cooking things I’ve already made before boring, and was working up the courage to tackle a harebrained idea for a cheesecake that had thin stacked layers.
[Does Deb have a thing for thin stacked cakes? I don’t know. Judge for yourself.]
[I also decided to share it on Instagram Stories because your comments always crack me up when I’m elbows-deep in my latest terrible idea.]
While most cheesecakes have crumb crusts, I wanted something thinner and more sturdy for stacking purposes, so I made wafer cookies, hoping to press the dough raw into thin layers to line the pans. It didn’t work (they just couldn’t be stretched enough with fingertips) so I rolled them out between two sheets of parchment (as we do here), froze them for 5 minutes so they’d be firm, and then lined the baking pans with them. It’s definitely an annoying step but I figured I wasn’t going to write up this recipe (because it was going to flop) so I only had my own complaining (which was significant) to deal with.
From there, however, things went surprisingly smoothly. While the wafer crusts baked, I made the cheesecake base I like so much here, divided the batter, mixed melted chocolate into one, instant espresso into the other, baked them quickly, (bakers who care about technique, cover your ears) shoved them into the freezer to cool them down really fast because it was like 5pm by now and then carved up and stacked and trimmed the layers and then whoa. I mean, I didn’t think the cake was going to taste terrible or anything (see also: cheesecake, buttery wafer cookies, chocolate, coffee) but I didn’t think it was going to be so ridiculously handsome. How fitting (aw).
As this site approaches its 14th (!) year of churning out wordy, full-color food content, I want to tell you something. Every on-a-whim kitchen experiment only goes one of two ways: it’s either heavily photographed and well-documented and ends up being a bomb, or I take no photos or photos and it turns out a freak favorite. This was the latter. So, this week, I made this entire crazy cake again and took pictures and wrote it down. For you. No seriously, come pick it up. We are way over our cheesecake quota for the month and it’s just not safe for it — or us — here.
Previously
One year ago: Fried Rice with Zucchini, Tomatoes and Parmesan
Two years ago: Chile-Lime Melon Salad and Chocolate Peanut Butter Icebox Cake
Three years ago: Frozen Hot Chocolate
Four years ago: Cold Noodles with Miso, Lime, and Ginger, Apricot Pistachio Squares and Raspberry Swirl Cheesecake
Five years ago: Strawberry Lime and Black Pepper Popsicles and Kale Salad with Pecorino and Walnuts
Six years ago: My Favorite Brownies
Seven years ago: Hazelnut Plum Crumb Tart
Eight years ago: Everyday Chocolate Cake, Zucchini and Almond Pasta Salad and Raspberry Limeade Slushies
Nine years ago: Asparagus with Chorizo and Croutons, Sour Cherry Slab Pie and Cantaloupe Salsa
Ten years ago: Blueberry Crumb Bars, Napa Cabbage Salad with Buttermilk Dressing, Key Lime Meltaways and Grilled Eggplant with Caponata Salsa
Eleven years ago: Brownie Mosaic Cheesecake
And for the other side of the world:
Six Months Ago: Korean Braised Short Ribs
1.5 Years Ago: Small Batch Tiramisu
2.5 Years Ago: Miso Black Sesame Caramel Corn and Hot and Sour Soup
3.5 Years Ago: Chocolate Oat Crumble and Oven-Braised Beef with Tomatoes and Garlic
4.5 Years Ago: Chocolate Hazelnut Linzer Hearts and Chocolate Peanut Butter Cheesecake
Layered Mocha Cheesecake
Servings: 10
Time: 2 hours if you're super organized
Print
The wafers here are the same we use for this icebox cake. They’re adapted from King Arthur Flour.
Wafers
1 1/2 cups (195 grams) all-purpose flour
1/4 cup (20 grams) Dutch-process cocoa powder
1/4 cup (20 grams) black cocoa powder (just use more Dutched cocoa powder if you don’t have it)
1 cup (200 grams) granulated sugar
1/2 teaspoon fine sea or table salt
1/2 teaspoon baking powder
1/2 cup (115 grams) unsalted butter, cold is fine if using a food processor
1 large egg
1 teaspoon (5 ml) vanilla extract
Cheesecake
1 1/2 pounds (3 8-ounce packages) cream cheese, at room temperature
1 cup (200 grams) granulated sugar
4 large eggs
1/4 cup (60 grams) sour cream
1 teaspoon (5 ml) vanilla extract
4 ounces (115 grams) semi- or bittersweet chocolate, chopped, or chips (2/3 cup), (melted and cooled slightly
2 teaspoons instant espresso powder
1 teaspoon molasses
To finish
3 ounces semi- or bittersweet chocolate, chopped, or chips (1/2 cup)
3 to 4 tablespoons (15 to 20 ml) heavy cream
1 tablespoon (15 ml) corn syrup (optional, but makes it glossier)
1 tablespoon black cocoa powder
Gold dragees, if you wish
Prepare pans: Line two 9×13 cake pans or quarter-sheet pans (what I use) with foil. You really don’t want this foil to tear; a trick I like is to press it over the outside of the cake pan first to mold the shape of the foil. Then, when you flip it over and line the inside, it’s easier to press tightly against the walls without tearing. Lightly coat the foil with nonstick cooking spray. Line the bottom of the pan, on top of the foil, with a fitted rectangle of parchment paper. While it’s not absolutely necessary, consider it a layer of security that makes it easier to move your cheesecake layers later.
Heat oven: To 350°F.
Make wafers:
…in food processor: Combine flour, cocoa powders, sugar, salt, and baking powder in the work bowl of food processor, pulsing until mixed. Cut butter into chunks and drop into work bowl; run machine until butter disappears into mixture, which will be powdery. Add egg and vanilla and run machine until the dough begins to clump/ball together.
…with an electric mixer: Beat butter and sugar together until combined. Add egg and vanilla and beat until smooth. Add baking powder, salt and cocoa and beat until combined. Add flour and mix just until it disappears.
Shape wafers: Roll dough between 2 large pieces of parchment paper until very, very thin and roughly the size of a half-sheet pan (13×18 inches). Slide onto board, the back of a baking sheet, or large cutting board (parchment paper and all) and place in freezer for 5 minutes, until firm. Once firm, peel back top piece of parchment paper (it should now come off cleanly, pull it back slowly), then lay it loosely back on the sheet of dough. Flip the sheet over and do the same (gently, slowly peel back the second parchment sheet) until the dough is now loose between them.
You can use the rectangles of parchment from the bottom of your baking pans to give you an idea of the sizes you’ll need for each wafer base, but you basically want to cut the sheet of dough in half. Carefully lift each dough halves into a prepared pan. Patch it where needed so that it fully covers the bottom, pressing it with your fingertips into an even layer, and out to the edges if it fell short. It’s fine if it goes up the sides a little — we’ll trim them after it bakes.
Bake wafers: For 10 minutes — they’ll be mostly, but not fully, baked. [Get started on the cheesecake batter while they bake.] Once the wafers are done, if you have any wafer edges that went up the sides of the pan, gently cut them away, which should be easy when they’re hot, but be careful not to cut through the foil. Leave oven on. Enjoy your wafer snacks.
Make cheesecake batter:
…in a food processor: (Yes, this really works.) Wipe the food processor you used for the wafer layer out so that no crumbs remain. Place sugar, then cream cheeses into the work bowl and blend until smooth. Add eggs, one at a time, blending between each, then sour cream and vanilla, blending until smooth. Scrape down bowl and blend another few seconds until smooth.
… with an electric mixer: Beat cream cheese with sugar until fluffy, then beat in eggs, one at a time, until thoroughly mixed, scraping down the sides and bottom of your bowl between each addition. Beat in sour cream and vanilla.
Both methods: Divide cheesecake batter in half, into two bowls. On my scale, each half weighed 565 grams. (I’m sorry I didn’t measure it in cups. Next time!) Slowly drizzle melted chocolate into first half, whisking until fully smooth. Pour batter into first wafer pan — it’s totally fine if it’s still warm/hot from parbaking.
Add espresso powder and molasses (which makes the color magically coffee-like) to the second bowl and whisk until smooth. Pour second half of batter into second prepared pan.
Bake cheesecakes: Bake both pans at the same time, rotating them mid-way because few oven racks are perfectly level, for 15 to 18 minutes, until cheesecake is set but slightly jiggly.
Cool cheesecakes completely: I am always in a rush and let them rest at room temperature on a rack for 5 minutes and then put them in the freezer to quick cool (this takes 15 to 25 minutes, depending on the freezer). You can also cool it over a couple hours in the fridge.
Assemble your layered cheesecake: When cheesecakes are fully cool, carefully pull the foil sling lining the pan onto your counter, taking the cheesecake with it. Gently pull the foil away from the sides of the cheesecakes so that their sides are fully exposed. Next, you want to remove the parchment paper under your coffee cheesecake layer. Use a thin, long offset spatula to run it around under the wafer layer, making sure it isn’t sticking in any places. Slide the parchment paper out carefully. (Usually you would invert your cake layer onto a rack here to remove the parchment, but I don’t think this is a great idea with soft cheesecake!)
Here is the scariest part: Gently begin lifting your coffee cheesecake from the edges with your fingertips until you can slide both hands underneath it, palms up, fingers spread for maximum support. Give it a practice lift up a half-inch, then inch, before taking a deep breath and moving it quickly on top of your chocolate cheesecake layer. The first time, mine broke. I moved the pieces back into place. It was far from perfect but nobody could tell by the time it was assembled.
Dip a sharp serrated knife in hot water — this is the only thing that gives it a passably smooth edge, trust me — and trim the sides of the cheesecake block so that they’re even. Wipe the knife with a towel and dip it again in water between each cut — trust me. Using the same wipe-then-dip knife method every time you cut into this cheesecake, including when you serve it.
Cut your cheesecake block into 3 equal rectangles. Once you’re done trimming, your cheesecake is usually about 7×11 inches and you want to cut it along the longer side, so each third is going to be 3 2/3 inches, but I highly recommend you use a ruler and not eyeball this. Once again, use a thin spatula to carefully separate the bottom layer of the cheesecake block from its parchment paper (you haven’t done this yet for the chocolate layer) before using your hands to lift and stack thirds of the cake into a 6-layer brick-shaped cheesecake. As you’re lifting, if you notice that your cheesecake is thicker on one side than the other (this totally happens due to aforementioned uneven oven racks and is more noticeable because the cake is so thin), simply turn your layer around so that the final stack is relatively flat.
Trim the edges again if needed, so that they are smooth. To smooth them further, I found I could press a piece of parchment paper against each side and gently peel it back (see 12th photo).
To finish: (You’re at the finish line!) Melt chocolate, 3 tablespoons of the cream, and corn syrup together and then whisk until smooth. Whisk in cocoa powder until smooth. I’m using black cocoa here to darken the color of the glaze so it looks better with the cheesecake. You want your final glaze to be thick but pourable. Add the last tablespoon of cream if needed to achieve this. Pour over top of cheesecake and use an spatula to smooth it and also push some over the edges for a drippy effect. Finish with sprinkles and refrigerate until needed.
To serve: Once again, a wet serrated knife makes the cleanest cuts. Thin slices are best because cheesecake is so rich. Leftovers keep in the fridge almost *too* well, heh.
Source: https://smittenkitchen.com/2018/08/layered-mocha-cheesecake/
1 note
·
View note
Text
Zucchini, Cheddar & Tomato Mini-Tarts
We've kinda hit that point in the season where I can't tell anymore if I want to hang onto summer or jump headfirst into fall and my cooking has definitely reflected this, as I swing wildly between entirely summery dishes and more cold weather fare. So today it's kinda fitting that I'm sharing these Zucchini, Cheddar & Tomato Mini-Tarts. Full of garden fresh zucchini and tomatoes, these have that late-summer feel that deliciously bridges the seasonal gap.
They'd be a great addition to any Labor Day celebration!
And even though they look kinda fussy and you're probably thinking "so totally not worth it", I'm here to say that these are actually not at all that hard to make and can even be made a day ahead and reheated a smidge before serving. So um, yes in fact, totally worth it!
You start by making a simple dough in the food processor that includes white and whole wheat flour, as well as some grated cheddar cheese, giving the crust tons of savory flavor and a little more oomph than traditional pastry crusts.
After you've rolled out the dough into a largish rectangle, you cut it into squares and line those dough squares into a muffin tin.
Meanwhile, you make this heavenly roasted mixture of zucchini, cherry tomatoes and honey spiked with a bit of cayenne pepper. Yum! It's hard not to just eat the mixture as is and forget about the tart part!
But force yourself to exercise a bit of restraint and add the ricotta/chive mixture to the little cups, topping it with those irresistible, spicy-honey roasted veggies--
And then a generous shaving of Parmesan cheese
And you'll be rewarded with adorable little appetizers that have layers and layers of flavor--gooey, melted ricotta, tender, sweet/spicy veggies, flaky crust and a crunchy Parmesan topping, that'll leave you both pining for warm lazy days and excited for those crisp, energized autumn ones to come. And that my friends, is a win-win!
Zucchini, Cheddar & Tomato Mini-Tarts
Makes one dozen mini-tarts
Prep Time for the dough: 10 minutes, plus at least 2 hours to chill, plus another 15 minutes or so to roll out, cut into squares and stick into muffin tin; Bake Time for Veggies: About 40-50 minutes; Prep Time for Ricotta Filling: 5 minutes; Assembly Time: 10 minutes; Bake Time for Tarts: 25-30 minutes
Ingredients
For the crust
1 1/2 cups (170 grams) unbleached, all-purpose flour
1/2 cup (65 grams) whole wheat flour
1/2 teaspoon fine sea salt
12 tablespoons cold unsalted butter, cubed and refrigerated until ready
3/4 cup (55 grams) Cheddar cheese, grated
1 large egg, beaten
Up to 6 tablespoons ice water
For the Veggie Filling
About 2 pounds zucchini (3-4 medium), ends trimmed and cut into small cubes
2 pints cherry tomatoes, cut in half
3/4 teaspoon fine sea salt
1-2 shakes red pepper flakes
2 tablespoons olive oil
1 1/2 tablespoons honey mixed with a pinch of cayenne pepper
1 tablespoon white wine vinegar
For the Ricotta filling
3/4 cup fresh ricotta
1 large egg
3 tablespoon freshly chopped chives
1 garlic clove, minced
Pinch of salt
Pinch of black pepper
For the topping
2-3 tablespoons milk or heavy cream
Finely grated Cheddar (somewhere between 6-8 tablespoons)
The Recipe
1. To make the crust: Pulse together the white and wheat flour and the salt in the bowl of a food processor. Add in the butter and cheddar and pulse until the mixture looks like little peas. Drizzle in the egg and 3 tablespoons water and pulse a few times. Squeeze a bit of the mixture between your fingers. If it holds together, you're done. If not, add one tablespoon water, pulse a couple of times and squeeze again. You just don't want to over mix or the dough will be tough. Turn the dough out onto the counter or a board and form into a ball. Flatten into a disk and wrap with plastic wrap. Chill for at least 2 hours and up to one day.
2. While the dough is chilling you can make the veggie filling. Preheat oven to 425ºF. Place the zucchini, tomatoes, salt and red pepper flakes onto a rimmed baking sheet and toss with the oil. Spread the mixture into an even layer and roast for 40-50 minutes, tossing every now and then, until the veggies are tender and beginning to caramelize. Remove the pan from the oven. Stir the honey with the cayenne pepper in it and the vinegar into the veggies and let them cool to room temperature.
3. When the dough has chilled, spray a standard muffin tin pan with nonstick spray and set aside. Flour a board or the counter lightly and roll the dough out into a large 12x16-inch rectangle. Trim any scraggly edges and use a ruler to cut four 4-inch strips and then cut those strips into 3 squares, so that you have a total of 12. Fit the squares into each muffin tin, gently pressing down in the center so that the corners of the dough hang over the edges of each well. Chill the dough for 15 minutes.
4. To make the Ricotta filling: Place the ricotta, egg, chives and garlic in a small bowl and whisk together well. Add a pinch of salt and pepper and mix together again.
5. Equally divide the ricotta mixture among the chilled dough wells. Top with the veggies and fold the overhanging dough corners over the filling. Brush the tarts with the milk and cream and sprinkle with the cheese. Place the tin on a baking sheet to catch any drips and bake for 25-30 minutes, until they are bubbly and golden. Let cool a bit, remove from the tins and serve.
6. You can definitely make these a day ahead. Let them come to room temperature in the tin, cover and chill and then reheat in a low oven before serving.
Enjoy!
Note: Recipe adapted from The New York Times by Melissa Clark, 2017. I tinkered a bit with the filling and some of the proportions. You could definitely also use different veggies.
#Cheddar Cheese#Heavy Cream#Black Pepper#Fine Sea Salt#Chives#Egg#Ricotta Cheese#White Wine Vinegar#Honey#Cayenne Pepper#Olive Oil#Red Pepper Flakes#Cherry Tomatoes#Zucchini
2 notes
·
View notes
Text
What would it take to be the Dark Knight? What would your eating and training habits have to look like for your body to stand up to the riggers of jumping off buildings, to be agile, yet strong, fast, and mentally sharp all at the same time?
I have personally been into health and fitness now for over fifteen years, and my ideology has drawn inspiration from Batman and what Bruce Wayne had to become to put on that cape and cowl. I’d like to share with you my personal thoughts on what it would take to be Batman.
Diet
Let’s start with the hardest component, and the most important one. Given how much money Mr. Wayne has and through the services of Alfred and other resources, Bruce really doesn’t have an excuse in this area. Everything would be tailor made for him, however, even with that you would need the willpower to stick with a clean diet for 80-90% of the time. Remember, with diet there are so many debates about what to eat, when, and how, that it can be endless. Given the amount of physical movement needed and the time in which is happens (between midnight and 4am), a good balance between the right carbohydrates, protein, and good fats would be essential.
A split across those three categories daily would be required without skipping meals, Breakfast, Lunch, and Dinner every day, and with a busy schedule that can get difficult even at the best of times. Some of the following are based off what I consume as part of my regular diet:
Breakfast Options (each of these options would be 1 meal per day):
6 Egg Whites / with Two slices of toast
High protein / low carb greek yogurt with plain oats. Mixed with berries and strawberries
Salmon, half an avocado with grilled greens and 4 poached eggs
Protein Pancakes with natural peanut butter X3
Lunch Options
Lean hamburger meat (no more than two fist fulls as a portion size), grilled with herbs and spices / Brown rice / boiled broccoli
Tuna in Spring water (2-3 servings), cottage cheese, salad with mixed green vegetables
Grilled Chicken with sweet potato, broccoli, and beetroot
low fat mince (beef), grilled with beans. Mixed with broccoli, zucchini, herbs, carrot.
Dinner Options
Protein Pasta, with home made tomato sauce, herbs and cottage cheese
Steak, broccoli, with sweet potato
Homemade Beef meatballs mixed in a stir-fry of green vegetables
Grilled Salmon steak, brown rice, with salad
Fish Whiting with lemon, mixed salad with feta, olives and brown rice.
Cheat Meals (once or twice a week)
Home made pizza (get that stove going, Alfred)
Pasta
Home made chips
Fluid Intake
Water
Tea (unsweetened)
The occasional wine (while playing the role of CEO)
With protein, I have always tried to take the approach of consuming 2x in grams per Kg of my body weight (Yes I am an Aussie, sorry I don’t use pounds). If your weight is 100kg, then you should be trying to take in 200 grams of protein a day as part of your diet. Not easy while keeping your carb intake at a balanced level. Now, given the amount of physical activity you would exhaust as the Batman, then you would need to consume your carbs straight after those events. So instead of going to bed at 4:30am after fighting crime for 4 hours and training during the day, you would need to eat after then ensure you have a good night’s sleep. Hard to do when you need to back it up night after night. I average 6-7 hours of sleep a night, to do what Bruce Wayne does your sleeping patterns would need to be around 8-10 hours.
Cheat meals would be a required component of your diet, given how much your body would be going through night after night. The body would need the sugar, and other elements as part of the overall process.
I’ve always said, Hydration is important. I have read so much about water intake and there is no definitive answer to how much your intake should be. It is different for every single person. Again, based on movement and energy that you’ve used, my metric is actually the colour of my urine. The darker it is, the more water you need. Better ensure your Batman Outfit has a handy zipper!!
Training (Based off parts of my own routine)
For the type of work required to be the Dark Knight, one of the priorities is to be able to push and pull your own body weight. There is no point in bench pressing 200 pounds if you can’t do 50 push-ups and 50 pull-ups! Jumping off buildings, crawling and pulling yourself across all sorts of surfaces means you have to pull and push your own body weight and then some. Add your suite, gadgets, outdoor conditions, and in the event you have a side kick; well you may need to help that person out a few times!
Body Weight Training (Executed every day)
100 Pull Ups: 10 sets of 10 reps with a 10 second rest
50 Pull Ups: 10 sets of 5 reps with 40KG hanging from your waste
Upside down pull ups (concentrating on your back): 10 sets of 5 reps
100 Dips: 10 sets of 10 reps with a 10 second rest
50 Dips: 10 sets of 10 reps with 60kg hanging from your waste
500 Push-Ups: 5 sets of 100 with a 1 minute rest
100 Push-Ups with 20KG plate on your back
A weight training program would consist of two body parts (A small with a large) 4 days a week, with no weights over the weekend for recovery, but ensuring that every two months the program is altered to ensure you body doesn’t get used to the routine.
Each of the days below would be your weights session + the body weight training above.
Monday (Chest and Triceps)
Dumbbell Chest Press – 4 sets of 12 reps
Dumbbell Flys – 4 sets of 12 reps
Clap Push Ups – 3 sets of 20 reps
45 Degree Bench Press – 4 sets of 12 reps
Overhead Tricep Extension – 4 sets of 15 reps
Tricep Push Downs – 4 sets of 20 reps
Tricep Kick Backs – 4 sets of 12 reps
Tuesday (Back and Traps)
Seated Row – 5 sets of 15 reps
Cable Cross Overs – 5 sets of 15 reps
Bent Over Row – 3 sets of 12 reps
Laying Down Overhead Dumbbell Extension – 4 sets of 12 reps
Barbell Pull Downs (wide grip) – 4 sets of 15 reps
Wednesday (Arms and Shoulders)
Standing Dumbbell Curls – 4 sets of 15 reps
Seated Dumbbell Shoulder Press – 4 sets of 12 reps
Medicine Ball Slams – 4 sets of 12 slams (15kg ball)
Kettle Bell Swings – 4 sets of 20 swings (40kg, no rest)
Barbell Curl 21s – 7 reps low, 7 reps mid level, 7 reps high = 1 set. Execute 4 sets, no rest
Thursday (Cardio only with Body Weight Exercises)
7-14km Run (depending on the state of your body), OR
30 Sprints, 1 min at 15-19km per hour, 30 sec rest
5km Sprint, as hard as possible
Interval 8km Run
Friday (Legs)
45 degree Leg Press – 4 sets of 15 reps
Seated Leg Extension – 4 sets of 15 reps
Barbell Squats – 5 sets of 10 reps
Box Jumps – 10 sets of 20 reps
Sled Push – 30 meters with minimum of 200kg, up and back = 1 set. Execute 5 sets
Saturday (Cardio only with Body Weight Exercises)
7-14k Run (depending on the state of your body), OR
30 Sprints, 1 min at 15-19km per hour, 30 sec rest
5km Sprint, as hard as possible
Interval 8km Run
5km Swim
Sunday (REST)
(adsbygoogle = window.adsbygoogle || []).push({});
So there you have it, it would take a monumental effort to have the body, mind, spirit, and eating habits of the Dark Knight. To make time and eat those meals every day, find the hours to train to the routine I have designed, and then you’re fighting crime at night, time would catch up with you very quickly, and given 3-5 years of that type of intense workload, your body wouldn’t be able to keep it up. Unless you use your imagination and think about what advantages you could buy with Wayne’s billions.
Let us know if you’re into health and fitness. If so, what does your training and diet look like?
Eating and Training to be the Dark Knight What would it take to be the Dark Knight? What would your eating and training habits have to look like for your body to stand up to the riggers of jumping off buildings, to be agile, yet strong, fast, and mentally sharp all at the same time?
34 notes
·
View notes
Text
CSA WEEK 6
P I C K L I S T
CABBAGE - POTATOES - BLUEBERRIES - TOMATOES (RED & HEIRLOOM) - THAI BASIL - CELERY - BOK CHOY - SUMMER SQUASH - ZUCCHINI - LITTLE CUCUMBERS - CILANTRO - GARLIC - JALAPENO
This week was met with more rain- aka a constant reminder, that it's time for new boots. Because of the rain crops like your bok choy are currently bathing in standing water. The bugs are pumped, especially those attracted to wet conditions (hence the little spots on said bok choy). To be perfectly honest with all of you, it sucks. YES the fields are wet, and yes the fields need moisture, but goodness gracious the crops will soon drown and rot. I’m not entirely bummed out just yet, the 10 day forecast looks promising enough. But let it be known that every drop of rain that comes out of that sky right now is met with an extreme grunt made by yours truly- and probably every other farmer in our region.
Moving on from the weather (is that even possible??!) The flower fields are exploding with color as we usher in Anne & Mrs. T’s cut flower CSA. For those that pick up at the farmstand, you can catch a glimpse of the zinnia field from 12A and it is GLORIOUS.
In other field reports- mesh lining was added to the tomato greenhouses to frustrate pests looking to enter, THE GREAT ANNUAL GARLIC HARVEST came and went- pretty lackluster harvest due to it not being that fun to pull garlic when the earth is so heavy with moisture (but we still love our garlic crop!!), blueberry season has begun, the heirloom tomatoes are finally catching up with the red tomatoes, and if we haven't already entered peak summer harvesting and eating, we are getting pretty close to it.
PRO TIPS:
Your tomatoes: do you see cracks in your tomatoes?! Great! that means they are ripe for the eating. Do not sleep on this fruit. Eat asap, nothing beats a juice ripe just picked tomato in the summertime.
Thai basil, cilantro, etc… These veggies with the listed herbs are pretty much begging to be incorporated into a vietnamese style rice noodle bowl and or fresh spring rolls. I am running out of room here for recipes, so give it a google if you need inspo.
Fried garlic chips
from my new fave cook book,
BURMA SUPERSTAR: ADDICTIVE RECIPES FROM THE CROSSROADS OF SOUTHEAST ASIA
by Desmond Tan and Kate Leahy
Makes about ⅓ cup fried garlic and about ½ cup garlic oil
Ingredients:
½ cup thinly sliced fresh garlic
½ cup canola oil (though i used olive oil and it turned out great)
Line a heat proof bowl with a strainer. Line a plate with paper towels. In a wok or small saucepan, heat the oil over medium heat for a minute or two (the oil shouldnt be scorching hot). Add the garlic and gently stir into the oil. When bubbles start to form rapidly around the garlic, decrease the heat to low and cook, stirring often, until the garlic is an even golden color and nearly completely crisp, about 3 minutes. If the garlic starts to darken too quickly, remove it from the heat and let it continue to fry in the oil. If the garlic needs more time to fry, return the wok to low heat and continue to fry.
Pour the contents of the wok into the strainer lined bowl. Lift the strainer up and shake off of the excess oil. Scatter the garlic onto the lined plate. The garlic should crisp up as it cools. The chips can be stored in an airtight container at room temperature for 1 month. Stor the oil in fridge for upto 6 months.
Ginger salad
Again, from my new fave cook book,
BURMA SUPERSTAR: ADDICTIVE RECIPES FROM THE CROSSROADS OF SOUTHEAST ASIA
by Desmond Tan and Kate Leahy
JENNY’S NOTE: I KNOW I KNOW, there is no ginger in your box this week to pickle- and also no romaine lettuce, BUT make do with what you DO have. For example i used pickled radishes instead of the pickled ginger and this Summer salad remained so bomb. It’s basically all I want to eat now, you’re welcome. ALSO I think the THAI BASIL would be awesome in this- give it a shot.
4 cups thinly sliced romaine lettuce
1 ½ cups shredded cabbage
3 heaping tablespoons pickled ginger, chopped
2 tablespoons fried garlic chips
3 tablespoons fried yellow split peas
3 tablespoons cilantro
2 tablespoons sunflower seeds
2 tablespoons coarsely chopped toasted peanuts
2 tablespoons minced jalapenos
1 tablespoon sesame seeds
1 ½ tablespoons toasted chickpea flour
1 ½ tablespoon onion oil
2 tablespoon juice from the ginger pickling liquid
2 teaspoon fish sauce
¾ teaspoon salt
1 lime or lemon cut into wedges
In a salad bowl, combine the lettuce, cabbage, pickled ginger, fried garlic, split peas, cilantro, sunflower seeds, peanuts, jalapenos, and sesame seeds. Sprinkle chickpea flour over the top and drizzle with oil and pickling liquid. Add the fish sauce and salt (use more salt if not using fish sauce). Squeeze 1 or 2 lime wedges over the top. Using your hands, mix well and taste, adding more salt or lime juice if needed.
JENNY’S NOTE: CHOP AND ADD YOUR CELERY HERE… OR USE IT in ANY OTHER RENDITION OF POTATO SALAD
4 pounds potatoes
1 3/4 cups Greek yogurt (I used full-fat but I think other fat levels would work)
1/4 cup sour cream
2 tablespoons freshly squeezed lemon juice (from half a big lemon)
1 tablespoon white wine vinegar
1 tablespoon minced fresh dill
1 medium garlic clove, minced
2 teaspoons kosher salt (I use Diamond brand; use less if you use another, read why here)
Freshly ground black pepper
1 cucumber (1 pound), unpeeled but quartered lengthwise, seeds removed
More ideas for additions: Crumbled feta, chopped green olives, chopped fresh mint leaves or a minced hot chile
In a medium pot, cover your potatoes with cold water and bring them to a boil over high heat. Once boiling, reduce heat to medium-high and let potatoes simmer until tender enough that they can be pierced easily with a skewer or slim knife. I find that small potatoes tend to be done in roughly 30 minutes from the time I put them on the stove cold, but it’s best to start checking 5 to 10 minutes sooner. Drain potatoes and let them cool completely. (This is a great step to do ahead, as it seems to take potatoes forever to cool. If you’re really in a rush, spread them on a tray and pop them in the freezer for 10 minutes.)
Meanwhile, in the bottom of a large bowl, stir together yogurt, sour cream, lemon juice, vinegar, dill, garlic, salt and lots of freshly ground black pepper.
Grate the cucumber on a box grater (or in your food processor’s shredding blade, if you like to get things done in one hundredth of the time) and try to remove some of the excess by squeezing out handfuls, pressing it in a mesh sieve with a spoon or wringing it in a square of cheesecloth or a lint-free dishtowel. Add to yogurt mixture.
Once potatoes are cool, cut tiny ones into quarters or larger ones into generous chunks. Add to cucumbers and yogurt and stir to coat. Add any extra ingredients desired. Adjust seasonings to taste. Either eat immediately or keep in the fridge for up to three days.
0 notes
Text
Veggie-stuffed zucchini boats
Last summer and fall I struggled with my zucchini plants, and if you’ve been a regular reader of the blog, you may remember that my first *perfect* zucchini was followed by months of disappointment in which none of my zucchinis grew to maturity. This year started out much better, with my zucchini plants growing happily in their raised bed home and producing an abundance of vegetables. Finally, I seem to be getting that bumper crop that I have heard so many other food growers talk about! This means that in addition to the piles of fried zucchini squash blossoms I ate last year, this year I’m able to enjoy meals made with the actual zucchini from my garden.
Growing zucchini can be a challenge because of squash vine borers, plants that only produce male OR female stems (you need both), or a lack of pollinators to help your vegetables grow and develop to maturity. Squash vine borers can be eliminated by affixing yellow sticky fly paper traps near your plants to attract them, or the surgical method: slicing your plant stem near the base and manually extracting the grubs. If you see signs of borer damage, you can also inject the stems of your plant with a solution of Bacillus Thuringiensis, or Bt (an organic pesticide), to kill these pests. Lack of adequate pollination is a major reason for fruit rotting or falling off the vine before maturity, so it’s very important that you plant flowers to attract bees to your garden, or hand pollinate your female flowers with pollen from your male flowers (the male flowers sit atop tall skinny stalks, while the female flower stems look like baby zucchinis).
Despite the challenges that are sometimes involved with successfully growing zucchini, it is one of the most popular vegetables to grow. It also grows well in pots. In a raised bed or in the ground, a single healthy zucchini plant can produce 6 to 10 pounds of zucchini, making it a prolific crop for those who have success with it.
Zucchini, also known as summer squash or courgette, is one of my favorite vegetables. It’s fairly mild-tasting, which means that you can easily add a lot of flavor to it without overwhelming the natural taste of the vegetable. Picking it while it is small (under 8 inches), especially if the flower is still attached to it, will ensure that it’s sweet tasting. While some farmers post impressive pictures of their massive zucchinis (they can grow up to 40 inches!), letting the fruit grow very large before picking will produce a vegetable that is much more fibrous.
This recipe is one of my favorite garden harvest recipes, and it’s pretty easy to make. You can make it vegan by eliminating the cheese on top.
Prep time: 15 minutes
Tools and/or vessels needed: frying pan, baking pan, (opt) melon baller
Ingredients
4 green zucchinis (courgettes), halved lengthwise
2 shallots, minced
3 cloves of garlic, crushed and chopped finely
1 tbsp fresh oregano (or 1 tsp dried oregano)
2 tsp smoked paprika
Salt and pepper to taste
1 red pepper, finely diced
2 carrots, finely diced
1 large tomato, finely diced
1 cup parmesan cheese (mozzarella, provolone, or Iberico will also work)
1 tbsp olive oil for frying
Directions
1. Heat oven to 350 degrees
2. Use a teaspoon or melon baller to carefully scoop out the insides of the zucchini, leaving about 1/8 inch of flesh (any less and you’ll tear a hole in the zucchini). Chop finely
3. Place empty zucchini halves in an oiled baking dish. Alternatively, you can line the dish with foil and brush foil with olive oil to make cleanup easier.
4. Heat ½ tbsp oil in pan, then sauté shallots for 1 minute. Add garlic, paprika, oregano, salt and pepper and sauté for 1 minute more, then add zucchini insides. Cook until zucchini is soft and mashable. Remove from pan, place into a mixing bowl, and mash lightly with a fork or potato masher
5. Add ½ tbsp oil to pan and fry diced pepper, tomato, and carrots for 5 minutes. Add to zucchini mash and mix well. (Alternatively, you can make 2 separate batches as in the picture: one with zucchini and carrots that have been sauteed together, one with zucchini, carrots, peppers, and tomatos. Just be sure to spice each batch equally, using 2x the amount of spices noted above.)
6. Scoop cooked vegetable mixture into the 8 zucchini halves, distributing evenly
7. Top with cheese (optional - for vegan recipe, skip the cheese)
8. Bake for 20-25 minutes. To create a crust on the cheese, move top oven rack to the highest shelf and broil on LOW for 2-3 minutes.
9. Remove from oven and enjoy!
0 notes
Last Seen Blogs

indydrawsstuff
IndyDraws Stuff

askloba
Ask-Loba

perfectimageconsultants
Untitled

fictional-scenarios
for your fictional needs

cactus-cactus-cactus
I’m Like If Harper Perkins Was Based