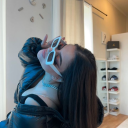
#I like colouring manually but I feel like I need to get better brushes lol
Text
2024, procreate
#art#digital art#I’ve been playing around with it I’m not very comfortable with digital yet#but here’s a fun little late nite sketch#I like colouring manually but I feel like I need to get better brushes lol
7 notes
·
View notes
Note
Hi! I love your drawings and it inspired me to continue drawing after getting depressed with my style. If you don’t mind I would like to ask you what type of sketchbook do you use and how do you scan your drawings?
hello, thank you for the kind message!! and i hope you’re feeling better about your art :>
i’ll put my reply below the cut:
i don’t really use expensive sketchbooks, because i draw a lot of rubbish and feel like i’d waste an expensive one..majority of the pencil drawings you see on my blog are on $1 memopads or scrap printer paper from documents i don’t need anymore, i just hoard paper that people are going to discard haha
i’m not sure how to answer the scanner question, because i’m aware that different scanners..scan differently? but either way the important part imo is adjusting the levels after scanning:
- this is how my drawings usually look after scanning.

- after that, i adjust the levels to bring out the lines and get rid of (most of) the paper texture. after that, i just manually clean up the remaining paper texture/scanner dirt using a white brush.
while i mentioned previously that i also draw on scrap paper (or thin paper you’ve already drawn the other side of), this makes cleaning up sketches super annoying to get rid of because the printed content on the other side is visible, lol. if you feel you’re gonna want to clean up your scanned art a lot, it might be worth to get better quality, thicker paper sketchbooks instead so the other side won’t show.

- then if i want to, i use colourise to change the colour of the sketch, to help give it a warmer (or whatever colour you want) feeling. after that it’s just setting the layer to multiply and colouring below.
hope this helps, even a little!
26 notes
·
View notes
Note
John Deacon and Quotes 3&4! Thank you so much lovies ❤️❤️❤️❤️
Thank you so much for the ask, Lena! Andso sorry you waited this long, we hope this makes up for it 💖 Love ya girl 😊💕
⁂⁂⁂⁂⁂⁂⁂⁂⁂⁂⁂⁂⁂⁂⁂⁂⁂⁂⁂⁂⁂⁂⁂⁂⁂⁂⁂⁂⁂⁂⁂⁂⁂⁂⁂⁂
Quote [3 & 4]: “You couldn’t handle me even if I came with a user manual.” + “I may be amess, but I’m the hottest mess you’ve ever seen.”
Warnings: FLUFF, some innocent flirting, some ANGST Idk what took over me lol, mentions of alcohol, drugsand violence seriously, Idk where this came from but nothing too graphicor upsetting. Girl power at some point. Pure FLUFF in the end.
Characters: Y/N, 80sJohn Deacon
Word count: 2K oof
Written by: @deakyswhitequeen
⁂⁂⁂⁂⁂⁂⁂⁂⁂⁂⁂⁂⁂⁂⁂⁂⁂⁂⁂⁂⁂⁂⁂⁂⁂⁂⁂⁂⁂⁂⁂⁂⁂⁂⁂⁂
Request a story from this prompt list!
⁂⁂⁂⁂⁂⁂⁂⁂⁂⁂⁂⁂⁂⁂⁂⁂⁂⁂⁂⁂⁂⁂⁂⁂⁂⁂⁂⁂⁂⁂⁂⁂⁂⁂⁂⁂
Sitting on a stool at the end of the bar counter, you lazily stirred your half-finished drink. From time to time you glanced at the dancing crowd trying to identify your friend and her date but they were nowhere to be seen. You huffed and turned to stare at your glass.
Great, you thought. That night was a total disaster.
Just when you thought about leaving once and for all, someone sat on the stool right beside you, sighing heavily and tiredly brushing a hand between their curly hair.
“One scotch, three ice cubes, please” the man beside you ordered to the bartender and you picked up your glass and brought it to your lips, an amused grin on your face.
You’d ordered the same.
When the bartender handed him the drink, the man half-turned in your direction to gaze at the crowd behind you. He raised the glass to take a sip of the drink and his eyes accidentally fell on you.
You were mirroring each other and he surely found the situation quite amusing too, cause he gave you a cheeky smile, before raising the glass in your direction.
“Cheers” he said and you followed him suit.
“Cheers to you” you replied, chuckling lightly.
“So, scotch, uh?” he continued, sipping his drink “Who’re you trying to get over?”
Was it that evident that that night sucked? Probably.
You scrolled your shoulders “I’m not trying to get over anyone… I’m trying to get through the night”
He chuckled, shaking his head and looking down “You choose the right drink” he raised again the glass and brought it to his lips.
You half smiled, then an idea popped into your head.
“Who are you trying to get over?” you asked curiously.
He laughed openly. He had a crystal clear kind of laugh. It was contagious and you found yourself laughing as well.
“Nobody, believe me. I’m just here as a wingman” he looked up at you from beneath the eyelashes, then pointed his hand to some spot behind you, causing you to turn and follow his indication.
“You see that blond with the sunglasses in his hair dancing with the brunette? Well I was the wingman and now that he’s found a prey, I back out and let him do his thing”
You chuckled, feeling his gaze on you.
“That doesn’t seem really fair…” you ventured, capturing his attention “I mean, you help him get the girl and don’t get the same treatment? That’s kind of rude…”
He chuckled “Well that’s Roger” he scrolled his shoulders “But it’s not all true… he actually does help me, we just happen to not have the same taste in girls and he always fixes me up with the wrong ones…”
He smiled looking down on his glass and you could have sworn you’d heard some sadness in his voice.
“…like tonight?” you questioned, making him look up at you and smile.
“You’re smart. I like that” he winked jokingly and you both ended up giggling.
You scrolled your shoulders “That’s cause I know the game… You see that redhead with the tall guy? That’s my friend Chris. She’d fixed us up with this double date with two incredible guys to her saying, of course – he chuckled and you smiled – Well, guess what? Mine came here, talked to me for like three minutes then bailed”
You looked down. Maybe it was the alcohol but you were pretty sure your eyes stung a little. You knew that guy was a prick when you’d first laid your eyes on him, but it still hurt being rejected like that. Especially after a few drinks.
The man in front of you probably sensed you’d upset yourself and hesitantly placed a hand on your arm.
“That guy’s surely a prick. He’s the only guy in the world who’d bail on a girl like you” he stated.
You scoffed “He’s not the first one, trust me. Men are always intimidated by me – you snorted – maybe I have some natural man-repellent, I don’t know…”
“I’m still here, aren’t I?”
You glanced at him and he had a serious expression written all over his face. He was studying you with his grey eyes and you felt suddenly exposed like he could read all of your insecurities.
You shifted in your seat uneasily “Anyway… I’m rambling on… I’m probably just tough to handle” you half laughed.
“I bet you are not” he replied with a smile. It was obvious he was suggesting he was different from the other guys.
You smirked, “Trust me, you couldn’t handle me even if I came with a user manual.”
He chuckled openly. There it was again, that damned contagious laugh.
“I’d be glad to prove you wrong”
He looked at you from underneath his lashes with a cheeky, irresistible smirk and your hazy mind, probably a bit blurred by the alcohol, felt the impulse to kiss him. And you almost did, but just when you were about to lean in, somebody practically threw themselves on the counter between the two of you, making you almost fall from the stool.
A mass of red hair you could have spotted anywhere was separating you from the mysterious man you didn’t even know the name of.
“Chris?!” you called your friend over the loud music that was now playing “What the hell, Chris?”
She turned to you. She could barely stand and her eyes were a bit red; when she laid them on you, it felt like it took her a second to focus on your face. She was clearly drunk and you wandered whether that Paul guy had gotten her stoned as well.
“Are you okay?” you asked waving a hand in front of her face.
“Y/N!!!” she slobbered and threw her arms over you, attempting at your stability on the stool.
“I think it’s time for you to go to bed…” you gently said, pulling her away to check her eyes again. Even in the poor light of the bar, you could see her pupils were dilated more than usual and her breath spoke for her in telling what she’d ingested.
“Nooooooo” she threw herself on you again.
“C’ mon, Chris” you jumped off the stool and threw her right arm over your neck so that you could sustain her.
You turned to Mystery Man “I’m sorry I need to take her up to her room. It was nice meeting you…” you still didn’t know his name.
“John” he said with a smile.
“’t was nice meeting you John” you smiled as well and he gave you a small wave.
You turned and aimed for the exit, but halfway there you found your way being blocked by a tall figure who you’d recognised to be Paul when you looked up.
“Where do you think you’re going?” he shouted over the music.
“I’m gonna take care of her, she’s clearly not okay” you tried to walk past him but he blocked your way again.
“C’ mon Y/N, don’t be such a bitch. We were having fun…”
You tried to ignore the insult and made your hand into a fist trying to remain calm.
“I can see you were, too bad she’s barely conscious now. So, if you’ll excuse me…”
Just when you were trying to get past him again, he put a hand over Chris and the other on your hip.
“I won’t excuse you” his voice was strangely low and raspy and even from that distance, you could sense he’d drank. A lot.
You instantly tried to pull yourself and Chris away from his reach, but he chased you through the crowd with his hands.
Walking backwards to avoid his hands, you suddenly bumped against something, or better, someone standing still behind you.
“Leave the girls alone” you turned halfway your head but you already knew it was John.
You smiled to yourself. My hero, you jokingly thought.
Paul half-laughed “Or what?”
“I already called security. I’m giving you the chance to avoid meeting them” John spoke harshly, his voice cold as ice but firm and determinate.
Paul’s expression was the embodiment of bewilderment. He inhaled angrily and threw himself towards John to hit him. He was a lot taller and certainly fitter than John; he pushed him on the floor with a rapid motion.
“No!” you heard yourself yelling. The dancing crowd had made a small circle around you, certainly amused by the turn of events.
Everything was happening so fast you barely could think right.
Paul was towering over John and your brain forced your body to move faster than you could realise what was happening. You let Chris down on the floor, walked up to Paul from behind and tapped his shoulder. He moved his arm as to push you away and you took the chance to block it in a firm grip, forcing him to face your way.
Your vision suddenly became in slow motion. When he turned, his face red in anger, you saw your fist heading up to his nose and punch it as hard as you could.
Then everything came back to its normal speed. Paul stumbled backwards, holding his face and shouting muffled curses; you took the chance to rush to John and help him get up so that he could help you carry Chris to the nearest elevator.
To this day, you don’t know how the two of you could run that fast and manage to close the elevator before Paul even acknowledged you were gone.
Running through the corridors of the 10th floor of the hotel, you couldn’t stop hearing the crowd cheering when you’d punched Paul.
You reached Chris’s room and let her in John’s arms while you worked the lock. You rushed into the room and instructed John to lay her on the bed, while you ran up and down, picking up medicines, water and damped clothes.
You’d taken care of her before and you knew exactly what to do. In a matter of minutes, she’d gained colour on her cheeks again and even tiredly smiled to you, mouthing a ‘thank you’.
You smiled as well, kissing her forehead and whispering her to call you if she felt sick. She nodded slowly, before turning on one side and going back to sleep.
Sighing heavily, you realised John wasn’t there anymore. You peeked your head outside the door and you saw him sitting down against the wall in front of you, his head tilted upwards leaning on the wall and his eyes closed.
However, the first thing you noticed was the purple-greenish livid on his right cheek.
You took the damp cloth you hadn’t used on Chris and sat down beside him. You were sure he was aware of your presence cause his lips had curved into a smile when your knee had brushed against his arm.
“I told you I’m tough to handle” you whispered, patting the cold, wet towel on his cheek. He flinched at the first impact, then relaxed and let out a soft giggle.
“Well, I’m still here, aren’t I?” he repeated his line from earlier and now it was your time to chuckle.
He finally opened his eyes.
“You’re right. Now I understand why you say men are intimidated by you. It’s because you show them you don’t need them. That you can perfectly take care of yourself without having to be saved”
You smiled “You learned that the hard way, uh?”
You both chuckled. You looked up to his eyes: they were smiling as well. In that moment you thought you’d never seen so much kindness in one’s eyes. Staring at them, you could see him, yourself and the whole world.
You felt at ease with John and he might have been the first man to ever get you. Like, for real.
You felt confident enough to tell him.
“You wanna know what’s my motto when I feel hurt by how men act around me? – he was deeply listening to you, half a smile on his face. You continued – I look in the mirror and repeat to myself: I may be a mess, but I’m the hottest mess you’ve ever seen.”
His smile widened “I couldn’t agree more with your mirror”
He slowly inched forward and you grinned, meeting him halfway into a gentle kiss.
#fluff#angst#john deacon fluff#John deacon imagine#john deacon angst#john deacon#queen#queen imagines#i'm strangely proud of this#wewillwriteyou#wewillwriteyou ask#wewillwriteyou prompt list#deakyswhitequeen#sweetgcreature
39 notes
·
View notes
Note
How can someone make a gif set basing in a color palette?? Like how can they edit so well the colors??
Hi!! Here are some tips for colour palette edits!
Difficulty: Easy-MediumPrior Understanding Required: It would be helpful to have basic photoshop knowledge!
Select Appropriate Scenes for your Palette
If you have a colour palette that has for example pastel colours, avoid choosing a dark scene because it’s hard to change the colour so drastically. Choosing scenes that would be easier to adjust in terms of colours is a very important aspect of making colour palette gifs. If your colour palette has a bright blue, try choosing scenes with a blue sky in the background or an area with a lot of blue tones. However, you should also be thinking about what can be easy to adjust. So let’s use the example of blue again: you want the colours to be blue, so you can choose scenes with green in them because it’s easy to change green to blue like so:

To This:
If you use Selective Colour layers in this case, it’s really simple to just change the colours (more about this layer will be explained further in this tutorial).
Now if you wanted to try to get from green to red, that would be a lot harder and not worth your time in this case, because it would just be easier to choose a scene that already has red in it OR choose a scene with oranges/pinks that can easily be adjusted to red using adjustment layers.
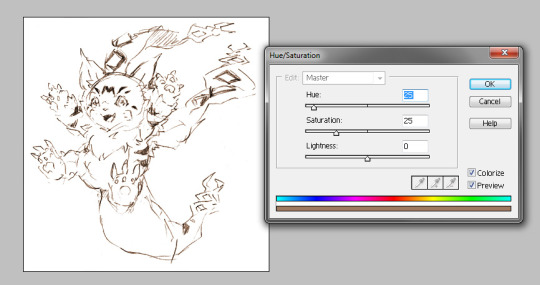
Hue/Saturation + Selective Colour Layers are your Best Friends
As you can see here, the flowers in the background of this edit are initially red:
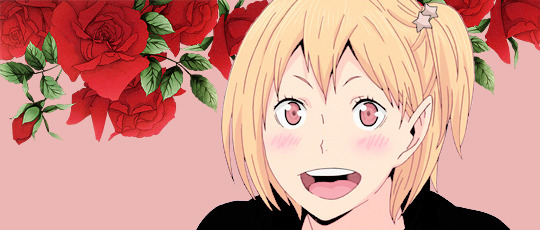
With the addition of a Hue/Saturation layer, you can change it to this:
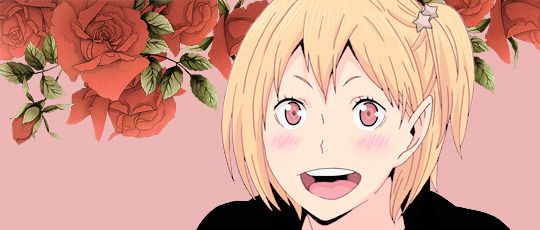
Now, I’ve added three Selective Colour Layers, each changing the colours every time:

As you can see, you can drastically change colours, but it really depends on what kind of adjustments you are making. For example, in this case, since the flowers were red and I wanted them to be a pastel yellow according to the following colour palette:

I decided to use Hue/Saturation first to make the reds into an orange colour (since it’s easier to make orange go to yellow). Then, I used the Selective Colour adjustment layers to slowly bring the colour to yellow. Playing around with the colours is key in this case, there’s really no better way than to take your time and try everything out. I go through every single colour options in the selective colour adjustment layers. For the above shown edit, I basically increased the yellow for the reds and lowered the cyans and magentas completely for the first two Selective Colour layers, and then in the third Selective Colour layer, I worked on making the now yellow colour look more pastel by adjusting the yellows.
More About the Hue/Saturation Layer
The Hue/Saturation Layer is a really helpful tool if used properly. I know it’s easy to just change colours with this adjustment layer, but you have to be careful about it because it might create colour noise in your edits.
Let’s say you want to change this blue colour to an orange colour using the Hue/Saturation Layer.
The problem here will be that when you change the Hue and the Saturation, you’ll be getting colour noise like so:

(zooming in...)
The reason I bring this up is because I see edits sometimes where this layer is misused....colour noise means you’ve done too much. At times you will find that the Hue/Saturation layer doesn’t even help in changing the colours to the specific one you want. However, I want to remind you that the Hue/Saturation layer works best paired with the Selective Colour layer (in my opinion at least lol).
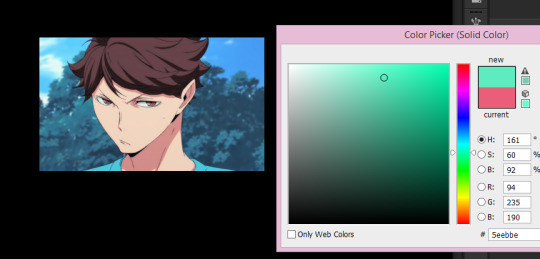
Anyway, you can still use the Hue/Saturation layer to help you reach colours without having to use a variety of adjustment layers. In this case, if you were to go from blue to purple instead, it would be a lot easier and cleaner with just one Hue/Saturation Layer:

Again, remember that it’s easier to change certain colours.

Blues can be changed to green and purple easily (and vice versa), but it’s difficult to change blues to reds. Likewise, reds can be changed to oranges, pinks, and yellows easily, but it’s difficult to change reds to blues.
You can also think of it this way, if you know that you’ve got something red and you want it to be blue, try changing the red to an orange, then the orange to a yellow, then the yellow to a green, then a green to a blue. It’s a long process that would require SEVERAL adjustment layers. Furthermore, you might just run into colour noise after repeatedly trying to change colours this way, so it’s not the best bet. That’s why I highly recommend you choose scenes that can be easily adjusted according to your colour palette.
More about Selective Colour Layer
This adjustment layer literally saves my life. I use it at least 3 times in every single edit I make. Selective Colour layer is great for slowly adjusting colours to the exact thing you want. The big thing here is that you have to play around with the scales to figure out how you want it to look and sometimes it takes multiple Selective Colour layers to do the job. Here’s an example from an edit I did a while back...
Starts off as this:

Now I’ve added the first Selective Colour Layer:

Second Selective Colour Layer:

Third Selective Colour Layer:
Fourth Selective Colour Layer:
Fifth Selective Colour Layer:
Thus, as you can see, you have to be patient and play around with the Selective Colour layers A LOT when it comes to reaching the desired colour scheme.
Manual Colouring
I know I’ve done manual colouring over certain parts of the gifs and edits before. If you have a certain part of a gif you need a specific colour, sometimes you can just colour it in in a new layer on top of everything. With gifs it’s a lot trickier because there’s a lot of movement. With edits it’s a whole lot easier. You would just be creating a new layer on top of everything and setting the Blending Options to whichever one you like best, and then choose the colour you want and just colour over the section of the gif with a brush. This is similar to the solid background tutorial I have done here.
Fill Layer
So this layer doesn’t necessarily change things drastically or anything, but I think it’s good to have at least one Fill Layer in your psd (tbh not even just for colour palette gifs but for edits in general). I usually have one Fill Layer with an opacity of 8%. Depending on which colour you choose, it can really bring out the tones of your gif/edit.
Here is the first gif I used in this tutorial with #eb5e79 as the fill layer, set to 8% opacity:

and now if we change it to #825eeb on the same opacity it has a kind of purple/blue tint compared to the previous one shown above.

here, I’ve changed it to #5eebbe on the same opacity, showing a lighter, greener tint to the overall look.
and then here, I’ve changed it to #ebe65e on the same opacity, making it lighter again with more yellow tones.
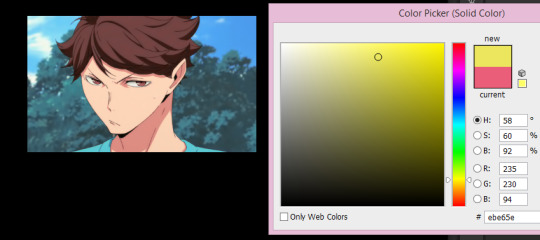
So my point is, while the fill layer doesn’t do THAT much to the gif, I think it’s worth having because it can subtly change the look and tone of your gif colouring that might be helpful in adhering to colour palettes.
~
So yeah! These are the best tips I can give you!! As I said before, the main aspect of colouring gifs to colour palettes is the choice of scenes to gif and playing around with adjustment layers (specifically, hue/saturation and selective colour layers). I do recommend that you try out other adjustment layers as well, though I know that these two are the best for changing colours drastically. Exposure layers are pretty good as well as the Levels layers, but those ones don’t necessarily change the colours so much so as they make things darker/lighter and such.
Anyway, I hope you found this helpful!! I apologize for the late response as well;; I wanted to make sure I covered everything that helps me with examples which is why this ended up taking so long to post. Best of luck and please feel free to ask for clarifications anytime!!
#itsphotoshop#chaoticresources#peachresources#yeahps#tips#tutorials#tut:misc#anon#answer#thanks for asking!!!
507 notes
·
View notes
Text
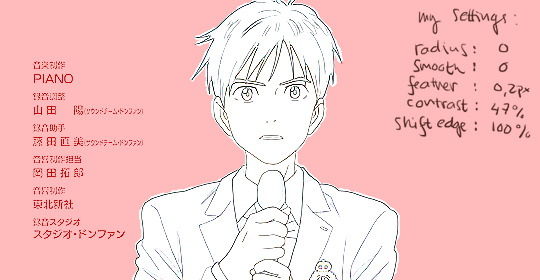
QUICK TUTORIAL: lineart gifs & watercolours
i’ve received a few asks about how i made this gifset, so here’s a quick guide! i’m skipping right to the interesting parts, so you need to have basic knowledge of how to use photoshop to make gifs or you’re not going to get much out of this tutorial. the basic idea is very simple but the process can be extremely frustrating, as usual. proceed at your own risk.
things you’ll find behind the cut:
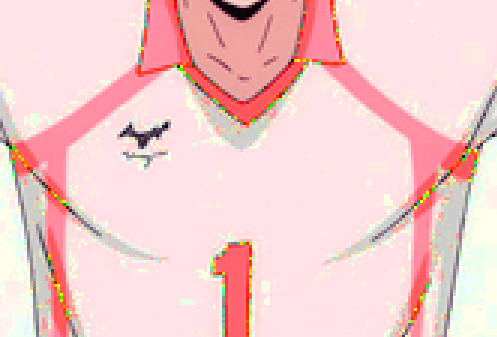
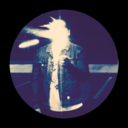
how i get from this:
to this:

and to this:

still with me? great! let’s begin!
i use photoshop cc in this tutorial! all features should be available in other versions too, but they might be called something else. in that case please consult google.
YOU WANT YOUR GIF TO HAVE AS FEW FRAMES AS POSSIBLE!
get them ready and do your basic thing ie resize, remove excess frames and set the framerate. next, flatten the frames into layers and download this action (19 frames at most) or do the following manually:
duplicate your first layer
set the copy to divide
add gaussian blur (approximately radius 0.6px) to the copy
use smart sharpen on the original layer. play around with the setting until the lines look clear and smooth (my settings: amount 300%, radius 0.3px, reduce noise 10%, remove gaussian blur)
check that the blurred layer is on top of the sharpened one
merge layers
repeat with every single layer :))))
now your gif should look something like this:
as you can see, if you wanted you could just paint over the parts where the background is still visible, add some colour or overlays and tadaaah, a perfectly fine gif! but we don’t want that today. we want to make our lives hell.
NEXT, WE’LL DO SOME MASKING AND GET RID OF THE BACKGROUND. i use the quick selection tool because it’s quick (lol), i’m lazy and these kind of gifs have nice and clear lines so it works like a dream!

make sure you’ve selected everything, it can be difficult to tell what’s part of the background and what’s the selection as you can see.
all done? next you’ll need to click mask and select. i invert the selection at this point, so the following settings only work with that! i forgot to put it in the pic but in addition to these setting, i usually have the output set to “layer mask” so that saves me a few clicks. when you’re happy with what you’re seeing, click ok and go though any bits that didn’t mask properly by hand.
can you guess what the next step is? yeah.
now do the same to all your layers...
... and you’ll end up with something like this!
you probably can’t notice much difference, because it doesn’t show up properly on my blog, but the background is transparent! i’ve also added two adjustment layers to clean up the lines a bit:
black & white
levels (my settings: shadow 60, midtone 1.00, highlight 230)
//EDIT: naturally, the settings i used for the tutorial don’t work for all scenes but in my experience they’re a pretty good place to start from! also, if the scene has a very busy background i usually mask it before resizing and applying the lineart effect to make sure it looks as good as possible (and it also gives you the option to use the same frames in other projects without having to do it all over again)! in those cases the blurred layer leaves a fuzzy border around the image when you merge the layers, so you need to select the sharpened layer’s pixels before merging and mask the resulting layer with the selection. oh and i usually convert the layers for the first frame into smart objects before sharpening or blurring so i can easily adjust the settings to be optimal for the scene.
again, you could stop here, walk away with a nice transparent lineart gif and call it a day.
no? then we’ll start adding the watercolour.
this is, of course, all done manually as well, frame by frame. don’t blame me, i told you this was going to be frustrating.
add a white layer to act as a background, and adjust the output levels of the levels layer you just added a few minutes ago! my setting are: shadow 0, highlight 238
THE NEXT STEP IS TO START PAINTING
the gif should give you the basic idea of what to do from here on.
basically, it’s something like this:
create a new layer on top of everything, pick a brush, add colour to appropriate spots, don’t mind if you can’t stay inside the lines. it’s actually better if you don’t! i usually have the colouring layers set to linear burn.
check what frame you have selected! you want to find the corresponding lineart layer, right click it and pick select pixels.
create a mask for your coloring layer from that selection. now the outline should be rather nice and smooth, and all you need to do is mask the inner parts using either a selection tool or do it manually. in this case i prefer the latter.
if your gif doesn’t have much movement, you can get away with duplicating the colouring layer for the next frame instead of painting everything from scratch! just duplicate the layer, delete the old mask, move the layer a bit if needed and add the mask from the next lineart layer.
repeat these steps until you run out of frames.
keep or delete the white layer you’ve used as a background.

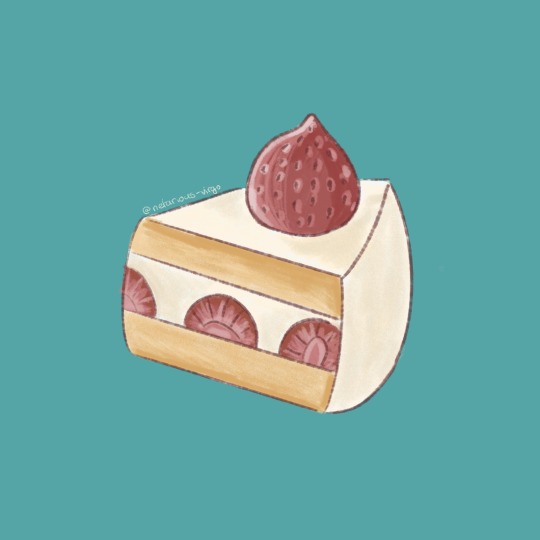
before you even notice, you have a super pretty lineart gif painted in watercolour style, ready to be posted on tumblr or edited more!
i edited mine a bit more and ended up with this baby! i kind of lied in the beginning, since i’m not telling you how i turned it into this lmao oops. basically i just added the bg image and a few gradients on top of everything? super easy!
//EDIT: i can’t not tell you guys i feel so guilty lmao.
okay, we’re starting from the bottom up!
changed the white background colour to #e6e6e6
a picture of flowers on top of it, color burn 60%
levels adjustment: shadow 60, midtone 1.00, highlight 230
and output adjustments are shadow 0, highlight 220
linear gradient fill layer, 90angle, colours #f3bfa5 and #fbeebc
set mode to soft light 100%
jump to between the lineart adjustment layers and colourings
color fill layer in #f3bfa5, set mode to soft light 100%
jump on top of everything
vibrance adjustment layer, +100 vibrance and +31 saturation
gradient map adjustment layer, colours #f3bfa5 and fbccbc
set mode to overlay 30%
duplicate the adj layer you just made, chance mode to color burn
look at your beautiful gif and cry tears of joy

and that’s about it! i hope this cleared up the process a little!
thank you for checking out my tutorial! if you have any more questions, my ask box is always open ♥
oh and feel free to tag me if you post something made with this tutorial! i’d love to see your creations! i track #nikiforoov so just tag your post with that :)
#yuri!!! on ice#chaoticresources#photoshop#fyyoi#yuuri katsuki#tutorial#my edits#please let me know if there are some clear errors#in my defense it's 5am here rn and i should've been asleep ages ago#but noooope#here i am#what can i say i really love playing around with photoshop lmao
2K notes
·
View notes
Last Seen Blogs

david-production-search-history
Trust us, we sacrificed our soul to make part 5.

headinclouda
Untitled

radianceofelectra
piss baby party squad
gramiluzije
sve(mir)🤍
livingxghost
Find yourself a tragedy; slowly lose your sanity.