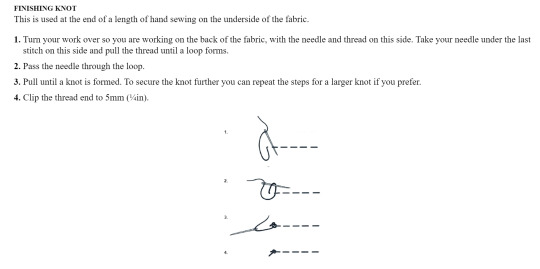
#DIY HOW-TO'S
Text
Meet yourself where you're at
{source}
19K notes
·
View notes
Text
youtuber/tiktoker/whatever-type-of-video-influencer marinette, where she makes crazy DIY and craft videos and debunks fake content-farm DIYs. she has a modest but loyal mass of followers that grow by the day as her crafts get increasingly intricate and cool. she catalogues all of her mistakes and is very earnest about the process. adrien falls asleep to videos of her sewing and making cool containers and explaining the mechanisms of the strange devices she makes
#lots of fashion and sewing of course but other crafts as well#i think a lot about how marinette made that box that she keeps the miraculous box in#the giant sewing box with a secret drawer that can only be accessed through by inputting a code into hidden buttons#like. that's a whole ass device w mechanisms and everything. girl is an all around DIY queen
5K notes
·
View notes
Text
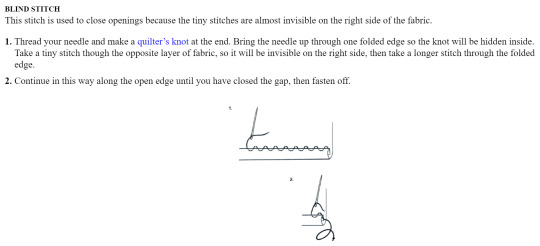
Had a few folks interested in how I made the patches I posted for Solarpunk Aesthetic Week, so I thought I'd give y'all my step-by-step process for making hand-embroidered patches!

First, choose your fabric and draw on your design. You can use basically any fabric for this - for this project I'm using some felt I've had lying around in my stash for ages.

Next, choose your embroidery floss. For my patches I split my embroidery floss into two threads with 3 strands each, as pictured. You can use as many strands in your thread as you prefer, but for the main body of my patches I prefer 3 strands.
Next you're going to start filling your design using a back stitch.

First, put in a single stitch where you want your row to start.

Poke your needle up through the fabric 1 stitch-length away from your first stitch.

Poke your needle back down the same hole your last stitch went into so they line up end-to-end.
Repeat until you have a row of your desired length (usually the length of that colour section from one end to the other). Once you have your first row, you're going to do your next row slightly offset from your first row so that your stitches lay together in a brick pattern like this:

Make sure your rows of stitches are tight together, or you'll get gaps where the fabric shows through.
Rinse and repeat with rows of back stitch to fill in your patch design.

When you're almost to the end of your thread, poke your needle through to the back of the fabric and pull the thread under the back part of the stitching to tuck in the end. Don't worry if it looks messy - no one's gonna see the back anyway.
This next step is fully optional, but I think it makes the patch design really pop. Once your patch is filled in, you can use black embroidery floss to outline your design (or whatever colour you want to outline with - it's your patch, do what you want). I use the full thread (6 strands, not split) of embroidery floss to make a thicker outline.

I use the same back stitch I used to fill the piece to make an outline that adds some separation and detail. You could use most any 'outlining' stitch for this, but I just use back stitch because it's just easier for me to do.
Once you're finished embroidering your patch, it's time to cut it out!

Make sure to leave a little border around the edge to use for sewing your patch on your jacket/bag/blanket/whatever, and be careful not to accidentally cut through the stitches on the back of the patch.
If you have a sturdy enough fabric that isn't going to fray, you can just leave it like this. If not, I recommend using a whip stitch/satin stitch to seal in the exposed edges (I find that splitting your embroidery floss into 3-strand threads works best for this).

And then you're done! At this point you can put on iron-on backing if you want, or just sew it on whatever you wanna put it on. Making patches this way does take a long time, but I feel that the results are worth it.
Thanks for reading this tutorial! I hope it was helpful. If anyone makes patches using this method, I'd love to see them! 😁
#solarpunk aesthetic week#sewing#tutorial#sew on patch#punk diy#diy punk#punk aesthetic#handmade#solarpunk#handcrafted#embroidery#embroidered patch#how to#how to make a patch
17K notes
·
View notes
Text
How to make a bug kisser 😘🐛
I'm going to launch a Kickstarter for these, sign up to be notified
36K notes
·
View notes
Text

retired 🩶
#call of duty#cod#simon ghost riley#john soap mactavish#soapghost#my art#listen this took me like two weeks so y'all better appreciate 🤌#johnny is the super active DIY father of the family#simon has made his way through all of the miss marple mysteries and has now set his sights on naval fiction#also growing his fringe out to hide the early onset baldness#johnny has gorgeous hair but we knew that#the dogs are called roger and wee albert--guess which is which#yes they all sleep in the same bed~#I guess I just need to see these two old and cranky and alive for whatever reason...#let them both burn in hell after a few good decades learning how to live beyond just surviving#god they probably make a banger pot roast....
5K notes
·
View notes
Text
How to make an archery target using recycled materials!
I’m still on the injury recovery bandwagon, but GOOD NEWS: there’s a massive stock of archery references available on my Patreon so you don’t have to miss out on watching me do cool stuff!
Edit: I found the spelling error, thanks everyone for being snarky about it 😉
3K notes
·
View notes
Text
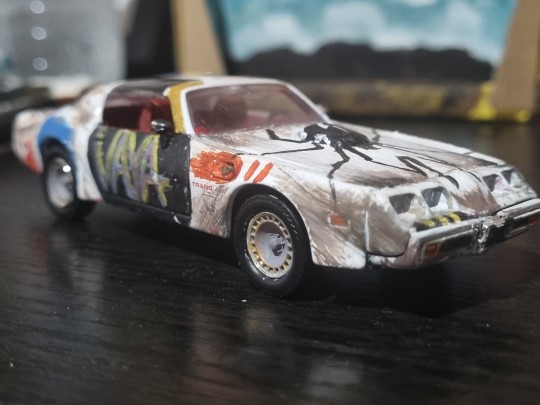
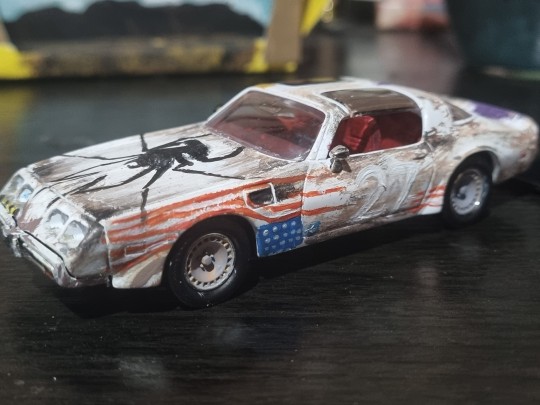

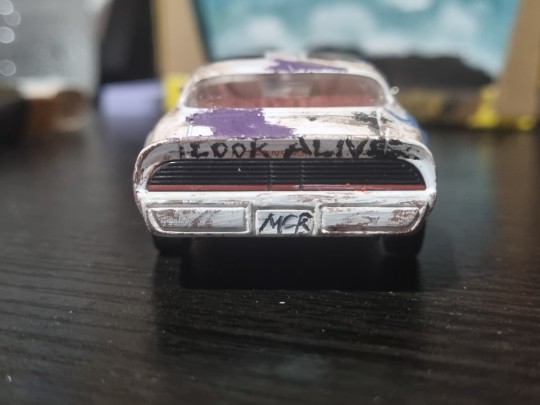
Did a little side project where I made the Danger Days car out of a little diecast trans-am !! I'm quite proud of it
#honestly thinking abt selling them if anyone shows enough interest!!!#this ones a bit messy it was my first trial#but fr these r so fun to make#im gonna make a second one soon and see how it goes!#danger days#danger days fanart#mcr#mcrfanart#my chemical romance#art#diy#fanart#trans am#my art
1K notes
·
View notes
Text
instagram
Looking For Your Next DIY Project?
Here's a holiday crafting, side hustle for your content community ...
Instagram DIY mini tutorial posted by rhinestone world, how-to create the Starbucks themed custom glittered out coffee tumblers..

#trending#fortheculture#entrepreneurship#thedigitaldigest🗞️#digitalculture#social media#repost#DIY HOW-TO'S#crafting#tutorials#holiday crafting#side hustle#content community#rhinestone world#custom glittered out coffee tumblers#Instagram DIY HOW-TO'S#Instagram reels#content cafe#aos#2022 DIY HOW-TO'S#mini tutorial#Instagram
0 notes
Text
The hellsite is eating my posts again. We'll see what gets through.
Edit: this one made it! You've asked for a house tour, I hope this isn't boring. There's some rooms that I don't include because I'm working on stuff and don't want to show the mess. This is still not that tidy but it's... tolerable mess. The audio is just Clair de Lune, no narration. I can answer questions if you have them; I'm always happy to talk about my million hobbies and the house is...definitely one of them.
I could also do a photo post for anyone who doesn't want to watch the whole thing.
#i dont want this to come across as braggy#i know exactly how lucky i am to have a house to do this kind of nonsense with#but also most of this is just diy after diy and a loooot of facebook marketplace trawling#every few months I get a couple family members in to move an item of furniture I cant get by myself but mostly im just doing things solo.#it's wild how much you can just DO#even if its not done perfectly#i like my house a lot#its not fancy--it is in fact a very simple 1900 american foursquare#and it needs a lot more work still#but im chipping away at it and it pleases me.
1K notes
·
View notes
Text


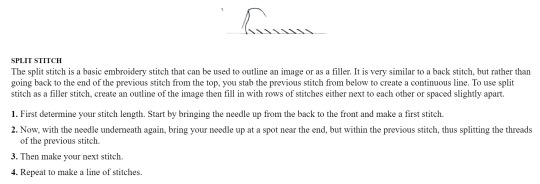
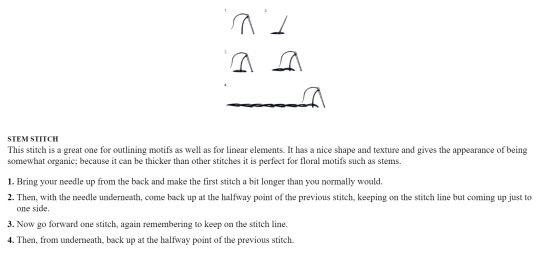
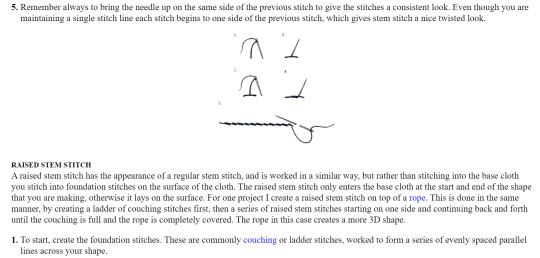
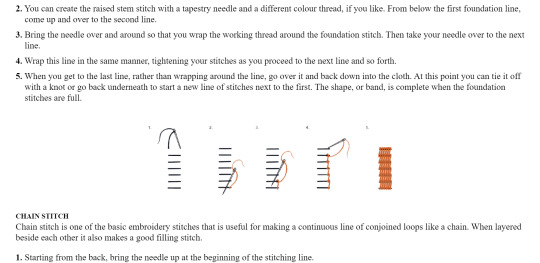

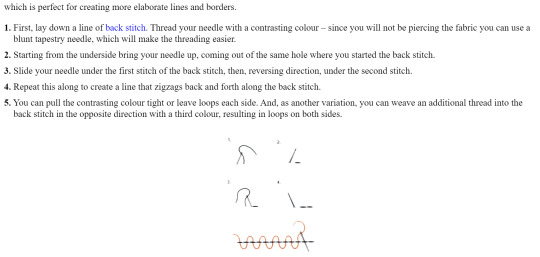
Part 1 From Embroidery: A Modern Guide to Botanical Embroidery by Arounna Khounnoraj
Stitch Directory Part 1/2/3/
1K notes
·
View notes
Text
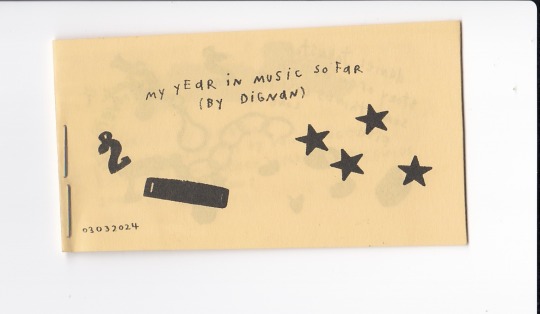

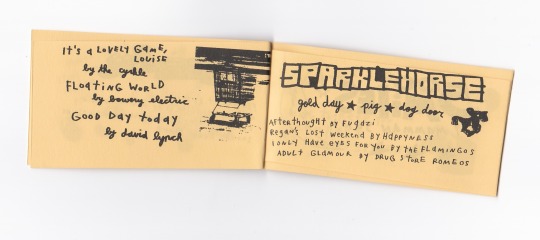
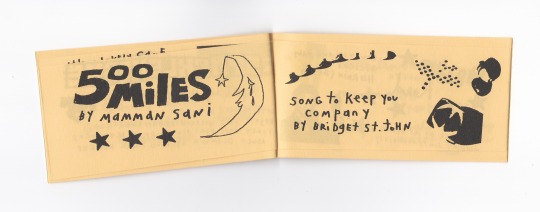

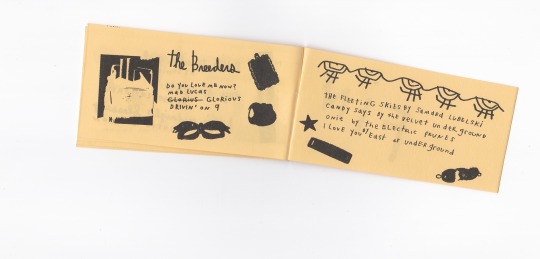

my year in music so far zine , playlist linked
#srry for deleting and reposting so much couldnt decide how i wanted to post it#d1gsart#artists on tumblr#art#music rec#playlist#lou reed#zines#zine#scans#my scans#spotify#mixed media#risograph#riso printing#diy
499 notes
·
View notes
Video
presto patch
#tiktok#tiktok DIY#Mercury Stardust#trans handy ma'am#diy home decor#diy home projects#DIY home repair#dry wall#DIY#how to
11K notes
·
View notes
Text
"Oh no, someone's attracted to the aesthetics of my -punk movement but doesn't know the praxis and history behind it like I do--"
OK. Tell them. Make it a teaching moment. Everyone who's in your movement learned the background from somewhere at some point, maybe this is that point for that person. Give them a jumping off point that they can dive into later.
"Oh but I shouldn't be responsible for teaching baby -punks about the history and the how-tos and--"
OK. Then don't tell them. You don't have to be responsible for teaching people with a budding interest in your group the ins and outs and how-tos. That's fair and valid! It can be a lot of work. Someone else will handle it
"But I'm annoyed that they would try to claim to be part of/be interested in my community without knowing all the details that I know after being in it for months/years/decades, they're dumb, they're posers, they're--"
OK. Then don't engage with them, if it's that bad. Maybe someone else will come around and tell them the history, maybe they'll pick it up on their own, maybe they'll just enjoy the fashion elements for awhile.
"But they shouldn't claim to be part of the -punk community if they don't know the--"
I feel like we have a few options here. People can either talk to them, share the history, share the values, share the praxis. Or they can just chase off anyone who even thinks about dipping a toe in their community, and then wonder why it's dying off later down the line.
I dunno, maybe I'm too naive and patient or whatever. But if people are entering your -punk spaces without knowing The Rundown of what you feel they need to know, maybe being nice about it and informing people instead of immediately assuming stupidity and malicious intent could help you make a new friend. Even the loudest voices in a space had to learn from somewhere, and not everyone has the luxury of being in the space as the History was Happening--whether it's an age thing or a not being aware of the space thing. Or maybe I just don't see what the big deal is behind people hating people who like the aesthetic of something and don't know the behind the scenes history about it yet.
Because I believe in the word 'yet.' No one comes into this world knowing everything about everything, and we're all constantly learning new things. I'm not gonna degrade someone and call them a poser for not knowing what I know. Because if it were me, interested in a scene but getting chased out and called a poser? I wouldn't hit the books and study up, I'd go 'that fuckin sucks, those people sucked' and then avoid anyone and anything having to do with it.
So chase people off and call them posers if you want. But if your community starts dwindling, don't be fucking shocked.
#out of queue#ani rambles#punks and posers#i cant even call this a 4am hot take because its 7pm but like#idk i keep seeing posts about like 'how DARE people think I bought my punk clothes how DARE they not know the how-tos and DIYs'#or 'ugh people only care about the ~aesthetics~ of my movement if you don't know shit get out of here' and like#maybe I'm just a shy ass introverted nerd whos scared of social rejection! but I avoid that shit like the plague#so if someone were to reject me based on not knowing about something I'd never even heard about? something i was JUST getting into?#there's a high chance I'd just scram and never look back. i don't wanna be the one who causes that emotion in someone else#granted this is coming from someone who STILL doesn't know how to make her own patches or worked up the courage to do direct action praxis#outside of offering neighbors to my tomatoes and trying to talk to people about what I'm passionate about#but still imo unless someone's a malicious intentional bad actor i dont see the point in scaring newbies off#thats how movements die imo#i know this is my solarpunk blog but its not a solarpunk specific thing#i think the main post that inspired this was about store-bought versus self-made spiked leather jackets#which honestly just feels petty to me but who knows.#might delete later
2K notes
·
View notes
Text
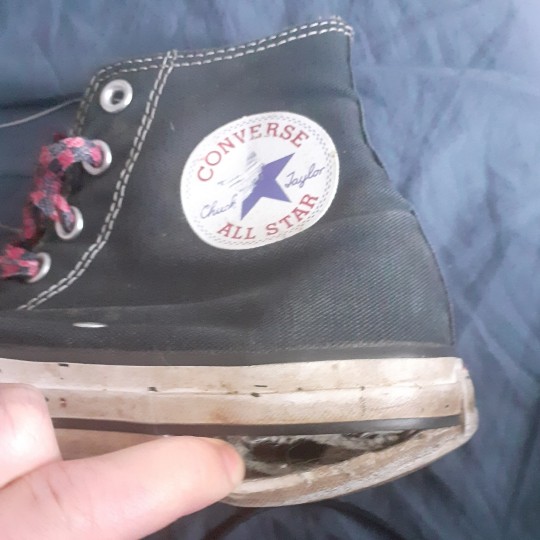

Since glue stopped working a while ago I pivoted 2 floss.... Is there anything she cant do?
#diy or die#visible mending#ik that might not be the usual thing in the tag but whatvr lol#also im slightly interested how horribly wrong this is from a shoe professionals perspective. not enough 2 look up proper technique tho#youd think after 9 years id be willing to part with this pair but absolutely not#also this destroyed my hands and i nearly broke a needle but it is what it issss#oh also. forgot more tags#diy punk#diy punx
217 notes
·
View notes
Text

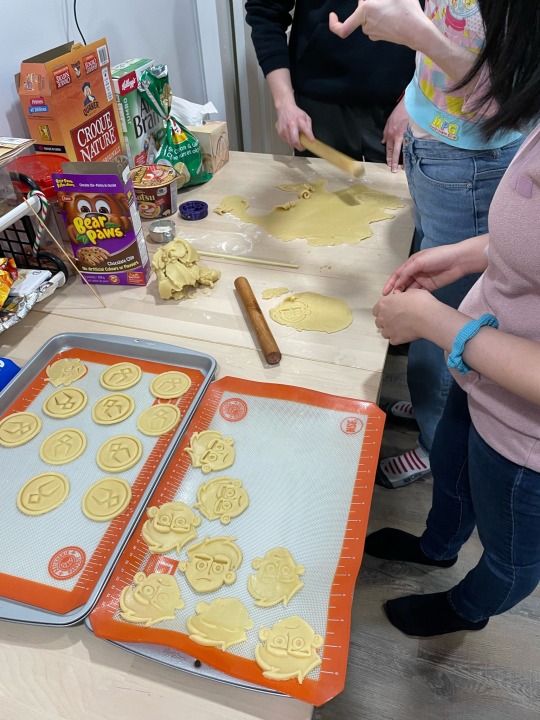
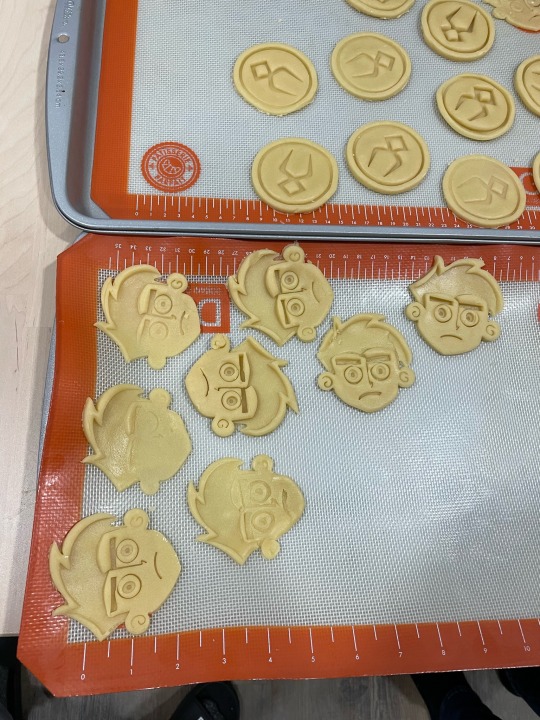
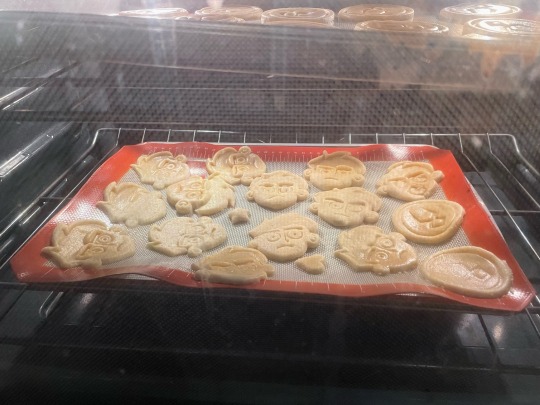
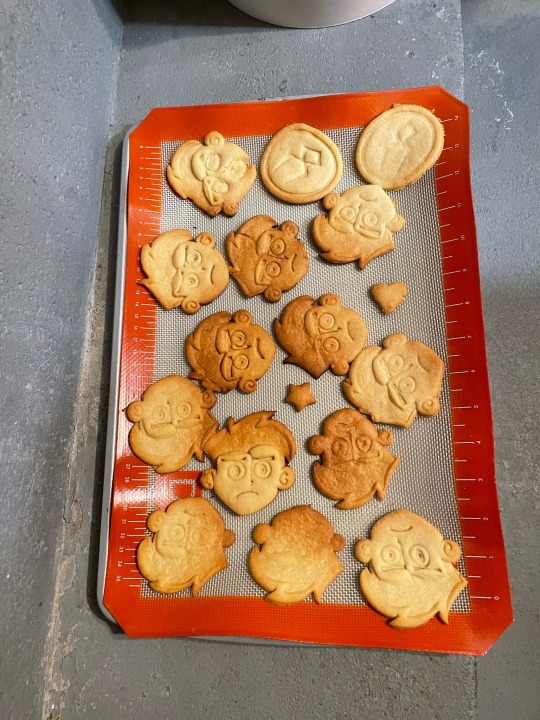
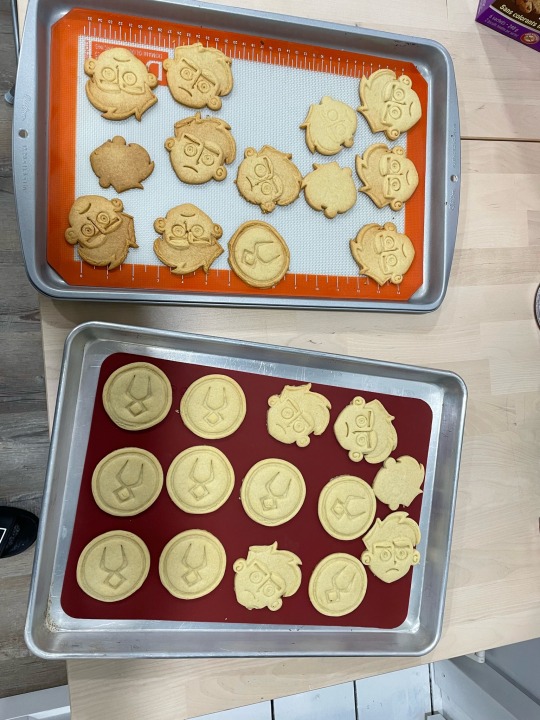

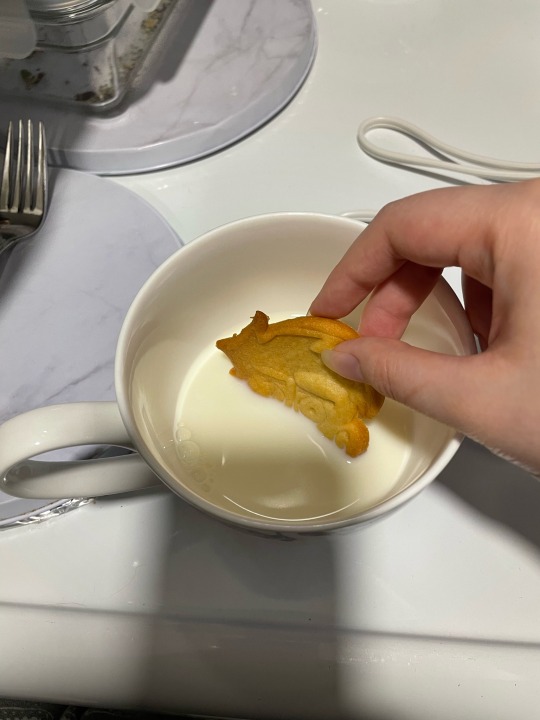
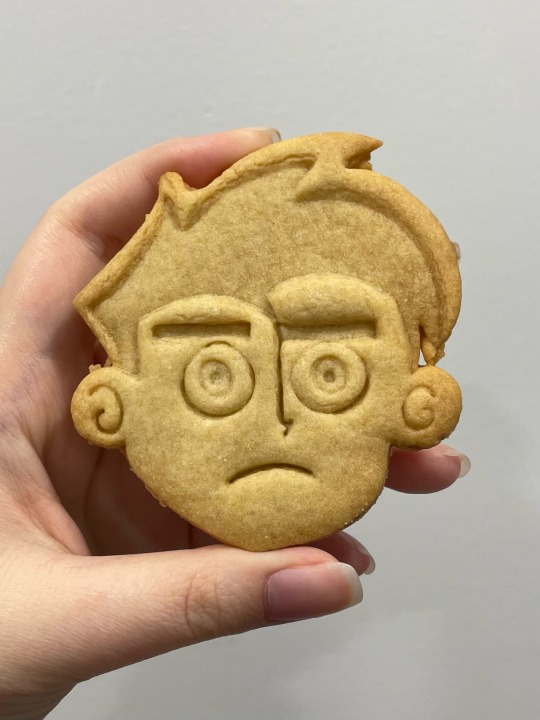
Happy Dannopocalyse :)
Using my evil powers to make Danno cookie cutters, and the power of friendship to wrangle my friends into helping me test them. They were very tasty.
#yes those are also obols from Hades#my evil powers(read as ‘I know how to 3d model stuff’)#over half the cookies disappeared as soon as they were cool#dannypocalypse#danno#dp#cookies#diy#baking#3d model#3d printing#.5k#1k
1K notes
·
View notes

Last Seen Blogs

deathtube-blog1
young mozart on a go-kart

daughterofhestiaposts-blog
Ouroboros

final-standalone
Final Stand!

yasuwatanabe
題名未設定

willawisp209
Willa Wisp