#Cutter & Buck
Note
Are Cosmo and Buck friends. I think they would be friends
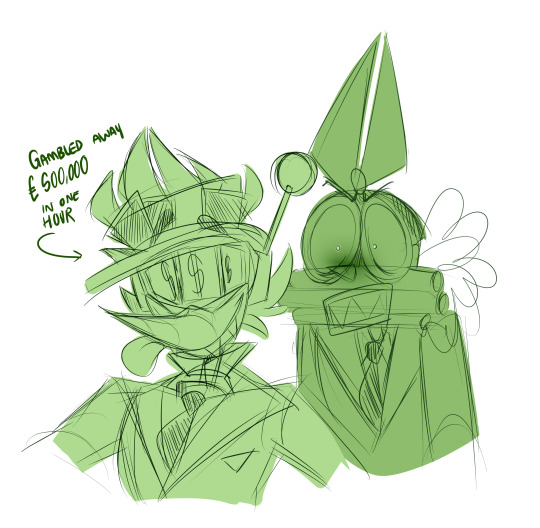

YOUD THINK. But Cosmos job is to cut costs where they can and maximise profit- and when his fellow manager is gambling the WHOLE BUDGET AWAY- kind of makes it hard for Cosmos infamously short temper to not get in the way X3
32 notes
·
View notes
Text
buck is literally cock ring ken. that's canon
#just remembered buck got a ring cutter. that's a thing that happened. they fit that into the plot#evan buckley#maya talks
45 notes
·
View notes
Note
my headcanon says eddie would be so turned on if he knew all the things s1 buck did. yes he benefits a lot from <3 housewife buck but we know slutty buck is still somewhere in there. I'm just saying ring cutter
Ok ur so right actually ….
#Eddie probably finds that ring cutter in bucks kitchen one day and is like lol what’s this thing!!!#and buck is like uhhhhhhhhhhhhhhhhh.#asks#anonymous
7 notes
·
View notes
Text
Turning 21 means you get excited to go home and take a shower because you got a new shower head (that still needs to be installed but that's part of the fun) and an African net sponge
#buck brawls#misc#i got excited over non-stick pans and a can opener last year#and the year before that it was a dough cutter and like?? some kind of washing machine cleaner-
3 notes
·
View notes
Text
evil dream
#levi plushies readily available in nearby stores..... why cant you be real.....#Y-Y#they were like 30 bucks each but man was i spending my money on em....#one of em was really funny it was just. shaped like a basic cookie cutter man. but entirely his hair colour and with a :< face#augh.....#sillyposting
2 notes
·
View notes
Text
Ring cutters in the kitchen… my k!nky ass brain has many thoughts about this cus just wtf like is this a firefighter thing? A buck thing? Wtf!?
#911 season 6#911 show#911 fox#911 abc#evan buck buckely#buck buckley#maddie buckley#k!nky thoughts#ring cutter#in the kitchen#THE KITCHEN#self explanatory#i need answers
9 notes
·
View notes
Text
oh
& can we talk about the other reasons why buck has a ring cutter at home??? 👀
#the other blatantly kinky reasons#that were not to be divulged to their sister#like there's no way that wasn't what buck meant given the way they reacted & responded to maddie's question#why else would a non-creative person need a ring cutter at home if it isn't for sexy times-gone-wrong?#911 spoilers#nsft#because technically yes
7 notes
·
View notes
Text
I think it says a lot about me that I'm "making articulated cosplay wings that open and close with a motor? yeah I bet I could do that with a bit of research and effort! No worries!" all positive and confident like
But then when someone reminded me that would also require me to make and glue a couple hundred near identical feathers i'm just "wait FUCK that's going to be the extremely difficult real challenge of the project" and considering if I can justify buying a laser cutter......
#...probably can't justify the purchase... those things are a couple hundred bucks at the minimum.....#also don't have room for even a small one........#curses to there being no accessible makerspaces around me anymore.....#the one i used to work for shut down... the laser cutter was so cool... :(#ramblings of a bystander#a bystander makes cosplay#ok look man i just get very bored if i'm doing the same thing over and over again.........
3 notes
·
View notes
Text
.
#some random youtuber living in a $5 million home#that youtuber : 'i got those pizza cutter for like 5 bucks! :O#im sorry binch.... but i can't relate#youtube recomennded shoves emmachaberlain home tour video down my throat
16 notes
·
View notes
Text
I have enough income to buy office supplies it’s fantastic 💕
#I’ve stopped using my paper cutter because money but I found replacements for 5 bucks#and I got myself a table pen charger because I got a new art gig
1 note
·
View note
Text
Cutter and Buck Golf Shirts
Cutter and Buck Golf Shirts: Exemplifying British elegance on the greens. These premium shirts combine sophisticated design with high-performance fabrics, ensuring comfort and style throughout your game. From classic polo styles to modern patterns, Cutter and Buck Golf Shirts offer a refined aesthetic that effortlessly transitions from the course to the clubhouse. Elevate your golfing experience with these timeless pieces that embody the spirit of British craftsmanship.
0 notes
Text
got to the ring cutter scene and can only think of how tumblr reacted to it
1 note
·
View note
Text


Chapter 2: One Sweet Day
Cutter & Buck Lakemont Half Zip Sweater Black - $110
Decenio Camisa Clássica Regular Fit - 44,98€
0 notes
Text
when i finally find a good (free) video editing program and actually make the buck & eddie fiona apple edits that have been rattling around in my head for weeks, it'll be over for you hoes
1 note
·
View note
Note
Any tips on learning to make buttonholes? I've been putting it off for.... *checks notes* like three years.... but better late than never and all that. I don't have any fancy machines so I gotta do it by hand but that seems right up your alley.
Thanks!
It IS up my alley, yes, I do most of my buttonholes by hand!
I'm actually part way through filming an 18th century buttonhole tutorial, but I expect it'll be a few more weeks before I finish that and put it on the youtubes, so in the meantime here's the very very short version. (The long version is looking like it'll probably be about 40 minutes maybe, judging by how much script I've written compared to my last video?)
Mark your line, a bit longer than your button is wide. I usually use a graphite mechanical pencil on light fabrics, and a light coloured pencil crayon on dark ones. (I have fabric pencils too, but they're much softer and leave a thicker line.)
You may want to baste the layers together around all the marked buttonholes if you're working on something big and the layers are shifty and slippery. I'm not basting here because this is just a pants placket.

Do a little running stitch (or perhaps a running backstitch) in fine thread around the line at the width you want the finished buttonhole to be. This holds the layers of fabric together and acts as a nice little guide for when you do the buttonhole stitches.

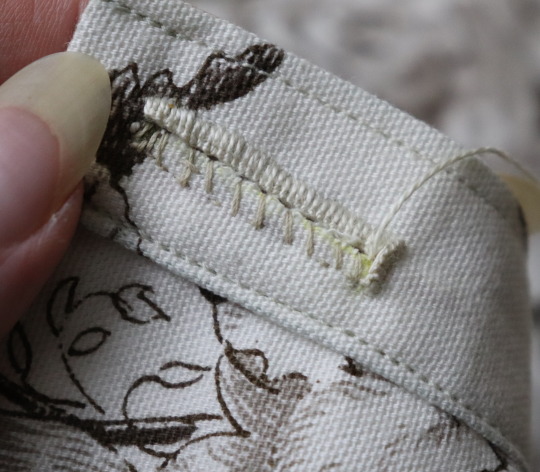
Cut along the marked line using a buttonhole cutter, or a woodworking chisel. Glossy magazines are the best surface to put underneath your work as you push down, and you can give it a little tap with a rubber mallet if it's not going through all the way.

I'm aware that there are some people who cut their buttonholes open using seam rippers, and if any of them are reading this please know that that is abhorrent behaviour and I need you to stop it immediately. Stop it.
Go get a buttonhole cutter for 10 bucks and your life will be better for it. Or go to the nearest hardware store and get a little woodworking chisel. This includes machine buttonholes, use the buttonhole cutter on them too. If you continue to cut open buttonholes with a seam ripper after reading this you are personally responsible for at least 3 of the grey hairs on my head.
Do a whipstitch around the cut edges, to help prevent fraying while you work and to keep all those threads out of the way. (For my everyday shirts I usually do a machine buttonhole instead of this step, and then just hand stitch over it, because it's a bit faster and a lot sturdier on the thin fabrics.)

I like to mark out my button locations at this point, because I can mark them through the holes without the buttonhole stitches getting in the way.
For the actual buttonhole stitches it's really nice if you have silk buttonhole twist, but I usually use those little balls of DMC cotton pearl/perle because it's cheap and a good weight. NOT stranded embroidery floss, no separate strands! It's got to be one smooth twisted thing!
Here's a comparison pic between silk buttonhole twist (left) and cotton pearl (right). Both can make nice looking buttonholes, but the silk is a bit nicer to work with and the knots line up more smoothly.

I've actually only used the silk for one garment ever, but am going to try to do it more often on my nicer things. I find the cotton holds up well enough to daily wear though, despite being not ideal. The buttonholes are never the first part of my garments to wear out.
I cut a piece of about one arm's length more or less, depending on the size of buttonhole. For any hole longer than about 4cm I use 2 threads, one to do each side, because the end gets very frayed and scruffy by the time you've put it through the fabric that many times.
I wax about 2cm of the tip (Not the entire thread. I wax the outlining/overcasting thread but not the buttonhole thread itself.) to make it stick in the fabric better when I start off the thread.
I don't tend to tie it, I just do a couple of stabstitches or backstitches and it holds well. (I'm generally very thorough with tying off my threads when it comes to hand sewing, but a buttonhole is basically a long row of knots, so it's pretty sturdy.)

Put the needle through underneath, with the tip coming up right along that little outline you sewed earlier. And I personally like to take the ends that are already in my hand and wrap them around the tip of the needle like so, but a lot of people loop the other end up around the other way, so here's a link to a buttonhole video with that method. Try both and see which one you prefer, the resulting knot is the same either way.


Sometimes I can pull the thread from the end near the needle and have the stitch look nice, but often I grab it closer to the base and give it a little wiggle to nestle it into place. This is more necessary with the cotton than it is with the silk.
The knot should be on top of the cut edge of the fabric, not in front of it.

You can put your stitches further apart than I do if you want, they'll still work if they've got little gaps in between them.
Keep going up that edge and when you get to the end you can either flip immediately to the other side and start back down again, or you can do a bar tack. (You can also fan out the stitches around the end if you want, but I don't like to anymore because I think the rectangular ends look nicer.)
Here's a bar tack vs. no bar tack sample. They just make it look more sharp, and they reinforce the ends.

For a bar tack do a few long stitches across the entire end.

And then do buttonhole stitches on top of those long stitches. I also like to snag a tiny bit of the fabric underneath.

Then stick the needle down into the fabric right where you ended that last stitch on the corner of the bar tack, so you don't pull that corner out of shape, and then just go back to making buttonhole stitches down the other side.
Then do the second bar tack once you get back to the end.

To finish off my thread I make it sticky with a bit more beeswax, waxing it as close to the fabric as I can get, and then bring it through to the back and pull it underneath the stitches down one side and trim it off.


In my experience it stays put perfectly well this way without tying it off.
Voila! An beautiful buttonholes!


If you want keyhole ones you can clip or punch a little rounded bit at one end of the cut and fan your stitches out around that and only do the bar tack at one end, like I did on my 1830's dressing gown.

(I won't do that style in my video though, because they're not 18th century.)
Do samples before doing them on a garment! Do as many practice ones as you need to, it takes a while for them to get good! Mine did not look this nice 10 years ago.
Your first one will probably look pretty bad, but your hundredth will be much better!
Edit: Video finished!
youtube
And here's the blog post, which is mostly a slightly longer version of this post.
#ask#buttonholes#sewing#hand sewing#sewing tutorial#I've been procrastinating on the video this week#I want it done! I don't want to work on it I want new projects! I want to cut out more gloves!#currently forcing myself to do the last few buttonholes on these pants and then maybe I can cut out new gloves? as a treat?#but I hope I get some filming done tomorrow too
3K notes
·
View notes
Text
I need to let you guys in on some knowledge ok.
if you want donuts. Buy yourself a tube of biscuit dough and separate it out and use a cookie cutter to cut out the centers (or just tear a hole with your thumb. become ungovernable). Get yourself a good sized pot with about an inch or two of your favorite flavorless oil. Make sure it has a lid (let's not start grease fires).
Heat it up on medium or medium low, depending on how hot your stove is. Then fry yourself some donuts. they are so fluffy it feels like it should be illegal. then roll them in powdered sugar or cinnamon sugar or make yourself a glaze with a bit of milk + powdered sugar + flavoring. you can be responsible and let them cool down or you can do what i did and hoover them straight into my mouth sizzling hot. way too many. im so full of fried bread.
it's like a couple bucks and the cost of feeling like you've seen god. it's so good. you get so many donuts and u can fry the donut holes too. You're unstoppable.
#help i ate way too many donuts#ough#but im passing it on to you with love <3 <3 <3#i'll be back on blorboposting when im not in a donut coma#it only took me a couple of minutes to fry up almost a dozen donuts
442 notes
·
View notes
Last Seen Blogs
2river4flows2
River🌺

crime-n-movies
Crime & Movies
kurasu-kurasu
by KURASUHITO KURASUTOKORO

stratataisen
Ordered Chaos

wilkoakdraws
Rawr.