#Cosplay Wig
Text
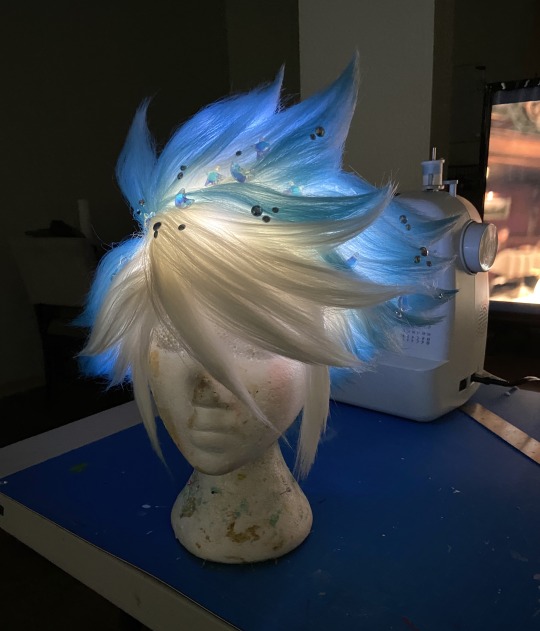
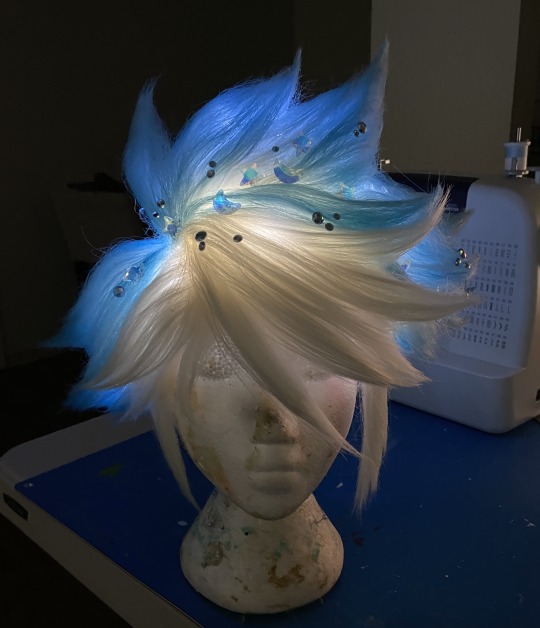

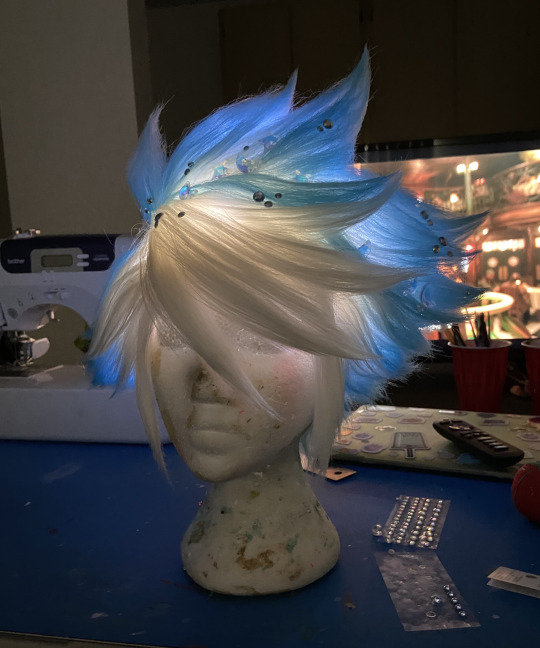
posting stardust cookie's wig as its at the 99.9% done stage (all i want to do now is soften the spikes a little)
also wanted to give this wig its own spotlight since theres going to be so many other lights on this thang it might get drowned out >_>
189 notes
·
View notes
Text
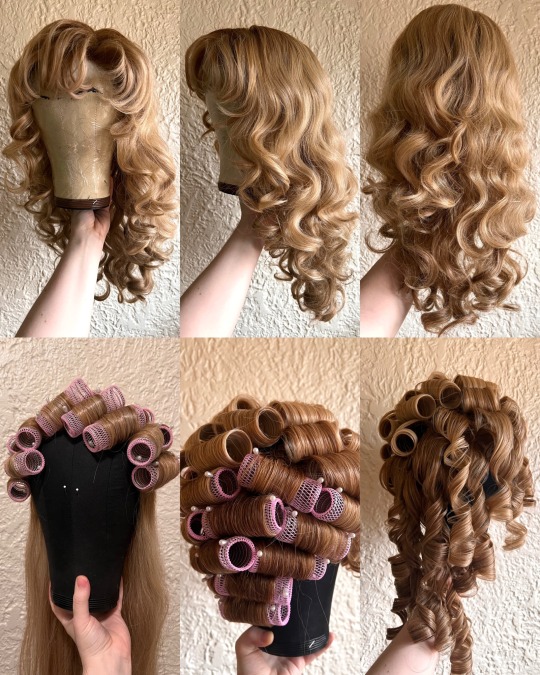

I recently found a cheap used lacefront off of eBay and styled it specifically for the Takarazuka version of Oscar! I want to make several looks from their productions at some point and decided to dedicate a wig specifically to it. The style has changed a lot over the years of productions, so I kind of picked the elements I liked best from different ones and combined them.
The base wig was straight, so I did a roller set, steamed it, combed it out, and trimmed the bangs and layers afterwards. Thanks @gormasmus for teaching me how to do roller sets, it's so much more efficient than a curling iron once you get the hang of it!
I'm actually planning on redoing my wig for my full military Oscar build which sounds crazy I know. I still plan on using my old wig for some of her looks, but I've realized I want to take the style a slightly different design direction for my competition build after some more thought and research.
#rose of versailles cosplay#rose of versailles#rov cosplay#oscar de jarjayes cosplay#oscardejarjayes#takarazuka revue#takarazuka#retro anime#old school anime#70s anime#the rose of versailles#cosplay wig#cosplay wig styling#wig styling#roller set#cosplay progress#cosplay wip
97 notes
·
View notes
Text
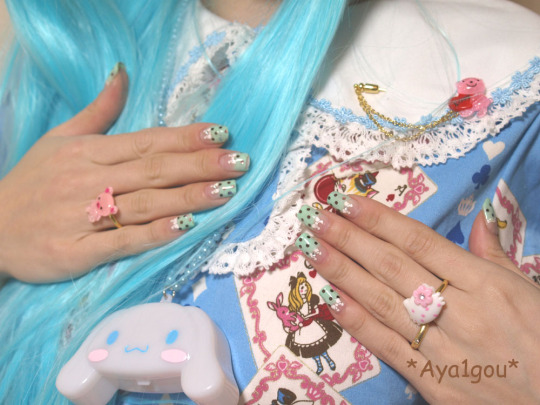
꧁★꧂
#lolita#lolita fashion#peter pan collar#nails#rings#cosplay wig#cinnamoroll#sanrio#cute#kawaii#flickr#oldweb#old web#2011
51 notes
·
View notes
Text
I was trying to steal Bratz merch and a cosplay wig from a supermarket at the mall.
237 notes
·
View notes
Text
cosplayers, may I present to you…..
✨ shaded braid ✨
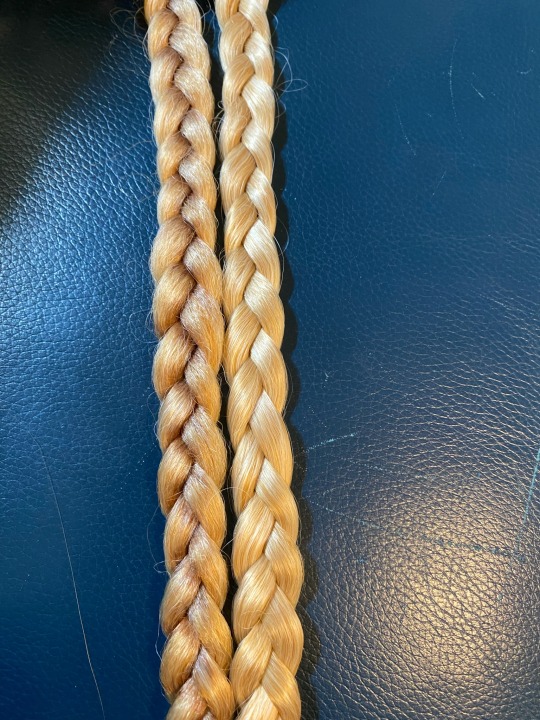
These two braids are otherwise identical but on the left, I used inexpensive alcohol markers to add some extra shadows into braided wig fiber so that it’d photograph with more dimension, much in the way you’d black wash a miniature or prop! It took such little time for such a dramatic result. It’s also hard to overdo this because if you put too much on, a little bit of rubbing alcohol on a swab will erase it!
[ID in alt text]
#cosplay#cosplayers on tumblr#cosplay wig#cosplay tutorial#cosplay tip#wig tutorial#wig tip#this was for a Jolyne wig lmao
120 notes
·
View notes
Text
So I commissioned this wig awhile back, but the artist refused to listen to me when I said I have a small head. Needless to say, it doesn’t fit me and looks fucking ridiculous on my tiny baby head. I literally tried it on once and put it back in the box it came in.
Anyway, I paid $400 for it. Still has the lace to be custom fit. I’m gonna let him go for $200 OBO. Idec about recouping cost. Please message me if you’re interested. This is taking up space and it needs to go.
Also, please note that I have it on the foam head a little weird bc it’s also too big for that lol.
PLEASE SHARE THIS POST unless you wanna buy it XD


#dbz#dragon ball#dbs#vegeta#wig#cosplay#cosplay wig#Vegeta wig#Dbz wig#for sale#wig for sale#cosplay wig for sale#Vegeta wig for sale
21 notes
·
View notes
Text
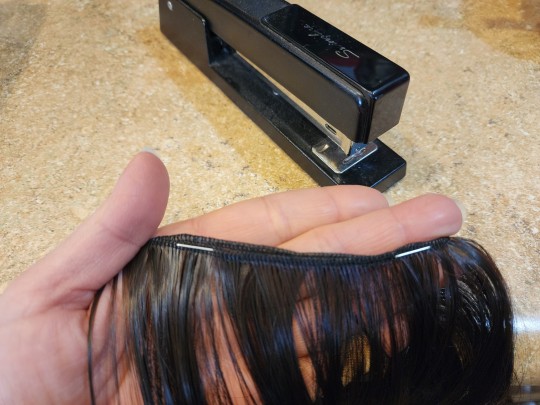
This is a totally normal way of attaching weft layers, right? 😅
18 notes
·
View notes
Photo


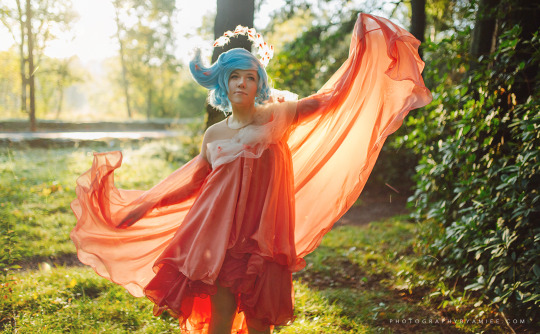
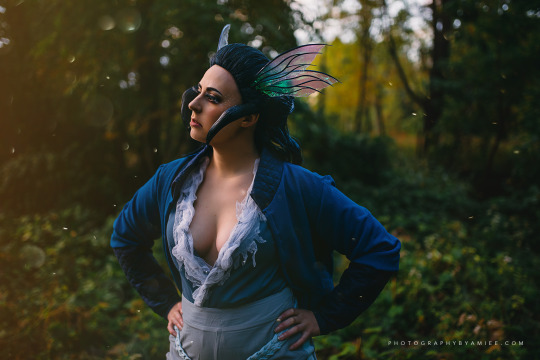

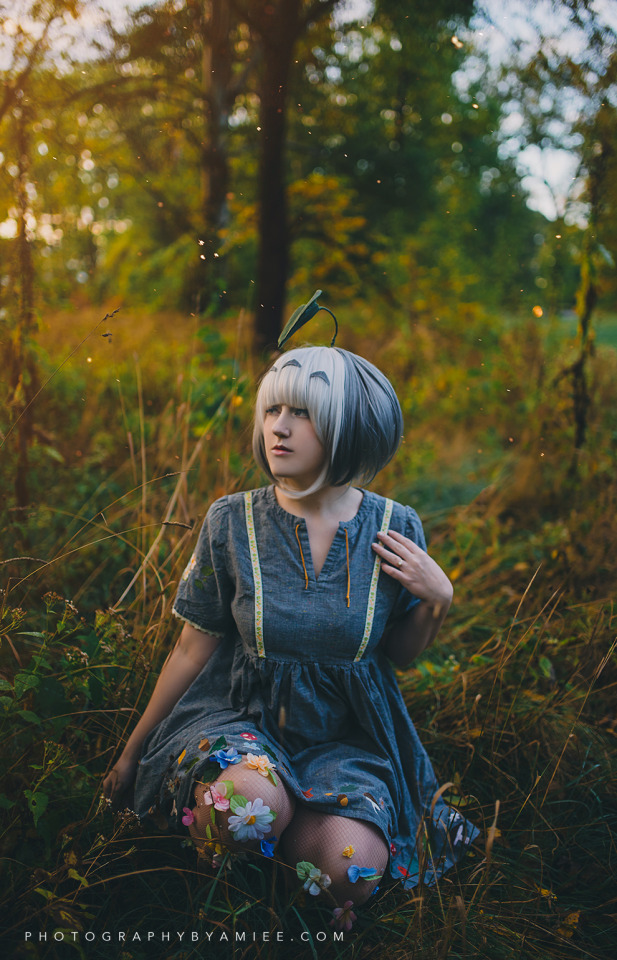
"𝐻𝑜𝑙𝑑 𝑦𝑜𝑢𝑟 𝑏𝑟𝑒𝑎𝑡ℎ 𝑤ℎ𝑖𝑙𝑒 𝑤𝑒 𝑐𝑟𝑜𝑠𝑠 𝑡ℎ𝑒 𝑏𝑟𝑖𝑑𝑔𝑒."
Studio Ghibli-inspired fashion designs.
Wigs designed and created by @cowbuttcrunchies
🏰 Howl’s Moving Castle | Pitchfork Cosplay (IG)
🌲 Princess Mononoke | @cowbuttcrunchies
🌊 Ponyo By the Sea | @cowbuttcrunchies
🌬️ Nausicaä of the Valley of the Wind | Turnfolio (IG)
♨️ Spirited Away | Jacquistuffnthings (IG)
🍃 My Neighbor Totoro | @giraffecosplay
Photography by Amie Photos (IG)
#cosplay#studio ghibli#spirited away#princess mononoke#ponyo#nausicaa#totoro#my neighbor totoro#miyazaki#cosplay design#wigs#wig#cosplay wig#wig design
207 notes
·
View notes
Text


LOL Prestige Heartsteel Yone Cosplay Wig
#cosplayclans#cosplay clans#LOL#LOL Prestige Heartsteel Yone#Yone#Cosplay Wig#Prestige Heartsteel#Prestige Heartsteel Yone#LOL Prestige Heartsteel#Yone Cosplay Wig#Prestige Heartsteel Yone Cosplay Wig#LOL Cosplay Wig#Prestige Heartsteel Cosplay Wig#LOL Prestige Heartsteel Cosplay Wig#LOL Prestige Heartsteel Yone Cosplay Wig
15 notes
·
View notes
Text
The wig has arrived but as I suspected it looks super awkward, how do you guys make this work?! I added a fringe and it looks way better, I might just be a loki variant with a fringe. 🤷


#loki#loki cosplay#cosplay#cp#loki laufeyson#loki odinson#loki variant#loki variant cosplay#closet cosplay#casual cosplay#wig#loki wig#cosplay wig#loki mcu#loki marvel#loki series#loki show
13 notes
·
View notes
Text
I forgot how expensive hair is for wigs
Last time I did anything with a wig I just reused as much hair as I could so I didn't have to buy or borrow anything
Half tempted to save my hair from when I finally cut it and then just bleach the shit out of it
I am not kidding when I say $70 is the low end
$60 if I use the hair marketed for box braids (I salute those that get that done regularly)
It's not even pink taxed with blonde (feminine) blond (masculine)
#ninjago lloyd#ninjago#lloyd garmadon#lego ninjago#Lloyd wig#cosplay wig#wigs#hair is expensive#I'm just trying to get wefts too. not even a full wig#I can make the wig from scratch
11 notes
·
View notes
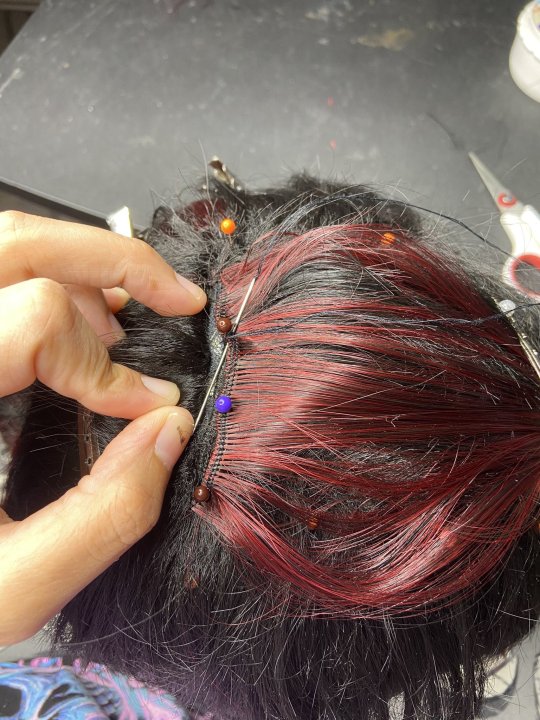
Text
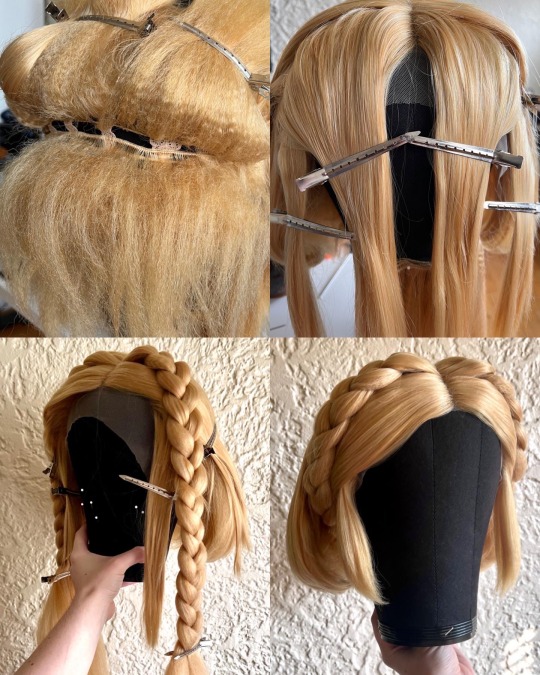
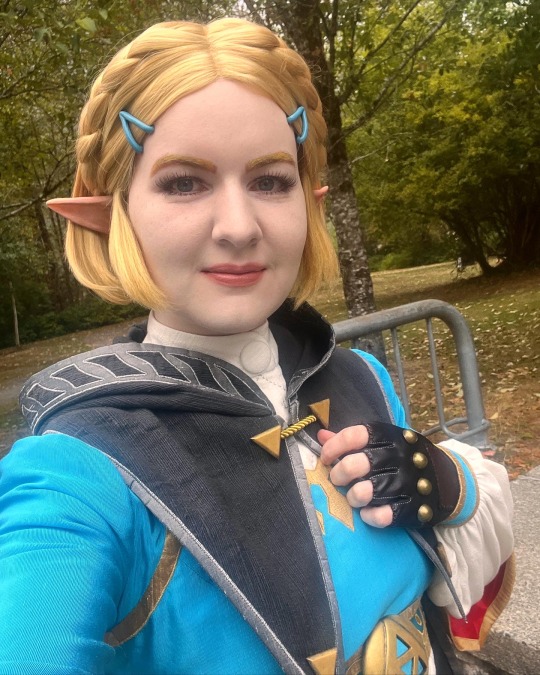
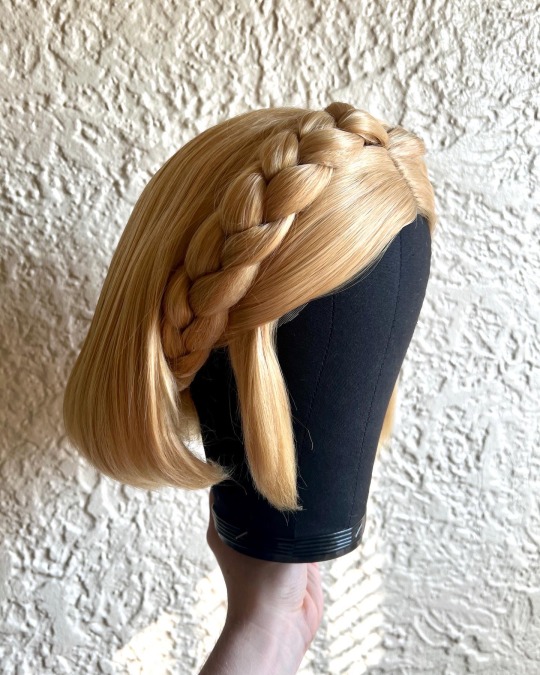

TotK Zelda wig WIP! I started with a Bucky in Pale Blonde from @ardawigs and some matching extra wefts. I straightened the hair, and crimped all the hair in the back except for the top layer which I left smooth to cover it. The crimping I did in vertical sections and combed them out afterwards to minimize the zigzag effect. I stitched a couple bundles of wefts to fill out the braids and crimped those as well.
The front I parted into 3 sections on each side, one that would get braided around the added weft bundles, the side tail sections, and the front part sections that tuck behind the ears. The weft bundles I stitched into the wig close to the lace part, but far enough away to hide them with hair. After that I carefully braided the smooth hair around the crimped hair, shortened them and overlapped them in the back with rubber bands and elastic.
I ended up cutting out a bunch of hair near the base of the wig in the back to make room for the braids to lay flat, and also since the volume of the wig turned out to be a bit too much. The side tails have a hint of crimping and curling in them to give them their poofy shape. I finished the wig off by trimming and evening up the bob in the back, and using a steamer and a brush to shape the soft curves and curled-under edges of her hair.
#tears of the kingdom cosplay#totk zelda#princess zelda cosplay#cosplay wig styling#tears of the kingdom#botw zelda#totk cosplay#legendofzelda#breathofthewild#cosplay wig#wig styling#botw cosplay#cosplay wip#cosplay progress#totk#botw
30 notes
·
View notes
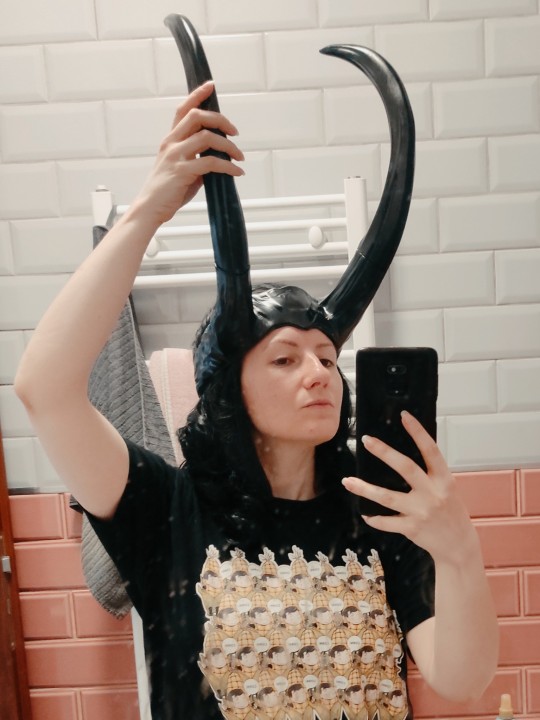
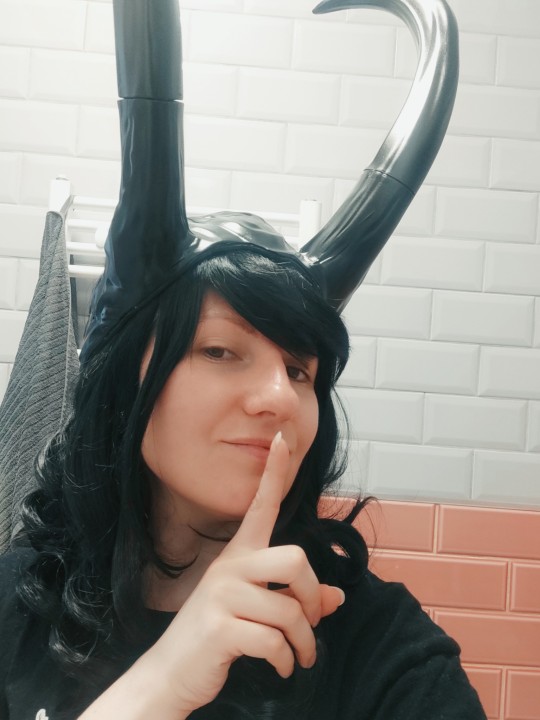
Text
I often struggle with bragging about my own work—- BUT HERE GOES: Had the privilege to build this wig for @xxautumnivyxx’s Karlach. I am grateful that she put her trust in me for this project and I am SO proud of how it came together.

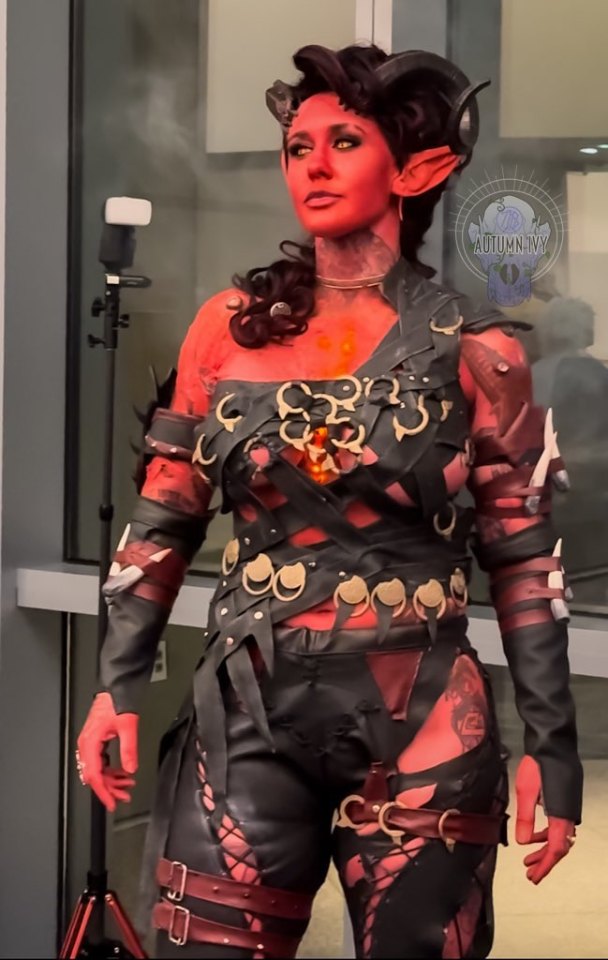
This wig took 20+ hours to build. I hand stitched the long wefts in myself, cut, AND styled. Then we worked together to integrate the horns into the infrastructure.

I will be throwing together a compilation on the building process asap~ This has given me the courage to continue working with wigs and I can’t wait to work on more fun projects in the future. :,)
In the meantime please take a look at my links! I am far more active over on insta and twitter~
🔥My Links
🔥 Autumn's Links
#Karlach#baulders gate 3#baulders gate karlach#wig#wig styling#my work#synthetic wigs#cosplay wig#karlach cosplay
12 notes
·
View notes
Text
#cosplay wig#ohoho guess who’s trying to get better at styling wigs#I am open to constructive criticism
9 notes
·
View notes
Text


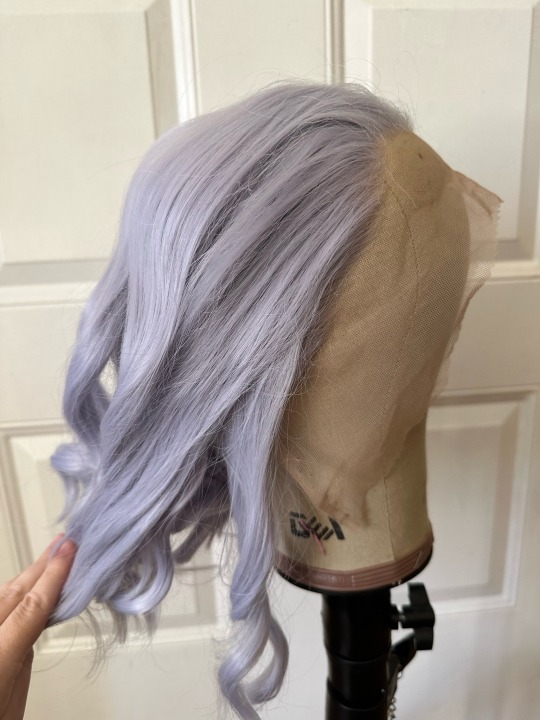
This is why I love shading the roots on a light colored cosplay lace front!
natural hair looks darker at the roots just because of how human hair works. Synthetic hair wigs do not behave the same way, so if you want a cosplay lace front to look more real, adding in shading with an alcohol marker alongside customizing the hairline (YouTube has a lot of info about this; the search term is “fix lace frontal hairline” and just skip any steps involving bleaching knots if your wig is synthetic) will make a wig look so, SO much nicer!
this isn’t even an expensive marker either, I’m literally using an alcohol marker from Five Below, a paper towel, and a bottle of store brand rubbing alcohol
You can also do what I’m doing here and choose a slightly different color for the roots than the base if you want to nudge a wig a bit more warm or cool than it already is! The possibilities are endless!
Literally you just (for a lace piece) part out a very thin amount of hair and color at the roots and, if it’s too dark or there’s too much of a line, form a gradient by wiping with rubbing alcohol. For the rest of the wig, you do that at the base of the weft. It’s easy!
50 notes
·
View notes
Text


Been working on a Rika Pokémon wig! I'm still tweaking the proportions of the spikes, but I think I'm on the right track.
26 notes
·
View notes
Last Seen Blogs

haiti
La nouvelle Haiti

optimalhealthchiropractic-blog
Optimal Health Chiropractic is a Chiropractic Clinic in Schuyler

eggplant-yaoi
3D Yaoi


ffcalssl
ffcalssl