#Convert JPG Files to Vector
Text
youtube
Let's learn simple AI together. This is a video about how to make 3D effects in AI.
https://www.mangodrawing.com
1 note
·
View note
Text
What Are the Best Practices for Converting Figma to WordPress?
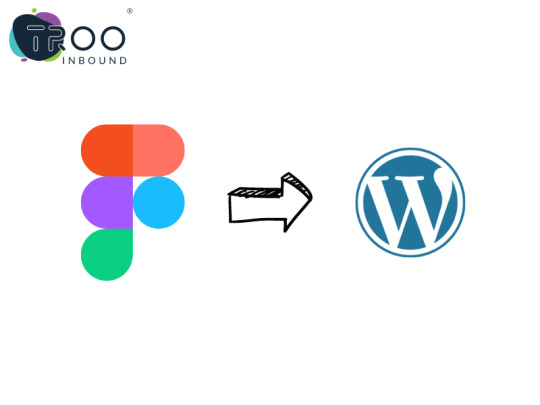
Are you seeking tips and tricks while converting your Figma to WordPress website?
You arrived at the right place.
What is Figma?
Figma is a popular vector graphic editor designer used to create user interfaces, illustrations, icons, and more.
The process of conversion started with converting the Figma design to code. The second method is to export as PNGs (Portable network graphics), JPGs, and SVGs (Scalable vector graphics). It is like other designing tools, like Adobe Photoshop (PSD), Sketch, etc.
Apart from the similarity with the other tools, Figma has a few unique features and functionalities that make it a valuable tool for designers.
Figma has become a famous alternative for building visual hierarchy websites and interactive web applications.
This platform is famous for its capability and flexibility, making this a unique one and one of the influential designing tools.
Whereas,
What is WordPress?
WordPress is a well-known CMS (Content management system) that powers more than 40% of all websites worldwide.
WordPress continues to influence the CMS ( content management system) industry and stays in competition.
Its extensive offerings of plugins that improve functionality, its user’s support community, and its adaptability make it a perfect choice for developers.
Let's walk over a few best approaches for Figma to WordPress conversion.
Top 5 Best Practices for Figma to WordPress Conversion
Let’s check out the best approaches while transferring files from Figma to WordPress. Check this following given below:
WordPress Installation:
One of the most important things to remember is to ensure you have a clean WordPress installation before converting your Figma design to WordPress. The installation will assist you in avoiding problems with current plugins and themes.
Choose theme compatible with Figma:
Look for a WordPress theme that integrates with Figma. A suitable theme will make converting your Figma design into a WordPress theme easier.
Employ a Child Theme:
If you are using a WordPress theme that supports Figma integration, it is recommended that you first establish a child theme. It enables you to modify the theme without compromising the original design.
Use Page Builder:
Page builders are an excellent approach to transforming your Figma design into a WordPress theme quickly and effortlessly. However, seek a page builder that integrates with Figma.
Testing:
Once you've transformed your Figma design into a WordPress theme, properly test it from beginning to end. Before publishing your website, test the Figma design to uncover potential concerns. If an issue arises, it may be resolved here.
Considering these few basics, you can ensure smooth Figma to WordPress conversions.
Looking for Figma to WordPress conversion?
TRooInbound is one of the well-known organizations having demonstrated years of experience.
We have an expert team of Figma and WordPress developers to offer any Figma to WordPress conversion services.
Our specialties include website development, application development, migration, digital marketing, and conversion services.
We have more than 5 years of industry experience with a demonstrated work portfolio. Our expert team is highly qualified for any web development project.
Why are you waiting for?
Contact us today!
#figma to WordPress#website design#website development#design to code#wordpress#wordpress website development#TRooInbound
5 notes
·
View notes
Text
Mountain forest hand-drawn elements
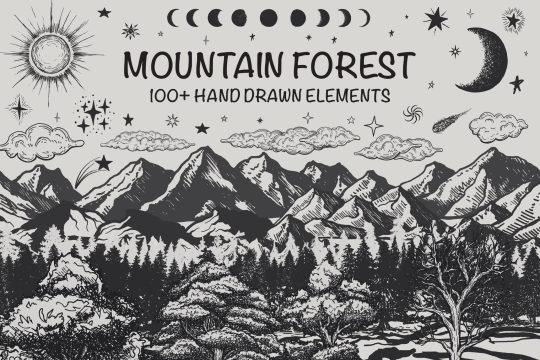
Mountain forest | Mountain forest landscape scenery kit | Mountain forest hand-drawn elements
Mountain forest hand-drawn elements includes 131 elements. Featuring mountain, trees, land, moon phase, sun, cloud, star, comets. Set mountain forest hand-drawn elements that are perfect for logos, branding, art prints, packaging, badges, web and social media graphics, posters, wall art, cards, scrapbooking, tattoo design, surface pattern design, wallpaper and more!
It's all vector so you can easily change color or scale it to any size you need.
Files Included:
- AI (all in one)
- EPS (all in one)
- 131 SVG individual elements
- 131 JPG individual elements
- 131 PNG individual elements
These elements are hand-drawn, then are scanned and converted to vector format so that the elements can have rough edges like original ink drawings.
Checkout Now!
Read the full article
#abstract#Adventure#alps#autumn#Background#beautiful#blue#climbing#cloud#design#environment#fog#foggy#Forest#graphic#green#hiking#Hill#illustration#lake#Landscape#misty#morning#Mountain#mysterious#Natural#nature#Outdoor#Panorama#park
2 notes
·
View notes
Text
What Is a Vector in Graphic Design
Avoid inferior designs that get blurry and can’t be resized or used in large formats. Knowing how to create or use vector-based graphics will allow you to resize logos and other designs without sacrificing crispness or image quality.
clashgraphics.com gathered the following information about the definition, use, and advantages of vector-based images.
What is a Vector Graphic?
Vector graphics are computer images created with a sequence of commands or mathematical statements placing lines and shapes in a two-dimensional or three-dimensional space. In vector graphics, a graphic artist's work, or file, is created and saved as a sequence of vector statements.
Note: Vector images and designs are typically saved as EPS, AI, or SVGs (Scalable Vector Graphics).
How is Vector Graphics Used?
Graphic designers typically use vector graphics to create high-quality designs that need to be scaled. The nature of vector graphics, where each line, curve, shape, and color is mathematically defined, creates images that can be scaled down for stationery like a business card, or scaled up for use on a billboard.
What is the Advantage of Vector Graphics?
Vector images have smaller file sizes when compared to other file types. Since there are no pixels of information in vector files, just mathematical points, the file size can remain small even when scaled very large.
Note: Vector images are editable, meaning you can modify individual elements without disturbing or distorting other components in the image.
What is the Difference Between jpg and Vector Images?
A JPG (Joint Photographic Experts Group) is a file format referring to a compressed image. This is a common file type for digital images from cameras and operating systems. These files often feature high resolution and image quality, which makes them ideal for printing, creating realistic paintings, and for general editing purposes. Since JPGs are very common, many graphic artists start their design or editing projects with JPG images and then export them (as a different file type) to suit their needs.
A vector image is a file format that establishes points on a grid to make the image appear more defined. Design programs can often open and allow you access to most of the vector formats (EPS, SVG, AI). These vector images will often feature a clear background, which makes these graphics helpful in graphic design and presentation projects, as they integrate on top or blend well with any background.
When a designer wants to print a logo or other design on a red t-shirt, they will turn the design into a vector file, enabling it a transparent background and to seamlessly print on a colored shirt.
Note: Raster image files include PNG, JPG, and GIF formats while a Scalable Vector Graphic (SVG) or EPS format is that of a vector file.
Why do Graphic Designers Use Vectors?
Vector images are clearer and more scalable. There is also a question of memory use. For raster graphics, computers must store information for every raster image pixel. Vector images only store the series of points that need to be connected by lines, curves, shapes, and colors.
How do I convert a JPG to a vector image?

You may choose to convert a JPG to a vector image (SVG) to obtain a graphic that is better suited for scaling and printing at larger sizes. To convert a JPG file into a vector using Adobe Illustrator, follow these steps:
Open Adobe Illustrator
Insert the JPG image you want to convert
Select a "tracing" workspace (switch to the "tracing" workspace in Illustrator)
Select the JPG
Adjust the color complexity settings
Adjust the pixels (advanced settings under the color complexity scale)
Change settings to adjust the image’s edges (use the "corners" sliding scale under the "paths" section)
Adjust pixel grouping (use the "noise" slider found below the "corners" one)
Review your changes (click "trace" to view your changes)
Click “Expand" (this converts it to a vector image you can save)
Save your image as an “Ai” (Adobe Illustrator) file and then as a vector (“SVG” for websites or “PDF” for printing)
Tip: Saving the file as an AI image first allows you to return to your project for further editing.
When you want to convert a vector image (SVG) to a JPG, follow these steps:

Open the SVG image file or drag & drop it on a pre-sized canvas in Photoshop, Illustrator, or CorelDraw
Go to File
Select Export
Click Export As
Select JPG format from the drop-down menu
Adjust the image size and canvas size as needed
Click “Export all” and save your new JPG image
Note: The “SVG” file format is the most popular tool for displaying two-dimensional graphics, designs, charts, and illustrations on websites. Plus, as a vector file, it can be scaled up or down without losing any resolution.
What Computer Programs Open an SVG File?
Google Chrome, Safari, Firefox, IE, Opera, and every popular web browser should be able to render and view SVG image files. SVG files are also supported in most text editors and high-end Graphics editors like Adobe Illustrator and CorelDRAW.
Vectors in Graphic Design
In this article, you discovered the definition, applications, and advantages of working with vectors or SVGs in your graphic design projects.
Knowing how to use and apply vector-based images will drastically improve your images when scaled up or down or applied to colored backgrounds.
Not using vector-based graphics will make your designs look less professional, appealing, and make you look like an inexperienced designer.
Source:
web.simmons.edu/~grovesd/comm328/modules/svg/creating-svgs
guides.lib.umich.edu/c.php?g=282942&p=1885352
pavilion.dinfos.edu/Article/Article/2223089/vector-vs-raster-images-choosing-the-right-format/
Clash Graphics Print Shop Atlanta Flyer Printing
2233 Peachtree Rd NE Ste 202 Atlanta, GA 30309
(678) 235-3464
To view the original version on Clash Graphics, visit: https://www.clashgraphics.com/printing-tips/what-is-a-vector-in-graphic-design/
2 notes
·
View notes
Text
We convert your scanned images from .jpg, .bmp, or .tiff file formats in a machine ready embroidery file like DST or .EMB formats for detailed embroidery digitizing visit our website website https://www.crestcreations.com/services-vector-artwork/
#PPAI#Vector#Design#artwork#art#Paper#digitization#Proofs#custom#logo#Pre#Press#virtual#graphics#digitizing#Samples#embroidery#ASI#SAGE#3D#conversion#discounts#artists#professional#computerized#service#PPAIEXPO#promotional#PNG#quality
2 notes
·
View notes
Text
Auxost | Logo Design services in Bhopal

You only have one chance to make a good first impression, so let’s make it work for your company. Being one of the best marketing firms in Bhopal with a focus on logo design, we are aware of the importance of a logo for a business.
Your logo will be the face of your company for years to come; therefore you can’t afford to engage a subpar logo creator who will damage such a significant project for you. Our team comprises talented as well as imaginative designers that can work hard to create unique logos that meet your requirements.
A logo is essential for every business, whether it is startup or established. A logo serves as your company’s brand. That’s why we provide specialized services for designing business logos that work for startups, mid-sized businesses, as well as large corporations.
Why do you need a good company logo?
Your brand image may be strengthened or damaged by your logo. People are naturally skilled at deciphering visual cues. You may make a lasting impression on potential clients or consumers by having a recognizable and expert logo design.
Here’s why you must choose a logo for your business –
Increases brand recognition
Stands out from the competitors
Creates an engrossing brand narrative
Offers complete control over your visual representation
Remains in people’s memories
What to expect from our Logo Design Services?
As a part of our logo design services, we provide –
Logo Design Consultation:
We provide initial consultation to understand the client’s brand, values, and target audience. Later, we discuss design preferences, color schemes, and style preferences.
Market Research:
We analyze industry trends and competitor logos to ensure uniqueness. We also identify design elements that resonate with the target market.
Concept Development:
We create multiple logo concepts based on the client’s brief and preferences. We also explore various design styles, fonts, and color palettes.
Custom Logo Design:
We develop a unique and custom-designed logo that reflects the brand’s identity, followed by iterative design process with client feedback for refinement.
Brand Guidelines:
We create brand guidelines to ensure consistent use of the logo across different platforms, followed by specifications on logo variations, color codes, and clear usage instructions.
Vectorization:
We convert the final logo design into a vector format for scalability as well as versatility.
Collateral Design:
We integrate the new logo into various marketing collateral, such as business cards, letterheads, and social media profiles.
Responsive Design:
We also ensure that the logo is designed to be effective and recognizable across different mediums, including print and digital platforms.
Logo Refresh or Redesign:
We evaluate and enhance existing logos to modernize or align them with current branding trends.
File Deliverables:
We deliver the final logo design in various file formats suitable for different applications (e.g., PNG, JPG, and EPS).
Mockups and Presentations:
We create mockups or presentations to showcase how the logo will appear in real-world applications.
Trademark and Copyright Assistance:
We provide guidance on the trademark and copyright aspects of the logo design to ensure legal protection.
Why Auxost is the best logo design services provider?
Here are some quick pointers that’ll let you know why you should choose Auxost and why we are better than anyone else ~
Save your money & time
Get the ideal logo without breaking the bank—save time as well as money with our affordable and competitive logo design services. Achieve perfection without compromise.
Uniqueness and creativity
Auxost surely provides uniqueness and creativity in every design, ensuring your brand stands out. Elevate your identity with our innovative approach.
Personalized for your industry
Our professional logo designers provide designs specific to your business niche. They understand your requirements thoroughly and then submit the designs to cater to your main visual needs.
Packages that work for everyone
Different package options are available for you if you want a customized logo for your company. Furthermore, based on your budget, select whatever package you prefer; every package is worth the money and requirements you have.
Customer support
You can contact our support staff if you face any problem; our experts are surely there to help you every step of the way. Drop an email, call, as well as chat instantly.
If you’re looking for Creative Premium logo design Services in India, Auxost is undoubtedly your answer!
0 notes
Text
jpg to dst converter
Converting a JPG file to DST format involves converting a raster image (JPG) to a vector format (DST), commonly used for embroidery machines. There are various software tools available for this conversion, but one of the most commonly used ones is dedicated embroidery software like Wilcom, Embird, or Tajima DG/ML by Pulse. These software packages often have built-in converters for various file formats, including JPG to DST.
0 notes
Text
Image Formats: What You Should Know For Your Website?
Have you spent hours crafting the perfect web design, only to find your pages loading sluggishly and your images looking less than stellar? It is no doubt a frustrating outcome, but fear not because the culprit might just be the image formats you’ve chosen.
To correct this mistake, you first need to know about various image formats for your web design. Later, from slow loading times to compromised image quality, we will explore the challenges that arise with each format.

So, grab a notepad and join us as we navigate the maze of image formats to ensure your web design shines bright and delivers an exceptional user experience.
Types of Image Formats
1. JPEG or JPG
JPEG, a widely embraced image file format, reigns supreme in the digital landscape, especially for photographs snapped by your trusty camera. Offering a staggering palette of 16,777,216 colours, it’s the go-to for preserving visual fidelity. This versatile format also boasts adjustable compression levels, making it a darling of web graphics.
However, it’s not without its quirks. While social platforms like Facebook and Instagram automatically convert uploads to JPEG, beware of its “lossy” nature—it sacrifices quality for smaller file sizes. Ideal for lifelike scenes and smooth colour transitions, JPEG falters with sharp-edged visuals like line drawings.
Yet, for web content like blogs and articles, JPEG’s compromise between quality and loading speed is unbeatable. Squarespace and Shopify swear by it for their products and pages, while Wix and Webflow advocate for its SEO-friendly attributes and browser compatibility.
2. PNG
PNG, renowned for its lossless compression, preserves image intricacies and colour contrasts flawlessly, making it the standout of graphic enthusiasts. Unlike JPEG, PNG excels in text clarity, making it a staple for infographics, banners, and screenshots. Its lossless compression ensures every pixel detail remains intact upon viewing, enhancing image quality and text legibility.
However, beware of bloated file sizes, especially with high-resolution images, which can sluggish website loading times. Yet, PNG offers versatility, allowing transparency adjustments and interlacing for faster development. Although lacking animation support, PNG’s extensibility opens doors for future innovations.
Usually, embraced for:
Decorative elements
High-quality images
Image optimisation
With universal browser support, PNG stands tall as the go-to solution for impeccable image quality without compromise.
3. SVG
SVG, or Scalable Vector Graphics, revolutionises web imagery with its markup language prowess, rendering two-dimensional masterpieces directly within browsers. Unlike raster formats, SVG employs XML text to define shapes and lines, enabling infinite scalability without sacrificing quality.
Ideal for:
Simple illustrations
Logos
Icons
Responsive web designs
While not suited for complex drawings or images, SVG’s small file sizes and lossless scaling make it a favourite among designers. Platforms like Editor X offer a plethora of vector assets, while Webflow and Wix Editor seamlessly integrate SVG into their design workflows.
However, with the lack of universal browser support, SVG may encounter quality limitations. Nevertheless, its unmatched scalability and versatility cement SVG’s status as the go-to solution for dynamic, responsive web design.
4. GIF
GIF, a staple in web culture, offers lossless compression, preserving image quality while limiting colour to 256 shades — unsuitable for digital photos due to their colour constraints. GIFs find their niche in website buttons and banners, where limited colours suffice.
Despite graininess in photos, GIFs excel in:
Quick loading times
Animation capabilities
Enhancing user engagement
However, once encoded, GIFs are immutable, requiring source data for edits. While ideal for training animations, their heavy file sizes can impede website loading, cautioning against overuse.
5. WebP
WebP, a state-of-the-art image format, revolutionises web imagery with superior compression techniques, catering to both lossless and lossy needs. It significantly reduces file sizes compared to PNGs and JPEGs, ensuring faster web speeds without compromising quality.
WebP’s adoption by platforms like WIX, Editor X, and Shopify underscores its efficacy in minimising file sizes while maintaining image integrity. However, its limited browser support, confined to the latest versions of Chrome and Firefox, presents a drawback.
In essence, WebP presents a compelling solution for web optimisation, delivering smaller yet equally or even better quality images, albeit with browser compatibility constraints.
6. AVIF
Lastly, AVIF is an advanced image format that optimises image sizes while preserving quality, akin to its predecessors like WebP and JPEG-XR. Its support for high-dynamic-range imaging and full-resolution 10- and 12-bit colour ensures images are significantly smaller, up to ten times, compared to other formats.
Backed by tech giants like Google and Amazon, AVIF offers:
Optimal compression
Transparency
Modern features without royalties
While it promises to replace outdated formats like JPEG, its limited adoption poses challenges. Each image format, including AVIF, has unique advantages and drawbacks, necessitating careful consideration before implementation. Despite its potential, widespread use of AVIF remains limited.
Final Word:
In conclusion, the diverse landscape of image formats offers a spectrum of choices, each with its own strengths and limitations. From the pioneering WebP to the cutting-edge AVIF, web design experts must weigh the trade-offs to optimise their web content effectively, ensuring a seamless user experience across platforms.
If you need a reliable professional to entrust your website design in Adelaide, you can check out Make My Website — an excellent and rising star in the industry. It has worked with different businesses, upscaling their web presence. So, feel free to touch base with MMW.
#seo geelong#seo melbourne#web design truganina#web design melbourne#web design perth#web design geelong
0 notes
Text
How to Download Images From Cricut Design Space: Full Guide
Were you aware of how to download images from Cricut Design Space? It is true, as Cricut software is the most crucial feature crafters need to use while using the Cricut machine. Also, it can use the downloaded images and convert them into cuttable images. Most beginners ask about downloading and uploading images to the Cricut app. Simply put, it is a straightforward process that allows you to get the image on your device within a few seconds.
In addition, you can download the image from a web browser for free or through a Cricut Access subscription plan. Are you ready to learn the facts about taking pictures while preparing your favorite project? If yes, then this blog is perfect for you, as it will explain the entire method in simple words.
Step 1: Search and Download An Image
If you intend to learn about how to download images from Cricut Design Space, open the search engine (Google Chrome, Safari, MS Bing, and others) and look for your image. After the list opens, right-click and click the Save as Image or Save Images to Downloads option.
After successfully downloading the image, go to the Downloads folder and check whether it has been downloaded perfectly. If it isn't appropriately downloaded, try re-downloading it from another search engine. Also, you can try downloading different images and checking the internet connectivity.
Step 2: Upload Your Image to the Cricut App
Following this, turn on your device and open the Cricut software, which is visible with the other installed app on the Home screen. To learn how to download images from Cricut Design Space, create an account or sign in by noting down your Cricut ID and password.
Next, you will land on the new web page and press the New Project present at the top-right-hand side or in the center of the page. Now, click the Upload tool given under the Menu bar on the left side of your canvas.
Following this, click Upload image > Browse, and your device's Downloads folder will instantly open. Now, select your downloaded image and then click the Open button. After that, click the Complex > Continue option. At this point, you will instantly be connected to the background remover page.
Step 3: Remove Background
Subsequently, use the background remover tool by selecting the background of your downloaded image. Then, click on the places where you want to make the changes and click the Apply & Continue button at the bottom right side of the page. Plus, choose the Cut Image and remove the background of your downloaded image. Following this, tap the Upload button present at the bottom right side of your page.
Step 4: Upload SVG File to Cricut Design Space
Afterward, you will see the edited image under the Recently Uploads > choose the image and then click the Add to Canvas button. Equally important, resize your image and then select the Make It option. Further, select the image on the cutting mat and proceed towards the cutting process.
It doesn't matter whether you are using a Basic image or a Vector image; you need to follow some steps. If you aren't aware of the methods, refer to the section below.
Method 1: Upload Basic Images (Raster Images)
Further on how to download images from Cricut Design Space, choose the Basic images in .jpg, .gif, and .png and drag them to the Cricut software's Upload window. Now, choose the image type and then click the Continue option. Next, choose the Crop tool to remove, erase, and restore the unwanted background.
If you want to preview the edited image, press the Preview button on your screen. If you don't get the desired image, press the Hide Preview button and edit it. After making the modifications, select Continue to proceed to the next stage. Concurrently, name your image and choose Print Then Cut or a Cut Image. Equally important, click Upload, and your edited image will appear in the Uploaded Images Library section.
Method 2: Upload Vector Image
On the contrary, if you are using a .svg or .dxf file, go to the File Selector and select the Open option. Then, drop the file in the image upload window, name it, tag it, and hit the Upload box. Also, return to the Upload section and search for your Vector file by inserting its name inside the Search bar.
At this point, choose the file, and it will directly move to your Cricut app canvas. Finally, the Vector images that are designed with layers will appear as grouped images. After ungrouping the image, you can move and change its size separately per your preference.
If you would love to explore how to download images from Cricut Design Space more, keep going by using the cutting machine and the designing software. Moreover, try to access the majority of content related to the app that will motivate you to unleash your creativity.
Frequently Asked Questions
Question: Where Can I Find My Uploaded Images in Cricut Software?
Answer: Take a look at the below steps, and you will find the images that you uploaded on the Cricut app:
Question: How Do I Load My Images Into Cricut Design Space on My iOS Device?
Answer: Refer to the following steps and load your favorite images on your Cricut Design app installed on your iOS device:
Question: Can I Use My Cricut Software Without the Internet?
Answer: You can surely use the downloaded images to make several customized projects without having an internet connection. Also, you get the right to edit the images and complete the leftover project using the tools given under the Menu panel. But you can't use the Cricut Access app without having an internet connection.
Visit: cricut.com/setup
install cricut design space app
www.cricut.com setup login
Source: https://cricricutdesigncut.wordpress.com/2024/04/01/how-to-download-images-from-cricut-design-space-full-guide/
#digital design#design space setup#cricut.com/setup#cricut.com sign in#cricut.com/create#cricut.com/register#cricut.com design space#cricut.com setup windows#cricut.com setup#www.cricut.com setup login#www.cricut.comsetup login#www.cricut.com/setup\cricut explore air 2 setup#www.cricut.com/setup login#www.cricut.com/setup#design.cricut.com/setup#install cricut design space app#install cricut explore air 2 setup
0 notes
Text
how to make a digital file for embroidery machine
A Beginner's Guide to Creating Digital Files for Your Machine
The whirring of the machine, the dance of the needle, the vibrant colors coming together to form a stunning design - embroidery is a captivating art form. But before your machine stitches its magic, a digital roadmap needs to be created. This digital file, often called an embroidery file or an embroidery design, tells the machine exactly where to place each stitch and in what color.
If you're new to the world of embroidery machines and want to create your own designs, this comprehensive guide will equip you with the knowledge and steps to transform your ideas into digital instructions. Buckle up, and let's dive into the fascinating world of embroidery digitizing!
Understanding the Digitizing Process
Embroidery digitizing is the process of converting an image or artwork into a format that an embroidery machine can understand. This format typically consists of vectors (lines and shapes) and stitch information (type, length, color). The digitizing software translates the image into these instructions, essentially creating a map for the needle to follow.
There are two main approaches to digitizing:
Manual Digitizing: This is the traditional method where a skilled digitizer uses specialized software to meticulously create the stitch instructions point-by-point. It requires a deep understanding of embroidery techniques, stitch types, and fabric properties.
Automatic Digitizing: With advancements in software technology, some programs offer automatic digitizing tools. These tools can simplify the process for basic designs, but often require manual adjustments to achieve optimal results.
For beginners, starting with automatic digitizing software can be a good option. However, as you progress, understanding the principles of manual digitizing will give you more control and flexibility in creating high-quality embroidery designs.
Tools of the Trade: Embroidery Digitizing Software
The heart of the digitizing process is the software. Several embroidery digitizing programs are available, catering to different skill levels and budgets. Here are some popular options to consider:
Wilcom Embroidery Studio: A powerful and industry-standard software offering a comprehensive set of tools for manual digitizing. It comes with a steeper learning curve but is highly versatile.
Hatch Embroidery: A user-friendly software with strong automatic digitizing features and a good balance of ease of use and functionality.
Inkstitch (Free, Open-Source): A free and open-source software designed for vector art conversion into embroidery files. It's a good option for beginners or those comfortable with vector editing software. However, it may require more manual adjustments compared to paid options.
When choosing software, consider factors like your budget, skill level, desired features (automatic vs. manual digitizing), and compatibility with your embroidery machine format (discussed later).
Additional Software: Depending on your workflow, you might find other software helpful:
Vector Editing Software (e.g., Adobe Illustrator, Inkscape): For creating or editing vector artwork before importing it into the digitizing software.
Image Editing Software (e.g., Adobe Photoshop, GIMP): For preparing images for digitizing, such as reducing colors and cleaning up details.
Preparing Your Design for Digitizing
Before diving into the software, some prep work on your design can significantly improve the digitizing process and final embroidery outcome. Here's what to keep in mind:
Design Choice: Embroidery machines excel at creating bold outlines and filled areas. Opt for designs with clear, well-defined shapes for optimal results. Avoid intricate details and small text, as they might not translate well into stitches.
Image Format: Embroidery software typically works with vector formats like DST, EXP, PES, etc. If you're working with an image (e.g., JPG, PNG), you might need to convert it to a vector format using image editing or vector editing software. There are also online tools that offer basic image-to-vector conversion, but the results may require further refinement.
Color Reduction: Embroidery machines typically have a limited number of threads (usually up to 15-20). If your design has many colors, you might need to reduce the color palette to match your machine's capabilities. Software tools can help with color reduction, but it's also a good idea to experiment and choose colors that complement each other well.
Step-by-Step Guide to Digitizing with Embroidery Software
1. Import Your Design: Open your chosen embroidery digitizing software and import your prepared design (vector or converted image). The software might offer different import options depending on the file format.
2. Define the Embroidery Area (Hoop Size): Embroidery hoops come in various sizes, limiting the size of your design. Specify the hoop size you plan to use for embroidery to ensure your design fits within the designated area.
3. Underlay : An underlay is a layer of stitches placed beneath the main design elements. It helps stabilize the fabric and prevent puckering, especially for delicate fabrics or designs with dense stitch fills. Some software offers automatic underlay generation, while others allow for manual customization of underlay stitch type, density, and placement.
4. Digitizing Objects:
This is where the magic happens! Here's a breakdown of the digitizing process for different design elements:
Outlines ( (satin stitch) or (back stitch)): For outlines, you'll define the path the needle will follow using satin stitch (for a smooth, filled look) or back stitch (for a more defined edge).
Fill Areas ( (satin stitch) or ((tatami stitch)): For areas of solid color, you'll choose a fill stitch type like satin stitch (for a smooth, dense fill) or tatami stitch (for a textured fill). The software will automatically generate fill patterns based on your chosen stitch type and density settings.
Text: Digitizing text requires careful attention to detail. Some software offers automatic text conversion tools, but you might need to adjust stitch types, sizes, and spacing for optimal results.
5. Defining Stitch Parameters:
Once you've outlined and filled your design elements, you can refine the stitch properties for each area. Here are some key parameters to adjust:
Stitch Type: Choose the most appropriate stitch type for each element based on desired texture and effect (e.g., satin stitch for smooth fills, bean stitch for textured fills).
Stitch Density: This determines how close the stitches are placed. Denser stitches create a more solid look but take longer to embroider. Experiment to find a balance between coverage and stitch count.
Stitch Length: This controls the individual stitch size. Shorter stitches provide more detail but increase stitch count. Longer stitches can save time but might not capture intricate details as well.
Thread Color: Assign thread colors to each digitized element based on your chosen color palette.
6. Editing and Cleanup:
After defining the stitch parameters, it's crucial to review your work and make any necessary adjustments. Here are some things to look for:
Jump Stitches: These are non-essential stitches used to move the needle between disconnected areas. Minimize jump stitches to prevent thread breaks and improve embroidery quality.
Overlapping Stitches: Ensure stitches don't overlap unintentionally, as this can create unwanted bulk in the finished embroidery.
Smoothness of Curves: Review how well the digitized outlines follow the curves of your design. Refine anchor points or adjust stitch density if needed to achieve smooth curves.
7. Test & Save:
Once you're satisfied with your digitized design, it's wise to create a test stitch-out on a scrap piece of fabric similar to your final project fabric. This allows you to verify the stitch quality, identify any errors, and make adjustments before embroidering on your final project.
Finally, save your embroidery file in a format compatible with your embroidery machine. Most software allows exporting to various file formats like DST, EXP, PES, etc. Consult your machine's manual for the specific format it requires.
Additional Tips for Beginners
Start Simple: Begin with basic designs that don't have excessive details or complex color variations. As you gain experience, you can tackle more intricate designs.
Practice Makes Perfect: The more you digitize, the better you'll understand the software and the nuances of embroidery techniques. Experiment with different stitch types and settings to see how they affect the final outcome.
Online Resources: There are many online tutorials, forums, and communities dedicated to embroidery digitizing. Utilize these resources for additional learning and troubleshooting.
Consider Digitizing Services: If you find the digitizing process overwhelming, there are professional digitizing services available. They can create embroidery files based on your artwork for a fee.
With dedication and practice, you'll be well on your way to creating stunning embroidery designs from your own digital artwork. Remember, the journey of digitizing is as rewarding as the finished embroidered product. So, unleash your creativity, explore the possibilities, and happy stitching!
Read the full article
0 notes
Text
Creative Fabrica Studio: A Powerful Online Design Tool for Everyone
Creative Fabrica Studio: A Powerful Online Design Tool for Everyone
Are you looking for a way to create stunning and professional designs without any hassle? Do you want to access millions of fonts, graphics, crafts and more for your personal or commercial projects? If yes, then you should check out Creative Fabrica Studio, a platform that offers various online design and edit features to help you unleash your creativity.
What is Creative Fabrica Studio?
Creative Fabrica Studio is a part of Creative Fabrica, a platform where you can find and create your own designs with millions of fonts, graphics, crafts and more. Creative Fabrica Studio is a free online tool that allows you to design whatever you want, from logos and flyers to SVG files and mockups. You can use it for any purpose, whether it is for fun, hobby, or business.
What can you do with Creative Fabrica Studio?
Creative Fabrica Studio has a lot of features that you can use to create unique and professional designs. Some of the features are:

• Background Remover: This feature allows you to remove the background of any image with just one click. You can also adjust the edges and download the transparent image in PNG format.
• SVG File Converter: This feature allows you to convert any image into a scalable vector graphic (SVG) file. You can also edit the SVG file with the built-in editor and download it in SVG or PNG format.
• PNG to SVG Converter: This feature allows you to convert any PNG image into a SVG file. You can also edit the SVG file with the built-in editor and download it in SVG or PNG format.
• JPEG to SVG Converter: This feature allows you to convert any JPEG image into a SVG file. You can also edit the SVG file with the built-in editor and download it in SVG or PNG format.
• Rotate Image: This feature allows you to rotate any image by 90 degrees clockwise or counterclockwise. You can also flip the image horizontally or vertically and download it in the original format.
• Crop Image: This feature allows you to crop any image by selecting the area you want to keep. You can also choose from predefined aspect ratios or enter your own custom dimensions and download the cropped image in the original format.
• Transparent Background Maker: This feature allows you to make the background of any image transparent. You can also adjust the transparency level and download the image in PNG format.
• Mirror Image: This feature allows you to create a mirror image of any image. You can also choose the direction of the mirror effect (horizontal or vertical) and download the mirrored image in the original format.
• JPG to PDF Converter: This feature allows you to convert any JPG image into a PDF file. You can also choose the page size and orientation and download the PDF file.
• JPG to PNG Converter: This feature allows you to convert any JPG image into a PNG file. You can also choose the compression level and download the PNG file.
• Change Color of Image: This feature allows you to change the color of any image. You can also adjust the hue, saturation, and brightness and download the image in the original format.
• Black and White Filter: This feature allows you to apply a black and white filter to any image. You can also adjust the contrast and download the image in the original format.
• Change Photo Background Color: This feature allows you to change the background color of any image. You can also choose from a color palette or enter a hex code and download the image in the original format.
• Add Text On Image: This feature allows you to add text on any image. You can also choose from hundreds of fonts, colors, sizes, and styles and download the image in the original format.
• Add Emoji to Photo: This feature allows you to add emoji to any photo. You can also choose from hundreds of emoji, resize, rotate, and move them and download the photo in the original format.
• PNG to JPG Converter: This feature allows you to convert any PNG image into a JPG file. You can also choose the quality level and download the JPG file.
• Circle Crop: This feature allows you to crop any image into a circle shape. You can also adjust the size and position of the circle and download the image in PNG format.
• Overlay Images: This feature allows you to overlay two images on top of each other. You can also adjust the opacity and position of the overlay image and download the image in the original format.
• Remove Background from Logo: This feature allows you to remove the background from any logo. You can also refine the edges and download the logo in PNG format.
• Resize Photo for Instagram: This feature allows you to resize any photo for Instagram. You can also choose from different aspect ratios and download the photo in the original format.
• AI Inpainting Tool: This feature allows you to use artificial intelligence to fill in the missing parts of any image. You can also adjust the brush size and download the image in the original format.
• Animate Pictures: This feature allows you to animate any picture with different effects. You can also adjust the speed and duration of the animation and download the picture in GIF format.
• Blur Background: This feature allows you to blur the background of any image. You can also adjust the blur intensity and download the image in the original format.
• Blur Image: This feature allows you to blur any image. You can also adjust the blur intensity and download the image in the original format.
• Crop JPG: This feature allows you to crop any JPG image by selecting the area you want to keep. You can also choose from predefined aspect ratios or enter your own custom dimensions and download the cropped image in JPG format.
• Crop PNG: This feature allows you to crop any PNG image by selecting the area you want to keep. You can also choose from predefined aspect ratios or enter your own custom dimensions and download the cropped image in PNG format.
• Darken Image: This feature allows you to darken any image. You can also adjust the darkness level and download the image in the original format.
• Edit PDF Image: This feature allows you to edit any PDF image. You can also add text, shapes, images, and more and download the edited PDF file.
• Image Enhancer: This feature allows you to enhance any image. You can also adjust the brightness, contrast, saturation, and sharpness and download the image in the original format.
• Photo Filter Effects: This feature allows you to apply different filter effects to any photo. You can also choose from dozens of filters and download the photo in the original format.
• Resize icon: This feature allows you to resize any icon. You can also choose from different sizes and download the icon in PNG format.
• Resize JPEG: This feature allows you to resize any JPEG image. You can also choose from different sizes and download the image in JPEG format.
• Resize PNG: This feature allows you to resize any PNG image. You can also choose from different sizes and download the image in PNG format.
• Sharpen Image: This feature allows you to sharpen any image. You can also adjust the sharpness level and download the image in the original format.
• Unblur Image: This feature allows you to unblur any image. You can also adjust the unblur level and download the image in the original format.
• Watermark to Photos: This feature allows you to add a watermark to any photo. You can also choose from different fonts, colors, sizes, and positions and download the photo in the original format.
How to use Creative Fabrica Studio?
Using Creative Fabrica Studio is very easy and intuitive. You just need to follow these simple steps:
• Go to Creative Fabrica Studio https://www.creativefabrica.com/studio/ref/181983/and choose the feature you want to use.
• Upload your image or choose from the gallery of images provided by Creative Fabrica.
• Edit your image with the feature you selected and preview the result.
• Download your image in the desired format and use it for your project.
Why choose Creative Fabrica Studio?
Creative Fabrica Studio is a great online design tool for everyone, whether you are a beginner or a professional. Here are some of the benefits of using Creative Fabrica Studio:
• It is free and unlimited. You can use it as much as you want without any restrictions or fees.
• It is fast and easy. You can create amazing designs in minutes with just a few clicks.
• It is versatile and flexible. You can use it for any purpose and any project, from personal to commercial.
• It is compatible and accessible. You can use it on any device and any browser, without any installation or registration.
• It is integrated and connected. You can access millions of fonts, graphics, crafts and more from Creative Fabrica and use them for your designs.
1 note
·
View note
Text
Best 6 Vector Converters Alternative Online Free
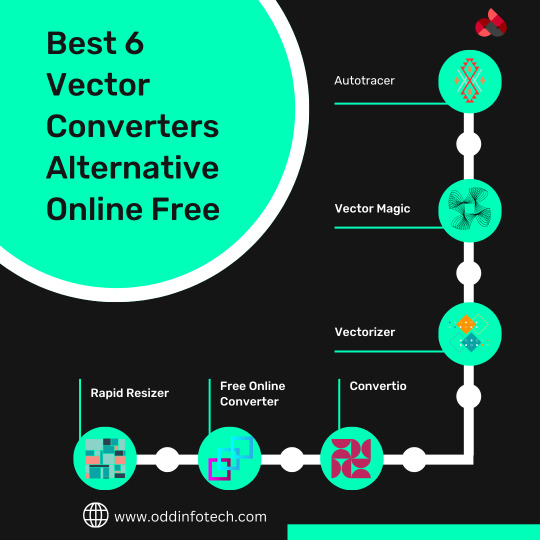
1. Autotracer
Using this online tool, you can convert JPG, GIF, and PNG image files to an array of vector formats like EPS, AI, PDF, and SVG. The program is free to use and requires no registration or installation.
2. Vector Magic
This a free to use browser-based tool that facilitates converting raster images to an array of vector formats. The files can be browsed and added or can be simply dragged and dropped to the program interface.
3. Vectorizer
This online tool allows converting your PNG, BMP, and JPEG files to vector formats. Up to 3 images can be uploaded, and 3 images can be downloaded using the program per hour.
4. Convertio
A maximum of 100MB file from your system, URL, Google Drive, and Dropbox account can be added to this online program for conversion to a vector image.
5. Free Online Converter
Converting raster images is simple and quick using this online tool that is free to use and needs no installation or registration. Up to 50 files can be processed using the program, and the converted image is black and white.
6. Rapid Resizer
This free online vector converter works best when you have black and white images. You need to add the file to the program, and after it gets uploaded, you can select from Outline or Centerline option to trace the file.
0 notes
Text
CAD Conversion for JPG to DWG Made Simple
Converting a JPG (image) file to DWG (AutoCAD drawing) format can be accomplished using various methods and software tools. Here's a simple guide to help you with the conversion process:
Method 1: Online Conversion Tools
Choose an Online Converter:
There are several online tools available for converting JPG to DWG. Some popular ones include AutoDWG, Zamzar, and OnlineConvertFree.
Upload Your JPG File:
Visit the chosen online converter's website and upload your JPG file. Follow the on-screen instructions to select the conversion format as DWG.
Complete the Conversion:
Initiate the conversion process and wait for the tool to process your file. Once done, download the converted DWG file.
Method 2: AutoCAD Software
Open AutoCAD:
If you have AutoCAD installed on your computer, open the software.
Use "Insert" or "Attach" Command:
Navigate to the "Insert" or "Attach" command in AutoCAD, depending on your version.
Select Your JPG File:
Choose the JPG file you want to convert. AutoCAD will prompt you to specify insertion points and scale.
Trace or Vectorize:
After inserting the image, you can manually trace over it using AutoCAD drawing tools, or you may use AutoCAD's raster-to-vector conversion tools for a more automated process.
Save as DWG:
Once you've traced or converted the image, save the file in DWG format using the "Save As" option.
Method 3: Specialized Software
Use Conversion Software:
Consider using specialized software designed for image to CAD conversions, such as Scan2CAD, Able2Extract, or Autodesk's Raster Design.
Install and Open the Software:
Install the chosen software and follow the instructions to open the JPG file.
Adjust Settings:
Adjust any settings for scaling, resolution, or vectorization as needed.
Initiate Conversion:
Start the conversion process within the software, and once completed, save the file in DWG format.
Tips and Considerations:
Accuracy: Manual tracing may be necessary for intricate or detailed drawings to ensure accuracy.
Image Quality: Higher quality JPG images will result in better DWG conversions.
Trial Versions: Some specialized software offers trial versions, allowing you to test the tool before purchasing.
Always ensure that you have the right to convert and use the images in the intended format, considering copyright and licensing agreements.
Additional Considerations:
Layer Organization: When converting images to DWG, consider organizing your drawing elements into layers. This will make it easier to manage and edit the different components of your drawing.
Cleanup: After conversion, review and clean up the drawing as necessary. Remove any unnecessary or duplicate elements that may have been generated during the conversion process.
Scale Calibration: If the scale of the drawing is crucial, make sure to calibrate the scale during the conversion process. This is especially important if you plan to use the DWG file for precise measurements.
File Size: Depending on the complexity of the drawing and the conversion method used, the resulting DWG file can vary in size. Be mindful of file size, especially if you need to share or work with the file on systems with storage limitations.
Check for Errors: After conversion, carefully review the DWG file for any errors or inaccuracies. Some conversion methods may not be perfect, and manual adjustments might be necessary.
Backup Originals: Before initiating any conversion, it's a good practice to create backups of your original JPG files. This ensures that you have a reference in case any issues arise during or after the conversion process.
Software Compatibility: Ensure that the DWG file you create is compatible with the AutoCAD version or other CAD software you plan to use. Different versions of DWG files may have varying levels of compatibility.
Explore Advanced Features: Some advanced software tools offer additional features such as OCR (Optical Character Recognition) for text extraction from images. Explore these features if your drawings contain textual information.
Online Security: When using online conversion tools, be cautious about the security and privacy of your files. Make sure to use reputable and secure platforms to avoid any potential data breaches.
By considering these additional tips and precautions, you can enhance the quality of your JPG to DWG conversion process and ensure that the resulting DWG file meets your specific requirements. To learn more about cad conversion you can read this article https://autocadindia.com/convert-your-pdf-into-autocad-dwg-file-format/
0 notes
Text
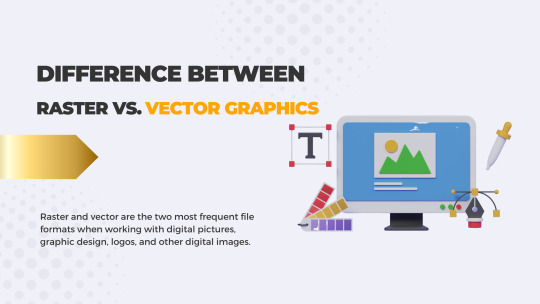
What is the difference between raster vs. vector graphics?
With so many photographs to pick from online, deciding which file types to use can take time and effort. Do you prefer raster or vector images? Pixels compose raster pictures, whereas mathematical shapes and routes compose vector images.
Raster vs. vector graphics are the two most frequent file formats when working with digital pictures, graphic design, logos, and other digital images. Knowing the ins and outs of both formats, as well as how they translate when exported, is a crucial ability for every designer.
Read this post to learn more about raster vs. vector graphics and how they vary:
What are the raster graphics?
Raster graphics, often known as bitmap graphics, are based on pixels. These are made out of a grid of colored dots or pixels. A single dot symbolizes a color, but the colorful dots together form a vibrant and complex artwork. This raster graphics approach produces images with a lot of detail. Digital cameras generate pictures using raster graphics. All photos used in print and online are bitmap images. Raster graphics are excellent for picture editing and digital painting. The most common raster graphics formats are .JPG, .GIF, .BMP, and.PNG.
Raster graphics, commonly known as bitmaps, store visual information as a two-dimensional map of pixels. Zoom in on a raster picture to view the information it contains – data on the color of each pixel. Zoom out, and the pixels appear to combine flawlessly to form a picture. Zooming in on a vector icons. on the other hand, allows you to view the smooth forms and curves of the image’s parts rather than individual pixels.
The most common raster image file extensions are:
GIF (Graphics Interchange Format)
JPG (Joint Photographic Experts Group)
PNG (Portable Network Graphics)
What Is Vector Graphics?
Vector graphics are based on mathematical formulae that define geometric primitives. These are polygons, lines, curves, circles, and rectangles. They are far more versatile, adaptable, and simple to use. It makes them ideal for organized imagery. Vector drawings are easily scalable, with no upper or bottom scaling limits. It always seems smooth, no matter how huge you make it or how close you zoom in. Vector may be saved in the.AI ,.SVG ,.PDF, and .EPS file formats.
These forms and figures are known as primitives in computer graphics because they are the most basic figures to which a shape may be broken down. Using graphics software, they may be merged to form more complicated figures. Vector icons software enables businesses to generate and alter pictures. You can utilize mathematical calculations and geometric commands. The vector graphics solutions are primarily concerned with supplying high definition. So, It makes sure that quality is not compromised while manipulating.
The vector format Graphics are used largely as source files for hard-edged graphics, logos, and drawings. This format is often used to generate simpler graphics. These are easy to scale up or down, depending on the application. Vector files must be converted to raster before they can be used on the web or printed, often in.JPG or.PNG format.
Click here to know difference between svg vs png web performance?
How to create Vector and Rasters?
Vector vs. raster graphics design is important to current digital design and imagery. These two main techniques are independent methodologies for representing and processing visual data. These graphics are created using a combination of software tools, creative vision, and technical ability. This investigation delves into the complexities of vector and raster graphics creation. It sheds light on the methodologies, tools, and creative processes that go into each method.
Vector graphics:
Vector graphics are a fundamental component of digital design. It provides an attractive and adaptable method of visual representation. Precision and scalability are kings in the field of vector graphics. This makes them an indispensable choice for a wide range of applications. This investigation digs into the interesting world of vector graphics. It explains the intricate details of their production as well as the distinct benefits they provide in the field of digital design.
Using Vector Design Software: Vector graphics are often made using specialist vector design tools. Some of the tools are Adobe Illustrator, CorelDRAW, Inkscape, etc.
Drawn or Designed Shapes: Mathematical formulae specify forms, lines, and curves that makeup vector graphics. Using the software’s numerous tools, you may draw and alter these forms. These forms are sometimes referred to as “objects.”
Pen Tool and Bézier Curves: The Pen Tool is a must-have in vector drawing software. It helps you to construct accurate pathways and forms by employing Bézier curves. These are mathematical curves specified by control points. By altering the placements of these control points, you may construct and change shapes.
Text and Typography: Vector graphics applications include text tools for inserting and manipulating text. One can modify the attributes of text, such as font, size, and style. It is considered as a vector object.
Scalability: One of the key benefits of vector graphics is its scalability. You can resize vector graphics without loss of quality. The mathematical specification is the reason behind it. As a result, these are great for logos, SVG icons, and images. You will require them in a variety of sizes while working on the project.
0 notes
Text
VeryUtils EMF to Vector Converter Command Line Software can be used to convert from EMF and WMF Metafile files to PDF, Postscript, EPS, SVG, SWF, XPS, HPGL, PCL, TIFF, JPG, BMP, PNG, GIF, etc. formats.
VeryUtils EMF to Vector Converter Command Line Software can be used to convert from EMF and WMF Metafile files to PDF, Postscript, EPS, SVG, SWF, XPS, HPGL, PCL, TIFF, JPG, BMP, PNG, GIF, etc. formats.
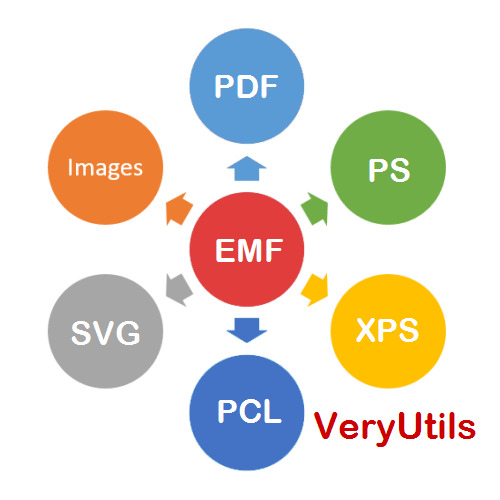
Are you tired of struggling with incompatible file formats and the loss of vector and text information during conversions? Look no further! VeryUtils EMF to Vector Converter (EMF2Vector) is your comprehensive solution for converting enhanced metafiles (EMF) and Windows metafiles (WMF) into a wide array of vector and raster formats while preserving their original quality. Let's dive deep into the features and benefits of this versatile software.
Transforming enhanced metafiles (EMF) and Windows metafiles (WMF) into an array of vector formats while preserving their core vector and textual attributes, VeryUtils EMF to Vector Converter (EMF2Vector) is your solution. With the ability to convert EMF and WMF files into formats like PDF, WMF, EMF, PS (Postscript), EPS, SVG, SWF, XPS, HPGL, and PCL, this software opens doors to seamless vector compatibility.
But it doesn't stop there. VeryUtils EMF to Vector Converter (EMF2Vector) is not limited to vector formats alone. It gracefully transitions EMF and WMF files into raster image formats, including BMP, GIF, JPEG, PNG, TGA, PCX, PNM, RAS, PBM, and TIFF, to cater to a broader spectrum of graphic needs.
EMF2Vector doesn't just cater to individual conversions; it's a versatile tool for batch conversions as well. Whether you prefer a user-friendly interface or the efficiency of batch mode, it can efficiently handle large volumes of EMF and WMF files in real-time. What's more, it's accessible through COM objects, DLL libraries, or Command Line, ensuring seamless integration into various programming and scripting languages such as Visual Basic, C/C++, Delphi, ASP, PHP, C#, .NET, and more. Whether you're processing files consecutively or simultaneously, EMF2Vector has your back.
✅ Effortless Format Conversion
EMF2Vector takes the hassle out of file conversion. It effortlessly converts EMF and WMF files into an impressive list of vector formats, including:
Output Vector formats:
•PDF: Adobe Acrobat PDF format
•PS: Postscript format
•EPS: Adobe Encapsulated PostScript
•WMF: Windows Metafile
•EMF: Microsoft Enhanced Metafile (32-bit)
•SVG: Scalable Vector Graphics
•SWF: Macromedia Flash File Format
•XPS: Microsoft XML Paper Specification
•HPGL: HP-GL plotter language
•PCL: HP Page Control Language, Printer Command Language Format (PCL)
✅ But that's not all! EMF2Vector can also convert EMF and WMF files into popular raster image formats, such as:
Output Raster image formats:
•JPEG: Joint Photographic Experts Group JFIF format
•TIFF: Tagged Image File Format
•BMP: Microsoft Windows bitmap
•GIF: CompuServe Graphics Interchange Format
•PNG: Portable Network Graphics
•PCX: ZSoft IBM PC Paintbrush file
•TGA: Truevision Targa image
•PNM: Portable anymap
•RAS: SUN Raster Format
•PBM: Portable bitmap format (black and white)
•And more!
No matter your desired output format, EMF2Vector has you covered.
✅ Seamless Batch Conversion
VeryUtils EMF to Vector Converter (EMF2Vector) is designed to handle both individual file conversions and large-scale batch processing. Its intuitive user interface allows you to convert files with ease. Plus, the software can run in batch mode, enabling you to process substantial volumes of EMF and WMF files in real-time. Whether you're a casual user or a power user dealing with extensive data, EMF2Vector adapts to your needs.
✅ Developer-Friendly Integration
Developers, rejoice! EMF2Vector is available as an easily integrated COM object, DLL Library, or Command Line tool. This means you can access the converter via your preferred programming or scripting languages, including Visual Basic, C/C++, Delphi, ASP, PHP, C#, .NET, and more. You have the flexibility to perform file conversions consecutively or simultaneously, adding efficiency to your workflow.
✅ Industry-Standard Output Formats
EMF2Vector converts EMF and WMF files to a range of industry-standard formats. By retaining the vector nature of the graphics, you gain a competitive edge when importing these files into your publishing system. Whether you're in CAD architecture, business diagramming, GIS cartography, chart and graph creation, scientific plotting, or vector artwork, EMF2Vector empowers you to deliver superior results.
✅ Licensing Options
Choose the licensing model that suits your needs:
•Server License: Licensed per Production Server, perfect for integration into ASP, PHP, C#, .NET, and other server-side applications.
•Developer License: Licensed per Developer with Royalty-Free Runtime Desktop Distribution, allowing installation on any number of servers or computers.
✅ Key Features for EMF and WMF to Vector Conversion
VeryUtils EMF to Vector Converter (EMF2Vector) stands out with its exceptional features:
•Standalone Software: No need for Adobe Acrobat or Adobe Reader; EMF2Vector is a self-sufficient solution.
•Multilingual Support: Available in a wide range of languages, including English, French, German, Italian, Chinese Simplified, Chinese Traditional, Czech, Danish, Dutch, Japanese, Korean, Norwegian, Polish, Portuguese, Russian, Spanish, Swedish, Thai, and more.
•Direct Integration: Easily import converted graphics files directly into your target applications.
•Optimized for Various Fields: Ideal for CAD architecture, business diagrams, GIS cartography maps, charts and graphs, scientific plots, vector artwork, and beyond.
•Font Preservation: Convert embedded fonts into Polylines within the vector graphics formats.
•Versatile Output: Convert EMF and WMF files into various vector graphics and raster image formats.
•Batch Processing: Seamlessly integrate high-volume batch conversion into your server-based applications or workflow.
•Customization Options: Specify width, height, X resolution, Y resolution, color depth, rotation options, and more for your image format conversions.
•Unicode Support: Preserve Unicode characters during EMF and WMF conversion.
•Platform Compatibility: Compatible with Windows platforms, including Win98, ME, NT, 2000, XP, 2003, Vista, 7, 10, 11 and later systems, support both 32bit and 64bit systems.
•Automated Viewing: View created files automatically.
✅ Special Features for EMF and WMF to PDF Conversion
VeryUtils EMF to Vector Converter (EMF2Vector) offers a host of advanced features when converting EMF and WMF files to PDF:
•Direct PDF Conversion: Convert EMF & WMF to PDF directly, without relying on any printer driver products.
•Compact PDFs: Produce PDF files with the smallest possible file size.
•Batch PDF Creation: In batch conversion, merge multiple document files into a single PDF or convert each document file into its own PDF.
•Password Protection: Secure your PDF files with 40 or 128-bit encryption, including "owner password" and "user password" protection options.
•Document Metadata: Set document title, subject, author, and keywords for enhanced PDF organization.
•Wildcard Support: Utilize wildcard characters (e.g., *.emf, *.wmf) for versatile file selection.
•Command Line Efficiency: Execute batch and unattended operations using the command line interface.
•Text Searchability: Ensure that produced PDF documents are fully text-searchable in Adobe Reader.
•Dynamic PDF Conversion: Integrate EMF and WMF to PDF conversion into web-based applications for real-time dynamic conversion.
•PDF Manipulation: Merge multiple PDF files into a single PDF, merge from a text file listing filenames, append or insert EMF and WMF files into existing PDFs, burst multi-page PDFs into single-page PDFs, and insert bookmarks into PDF files.
✅ Experience the Power of EMF to Vector Conversion
Unlock the full potential of your EMF and WMF files with VeryUtils EMF to Vector Converter (EMF2Vector). Whether you're a designer, developer, or professional working across diverse fields, this software provides the flexibility, efficiency, and quality you need for seamless file conversion. Say goodbye to compatibility issues and hello to a world of possibilities.
Try EMF2Vector today and discover how easy it is to transform your EMF and WMF files into versatile vector and raster formats!
✅ Custom Development Service
Discover the power of customization with our VeryUtils EMF to Vector Converter Command Line software custom development service. We understand that every organization has unique needs, and that's why we offer tailored solutions to meet your specific requirements. Whether you need additional features, specialized integrations, or unique functionalities, we have the expertise to modify our software to align perfectly with your objectives. With our custom development service, you can harness the full potential of VeryUtils EMF to Vector Converter, ensuring it becomes an invaluable asset that seamlessly integrates into your workflows and delivers precisely the results you envision. Let us transform our software to suit your needs, empowering you with a powerful tool that caters to your unique demands and accelerates your productivity.
If you are interested in purchasing this software or developing a customized software based on it, please do not hesitate to contact us.
We look forward to the opportunity of working with you and providing developer assistance if required.
0 notes
Text
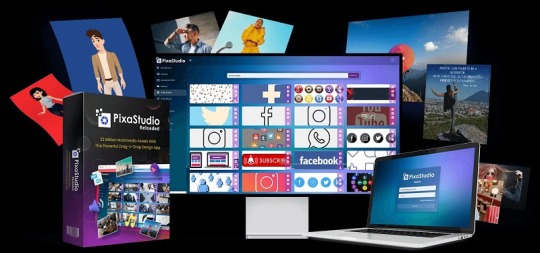
PixaStudio-Reloaded Commercial
PixaStudio-Reloaded Commercial information.Start Your Own 6-Figure Design Agency Business In Minutes Using World’s First A.I Based Drag-n-Drop Design App With Over 22 Million+ Multimedia Assets For A Low One Time Price. OneTime Investment | No Monthly Fees | Commercial License Included.Grab PixaStudio Commercial for Just $27 One Time Payment.PixaStudio Has EVERYTHING You Need.15 Million+ Searchable Images,500K+ Hi-Def Stock Images,Download files in desirable formats (JPG, PNG, JPEG, GIF),Over 2.5 Million Searchable GIFs and Memes,Over 20K Vector Graphics,1-Click Hassle-Free Sharing On Leading Social Media Platforms,3 Million+ Searchable Stock Videos,Over 20K Downloadable Animated Gifs,10GB Cloud Storage to upload and edit your own images and videos,Over 50K Searchable icons and stickers,Photoshop Like Image Editor,Viral Quotes Collection,AI Toonifier (Converts Any Human Face to Cartoon),AI Image Colorizer (Converts Any Black & White Image to Colored),AI Text to Image Generator,Image Background Remover.There are also too many things in the update Pixa studio. For more information please visit :
https://jvz8.com/c/2986437/373089/
PixaStudio #PixaStudio-Reloaded #PixaStudioReloaded #Software #Stockvideo #Socialmediavideo #freevideo #Freeimage #Freesticker #Pixa #Studio
0 notes
Last Seen Blogs

mybeautifulpoland
Poland Photography

bugie78
Fairy Tail Is My Life

opity-blog
passion


attitude-magazine
Attitude Magazine