
rdpshop
RodsShop
One of the best Auto Body repair shops around.
715 posts
Don't wanna be here? Send us removal request.
Last Seen Blogs

chelseahill
chelsea hill

i-canshow-youtheworld
beautiful black goddess

dragonstheninerealms1x4
[Serie TV] Dragons: The Nine Realms Temporada 1 Capitulo 4 Onlin

lilithphx
lilith

mr-beeboo
Good Soup
Text
How To Pack A Wheel Bearing The Old Fashion Way
Learning how to pack a wheel bearing may not seem worth a blog post, but is it? There are tools for packing wheel bearings and I will go over those. However, in this post, I want to look at the old fashion way of packing a wheel bearing.

When you pack a wheel bearing the old fashion way, you actually can ensure it is done correctly. The key on how to pack a wheel bearing, is to ensure no roller is missed getting greased. By hand, you can see where the grease is going. With a tool, not so much.
What is a Wheel Bearing
A wheel bearing is a set of precision-engineered rollers or balls enclosed within a metal ring, known as the race.
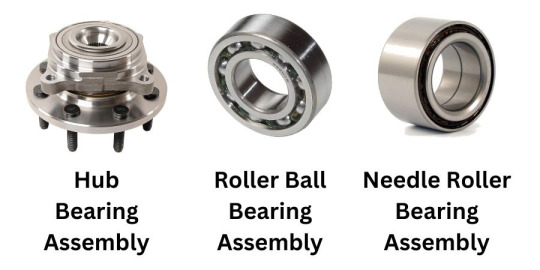
There are several types of wheel bearings today. This article is only covering a tapered wheel bearing a race type. For roller bearings, needle bearings or hub assemblies, this doesn’t apply.
Tapered wheel bearings and race are more common in older cars, before hub assemblies came out. However, they are still in use on many cars today, like on rear drum brakes.
They are most commonly found in various types of automotive wheel hubs, transmissions, differentials, trailer axles, and heavy machinery.
What distinguishes tapered wheel bearings and races is their conical shape. The inner and outer surfaces of both the bearing and race are tapered, allowing them to withstand both radial and axial loads efficiently.
This design enables the bearing to handle the lateral forces experienced during cornering, acceleration, and braking in vehicles.
For wheel bearings, regular inspection and lubrication are necessary to prolong their lifespan and maintain correct lubrication.
What is the Best Wheel Bearing Grease to Use

When others are learning how to pack a wheel bearing on their own. I often get asked what is the best wheel bearing grease to use? I have used a lot of greases and most of them have done just fine.
However, my two favorite wheel bearing greases to use are Timken and Lucas. Both the Timken and the Lucas Red “N” Tacky just seem to hold up and last longer.
When it comes to packing a wheel bearing, you don’t want a grease that is thin and doesn’t adhere. Learning how to pack a wheel bearing, is understanding how grease works.
The primary function of wheel bearing grease is to lubricate the moving parts within the bearing assembly. This reduces friction between the rollers and the bearing races, minimizing wear and heat generation.
By maintaining a thin film of grease between these components, the grease effectively reduces friction, allowing the bearings to rotate smoothly.
Using a thinner cheap grade grease, the heat will break down the lubricating quality and cause the bearing to wear excessively.
The goal is to buy a grease that is designed for higher heats and will stick to the rollers. Low grade grease, will stop adhering to the rollers when they get hot.
Identifying Types of Bearings
As mentioned from above, there are different types of wheel bearings. Ensure that you have a tapered wheel bearing and race type before trying to pack it.
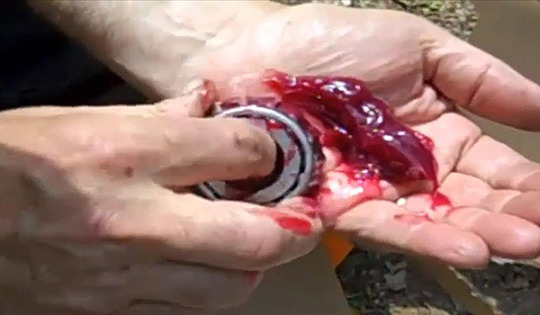
This is the type of wheel bearing you want to pack. NOTE: The bearing is on the left and the race in on the right..

The following are not the type you pack with this method.
How To Pack a Wheel Bearing
I am going to try my best to explain this, but I will say images and the video below will help you best.
Take a medium amount of grease and place it in the palm of your hand. You can use the wheel bearing to scoop some from the tub of grease.
Look at this image to help understand what the goal is.

You will want to take the bearing and scrape the grease into the roller cage a little at a time. Notice how the bearing is tapered. With the narrow side facing up and the wider side facing down. Scrape the grease with the wider side and watch it ooze up through and between the sleeve and roller cage.
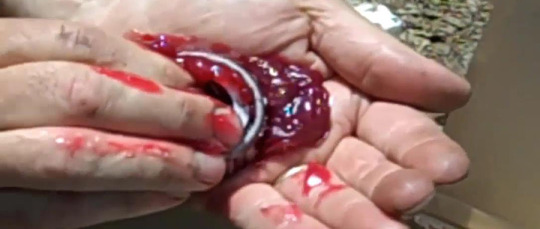
You will rotate the bearing while scraping until you see grease secreting up and out of the top gap. Once the grease is completely oozed through the gap, all the way around, you’re done.
Do not leave any parts of the gap, missing any grease, it has to be even all the way around.
Watch – How To Pack a Wheel Bearing
Wheel Bearing Packing Tools
For every type of vehicle, there are always many different type of tools you will need. Be sure to check out my page, Automotive Tools and Supplies.
Browse my Amazon Store for Wheel Bearing Essentials. Everything you would need to pack a wheel bearing with.
Read the full article
0 notes
Text
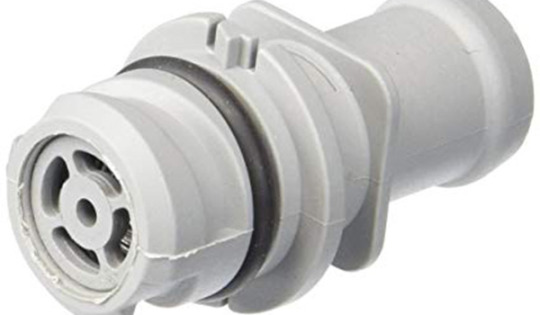
How Does a PCV Valve Work: A How To Guide for Automotive Enthusiasts

How does a PCV valve work? The PCV valve, or Positive Crankcase Ventilation valve, plays a crucial role in protecting your car's engine and ensuring optimal performance. This seemingly small component is responsible for controlling the flow of crankcase gases and regulating the amount of vacuum in the engine. In this article, we'll explain how the PCV valve functions and why it's vital for your vehicle.

To understand the significance of the PCV valve, it's essential to learn about the crankcase gases your engine produces during combustion. These gases accumulate in the engine's crankcase and, if not managed properly, can lead to increased pressure, engine damage, and decreased performance. The PCV valve is designed to release these gases into your vehicle's intake manifold, where they are burned and expelled with the exhaust.
Working in tandem with your engine's vacuum system, the PCV valve is typically a one-way valve that adjusts its opening based on engine load and RPM. This allows the system to provide adequate ventilation, while maintaining optimal vacuum in the crankcase. By understanding the function of the PCV valve, you can ensure your engine stays healthy and delivers the best possible performance.
How Does a PCV Valve Work
Role of the PCV Valve in an Engine
The PCV (Positive Crankcase Ventilation) valve plays a crucial role in maintaining your engine's optimal performance and efficiency. Its primary function is to regulate the circulation of crankcase gases, which are created as a byproduct of the internal combustion process. These gases can accumulate in the crankcase, leading to increased pressure and potential damage to your engine.
By controlling the release of these harmful gases, the PCV valve reduces emission levels and prevents the buildup of toxic substances within the combustion chamber. In doing so, it helps to enhance the overall function and longevity of your engine.
Design and Components
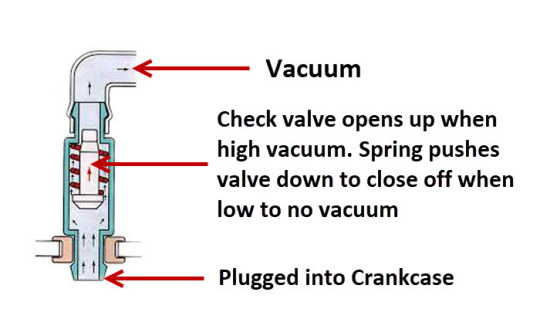
The PCV valve is essentially a one-way valve that connects the crankcase and the intake manifold. It consists of a few key components:
- Housing: A cylindrical case that contains the other valve components.
- Valve: A spring-loaded plunger located within the housing. This plunger is responsible for maintaining a constant vacuum level by opening or closing the connection between the crankcase and the intake manifold.
- Inlet: A connecting port where the crankcase gases enter the valve.
- Outlet: A second connecting port, where the gases exit the valve and travel towards the intake manifold.
When your engine operates at a normal speed, the vacuum created in the intake manifold causes the valve to open, drawing the crankcase gases into the intake manifold. These gases then travel to the combustion chamber, where they are burned along with the air-fuel mixture. This process effectively eliminates the harmful substances, keeping your engine clean and reducing emissions.
In summary, the PCV valve is a vital component in the efficient operation of an internal combustion engine. By effectively managing the circulation of crankcase gases, it maintains engine performance and helps protect the environment from excess harmful emissions.
Impact on Engine Performance
In many cases, a PCV Valve can be defective and many drivers don't even notice, at least not at first. How does a PCV valve work? This is something you should at least have an idea about to help protect your engine. There are tell-tale signs and symptoms that can indicate your PCV valve is failing or has failed. This section will delve into the consequences of a faulty PCV valve and how to diagnose potential issues.
Consequences of a Faulty PCV Valve
A faulty PCV valve can have several negative effects on your engine's performance. Here are some of the most common consequences:
- Increased Emissions: Since the PCV valve is responsible for regulating the release of blow-by gases, a faulty PCV can lead to increased emissions and even black, blue or gray smoke from the exhaust.
- Decreased Fuel Economy: A faulty PCV valve can disrupt the air-fuel mixture, causing the engine to consume more fuel and compromise fuel economy.
- Rough Idling and Engine Misfires: Improperly managed blow-by gases can cause erratic air-fuel mixture, resulting in rough idling and engine misfires.
- Oil Consumption and Sludge: A non-functioning PCV valve can lead to oil leaks, increased oil consumption, and the formation of sludge in the engine.
- Check Engine Light Activation: The vehicle's onboard diagnostics may detect the issue and trigger the check engine light.
Symptoms and Diagnostics
Here are some common signs that your PCV valve might be faulty, and how you can diagnose the issue:
- Poor Performance: If you notice decreased fuel efficiency, rough idling, or engine misfires, it could indicate a problem with the PCV valve.
- Visible Oil Leaks: Inspect the area around the PCV valve for signs of oil leaks. This could indicate that the valve is not functioning properly.
- Increased Oil Consumption: Keep track of your oil levels - if you notice a sudden increase in oil consumption, it could be due to a faulty PCV valve.
- Sludge Buildup: Check for the presence of sludge in the engine, as this can be a sign of a malfunctioning PCV valve.
- Check Engine Light: Use an OBD-II scanner to read any stored diagnostic trouble codes related to emissions or the PCV valve.
Regular maintenance, including inspection and replacement of the PCV valve, can help to ensure optimal engine performance and prevent these issues. Be sure to consult your vehicle's owner manual for specific guidelines related to your make and model. Knowing how a PCV valve works, can increase the life of your engine.
Maintenance and Replacement
Proper Inspection and Maintenance
Regular inspection and maintenance of your PCV valve are essential to ensure its proper functioning and the overall health of your vehicle. You should check the valve, its hoses, and tubes periodically for signs of damage, wear, or clogging.
To inspect the valve, first locate it on the engine, usually near the valve cover gasket. Carefully disconnect the vacuum hose attached to the PCV valve, and remove the valve from its seating. Next, shake the valve gently; if you hear a rattling noise, it often indicates the valve is functioning correctly.
It's also crucial to inspect the attached vacuum hose and tubes for any signs of cracking, hardening, or leaks. Damaged hoses might not allow proper ventilation of the crankcase pressure, resulting in poor engine performance or increased oil consumption.
Additionally, you should pay attention to the appearance and smell of the oil vapors that pass through the PCV system. Excessive sludge or a strong fuel odor could be indicative of a malfunctioning valve or other issues within the engine.
PCV Valve Replacement Process
When it's time for a PCV valve replacement, the process is relatively simple and inexpensive. The average PCV valve replacement cost ranges between $30 and $60, including both the part and the labor charge. However, keep in mind that costs can vary depending on the make and model of your car, as well as labor rates in your area.
- Locate the PCV valve. As mentioned earlier, it's usually found near the valve cover gasket.
- Disconnect the vacuum hose. Be cautious while detaching the hose to avoid causing any damage.
- Remove the old PCV valve. Use a wrench, if necessary, to unscrew the valve from its seating.
- Inspect the valve. Though you're replacing it, double-check for any signs of damage or wear as a good practice.
- Install the new PCV valve. Screw it back into its seating and make sure it's tight and secure.
- Reconnect the vacuum hose. Ensure it's properly fitted to avoid any leaks or malfunctions.
After completing the PCV valve replacement, your vehicle should perform better, with improved fuel efficiency and reduced crankcase pressure. Make sure to continue inspecting and maintaining the system as needed to help maintain the overall performance of your engine.
Most manufactures recommend replacing your PCV Valve every 30,000 miles on the average. It is best to look at your owner's manual or ask a dealership. Some vehicles vary and some vehicles are extremely difficult to change. A 1998 through 2001 Nissan Altima PCV valve is located in the back of the engine. It is in such a place, that it isn't feasible to change. There are some cars that are not obvious but can be changed with some effort, like this Mazda 6.
Conclusion to How does a PCV valve work
It is best practice to ask a garage to inspect your PCV valve whenever you are in for oil changes or other related services. Definitely have the PCV valve replaced at 30,000 miles or to whatever the manual recommends. It is important to note, a clogged PCV valve can blow gaskets. Usually the valve cover gasket is the first to go, but any gasket leaking is dangerous.
Read the full article
0 notes
Text
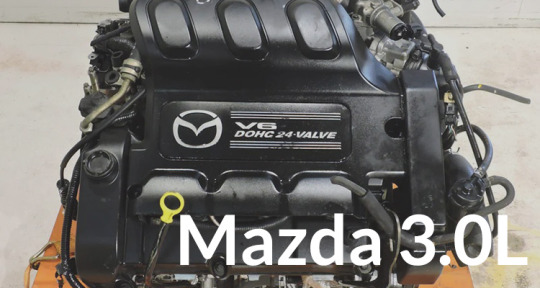
How to Change the PCV Valve on a Mazda 6: 3.0L 04 to 08
How to change the PCV Valve on a Mazda 6 with a 3.0L from 2004 to 2008. You may be wanting to do a thorough maintenance on your Mazda 3.0L and found the PCV Valve isn’t in plain sight. Not to worry, this quick and short article will go over where to find it and how to replace it.

Most people don’t realize how crucial a PCV Valve is. When they stop functioning like the should be, problems can arise. Your car can start using oil and burn it out the tail-pipe, or start blowing gaskets. The PCV Valve balances the crankcase pressure while the pistons are in motion.
Without this valve, the crankcase can build up pressure and cause your gaskets to start leaking. On the other hand, with the valve in the stuck open position, will make your engine to suck oil into the intake and burn oil.
How the PCV Valve on a Mazda 6 3.0L Works

I have mentioned what can happen if it isn’t working properly. However, it can be helpful to know what it does. PCV stand for “Positive Crankcase Ventilation.”
The PCV valve system operates on a straightforward principle. It regulates the pressure in the crankcase. Connected to the intake, it modulates vacuum levels. When the engine is at idle, the vacuum is high. With the high vacuum, the check valve restricts vacuum from being pulled on the crankcase.
As the RPM increases and vacuum drops, the valve opens wider, permitting more pressure into the intake. This pressure and gases then re-enter the combustion cycle, burning off alongside fresh fuel and air. This prevents condensation in the oil, and keeps gaskets from leaking due to pressure.
So, basically, when the engine is at idle or low RPM, the crankcase isn’t under that much pressure. When you increase the RPM’s, the crankcase starts to build pressure. The regulated vacuum, releases that pressure and allow the engine to burn off the excess pressure.
Do not think that a PCV Valve is only for emissions, there are many articles that make that statement. California required this Valve in 1961. Car engines up till then, just vented the oil vapor straight to the atmosphere. By venting straight into the air, you had some pollutants, but you also had oil usage.
The PCV valve just allows the oil vapor to go back into the combustion chamber to be burned. This reduces the number of pollutants released by the engine. However, the PCV also reduces how much oil an engine loses. Learn more about how a PCV valve works reading my article: How Does a PCV Valve Work.
What to Look for With a Bad PCV Valve on a Mazda 6
Most of the time, when a PCV Valve goes bad, the driver doesn’t even notice while driving. What you may notice, is oil puddles under the car, or the car smoking out the exhaust.
It can affect the car’s performance in some instances, but normally not. Depending on the engine, sometimes, although rarely. A defective PCV Valve can cause the engine to misfire, or stumble upon acceleration.
What To Look For If Valve Is Stuck Closed
- Whistling or hissing sound coming from the engine
- Oil leaks, most commonly from the valve cover gasket
- A decrease in your fuel mileage
- Possible “Check Engine Light”. This would be set off if your emission levels are far enough off.
What To Look For If Valve Is Stuck Open
- Excessive oil residual build up around the PCV Valve hose or around the valve cover
- Rough idle or even misfiring, rare possibility in noticing a drop in performance
- Harder to start after the car has sat for a period of time
- Blue, gray or white smoke coming from exhaust pipe, meaning it is burning oil
Locating Your PCV Valve on Your Mazda 6 3.0L

You will find at the very back of the engine, a hose that curves downward. This hose is the PCV Valve hose and the valve is down and below the plenum. You will be removing the hose from the plenum and from the valve itself.
There is a bracket that mounts a module and a wire retainer, remove this with two bolts . This will give you room to move your hand around. Disconnect the small bolts to the module and bracket, and peel them back out of the way. No need to disconnect wires or hoses from this.

Remove the PVC Hose by releasing the clamp and pulling it back. Pull the hose from the plenum and then pull it off the PCV Valve. There is a smaller hose also going to the plenum for you to remove. Looking at the where the PCV Hose goes to the plenum, this next hose is to the right and a little below it. Again, pull and slide the clamp back and pull this hose back and push it out of the way.
You will now have a clear view of the PCV Valve. Using a long pair of needle nose pliers. Grab a hold of the square part of the valve and twist it counter clockwise, while pulling lightly upward.
Using the same pliers, take the new valve and put it back into the hole and twist it clockwise. This all could possibly be done by hand. So, you can try it first with you hand first.
Now reconnect the PCV Hose, then the smaller hose. Put the bracket back to the firewall and you have successfully change a PCV Valve on a Mazda 6 3.0L
Video How to Change the PCV Valve on a Mazda 6: 3.0L 04 to 08
Shop Amazon for parts related to replacing the PCV valve on a Mazda 6.
Read the full article
0 notes
Video
youtube
Toyota Tundra Front Brake Job Made Easy #toyotatundra
0 notes
Text
How To Change Spark Plugs On a Mazda 3.0L V6

In the old days, changing spark plugs on your car, wasn't that big a deal, well not any more. You would think on how to change spark plugs on a Mazda 3.0L V6, wouldn't need a "How To" guide. But here you are, looking into how to accomplish this no so easy task. This article covers the Mazda 3.0L V6 from 2004 to 2008.
The first thing you need to understand. This is one of those jobs where you are doing more than just changing the spark plugs. This job requires some disassembly of the engine. Which means, while you are there, there is other things you should replace while you are at it. Let’s dive into this really fun job and look at what all needs to be done.
What Else to Changing Spark Plugs on a Mazda 3.0L
Here is a quick layout what you will be getting into on changing spark plugs on a Mazda 3.0L. This layout will help you decide now if you even want to attempt it.
Some models of Mazda’s with the 3.0L may be more or less difficult. This article is based on the Mazda 6 and the MPV. Overall, they will all be about the same.
In order to get to the spark plugs on a Mazda 3.0L, you have to remove the upper plenum.
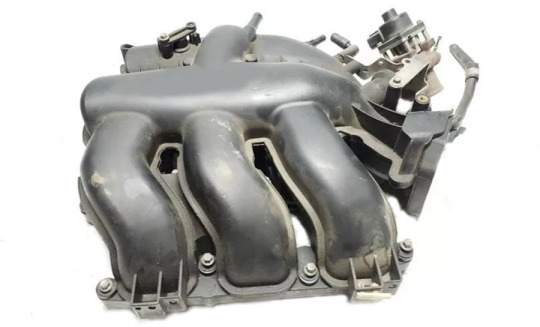
The plenum has to be removed for the rear three spark plugs only. However, this is going to be your hardest task out of the whole project.
In order to remove any of the spark plugs. You first have to remove the coil packs that are mounted on top of the plugs.

There is one more part that should be changed while you have everything apart. The PCV Valve, it is buried below the plenum. If there was ever a time to change the PCV Valve, this is it.
So, you can see, this isn’t an impossible task, but more than just a simple changing of the spark plugs on a Mazda 3.0L V6. All in all, you can do this job, completely unexperienced, in and around 3 hours.
How Often Do Spark Plugs on a Mazda 3.0L Need to be Changed
Many spark plugs today can go 100000 miles before needing to be replaced. However, on the Mazda 3.0L between 04 and 08. The answer would be to replace them every 75000 or every 60 months.
Coil packs can technically go 100000 miles, but there is a catch. When a spark plug starts declining in performance, it causes the ignition system to decline.
Just like in the old days when cars had distributors. When a spark plug starts building up resistance not being able to fire as good as it once did. The ignition backs up into the distributor cap, causing the cap and rotor to burn out sooner.
This applies to coil packs as well. When the spark plug starts to not fire as efficiently, it causes the coil packs to overheat and burn out.
So, as mentioned above, since you have so much to do to change the spark plugs anyhow. Keeping the plugs and the coil packs changed at the same time is the most logical way to go.
Now that you know that how declining spark plugs on a Mazda 3.0L can wear down the coil packs. I hope you understand why it is important to change both at the same time.
Always Replace in Pairs and Sets
There are some shops that shouldn’t even be in business, that will change just the failing plug or coil pack. Do not follow their practice of this stupid mindset.
Always change tune-up parts in pairs or sets. Meaning, no matter how many cylinders your engine has. Replace all spark plugs as a set. This includes coil packs or spark plug wires as well.
Understand, if one plug is starting to fail, that just means the others are right behind it. Imagine the expense on an engine like this Mazda 3.0L. Where you have to spend 3 hours to remove the plenum each time to replace the rear spark plugs.
It makes no sense to replace any parts like for tune-ups or brakes or even headlamp bulbs, one at a time.
You can learn more about this by reading my article on “Buying in Pairs to do the Job Right.”
In the old days, changing spark plugs on your car, wasn't that big a deal, well not any more. You would think on how to change spark plugs on a Mazda 3.0L V6, wouldn't need a "How To" guide. But here you are, looking into how to accomplish this no so easy task. This article covers the Mazda 3.0L V6 from 2004 to 2008.
The first thing you need to understand. This is one of those jobs where you are doing more than just changing the spark plugs. This job requires some disassembly of the engine. Which means, while you are there, there is other things you should replace while you are at it. Let’s dive into this really fun job and look at what all needs to be done.
What Else to Changing Spark Plugs on a Mazda 3.0L
Here is a quick layout what you will be getting into on changing spark plugs on a Mazda 3.0L. This layout will help you decide now if you even want to attempt it.Some models of Mazda’s with the 3.0L may be more or less difficult. This article is based on the Mazda 6 and the MPV. Overall, they will all be about the same.In order to get to the spark plugs on a Mazda 3.0L, you have to remove the upper plenum.
The plenum has to be removed for the rear three spark plugs only. However, this is going to be your hardest task out of the whole project.In order to remove any of the spark plugs. You first have to remove the coil packs that are mounted on top of the plugs.
There is one more part that should be changed while you have everything apart. The PCV Valve, it is buried below the plenum. If there was ever a time to change the PCV Valve, this is it.So, you can see, this isn’t an impossible task, but more than just a simple changing of the spark plugs on a Mazda 3.0L V6. All in all, you can do this job, completely unexperienced, in and around 3 hours.
How Often Do Spark Plugs on a Mazda 3.0L Need to be Changed
Many spark plugs today can go 100000 miles before needing to be replaced. However, on the Mazda 3.0L between 04 and 08. The answer would be to replace them every 75000 or every 60 months.Coil packs can technically go 100000 miles, but there is a catch. When a spark plug starts declining in performance, it causes the ignition system to decline.Just like in the old days when cars had distributors. When a spark plug starts building up resistance not being able to fire as good as it once did. The ignition backs up into the distributor cap, causing the cap and rotor to burn out sooner.This applies to coil packs as well. When the spark plug starts to not fire as efficiently, it causes the coil packs to overheat and burn out.So, as mentioned above, since you have so much to do to change the spark plugs anyhow. Keeping the plugs and the coil packs changed at the same time is the most logical way to go.Now that you know that how declining spark plugs on a Mazda 3.0L can wear down the coil packs. I hope you understand why it is important to change both at the same time.
Always Replace in Pairs and Sets
There are some shops that shouldn’t even be in business, that will change just the failing plug or coil pack. Do not follow their practice of this stupid mindset.Always change tune-up parts in pairs or sets. Meaning, no matter how many cylinders your engine has. Replace all spark plugs as a set. This includes coil packs or spark plug wires as well.Understand, if one plug is starting to fail, that just means the others are right behind it. Imagine the expense on an engine like this Mazda 3.0L. Where you have to spend 3 hours to remove the plenum each time to replace the rear spark plugs.It makes no sense to replace any parts like for tune-ups or brakes or even headlamp bulbs, one at a time.You can learn more about this by reading my article on “Buying in Pairs to do the Job Right.”
Read the full article
0 notes
Text
Unmasking the Sources of Stress: Your Guide to a Balanced Life
Today we’ll look at unmasking the sources of stress. We’ll guide you through the process of recognizing the factors that contribute to your stress levels. Offering insights into how to regain control over your life and find balance. In today’s fast-paced world, stress has become an inevitable companion in our lives. However, the key to managing stress effectively lies in identifying its sources…

View On WordPress
0 notes
Text
How to Remove Door Handles on VW Beetles: 1998 to 2010

Learn how to remove door handles on VW Beetles from 1998 to 2010. Do you need to remove your exterior door handle on your 6th Generation VW Beetle? This is a quick article to help anyone who is looking how to accomplish this project. You will find images and a video included in this article.

In many ways, the way exterior door handles on cars today, are easier to get off than they used to be. Many of the cars up to around the late 90’s, required removing the door panel to remove the door handle. Even though this article is about how to remove door handles on VW Beetles. The method is very similar with other makes and model cars today.
Reasons For Removing VW Beetle Door Handles
You probably already have your reason for needing to remove your door handle. It could be to replace it because it is broke, or you may need to improve its operation. I just wanted to go over a few things first. If you are looking to improve the operation by lubrication, there is very little to lube.
With the door handle end out, which will be covered later. You can see some of the mechanics of that make the handle work. You can spray some white lithium grease on these parts but let me ask you this. Is the handle stiff or hard to pull out or does the door act like it is stuck a little?
If it feels like it is sticking, look for the latch area. Spray white lithium grease up inside the latch area and see if that solves the issue. This is kind of a common issue with this generation VW Beetle. The key-lock cylinder can also need lubrication. I would recommend a graphite lubricant down inside where the key goes.

You may be replacing the door handle due to damage or repainting. If you are repainting, be sure not to spray any areas that are the mechanics of the handle. For replacement handles, shop here on Amazon. If you need to paint a new handle or the old one, get matched paint from Automotive Touchup Paints.
How to Remove Door Handles on VE Beetles
This isn’t a really long process and the images and video below will probably serve you best. You do not have to pull the door panel off. Everything is accessible from the outside edge of the door. You will mainly need three tools. A flashlight, a small flat blade screwdriver and a T-20 Torx head socket. The Torx bit will require a ratchet and an extension, so that is five tools in all.
Door Handle Removal Procedure
1. Open the door and look at the end of the door
2. Remove the rubber plug at the end of the door

3. Unscrew the T-20 Torx bolt about half way out – about 2 turns out. You do not have to remove the bolt.
4. Pull the “Handle End” straight out of the door

5. Look for a plastic catch that is hooked to the actual handle, this needs to be disconnected
6. Using a small flat blade screw driver, pop the cable catch out of the door handle
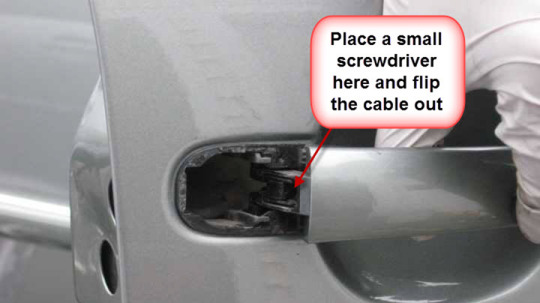
7. Once the cable catch is disconnected, slide the handle towards the rear and the handle will come off from the door
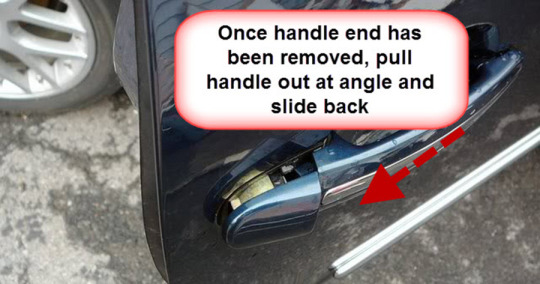

As you can see, you have to pull the handle to the rear of the door and pull out at the same time. The front of the handle is a cradle hook. There is nothing it attaches to; it just sticks into the hole in the door.
To reinstall, just reverse the removal process. I recommend watching the video as well to fully understand the removal and reinstall process.
How To Video
Conclusion
Your biggest obstacle to remove door handles on VW Beetles will be the cable catch. Both on popping it free and hooking it back up. To me, it isn’t that obvious, especially if you have never done one before. On installation, after putting the handle back in. You will need needle nose pliers to pull the catch cable into place. All it takes to hooking it back up, is to snap it back to the handle with your finger. You will find that the removal process is much like a KIA and Hyundai Door Handle Removal.
If you have any questions, be sure to reach out and contact me and I will help you the best I can. Be sure to watch the video as well.
Read the full article
0 notes
Text
How to Make Your Life More Interesting: Tips and Tricks
How can you make your life more interesting? Are you feeling bored with your life? Do you find yourself going through the motions day after day without any excitement or passion? If so, you’re not alone. Many people struggle with the monotony of daily life and crave something more. The good news is that there are simple steps you can take to make your life more Interesting and…

View On WordPress
0 notes
Text
How To Tighten Your Lug Nuts
How to tighten your lug nuts may seem like a really silly topic. However, you might be surprised, how many drivers don't even know how to take a wheel off of a car. There’s nothing really wrong with this. Nowadays, people take their vehicles into a shop or have roadside service. So, we live in a spoiled and catered society and skills are disappearing by the day.
We also live in times where more and more people have to do their own car repairs. Garages hourly rates are climbing and car prices keep soaring. Doesn’t leave to much money left to pay a shop. You would think that tightening lugs nuts would be the simplest thing to do. But you would be wrong, not knowing how to tighten your lug nuts can be a big problem.
How Serious Can Lug Nuts Be
There are many theories on how to tighten your lug nuts, you would be surprised how many of them are wrong. You may hear that you have to tighten a lug nut with all of your might. Another idea is that you just snug them up. Both of those methods are wrong, you kind of need to be in the middle.
Even if you have some mechanical experience and have changed a tire or two. You may not know the correct procedure of tightening lug nuts and the importance of doing it correctly.
If lug nuts are not tightened properly, there are a few things that can happen. The obvious is that the wheel can come off going down the road. However, there are other damaging things that can occur from not knowing how to tighten your lug nuts properly.
If your lug nuts are not tightened evenly, this can warp the wheel, or the brake rotor. The same goes with over tightening them. With the lug nut not tightened enough, you can start losing them while driving. Your wheel can come off as well, which can be highly dangerous to you and others.
By over tightening your lug nuts, can also have a problem if you need to change the tire. I have seen lug nuts that were so tight, even my impact gun couldn’t remove them. Imagine if you were on the side of the road with lug nut that wouldn’t budge loose. Over tightening your lug nuts can also damage the wheel itself. The lug nuts can start rounding out the holes or even crack the wheel.

Issues Caused by Improper Lug Nut Tightening
- Wheel warpage
- Brake rotor warpage
- Damage to the stud holes in the wheel, rounding out the holes
- Cracking the wheel
- Making it impossible to get the lug nut loose
- Losing lug nuts while driving
- Wheel coming off while driving
How To Tighten Your Lug Nuts

The first thing you need to pay attention to is how many holes does your wheel have. This is important because there is a sequence to tightening them based on how many holes.
It is best to tighten at least two lug nuts by hand to help center the wheel and hold it in place. This makes it easier to put the other lug nuts on so you are not constantly fighting the tire movement.
Do not get the lug nut started and then use an impact gun to run them up. This can affect getting the lug nuts evenly tightened in the end.
Once you have all the lug nuts snug, you will need a torque wrench to apply proper torque to each nut. Knowing how to tighten your lug nuts doesn’t mean you have to have a torque wrench. I will explain the other method later.
To use a torque wench, you will need the torque specs. You will also need to know the torque pattern sequence. If your wheel had 5 lugs, then you do what is known as the star pattern. This is the most common.
Go to the Tighten Your Lug Nuts page to get sequence patterns and torque specs.
How To Tighten Your Lug Nuts Video
If you do not find your torque spec for your lug nuts, contact me and I will get your specification and add it to my chart.
Click the button below to be able to view or download, the complete wheel lug torque chart. You will also find the wheel lug torque pattern sequence illustration on this how to page. Additionally, any necessary tools you might need to make tightening your lug nuts or even jacking up the car are added.

Read the full article
0 notes
Text
How To Change Spark Plugs and Coil Packs 04 – 08 Mazda 3.0L

Read the full article
0 notes
Video
youtube
Quick Common Myths About Weight Loss⚖ #weightlosstips
0 notes
Video
youtube
3 Simple Daily Routines to Keep Healthy
0 notes
Video
youtube
How to Replace Front Sway Bar End Link 00-06 Toyota Tundra 🔧 | Stabilize...
0 notes
Text
The Power of Positive Self-Talk: Boost Your Confidence and Achieve Success
Do you ever find yourself stuck in a negative thought pattern? Maybe you constantly criticize yourself or doubt your abilities. It’s easy to fall into this trap, but the good news is that you have the power to change it. Positive self-talk is a simple yet effective tool that can help improve your mental health and overall well-being.
Continue reading The Power of Positive Self-Talk: Boost Your…

View On WordPress
0 notes