withlovecesca
With Love, Cesca
Hello Loves! Welcome to my Tumblr Blog
244 posts
Don't wanna be here? Send us removal request.
Last Seen Blogs
dayplaze
911
theplasticsofdarkness
Plastics of Darkness:
Once Upon a Time
+Mean Girls

michaelwheelerapologist
delusional byler

otra-cuentx
Blog de Pensamientos
tastyspices
My Tasty
Text

Contouring can be a pretty intimidating step in makeup but trust me when I say, it’s the best part of makeup and very simple! Its what sets you apart from the rest. Knowing this technique can be life changing. I have the most fun when I’m doing my face makeup. There’s something about a great base that gets me so excited. Some girls love eye shadow, some love lipstick, I truly love face makeup in general; contour, highlight, foundation, concealer, etc. I live for a beat face and flawless skin! Keep reading to find out my tips on how to slay that contour game!
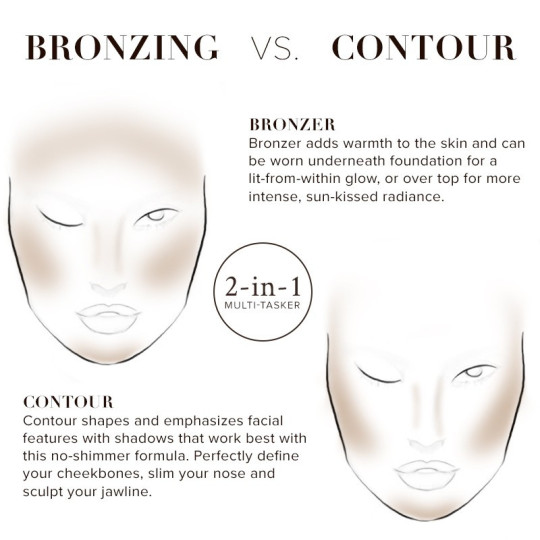
Photo Credits: temptu.com
BRONZER VS. CONTOUR
Before I teach you how to contour, you must be wondering, “what is the difference between contour and bronzer?” Just as the photo above depicts, contouring your face adds shape and dimension in places where a contour shade is applied. Kinda like adding shadows to emphasize certain features you want to draw attention to (e.g. cheekbones, nose, lips) or even mask certain features you wouldn’t want emphasis on (e.g. forehead that looks like a five-head, I’m guilty of this I must admit).
Bronzer on the other hand, simply adds warmth and colour back into your face. You’d apply this where the sun would naturally hit (e.g. temples, cheeks, forehead) and give your face a nice sun-kissed glow. After applying foundation and powder, our face tends to look flat and pale, this is where we add bronzer and contour to bring back that colour and dimension.
I can do a whole video on just bronzer, but you have to stay tuned for that! So make sure to follow me on IGTV because I’m doing a whole series on the “how to’s” and basics of makeup application.

Photo Credits: glossedboutique.com
FACE SHAPE GUIDE
I was quite fortunate to stumble upon this illustration below from “Glossed Boutique” another beauty blogger who has really amazing tips and tricks with illustrations. I’m not really good at that. You can check out her blog post for more information here.
She basically discusses the differences between face shapes. This really helps determine where to contour and where to highlight. You have to remember we all look uniquely different from each other, what I contour might not be exactly what you would like to contour. So finding our what parts of your face is best contoured and highlighted is really important.
Don’t worry! Do not give up just yet, it’s quite simple. Ask yourself these simple questions:
Is my forehead big? – If YES, contour and bronze. If NO, don’t contour just bronze.
Are my cheekbones pronounced? Is there a noticeable line right below my cheekbones? – If YES, simply bronze. If NO, contour and bronze.
Do I wanna emphasize my jaw? If YES, contour and bronze. If NO, bronze only.
Now this isn’t the exact formula to figure things out. I would still suggest trying it out and see what works for you. Remember, it’s just makeup, if it didn’t work out for you you can take it out at the end of the day.
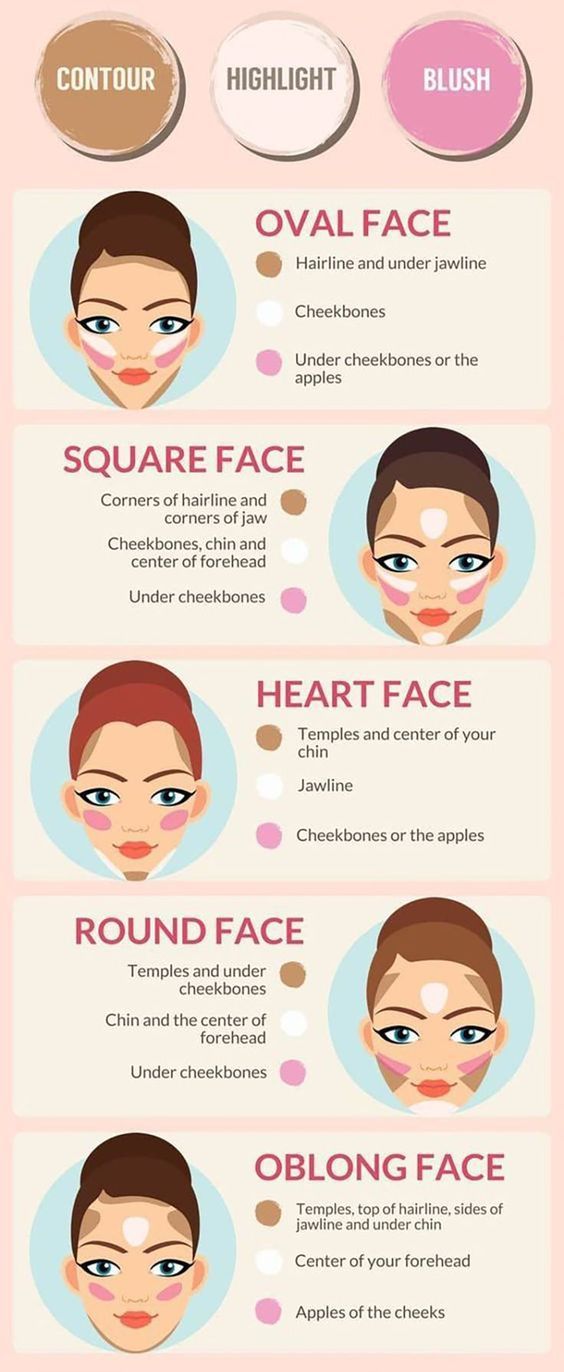
Photo Credits: glossedboutique.com
HIGHLIGHT, CONTOUR & BLUSH GUIDE
Again, another amazing illustration from “Glossed Boutique” above that gives you a guide on where to apply blush, highlight and contour. I wouldn’t say it’s completely accurate, but it’s a good base guide for beginners who have no clue at all.
As we discussed earlier, contour is used to add dimension, bronze for warmth, now what is highlight and blush? Where do you apply that? As a general rule, blush is best applied on the apples of the cheeks. It was designed to give you that illusion of “rosy cheeks”, a flushed and healthy look. I would suggest NOT smiling, coz then when you’re not smiling, the blush would’ve drooped down and that isn’t a flattering look.
Highlighter on the other hand is a completely different story. I would suggest applying this on the high points of your face where the light would normally hit, giving you the illusion of radiant skin. (e.g. Tops of the cheekbones, brow bone, inner corner of the eyes, bridge of the nose, & cupids bow)
I personally LOVE highlight. It gives you that glowing look that is just so gorgeous. I am guilty of applying too much highlight sometimes, but that’s because I naturally have dry skin. It’s that saying of you always want what you can’t have. Oily-skinned people want to look matte, dry-skinned people want to look dewy. The grass isn’t always greener on the other side but in this case highlight is always glowier! (is that even a word? oh well, now it is)
Processed with VSCO with al3 preset
Here’s the look I created on my IGTV showing how I contour and highlight with cream products as well as powder products. Click here to watch!
I love highlighting and contouring with creams! I find that it makes my makeup last so much longer, keeping me looking fresh all day! In my next tutorial I’ll show you a faster technique on how to contour with just powders. Perfect for those of you who would like a quick and easy look!
And that’s pretty much it! I hope you guys learned something about highlight, contouring and bronzing. Remember, it’s just make up! You can take it off at the end of the day. So keep practicing because it’s so much fun!
Thank you guys so much for reading! Subscribe to my Youtube Channel & make sure to follow me on my social media accounts; Instagram & Facebook, that is all @cescamandigma just like my blog name.
As always, all of the love and support is very much appreciated. Until the next post!
With Love,
Cesca ♥
Ever wondered what's the difference between bronzer & contour? Highlight & Blush? Well, here's a guide on how to slay the Highlight & Contour Game! Contouring can be a pretty intimidating step in makeup but trust me when I say, it's the best part of makeup and very simple!
9 notes
·
View notes
Text
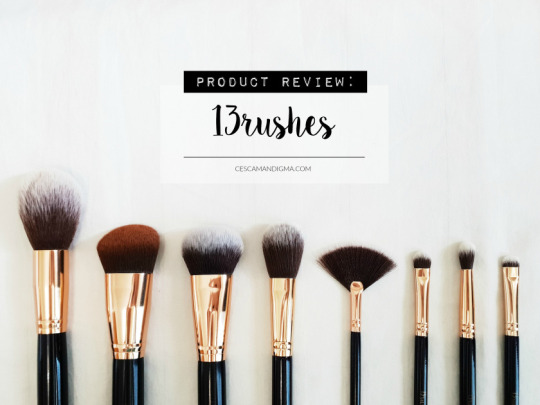
Product Review: 13rushes Brush Line
Product Review: 13rushes Brush Line
Whenever I travel to a new country, the thing that I am most excited about is trying their local brands of makeup. I always do my research prior to my arrival; brands, locations, best sellers, reviews, etc. It helps a lot. Saves time on shopping allowing me to visit the sites, eat local food, and at the same time acquire my versions of souvenirs; makeup.
13rushes was founded in 2013 with a…
View On WordPress
#13brushes#Beauty#brush#brushes#cruelty free#Makeup#makeup brushes#product#Product Review#Review#singapore#Singaporean#synthetic
4 notes
·
View notes
Text

“Even the simplest tools can empower people to do great things…”
That’s exactly how I feel about makeup tools. The biggest mistake you can make when starting out in makeup is to splurge on expensive products without having the right tools to apply them properly. I always say that even the cheapest of makeup can look amazing with just the right brush or sponge. (However, if the product is a complete dud, no brush in the world can save it. LOL) I understand though that makeup brushes and tools can be completely overwhelming with the large variety in the market. Here I have a simplified guide on how to start your own makeup brush set that would fit your own makeup style. I share with you the brushes you’d need, the purpose and my favorites. You don’t have to go out and buy the exact same brush as I mentioned, but at least get something similar that fits the purpose. Are you a Minimalist, an Enthusiast or an Extra? Read more to find out..
WARNING: It’s gonna be a long one, so grab a snack…
NOTE: These sets are meant to compliment my “Must Have Tools” guide. If you haven’t read that yet, I highly suggest checking that out and then coming back to things to really have an overview of how your tools and your brushes can work together. In that post I recommended getting a makeup sponge which is why I no longer mentioned it in this one. The idea is to have all of those tools and build your brushes from there.

THE MINIMALIST – Just like the name suggests, this is for every makeup lover who wants to keep it simple, quick and minimal. However, with this set you can make a complete makeup look if you just know how to use them. Another key thing in making this set work for a complete beat face is to spot clean your brush in between shades/products to avoid making your makeup look muddy. Here’s how to use each brush
1. Multi-Purpose Face Brush | 13rave from 13rushes
PURPOSE: Foundation, Powder, Bronzer, Contour and any other Cream/Powder products for the face
Let me discuss this brush in particular. This has changed my minimalist makeup game so much! It’s absolutely incredible. The idea is to get yourself an angled buffer brush but the reason why I love this one in particular so much is because it’s such an amazing quality brush. The angle isn’t sharp and there’s a bit of a curve at the end so it fits your cheekbones perfectly as well as the other crevices of your face. You don’t have to get this specific brush but if I were to recommend one, this is definitely the top on my list. An alternative would be any angled buffer brush. So many brands have their own kind. Just find one that fits your budget and works for you
2. Concealer Buffer Brush | Zoeva Concealer BufferZoeva Concealer Buffer
PURPOSE: Under eye concealing, spot concealing, detail brush and a small buffer brush.
3. Small Blush Brush | 13rushes Classic Blush Brush
PURPOSE: Blush & Highlight
This brush in particular I suggest would be a small brush and a bit tapered at the tip just so that you can use it to highlight the high points of your face but still be able to blend out your blush.
4. Tapered Fluffy Blending Brush | 13rushes Fluffy Blender
PURPOSE: Transition shade, crease shade and over all eye blender
This brush in particular has to be fluffy yet tapered, meaning there is a little point at the end. That will allow you to blend if needed but also be precise for the crease shades.
5. Shader Brush | Zoeva Luxe Smokey Shader
PURPOSE: All over eye shader and detail brush
6. Smudge Brush | Zoeva Smudger BrushZoeva Smudger Brush
PURPOSE: Under eye smudge brush or tight lining.

THE ENTHUSIAST – I personally don’t like to mix brushes. I have a specific brush for a specific task. If you’ve become like me, no longer a minimalist, and you don’t want to have to spot clean your brush every time you have to switch products/shades then welcome to the enthusiast club! You still have the minimalist essence in you but you’d like to venture out into more tools and looks. You’re ready for more and these are the brushes you’ll be needing to ADD to your Minimalist Set…
(Note: I said adding, let’s just say you came from a minimalist wanting to upgrade to an enthusiast so here you go)
1. Duo Fiber Small Stipple Brush |ELF Small Stipple Brush
PURPOSE: Cream or liquid blending brush
I personally love to blend out my cream contour with this brush. It leaves it looking airbrushed and natural I love it.
2. Large Fluffy Powder Brush | ELF Complexion Brush
PURPOSE: Over-all setting brush or Bronzer Brush
This brush is my ride of die bronzer brush. This is one of the first OG brushes I had when I started makeup and it’s still my absolute favorite!
3. Contour Brush | Morphe E41 Round Deluxe Powder
PURPOSE: Powder Contouring
When starting out with contouring using powders, I always suggest a small round powder brush. It’s the easiest contour brush to start with to avoid looking like you have harsh lines drawn on your face. The small circular buffing motions helps create that chiseled effect without looking too harsh.
4. Fan Brush | ELF Fan Brush
PURPOSE: Nose contour or highlighting
This was my OG nose contour brush. If you’re just starting out in contouring your nose this type of brush will do you wonders. The brush does all the work for you. You can’t go wrong! (Unless you choose the wrong shade, then that’s a completely different problem all on it’s own)
5. Highlight Brush | Morphe M509 Deluxe Pointed Blender
PURPOSE: Highlighting the high points of your face
6. Fluffy Blending Brush | Sigma E40
PURPOSE: Transition shade and over all blender
Gone are the days you’d only need 1 brush for the crease and transition shade. You are about to up your eye look game and use more brushes to get an even more defined look!
7. Crease Brush | Zoeva Luxe Soft Definer
PURPOSE: Blown out crease blend
8. Pointed Crease Brush | Zoeva Luxe Crease
PURPOSE: More precise crease blending and application
9. Fluffy Shader Brush | ELF C Brush
PURPOSE: Brow bone shade application. Under the brow shade definer. Wash of color for the lid

THE EXTRA – CONGRATULATIONS! You’re no longer a beginner, nor an enthusiast. You are a certified makeup addict and welcome to the club! The minimalist makeup just doesn’t work for you and the enthusiast style is not cutting it anymore. You need variety and precision! You’re makeup game is so on point that you can’t do with just a few brushes in your kit. You need it all! Each brush is dependent on what product your going to use, what look you’re going for and what you need to achieve that sharp crisp lines or even that airbrushed makeup look! Here are the brushes that you HAVE to have but not necessarily need…
1. Round/Flat Buffer Brush | Morphe M439
PURPOSE: Powder/Liquid/Cream Foundation
2. Big Powder Brush | Morphe E41
PURPOSE: All over Powder Setting
3. Small Tapered Powder Brush | Morphe M438
PURPOSE: Highlighting & Setting
4. Thin Flat Contour Brush | Nars Ita Kabuki Brush
PURPOSE: Sharp Crisp Contouring
5. Round Blush Brush | Morphe M530
PURPOSE: Airbrush Blush Finish (buff blush in circular motions)
6. Small Crease Blending Brush | Zoeva 224 Luxe Defined Crease
PURPOSE: Detailed transition/crease blending
7. Small Tapered Crease Brush | Zoeva 231 Luxe Petit Crease
PURPOSE: Crease detail
8. Small Detail Shader Brush | Zoeva 237 Detail Shader
PURPOSE: Highlighting Inner Corners of the Eyes or application in small places
9. Pencil Brush | Zoeva 230 Luxe Pencil
PURPOSE: Under eye blending or detail application
10. Liner Brush | Zoeva 317 Wing LinerZoeva 317 Wing Liner
PURPOSE: Upgrade from using an angled brow brush to apply liner
*Phew*
That was definitely a long one…
And that’s pretty much it! I hope this post help you out somehow and gave you more clarity on what brushes you really need and what they’re used for. I know that this part of makeup can be overwhelming especially for a beginner which is why I really tried to make it as detailed as possible with as much information I can give without being too redundant. If you want a tutorial on how to use specific brushes and more techniques just let me know! I think that’s what gonna be the next “Every Makeup Lover’s Guide” topic. Stay tuned for next week’s post. Same time. Same place.
Thank you guys so much for reading! Subscribe to my Youtube Channel & make sure to follow me on my social media accounts; Instagram & Facebook, that is all @cescamandigma just like my blog name.
As always, all of the love and support is very much appreciated. Until the next post!
With Love,
Cesca ♥
Wanna up your makeup game? What kind of makeup lover are you? MINIMALIST, ENTHUSIAST or EXTRA? Check out my latest post to find out! "Even the simplest tools can empower people to do great things..." That's exactly how I feel about makeup tools.
2 notes
·
View notes
Text

Innisfree is a brand that is near and dear to my heart. I love that they use natural ingredients in all their products assuring the highest quality of makeup at a reasonable price. They brand promotes their “green” values across the boarder; from eco-friendly materiels, natural ingredients, to “go green” campaigns such as clean jeju and bottle recycling. It’s really an amazing company that not only talks the talk but actually takes action to maintain their image and values, one that you don’t see often in the market.
Because of that, every time I get a chance to purchase their products I really do. LOL Today I will be reviewing the Innisfree Eye Contouring Stick (Edge). I’ve recently gotten into easy fuss-free makeup (“inis/irritate free” pun intended. LOL) that I figured this might be a good product to try out.
Product Information:
Comes in 5 Neutral Shades
Matter Finish
Easy to Use – highly pigmented and blendable
Multi-purpose Sticks – can be used alone, as an eye shadow base, or even a face contouring stick depending on your choice of color and skin tone
Retail Price: 623Php
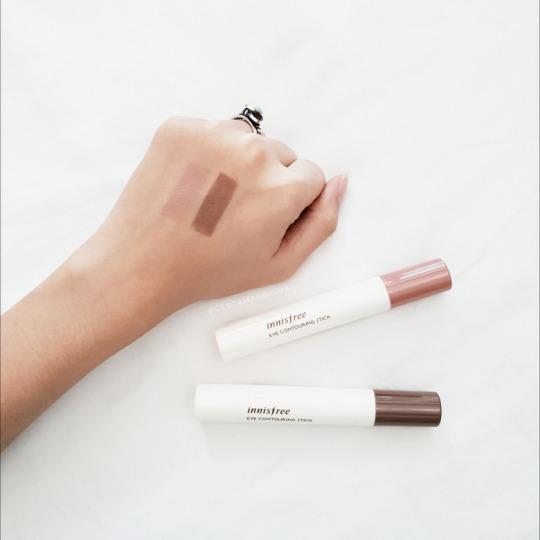
I got the colours 1 & 5 and I really wish I picked up a few more. I have been loving applying 1 on my eyes and just blending it out for a wash of colour and applying 5 as a contour for my crease as well as my nose! It’s really amazing. The best part is if you don’t have oily lids like me you can apply just this on your eyes and you won’t have to set it with another shadow! It’s long lasting, easy to blend and very pigmented! Absolutely worth every penny!
Innisfree can be purchased online. There’s so many websites that sell them; BeautyMNL and YesStyle just to name a few. I normally purchase mine when I travel to Korea or Singapore.
I truly believe make-up should be easy and fun. With a little practice and finding the right products that work for you, I promise, makeup will become second nature even to those who never thought it would. My everyday makeup bag has gotten smaller and simpler because of all these amazing multi-purpose products I’ve been discovering! Can’t wait to share more with you!
And that’s pretty much it!
Thank you guys so much for reading! Subscribe to my Youtube Channel & make sure to follow me on my social media accounts; Instagram & Facebook, that is all @cescamandigma just like my blog name.
As always, all of the love and support is very much appreciated. Until the next post!
With Love,
Cesca ♥
Product Review: Innisfree Eye Contouring Stick Innisfree is a brand that is near and dear to my heart. I love that they use natural ingredients in all their products assuring the highest quality of makeup at a reasonable price.
0 notes
Text
Every Makeup Lover's Guide To: TOP 5 Must Have Makeup Tools You Need to Slay!
Every Makeup Lover’s Guide To: TOP 5 Must Have Makeup Tools You Need to Slay!
Every makeup lover knows that you always have to be ready to slay! However, with the many gadgets, trinkets and gizmos in the market, it’s hard to tell which ones are really necessary and which are optional. With that in mind, I decided to go back to the basics are start the “Every Makeup Lover’s Guide” series on my blog.
This series is dedicated to sharing with you basic tips and tricks on how…
View On WordPress
1 note
·
View note
Text
Things I Loved this May
Things I Loved this May

This month of May has been wonderful for my Blog. I finally my voice again, my inspiration, my purpose. (wow. so dramatic) But kidding aside, it’s true. For a time I just didn’t see the need to continue, however, I couldn’t stay away for too long. I must admit, I missed this. I know now what I did wrong along the way and why I lost all interest and I wanna make sure I don’t do it to myself yet…
View On WordPress
#13 brushes#13brushes#13rave#Beauty#bujo#bullet journal#calypso#canva#Favorites#IG story covers#magic concealer#may#may favorites
1 note
·
View note
Text
10 Best Things I Did for Myself
10 Best Things I Did for Myself

A lot has changed in my life over these past few years; I graduated college, moved to Paris, tried to learn French, learned how to bake, got my MBA and now I moved back to Manila, working full time.
A lot of ups and downs but still staying strong. Aside from the things that have changed, I know in myself that I have changed as well (for the better I hope). There were things in my life, habits in…
View On WordPress
#10 best things#advice#how to be happy#how to be the best#how to feel secure#inspiration#life#life lists#life quotes#Lifestyle#quotes#saving money#self help
0 notes
Text
Mini Review: Japanese Falsies
Mini Review: Japanese Falsies
"Eyes without lashes are like cake without frosting…" . Japan has the most amazing affordable false lashes! They are PERFECT for my eyes! They're fluttery and beautiful, super easy to apply. I also love the fact that most of them are perfectly sized to my small Asian lashes! No need to cut and size down. If you're in the market for falsies definitely try out some japanese brands. These are…
View On WordPress
#airily#eyemazing#false lashes#falsies#i love magic#japanese#jun komori#lashes#mini review#play girl#Product Review#Review#sho-bi
0 notes
Text
Mini Review: Canmake Makeup
Mini Review: Canmake Makeup
"Canmake has consistently enjoyed tremendous popularity with its range of petit-price cosmetics that take the effort out of looking pretty and fashionable…" . This is another japanese makeup brand that I adore. They have the cutest packaging and their products are travel friendly. Very affordable, highly pigmentented, long lasting, and so darn cute! . Perfect Multi-Eyes eyeshadow in 02 All…
View On WordPress
#canmake#eye shadow#eyeshadow kit#japanese#Makeup#marshmallow finish#Matte#perfect multi-eyes#pressed powder#Product Review#quad#Review
1 note
·
View note
Text
"Calypso magic concealer is designed to reduce visibility of various skin concerns such as unevenness of skin surface due to wrinkles, fine lines, pores and acne scars, and uneven complexion like under eye dark circles. Moisturizing ingredients: royal jelly extract, aloe extract, and hyaluronic acid combination…" . ** Salmon beige is recommended for darker skin tone ** Pink beige is recommended for lighter skin tone . The most amazing concealer ever! I first discovered this in 2015, my first trip to Japan, and I have been using it ever since. It was actually an accidental discovery and the packaging caught my eye. (Swipe left to see) I told myself if this concealer can really cover my dark circles then it's really magic. I was not disappointed. For my minimal makeup days I just use this to conceal my under eyes, set it with powder, do my brows and call it a day. I buy mine in #donquijote japan and I normally buy extra to make sure I don't run out. If you have a chance to try this out please do! You will not regret it… . With Love, Cesca ❤ . . . #withlovecesca #beauty #blog #beautyguru #makeup #instamakeup #goals #flatlay #makeupph #makeupguru #makeupblogger #beautyblogger #makeupgoals #photooftheday #instadaily #instabeauty #bloggerph #productreview #blogger #IGblog #japanesemakeup #concealer #calypso #nomakeupmakeup #notsponsored
A post shared by CESCA MANDIGMA (@cescamandigma) on Apr 30, 2018 at 7:22am PDT
“Calypso magic concealer is designed to reduce visibility of various skin concerns such as unevenness of skin surface due to wrinkles, fine lines, pores and acne scars, and uneven complexion like under eye dark circles. Moisturizing ingredients: royal jelly extract, aloe extract, and hyaluronic acid combination…”
.
** Salmon beige is recommended for darker skin tone ** Pink beige is recommended for lighter skin tone
.
The most amazing concealer ever! I first discovered this in 2015, my first trip to Japan, and I have been using it ever since. It was actually an accidental discovery and the packaging caught my eye. (Swipe left to see) I told myself if this concealer can really cover my dark circles then it’s really magic. I was not disappointed. For my minimal makeup days I just use this to conceal my under eyes, set it with powder, do my brows and call it a day. I buy mine in #donquijote japan and I normally buy extra to make sure I don’t run out. If you have a chance to try this out please do! You will not regret it…
.
With Love,
Cesca ❤
Mini Review: Calypso Magic Concealer "Calypso magic concealer is designed to reduce visibility of various skin concerns such as unevenness of skin surface due to wrinkles, fine lines, pores and acne scars, and uneven complexion like under eye dark circles.
#Beauty#brightening#calypso#Concealer#dark circles#full coverage#liquid#magic concealer#Makeup#mini review#Product Review#Review#under eye
0 notes
Text
"Discover the secret key to youthful, radiant skin with a balancing essence that moisturizes and brightens…" – www.sk-ii.com . I've always said that makeup application begins with your skin regiment. My nona (grandma) and momma always taught me the importance taking care of your skin even at a young age. SK-II offers an amazing range of skin care products that are really beneficial for your skin. When I added this award winning facial essence in my skin care routine I immediately noticed the results. My skin has never looked and felt this good. I am now confident enough to go out makeup free. (Swipe to see my #nomakeup #nofilter face but ignore the eye bags. They're stubborn) It's pricey, I must admit, but it's seriously worth it. Should I share a full skin care routine? Let me know… . With Love, Cesca ❤ . #withlovecesca #beauty #blog #beautyguru #makeup #instamakeup #goals #flatlay #makeupph #makeupguru #makeupblogger #makeupgoals #photooftheday #instadaily #instabeauty #bloggerph #productreview #blogger #IGblog #japaneseskincare #sk2 #skiioriginal #beautyblogger #skincare #skincareroutine #notsponsored
A post shared by CESCA MANDIGMA (@cescamandigma) on Apr 26, 2018 at 7:54am PDT
Processed with VSCO with preset
“Discover the secret key to youthful, radiant skin with a balancing essence that moisturizes and brightens…” – http://www.sk-ii.com
.
I’ve always said that makeup application begins with your skin regiment. My nona (grandma) and momma always taught me the importance taking care of your skin even at a young age. SK-II offers an amazing range of skin care products that are really beneficial for your skin. When I added this award winning facial essence in my skin care routine I immediately noticed the results. My skin has never looked and felt this good. I am now confident enough to go out makeup free. (Swipe to see my #nomakeup #nofilter face but ignore the eye bags. They’re stubborn) It’s pricey, I must admit, but it’s seriously worth it. Should I share a full skin care routine? Let me know…
.
With Love,
Cesca ❤
Mini Review: SK-II Facial Treatment Essence "Discover the secret key to youthful, radiant skin with a balancing essence that moisturizes and brightens..." - www.sk-ii.com…
#facial essence#facial treatment essence#japanese#japanese skin care#japanese skincare#mini review#Product Review#Review#SK#sk2#skII#skincare
0 notes
Text
Mini Review: Banila Co. So Contouring Twin Stick
Mini Review: Banila Co. So Contouring Twin Stick
"Contains Chamomile extract to control the excess secretion of sebum, Damask Rose extract that prevents the loss of skin moisture. It is also infused with Rose Hip oil which improves the color pigmentation of the skin…" . I love makeup products that is also good for your skin. #banilaco is another brand I love from #korea. This So Contouring twin stick in Light Brown is my absolute favorite…
View On WordPress
0 notes
Text
Mini Review: Too Cool for School Art Class By Robin Contour, Blush & Highlight
Mini Review: Too Cool for School Art Class By Robin Contour, Blush & Highlight
"Too cool for school's art class by Rodin, a product inspired by Rodin's world of art is designed to aptly render subtle outlines and accentuate distinct features…" . When I first got this product I didn't know much about it I saw it in store and I figured I'd give it a shot. For a time it became my favorite combo! It gives such a natural effortless look. Unfortunately I broke my blush 😔…
View On WordPress
#art class#Beauty#blush#by robin#contour#highlight#kbeauty#mini review#Product Review#Review#Too Cool for School
0 notes
Photo

Mini Review: Too Cool For School Concealed Créme "Conceal don't feel, don't let it show..." . Okay, so sometimes there's really no perfect quote to go with a post.
0 notes
Text
Product Review: Kiss Me Heroine Make Long & Curl Super Waterproof Mascara
Product Review: Kiss Me Heroine Make Long & Curl Super Waterproof Mascara
Hello Loves!
I’m back with a product review on something that has got to be my favorite find at the moment! It has also been my ride or die product of all time! Nothing has beat this yet! As you can tell by the title I am reviewing the Kiss Me Heroine Make Long and Curl Super Waterproof Mascara and the Kiss Me Heroine Make Volume and Curl Super Waterproof Mascara. (Those product names are so…
View On WordPress
#Beauty#japanese makeup#japanese makeup brands#japanese mascara#Kiss Me Heroine Make#lengthening mascara#long and curl#Makeup#mascara#Product Review#volume and curl#volumizing mascara#waterproof mascara
0 notes
Text
Product Review: Moonshot Jelly Pot
Product Review Alert: Moonshot Jelly Pot
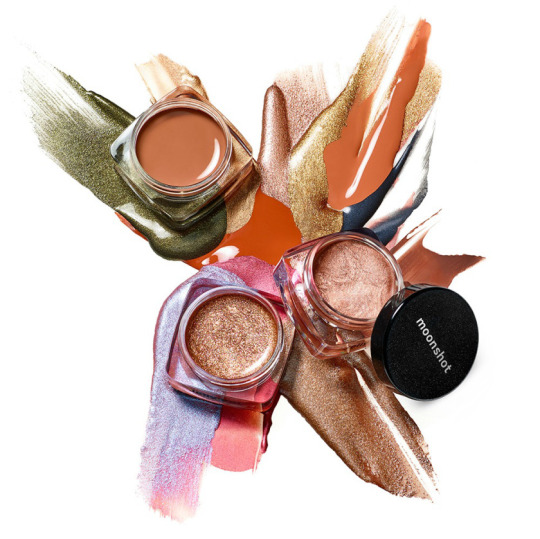
Korean Makeup and US Makeup are on opposite ends of the spectrum. They’re completely different! Kon! You have heavy contour, baking, intense highlight and so on. To keep it short and sweet, Korean makeup is a lot simpler in terms of application.
I taught myself to do makeup based on the western trends (basically the complicated version LOL). I have however, tried to venture into Korean Makeup.…
View On WordPress
#cream shadow#Easy Makeup#eye shadow#jelly pot#Makeup#moonshot#moonshot cosmetics#Product Review#quick makeup
0 notes
Text
VLOGMAS DAY 9: DRUGSTORE SHOPPING!!!
Hi Loves! Come join me on vlogmas day 9 as I attempt to shop for the 1,000Php makeup challenge! It was a lot more difficult than I thought it was LOL See how I did and watch the vlog! Make sure to catch up on the other episodes! STAY TUNED! EVERY NIGHT 9:00PM (UCT+8:00) FOR NEW EPISODES! Subscribe to my Youtube Channel and hit the…
View On WordPress
#1k challenge#1k peso makeup challenge#challenge#haul#Makeup#makeup challenge#makeup haul#vlogging#vlogmas#vlogmas 2017
0 notes