#you better like this i used adobe photoshop to make them nicer
Text
as promised…


#you better like this i used adobe photoshop to make them nicer#bloody bloody andrew rannells#andrew rannells#barbie movie#broadway#barbie 2023#barbie#barbie movie poster#tony awards
179 notes
·
View notes
Text
Fundi's Review/Reflection
In this course we have covered a range of different things, focusing in on the 3 different types of software that we need to learn and become masters at, for this overall course. Those three softwares are Adobe Photoshop, Adobe Illustrator and Adobe InDesign. I have had a decent amount of experience in Illustrator and Photoshop from past courses so I was already familiar with a large amount of these things learnt though there was a lot of helpful things still. To give a brief description of these two softwares, Photoshop is very useful for doing things like image adjustments and editing because of the fact that PS works in pixels whereas Illustrator is very handy for creating graphics from paths, shapes and text as Illustrator works with Vectors. You can also work between the two to create even nicer looking graphics. The last software we learnt was InDesign, in which I had had absolutely no experience with so this was the first time i had used it. It is very helpful to make layouts and spreads and format them nicely.
In each of these software apps, we learnt specific process and functions with-in each of them respectively which will all be very useful in our courses overall. Some examples of these functions that were learnt in Photoshop that are useful in image adjustments are the Curves, Hue/Saturation and Color Balance menus. We learnt and experimented with these menus to familiarise ourselves with how to use them and what to use them for. Other useful PS functions that we looked at were the use of masks, the use of layers and how to use them, smart objects and object selection to name some of the more important skills. Some of the functions that were learnt in Illustrator was the use of anchor points and handles, how to draw paths more specifically curved paths, how to make shapes and color them as you wish from these paths or just in general, and what I feel is extremely important skill to have in AI, the use of the pen tool. Finally some of the useful things we learnt in InDesign was how to make, edit and apply paragraph/character styles, how to use images in InDesign and what you can do with them (as it is not the same as the other two softwares) and, how to use columns/parent pages when making a spread. I also became familiar with a large amount of new Keyboard shortcuts in each of these applications
Though I am overall quite happy with how this course has gone, there has still been a few problems along the way and a few things I could have done better. One main thing that I could have done better was managing my time especially with going away and being absent from a few classes which has always been a bad habit of mine. I mean this in terms of writing these tumblr posts directly after the lesson instead of letting them build up for a few weeks as this is what I had done a few times throughout this course finding myself procrastinating trying to write that weeks blog post, and I was also adamant to have my posts in order so most of my posts sat in my blog archive until I had done missed homework tasks in between class work posts. Another thing I wish I could have done better would be to have spent more time on a few of the homework tasks as I have quite obviously rushed one or two of these and have now no time togo back and do a better job of them. Something that I feel like I have done well in this course that I have not done well in the past was the management of my files in my folders, I feel I kept these folders neat and orderly making it easy to go back and find any files that I need.
I feel like I have gained a large amount of knowledge from this course though and have a whole new skill set for my courses to come. If I was to choose a part that was most useful for me personally, I would probably say the InDesign section, more specifically the formatting parts of this in terms of paragraph styles and parent pages as I had never used this app before and we were required to use it for one of our DT1 projects so learning all these things just before starting this project I found extremely useful. Thanks
0 notes
Note
Hiii I love your name's post and I kinda want to learn how to do this edit but I can’t find a tutorial anywhere so if you could give small tip or where to find a tutorial or app or whatever I would appreciate it
omg hi thank you!! it’s so nice that you like them!
so i’m not super great with technology and there’s probably a better way than what i do to make them, but i’m lazy, so I’ve just got a google slides presentation where i put each image as the slide background and then put the font over it before screenshotting each slide and putting them all in a tumblr post.
I usually edit the photos first, and they should be cropped to have a 16 x 9 aspect ratio so they can fit nicely on the slide (you can also change the dimensions of the slide itself if you want the pictures to have different dimensions, but 16 x 9 is what works best for me). You can crop photos to 16 x 9 really easily on an iphone or ipad (i don’t know about other kinds of devices, but i’d imagine it’s not super hard). I personally use adobe photoshop on my ipad, just because it has more advanced settings to make the photos look nicer, but you could definitely just do the editing on an iphone if it’s easier for you!
hope this helps!! <3
1 note
·
View note
Text
15+ Figma Plugins to Help You Design Better
Figma, the second most-used tool for designing user interfaces (and the first most-used tool when counting only Windows OS), has really taken the digital design industry by storm lately, with even Adobe XD shipping their own version of Figma’s multiplayer feature (naming it “coediting”).
However, the hot topic at Figma right now is the release of plugins — extensions that Figma users can install on Figma to allow for extra functionality or to improve their design workflow.
Let’s take a look at some of the best Figma plugins so far.
1. Arrow Auto (create user flows)

Arrow Auto adds flowchart functionality to Figma, which is useful for creating user flow maps. Select any two objects on the canvas and Arrow Auto will enable you to draw a connector between them. You can also hide and show the flows on demand.
Autoflow is a decent (and maybe nicer looking) alternative, but Arrow Auto has more features, including the ability to switch connector directions and also move connected objects around while keeping connectors intact.
2. Angle (utilize device mockups)

Angle allows you to display your screens (i.e. artboards) from within a number of realistic or matte-effect device frames that each come with a variety of angle options and shadow styles.
Impressively, they’re 100% vector as well.
Artboard Studio isn’t quite the same thing, as it allows for inserting a whole bunch of random 3D objects onto the canvas (like a kiwi, for example). If you only care about device mockups, I’d install Angle. Vectory 3D is similar to Artboard Studio, but it outputs actual 3D assets.
3. Master (manage components more easily)
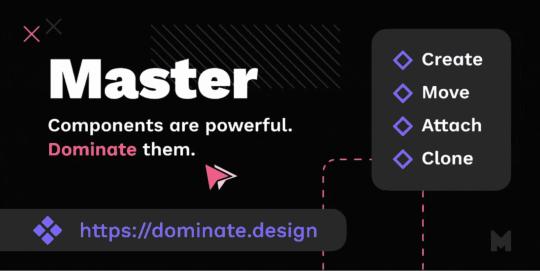
Master offers a better way to manage components, such as the ability to turn multiple identical objects into a component, duplicate components into other Figma files, and much more.
4. Clean Document (auto-clean documents)
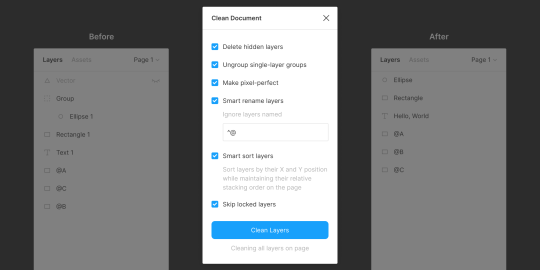
Clean Document, well … cleans your document! It deletes hidden layers, sorts them intelligently, renames them according to your liking, ungroups single-layer groups, and even rounds dimensions to the nearest pixel. A terrific tool for obsessive neat freaks!
5. Similayer (select similar layers)

Quite simply, Similayer allows you to select layers based on their similarity to the layer that’s currently selected. Let’s say that you wanted to change a shadow style that’s being used on a number of different elements: Similayer could do that.
You could also use it to batch-reassign multiple components.
6. Viewports (change the viewport)
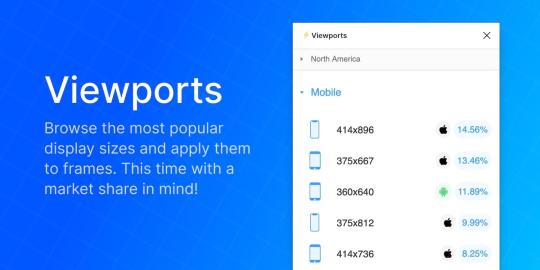
Find out the correct market share of all viewport dimensions, then apply them to frames. It’s insane how useful this is!
Viewport data is live-sourced from StatCounter.
7. Todo (create todo lists)

There are dozens of terrific todo lists, but this one exists within Figma. It’s not designed to replace your everyday todo list, but it’s a more convenient way of keeping track of your design-specific todos without needing to leave Figma. Have a list of changes to make? Need to establish priorities?
If so, install Todo.
8. Font Scale (establish a font scale)
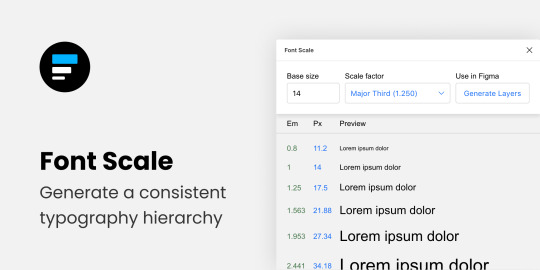
Establish a visually consistent/hierarchical font scale by choosing a base size and scale factor, then save the results to your document for continuous reference (as either em or px).
9. Content Reel (insert better-than-lorem-ipsum content)
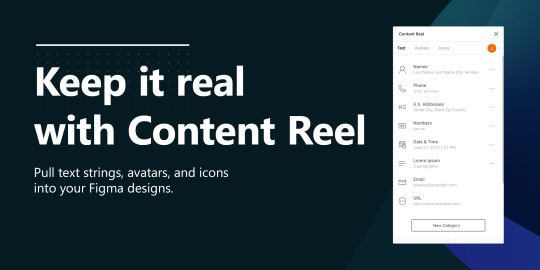
Content Reel inserts “real” content into your design. Need a quick address? Or an avatar? For some reason can’t think of a single name when you need one? Content Reel has your back.
Designing with real data ensures that the design doesn’t look odd once developed, and also helps us to design for edge cases.
10. Google Sheets Sync (sync data from Google Sheets)
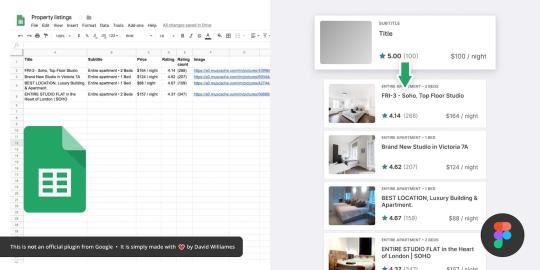
Whether your app has an API or you just want to create a table of data manually, Google Sheets Sync will basically allow you to sync this data directly into Figma. It’s like Content Reel, but instead you define the data yourself. It’s useful for designers that want to build ultra-realistic mockups with data from their actual niche (or live application), and it’s especially useful for teams that want to design using the same library of data.
11. Chart (create “real data” charts)
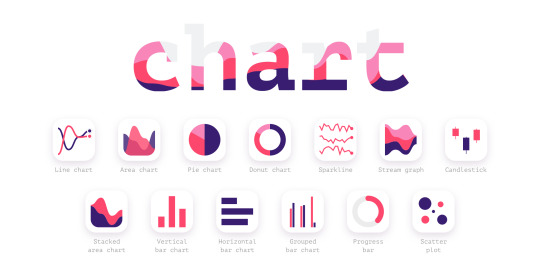
Create stunning, customizable charts with data from Excel, Numbers, Google Sheets, or simply import a local CSV or JSON file. Datavizer is suitable alternative, but Chart can also sync with live JSON (i.e. you can connect Chart to a REST API).
12. Iconify (utilize icon fonts)
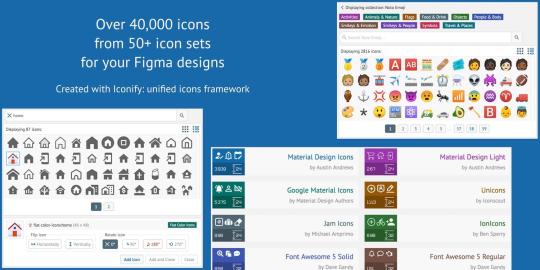
All icon fonts, right inside Figma. Material Design Icons, FontAwesome, Jam Icons, EmojiOne, Twitter Emoji — you name it.
Pretty iconic, really.
13. Figmotion (create animations)
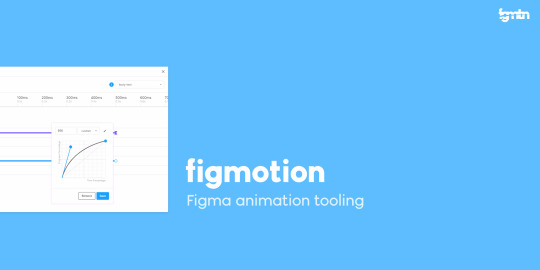
If the thought of exploring animation scares you, or you dread switching tools to access advanced animation features, Figmotion makes animation a lot less anxiety-inducing. The animations are also easy to hand off, since they’re based on web technologies.
14. Split Shape (make columns … and stuff)
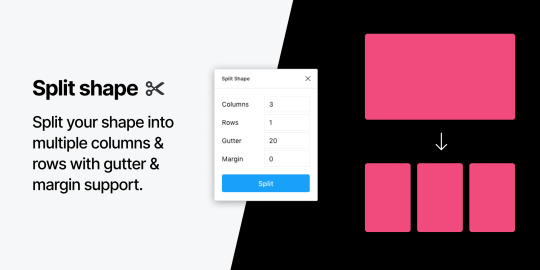
An interesting method of creating columns, Split Shape splits, say, a rectangle into multiple rectangles from which you can then create columns (or rows, or whatever). Split Shape can be used for various things if one thinks outside the box! 😁
15. Remove BG (create transparent bitmaps)

Remove BG is a web tool that removes the background of bitmap images, effectively turning them into transparent PNGs. Remove BG for Figma essentially does the same thing, but within Figma.
If you’ve been hoarding Adobe Photoshop only so that you can remove backgrounds, you can now delete it and probably free up approximately 80 thousand million GBs of space on your SSD 😌.
Popular Figma Plugins
There are a few Figma Plugins that I didn’t mention because they’re already super well-known to users of other UI design tools such as Sketch. You probably have these ones already:
Confetti (create dispersions)
Unsplash (insert stock images)
Rename It (rename layers more efficiently)
Humaaans (insert mix-n-match illustrations)
Stark or A11y – Color Contrast Checker (measure color contrast)
Bonus Figma Plugins
These Figma Plugins are awesome, but you might not need them often (if at all). It’s nice to know they’re there, though.
Arc (arch text)
Roto (rotate-extrude shapes)
Table Generator (create tables)
To Path (create text on a path)
Brandfetch (source brand assets)
Isometric (make objects isometric)
Mapsicle or Map Maker (create maps)
Skew (create simple isometric mockups)
Image Tracer (convert bitmaps to vectors)
Shadow Picker (intelligently create shadows)
Metaball/Blobs/Waves (create abstract shapes)
And finally, all Figma Plugins (in case you just can’t get enough of ’em! 😉).
Keen to learn the ins and outs of developing your own plugins, either to improve your workflow or the workflow of others? Check out Figma’s Plugin Docs.
14 notes
·
View notes
Note
Are you ever going to stop pretending you're actually painting pictures? You're not an artist, you're a fraud. That picture of Wellinger is not something you painted, it's a photo you ran through a photoshop filter (takes 1 second, so not actually a great achievment!). Same with the picture of Tande, just a photo you blurred and then added some (badly done) line art to. Everyone who knows even the tiniest bit about digital art can tell you're a liar, so stop this ridiculous charade.
Ah i‘m sorry to tell you this but i‘m not lying or using some filter thing, i do them myself!! i use adobe draw for it on my ipad and there are people out there who make amazing drawings with this app and i simply started doing some too beause i think its fun! most of these people are pretty surely older than me (i’m 13) and i have a lot of respect for them and professional digital artists i mean the drawings do take some time, the andi drawing took me a couple of months because i lost motivation pretty soon lol but i wanted to get it done because i liked doing it!like jesus if you‘d see the first drawings i ever made you‘d cringe so much because they simply werent good! but i kept on doing them because i had fun and now i‘m pretty satisfied with my drawings, though like i said there are people who use the same app as i do and make WAY WAY better and nicer stuff and i admire them allso basically, what i did for example on the andi drawing was to choose a color from the picture i was drawing (i put the picture underneath to just get the colors and shading and stuff right but on the finished drawings that i posted on here i have deleted the picture layer) and then just make a simple dot on the spot where i picked the color from and just did that all over again and again. i can show you closeups if you don’t believe me lmaoi did the same with the one for daniel‘s birthday, just that the dots were way bigger bc i am a lazy person, but i lowered the opacity and added a layer of just one solid eg skin color for the face underneath it so it would blend in. i‘ve seen this at a few people and just wanted to try it out too! i added the outline because i just thought it would look nice, i mean i dont mind if you don‘t like it.also i don‘t really consider myself an artist because its just something i do for fun and do not necessarily want attention for, i just thought it would be nice to share them on here for this nice ski jumping community we have 🤷🏻♀️i dont really know if anyone is still reading this but i guess these were just the couple of things i wanted to say, please just talk to me in person next time, i can guarantee i‘ll try to explain things as best as i can in a friendly way and won‘t judge. i just didnt want to bitch around because creating unnecessary drama about stuff that is not crazy important doesn’t quite feel right to me. no matter if you still think i‘m "lying" or not, i hope i could at least clear some things or at the very least not make things even worse. sooo have a great rest of the day baiii
32 notes
·
View notes
Text
How to Make Icons (And GIF Icons) Using GifCam and Photoshop
Another tutorial for @rumdaydreams as well as anyone else who would find this useful. GifCam is a wonderful program that can create GIFs from a screen recording, and with very little tweaking you can use it to make lots of RP icons in one go.
So let’s get started! (Note: I am writing this as though you’ve never touched either program before in your life.)
Step one: download and install GifCam from here.
Step two: open your video and find the part you want to record. Again, I’ll be using Reg Barclay from Star Trek because I like his face. I literally just opened Netflix to to correct episode and found a spot I liked.

Step three: open up GifCam and resize it to record as much of the screen as you would like. It’s probably easier to crop in Photoshop after the fact, so better to record too much than too little.
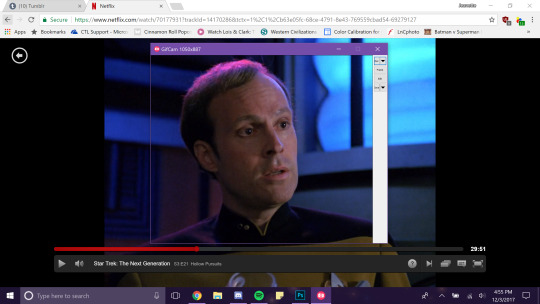
(Note: my monitor resolution is a bit weird so your GifCam buttons shouldn’t be that awkwardly small…)
Step four: GifCam settings. The little drop down button next to record has some frame rate options. If you’re just making icons, 10 is probably the best bet, but if you want GIFs as well, I’d go for 16. 33 will probably make things weird, and it can’t record for as long, so I would avoid that one.
Step five: Play the video! Hit record when you get to the spot you’d like, and stop recording whenever you get to the end of it. As a note, it’s again better to get too much than too little, as you can easily get get rid of things in Photoshop, so it’s alright if your recording runs a bit longer than you want. Hit save when you’re done to get your new GIF.
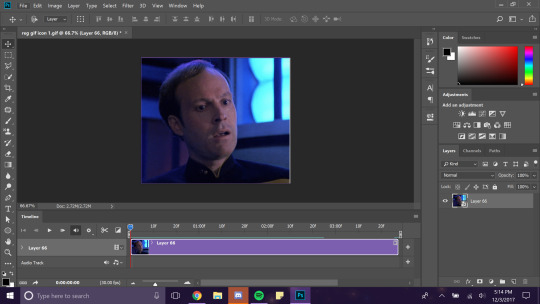
Step six: Open your GIF in Photoshop.
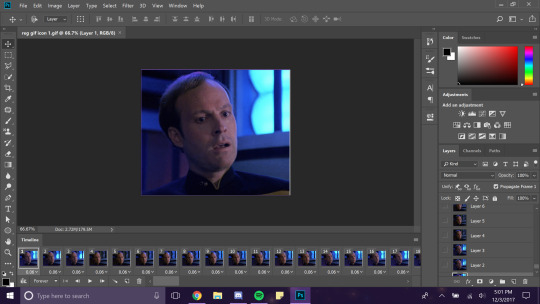
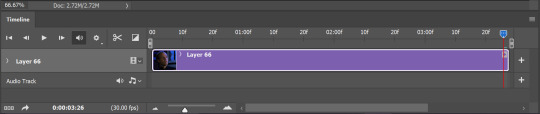
The row of images at the bottom? That’s the timeline window, and it’s your new best friend. Also your enemy. If you hit the play button you can watch your GIF.
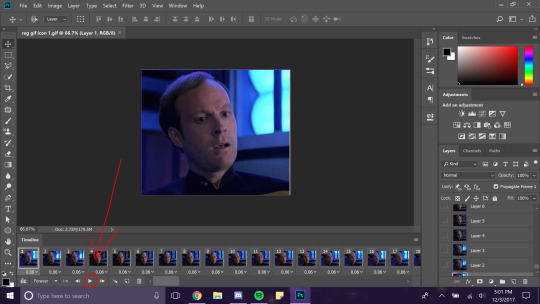
Step seven: Clear out any frames that just don’t need to be there. If you look at mine, you’ll see that I recorded too long and have some of Geordi in my GIF, from frames 59 to 66.

I like Geordi well enough, but I want Reg icons. So I’m going to select all the frames with Geordi, and click the trash can icon to delete them.

And now they’re all gone.

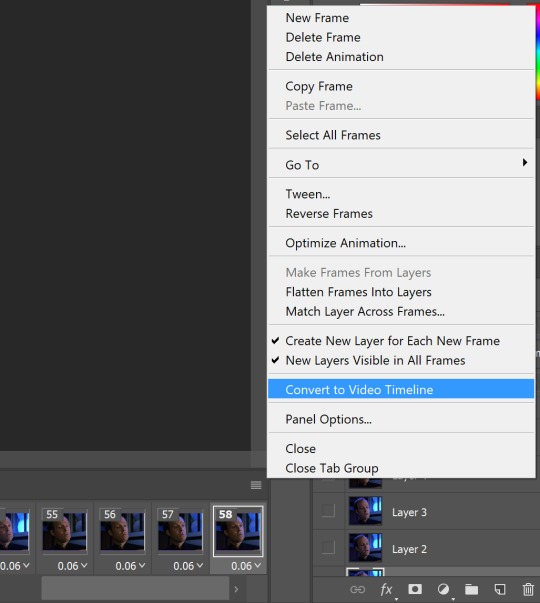
Step seven: Convert to a video timeline. This may seem counter intuitive, but let me assure you that making edits to a video timeline is 30000x easier than edits to a frame animation. To do this, click the three lines in the top right corner and select Convert to video timeline.
Aaaahhhh!!
What happened!? Why is this so weird!?
Don’t panic. It’s okay. The video is doing what it’s supposed to, but every single frame is still a separate layer. To fix that…
Step eight: make all of your frames into a single smart object. Go to the layers panel in the bottom right and select all your frames (I usually click the one on the bottom, scroll to the top, and shift + click the one on the top). Make sure you get all of your frames, even ones you might have deleted from the animation in the previous step. Then right click and select convert to smart object.
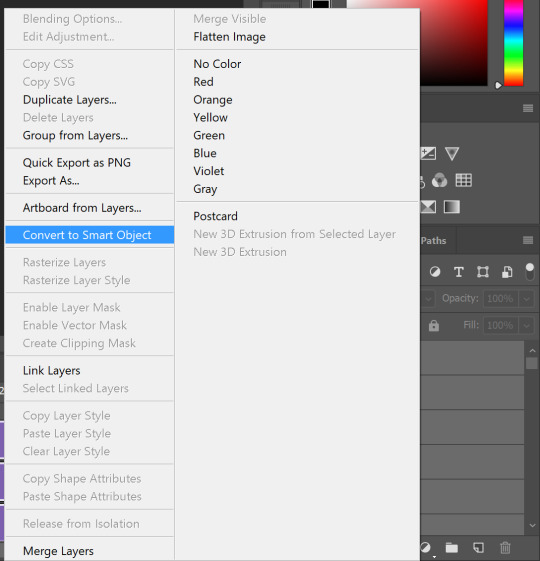
And…
Ah. Isn’t that so much nicer? Play through and make sure it all looks the way you want.
Step nine: cropping and any other effects you’d like. For this, I’m going to refer you to this post I already made for how I usually do edits. Everything should work exactly the same. So now mine has gone from this…
To this…
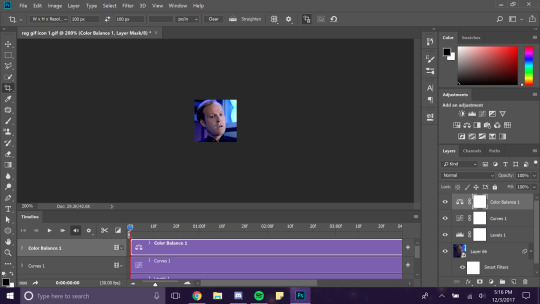
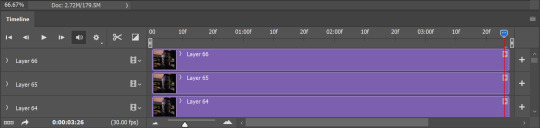
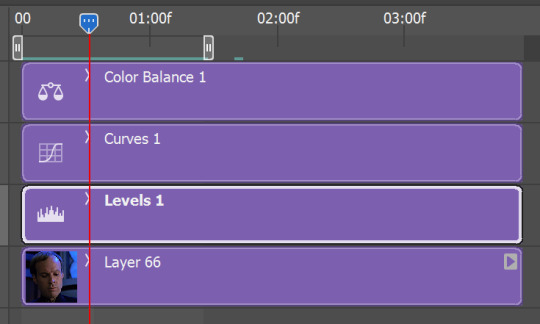
Important note. Scroll through the entire video timeline and make sure that all effects layers are the same length as the GIF itself.
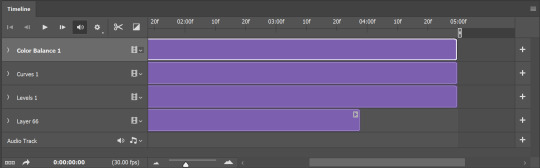
Here, you can see my adjustment layers are all longer than Layer 66 (my original GIF). Adjusting the length is very easy, though – just select the end of the track and drag it until it matches length.
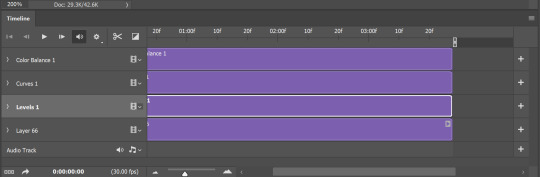
Much better.
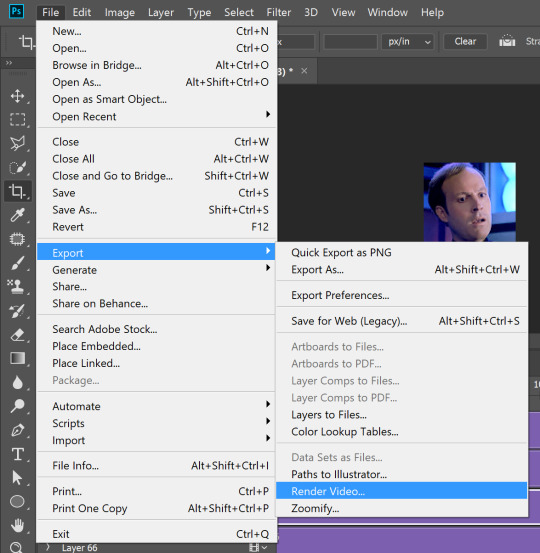
Step ten: export the frames. For this, go to File > Export > Render Video.
The options look like this.

Important things:
Name. Obviously, what you want the files to be called. Photoshop will automatically add numbers to the end of this.
Select Folder. Where you want the files to go. Please put them somewhere you’ll remember, there are few things more annoying than not knowing where the program sent them.
Photoshop Image Sequence. If this says “Adobe Media Encoder” – change it. You want to export an image sequence, not a video file.
Frame Rate. Essentially how many images you want to export. If you have this set too high, you’ll get a lot of essentially identical icons, so set this to your preference.
And when you’re ready, hit render in the top right corner!
Now, if I go to where I set these icons to save to…
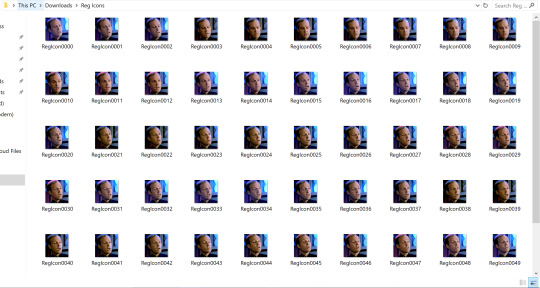
Wow! Look at all those! Obviously, some are so similar that they’re redundant, but you can always clear out the ones you don’t want after the fact.


Step eleven (optional): if you would like a GIF icon as well, it’s incredibly easy to do these both at the same time.
The little gray knobs at the top are In and Out. Essentially start and stop. You can drag them to wherever you’d like and play through to watch your GIF icon. Then go to File > Export > Save For Web.

Here is what those options look like. (Again, pardon my funky computer resolution, it likely won’t be so crowded on the bottom for you).
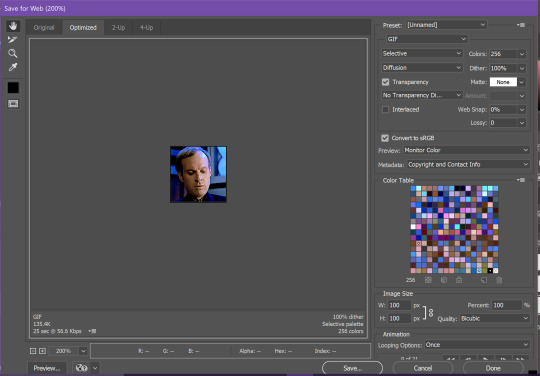
Most of these options should be fine 95% of the time. But you always need to check looping options.

Switch that from Once to Forever, otherwise your GIF will play once and then… stop. And never play again.
Then hit Save and select where you want it to go. And voila. A GIF icon.

And that’s how to make a whole bunch of icons (and GIF icons) at once without getting screenshots or even downloading the video! I hope this helps you out.
29 notes
·
View notes
Text
Summary, Reading III (The New Materiality of Design) by Iida, 3 oct 2020
Our main ideas were once again quite similar. When talking about new materiality, we did have different approaches to the texts and the problems and questions we found within them. I focused a lot on thinking about a designer’s job and responsibility in regard to these texts. It seems to be that whatever the text is, my approach is often to try and think about how it relates to our field, and what questions (or answers) emerge from that. I think Hilla focused more on new technologies that have taken over our field, thinking about how they affect our work, how we affect them, and how the ever-changing and developing technologies create anxiety and pressure to designers. Mirya thought about how digital work methods have become the presumed way of working, and how that affects the look and boundaries of the design we put out.
The fact is, that the technologies that we use - our computer, and multiple different programs like Indesign and Photoshop, are non-human entities, and still necessities to us. Without tremor job would be impossible. Our computers, or our phone for example, have become such ordinary and obvious parts of our lives, that we hardly even notice where our minds and thought (or work) ends, and where the particular piece of technology begins. They are the third hand and our extended mind, and that is the new standard today. An example of this is the fact that multiple studies have shown how our phone for example has changes how our memory works, and has affected our ability to focus.
We started talking about the programs that we use, and how they affect our work. We often don’t question the tools that we use, or for example the fact that Adobe’s programs are the ones taught in our school. They are the standard in our field, but who has the access and how much do they really guide are work? Are we using Adobe’s tool, or is Adobe using us as a tool? A thought that came upon the later discussion, was the term ”brainless human”, human being more and more dependent on the technologies we use. The truth is that we shape technologies and then they shape us. How aware we are of this- that is another question.
So how did we get here? The need for standardization and efficiency, and the industrialization are things that were at least partly the reason for the technologies that have become the standard today. From the typewriter to the invention of the A4, to the fast-pace, mass producing world we live in nowadays - automatization and standardization is focused on making thing easier and faster, with lower costs. But while you would think that machines and technology would help us, it has also made our work more fast paced and stressful in a different way than before. We have to learn new, emerging programs all the time, and the future of our field, any field for that matter, has to ask themselves - can a machine do this better and faster than I can, at some point? When will AI make my knowledge and capabilities irrelevant?
The last thing we talked about was how we could harness these technologies that are available to us, and instead of thinking about them as enemies, we could think about them as tools, as a sort of co-designer. We should always question the tools we use, but rather than getting anxious over them, we should think about the possibilities. Like in the text about the importance of door hinges - we are the engineers of the design world, making messages easier to comprehend, and nicer to look at. Without designers all the information we see daily, would be a lot harder to read - and for the time being, we are the ones making the designs, not machines.
0 notes
Text
Gif tutorial (Avisynth, Photoshop and Topaz)
okay so I’ve gotten a lot of questions asking me how I get my gifs so nice and smooth and HD and normally I don’t really go into depth because it’s kind of a combination of stuff I’ve learnt over time. My old gif tutorial only outlines using photoshop and is like over a year old so here’s an updated version.
Everything below the cut
So I’m going to break this tutorial down into 3 key parts, avisynth, photoshop and topaz. So you can pick which section that applies for you and each tutorial is basically independent.
Avisynth
disclaimer: not recommended to start out using avisynth, learn and familiarise using photoshop to make gifs first.
some background - why I use avisynth is because it’s a way to downscale the video without/next to no loss at all, so the quality is retained. Definitely check out brandinator’s tutorial and explanations here as he’s basically the innovator for avisynth gifs. He’s also super friendly so if you have any issues definitely hit him up. His tutorial basically explains everything and I guess I’ll just outline what it’s telling you to do.
Drag your video file onto normalwebmrange.bat and a command prompt will pop up
if your file does not work with normalwebmrange, then useless lossless intead
Type in your start time and hit enter, do the same for the end time (must be in hh:mm:ss format, i.e. 00:00:03 for it to start at 3 seconds)
Then after all the frames are done processing resizer.html will automatically open up in your browser
From here you figure out the sizing of your video (please refer to brandinator’s video here because it explain it really well)
For the following steps just refer to the rest of the video because its visually easier to learn off
When you copy your code across, dont include the crop line of code just in case you want to move things around in photoshop later
What do all the options in the resizer.html mean?
GIF size - Here you just plug in the value that you intend for your gif. Refer here for the tumblr post width guides. I personally use:
540 x [anything] for single gifs
268 x 350 for double gifs
177/178 x 250 for triple gifs
Opacity - This slider is just so you can see which part of the video will be shown in your given dimensions and is really useful as a preview to see if everything you want in your gif is visible for that dimension so you can go back and tweak your size if necessary
Resizing - In the bottom right hand corner of the video itself you can click and drag to resize the video so that you can find the desired size/zoom for your given dimensions
Pre-processor - Okay this is the important one and where all the smooth and HD quality comes from. In the first box you are given these options
Use for standard video formats (mp4, avi, mkv etc)
None (choose none for every video that is not a .ts file)
IVTC (tbh idk what this does, but you don’t need it)
1 in 5 Dupe (some videos have a duplicate frame for every 5th frame and this fixes it, kind of rare to use)
Only use for .ts files
Basically the 30 and 60 is talking about 30fps or 60fps, recommend that you choose 30fps for single gifs because you’re going to find it hard to fit anything of substance under 3mb for single gifs. Double gifs can be either 30/60 at your own discretion. Triple gifs can definitely be 60fps without worries about cutting out frames. The fast and slow options are the encoding speed once you’ve saved the avs, slow renders at a better quality but its barely noticeable so you can use fast every time
qtgmc 30 fast
qtgmc 30 slow
qtgmc 60 fast
qtgmc 60 slow
In the second box you can pick between resamplehq, debilinear and dithertools. All you need to know is that you choose debilinear every time and for every video format
Didn’t want to make another comparison gif so just reusing this one again, it’s slowed down so you can really see the different between 30fps and 60fps which you don’t normally feel too much if the gif is faster but definitely makes a difference. Notice the quality differences also between the first two, thats what avisynth helps with the most; making sure the quality loss is minimal

Photoshop
if you haven’t used avisynth to cut/resize your video then you can do that in photoshop, although I recommend that you cut the video first in another editing program so there’s less loading time and strain on photoshop itself (I use to use Adobe Premiere for this)
Refer here for the sites that I use to download my videos from.
Importing/Resizing
Import it into Photoshop (File > Import > Video Frames to Layers)
Match the settings to these

Select the part you want with the slider on the right and hit okay
Once it’s all into Photoshop, make sure you have the timeline/animation window open (Window > Timeline) and you should be able to see all the frames of your gif
If you’ve used avisynth you only need to crop it (Image > Canvas Size; and input in the desired size of your gif) otherwise you’ll need to crop it and then down size it to the desired gif size (Image > Image Size; setting width to either 540, 268, 177/178). Remember to set it to Bicubic and locking the width when you resize it


delete all the unwanted frames from your gifs
Sharpening
At this point I normally apply topaz (so refer below) otherwise you can do standard sharpening now
Select all your frames and layers and then convert it to a video timeline (bottom left of the timeline window)

Convert your layers to a smart object (Filter > Convert to Smart Object)
Then use Smart Sharpening (Filter > Sharpen > Smart Sharpen)
These are the settings that I used before, feel free to tweak them to whatever you like. (Note that .ts files resized with avisynth rarely need to be sharpened at all because sometimes they already look over sharp, and thus we use topaz to clean them up)

After you’re happy with your sharpening, flatten the layers back to frames, make sure your gif is on the first frame (top right hand corner of the timeline (Convert Frames > Flatten Frames to Clips) and then create the frames again (Convert Frames > Make Frames from Clips)
Click the bottom left again to change your video timeline back to frame view and delete the first frame (it should be blank) and your first layer (it should be the one thats still a smart object)
Now everything should look like it did before you did your sharpening except now your gif will be sharpened
Colouring
I’m not really going to tell you how to colour your gifs because everyone does them differently and it’s also kind of each individual’s signature thing, like often I can tell who’s gif it is just by the way its coloured. Things to note here that too many colours and over saturation will lead to your gif file being extremely large. If you want to lower the file size of your gif it’s helpful to note that darkening the blacks and/or brightening the whites helps a lot. Colouring overall can drastically change your gifs so much. Here’s an example

of course you don’t want to change the colours so heavily every time but its just an example of what’s possible
Timing
To change timing (speed) for your gif you just need to select all your frames and then click on the arrow at the bottom of any of the frames and someone will pop up for you to input the time. Generally this is what I use for my gifs
0.02/0.03/0.04 for 60fps
0.04/0.05/0.06 for 30fps
Exporting
After all your colouring and timing is done you just need to export your gif (File > Export > Save for Web (Legacy)), double check that your gif is less than 3mb (in the bottom left) and also here are my export settings. Never lower the colours unless your gif is black and white or you’ll probably lose quality
200212 update: gif size limits have been increased and can reach up to 8mb but have exponential loss in quality the larger the file size. The optimal size is to remain under 3.5mb-4mb, another larger and you’ll start to notice a loss in quality.

Topaz
I’m not going to tell you where and/or how to download topaz because you can probably look that up yourself, there are a bunch of tutorials how on tumblr/youtube etc so you can sort that out. I use Topaz Denoise and Topaz Clean. Topaz Denoise does exactly what you think it does, it removes the noise from your gifs and it helps clean everything up. Topaz Clean is basically the same principle of sharpening but it’s a lot nicer and doesn’t over sharpen like smart sharpening does most of the time. Topaz takes a lot longer than regular sharpening because it processes it frame by frame so if you don’t want to bother and wait for it that’s alright.
Following the same two steps as the sharpening section of the photoshop tutorial, you’ll have a video timeline and a smart object
Then apply Denoise first (Filter > Topaz Labs > Topaz Denoise)
Play around with the settings as you see fit
Then do the same for Clean (Filter > Topaz Labs > Topaz Clean)
After you’re happy with the settings you’ll need to flatten the frames back (refer above to the sharpening section), and then just put on your psd like normal
Sometimes topaz isn’t as noticeable but when compared to original and smart sharpening it’s more noticeable


Smart Sharpen, while it does sharpen the gif also increases how grainy it is so for gifs which are originally grainy it’s not a good solution. Meanwhile topaz sharpens it without increasing the grain and can also reduce it. (The gifs above aren’t that grainy so smart sharpening doesn’t look that bad)
Here’s another example of how topaz removes the noise from gifs

Wrap-up
Okay so this is a pretty comprehensive post about everything and anything I know about photoshop and gif-making in general, it outlines all the little steps I take to make my gifs look really nice and just for an overall comparison to show you that the little things really add up

and slower for you to notice the framerate

Additional Video Tutorial Resources:
Basic gif tutorial (photoshop only)
Gif Tutorial
How I adjust for coloured lighting
Colouring tutorial - levels + exposure
Blurring text/captions
If you have any other questions on this or felt like I’ve missed something feel free to send me an ask. Happy Gif-ing!
#text#tutorials#okay this is was longer than i thought it would be#i really hope it covered everything#hmu if you think i missed anything#i proof read it but i probably missed smth so cut me some slack#ive been @ this for like 1387201 hours#long post#this is the most comprehensive thing i've written in my life
1K notes
·
View notes
Text
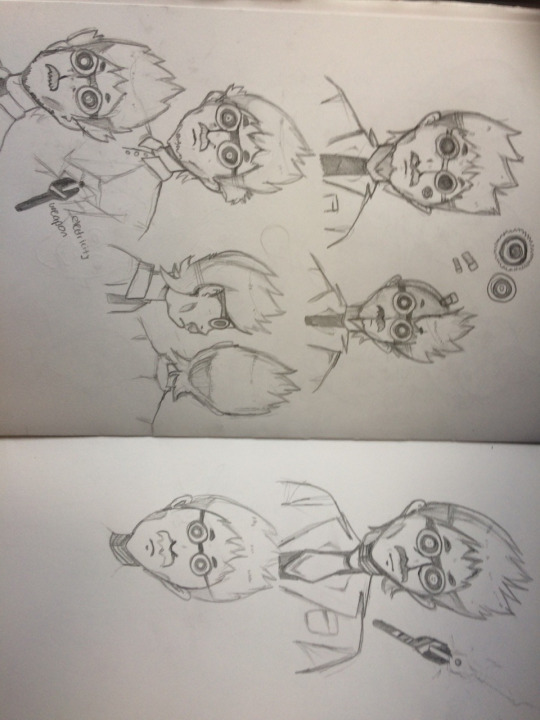
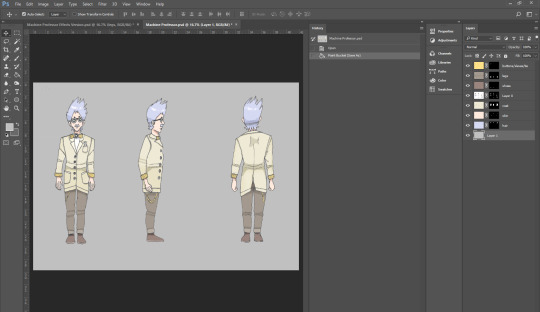
Character Turnaround Sheet
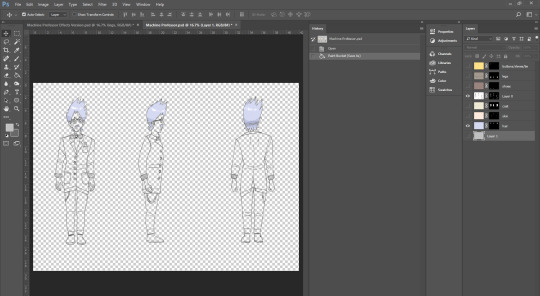
14/11/17 - Today we coloured our characters which we’d drawn and scanned them onto the computer last week.
Originally, we had to randomly pick two pieces of paper which had a character type and an object/objects in which we essentially had to combine together. For example, I picked ‘machinery’ and ‘professor’. I researched various different professor drawings and photographs and got drawing after a while. For machinery, I already had an idea of what things I could include, such as cogs and gears as glasses and various different black and yellow stripes on his outfit. After drawing three different angles of the character, I went over it with a copic, to make sure that the lines were more prominent so that they didn’t connect with other lines and that I’d easily be able to select with the magic wand tool. After this, I had it scanned and put onto my USB device. I then opened up Photoshop and proceeded to follow the steps (after receiving a bit of help) which would allow me to be able to easily and cleanly colour my drawings.
Below are my initial sketches which I eventually will have scanned into Adobe Illustrator. For the drawings, I used visual references from the web, some of the things I typed in for my references are as follows: machinery, real life professors, professor drawings and a lab coat drawing because I’m not great at drawing clothes. For the machinery references, I saw many cogs and bolts, so I decided to use them as buttons on his coat and also the middle of his bow tie, as well as my personal favourite; his glasses frames. I also had the idea off the top of my head that I could somehow incorporate the black and yellow lines that give off the hazard warning effect, because machinery can be very dangerous- so I added it to his sleeve cuffs, the sides of the bow tie, and the thing which hangs from the left side of his trousers. Obviously, I used the lab coat reference because I didn’t really have a clear image of what it looked like in my head- I used various references and came up with something that looks fairly original, albeit a bit too tight-looking. It also comes complete with a pocket including a screwdriver and a wrench that generates electricity between the two tips, which he uses as his weapon. The hair was one of the first things I came up with when I did the original sketches, and often determines how I draw the rest of my character because I have to make sure it fits with the outfit and such.
It did pose a challenge for me to draw these, as I’m not very good at full body drawings, as I tend to only draw the top half of the character- but once I was finished with the first angle, it did become slightly easier, as I could base the other two off of the first one.
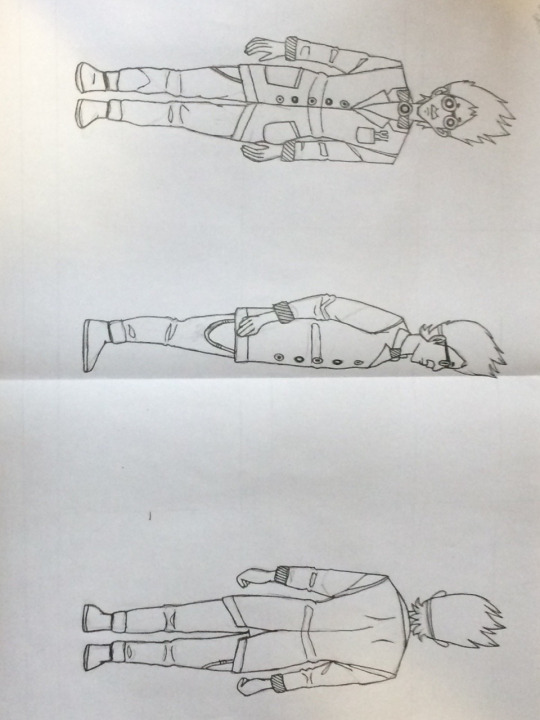
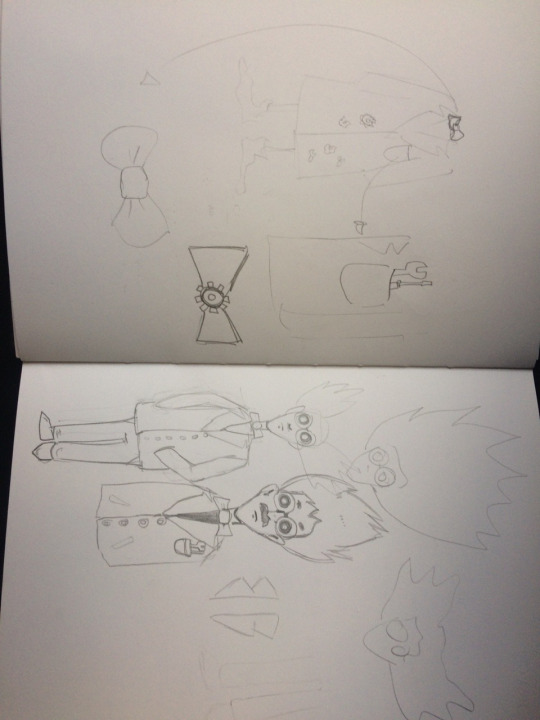
The sketches below are the original sketches which I did which are far more detailed than the final sketches for the turn around sheet as if I were to include all of this detail, it would most likely be difficult to see and probably would be very messy and would probably interfere when it got to selecting the various different parts of his hair in Adobe Illustrator, this is also why the turnaround sketches are not shaded- because shading will be added in Illustrator. As you can see, I liked the idea of having cogs as his glasses and the one on the top left (of this image) has my favourite design so I decided to go with that one. One of the designs had half professor half robot or machine or whatever- I decided that it didn’t look so good, so I didn’t continue to develop it. There are also early drawings of the side and back view, which ironically, looking back, I like them more than the actual turnaround sketches. There’s also cog designs on the image at the side, which I was going to do as the glasses, but I decided they were far too complex and I wouldn’t be able to recreate them each time, so I went with the white>black>white design, which almost looks hypnotic in a way. I also thought of the idea to add a bolt in his head (you can see this on the half and half design) but it looked stupid so I didn’t do it again. Finally, there’s his wrench weapon at the side, which can be seen in his pocket in the final turnaround sketches- it clearly shows electricity being generated between the tips- but don’t ask me how that works.
Below are some more developments for my character. They include the mechanical bow tie idea I developed later on during the turnaround sketches. It also shows where I decided to add the pocket, which includes the wrench weapon and screwdriver. There are also some wacky hairstyles which I’m not a huge fan of along with a couple of full body rough sketches. This is where i also came up with the different cog buttons on his coat. Out of these, I decided to further develop the design with the mustache and buttoned coat, which you can see in the finalized turnaround sketches.
The steps basically consisted of firstly shift+ctrl+alt+2 which would select everything, then I had to inverse the selection (select>inverse). I then added a mask and sampled all the layers, and then did layer>new fill layer>solid colour, so that I could colour each part of his body.
The Process
I started by selecting his hair and colouring that. I went with a light blue colour which I think suited his character as he’s a professor after all- I did originally consider just colouring it white but I felt that would look too boring. I added a blue-grey shade where I thought looked right, such as the bottom of his hair as the top of his head would cast a shadow below. and highlights across the top of his hair, as that’s where his hair would be most flat.
Next, I had to select and colour his clothes and skin. I went with a normal skin tone, with shadows in the necessary places, such as under the neck and inside the ears, as well as on his arms under his sleeve cuffs. I chose to colour his coat a beige colour because I thought white was again, a little boring. I added the necessary shades like at the back and where the creases and folds are, to imply that they’re going inwards slightly.
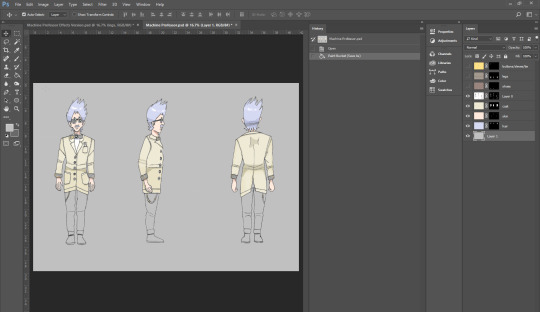
I then coloured the trousers, I just made them brown, and added the shades like under his coat and the creases in his trousers- as well as making the shoes as a lighter shade of brown, with shades that appear under the trouser cuffs to show that they’re below the trousers. I decided to colour the bow tie and the sleeve cuffs black and yellow to portray the hazardous colours to imply danger- what with him being a machinery professor and all.
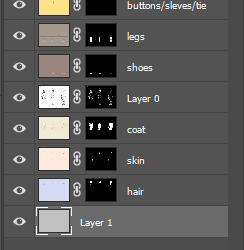
Here’s an image of the layers which I used and how they look all together when next to each other, showing the masks that I used and what things were on which layer.
The Final Result
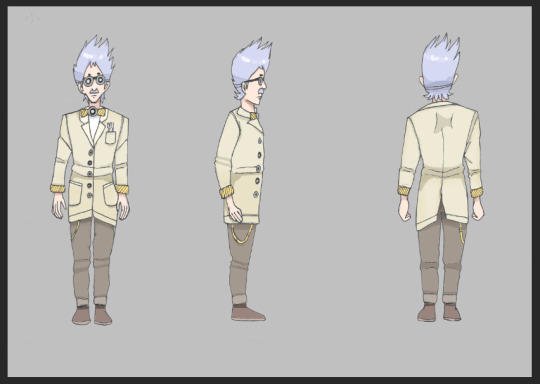
I think that the overall final look turned out okay, not brilliant but it looks alright. I think that it was successful as I followed the task. Obviously, I need to improve my anatomy drawing skills, as well as drawing clothes- and I feel as though they look a bit too casual for a professor- but I think the colours turned out decent for the most part. I found that drawing the initial sketches was probably the toughest part of all of this because as I mentioned earlier, I have a bad habit of drawing only the top half of a character and so I’m not as experienced with proportions, which is why I think that this task was helpful in improving my skills if only slightly. I’m used to working with colours so picking those out was probably the easiest part of this task. To improve, I think I’d need to research more and look through more examples to include in my drawing as I’m sure if you looked at it without knowing anything, you wouldn’t really think ‘oh, it’s a machinery professor!’, so I’d need to make the machinery elements more prominent and noticeable if I were to do this again. Also like I said, I need to study anatomy more and clothes and keep practicing so that I can get better at drawing full bodies such as this one.
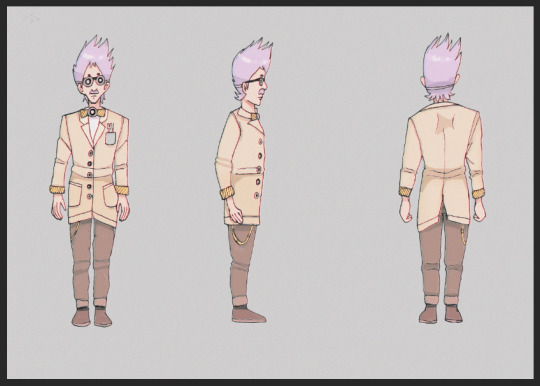
Bonus: I have a habit of editing things and messing around with filters and layer adjustments, such as the colour channels, so that’s what I did with this too. I personally think it looks better than the original as the colours just look nicer and more vibrant.
1 note
·
View note
Text
When to shoot RAW images on your smartphone
New Post has been published on https://nexcraft.co/when-to-shoot-raw-images-on-your-smartphone/
When to shoot RAW images on your smartphone
To RAW or not to RAW—that is the question. (Banter Snaps via Unsplash/)
Being interested in photography doesn’t mean you have to spend thousands of dollars on a professional camera. Smartphones have come a long way and are capable of snapping impressive shots.
But if you want to go beyond default settings, know your smartphone camera still has some interesting options for you to play with. A good example is file format. The most common one is JPEG, where your smartphone compresses the data captured by the camera into a smaller, easier-to-manage file. Then, your phone automatically processes the image to make it look better, adding contrast, saturation, and sharpness.
Images in RAW format, on the other hand, are not really images in the strictest sense, but a bundle of all the data captured by the camera. These files are much bigger, and since they’ve had minimal processing, they’re not ready to print or post on Instagram. Because that’s the thing with RAW files—you absolutely have to edit them if you want to do anything with them, since they are, well, raw.
The advantage of RAW files over JPEGs is that extra data, which gives you a lot more flexibility when you edit. For instance, you can fix problems with color and exposure in RAW files, whereas in a JPEG, you probably can’t. But even with this advantage, you might want to consider when it is worth taking RAW photos, and when it’s just better to let your smartphone do the work for you.
How to shoot RAW on your iPhone
The built-in camera app on your iPhone won’t let you shoot RAW images, so you’ll need a third-party app.
The best, free solution is Adobe Photoshop Lightroom. When shooting from the app, Lightroom will make your smartphone camera automatically save files in Adobe’s DNG RAW format. The editing features in the app can also process your RAW images to get them social media-ready. The one downside is that unless you’re already subscribed to one of Adobe’s Creative Cloud plans that includes Lightroom, the company will keep nagging you to sign up.
If this gets too annoying, a good alternative is my favorite iOS camera app—Halide ($5.99). It’s one of the best-thought-out camera apps available, the controls are intuitive, and you can manually control most settings.
How to shoot RAW on your Android phone
While you can also use a third-party app like Lightroom on your Android phone, most of the latest midrange and high-end Android devices allow you to shoot RAW images from the default camera.
For example, the Samsung S7, the Google Pixel 2, and all those phones’ more recent iterations allow you to shoot RAW straight from the default camera app just by adjusting some settings. Most of the latest models by Huawei and OnePlus do, too.
To set your camera for RAW files, dig into the settings and see if there’s a toggle to change what image format you shoot in. For example, on the Samsung Galaxy S10, go to Camera Settings > Save Options and toggle RAW Copies (Pro) on. Then, when you shoot in Pro mode (by selecting it from among the various camera presets), your phone will save a separate RAW copy of every photo.
When to shoot RAW with your phone
Because of the large amount of data they carry, the RAW image format is objectively superior to JPEGs. But since you have to process the images yourself, it might not be practical to use it all the time. So, when is it better to shoot RAW?
When you plan to edit your photos
Straight out of the camera, JPEG files look better, since they’ve been processed. RAW files, meanwhile, tend to look a bit flat and bland. Below, the JPEG file is on the left and the unedited RAW file is on the right. I shot both at the exact same time with my iPhone 7. At first glance, the JPEG looks much nicer.
RAW is designed to give you more flexibility in post-production, not create nice-looking images out of the camera. (Harry Guinness/)
However, you have much more leeway when you edit RAW images. Below, you can see that as I’ve increased the brightness of both images, the colors in the JPEG on the left have started to wash out, whereas in the RAW file on the right, they haven’t. That means I could tweak the RAW file even more if I wanted to.
RAW files can be edited a lot more than JPEGs. (Harry Guinness/)
When you want total control over the colors
Our brains take cues from our environment to determine how we see colors. We see a sheet of paper as white whether the light hitting it is the orange glow of a sunset or the flat gray of a cloudy day. Since cameras don’t have brains to interpret context or lighting, they just capture what’s in front of them.
In photography, how blue or yellow the whites appear in a frame is determined by the white balance setting of your camera. When you shoot a picture in JPEG format, the camera makes its best guess about what white looks like, then saves the image. This is fine if its guess is accurate, but if it’s wrong, every other color in your photo will be off and there won’t be a lot you can do to fix it—even with editing programs such as Photoshop. When you shoot RAW, however, the white balance isn’t permanent, so you can change it at any time in a RAW processing app.
While the bowl looked white to my eyes when I took the image on the left, it was actually pretty yellow from the light reflecting off the wood and walls. With a RAW file, you can correct it back to a neutral white, as seen in the image on the right. (Harry Guinness/)
When you’re shooting in difficult circumstances
RAW files have more data than JPEGs, so if your image ends up underexposed or overexposed, there’s more room to correct things. If you’re shooting in tricky lighting situations—like directly into the sun, before sunrise, or when there’s a lot of contrast, shooting RAW can make it easier to make adjustments.
Nala, here lying in a sunny spot on the shady floor, is a pretty terrible situation for most cameras to deal with. But by shooting RAW, I was able to edit it into an acceptable image. (Harry Guinness/)
When you have the time
Any time you’re able to stop and really think about what you’re trying to capture with your camera is a good time to go for RAW images. It also gives you the opportunity to manually control your camera settings so you really nail the shot. If you’re just trying to take a quick snapshot, switching to a RAW camera app or tweaking the settings to RAW will only slow you down.
When you shouldn’t shoot RAW with your phone
The best thing about your smartphone’s camera is how convenient it is. In moments, you can have your phone out, swipe, and shoot away, which allows you to capture moments you’d otherwise miss.
Smartphone cameras are also getting better by using computational photography. By default, iPhones that support iOS 12 now shoot high-dynamic range (HDR) photos, which combine multiple shots into a single composite image, giving them more depth and definition. Google, too, is spending a lot of time using machine learning to help the Pixel’s camera, which some consider the best smartphone camera on the market.
Even if you know what you’re doing, the advantage of shooting RAW all the time is slipping. At the moment, in almost all situations, you can get a photo that is comparatively good for a fraction of the effort just by letting your smartphone camera make the decisions. But if you have the time and want to experiment with editing your photos, shooting RAW is also a great idea.
Written By Harry Guinness
0 notes
Text
3 Terrible Purchases That Finally Made Me Change My Lifestyle
With the approach of a New Year, I think it’s inevitable that we all start reflecting on ourselves and what we’d like to change. While I definitely fall into the category of people who are “New Year’s Resolution-Makers,” I actually do try to implement changes throughout the year and not just at the beginning. I’ve learned throughout the years that I can get easily sidetracked and distracted by multiple goals and projects, so if I truly want something to change, I just have to start (or least start planning) now instead of waiting for a particular date.
But I am a fan of New Year goals and resolutions. I don’t think there’s anything wrong with having that motivational push and if it that’s what you need to help you get into the self-improvement mindset. So in the spirit of 2019, these are the three lifestyle changes I’m continuing to work on after making some of my worst purchases. Sometimes these were made out of insecurity and vanity, and sometimes they were simply because I was irresponsible. Either way, these seemingly innocent purchase mistakes ended up teaching me more than how to better manage my budget.
1. A Custom Blazer I Saw On Instagram
Cost: $100 CAD ($75 USD)
When Instagram became popular a few years ago, I began to follow a lot of fashion and lifestyle bloggers. They all posted these incredibly beautiful photos — you know the ones — posing in a stunning outfit in front of a white-washed background with perfect hair and make-up. At the age of 21, I was super impressionable and in awe of all the beautiful people and things on Instagram.
So in 2015, when I was visiting my family in Vietnam and was in the city of Hoi An, famous for custom tailoring, I decided that I was going to treat myself. I had a custom blazer made in the same style as one of the fashion bloggers I had been following. She had just posted this incredibly chic photo in New York in it and I thought it would be perfect for when I returned to work after my trip. To be clear, it was not an average blazer, it was this cape-style blazer that didn’t have sleeves, but instead had the arms slits cut mid-way down the blazer.
I didn’t even wear it once before I threw it in the donation bin a year later.
I realized then that a lot of the beautiful things fashion/lifestyle bloggers wear are on Instagram are not only impractical, they’re down right uncomfortable. That blazer was not functional; because it didn’t have proper sleeves, I couldn’t move my arms without it slipping into an uncomfortable position. Literally the only thing that blazer was good for was Instagram likes.
I knew I couldn’t afford the designer blazer she was wearing so I had a custom one made instead and while $100 didn’t break my bank account, it was a lot of money for me on a backpacker’s budget.
To me, that blazer was the physical manifestation of all those Instagram photos of influencers that I aspired to be like – carefree, beautiful, and always perfect looking with this effortless backdrop. But that blazer taught me I had to be careful not to let beautiful photos skew my perception of reality in how I see myself and what I can afford to spend.
I’d like to say that I cut off all Instagram influence after this experience, but it wasn’t that simple. Sure, I unfollowed fashion bloggers here and there, but it wasn’t just the clothes, it was the lifestyle. Every year I try to get better and better at critically thinking about who I follow and what kind of online world I want myself surrounded by. I try to unfollow people throughout the year if I don’t think if they positively contribute to my life anymore, but I recently found a loophole into this horrible habit. For the past year, I’ve instead been lurking the profiles of people who live these perfect lives to see what they were up to and what they were wearing. And every time I searched them, it would appear as a suggestion in my search bar. So it would be this vicious cycle of me still viewing these people’s highlight reels except I would check back on their profile instead of following them, which was worse (you can judge me for this one, because it really was creepy).
You probably think I sound obsessive, and honestly, it’s probably bordering there. But as of recently and into 2019 I’m going to get more use out of the hide, mute, and block function on Instagram to stop myself from going down that rabbit hole. I fully understand that these are not bad people; I’m sure they are great people, but in trying to stay authentic to myself, I’ve learned that I have to be surrounded by people online that I would want to hang out with in real life. This means following people who genuinely share their successes and challenges in life, and not just the perfect cool girls who were nice, but I never ended up staying in touch with after high school.
2. The Subscription I Refused to Cancel
Cost: $518.64 CAD ($387.75 USD)
One of the worst and costly mistakes I’ve ever made was being too lazy to cancel subscriptions that I do not use. And I’m sure I’m not alone in this one since gym memberships are notorious for being a prime example of how long one can deny the use of a subscription until actually canceling it. Thankfully, I’ve never lied to myself that much and bought a gym membership. I much prefer to exercise in the outdoors; I pay enough for it by living in Vancouver, BC.
However, there were many times that I talked myself into other costly subscriptions and never fully used them, which is exactly the same thing as a dusty gym membership. For me, my vice is learning. I want to learn everything.
So after discovering the world of calligraphy and typography (on Instagram of course), I got swept away with the idea of learning all things graphic design. Shortly after, I looked into getting an Adobe Photoshop license for my computer, even though I was nowhere near that level that required it. And because I still had a student email account, I learned I got a discount if I subscribed to the Adobe Creative Cloud Suite instead which would come with all of their programs as opposed to just the one or two I needed and I thought, “what a great deal! What a great chance to learn more.” The problem was I only clicked into those other programs maybe once before deciding it was not for me and never opened them again because I was too overwhelmed. I should have just canceled it after the two months after realizing that I didn’t need it and wasn’t interested in learning all these programs after the initial excitement wore off, but I didn’t. I lied to myself for a bit more than a year before finally letting go of that $30+ charge each month.
The plus side is that I did a lot from it, but not surprisingly, I really only learned Photoshop and Lightroom which were the only two I was interested in. More than that, I learned that I did not need the software to really practice my hobby (if I wanted to turn it into a side hustle sure, but I was nowhere near that level yet).
I think constantly having the desire to learn more and further my self-improvement is a wonderful quality and I do really like that about myself. But I’ve also learned I need to put limits on it, both in time and in money. I can’t just jump into things thinking I have the time and desire to learn it. More importantly, I shouldn’t just sign up for costly subscriptions and software to think that I needed them to pursue a hobby. We do live in the age of YouTube and tutorials and if I really wanted to learn something, I should use make use of free resources to consider if I truly enjoy the hobby, before jumping in credit card first.
I could have waited a bit longer to see if I really needed those programs, but I got tempted by the package offer and caved into the idea that I would be “saving money” with this bundle. In the end, I spent over $500 on this very expensive lesson.
Nowadays, I have a budget and account for creative projects. Whenever I make money through my side hustles, I put it towards paying for new creative things I want to learn. I have a budget for everything else, why not creative hobbies? Having a set budget for it really makes me critically think about whether I have the time, energy, and interest to really pursue a particular creative project because I have to work extra hard for side hustle money as opposed to my regular salary.
So far, it’s going great, and made me really think about what I enjoy enough to spend money learning more about. For 2019, I’m going to continue using the budget mostly for my blog because more and more I’ve found my passion for it, and be super honest with myself if I have the budget for more projects. The best part of this system is that it has created a definite limit on my spending and makes me super cautious of subscriptions. Before, the charge would just come off of my credit card, and it would be buried underneath a mountain of other transactions. Now, there’s a set amount in a specific side hustle account in my PayPal account and everything for creative projects gets paid out from there. If I don’t add to it, I simply run out of money and can’t buy it.
3. The Wrong Paint
Cost: $42.97 CAD/$32.13 USD (for the wrong one), $34.97 CAD/$26.14 USD (for the correct one)
Yes, I paid more for the wrong paint.
This one is just a reflection of how poorly I plan and research sometimes. After buying my apartment, I naturally wanted to put a fresh coat of paint on it. Not only for the obvious reason that it would look nicer, but because the previous owners also chose this horrendous brown-y yellow paint for a small bedroom. Like, why?
In my excitement, I did absolutely zero research on what type of paint I actually needed and based 100% of my decision solely on the color of paint.
Life lesson: There are different types of paint.
I ended up buying two colors of paint; a grey one for my living room and a white one for my bedroom. However, after painting my entire bedroom with friends, I learned that I had accidentally bought “exterior” paint, which is sturdy and sticks the second you apply it. While painting, I could see that it looked really streaky, but I told myself that it would look better when it dried. When my mom came over and jokingly remarked “wow, this looks really bad”, I responded defensively. But when the paint was fully dried, I realized (of course) that my mom was right and it did look really, really bad. I had to come to terms with the fact that I had made a mistake and it not only cost me financially, but it cost me time. If anyone has ever painted an entire room before, you’ll know it’s not quick. I had to re-paint the whole place myself and it took many evenings after work to complete it.
Prior to this, if something was broken or needed repair in the home, my parents or landlord would fix it. This was the first decision regarding a home where I was the one completely responsible for the damage and for the repair. And the responsibility was hard to deny when I was literally standing in the middle of a horribly painted bedroom.
As I’ve continued to decorate and organize more of my apartment, I’ve gotten better and better at planning and researching my needs beyond just the aesthetics of it. I’m not perfect, but I’m getting there. More specifically, I’ve started especially really paying attention to the exact measurements of things instead of just eyeballing it. And probably to no surprise, it’s been working. What a concept.
In the end, these were all purchases I’ve made that were probably not my best choice. I actually choke a little when I think about all the money I spent on the fancy tools and software for hobbies I became enamored with (I did not include all of them or else this article would have turned into an essay), but spending this money badly taught me a lot. These bad purchases showed me, in a tangible dollar amount, the not so nice parts of me. It showed me how much I truly do care about my looks (despite what I think), the cost of my ambitions, and the consequences I have to pay when I rush into home purchases. Sure, I could have learned these lessons another way, but these bad purchases really pushed that mirror on me to reflect upon.
These are changes and lessons I’m currently incorporating, and working to improve upon in 2019. I’m definitely not perfect when it comes to curating the noise of social media or planning for my home but every month I get better and better. I’m using the New Year as a way to ride onto the “new year, new me” wave, but I hope you’ll think about something you’ve been meaning to change too. Even if you don’t start on January 1st, that doesn’t make it any less important or mean it will be any less successful.
Kimberly is the writer behind www.millenniallifeadmin.com. MLA is a blog that helps break down the everyday adulthood tasks of growing up; one unavoidable responsibility at a time. You can also find her scrolling through memes and sassy posts on Instagram @millenniallifeadmin.
Image via Unsplash
Like this story? Follow The Financial Diet on Facebook, Instagram, and Twitter for daily tips and inspiration, and sign up for our email newsletter here.
Source: https://thefinancialdiet.com/3-terrible-purchases-that-finally-made-me-change-my-lifestyle/
0 notes
Text
Hands on with the Sony RX0
Last month at Sony Pictures Studios on Stage 23, I was given a few hours to play around with the recently released Sony RX0, priced at $700. There were two pre-lit scenes available to film and photograph, along with a person-sized circular podium to highlight the slow-mo capabilities of the RX0 by spinning it around the podium as quickly as possible on a sort of selfie stick. The footage was reminiscent of the comedian intros from Ari Shaffir’s This is Not Happening.
The first thing I did was pull out my Sony X3000 Action Cam and compare sizes. The RX0 is more GoPro-like in size and shape than its Action Cam brother, but constructed out of aircraft-grade aluminium instead of plastic. The front of the camera is optical glass instead of something like Gorilla Glass, meaning that while the camera body can take a 10ft fall just fine, the glass will absolutely shatter. While Sony has made it easy to replace via removal of the 4 front screws, replacement glass will run you an eye-popping $100 each. I can see people finding similar-thickness plastic sheets and cutting them down to size rather than replacing the front.
I was personally relieved to find the bottom of the camera has a standard ¼” screw hole, just like the X3000, which allows for mounting on standard camera mounts, mono or tripods, cinearms, etc. I hate the GoPro’s proprietary mount, but that’s just me. The camera is also waterproof down to 33ft/10m.
The immediate comparisons with Sony’s Action Cam line kind of ends there. As Sony themselves have stated, this is not an advancement of that line. Instead, it’s more or less a miniaturization of the CyberShot series, specifically the RX100V. This camera shares its 1” sensor, menu design, and many of the same features with that product.
In that vein, this is not a “set it and forget it” style camera as the body size would suggest. You’re going to need to adjust your settings as you would with any camera for the best results in any given shooting situation. While rather tiny, the menu is extensive enough to offer full control of your image without taking up 18 pages. The button layout is intuitive with a standard complement of up/down, left/right, select, and menu buttons. The only thing that wasn’t obvious was the fact that you have to hit “left” when outside the menu to change shooting modes. Here I was hitting “right” over and over, thinking either direction would offer that functionality. After talking to some of the other people at the event, I discovered that was a common hiccup.
Like many cameras, the RX0 comes with auto modes for photo and video, but just like those cameras, the results can be hit or miss. Due to the 24mm equivalent f/4 lens, in a dark situation you’re either boosting ISO or lowering shutter speed. From my experience neither offered an ideal result. However, when shooting the pre-lit scenes, the photos looked great with the video just looking above-average. By comparison, the X3000 & RX100V have f/2.8 & f/1.8-2.8 aperture lenses respectively.
Interestingly, the video modes use the full 1” sensor whereas the photo modes use a smaller section. I shot the photos shown below in JPEG+RAW but was unable to edit the RAW images in Photoshop when I got home, for whatever reason. After updating to the most recent version, neither Bridge nor Photoshop could read the RX0’s .ARW files, so I’m assuming there’s an update on the horizon. I’m potentially doing something wrong, but I don’t know what that could be. I wasn’t able to convert the ARW file to something more universal like DNG either, using Adobe’s conversion tool.
[unedited jpegs straight out of the RX0]
It was at this point that I found myself having trouble pinning down what this camera was for. The X3000 is a great action cam due to its ease of use, wide FOV, BOSS Optical Image Stabilization, and can be trusted to get the shot even in surprisingly dark scenes (even better than the GoPro, which isn’t saying much). The RX100V is a great pocket camera utilizing a tried-and-true sensor pedigree, great functionality, and reasonable size. Imagine buying an RX100 but the screen is 2” and you have to make all your adjustments in menus. A little annoying, right? While you can set custom functions to the buttons easing some of that discomfort, judging focus is near impossible, and so much of the screen is taken up by information readouts that you’re really only able to use it for framing. In essence, the RX0 is either a difficult to use RX100V or an over-complicated X3000 with a nicer sensor.
So where does the RX0 succeed? Well, the half-press to focus (a feature on every camera save action cams) was a welcome surprise. While it can only record 1080p internally, it can do so up to an impressive 960fps which is pretty uncommon and oft-asked for feature. If you want 4K (UHD) you can attach it to a recorder via HDMI, but then its form factor becomes sort of a moot point and it can’t do high frame rates at that size anyway. To be fair, I never shoot in 4K so that wouldn’t bother me too much. It also shoots to common MicroSD cards instead of something proprietary, which is a big plus, and does so in standard formats like AVCHD, MP4 and Sony’s own XAVC-S codec. Additionally, it has Slog2, which for professional video is basically a requirement.
Amusingly, among photo profiles like “Vivid” and “Neutral” there’s “Autumn Leaves” which I’ve never seen before and is such a specific thing to program in that I’m not entirely sure who thought we needed that, but there it is.
Just like the X3000, the PlayMemories Mobile app is easy to use and works with little to no fuss. Even with (let’s say) 30 to 50 different RX0s all in play at once in the studio, mine never lost connection. At worst it was a little choppy, which may just be the result of my beta Android firmware. Unlike the X3000, I was unable to transfer video to my phone via the app (photo worked just fine), but I was told that functionality would be available soon. Putting the RX0’s SD card in my X3000, I was able to kick the videos over to my phone without issue. While the UI is a little bland, the PlayMemories app absolutely destroys whatever GoPro is calling its current iteration and all previous versions. It’s actually nice to use, and one of the best things I can say about it is that it just works. That means a lot.
This isn’t a bad camera, just a confusing one. I’ve come to the conclusion that Sony has made this for multi-cam situations and crash cams, as evidenced by the ability to control up to 5 cameras with the app alone and by some of their literature. A multi-camear “bullet time” demonstration was quietly going on at one of the scenes. I’d guess they’re also aiming at the 360 Video market (NOT to be confused with VR because they are not the same thing) as people are using A7s’ and RX100s for this as we speak.
All things considered, if you’re in that sort of crash cam situation or the small form-factor and the ability to adjust settings for specific shooting scenarios is required, this might be a good camera to look at. If you’re in a cinema scenario and have the time to dial in settings, then it would be a decent choice. However, in most situations, it’s really not a replacement for your GoPro. Aside from not being very wide-angle, you can’t strap the RX0 to your Snowboard helmet and just start riding due to all the aforementioned menu-fuddling in the same way you can’t just turn on a FS700 and just start shooting. If you’re thinking this will replace your GoPro, you’re going to have a bad time.
The post Hands on with the Sony RX0 appeared first on ProVideo Coalition.
First Found At: Hands on with the Sony RX0
0 notes
Text
JUMP + MAIN SHOT MOVEMENT
for the jump towards the fence, I done pretty much the exact same method i used for the first, opening effect. The only difference being, I changed the direction of the ghosting effect. so it moves towards the gate. Other than that, there wasn't anything else i had to do differently.
Now for the main shot, I AM SOOOO EXCITED TO DO THIS.
so im just going to get straight into it because i dont want to keep on.
3D SOFTWARE
First thing i done was think about different ways it would be possible to create this effect. I watched the clip over and over so i could confirm that the camera does in fact, move from one side of the keyhole, through and out from the other. Meaning, they couldn’t have physically done this with an actual camera unless it was one of those spy snake camera things... (it wasn’t)
So, seeing as they used CGI, my first idea was to go to cinema 4d and try to recreate a keyhole and animate a camera coming through, and by adding greenscreen footage of me jumping, i may e able to achieve the effect with motion blur added to hide the imperfections. Although thats never a good idea to have in mind, and an easy way out.
Problems with this is, i need to have an effect that is the most realistic it can be and i dont think i will be able to achieve this in 3d software with my limited knowlege within the software. So, that idea is out of the cards.
FILM IT
The second idea i had was to put either an extremely wide angle lens on my camera and see how far into the keyhole i can get it, so that, with a digitally added zoom, i may be able to fake the effect of coming from one side to the other. The only problem with this is that i’m filming in 1080p and if I zoom in any more than 25%, which i probably will need to, the video will be really pixelated and not look good. still an option though.
PHOTOGRAPH
this is my favourite trick, and i come across it myself actually when trying to animate a friends photo. But the idea is simple, My camera takes images at 18mp, which is 5184 x 3456 pixels, which is the equivalent to a 5k video ratio. That meant i would be able to zoom in to the image to a super small size, and still remain an HD image. Heres an example of how much i can zoom.

i just pulled an image of google, but you get the idea, its a lot. and thats only 1080p, theoretically i could go another 20% and still, remain HD. Bad hd, but its HD.
So, i wanted to test out this method as i’ve done it before with my instagram, but i needed to make sure it would work as its the most important effect in the film.
(This will be quick as ill get into the main effect afterwards)
I first took a photo of the keyhole on my shed, i know i’m not going to be doing a keyhole, although i just wanted to test it because if it works with the keyhole, it will defiantly work on the fence.
Once i had that i took it into adobe photoshop raw to edit the details and also then cut out the black from the photo.
I then took a random image off google to use as the background as it was only a test.
In after effects i opened up both photos and placed them in 3d space.
to give the keyhole a 3d depth look, i duplicated the keyhole layer and moved it back in space slightly. This is a simple trick to fake 3d.
After keyframing the keyhole layer to move back extremely fast, with motion blur, this is the effect i achieved. I think i nailed it if i do say so myself.
youtube
Its quick, but i matched it to the speed of the one in the film, and that was the rsult, super happy with it, and i now know ill be able to pull of the effect for the main video.
NOTE: There was a lot more to it than i made it look like
MAIN SHOT
So for the main shot, i first went out and used my 50mm 1.8 lens to take a photo of the gate triangle hole. i took a few photos at different exposure as i never like to rely on the cameras screen.
I then opened the photo up, yet again in photoshop raw, which i would first tweak with the shadows and highlight, and most importantly, increase the clarity to 100%, i wanted to punch out those wood grains.
After this i opened it in photoshop and started to manipulate the photo to make it better for the video, and more visually pleasing. I used the spot removal tool to fix a few minor things just to clean up the wood, and mainly, made the hole symmetrical, so that it didn’t look odd in the video. This is the process of the photoshop edits.
GIF:
its a simple clean up process, but it makes it a whole lot nicer to look at. and will be better for video.
Once i had this i then took an image through the fence hole of the background.
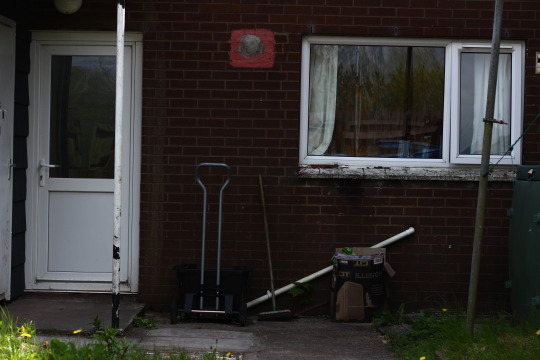
This is in focus so that i can choose how out of focus I want it to be when coming around to editing in.
To blur the background, i applied camera lens blur these were the settings i used to get the blur i wanted.
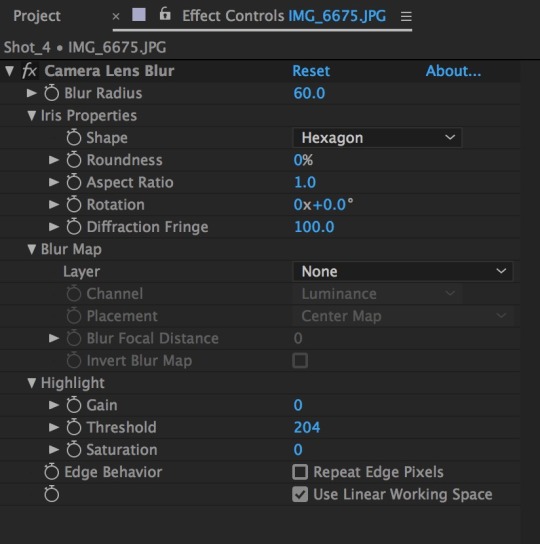
Once i had done that, i the background layer back in 3d space, and then scaled it back up to fit the size of the comp.
Then i added in the Fence layer and brought that forward in 3d space. I tried to align the images as close as i could to how i seen them in person, and this is the result i had.
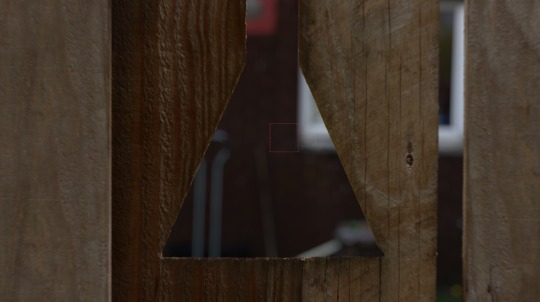
Now it looks okay, but theres still so much that needs to be done. First off, the image is too flat, although theres depth, a camera has a field of view, meaning theres perspective. This means i need to fake the 3d perspective of the fence and add it back in.
to do this i’m simply going to do what i done for my test and duplicate the fence layer. once i done this i pushed it back in 3d space slightly until it was around about the same thickness as the actual fence was in person.

I added a fill and used the colour picker to match the wood colour and this is the result I had from doing that.
Still has a lot of problems, but its getting there. Next i am gong to bring back the wooden textures as at the minute, it doesnt look right. to do this i simply am going to duplicate the wood fence layer and place that ontop of the 3d depth layers. and then by using a blending mode, i can maintain the wood textures on the 3d depth.
Its subtle, but they are there. Now the effect is starting to look much more real. Obviously, because you know i’ve edited it, you a prone to see its fake, but to any average person. They wouldn’t know, hopefully.
KEYFRAMING
now to create the effect of the camera moving from the one side of the fence to the other, i am not actually going to create a camera, but move the entire scene itself. Using keyframes i am going to move the fence from off camera, to fly past and slowly come to a stop in frame.

As you can see i have set the 4 layers to be parented to the null object, which is what i use to move all layers together without having to do them individually.
Once I had done this, i then just key framed the fence to start off screen, at a really far distance, and then end up on screen towards the end of the comp.
And thats the movement sorted. Because i have used a parent, i didn’t need to separately keyframe the depth of the wood, which is good because by doing it manually, it would have been jerky and not smooth. With motion blur applied, the effect works wonders, and you can see the 3d depth take place when the camera is coming through the hole.
and thats the movement for the main shot done. Now i just need to add the footage of me jumping and then i can take it into premiere to edit all the footage together.
0 notes
Text
iPad Pro w/ Apple Pencil vs. Wacom Cintiq Companion
Hello everyone!For Christmas this year, I received an iPad Pro 12.9in and an Apple Pencil!
As someone who has been practicing digital art for almost 10 years now, I thought it made sense to throw my two cents into the internet about this tool. I also included a few other people's thoughts on each device to try and make the review as well rounded as possible!
Keeping in mine that my Cintiq Companion 1 is three years old now, and my iPad is the latest 2016 edition, you can take this review with a grain of salt if you like.
Let me first start by listing the tools I have used to draw with...
Drawing Tablets I've used:
Wacom Bamboo Tablet (No longer available)
Wacom Intuous 4 Tablet (No longer available?)
Wacom Cintiq Companion (First gen, 2013, Windows 8)
and now:iPad Pro 12.9 w/ Apple PencilDrawing
Programs I've used:
Photoshop Elements
Corel Painter
Sketchbook Express
Paint Tool Sai
Fire Alpaca
Photoshop CC
Procreate App
Medibang Paint App
The Cintiq
I've had a Wacom Cintiq Companion v1 since 2012-2013 ish, and I have always loved it. I took to drawing directly on the screen pretty fast, and since beginning to use it, I've always had a slight disconnect when returning to regular drawing tablets. I'm just not as used to it anymore, but I do use them in a pinch.
The Cintiq has an amazing Tempered Glass screen which gives the texture of the drawing a really nice feel, though it seems to make its accuracy suffer, it's very easy to tell that you are drawing on a SCREEN and theres a bit of glass between you and your drawing, but you hardly notice it when drawing usually.
However, Wacom recently, in my opinion, has been going down hill with its portable tablets...I haven't tried out/seen anyone usng the Mobile Studio, but maybe that one is better! Sure looks promising!
My cintiq's charger has been broken for some time now, and after doing some research I found out that any tablet manufactured before July 2014 has a really bad charging problem...and Wacom will fix it for free, but it's been known to just be a band-aid fix. Many friends have said this about their external drawing tablets from Wacom in recent years as well. It makes me miss my old Intuos 4!
My Cintiq has a battery life right out of the box of between 8-10 hours. I use photoshop extensively to draw, and sometimes switch between that and other programs, making 8 hours about the max I can get out of it. After a year or so, that went down to 5-8. So I wouldnt use this more at home than on the go.
Pros:
OS is up to you (Mac or PC available)
Desktop Applications (Creative Cloud, etc)
Pen w/ eraser on back- Comes with Stand/Case/Pen in one cost
Sort of Portable
Custom Brushes/Downloadable Brushes
Can use on its own w/ no external monitor
Pressure Sensitive
Cons:
Heavy heavy heavy!
Very thick
Fan gets loud
Included stand is pretty bad
Calibration is off near the edges (Granted, not many people draw near the edges)- Wacom usually has problems
Horrible Battery life
Takes a long time to charge
Screen resolution is odd
Colors are always slightly off
While my review is of the Cintiq Companion 1, I've noticed not much difference in my friend's Cintiq 2, aside from the battery charge lasting a little longer, and it being a bit lighter in weight, but they had this to say:
"Haven't used the iPad so i'm biased - t's the industry standard, I like having the touch keys while drawing, i like the texture of the surface, and it's powerful enough to run Adobe programs without lag, I also like that it's fairly portable if you don't mind the weight. The color on screen I think is sliiiiightly off bc whenever I transfer it from there to my phone or elsewhere something is just... off with the colors. Cintiq is powerful. Use it if you're like professional, because Adobe programs and other stuff. Plus it's a laptop. But if you're just looking for something to do digital art on, the iPad is cheaper and will do it for you from what I hear. I enjoy [my cintiq companion 2], it does what I need it to and that's all I asked for."
The iPad Pro 12.9in w/ Apple Pencil
Now to be fair, I've only had my iPad for a week and a half, but I think that's even more impressive, because I love it WAY more than my cintiq
The battery life of the iPad is already way longer than my cintiq ever had. I've charged my iPad once since unboxing it. (it was unboxed at about 70%) and thats with extensive drawing every day. Apple says it gets between 10-18 hours of life depending on what you're doing, and boy is that true The downside is that this thing takes FOREVER to charge again, but for how long it lasts, I suppose it's a small price to pay.
The Apple Pencil has an amazing battery life and charges incredibly fast. I've topped it off once since getting it, and it charges fast. Charging it for 15 seconds supposedly gets you another 30 minutes of life. I haven't tested that out, but I wouldn't doubt it honestly. I was able to charge it from 12% to 100% in just 20 minutes, and that's the only time I've had to charge it!
The Apple Pencil feels great on the iPad, and glides really nicely and naturally. It didn't take me long to get used to it at all, it's very much like drawing on the cintiq screen which I liked. However the pressure sensitivity is even more accurate, and the ability of the pencil to draw exactly where you put down your tip is INCREDIBLE. It's very much like drawing on paper.
The size is also great, as it's like drawing on any A4 paper if you draw portrait, and the real-estate of the screen drawing landscape is even nicer. The resolution is much more comfortable than the cintiq's, and I don't feel like I'm drawing in a super cramped area. (Though this all depends on the App you use, I'm not a fan of Medibang Paint as I feel like everything is so squished!)
The Apple Pencil also has the ability to draw tilted. The cintiq's stylus has this too, but it's not as accurate or helpful. This is what makes the Apple Pencil a PENCIL and not a stylus.
However, the Pencil and iPad, which are sold separately, don't come with anything to hold the Apple Pencil in, so I had to buy a sling for it, which was only 6$, but still. It's an expensive item and you're going to want to keep it, not lose! Before buying the sling, I was constantly worried about misplacing my pencil. I don't mind not having a stand as the iPad Pro is so comfortable to draw with it in your lap, sitting anywhere you like. If you're looking for a stand for it, they're pretty cheap on Amazon
Pros:
Better Pressure Sensitivity/Accuracy
Amazing Battery Life
Extremely Portable
Cheap or free Apps W/ Great Quality. Bridging the gap for Photoshop.
Pencil feels great to draw with
iOS Updates
Custom Brushes/Downloadable Brushes
Feels more natural to draw on
No Lag
Cons
Pencil/Tablet sold separately
Slow to charge
Case/Accessories all sold separately (I'm told Mobile Studio Cintiq will also have everything sold separate)
No Desktop Apps (Photoshop, Creative Cloud, etc)
No cursor to show how big your brush is (in Procreate at least)
ONLY compatible with iOS for iPad
Not a full computer
I was lucky enough to have professional Comic Artist, K. Lynn Smith of "Plume" give me her thoughts on the iPad Pro as well!
"Pros, extremely fun to draw on, it replicates pencil and paper perfectly and it's portability is amazing. You can draw anywhere. Cons: not a lot of storage space on the iPad, sometimes the airdrop goes wonky, and though the programs available are amazing, there are some options not available...like assistance in drawing a perfect circle or stamp/clone tool. "
You can read Plume here!
The Final Word
In all Honesty, I think I'll be using my iPad Pro for most of my digital work from now on. Between all the apps and features, especially with ProCreate, this tablet is really bridging the gap between a Ciintiq and an iPad. Procreate specificaly is missing a few things such as a crop tool, and a text tool. It also doesn't have quite as many ways to edit as Photoshop does, but it's got most of them and enough that it doesn't bother me. You can also save your files from this app as JPEGS, PNGs, PSDs, and GIFs, to name a few.
My Cintiq is currently on it's way out and wheezing its way through life , but I don't think I'll be totally getting rid of it in case I need to bring something from my iPad over for photoshop, but honestly, I do that with my traditional work already so that really isn't an issue to me.
If you're looking to get into digital work, I recommend the iPad Pro 12.9 and Apple Pencil over the current Cintiq Companions. When adding in all the things you'll need, it comes out to the same price as a Cintiq Companion.
While the Cintiq and Wacom ARE the "Industry Standard", you really cannot tell the difference any longer, and I know of many professionals who use strictly the iPad Pro 12.9! Most studios/Art Directors care about what the work looks like, not what you made it on. (unless you're animating!)
0 notes
Text
Adobe RGB vs sRGB Profiles
The Adobe RGB (1998) colour space is an RGB (RED, GREEN BLUE) colour space developed by Adobe Systems, Inc. in 1998. It was designed to encompass most of the colours achievable on CMYK colour printers, but by using RGB primary colours on a device such as a computer display.
sRGB is the standard RGB colour space created cooperatively by HP and Microsoft in 1996 for use on monitors, printers and the Internet, and subsequently standardised by the IEC as IEC 61966-2-1:1999. It is often used as the "default" colour space for images that do not contain any colour space information, especially if the images are stored as 8-bit integers.
To better understand which one to use, you must first understand the difference between the two. AdobeRGB, by all accounts, is better, as it represents a wider range of colours. How much better? They say that AdobeRGB is able to represent about 35% more colour ranges than sRGB is able to. But does that make it the best for photography? Not exactly, as the world works with sRGB far more than it does with AdobeRGB.
How to Accurately Convert Your Photos from AdobeRGB to sRGB
Adobe Lightroom
If you use a tandem of Lightroom and Photoshop, Adobe makes this conversion process painless for you. My workflow and many others consist of loading images into Lightroom, making basic corrections, then importing the image directly into Photoshop. Upon importing to Photoshop, you can have your images converted for the web with just a few simple setting adjustments. Simply go to Edit>>Preferences>>External Editing and adjust your colour space to sRGB when being imported into Photoshop. This technique is the most preferred, as it'll automatically convert all images you export to Photoshop to sRGB, without any colour loss in the web format. This will also allow you to keep both an AdobeRGB copy of the image for print, and an sRGB version to use for the web and everything else.
Adobe Photoshop
If you work without Lightroom and still want the benefits of AdobeRGB colour space, you can also convert your images for the web in Photoshop. Simply navigate through your menus to Edit>>Convert To Profile and change your destination space to sRGB after editing your image. To ensure that you do this every time, I recommend you incorporate it an action used for saving your images. Remember, failure to convert your images prior to saving them for the web will result in dull and unflattering colour tones.
Conclusion
All of this is very confusing and leaves you feeling overwhelmed, you can switch your camera to sRGB colour space. It'll still allow you to photograph and print beautiful images. However, if you're shooting specifically for print, AdobeRGB offers more range and versatility in the images taken. It all really comes down to personal preference, AdobeRGB does offer more colours, but at the cost of complicating things for a subtle difference in your photos. However, if you're a perfectionist, like me, the extra steps taken to shoot in AdobeRGB may be worth the headache to achieve nicer prints, and get the best of both worlds.
References - Fstoppers and Wikipedia
#adobe#photohop#ICC#icc#colour profile#colour profiles#ICC colour profile#icc colour profile#icc colour profiles#photoshop colour profile#adobe colour profile#printing#print#prints#color#colour#RGB#rgb#sRGB#Adobe#Adobe RGb#Adobe RGB 1998#Printing
0 notes
Last Seen Blogs

subiker
SUBBIKER

robby2u
Untitled

thelonglist
Fanfiction Recomendations (all BNHA for now)

m2track
M2TRACK Rastreamento Veicular

leblogdeciccio
Le Blog de Ciccio