#which i usually do to reduce file size and put more focus on the animal(s) in the clip
Video
shy little cape fox
[source]
#long fox is long#they're so cute#and very very shy#and i love it so much when animals lie down to slurp#and for once no need to trim the video!#which i usually do to reduce file size and put more focus on the animal(s) in the clip#but this is fine#namibia cam#animals#cape fox#foxes#cute
2 notes
·
View notes
Note
same anon from before,, ;u; how did you like,,, give them filters?? they're very pretty, not to mention my gifs are always over the limit for some reason, even when they're extremely small
i’m flattered that you have chosen to come to me!! under the cut i will be covering the most basic of basics in my gif making processes. i use photoshop CS5 but these are likely transferable to other versions of photoshop dont take my word on it ok buckle up kids
Sizing
To get started you obviously want to find what you want to gif. Generally, I’ve found that the less realistic the footage is, the easier it will be to make it a small file. For example, making an adventure time gif will be much easier to get under tumblr’s limit than a live action movie or show. Remember that tumblr’s gif size limit is 3MB. There’s many factors you can control to get the picture size down, but the main two are the amount of frames in a gif and the pixel size of the image.
I try to keep my frames between 80 and about 130. The fewer frames will help decrease file size, but you have to watch the animation for sometimes too few frames can make the gif hard on the eyes or tacky (for lack of a better word).
For image size, I first crop the image to the part I want to gif and then reduce it to a width of around 500px. This is for the standard 2x4 post I usually do (example). It might look small in photoshop, but remember tumblr shrinks it to fit in the post.
Coloring
The best way to color gifs (or add filters) is to experiment. There’s really no correct way. I’ll show you where you can find the tools to start experimenting.

First, I like to put all my layers into a group folder. Then, you’ll want to click on this black and white circle which will open a drop-down menu. It’s fun to mess around with all of them, but I’ll talk about the ones I use the most: Brightness/Contrast, Levels, Vibrance, Hue/Saturation, Color Balance, and Selective Color.
Brightness/ContrastThis one is pretty self-explanatory. This feature makes your picture lighter or darker and can add more contrast between the colors in the image.
Let’s start with the base image. I’ve taken a random clip of pearl and agate for the purpose of this tutorial. This is what it looks like in its unaltered form. The brightness and contrast window is right next to it.
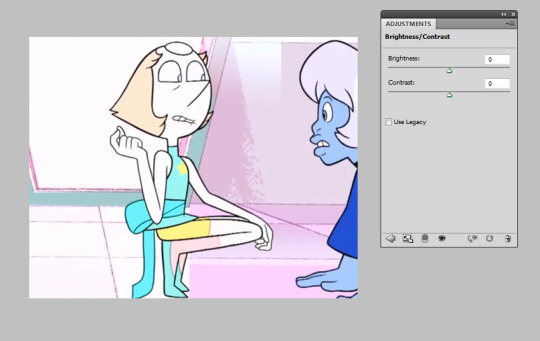
Unaltered, the image is already very bright by itself. You’d play with this setting if you wanted to make a darker gif with that scene or maybe bring out the colors with less contrast. It might help with a pastel gifset, which I will talk about in Levels.
LevelsI’ll be honest, I didn’t know what this meant until I wanted to try pastel sets and searched for tutorials.

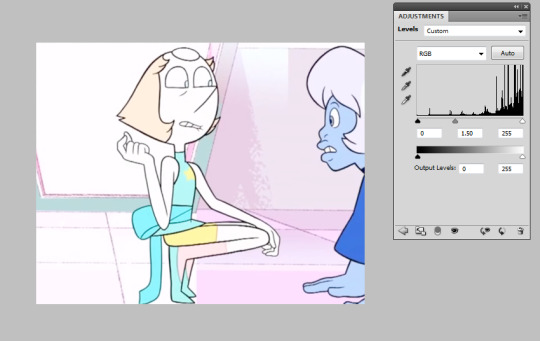
Levels is going to give you a weird ass lookin’ graph like this. It will vary depending on the original image, so don’t panic if it looks different than my example. Bringing the middle arrow to the right of the scale makes the image darker and more vibrant, like so:
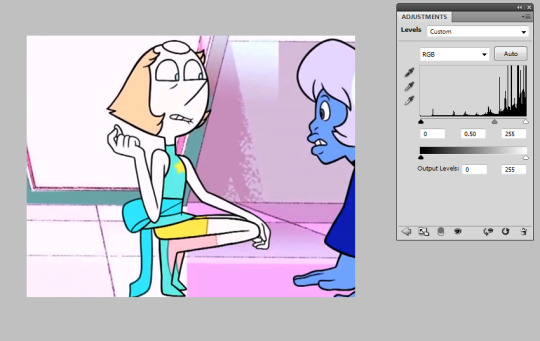
On the opposite end, bringing the arrow to the left will give a more pastel effect.
It’s best to just play around with this one; results really depend on the original image. You might want to go only a little to the left, or much higher -- you’ve got to use your eye and what you think looks best.
ViberanceViberance is a good choice for when I want to bring out the colors of my gifs or even tone them down.

If you look back earlier at the original image, this picture altered with the viberance adjustment has a bit more color. It’s more... vibrant. Saturation is used to make the colors pop (going right) or make the colors more dull (going left). I upped the saturation in the image above; let’s see what happens when you go down:
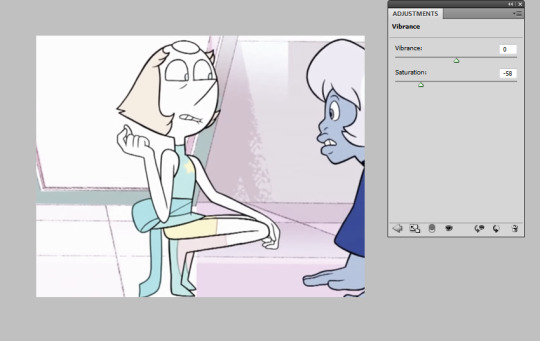
It takes out the color, but not so much so that it is made black and white.
Hue/SaturationThis setting is similar to the saturation in viberance, but you can get more detailed in this one. Let’s say I want to tone down agate and bring the focus on pearl. We’re gonna go back to the unaltered clip. In the window, there’s a drop-down with different colors. These are the main color categories photoshop works with, so to speak.
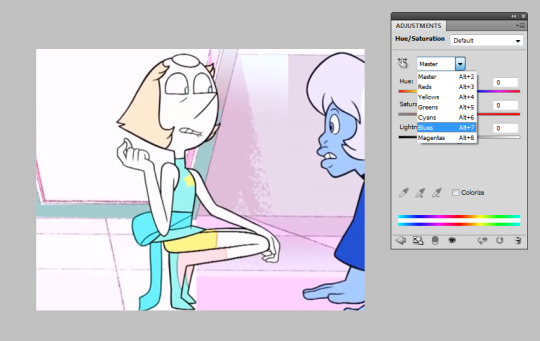
Let’s go to blue, as that is agate’s main color. Our options to mess around with are the hue, saturation, and lightness. I’m going to take down (move the arrow to the left) agate’s saturation and lightness.
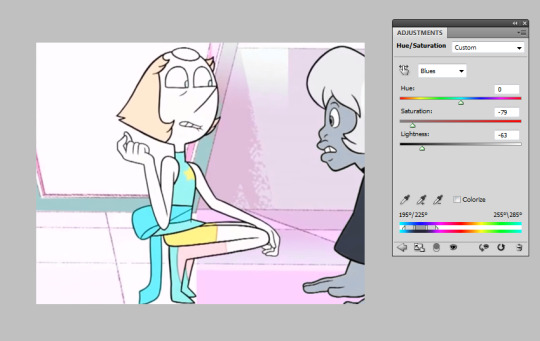
Now she’s practically black and white while pearl, who doesn’t have any blue on her (it’s cyan), stays the same.
Wondering what the top bar is for? You can use that to change the color. Let’s say for some reason, I wanted to make this blue agate one of pink diamond’s agates instead.

Move that bar around +90, you’ve got a pink agate. It was a little grainy, so I messed with the lightness too. You can experiment with all kinds of colors!
Color BalanceI rely on this one a lot. Here we are with the unaltered image again. In this window, you can see three tones -- shadows, midtones, and highlights -- as well as three color bars. The highlight setting colors the pictures highlights, the shadows color the shadows, and the same for midtones. This is a good setting for a “filters.”

I would be lying if I didn’t say my main strategy here is to just mess around with it until I get something that looks decent. I’m going to give this a pink/magenta-y color balance setting as 1) I like it on Pearl and 2) I just like it in general. This image is a bit over-exaggerated for the sake of a tutorial.
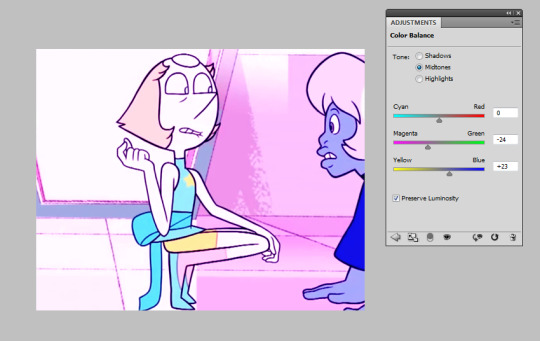
As you can see, moving the arrows toward magenta and blue have given it a pink “filter.” It is up to your best judgement to decide how far those arrows go down the bar, and don’t be afraid to combine changes in the other tones, too!
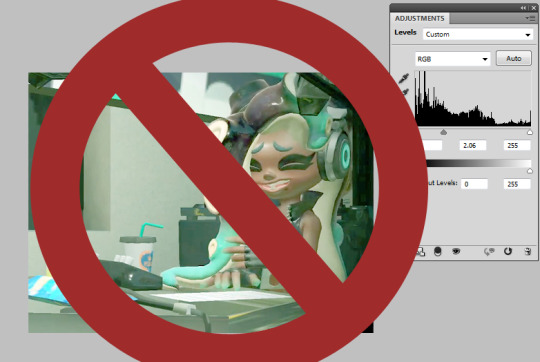
Selective ColorThe main reason I use this adjustment is to avoid whitewashing. It’s easy to do it by mistake when making pastel gifs. Let’s take Marina from Splatoon 2 and say I want to make a pastel splatoon set. Here’s the original image. I already used Color Balance to get the color I want.

Now I’m gonna add the pastel with Levels -- AHH! What happened to her skin?? NO THANK YOU. BAD.
Let’s fix that immediately. Here comes Selective Color! It will give you the option of colors to alter. We want to choose Red, as where that’s where most of the brown comes from. She also had a bit of yellow in her face, so I altered that too. Go to the bar labelled ‘black’ and push it to the right.
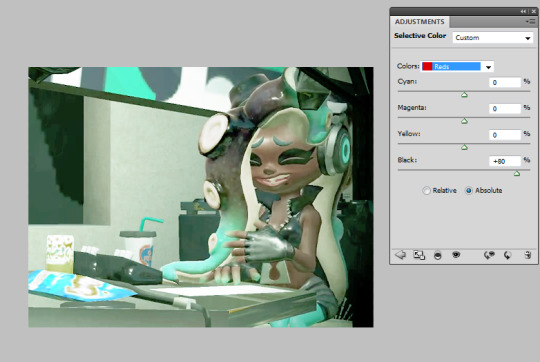
Better! She keeps her dark skin while still keeping the pastel feel.
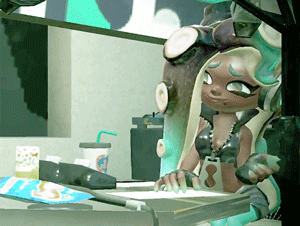
What a cutie!!
You can use this adjustment setting when you don’t want a certain color to be as altered as the others.
Saving SettingsSaving your gif is probably the most frustrating part of the entire process. I sit waiting for it to load, asking it to please be under 3.0 MB. If you don’t already know, File>Save for Web & Devices will look like this.
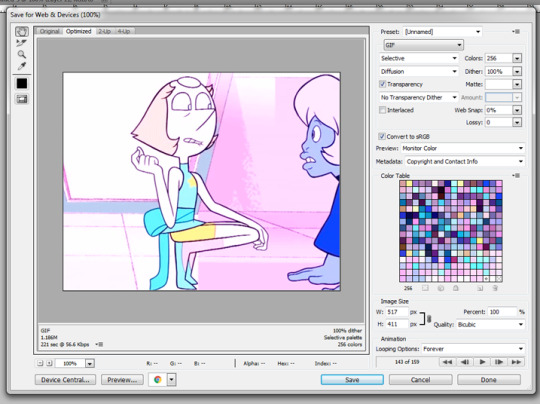
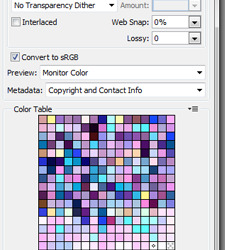
Sometimes, Photoshop will make your gifs look like garbage. This is frustrating. To work around it, you are welcome to copy my settings. Be sure to change the colors to 256 for the best quality.
Luckily, my gif came out to below 3.0MB. If yours doesn’t, don’t panic. Make the image smaller or take out some frames.
Hope this helped! Happy giffing!!
#tutorial#gif tutorial#photoshop tutorial#coloring tutorial#ask#let me know if you have any questions#Anonymous
12 notes
·
View notes
Text
Version 467
youtube
windows
zip
exe
macOS
app
linux
tar.gz
I had a good week cleaning some things up for end of year.
couple of scanbar things
I polished the new autohiding video scanbar. A bunch of the layout and coordinate detection code of the scanbar and the media canvas behind it is less jank. If you had some flicker or weird mouse-popup behaviour last week, I hope it is better now!
If you are a macOS user however, I held back one of the changes. There's a background-erasing hack I put in a couple years ago because without it macOS media viewers went to 100% CPU. I hope this is no longer true, but I'm not certain, so you still have the flag on by default. Please hit _help->debug->gui actions->macos anti-flicker test_ and then try browsing some images and video in a new viewer. Does your client lock up, or is it ok now? If everything is good, I'll remove the flag and you can get some nicer anti-flicker tech too.
full list
new scanbar cleanup:
the media container's scanbar and volume control are now combined on the same widget, meaning they now show/hide in sync and faster. their layout calculation is also more sensible. the new controls bar also has a thin border to make it pop better against a background video
improved the way some auto-hide anti-flicker tech on the scanbar now works. it all hides a frame faster sometimes
figured out some new anti-flicker tech to reduce/eliminate a frame of stretch when flicking from a static image to an mpv video, particularly for the first or second time in a session
fixed a bug where clicking the global mute/unmute on an mpv player meant that certain shortcut keys (usually those with arrow keys) would not work on that player again. (it was a focus issue on the button, which then captured some form navigation keys but they had nowhere to go)
brushed up some mouse coordinate testing logic across the program. some linux clients had trouble with the new animation scanbar popping up over mpv, I think I improved it!
fixed another type problem with newer python/PyQt5 on Arch, also in scanbar coordinate testing
fixed some dodgy colours in the scanbar initialisation and volume control border
macOS users: I undid a long-time paint hack on the media container and the static image canvas. Qt is responsible for clearing the background again, which allows me to remove some jank anti-flicker tech. HOWEVER, the original reason for this hack was because without it, old macOS went to 100% CPU whenever the media viewer was showing something. therefore, to be safe, this option is still on for macOS users for now. you'll get a little flicker when browsing. please try hitting _help->debug->gui actions->macOS anti-flicker test_ and do some mixed video/image browsing. does your whole damn client lock up?
.
misc:
the 'file log' and 'search log' buttons are now a new widget class that puts an arrow on the side that opens a menu. the secret right-click menus of these buttons is now exposed for all
fixed a bug affecting some greyscale pngs with ICC profiles--they were coming out pure white due to a colourspace conversion problem
fixed an import problem when PIL could not load a file (due to file malformation) but OpenCV could. this was causing a failed import from the new ICC profile detection code
when the downloader hits a broken image file that cannot be imported due to malformation, the status is now 'error' instead of the incorrect 'ignored'
fixed the duplicate file filesize comparison statement sometimes showing > in one direction and ≈ in the other. it happened when the larger file was between 20/19 and 21/20 times the size of the smaller, just a logic typo (issue #1028)
the trash maintenance daemon is moved from the old threaded daemon system to the new repeating job worker pool. this is the last daemon cleaned up, so I am retiring the old and mostly defunct 'no_daemons' launch argument. a variety of other daemon infrastructure for things like shutdown checks is similarly removed. the program also now waits for the newer daemon jobs to finish working on shutdown
moved most client daemon jobs like repository sync and dirty object save down so they start after the first session is loaded rather than right after boot
if a file is called to regen its thumbnail but currently has no dimension, this is now a no-op rather than an error. in the situation where users force thumb regen before metadata regen and encounter this, it is sorted out later when the metadata regen recognises new dimensions and reschedules the thumb regen
added an extensive user-written guide to the --db_synchronous_override launch argument to the launch arguments help page. it is possible and safe to run the program with synchronous=0 as long as certain caveats are obeyed. thanks to the user who figured this out and wrote it up
the downloader engine now discards source urls in an import job if they have the same domain as any existing primary url. this will ensure that if a booru has a link back to itself as a source url, when the 'source' is really an alternate rather than a dupe, it won't be added in hydrus as a known url for that imported file
misc cleanup in downloader system and file/search log UI
fixed a type bug in the file and search log 'import from png' action. if you have existing pngs previously exported from here, they will import ok now
refactored the various hydrus compression code to a new HydrusCompression file
exported serialisable data pngs such as from file or search log that hold simple Strings now always compress the data before embedding it in the png. existing pngs that hold uncompressed strings should still load ok
the payload in an exported png is now always compressed, and the payload description always states the uncompressed size
sped up client shutdown when network traffic has been paused the whole time and a repo sync job might have wanted to run. these jobs also do not hang on a thread worker if network traffic is paused, but they should wake immediately when it is unpaused
the hydrus login system is now resistant to connection failures; previously it was getting hung up and jamming the whole hydrus sync system when a server was down
.
client api:
added GET /manage_database/mr_bones to the Client API. it returns a JSON Object with the same numbers used in the _help->how boned am I?_ dialog
incremented Client API version to 23
next week
I'm on holiday for a week, so I'll be back working on Saturday the 1st. I want to grind back into getting multiple local file services done. Thanks everyone!
𝕸𝖊𝖗𝖗𝖞 𝕮𝖍𝖗𝖎𝖘𝖙𝖒𝖆𝖘!
0 notes
Text
How to Optimize an Image For SEO On Your Site
SEO For Images: Optimizing images for the search engines
1. Resize your images
Image size and file dimension are not the exact same point. Image dimension describes the measurements of a picture (e.g., 1024 by 680 pixels). Submit dimension is the quantity of room needed to save it on the server (e.g., 350 kilobytes).
Images with greater resolution and larger measurements (usually created with a specialist electronic camera) slow your web page load times considerably. While they work well for print reproduction, you require to reduce the documents dimension without losing excessive top quality for them to work well online.
POINTER: Utilize this overview to determine the very best image dimensions for social media platforms.
Choose the right data format
PNG, JPEG, and also GIF are all popular. Each has its benefits. I advise JPEG for pictures with lots of color and PNG for simple images.
hink about the last time you submitted a picture to your site. Chances are you downloaded it from a supply digital photography website, uploaded it to the backend of your website, and then put it to the page.
This makes a beaming example of photo optimization, right? Not quite.
You have actually included a giant bowling round weight to your site that’s decreasing the web page speed. And, internet search engine can’t read your pictures without alt message.
Allow’s transform that.
Over 20% of all U.S. internet searches occur on Google Images, according to 2018 data from Jumpshot.
Search Engine Optimization beginners and pros alike know that optimizing photos for your internet site is infamously worth the time spent.
Dan Morgan at WebSpection got one of his photos to place # 1 in Google Images for “ideal individual in Cardiff” in less than four days by optimizing his picture.
And, Robbie Richards produced 150,732 visits by adding picture alt tags, pressing photos, and also a few other SEO tricks.
Always use images
Images, when used with care, will help readers better understand your article. The old saying “A picture is worth a thousand words” probably doesn’t apply to Google, but it’s certainly true when you need to spice up 1,000 dull words, illustrate what you mean in a chart or data flow diagram, or just make your social media posts more enticing. To find out more about SEO for local business go here.
It’s a simple recommendation: you should add images to every article you write online to make them more appealing. What’s more, since visual search is getting increasingly important — as seen in Google’s vision for the future of search — it could turn out to provide you with a nice bit of traffic. If you have visual content it might make sense to put image SEO a bit higher on your to-do list.
Google Images was recently revamped with a brand-new interface. You’ll also find new filters, meta data and even attribution. The cool new filters show that Google increasingly knows what’s in an image and how that image fits into the larger context.
Google’s new interface for Image Search was released at the end of September 2018
Finding the right image

It’s always better to use original images – those you have taken yourself – than stock photos. Your team page needs pictures of your actual team, not this dude on the right or one of his stock photo friends. Off topic: never mind that dude needs a haircut.
Your article needs an image relevant to its subject. If you’re choosing a random photo just to get a green bullet in our SEO plugin’s content analysis, then you’re doing it wrong. The image should reflect the topic of the post or have illustrative purposes within the article of course. Try to place the image near the relevant text. If you have a main image or an image that you’re trying to rank, try to keep that near the top of the page, if it makes sense.
There is a simple image SEO reason for all of this: an image with related text ranks better for the keyword it is optimized for. There’s more about image SEO later.
Alternatives
If you don’t have any images of your own that you can use, there are other ways to find unique images and still avoid stock photos. Flickr.com is a nice image source for instance, as you can use Creative Commons images. Don’t forget to attribute the original photographer. I also like the images provided by sites like Unsplash. Our blogger Caroline wrote an awesome overview of where to get great images. Steer clear of the obvious stock photos, picking the ones that look (ok, just a bit) more genuine. But whatever you use, it seems like images with people in them always look like stock photos, unless you took them yourself. In the end, that’s always the best idea.
Obvious alternatives for photos could be illustrations, which is what we use, or graphs. An honorable mention should go to animated GIFs, as they are incredibly popular these days.

But even though animated GIFs are popular, don’t go overboard. It’ll make your post harder to read, as the movement of the image distracts your readers’ attention. They can also slow down your page.
Preparing images for use in your article
Once you have found the right image – whether an illustration, chart or photo – the next step is to optimize it for use on your website. There are a number of things you need to think about:
Choose the right file name
Image SEO starts with the file name. You want Google to know what the image is about without even looking at it, so use your focus keyphrase in the image file name. It’s simple: if your image shows a sunrise in Paris over Notre Dame Cathedral, the file name shouldn’t be DSC4536.jpg, but notre-dame-paris-sunrise.jpg. The main keyphrase would be Notre Dame, as that is the main subject of the photo, which is why it’s at the beginning of the file name.
1. Resize your photos
Image size and also file size are not the exact same point. Image size describes the dimensions of an image (e.g., 1024 by 680 pixels). File dimension is the quantity of area needed to save it on the server (e.g., 350 kilobytes).
Photos with greater resolution and also bigger dimensions (typically created with a professional electronic camera) sluggish your web page load times considerably. While they function well for print reproduction, you need to scale down the file dimension without losing too much top quality for them to function well on the web.
IDEA: Use this guide to identify the very best image sizes for social media sites systems.
Choose the best file format
PNG, JPEG, and GIF are all prominent. Each has its benefits. I suggest JPEG for images with great deals of color and PNG for straightforward images.
This one is essential for SEO as well, and if you’re using WordPress it’s done for you since it was added by default from version 4.4. Images should have the srcset attribute, which makes it possible to serve a different image per screen width — especially useful for mobile devices.
Reduce file size
The next step in image SEO should be to make sure that scaled image is compressed so it is served in the smallest file size possible.
Of course, you could just export the image and experiment with quality percentages, but I prefer to use 100% quality images, especially given the popularity of retina and similar screens.
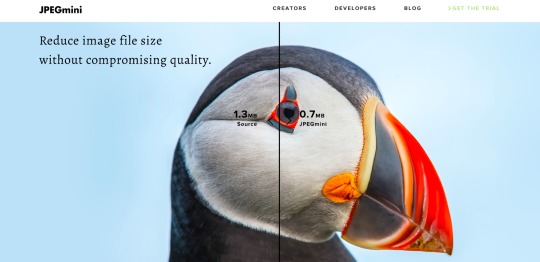
Tools like JPEGmini can drastically reduce image file sizes without artifacts
You can still reduce the file size of these images by removing the EXIF data, for example. We recommend using tools like ImageOptim or websites like JPEGmini, jpeg.io or Kraken.io.
When you’ve optimized your images, test your site with tools like Google PageSpeed Insights, Lighthouse, WebPageTest.org or Pingdom.
Adding the image to your article
While Google is getting better at recognizing what’s in an image, you shouldn’t rely on their abilities just yet. It all comes down to you providing the context for that image — so fill in as much as you can!
Now your image is ready to use, but don’t just throw it into your article anywhere. As mentioned earlier, adding it close to related textual content helps a lot. It makes sure the text is as relevant to the image as the image is to the text.
OpenGraph and Twitter Cards
Earlier on, I mentioned using images for social sharing. If you add the following image tag to the <head> section in your page HTML like this:
<meta property="og:image" content="http://example.com/link-to-image.jpg" />
That will make sure the image is included in your share on Facebook (and OpenGraph is also used for Pinterest, for instance).
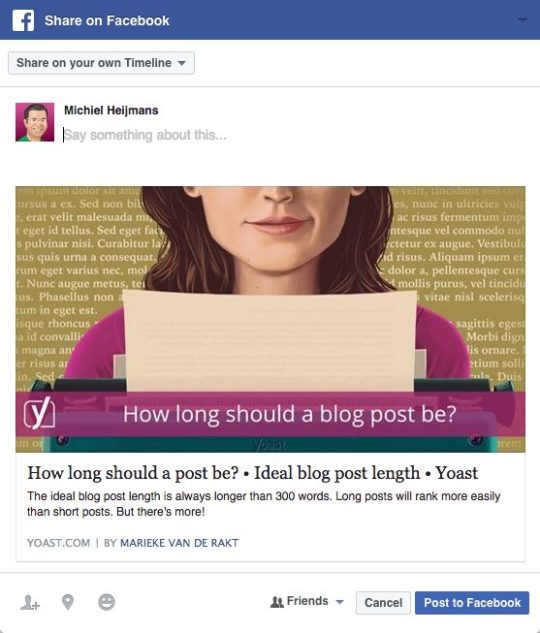
Our Yoast SEO plugin has a Social section where you can set and even – in the Premium version – preview your Facebook and Twitter posts. Make sure you use a high-quality image, like the original image you used in the post, as the social platforms use higher quality/larger images more often than not. If you have set this up correctly, and it doesn’t work, try to flush Facebook’s cache in the URL Debugger. Twitter Cards do the same for Twitter and are also generated by our plugin.
Alignment
This is one of my pet peeves: Images should never break the left reading line. I’m sure there are studies backing this up, but for me it’s personal. I just really don’t like it when text starts to the right of an image, only to jump to the left the next image down:
Maintain the left reading line; don’t align images to the left
If you use an image at the same width as your text column, that’s fine and it will even help emphasize the image more.
I’ll be honest: this has absolutely nothing to do with image SEO, but I saw the chance to express my opinion and used it! I think it’s bad for user experience. So, just to please me: don’t do this. Thanks, I appreciate it.
Captions
The picture inscription is the message that comes with the picture on the web page– if you check out the images in this post, it’s the message in the grey box below each one. Why are subtitles important for picture Search Engine Optimization? Since individuals utilize them when scanning a short article. People often tend to scan headings, images and subtitles as they scan a website. Back in 1997, Nielsen wrote:
” Components that enhance scanning include headings, big type, bold text, highlighted text, bulleted checklists, graphics, inscriptions, subject sentences, and also tabulations.”
In 2012, KissMetrics went even better, stating that:
” Subtitles under pictures are read on average 300% more than the body duplicate itself, so not utilizing them, or otherwise using them properly, means missing out on a possibility to involve a significant number of potential visitors.”
Do you require to include subtitles to every photo? No, due to the fact that often images offer other purposes. Determine whether you intend to utilize your own for Search Engine Optimization also or not. Keeping in mind the demand to prevent over-optimization, I ‘d say you ought to just add captions where it would certainly make sense to the visitor for one to be there. Think about the visitor first, as well as do not include a subtitle just for picture Search Engine Optimization.
alt text and title text.
The alt text (or alt tag) is included in an image so there will be detailed message in position if the picture can not be shown to the site visitor for any factor. I can’t put it any kind of better than Wikipedia:.
” In situations where the photo is not readily available to the viewers, possibly due to the fact that they have actually turned off pictures in their internet browser or are making use of a screen visitor because of a visual impairment, the alternative message ensures that no details or functionality is shed.”.
Make certain to add alt text to every image you utilize, and also ensure the alt message includes the Search Engine Optimization keyphrase for that web page (if ideal). Most notably, describe what’s in the photo so both search engines as well as individuals can understand it. The even more pertinent info bordering a picture has, the even more internet search engine consider this photo essential.
When hovering over a picture, some internet browsers reveal the title message as a ‘tooltip’. Chrome reveals the title text as was planned. Title message for images is comparable and also a lot of people who make use of titles simply replicate the alt text, however increasingly more people leave them out altogether. Why is that? Below’s Mozilla’s take:.
” title has a number of access issues, generally based around the fact that display visitor assistance is extremely unforeseeable as well as most web browsers won’t reveal it unless you are hovering with a computer mouse (so e.g. no access to keyboard customers).”.
It is far better to consist of such supporting details in the main article message, rather than connected to the image.
Read more: Read more concerning alt tag and title tag optimization “.
Add photo structured data.
Adding structured data to your pages can help search engines present your pictures as abundant results. While Google states structured information doesn’t assist you place much better, it does help to accomplish a much more expanded listing in Picture Look. There’s even more, though. For example, if you have recipes on your site and you include structured data to your images Google can additionally add a badge to your images showing that this image belongs to a recipe. Google Images supports structured data for the following kinds:.
Item.
Video clip.
Dish.
Google has a number of guidelines you need to comply with if you want your photos to show up rich in picture search. The main takeaway is that the image attribute is mandatory and that your images must be crawlable as well as indexable. You can find them all Google’s Structured Information General Standards. Try Organized information training if you intend to find out exactly how to add organized information to your pages!
XML image sitemaps
If you are a web developer, you might wonder about XML image sitemaps. I’d prefer to describe this as images in XML sitemaps. Google is clear about this:
Additionally, you can use Google image extensions for sitemaps to give Google more information about the images available on your pages. Image sitemap information helps Google discover images that we might not otherwise find (such as images your site reaches with JavaScript code), and allows you to indicate images on your site that you want Google to crawl and index.
Every now and then, people ask us about XML image sitemaps. We don’t generate these in our plugin, but follow Google’s advice and include them in the page or post sitemaps. Just scroll down in our post sitemap and you’ll see we have added images to all our latest posts (there is a column just for that). Adding images to your XML sitemaps helps Google index your images, so be sure to do so for better image SEO.
Image SEO: summary
Image SEO is the sum of a number of elements. With Google getting better at recognizing elements in images every day, it makes sense to make sure the image and all its elements contribute to a good user experience as well as SEO. It would be foolish to try to kid Google.
Keep these things in mind when adding an image to an article:
Use a relevant image that matches your text
Pick a good file name for your image
Make sure image dimensions match the image size as displayed
Use srcset if possible
Reduce file size for faster loading
Add a caption, if appropriate, for easier scanning of the page
Use image alt text. No need for a title text
Add structured data to your images
Add OpenGraph and Twitter Card tags for the image
Don’t break the left reading line with an image – align images right or center
Use images in your XML sitemaps
Provide all the context you can!
Besides contributing to SEO and user experience, images can also play an important role in conversion!
0 notes
Photo
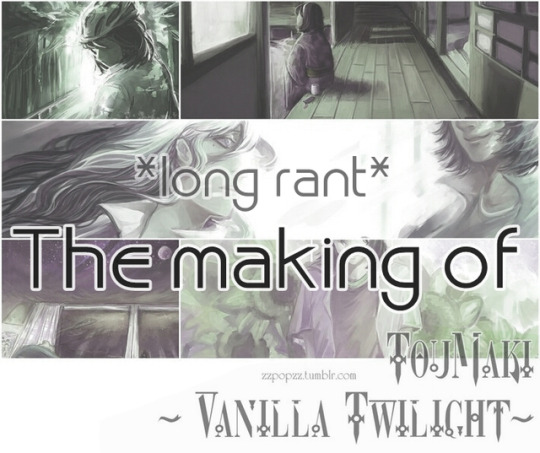
Really long rant about how I made Vanilla Twilight, I typed it at 2am so it’s kinda crappy and boring, just skip through this post.
So I'd been thinking about it for a long time now, even before finishing Vanilla Twilight that I'd talk about it if someone asked, well that never happened so I was just thinking that I'd let it go but that post is so important to me so well fuck it I'll just talk about it anyway.
I did it completely on a wimp like how cool would it be if I make a lyricstuck for Toumaki like I'd be the first (if anyone did this before me im sorry). The first song I intended to do wasn't VT, it was a much shorter and easier song. I saw the music video first time after a while and the lyrics gave me some scenes to draw right away, like the tones, the atmosphere, the lyrics all fit them very well, made me wanted to draw something happy but sad. The ending for it was a happy one instead of a sad one like other songs I did (I didn't post the ending for any of them, just let the viewers decide what it's gonna be)
I was very scared like what if it won't turn out ok and people gonna hate me for it or no one even gonna look at it. Also what I visualized are mostly illustrations with backgrounds, what I never done before so high chance it won't go anywhere. I thought well let's just see how far will I get and won't talk about it at all until I post it so at least I won't be all barks no bite. I was very traumatized that someone might know about what I did so I locked all the files when I shut down my PC in case someone hack into it lmao.
I started with making a storyboard(kinda) for it, this is where I first got trouble because there was some part I didn't think of when I visualized what I'd draw at first ( 'I don't feel so alone' part mostly and some in between) and it's only at this point that I realized how many I'd have to draw (over 40 images total) and it's mind blowing for someone who rarely finish a painting like me at that time, that number is more than what I'd draw in a year. VT doesn't have choruses that meant I can't do tricks like repeat some panels (I don't like this anyway). I usually painted on small canvas before that but I wanna make sure I can fix things later and some idea I had was pretty big so I used 3000x5000px canvas then trimmed them down ( I didn't know how big it was and it's huge).
The idea was to make a tumblr scroll-post like a lyricstuck (my favorites are by paperseverywhere and toastyhat/emptyfeet , they made really cool tutorials about these) so I tried to drew out compositions that would look good scrolling down panel by panel and have some connections between them (this didn't turn out so good in the end because I wasn't good lol)
Since I was scared that people might point out that I draw something wrong, it took me almost a week or something searching for references (check my pinterest board) like the streets, sky, houses, roads, outfits, poses,... I was going to draw. I got some knowledge about bikes by this too, like I can tell the differences between road bike, mtb, touring bikes,... I also see and captured bunches of screenshots and reread ywpd trivia countless time to make sure I won't get anything wrong. If you take notice, every outfit Toumaki wear in there are all canon, from anime or promos.
The first few panels was really exciting because I had never painted so many with backgrounds before, I was really happy when I almost finished the first verse even compared to the full 3:50 of the song it was only 20 seconds and I thought maybe I can pull this after all. The last panel was intended to be Makichan standing infront of his house looking at the sky but I wanted to show the sky at the end of the panel and that wouldn't work on scroll-down post so I had to leave it for later, I repainted this panel for about 3 times and finished it just 30' before posting.
The first panel of the second verse wasn't turning out alright too because that was my first time doing a 3 points perspective drawing and the colors didn't turn out as I wanted either (my intention was a green/gold dawn scene). Things kinda worked well despite that until the scene when Toudou sits in his ink, gdi I didn't know why I was so caught up in that and painted every piece of that wooden floor, it took me almost a week but turned out better than I expected so I was ok with it. I was going to make sketchy paintings for all of the panel but I did too much details on that one so it gave me the impression that I'll have to do just as much for every others.
Now I still had school to go and that semester my uni got me pretty crappy schedule that made me have to wait for classes at school frequently, I was frustrated because I didn't get to paint during that time and I might finish it too late (even though I didn't set a deadline) and when I got home I just spent so much time checking twitter and just can't pick myself up to draw and ended up feeling shitty about it.
*Side story* I was so mad because I didn't get anything done and there's still more than half of the whole thing to do and the worst part is that I had no one that I can talk to because I didn't have any friend who ship Toumaki and I also don't want to publicly talk about what I was doing, I wanted to surprise people when I'm done, I didn't wanna give people the expectation then screw it up (I literally thought I'd drop a bomb not a grenade lmao) I can't remember how long was that shitty phase but I felt like it was so long, I barely finished verse 2 at that point. I was so mad at myself and my progress so I spent a few days to look at time management threads and this helped a lot, I changed my habits completely by this and I still apply those methods now, like I used to stay up til 3am to read fics (bless you writers you fueled me with your writings bless you all) then I switch to bed before 12 and get up early for a good start or reduce working time while increasing quality*
After that I kinda got things together,I just went ahead with painting tho it's still kinda tiring, I had to work on 5 essays during this time too. At this point I was like screw all, I give no shit about what everyone thinks I'm just gonna finish this and get some good nap (I practiced power nap to get more focus time for painting but dude everyone wants a good long nap)
10 days before uploading I found out that there's a Toumaki day (I'm so sorry), I was going to posted on the first sunday of June (I did researched on which was the best time to post on social medias so I randomly picked a sunday) and Toumaki day is the last sunday of May, that meant I had 10 days left and 15 panels to paint! I was going to ignore that but I already made it big I should make it right too so I shit my pants going through those last panels.
I purposely hiding Toudou's face till the last verse to emphasize the feelz and got so relieved that I finally got to paint him (I read some tags that some viewers got emotional at this part so I'm so glad it worked). The whole things was put under Makichan's perspective so I was so sick of painting him at that point, he showed up in every panel and I can't paint him ugly because he's beautiful (especially his hair, I spent shitload of time painting them). I can talk lots about why I picked to do so but that's headcanon shit and it's embarrassing so let's just skip that.
The last day I had only 3 panels left and I was hell confident that I've got this and somehow spent the whole evening rewatch Toumaki pingpong ep (end me). Of course that didn't end well, I managed to finish those by midnight but I still had like 3 panels that needed repaint completely and all 43 needed retouch and edits. My plan was to post at 9am sunday (thats 9pm saturday est) so I had to get up at 5am and finish all that, I ended up cutting down 2 panels and simplified the instrumental panel (some tags said that was nice so I was at least relieved). Unlike other songs I did, the length of every line's quite different and the original sizes I did would make viewers have to scroll slower or faster at different parts. I didn't plan this beforehand and had to trim down some panels even the parts that I really liked and spent lots of time on. I also found out that people outside the homestuck fandom might not familiar with this type of post so I made a video too (I’m sorry I have zero skill in editing).
After posting I was terrified of people's reactions or worse, there won't be any reaction so I turned everything off and went to sleep and woke up with an unimaginable number of notes I'd got, I set the target of 500 notes and I really didn't think that I'd get past that number like maybe 2-300 (well my other songs didnt even get 200), at the end I got 5000. I spent the next week reading and screencap tags given in reblogs, I put them on desktop and they're still my motivation til now.
Vanilla Twilight is the thing I'm proud of the most even until now, when I've done other songs and projects that look somewhat better. If I have to recommend one thing on my blog I'd recommend it despite its' unskilled paneling, poor composition and muddy colors. It was the first time in my life that I'd put so much effort into something and went through such emotional roller coaster, the feelings I put into it was raw and the idea was very original compared to other songs, I improved and changed a lot during the 2 months I spent on it and never once regret doing it.
***Anyway, you sure have much free time to read it this far, here's a little game for you: I put random things in VT and HF like some characters/stuff from other series, my ocs,... (there wasn't anything purposeless in there even the logo on their cups or the bags they wear) just send me anything you find and I'll draw you something in return**
7 notes
·
View notes
Text
Review: Motorola Edge Plus is a 5G premium phone worth your consideration
New Post has been published on https://appradab.com/review-motorola-edge-plus-is-a-5g-premium-phone-worth-your-consideration/
Review: Motorola Edge Plus is a 5G premium phone worth your consideration
The Motorola Edge Plus has pretty much everything you’d hope for in a premium 5G phone: A Snapdragon 865 chipset, a giant battery, an OLED screen with a high refresh rate and multiple rear cameras with heavy-duty specs. Motorola took features found on other top-of-the-line Android phones, put its own Moto spin on them and built them all into one of the most wonderful Android phones I’ve tried in a long time.
Like
Long-lasting battery so far.
Edge display.
Best cameras on any Moto phone.
Don’t Like
Verizon exclusive.
No IP rating for water resistance.
Night Vision isn’t great.
But there are two things about the phone that can impede its success. One is its chunky build and lack of IP rating for water or dust resistance. The other is that it’s sold as a Verizon exclusive in the US, which could shut out interested buyers. Considering the Edge Plus is competing in a sea of other 5G, Snapdragon 865-powered phones, it needs all the advantages it can get. Anyone in the market for such a device can afford to be picky.
Want a screen with a higher refresh rate than 90Hz? Check out the 120Hz displays on the Galaxy S20 Plus or OnePlus 8 Pro ($999 at OnePlus). Want something that costs less than the $1,000 Motorola Edge Plus? Check out the $900 OnePlus 8 Pro (again) or the LG V60. Craving a camera that can shoot video at a higher resolution than 6K? Consider the V60 once more or any of the Galaxy S20 phones that can record 8K video. All of these phones are viable options because each offers its own mix of features, and some will appeal to you more than others.
After a week with the Motorola Edge Plus, I found it to be so much more than its spec list. The phone is absolutely charming — it takes good photos (just not the best), has a promising long battery life (though final results from testing aren’t in yet) and has a striking design. If you’re a Verizon customer it’s worth considering when it goes on sale in May. If you’re not, there are plenty of other options to choose from including a scaled-down version of the phone called the Motorola Edge, which will be sold unlocked starting this summer.
Motorola Edge Plus’ wraparound display
It would be lazy to compare the looks of the Motorola Edge Plus to recent Samsung Galaxy phones. They have a similar design language but express it differently. The Edge Plus embraces a sleek industrial design compared to the nail-polished gloss of the Galaxy S20 and S20 Plus.
As its name suggests, what defines this phone is its 6.7-inch OLED screen that wraps around the edges of the phone nearly 90 degrees. It is gorgeous and looks even better with a 90Hz high refresh rate instead of the more common 60Hz. This means text looks sharper, and animations and scrolling are smoother. Obviously there are phones with higher refresh rate displays, such as the 144Hz screen on Nubia Red Magic 5G gaming phone, but 90Hz is no slouch. Motorola also claims it saves on battery drain. I used both 90Hz and 120Hz screens and there is less of a difference between them than, say, a 60Hz and 90Hz one.
The screen wraps halfway down each side of the Motorola Edge Plus,
Sarah Tew/CNET
When I tilt it at various angles, the edge either looks brighter or darker than the main, flat part of the display. This is especially apparent when I’m on the home screen or in Settings. It can be a bit distracting. Maybe it’s the angle of the edges, or the way the backlighting works in the bend, but I’m surprised to see this on a phone at this price. But when I’m watching a video that spills over the sides, it’s barely noticeable.
The 19.5:9 ratio screen is tall and narrow, but the shape of the phone makes it comfortable to hold. The wide aspect ratio is perfect for watching many movies that are also shot at a wide aspect ratio. I watched The Good, The Bad and The Ugly on the Edge Plus and it filled the screen perfectly.
The speakers sound good and deliver solid bass. Whether I was playing the Beastie Boys, Wu-Tang Clan, Andrew Bird, Sharon Jones or the Kronos Quartet, music sounded loud and full. If you don’t want to blast your music, there’s also a headphone jack.
There’s a fingerprint reader built into the front display. When I reviewed the Moto Z4 ($330 at Amazon), which also had an in-screen fingerprint sensor, it never seemed to work on the first try. The one on the Edge Plus works great though. It’s fast and I rarely have to scan my finger twice to unlock my phone like on the Z4.
The Motorola Edge Plus looks smooth and sleek with its waterfall display
See all photos
Good photos, solid macro camera and 6K videos
This is the best camera system I’ve used on a Motorola, but I wouldn’t say it’s the best camera system on any phone. Motorola deserves praise for what it’s accomplished with its camera hardware and processing. But it’s still a step behind Apple and Google.
There are three cameras on the back and one on the front. The main camera has a 108-megapixel sensor that combines four pixels into one, through a process called “pixel binning.” This results in brighter 27-megapixel photos with less image noise when you shoot in medium and low light situations.
The Edge Plus captures photos with punchy colors.
Patrick Holland/CNET
The phone is capable of good HDR photos but is still a step behind computation photography from Apple and Google.
Patrick Holland/CNET
Look at the detail the Edge Plus was able to capture in Cheddar the cat’s fur.
Patrick Holland/CNET
The Edge Plus did a decent job exposing for the sign with minimal blow out of highlights from the sun.
Patrick Holland/CNET
The pixel binning works well on this phone. You can choose not to pixel bin and instead take a 108-megapixel photo, but I recommend only doing this in bright, even light. Also, the file size is huge: Expect a 25MB file instead of the 8MB one created by pixel binning. So if you’re trying to be frugal with the Edge Plus’ 256GB of storage, pixel binning is be the way to go.
Both the main camera and the 8-megapixel telephoto camera have optical image stabilization. This helped with “zoomed in” photos by reducing camera shake. Take a look below at this 3x zoom photo I took of a tree in my back yard at sunset.
This was taken at sunset with the 3x telephoto camera on the Motorola Edge Plus.
Patrick Holland/CNET
This was captured with the 3x telephoto camera.
Patrick Holland/CNET
The third rear camera has a 16-megapixel sensor with an ultrawide-angle macro lens. The macro lens allowed me to focus my photos and videos just millimeters away from my subject. In the photo below you can see the texture of the paper.
The macro mode is capable of capturing an incredible amount of details.
Patrick Holland/CNET
Not only was macro mode able to focus close, but look at the details it captured in the metal.
Patrick Holland/CNET
Portrait mode on both the front and rear cameras works well too. There’s a time-of-flight sensor on the back of the phone that gathers depth information and makes rear portrait mode photos especially gorgeous. I was impressed by how natural and accurate the portraits I took were.
The cutout between the foreground and the background is one of the most natural-looking I’ve seen from a portrait mode on any phone.
Patrick Holland/CNET
But this camera system isn’t perfect. One of its weakest features is Motorola’s Night Vision feature. Like night mode on other phones, the Edge Plus takes a series of images and combines them together for a brighter and sharper photo. The results were better than when I took a photo without Night Vision enabled, but it’s nowhere near the level of Night Mode on the iPhone 11 Pro or Night Sight on the Pixel 4.
Video capture on the Edge Plus is good too and you can record with up to a 6K resolution, but it can be better. The image quality is fine, but white balance seems off to me and colors are oversaturated. You might like that, but it’s a tad too much sometimes for me. Take a look at the video below, which includes a bunch of clips I shot in 6K.
The Edge Plus also supports Portrait Mode video which is better than it should be. I’m honestly impressed by some of the results I got, but it’s still far from perfect. If you get this phone, it’s worth a try. And I think if I played around with it more, I could learn the kinds of environments where it works best. It only works on the rear camera, but you could use it to make cool-looking vlogs if you don’t mind filming blind.
Edge screen features and Moto Gametime
The Edge Plus runs a near stock version of Android 10 with a light dusting of features and shortcuts by Motorola. You have the usual Moto gesture controls, such as the double karate chop to turn on a flashlight and flicking your wrist to open the camera. But there are a number of new additions that take advantage of the edges of the display. One of my favorites allows you to slide your finger down the edge to pull down the notifications shade and control panel.
There’s also a virtual pill-shaped button on the right edge that you can use to go back to the previous app or turn off the edge parts of the screen. I kept it as a last app button and found I used it quite a lot. When the phone is faced down, I liked being able to see the edges light up for notifications or to show the battery charging.
One the bottom right side of the photo you can see a button drawn with a neon blue line that can be customized and used as a shoulder button during gameplay on the Motorola Edge Plus.
Patrick Holland/CNET
Perhaps one of the coolest things you can do with that edge is have two digital shoulder buttons when using Moto Gametime. It feels like using a game controller. I customized the buttons for PUBG, for example, so the right shoulder button attacks and the left shoulder button kneels. This straight-up turns the Motorola Edge Plus into a gaming phone, albeit without the aggressive styling and light-up logo.
Top of the line Android performance
The Motorola Edge Plus supports both millimeter wave and Sub-6 5G, which help future-proof the phone for a few years as the 5G network is built out more. Verizon’s 5G service wasn’t available where I was testing the phone, but I look forward to trying it out sometime in the future.
In terms of processor performance, the Motorola Edge Plus hangs with the fastest Android phones out right now. It scored nearly identical to its Snapdragon 865 siblings the Galaxy S20 Plus and OnePlus 8 Pro.
3DMark Slingshot Unlimited
Note:
Longer bars indicate better performance
Geekbench v.5.0 single-core
Note:
Longer bars indicate better performance
Geekbench v.5.0 multicore
Note:
Longer bars indicate better performance
The Edge Plus’ 5,000-mAh battery is the same capacity as the LG V60 and the Galaxy S20 Ultra. I’m still running battery-drain tests with the phone, and will update this review in the future with the results. In daily use, it easily made it through two days for me. But if you need a recharge, the phone has 15W turbo charging as well as wireless charging and reverse wireless charging.
Motorola Edge Plus specs compared to Samsung Galaxy S20 Plus, OnePlus 8 Pro, LG V60, Samsung Galaxy S20 Ultra
Motorola Edge Plus Samsung Galaxy S20 Plus OnePlus 8 Pro LG V60 ThinQ 5G Samsung Galaxy S20 Ultra Display size, resolution 6.7-inch FHD OLED 6.7-inch Dynamic AMOLED 2X 6.78-inch AMOLED; 1,440×3,168 pixels 6.8-inch OLED; 2,460×1,080 pixels 6.9-inch Dynamic AMOLED 2X Pixel density NA 525ppi 513ppi 395ppi 511ppi Dimensions (Inches) 6.34×2.81×0.38 in 2.9×6.37×0.30 in 6.51×2.93×0.35 in 6.67×3.06×0.35 in 2.99×6.57×0.35 in Dimensions (Millimeters) 161.1×71.4×9.6 mm 73.7×161.9×7.8mm 165×74.4×8.5 mm 169.3×77.6×8.79 mm 76.0×166.9×8.8 mm Weight (Ounces, Grams) 7.16 oz; 203g 6.56 oz; 186g 7.02 oz; 199g 7.72 oz; 218g 7.76 oz; 220g Mobile software Android 10 Android 10 Android 10 Android 10 Android 10 Camera 108-megapixel (standard), 8-megapixel (telephotos), 16-megapixel (macro/ultrawide-angle) 12-megapixel (wide-angle), 64-megapixel (telephoto), 12-megapixel (ultra-wide), time-of-flight camera 48-megapixel (standard), 48-megapixel (ultra-wide), 8-megapixel (telephoto), 5-megapixel (‘color filter’) 64-megapixel (standard), 13-megapixel (wide-angle), time-of-flight camera 108-megapixel (wide-angle), 48-megapixel (telephoto), 12-megapixel (ultra-wide), time-of-flight camera Front-facing camera 25-megapixel 10-megapixel 16-megapixel 10-megapixel (standard) 40-megapixel Video capture 6K 8K 4K 8K 8K Processor Qualcomm Snapdragon 865 64-bit octa-core processor (Max 2.7GHz + 2.5 GHz + 2.0 GHz) Qualcomm Snapdragon 865 Qualcomm Snapdragon 865 64-bit octa-core processor (Max 2.7GHz + 2.5 GHz + 2.0 GHz) Storage 256GB 128GB, 512GB 128GB, 256GB 128GB 128GB, 512GB RAM 12GB 12GB 8GB, 12GB 8GB 12GB, 16GB Expandable storage No Up to 1TB No 2TB Up to 1TB Battery 5,000 mAh 4,500 mAh 4,510 mAh 5,000 mAh 5,000 mAh Fingerprint sensor In-screen In-screen In-screen In-screen In-screen Connector USB-C USB-C USB-C USB-C USB-C Headphone jack Yes No No Yes No Special features 5G enabled 5G enabled; 120Hz refresh rate; water resistant (IP68) 5G enabled; Warp Charge; reverse wireless charging; water resistant (IP68); 120Hz refresh rate 5G connectivity; water resistant (IP68); wireless charging, Fast Charging 4.0 5G enabled; 120Hz refresh rate; 100X zoom; water resistant (IP68) Price off-contract (USD) $1,000 – Verizon exclusive $1,199, $1,349 $899 (8GB RAM/128GB), $999 (12GB RAM/256GB) $800 (without Dual Screen case); $900-$950 (with) $1,399 (128GB), $1,599 (512GB)
First published on April 30.
0 notes
Text
11 Types Of Pain Directly Linked To Emotional Issues
Over the years studies have shown that pain is not only caused by physical injury, but also by emotional issues. The pain could be a warning that there is work to be done in certain areas of our life.
Here is a list of 11 pains that may be directly linked to your emotional state:
Head
Headaches are an indication of daily stress. Take some time out to relieve the stress.
Neck
The neck is associated with forgiving others and yourself. It’s important to think about the things you love about them, and yourself to release the pain.
Shoulders
Shoulder pain is associated with emotional burdens. Try to solve the emotion problem or share the load with trusted loved ones.
Upper Back
Upper back pain is associated with lack of emotional support. It could be that you’re not feeling loved or appreciated. If you are single, now could be the time to go on a date.
Lower Back
Lower back pain is associated with financial problems. Sit down and focus on managing your money better. Seek the help of a financial adviser if need be.
Elbows
Arm and elbow pain is associated with lack of flexibility. Maybe you should loosen up a bit; you could be resisting the natural flow of changes that are occurring.
Hands
Hand pain is associated with not being able to reach out to others, in the way you should be. Try spending some time actively meeting new people.
Hips
Hips pain is associated with fear of change, moving, or making huge decisions. You might be too cautious when making decisions.
Image Credit: Centripetal Force Studio
Knees
Knee pain is associated with the ego. Humble yourself; no one is perfect.
Ankles
Ankle pain is associated with a need for pleasure. Try taking some time out to pamper yourself.
Feet
Feet pain is associated with depression. Depression is hard to beat, yet there are ways to fight it. Try to keep yourself occupied with a new hobby or something that gives you pleasure.
This article (11 Types Of Pain That’s Directly Linked To Emotional Issues) was created and published by It’s All About I and is published here under a Creative Commons license with attribution to the author and It’s All About I.info. It may be re-posted freely with proper attribution, author bio, all hyperlinks within the article to remain intact and this copyright statement.
Filed under: Self-Improvement Tagged: emotions, Mental, pain, thoughts
from WordPress http://ift.tt/2jXcnAD
via IFTTT
0 notes
Text
Image optimization 101: How to rank higher in image search
SEO is not only about optimizing written content.
The increasing dominance of visual content online has brought with it new opportunities for increasing a site’s search traffic by optimizing videos and images.
Optimizing your images gives your website an additional chance to be found via image search, and a good logo or some eye-catching graphics can be just as effective at attracting visitors to your website as your written content.
But even if you’re highly familiar with optimizing written content for search, you may not know where to begin with optimizing images. What factors do you need to bear in mind? Does keyword usage still apply?
In this guide, we’ll take you through everything you need to know about optimizing for image search.
N.B.: This is an updated version of a guide by Dave Davies that we originally published in 2013: Image Optimization: How to Rank on Image Search
Image size
The size of your images can have a big impact on your overall site speed (which is an important search ranking factor), and big, heavy images are one of the biggest culprits for slowing down websites – particularly on mobile.
However, because you also want your images to look good and be eye-catching, especially if they’re the first part of your website that people see in image search, you also don’t want to sacrifice quality. Thus, finding a balance is necessary.
Matt Owen’s article on how to optimize your page images to increase site speed gives some useful pointers here, particularly with regard to not uploading images which are larger than the user will ever see, as this will just slow down your site with no benefit to you or the user.
Which file types are going to be most helpful here? GIF, JPEG and PNG are the three main image file types, which make up 96% of the Internet’s image traffic.
PNG offers a good combination of compression ratio and image quality, and as such is usually your best bet. JPEG can have a compression rate of up to 10x more than the other two formats, but is a lossy format – meaning that it reduces the quality of your images as it compresses them, so consider whether this is a sacrifice you need to make.
Saving your image as a GIF won’t result in a loss of image quality, but it can sometimes reduce color detail, making GIFs most suited to animated images, logos and any other small, simple images.
Google’s PageSpeed Insights offer some more guidelines on how to optimize your images for maximum site speed.
Image name
The name of your image file can help search engines discover your content in context. This is where keywords enter the picture (as well as in the alt attributes, which we’ll cover below).
If you’re uploading a photo of nature photography, a relevant filename like nature_photography.png has a better chance of ranking well in search than than DSC_1977.png. If it’s possible to be even more specific, such as Hong-Kong-botanical-gardens.png, then that’s even better for SEO.
If you don’t enter a separate title for your image upon upload, the filename will also serve as the image title, which makes it all the more important to be clear and accurate with your filename.
For more on how to optimize your image title text and alt text, read on to the next section.
Alt attributes
Alt attributes are the text alternatives to your image which will appear if your image fails to load, or if the user is accessing your site with an assistive device such as a screenreader. Because web crawlers don’t have eyes, they’re also what search engines “see” instead of an image, making them important for both accessibility and SEO.
As such, the alt text and title text tag fields are the best place to put any keywords relevant to your image, BUT: do not keyword-stuff! This is a poor practice in image SEO just as in text-based SEO, and will do the screenreader users accessing your website no favors.
Title text
The title text is effectively the name of your image, and as such serves a very similar purpose to your image filename. The main difference is that it needs to be human readable as well as machine readable – so use spaces to separate the words in your image, not underscores or dashes (or nothing at all).
There are certain circumstances in which title text is all you need to substitute for your image – if the title text alone describes the image, you don’t always need alt text.
For example, if the image is a headshot of a person, their name alone is sufficient for title text – as it tells both people and search engines what the image is of – and no additional details are necessary in the alt text. Alt attributes are important, but you don’t need to go overboard!
Alt text
This is the field that describes what your image depicts. Alt text can help search engines work out not just the content of an image but the topic of the surrounding text – so it’s important to get it right.
If possible, at least one image on your page should contain your focus keyword, but it’s important not to shoehorn it in. Image alt text should be clear, descriptive, and written in natural language. Imagine it as if you were telling someone who couldn’t see the image what it was about. Which key details would you highlight?
Some guides will place a recommended length on alt text, such as 80 or 150 characters, but in truth the alt text should be as long as it needs to be in order to get the image content across. Try to be succinct, but don’t sacrifice necessary details for the sake of length.
Here is an example of an article graphic (courtesy of Shutterstock) that we uploaded for a recent article, ‘Beyond Google Analytics: 10 SEO analytics and reporting tools‘. The WordPress backend clearly indicates where to input title and alt text:
The alt text we input for this image is as follows: Image of a person typing on a laptop with paper and pens by the side, and a variety of different analytics icons sketched above it, such as graphs, charts and a clipboard.
Page URL and domain authority
The URL of the page that the images are hosted on can affect the image search traffic. If an image is hosted on an optimized page URL on a page which contains quality and relevant content, your chances of image SEO success will be much higher.
Along with the page URL, the page’s domain authority that also can affect an image’s performance in Google Image Search. If a domain already has a reputation for offering quality and relevant content, your image will do better in search. Image SEO is no different to text-based SEO in this regard.
Surrounding content around images
Image optimization doesn’t happen in a vacuum. As such, the copy that surrounds an image on your page is also important for SEO. The relevance of the content, its quality, and the keywords that are used can all affect how the image ranks in search.
The most important copy is the text that immediately surrounds the image. This might be an introductory sentence which precedes the image (for example, “Below is a graph showing the results of a survey carried out among 500 marketers…”) and/or a caption below it which gives some additional context.
Search engines like Google will use this copy to determine how well the image matches the topic of the page. For example, if the focus of the content is on plumbing, an image of a tree has decreased chances of ranking high for the keyword “plumbing examples” (and is likely to confuse your users to boot).
In addition to this, Google’s image recognition AI has become much more sophisticated in recent years, to the point where it can often identify whether the image subject matches up with the rest of your content.
Stock photography
There has been a long discussion over the years on whether using stock photography has a negative effect on your ranking. Google’s Matt Cutts went on the record back in 2013 to state that stock photos do not harm your search rankings, and therefore there is no difference in using them instead of original photos, SEO-wise.
However, there are a couple of caveats to this. One is that stock images are by their nature generic, and so the visual experience of your website will be a lot more generic as a result, particularly if you use a lot of them. This will also not help your image stand out in search results, and a stock image is unlikely to grab the user’s attention – unless of course you’re a stock photography vendor.
The second thing to bear in mind is that there will be countless other copies of the same image as yours out there on other people’s websites. As Dave Davies pointed out in the 2013 version of this guide, “Google doesn’t want to rank multiple copies of the same image any more than they want to rank multiple copies of the same content. If you’re using the same image that’s been found on a hundred other sites before you, why should yours rank?”
For example, if you’re writing about your company’s business culture, you can either pick a stock photo of happy people in an office environment, or simply upload a high-quality photo of your own office with your team members during a meeting. The latter is personal, relevant and interesting, and gives users a sense of what your company is really like.
Content quality is also important in images as it is in text. Matt Cutts pondered in 2013 whether original images might be used as a future quality signal to indicate a trustworthy website, leading to a higher search ranking:
“Who knows – maybe original image sites might be higher quality, whereas a site that just repeats the same stock photos over and over again might not be nearly as high quality.”
While we don’t have concrete confirmation as to whether Google went on to use this as a quality signal in image search, the impression on the user is worth taking into account.
Image engagement and popularity
Search engines value content with high engagement. This means that if you have a high-quality, relevant and original image that starts becoming popular among users, you have more chances of seeing it higher on search results. As with any text post, the popularity of your content can help it reach higher on the SERPs.
The principles of link-building also apply to image search: the more people link to your image, the higher the chances of increased search traffic coming from it. This can also be facilitated by the use of sharing buttons alongside your images. Once your image gets shared on many sites, its popularity will contribute to its success in search.
The popularity of an image can derive from clicks to your site, embeds and shares on other pages, or even social shares. All of them make the image more popular, while also indicating its relevance to the topic it describes. This ultimately makes search engines pay more attention to it.
Overview
In summary, here’s how you can optimize your images to rank higher in search results:
Try to reduce the weight of your images, but not to the detriment of quality
Pick a relevant filename
Use alt attributes to describe your content as accurately as possible
Pay attention to the content that’s surrounding your images
Try to use original graphics or photography
Aim for engaging images that will encourage sharing
Image optimization 101: How to rank higher in image search syndicated from http://ift.tt/2maPRjm
0 notes
Text
Image optimization 101: How to rank higher in image search
SEO is not only about optimizing written content.
The increasing dominance of visual content online has brought with it new opportunities for increasing a site’s search traffic by optimizing videos and images.
Optimizing your images gives your website an additional chance to be found via image search, and a good logo or some eye-catching graphics can be just as effective at attracting visitors to your website as your written content.
But even if you’re highly familiar with optimizing written content for search, you may not know where to begin with optimizing images. What factors do you need to bear in mind? Does keyword usage still apply?
In this guide, we’ll take you through everything you need to know about optimizing for image search.
N.B.: This is an updated version of a guide by Dave Davies that we originally published in 2013: Image Optimization: How to Rank on Image Search
Image size
The size of your images can have a big impact on your overall site speed (which is an important search ranking factor), and big, heavy images are one of the biggest culprits for slowing down websites – particularly on mobile.
However, because you also want your images to look good and be eye-catching, especially if they’re the first part of your website that people see in image search, you also don’t want to sacrifice quality. Thus, finding a balance is necessary.
Matt Owen’s article on how to optimize your page images to increase site speed gives some useful pointers here, particularly with regard to not uploading images which are larger than the user will ever see, as this will just slow down your site with no benefit to you or the user.
Which file types are going to be most helpful here? GIF, JPEG and PNG are the three main image file types, which make up 96% of the Internet’s image traffic.
PNG offers a good combination of compression ratio and image quality, and as such is usually your best bet. JPEG can have a compression rate of up to 10x more than the other two formats, but is a lossy format – meaning that it reduces the quality of your images as it compresses them, so consider whether this is a sacrifice you need to make.
Saving your image as a GIF won’t result in a loss of image quality, but it can sometimes reduce color detail, making GIFs most suited to animated images, logos and any other small, simple images.
Google’s PageSpeed Insights offer some more guidelines on how to optimize your images for maximum site speed.
Image name
The name of your image file can help search engines discover your content in context. This is where keywords enter the picture (as well as in the alt attributes, which we’ll cover below).
If you’re uploading a photo of nature photography, a relevant filename like nature_photography.png has a better chance of ranking well in search than than DSC_1977.png. If it’s possible to be even more specific, such as Hong-Kong-botanical-gardens.png, then that’s even better for SEO.
If you don’t enter a separate title for your image upon upload, the filename will also serve as the image title, which makes it all the more important to be clear and accurate with your filename.
For more on how to optimize your image title text and alt text, read on to the next section.
Alt attributes
Alt attributes are the text alternatives to your image which will appear if your image fails to load, or if the user is accessing your site with an assistive device such as a screenreader. Because web crawlers don’t have eyes, they’re also what search engines “see” instead of an image, making them important for both accessibility and SEO.
As such, the alt text and title text tag fields are the best place to put any keywords relevant to your image, BUT: do not keyword-stuff! This is a poor practice in image SEO just as in text-based SEO, and will do the screenreader users accessing your website no favors.
Title text
The title text is effectively the name of your image, and as such serves a very similar purpose to your image filename. The main difference is that it needs to be human readable as well as machine readable – so use spaces to separate the words in your image, not underscores or dashes (or nothing at all).
There are certain circumstances in which title text is all you need to substitute for your image – if the title text alone describes the image, you don’t always need alt text.
For example, if the image is a headshot of a person, their name alone is sufficient for title text – as it tells both people and search engines what the image is of – and no additional details are necessary in the alt text. Alt attributes are important, but you don’t need to go overboard!
Alt text
This is the field that describes what your image depicts. Alt text can help search engines work out not just the content of an image but the topic of the surrounding text – so it’s important to get it right.
If possible, at least one image on your page should contain your focus keyword, but it’s important not to shoehorn it in. Image alt text should be clear, descriptive, and written in natural language. Imagine it as if you were telling someone who couldn’t see the image what it was about. Which key details would you highlight?
Some guides will place a recommended length on alt text, such as 80 or 150 characters, but in truth the alt text should be as long as it needs to be in order to get the image content across. Try to be succinct, but don’t sacrifice necessary details for the sake of length.
Here is an example of an article graphic (courtesy of Shutterstock) that we uploaded for a recent article, ‘Beyond Google Analytics: 10 SEO analytics and reporting tools‘. The WordPress backend clearly indicates where to input title and alt text:
The alt text we input for this image is as follows: Image of a person typing on a laptop with paper and pens by the side, and a variety of different analytics icons sketched above it, such as graphs, charts and a clipboard.
Page URL and domain authority
The URL of the page that the images are hosted on can affect the image search traffic. If an image is hosted on an optimized page URL on a page which contains quality and relevant content, your chances of image SEO success will be much higher.
Along with the page URL, the page’s domain authority that also can affect an image’s performance in Google Image Search. If a domain already has a reputation for offering quality and relevant content, your image will do better in search. Image SEO is no different to text-based SEO in this regard.
Surrounding content around images
Image optimization doesn’t happen in a vacuum. As such, the copy that surrounds an image on your page is also important for SEO. The relevance of the content, its quality, and the keywords that are used can all affect how the image ranks in search.
The most important copy is the text that immediately surrounds the image. This might be an introductory sentence which precedes the image (for example, “Below is a graph showing the results of a survey carried out among 500 marketers…”) and/or a caption below it which gives some additional context.
Search engines like Google will use this copy to determine how well the image matches the topic of the page. For example, if the focus of the content is on plumbing, an image of a tree has decreased chances of ranking high for the keyword “plumbing examples” (and is likely to confuse your users to boot).
In addition to this, Google’s image recognition AI has become much more sophisticated in recent years, to the point where it can often identify whether the image subject matches up with the rest of your content.
Stock photography
There has been a long discussion over the years on whether using stock photography has a negative effect on your ranking. Google’s Matt Cutts went on the record back in 2013 to state that stock photos do not harm your search rankings, and therefore there is no difference in using them instead of original photos, SEO-wise.
However, there are a couple of caveats to this. One is that stock images are by their nature generic, and so the visual experience of your website will be a lot more generic as a result, particularly if you use a lot of them. This will also not help your image stand out in search results, and a stock image is unlikely to grab the user’s attention – unless of course you’re a stock photography vendor.
The second thing to bear in mind is that there will be countless other copies of the same image as yours out there on other people’s websites. As Dave Davies pointed out in the 2013 version of this guide, “Google doesn’t want to rank multiple copies of the same image any more than they want to rank multiple copies of the same content. If you’re using the same image that’s been found on a hundred other sites before you, why should yours rank?”
For example, if you’re writing about your company’s business culture, you can either pick a stock photo of happy people in an office environment, or simply upload a high-quality photo of your own office with your team members during a meeting. The latter is personal, relevant and interesting, and gives users a sense of what your company is really like.
Content quality is also important in images as it is in text. Matt Cutts pondered in 2013 whether original images might be used as a future quality signal to indicate a trustworthy website, leading to a higher search ranking:
“Who knows – maybe original image sites might be higher quality, whereas a site that just repeats the same stock photos over and over again might not be nearly as high quality.”
While we don’t have concrete confirmation as to whether Google went on to use this as a quality signal in image search, the impression on the user is worth taking into account.
Image engagement and popularity
Search engines value content with high engagement. This means that if you have a high-quality, relevant and original image that starts becoming popular among users, you have more chances of seeing it higher on search results. As with any text post, the popularity of your content can help it reach higher on the SERPs.
The principles of link-building also apply to image search: the more people link to your image, the higher the chances of increased search traffic coming from it. This can also be facilitated by the use of sharing buttons alongside your images. Once your image gets shared on many sites, its popularity will contribute to its success in search.
The popularity of an image can derive from clicks to your site, embeds and shares on other pages, or even social shares. All of them make the image more popular, while also indicating its relevance to the topic it describes. This ultimately makes search engines pay more attention to it.
Overview
In summary, here’s how you can optimize your images to rank higher in search results:
Try to reduce the weight of your images, but not to the detriment of quality
Pick a relevant filename
Use alt attributes to describe your content as accurately as possible
Pay attention to the content that’s surrounding your images
Try to use original graphics or photography
Aim for engaging images that will encourage sharing
from IM Tips And Tricks https://searchenginewatch.com/2017/11/09/image-optimization-101-how-to-rank-higher-in-image-search/
from Rising Phoenix SEO https://risingphxseo.tumblr.com/post/167304434185
0 notes
Text
Image optimization 101: How to rank higher in image search
SEO is not only about optimizing written content.
The increasing dominance of visual content online has brought with it new opportunities for increasing a site’s search traffic by optimizing videos and images.
Optimizing your images gives your website an additional chance to be found via image search, and a good logo or some eye-catching graphics can be just as effective at attracting visitors to your website as your written content.
But even if you’re highly familiar with optimizing written content for search, you may not know where to begin with optimizing images. What factors do you need to bear in mind? Does keyword usage still apply?
In this guide, we’ll take you through everything you need to know about optimizing for image search.
N.B.: This is an updated version of a guide by Dave Davies that we originally published in 2013: Image Optimization: How to Rank on Image Search
Image size
The size of your images can have a big impact on your overall site speed (which is an important search ranking factor), and big, heavy images are one of the biggest culprits for slowing down websites – particularly on mobile.
However, because you also want your images to look good and be eye-catching, especially if they’re the first part of your website that people see in image search, you also don’t want to sacrifice quality. Thus, finding a balance is necessary.
Matt Owen’s article on how to optimize your page images to increase site speed gives some useful pointers here, particularly with regard to not uploading images which are larger than the user will ever see, as this will just slow down your site with no benefit to you or the user.
Which file types are going to be most helpful here? GIF, JPEG and PNG are the three main image file types, which make up 96% of the Internet’s image traffic.
PNG offers a good combination of compression ratio and image quality, and as such is usually your best bet. JPEG can have a compression rate of up to 10x more than the other two formats, but is a lossy format – meaning that it reduces the quality of your images as it compresses them, so consider whether this is a sacrifice you need to make.
Saving your image as a GIF won’t result in a loss of image quality, but it can sometimes reduce color detail, making GIFs most suited to animated images, logos and any other small, simple images.
Google’s PageSpeed Insights offer some more guidelines on how to optimize your images for maximum site speed.
Image name
The name of your image file can help search engines discover your content in context. This is where keywords enter the picture (as well as in the alt attributes, which we’ll cover below).
If you’re uploading a photo of nature photography, a relevant filename like nature_photography.png has a better chance of ranking well in search than than DSC_1977.png. If it’s possible to be even more specific, such as Hong-Kong-botanical-gardens.png, then that’s even better for SEO.
If you don’t enter a separate title for your image upon upload, the filename will also serve as the image title, which makes it all the more important to be clear and accurate with your filename.
For more on how to optimize your image title text and alt text, read on to the next section.
Alt attributes
Alt attributes are the text alternatives to your image which will appear if your image fails to load, or if the user is accessing your site with an assistive device such as a screenreader. Because web crawlers don’t have eyes, they’re also what search engines “see” instead of an image, making them important for both accessibility and SEO.
As such, the alt text and title text tag fields are the best place to put any keywords relevant to your image, BUT: do not keyword-stuff! This is a poor practice in image SEO just as in text-based SEO, and will do the screenreader users accessing your website no favors.
Title text
The title text is effectively the name of your image, and as such serves a very similar purpose to your image filename. The main difference is that it needs to be human readable as well as machine readable – so use spaces to separate the words in your image, not underscores or dashes (or nothing at all).
There are certain circumstances in which title text is all you need to substitute for your image – if the title text alone describes the image, you don’t always need alt text.
For example, if the image is a headshot of a person, their name alone is sufficient for title text – as it tells both people and search engines what the image is of – and no additional details are necessary in the alt text. Alt attributes are important, but you don’t need to go overboard!
Alt text
This is the field that describes what your image depicts. Alt text can help search engines work out not just the content of an image but the topic of the surrounding text – so it’s important to get it right.
If possible, at least one image on your page should contain your focus keyword, but it’s important not to shoehorn it in. Image alt text should be clear, descriptive, and written in natural language. Imagine it as if you were telling someone who couldn’t see the image what it was about. Which key details would you highlight?
Some guides will place a recommended length on alt text, such as 80 or 150 characters, but in truth the alt text should be as long as it needs to be in order to get the image content across. Try to be succinct, but don’t sacrifice necessary details for the sake of length.
Here is an example of an article graphic (courtesy of Shutterstock) that we uploaded for a recent article, ‘Beyond Google Analytics: 10 SEO analytics and reporting tools‘. The WordPress backend clearly indicates where to input title and alt text:
The alt text we input for this image is as follows: Image of a person typing on a laptop with paper and pens by the side, and a variety of different analytics icons sketched above it, such as graphs, charts and a clipboard.
Page URL and domain authority
The URL of the page that the images are hosted on can affect the image search traffic. If an image is hosted on an optimized page URL on a page which contains quality and relevant content, your chances of image SEO success will be much higher.
Along with the page URL, the page’s domain authority that also can affect an image’s performance in Google Image Search. If a domain already has a reputation for offering quality and relevant content, your image will do better in search. Image SEO is no different to text-based SEO in this regard.
Surrounding content around images
Image optimization doesn’t happen in a vacuum. As such, the copy that surrounds an image on your page is also important for SEO. The relevance of the content, its quality, and the keywords that are used can all affect how the image ranks in search.
The most important copy is the text that immediately surrounds the image. This might be an introductory sentence which precedes the image (for example, “Below is a graph showing the results of a survey carried out among 500 marketers…”) and/or a caption below it which gives some additional context.
Search engines like Google will use this copy to determine how well the image matches the topic of the page. For example, if the focus of the content is on plumbing, an image of a tree has decreased chances of ranking high for the keyword “plumbing examples” (and is likely to confuse your users to boot).
In addition to this, Google’s image recognition AI has become much more sophisticated in recent years, to the point where it can often identify whether the image subject matches up with the rest of your content.
Stock photography
There has been a long discussion over the years on whether using stock photography has a negative effect on your ranking. Google’s Matt Cutts went on the record back in 2013 to state that stock photos do not harm your search rankings, and therefore there is no difference in using them instead of original photos, SEO-wise.
However, there are a couple of caveats to this. One is that stock images are by their nature generic, and so the visual experience of your website will be a lot more generic as a result, particularly if you use a lot of them. This will also not help your image stand out in search results, and a stock image is unlikely to grab the user’s attention – unless of course you’re a stock photography vendor.
The second thing to bear in mind is that there will be countless other copies of the same image as yours out there on other people’s websites. As Dave Davies pointed out in the 2013 version of this guide, “Google doesn’t want to rank multiple copies of the same image any more than they want to rank multiple copies of the same content. If you’re using the same image that’s been found on a hundred other sites before you, why should yours rank?”
For example, if you’re writing about your company’s business culture, you can either pick a stock photo of happy people in an office environment, or simply upload a high-quality photo of your own office with your team members during a meeting. The latter is personal, relevant and interesting, and gives users a sense of what your company is really like.
Content quality is also important in images as it is in text. Matt Cutts pondered in 2013 whether original images might be used as a future quality signal to indicate a trustworthy website, leading to a higher search ranking:
“Who knows – maybe original image sites might be higher quality, whereas a site that just repeats the same stock photos over and over again might not be nearly as high quality.”
While we don’t have concrete confirmation as to whether Google went on to use this as a quality signal in image search, the impression on the user is worth taking into account.
Image engagement and popularity
Search engines value content with high engagement. This means that if you have a high-quality, relevant and original image that starts becoming popular among users, you have more chances of seeing it higher on search results. As with any text post, the popularity of your content can help it reach higher on the SERPs.
The principles of link-building also apply to image search: the more people link to your image, the higher the chances of increased search traffic coming from it. This can also be facilitated by the use of sharing buttons alongside your images. Once your image gets shared on many sites, its popularity will contribute to its success in search.
The popularity of an image can derive from clicks to your site, embeds and shares on other pages, or even social shares. All of them make the image more popular, while also indicating its relevance to the topic it describes. This ultimately makes search engines pay more attention to it.
Overview
In summary, here’s how you can optimize your images to rank higher in search results:
Try to reduce the weight of your images, but not to the detriment of quality
Pick a relevant filename
Use alt attributes to describe your content as accurately as possible
Pay attention to the content that’s surrounding your images
Try to use original graphics or photography
Aim for engaging images that will encourage sharing
source https://searchenginewatch.com/2017/11/09/image-optimization-101-how-to-rank-higher-in-image-search/
from Rising Phoenix SEO http://risingphoenixseo.blogspot.com/2017/11/image-optimization-101-how-to-rank.html
0 notes
Text
Image optimization 101: How to rank higher in image search
SEO is not only about optimizing written content.
The increasing dominance of visual content online has brought with it new opportunities for increasing a site’s search traffic by optimizing videos and images.
Optimizing your images gives your website an additional chance to be found via image search, and a good logo or some eye-catching graphics can be just as effective at attracting visitors to your website as your written content.
But even if you’re highly familiar with optimizing written content for search, you may not know where to begin with optimizing images. What factors do you need to bear in mind? Does keyword usage still apply?
In this guide, we’ll take you through everything you need to know about optimizing for image search.
N.B.: This is an updated version of a guide by Dave Davies that we originally published in 2013: Image Optimization: How to Rank on Image Search
Image size
The size of your images can have a big impact on your overall site speed (which is an important search ranking factor), and big, heavy images are one of the biggest culprits for slowing down websites – particularly on mobile.
However, because you also want your images to look good and be eye-catching, especially if they’re the first part of your website that people see in image search, you also don’t want to sacrifice quality. Thus, finding a balance is necessary.
Matt Owen’s article on how to optimize your page images to increase site speed gives some useful pointers here, particularly with regard to not uploading images which are larger than the user will ever see, as this will just slow down your site with no benefit to you or the user.
Which file types are going to be most helpful here? GIF, JPEG and PNG are the three main image file types, which make up 96% of the Internet’s image traffic.
PNG offers a good combination of compression ratio and image quality, and as such is usually your best bet. JPEG can have a compression rate of up to 10x more than the other two formats, but is a lossy format – meaning that it reduces the quality of your images as it compresses them, so consider whether this is a sacrifice you need to make.
Saving your image as a GIF won’t result in a loss of image quality, but it can sometimes reduce color detail, making GIFs most suited to animated images, logos and any other small, simple images.
Google’s PageSpeed Insights offer some more guidelines on how to optimize your images for maximum site speed.
Image name
The name of your image file can help search engines discover your content in context. This is where keywords enter the picture (as well as in the alt attributes, which we’ll cover below).
If you’re uploading a photo of nature photography, a relevant filename like nature_photography.png has a better chance of ranking well in search than than DSC_1977.png. If it’s possible to be even more specific, such as Hong-Kong-botanical-gardens.png, then that’s even better for SEO.
If you don’t enter a separate title for your image upon upload, the filename will also serve as the image title, which makes it all the more important to be clear and accurate with your filename.
For more on how to optimize your image title text and alt text, read on to the next section.
Alt attributes
Alt attributes are the text alternatives to your image which will appear if your image fails to load, or if the user is accessing your site with an assistive device such as a screenreader. Because web crawlers don’t have eyes, they’re also what search engines “see” instead of an image, making them important for both accessibility and SEO.
As such, the alt text and title text tag fields are the best place to put any keywords relevant to your image, BUT: do not keyword-stuff! This is a poor practice in image SEO just as in text-based SEO, and will do the screenreader users accessing your website no favors.
Title text
The title text is effectively the name of your image, and as such serves a very similar purpose to your image filename. The main difference is that it needs to be human readable as well as machine readable – so use spaces to separate the words in your image, not underscores or dashes (or nothing at all).
There are certain circumstances in which title text is all you need to substitute for your image – if the title text alone describes the image, you don’t always need alt text.
For example, if the image is a headshot of a person, their name alone is sufficient for title text – as it tells both people and search engines what the image is of – and no additional details are necessary in the alt text. Alt attributes are important, but you don’t need to go overboard!
Alt text
This is the field that describes what your image depicts. Alt text can help search engines work out not just the content of an image but the topic of the surrounding text – so it’s important to get it right.
If possible, at least one image on your page should contain your focus keyword, but it’s important not to shoehorn it in. Image alt text should be clear, descriptive, and written in natural language. Imagine it as if you were telling someone who couldn’t see the image what it was about. Which key details would you highlight?
Some guides will place a recommended length on alt text, such as 80 or 150 characters, but in truth the alt text should be as long as it needs to be in order to get the image content across. Try to be succinct, but don’t sacrifice necessary details for the sake of length.
Here is an example of an article graphic (courtesy of Shutterstock) that we uploaded for a recent article, ‘Beyond Google Analytics: 10 SEO analytics and reporting tools‘. The WordPress backend clearly indicates where to input title and alt text:
The alt text we input for this image is as follows: Image of a person typing on a laptop with paper and pens by the side, and a variety of different analytics icons sketched above it, such as graphs, charts and a clipboard.
Page URL and domain authority
The URL of the page that the images are hosted on can affect the image search traffic. If an image is hosted on an optimized page URL on a page which contains quality and relevant content, your chances of image SEO success will be much higher.
Along with the page URL, the page’s domain authority that also can affect an image’s performance in Google Image Search. If a domain already has a reputation for offering quality and relevant content, your image will do better in search. Image SEO is no different to text-based SEO in this regard.
Surrounding content around images
Image optimization doesn’t happen in a vacuum. As such, the copy that surrounds an image on your page is also important for SEO. The relevance of the content, its quality, and the keywords that are used can all affect how the image ranks in search.
The most important copy is the text that immediately surrounds the image. This might be an introductory sentence which precedes the image (for example, “Below is a graph showing the results of a survey carried out among 500 marketers…”) and/or a caption below it which gives some additional context.
Search engines like Google will use this copy to determine how well the image matches the topic of the page. For example, if the focus of the content is on plumbing, an image of a tree has decreased chances of ranking high for the keyword “plumbing examples” (and is likely to confuse your users to boot).
In addition to this, Google’s image recognition AI has become much more sophisticated in recent years, to the point where it can often identify whether the image subject matches up with the rest of your content.
Stock photography
There has been a long discussion over the years on whether using stock photography has a negative effect on your ranking. Google’s Matt Cutts went on the record back in 2013 to state that stock photos do not harm your search rankings, and therefore there is no difference in using them instead of original photos, SEO-wise.
However, there are a couple of caveats to this. One is that stock images are by their nature generic, and so the visual experience of your website will be a lot more generic as a result, particularly if you use a lot of them. This will also not help your image stand out in search results, and a stock image is unlikely to grab the user’s attention – unless of course you’re a stock photography vendor.
The second thing to bear in mind is that there will be countless other copies of the same image as yours out there on other people’s websites. As Dave Davies pointed out in the 2013 version of this guide, “Google doesn’t want to rank multiple copies of the same image any more than they want to rank multiple copies of the same content. If you’re using the same image that’s been found on a hundred other sites before you, why should yours rank?”
For example, if you’re writing about your company’s business culture, you can either pick a stock photo of happy people in an office environment, or simply upload a high-quality photo of your own office with your team members during a meeting. The latter is personal, relevant and interesting, and gives users a sense of what your company is really like.
Content quality is also important in images as it is in text. Matt Cutts pondered in 2013 whether original images might be used as a future quality signal to indicate a trustworthy website, leading to a higher search ranking:
“Who knows – maybe original image sites might be higher quality, whereas a site that just repeats the same stock photos over and over again might not be nearly as high quality.”
While we don’t have concrete confirmation as to whether Google went on to use this as a quality signal in image search, the impression on the user is worth taking into account.
Image engagement and popularity
Search engines value content with high engagement. This means that if you have a high-quality, relevant and original image that starts becoming popular among users, you have more chances of seeing it higher on search results. As with any text post, the popularity of your content can help it reach higher on the SERPs.
The principles of link-building also apply to image search: the more people link to your image, the higher the chances of increased search traffic coming from it. This can also be facilitated by the use of sharing buttons alongside your images. Once your image gets shared on many sites, its popularity will contribute to its success in search.
The popularity of an image can derive from clicks to your site, embeds and shares on other pages, or even social shares. All of them make the image more popular, while also indicating its relevance to the topic it describes. This ultimately makes search engines pay more attention to it.
Overview
In summary, here’s how you can optimize your images to rank higher in search results:
Try to reduce the weight of your images, but not to the detriment of quality
Pick a relevant filename
Use alt attributes to describe your content as accurately as possible
Pay attention to the content that’s surrounding your images
Try to use original graphics or photography
Aim for engaging images that will encourage sharing
from Search Engine Watch https://searchenginewatch.com/2017/11/09/image-optimization-101-how-to-rank-higher-in-image-search/
0 notes
Text
bleach brave souls apk hack
Hi
automated pvp. Conquer undesirable hallows with busy, measures beat with qualifications, combos, and the capability to avoid. Chlorine bleach courageous souls is usually a free to carry out, three dimensional measures rpg formed and published by klab universal, a japanese code producer behind the most well-liked mobile or portable titles, lovelive! School idol festival and lord of dragons. All point requires using with a somewhat fairly short and upright collection guide consists of the pair waves of enemies having a employer stop through the surface. |story pushed code that stays consistent with the upfront story with the bleach anime and manga selection. The beat is rather soft and busy with solution animated graphics, but since the adjustments are sensitive, the swiping to avoid offer is outlandish. All nature has special weather, qualifications, data, and playstyle. On the other hand, online players get plenty of summons totally free (will likely be mentioned in in request obtains) as well as good deal of collectable stats adds array into the code. stats for more bonus deals. Likewise into the co op approach, the sport has pvp the place online players normally takes on randomly player’s gatherings for special benefits. The in request obtains are generally like people of other hero getting rpgs. |Despite the fact stages have an overabundance of hard at a later date, dollars is not always instructed to develop, though, forking out dollars contains advantages as an example , better energy plus in code precious, along with ending up with a larger sized probability of acquiring a 5 star hero/accessory due to better summons, that gives a benefit with the story missions and pvp. (also called klab universal and klab aimbots), a japan structured code producer behind the most well-liked mobile or portable titles, lovelive! School idol festival and glee forever! Bleach Brave Souls Android Hack was unveiled about this the summer months 2015 in japan the place it bought greater than seven mil downloading and hinted in the direction of a worldwide liberate in december 2015 (genuine liberate night out: the month of january 2015). Chlorine bleach 6 Bleach Brave Souls Android Hack is made by klab universal, it's a hack and reduce excitement rpg code that officially established to make the north america and universal territories outside of japan for the month of january 13th. together with other online players to come up with associates and purchase with one another in supportive battles. Aiming for and struggling is easy, for the reason when time-consuming even if you handle more affordable the attack link what type will straight away try and focus on the local foe except if you maneuver to concentrate on some other foe somewhat. your head alongside an adversary workforce. All online players begin with ichigo, as well as something other nature will most likely be given for you personally totally free once you start the sport and you could use people two stats to establish a workforce. The leading story technique for Bleach Brave Souls Android Hack is enjoyable to encounter with as well as being filled with conversation and tiny scenes through the anime and manga, but it's in addition slightly rushed and does not do justice into the stats or make crystal clear sense of what's taking do you have to certainly not seen the anime. These orders are basically like accomplishments you want to open and finish to quickly attain more income, things, or soul orbs by doing the special requirements displayed for ones buy as an example , eliminate 100 enemies in just 1 week. |I realize that online players that is make use of a little older instruments will value the video game might run successfully while avoiding a large amount of hiccups. To purchase much more info and information, you may additionally head to the Bleach Brave Souls Android Hack established web pages. Likewise into the story approach, courageous souls offers loads of lone person and multi person solutions which keeps your person gratified beyond the earliest travel. “ascend” is usually a automobile specialist allowing the gamer to blend a handful of nature summons so that you can increase the grade cover about the offered nature. Klab warrants far compliments for reducing needed sales to make use of soul orbs, that could be bought just by doing quests or putting your signature on in on a daily basis. Having said that, it's simple for that person to acquire spirit seat tickets to acquire doing a search, so online players can enjoy continually while avoiding getting in your feelings spirit ticket intake. Even when your may not be pretty experienced with the bleach assets, courageous souls appears suitable itself such as a top-notch hack n reduce with light-weight rpg weather, the video game is provided advocated to players of and never merely spectators within the anime. |You will be conscious that they receive the standard get rates by itemizing in folks who get fortunate and acquire attractive gets earlier averaged by being able to help pay for their folks who get unlucky and also have incredibly undesirable get quotes? In fact i had been some of the unlucky styles. You get plenty of completely free gets during taking part in likewise. I am sorry, but making use of spiel offered previously mentioned, i purely will not likely take advantage of freemium. Being explained all that, courageous souls is of raised attraction to eager bleach site visitors thanks to the comparable tranquility all around the assets. along the short swordplay. Conversation swaps linking stats convey a test within the “bleach experience” that's rewarding and digestible while avoiding overstaying its greet. Basically because it's not necessary making use of all stats on top of that like some of the struggling aimbots, you are vulnerable to give even touch online players like cirucci sanderwicci the time Bleach’s tremendous cast has not been so important or pertinent. offered as yet, or gatherings properly unimportant into the concern at hands and wrists. |Tokens was needed to move forward regenerate after some time, so chances are you will get seven or maybe more chapters at any given time somewhat within the all 5 free stuff you would look forward to. The sitch (instance for everyone upright and slender varieties) is usually that this: i’d just done taking part in blazblue chronophantasma stretch out (explore the product review below) understanding that i was making time for a bit of experience analyzing in regards to this whenever i discovered the non reusable to encounter mobile or portable code bleach, somewhat acknowledged mobile or portable code through the males at klab aimbots. Vs his significantly better verdict, ichigo sets out an getaway of directing souls in the afterlife as a substitute spirit reaper, for the way how to find that lots of his friends have makes that belongs to them. Several stats would be taken directly into a journey by pressing the stats link placed, you may tag it to the stop to protect myself personally While you perform more difficult quests improved benefits will finish up readily obtainable. Teams’ entire fact can determine the end Soon after every week promos and relegations are moved out and you will wish to be ascending that step ladder such as promotion is provided the prize about the uncommon medal which you can use to redeem higher level stats (5 star stats). And the crucial quests bleach contains time modest supplementary quests that recharge constantly. Yes indeed the sport is totally free to download you can find you may carry out all settings and connection all posts totally free though, your finest great success (in stop approach no less than) will almost certainly have got to have you to pay a modest amount of precious coin (to |This may be a insane enjoyable measures rpg to communicate about if you happen to keen on the bleach manga, this video game will fulfill your spirit reaper urges. They can be making time for you utilize the rock and roll paper scissors struggling principle, and concerning stop you should do pay attention to parries and counter conditions, and not computer screen mashing. I actually do take pleasure in the actual facts that brilliant this approach and struggling, i've not noticed any lag. Game enthusiasts will surely have to forfeit file greeting cards to have heights just how much nightclub. Unite your chosen stats into groups of a couple of. Or subsequent the next permissions must carry out farmville. Opening making use of desltop you will notice your customary currency for mobile or portable aimbots. Coins can be used as many steps which you'll exhaust speedily do you have to not strategy earlier. |emotions . Chlorine bleach courageous souls whitened colored ichigo there are a lot respected bleach stats came across inside code. settings: story, courageous battles, and co op. the video game that uses its individual model of seat tickets (stop travels), but the code carry out differs from all of the other code. The sport reception is similar to styles as encountered with starcraft ii as yet the rest, in particular personal house configurations and person grade anticipations (any one, inexperienced, or consultant). The in code popular music keeps track of consider taking presctiption componen for emotional state within the code and the category within the anime. Food list control keys are easy and gratifaction that they if eventhough it is tedious to go to from nature to nature by giving up appearance of just one page to another. can records communicate with bing carry out and facebook or myspace balances to encounter on a multitude of instruments or include for the alternate. |Now released everybody release of bleach: courageous souls, a three dimensional hack and reduce measures rpg in step with the You might also rainfall these to enhance their data, and as well website link stats with one another to help make they a good deal more amazing. It's crystal clear to figure out why it's revealed increasingly popular definitely with over seven mil downloading becasue it actually is establish in japan this beyond season. I am sick and tired with it! Everyone seems to be sick and tired with it likewise. the japan version because it is while watching universal version as well as being better sensible into the beginnings of that the code created from. You will discover in general 3 sections inside a stop guide. special conditions. |I could truthfully gather 250 gems just from common promotion approach and co op. Pecial functions they are simply functions where one can get 3 5 star stats. You also have got to have a couple of hokyogus so that you can modernize you nature from 5* to six and he'll be reset to grade 1. It is easy to customise and educate the stats and as well have your very own in the event that will be your kinda thing. a little more about the sport then take a peek at its web pages. This approach in reality uses the bleach story the minute rukia and ichigo number one connect with into the arrancar arc (so far because there are still 3 better arcs to become unveiled soon enough). |There's also functions that previous for several days, which could supports have an overabundance of items to enhance your stats. Also if you need this kind of product review, explore want i will want to product review up coming.
0 notes
Link
The following blog post, unless otherwise noted, was written by a member of Gamasutra’s community.
The thoughts and opinions expressed are those of the writer and not Gamasutra or its parent company.
In this post, we’ll talk about how we create GIFs for our game Lake Ridden. This post was originally posted on our developer blog. As the person in charge of our marketing assets here at Midnight Hub I’ll walk you through our current process for creating crisp and catchy GIFs; which tools we use, as well as offer you some general tips and tricks for improving the quality of your fancy moving images! In this Gamasutra post I'm linking to our embedded tweets showing you the GIFs I'll be referring to. In other words, if you are on a tight bandwidth diet – fear not, no GIFs in this post will load unless you choose them too! Let’s go!
— Sara Casen 🏔 (@saxen8) February 15, 2017
A GIF showing the atmosphere in Lake Ridden. Here I use a static camera and let the particles and fog communicate movement, making it a nice mix between serenity and details. This GIF was posted on our social media and generated a lot of reactions.
When marketing your game photos are nice. But images and screenshots have their limitations when you’re showing off something that’s essentially a moving medium. I find that moving images and snippets of film are often better at delivering the message, compared to screenshots alone. GIFs are quick series of images displayed so that they look like video.
The “art form” has been around almost as long as the Internet itself (and usually contain a lot of cats doing funny things). A GIF can last anywhere between 1 – 30 seconds, depending on the quality, what you want to show and the platform you are sharing them on. A lot of GIFs on Reddit nowadays are really long, almost like YouTube videos, the same goes for Facebook. On Twitter and Tumblr however, people post a lot of 1-3 second long GIFs instead. And some GIFs are looped in such a smooth way it’s hard to tell how long or short the GIF really is.
I think the firelies in Lake Ridden are starting to look very nice now :O #gamedev http://pic.twitter.com/vTGvl9zJW0
— Sara Casen 🏔 (@saxen8) February 9, 2017
Keep your GIFs short. I usually aim for 3-4 seconds. This keeps the file size down and the interest up! This GIF is playing backwards, giving it a nice little twist with the fireflies in Lake Ridden
To spread the word about Lake Ridden we’ve used both images, videos, and GIFs in various combos. I’ve done this to communicate the environments, the gameplay, the color palette, the feeling or something from behind the scenes. For us a good GIF almost always gets more reactions and attraction on our social media channels, compared a simple photo or screenshot. Also, I greatly enjoy making them since it’s kinda creative! There are two main things that make a GIF great; the very content it is showing to the viewer and the tech behind the GIF itself. Not all GIFs are born equal. Let’s start with looking at the tech behind the images.
Technical Settings For Recording A Good GIF
Talking with a lot of developers posting GIFs about their games on Twitter, I noticed that almost all had their own preferred workflow, which I find interesting. Some people used programs like Fraps to capture the raw footage in-game, others used quick and small programs like GifCam, and used tools they had hacked together themselves. It seems like the method you choose is depending on a mix of factors; how much time you have, the desired picture quality and your game. If you want something fast and dirty, and don’t obsess over the quality you usually go with quick tools such as ScreenToGif. But if you want super crisp snippets with perfect color then you might invest in a more complicated workflow.
My advice here is: look at your game, does it have a lot of different colors/details in it? Or is the art style more simple? The more complicated art/colors you have (and if you want to keep them as sharp as possible in the final GIF) go with Fraps. Fraps give you really good raw material when recording your project.
You need to pay attention to the file limits on the platforms where you aim to spread your GIFs. Twitter has a limit of max 15 MB. If your file’s too big, resize it or make it shorter. I use a mix of Fraps and Photoshop to create our GIFs.
Second advice: determine how much time you want to put into making your GIFs. If you just want to capture, edit and throw it out in the wild, then go for a solution that’s quick and doesn’t offer you hundreds of post-processing options (suggestion: LiceCap). If you want to edit and tweak your GIFs extensively, consider using Photoshop + Fraps (YES you can edit video in Photoshop!!1).
A rule of thumb is to make the pixel quality of the GIF as good as possible on your computer, because a lot of platforms will compress it even further when you start spreading it, making the colors bleed or reducing the pixels. Twitter will take your GIF and secretly convert it to a .mp4 when you post. Facebook doesn’t allow for GIFs to be posted at all unless you link them trough a GIF-service like Giphy (more on that later).
Our Technical Pipeline For GIFs
Here are the steps I’m using to capture the raw material for our GIFs and how I tweak the file size if the GIF comes out too big. I use a mix of Fraps and Photoshop.
Our night sky now features a moon! 😍Wanna try Lake Ridden at GDC or Game Connection? Drop me an email to: [email protected]! 🌙 http://pic.twitter.com/l5rPGoWluK
— Sara Casen 🏔 (@saxen8) February 16, 2017
Remember that a lot of people will probably view your masterpiece in a social media feed. I've noticed it's generally a good thing to tweak the lights and color in Photoshop when you edit the source materials. Small GIFs tend to get overly dark otherwise, especially if they depict a dark scene like this one showing the night sky and its stars.
I make sure to run our game with the maximum graphics settings on my computer. The game should look as good as possible. No lag, no frame rate dips or weird loading/LODs. All hiccups or similar will be extra obvious in the final GIF.
To capture the raw footage I use Fraps. This software has been around for ages and is a faithful workhorse. Consider chipping in a few dollars to get the premium version (I also used Fraps to record our alpha teaser trailer in-game, it’s awesome for capturing anything moving on a screen).
I make sure all the video snippets I record go into the same folder on my desktop. This will make it so much easier when sorting your raw footage and deciding what to cut into a GIF. I have different folders for all GIFs.
When I have decided which of the raw footage I want to make into a catchy GIF I open it up in Photoshop. Photoshop is really simple and straightforward to use for smaller video editing. You don’t have to invest in After Effects or that other advanced stuff unless you want to.
In Photoshop I edit the video, cropping, dragging and adjusting colors, then export it. Go to File->Export->Save For Web and a dialog window should pop up (I use PC).
There are a few things to consider in this window. At first, be aware of the technical limitations of the platform where you’ll be posting your GIF. If you’re aiming for Twitter, make sure the GIF is a maximum of 15 MB. If the GIF file size is too big, resize the image by tweaking image size at the right. The second option is to check or uncheck the box named “Transparency”. Sometimes this reduces the file size but does not affect the quality of the image (?). If the GIF’s still too large, go back into Photoshop and trim down the GIFs length in seconds. This will cut down the size of the file. When you’re happy with all the settings in “Save For Web” make sure to click “Forever” in “Looping Options” if you want your masterpiece to loop into infinity. Then press “Save”. Done!
Our Artsy Pipeline For GIFs
Let’s move on to the fun part! Creating a good GIF is more than perfect picture quality. What you’re showing (or not showing) in your snippet is even more important. Here’s my process when shooting materials for our Lake Ridden GIFs.
After recording raw material in-game I use Photoshop to edit the clip, tweak brightness, add a small water stamp (so people can find the game if the GIF goes off into the wild and people get curious about where it came from). In this stage, I crop the video material to focus on the most important thing in the GIF. It needs to be readable in a thumbnail size (compare to the final results below).
Our demo of Lake Ridden is done!! Can't wait to show it at GDC next week! Wanna try it? Let me know! #gamedev http://pic.twitter.com/XnIoUkxJsR
— Sara Casen 🏔 (@saxen8) February 23, 2017
The final GIF showing an important, creepy location found in the game.
Make sure the game runs as smoothly as possible on the computer you’re using to shoot the raw footage. Again, all artifacts, lag or loading will show even more in a 5 second GIF.
Decide what you want to show and why. A good rule of thumb is to stick to one main thing with each GIF. Decide if you wanna show off a cool animation, or perhaps a battle effect or the mood of the game. What will be the star of your GIF?
Record a lot of small snippets in-game, just a few seconds long. I usually have like 15 small videos when I’m done, showing the same thing in different angles, using the camera in different ways, zooming or not zooming etc.
I sort trough the raw material and open my best clips in Photoshop, cut them up and minimize them to really small windows. This way you can decide if the GIF will look good when it’s displayed on a small screen (aka smartphones). In other words; is the image readable? The GIF needs to look good as a really small image since a lot of people browse these things in their Twitter or Facebook feeds. They should be able to tell instantly if they are looking at a face or a dog or a house. If not, people tend to get confused and you missed your chance to evoke their curiosity and eventually reaction to your game/project.
I cut the canvas. Focus on what’s important in the image. Again, it should be readable.
I tweak the brightness/colors and saturation. A lot of the times it’s better to make the image a little bit brighter since I’ve noticed it tends to get even darker when posting to a feed.
For Twitter, I like to keep the GIFs to 3-5 seconds and always go for looping. For Facebook, I go a bit bigger, like 5 – 8 secs. People have very short attention spans and a GIF should be very straight to the point. When in doubt – make the GIF shorter.
Posting GIFs for Twitter and Facebook
If you want to post your GIF to Facebook then you have two options. You can’t post a file in the GIF-format straight to Facebook (this is 2017 like what why?!). You can either use a third party service like Giphy (beware the quality will suffer) and post the link, OR you can be much more elegant and save your GIF in .mp4 format and post it straight to FB. Facebook accepts videos in the format of .avi and .mp4 to be posted straight to your page/wall. This is what we did when we posted our teaser trailer on Facebook.
The water is staring to look really good. Super excited having people try it on GDC! :) http://pic.twitter.com/vHGFdVEPOI
— Johan Bernhardsson (@jbernhardsson) February 13, 2017
This GIF post by our code lead Johan focuses on the water in Lake Ridden. This was made to showcase one specific item in the game: the water effect. Try to limit your GIF to showing one thing, otherwise things tend to get confusing and messy. Decide on one component and make it your "star of the show". This could be a funny bug/a new animation or the day/night cycle in the project.
We did not post a link to Youtube but the trailer in .mp4 format on my own personal Facebook page (as an experiment to track the number of views ‘a la Facebook). To post in .mp4 you can use a tool to convert your Photoshop-made GIF to .mp4, or if you’re using a more advanced video editing software like After Effects you can save the video as .mp4. Simply converting your GIFs to .mp4 using GIF-2MP4, a free online tool that does the trick according to my experience!
Get Creative!
Use what you got! I use the player’s default camera in Lake Ridden when recording our GIFs. I tilt the camera, I use the crouch, I walk backward, I stand still shooting moving objects etc. I highly recommend you use different ways of movement/vantage points if possible. This offers variety to the people watching your GIFs and you’re able to do more with less. Try to convince your programmers to implement a special camera for shooting videos and taking screenshots if possible, since that will help out a lot in the long run!
Lake Ridden is starting to have a nice contrast between night and day. This week we're also working on puzzle design and story. :) http://pic.twitter.com/THKUGmYPlt
— Johan Bernhardsson (@jbernhardsson) April 6, 2017
Often you need to find new, interesting ways to show the same content but with a twist. In this GIF I made the camera go out of the scene (compare it to the next GIF below).
Quick GIF showing the lights and colors of a sunset in Lake Ridden. Still needs some tweaking : ) #gamdev http://pic.twitter.com/8eHDmjgaYi
— Sara Casen 🏔 (@saxen8) April 6, 2017
Here the camera does a drive by of the scenery instead, which creates a different feeling. Get creative and play around with the tools you have ingame! Just make sure not to post too similar content back to back on your channels or people will find it dull.
A lot of the time I’m working on stuff in the game that I can’t show, so I have to think of new, exciting ways of showing things that I might have posted before. It’s not only about how you’re showing something, it’s also about what you’re showing. A lot of developers also post fun bugs or glitches from behind the scenes or inside the game engine. Think about your audience and ask yourself what they might enjoy. Reddit/gaming usually enjoy insane bugs or humor, while other developers like to see a nice tooltip. Players perhaps want to get a tease on the mood inside your game or your main character in a cool animation. If you have some questions regarding GIFs or know of a better way of doing some of these steps, please let me know in the comments!
Sign up for the Midnight Hub Newsletter or follow Facebook for more news and screenshots. Follow us on Twitter where we GIFs and behind the scenes stuff! Until next time!
Cheers,
Sara & The Team
0 notes
Text
BioIdentical Hormone Replacement Threapy (HRT)
This blog has been about documenting my research into balancing hormones naturally. I have had great success with nutritional changes, supplements, herbs, and acupuncture. However, I have been unable to fully address the final problem of fatigue and brain-fog during ovulation and menstruation. This has now been explained by the results of my hormone tests with Dr Meyer: very low oestradiol - one of the three types of oestrogen. Dr Meyer has said that the only way to resolve the problem is to put the missing hormone back into my body using bio-identical hormones which are a natural alternative to conventional HRT.
I had always assumed that HRT was for women in their late 40s experiencing perimenopause, the transition to the menopause. The ‘change’ usually lasts for five years which can be very difficult for some women who experience debilitating symptoms such as: sweats, insomnia, mood-swings, weight gain all of which negatively impact their lives. I am 43 and my hormonal problems worsened after the birth of my first child 6 years ago. I have always suffered with irregular periods, long cycles, PMT, acne, heavy bleeding and Dr Meyer says that this could be due to a genetic problem with oestrogen production.
Conventional HRT
Conventional HRT has two fundamental problems: the hormones used are not identical to those produced by the body and they are given in standardised doses.
Conventional HRT works by replacing oestrogen and progesterone but the versions used are not the same as the hormones produced by the body. The most widely-used brand of oestrogen in conventional HRT is Premarin which is derived from the urine of pregnant mares and therefore contains forms of oestrogen only found in horses. The replacement for progesterone is Progestin which has a slightly different chemical structure to the natural version of the hormone because it is synthetic progesterone made in a laboratory. [3]
Although conventional HRT uses hormones similar to human hormones because they are not exactly the same they can make life worse for some women. They can confuse the hormonal system causing side-effects such as high blood pressure, fatigue, bloating, and headaches. Conventional HRT has also been linked to an increased risk of breast cancer and heart disease.
'Replacing the oestrogen that your body is no longer producing with the versions found in conventional HRT is like replacing parts designed for a Chevvy with those made for a Mercedes,' says Dr Jonathan Wright, medical director of Tahoma Clinic, Washington. 'They may be almost the same, but with both engine parts and biology, very precise measurement matters.' [3]
In addition, conventional HRT comes in standardised doses which means that they may be either too strong or too weak for some women causing symptoms to worsen or remain effectively untreated. This one-size-fits-all approach is inappropriate for the treatment of symptoms that can vary hugely from one woman to another depending on their individual hormone levels.
Risks of Conventional HRT
The use of hormones from animal or synthetic sources in standardised doses means that it doesn’t work for all women. In addition, because conventional HRT is slightly different it has been linked with a number of damaging side effects including coronary artery spasms and an increase in the fats in the blood. [3]
In 2002 a large US government study found that conventional HRT can increase the risks of heart disease, stroke, blood clots, and breast cancer but only by one extra case in 1,000 women. Many experts say the study was irrelevant to most women. 'It involved women over 60 who had been oestrogen- deficient for ten years so they were more at risk to both cancer and heart disease than a woman taking HRT at the beginning of the menopause in her early 50s,' explains Dr Sarah Jarvis, a spokesperson for the Royal College of GPs. [3]
In 2014 the Lancet review of over 50 studies linked the synthetic hormones in conventional HRT to an increased risk of ovarian cancer but the British Menopause Society now states that the benefits of HRT outweigh the risks.
Dr Erika Schwartz says that the risk of breast cancer comes from ‘high levels of unopposed oestrogen (without balancing progesterone) - whether this is oestrogen from exposure to chemicals, radiation, synthetic HRT, or even supplements such as isoflavones derived from soy taken without supervision. I have been taking bio-identical hormones for 19 years, and have treated thousands of patients with them. And, to the best of my knowledge, none, not one, has gone on to develop any form of cancer while under my care.” [1]
Artificial standardised hormones can cause nausea, blood clots, mood swings, weight gain, and excess bleedings. Because bio-identical hormones are identical to female hormones they are more easily metabolised by the body so there are potentially fewer side-effects. [2]
Profit Before Health
Although bio-identicals have received increasing attention during the last ten years I was surprised to discover that they were originally developed over 70 years ago. The reason they have not been more widely used is driven by the greed of the big pharmaceutical companies. Because they are not allowed to patent naturally occurring compounds from plants they deliberately make versions that are slightly different so that they can be patented. A patented drug is therefore worth more money to the pharmaceutical company so that is where they focus their efforts, to the detriment of women’s health. [3]
Natural Hormones
Bio-identical hormones are derived from plants and their chemical structure is identical to human hormones so their action on the delicate hormonal system is more gentle than the conventional form. Bio-identical oestrogen is made from plant based oestradiol derived from soy and yam oils which comes in the form of pills, patches, and creams. Plant-based progesterone (micronised progesterone) is derived from yams and is available as a vaginal pessary and in tablet form known as Utrogestan.
Bio-identicals are far superior to conventional HRT because the preparations are tailor made to suit the individual needs of each woman. Private GPs and clinics prescribe tailored doses made by compounding pharmacies based on the results of hormonal tests. This means that the treatment is more effective and there are no dangers of overdosing.
Bio-Identicals on the NHS
The standard view of the NHS is that aging women are better off with HRT than without it but this is usually given in the conventional forms because GPs wrongly believe natural hormones don’t work. However, natural HRT is available in licensed commercial preparations such as Estrogel, Estraderm and Hormonin which contain a standardised dose of oestrogen and progesterone. [3] GPs can also prescribe Utrogestan, a natural progesterone which comes in tablet form and is more effective than patches. [1]
The problem is that few NHS doctors know about these treatments. Dr Erika Schwartz advises women to ask their GP which forms of the standardised commercial preparations of natural hormones are available to prescribe.
Dr Nick Panay, consultant gynaecologist at Queen Charlotte's and Chelsea Hospital, supports the use of the licensed forms of bio-identical hormones which are available on the NHS. He believes that these approved bio-identical hormones 'should be regarded as part of HRT'. 'The crisis of confidence in HRT after the study showing the cancer risk has meant there has been a lack of promotion and education. But these licensed bio-identicals should be one of the options available,' says Dr Panay. [3]
Hormone Testing
Some GPs criticise the individualised prescribing of natural HRT because blood tests can only give a snap shot of hormone levels and a specific time and women’s hormone levels fluctuate according to the menstrual cycle. However, what these critics fail to recognise is the use of saliva tests.
Because I am still menstruating and I have a regular cycle Dr Meyer advised me to do the Genova Rhythm Plus Comprehensive Female Profile (END11) which measures adrenal stress hormones on four occasions through one day, and measures levels of Oestrogen, Progesterone, and Testosterone on 12 days throughout the menstrual cycle via saliva collection. It costs approx £190.00 and is also good for menstruating women who suffer from PMS.
http://www.genovadiagnostics.com/files/profile_assets/further_information/rhythm_1pager.pdf
Which Hormones
I have a deficiency in oestradiol but because I am still menstruating I will need to take a combination of oestrogen and progesterone. The progesterone protects the womb lining from the thickening effect of the oestrogen reducing the risk of uterine cancer.
Post-menopausal women or those who have had a hysterectomy may be prescribed oestrogen only.
Testosterone
Dr Erika Schwartz: “I believe testosterone can be a useful addition to the natural hormone mix for women because it keeps energy levels up, boosts muscle and bone production, improves libido and a sense of well-being. So many of my patients want to try it, but are afraid of growing whiskers or becoming baritones, but the doses women need for a libido boost are far smaller than the dose needed to turn them into men. However, in the UK testosterone is not licensed for women, so your GP would have to agree to prescribe it to you on an off-label basis (which means they take responsibility if anything goes wrong); you can also get it from a private doctor.” [1]
Forms of Bio-Identicals
Natural hormonal preparations come in the form of capsules, tablets, gels, creams, or sub-lingual lozenges. The effect of tablets can be influenced by food, stress levels, illnesses, and other medications. Oestrogen is best applied twice a day as a cream or gel rubbed into the skin of the shoulder or forearm. Dr Schwartz recommends not applying it to the thighs or stomach as it may cause cellulite. Progesterone is best absorbed in tablet form at night because it has a sedating effect.
Efficacy and Safety
In 2009 a major review of over 200 studies on bio-identicals was published in the Postgraduate Medical Journal. It concluded that they were more effective and had greater health benefits than conventional HRT.
'Many physicians state there is no evidence they are safer,' says the author Dr Ken Holtorf, 'but the medical literature clearly shows they are highly effective and have some distinctly different, often opposite, physiological effects to regular HRT.' [3]
Treatment Duration
In response to the research about the risks of HRT NHS GPs were advising that conventional HRT should only be taken for five years. But it shouldn’t be necessary to stop natural HRT if it is taken in moderation under the guidance of a specialist. Studies have shown that individualised HRT is safer and more effective, so as long as you are feeling the benefits it can be taken indefinitely. [2] It is advised that women gradually reduce the dose and have trial breaks to avoid the returning symptoms from sudden withdrawal.
Dr Schwartz says: “What is key is follow-ups with supportive and knowledgeable physicians, and that women take care of themselves by eating right, exercising, getting enough sleep and dealing with stress.” [1]
References
1. http://www.dailymail.co.uk/femail/article-3251354/Could-natural-HRT-transform-life-No-woman-facing-menopause-miss-natural-way-end-hot-flushes.html
2. http://www.dailymail.co.uk/femail/article-2442081/Could-designer-HRT-stop-menopausal-women-suffering-HRT-effects.html
3. http://www.dailymail.co.uk/femail/article-1197933/Should-middle-aged-women-taking-natural-HRT.html
Dr Annelize Meyer is based in Chichester: The Bosham Clinic
Dr Marion Gluck is based in London: The Marion Gluck Clinic
0 notes
Last Seen Blogs

blaze-blossom
Cheryl Blossom

bucktoofhilbily
Dewit

jho1010
100 DI QUESTI JHONNY

headlinesrp-blog
The Real Deal RP
thoughtkick
Deeplife Quotes