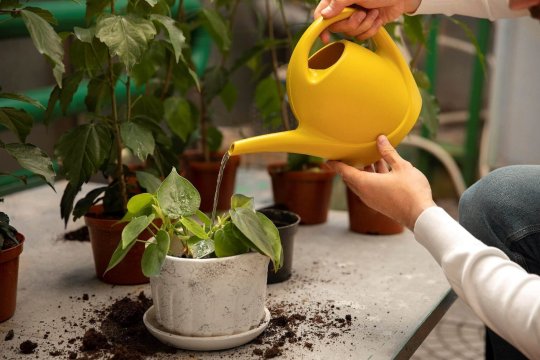
#the pot should be large and filled with well-draining soil.
Text
Adenium plant
Adenium plant
Adenium plant is a popular succulent plant and indoor bonsai plant. The adenium plant also called as "desert rose" and this adenium plant belongs to the Apocynaceae family. Adenium desert rose are known for unique appearance and beautiful star-shaped flower. And most commonly cultivated variety is "adenium obesum". These desert roses grow up to a height of 3 feet to 6 feet tall. And "adenium somalense" naturally tends to grow up to a height of 6 to 10 feet.

How to grow adenium desert rose
Adenium desert rose requires an abundant amount of care. These desert rose requires bright light and indirect sunlight. These desert rose are grow in mild hot areas.
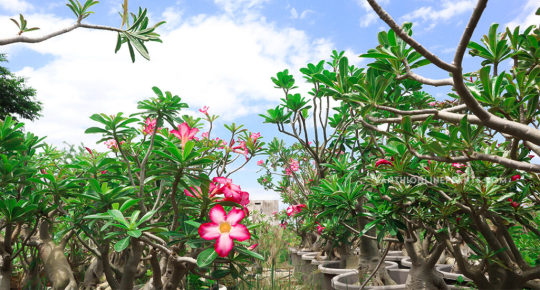
Flower
These adenium desert rose has attractive foliage, star shape, and their symmetrical pattern of petals that give a unique appearance. Adenium desert roses have a wide range of color shades that includes pink, white, red, and purple and some varieties have bi-color and multi-color too. The size of the flower varies from growing conditions generally adenium desert rose flowers scale 2 to 4 inches.

Soil
Soil should be on the PH scale of 6.5 to 7.0. These desert rose requires well-draining soil that helps to prevent waterlogging to avoid root spoiling. A normal mixture of Bio-NPK with sand goes well for the growth of adenium.

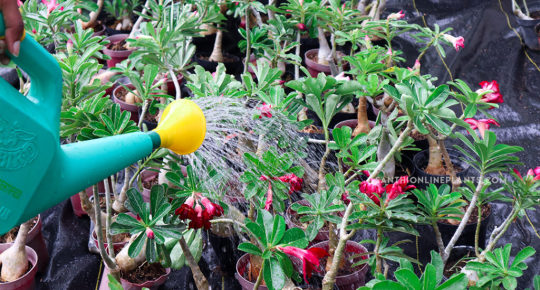
Watering
Adenium desert rose are succulents that don't require more water for their growth. While watering these require a less amount of water so to ensure after watering the top layer should be dry and water shouldn't stay in the pot. It’s better to water frequently in the growing season and reduce watering in the winter season.
Sunlight
Desert rose plant requires bright light and indirect sunlight. Desert rose are grow both in outdoors and indoors. In outdoor conditions, they need to be placed in a shade receiving area to avoid high temperatures.

Fertilizers
Treat desert rose plant with Bio-NPK. Organic fertilizers such as seaweeds and composted materials are used in the growth of desert rose plants. The Desert rose plant is a slow-growing plant it only requires few nutrients. Application of steamed bone meal increase the colour of flower.

Propagation
Desert rose plants propagated through stem cuttings, seeds and grafting. For stem cuttings choose a healthy mother plant. The other technique is grafting in which join a piece of scion onto different rootstock.

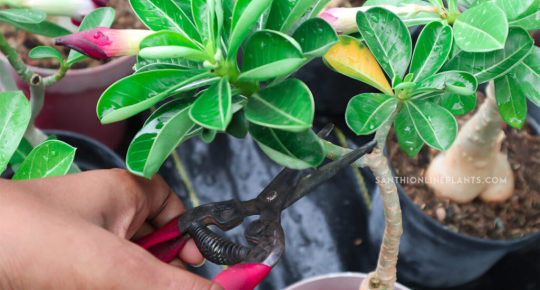
Pruning
Pruning in this plants by cutting the infected branch helps to encourage new branching and by removing dead parts which helps in the efficient growth of this plant
Repotting
Adenium plants are repotted after two years of planted. For repotting, the pot should be large and filled with well-draining soil.

#Image#Fertilizers#Treat desert rose plant with Bio-NPK. Organic fertilizers such as seaweeds and composted materials are used in the growth of desert rose pl#Propagation#Desert rose plants propagated through stem cuttings#seeds and grafting. For stem cuttings choose a healthy mother plant. The other technique is grafting in which join a piece of scion onto di#Pruning#Pruning in this plants by cutting the infected branch helps to encourage new branching and by removing dead parts which helps in the effici#Repotting#Adenium plants are repotted after two years of planted. For repotting#the pot should be large and filled with well-draining soil.
0 notes
Text
A wave of sweet smelling humidity washes over you as you step into the green house. The loud hum of large fans fills the building, though they seem to do little to lower the temperature. Ellisa and her Sceptile stand between a large table and a tall, narrow rack. The table is covered in plants, ranging from tiny seedling, to leafy bush, to draping vine. Terracotta pots, square plastic containers, and fabric grow bags line the shelves of the rack. Ellisa is already elbow deep in a wheelbarrow full of dirt as students begin to gather around.
Gardening in Small Spaces
Whether you live in a tiny studio apartment or on acres of land, everyone can grow something. With a little planning and patience, you can turn a windowsill, shelf, corner, or closet into a functional green space. Lets break it down into a few simple parts:
Location and Lighting
You should choose your location based mostly on the kind of light it will receive. Although most fruiting plants prefer bright, direct light, even a less than optimally placed window can provide enough light for some herbs and leafy greens. If you want to grow more than that, or have no good natural light source, you can find reasonably priced grow lights at your local berry shop or growers outlet. Install the lights to where it will reach the maximum space possible. If you are converting a closet, the ceiling light may not be enough, and you may need to use strip lights along the inside of the door. If you have a patio or balcony, make sure your plants are positioned to receive the most light in the morning rather than the hot afternoon sun if possible.
Containers and soil
Plants take up space, both above and below the soil. In fact, most traditional crops take up about as much space underground as they do on the surface. The container you choose should be roughly two inches bigger than the adult plant will eventually get. Additionally, plants in larger containers are more susceptible to water logging and root rot. Because of this, gardeners in small spaces often need to get creative with their potting choices. High quality potting soil can help combat these issues by providing enough nutrients to feed the plant even in a smaller container and enough drainage to direct water away from the roots until they fill the container. Soil for crop plants in containers should mostly consist of organic matter such as compost, manuer, and worm castings, as well as lots of small gravel or perlite for drainage. Another excellent option for some plants is to grow them upside down. I'm sure you are all familiar with the "Topsy-turvy" tamato berry planters, however any vining plant can be grown in this fashion, and you can make the containers yourself with materials you may already have lying around. These containers make use of vertical space and help plants thrive in a less than optimal amount of soil. Stacking pots or vertical grow towers are also efficient ways to grow several crops at once in a small space, though they can be more expensive and harder to maintain.
Water
Of course plants need water to live, however over watering can cause major problems in container grown crops. Rather than watering on a schedule, your can stick your finger down to the second knuckle in the soil, being careful not to break any roots. If it feels moist, check again tomorrow and leave your plant alone. For most plants, wait until the soil completely dries up before watering deeply. How do you know you have watered deeply? Sometimes when soil is very dry, it may become hydrophobic. Water will pool on the surface, never absorbing, or drain straight through the bottom without reaching the roots. Any container you can lift that has drainage holes at the bottom can be bottom watered, which allows the soil to slowly absorb water. Fill a bowl or other solid container about halfway with water, and place your pot right-side up in the water. Wait twenty minutes and come check on your plant. You will know that it worked if the top of the soil is damp and there is less water in the bowl. For larger pots or upside down planters that can't be lifted, try poking holes in the soil with a small stick or chopsticks and spraying the surface to wet it slowly and provide pathways for the water to enter.
What to grow
So you have everything you need to get started, what should you plant? Well, start with things you know you will eat. Tomatoes, beans, and lettuces are some of the fastest growing crops, but not everyone likes them. Start small, and consider variables such as how much time and energy you have to spare. If all you can manage to begin with are a few herbs then it's still a great place to start. Rosemary, mint, basil, and thyme are great beginner herbs. They are relatively hard to kill and smell wonderful, plus they add that extra touch to anything you cook.
Succession sowing and other helpful hints
Growing indoors means you can grow year 'round with a little timing. When you purchase seed or nursery plants, there will always be a tag that tells you how many weeks until sprouting and then until harvest. Subtract the weeks 'till sprouting from the weeks 'till harvest to get how far out you should begin the next round of seed to ensure you always have fresh produce.
Quality potting soil can be expensive, or you can compost your kitchen scraps to add to cheap potting soil. Food waste makes up a huge percentage of landfills, but you can easily combat this with a few simple items. You'll need three buckets at five gallons each, holes drilled in the bottom of two of them. Stack the buckets with the solid one on the bottom. Fill the middle bucket with kitchen scraps and paper waste, then add worms. Over the next few weeks, put all of your kitchen scraps in the top bucket. When the worms have processed everything in the middle bucket, you will see them move up to the top. The middle bucket is now organic compost that you can add to your soil! Empty the middle bucket, replace it on top of the full bucket, and repeat forever! The bottom bucket will fill with a concentrated liquid fertilizer that is also great for your fruit bearing plants. Mix your compost with cheap potting soil and perlite or small gravel, and now you have premium potting soil for a fraction of the price.
By the end of the class, Ellisa has filled the rack with various herbs and lettuces, with cucumbers, beans, and tomatoes hanging from the sides . Sceptile helps her roll it towards a closet within the greenhouse, which has been lined with grow lights, and push it inside. Campers can see how even in a very small space, they can grow enough to at least lower their grocery bill.
11 notes
·
View notes
Text
Believing These 7 Myths About Peppers Keeps You From Growing
Peppers are versatile and flavorful additions to any garden, but misconceptions about their cultivation can hinder your success. In this article, we'll debunk seven common myths about growing peppers to help you achieve a thriving pepper garden.
Myth 1: Peppers Only Grow in Warm Climates
Contrary to popular belief, peppers can be grown in a variety of climates, including cooler regions. While peppers do thrive in warm temperatures, many varieties are adaptable and can be successfully cultivated in cooler climates with proper care and protection from frost.
Myth 2: All Peppers Are Spicy
While peppers are often associated with heat, not all varieties are spicy. Peppers range in heat level from mild to extremely hot, with options to suit every palate. Bell peppers, for example, are sweet and mild, making them a popular choice for cooking and snacking.
Myth 3: Peppers Need Excessive Watering
Overwatering can be detrimental to pepper plants, leading to root rot and other moisture-related issues. While peppers require consistent moisture, they prefer well-drained soil and benefit from deep, infrequent watering rather than frequent shallow watering.
Myth 4: Peppers Don't Need Pruning
Pruning is essential for promoting healthy growth and maximizing pepper yields. Removing suckers and lower foliage helps improve air circulation and sunlight penetration, reducing the risk of disease and increasing fruit production.
Myth 5: Peppers Are Prone to Pests and Diseases
While peppers are susceptible to pests and diseases, proper care and preventive measures can minimize these issues. Regularly inspecting plants for signs of pests or disease, practicing crop rotation, and using organic pest control methods can help keep your pepper plants healthy and thriving.
Myth 6: Peppers Can't Be Grown in Containers
Peppers are well-suited for container gardening, making them an excellent option for small spaces or urban environments. Choose a large container with good drainage, fill it with nutrient-rich soil, and place it in a sunny location to enjoy a bountiful harvest of fresh peppers.
Myth 7: Peppers Stop Producing in the Winter
While pepper plants may slow down or enter dormancy during the winter months, they can continue to produce fruit if provided with adequate light and warmth. Indoor growers can extend the pepper growing season by providing supplemental light and maintaining a consistent temperature.
Conclusion
Don't let these common myths hold you back from growing a successful pepper garden. By understanding the truth behind these misconceptions and implementing proper growing techniques, you can enjoy a bountiful harvest of fresh, flavorful peppers year-round.
FAQs
Can peppers grow in cold climates?
Yes, many pepper varieties can be grown in cooler climates with proper care and protection from frost.
Do all peppers have heat/spiciness?
No, peppers range in heat level from mild to extremely hot, with some varieties being sweet and mild.
How often should I water my pepper plants?
Water pepper plants deeply but infrequently, allowing the soil to dry out slightly between waterings.
Is pruning necessary for pepper plants?
Yes, pruning helps promote air circulation, reduce disease risk, and increase fruit production in pepper plants.
What are some common pests and diseases that affect peppers?
Common pests include aphids, spider mites, and pepper weevils, while diseases such as bacterial wilt and powdery mildew can also affect peppers.
Can peppers be grown indoors in pots?
Yes, peppers can thrive in containers indoors as long as they receive adequate sunlight and proper care.
Do peppers continue to produce in the winter?
With supplemental light and warmth, pepper plants can continue to produce fruit throughout the winter months.
For More Read Our Blog on:
1 note
·
View note
Text
5 Easy Steps to Grow Your Own Avocado Tree from Seed
5 Easy Steps to Grow Your Own Avocado Tree from Seed. Learn how to easily grow your own avocado tree from seed with these simple steps.
5 Easy Steps to Grow Your Own Avocado Tree from Seed

5 Easy Steps to Grow Your Own Avocado Tree from Seed. green thumb required 5 Easy Steps to Grow Your Own Avocado Tree from Seed
How Can I Grow an Avocado from Seed?
Avocados are a popular and versatile fruit, packed with nutrients and healthy fats. Many people enjoy adding avocado to their meals or using it as a spread on toast. However, did you know that you can easily grow your own avocado tree from the seed? Not only is it a fun and rewarding process, but it also allows you to have a constant supply of fresh, organic avocados right at home. In this article, we will guide you through the steps on how to grow an avocado from seed.
What You Will Need
Before we dive into the process, here are the things you will need to grow an avocado from seed:
Large, ripe avocado
Toothpicks
Glass or jar
Pot with drainage holes
Potting soil
Sunny spot
Organic fertilizer
Water
Choosing the Right Avocado
It is important to start with a large, ripe avocado when you want to grow an avocado tree. Look for an avocado that is dark green in color and slightly soft to the touch. Avoid avocados that are too hard or too mushy, as they may not produce a healthy tree. Also, make sure that the avocado has a large seed in the center.
Step 1: Prepare the Avocado Seed
Once you have found the perfect avocado, carefully cut it in half and remove the seed. Wash off any excess fruit from the seed and allow it to dry completely. This can take anywhere from a few hours to a day.
Step 2: Secure the Seed with Toothpicks
Once the seed is completely dry, take three toothpicks and insert them into the seed at a slight downward angle. The toothpicks will act as a support for the seed and help it grow.
Step 3: Place the Seed in a Glass
Fill a glass or jar with water and place the toothpicks on the rim of the glass. The seed should be suspended in the water with the pointed end facing down.

Make sure that the bottom of the seed is touching the water, but the toothpicks are not submerged.
Step 4: Change the Water Regularly
Make sure to change the water every few days to keep it fresh. This will also help to prevent the growth of any bacteria or mold on the seed.
Step 5: Wait for the Seed to Sprout
It can take anywhere from 2-8 weeks for the seed to sprout, so be patient. Check the water regularly and add more as needed to ensure the bottom of the seed is always submerged.
Step 6: Transplant the Sprouted Seed
Once the sprout has grown to about 6 inches, it is ready to be transplanted into a pot. Fill a pot with well-draining potting soil and make a small hole in the center. Gently remove the toothpicks from the seed and plant it vertically in the hole. The pointed end should be facing up.
Step 7: Provide Adequate Sunlight and Water
Avocado trees need plenty of sunlight to grow, so make sure to place the pot in a sunny spot. Water the tree regularly, making sure not to overwater or let the soil dry out completely. Keep the soil moist, but not soggy.
Step 8: Fertilize the Tree
As the tree grows, it will need nutrients to thrive. Use an organic fertilizer specifically made for avocado trees and follow the instructions on the packaging.
Step 9: Watch Your Tree Grow
With proper care, your avocado tree should continue to grow and flourish. It can take 2-3 years for the tree to produce fruit, so be patient.
FAQs:
What is the best time of year to plant an avocado seed?
Spring is the best time to plant an avocado seed. The warm weather and longer daylight hours provide the ideal conditions for the tree to grow.
Can I grow an avocado tree indoors?
Yes, you can grow an avocado tree indoors. Just make sure to place the pot in a sunny spot and provide proper care for the tree to thrive.
How often should I water my avocado tree?
Watering requirements may vary depending on the climate and the size of the tree. As a general rule, water the tree once or twice a week, keeping the soil moist but not waterlogged.
Final Thoughts
Growing an avocado tree from a seed may take some time and patience, but it is a fun and rewarding process. With proper care, you can enjoy fresh, organic avocados right from your own tree. So, go ahead and give it a try. Your avocado tree will not only provide you with delicious fruit but also add a touch of greenery to your home.
5 Easy Steps to Grow Your Own Avocado Tree from Seed
Learn how to easily grow your own avocado tree from seed with these simple steps. No green thumb required, just a bit of patience and this helpful guide. Start enjoying homegrown avocados in no time!. avocado 5 Easy Steps to Grow Your Own Avocado Tree from Seed
What's the fastest way to grow an avocado
The fastest way to grow an avocado is to use a seed from a ripe avocado and plant it in soil with the pointed end facing upwards. Keep the soil moist and warm, and the seed should sprout within 2-6 weeks.
How long does it take to grow an avocado from seed
It can take anywhere from 2-6 weeks for an avocado seed to sprout, and 3-15 years for the tree to mature and produce fruit. Patience is key when growing avocados from seed!
What is the best way to start an avocado plant
The best way to start an avocado plant is to first remove the seed from a ripe avocado and then clean it thoroughly. Next, insert 3-4 toothpicks into the center of the seed around its circumference and rest the seed on top of a glass of water, making sure the pointed end is submerged. Place in a warm spot and wait for the seed to sprout before planting in soil.
Can I grow an avocado from store bought fruit
Yes, you can grow an avocado tree from the seed of a store bought fruit. However, keep in mind that store bought avocados may not produce the same quality of fruit as a tree grown from a seedling.
What are the best conditions for an avocado seed to grow
Avocado seeds thrive in warm and moist environments, so it's important to keep them in a warm spot with plenty of sunlight. The soil should also be well-draining to prevent root rot. Once the seed has sprouted and has a few leaves, it can be transferred to a larger pot with rich, well-draining soil.
0 notes
Text
How to Care for Philodendron Plants
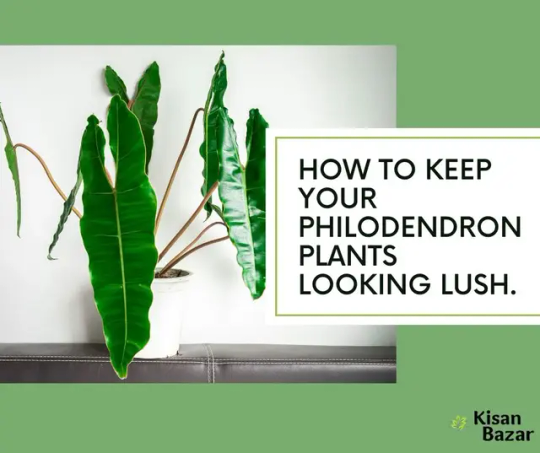
Are You Searching for Low Maintenance Houseplants to Add Greenery to Your Home? Philodendron plants make for excellent additions that require little care - from their ease of care, beautiful appearance and overall ease. In this blog post I provide all of the essential information and tips necessary to ensure the longevity of philodendron plants in the home environment.
Light and Temperature Requirements for Effective Operation
Light is essential when caring for Philodendron plants. Make sure your Philodendron gets bright indirect sunlight without direct exposure; direct sun can scorch its leaves. Philodendrons thrive best between 65-75degF temperatures so it is important to protect it from drafty spots or sudden temperature shifts.
Humidity plays an integral part of Philodendron care. Philodendrons thrive in humid conditions; therefore if your humidity level dips too low you should take steps to increase it by grouping plants together or misting their leaves regularly or investing in a humidifier.
Before watering your Philodendron, wait until its top layer of soil has completely dried before watering again. Be sure to allow all excess liquid to drain out completely from its container; this will prevent root rot from being trapped underneath wet soil, helping protect its health and prevent root diseases that arise due to overly moist environments.
Hydrating and Humidifying Philodendron plants require little attention in terms of maintenance. With proper watering and humidity levels, however, you will enjoy years of lush green foliage from these lovely flowers. Philodendron plants prefer moderately moist yet well-drained soil. In order to get optimal growth conditions for these beauties, water when the top 1-2 inches feel dry - otherwise their root systems might suffer and the plants could die quickly!
Keep humidity levels high to promote plant health; mist regularly or use a humidifier if necessary; avoid direct sunlight which will scorch its leaves and prevent photosynthesis from taking place. Place philodendron plants in indirect lighting such as north or east-facing windows for optimal results. Fertilize once every month throughout its growing season (spring-summer) using an all-purpose liquid fertilizer; with proper care and attention these beautiful perennials will continue to provide lush foliage for years.
Soil and Fertilizing
Caring for a Philodendron plant can be relatively straightforward; just keep a few key points in mind to keep yours happy and healthy. Soil should have good drainage with an ideal pH range between 5.5 to 6.5 and be fertilized every two weeks during growing season using balanced 10-10-10 fertilizer;
water the top two inches when dry; prune when too large/leggy or excessive sunlight becomes present, while optimal temperatures range between 65deg- 80deg Fahrenheit as well as temperatures between 65- 80deg Fahrenheit for optimal conditions -- in that way ensure yours keeps its healthy roots happy while remaining happy in its surroundings! Using these tips will ensure its overall well being.
Pruning and Propagation
Pruning is an integral component of maintaining any Philodendron plant. Once every month, use clean and sharp scissors to cut away dead or discolored leaves to stimulate new growth and make your Philodendron look its best.
Propagating Philodendrons from cuttings is straightforward. Cut off an actively growing stem to yield 4-6 inch cuttings; remove lower leaves before placing into a glass of water with leaves above its surface; change this every few days for several weeks or so and when roots have begun forming you can transfer this cutting into soil-filled pots for propagation.
Pests and Diseases
Care of Philodendron plants is essential to their overall wellbeing and vibrancy, so regular inspection for pests and diseases is of utmost importance in successful treatments. If any signs are discovered, an appropriate insecticide or fungicide must be applied immediately;
alternatively bringing samples of your plant in for diagnosis at your local nursery/garden center can often offer guidance as to its causes; trimming away infected leaves/stems is helpful as can following package directions when applying any insecticide/fungicide product.
As well as treating pests and diseases, taking measures to keep your philodendron healthy can also make a big difference in its wellbeing. Wiping its leaves regularly with damp cloth may help deter pests; providing your plant with plenty of sunlight and humidity may also contribute. Wilting or yellowed leaves could indicate insufficient light or water; make adjustments as soon as necessary so your philodendron thrives for years.
Repotting and Transplanting
Repotting philodendron plants is important for their health and growth, and should be done every 1-2 years.
When selecting a potting mix, it is important to choose one that is well-draining and slightly acidic. To start, carefully remove the plant from its pot and inspect the root system. Prune away any roots that are unhealthy or damaged, and then repot it in a container that is 1-2 inches larger than the current pot.
For best results, transplanting should be done in the spring or early summer when the weather is warm and dry. When selecting a location for your philodendron, it is important to choose a shaded area that has plenty of indirect sunlight.
To begin the transplanting process, dig a hole that is twice as wide and twice as deep as the root ball. After carefully removing the plant from its pot, place it in the hole and backfill with soil, making sure to tamp it down firmly. Finally, water the plant thoroughly after transplanting.
Training and Supporting
Caring for a Philodendron plant can be extremely rewarding; with proper care and attention it will prosper over the years to come. One key aspect of taking care in tending your Philodendron is monitoring soil moisture.
Make sure to inspect and water the plant when its soil becomes dry to the touch, especially Philodendron plants which prefer bright indirect light rather than direct sun as direct sun can scorch its leaves, as this should be avoided for maximum results.
As soon as spring and summer arrive, fertilize the Philodendron every two weeks with a balanced liquid fertilizer to maintain optimal conditions for it's health and blooming potential. Pruning periodically can help control its size by cutting away dead, yellow or wilted leaves; using damp cloth cleanings on its leaves remove dust and debris build-up; periodically check for spider mites mealybugs or aphids and treat with an insecticidal soap treatment as necessary if present; with proper care your Philodendron could flourish for years ahead!
Care and Toxicity for Philodendron Plants
Caring for Philodendron plants can be rewarding experience; to make sure yours stay healthy and blossom well, here are a few important pointers you should keep in mind when caring for one.
First, locate an area with bright, indirect sunlight - this will enable your plant to flourish by providing it with essential lighting needs for its development.
Second, use caution when watering philodendron plants. Allow their topsoil to become dry before watering again - using a potting mix with excellent drainage can also help avoid overwatering issues.
Make sure that when handling plants, gloves are worn when handling sap as this could irritate skin and it could potentially become toxic if inhaled - therefore keep out of reach of children and animals alike!
Fertilize your Philodendron every two to four weeks during its growing season using an all-purpose fertilizer, while pruning leaves and stems of your plant to promote its healthy development.
Finally, be sure to regularly inspect your Philodendron for signs of pests or disease and treat immediately if any appear. With proper care and maintenance, this plant should thrive for many years ahead.
Care of Philodendron Varieties
Maintaining your Philodendron plant doesn't require too much work; here are a few helpful hints on how you can properly care for it.
Provide sufficient light: Philodendron plants thrive when given bright indirect lighting from windows; placing it close by would ensure optimal conditions. Direct sunlight should also be avoided for best results.
Keep the soil moist: Water your Philodendron when its top few inches of soil become dry; but avoid overwatering as that could lead to root rot and overly saturated roots.
Feed regularly: To maintain optimal growth in spring and summer conditions for your Philodendron plant, feed it monthly with liquid fertilizer.
Pruning: For optimal plant appearance, remove dead or yellowing leaves by regularly pruning off any dead or yellowed foliage from your plant. This will keep it looking its best!
Repot when necessary: Repotting your Philodendron every couple of years will allow it to continue growing with plenty of room to expand.
Avoid Extreme Temperatures: For best results, place your Philodendron away from drafts or air conditioning vents so it does not become either too cold or hot.
Stay on the Lookout: To protect your Philodendron from pests and treat accordingly, regularly inspect it for signs of spider mites, mealybugs and scale.
Philodendron Plants Can Add Charm To Any Decor Scheme
Philodendron plants add life and vibrancy to any room in your home, thanks to their easy care requirements and adaptability to various indoor environments - an ideal option for those without green thumbs! When decorating with Philodendron plants, ensure their location receives ample indirect sunlight, with enough room for growth in its container.
To keep your Philodendron looking its best, it is vital that it receives water when its top inch of soil dries out, as well as regular fertilization every two or three months. Dust its leaves regularly so as to rid yourself of pests - this will ensure it remains healthy and vibrant over the course of many years!
How often should I water my Philodendron plant?
Care of Philodendron plants does not pose too many problems, though some knowledge may be required. One key point is not overwatering; when the top layer of soil feels dry when touched lightly it's time for some Philodendron care! As cold water can shock roots, use room temperature water instead. Water deeply until all parts of your pot have received sufficient hydration -
aim to do this every 7-10 days during warmer weather months and less frequently in wintertime. Make sure that you do not overwater the plant by periodically monitoring its soil moisture level by sticking your finger into it or purchasing a moisture meter which provides accurate readings on soil moisture content.
In order to protect its leaves and prevent their potential rot, try not to allow water into their area of potted growth as too much wet can damage or destroy their health; with proper care a Philodendron plant can make a beautiful addition to any home!
What type of soil works well with Philodendron plants?
Philodendron plants require special soil conditions in order to thrive; their ideal pH level lies between 5.5 and 6.5 for ideal results. Furthermore, light and airy soil allows adequate drainage and air circulation around these delicate flowers.
Philodendron plants require high quality potting soil that contains equal parts peat moss, perlite and vermiculite or you may mix your own from equal portions coco peat, garden soil and sand or perlite. Philodendron plants require not only soil but also pots with drainage holes for adequate drainage to avoid root waterlogging and access the right amounts of oxygen and moisture for growth. If they become waterlogged they won't survive as efficiently. This way they get optimal growth.
Philodendron plants may survive under low light, providing adequate levels for their development.
Philodendrons are widely-favored houseplants due to their minimal upkeep requirements and ability to thrive even under low light conditions. Although philodendrons can do well under low lighting conditions, proper care must still be provided to maintain healthy growth - here are a few tips to care for philodendrons in such low lighting environments.
First and foremost, it is key that you ensure the soil remains moist but not soggy. For best results, choose a pot with drainage holes, and water your plant when its top layer feels dry to touch. In addition, make sure you fertilize every two weeks to promote healthy plant development and growth.
When choosing the location for your philodendron plant, choose an area which receives indirect sunlight; this will keep its color vibrant and lush. Misting with water two to three times every week should keep moisture levels balanced for proper plant development. Also remember to rotate its location every few weeks for even growth and bloom.
By following these tips, you can help your philodendron thrive under low light conditions and enjoy its beauty for many years to come.
How can I propagate a Philodendron plant?
Care of Philodendron plants is relatively straightforward provided you follow some general guidelines. Philodendrons need regular watering; ensure soil remains damp but not saturated, and make sure not to overwater when propagating through stem or leaf cuttings.
Place stem or leaf cuttings in moist soil in an environment with warm temperatures and sunlight, misting periodically so the soil stays damp. As soon as they have begun growing actively, transfer them to another container. Regular fertilizer applications with balanced solutions will aid the Philodendron's health and growth, while pruning helps it remain attractive and maintain a good shape. With some basic care steps and regular pruning sessions, your Philodendron should soon be flourishing!
What are some common pests affecting Philodendron plants?
Proper care of philodendron plants is crucial to their health and growth. Here are some guidelines on identifying and treating common pests or diseases that could threaten to undermine its wellbeing.
Spider mites can be an issue for philodendron plants and can be identified by yellow spots and stippling on the underside of leaves. To rid yourself of them, dip a cotton swab in rubbing alcohol before gently rubbing over affected areas with your hand or cotton swaps.
Mealybugs are another prevalent problem and are easily identified by their white, fuzzy wax covering stems, leaf axils, and buds. To control them effectively use cotton swabs dipped in rubbing alcohol on affected areas or opt for natural insect control sprays as effective remedies.
Aphids, or Aphidophorus insidiosus, are tiny insects easily distinguished from one another by their green, black or white coloring. Aphids feed off of plant sap while leaving behind sticky honeydew-like honeydew residue; to get rid of them use cotton swabs dipped in rubbing alcohol to gently rub over affected areas and gently wipe the affected spots clean with them.
Scale insects are small pests that feed off of plant sap by attaching themselves to stems and leaves and feeding on its sap. Scale insects are easily identified by their hard and scaly outer shell, often covered in scale-like structures.
Read the full article
0 notes
Text
Cosmos Plant Easy Guide
Cosmos are sun-loving plants with a long flowering season. They fill borders with a profusion of flowers, ranging in colour from white through to pink, red and orange, in contrast with masses of feathery foliage. Shorter varieties also look good in containers and all cosmos make fantastic cut flowers. The simple open flowers are guaranteed to brighten up any garden well into autumn, and pollinators like them just as much as gardeners do.
Cosmos are native to Southern and Central America and therefore need to be planted in a warm, sunny spot. Soil should be free-draining.
Sow seed in early spring directly into the soil where you want your cosmos to grow, or into small pots or modules filled with free-draining seed compost. If growing in pots, pot on seedlings when they are large enough to handle. Plant out in late April/May after the danger of frost has passed.
Once your seedlings have formed 2-3 pairs of leaves, you can pinch out the growing tips to produce bushier plants with more flowers.
Taller varieties may need staking. Otherwise all varieties will flower for a long period if deadheaded regularly and fed with a liquid fertiliser. When deadheading, cut the stem back to the first leaf beneath the flowerhead.
The perennial chocolate cosmos varieties will need winter protection. Place them in pots until they've finished flowering, then shelter over winter in a frost-free place until spring.
You can collect seed from flowering cosmos and save for next year. Or if you're growing chocolate cosmos, you can divide the tubers when you lift the plants for storage over the winter months.
HOW TO
Grow cosmos in moist but well-drained soil in full sun. Deadhead to prolong flowering and lift in autumn, after the first frosts. Save seed from spent blooms to sow the following season.
Read the full article
0 notes
Text
How can you grow iris flowers from seed or rhizome?
Growing iris flowers from both seeds and rhizomes is a rewarding process that can result in beautiful blooms. Here are the steps for each method:
Growing Iris from Seeds:
Seed Collection: Collect iris seeds in late summer to early autumn when they are mature. The seed pods will turn brown and begin to split open when the seeds are ready.
Seed Extraction: Gently remove the seeds from the pods, being careful not to damage them.
Seed Stratification: Iris seeds often require a period of cold stratification to break dormancy. Place the seeds in a plastic bag with a moistened paper towel or perlite, seal the bag, and refrigerate it for about 8–12 weeks.
Seed Sowing: After stratification, sow the seeds in early spring. Fill seed trays or pots with a well-draining potting mix and press the seeds lightly into the soil, then cover with a thin layer of soil.
Provide Adequate Light and Water: Place the trays or pots in a bright, indirect light location. Keep the soil consistently moist but not waterlogged.
Transplanting: When the seedlings are large enough and have a few sets of true leaves, you can transplant them into individual pots or directly into your garden.
Garden Placement: Choose a sunny location with well-draining soil for your iris seedlings.
Care: Continue to water the seedlings as needed, and provide regular care as you would for mature iris plants.
Growing Iris from Rhizomes:
Rhizome Selection: Choose healthy iris rhizomes from a reliable source. Make sure they are disease-free and have at least one fan of leaves attached.
Planting Time: The best time to plant iris rhizomes is in late summer or early fall, typically about 4 to 6 weeks before the first frost.
Soil Preparation: Prepare the planting area by amending the soil with compost or well-rotted organic matter to improve drainage.
Planting: Dig a shallow trench or hole in the soil and place the rhizome horizontally with the leaf fan facing outward. The top of the rhizome should be at or slightly above the soil surface.
Spacing: Plant rhizomes about 12 to 24 inches apart, depending on the iris variety.
Watering: Water thoroughly after planting to settle the soil and encourage root establishment. Keep the soil consistently moist but not waterlogged.
Mulching: Apply a layer of mulch around the iris to help retain moisture and control weeds.
Maintenance: Iris plants are relatively low-maintenance. Water during dry spells and remove dead or diseased foliage as needed. Fertilize in the spring with a balanced fertilizer.
Division: Over time, iris rhizomes can become crowded. Divide them every 3–4 years in late summer or early fall to promote healthier growth and more blooms.
Pest and Disease Control: Watch for common iris pests like aphids and iris borers. Treat any issues promptly to protect your plants.
Both methods can yield beautiful iris flowers, but growing from rhizomes tends to be more common because it results in quicker and more predictable blooms. Growing from seed requires more patience and can take a few years before you see flowers.
#home garden shop#terrace gardening kit in coimbatore#vegetable garden kit for terrace#terrace gardening#gardening#home garden#agriculture#home gardening#planting#seeds#vegetable seeds#sesame seeds#seeds online
0 notes
Text
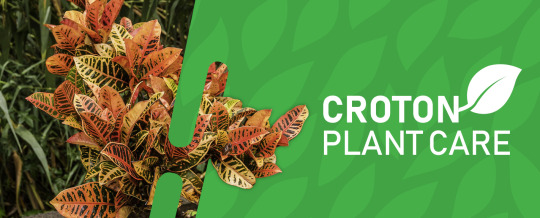


The croton plant is a perennial evergreen shrub that’s native to tropical regions of India and Malaysia. These striking plants are multicolored with thick, leathery leaves and a distinct variegated pattern. A croton’s bright colors are its most recognizable feature, and these shades will vary from one croton variety to another, ranging from green and gold to blue-green and pink. While all mature crotons possess these vibrant colors, the leaves will darken as the plants age, eventually turning almost black.
The name “croton” itself is derived from the Greek word for tick, since the heavy veins that criss-cross the leaves bear a striking resemblance to these insects. This name is pronounced phonetically, and sounds like “crow-tun.” Crotons are commonly confused with a plant called Rushfoil but don’t be fooled. Rushfoil is a subspecies of crotons — one of the many different varieties that fall into this larger plant family.
Croton height will vary slightly depending on the variety. Most will be around 3 feet tall although some can grow as tall as 10 feet. Dwarf varieties exist as well, and these will be much shorter. Crotons are also exceptionally full plants, with the large leaves growing in clusters to give the plant greater volume.
https://www.beegreen365.com/services/shrub-and-ornamental-care/croton-plant-care/
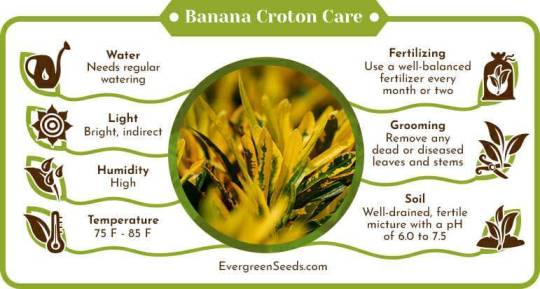
Where Should I Keep my Crotons?
Whether you decide to keep your crotons inside or out, make sure to place them in a spot where they’ll get plenty of sunlight throughout the day. Without this, those gorgeous colors will quickly begin to fade.
To plant crotons in a pot, begin by choosing a planter with several drainage holes that is roughly one third larger than the croton’s root ball. Fill the container about a third of the way full of potting soil before carefully nesting the ball on top of this soil bed. Continue adding soil around and over the roots until the pot is full and the roots are buried about an inch below the surface. Water the plant, let it drain and then set it in its new home in a sunny location.
It’s crucial to remember that crotons favor a warm, humid environment. If you’re planting them in a very different climate, your goal is to mimic these conditions as much as possible. To achieve this, the soil in which crotons are planted should remain moist but not soaking, particularly during the spring and summer when crotons will be doing most of their growing. To judge if the plant needs water, feel the soil. If it’s starting to feel dry and crumbly, give it a little water. If it still feels moist to the touch, it probably has all the water it needs.
If you’ve felt the croton’s soil and still can’t determine whether or not it needs water, let the plant’s foliage be your guide. If the leaves are drooping or curling up, that’s their way of asking you for more water. If they’re perked upright, however, they’re probably doing just fine. If the air inside your home is especially dry, or if you have the croton planted outside and live in an arid environment, you may need to water it a little more often. You may even want to mist the leaves with a spray bottle to keep the leaves healthy and growing.
Remember that just as crotons should not be allowed to dry out, neither should they be kept too wet. Too much water can rot the roots and kill the plant just as easily as if it had been left too dry.
How To Propagate CROTON Plant In Water With 100% RESULTS
How to grow Croton plant without soil
https://youtu.be/c_ZfYmpVVOs
youtube
0 notes
Text
Twister Pepper 15 Seeds Sweet Rare Massive 10-12 inches
Experience the thrill of growing your own unique and delicious peppers with Twister Pepper Seeds.
Personally recommended by Chappy the Gardener, this extraordinary variety offers sweet and massive peppers measuring a remarkable 10-12 inches in length.
With this pack of 15 seeds, you'll have the opportunity to cultivate a bountiful harvest of Twister Peppers, renowned for their exceptional taste and size.
Don't miss out on the joy of growing and savoring these extraordinary peppers in your organic garden!
Sweet and Exceptionally Large Peppers: Twister Peppers are a game-changer for pepper enthusiasts seeking a remarkable combination of sweetness and size. Each pepper measures a jaw-dropping 10-12 inches in length, making them a standout in any garden or kitchen. Enjoy the pleasure of harvesting these massive, succulent peppers with a delightful, sweet flavor that will leave you craving for more.
Rare and Unique Variety: Stand out from the crowd and impress your family and friends with the rarity and uniqueness of Twister Peppers. This special variety is not commonly found in local markets, making it a prized addition to your organic garden. Be the talk of the town as you showcase these impressive, sweet giants that are sure to amaze everyone who sees and tastes them.
Organic Excellence: At Chappy's, we understand the importance of organic gardening. That's why our Twister Pepper Seeds are organic, ensuring that you can grow your peppers with the utmost care for the environment and your well-being. Cultivate your own organic produce and relish the flavor of homegrown goodness.
How do I germinate Twister Pepper Seeds?
To germinate Twister Pepper Seeds, start by filling a seed tray or small pots with a well-draining seed-starting mix. Sow the seeds approximately 1/4 inch deep and keep the soil consistently moist. Place the tray or pots in a warm location, ideally between 75-85°F (24-29°C). Germination usually occurs within 7-14 days. Once the seedlings have developed their first true leaves, they can be transplanted into larger containers or the garden.
Can I grow Twister Peppers in containers?
Absolutely! Twister Peppers are well-suited for container gardening. Select a large container with good drainage and a minimum depth of 12 inches to accommodate the extensive root system. Ensure the container receives at least 6-8 hours of sunlight per day and water the plant regularly to maintain consistent moisture levels. With proper care, you can successfully grow Twister Peppers in containers and enjoy the convenience of harvesting them right from your patio or balcony.
Are Twister Peppers suitable for organic gardening?
Yes, indeed! Twister Peppers are a fantastic choice for organic gardening. Our seeds are certified organic, meaning you can grow your peppers without the use of synthetic fertilizers, pesticides, or herbicides. Embrace the organic gardening experience and savor the satisfaction of growing your own healthy, delicious, and environmentally-friendly produce.
"I don't have enough space to grow large peppers." - Twister Peppers may be massive in size, but they are surprisingly adaptable and can thrive in various garden sizes. With proper spacing and support, you can cultivate these giant peppers even in smaller gardens or containers.
"I can't find these peppers in local markets." - That's precisely why you should buy Twister Pepper Seeds! This rare and unique variety is not commonly available in local markets, giving you the opportunity to grow something truly extraordinary and impress your friends and family with your garden-to-table delicacies.
"I prefer organic produce." - We've got you covered! Twister Pepper Seeds are certified organic, ensuring that you can grow your peppers in alignment with your organic gardening principles. Enjoy the flavors of organic, homegrown goodness while knowing you're supporting a healthier and more sustainable lifestyle.
Unleash your gardening prowess and embark on a journey to grow the extraordinary Twister Peppers.
Add the Twister Pepper Seeds Mega Pack to your cart today and witness the magic of cultivating sweet, rare, and massive peppers in your very own organic garden. Chappy the Gardener guarantees that these exceptional peppers will elevate your culinary experiences and make your garden the envy of all who see it.
Happy Gardening!
Read the full article
0 notes
Text
it doesn't seem like i did much, but i kinda did?
i think the garden might need to be watered every morning and maybe every other evening... it gets dry so fast. i could probably make due with some hay or something to try to cover the soil to keep it moist. it just seems like on the days it doesn't get watered, it's bone dry.
fixed the second large planter...
my dad... bless him, he set them up years ago and put a bunch of rocks on the bottom as drainage and stability... but forgot to take the bottom cap off so the water has easier access to drain through. 😆 i fixed that. took the rocks out, filled with leaf litter instead, amended the soil, and repotted. i found another pot and did that one as well. so now i have 3 empty pots to throw things into. my new seeds should be here tomorrow or the next. I'm thinking Daikon radish... I'm still hoping a ground cherry seed will sprout so i can set that up out front... and I'll probably put the nasturtiums in the pot instead of directly in the ground. I'll need another pot for that so i have one in each side next to the squash.
we're going to the store today so i may buy 2 just for that and use the extra pot for my leeks that I'm currently propitiating. i forgot how much i love leeks and then realize the reason i haven't gotten any is because they're fucking expensive. $3 for 2. 🙄
i figured out i set my trellises upside down with the pointy end on top so i fixed that and tied some twine through to make more places for the beans, peas, and squash to latch onto.
threw some extra moist soil into the garden. covered up my rehab purple basil and habaneros. i don't know about 3 of the basil plants, they seem very witty, but they perk up fairly quickly. i gave them a sugar/ peroxide boost earlier before i covered them. it took my Thai basil over a week to get strong so I'll know for sure by next week. i thought they'd have an easier time since the sunflowers give them a bit of shade, but i think the shock in itself was too much.
0 notes
Text
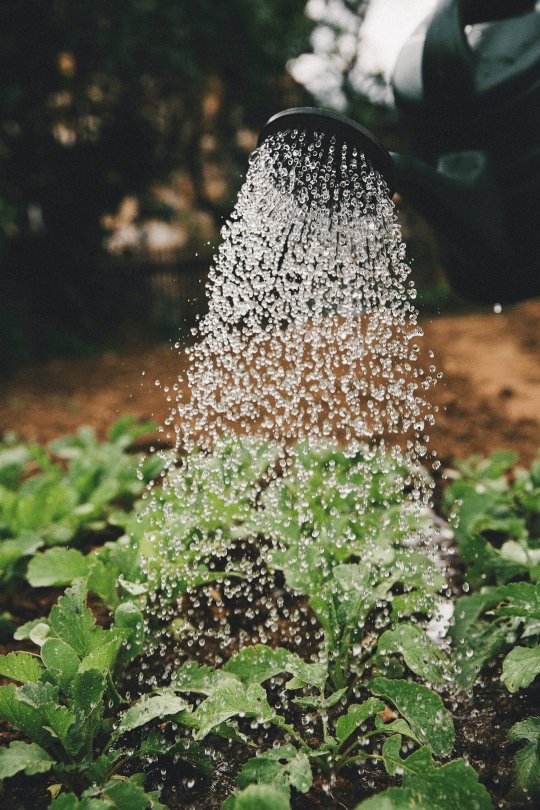
How Often Should You Water Plants & Flowers in Pots?
Watering potted plants and flowers is a crucial part of plant care, but it can be difficult to know exactly how often to water. Overwatering can lead to root rot and other problems, while under watering can cause plants to wilt and die. So how often to water pot plants?
In this article, we’ll explore the factors that influence how often you should water potted plants and flowers, and provide some general guidelines to help you keep your plants healthy and thriving.
How often should you water your potted plants?
The frequency of watering potted plants depends on a number of factors, including the size and type of the plant, the size and type of the pot. Here are some general guidelines for watering potted plants:
Water small plants (such as herbs and succulents) more frequently than larger plants, as they have smaller root systems and dry out faster.
You should water plants in clay pots more frequently than those in plastic pots, as clay pots tend to dry out faster.
Water plants in well-draining soil more frequently than those in soil that retains moisture, as the latter can stay too wet and lead to root rot.
Those in dry environments should be watered more frequently than those in cooler, more humid environments.
Finally, water plants that are actively growing more frequently than those that are dormant.
One way to determine when to water your plants is to check the moisture level of the soil. Stick your finger about an inch into the soil. If it feels dry, it’s time to water. If it feels moist, wait a few more days before watering.
Watering techniques for potted plants

There are several watering techniques that can be used for potted plants, depending on the size, type of the plant and the soil. They include the following:
Top watering
This is the most common method of watering potted plants. To top water, simply fill the pot with water until it begins to drain from the bottom. This method is easy and convenient, but it may not be as effective at reaching the roots of the plant, especially if the pot is large or the soil is dry and compacted.
Bottom watering
In this method, fill a tray or saucer with water and place the potted plant in it. The plant will absorb water through the holes in the bottom of the pot. This method is more effective at reaching the roots of the plant, but it’s important to make sure the pot is not left standing in water for too long, as this can lead to root rot.
Drip watering
With drip watering, a hose or watering can with a long spout is used to slowly and evenly water the soil around the base of the plant. This method is good for plants that need a lot of water, but it can be time-consuming and may not be suitable for plants with small pots or shallow root systems.
Watering can
A watering can is a convenient tool for watering small potted plants. To use a watering can, fill it with water and gently pour it over the soil until it is evenly moistened. It is ideal for plants that need a moderate amount of water.
Self-watering pots
Self-watering pots have a reservoir at the bottom that holds water, which is gradually absorbed by the soil as needed. This method is good for plants that need a consistent supply of water, but it’s important to monitor the water level in the reservoir and refill it as needed.
It’s important to choose the watering method that is most suitable for your plants and their needs. Overwatering can be a problem, so it’s important to be cautious and not water your plants too often.
Signs for overwatering potted plants
There are several signs that a potted plant may be overwatered:
Soggy or waterlogged soil
If the soil in the pot feels soggy or waterlogged, it may be a sign that the plant is being overwatered.
Yellowing or wilting leaves
Plants that are overwatered may develop yellowing or wilting leaves, as the excess water can cause the roots to rot and prevent the plant from getting the oxygen it needs.
Foul smell
If the soil in the pot starts to smell sour or rotten, it may be a sign of overwatering. This is because excess water can cause bacteria and fungus to grow in the soil, leading to a foul smell.
Stunted growth
Overwatering can cause plants to stop growing or grow more slowly than they should. It is due to dilution of nutrients that support plant and flower growth.
Mushy or black roots
If the roots of the plant look mushy or black, it may be a sign of root rot, which is often caused by overwatering.
If you suspect that your potted plant is overwatered, it’s important to reduce the frequency of watering and allow the soil to dry out slightly between waterings. It may also be necessary to repot the plant in fresh, well-draining soil to help prevent further damage.
Signs that a potted plant is underwatered
Here are several signaling a potted plant may be underwatered:
Dry or brittle soil
If the soil in the pot feels dry or brittle, it may be a sign that the plant is not getting enough water.
Yellowing or wilting leaves
Plants that are underwatered may develop yellowing or wilting leaves, as they are not getting enough moisture to support their growth.
Stunted growth
Underwatered plants and flowers may grow slowly or stop growing altogether.
Dry, crispy leaves
If the leaves of the plant feel dry and crispy to the touch, it may be a sign that the plant is not getting enough water.
Curling leaves
Some plants may curl their leaves to reduce surface area and conserve water when they are underwatered.
Best watering techniques for potted plants and flowers
Here are some best practices for watering potted plants:
Check the soil moisture level before watering: Stick your finger about an inch into the soil to check the moisture level. If it feels dry, it’s time to water. If it feels moist, wait a few more days before watering.
Water thoroughly, but not too often: When watering, it’s important to make sure the soil is evenly moistened. However, it’s also important not to water too often, as overwatering can lead to root rot.
Avoid getting water on the leaves: Watering the leaves of a plant can cause fungal diseases to develop, so it’s best to avoid getting the leaves wet. Instead, focus on watering the soil around the base of the plant.
Use lukewarm water: Cold water can shock the roots of a plant and cause stress, so it’s best to use lukewarm water when watering.
Use the right watering tool: Choose a watering tool that is suitable for the size and type of your plant. For example, a watering can may be suitable for small potted plants, while a hose or drip watering system may be more appropriate for larger plants.
Water at the right time of day: It’s best to water potted plants in the morning or early evening, as the cooler temperatures and lower light levels will help prevent evaporation and minimize the risk of fungal diseases.
By following these watering practices, you can help ensure that your potted plants are getting the moisture they need to thrive.
Now that you know when to harvest potted plants, let’s look at the benefits of planting in pots:
Watering indoor plants potted plants Vs. outdoor potted plants
Watering outdoor potted plants and indoor potted plants can have some similarities, but there are also some important differences to consider.
One similarity is that both types of plants need to be watered regularly to ensure that they receive sufficient moisture. Both types of plants will also benefit from being watered thoroughly, so that the water reaches the roots and the soil is evenly moistened.
However, there are a few key differences to consider when watering outdoor and indoor potted plants:
Climate
Outdoor potted plants are exposed to a range of weather conditions, including sun, wind, and rain. This can affect how often they need to be watered, as well as the amount of water they require. Indoor potted plants are typically protected from these elements and may need less frequent watering as a result.
Soil type
Outdoor potted plants are often grown in potting soil that is designed to drain well, while indoor potted plants may be grown in a variety of soil types, including potting soil and soil-less mixes. The type of soil you use can affect how quickly it dries out and how much water your plant needs.
Light levels
Indoor potted plants are typically grown in lower light levels than outdoor plants, which can affect their watering needs. Indoor plants may need less frequent watering than outdoor plants because they are not exposed to as much sunlight and heat.
Overall, it’s important to pay attention to the specific needs of your outdoor and indoor potted plants and to water them accordingly. This may involve checking the soil moisture level regularly and adjusting your watering schedule as needed.
Conclusion
In general, potted plants and flowers should be watered regularly, but the specific frequency will depend on a variety of factors such as the type of plant, the size and type of pot, the climate, and the soil mix. Since you know how often to water pot plants, ensure to follow the tips to have healthy plants in your backyard or balcony.
Original Source:
https://releasepots.com/how-often-should-you-water-plants-flowers-in-pots/
0 notes
Text
Buy Vertical Garden Online

Vertical gardens are a wonderful way to save energy, conserve water, and bring fresh air and colour to your indoor or outdoor space. A vertical garden can even be a great alternative to a potted plant. With a vertical garden, you don't have to worry about soil, pests, or bulky plants. You can put flowers, herbs, or vegetables in a small pot and grow them on the wall. This type of gardening is also a great way to create a natural habitat.
One of the first vertical garden planters to develop a successful vertical garden was Mr Stacky. They have been selling hundreds of thousands of units since they started in 2000. This is because the company combines food production and philanthropy. Their aim is to help build capacity in developing communities, schools, and refugee camps. The company sells through various hydroponic outlets, making them a trusted brand to buy vertical garden online.
When shopping for a vertical garden, keep in mind that you need to use the right materials to create the best possible design. For example, the right containers can make all the difference. These containers can come from recycled items such as old shoe organizers or coco coir basket liners. It is also a good idea to choose a pot that has a hole at the bottom to allow water to drain. If you don't have access to a hose, you can fill it with gravel to add more drainage.
Aside from having the right materials, it is a good idea to know how large the plants you intend to grow will be. Most of these plants prefer a pot that is about 8 inches tall, but some will tolerate smaller pots. However, you should remember that perennials should be divided when they outgrow their containers.
You can find a wide selection of freestanding vertical garden kits at Nurserylive. These include planters, arbors, trellis, and more. Each kit is available in a variety of colors and styles to suit your decorating needs. Whether you want to create a lush, colorful display, or you are a more minimalist home owner, you are sure to find a vertical garden kit that meets your needs.
Some popular plants for a vertical garden are herbs and edible flowers. Herbs and lettuces tend to grow well in smaller pots and containers. They are also very compact. In fact, they are often the perfect plants to grow in pocket-sized felt planters.
As with any other outdoor project, it is important to plan for the weather. It is usually better to start a new garden during the warmer months. During winter, however, it is a good idea to cover up the plants with plastic or glass in order to protect them from freezing. Also, you may want to purchase a dark-colored pot for the same reason. Dark-colored pots absorb heat and dry the soil more quickly. Alternatively, you may want to install stones or other drainage options in the pot to enhance soil drainage. To familiarize yourself more with this topic, it is best that you check out this post: https://en.wikipedia.org/wiki/Green_wall.
0 notes
Text
Hoya memoria gracilis

If you have concerns about shipping during cold weather, please reference our Winter Shipping Insurance. (Na rostlinky v kategorii 'Dej mi ízek' nedáváme ádnou záruku. All 4 plants are sent using USPS First Class Mail for a delivery. Doporuujeme zakoupit sluivou opru na plhání KLIK ZDE :). Hoya Memoria Gracilis - 4 from California Tropicals. This little plant was at first thought to be H. ízek je ji zakoenní a pipravený k zasazení. FRATERNA Official Bulletin Of The Volume 17 1 INTERNATIONAL HOYA ASSOCIATION. We are proud to report that over 99% of our orders to date have been delivered in happy and healthy condition. Úchvatná Hoya memoria s nádhernými listy. Our Happy & Healthy Guaranteeįrond & Folia guarantees that the plant you receive will arrive in happy and healthy condition, and we take extreme care in packaging and shipping to ensure this. Moving a blooming Hoya can cause the bloom to wither and fall off. If you are lucky enough to find your Hoya blooming indoors, take care not to disturb the plant or move its location. Each flower is up to 0.4 inch (1 cm) across and form groups of blooms which are up to 4 inches (10 cm). Hoya are known for their beautiful flowers, which are said to look as if they were crafted from porcelain or wax. The leaves are narrow and have more or less silver flecks. Moving a Hoya to a larger pot should only be considered if the plants roots are nearly filling the pot. Because Hoya are epiphytic in nature, they generally do not possess an excessive root system. Hoya prefer to be pot bound, and will not enjoy being placed in a pot which is much too large for their roots. Hoya love humidity, and moderate to high humidity is preferred. Most Hoya can withstand night time temperatures of 50 degrees during the winter. Hoya prefer room temperatures between 70 and 85 degrees Fahrenheit. Amending a standard potting soil with perlite, orchid bark, and/or lava rock will help provide the drainage this plant needs. As an epiphytic plant in nature, Hoya will require an extremely well-draining soil. Thinner leaved varieties such as Hoya Australis, Retusa, or Linearis will prefer to be watered a bit more often, since they store less moisture in their leaves. Hoya should be allowed to dry out between waterings, perhaps by about 75%. Because of this, their water needs are considered moderately low. The majority of Hoya are semi succulent in nature, possessing thicker stems and leaves, hence the name “wax plant”. Low light should be avoided for all varieties of Hoya. Variegated varieties such as Tricolor and Krimson Princess require higher exposures to support variegation and proper photosynthesis. Green, non variegated Hoya can tolerate a bit lower exposure, and a medium range exposure may be sufficient. Avoid direct sun, which can burn these plants leaves. Details: - Rooted plant in 4 pot - The actual plant you will get might be slightly different than the one shown in pictures, but same size/amount of leafs.19. Hoya thrive in very bright, indirect or filtered light. Most Hoya found in nature are epiphytic, meaning they grow off of other plants or trees rather sending their roots into the soil. Hoya are found in the wild in Australia, Asia, and the Pacific Islands.
0 notes
Last Seen Blogs

thisisabellykinkblog
Thisisabellykinkblog

bluefaewren
i love you. take care.

playar4
Untitled

witchoftheabyss
One Track Mind

relaxinawhile
Citizens for Boysenberry Jam