#sewing how to
Text
Quick guide to inserting zippers into garments without hand-basting.
Because I know that no matter how many times I tell y'all that you need to hand-baste, you're not going to do it.
Quick note: zippers are ALWAYS easier to put in when the zipper is several inches longer than your seam. This lets you put the slide out of the way when you sew. When you're done, you can pull the slide back down and then cut the excess tape. For every zipper where it's even vaguely possible, I get a long zipper, center the bottom of the tape at the place where you want the zipper to end, and leave extra tape hanging at the top. I don't know why zippers tell you to shorten them at the bottom. It's lies. Don't believe it.
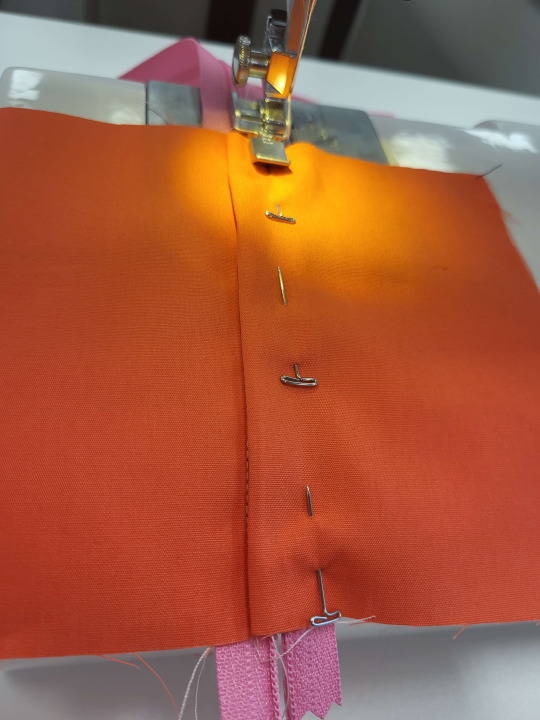
Centered zipper:
You'll use the centered zipper application when you're putting a zipper in the center back or center front of a piece. There's a different application method for side seam zippers, which we'll go into later.

I start all zippers by machine-basting the seam closed. This is especially important on dresses, where you need the seam between the bodice and the skirt to match up. If your seam looks good basted shut, it will look good when a zipper is in there. So set your seam length to the longest, and baste the seam shut.
A note on seam allowances: You need your seam allowances to be big enough for the zipper to fit on. If your garment was made by someone insane and deranged who put a 1/4" seam allowance in a zipper seam, and you're only just not realizing it, you're going to need to sew twill tape or seam binding onto your seam allowance to make it big enough.
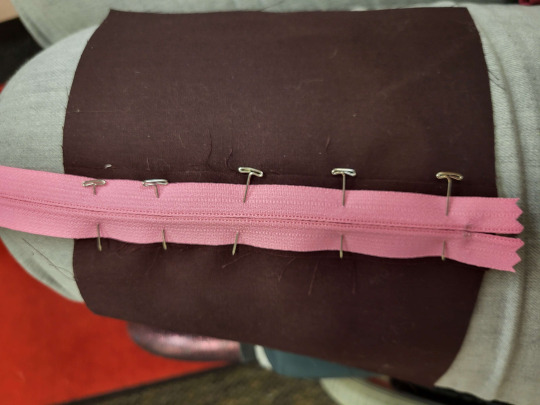
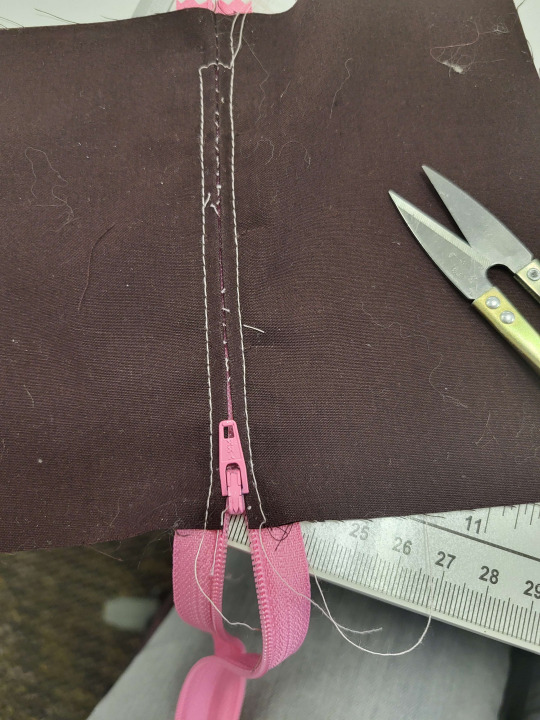
Put the zipper tape onto that seam. You want the center of the teeth to line up with the center of the seam. It's called the centered application for a reason.
When you're pinning from this viewpoint, you're best equipped to make sure that the teeth are perfectly centered. I'm going to recommend pinning with the pins perpendicular to the zipper teeth. You'll see why.
However, you can't actually sew the zipper from this side, with any kind of precision, so you'll need to do the flip.

So, go ahead and flip your garment so that you can access the right side. Next to each pin that you have on the wrong side, put a pin next to it on the right side. You can then remove the wrong-side pin.
And yes, you do need to do it like this and not just pinning from the front. It won't be centered. Trust me. It won't be centered.
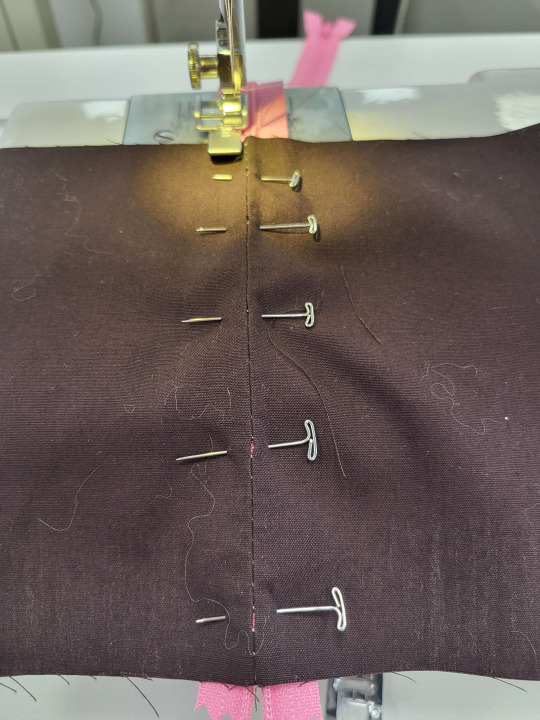
Zipper foot time. When you're sewing a zipper, you will ALWAYS sew from the top to the bottom. Put your zipper on the side of the tape where the points of your pins are.
Quick note: is your machine still set to a basting stitch? Now's the time to change it, and not after you did 13" of sewing. Ask me how I know.
Here's where you're going to decide how wide you want the lap (the fabric flaps that cover the zipper) to be. For a lot of people, this is a style choice. I like mine more narrow, and I like to just eyeball them. As long as it's straight and not stuck in the teeth, all options are fine.
The reason that we're starting on the side with the points of the pins is that you can slide the point of the pin out of the way to sew over them, and then slide them back into place so that they hold the zipper in place for the other side.

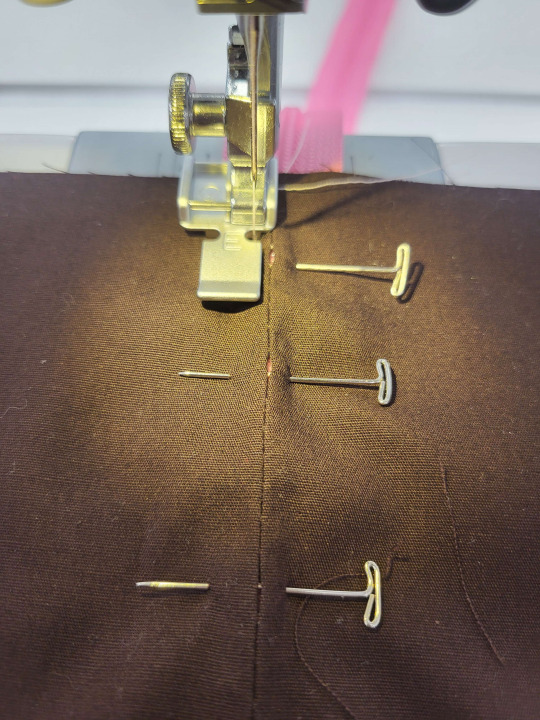
Once you've sewn down one side, cut your thread, bring your foot back to the top, and sew down the other side. (If you keep sewing and go up, your lapping will be wrinkled when you're done).
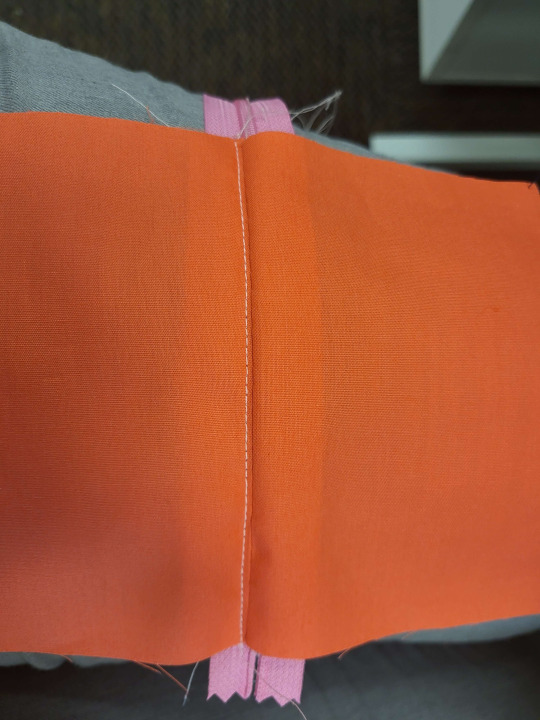
Once you hit the bottom of your zipper, sew a couple of stitches across the bottom, connecting the two lines of stitching. If you're using a nylon coil zipper, you can just sew straight through it. If your zipper has metal teeth or big plastic ones, sew this connecting stitch just below where the teeth end.
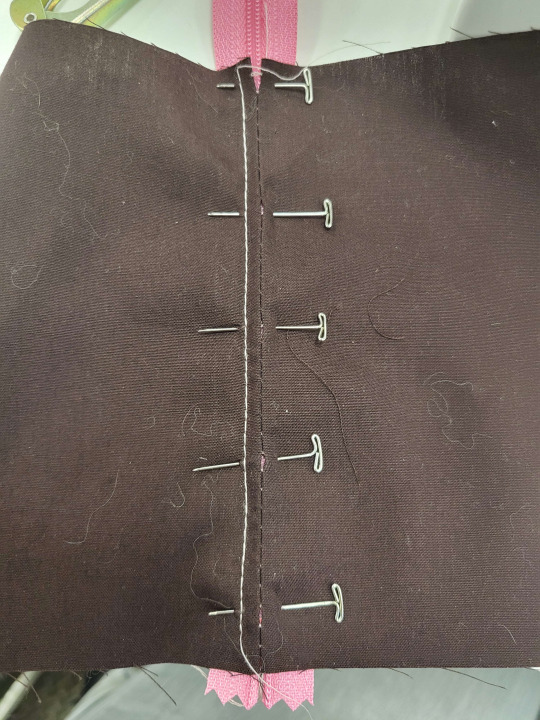
Now you just take your seam ripper and take out the basting stitches, and you're done!
What about that extra zipper tape at the top? Well, if you're putting the zipper in a seam where there will be a top facing, top hem, application of lace, or anything else, you can trim the tape and the hide it in that facing/hem/lace/etc. If there's absolutely no way to hide the top of the tape, you can stitch around the top of the teeth on each side, so that the slide doesn't come off, and then trim the excess tape off.
Side application:
If you're putting a zipper in a side seam, you don't want to center it. I mean, you can if you want to, and it'll probably look fine, but it's not the technically correct application.
In a centered application, both seam allowances cover the zipper tape and hide it from view. In a side application, the front seam allowance is longer, and covers the zipper tape. The back seam allowance is just along for the ride.
Like the centered zipper, this one starts by machine basting the seam shut.
Not everyone starts their side zippers like this, but I think that it's important because it keeps the waist seam even on both sides. People who don't like this method are going to point out that my method here does make your seam allowance 1/8" smaller than what you baste. If you think this will really mess your work up, remember to sew this seam at 1/16th" smaller than you would normally sew it. I don't ever bother with that and it never has made a difference to me. If you don't want to do it like that, you can just hand-baste this in. This is a no-hand-baste tutorial, so you're on your own for that.
You're going to pin this in a different place. On the centered zipper, you wanted the seam to be in the middle of the teeth. In the side application, you want the seam to be right along the edge of the teeth.
You'll also note that I'm pinning differently from how I did the centered version. Here, I have the pins with the points facing the top of the zipper.

So, always sewing top to bottom, we're going to sew down the side seam. We pointed all the pins at the top of the seam because now you can pull them out as you go.
It's hard to tell when you're just doing a sample like this, but we're going down the seam attached to the back of the dress.
Remember that "it takes 1/8" off the side seam" statement? Here's where it happens. We're going to take the front seam allowance, and just sneak it a little bit more over the edge. You're just going to roll it so that it covers that previous line of stitching. Then you're going to pin in place and sew down the other side. At the bottom, just like you did with the centered zip, you're going to turn a right angle and sew along the bottom, closing off the lapping.
I find that my favorite width of this is to sew where the fold of the lap to the line of stitching measures at about 1/2". If you're not good at eyeballing this, some people like to use tape as a topstitching guide.

Just like with the last one, time to take out the basting stitches that hold the seam shut, and there's your zipper.
Invisible zipper application:
NO.
138 notes
·
View notes
Text
My latest short video. I will be making a full series of these, and a longer one for those who don't like short form content. it will just take me some time to make it. This is for all beginners who have a sewing machine that they want to use, but have NO IDEA where to begin
I will also cover my vintage machine (its almost an antique) for those who want to know how to use one
2 notes
·
View notes
Video
how to knot of your thread
44 notes
·
View notes
Text
You guys rlly don't realise how much knowledge is still not committed to the internet. I find books all the time with stuff that is impossible to find through a search engine- most people do not put their magnum opus research online for free and the more niche a skill is the less likely you are to have people who will leak those books online. (Nevermind all the books written prior to the internet that have knowledge that is not considered "relevant" enough to digitise).
Whenever people say that we r growing up with all the world's knowledge at our fingertips...it's not necessarily true. Is the amount of knowledge online potentially infinite? Yes. Is it all knowledge? No. You will be surprised at the niche things you can discover at a local archive or library.
#rambles#if you are a person who is into delicate skills#like lacemaking or printing or sewing#you will know fair well just how non expansive the knowledge online is in comparison to written guides from like the 50s#there was a time where at least one person in the household had to know a constructive skill#but in the modern day there is just less ans less demands for comprehensive guides#library propaganda#im stuck doing an essay rn but bc i have covid i cant go to the library and its totally fucked me#i want to source a lot of the stuff i read irl but i just cant go and get it and theres no online ver
81K notes
·
View notes
Text
youtuber/tiktoker/whatever-type-of-video-influencer marinette, where she makes crazy DIY and craft videos and debunks fake content-farm DIYs. she has a modest but loyal mass of followers that grow by the day as her crafts get increasingly intricate and cool. she catalogues all of her mistakes and is very earnest about the process. adrien falls asleep to videos of her sewing and making cool containers and explaining the mechanisms of the strange devices she makes
#lots of fashion and sewing of course but other crafts as well#i think a lot about how marinette made that box that she keeps the miraculous box in#the giant sewing box with a secret drawer that can only be accessed through by inputting a code into hidden buttons#like. that's a whole ass device w mechanisms and everything. girl is an all around DIY queen
5K notes
·
View notes
Text
Had a few folks interested in how I made the patches I posted for Solarpunk Aesthetic Week, so I thought I'd give y'all my step-by-step process for making hand-embroidered patches!

First, choose your fabric and draw on your design. You can use basically any fabric for this - for this project I'm using some felt I've had lying around in my stash for ages.

Next, choose your embroidery floss. For my patches I split my embroidery floss into two threads with 3 strands each, as pictured. You can use as many strands in your thread as you prefer, but for the main body of my patches I prefer 3 strands.
Next you're going to start filling your design using a back stitch.

First, put in a single stitch where you want your row to start.

Poke your needle up through the fabric 1 stitch-length away from your first stitch.

Poke your needle back down the same hole your last stitch went into so they line up end-to-end.
Repeat until you have a row of your desired length (usually the length of that colour section from one end to the other). Once you have your first row, you're going to do your next row slightly offset from your first row so that your stitches lay together in a brick pattern like this:

Make sure your rows of stitches are tight together, or you'll get gaps where the fabric shows through.
Rinse and repeat with rows of back stitch to fill in your patch design.

When you're almost to the end of your thread, poke your needle through to the back of the fabric and pull the thread under the back part of the stitching to tuck in the end. Don't worry if it looks messy - no one's gonna see the back anyway.
This next step is fully optional, but I think it makes the patch design really pop. Once your patch is filled in, you can use black embroidery floss to outline your design (or whatever colour you want to outline with - it's your patch, do what you want). I use the full thread (6 strands, not split) of embroidery floss to make a thicker outline.

I use the same back stitch I used to fill the piece to make an outline that adds some separation and detail. You could use most any 'outlining' stitch for this, but I just use back stitch because it's just easier for me to do.
Once you're finished embroidering your patch, it's time to cut it out!

Make sure to leave a little border around the edge to use for sewing your patch on your jacket/bag/blanket/whatever, and be careful not to accidentally cut through the stitches on the back of the patch.
If you have a sturdy enough fabric that isn't going to fray, you can just leave it like this. If not, I recommend using a whip stitch/satin stitch to seal in the exposed edges (I find that splitting your embroidery floss into 3-strand threads works best for this).

And then you're done! At this point you can put on iron-on backing if you want, or just sew it on whatever you wanna put it on. Making patches this way does take a long time, but I feel that the results are worth it.
Thanks for reading this tutorial! I hope it was helpful. If anyone makes patches using this method, I'd love to see them! 😁
#solarpunk aesthetic week#sewing#tutorial#sew on patch#punk diy#diy punk#punk aesthetic#handmade#solarpunk#handcrafted#embroidery#embroidered patch#how to#how to make a patch
17K notes
·
View notes
Text
#polls#i wish i knew how to use a sewing machine but i don’t have access to one and can’t afford one :/
4K notes
·
View notes
Text
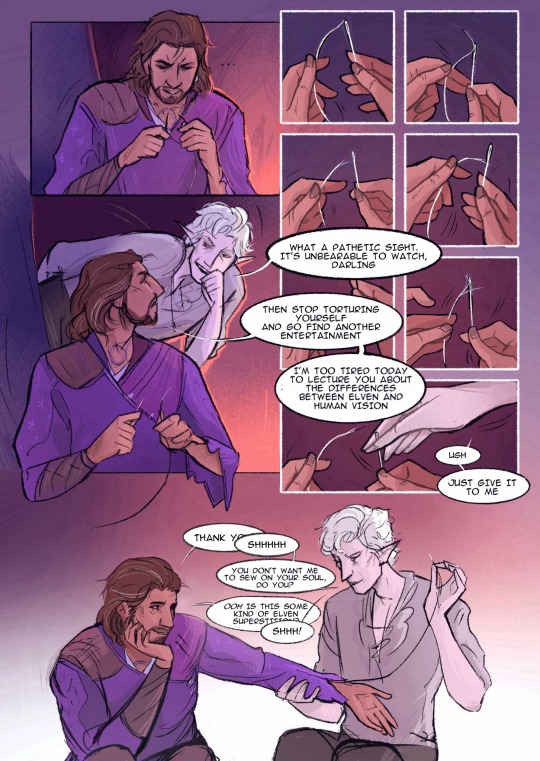
#idk how common this superstition is#but my mom always tells me that you can’t talk when you’re sewing on yourself#otherwise you will sew on your soul#or memory#baldur's gate 3#bg3#bloodweave#gale dekarios#gale of waterdeep#astarion#baldurs gate 3
5K notes
·
View notes
Text

HEY guess who's being completely normal about episode 7 :)
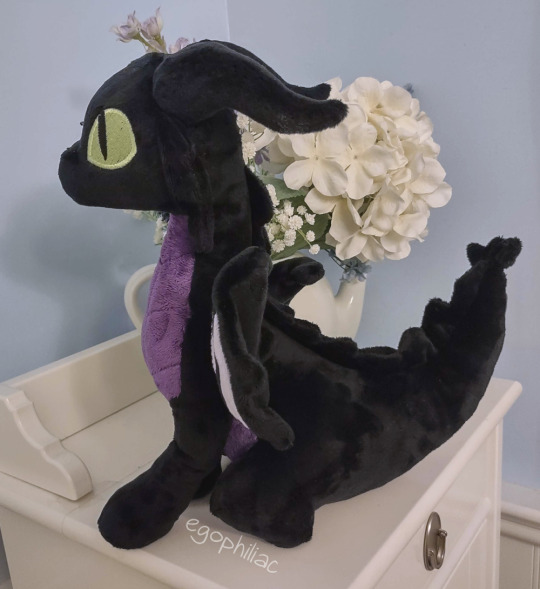
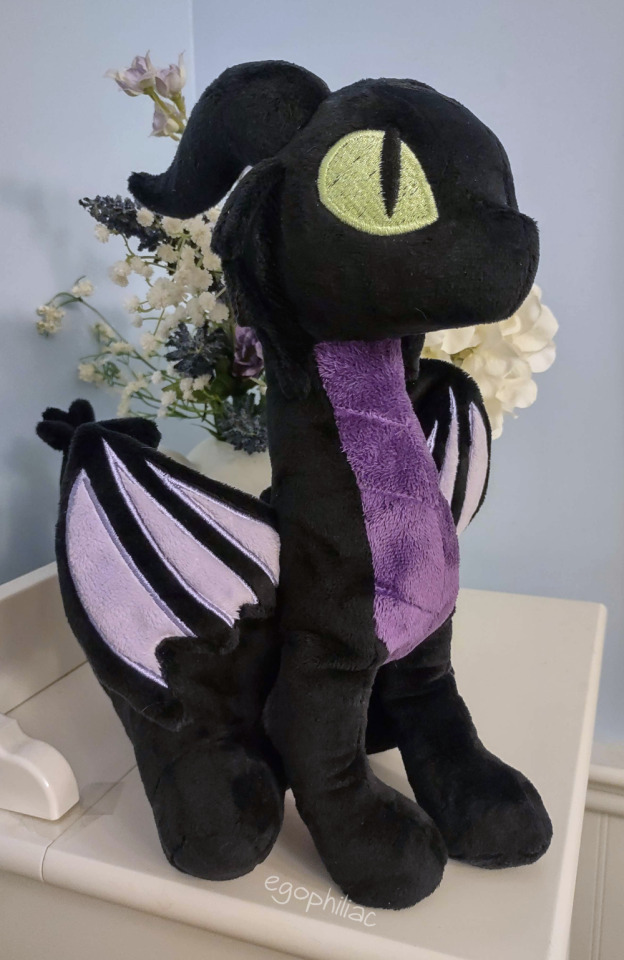
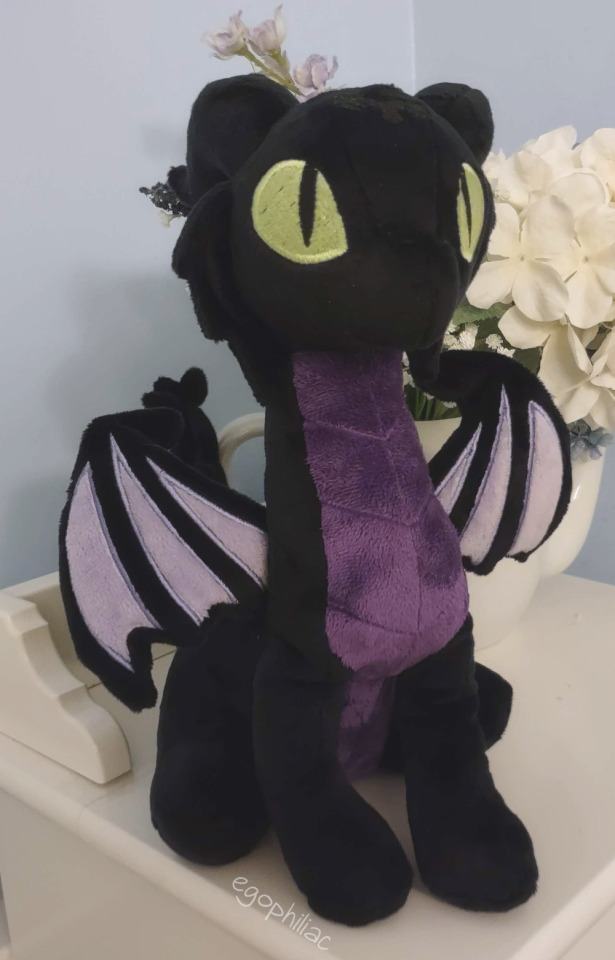
anyway it sure ain't me, so I made myself a baby Malleus! I used the single-headed version of Choly Knight's hydra pattern (link will be in replies ↓↓↓) as a base, and just messed with some of the pieces to make him more Mall-y. including sewing all those little claw pieces, then pinning them on and realizing I actually liked him better without them...oh well. to heck with accuracy, I want stubby little dragon legs!
unfortunately, he doesn't photograph very well, especially his forehead scales (they're there! I promise!) (they're made of glitter HTV so they are actually SPARKLY in real life, yet apparently they come out completely invisible in photos, woe). but he is super cuddly and soft so I'm happy with him! just as in canon, he is a product of LOVE. :>
#twisted wonderland#twisted wonderland spoilers#twisted wonderland episode 7 spoilers#twisted wonderland book 7 spoilers#twisted wonderland episode 7 part 6 spoilers#twisted wonderland book 7 part 6 spoilers#toys#sewing#i impulse-bought the pattern the second i saw it and then couldn't work up the motivation to actually make it :')#until i realized how easily it could be malleus-ified#score one for hyperfixations!#(i gotta make the full version at some point though it's pretty incredible)#i will say that turning this beast after sewing was an experience. oof.#but he made it! and he turned out honestly way better than i thought he would#(don't look at my embroidery i-i'm still learning okay)#i'm kind of in shock at how well the topstitching came out out considering i...literally just drew lines in the plush with a pin...#and then stitched over them while trying not to erase them#hey if it works it works
1K notes
·
View notes
Text
I would like a button to press that says "I am already part of Marginalized Community X and active in Political Issue Y, please do not show me all the posts about horrible things happening to people like me and my loved ones that are directed at Dominant Group A to raise awareness, because I have already cried about Horrible Thing Z twice today, I do not need to be more aware."
That probably wouldn't fit on a button, huh.
#i guess the button is the timer on my phone that limits how much i open instagram today#just sucks that i also have to give up the cat photos and sewing inspiration
2K notes
·
View notes
Text
Novice sewing pattern: Cut out shapes. Line up the little triangles on the edges. Stitch edges together. We've also included step-by-step assembly instructions with illustrations.
Novice knitting pattern: yOU MUSt uNDerstANd thE SECret cOdE CO67 (73, 87, 93) BO44 (63, 76, 90) 28 (32, 34) slip first pw repeat 7x K to end *kl (pl) 42 * until 13" (13, 13, 15) join new at 30 pl for 17 rows ssk 27 k2tog mattress lengthwise BO and sacrifice a goat to the knitting gods. WHAT DO YOU MEAN YOU WANT "INSTRUCTIONS," I JUST GAVE THEM TO YOU
#knitting#no it's not a real pattern but I can't write one that makes sense because I have no freaking clue what any of that means#How do you make things that aren't basic rectangles#Why has every knitter I've asked for help just said 'patterns are easy; you just have to know how to read them' & then refused to teach me#Where do I even find a goat to sacrifice#How do I join the pattern cult#I am so confused#I've been knitting for almost a decade but I can only make scarves and potholders#I learned one (1) stitch by watching a YouTube video and none of my friends or family knit so I have no IRL resources#And nobody I meet seems to want to take the time to explain the rest to me#I taught myself to sew through trial and error but that doesn't really work with knitting because error is pretty much just... Unraveling?#Anyway sorry for the tag rant I'm just frustrated that I see pretty things I want to make but the instructions are in an alien language#And the gap between 'absolute novice' and 'intermediate' seems to be about 20 years of experience and formal instruction
1K notes
·
View notes
Text
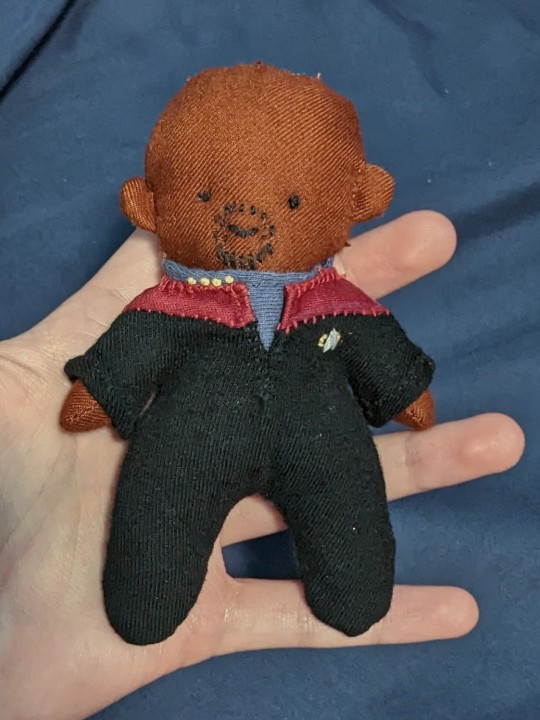
experimenting w making little trek dolls for the STLV craft swap :))
#sisko first bc idk how I'm gonna make hair LMAO but isn't he so cute??#made the doll a while ago but I just made his little outfit today and yesterday :))#hopefully giving them away for free means no one will mind the shoddy craftsmanship lmao#I think I've set a new record for terrible hand sewing. and there's raw edges on the inside. and none of the thread is the right color#but WHO CARES HES SO CUTE!!!!#it's the early ds9 uniform bc I've been watching voy and I'm sooo enamored with their uniforms ugh I need to make an actual life size one#watching voyager will have u saying things like. surely it can't be that hard to sew an invisible zipper??#anyways. need to figure out how to make hair so I can make characters other than him and picard 💀💀#ds9#star trek#benjamin sisko#deep space nine#captain sisko#narcissus's echoes#narcissus plays dress up#(?)
1K notes
·
View notes
Text
there are days that it is hard, and unfair, and some horrible part of me wishes i could have been born in a different world. i love being queer, i hate how others react to it. when i first came out at 15, my mom whispered: please don't say that. your life would be so much harder.
it is harder.
it is also a tuesday, walking my dog. we are both skiving off of work, and yes both of us have dyed hair and pronouns. mine is patchy - it was my first time trying bleach; i didn't have enough. theirs is a resilient toadstool green. a little girl comes up to us and asks um, excuse me? is your hair real? 'cause jason says you're a fairy.
it is sunday brunch, all of us talking over each other, overfull on love. she is trying out a new name today, and we made her a cake with today's name scrawled in shaky purple letters. she laughs so much she cries and then gets frosting in her hair. someone young at a different table keeps giving us these large, wide eyes: the same look we have all been on the other side of. the kind that says, breathless: wait, is that possible?
it is a half-fight in a supermarket because he loves "dance moms" and says abby's tiktok is funny and meanwhile i think the children in that show should be allowed to sue abby lee miller for child abuse. i tell him that it led to the casual acceptance of child harassment for mainly adult views; and then i am standing, suddenly, in someone else's thrown soda. there's a white lady standing there, furious, saying something about hell-on-earth. i had forgotten i was wearing stuff with pride colors. and then it is this: he had just been casually arguing with me - and within an instant, he squares his shoulders and goes after her like i am his sister
on saturday i sat in a circle while beca played with my hair and we were all over 30 and we laughed about how much happier we are being this old, how much more we appreciate our community. 25 minutes from now, we will be on stage to dance in baggy beige clothing, but for now we look on with envy to the dancers in loud-and-bright buttondowns. where are they getting these shirts! i cry, distraught. everyone laughs. one of our friends has a mushroom witch hat. this would have been cringey in high school, probably. instead we are all delighted with each other; happy just to be here and alive and moving
it's that last week my new friends cried with joy for me when they heard i'm getting top surgery. every so often i have the honor of being the first person someone feels comfortable enough to tell. i'm trying to make long fluttery butterfly wings to wear to pride; but i don't know anything about fabric or dye, so my friends have been sending me their personal advice.
i think in a different poem i would talk about how sometimes you walk into a room and put the mask back on. but i'm sleepy and my whole brain is fuzzy so i think in this one, it's a monday, and my dog and i took a nap on a couch, and i had missed texts from friends. i used to wake up lonely. i think this poem is about walking into a room and seeing someone and just knowing, the way you just-know-sometimes, and then giving them that little smile, and seeing them light up with joy and relief. it is how we always seem to be able to find each other in a crowded room. how we always seem to make friends with each other before even we know-it-to-be-true. it is saying: we're very different people; but i belong to you.
it is harder, yes. but it comes with a built-in family.
#wish this was better written!!! but im sleepy!!#writeblr#pride#lgbt#but for real please help me make these lesbian wings. gonna get the supplies tomorrow . i have#no sewing machine but know how to hand sew#have never done a good job with tie dye so idk why im just runnin with it#ps im specifically going to boston pride next weekend come hang out with me
5K notes
·
View notes
Text
porrim and dirk are so fucking funny in turnabout au you guys have no idea. theyre each others yes man in the worst possible way.
porrims like "i want to+ get a seco+nd to+ngue piercing, but i think it might be a little much..." and dirk immidiately shoots back "Nah you're fine. Sit down, relax, and i'll be back once i alchemize the piercing and ready the needle.". kankris having an aunerysm every time he sees these two talking to each other.
#homestuck#homestuck au#turnabout au#homestuck turnabout#dirk strider#porrim maryam#still on the fence about how dirks tatts would look like tbh but im SURE hes gonna get some in this au#i live for their friendship tbh#theyre sharing sewing tips with each other and show their sketchbooks between themselves#also ive been thinking that porrim would definitely help dirk customize his godtier fit#hed be like “THOSE SLEEVES NEED TO GO” and shed go “say no more fam”#i love them sm theyre activating some kind of neuron in my head
1K notes
·
View notes
Text
sew the mouth of your zombie wife shut, now she can't bite you
#oc#oc art#when characters do unhinged things for their lovers#good food#might be absolutely traumatizing to sew your wifes mouth shut#as her undead body struggles beneath you#you dont know if she can feel pain#you dont know if she can even feel#but you promised to love her no matter what happened to her#so you have to go through with it#thats how love is!!#tw horror#no idea what 2 tag this with#tw blood
1K notes
·
View notes
Text
i like this substack article I found while googling jamie loftus’s book on hotdogs. it’s like a poem on the subject of “you can do whatever you want forever” to me
#this is how I felt when I planned my first vacation without my parents and when I moved to nyc and every time I take a train on my lunch#break and when I wear something I sewed#etc. it feels like there’s a lot of things im getting away with and its a fun little reminder that sometimes you can just do things#my posts#unrelatedly obsession with Jamie loftus continues. jamie are you (six feet tall) free on Thursday when I am free
2K notes
·
View notes
Last Seen Blogs

kisekinomiko
Nothin' but Sanae
kisekinomiko
Nothin' but Sanae

pollypeptide
sad eyed lady of the lowlands

123goth
Collection of short stories

waadsthings
WH