#redbubble for hats and everything else
Text
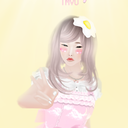
HELLO TOMPLR >:3c
🍄MY SHOP ORDERS ARE FINALLY OPENNN🌈
these are some of my items ...... 🐛🖤 i'm super super proud of how my shop turned out and the improvements i made to the quality of my merch!!!!


perhaps u like Thimgss containing critters, plants, maybe even a cat or two ,,,,,,,,,,.......
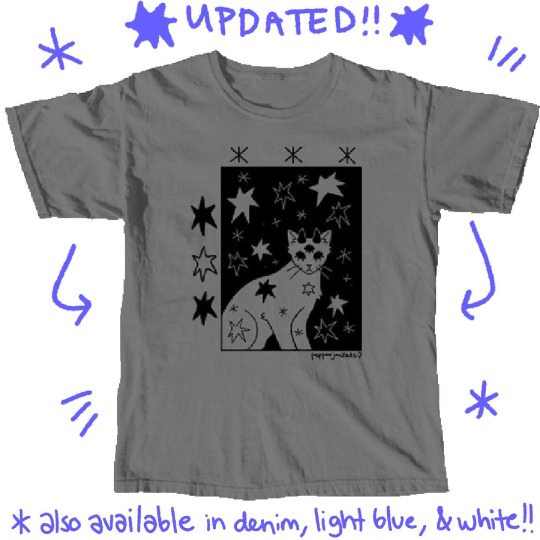

you might even like apparel that's made to look like merch for an imaginary metal band called "Barbie Girl"☝️🐈‼️
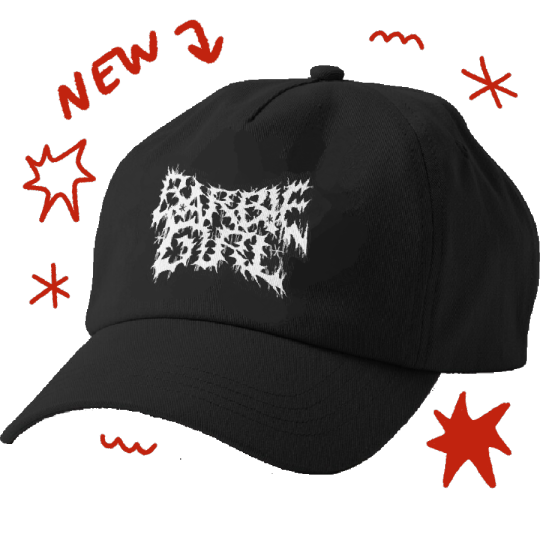
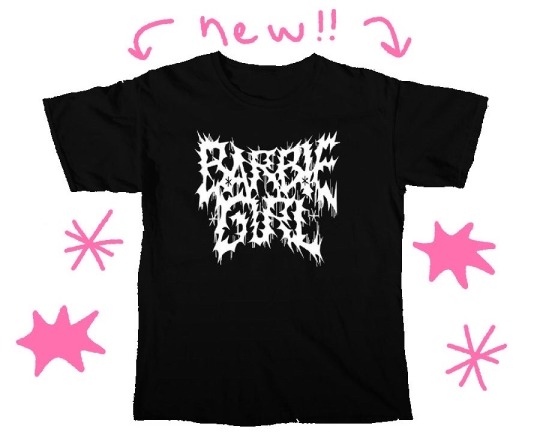
i hope you love my things!!!! i'm very excited to be doing this after wanting to for so long!!!
important info:
- orders expected to start shipping in edit: 2-4 weeks! i'm gonna try to ship orders out in batches every week, plz b patient with me! !!
- 10% discount automatically applied at checkout for orders over $30usd !!!!!
- things i sell: tote bags, t-shirts, pins, photo prints, stickers, and more!!!!!
- pls email me at [email protected] for any questions/concerned related🐛🍄🌿
#shop small#shopify#shoponline#sticker shop#art#queer artist#digital art#cat art#poc artist#lgbtq artist#artistsoninstagram#artists on tumblr#cat#cats#my art#peppershop updates#printmaking#bonfire for apparel and totes#redbubble for hats and everything else#comfort colors#latina#latine heritage month#latine artist#hispanics#latinx#original art#digital artist#non biney
50 notes
·
View notes
Photo
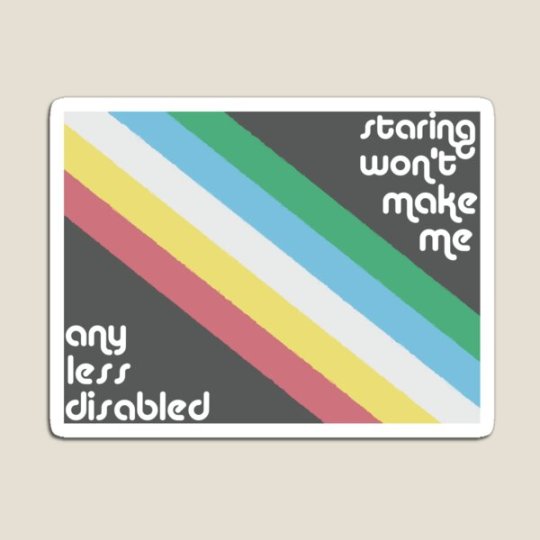
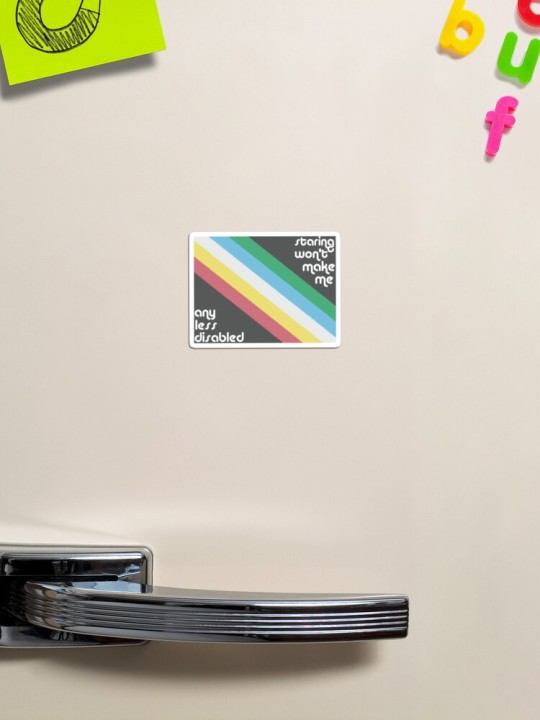
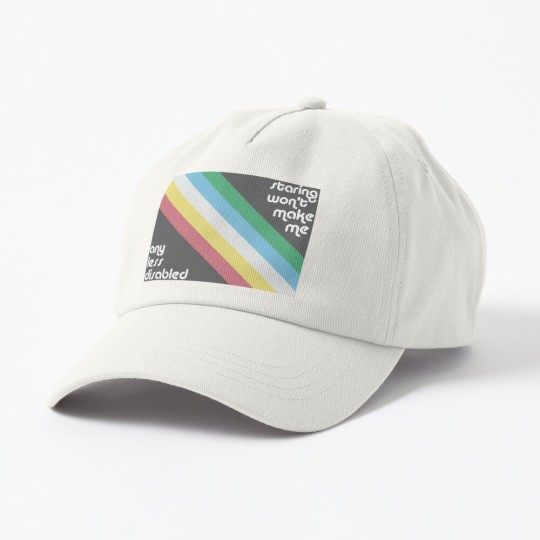
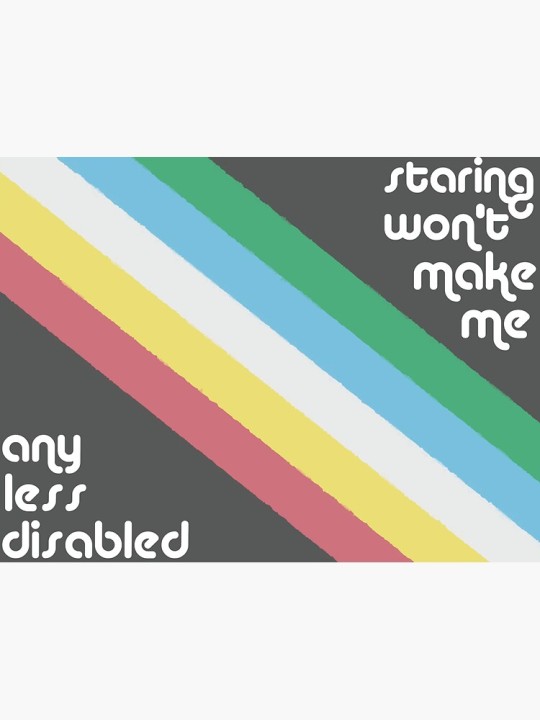
Hey get this design I made to own the ableds who stare at you for being visibly disabled/using mobility aids!
It’s on stickers, hats, water bottles, magnets and everything else that Redbubble makes
You’ll be supporting a Certified Disabled Person (me) by doing so!
#findyourthing#redbubble#actually disabled#disability#cripple punk#cripplepunk#me/cfs#ableism#disabled#art#my art#artists on tumblr#disability pride month#disability pride flag
88 notes
·
View notes
Photo


Ita tomorrow/in italiano domani: my new collection "DIFFERENTLY HEALTHY" on Redbubble, Teespring and Threadless!
You should check them out because each of them has some special objects no one else has + *sales* all over + in my Teespring shop you can use the code KALISEPT 10% off until October + on Threadless I give 5% of my earnings to a different cause for each product.
What to say? This collection was very important to me as I'm chronically sick and try to put humor in everything, and funnily enough I *was* slowed down by my body disintegrating for a few days. So of course I missed my own deadline for posting it. But still, I started and I'll keep adding designs as I go, depending on when inspiration hits.
Some things you will find everywhere, like apparel, mugs, home decor, but when it comes to “unique” things: on Teespring you get to pick among many background-colors plus you get the cute round hats, yoga mats (irony), bike short, tumblers, all kinds of stickers and more. On Threadless shoes, shirts that I can personalize giving their sleeves a different color, different types of bags, skateboards; Redbubble offers clocks, leggings, baseball hats, dresses. And I know I’m forgetting lots of unique stuff on top of the typical kind.
in the source a link to the post with all my shops and stuff
-reblog to help out a sister, but also if you are already buying on teespring consider adding even just a sticker from my stuff, a few sales and I can appear in the marketplace!
#chronically ill#chronically sick#disability#invisible disability#invisible illness#chronic illness#chronic sickness#chronic fatigue#spoonies#spoons#chronic pain#chronic#pcos#endometriosis#ibs#irritable bowel syndrome#chron disease#redbubbledesign#redbubbleart#redbubbleshop#teespringshop#teespringshirt#threadless#threadlessshop#redbubblestickers#mine
17 notes
·
View notes
Photo
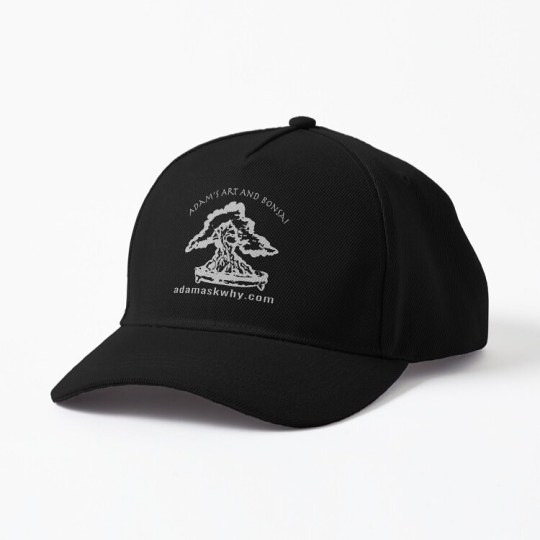
We have hats available on Redbubble now! (And everything else too, get yourself an Adamaskwhy shower curtain). Go to Redbubble.com and search Adam Lavigne or Adam's Art and Bonsai, or follow the link below. (https://www.redbubble.com/i/hat/Adam-s-Art-and-Bonsai-Logo-for-Dark-by-Adamaskwhy/75285575.9AAXL) #bonsai #bonsaitree #bonsaiswag #bonsaiart (at Adam's Art and Bonsai Studio and Nursery) https://www.instagram.com/p/CT3SGDZNQNP/?utm_medium=tumblr
2 notes
·
View notes
Photo
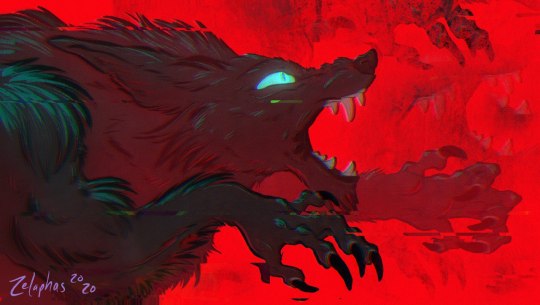
Quick werewolfy doodle to play with the new Procreate 5X features. Everything's glitchy now!
🟣🟣🟣
Thanks for enjoying this piece! Your comments are appreciated.
🗝Want to see my art before anyone else on this cursed earth? Join my Patreon for $2 to get an invitation to my private telegram chat and see my Friday 'art shares' before anyone else. 🗝
🛍Etsy and Redbubble 🛍
💸Toss a coin in my hat 💸
💬Public chatroom & updates 💬
🟣🟣🟣
#art#artwork#drawing#animal#animals#fantasy#creature#creatures#character#characters#character design#digital#digitalart#digitalartwork#digital art#digital artwork#dragon#dragons
7 notes
·
View notes
Photo

Figures in Good Style
It's about time I got this one finished and uploaded!
This piece was inspired by this adorable vintage Valentine: Vintage Valentines - Worth Your While graciously posted by Yesterdays-Paper
Believe it or not, I actually started on the sketch back in January not long after the original Valentine was posted. (From pretty much the moment I saw it I wanted to draw something inspired by it so I've had it open in another tab so I wouldn't forget this entire time! ) I got about halfway through and started to run into...not really problems so much as frustration. Some of the details were just not working out the way I wanted, the proportions looked wonky, etc.
So I gave up and worked on some other things for a little while; some things that were on my to-do list, others that came up as I went along, stuff like that. The longer I went, the more it was looking like the sketch was going to be abandoned, especially as it drew closer to Valentine's Day (because originally I wanted to post it before then for hopefully obvious reasons). But all the while there was this voice in the back of my mind more or less egging me on to go back to it.
One night when I was feeling artsy but had finished my other projects, I decided to go back to it.
This was one of those times where there must've been something artful in the air because even though it was still trying my patience a little, I didn't get discouraged like I did before and powered through to finish the sketch. (Well, what I was calling finished, anyway.) And somewhere in the mix, I had decided to see it through to completion, after Valentine's Day or not.
Compared to the original, I did alter some details and age the two characters up a bit to better suit my own style. The eyes, in particular, I couldn't make out the color on the original that well, so I gave the girl blue eyes to tie in with the boy's shirt and he got green eyes to go with her dress. I think it connects them a bit more since otherwise, their looks don't really go together.
I sat on the sketch for a day or two to figure out what I wanted to do exactly beyond just coloring it. I ended up doing the line art on this Parchment Paper by Strathmore that I got on clearance sometime last year, And I really should use that stuff more often. It's got five tinted colors to pick from (I went with the darker of two creamy/tannish options here) and the pages have a sort of subtle marbled look to them. It's also pretty smooth, so markers work pretty nicely on it, but not so smooth that colored pencils won't stick. It's only the 200 series, 60 lb. so it's kinda thin, but I haven't had any issues with that. (Beyond the very obvious I am never taking water to this paper because I am very sure it wouldn't hold up to it very well).
I thought the creamy and marbled look would fit with the vintage theme, and the tints of the paper are light enough that they don't affect the color too much.
Because I was feeling a little lazy I went with doing a base layer in alcohol markers--good, even coverage pretty quickly without having to build up layers--do a little minor shading, and then deepen up the shadows with pencils. This worked quite well, and again this is something I should do more often. I like colored pencils, but they do tend to take a little longer. I also like markers, but sometimes it's intimidating to me to try and get enough depth/shading/etc. with them alone. (Only thing is I can't use the markers on my tan and gray papers, which is a shame)
Originally I wasn't going to include the little pattern on the girl's skirt, but once I started working with the pencils I said, "eh, I can do a little quick sketch-in with a darker green" and then later I accented it with a Pentel Sparkle Pop, so IRL when you move the picture it sparkles. This led me to add the ribbon on the boy's hat so he would have some glitter too. (I did do a couple of gold buttons on him, but it didn't feel like enough). The gold on the fan also sparkles; leaving it plain white in that spot didn't feel right.
Then obviously I took my white gelly roll to them, And IRL the shine on their eyes somehow now looks almost like it's glowing because it is so nice and bright .
Now, I had figured out while I was doing all this that I didn't want to just leave it on the paper and that be that.
Once I was done with the coloring and everything, I let the drawing sit for another day or two and thought about what else I could/wanted to do with it.
From my Elizabeth Tower piece, I have this stack/block of paper printed with maps/test/ledgers/etc. On a whim, I started flipping through it, possibly to cut and mount the drawing on a piece.
I went through a few different ideas, but I ultimately came back to this piece left over from the Tower; I'd cut a butterfly out of one corner. I hated to waste a whole new piece to cover up most of it, so I was thinking about how I could use this piece that had already been marred.
I still had the butterflies I used; So I pulled one out and cut one out of the other corner To fill it out, I pulled out on the ledger pages and mounted it on that, then cut out the drawing and mounted it on that.
Though I hadn't planned on it, I ended up mounting my little paper sandwich on a piece of my metallic cardstock just to give it some more stability. (The cardstock I got pretty cheap and don't use it that much, so I don't mind using it for stuff like that.)
Some details and proportions still came out a little bit funny, but ultimately I'm happy with it. It's cute, and the different papers make it feel a bit fancier.
This was also the piece that put a nicer paper cutter than the one my mom got from the dollar store many years ago on my art shopping list because that one was still cutting crooked and giving me trouble. (I have since purchased a pretty nice one by Fiskars that works wonderfully from Wal-Mart).
I went with "Figures in Good Style" for the title as it comes from the text on the original and seemed like a good fit.
Next up...hmm...I've got a new resource to share, a colored pencil test, and another test, but I also have one other thing that's not quite finished I plan on wedging in there somewhere.
____
Artwork © me, MysticSparkleWings
____
Where to find me & my artwork:
My Website | Commission Info + Prices | Ko-Fi | dA Print Shop | RedBubble | Twitter | Tumblr | Instagram
2 notes
·
View notes
Text
Custom T-Shirts – Plan And Design Your Own!
Even though t shirts are easy to find, and you can get many existing designs, there’s something incredibly appealing about getting your own shirt made. You can get these made in a physical store or purchase them online.
Quick Navigation
Planning a Custom T Shirt Design
Choosing a Color Scheme
Finalizing the Design
Creating a Digital Image
How to Transfer Your Design
Using a Screen Printer
Using a Stencil
Finding Custom T Shirts Without Really Trying
Enjoying Your New Custom T Shirts
Of course, you could go the full customization route and design your own custom t shirt from the ground up. Whether you want to do this as a hobby or plan to turn it into a small business, you should know how to design t shirts. It won’t take long to become an expert.
Planning a Custom T Shirt Design
What exactly do you want to do with your custom t shirt? It could be a really cool new design to show off, or some kind of symbol to promote a brand that you’re working with. Whatever it is, the purpose behind the design should motivate the design itself.
If you’re advertising anything from a professional background, the point of the image should be to highlight the logo. Go for something simple but effective when you’re trying to push a product. If you’re promoting a sports team, ensure that you include the team’s colors when you create the shirt. If it’s for a music group, try to incorporate the style of music or the image of the band itself.
You could also start with a photo and work from there. Make sure to use a photo that you won’t have to credit to anyone else. If it specifically came from a stock photo with explicit free-use instructions, this is fine.
Choosing a Color Scheme
Contrast is one of the biggest things to consider when making a custom t shirt. You’ll need to think about how certain ink colors will blend with each other when going with lights vs. darks. There are some kinds of ink that will appear to stand out more than used on an actual shirt as compared to what they look like on a digital screen.
When working with lighter shirts, stay away from light blues and pinks, as well as anything with yellow. They’ll stand out on a shirt, but you won’t be able to tell what they say from a distance. If you need a shirt with a logo, you need that logo to be visible from as far away as possible.
If you go with pastel colors, throw in an outline of a darker color to make the text jump out. It will make the entire shirt easier to read.
A dark-colored shirt will look amazing when you use lighter ink. You do need to be careful, though, when using dark on dark. Shirts that are colored maroon, dark green, or dark blue can distort any ink when you go to print them.
Anyone that uses Adobe Illustrator will find that the Global Colors settings will help out a lot.
Finalizing the Design
Next, you can add dimensions into your existing design. After you have finished work on the coloring aspect, you might find that it still doesn’t “pop” enough. To give your shirt a bit more depth, you can add colors that are the same shade as what can be seen beneath it. This way, you can brighten your image and add to the dimensions.
Making a vector outline inside your software is a great way to resize anything in your design that you might need. If you’re using software that has a lot of customization options, like Gimp or Paint Shop Pro, you can start with an image and manipulate it however you like. The possibilities for t shirt choices are endless.
Get some balance throughout your design by combining all the parts into a whole. This might sound unnecessary, but you need to work with your image to give it some clarity. You might have a lot of smaller elements that need to be organized into a bigger canvas.
Make sure that everything comes together evenly on the t shirt. If the whole image is balanced, it will draw more attention to what you’re trying to convey.
As you finalize the design, figure out where it should be placed on the shirt. Do you want to center it, or create an image that ends up wrapping around? For a more professional display, something simple and in the middle tends to be the most effective. Don’t forget about the back of the shirt as a supplemental spot, too.
Creating a Digital Image
Once you have your design worked out, you can take what you’ve made on paper and feed it into your computer. Use a scanner or camera to transfer your sketches into your imaging program, where you can clean up any uneven lines. You can make adjustments with filters, brightness, and saturation if you need to.
Throw in some lines and splatter effects before you get any further. Ensure that the whole layout is consistent by keeping all of your measurements and proportions at an effective level.
If something isn’t working for you, you can create more sketches from scratch inside your imaging program. Add color inside your tablet if you want to take the image with you to work on the go. You never know when inspiration might strike you, especially if you notice a color scheme while you’re out walking or on the train.
When working with fonts, you need to complement the design and not take away from it. Using the wrong type of font can completely take a viewer out of the image and ruin the entire concept. Use any filters you have on the font as well as the image and check to see that your layers are properly applied inside Photoshop.
You can find tons of fonts on different websites. Many are free as long as you aren’t using them in a commercial property like a film or video recording. If you’re an expert in design, you might even consider making a new font from the bottom up. It’s hard to argue against the effectiveness of an original font to bring in awareness.
How to Transfer Your Design
You have several options for how to move your image from printer to an actual t shirt. Obviously, you want to start by having a blank t shirt for printing. From here, your supplies will depend on how you want to print your image.
Using a Screen Printer
For this method, you’ll need access to a printing screen. You can easily find these on Amazon or at your local art supplies store. You’ll be mixing emulsion and sensitizer together with this method, so make sure you are comfortable with different kinds of chemicals.
Once you have created the image and put it into a transparency, you can burn the entire image into the shirt. You’ll need a powerful bulb for this, around 500 watts. This can be done in about 15 minutes.
You can then rinse the screen under a thin layer of water for a couple minutes. Tape off the edges of the underside and get your screen-printing ink ready. Once you’re done with the application, you can cure the ink with a hairdryer.
SaleBestseller No. 1
256 Reviews
F2C 5 in 1 Professional Digital Transfer Sublimation Swing-away...
Non-stick surface W/ Detached upgraded aluminium alloy cradle for use of the mugs, hats & pads...
Large 12" x 15" Heat Press, provides a big surface to create your own custom T-shirt etc;
Full 360-degree rotation and professional swing-away design.Note: If the heating plate is not flat,...
Check Price on Amazon
SaleBestseller No. 2
170 Reviews
Xyron 624632 Creative Station, 9" with 5" Option
Xyron-Adjustable 9 Inch Creative Station
The New Creative Station Was Designed To Take Up Less Space On A Desk With Its Compact Style And...
It Will Also Allow For Greater Flexibility With Less Material Waste By Using Two Cartridge Sizes In...
Check Price on Amazon
Using a Stencil
When stenciling, you’ll need contact paper. Tape the paper to the peeling side to keep the design visible throughout the process. Use the sharpest possible knife to cut out any black parts on the design, and peel off the sticky side from the contact paper. Now, you can slide a piece of cardboard inside the shirt.
With a sponge brush, you can apply the fabric paint. Don’t out the spots anywhere that the contact paper hasn’t been cut and let it dry. Once you peel off the contact paper, your stencil work will be complete.
Finding Custom T Shirts Without Really Trying
If you aren’t especially artistic, you don’t have to worry. Plenty of online merchants sell custom t shirts directly to customers. In fact, you might find some people who have the same ideas as you for designs even if you can’t make them yourself.
Look into Etsy or Redbubble to find designs that you would like to wear for yourself. If you’re looking for a new design for a business, you might consider commissioning a new logo through someone whose art you admire. Be sure to show courtesy when asking about a potential job, as artists can get busy fairly quickly.
Enjoying Your New Custom T Shirts
All that’s left for you to do is proudly display your new creation. If you’re promoting a band or a new product, wear the shirt wherever you can to raise the visibility. Scan your design and hashtag it on Instagram or Twitter to see how far you can get the message out.
It only takes one person to notice your custom t shirts before they become popular. You never know exactly who could be looking, so give it your best shot when designing your logo or image. You might even have someone ask how they can buy the exact same shirt.
The post Custom T-Shirts – Plan And Design Your Own! appeared first on Heat Press Machine Reviews.
from Heat Press Machine Reviews https://heatpressmachineguide.com/custom-t-shirts/
2 notes
·
View notes
Photo
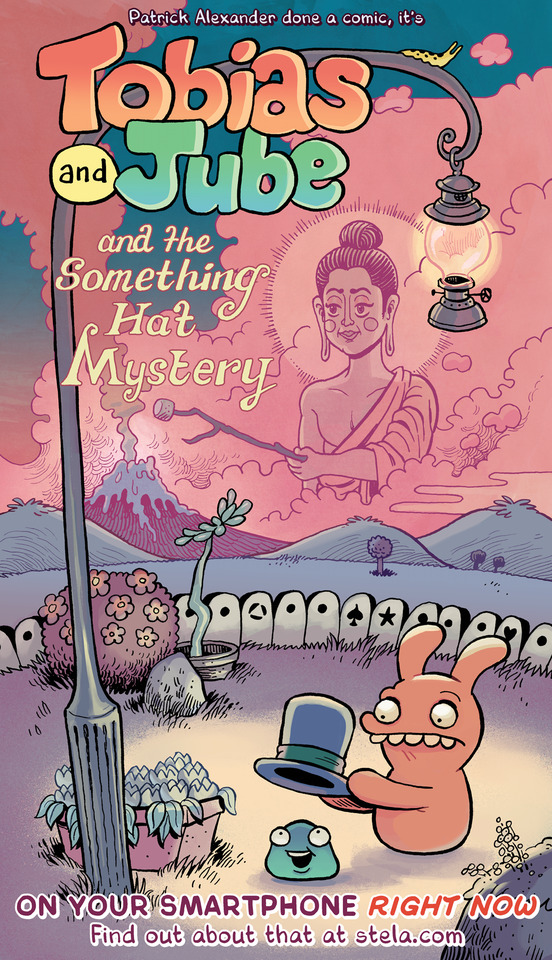
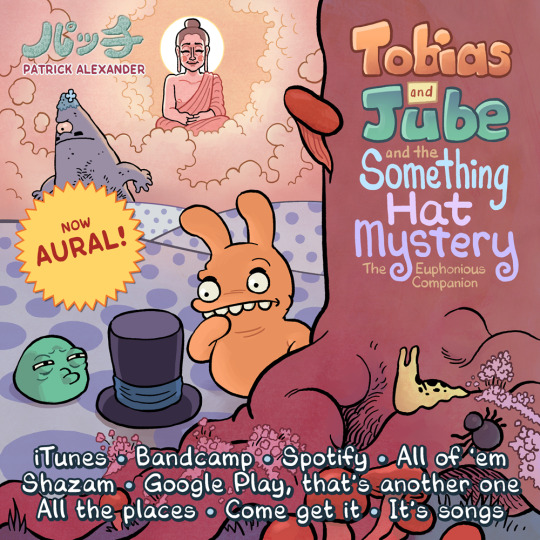
Hello everyone, did I mention my new Tobias and Jube comic? I can't recall. Anyway, it's called Tobias and Jube and the Something Hat Mystery and the first chapter is up on the Stela app right now! It'll run for five weeks; one chapter per week. It's basically 50-something print pages, in total — a little book, like an Asterix book! It is also, would you believe, suitable for all ages. And 'all ages' doesn't mean 'children', it means ALL AGES — I'm looking at you, Granddad! You think I can't see you curled up on the floor behind the recliner? Granddad? Oh, the old silent treatment, eh? The old silent and motionless except for sporadic twitching treatment, is that it, old man? Pathetic.
I'm exceptionally proud of Tobias and Jube and the Something Hat Mystery and excited for you all to enjoy it. It's not free — you do have to buy it (god, I know) — but at least you can buy it without leaving your house! FRESH LAUGHTER AND NATURAL HUMAN DELIGHTS, EVERY WEEK. And phwoar, look at those gorgeous colours by Lin Visel. Pages of that good stuff. Get into it.
BUT WAIT. Did you think that was all? "Oh, he's made the funniest comic in the history of the medium, surely that's enough for one man" — was that you just now?
[shakes head sadly while throwing head backwards in flamboyant laughter]
"I don't think I've smiled this much listening to an album... ever? Ever."
"I would say this feels like the soundtrack to a mysterious, quirk-laden Japanese PS2 game, but it's the soundtrack to a wonderful comic!"
"I almost choked on my own snot listening to this. Patrick you are wonderful. My new anthem here."
"This unironically owns."
"That record is like some evil corrupt maniac formed the second coming of the Bonzos just to corrupt the minds of children."
"That was brilliant! ... What an inventive track, nice to hear something different."
"Holy shit! This is hilarious and great!"
"The most fun you can have without burning down a church."
— Comments already received from authentic fellow humans
Yes, Tobias and Jube and the Something Hat Mystery is also a 30-minute album of amazing songs, subtitled The Euphonious Companion, which makes quite a long and grandiose title altogether, but I promise it's not prog, IT'S NOT PROG. It is a POP album but WEIRD POP and oh my goodness, remember how the comic is the #1 and sole greatest thing I've ever done? Well the album is also the #1 and sole greatest thing I've ever done! How is this possible? It's not. It's a miracle.
Bandcamp! iTunes and Apple Music! Spotify! Google Play! Soundcloud! And Amazon and Deezer and even Saavn, and other places too — just search for the album. And you can even Shazam all of these songs, which is really cool. If you play my songs at a party, people can go, "Siri, what is this stream of pure, rainbow-flavoured delight? I must know!"
It is a DELIGHTFUL album; that is the word I keep using. You will be delighted. It's only a short album — go to Bandcamp and have a listen. You will feel delight, I promise. This isn't cartoonist music, this is cartoonist AND musician music. You've been waiting for it, bored with everything else, and now, here it is.
"Patrick I bought the album and subscribed to the comic, I am into this Tobias and Jube thing, help me!"
Tobias and Jube prints and goods at redbubble! Tobias and Jube stamps for Line messenger! Old-school Tobias and Jube comics that I'd hoped to have rescanned and recoloured by now, oh well! You want more?? Tell me about it! No, actually tell me about it. Thanks.
Thanks for enjoying my work, and thanks in advance for telling your friends and social networks about it! It makes a big difference; you have no idea.
tl;dr: Lots of new Tobias and Jube stuff! Here and here. Hooray!
8 notes
·
View notes
Photo
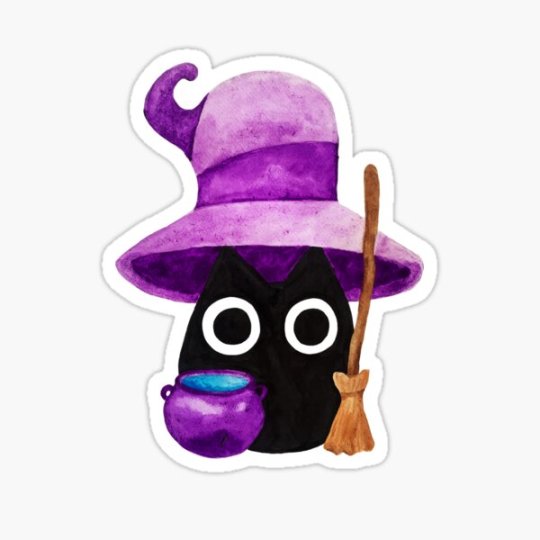
I call this “Witchy Black Cat With a Big Purple Hat” and it’s my favourite thing I’ve painted in a while.
If you like it it’s available on Redbubble, TeePublic and Society6 and you can get it on stickers, prints, phone cases, magnets, t-shirts, tote bags and basically everything else you can imagine.
#findyourthing#redbubble#black cat#halloween#fall#witch#witchblr#cats of tumblr#cute art#art#sticker#stickers#phone case#phone cases#teepublic#society6#my art#artists on tumblr#disabled artist#familiar#witchy#witchcore#witchcraft#witch cat
3 notes
·
View notes
Last Seen Blogs
the-prettiest-demon
Daki Shabana
dolly-loli
Dolly IMVU
mestrecaxambu
caxambu
ivy-stclaire
The Good Doctor Imagines And One Shots

niposkin-official-blog
Untitled