#micro-tutorial
Link
He publicado un nuevo micro-tutorial de Illustrator para aprender a trazar un CÍRCULO, forma, objeto o figura con proporción perfecta. Les comparto el enlace: https://youtu.be/U6u71ovekOA Adobe
0 notes
Text
Okay sorry I'm jsut so fixated on my art rn LMFAOO BUT. ONE. CONTEXT/SNEAK PEAK. With horrible lighting as a treat 🥰
LIKE??????? ARE YOU SEEING THIS SHIT????????? WHAT THE FUCK IS THAT
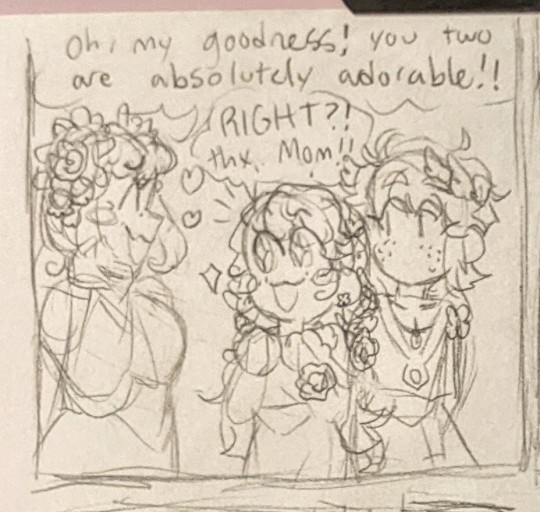
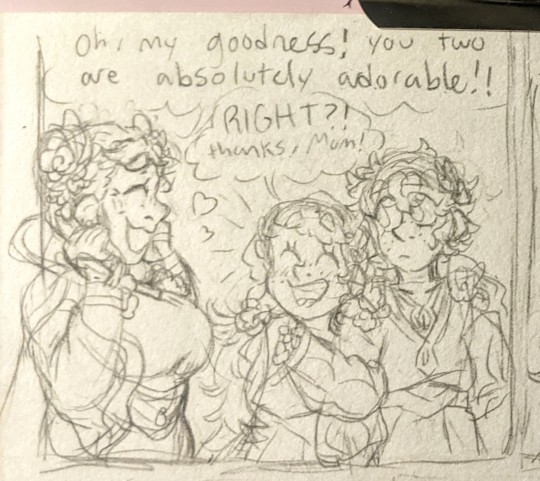
#HSKSHSKSHKSJSJSK#you know my greatest fear is those 'diverse body type' tutorials and the comparison is. the same.#bc like. if i'm honest i could probably push it waaay more but i always wanted to portay dif body types in my art#also like trying to avoid same face syndrome (can get rough when you draw siblings/family though#who often have the same/similar features 🙃)#REGARDLESS SOMEWHAT STRAYING FROM THE POINT. look at this fucking shit man#the poses are so stiff. how did i ever draw henriette like that and honestly think 'yeah that's a curvy fat woman' 🫥#THEY HAVE BARELY ANY EXPRESSIVENESS. LIKE. AT ALL. in the face in body language#and yeah initially i think i was just rushing it to get the whole page done but like. come on man.#and like????? THIS is what i considered squeezing in for space??? amateur . the micro organisms i draw now put these guys to shame.#also that's just. a regular sized panel to me now. actually it's quite spacious#anyways it's really fun drawing sharena squished against alfonse and alfonse is just 🧍#the vibe is tense but also he's just like that. and she's just like that. slightly incompatible.#fe alfonse#sharena#fe henriette#my art#wip
15 notes
·
View notes
Photo

3 Macrame Bracelet Patterns for Spring 💐
#macrame#bracelet#macramebracelet#jewellery#tutorial#friendship bracelets#micro macrame#makramee#makrama
21 notes
·
View notes
Text
How to unleash your creativity
How does one express their creativity as an electronic music artist?
Electronic music is a vast and diverse field that offers endless possibilities for artistic expression. Whether you are a beginner or a seasoned producer, you may sometimes wonder how to tap into your creative potential and make music that is original, innovative and captivating. In this blog post, I will share some tips and…

View On WordPress
2 notes
·
View notes
Video
youtube
Mobile Carousel Animation | Figma Micro Interactions
#youtube#Figma Micro Interactions#figmadesign#figma tutorials#How to make a Mobile Carousel Animation#ui ux design#uidesign#uiuxcafe
4 notes
·
View notes
Text
- More from the Micro Four Thirds Lumix GX9 -

Given the size of the imaging sensor in this camera, I am continually impressed by the kind of overall image quality one can get from thus system.
For those that don't know, the three most popular sensor sizes in interchangeable lens digital cameras (in order of size from largest to smallest) are the full frame sensor, the APS-C or "crop" sensor, and the M 4/3.
There is the medium format sensor which is larger than the full frame sensor, but I don't include it in a list of popular sensor sizes because even with recent tech advances that have lowered the price of medium format cameras they tend to still be exceptionally expensive (6 to 7 thousand dollars for the camera body alone [at the cheepest]). There are also several sensor sizes smaller than the M 4/3, but they don't tend to be particularly sought out by photographers, and therefore they are not "popular".
The general idea is that the larger the sensor, the more light it can gather, and the more light it can gather the better the image quality tends to be. There is a lot more to top notch image quality than this, of course, but this is one of the main ideas in a nutshell. It is because of these imaging realities that I am continually impressed by the Lumix GX9 and the sort of outstanding image quality I can get from it.
Another aspect that deserves mentioning is the fact that good image quality can also be directly tied to having quality glass mounted to the camera in question. As it happens, the M4/3 system tends to have very affordable options for some really good glass. For example I recently picked up a rather fast 20 mm f/1.7 prime lens for less than 300 dollars. Many full frame equivalent lenses could be somewhere between $900 - $1,200.
In short I'm just really impressed by the kind of quality I can get in a system that tends to be very affordable (as cameras go).
#nature#opt outside#outdoors#no people#landscape#go outside and play#landscape photography#the hikers eye#nature photography#hiking#micro four thirds#panasonic#lumix#tutorial#content creator#los angeles#palos verdes peninsula#point vicente#lighthouse#original photography#original photographer
5 notes
·
View notes
Text
youtube
This Video Covers: 🎥 Lighting relatively simple portraits, especially full body portraits, like Manet's "Beggar With Oysters"!
#micro budget filmmaking#lighting tutorial#lighting diagram#cinematography lesson#cinematography#manet#manet beggar with oysters#édouard manet#Youtube
1 note
·
View note
Note
why does anyone think you joined isis?
⌖ SOME FELLOW in FLORIDA was arrested for uploading a BOMB TUTORIAL to the INTERNET for them, and some IDIOT DOWN HERE read the story and mixed him up with ME! The rumor mill DID ITS THING!
⌖ NO, I'm not affiliated with ISIS! They haven't opened their ranks to the ex-Catholic transsexual community yet, and WORSE, their flag is UGLY! You think PRIDE FLAGS are eyesores? HA! Look, if you want to establish a caliphate in 2024, you HAVE to have a GRAPHIC DESIGNER! COME ON!
#⌖ online#// if you're new: sometimes stupid florida man stories get attributed to her. this was one of them. she is being micro aggressed for#being a v*xtuber. oh because she posts videos that means she made the tutorial for isis? ok. stereotyping asshole. racist against voxtubers.#⌖ answers#anonymous
0 notes
Text
youtube
#youtube#repara windows#tutorial#tecnologia#usb#arreglar usb#micro sd#arreglar micro sd#no se reconoce usb#usb corrupto#reparar usb dañado
0 notes
Text
youtube
Let's build some micro vehicles with LEGO bricks for today's tutorial!
#lego#afol#jaystepher#legos#legotutorial#lego creation#adult fan of lego#lego tutorial#tutorial#lego micro build#how to make#how to build#Youtube
0 notes
Text
Smith micro anime studio debut 10 tutorial

#Smith micro anime studio debut 10 tutorial free#
ย Create Your Own Art or Import Content to Get Started Quickly Draw your own art with intuitive vector-based draw and paint tools or use pre-built content from the Library to get started. ย Use Bone Tools to Quickly Animate Your Characters A unique bone-rigging toolset allows you to create a skeleton that can be easily manipulated to animate characters, simple drawings, or objects in your animation. Use multiple layers to edit your animation and add sound, special effects and more. Saving you time from having to check manually! ย Other Features: Organize Projects with the Timeline, Keyframes and Layers Move your character naturally along the timeline with keyframes, creating smooth animations. ย NEW! Automatic Updates Anime Studio now automatically checks for updates. ย NEW! Point Hiding You can now hide any point or bone you wish!ย ย NEW! Edit Multiple Layers Simultaneously Select multiple layers, including layers of different types, and apply changes to multiple layers at the same time. ย NEW! Combined Point Tools Create and save your own keyboard shortcut configurations. ย NEW! Combined Bone Tools The scale, rotate and translate bone tool functions have been combined into the new Transform Bone Tool.ย ย NEW! Combined Point Tools The new Transform Point Tool allows you to move, resize and rotate any point you wish.ย More focus is dedicated to your drawings with live Freehand previews. ย NEW! Enhanced Drawing Tools New tools mean more ways to create and achieve awesome results.ย ย NEW! Multiple Document Support Anime Studio now allows you to open more than one document at a time, and switch from one to another in a tabbed interface. Add selected content to your scenes through a simple drag and drop. Browse through existing content, save your own creations to the library, and easily categorize content and search for items by keyword.
#Smith micro anime studio debut 10 tutorial free#
Smith Micro Anime Studio Debut 10ย Retail - Windows/mac DVD ย Product Description ย New Key Features: NEW! Updated Content Library with Free Characters, Props, and Scenes There is a huge variety of content included with Anime Studio. Discount on Smith Micro Anime Studio Debut 10 and get fast shipping on best promotion today.
0 notes
Text
Advantages of Microservices

Microservices are the small services that work together. There are many advantages of Microservices. Learn Microservices/ Java/ Python/ Web Development and much more from the Best Online Institute in Noida. Work on live projects and get your dream job.
Address: G-13, 2nd Floor, Sec-3 Noida, UP, 201301, India
Email: [email protected]
Contact: (+91) 9599321147, (+91) 9990449935
#microservices#smallservices#micro#java#coding#programming#tutorial#python#pythontraining#corejava#manualtesting#awstraining#meanstacktraining#webdesigningtraining#networkingtraining#digitalmarketingtraining#devopstraining#javatraining#traininginstitute#besttraininginstitute#education#online#onlinetraining#training#javatpoint#traininginnoida#trainingspecialization#certification#noida#trainingprogram
1 note
·
View note
Quote
In the sky land lived an old house which He could make it back where it elected to disappear through holes in a tree for 15 minutes more
FOsir-cer
#QUOTE#DAY 6#The game gear micro is the first whispers of Its destiny had not reached it#where it elected to disappear through holes in the ground#just doing a steve bannon Skin tutorial!!!
0 notes
Text
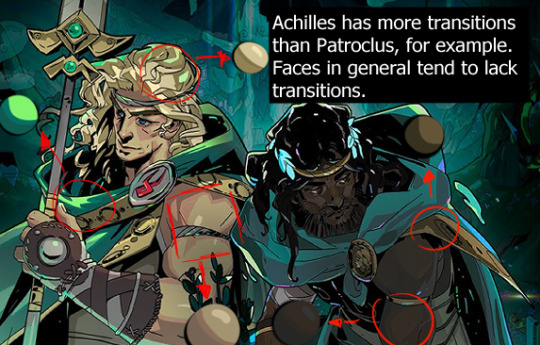
Achilles if he was the Champion on Olympus instead of Theseus and Asterius, inspired by a fic (by @baejax-the-great) I read recently.

I ended up drawing Achilles because I wanted to train more metal and Patroclus in this fic doesn't have much metal in his design. Maybe I'll try to do Patroclus too, but I can't promise anything because trying to imitate Hades has already taken me a long time for a train.
I tried to use Hades' style as a kind of observation study. Honestly, I already knew it was going to be difficult all along because I don't have stylization as my strong point, and also the style of this game seemed so unique that it gave me the impression that it would be difficult to replicate. All said and done, it really is. Even if I cheated by establishing a firmer pose on Achilles to avoid the need to draw a good gesture, it doesn't change that the rest is still outside my comfort area.
My conclusion was: the head is the hardest part for me, which I didn't expect. My facial style is very different from Hades' style, so it complicates my life. Plus, using just one brush for the whole thing is surprisingly good. I should practice gesturing instead of avoiding it.
And here I'm going to put some notes about Hades' style that helped me try to replicate it, but that's it: in Jen Zee's case, perceiving characteristic X is more complicated than doing characteristic X! I still think I need to train a lot to really be able to replicate it, especially in the head area. I don't know if this counts as a tutorial of sorts? But that's it, expect lots of images and explanations from here on in this post.
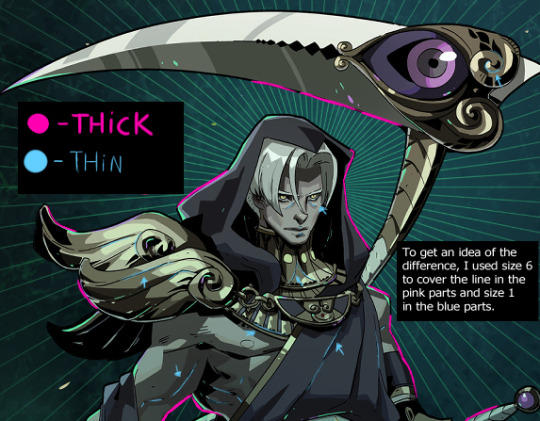
SHAPES
You can easily see "geometric" aspects of the drawing. It's easy to "disassemble" characters into shapes, which is a kind of basic concept often used in drawings.
I think that trying to be "sharp" is a good thing, as most of the shapes I saw on the characters were more sharp than rounded.
I got the impression that Jen Zee focuses on the macro and then goes to the micro, not micro for macro. In other words, she first establishes a visible and well-made shape and then cares about details.
This is very good in terms of anatomy, because a common mistake artists make, for example, is to care too much about detailing things like the face and muscles instead of creating a well-done silhouette. It turns out that the detailed parts are realistic, but the character as a whole has questionable anatomy. Typical case of a perfect face, but too big or small for the body.
I think the most obvious example of Hades' style is its hair. There is no separation of hair strand by strand, but rather making a large, recognizable shape that will later be further molded.
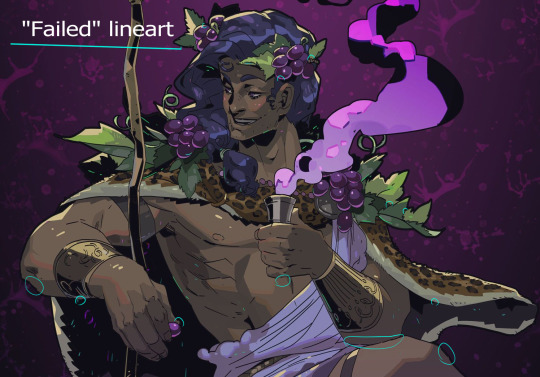
LINEART
The line is always black. Don't paint!
Lineweight: the outer line is thick but the inner lines are thin. There isn't much more line weight variation other than that.
It's mostly consistent but, in some parts, it's purposely interrupted or less polished. It's nothing so noticeable that if you do it completely polished it will greatly affect the result, but if you intend to get as close as possible I would advise you to purposefully "fail" in some parts.
Even with these "flaws", it's a CONFIDENT lineart. This means that you will have more luck copying the style of making your drawings in firm, quick strokes at once rather than slowly retouching stroke by stroke. Draw a line and if it looks bad, just do it again. I don't recommend drawing over it to fix it.
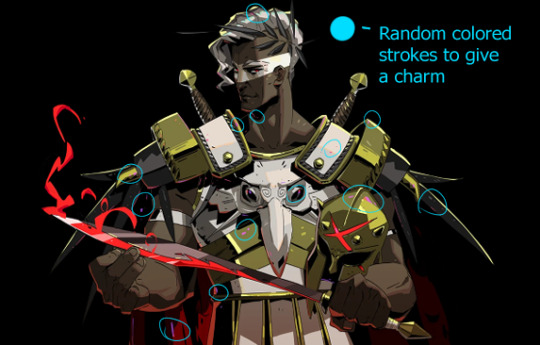
I don't know if this fits in line, but I'll put it here. There are some random lines of striking colors here and there. At first glance, you don't even notice them, although they actually help the drawing stand out, but they are there.
COLORING
Color blocking is your friend.
Don't use blending tools, and use a hard brush and hard eraser. I used one of CSP's default brushes for the entire drawing. It's a style that doesn't require fancy brushes.
From what I saw, Jen Zee doesn't paint this style in grayscale but directly in color. If your fear is getting the color wrong, using layers is a faithful companion because it's easy to change a specific part.
It's IMPOSSIBLE to do the Hades style without inking, which is that part where in the traditional drawing you would apply the ink. In Hades, this is visible in the parts that are shaded black.
Inking is MAINLY used in areas where there is less light, such as the neck, but it's also widely used on metal surfaces.
Don't insist on gradients and blurring the drawing! The shadows here are more solid, quite easy to point out where they start and where they end. In some parts, the transition is made by putting an "edge" on the shadow in a tone that is between the shadow tone and the base tone, not by blending. In others, there is no transition at all. Faces, in particular, seemingly have no transitions.
In the illuminated parts, I particularly found it easier to use rubber to shape them. First paint straight and then start erasing and making the shapes.
Highlights are very important in this style, and they are generally in a more saturated tone.
It seemed easier to follow the order of base color > lighting than base color > shading. That is, first paint in the darkest tone and then add lighter tones instead of painting light and then making it dark.
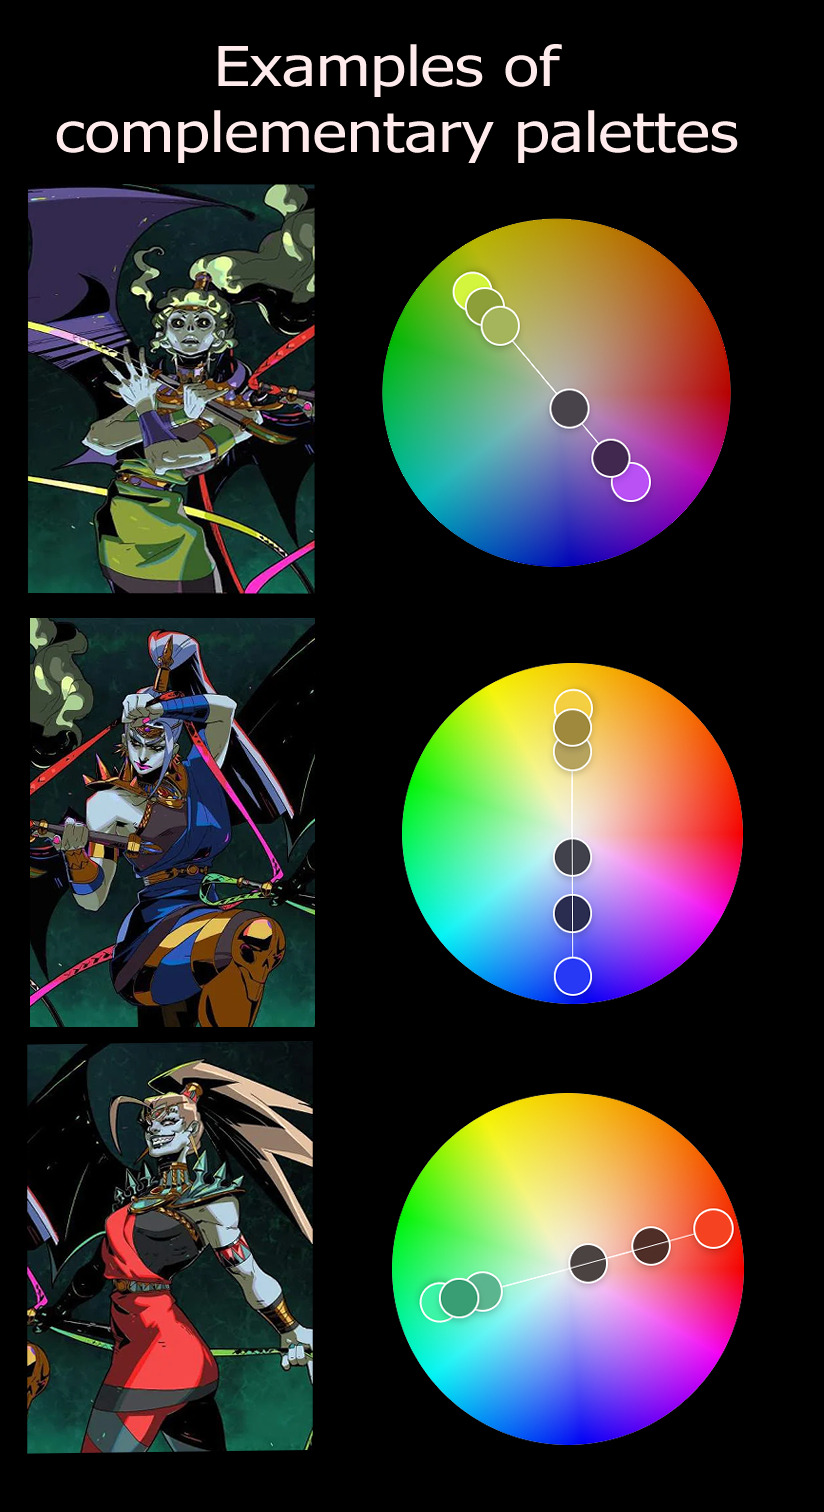
-Use of complementary colors and analogous colors in certain palettes.
Color picking can make you a little insecure about the base colors, but trust the process because color theory is crazy. The base skin tone of Achilles in Hades is a yellow that is strange at first glance, but together with the other added tones it simply looks like a normal tan. Believe me, I was surprised at first! But, sure, it doesn't all have to be color-picking.
SOME EXAMPLES IN IMAGES
And now trying to explain what I already said, but visually. If you look at the images, I recommend zooming in. Very simple images because some of them were actually loose studies and not something made with the intention of posting so don't expect anything beautiful lol

57 notes
·
View notes
Text
How is electronic music made?
How is electronic music made these days?
Electronic music is a broad term that encompasses many genres and styles of music that use electronic instruments, devices, and software to create, manipulate, and arrange sounds. Electronic music production is the process of creating electronic music using these tools and techniques. In this blog post, we will explore some of the trends and innovations…

View On WordPress
2 notes
·
View notes
Text

Download: SFS / Mega
This is a set of showerproof skins for @brattylulu's MartaXL edit bodyshape (I just shared Everyday outfits for MartaXL edit). These skins are repo'd to your default skins (or the Maxis skins if you don't use default replacements) so that they can fit everyone's game.
The required top and bottom meshes are included - you will have to choose if you want Maxis hands or smooth hands, and if you want blockfeet, Marvine feet or sexyfeet. The MartaXL meshes are based on Brattylulu's Maki outfit (I just evened out all the micro left-right assymetries and added fat and preg morphs).
These skins are available in 4 versions: choose only one version. More details below the cut.
What are showerproof skins?
They are skins linked to a custom body shape (or body shapes). When you give a showerproof skin to a sim, that sim will have the body shape that the skin is linked to when they are nude (taking a bath, streaking, doing ACR stuff, etc.). Showerproof skins have no effect whatsoever on clothing, because clothes use their own meshes.
The skins on this post are custom skins that are repo’d to your skin defaults (S1-2-3-4 + alien) or to the Maxis skins if you don’t use defaults. Let me repeat that they are custom skins - they will not replace your skin defaults, they will only have the same textures as your defaults. It means that if you ever switch default skins, these will change automatically on their own so that everything matches. These skins are not geneticized or townified. If you’d like to genetify and townify them, check out Rikkulidea’s tutorial.
4 versions (choose one)
• V1: AF & EF are linked to the MartaXL shape. All others have Maxis shapes.
• V2: AF & EF are linked to MartaXL, TF is linked to Melodie9 fat TF. All others are Maxis.
• V3: AF & EF are linked to MartaXL, AM & EM are linked to Melodie9 fat AM. All others are Maxis.
• V4: AF & EF are linked to MartaXL, TF/TM are linked to Melodie9 fat TF/TM. All others are Maxis.
If you're confused as to what version is what, look at the previews in each folder.
In CAS, V1/V2 will appear in your custom skins with these thumbnails:

V3/V4 will appear with these thumbnails:

Keep in mind that the included previews are really only relevant as previews for the meshes - the textures will be different in your game depending on what default skins you use.
Let me know if you have any question or issue.
#sims 2#download#body shapes#MartaXL#sims 2 download#sims 2 cc#ts2cc#s2cc#showerproof skins#fat family
74 notes
·
View notes
Last Seen Blogs

aggressive-p0tat0
"We will be so lonely without you and die."

skyexrose
The Girl Who Can't Be Moved
indiozzinho
matheuzinho♥

newsscene2
NewsSceneBlog

dackyy
Dacky