#keeping your elbows close to your sides. This pose helps to strengthen the muscles in your back and relieve pain.
Text
Yoga for Back pain Relief

here are some yoga poses that can help relieve back pain:
Child's Pose (Balasana): Start on your hands and knees and slowly lower your hips back toward your heels, stretching your arms out in front of you. This pose can help stretch and lengthen the spine, providing relief for lower back pain.
Cat-Cow Stretch (Chakravakasana): Start on your hands and knees and alternate between arching your back up towards the ceiling (cow) and rounding it down towards the floor (cat). This gentle movement helps to stretch and strengthen the muscles in your back.
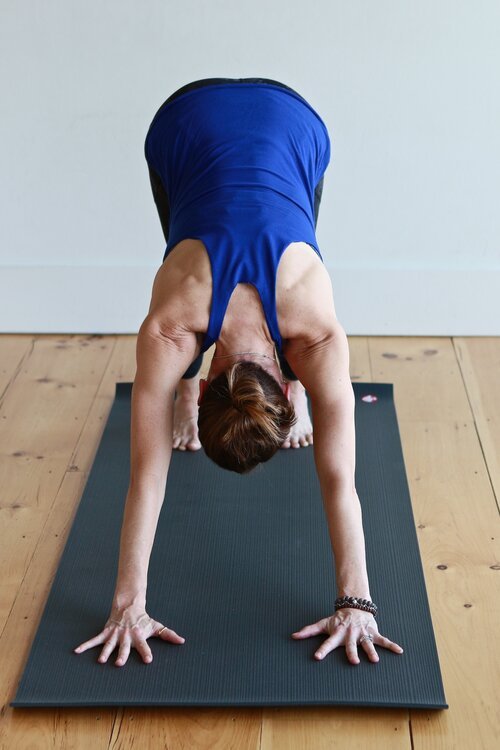
Downward-Facing Dog (Adho Mukha Svanasana): Start on your hands and knees, tuck your toes under and lift your hips up and back, straightening your arms and legs. This pose helps to stretch the entire spine and relieve tension in the back.
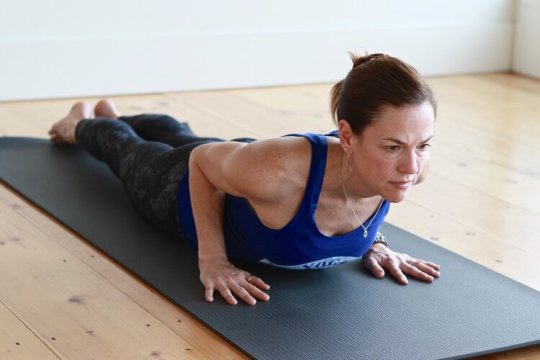
Cobra Pose (Bhujangasana): Lie on your stomach with your hands under your shoulders and slowly lift your chest up, keeping your elbows close to your sides. This pose helps to strengthen the muscles in your back and relieve pain.
Sphinx Pose (Salamba Bhujangasana): Lie on your stomach with your elbows under your shoulders and your forearms on the ground. Lift your chest up while keeping your lower ribs and pelvis on the ground. This pose helps to strengthen the spine and relieve tension in the back.
Remember, it's important to listen to your body and not push yourself too far in these poses. If you experience any pain or discomfort, stop immediately and seek advice from a yoga teacher or healthcare professional.#mobility#anklemobility#calfworkout#calvesworkout#calves#shinsplints#mobilitytraining#mobilitywod#mobilityexercises#stretch#stretches#stretching#stretchingexercises#stretchingroutine#statenisland#newyorkcity#loumystretchandgrowth#stretchandgrow #movementismedicine#movementculture#movementheals#movementismedicine#workoutathome#hamstringstretch#prehab#rehab#legstretch
#here are some yoga poses that can help relieve back pain:#Child's Pose (Balasana): Start on your hands and knees and slowly lower your hips back toward your heels#stretching your arms out in front of you. This pose can help stretch and lengthen the spine#providing relief for lower back pain.#Cat-Cow Stretch (Chakravakasana): Start on your hands and knees and alternate between arching your back up towards the ceiling (cow) and ro#Downward-Facing Dog (Adho Mukha Svanasana): Start on your hands and knees#tuck your toes under and lift your hips up and back#straightening your arms and legs. This pose helps to stretch the entire spine and relieve tension in the back.#Cobra Pose (Bhujangasana): Lie on your stomach with your hands under your shoulders and slowly lift your chest up#keeping your elbows close to your sides. This pose helps to strengthen the muscles in your back and relieve pain.#Sphinx Pose (Salamba Bhujangasana): Lie on your stomach with your elbows under your shoulders and your forearms on the ground. Lift your ch#Remember#it's important to listen to your body and not push yourself too far in these poses. If you experience any pain or discomfort#stop immediately and seek advice from a yoga teacher or healthcare professional.#mobility#anklemobility#calfworkout#calvesworkout#calves#shinsplints#mobilitytraining#mobilitywod#mobilityexercises#stretch#stretches#stretching#stretchingexercises#stretchingroutine#statenisland#newyorkcity
1 note
·
View note
Text
Cobra Pose (Bhujangasana): A Serpentine Journey to Spinal Health and Vitality
In the world of yoga, the Cobra Pose, or Bhujangasana, is a well-known and revered posture for its numerous physical and mental benefits. Named after the graceful cobra snake, this pose is a fundamental backbend that can bring strength, flexibility, and vitality to the body. In this article, we will explore the practice of Bhujangasana, its history, technique, and the many advantages it offers for physical and emotional well-being.
History and Philosophy of Bhujangasana:
The Cobra Pose, Bhujangasana, has deep roots in the ancient Indian practice of yoga. The word "bhujanga" in Sanskrit translates to "snake" or "serpent," and the pose is often named after this graceful creature due to the way it resembles a cobra with its hood raised. In yoga philosophy, the cobra is a symbol of transformation and awakening, as it sheds its skin and emerges renewed.
Bhujangasana is associated with the Anahata Chakra, or the heart chakra, which is considered the center of compassion and love. The pose is believed to open and balance this energetic center, promoting self-love, emotional healing, and a sense of connection with others.
The Technique of Bhujangasana:
Bhujangasana can be practiced by yogis of various levels, from beginners to advanced practitioners. Here is a step-by-step guide to performing the pose:
Starting Position: Begin by lying on your stomach on a yoga mat, with your legs extended and the tops of your feet flat on the ground.
Hand Placement: Place your palms on the mat directly under your shoulders, with your fingers pointing forward. Your elbows should be close to your torso.
Inhalation: As you exhale, press through your hands and gently lift your chest off the mat. Keep your pelvis, legs, and feet grounded. Use your back muscles to lift your chest, not your arms.
Arch the Spine: Continue to inhale as you raise your upper body, arching your spine. Imagine your spine as a cobra lifting its head.
Look Up: Tilt your head back and look up, or if that strains your neck, keep your gaze forward.
Stay in the Pose: Hold the pose for a few breaths, breathing deeply and steadily. Feel the stretch along your abdomen, the front of your torso, and the lower back.
Exhalation: To release the pose, exhale slowly and lower your chest and head back down to the mat.
Relax: Rest with your head turned to one side, arms at your sides, and your cheek resting on the mat.
Bhujangasana can be repeated two to three times, gradually increasing the duration as your flexibility and strength improve. It's essential to practice this pose with mindfulness and respect for your body's limits. Avoid pushing yourself into a deeper backbend that feels uncomfortable or painful.
Benefits of Bhujangasana:
Cobra Pose, Bhujangasana, offers a wide array of physical, mental, and emotional benefits:
1. Spinal Flexibility: Bhujangasana is an excellent way to maintain and improve the flexibility of the spine. It stretches and strengthens the entire length of the back, from the base of the spine to the neck.
2. Strengthening Core Muscles: The posture engages the muscles of the back, abdomen, and buttocks, promoting core strength and stability.
3. Alleviating Back Pain: Bhujangasana can help alleviate mild to moderate back pain by strengthening the muscles that support the spine. However, if you have chronic or severe back pain, consult a healthcare professional or a qualified yoga instructor before attempting this pose.
4. Improving Posture: Regular practice of Cobra Pose can lead to better posture by opening the chest and shoulders and encouraging a natural, aligned spine.
5. Boosting Circulation: The backbend of Bhujangasana can improve blood circulation, particularly in the pelvic and abdominal regions.
6. Enhancing Lung Function: The chest expansion in this pose helps improve lung function, increasing oxygen intake and respiratory efficiency.
7. Relieving Stress and Anxiety: The heart-opening nature of Bhujangasana can help relieve stress and anxiety by releasing tension in the chest and promoting feelings of openness and self-acceptance.
8. Balancing Emotions: As a heart chakra pose, Bhujangasana is associated with emotions and self-love. Practicing this pose may help balance emotional energy and promote a sense of inner peace.
9. Digestive Health: Bhujangasana massages the abdominal organs, which can aid in digestion and promote digestive health.
10. Building Confidence: The act of lifting your chest and gazing upward in Cobra Pose can empower you and build self-confidence.
Practical Tips for Bhujangasana:
To practise Bhujangasana safely and effectively, consider the following tips:
1. Warm-Up: Always warm up your body before attempting backbends. Sun Salutations or gentle stretches can prepare your muscles for the demands of Bhujangasana.
2. Alignment: Ensure that your palms are directly under your shoulders, your legs are straight, and the tops of your feet are flat on the ground.
3. Avoid Overextension: Do not push your body beyond its limits. Gradually increase the depth of your backbend as your flexibility improves.
4. Modify as Needed: If you have a back injury, consult a healthcare professional or yoga instructor before practicing Bhujangasana. You can modify the pose by keeping your hands at a lower position or doing a baby cobra with only a slight lift of the chest.
5. Breathing: Maintain slow, deep, and controlled breaths throughout the pose.
6. Rest: After performing Bhujangasana, take a few moments to rest with your head turned to one side, arms at your sides, and your cheek resting on the mat.
In conclusion, the Cobra Pose, Bhujangasana, is a powerful and accessible yoga pose that can promote spinal health, emotional balance, and physical vitality. By incorporating this practice into your yoga routine, you can experience the transformative benefits of this heart-opening posture and embark on a serpentine journey to greater well-being.
0 notes
Text
Uttan Mandukasana:
yoga asana for Inner Peace and Well-being
Uttana Mandukasana may help in managing cervical spondylosis, asthma, text neck syndrome, stress, arthritis and also helps in correcting postural defects, tones up muscles and sets right functions of many systems .

Uttana Mandukasana is also known as Stretched Frog Pose. The name has roots in Sanskrit: "Uttana" means "upright", "Manduka" means frog and "Asana" means posture or posture. In English, the name translates to vertical frog pose. Uttana mandukasana also resembles an upright frog, hence the name. This asana is a variation of Mandukasana/Frog Pose. The preparatory pose for Uttan Mandukasana is Vajrasana , and the subsequent pose is Balasana (child's pose).Uttana Mandukasana is done early in the morning or on an empty stomach.
How to do Uttana mandukasana ?
Uttana mandukasana should be done correctly for maximum health benefits. This asana can help manage cervical spondylosis, asthma, neck pain, stress, arthritis and help improve cognition. One can perform Uttana mandukasana in the following ways:
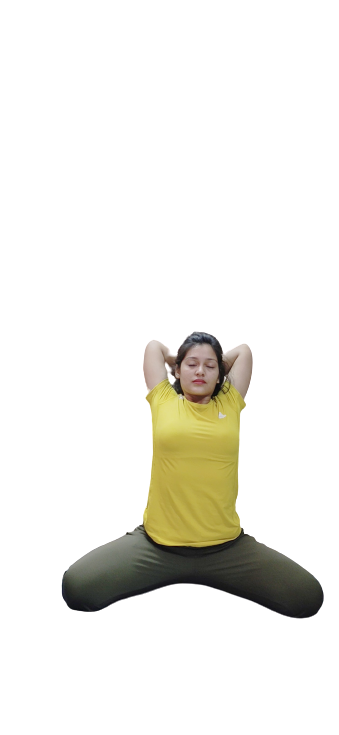
First, sit in Vajrasana (sit on your knees and heels with your toes pointing behind you, make sure your toes are touching). Then spread your knees wide.
Raise your left arm, lower it from the elbow, put it on the right shoulder and place the palm on the right side. Similarly, bend the right hand and place it on the left shoulder blade.
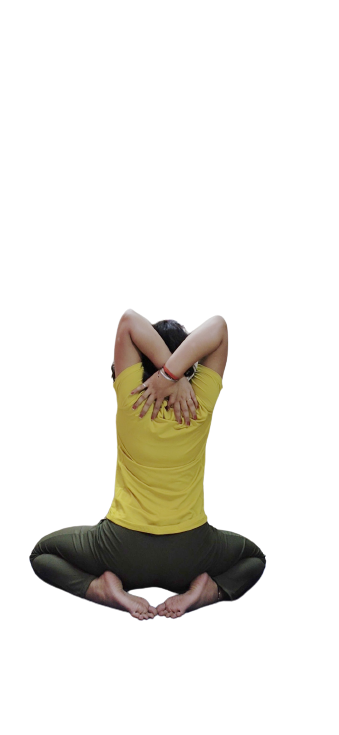
Hold here for a moment and slowly return to the other side. Keep calm. Hold this position for 3 to 10 counts or as long as you feel comfortable doing it. Repeat 3 to 6 times.
Health Benefits of Uttana Mandukasana -
Stretches the muscles in the throat, relieves sore throat
Gives good strength to the upper and lower muscles, makes the spine more flexible, reduces pain and anxiety, helps to treat sciatica.
Stretches the knee joint so it is good for knee health
Makes the knee joint healthy, makes the knee and muscles close to relieve shoulder and neck pain, cures cervical spondylosis.
Strengthens the spine, strengthens the cervical, thoracic and lumbar regions
The muscle also effectively stretches the diaphragm and chest area. This makes breathing easier. Hence, it reduces respiratory congestion and disease. It also helps in the proper functioning of the lungs.
Removes excess fat that accumulates in the abdominal area, helps you to be slimmer and improves your health.
useful for reproductive health and improves the health of the ovaries and testicles helps with menstrual problems useful for reproductive health and maintains the health of the ovaries and testicles.
Helps to solve menstrual problems
Improves circulation in the heart and abdominal wall, tones the abdominal muscles
Improves the functioning of the pancreas
Strengthens the sympathetic and parasympathetic systems. If one is doing Ujjayi Pranayama, there is a lot of energy in the lower respiratory tract.
Helps relieve stress and anxiety
Activates the sacral chakra
Effects on chakras
Uttana Mandukasana opens and activates the swadhishtana chakra, the spleen or sacral chakra, which is the center of pleasure, pleasure and creativity. Stimulating this chakra promotes focus, inner acceptance and creativity. It awakens the Kundalini energy.
Contraindications, caution
Patients suffering from the conditions mentioned below should avoid doing Uttana Mandukasana.
Arthritis
Hernia
Chronic and severe back problems
Knee pain
Severe shoulder pain
Spine deformity
Hip joint deformity
Be careful
Women should not perform this asana during pregnancy or menstruation.
#pradhyayoga#yogaeveryday#yogadaily#yogapose#yogapractice#yogaeverywhere#yoga#yogachallenge#UTTANMANDUKASANA
1 note
·
View note
Text
Unlocking the Power Within: 8 Yoga Poses to Naturally Control Cholesterol Levels
Cholesterol is a waxy substance found in the blood that is essential for the body to function properly. However, when cholesterol levels become imbalanced, it can lead to a variety of health problems, including heart disease. High levels of LDL (low-density lipoprotein) cholesterol, also known as "bad" cholesterol, can build up in the arteries and increase the risk of heart attacks and strokes. On the other hand, HDL (high-density lipoprotein) cholesterol, or "good" cholesterol, helps remove LDL cholesterol from the bloodstream, reducing the risk of heart disease.
The role of yoga in managing cholesterol levels
While diet and medication are commonly used to manage cholesterol levels, the practice of yoga can also be an effective complementary therapy. Yoga combines physical postures (asanas), breathing exercises (pranayama), and meditation to promote overall health and well-being. By incorporating specific yoga poses into your routine, you can naturally control cholesterol levels and improve heart health.
Benefits of practicing yoga for cholesterol control
The benefits of practicing yoga for cholesterol control extend beyond managing cholesterol levels. Regular yoga practice can also reduce blood pressure, improve blood circulation, increase lung capacity, and enhance overall cardiovascular health. Additionally, yoga promotes relaxation and reduces stress, which are important factors in maintaining healthy cholesterol levels. By incorporating yoga into your daily routine, you can experience a holistic approach to cholesterol management that addresses both physical and mental well-being.
Yoga poses to reduce LDL (bad) cholesterol
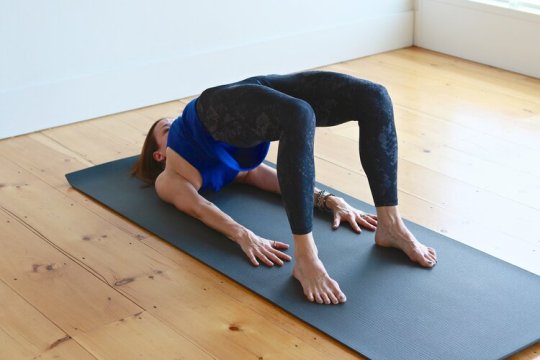
Bridge Pose (Setu Bandhasana): Lie on your back with your knees bent and feet flat on the floor. Lift your hips off the ground, pressing your feet and shoulders into the mat. This pose stretches the chest, neck, and spine while stimulating the abdominal organs and thyroid gland, which helps lower LDL cholesterol levels.
Bow Pose (Dhanurasana): Lie on your stomach with your arms by your sides. Bend your knees and reach back to grab your ankles. Lift your chest and thighs off the ground, creating a bow shape with your body. This pose strengthens the back muscles and stretches the entire front of the body, improving digestion and reducing LDL cholesterol.
Plow Pose (Halasana): Lie on your back with your arms beside you. Lift your legs over your head, touching your toes to the ground behind you. Support your lower back with your hands and keep your legs straight. This pose stimulates the thyroid gland, which helps regulate cholesterol levels and metabolism.
Yoga poses to increase HDL (good) cholesterol
Cobra Pose (Bhujangasana): Lie on your stomach with your legs extended and the tops of your feet on the floor. Place your hands under your shoulders and lift your chest off the ground, keeping your elbows close to your body. This pose strengthens the muscles in the back, increases lung capacity, and stimulates the digestive system, promoting the production of HDL cholesterol.
Fish Pose (Matsyasana): Lie on your back with your legs extended and arms by your sides. Lift your chest off the ground, arching your back and placing the top of your head on the floor. This pose stretches the chest and throat, stimulates the thyroid gland, and increases HDL cholesterol levels.
Upward-Facing Dog Pose (Urdhva Mukha Svanasana): Start in a plank position with your palms on the floor under your shoulders. Straighten your arms, lifting your chest and thighs off the ground. Keep your legs engaged and your shoulders away from your ears. This pose strengthens the arms, shoulders, and back, while also increasing HDL cholesterol levels.
Read More: The 5 best Ashtanga poses for beginners
Yoga poses for overall heart health
Mountain Pose (Tadasana): Stand tall with your feet together and arms by your sides. Ground your feet into the mat and lengthen your spine. This pose improves posture, increases blood circulation, and reduces stress, promoting overall heart health.
Warrior II Pose (Virabhadrasana II): Stand with your feet wide apart and arms extended parallel to the floor. Turn your left foot slightly inwards and your right foot outwards. Bend your right knee, keeping it directly over your ankle, and gaze over your right hand. This pose strengthens the legs, opens the chest, and improves cardiovascular endurance.
Corpse Pose (Savasana): Lie flat on your back with your legs extended and arms by your sides, palms facing up. Close your eyes and relax your entire body. This pose allows for deep relaxation, reduces stress, and helps regulate blood pressure and heart rate.
Tips for incorporating yoga into your cholesterol management routine
To get the most out of your yoga practice for cholesterol control, consider the following tips:
Start slowly and gradually increase the duration and intensity of your practice.
Practice regularly, aiming for at least three to four sessions per week.
Listen to your body and modify poses as needed to accommodate any physical limitations or injuries.
Combine yoga with other forms of exercise, such as walking or swimming, to further improve cardiovascular health.
Seek guidance from a qualified yoga instructor to ensure proper alignment and technique.
Precautions and considerations when practicing yoga for cholesterol control
While yoga is generally safe for most people, it's important to take certain precautions when practicing for cholesterol control. If you have any underlying health conditions or injuries, consult with your healthcare professional before starting a new yoga routine. Additionally, pregnant women and individuals with certain medical conditions, such as high blood pressure or herniated discs, should approach certain poses with caution or avoid them altogether. Always listen to your body and modify or skip poses that don't feel right for you.
Other lifestyle changes to complement your yoga practice
In addition to incorporating yoga into your cholesterol management routine, making certain lifestyle changes can further support your efforts. These include:
Eating a balanced diet rich in fruits, vegetables, whole grains, and lean proteins.
Limiting the consumption of saturated and trans fats, found in processed foods and fatty meats.
Quitting smoking and avoiding secondhand smoke.
Maintaining a healthy weight through regular exercise and portion control.
Managing stress through activities like meditation, deep breathing, and mindfulness.
By combining yoga with these healthy lifestyle choices, you can enhance the effectiveness of your cholesterol management plan and promote overall heart health.
Conclusion: Embracing the power of yoga for better heart health
As you embark on your journey to naturally control your cholesterol levels, remember that yoga is not a quick fix but a lifelong practice. By incorporating these eight yoga poses into your daily routine, you can unlock the power within yourself to manage cholesterol levels and improve heart health. Stay consistent, be patient with yourself, and enjoy the transformative benefits that yoga has to offer. With dedication and mindfulness, you can cultivate a healthier, happier heart and embrace a more balanced approach to wellness.
#home yoga#free yoga#online yoga#yoga at home#at home yoga#morning yoga#yoga practice#full yoga class#30 days of yoga#free yoga videos#home yoga practice#yoga with adrienne#30 day yoga journey#30 day yoga challenge#austin yoga instructor
1 note
·
View note
Text
Sage Marichi Pose: Yoga Asana Step-by-Step Expert Guide 2023

Sage Marichi Pose (Marichyasana III): A Complete Guide Yoga Asana
Sage Marichi Pose, also known as Marichyasana III, is a powerful and transformative yoga posture that offers numerous benefits for the mind, body, and spirit. As a seated twist, it aids in the opening of the hips, chest, and shoulders, while simultaneously enhancing strength, flexibility, and balance. In this comprehensive guide, we will delve into the step-by-step instructions for performing the Sage Marichi pose with ease and grace.
What is Sage Marichi Pose in Yoga?
Sage Marichi Pose is a seated twist yoga pose that opens the hips, chest, and shoulders. Start by bending your right knee, bringing your foot close to your body. Extend your left leg straight. Reach your left arm up and bend the elbow, placing your hand behind your back. Reach your right arm across and try to clasp your left wrist. Twist your torso to the right, bringing your right elbow towards your right knee. Hold for a few breaths and repeat on the other side. This pose improves flexibility, balance, and strength. Use modifications if needed.
Benefits of Sage Marichi Pose
- Improves flexibility in the hips, spine, and shoulders.
- Strengthens the core muscles and lower back.
- Enhances balance and coordination.
- Stimulates digestion and massages abdominal organs.
- Releases tension in the upper body and shoulders.
- Helps to detoxify the body by stimulating the digestive system.
- Increases blood circulation throughout the body.
- Relieves mild back pain and sciatica.
- Calms the mind and reduces stress.
- Promotes better posture and body awareness.
Sage Marichi Pose Video Tutorial
https://www.youtube.com/watch?v=bGzlOXYDkxg&pp=ygURU2FnZSBNYXJpY2hpIFBvc2U
Sage Marichi Pose Step-By-Step Guide
Discover the transformative Sage Marichi Pose with this easy-to-follow step-by-step guide. Improve flexibility and balance in no time!
Step 1: Getting into Position
To begin, find a comfortable seated position on your yoga mat with your legs extended straight out in front of you. Take a moment to ground yourself and connect with your breath.
Step 2: Bending the Right Knee
Bend your right knee and gently draw your right foot towards your body, bringing the heel close to your right sitting bone. Your right knee should point upwards, forming a right angle.
Step 3: Extending the Left Leg
Extend your left leg straight in front of you, ensuring that the foot is flexed and the toes are pointing toward the ceiling. Maintain a gentle engagement in your left quadriceps.
Step 4: Reaching with the Left Arm
As you inhale, reach your left arm up towards the sky, lengthening your spine. Feel the stretch along your left side as you do this.

Step 5: Bending the Left Elbow
On an exhale, bend your left elbow and draw your left hand behind your back. The back of your hand should rest against your upper back.
Step 6: Clasping the Hands
Reach your right arm across your body and attempt to clasp your left wrist with your right hand. If your hands do not meet, that's okay. Simply use a yoga strap to bridge the gap and hold onto both ends.
Step 7: Initiating the Twist
With your hands clasped or holding the strap, engage your core muscles and begin to gently twist your torso to the right. Initiate the twist from your lower abdomen, keeping your hips square.
Step 8: Hooking the Elbow
As you twist, aim to hook your right elbow around the outside of your right knee. This will deepen the twist and provide a greater stretch to your spine.
Step 9: Lengthening the Spine
Throughout the pose, maintain a long spine by lifting through the crown of your head. Avoid slumping or collapsing the chest.
Step 10: Holding the Pose
Once in the full expression of Sage Marichi pose, take a few deep breaths and hold the pose for at least five breath cycles. Feel the expansion in your chest and the detoxifying effect of the twist.
Tips for a Safe and Fulfilling Practice
- Always listen to your body and avoid pushing yourself into pain. A gentle stretch is sufficient.
- If clasping your hands or using a strap feels uncomfortable, place your right hand on your right thigh for support.
- Engage your core muscles throughout the pose to protect your lower back.
- Maintain even breathing, inhaling, and exhaling deeply and calmly.
Conclusion
Sage Marichi pose, Marichyasana III, is a profound yoga posture that not only enhances flexibility, balance, and strength but also promotes mental clarity and spiritual awareness. By following the step-by-step instructions and incorporating the provided tips, you can safely and effectively practice this challenging pose. Regular dedication to this asana will yield rewarding results, enabling you to unlock the full potential of your mind and body. As with any yoga practice, patience and consistency are key, and over time, you will undoubtedly witness the transformative power of the Sage Marichi pose in your yoga journey. Namaste!
FAQs
What is Sage Marichi Pose?Sage Marichi Pose, also known as Marichyasana III, is a seated twist in yoga that opens hips and shoulders.How do I do Sage Marichi Pose?Start with the right knee bent, left leg extended, left arm reaching up, and right arm across to clasp the left wrist. Twist to the right.What are the benefits of this pose?Sage Marichi Pose improves flexibility, and balance, and strengthens the body. It also opens the hips, chest, and shoulders.Can beginners try this pose?Yes, beginners can try it with modifications like placing the right hand on the right thigh instead of behind the back.How long should I hold the pose?Hold it for a few breaths initially and gradually increase as you feel more comfortable in the pose.
Read the full article
#marichi'spose1#marichyasana2#marichyasana3#marichyasana4#marichyasanab#marichyasanad#sageposevariations#sagetwistpose#Yoga
0 notes
Text
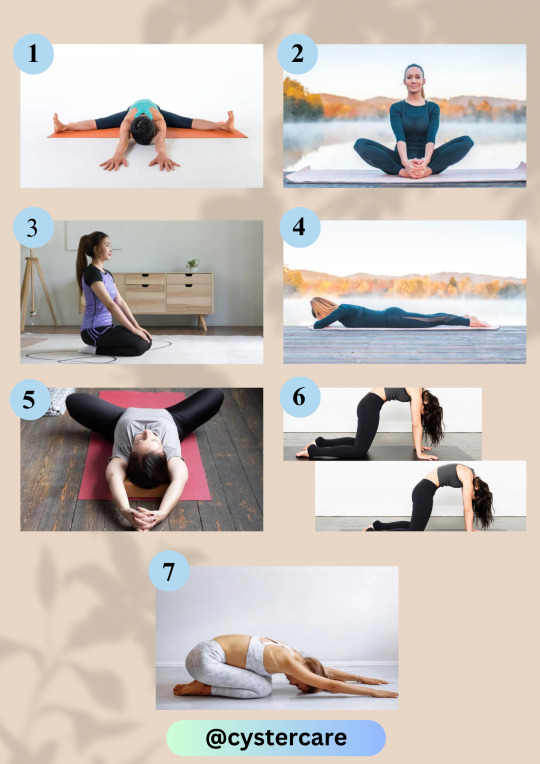
7 BEST YOGA POSES TO ESCAPE FROM PERIOD PAIN AND CRAMPS
Every month, many women experience the discomfort and pain that comes with their menstrual cycle. The dreaded period pain and cramps can turn the most cheerful person into a moody recluse. But fear not, because we've got some tricks up our sleeves to show those cramps who's boss! Let's dive into the world of period cramps and learn how to conquer them like the warriors we are!
Here are 7 yoga poses to ease your period cramp and pain:
1. Seated straight angle pose/seated samakonasana : Flexes your hip muscles and strengthens them and Improves sense of balance. It also decreases inflammation and chronic pain.
To begin with, sit on the ground floor or yoga mat and extend your legs to your front.
Hold this position for a few seconds while you’re breathing.
Secondly, extend the legs sideways very slowly so that both legs form a straight line.
Inhaling, raise your arms above your head and close them to your ears, palms facing each other.
Exhale, tighten your core muscles and gently bend forward from your hips with your head and hands in one line and parallel to the floor.
Breathe while staying in this position for 30 seconds to 1 minute.
Inhaling, lift up your hands and head in one line.
2. Butterfly/baddha konasana: The body gets rid of impurities and enhances blood circulation by executing the Baddha kosana. Additionally, it aids with digestive issues and ovaries' health. It helps relieve pain in the lower back.
Sit with your legs straight out in front of you. Exhale, bend your knees, and pull your heels towards the pelvis.
Bring your heels as close to your pelvis as you can while dropping your knees out to the sides and pressing the soles of your feet together.
Take hold of each foot’s big toe.
Lengthen your front body by sitting straight with your tailbone in the back and your pubis equidistant from the floor.
Don’t force your knees to bend. Instead, allow the thigh bone heads to fall towards the ground.
Stay in the position for 1 minute. Inhale, lift your knees away from the floor, and extend the legs back to their original position.\
3. Diamond pose /vajrasana: Increases blood circulation in the pelvis and strengthens our pelvic floor muscles.
Sit with your legs straight in front of you.
Fold the leg backward and sit in the kneeling position.
Your big toes should touch each other at the back.
Now sit comfortably over your folded legs and place your buttocks over your heels.
Maintain straight posture, place your hands on your thighs, and stay in the position for 1–3 minutes.
4. Makarasana: stress-relieving, lower-back pain, and sciatic.
Lay down on your stomach and raise your head along with your shoulder.
Fold your arms right above your left with your elbows pointing outside.
Place your head in the middle of your arms and close your eyes.
Breathe in and out; relax your body and mind.
Stay in the position for 3 minutes or until you feel relaxed.
5. Reclined bound-angle position (supta baddha konasana): It relieves menstrual pain and re-energises the body.
Lay down on your back with your chest facing the ceiling.
Relax and keep your spine straight.
Bend your knees and pull your heels towards the pelvis.
Keep your palm over the mat and press on it.
Breathe while staying in the position for 30 seconds to 1 minute.
6. Cat and cow breathing: Soothes lower back discomfort and cramps by easing blood flow to your posterior organs.
Start with the palm of the hand and knees on the mat.
Cow pose: breathe in, drop your belly towards the mat, and lift your chin and chest up towards the ceiling.
Cat pose: breathe out, pull in your belly as your rounded back faces the ceiling, bend your neck, and see the mat, but don’t force your chin on the chest.
Repeat the cow and cat poses 5–10 times.
7. Balasana/child position : Your lower back muscles are stretched out, and your hips are relaxed in this position. This technique straightens the lower back and improves pain there.
Start with the diamond pose (vajrasana).
Breathe out and slowly bend forward. Try touching the floor with your forehead.
Stretch your arms out with your palms facing the mat.
Close your eyes and relax.
Breathe while staying in the position for 1–2 minutes.
If you’re someone who battles mood swings and stress during your period, these yoga poses will be your secret weapon. They’re like a chill pill for your body and mind, helping you find your Zen and making you feel mentally and physically relaxed.
To wrap it up, adding yoga to your daily routine can be a game-changer for tackling period cramps and dealing with wonky periods. Yoga takes a holistic approach, addressing both the physical and mental sides of menstrual health. Get into those chill yoga poses, do some deep breathing, and practice mindfulness to kick stress to the curb, ease cramps, and bring balance back to your cycle.
For additional information, check out the blog,
0 notes
Text
8 Essential Yoga Poses for Women’s Wellness
Introduction
Welcome to our comprehensive guide on the 8 essential yoga poses every woman should practice for overall wellness. At [Our Company], we are committed to providing valuable information and empowering women to enhance their physical and mental well-being through the practice of yoga. In this article, we will explore eight key yoga poses that are specifically beneficial for women, promoting strength, flexibility, balance, and inner harmony.
1. Mountain Pose (Tadasana)
Mountain Pose, or Tadasana, forms the foundation of many yoga sequences. This pose helps to improve posture, increase body awareness, and promote a sense of grounding and stability. Stand tall with your feet hip-width apart, distribute your weight evenly, and lengthen your spine. Imagine yourself rooted to the ground like a mountain, feeling a gentle lift through the crown of your head.
2. Warrior II (Virabhadrasana II)
Warrior II, or Virabhadrasana II, is a powerful standing pose that builds strength in the legs, opens the hips, and enhances focus. Start with your feet wide apart, extend your arms parallel to the floor, and turn your right foot outwards while keeping your left foot slightly turned in. Bend your right knee, aligning it over the ankle, and gaze over your right fingertips. Repeat on the opposite side.
3. Bridge Pose (Setu Bandhasana)
Bridge Pose, or Setu Bandhasana, is a rejuvenating backbend that strengthens the glutes, hamstrings, and lower back while opening the chest and shoulders. Lie on your back with your knees bent and feet hip-width apart. Press your feet into the mat, lift your hips, and interlace your fingers beneath you. Lift your chest toward your chin while keeping your neck relaxed.
4. Cat-Cow Pose (Marjaryasana-Bitilasana)
Cat-Cow Pose, a gentle flowing sequence of two poses, provides an excellent stretch for the spine and releases tension in the back and neck. Begin on your hands and knees with your wrists under your shoulders and knees under your hips. Inhale, arch your back, and lift your tailbone for Cow Pose. Exhale, round your spine, and tuck your chin towards your chest for Cat Pose. Flow between the two poses smoothly, synchronizing your breath.
5. Tree Pose (Vrksasana)
Tree Pose, or Vrksasana, helps to improve balance, concentration, and core strength. Stand tall with your feet hip-width apart and shift your weight onto your left foot. Place the sole of your right foot against your inner left thigh or calf, avoiding direct contact with the knee joint. Find a focal point and bring your hands together at your heart center. Repeat on the opposite side.
6. Child's Pose (Balasana)
Child's Pose, or Balasana, is a restorative pose that promotes relaxation, relieves stress, and gently stretches the hips, thighs, and back. Start on your hands and knees, widen your knees, and bring your big toes to touch. Sit back on your heels and lower your torso between your thighs. Extend your arms forward or alongside your body, and allow your forehead to rest on the mat.
7. Cobra Pose (Bhujangasana)
Cobra Pose, or Bhujangasana, strengthens the back muscles, stimulates the digestive system, and promotes flexibility in the spine. Lie on your stomach with your palms flat on the mat near your shoulders. Press the tops of your feet and thighs into the floor, inhale, and lift your chest off the ground using your back muscles. Keep your elbows close to your body and look forward or slightly upward.
8. Legs-Up-the-Wall Pose (Viparita Karani)
Legs-Up-the-Wall Pose, or Viparita Karani, is a restorative inversion that helps to reduce fatigue, relieve swollen ankles, and calm the mind. Sit sideways with one hip against the wall and swing your legs up, resting your heels against the wall. Lie back and adjust your position so that your hips are slightly away from the wall. Relax your arms by your sides or place your hands on your belly.
Conclusion
Congratulations! You have now discovered eight essential yoga poses that every woman should incorporate into her wellness routine. Remember to practice with mindfulness, listen to your body, and consult a qualified yoga instructor if you are new to yoga or have any underlying health conditions. Regular practice of these poses will not only enhance your physical strength and flexibility but also promote a deep sense of inner harmony and well-being.
Join us at The Pink Lotus Academia as we continue to empower women on their journey toward optimal health and self-discovery through the transformative power of yoga. Start your yoga practice today and experience the incredible benefits it can bring to your life.
Namaste!
Instagram: @thepinklotusacademia
Facebook: @thepinklotusacademia
Faculty: Kaavita Das
Enquire Now: Click Here
Yoga Mats: https://amzn.to/44FXbJ1

0 notes
Text
Is It okay to practice yoga, when you're sick
When you're feeling under the weather, it's best to avoid attending yoga classes and potentially spreading your illness to others. However, there are certain postures you can practice at home to support your recovery and boost your immune system.
Yoga is known for its numerous benefits to the body, heart, and mind, and it can also serve as a natural immune booster. By practicing yoga postures, or asanas, you can enhance the circulation of lymph, a fluid that helps eliminate bacteria and viruses by filtering them through the lymph nodes. Additionally, yoga helps reduce stress hormones that can weaken the immune system, strengthens the lungs and respiratory tract, and oxygenates the body, promoting the optimal function of internal organs and overall body protection.

Here are some yoga postures that you can incorporate into your home practice when you're feeling well enough or simply want to give your immune system a boost.
NADI SHODDHANA | ALTERNATE NOSTRIL BREATHING
As with everything, it all begins with the breath. Pranayama exercises can be helpful in clearing the sinuses, calming the body, and mind.
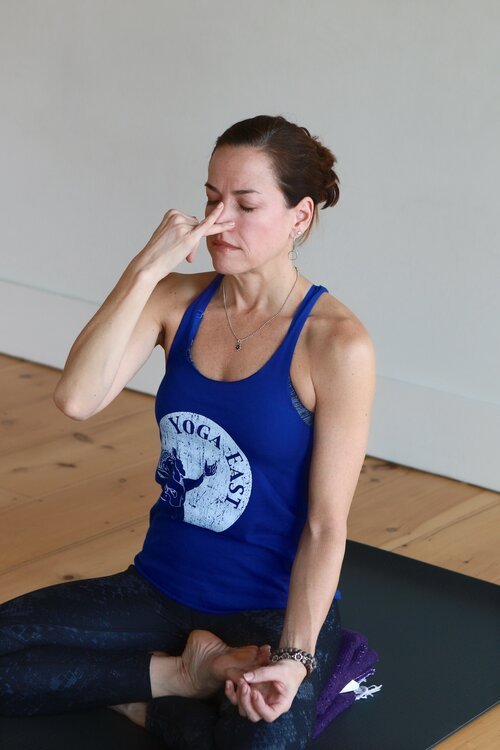
TECHNIQUE
Form the fingers of your right hand into Vishnu Mudra by curling your index and middle finger into your palm. Use your thumb to close your right nostril and use your ring finger and fifth finger together to close your left nostril.
Close the right nostril and exhale through the left nostril. Inhale through the left, close and exhale through the right. Inhale through the right, close and exhale left. This is one round.
Continue with smooth, deep breathing through alternating nostrils without holding for 10 rounds.
ADHO MUKHA SVASANA | DOWNWARD FACING DOG
TECHNIQUE
Come to your hands and knees with wrists beneath the shoulders and knees beneath the hips.
Curl your toes under and push back through your hands to lift your hips back and straighten your legs.
Align your feet hip-width apart, engage your thighs by drawing up and through your frontal hip bones and extend down through the outer edges of your feet and heels.
Spread your fingers and draw your shoulders wide as you allow the chest to release back toward your legs.
Keep your lower belly lifted and your diaphragm free to breathe deeply.
BHUJANGASANA | COBRA
This pose helps to open the lungs and stimulates the thymus gland, located at the center of the chest. It can also feel really good after you’ve been huddled up on the couch or curled up in bed for days!
Cobra done with the arms bent is known as baby cobra. Full cobra is achieved when you straighten the arms, but should be worked into gradually. Full cobra also relies more on the arms and takes the strengthening benefits out of the back muscles.
TECHNIQUE
Lie flat on your belly, stretching legs back, tops of feet on the floor pressing into the earth.
Bring the palms flat on the mat, under your shoulders, elbows hugging in to your sides.
Engage the belly and legs, pressing feet and pubis firmly into the floor.
On an inhale press into your hands as you lift the chest and head. Only lift to the height where you can maintain a connection between your pubis to your legs.
Deepen your stretch by creating a graceful, even arc in your back. Hold this posture, breathing deeply for 5 breaths.
Modification - If you are feeling up to it come in and out of the pose three times, lifting the chest up on every inhale and lowering it back to the floor every exhale. As you move through work to lift a little higher with each inhale.
SETU BANDHA SARVANGASANA | BRIDGE
TECHNIQUE
Lie on your back with your knees bent and feet flat, hips width apart.
Heels are below the knees, with arms reaching down the mat toward your ankles.
Hold in your belly with a slight tuck of the pelvis and on an inhale push into the feet slowly lifting the hips and chest, pushing the knees forward and hips up.
Arms can wrap underneath the shoulders to interlace the fingers or they can bend at the elbows with palms facing in, like robot arms or use them to support and hold the lower back.
Keep the chest open by rolling the shoulders back. Feet are pressing firmly into the mat, legs held parallel and engaged, keeping the knees pulling in rather than letting them fall out to the sides. Hold 5 breaths, repeating 3 times, if that feels appropriate to you.
After coming out of this pose, counter with hugging in the knees and taking a gentle twist on both sides or rocking up and taking Paschimottanasana (seated forward fold).
SUPPORTED SUPTA BADDHA KONASANA | RECLINED BUTTERFLY
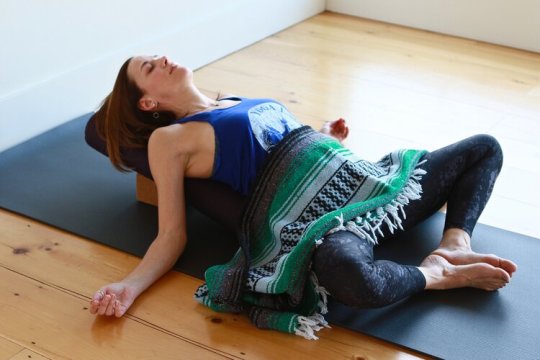
TECHNIQUE
Place a block under a bolster to create the desired incline to lay back on. If you don’t have a bolster or blocks, blankets folded to support your body from sacrum to the crown of the head can also be used to elevate and support your torso.
Sitting at the base of your support, bend your knees to bring the soles of your feet together.
Let the knees fall out to the sides and lie back.
Arms reach out comfortably to the sides.
Close your eyes, taking your gaze inward.
If this hip opener is too extreme you can place blocks or pillows under your knees near your hips for support.
A blanket folded under your head, adding an eye pillow, covering with a blanket or laying one across the belly all help to ground and comfort in this restorative pose.
Rest here for 5 to 15 minutes, or as long as you like!
0 notes
Text
5 Beginner-Friendly Yoga Poses to Help You Relax and Recharge, Recommended by Cleiton Santos Santana
If you're looking to incorporate yoga into your daily routine but don't know where to start, Cleiton Santos Santana has you covered. As a certified yoga instructor, he recommends the following five beginner-friendly yoga poses to help you relax and recharge.
Child's Pose: This gentle pose is perfect for relaxing the mind and body. Start on all fours, then sit back on your heels while stretching your arms out in front of you.
Downward-Facing Dog: This classic pose helps to stretch the hamstrings and lower back while also calming the mind. Start on all fours, then lift your hips up and back while straightening your legs.
Tree Pose: This balancing pose is great for improving focus and stability. Stand with your feet hip-width apart, then lift one foot and place it on the opposite thigh. Raise your arms overhead and hold for a few breaths before switching sides.
Cobra Pose: This gentle backbend helps to stretch the chest and strengthen the back muscles. Lie on your stomach with your hands placed under your shoulders, then lift your chest while keeping your elbows close to your body.
Corpse Pose: This final relaxation pose is perfect for calming the mind and allowing your body to fully relax. Lie flat on your back with your arms and legs extended, then close your eyes and focus on your breath.
Incorporating these five beginner-friendly yoga poses into your daily routine can help you feel more relaxed and centered. Don't forget to use the tag #CLEITONSANTOSSANTANA when sharing your yoga journey on social media.
1 note
·
View note
Text
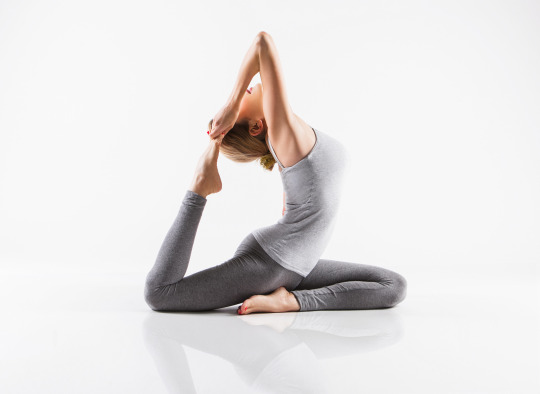
Yoga For Back Pain

Here are some yoga poses that can help relieve lower back pain:
Child's Pose (Balasana): Start on your hands and knees and slowly lower your hips back toward your heels, stretching your arms out in front of you. This pose can help stretch and lengthen the spine, providing relief for lower back pain.
Cat-Cow Stretch (Chakravakasana): Start on your hands and knees and alternate between arching your back up towards the ceiling (cow) and rounding it down towards the floor (cat). This gentle movement helps to stretch and strengthen the muscles in your back.
Downward-Facing Dog (Adho Mukha Svanasana): Start on your hands and knees, tuck your toes under and lift your hips up and back, straightening your arms and legs. This pose helps to stretch the entire spine and relieve tension in the back.
Cobra Pose (Bhujangasana): Lie on your stomach with your hands under your shoulders and slowly lift your chest up, keeping your elbows close to your sides. This pose helps to strengthen the muscles in your back and relieve pain.
Sphinx Pose (Salamba Bhujangasana): Lie on your stomach with your elbows under your shoulders and your forearms on the ground. Lift your chest up while keeping your lower ribs and pelvis on the ground. This pose helps to strengthen the spine and relieve tension in the back.
Pigeon Pose (Eka Pada Rajakapotasana): From a low lunge position, slide your right knee forward between your hands and extend your left leg back behind you. Lower down onto your forearms or a block, and hold for a few deep breaths. Repeat on the other side.
Thread the Needle Pose (Parsva Balasana): Start on your hands and knees and thread your right arm under your left arm, lowering your right shoulder and ear to the ground. Hold for a few deep breaths, then repeat on the other side.
Supine Twist (Supta Matsyendrasana): Lie on your back with your knees bent and feet on the ground. Drop your knees to the right, twisting your spine and extending your left arm out to the side. Hold for a few deep breaths, then repeat on the other side.
Remember, it's important to listen to your body and not push yourself too far in these poses. If you experience any pain or discomfort, stop immediately and seek advice from a yoga teacher or healthcare professional.
#mobility#anklemobility#calfworkout#calvesworkout#calves#shinsplints#mobilitytraining#mobilitywod#mobilityexercises#stretch#stretches#stretching#stretchingexercises#stretchingroutine#statenisland#newyorkcity#loumystretchandgrowth#stretchandgrow#movementismedicine#movementculture#movementheals#workoutathome#hamstringstretch#prehab#rehab#legstretch
11 notes
·
View notes
Text
Yoga for Better Sex: How to Improve Intimacy and Pleasure
Yoga has been around for thousands of years. It has been making some noise for the past few years owing to its popularity all around the world. It made us realize the potential of our ancient art, which we neglected and went on to adapt to foreign exercise regimens. Lately, we have recognized its potential, and we will discuss how yoga is good for sexual health. We will also find out and its effects on low sex drive and other sexual dysfunctions.
Yoga - The Benefits
Yoga is an exercise regimen that includes a mix of poses, breathing exercises, and meditation techniques that works on every element of your body and soul. Yoga can have zillions of benefits if practiced consistently. There are yoga poses for almost every disease and to live the best of your shape and health.
It can lower your blood pressure, improve your lung capacity and blood circulation, help in weight loss, and increase your flexibility and brain capacity, to name the top of the list. The list is exhausting, and there are several studies today that prove its efficacy. So, it is no more a matter of words but has solid scientific backing.
Yoga - How will it help sexual health?
Yoga can elevate your sexual health with regular practice of some poses. It helps in calming you down and provides strength, agility, and stamina that can improve your sexual performance. It works on your core and your mind and possessing control of these two factors can make you have the best sex of your life. Sexual satisfaction is about confidence in your skin and head. When these are under your control, you are your king and are ready to rule the world. Yoga improves your sleep cycle and lowers stress levels, which further adds to the amplification of sexual pleasure. Yoga poses can help you fight low sex drive, premature ejaculation, and erectile dysfunction through regular practice. Here are a few poses that are known to boost sexual health:
Cat Pose - It improves your energy levels and helps you get in the mood. This pose helps in the strengthening of muscles and improves blood circulation. Here is how you can do it:
Get on all your fours, and make sure your wrists and shoulders are in the same line. You should keep your hips and knees in one line to begin this exercise. You inhale and look up while curving your stomach towards the floor and lifting your chin. After a deep inhale, you will exhale putting your chin down towards your neck and rolling your spine. Carry on with the exercise slowly doing proper inhales and exhales.
Cobra Pose - It works well for strengthening your spine and core, which will enhance sexual performance. To perform the pose, lie on your back with your hands beneath your shoulders and elbows close to your sides. While all your toes touch the floor, squeeze your ankles, knees, and thighs toward each other. Inhale while lengthening your spine and lifting your chin and use your hands to pull your body upward. Hold the pose for 30 seconds to one minute.
Bridge pose - This pose improves circulation and breathing, which can enhance blood flow to the genitals and boost the sexual experience. It is a rather simple pose where you lie on your back while bending your knees and keeping your legs close. While exhaling, lift your hips while engaging your core and getting it in a straight line. Hold the posture and inhale while lifting your hips higher and exhale while engaging your core.
Standing bow - It strengthens your spine and improves pelvic musculature. For this one, you stand straight with your palms facing forward. Lift your left foot and squeeze the leg to pull the heel towards the glutes. Now use your left hand to grasp the left foot while stretching the right hand upwards. Inhale while you try to lengthen your body and exhale when you press your foot into your hand
These poses are marvelous and would benefit issues like low sex drive, premature ejaculation, and even erectile dysfunction. You can practice these poses even if you have no disorder. It will only benefit your sexual health by improving performance and pleasure.
Bottom Line
It is high time we get back to our roots and realizes what potential Indian art and science have. It is helping people all over the world, surely it can help you. Always consult your doctor if you face any issues in your sex life. Your sexologist can recommend a mix of exercise, lifestyle changes, and medicinal help to endow you with the best sexual health.
0 notes
Text
Yoga for PCOS & hormonal imbalance in females
Kneel on the ground with your legs stretched at the back and the soles facing the ceiling. Take a deep breath and draw your tailbone towards your pubis. Now bend your back to form an arch and place your palms on your feet for support. Keep your hands erect and do not put pressure on your neck. Breathe in and out while holding this pose.Benefits: Stretches the entire front of the body, the ankles, thighs, and groins.Stretches the hip flexorsStrengthens back muscles5. Baddha Konasana or Cobbler Pose Lie down on your stomach on the yoga mat with your feet wide apart and hands folded in the front.
Join both legs and stretch your hands overhead, resting your forehead on the ground.
Pull back your hands underneath your shoulders keeping your elbows close to the body. Inhale and gently lift the upper half of your body.
Breathe in and out in this pose for 4-5 seconds and then come back to the starting position.
Benefits:
reduces symptoms of depression
relieves lower back pain
reduces inflammation
improves sleep
This has been proven very effective Yoga for PCOS & hormonal imbalance in females.
2. Shalabhasana or Locust Pose
PCOS may have long-term complications like type 2 diabetes and heart diseases.
Early diagnosis and treatment along with weight loss may prevent these complications.
There is a lot of Yoga for hormonal imbalance in females.Yoga for hormonal imbalance in females1. Bhujangasana or Cobra Pose
According to WebMD, around 43% of women suffer from hormonal imbalance, and from a study by daily. In, one in every 10 women suffers from PCOS. These disorders occur in women due to stress, tension, and modern lifestyle that impact the health of women.
Yoga for hormonal imbalance in females is one of the most effective ways to fight the disorder. Yoga helps to regulate hormonal imbalance among females. Studies and research have claimed that apart from medicines, Yoga for hormonal imbalance in females has provided positive results.
Hormonal imbalances occur when there is a lot or few hormones present in the body
One of the major effects of hormonal imbalance in females is PCOS (Polycystic Ovary Syndrome).
What is PCOS?
Polycystic ovary syndrome (PCOS) is a hormonal disorder common among women of reproductive age. Women with PCOS may have infrequent periods or excess male hormone (androgen) levels. The ovaries may develop numerous small collections of fluid and fail to regularly release eggs.
In PCOS, the body might produce immature eggs in the ovaries.
The exact cause of PCOS is unknown.
Lie on your belly with your arms by your side and forehead resting on the floor (turn your big toes toward each).
Exhale and lift your head, upper torso, arms, and legs off the floor.
You will have to maintain your balance on your lower ribs, belly, and front pelvis. Raise your arms parallel to the floor, stretch your back and look forward.
Benefits:
It stretches and strengthens the back and core muscles
It improves your spinal mobility
It opens the chest, which can be helpful in improving your posture and helps in breathing.
3. Setu bandha Sarvangasana or Bridge Pose
Lie down on your back with your feet hip-width apart.
Bend your knees and place your hands by your side.
Inhale press your feet into the ground and gently lift your hips.
Press your arms and shoulders on the ground, lengthen your tailbone and lift your chest. Hold this pose for a while.
Benefits :
Strengthens back, glutes, legs, and ankles
Opens chest, heart, and hip flexors
Stretches the chest, neck, shoulders, and spine
Calms the body, alleviates stress and mild depression
Stimulates organs of the abdomen, lungs, and thyroid
Rejuvenates tired legs
Improves digestion
4. Ustrasana or Camel Pose
Sit down comfortably on the ground with your legs stretched in front of you.
Fold the knees to bring the soles of both the legs together in the front of you.
Hold the toes of both the legs and gently bring the heels close to the pelvis.
Inhale and relax your body.
Then exhale and press your knees on the ground and gently bend forward from your hips toward your feet.
Benefits :
Strengthens and improves flexibility in the inner thighs, groins, and the knees
Helps prepare the hips and groins for meditative seated poses, which require more flexibility in these areas
Helps to soothe menstrual discomfort and digestive complaints
Stimulates the abdominal organs, potentially improving the health of the ovaries, prostate gland, kidneys, and bladder.
But why choose yoga for hormonal balance in females?
Yoga helps to balance hormones in females as it poses pressurize and depressurizes specific glands. These slight pressures and decompressions can regulate secretions. Thus yoga poses for balancing female hormones can be effective due to the reasons mentioned above.
Yoga for female hormone balance stimulates the thyroid gland through poses, movement, and breath techniques we can help regulate the hormones produced there. We can think about yoga poses for balancing female hormones in terms of all our hormone-releasing glands, we can think about using Yoga for PCOS and hormonal imbalance in females.
The effects of a hormone imbalance are starting to come to light because they may be at the root of some draining and damaging conditions. According to WebMD.com; a healthy functioning endocrine system plays a vital role in whether or not you develop diabetes, thyroid disease, growth disorders, sexual dysfunction, and a host of other hormone-related disorders.
Thus, Yoga for hormonal imbalance in females is very effective as it prevents long-term health risks that might cause serious damage to the body.
So should you choose Yoga for hormonal imbalance in females?
Yes, Yoga for female hormone balance is highly suggested if you are suffering from PCOS or hormonal imbalance.
1 note
·
View note
Text
Do These Yogas To Improve Eye Health
Your eye is one of the most important senses, We spend most of our time looking at Digital Screens. During that time we forget about our eye health. This causes more stress to the eyes, This can lead to increased eye problems at an early age. These Yoga exercises can help you improve vision and reduce eye stress.
Bhramari pranayama
Bhramari Pranayama helps your eyes to relax in easy and simple steps. It also helps to relieve hypertension.
1.Sit in a cross-legged position (if possible)
2.Sit with a Straight Spine
3.Close your eyes and bring your thumbs to your ears and gently close your ears
4.Now take a deep breath in and hold for 2-3 seconds and exhale slowly You can hear the sound that resembles the humming of a ‘’bee’’
5.This should be done at least 10 times to get all the benefits
Sarvangasana
Sarvangasana is an all-body exercise The word ‘sarv’ means all ‘anga’ means all parts of the body. This yoga pose is highly beneficial for mental, physical and eye health
1.Lie on your back with your hands on your side
2.Now slowly lift your legs, buttocks and backs and support your back with your hands
3.Then Move your elbows closer, Keep straightening the legs and spine by pressing the elbows down to the floor and hands into the back. Your body should be supported on your shoulders and upper arms. Do not stress your head and neck
4.Now lift your legs straight and stay in that posture for 40-60 seconds
5.To come out of the posture do it vice-versa
Palming
1.Find a relaxing and comfortable place
2.Straight your back and neck
3.Warm-up your hands by rubbing your palms together
4.Now place your warm hands in your eyes
5.Inhale and Exhale slowly during this process
Blinking
Blinking exercises helps to improve dry eye symptomology
1.Close your eyes gently in a relaxing position and hold them for 3 second
2.Now gently open your eyes and relax them
3.Repeat this process
Chakrasana
It improves your eye health and enhances your nervous system . It also increases the flexibility of the spine, Strengthens the bones and muscles, and Helps in better functioning of the heart, liver, spleen, and kidneys.
1.Lie down on the mat and relax your body comfortably and look straight in an upward direction
2.Fold your legs and bend them below your buttock, touching the feet’s sole to the ground.
3.Place your hands beside your head and keep them beneath your shoulders
4.Inhale and slowly raise your body
5.Arch your back while raising the body
6.Now lift your head and trunk and straight your hands and legs as much as possible
7.Lift the heels and balance on the foot fingers and hands then lower it slowly
8.Stay in this posture as long as you feel comfortable
Eye rolling
1.Sit straight and inhale
2.Slowly look up, and focus above.
3.Roll both of your eyes so that you’re looking all the way to your right.
4.Roll both of your eyes so that you’re looking all the way down.
5.Roll both of your eyes so that you’re looking all the way to your left.
6.Come back to the first position, then look straight ahead and inhale.
7.Repeat this process
There are many ayurvedic eye care formulations for eye health. Sahasra Netra Yoga Book has 1000 Eye care formulations for Your Eye health
Please visit Sreemed for Ayurvedic products for Skin care, Hair care, Eye care, Body care
0 notes
Text
Yoga Swing Poses For Flexibility and Mood
Yoga swing poses are great for improving flexibility and mood. These exercises help improve balance and coordination. In addition to stretching the hamstrings, they also increase strength and stamina. Try one out for a few minutes and see if you like the result. Aside from reducing your stress level, these poses are also good for your health. So, try a few out for yourself! There are several yoga swing workout essentials benefits .
The first pose to try on a yoga swing is the Downdog, also known as the flying squirrel or the flying spider. It involves standing facing the swing and pulling it close to your hip crease. While extending your arms, lower your back and slide your grip down. Depending on your level of flexibility, you can hold this position for a while or let go. Once you have the hang of the pose, you can try the Bow Pose, where you wrap your legs around the hammock, then bend your knees and lower your body.
The second pose is the superman pose, also known as the flying squirrel or the flying spider. This poses requires you to sit on the yoga swing with your lower back and upper arms on the ground. While you are swinging, try to keep your shoulders straight and your elbows together. This will prevent your back from being stiff and your body from feeling strained. If you have strong legs, the half-moon will make them stronger and open up your hips.
The next yoga swing pose you can try is the superman pose. This one is known as the flying squirrel and the flying spider. The first step to this challenge is to wrap your midsection around the hammock and lean back. Then, extend your legs and arms and then place your head and upper back on the ground. The superman pose can be done anywhere from a chair to a hammock! This will strengthen your shoulders, legs, and core, read more now .
To start yoga swing poses, you need to warm up. It is best to do a warm-up first. This is a good way to warm up before pushing your limits. You should stretch your hamstrings and groins first. These muscles support your hips and are key to maintaining balance in the swing. A hamstring stretch will strengthen your groins, which in turn will help stretch your back.
Another common yoga swing pose is the superman pose. This pose is similar to the famous superhero pose but requires you to stand facing the swing. With your arms on the side of the swing, you should extend your legs out. Your chest should be stretched. Your legs should be fully extended. You should then wrap your hands around the handles and place your head and upper back on the floor. This pose can help you improve your balance and flexibility. If you probably want to get more enlightened on yoga, then click on this link https://en.wikipedia.org/wiki/AntiGravity_Fitness .
2 notes
·
View notes
Last Seen Blogs

simsofcrows
Change the game

coolhappinessfornow-blog
Sin título

afterthefuneral
After The Funeral

inmypawsnj
In My Paws
frndlywtch
Witchy BOS (upg) and random reference posts