#marichyasana2
Text
Sage Marichi Pose: Yoga Asana Step-by-Step Expert Guide 2023

Sage Marichi Pose (Marichyasana III): A Complete Guide Yoga Asana
Sage Marichi Pose, also known as Marichyasana III, is a powerful and transformative yoga posture that offers numerous benefits for the mind, body, and spirit. As a seated twist, it aids in the opening of the hips, chest, and shoulders, while simultaneously enhancing strength, flexibility, and balance. In this comprehensive guide, we will delve into the step-by-step instructions for performing the Sage Marichi pose with ease and grace.
What is Sage Marichi Pose in Yoga?
Sage Marichi Pose is a seated twist yoga pose that opens the hips, chest, and shoulders. Start by bending your right knee, bringing your foot close to your body. Extend your left leg straight. Reach your left arm up and bend the elbow, placing your hand behind your back. Reach your right arm across and try to clasp your left wrist. Twist your torso to the right, bringing your right elbow towards your right knee. Hold for a few breaths and repeat on the other side. This pose improves flexibility, balance, and strength. Use modifications if needed.
Benefits of Sage Marichi Pose
- Improves flexibility in the hips, spine, and shoulders.
- Strengthens the core muscles and lower back.
- Enhances balance and coordination.
- Stimulates digestion and massages abdominal organs.
- Releases tension in the upper body and shoulders.
- Helps to detoxify the body by stimulating the digestive system.
- Increases blood circulation throughout the body.
- Relieves mild back pain and sciatica.
- Calms the mind and reduces stress.
- Promotes better posture and body awareness.
Sage Marichi Pose Video Tutorial
https://www.youtube.com/watch?v=bGzlOXYDkxg&pp=ygURU2FnZSBNYXJpY2hpIFBvc2U
Sage Marichi Pose Step-By-Step Guide
Discover the transformative Sage Marichi Pose with this easy-to-follow step-by-step guide. Improve flexibility and balance in no time!
Step 1: Getting into Position
To begin, find a comfortable seated position on your yoga mat with your legs extended straight out in front of you. Take a moment to ground yourself and connect with your breath.
Step 2: Bending the Right Knee
Bend your right knee and gently draw your right foot towards your body, bringing the heel close to your right sitting bone. Your right knee should point upwards, forming a right angle.
Step 3: Extending the Left Leg
Extend your left leg straight in front of you, ensuring that the foot is flexed and the toes are pointing toward the ceiling. Maintain a gentle engagement in your left quadriceps.
Step 4: Reaching with the Left Arm
As you inhale, reach your left arm up towards the sky, lengthening your spine. Feel the stretch along your left side as you do this.

Step 5: Bending the Left Elbow
On an exhale, bend your left elbow and draw your left hand behind your back. The back of your hand should rest against your upper back.
Step 6: Clasping the Hands
Reach your right arm across your body and attempt to clasp your left wrist with your right hand. If your hands do not meet, that's okay. Simply use a yoga strap to bridge the gap and hold onto both ends.
Step 7: Initiating the Twist
With your hands clasped or holding the strap, engage your core muscles and begin to gently twist your torso to the right. Initiate the twist from your lower abdomen, keeping your hips square.
Step 8: Hooking the Elbow
As you twist, aim to hook your right elbow around the outside of your right knee. This will deepen the twist and provide a greater stretch to your spine.
Step 9: Lengthening the Spine
Throughout the pose, maintain a long spine by lifting through the crown of your head. Avoid slumping or collapsing the chest.
Step 10: Holding the Pose
Once in the full expression of Sage Marichi pose, take a few deep breaths and hold the pose for at least five breath cycles. Feel the expansion in your chest and the detoxifying effect of the twist.
Tips for a Safe and Fulfilling Practice
- Always listen to your body and avoid pushing yourself into pain. A gentle stretch is sufficient.
- If clasping your hands or using a strap feels uncomfortable, place your right hand on your right thigh for support.
- Engage your core muscles throughout the pose to protect your lower back.
- Maintain even breathing, inhaling, and exhaling deeply and calmly.
Conclusion
Sage Marichi pose, Marichyasana III, is a profound yoga posture that not only enhances flexibility, balance, and strength but also promotes mental clarity and spiritual awareness. By following the step-by-step instructions and incorporating the provided tips, you can safely and effectively practice this challenging pose. Regular dedication to this asana will yield rewarding results, enabling you to unlock the full potential of your mind and body. As with any yoga practice, patience and consistency are key, and over time, you will undoubtedly witness the transformative power of the Sage Marichi pose in your yoga journey. Namaste!
FAQs
What is Sage Marichi Pose?Sage Marichi Pose, also known as Marichyasana III, is a seated twist in yoga that opens hips and shoulders.How do I do Sage Marichi Pose?Start with the right knee bent, left leg extended, left arm reaching up, and right arm across to clasp the left wrist. Twist to the right.What are the benefits of this pose?Sage Marichi Pose improves flexibility, and balance, and strengthens the body. It also opens the hips, chest, and shoulders.Can beginners try this pose?Yes, beginners can try it with modifications like placing the right hand on the right thigh instead of behind the back.How long should I hold the pose?Hold it for a few breaths initially and gradually increase as you feel more comfortable in the pose.
Read the full article
#marichi'spose1#marichyasana2#marichyasana3#marichyasana4#marichyasanab#marichyasanad#sageposevariations#sagetwistpose#Yoga
0 notes
Photo
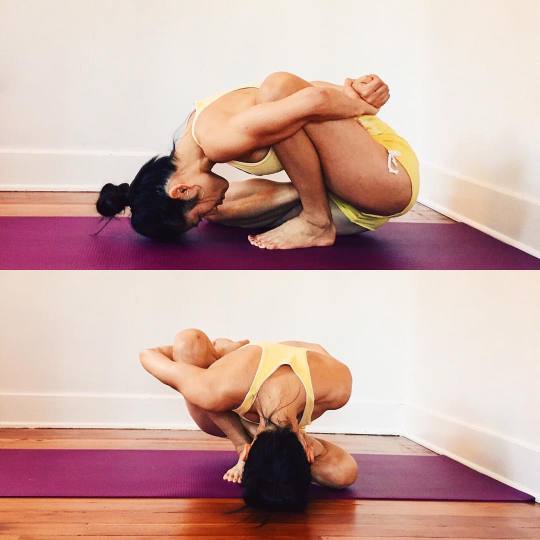
DETAIL + DEPTH | After Marichyasana 1, draw the limbs in by taking Marichyasana 2. Marichyasana 2 is just like Marichyasana 1, but with the second leg folded into half lotus. For those who cannot bring the leg into half lotus, simply let the foot rest on the floor rather than at the crease of the hip, as if taking Janu Sirsasana. Follow the same instructions as Marichyasana 1 by letting the right knee widen to the side so the torso has space to come to the inside of the leg. Lengthen the spine forward to come down. Hug the knee back into the torso and wrap the second arm. Do allow the sitbone of the lifted leg to lift slightly. Stay and breathe, then switch sides. #detailanddepth #marichyasana2 #marichyasanab #puppypress #ekapadabakasana2 #yoga #yogaprops #yogasequence #alignmentyoga #practiceandalliscoming #practicedaily #yogapractice #iyengaryoga #iyengar #yogaforeverybody #silverlake (at Qingdao, Shandong)
#marichyasana2#iyengar#yogasequence#yoga#iyengaryoga#puppypress#alignmentyoga#detailanddepth#marichyasanab#ekapadabakasana2#yogaforeverybody#practicedaily#practiceandalliscoming#silverlake#yogaprops#yogapractice
26 notes
·
View notes
Last Seen Blogs

hrov87
Time to Make a Change

crimsonlovebartylus
Crimsonlove

bbsradio
BBS Radio TV

kodakblack1k
Mr. there he go❗️

jonginpeachh
phi