#edit: also tumblr destroying the quality once again so click if you want to see it not all blurred up
Text

He's been caught doing some mischief
#did this back in the summer but I only had this really awful brush that was hard to control and I initially didn't like the end result#but now looking back I'm actually really vibing this so you guys get to see it :D#loki#loki fanart#child loki#kid loki#young loki#loki laufeyson#loki friggason#loki marvel#marvel fanart#violetscanfly#edit: also tumblr destroying the quality once again so click if you want to see it not all blurred up
665 notes
·
View notes
Photo

Soph’s Header + Doodle Tutorial (requested by anonymous)
Hi! I’m back again with the sequel to my icon + colouring tutorial, this time with headers and doodles! 🥰 You will need:
I’m using Photoshop CC 2018 to make these headers and doodles, but you could easily make them with earlier/other versions.
Basic gif making knowledge.
A screencap you want to use, some fun textures, and some time and patience!
I always start off with my headers as size 500 by 281 pixels. It doesn’t really matter necessarily, as long as the size is in line with the tumblr dimensions and fits. I find these sizes work to keep a gif or header small, so you can make it a bit longer without going over the tumblr size limit. I know technically tumblr doesn’t have a size limit any more, but I do still try to stick to the 3 MB limit when I can. This is because sometimes gifs lose their quality if you go over. In my opinion, you can afford to go over a bit, but if you go too far, the quality of the gif gets destroyed, and sometimes for me even on 4 MB they just don't play, so 6 MB or 8 MB doesn’t stand a chance. Not sure if anyone else has run into this problem, but you can read more about what I mean here and here.
Okay, so. Making simple headers is actually pretty easy, it’s just a lot of layering of the right things. Once you have your base size, pick a nice gradient to put on it. For me, I’m going with a light purple to a slightly darker purple:

It’s important that you have video timeline turned on for this. If you are not familiar with frame animation and video timeline, I suggest you take a look at this, since we are going to be using both quite a lot in this tutorial.
Next, you want a nice background texture for your header. You don’t have to, but I think it just gives it a little something extra. You can find some textures here they have A LOT to choose from.
Once you have your texture, make it black and white and set it to soft light (unless the texture is the same colour as your background, then sometimes leaving it in colour can enhance the whole thing). Then you should have something that looks like this:

Now add your cap, coloured + smart sharpened and whatever other adjustments you want to make, on top of these layers. If you don’t know how to do this, please see my icon tutorial, where I explain how to do these steps in depth.

Obviously in this instance, Steve is much larger than if this was an icon. Make the picture proportional to the header size, but it’s up to you how big or small you want that to be! So, you could just save the header like that, if you wanted to. BUT, since we’re going to be adding gifs + doodles, I’ve had to make some special adjustments. As you can see down the right-hand side in the layers tab, I’ve added some purple colour over and under Steve (set to soft light, opacity anywhere between 5-30%, whatever suits you) and also lightened the background A LOT. There is a reason for this, which you wouldn’t need to do if you weren’t going to add gifs (unless you wanted the background to be lighter, of course).
So, for the gifs underneath your cap. Here is a pack of gif overlays that I love and adore, once you have chosen one of those, you want to put it underneath your cap. To do this, open the overlay gif, it will look like this:

And you can just drag it across from one file to another, underneath your cap.

I turned off all the layers above the gif, temporarily, so I could move it into place. Once it’s in your header file, make sure to change the gif to “overlay”, which will then bring back your nice background colour. Setting something to overlay makes everything underneath it look darker, hence why we lightened the background before, as I personally didn’t want it to look too dark for the overall header. (You could also put your cap underneath it if you wanted the gif to go over the person, but you’ll have to do extra editing to make sure the cap isn’t too dark if you do so).
Now you should have something that looks like this:

You want to make sure you end the header where the gif ends, even if your layers are “longer”, as you can see above. Again, this is a perfectly acceptable place to leave your header and save it, but this is where I tend to add the doodles!
Open a new file, I usually make them quite big say 800 by 400 px, as you can scale the doodle down later on, rather than starting small and working in a small space, which makes things unnecessarily difficult. If you would like to add some premade doodles onto your gifs, you can find some here, but I will show you how to make your own below!
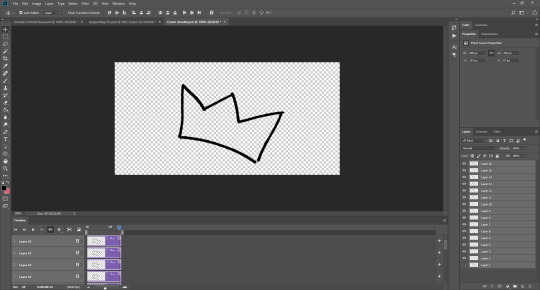
You could draw the doodles yourself, probably making your life a lot easier, but if you’re like me and you don’t want to do that (for me it’s because I suck at drawing on ps, LMAO) you can use a picture too. Find a picture of what you want, I usually just google it, so here I’ve got a simple crown:
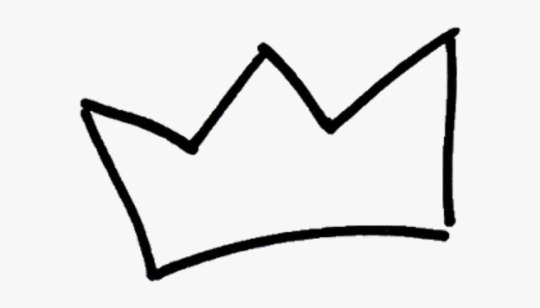
I used the magic wand tool to cut it out, and now we have this:
Now what you want to do is change the video timeline to frame animation. Click the “creative video timeline” button if video timeline isn’t already displayed, then the three dots in the left-hand corner to convert to frame animation, and you should get something like this:


Now, here’s the long-winded bit. It’s slightly odd and a bit complicated, so if this doesn’t make sense, please feel free to message me and ask further questions.
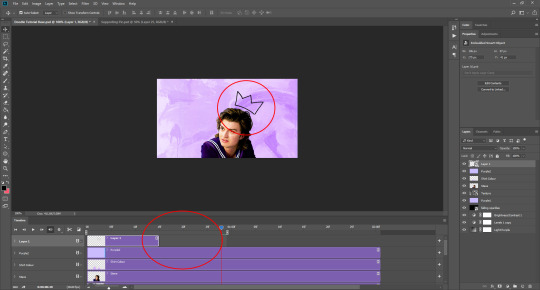
So, we want the doodle to look like it draws itself, right? What you want to do is crop the image so bits of it are added as the frames go on, thus achieving that effect. The key to this is turning layers on and off on the right-hand side, so only certain parts of the image show themselves one after the other.
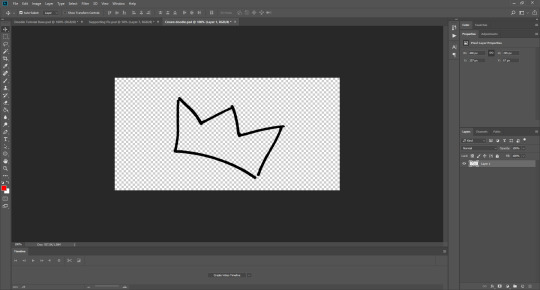
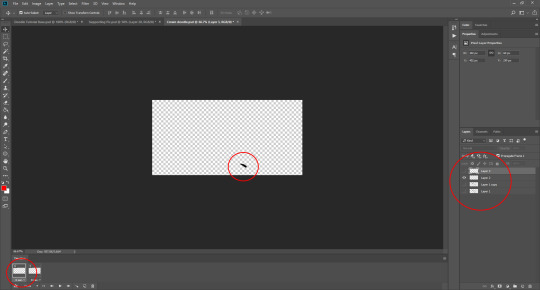
Firstly, duplicate Layer 1 and turn the original image off. This is a safety in case we mess something up later and need to revert to the original image. Now, crop out the first part of your picture. I’m going to start on the bottom of the crown and work my way around clockwise. Use the marquee tool (I’m using the elliptical one) to cut out one section of the image, then right click and select ‘layer via cut’.

Then turn off the rest of the layer, so you’re only left with this tiny piece:
Now, add a new frame. On the bottom bar there is a button, next to the bin/trash, that looks like a sheet of paper, which says “duplicate frame” if you click on it. Do that. Now is where the turning off and on part comes in. Each layer on the right-hand side corresponds to a frame on the bottom, and you want to build up what is shown in each frame every time.
This is going to involve a lot of duplicating and merging of layers, because I haven’t found a better way to do it currently.
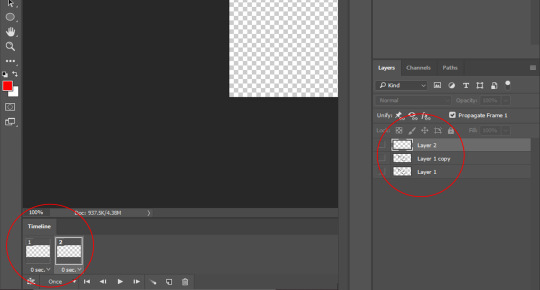
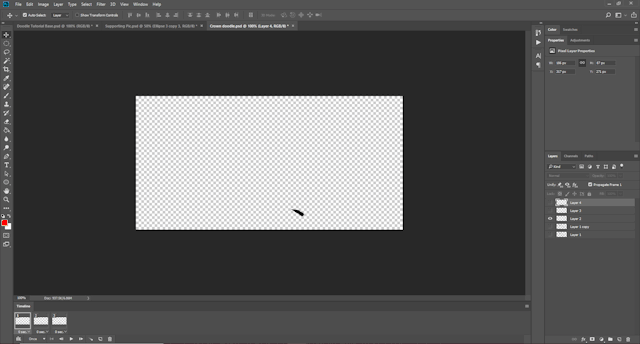
First you want to turn off all the layers when you have Frame 2 selected. When you’re on Frame 1 your tiny piece (Layer 2) should be turned on (you turn layers on and off on the right-hand side, toggling the little eye icon). Like so:


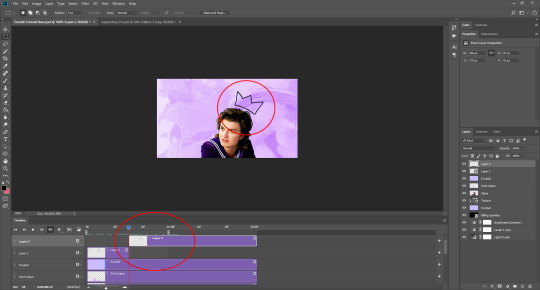
You want to be working with Frame 2 selected for these next parts. Then you want to duplicate the tiny piece layer (so now we have Layer 2 copy). By turning the Layer 1 copy on briefly, you can cut out the next part of your image, so use the marquee tool again to cut out the next little piece. Make sure you have the layer with the rest of the image selected when you do this, otherwise you could be cropping nothing, since the other layers should still be turned off. Once you’ve done that (once again using layer via cut!) you should now have Layer 3. Move this to the top, turn off Layer 1 copy, and turn on Layer 2 copy, like so:
You may not be able to see in the picture, but the two layers aren’t quite touching. Since it doesn’t matter what the original image looks like for the end result of the doodle, you can move Layer 3 in line with your first piece. DO NOT move the original small layer, Layer 2, as then it will be in a different place on Frame 1 and Frame 2, and you’ll have to try to move it back, and that will be a mess. Always adjust the newest layer in line with the previously existing layers so this doesn’t happen.
When you’ve done that, select both Layer 2 copy and Layer 3 at the same time. I usually use the ctrl key to do this, which I think is command on macs, then when you’ve done that, right click on those layers and select merge layers from the menu that appears. They should now be one layer called Layer 3.
The problem is, when you do this in the second frame, it usually turns itself on in the first frame too, which you don’t want. So click on Frame 1, and make sure to toggle Layer 3 off for Frame 1, and on for Frame 2. And the opposite with Layer 2: make sure it is on for Frame 1, and off for Frame 2, like this:

Now, you want to repeat the process. So, add a new frame at the bottom, so you have three frames. Turn all the layers off when Frame 3 is selected. Duplicate Layer 3. Cut out the next piece from Layer 1 copy, and make sure it aligns with the other layers without moving the previous pieces. Merge Layer 3 copy and Layer 4. Make sure Layer 4 is turned off in Frame 1, because the newest layer WILL turn itself on there every time. Go back to Frame 3, and turn Layer 4 on again.
You should have something that is looking like this:
Can you see how all the different layers are corresponding to the different frames? I don’t mean to be patronising at all, so I hope it doesn’t come across that way. I just know that some people don’t understand how frame animation works, so I’m trying to be as clear as possible.
It doesn’t matter if your doodle is moving away from your original image, because you won’t be seeing the original image when the doodle is done, only the doodle. As long as the layers that correspond to your frames aren’t moved during the process, then don’t worry.
Continue to do this until the whole doodle is made, like so:

I ended up with 15 frames, and 16 layers. You can set this to whatever speed you think is best by highlighting all the Frames. If you click the thee little lines on the right-hand side of the frame animation window, a little menu pops up, and there you can select all frames (or hold shift and click on the first and the last frame). From there, you click on the time underneath the frames and adjust it whatever looks best for your gif, 0.05 usually works well.
Now, you want to convert the doodle into one object that you can move. To do this, click on the little lines in the left-hand corner (where the frame animation dots were before), and all the framers will turn into layers in video timeline. Then, to make them all one object, select all the layers at once on the right-hand side, and go to filter > convert for smart filters.
You should now be able to drag your doodle into your header file! Like so:
As you can see, sometimes the doodle isn’t as long as the loop of your gif, but that’s okay. What you can do is use the marquee tool and right click when you’ve selected the doodle, choosing layer via copy. This will create a still image of your doodle, which you can place after it ends to ensure it stays on the header until your gif is ready to loop again, as you can see here:
As you can see here, I decided to make the crown white, since I felt it fit better with the header’s aesthetic. To do that, I inverted the gif and the still shape, and set them both to lighten. I also added a white stroke of 1px just to make it stand out (double click your layer on th right-hand side, and find stroke in the pop up that appears, adjust to your liking!)

I also added another doodle to mine, using the same process as before. Spelling out ‘king steve’ had a lot more layers and frames, but it was the same process. Then I dragged it over, and copied the layer just before it re-looped so I could have it as a still image for a portion of the gif. You may need to duplicate your overlay gif underneath the cap to ensure eveything has enough time to loop properly, like so:

And that’s it really! If you would like to add a divider on top of your header AKA a header template, these are the ones I use (one, two). To add it, open the file and drag it onto your gif file, then place it where you want it to be. Once you’ve done that, set the layer to screen (here is a tutorial from the op) if you want it to be white, or invert the image (image > adjustments > invert) and then set it to darken if you want it to be black. If you want it to be a different colour, you’ll have to cut out the divider from the background image, and then double click the layer to get the style menu. In layer style, you can select ‘colour overlay’ and make it whatever colour you want!
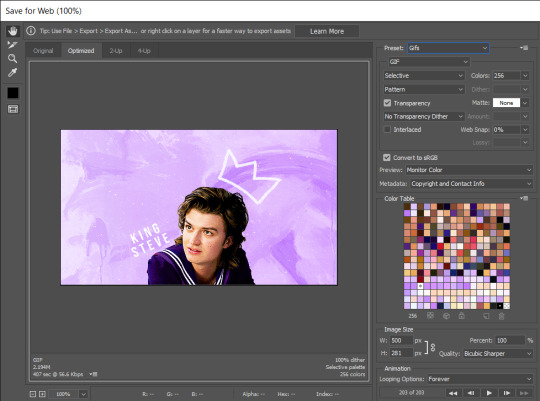
To save your gif, go to file > export > save for web (legacy). It may take a while, so just let ps do its thing until the bar has loaded. You can preview the gif by clicking preview in the bottom left-hand corner, in case you want to cancel and make some changes to your gif before you save it. These are my settings:
And voilà, you have a bright and shiny new gif, doodle, header! If you’d like to use this, you can find it here 💜
#tutorial#header tutorial#tutorial*#resources#headers#chaoticresources#completeresources#yeahps#i hope this helps!!!#thank you to ally @siriusblacks for reading this over for me 🥰
182 notes
·
View notes
Last Seen Blogs
niccchka
Nichka

assidvous
✧ ; 𝐎𝐇, 𝐀𝐓𝐋𝐀𝐒 .
deflandriens
De Flandriens
ringedoubliette
RingedOubliette

mangotreemama
Mango Tree Mama