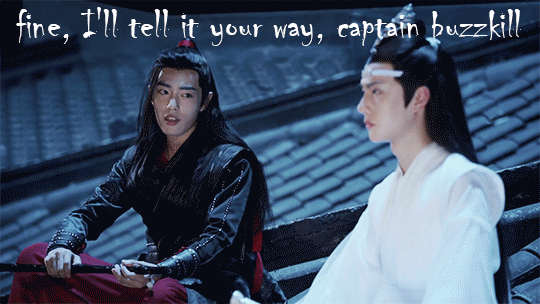
#click for higher quality tumblr is mean to me
Text
JUST A HOLY FOOL OH BABY ITS SO CRUEL BUT IM STILL IN LOVE WITH JUDAS BABYY OH WOAAH IM IN LOVE WITH JUDA-AS JUDA-AS
yeah so benry totally knows all the choreography to lady gaga songs. ive been wanting to draw him dancing to her for a while
#click for higher quality tumblr is mean to me#i also drew him doing the gmod sexy dance (the voguing). dunno if ill post it tho i made his butt too big#anyways#OHHHHHH IM IN LOVE WITH JUDA AS JUDA AS#i also wanna draw benry genuinely voguing#hlvrai#benrey#benry#half life vr but the ai is self aware#benrey hlvrai#hlvrai benrey#benry hlvrai#hlvrai benry#my art#lady gaga#??
176 notes
·
View notes
Note
How do you get your drawings to be high quality? Whenever I post art the quality is SO bad 💔
uhm... sorry this is got long. for some reason you activated my work mode. i don't have a constumer service voice but i have like an explenation mode for clients so... uhm. here is way more information that you asked for. my apologies...
Resolution is what determines the sharpness of the artwork. The low-resolution illustration will appear pixelated when scaled in large sizes. this is why it is recommended to work on a digital canvas with a resolution of at least 300 dpi when you work. (i prefer 400dpi)
dpi are Dots Per Inch. dots just being a different name for pixels. the more pixels are contained in an inch the smoother lines and gradients are. an indication of higher quality. but, the device you are working on has to use up most of its ram/power to calculate the preview on the screen. so higher quality demands more capacity from your device but also from websites that display your artwork. Soo...
I have two files.
One on 400 dpi is way larger for me for smooth comfortable drawing.
and the second drawing is sized down to 150dpi to accommodate the recommended resolution of the website I want to post the image.
luckily for us, most social media sites have a similar resolution.
Tumblr's Dashboard images have a minimum size of 500 x 750 pixels, a maximum expanded the size of 2048 x 3072 pixels, and a recommended size of 1280 x 1920 pixels for a 2:3 aspect ratio.
I use a with of 1280. the high depends on the drawing
It's way easier and recommended to size images down rather than up.
sizing artwork up would put them through an interlacing process, which means that the graphics program of your choice would calculate the average between two pixes and add it in between them. It adds pixels to make the image larger. easy answer it blurs your image.
it isn't the end of the world if you have to size up the image a tiny bit.
I kind of have to do a bit all the time for work. and most of the time it's fine! it depends on your art style and how forgiving it can be.
It's also a difference if you post images in a JEPG or PNG.
uhm... without going into much detail... take PNG just trust me.
now... a tiny little last trick out of my sleeve.
if you... use photoshop. and you want some extra sharpness.
you can sharpen your images with the high pass filter.
Duplicate your artwork
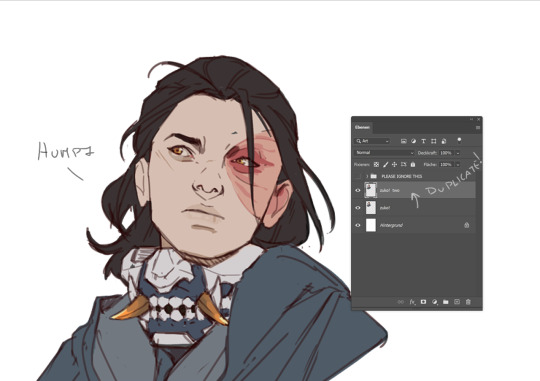
Filter > other >highpass

As soon you select High Pass, your image will turn grey

It works by filling the entire image with flat, neutral grey. It then looks for edges in the image and highlights them by making the light side of the edge lighter and the dark side darker.
Don't overdo it. keep the contrast low. a radius of 1,5px is enough most of the time!
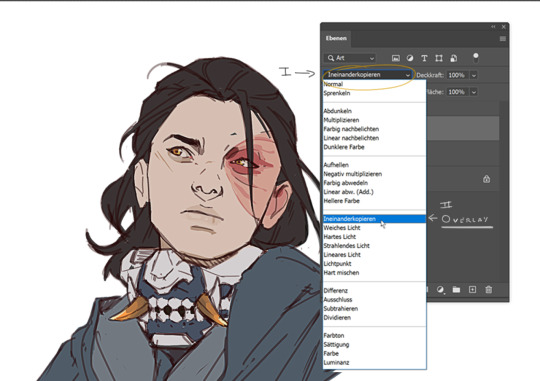
Click okay to exit the menu and set the layer on overlay.
ta-da! it is sharp and crisp!!!
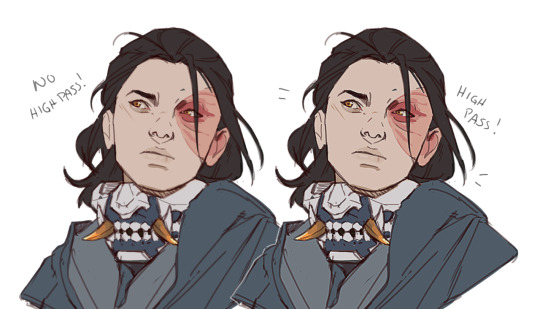
It's all a trick!!! vary subtle... i know but ehh i like it
I am sorry I don't know if other programs also have this option. I know CSP has a sharpening filter. but... you can keep images crisp by keeping resolution and dpi in mind too.
uhm... well so... -hides-
#chip!ask#chip!talks#i maybe overdid it here#but i ended wrtiting it and now i just... eh. i don't want to delate it... sorry!#zuko
992 notes
·
View notes
Text
gif making tutorial for the inimitable @snowysobsessions
disclaimer: this is exactly how i do it, but im basically just winging it tbh. there may be other methods that are quicker and/or look way better. this is just the way to which i have become accustomed. i am not a fancy ass gif maker who does colouring and sharpening or uses photoshop whatever, those folks are the real pros. i just like to get the job done :) if you wanna make really fancy gifs other tutorials may be more appropriate. ok lets get into it under the cut!
step 1:
select your source. for the purposes of this tutorial im going to stay on-brand and use this video of weird al on 30 rock (aka the original Milf Weird Al).
youtube
step 2:
either download the video (i dont have a good recommendation for a website for that unfortunately, they all seem virus-ridden these days) or screen-record the part of the video you want to turn into a gif. for me, thats the part with al in it.
my computer runs windows something - 11 maybe? and it comes with screen recording software built in that saves into a folder called "captures" in the video folder, which can be activated with the keyboard shortcut Windows Key + Alt + R. most phones also have screen recording functions, you could record it on your phone and transfer it to your computer? (for the record the website i use works on mobile too, but its very slow and annoying so i much prefer to use my laptop.)
step 3:
use video editing software of your choice to cut the clip down to just the part you want giffed. i use microsoft clipchamp because thats whats on my computer. it can also be used to crop away any black bars around any video clip, which is useful, because a properly cropped gif will probably be better quality. export the clip in as high quality as possible.
tip: try to keep the gif 3 seconds or under. this keeps the filesize down. tumblr gif size limit is 10MB, but i keep all my gifs 5MB or below because otherwise the loading time/storage burden is painful, and like i said, im not making fancy ones here, i dont mind them being a bit lower quality.
here is my clip. i saved it muted because its filesize is smaller that way.
step 4:
go to https://ezgif.com/video-to-gif which looks like this.
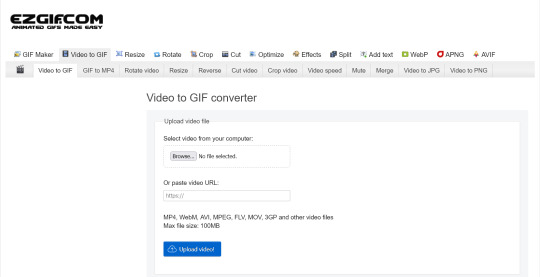
note that ezgif has tools for cutting, cropping and resizing videos if you dont have access to any video editing tool. its quicker if you do it in advance, though, i find.
upload your video and you will see this type of screen appear.
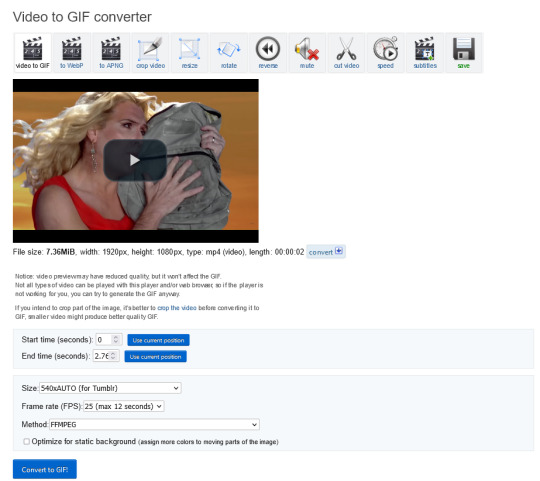
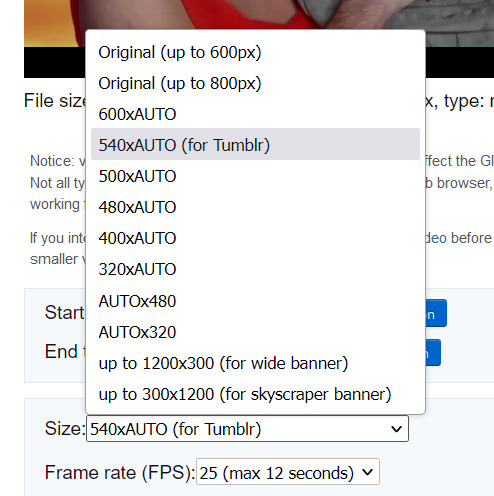
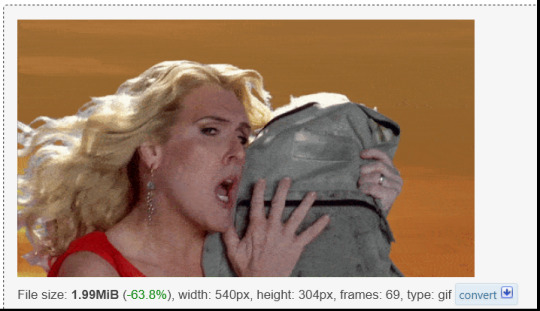
if youre uploading it to tumblr, the 540xAUTO size option is the one i go for by default, but it also has the following size options.
smaller size = smaller filesize, and you want the filesize as small as possible within reason. i sometimes make a gif smaller in dimensions if i'm really struggling to get the filesize below 5MB.
next is the frame rate: i set it to 25 because thats closest to the oriignal frame rate of most recorded video, but in order to make savings on filesize, it can be selected to 20FPS or 12FPS. i wouldnt recommend lower than that unless you want it to look weird and choppy, in which case, go ahead, and i wouldn't recommend higher unless you literally need the animation to be smooth as silk - for making it slowmo, for example.
i don't mess with the "method" drop down bc idk what it means.
the "Optimise for static background" tickbox is useful for if someone is doing something on a totally still background, because it reduces filesize by not animating every single bit of background in every frame. it could be helpful here as our background is not moving at all, just our heroine Alfina. i'm going to tick it.
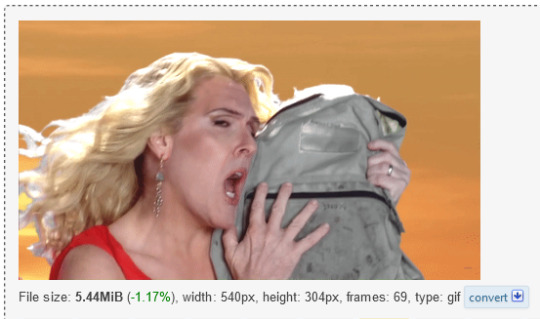
now you can click "Convert to GIF". you should see something like this - itll be animated of course, this is just a screenshot.
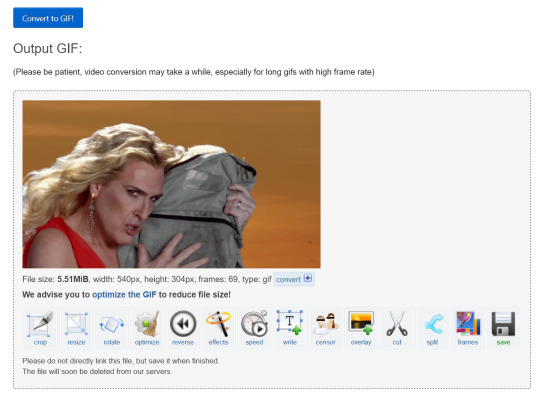
our gif looks crispy fresh (and has 69 frames - NICE), but its filesize is 5.51MB which is more than id like it to be, but first we're gonna look at Effects, so I'm not going to click the "Optimise" option yet.
step 5:
clicking effects will provide the following options
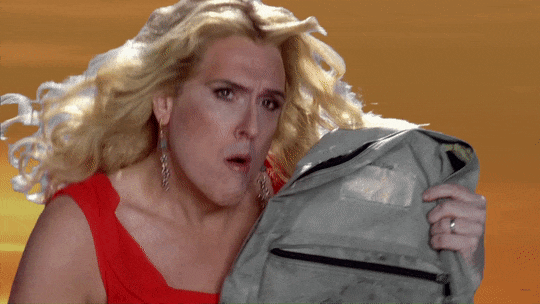
if the video was sort of dark and hard to see, for example if it was live footage, it can be helpful to increase the brightness. changing the brightness and contrast makes our gif look like this, and makes it pop a little more.
you can keep playing with the settings and clicking "Apply selected" until it looks about right to you, or not add any effects at all - it's up to you. I hit the back button in my browser to go back to the gif before i added the effects, then I went to Optimise.
step 6:
the Optimise screen is like this
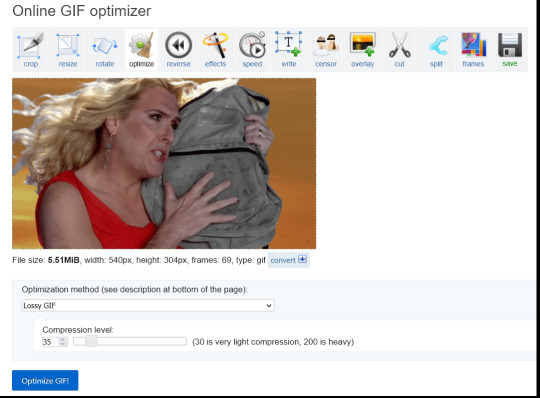
i tend to stick with the Lossy GIf optimization method. I put the compression level down to 30, and press Optimise GIF and see what happens.
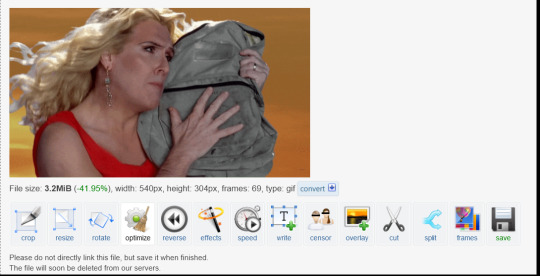
as you can see, the filesize has been reduced by 41.95% to 3.2MB without a super noticeable drop in quality.
if you set the compression level to 200, this is what it looks like
much more pixely, and not much further reduced in size, so i stick to the lower end of the compression scale.
this is our finished gif! isnt she beautiful. i just right-clicked and hit save on it on the webpage after generating - on mobile, i guess you'd long-press on it to download it.
hope that helps!!! lmk if you need help with any other aspect like changing speed or overlays or anything but honestly it's pretty intuitive once you know how to do these bits.
17 notes
·
View notes
Photo

✨ BEFORE WE BEGIN,
I'd like to mention the obvious that my process is just one way to create a gif. What I do works best for me, and for beginners out there you might find later on that a different method suits you as you get familiarized with PS’s basic tools and functions. The important thing is you start somewhere.
So let’s get started!
✨ IMPORTANT NOTES
- Use high quality footage for gif-making. Whether it’s from a game, show or movie, you want the best you can get. The quality should be 720p at the very least. Lower quality footage can be frustrating to work with if you're just starting out. And in general, really.
- With the method I’ll be outlining, Photoshop will accept videos in .mp4 and .avi format. For game footage, these are the formats you’ll likely see the most.
- I use Nvidia ShadowPlay to record my own in-game footage which saves directly into .mp4 format. Software such as Bandicam and OBS are good, free recording alternatives that do the same.
- For downloading HQ videos from YT, I’d suggest 4k Video Downloader. 4k's free version has the option to save videos in .mp4 format.
- I use Windows and bum the latest version of Photoshop off of aesfocus but previously worked with CS5 for 8+ years. The same tools used in this tutorial are available in previous versions of PS.
- This post displays tumblr's current dimensions for gifs if you don't want them showing up fuzzy/blurry on the dashboard.
- Tumblr’s file size upload limit for each gif is currently 10MB.
✨ BONUS ACTION
With her permission, I’m very happy to provide my bestie aesfocus’ custom action for use which can be downloaded here! This action includes beautiful, subtle corrective image adjustments. I’ve been using this on every gif I’ve made over the past few months.
To set up this action:
Go to Window > Actions
Click the quadruple bar symbol (≣) to top right of the Action box
> Load Actions
Find the saved aes_gif.atn file
Load
Hit the play button (▶︎)
And you’re done! Until you either unselect or delete this action, it will be automatically applied to all video footage you load into Photoshop. Including what you’ll be creating!
✨ STEP 1 - VIDEO TIMELINE
1.) Go to Window > Timeline
Make sure what pops up is a video timeline (aka animation timeline), not frame animation. If you see the symbol below, then it means you're currently in frame animation. Click the symbol to convert to video timeline. (If you’re a Mac user, a similar button should be in the bottom right corner of the timeline.)

2.) Drag the .mp4/.avi video file from its location on your computer and drop it into Photoshop.
3.) In the upper right corner of the Timeline, click the quadruple bar symbol (≣) and go to > Set Timeline Frame Rate.

For a smooth and nicely paced frame rate, I usually stay somewhere between 20 to 24. If you’re doing a close-up gif of someone speaking, I’d suggest setting it to a slower speed of 18 or 19. (But be free to test different speeds!)
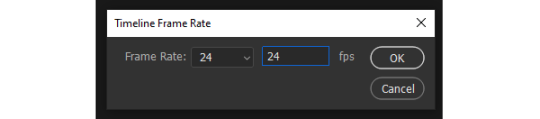
The higher the frame rate, the smoother the gif. However, the file size greatly increases as you get close to 60, so keep that in mind.
✨ STEP 2 - SETTING UP YOUR WORK AREA
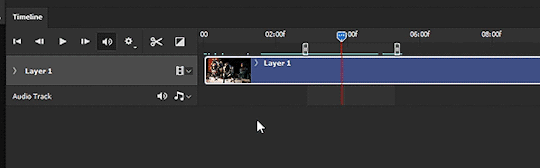
1.) With the footage loaded and prepped, the next step is finding and carving out what you want to turn into a gif. I’ll refer to this as the work area. The work area is set by what footage is between the two slideable 'bumpers' shown below.
If you’re on a Mac or using an old version of PS, the timeline and button positions will look a little different but the functions are the same.

These bumpers will indicate where the gif will start (front bumper) and end (back bumper). Once you know what portion of the footage you'd like to make into a gif, we’ll cut and delete everything else outside the bumpers. What’s between the bumpers is your precious cargo.
Drag the playhead (attached to the red marker) at the top of the Timeline around. This will allow you to preview the loaded footage and help you determine where you're going to place the bumpers.
Try not to put too much footage into your work area if you're just starting out. The lengthier the gif is, the larger the file size. Remember, when the gif is saved it must be under 10MB in order for tumblr to upload it.
2.) Move the playhead to the left until the red marker is at the beginning of the work area where the gif will start (the front bumper). Click on the scissor icon to the left to cut the footage. Click on the unwanted footage that was cut and delete it.
3.) Move the playhead to the right until the red marker is at the end of the work area (the back bumper). Click the scissor icon to cut the unwanted footage, select it, then delete it.
4.) You should be left with your work area on a single layer. Select the work area and drag it to the left on the Timeline, until the start of it is under 00.
✨ STEP 3 - SIZING THE IMAGE
This step can be fiddled with as it's dependent on what size gif you'd like to make. In this example, let’s make a gif that's 540px wide.
1.) Right click the top of the file (or ALT+CTRL+I) to bring up Image Size. Here we'll only change the image Width to 600px and hit OK. (This will give us wiggle room when you decide what you want to crop.) CTRL+1 to bring the canvas to its new full size. (or hold ALT and use your mouse’s scroll wheel to zoom in/out)
After you change the image size, the footage layer (Layer 1) is automatically turned into a Smart Object with a Smart Filter applied. (You can double check this by going to Filter and seeing if the > Convert for Smart Filters option is greyed out. If by chance it's not greyed out, go ahead and convert it.)
SUPER FUN FACT!: Applying a Smart Filter is essential to making gifs. It acts as masking that protects your layer from irreversible change. When converting anything for Smart Filters, any filter you add (sharpening, blurring, etc.) can be adjusted/moved/deleted at any time - even after you save and exit PS! Without the Smart Filter, anything you do directly to the footage layer will be permanent and cannot be undone once you close the file.
✨STEP 4 - CROPPING
1.) Select the Crop tool from the toolbar to the left (C key). You'll notice white borders pop up around the canvas. Click and drag any part of the white border to adjust the crop preview.
Hold CTRL+left click on an outer corner for smoother scaling.
Feel free to drag the footage around within the crop preview to frame it as you see fit.
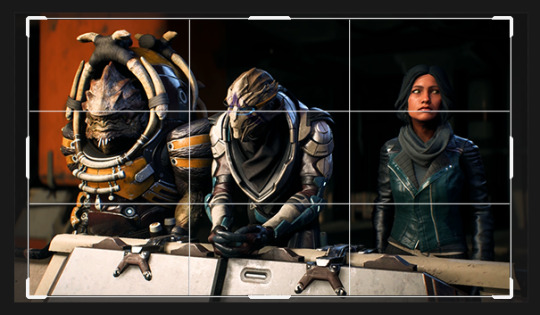
2.) As you move the border of the crop preview, you should see a small dialogue box following your cursor that tells you the current Width and Height of the current preview area. Since we're making a gif 540px wide, we'll adjust the selection to match that and set the height to whatever you prefer. When you're satisfied with the sizing, doubleclick the area within the preview box to crop. (Or go to Image > Crop)
It's beginning to look like something!
3.) To exit the Crop tool, click the Move tool or hit the V key.
✨STEP 5 - ADDING FILTERS
This step will go over one way to sharpen and lightly blur a gif. We’ll use the Unsharpen Mask to start, (Ironic name, I know) though a common filter used for sharpening is the Smart Sharpen option. I tend to use Unsharpen most often.
1.) With the Smart Filter already having been automatically applied earlier, it’s safe to go ahead and add the Unsharpen filter. While having the gif layer selected, go to Filter > Sharpen > Unsharpen Mask and use the following settings:
Amount: 200
Radius: 0.4
Threshold: 1
Hit OK when done.
Under your Layers tab in the dock to the right, you'll now see the Unsharp Mask beneath your Smart Filter layer mask.
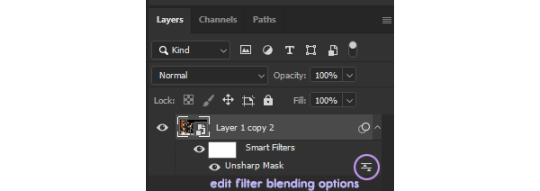
If you click the edit filter button to the right of Unsharp Mask (that look like two arrows between two lines), it'll bring up Blending Options. From here, you can adjust the opacity of your sharpening filter and set a blend mode if you want. For the sharpening we'll leave the opacity alone and keep the mode as Normal.
2.) Now we're going to apply a slight blur filter to sit atop the sharpening. Go to Filter > Blur > Box Blur, set the Radius to 2px and hit OK.
3.) Click on the edit filter button to the right of the Box Blur filter to get to the Blending Options. For this filter, set the Opacity to 45%. If you're working with dark footage, set the Blend to Screen. If the footage has plenty of light and colors, try setting it instead to Overlay. Hit OK.
This will give your sharpening a light softened halo/smeared light effect. Click the eye button to the left of Box Blur to hide the filter if you don't want it, or you can right click on Box Blur > Delete the Smart Filter.
✨STEP 6 - ADJUSTMENT LAYERS
1.) Now that we have filters applied, we'll add our first adjustment layer. Click on the black and white circle > Levels

2.) Below the histogram you'll see three arrows: the darkest arrow to the left, the mid-range grey arrow, and lighter arrow to the right. Move these arrows around only slightly to test how it effects the tonal range. I find that a Levels layer cleanly balances shadows more than anything, particularly with footage or images that are quite dark.
3.) Click again on the black and white circle > Color Balance
4.) On the Color Balance layer, the first tone you can adjust is Midtones by default. Under the dropdown list, you'll see an option for Shadows, Midtones and Highlights. For each Tone, move the sliding arrows around - again, only slightly - to see how it effects the colors of the footage. This is a great tool for color correction.
Similar to Color Balance, Selective Color and Channel Mixer are great color-focused adjustment layers to experiment with.
Curves is also a handy adjustment layer that will effect the tonal range of your gif, similar to Levels.
5.) Before the gif is saved, it’s important to look over the Timeline to make sure that each layer is evenly parallel to your footage layer.

The layers aligning with the footage layer will ensure that everything syncs when the gif loops. You’ll also want to make sure that the back bumper is also placed directly where the footage layer ends.
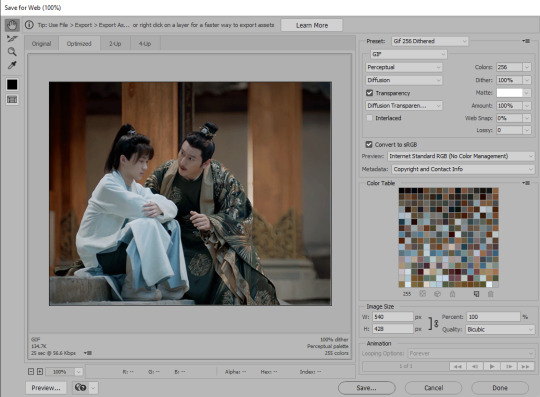
✨STEP 7 - SAVING
1.) File > Save (CTRL+S) the file on your computer wherever you prefer, keeping it in .psd format.
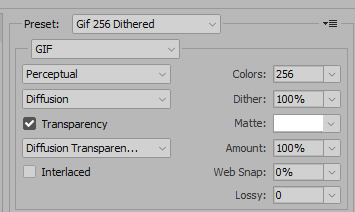
2.) To save as .gif, go to File > Export > Save for Web (Legacy). (CTRL+Shift+ALT+S) The settings below are what I typically use, but feel free to change Pattern to Diffusion or Noise to see how it effects the preview.
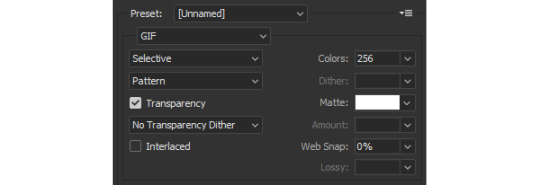
Each dither algorithm option (Pattern/Diffusion/Noise) will change the file size as well has the gif's appearance.
3.) If the file size is under 10MB, then you're ready to save the gif.

If the file size is larger than 10MB, it's likely the footage is too lengthy. In this case, try 1) trimming the footage down as we did previously using the scissors icon on the Timeline, and/or 2) changing the frame rate speed to a number higher than 24, starting with 25, 26, 27, etc. (This will reduce the gif size, but make the speed of the gif faster.)
There are other ways to reduce the file size as well, such as changing the number of Colors on the Save for Web (Legacy) screen from 256 to anything below that. (Which I don't really recommend if your gif is very vibrant or full of color. But it will work well on more neutrally colored/dark gifs.)
Congrats! You're all done.
✨CLOSING THOUGHTS
Hopefully this basic guide will help in making Photoshop seem less intimidating for those starting out. If you’ve found this tutorial useful in any way, a reblog would be appreciated. :~)
For helpful resources, please visit us at gamingresources. If you have a gif or edit tutorial of your own that you’d like us to share, please feel free to tag #gamingresources.
Happy creating! 🧡
#hopefully this helps anon!#this is my first lengthy step-by-step tutorial#I'd be happy to answer any questions as best I can#gif tutorial#gamingresources#gamingedit#vgedit#`reqs#`tutorials#`22
85 notes
·
View notes
Text
Hello Tumblr city I have nightly doodles


This time it was just finishing up old doodles since I only gave myself 2 hours, and uh. I also had a Garfield x Tom sketch but I decided not to finish that one also if you want to hear about my DSAF au that goes with the image click the read more below
Close up of the image along with the ref I used i wouldnt recommend clicking on any of my images for higher quality since my coloring is very unpolished
Anyway this au is pretty simple but I highly enjoy it so I'm going to rant about it past my bedtime - essentially, I looked at how the good ending is a pretty sad ending, and while it's great when the canon/best endings in games aren't the best outcome, I wanted to fix it /j. Specifically I wanted a good ending for Davenport, fuck the children fuck everything else let's take the morals of the Dave endings in the games and fucking run with them.
So i uh haven't replayed the game in a long while forgive me for mistaking a few details but it follows the ending where you salvage davetrap, and Jack doesn't go past the second layer of the flip side and never meets Dee, but instead of Henry possessing Jack or whatever the fuck happened there, Jack starts to work on a solution. I should mention this is a world where Jack never gets a new phone guy but listens to all of Henry's tapes - but Jack gathers the fact that daveyrap is unhappy because hes not a complete soul, and devises a plan. That plan is just to work with both Dave's, making sure davetrap doesn't cause his business to go under due to child murder but he can't completely stop him and working with flipside Dave to both figure out how to make a robot vessel that looks like Dave and could reasonably pass as looking like a human since it wouldn't need anything for programming or ai or movement that possession would be capable of, and to convince flipside Dave to try and be a complete soul again.
Because from what I've gathered, the whole soul thing means thag when the "child" or in Dave's case the part that doesn't want to deal with murder part of the soul goes away to the flip side, the soul is torn apart since there's still something with a mind in the animatronics, it's just left without the reason part of itself. If we incorporate remnant lore which I'm not going to go very far in it further exemplifies the point that Dave repossessing himself over and over tore his soul apart while normal dead kids just leave the remnant behind but whatever whatever Jack decides that if the two halves of the soul exist in one body again they can merge back together and become one soul capable of the full range of emotions, including happiness.
Also my jacks a bit fucked up in the head because this jack went to Vegas twice and killed the real Fredbear so he's on a slippery slope of almost becoming a Henry Miller pulling this shit and asking Dave to continue repossessing himself, but instead risking losing his soul entirely by asking him to possess something that doesn't have any connection to his dead body. And it works when the "it looks exactly like Dave but he can't go in the rain and doesn't smell like a rotting corpse anymore and also doesnt have nearly as many scars" robot vessel is built and the two try possessing the body. And then Dave helps Jack make a robot body for himself and is built in like 1/3rd of the time since Dave knows how animatronics work and not smelling is a pretty nice feature, except Jack doesn't actually *have* a soul so for all intents and purposes I have no clue how to fix that so the jack body is just sitting in the closet of jacks house useless but it's there.
And like then there's actual lore but I need to go to sleep since I have school tomorrow but Dave and Jack decide to keep running Freddy fazbenders considering Jack doesn't have a problem with murder, and the two soul halves in davetrap argue enough that the murder keeps to enough where Freddy fazbenders just seems like a hotspot rather than it actually needing to be a place in need of getting shut down for an investigation. That and Jack blackmailed the phone guy I forgot his name into helping them cover shit up in exchange for getting a hell of alot of freedom [for a phone guy it's a lot of freedom at least, Fredbears isn't a stranger to murder coverups even if it goes against his morals.] Also the nice part of Dave is only really staying with davetrap because he cares so much about jack because I do support Davesport but I try to keep it at a level of implication so it can be passed off as platonic if someone wants it to be
#dsaf#davesport#oc art#talk talks#original post#i love vira so much#shes so damn hard to draw because of her color scheme but i love her#also this is one of the. very few up to date refs i have of her#i dont draw vira very much and shes gone through alot of design changes very quickly because she didnt look correct without the long shirt#and the cape just spices up the design and i might give her multiple sets of capes so she can have more variety#art
8 notes
·
View notes
Text

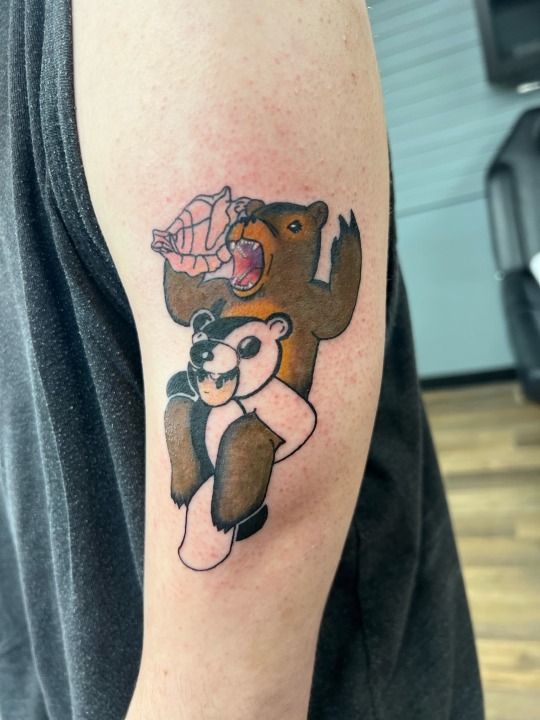
Not my usual art content, but I'm super super proud of the design I created for my first tattoo and wanted to share it with y'all!!! I won't get too sappy on here but @falloutboy means more than words can express to me and I wanted to be able to show some of that to the world, and the artist did an amazing job of making my ideas come true :D
(As with all Tumblr posts, please click the image for higher quality!! Descriptions are in the alt text) (Edited to fix a transparency issue with the design image!! Apologies if it looks a little funky now but you should be able to see it at least HFDKDNDN)
#digital art#digital artist#art#tattoos#tattoo design#fall out boy#fob#fob fanart#fanart#2000s emo#I've been planning for just the bears for a few years now but after the release of the new album I HAD to add some of that to it#the shell is my fav part because it's got a lot of meaning to me but I found a way to make it work well in the design and I'm lov#archers voicebox
17 notes
·
View notes
Text
Lmao I forgot to post this whoops, sorry y'all!
Page two of Delta's Log!!
Panel 7 says: "!!Warning!! Planet Core: Damaged"
Please click for higher quality, I almost always work with a large canvas and Tumblr downgrades the quality!!

The text size is a lot smaller this time since there's more panels (more panels means less space for each one so keeping the larger font size covers more of the art)
Let me know what y'all prefer! Original text size with less panels or smaller text size with more panels?
#murder drones#art#murder drones oc#delta's log#not transformers#comic#SD Delta#A DL masterpost will be made at some point#dk when but it'll happen
7 notes
·
View notes
Text
A Few Words of Thanks
Yesterday, I posted as to why I was sharing the music that I was..., "To chase off the weak." Meaning the weak of mind. Apparently I have no Followers that are weak of mind. Perhaps some of you were just plain forgiving. But it takes a strong mind to forgive (or just scroll by) as well. I have been as careful as I can be to vet those who Follow me. By clicking on their link to their Tumblr Blog. I really hate that term. Is there nothing more clever to be found than "Blog"? Not "X" either, that sucks as well. But I digress. Point is, I couldn't ask for a higher level of quality people around who are supportive even when I'm being a bit off the wall in all things. Nor could I ask better of you that I Follow, for your insight and inspiration. So..., thank you all for indulging my attempt at a purge of those who prefer to swim in the shallow end of the pool. If you are reading this as a Follower, then obviously it wasn't directed at you personally. Thanks for being a part of my Tumblr experience. You are of high value.
I don't even know what most of you look like, what color your skin is or what Gender ID you prefer etc. etc. But I can make an educated guess when you educate me in what you share. All that matters to me..., is your mind. How vast it's horizons. Imagine that.
1 note
·
View note
Text
Careful with all the asking for money posts in Tumblr.
+ Good ways to help yourself
Look, we all need money. The wealth inequality is abysmal. But I'm not about to give a penny to:
1. Complete strangers I don't even know the name of who go on social media and ask you to donate to some PayPal with a name like "SexyPanther03".
2. People who think that putting lgbt flags and telling people they're practically in every minority group and disabled and so on means we should give them money with no questions asked.
3. Click-baiters.
4. People who for all I know are just trying to take advantage.
My family and I have always struggled economically due to health problems and not once have we ever tried to become a sad story in social media and asked strangers for money saying things that people cannot tell if they're true or not. And I know it all. Being so sick you can't work? My dad was until he died. Not qualified enough? Or super qualified and there just isn't work? Or you work for next to nothing? Or you get a job but your health makes you struggle with it? I've lived them all. I know what it is like. I know what it feels like to not have a choice but to ask for help. To count the pennies.
But dude, you do SOMETHING. Anything but posting a lgbtq in flag and telling people to donate to your PayPal because basically you're trans black disabled and trying to get out of an abusive situation. Hey might be true but even so, where are the authorities? Relatives? Friends? Is there any aid you can claim? Have you really tried every option? Is there really nothing better for you to do than that?
I'm sorry but if you have PayPal and Tumblr, you've got access to Internet and computers which is more than anybody who truly needs help can say. If you're a protected minority there are many organisations who are devoted to help you. If you're disabled, you also typically have a right to some small help (I know it's very little, but it's something).
These are some PROVEN things I've done to help myself financially in times of struggle (in case they help anybody):
When shopping look at the cheapest price per kilo / half kilo / whatever larger measure they show. NOT for unit.
Check how big things are and how long they last. For example it might be worth buying a £6 shampoo if it's so big it'll last you 6 months (basically £1 a month goes in shampoo) than buying a £2.5 shampoo that you need to buy twice a month because of it's size (£5 a month).
Check out organic products. Yes they're more expensive but often last longer and are cheaper in the long run. For example with the conventional deodorants I used to spend about £3 every 2months. Now I buy an ecological bar soap style deodorant that works better (so I put very little of it) and lasts me for 7 months at about 1 pound a month.
Always buy higher quality things when you can. They will last you way longer and you won't need to buy another in so long that it'll end up being cheaper than buying shit quality often.
Make a list of the things you truly need for survival and plans about getting the money. Leave every expense you can't afford. Sometimes even ketchup is a luxury.
Look for employment OUT THERE more than online. Sometimes your neighbourhood has many little opportunities.
Don't get snobbish about what job you have.
Relish every opportunity to study (and use every student's aid!) I was very privileged as a student to be paid 3000€ per year for being a poor student with high grades. Thanks to those my mum could pay our bills and uni books!
Check out your local authority aids, your government aids, any organisations you could count on.
Reduce your transport expenses as much as you can. In London I used to pay an exorbitant amount on transport because of the zone fares but once I realised I barely go to certain zones and stopped paying them, I saved hundreds.
Try and live in cheaper areas if you can! It's always the battle of cheaper place with more transport expenses or the other way around. Personally I think cheaper place is best and trying to work locally if you can.
Check out if your age means you can get things cheaper or free. There's a lot of that in the UK if you're under 25.
1 note
·
View note
Text
Tutorial: Making a Gif in Photoshop
(Pinboard of all my Masterposts) (Tutorials Masterpost)
Here’s a beginner’s guide to making gifs in photoshop. I’m going with the assumption that 1. you have Photoshop (I do this in Photoshop CC 2021 at the moment, but this isn’t new functionality, so other recent versions should work similarly.) and 2. You want to be able to upload your gifs on Tumblr.
Note: When I name a menu in bold followed by this arrow thingy --> I am telling you what to select from that menu. If I have two arrow thingies, it’s two menu selections deep. Etc.
Super Basic Stuff
1. Capture a video clip in MP4 format (or another Photoshop-friendly format; I use MP4). There are a lot of ways to do this--google it and you’ll find options.
2. Drag the video clip into your photoshop session.
3. Image Menu-->Image Size-->width 540 pixels, with whatever height the aspect ratio assigns. Tumblr compresses your gifs to 540, so doing it yourself is the best way to avoid icky artifacts. Fun fact: iPad retina displays throw white flashing pixel artifacts that other displays don’t, so you may be making beautiful gifs that secretly look incredibly shitty on an iPad. I learned this the hard way when I got an iPad and looked at some of my posts. I learned the 540px resize tip from the good folks in Tumblr’s pixel art community, which fixes about 95 percent of my gifs. *bows down to pixel artists*
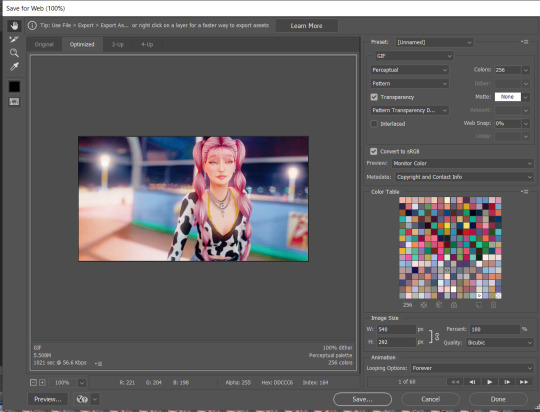
4. File Menu-->Export-->Export for Web. These are my settings.
The settings in the top right control the quality of the gif.
These can be changed around once you get the hang of things, but since this is the super basic version, these are settings I can vouch for. This gets me nice looking gifs without a lot of artifacts. Ignore the preset name; that’s what I call the preset I made for this. On your screen it’ll say “custom” unless you save your own preset. It will remember your settings even if you don’t save a preset.
The size of the gif is at the bottom left. For tumblr, this has to be under 10 meg. UNDER 10 meg, if you make a beautiful gif and save it at 10.0 mb tumblr is very likely to reject it and make you re-save it a few bytes smaller, thanks to rounding.
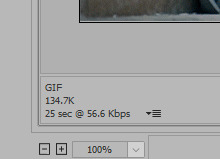
If it’s too big, just cancel and go to step 5.
5. Window menu-->Timeline. In the timeline, you can trim your video by dragging the ends in, or by cutting with the scissors icon and deleting the extra bit. The controls in the timeline are fairly intuitive and limited to just what’s useful unlike premiere pro cough cough.
6. There’s a context menu in the right upper corner of the timeline window. Select that and choose “set timeline frame rate” to speed the whole video up or down. Higher numbers mean more frames overall and a bigger, slower gif. Lower numbers mean fewer frames and smaller, faster gif.
Slightly Less Basic Stuff
(after the cut)
You can convert your video to individual frames by exporting your gif and re-opening the gif, but you’re going to lose quality when you re-save so that’s not ideal. Better is to create a frame animation in the timeline. That has several steps. I’ve recorded an action for it that looks like this:
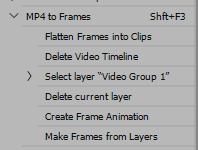
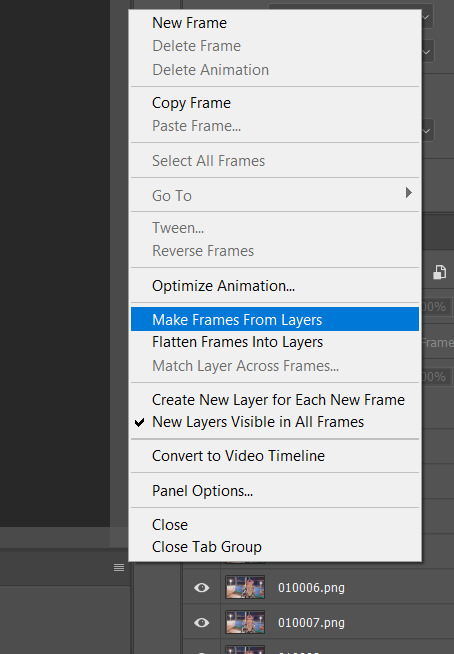
1. Timeline Context Menu-->Convert-->Flatten Frames into Clips. This will make layers out of the individual frames in your timeline video.
2. Timeline Context Menu-->Delete Timeline. This clears the timeline so you can use the layers to make frames.
3. Window Menu-->Layers. Hopefully you already have the layers window open all the time, because it’s a fundamental part of photoshop workflow, but if not, do this to open it.
4. At the bottom of the layers window there is a weird unhelpful video group with a single layer in it, shown in picture. Select it, hit the delete key, and chose “delete group and contents.” Otherwise this will become an annoying blank frame, as I recall.

5. In the middle of the currently-empty timeline window is a button that says “create video timeline” with a dropdown next to it.
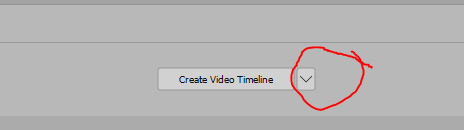
Click the dropdown to change the button to “create frame animation,” and then click that. This will create an animation with a single frame.
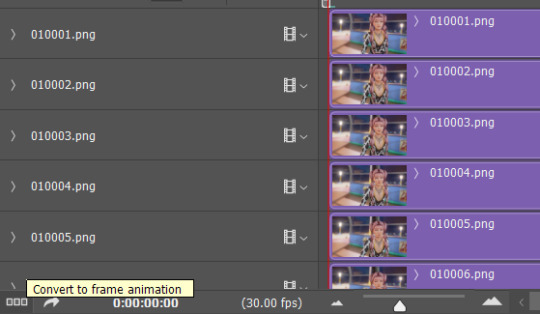
6. Timeline Context Menu-->Make Frames from Layers. This puts all of your layers into your timeline. Whew! You see why I made an action for these steps.
7. Now you can delete frames from the ends or middle of your animation by selecting them and using the trash can icon on the timeline. Don’t hit “delete” as that will delete the associated layer, potentially, and cause you a headache while you figure out what happened. With a normal aspect ratio for your frame and 540 horizontal pixel width, you should be able to fit around 100 frames into a <10mb gif. It does vary a lot depending on what’s going on in the scene & how much each frame changes from the one before it. And aspect ratio makes a huge difference - big square gifs are beautiful, but can’t fit nearly as many frames into the <10mb limit.
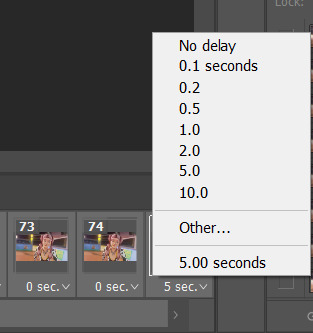
8. If you changed your frame rate and want to introduce a delay between frames, go to Timeline Context Menu-->Select all Frames. This will grab all the frames so you can apply a delay to all of them at once. While they’re selected, choose the delay dropdown from any frame and it will apply to all of them.

If a gif feels like it’s going too fast, I apply a delay of anywhere from 0.04 to 0.07 (using the “other...” option from the dropdown--all of the default delays are too much). That’s when my gif has a frame rate somewhere between 15 and 30 fps. Try some different settings and save the results out. Note: Always check your speed by loading the gif into a draft on Tumblr, since different previewers play things at different speeds, which is super annoying.
9. When you’re satisfied or want to test, repeat step 4 of the Super Basic Stuff section.
Fun with Layers
1. The order of the frames is the opposite of the order of the layers, which doesn’t matter for basic stuff, but when you start messing with adding text, layer effects, etc, this will definitely matter. You can reverse the order of the layers by selecting all of them in the layers window (NOT the frames in the timeline), and then: Layer Menu --> Arrange --> Reverse.
2. To put text on top of the whole sequence, choose the top layer in your layer window and click “text” to add your text. You can change your font, color, and size as much as you want, but you can’t drag your text around after you create it because it will (usually) only move on the current frame. So if you don’t like where it ends up, delete the text layer and try again. I usually keep text centered and add spaces to either end to put it where I want it.
3. To add text in the middle of the sequence, use the timeline to select the frame where you want the text to appear. Then go look at the layers stack; scroll up and down until you see the visible/selected layer. This corresponds to your current frame. Stick your text layer on top of that layer and -- if your arranged your frame order correctly in step 1 -- the text should appear part way through your sequence. For this gif, each “eye contact” is a separate text layer placed a little further down the layer stack.

4. To make text disappear partway through an animation, go to the timeline and select all the frames where you DON’T want the text. Keep them selected, go to your text layer in the layers menu, and hit the eyeball to make it invisible. That should make it invisible just for the selected frames. For this gif, I put all the text layers at the top but changed the visibility for each one to limit it to a particular set of frames.
5. To change the brightness of your gifs, select your top layer and go to Layers Menu -->New Adjustment Layer-->Brightness/Contrast. Adjustment layers let you make non-destructive modifications, and they affect all the layers below them so you can change the whole gif at one time.
6. To change the color balance, I like to use: Layers Menu -->New Adjustment Layer-->Selective Color. Within the Selective Color controls, choose “neutrals” and give it some tweaks. As you get the hang of it, you can do a lot more with this, but basic adjustments to the neutrals setting will make a big difference.
7. I use the BW adjustment layer to make black & white gifs - it has more options than simply desaturating - and I use a levels adjustment layer for more nuanced contrast changes than you get with brightness contrast. Hue/Saturation is good for resaturating flashback scenes.
8. Any time you like the effect of an adjustment layer, save it (or a group of them) to a new document by going to the Layers Context Menu-->Duplicate Layers and then choose “New document” in the dialog window. Save your new doc, which will just be the adjustment layer(s). Then you can use these layers on other gifs, rather than constantly recreating your tweaks. When you’re giffing a whole show like I am, you find yourself making the same adjustments over and over anyway, so this is a time saver.
All right, that’s all for now! Other tutorials are linked up at my Tutorials Masterpost. It’s small but it’s growing!
124 notes
·
View notes
Note
I just want to say I have No Idea why Tumblr started recommending your peafowl posts to me as a "based on your likes", but I am HERE for the drama and anecdotes of your peafowls anyway. My grandma has fan tailed pigeons that I love, but I've never considered looking more into birds. You have me intrigued. How many birds do you have and what kinds? What is the difference between "purple" and "violets"?
I currently have 26 peafowl (though a lot of those are babies that I will hopefully sell over the summer), 1 mille fleur d'uccle chicken, 2 gold laced wyandotte chickens, 10 old german owl pigeons, around 20 coturnix quail, and a few bobwhite quail.
And the difference between purple and violet depends on which violet you mean. The issue is that there's only one "violet" and the other is "violeta" (specifically Sonja's Violeta). Violet is a European-born morph that is usually specified by the addition of EU to the morph name (EU Violet). Sonja's Violeta is a US-born color morph that is completely separate from purple and violet, but it often gets called "violet" because people are casually sexist and have no respect for language.
Sonja is the wife of the man upon whose farm Sonja's Violeta first appeared. He named the morph after his wife so that she would continue to live on as long as the morph does. The Buford Bronze morph, commonly shortened to just Bronze by some, usually retains the "Buford" in the name as it was first named by Buford Abbot in the 1980's. Where Buford's name tends to remain attached to the morph name, Sonja's name tends to be left off AND the morph name tends to be called "violet" instead of violeta. I hate this with a passion. Not only is violet plain old just more BORING than violeta, it's also HIGHLY confusing to new (and even some old) folks who hear "violet" tossed around for both Sonja's violeta and EU violet, when the two birds look NOTHING alike.
So, with that understanding in hand (hopefully), purple is different from Sonja's violeta because it's a completely different morph that uses different genes. If you click the links in this post it will take you to the peafowl image database, which will show you pics of the morphs I'm discussing, and you'll see Sonja's violeta is this rich, dark color, and purple is a warm muted color.
However, purple is only different from EU violet by intensity of the color. Normally when you breed 2 different morphs together, rather than producing a bird that is a mix of both, you produce a wild type that carries 1 allele for each mutation. For purple and violet, this isn't true; when you breed a violet to a purple, you get a really good purple or a really crappy violet, a bird that's somewhere between the two. This is the ONLY morph that does that in peafowl. It's believed to be the same gene, but one is basically a much higher quality, or perhaps has a modifier involved to increase the effect. Personally I think purple/violet are a dilute gene rather than a full morph, and that EU violet is a stronger version of the gene.
49 notes
·
View notes
Text
Reblogs vs. Likes: A Basic Rundown
Welcome back, Twitter refugees, to my series on how to use this hellsite and assimilate into mcytblr as smoothly as possible.
Today we’re talking reblogging versus liking, both on mobile and a computer.
For reference, Total Notes = Likes + Reblogs + Replies on a single post.
Reblogs
Reblogs are the best way to get a Tumblr post out to your followers. For more in-depth information on how reblogs work within the Tumblr algorithm, as opposed to any other social media site, please refer to this.
Longevity: Reblogs stay on your blog for the rest of eternity, unless you delete it. However, even if you delete an original post, if someone has reblogged it, it will stay on this site forever as a reblog on that person’s blog.
Adding to a post: You can reblog a post blank, add your thoughts in the tags, or add an actual addition to the reblog. Lately, I’ve noticed a reluctance to add to anyone’s posts, which makes me sad because one of the most iconic things about Tumblr has always been its reblog chains, where the initial meaning of a post can become something totally warped and hilarious. Still, most people on mcytblr reblog with their thoughts in the tags; you can do whatever you want really since there’s no wrong way to rb.
Hashtags on reblogs: Tags on a reblog do not make that reblog show up in search results, because only original posts show up in search results. If people are tagging a reblog, it’s basically just to add their own thoughts or to organize their blog.
Notifications: The OP of a post will get a notification for you reblogging their post, and the person you reblogged from will get a notification. In addition, Tumblr added a feature this year where we can now see the tags on a reblog from our activity bar.
Reblogging can seem cumbersome because it opens a whole window if you choose to reblog a post, and then Tumblr will update your dash once you finish reblogging. This is where Quick Reblogging comes in:
On mobile, you can hold down the reblog icon to reblog a post to whichever blog you choose, without opening up a new page or refreshing your dash. This is called a Quick Reblog. If you go to your mobile settings, you can turn on “Beta” features to enable the Quick Queue feature, which works in the same way.
On a computer, there is a lovely extension called XKit that many veteran users have downloaded. Many of its features unfortunately no longer work because of changes to Tumblr’s code in 2019/2020, but one that still does is One-Click Postage. This feature lets you add text to a reblog or tags (unlike the mobile option), and then quickly reblog or queue it to your blog, all without opening a new window. I’d highly recommend XKit, if only for this feature.
Likes
On Tumblr, likes serve only as a bookmarks feature for each user, to add to a post’s total number of notes, and/or to let someone know you literally “liked” what they posted/reblogged. The total number of notes on a post might help it get into other users’ “Recommended posts,” or show up higher in the Search function (when sorted by Top Posts), but otherwise, likes don’t play a direct role in sharing a post with other users.
On mobile, you can double-tap a post to like it, a-la-Instagram.
To this end:
This site was made to mostly consist of reblogs. Unlike on Twitter, lacking original content on your own blog is not condemnable or a bad thing. Tumblr culture has shifted significantly because of the porn ban, subsequent Twitter emigration, Twitter immigration during the pandemic, and several mcyttwt exodues; however, since its inception, Tumblr has always been about building your blog (unless you’re a creator) primarily through reblogging. It’s no coincidence that your post will seemingly blow up if someone with a lot of followers reblogs, rathern than likes, your posts. For this reason, please reblog things you think are worthy of sharing- PSAs, urgent political info, art, writing, etc. Your blog quality is not lowered for being made up primarily of reblogs; on the contrary, it increases.
65 notes
·
View notes
Photo
Finding high quality film/tv rips, saving the large files, and screencapping them are half the battle for gifmakers when setting out to make a gifset. Here’s a little guide on this process, including my advice on
Where to download stuff
Where to store your movies/shows
Screencapping programs
Making gifs as HQ as possible, including tips for picking out what to download when you have multiple options (not all 1080p rips of the same movie or tv episode are the same quality and I explain why)
Why screencaps of 4k movies can look weird and washed out and how to fix that
and more
✨ You can find my gifmaking 101 tutorial here and the rest of my tutorials here.
Where can I download movies and shows?
First off, I prefer direct downloading rather than torrenting stuff because it’s faster and with torrenting, there’s more of a risk. Other people downloading the same torrent can see your IP address. This means movie studios can find out you’re downloading their content and can send you a warning letter. The download speed also varies depending on how many other people are seeding it. I would only do it if it’s your only option and you have a VPN or something.
This is THE best guide for pirating I’ve ever seen. I use it for finding sites for books, music, you name it. The part of the guide you’d want to look at is where it says Direct Downloads Link (DDL) sites. My favorite place is Snahp. These ddl sites will have links to their movie/tv rips that are typically hosted on one of these two sites: google drive or mega.nz. You can download stuff from both of those sites for free, but with mega, they have a 5GB file download limit unless you have a premium account. I personally pay the $5 a month membership for mega because it’s worth it imo. You can buy a subscription through the mega app found on the iphone app store (so you’re billed through apple and it’s less scary than giving a random site your credit card info lmao) and as for androids I think mega has an app on there too.
So basically, if you go to http://snahp.it, they’ll have rips for different movies and shows.
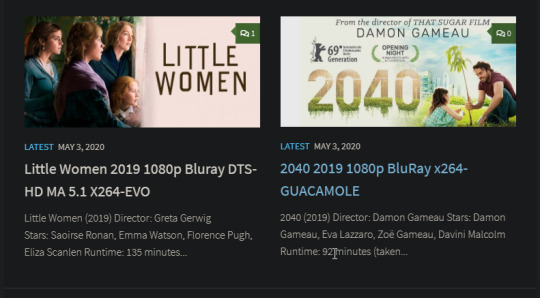
You click on the movie title and it’ll take you to a page where they have links for the video which they have uploaded on a variety of sites (including mega).
How do I make my gifs as HQ as possible?
It’s best to gif things that are 1080p. And usually the higher the file size, the better. A really important thing to note is that not all 1080p bluray rips are the same. The piracy groups that rip these files take uncompressed .mkv rips from discs that are anywhere from 10gb to like 50gb, and then run that through video converters to compress the file down so that they’re 2-8gb. Sometimes when that happens, the video quality goes down a LOT. The same goes for TV episodes. One rip could be 800mb, the other could be 3gb and both could claim to be “1080p” but the quality would be NOTICEABLY different. Your best bet is to always pick the rip with the highest file size.
I’ll show you an example with this scene from You’ve Got Mail.

I downloaded 2 different 1080p rip versions of the film. Both claim to be 1080p, but one is 2.41 GB and the other is 9.75 GB. After taking screencaps, it’s obvious that there’s a BIG difference in quality.
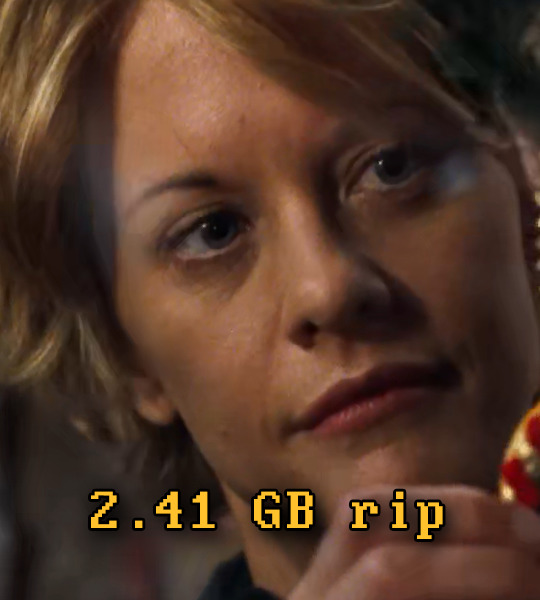
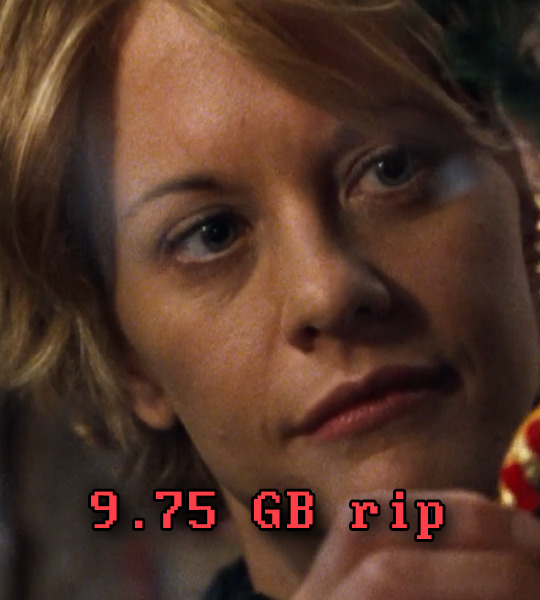
(these pictures are best viewed on desktop tumblr)
When it comes to Blu-ray rips, download remux versions of films and shows if possible. Remux means .mkv files that are uncompressed and straight from a Blu-Ray disc. Giffing remux rips cuts down on the possibility of seeing pixel-y effects a LOT in my experience. It’ll take a bit longer to download than typical 1080p rips but it’s worth it imo.
For TV episodes, if you can’t find a Blu-Ray rip, uploads with the word AMZN in it are usually the highest quality and your best bet (unless you see another upload that’s higher in file size - again: always try to pick the highest file size). 'AMZN’ means they’re from a person that ripped the episode from Amazon Prime Video.
Also, even better than 1080p is 4k (2160p). I only really recommend this though if you know you’re going to gif something up close and crop it a lot - like if it’s a big 540x540px close-up gif of a person. You’ll REALLY see the difference if it’s a 1080p vs 4k rip in that situation. I usually don’t bother with giffing 4k files unless it’s the case above because my laptop lags when taking 4k screencaps and it takes longer to load them into photoshop (4k screencaps are usually about 60mb each!)
⭐️ Another thing that’s important is making sure that when you actually make your gifs, you set them to the correct speed (.05 for movies and most shows, and .04 sometimes for reality tv and live broadcasts). Here’s my gif speed guide. Having the right gif speed is really important for making a gifset HQ. You don’t want it to look too slow or too fast.
What’s your favorite video player to take screenshots with?
MPV player, hands down. And I’ve tried a TON of programs over the years. I’ve tried KMPlayer and found that it added duplicate frames (and even missing frames) which is horrible, and I’ve tried GomPlayer which is.....I’m just gonna say it, I’m not the biggest fan of it. It’s a little overly complicated in my opinion and it has ads. If you like these programs, more power to you! Use whatever you’re comfortable using. I just like MPV the most because it doesn’t have ads, it’s simple, you can take sequential screencaps with a keyboard shortcut, and it can play 4k movies.
Screencaps I take of 4k 2160p movies look so dull and washed out, like the colors aren’t right. Why is that?
That’s because your computer can’t handle HDR 4k video files. It probably can handle SDR 4k video files, but unfortunately, 99% of 4k rips out there are HDR.

[picture source]
Now, HDR displays just fine on computers that have 4k-HDR capabilities, but most older computers don’t have this ability. Having said that, MPV - the video player I mentioned above can take a 4K-HDR video and fix the colors/lighting in real time so it displays correctly AND take screenshots of it with the fixed colors. If you have an older version of MPV, make sure you download the newest update for this. In my general gifmaking tutorial, there’s a portion on how to install this program on macs. I also just made a video tutorial on how to install it on pcs here!
High quality TV and Movie rips can take up a LOT of space on my computer. Where do you store your files?
I store them on external hard drives. External hard drives are like flash drives but they have a MUCH higher storage capacity. You just plug them into your computer via a usb cord when you need access to the files and it’s that easy. I have two of these Seagate 4TB hard drives in different colors so I can easily pick out whichever one I need. I have silver for my movies (because it makes me think of “silver screen” lmao and it’s easier for me to remember) and then I just have a blue for shows. Now, external hard drives of this size can be $$$$ but it’s worth it imo. Look out for when they’re on sale.
What’s the size limit for gifs now?
It’s 10mb! It used to be 3mb and then last year Tumblr upped it to 5mb. Some gifs initially had distortion because of Tumblr’s switch from the .gif to .gifv format, but they’ve fixed the problem AND increased the upload limit to 10mb. Just make sure not to add any lossy to a gif.
Lossy is basically a grain you can add to a gif to lower the file size down. Gifmakers (including myself) used to use this as a trick to get the file size down under 3mb. However, since the .gifv update on Tumblr, any gifs with Lossy added will look distorted like it’s a gif made on a phone app or something.
_________________________________
That’s it for this guide! Again, feel free to check out my other tutorials on photoshop, how to center subtitles, download hq movie trailers, and more ✌️
UPDATE 6/23/20 ⚠️
I’ve gotten an ask about this problem 3 times since I’ve uploaded this tutorial, so I thought I’d add this in. If you are experiencing duplicate and/or missing frames in mpv, it is a glitch with the latest version of mpv. download an older version like 0.29.0. this happened to me on my mac and downloading an older version fixed the problem.
2K notes
·
View notes
Text
Jason sent me an email. It's below, under the cut, along with my reply to him.
Hi Daniel,
I closed the thread for two reasons: because I had other obligations to deal with, and because I wanted answers to my questions from someone that was actually engaging with it.
Backing up, though, I really don't understand the hostility and vitriol you're spewing in my direction. Like, it is so disproportionate that it's incomprehensible.
Considering that vitriol, I'm hoping that we can have a private conversation so that I can better understand your position.
Thank you for making a pass at answering my questions on Tumblr, but I have some counter points.
Purchasing a digital item gives you access to a form of that item that others, who did not purchase said item, do not legally have.
How is this different from an NFT? You're buying the form of the token that gives you the legal right to that item. What's more, you have the legal right to sell that item, whereas if you "buy" a wallpaper, you're actually just licensing it for private use. You're not allowed to resell it next year, when you don't want it anymore.
if I want to buy a digital wallpaper, the seller will then provide me with a full resolution of the image, that I could not, legally obtain otherwise.
And an NFT seller provides you with a token. Are you saying that it's the resolution that makes a wallpaper acceptable and an NFT not? By which I mean, the fact that the art is available on the web makes selling the rights to that art unacceptable?
Which leads me onto your second point:
NFT is not the same as DRM.
Functionally, I disagree. An NFT is a DRM: it manages the digital rights to a thing.
When you purchase NFT you get bragging rights. You get to say you paid money for an online picture that was not created specifically for you and was made only to be sold as a sort of internet trading card. You're allowed to transfer the link to the image into your own NFT wallet. That's it. Everyone else can see the NFT. Everyone else can right click and save the image. You get to brag you paid money for the image.
And that's bad because...?
For example, I could imagine that under the image on the credits page of our games, it might say:"The NFT of this art is owned by Scurvy Danny," letting the world know that you had specifically financially supported the artist.
DRM limits the way a person can interact with digital media. A DRM will check if your copy of a game was legally purchased and stop you from using it if it detects, well, many things.
Well, I could certainly image a world in which, if you bought the NFT for the, say, Werewolves: Haven Rising art, whenever you opened your omnibus app and looked at the art, you'd get some sort of special effect inside the app that would be facilitated by the ownership of the NFT. By owning the NFT, you'd have the right to that special effect. That sounds like DRM to me. Everyone that didn't own the NFT wouldn't (legally) be able to view that special effect.
Now, hold up, I hear you cry, but what if you don't pay for a specific quality of an image? What if you just pay for a commission and that commission is then posted to the artist's gallery anyway, for everyone to see? That's exactly how you said paying for an NFT is!
Well, as someone who does that type of work, I'm happy to explain.
When you commission an artist, they create a bespoke image for you, that they would not have created otherwise. And often you will get a higher res version compared to what is posted in the artist's gallery, but if you don't, you still didn't just pay for your name to be attached to an image everyone else can access. You paid for the service of the artist creating a digital image that they wouldn't make if you never paid them. You paid for the time they spent creating something that caters specifically to you.
I'm talking here about selling NFTs of the art that we've already commissioned. So, again, taking the Werewolves: Haven Rising example, we'd sell the NFT of that.
In this instance, the buyer would get their name attached to the piece of art, yes. And the artist would get paid for work that they've already done.
I really don't understand what's offensive about that. That someone's paying to have their name attached to the piece of art that wasn't created specifically for them? That the artist is getting paid for doing nothing?
There are of course other ways artists can make money from already created digital content. Prints are a good example, but of course Jason already said how bad that is for the environment compared to XRPL, because oh no, you're using paper and ink! That's a higher carbon footprint than XRPL!
Yes! If the argument against NFTs is the fact that they have a carbon footprint, you have to make a comparison to what the alternatives are. If the alternatives have a larger carbon footprint, then the argument is negated.
So is buying a new sweater that I technically didn't need but I did it anyway because individual people decreasing their own carbon footprint to zero wouldn't be enough to stop, let alone reverse global warming, what we need to do is force the top polluters (corporations) to stop fucking polluting
I'm aware of all these things, but other people keep arguing in the thread that cryptos are untouchable because of the carbon costs. So, whatever point you're trying to make about NFTs is lost to me here. The best I can glean is that you're saying that NFTs on the XRPL don't matter in the grand scheme of things.
and besides, we've already been thru this, the carbon footprint of the NFT isn't what's actually the most concerning thing about them in this case.
But, again, I don't understand what is concerning.
You can make prints and zines of your work with small and medium printers that you trust. I know MANY artists that do this, that do not employ print on demand corporations specifically because of their sketchy practices, and they're doing fine.
But then someone would have to make those prints, warehouse them, inventory them, and account for them. That's a whole investment of capital and/or hiring someone. It would also take a lot of time. And, unless the print run was huge—which would be a large financial risk for us—the artist themself would probably make less money than with an NFT sale.
Specifically, making prints and zines isn't our business. We don't know anything about that business. I don't want to start a new business completely unrelated to interactive novels.
And, to top it all off, it would have a significantly greater carbon impact than an XRPL NFT.
But another option many furry artists are already screaming at me about is selling adopts. You create a character, design them, often even write a whole backstory, and then put them up for sale. It is a digital collector's item that's existed long before crypto. You can then use the character however you like, you gain all rights to the character and can legally roleplay as them, put them in your book, comic, whatever you want. And many people just collect them. And we didn't need NFT for it.
I'm happy that you have "adopts," but I don't see what the relevance is. That the furry community is small enough that the social pressure/shame of using someone else's adopt prevents unauthorized use? I don't get the point of comparison.
But that doesn't allow for a middle man, so I don't think that option would work here, because CoG and Jason want something they can take a percentage off of.
Two things about this. The first is that artists have tried to exploit their artwork that they did on their own, and it failed miserably. They don't have the marketing reach that we do. Secondly, it's the games that we publish that give these artworks significant context. As cover art, the art is in dialogue with the work, which we produced. So, should we get a cut? Absolutely.
In particular, by making a whole collection of NFTs, they collectively give each other value. An individual artist trying to make one of these works into an NFT and selling it has much less contextual value. (The "collectable cards" analogy.)
Remember, this art is not being commercially exploited right now. I'm trying to get money to the artist from work they've already done.
Yes, artists can have other venues of getting money off their old art already. But the way you wrote about it in the thread made it clear you specifically want to be the one facilitating it.
Yes! Because they won't make any significant money off of it themselves! If we do it, they'll make more money. And they won't have to do any of the work!
The problem is, Jason, we don't need you to make money. But you need us. You need your authors. CoG will not exist if every writer decides to move to another venue, use twine, RPG maker, or hell, learn Python or HTML and code their own game from scratch. You have no idea how motivating to learn spite is, and what you're doing now is making a lot of people want to show they don't need you and your crypto bullshit simply out of spite.
Again, I don't understand this spite. What have I done that is deserving of spite? I've suggested a method to create a carbon-lite source of periodically recurring revenue for our artists on top of the payment we already make for generating the work. Why is that spite-inducing?
Regards,
-Jason
My reply:
You either do not understand what an nft is (nothing, it's nothing, it's like you buy a cake but all you get to take home is the receipt, except you were made to believe you own the cake, how many more ways can i explain this) or you believe I can be convinced if you just keep explaining why being a middleman who does nothing is good actually.
I'm almost 40. I have worked in education and finance all my adult life. Two things required of me, always, were research and due diligence. You're not going to convince me a scam is not a scam. If every MLM currently operating in my country couldn't, neither will you.
You seem to want to feel like what you do is some form of service for people on your platform and it is. Allowing people faster and easier access to sell their games is a useful service. But it's not as useful as you think it is. It's certainly not "people will overlook us getting involved with something that's been proven a scam over and over" important.
No, buying bragging rights to an image that you have no proof was even made by the artist (as the many nfts sold have been outright stolen) is not the same as sending the artist cash on ko-fi or Patreon. Support via Patreon will get me bragging rights and a shout-out too and it will let the artist keep a lot more money.
There won't be fees they'd have to pay to mint an nft.
There won't be fees they'd pay for purchasing the crypto to mint the nft.
There won't be fees for converting the crypto back to cash.
The value of what they earned won't drastically change day to day.
The money will actually mostly profit the artist and not a third party.
And you admitted you want to be that third party because you believe without you artists cannot prosper.
Except they do.
Yes, some great authors got their foot in thru CoG. Chris Huang would probably be my first example as he is now a successful author. But the fact he started with your company is superficial. He could have started with someone else. He could have paid his own entry fee to Steam and done it himself. I don't use your platform to promote my art and i know for a fact I earned more this year from my art than many of your writers. And all I got is a Twitter account and word of mouth.
You pay them ~17% (25% if what's left after steam takes their 30% iirc) of the game price in the end.
I know people who earn more from putting their game on itch.io and doing almost no advertising. You provide a service, yes, but it's not essential.
The way you dismissed every argument your writers had for you on why they don't want CoG anywhere near nfts is disheartening. Just exactly what do you plan to sell when your writers and artists leave?
And you also had the nerve to say you want to let artists get paid without them doing no work?
They do all the work, Jason. They code the games they draw the art, they test and edit and gather feedback, you don't even provide beta testers, your writers organize all that. Most I know don't even do it through your forum anymore (citing you as the reason they don't use it by the way) and advertise on unofficial discords and Tumblr.
Your engine isn't even the superior if interactive fiction engines at this point anymore, not with so many other free options out there that don't require users to align their art with one specific publisher to use them.
I don't have vitriol towards you, Jason. I don't even have spite because I never even published with you, only played games from your platform. I do have a lot of disgust though. You genuinely disgust me at this point, for your causal dismissal of actual issues, your lack of concern for people who rely on your platform and whom you need to produce your profit and for your delusions about how important to them you are.
And don't start with "but this isn't different from how you would earn money in other commission based jobs" I know it's not.
I think commission based pay is disgusting, i think the way publishing in general is structured is disgusting and I'm glad it's becoming more and more obsolete by the day.
I plan to make your delusional reply public as well so if you hoped to keep this hidden by sending an email, tough. You're the owner of a public publishing company, you're in a position of power, I'm a forum user who tried to give people info and got accused of harassment for it.
Good luck with your scam currency.
20 notes
·
View notes
Note
Omg can you give detail on how you make it into a gif
ahhh i can try! this is one of those things i've been doing for so long that it's second nature and by now i don't even think about it but!!
this is for making gifs only if you have already rendered your frames! this isn't a method for converting videos into gifs.
if you open photoshop and go file>scripts>"load files into stack" and you'll be greeted by a pop up window instructing you to add your frames. select browse to find and add them, and click okay-- now it's going to take a few minutes to load all those files into a stack!
photoshop has a lot of windows that are hidden for very good reason, so make sure you go to window>timeline to make sure your timeline is visible at the bottom. this is important because gif making happens in the time line!
i'm gonna put the rest under a read-more because i'm writing this off the cuff and very tired
anyway, by now you should see something like this! when you click "create video timeline" you'll be met by the timeline used for video editing, but look in the corner and select "convert to frame animation" and you should get something a little less scary!
this is a lot less intimidating, right?

on the timeline, on the far right hand, there's the button with the little lines, and when you click that it opens up a world of possibilities.
first thing's first, you're going to want to make frames from layers, and there are two things you're gonna wanna take note of. 1. your frames are backwards, and 2. they are timed badly! again, using that drop down menu, "select all frames," then reverse frames, and they should be in the right order.
now, for timing the gif!
you always want to make sure you have ALL the frames selected when you do something like this, unless you wanna get a little timey-wimey with it. depending on what you're into or the effect you're going for, the sweet spot is between .04 and .08 seconds!
also, good general rule of thumb when you're making gifs? always make sure the first frame is selected. it's a good habit to get into! anything you do to the first frame will happen to all the frames-- if you're adding a PSD or filter, that's incredibly useful. select the first frame of your gif, and you can just drop the PSD onto it and go!
all that's left is to resize it, which i do using image>image size, and make sure the number of frames fit in under tumblrs very strange file size limits, and save it using file>export>save for web/legacy, at which point you will be greeted with this!
a few quick things:
1. your dither settings will always look best as a pattern. trust me. when the dither is a pattern it's less noticeable to people, the uniformity makes it easier to ignore any dithering.
2. you really don't need to worry about your color settings anymore, so you can ignore them all together. in olden times, we would lower the number of colors to get a smaller file size, because tumblrs limitations were soooo restrictive.
which brings me to...
3. file size. if you go onto tumblrs FAQ it will tell you the limit is 10MB, and i'm here to tell you that is a lie!
in theory, you could get a 10MB gif to work on tumblr, but that gif would have to be incredibly small, with shitty colors, and even then the quality would get eaten up. someone once fit the entire bee movie into a 100x100px gif and it fit under the limit-- but just because you can doesn't mean you should!
personally, i think 5MB is the sweet spot for what tumblr can handle, reliably. higher quality gifs might get mangled screen to screen, but 5MB is a pretty safe bet that everyone will be seeing the same gif. that's not to say shoot for 5MB-- it means try not to exceed 5MB. but, i cannot stress enough how much size matters.
tumblr is designed for 540px wide gifs, and i've managed to cram about 30 frames into a 540x1000px gif, but there wasn't a whole lot of movement happening. meanwhile, at 540x300-ish, i can cram anywhere from 50-75 frames in there. however, if you were to do half-sized gifs (268px wide), you could probably manage to make a hundred frames fit under the limit-- but if you do that i think they call the police on you because that's insane!!! i've done it and i'll do it again tho
tldr on gif limits and sizing; bigger canvas=less frames, smaller canvas=more frames. more motion=less frames, less motion=more frames. tumblr propaganda machine says 10MB, dude with 10 years experience making gifs on tumblr says 5MB is the goldilocks zone.
#IS THIS EVEN HELPFUL??? i'm sorry#i'm exhausted and got carried away at the end#if you want horror stories about how we used to make gifs on tumblr.... lmk#the limit was 1MB#asks#photoshop help
27 notes
·
View notes
Note
Hnnnggg how do you make such lovely gifs with the words?? I am extremely new to Tumblr and have no idea what I'm doing, so please excuse any misuses of terminology. Literally any help would be amazing on how to do anything similar, can't seem to find any recent tutorials of any sort. Thank you!
Thank you so much for the ask, anon! This is just going to be a summary on how I gif things so prepare 😂
1. Sharpening
Sharp gifs usually come from the quality of the original video (I use 1080p videos) and the program that you use to sharpen. For all of my love hatred of da vinci, I’m not satisfied with it’s sharpening tool, and photoshop chugs my RAM like a starving horse. So I use a combination of ezgif and photopea, which are both free websites.
I trim the clip that I want to make into a gif (usually between 1-3 seconds depending on the size of the gif and how smooth you want it to run). I convert that video into a gif using ezgif (a higher frame rate means smoother gifs) and then plug the gif into photopea.
I then select all of the frames, click Filter > Sharpen > Smart Sharpen. For s1-3 I usually use Amount: 200% and Radius: 0.2 (I might do it once or twice. Sometimes doing it twice only makes it unclear so it depends on the scene you’re doing). For s4-5, I use Amount: 200% and Radius: 0.3.
(I know @arthurpendragonns does radius 0.4 for s1-3, but doing that only makes the gif more grainy for me. It may be because of the difference in programs - she uses photoshop -- but feel free to try different radiuses! I‘ve also heard that doing some noise reduction before giffing may make it less grainy but I have yet to try that method out)
2. Colouring
I think most people have different ways/orders of colouring things, but I usually start with , color balance, then selective colour, then saturation (don't put the value setting too high or else it will make your gif grainy) and then brightness/contrast. It’s mostly all about just playing around with those settings until you find something that you like. These options can be found under Layer > New Adjusment Layer.
3. Words
The settings for the words depend on what you’re trying to do with it. For subtitles like this:
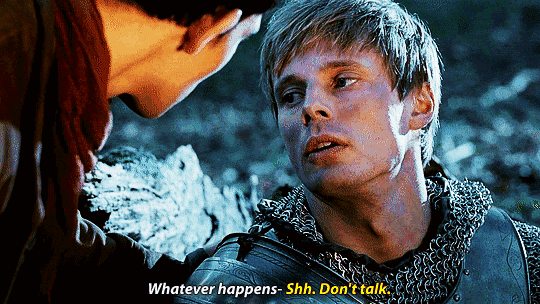
I use Myriad Pro Bold Italics in size 16px. After adding a new text later, changing the font, font size and colour of the words, I right click on the text layer, go to Blending Options, change the stroke to 1 and change the color from red to black. This creates the black outline you see above. Sometimes the words still isn’t quite visible on the background despite the black outline so I select Drop Shadow as well to create a shadow behind the words. Put the Distance at 0, and change the size and spread until the words are adequately visible.
For words that aren’t subtitles like this:
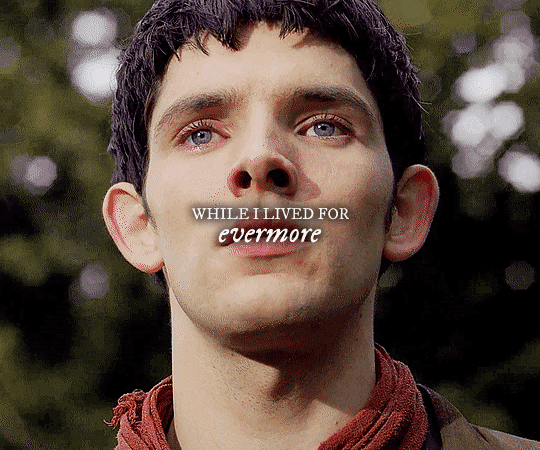
I pretty much just play around with different fonts, font sizes and blending option settings until I find one I like 😂
That’s all the advice I have for now! I hope it was helpful and I apologise If I confused you
143 notes
·
View notes
Last Seen Blogs

aveloka-draws
Aveloka

local-bisexual-weirdo-blog
Untitled

manicmechtech
beluvd

kharlosgaming
Kharlos Gaming
nobodystentacle
x.x