#THE IMAGE WONT UPLOAD EITHER
Text
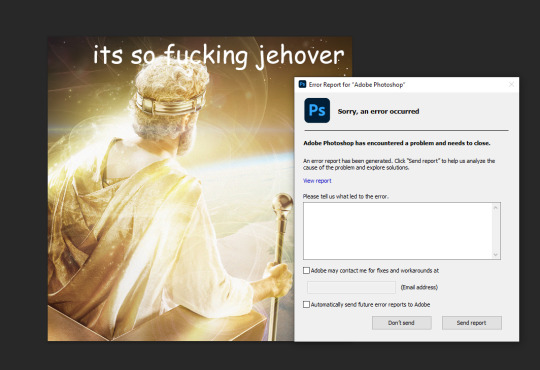
i think ive just experienced divine intervention
1K notes
·
View notes
Text
The big dillema of the fact that i dont actually have a chapter ready for monday
Like its half ready and i have the chapter afterwards. But this one, despite bringing me great happiness, is only half baked cause most of the week i spent packing then moving then randomly doing arr relic in ffxiv, and then grandma died and now we’ll spend the next three days travelling or taking care of the funeral
And while technically all of those are respectable reasons not to upload images gonna feel worse if i dont cause then im gonna be sad. I have options either to post a part of what i have (which im not sure is actually a full half cause i like bullying suguru too much and keep adding more), post later but the next chapter would be on time so technically its like we’re still on schedule. Or just post what i have complited a while ago, the chapter that was meant to be after a suguru interlude. Idk. Questionable. And also next two weeks would probably be so busy. Fuck me. I want to play ffxiv and write and now do adult shit and travel. God gives maybe ill have decent grades and at least that wont go to hell, though its questionable. Can life be nicer. Im like not processing death but also when i stop for ten minues i suddenly do and its not pretty
16 notes
·
View notes
Text
PEGOKITA RENTRY ATTEMPT PLS WORK
Ignore this if you want I'm literally just trying to get this shit to work for a daily account I wanna run on Twitter, BUT THE IMAGES WONT UPLOAD TRANSPARENT ANYWHERE ELSE I UPLOAD THEM. NOT TWITTER. NOT PINTEREST. IM GONNA LOSE IT IF THIS DOESNT WORK EITHER.
7 notes
·
View notes
Text
hiii everyone im trying to change the header image on sadgrls neocities layout generator and it just… wont change? like i have my image uploaded and in what i think is the correct place… and its just not showing up in the header? also im trying to delete the background image and that wont go away either
10 notes
·
View notes
Text
STIM GIF TUTORIAL!!!
Over-explained process on how I make gifs, using a recently made gif that took a lot of effort + went thru ALL possible steps i usually do. So. yeah.
First of all: I use Firefox and the adblock extension UBlock Origin , you should too. (I also use Windows, but i can't say i recommend that.)
Find your video source
I use mostly youtube and instagram.
for instagram I use: https://fastdl.app/
for youtube i use: https://yt5s.com
You may use whatever downloader you're comfortable with, it doesn't matter really. either way, USE AN ADBLOCKER!! Something that will block pop-ups.
I will be using this video: https://www.instagram.com/p/CCgrjLJnDWO/ !

TRIMMING THE VIDEO
Trim video into short sections will make it easier and faster to turn it into a gif! I use the windows editing software to do this. Open the video and go down to the pen icon, click it and then click "Trim"

This pops open a new window! (The volume settings do NOT carry over (very stupid) so i recommend having your headphones either off or turned very low.)
On the timeline on the bottom, there is three things. Start and End are both blocks, and your viewing point is a little circle with a line. Don't worry about cutting exactly to the point you want, we can get it exactly to the frame later. Then save the trimmed video! I like to name them "trim 1" "trim 2" ectera if i have multiple.

STABILIZING THE VIDEO
This video is kinda very shaky! (Which is also why i am using it for this tutorial). But we can fix that!
(not every video will need stabilizing. Most don't. Some shaky videos I leave shaky, because stabilizing them looks weird. this is all personal preference)
I use this website for stabilizing: https://pixiko.com/tools
alas, it leaves very large watermarks a corner of the video. Which usually isn't an issue for vertical videos that I will crop, but this one is square. So we will make it vertical
AVOIDING PIXIKO WATERMARK BY RESIZING VIDEO! (sidequest)
go to photopea!: https://www.photopea.com/
we will revisit this later.
File -> Open -> Select your mp4 file -> Open
It will then pop up asking for what frames per second(fps) you want! It will also display the original video's information in this order:
Pixel size (540 x 640 px), Original amount of frames(221 frames), Video size (345.3 MB decoded)
Length of video (7.37 seconds), Original video's fps (30 FPS)
Then it will have a slider! Here you can input whatever fps you want on your gif. More frames means smoother gif, but higher file size. Less frames means a choppier gif, but lower file size. I usually use 12, 15, or 20 fps. If you want to slow down your video later, you should probably put your frames higher so the slowed video won't end up looking choppy.

Then open it up! It might take a while to load. When it does, go up to "Image", click, then go down to "Canvas Size"
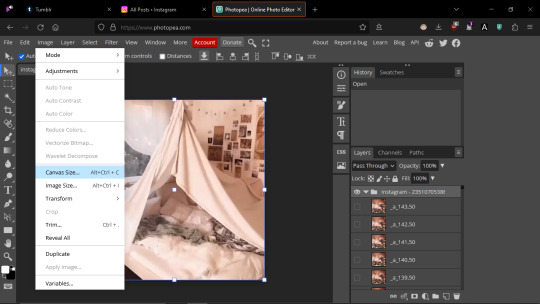
Awesome, new window popup. Here you can change the canvas size. The little chain icon locks the ratio (the number:number next to it). We won't use that. The little grid with the circle in it is where the image will anchor from, you click different squares of the grid to change it. Anchoring it just means that spot will stick the same, and canvas will expand/shrink from it. For now we are keeping it in the middle.

We will change the height of the gif, since Pixiko adds watermarks to either the top or the bottom of the video.

Awesome. We have transparent bits on the top and the bottom that we will crop out later. Now Photopea doesn't let me export files as mp4s, and Pixiko doesn't let me upload gifs. So we will over-complicate this even more!
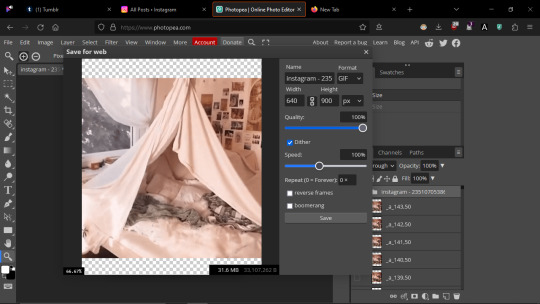
File -> Export As-> GIF.
A popup might appear asking about if you want to resize your gif smaller. In this case I wont.
Wow! A new window! These are all the stats of your new gif. Previous things already explained are previously explained.
"Quality" is a slider that effects how many colors and how many details are in your gif. It saves minor space, but it's such a small change that I won't recommend lowering it.
"dither" is a checkbox that effects if your gif is dithered or not. Dithering is little pixelizations of color added to blend things better. It takes up a lot more space, but looks better in most cases. By default it is off, and instead the colors of the video are more segmented and can look like cell-shading. This saves some space, but it doesn't look good for certain small details or color gradients. I will turn dither on.
"Speed" is how fast or slow the gif plays.
"Repeat (0 = Forever) is how many times the gif will repeat itself. By default it should be 0, meaning it will loop forever. You can change this if you want, but that means the gif will only play that many times before being frozen forever.
"reverse frames" plays the gif in reverse.
"boomerang" means the gif will go 1,2,3,4,3,2,1 ; it will complete itself normally and then reverse to the beginning.
OKAY AWESOME. Save your gif and pack it up to move to YET ANOTHER website, ezgif!
Ezgif: https://ezgif.com/
Head over to "Video to GIF", then to the "GIF to Mp4" below that.
Select your file and press the blue upload button! This might take a while to load!

Then scroll down, press the blue "Convert GIF to Mp4" button. Wait for your video to process and then download it!
OKAY WE FINALLY GO BACK TO PIXIKO
STABILIZATION BACK ON TRACK!!!!!!
Here's the website again: https://pixiko.com/tools
Go to the tools section (up on top) and then scroll down to Video stabilizer (in "SEPERATE TOOLS" category). Or you could just ctrl+f it.

From that point on it is just uploading the video, waiting(a while), and then downloading your new stabilized video!! Awesome!
PHOTOPEA CONTROLS (canvas size, color editing, deleting frames) (the fun part)
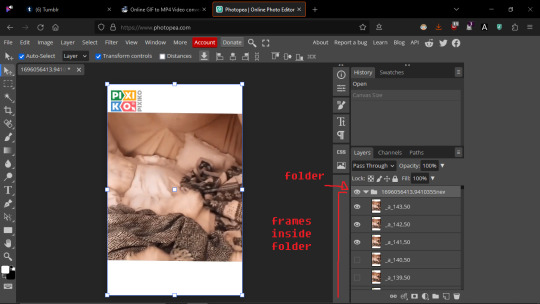
NOW go back to photopea. Upload your gif (File -> Open -> select file -> open). You will have to put your fps again!
Ok. Now you must learn how Photopea organized gifs. Gifs are their own folder, and inside that folder each frame is a file. 'layer 1' plays first and 'layer 2' plays second. Layers outside of the folder, and below it, will display behind the gif as a still image. (cool for transparent gifs, or if you need to stretch out a gif)
To view each layer/frame, press the square next to it's image+name. If there's an eyeball, it's visible. If there's an empty box, it's not. All layers in the folder will show up in the gif, even if they are all empty boxes, so don't worry about that!
You can shuffle frames or delete them, but keep them inside the folder. (and keep the folder "Pass Through". You can change individual layer types though)
You may delete specific frames! If your trim of the video wasn't perfect, you can delete the ends/starts here!
Here, i deleted a frame in the middle of the gif. it was awkward and made the gif jump weirdly. Cutting it out made it a little choppy, but i prefer that look to how it looked before.
awesome. Okay, first, go to the left side of the screen and select the first tool (an arrow). On the top of the screen, next to "Auto-Select" find the dark box saying "Layer". Click it and switch to "Folder".
This makes it so when you move things, you will be moving the entire folder/gif and not just singular frames.

On tumblr, images that are sidebyside will "crop" (if you click on it it's full size) to whatever the lowest height ratio is in that image row.
This means, if you have a row of 1:1 , 3:1 , 1:3 (width:height), the whole row will crop down to 3:1 and your gifs will all be rectangles.
example:

SO, I crop my gifs to 1:1.
Awesome. Okay, go up to Image -> Canvas Size. and crop the gif down to 1:1. You may have to move your image to get the things you want in frame. Use the cursor tool for this, and just click and drag.

awesome. now here's the fun part.
THE FUN PART (editing, colors, pizazz)
You can add effects to your gif, such as changing its color. Mostly changing its color.
Select the folder by clicking on it, this makes it easier to get your effect into the right place (though you can drag it around). Anything below the Adjustment layer is effected, and anything above isn't.
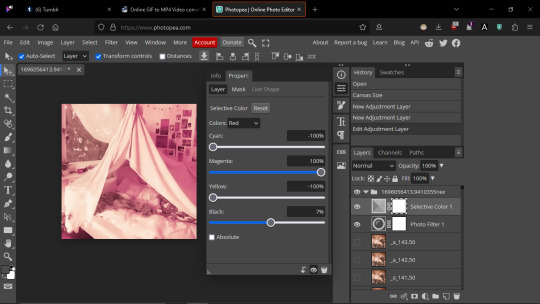
Then go down to the bottom, below the layer window, and click the half-filled in circle. A popup will appear with lots of different effects! You can mess around with all of these. For this one I will be using "Photo Filter" and "Selective color"
Photo Filer applies a color over the entire image. By clicking the orange (default) color block, you can pick the color you want. Density slider is basically the opacity. "Preserve Luminosity" means it will keep the brights and darks of the original image.
Now!! If you ever loose your adjustment sliders: select the adjustment layer, then go up to the little button that has little sliders/horizontal lines in it. Click that, and it should pop back up.

Selective color lets you pick basic colors and turn up certain amounts for them. I can make red more magenta, and yellows more cyan, or whites more magenta.
"Absolute", as far as i can tell, just turns up the effect more strong. I usually turn it on when i want to really effect something.
There is many other adjustment layers you can use! I will not explain them all, you can explore yourself.
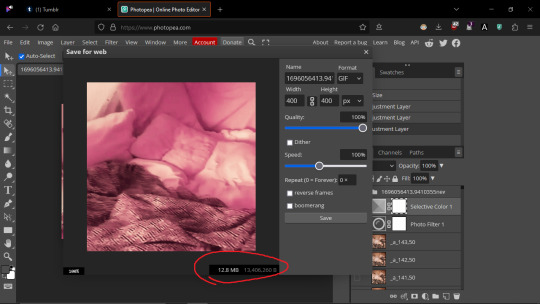
ONCE YOU ARE HAPPY, you can export the gif! File -> Export as -> GIF.
set your speed and if you would like dither or not.
Now, this file may be HUGE. A quick way to deal with that is to turn down the pixel size of the image. Make sure the little chain between Width and Height is selected(dark). This keeps the ratio the same (and you will only have to edit one number instead of both).
I will shrink my image down to 400 px.
You can check how large your file size in within the little viewer, in a black box on the bottom. Tumblr's highest file size is 10 MB, so this gif is too big at 12.8 MB. WE SHALL FIX THAT!
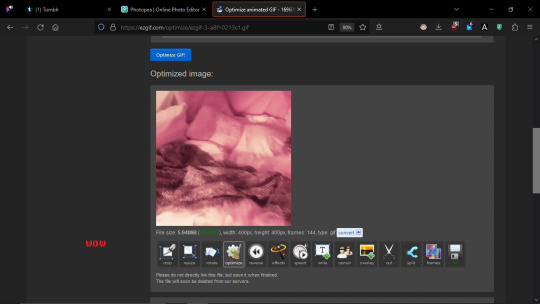
EZGIF OPTIMIZATION
head BACK to ezgif! This website has many good ways to optimize gifs.
Click the "Optimize" tab. Select your file and upload!

awesome. Ezgif explains itself well, and is a great website, so i will just explain a few things that aren't explained.
Clicking through the bar of "crop, resize, crop, optimize," Ectera will keep the same gif you uploaded.
Say i used lossy gif, pressed the blue button, watched a cat dance as it loaded, then got my compressed gif.
A new bar appears below this new gif! If you'd like to keep this gif, you should click this bottom bar. Now i can click "Resize" and go resize my gif, and it will transfer this same gif over. ( i do recommend resizing before doing any compression/lossy gif though)
Now i will explain a way of lowering fize size: deleting certain frames.

In optimize, there is an option to remove every certain frame. This makes the video more choppy, but is a good way to save space. Say I remove every 2nd frame,
original:
every second frame removed:

A LOT FASTER!!!!! this is because it's literally cutting it in half. each frame waits like, 20 milliseconds, so removing every second frame is cutting that total time in half. I fix this by going to the speed tab!
50% slower for every 2nd frame,
66% slower for every 3rd frame,
75% slower for every 4th frame

here's the same every second frame removed gif slowed down.

looks better! Very choppy, but that's just because there's so many frames missing. If you do remove frames, I recommend just using every 4th frame becase it's hardly noticeable.
Ezgif explains everything else well, so i will let it explain itself.
THAAANKKS FOR READING here's a link to the actual gifset made
3 notes
·
View notes
Text
clearing up some things about the deviantart situation
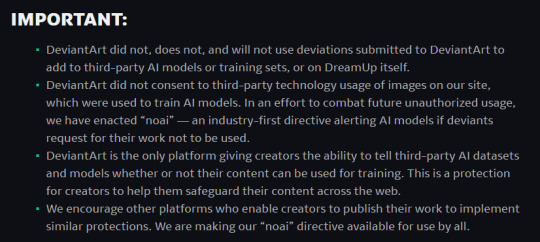
in layman's terms, they are NOT using art uploaded to the website for THEIR on-site AI, DreamUp... by default.
HOWEVER!!
Your art can still seemingly get put through their AI, but I will get to that in a moment. This "opt-out for having your art used for AI training" thing is for third party AI's, generators hosted on other websites. Some of these models were trained off of random online art, including images posted to dA. The trouble comes in two parts:
The ability to opt-out of having your art available for 3P AI generation is opt-out, not opt-in. The ability to mass-disable this for all your deviations is not available yet, but "coming soon" - so if you want to disable it, you have to go through your hundreds, perhaps thousands of deviations manually. One by one. Art submitted to the website will not be fed into DreamUp unless...
Users can still tell deviantart's AI to generate images in the style of another artist. THIS is what the google form you have to fill out and have reviewed by a real person is for, they claim they will not use images submitted to the website as reference for their AI, but then how will the AI know how to generate images in those styles? You can submit your deviantart username and links to your other social medias in the form, so presumably they have a big loophole - they'll still let their AI look at art from your other social medias, and perhaps even your deviantart, if it's asked to. Sure it wont use your art unprompted, but it Will use your art if somebody puts your dA username (or Any of your usernames) in the generator and you haven't sent deviantart a form asking it Not to do that. Which is scummy.
There are a lot of deceased artists on the website who cannot opt out of either, because they are dead. So that's fun.
I've seen some slight misinformation but people are still coming to the right conclusions, this is a Horrible, Horrible update so please do whatever you think is right in regards to your accounts.
#liz blogs#deviantart#ai art#dreamup#like i don't think anybody's gonna be trying to generate images in the style of your dA from 2007 with 84 watchers#but frankly they still shouldnt have the Ability to#my archivist braincell says 'please dont delete your accounts' but my anti corporate braincell says 'BURN EVERYTHING'#'I WANT DEVIANTART TO GO UP IN FLAMES'
24 notes
·
View notes
Text
Okay so I really do want to fix most of the problems with my layout, and I'm really not bad with code, so i went back to the source! I figured maybe it wasn't working because I touched something I shouldn't have.
Turns out, there was a lot that was fucked up about it for some reason. Either the original has been updated since I uploaded it or something got messed up. F'ex there *is* a whole button for credit to the creator? Why wasn't it there earlier? I have no idea. Also the menu bar is supposed to stick to the top exactly as I said I wanted, so... I don't know why it wasnt.
On the other hand, the search bar is at the bottom of the page. I think I can figure out how to move that to the menu, tho, as well as keep the links on by default. The "dark mode" is just... darker mode, still, but now the code for that is right up top so that should be an easy fix.
So, I dropped it into place and.... now my background wont load. urgh. whyyy wont this layout behave? I can SEE the url in the code? Copy paste that and it takes me to my image so why isn't it showing up?
I was hoping I wouldn't have to find a completely different one. Sigh.
1 note
·
View note
Text
Q: why is cyborg cookie your icon instead of leek
A: tbh ive associated egg more with cyborg, and also because i feel like it
Q: whats the purpose of this account
A: one is that i apprechiate archive accounts, two is that alot of people enjoyed their work and this is a way for them to enjoy their content again, three nostalgia? in a way
Q: *why* exactly are you looking for their videos
A: i was featured in a collab, i remember how i bragged about it to some kid in 5th grade, remembered that and went "huh, i want to see that again" and spiraled
Q: have you known egg
A: yeah, infact its *kinda* the reason why im looking for their videos, we havent talked in a long time though
Q: do you know where egg is
A: no i dont, last i know egg was doing better since they left, and i dont think its in best taste to find them either way, leave them alone
Q: what are you using to find their stuff
A: went through way back machine to find thumbnail / art, images to find some of the screenshots ive posted, thats it i think
Q: i have a video saved, how do i send it to you?
A: either through the email in my about page, or putting it in google drive and sending the video over to me
Q: are you dumbegg?
A: no im a 16 year old trying to survive highschool thats autistic about warrior cats, hope that helps 👍
Q: how long have you been into cookie run
A: since 2019 (ironically enough cyborg menace was my first event lol), but i wasnt hyperfixed on it during 2020, basically it keeps comming back every other year (small interest though as of now)
Q: whats your main account?
A: i might drop like a "hey this was me lol" but i wont really include my current usernames so most of what youll probably see are my old usernames ive used when i was 12
Q: why do you post stuff like thumbnails, art etc
A: for thumbnails its so that it can be recogniseable and i try to collect descriptions and upload dates too to make it feel "complete"? i guess, as for art its the same as the videos people probably liked it and while not as important i thought itd be neat
Q: what if egg comes to talk to you
A: if they tell me to take down everything ive found *i will*, its their right, they have deactivated their channel for a reason and i wont blame them if they feel that way, other then that depends on whats being said
Q: why do you add "leek cookie" to the tags sometimes
A: to get more reach, listen i hate it just as much as you that theyre only recused to "haha leek simp" but thats litterly the only thing people would care about if you mention them, and algoritms and stuff ig, this only applies to some text posts though, if its like a video or something ill tag the characters that appear in it only (cyborg is sometimes added cuz its my layout and see Q 1)
Q: what the fuck are you talking about in your update videos
A: im not a native english speaker and im terrible at wording, hope this also helps
Q: whats ur fave danganronpa character
A: sonia nevermind 👍
#cookie run#cookie run ovenbreak#cookie run kingdom#Q&A#thought i should make this#added the last part cuz i found through a comment on the syrupyy collab and they kinned nagito#leek cookie#cyborg cookie#if you dont see a question in this that you have feel free to shoot it in my askbox lmao
0 notes
Text
Comms: Open!
Hello! This post will just basically be the nitty gritty of all my commission information!
If you happen to be interested in my commissions feel free to continue on below! You’ll find my terms of service as well as pricing! -^^-
Comm examples post:
Commission ToS:
Payment and refunds:
* Payment is expected within 24 hours after verification of commission sketch
* ALL payments USD
* Payment will be taken through PayPal and Cash-app ONLY
* Non-payment within 24 hours will result in the commission being cancelled. Progress up to this point, if any, will be deleted.
* Refunds are available but vary depending on how much work is done
* Sketch: 90%
* Line: 50%
* Line and Flat Color: 0%
General terms:
* When commissioning me please do so in a kind and professional manner.
* Please provide clear reference images, I do not accept text messages as reference no matter how detailed your texts may be. (Does not apply to some commissions)
* Please follow any and all rules or directions within my TOS policy.
* If I have accepted payment for a commission but find I cannot finish it for some reason i will either ask if you want me to draw another character of yours, or give you full refund.
* I have the right to increase the price if your character has a very detailed design or you want a very detailed illustration.
* My art is constantly evolving and improving which means there will be some small changes from time to time in my work (anatomy, coloring, lineart etc) please keep that in mind!
* By commissioning me, you automatically agree to my Terms of Service and is expected and obligated to follow them. You are also automatically promising that you wont request any paypal chargebacks.
Copyright / Usage terms:
As the Artist, I am allowed to:
* Promote myself with the artwork on any other places or websites.
* Post/display the artwork anywhere i want (on my Commissions page or Discord for example) but i will always give you proper credit as the owner of the character.
* Publish books with it.
As the commissioner, you’re allowed to:
* Re-upload the image with credits given to myself in the form of a link or Name of my Discord or Commission page (MUST be a link)
* Claim the right of your characters depicted in the commission[s] but NOT the art work
As the commissioner, you are NOT allowed to:
* Reproduce/using the artwork commercially (meaning making money of it in any way)
* Remove my watermark/signature.
* Edit/change the artwork without my permission.
Finally: BY ORDERING ANY SUGGESTIVE/18+ ART YOU ARE AGREEING THAT YOU ARE 18 OR OLDER.
[Now that that has all been addressed be can finally get into the good stuff!!]
Illustrations:
Headshot/ icon:
- Sketches: $2-5
- Lines: $5-8
- Color: 8-10
- Color with Shading: $10
- Matching icons: 25 [Fully rendered always]
Half body:
- Sketches: $7-10
- Lines: $15
- Color: $20
- Color with Shading: $30
- Additional Character: $10
Full body:
- Sketches: $15-20
- Lines: $30
- Color: $40
- Color with Shading: $60
- Additional Character: $10
Backgrounds:
- Included with commissions just up to you if you’d like it or not
- Please refrain from asking for complicated backgrounds
Turnaround time: 1-3 weeks
Emotes/Badges:
- $5 per emote
- $35 for 10 pack
- 50 for 20 pack
- Color with Shading: $60
- Please have the emotes you want picked out before you contact me
- Animated emotes coming soon
Turnaround time: 2-6 weeks
Relative PNG/Chat TTS Bot
- Half body only $30
- Alternative pose +10
Turnaround time: 2-6 Days
(Not guaranteed)
Reference sheets:
- Front view: $60
- +Detail Shot: $15
- +1 Prop/Pet: $15-20
- +Back view: $20
- +Alt Costume: $30
- Backgrounds are Included with commissions just up to you if you’d like it or not
- Please refrain from asking for complicated backgrounds
Turnaround time: 2-6 weeks
Tattoos:
In the case that any of the work i provided is wanted to be used for a tattoo a $15 fee will be added to the final total.
To place an order, please send me a message through discord or use my commissions page (will be linked when it’s finished) with a clear description of what you're looking for. If you have any reference images or specific requests, please include those as well.
I'm happy to work with you to create a piece that you'll love. I also offer discounts for customers who order multiple pieces. This discount can be anywhere between 10-20% depending on the commission.
Thank you for considering me for your art needs! Looking forward to working with you!
Best for:
* Undertale/skeletons
* Homestuck
* Reference sheets/character sheets (see for price)
* Character design (bring your Oc or other characters to life!)
Will draw:
* OCs
* FCs
* Cannon Characters
* Ships
* SelfShips
* Light NSFW/suggestive themes
* Mild violence
* Angst
* LGBT+
* Icons
Not great but will try:
* Banners
* Furries
* Scalie
* Chibi icons
Absolutely not:
* Realism (for now)
* Overly complicated characters/designs
* Overly complicated backgrounds
* Heavy NSFW
* Heavy gore
* Mechas or Gundams
* Lolis or other child like characters in sexual or suggestive themes
Comm examples post:
If there is anything that I haven’t listed here feel free to shoot me a message about if I’ll be able to draw it or not
#comms open#commissions open#commission#commission info#comms info#digital artist#digital art#undertale au#au sans#sans oc#sans undertale#underverse#undertale alternate universe
1 note
·
View note
Text
Study week is coming and I generally like to type a whole summary at the end of the semester when one ends. Holy Fuck I've been at home most of this semester. Like the amount of times I've actually went to my Uni is either at the single digits or barely past the double digits. So yeah. I wonder if it wasnt for the pandemic how often would I actually be at school. I asked my sister and she just said that I probably would've been there a whole lot. So yeah Fuck. Anyway as an art major looking back I made more shit I like I did this semester compared to last. Which I would probably upload images of but no. I keep my Uni art away from my big tiddy Tumblr Twitter art. Which I haven't done in a while but I'll get back on the horse. Soooo...... A painting I did do that I really liked is this weird nun painting and honestly...
Imma make a big tiddy spooky nun! If the good ol book is telling the truth I'm probably going to hell but considering how I like cute guys and scary chicks I'm probably going to hell either way so that's groovy.
So now I only have two semesters of uni left. It would be one but the art higher ups like to fuck over students so a class that is required that I haven't taken yet is only on during the fall semester. So I'm just gonna be getting as much credits I need this semester and finish up the last class next semester. And then I'll probably get a job for some experience.
Who knows maybe the winds push me a different way and I'll be married to a rich older woman (still like milfs) and live a comfortable life or a cute dude whose is a hard worker. I didn't say dilf cause I don't like dilfs. Hell who knows maybe I'll be a vtuber or get back into IT. (I hated IT)
But let's get a bit existential since like only two mutuals will read this also hey love you and appreciate you homie! Are you ok I hope you are. Anyway the existential dread I wanna hop onto for awhile. Not what happens when I die but more so do you ever wonder what happens to where you live in the next 10 years? Now I'm not talking about family I'm talking about landscape and environmental shit because holly balls to the walls when the city you live in is extremely reliant on a lake that is drying up and you live in a desert. Boy howdy are you fucked! Because the lake I live next to or too is gonna be gone in the next 10 years. Which bring some to this. Where would I go? Who would I be by that time? Will I still be the guy I am? Or maybe something new?
And you know what the answer to all those questions are. Who fuckin knows.
Right now however you know what I'm thinking about?

THIS FUCKING BITCH WHO IVE BEEN TRYING TO SUMMON GOD DAMMNIT FIRST THEY DIDNT GIVE RAIKO, THEY DIDNT GIVE ME VAN GOGH, THEY DIDNT GIVE ME, RAIKOU AGAIN, AND THEY DIDNT GIVE ME A COSMIC HORROR GIRL, AND THEY WONT GIVE ME THIS SNAKE BITCH GOD FUCKING DAMNIT JUST GIVE ME THE SNAKE BITCH HAVE PITTY ON ME IVE BEEN GETTING SERVANTS I DONT FUCKING WANT LIKE COME THE FUCK ON JUST GIVE ME THE SNAKE BITCH IM NOT SINKING MONEY INTO FGO SHES THE ONLY SERVANT I WANT FOR A GOOD WHILE COME THE FUCK ON I BLAME MY WEIRD FUCKING LUCK FOR NOT GETTING HER I SWEAR TO GOD AN I GOT COCK TEASED BY SUMMONG A GOLDEN CARD SABER WHO WASNT FUCKING IBUKI DOUJI AKA SNAKE BITCH INSTEAD I GOT SOME SABER FACE I COMPLETELY FORGOT ABOUT JUST GIVE ME THE SNAKE BITCH
Also it turns out I haven't been eating Philadelphia sandwiches I've just been eating fajita burgers with cheese
#i hate fate grand order#if it wasn't for Scherezade i would've quit#also fuck you i love Scherezade#fgo
0 notes
Text
Access to google drive download denied

#ACCESS TO GOOGLE DRIVE DOWNLOAD DENIED ARCHIVE#
#ACCESS TO GOOGLE DRIVE DOWNLOAD DENIED FULL#
#ACCESS TO GOOGLE DRIVE DOWNLOAD DENIED WINDOWS#
Google will then send you the archives via email or to a cloud storage of your preference. Google then creates zipped folders in a size (ranging from 1 GB to 50 GB) and type (.zip. Log into your Google Drive account via the new window. Now, either change the permission or turn off link sharing. How to Fix Google Drive Access Denied Use Incognito Mode. Step 2: To turn off link sharing or change the permission, click on the ‘Anyone with the link’ box. You can select particular folders (or labels) when doing Gmail and Drive or just grab the whole thing. Click Customize and control Google Chrome symbol in the top right and select New Incognito Window on Chrome > Click the three-dot symbol in the top right of your screen and select New Incognito window on Internet Explorer. Second, for any other file, you can right-click in Google Drive Download.
#ACCESS TO GOOGLE DRIVE DOWNLOAD DENIED ARCHIVE#
This is Google's solution to how you can archive or take data with you from a variety of apps including Photos, Contacts, Calendars, Gmail and Drive (plus many more). First, if you cannot download Google Docs files, try to open them in the editor and then select File Download pick a format. Furthermore, you can find the Troubleshooting Login Issues section which can answer your unresolved problems and equip you. LoginAsk is here to help you access Access To Drive Is Denied quickly and handle each specific case you encounter. If a file is moved to the folder (even if it was added to Google Drive in the last 4 days), the Zap wont trigger Also, you cant trigger or act upon a folder shared with you, so files added to folders you dont own will not trigger the Zap.
#ACCESS TO GOOGLE DRIVE DOWNLOAD DENIED WINDOWS#
If there are bad sectors, it may cause C dive access denied in Windows 10. Access To Drive Is Denied will sometimes glitch and take you a long time to try different solutions. Google has many special features to help you find exactly what youre looking for. Close the window and check if the issue is solved. Search the worlds information, including webpages, images, videos and more. Click on the browser’s Address bar line and press Ctrl + V to paste the link. Select Administrator and click on Change account type. Right-click on the file you want to download and choose Get shareable link from the contextual menu. Other problems are random files will get corrupted in the process causing you to lose the ability to access them and have to go back and find those particular files to re-download and upload until you can get a usable version.Īnother way to get your files is through the 'my account -> control your content' features within GSuite. Select Change account type from the window and click on your user account name. Breaking the content up into several folders seems to be one way to fix this issue. In the above bar, look for the share icon and click on it. Here, click on the file and or select all the files if there are multiple. You will find the file in the recent, which is there in the side menu.
#ACCESS TO GOOGLE DRIVE DOWNLOAD DENIED FULL#
One flaw I've found is that trying to download large folders full of content can lead to download errors. Open your Google Drive and find the file you were trying to send via Gmail.
0 notes
Text
.
#trying to edit a post and my app keeps crashing......#like fam come on#this has happened before likem#like why can u handle me editing a post?#everytime it ruins my links/font choices#rambles#my header image on a sb wont upload either#i am trying to do this instead of homework like help a homie out
0 notes
Photo
I thought it was finally about time that I updated my WMS recoloring tutorial, since it’s quite outdated and my “technique” has changed a lot since then.
Again this is going to be a very long and slightly complicated tutorial, just for your information - a lot more than the former one. But when you get this method down, it’s 10 times easier and quicker to recolor!
I’ve tried to make this as beginner-friendly as i could, but it can be a bit hard to understand if you have no knowledge of either PS or S4S.
If you have any questions regarding the tutorial, please shoot me an ask and I’ll help you as much as i can :)
Also please keep in mind that english is my second language, and because of that some sentences or expressions may be weird! Thank you.
Press keep reading to go to the tutorial vv
What you will need for this tutorial:
- Photoshop (PS) of any kind that is compatible with Nvidia DDS plugin (you can get CS2 for free right here)
- Sims 4 studio - S4S (you need to register to download it)
- A DDS plugin for PS 32 bit (the download is called texture tools)
- WMS recoloring actions by @wildlyminiaturesandwich (we’ll be making our own later, but we use these as our “base”)
- A WMS color palette for S4S made by the lovely @valkryiesims
- An action that turns the dirty blonde swatch into the white swatch by me
Before starting you should read these posts, since we’ll use the information from those in the tutorial:
- WMS recoloring actions (you should read everything she has to say about her actions)
- @neverloores post about SecondayDisplayIndex - also called SDI
- @verdigrisss post about making an all-in-one recoloring action. (this is a bit complicated so take your time reading it)
If you’ve read and downloaded everything, you’re ready to start the tutorial!
1. Install PS, S4S, the S4S palettes, the actions and the DDS plugin.
The DDS plugin only works with CS2 if you download the 32-bit version, since that’s what CS2 is.
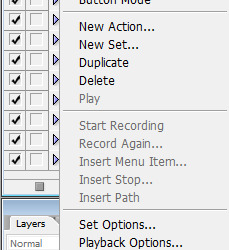
To install the WMS actions in PS go to ‘actions>load actions’ (the little round icon with the triangle in it) and then find the downloaded actions in your download folder. Press okay and the should be loaded in now.
To install the WMS palettes into S4S, go to ‘documents>Sims 4 Studio>palettes’ and copy+paste the downloaded palettes into that folder.
2. Find whatever hair you want to recolor.
To check if that hair has already been recolored check out this spreadsheet by @celebi88. Press ctrl+f to search inside the spreadsheet
Put the hair into the S4S mods folder, which is found in ’document\Sims 4 Studio\mods’
Keep in mind that there are a lot of hairs and recolors out there, so the spreadsheet may be out of date. You can join the WMS recolors discord right here by @namea and @celebi88, and we can help you find a recolor if you’re unsure if the hair has been recolored before!
3. Create your recoloring file in S4S.
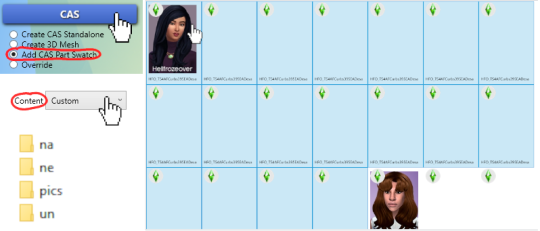
Open S4S, type in your username in the down right corner and go to the CAS section and click on ‘Add CAS Part Swatch’. If you don’t do this, the recolors will show up as a standalone file, and will not be a part of the original hair file in game.
Click ‘CAS’ and it will take you to the different meshes EA has created.
To find the hair you want to recolor go to the top right corner and click on the ‘ALL’ button next to ‘Content’ and sort to ‘Custom Content’.
Find the hair you want to recolor and shift+click it, to select all swatches.
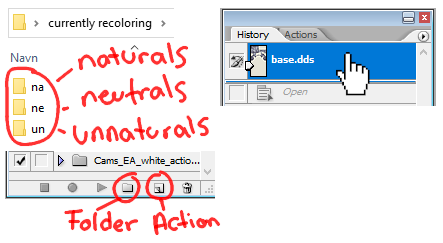
A new window will pop up and this is where you save your file. I’ve created a folder for the CC I’ve made (called homemade), and in that I’ve made a folder for my WMS recolors. From there I create a folder for every hair creator, and in every creator folder I put a new folder for every hair I’ve recolored. And lastly in the specific hair recolor folder I make 4 folders, one for each of the palettes and one for pictures. So the path will look something like this: ‘documents\homemade\wms recolors\*creator name*\*hair name*\’. The four folders are then created and named ‘un’ (for unnaturals), ‘na’ (for naturals), ‘ne’ (for neutrals) and pics (for pictures if you want to upload the recolors).
Then create the file after you’ve made your folder, and name it after whatever palettes you’re recoloring in.
4. Get ready to recolor.
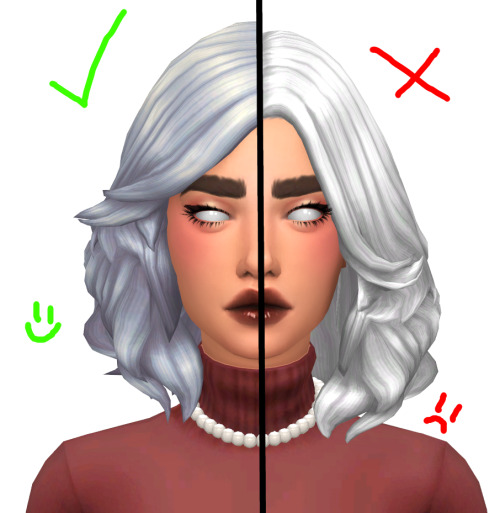
Your recoloring file will now open up in S4S, where you can see all the swatches. First we have to access the white swatch to see if it matches the other EA white swatches, or if it is ‘too white’. It should look something like this: (refer to the picture under this section)
If the white swatch looks fine you can go on ahead and export that swatch as a .dds file (important). Remember to rename it to ‘base’ - we’ll use that later on. Also skip the next steps if the swatch looks fine!
If the white swatch doesn’t look perfect, export the ‘dirty blonde’ swatch as a .dds file and rename that to ‘base’.
Open up the ‘dirty blonde’ base in PS and use this action (by me) to make it look like an EA white swatch.
Save the file and close it! (Very important). If not saved and closed before using the actions, the actions will go back to the dirty blonde base, and the EA white wont be used.
If recoloring a childrens or toddlers hair, export the ‘dirty blonde’ swatch and use my action on it!
5. Making all-in-one recoloring actions
Open up your base in photoshop. Make sure it’s called ‘base’ and nothing else. (this goes for every hair base you’re ever going to recolor, it has to be named base)
Create a new folder on your desktop, or somewhere where you’re never going to move it. I called mine ‘currently recoloring’. Inside that folder there should be 3 folders; one for each of the palettes. If you ever move this folder, you’ll have to redo your all-in-one recoloring actions, so make sure you have found a nice place for the folder!
Now it’s time to make the action. Your ‘base’ is open and now you navigate to actions. Start by creating a folder for your new actions called ‘all-in-one wms actions’.
To make the first actions, click ‘create new action’ and name it ‘unnaturals’ (for the unnaturals), ‘naturals’ (for the naturals) and ‘neutrals’ (for the neutrals). Make sure the set is set to ‘all-in-one wms actions’. Press record.
Now it’s time for the tedious task, which is to play all the actions provided by WMS. Go to history and make sure you haven’t done anything to the image. Play the first in action in whatever palette you’re choosing, and press ‘ctrl+shift+s’ to save your file as a new file. Relocate to the folder you made a little while ago on your desktop (or where else you placed it), and go into the folder with the matching palette. Name the first action ‘1′. Once saved it’ll send you back to your base that is recolored. Go to history and press ‘base’ or ‘open’, whatever is the first thing you can press. Now it’s time for the next action in the palette. Do the same but name that file ‘2′. Keep doing this until you’ve gone through all of the actions/colors. There are 35 unnaturals, 20 naturals and 20 neutrals.
Once you’ve run all actions in each palette, click on the small record button under actions, to stop your action. And there you have your all in one actions!
6. Importing recolors into S4S
Open up your folder in which you placed your .package file in (fx. documents\homemade\wms recolors\*creator name*\*hair name*\). There should be a folder for each of the palettes in there (+ one for pictures).
Open up another your folder in which you placed the recolored .dds files (fx. desktop\currently recoloring).
Go to the first color palette named folder (fx. un (for unnaturals)) and cut those files (ctrl+x). Paste those into the other folder (with the .package file) and into the matching palette folder. Do that for all the palettes.
You should now have 3 filled folders with .dds recolors in your ‘homemade’ folder.
Open up your recolor in S4S. There are 18 different hair swatches. Delete swatches until you have only one swatch left.
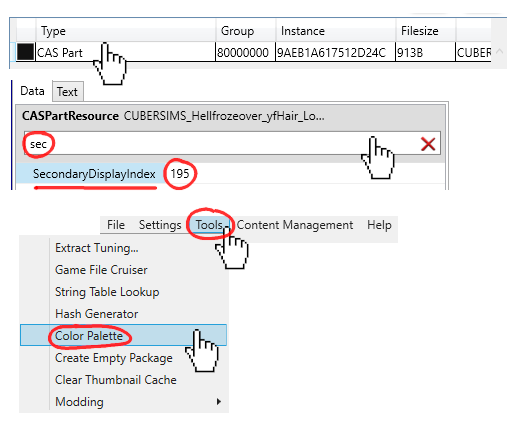
Go to the warehouse tab in S4S. Here there are two sections, the right and the left section. On the left you should see the same swatch as the one you have in the studio. Go to the right and locate the search bar. In the search bar type ‘sec(ondarydisplayindex) and the SDI (secondarydisplayindex) will pop up. Change whatever number you have there to either ‘195′ (for unnaturals), ‘395′ (for naturals) or ‘595′ (for neutrals. If it’s easier for you to remeber, you can add five to each number so it’ll be 200, 400 and 600.
Now go back into the studio, and press ‘tools’ in the bar at top. Under that press ‘color palette’ and a new window will pop up. Find whatever palette you’re recoloring in and apply the palette to the package. It will then ask you if you’d like to keep the existing swatch, press no.
The palette you’re recoloring in will be imported into your .package file. Now you have to import all the .dds files into each of the swatches. Click import and locate your recolored .dds files (they should be in documents\homemade\wms recolors\*creator name*\*hair name*\*palette name*).
7. Finishing up the packages
Now that all the swatches has been imported, the recolor is almost done. Save your .package file. Repeat section 6 with all three palettes.
Go to the folder where your .package file is located in and rename it so that people can identify it when they download it (if you’re uploading the recolors of course). Mine are normally called ‘-CUBERSIMS- *hair creator* *hair name* recolor WMS *PALETTE* ADDONS. But you can customize any way you’d like!
Now you should have 3 files named after each palette. To merge the packages into one .package file, go back into S4S. Go to the tab bar and click ‘content management’ and then ‘merge packages’.
A new window will pop up. Click add and add/import the 3 recolored files. Click ‘merge’ and save the new .package file with a new name (fx. mine looks like this: -CUBERSIMS- *hair creator* *hair name* recolor WMS ALL ADDONS MERGED)
Now you should have 4 .package files. One for each of the palettes, and one for all the palettes.
Put the merged .package file into you game (where you put cc) and test your recolors!

And that is it! You made a recolor! Good job!
I hope this tutorial could help you guys out there, who wants to either start recoloring, or update their recoloring method.
If you used this tutorial, feel free to tag me in your posts with WMS recolors! I’d love to see what you guys create, and reblog it to my cc finds :D
#ts4 tutorial#s4 tutorial#tutorial#s4 help#ts4 help#recolor tutorial#sims 4 tutorial#s4s#sims4studios#simblr#ts4 simblr#s4 simblr#lanaccfinds#sssvitlans#mmfinds#maxismatchccworld
123 notes
·
View notes
Video
youtube
Watching this short clip of newest music video from Wataru Hatano (Badd’s VA), made me thinking:
What most people don’t know yet is that Badd can actually sings beautifully.
Garou discovered this trivial fact when he heard Badd singing in the shower. His voice range is also good: Badd could do from lullaby or mellow-sounded songs to the screamo metal songs.
Badd usually does the lullaby singing whenever there’s thunderstorm at their place and Zenko was afraid to sleep alone, hence Badd calming Zenko down and made her feels safe with his singing. Garou also likes to lie beside Badd when he was lullabying Zenko and couldn’t help but loving his soothing voice so much.
The latter only when he got frustated after finishing annoying missions, like being snobbish executive’s bodyguard or encountering troublesome monsters. It was hilarious everytime Badd does that kind of screamo singing, Garou was wondering if they should just forming a rock or metal band together instead of doing heroes’ duty.
One time he sings Amai Mask’s song because he always (or forced to) listening Zenko’s favorite playlist on daily basis. Garou casually commented, “You sure do a much better job than him, babe!” while giving him a genuine adoring smile. Badd took it as the most flattering praise from Garou as he felt encouraged.
So from that day on, he would be singing more around Garou, as it could improve their mood: Badd doing his secret hobby more freely without being judged and Garou enjoying his boyfriend’s beautiful voice to the fullest.
Imagine Garou decided to join Badd at singing duets when they have shower together, lmao. Truly chaotic and hilarious but still sounds beautiful.
Then at some point, there was a rather big television studio inviting S-Class heroes to be the guests for their new summer program.
The plan was originally only having a talkshow night along with usual interviews, but the studio asking someone among S-Class heroes to be a volunteer singer for a short promotional music video clip.
All of them agreed to attend the talkshow night, but nobody dared to volunteer as a singer. Either too shy/embarassed that they couldn’t sing, have performance anxiety, or don’t like singing at all.
Suddenly Garou suggested that Badd would do it since he got a nice voice and wonderful performance acts. Which resulted in Badd being combusted immediately and spluttered on why did Garou exposed his secret ability.
Garou said he wanted people to appreciate him and his skill, that Badd also has good talent beside being a courageous hero. Also, why not seeing the softer side of Metal Bat doing adorable singing performance on TV?
Badd wont admit it but Garou has a real good point, also felt happy that Garou always being a very supportive boyfriend to him. Thus it was decided that Badd would be the volunteer, saving all the S-Class heroes’ face from ruining the genuine offering.
Before the recording days, the TV program gave Badd the script for video performance, the song lyrics, and the demo song sample from the producer.
It has summer-vibe theme, coincidentally also suits perfectly to Badd’s real image as a summer boy. Badd thought the song was actually pretty cute and high-spirited, too. He was sure he could do it easily with some improvisation acting, based on what he feels about the song lyrics.
Badd only needed 2 days (in his sparetime after daily hero patrol) to memorize the song and singing it perfectly. Of course Garou never missed to watch Badd’s practices at home or at the studio, as he always accompanied Badd on each scheduled time.
The recording day has come, imagine Badd’s performance for the song was like in the video above, just like what Wataru Hatano did.. 🎤🎶🌻☀
Everyone was very satisfied with Badd’s surprisingly skillful singing performance, including Garou who was so proud of him from outside recording room.
He immediately gave Badd standing ovation on the spot, then hugging him tightly and kissing him passionately once Badd finished the recording session in front of people. PDA be damned Garou just wanted to appreciate his smol amazing lover.
The short music video was officially aired during the talkshow night, shocking both the whole audiences at the studio (including the S-Class heroes) or audiences from home who watched the live TV program (like Zenko).
It was surprisingly also got so many views and likes when the video was uploaded at Ytube, not to mention being shared a lot on multiple social medias. Until Badd’s MV become the trending topic for 2 weeks straight, beating Amai Mask’s own newly released MV at that month.
People have been asking Badd if he would ever consider a singing career outside his current job. Badd answered he was actually feel comfortable and satisfied working as an S-Class hero. That no matter how hard and dangerous it seems, he still proud of his job. It’s what he means to be: saving people’s life. So, the answer is a Big No.
Badd only consider singing as his hobby, not his job. Besides, his singing voice is only reserved for his special people in his heart: Zenko and Garou. Only both of them who get free pass on enjoying his voice.
Badd ended his public speech by giving a lingering soft kiss on Garou’s cheek and tender yet bright smile, saying that he’s very grateful for having such a supportive boyfriend on his side..
———————-
How was it? I hope the headcanon doesn’t sounds too weird hehe 😅💦
Since knowing Badd’s VA is Wataru Hatano, who often singing some anime’s OST beside voicing characters, I was thinking what if Badd also can sing beautifully like him?? 😳💕
If Amai Mask who is voiced by the famous Mamoru Miyano can sing in canon as an idol hero, why not Badd, too?? Since Wataru Hatano is also quite famous for his singing voice, y'know.. 👀✨
Besides, I think Garou would absolutely indulging on listening Badd’s beautiful voice at every possible chance, encouraging him even joined singing along with Badd happily. Just being lovable dumbass couple together, lmao!
As always, big thank you for:
@hiro-gari, @the-goddessfighter, @kaincuro, @guby1620, @garous-nipple, @jusqu-une-etudiante, and @lovelybutnot-ablankcanvas, also ofc all of Batarou shippers in the fandom! 😆❤💜💙💖🌸🌻🌷💐
I know I’m just a very amateur writer who couldn’t ever make impressionable writing, which usually resembled like some shitposting, I’m so sorry for that. But I hope you still enjoyed this silly headcanon of mine :“”)
Have nice days, guys~ 😌💕💓
-Little1993lamb-
—————————
~Lilia:
first of all exCUSE me I had no idea this was Badd’s VA omfg he’s??? amazing?? I love him 😭💖
Omg Badd singing lullabies to Zenko that’s so soft🥺🥺 his voice is deep and soothing he’d be so relaxing to listen to awww
asfdksdkfs Garou totally volunteered him with NO hesitation 😂😂 Yaaaas Badd >>>> Amai 👏😤 like sure they’ve both got good vocals but Amai’s personality is... you know... So happy Badd put him in his place even if it was only for a couple weeks, Garou gotta be so proud :’)
Thank you so much this is cute as hell asgdjskks 💕 DW anon I love your headcanons !!
#this is so crazy cause I was literally just listening to Midorikawa-san sing Disney songs#specifically Can You Feel the Love Tonight T-T#and I was like#what if he was singing to his boyfriend tho#are you psychic anon#ily omg#i hope you have a nice day too <3#submission#anon#batarou#garou#metal bat#au
12 notes
·
View notes
Note
Hello! Hope u are having a good day! :D
Umm just want to ask of your opinion... As someone who does art, if someone use your picture for things like making a collage or something related without giving you credit- either they know the picture is yours or they don’t know it’s yours -will you, let them? Like, will it be consider an insult and make you feel unappreciated? Just had something in mind...
What if instead of putting your name, they simply say “credits to the owners”, due to not knowing exactly are the owner of the drawing?
Will you feel offended, in any way?
Sorry for taking your precious time! > . <
hello, i hope you are having a nice day as well!
tldr: if youre doing it for your own personal use (meaning you are the only one who sees it, and wont post online) then please feel free to do so. if you are posting this collage online, you can do so but please give credit, cause i drew the original image in the first place. please dont confuse this with me allowing reposts. i only allow my work to be used in collages, amvs, etc. because its someone turning my work into something new. theres creativity behind it. and dont even say “credit to the original owners” to me, it lights a raging fire in me that can compare to no other
and here is the longwinded explanation :D
for me, it all depends on whether the collage is for personal use or if its going to be reshared online. personal use means only you or some select friends/family will see it. i know some people like to do collages for fun as a personal hobby and i think thats really cool and i would definitely allow my art to be used for something like that ^^! something like this will fall under personal use. using art as phone wallpapers also falls under this category (which is why you dont have to ask for my permission to use my stuff as wallpapers ^v^) because youre the only one seeing/using it!
of course, there are some people who use art for edits/amvs/collages that they post online like you said and i think thats great. i know i have no reposting in my bio, but for people who make these edits using others art, they are using their own creativity to make something new, with a work that i drew!!! i think thats super cool so of course i allow it. with. credit. im very thankful to the people who asked me for my permission first though, because it shows they care about the original artist ;v;. online, multiple eyes are seeing it and artists should be given credit when credit is due. reposting tho? no creativity at all. the laziest thing you can do to a piece of work. download image, upload to another site, post.
and i absolutely hate whenever i see “credits to the owner” because to me its the laziest and most disrespectful thing you can do to an artist. just the phrasing...irks me. like the person recognizes that they dont own the piece, the artist is the owner, and yet they are still reposting without permission. even a repost with no caption fills me with less rage than a “credits to the owner” so yes, i will be offended. please dont do that
please join me under the cut if you would like to see my explanation that has turned into a rant about reposting
and in some cases there is a watermark on the piece itself!!! clearly written!!! in plain view!!!! and yet people still write “credits to the owner”. like no, the owners name is clearly written on the watermark. plus it takes not even 5 minutes to put an image into a reverse image searcher and find the original artist. i have done this multiple times because yes, reposting without credit is really that common unfortunately and troublesome for people (me) who want to follow and support the original artists :/// my art has gotten reposted COUNTLESS of times with and without credit, and at this point ive given up on keeping track of and reporting them all cause theres just so many. im convinced i am aware of only 5% of all my art thats gotten reposted.
so to me, as a person who has gotten my art reposted countless of times, saying “credit to the owner”, even though i have written in both of my account descriptions NO REPOSTING in all capital letters, and have watermarked most of my work, is very disrespectful. i remember when my work started getting reposted A LOT for the first time, and i would get super angry every time it happened, and that rage has fizzled out now but it still remains. i still hate reposting with a burning passion.
i understand theres the innocent kind of reposting where the person is like “this art is so cool! i want to share this with everyone i know!!” (i know cause i did this in the past when i was a stupid kid) and then theres the kind of reposting that tries to gain likes and followers...off of someone elses work. off of something that they have not even made or own. how do you tell the difference between these kinds of reposting? the second one will probably have 100 something tags in the description :/...how lazy could that be? to use someone elses work for your own personal gain. my work is my work alone. if you want to get big on social media, do it with your own work. period.
i know im not alone on this because there is not a single artist i have seen who allows reposts with no credit. (and some reposters have the gall to say theyve done nothing wronggg oooooooo how inconsiderate can they possibly be ooooo im gonna kick them) theres some artists who dont allow reposts at all, no matter what condition, and i completely understand because someones art is their intellectual property, im done.
in conclusion please be considerate to artists, we already got it rough as it is ;-; (sorry for the super long answer ;;;;)
34 notes
·
View notes
Text
resources that i use for my userboxes and other things that are free (with links lol) and applicable examples:

Userbox Maker: Since we’re talking about userboxes, this one is indeed a no-brainer. The interface is easy and simple: You type the message, you change the colors, and then voila. The site doesn’t have images to add to the userbox ID square, thats up to you to put something there later.
What does it offer me?/Pros:
well, it offers you a way to make really easy userboxes with a color scheme (some are premade, others you can choose the colors) and resizeable text.
Cons:
The whole ‘Use this code in the English Wikipedia’ to get the box is LOST on me completely. im savvy but im not that savvy! What i normally do is enlarge and cut it, make the background transparent, then make the edit from there for what I need. Is that illegal? Who knows.
The colors of the premade color schemes are very dull and kinda washed out/ muted. You can change the color scheme of you box manually in the hex boxes, but even then they’re not as bright as you would hope. But hey, its free, what can you do? Here’s the color hex site that I use: X and here’s a pixel art maker bc I know the kids love that: P

LunaPic: Allows you to make transparents, flags, and other little photo edits like crop and filters. Con is that you have to have the thing you want to edit saved on your computer already, thus if you wanna do a quick edit of something in your clipboard you have to save it first aka, a hassle if you’re trying to meme
What does it offer me?/Pros:
See all those tabs right there? each one has a bunch of effects and things that go with them, so you’re bound to find something useful on the site no matter what you’re looking for, complete with sliders for easy adjustments. There’s color tinting, watermarking, transparency, pixelations, and the list goes on. You can also draw but its no PTS if you catch my drift.
There’s a editing history at the bottom of the page for you to see what you’ve done to your image. The site automatically carries your image over to the next tool you click on (if the tool is applicable to it, such as Draw from Color Tint). This is also a con if you accidentally edit your picture to something else entirely, but the history allows you to jump back an edit.
No flash needed for a lot of them!
Cons:
The site it massive in your browser, and because of the automatic drop down when you hover, you end up getting this overlap over the category and may end up clicking what you didn’t mean to. Easy fix is zooming out to about 80% to combat the overlaps. Because of this, if you’re going to use your phone, do it in landscape mode. wont be the best experience but it gets shit done.
site has ads but not pervasive ones. if you really dont like them, use an adblock.
For flag editing, the colors are a little rough, and require pretty damn good memory of what the right colors you want are called if you want a richer or more specific look. there is a color wheel though, which i believe is new.

Bloggif: another photo editing site, but its hella retro kinda. I believe the site is originally french so hey. lets you make old internet type gifs and icons, complete with glitter effects,fx effects, and even little smileys to add to your stuff.
What does it offer me/Pros:
Truth be told: not very much! There are only 20 editing tools on the site to use at your leisure, a significant downgrade from LunaPic’s 200+, but what it lacks in editing it makes up for the lovely retro feel it has. There is gif support, including deconstructing gifs if that’s your flavor, and the infamous glitter tools kids love these days!
some of the tools actually have lots of options with them, for example, the ‘Animated smiley’ tool, which offers 16 smiley shapes, numerous little add ons, and the ability to upload your own image to edit into this ‘smiley’. There are options at the bottom for the blink speed (Rapide, Moyen, Lent, Aucun which in layman translation is Fast, Slow, Slower, Stopped).
can support small images and larger images, but i wouldn’t recommend trying to over power the site. Here’s an example of the smiley tool in effect:

It’s fast! And really easy. You can do it from your phone as well!There are photo collages, animated text with effects on the letters and a few other things.
Flash not needed for all of them!
Cons:
‘Swiss army knife of photo editing’ is a bit of a stretch since there are so few tools.
For smilies, there is no free placement of the little effects. They pick a spot and stay there. To layer, you have to reupload the smiley and drop another effect.
Just not a lot to offer, tbh...but retro! and cute!

Blingee: ye olde blingee.com, lets you make blingees for that really early 2000s feel. TRES IMPORTANTE: to make blingees you need to set up an account (its free). You also need to use firefox (if DDG works im not sure i havent used it with that browser) and update your flash to actually make them after setting up an account. IDKY but it does not work with chrome whether you fixed your flash or not. the site gives you options to share your blingees as well, and you can also see shit from like ...2006 sksk
What does it offer me?
The ability to make blingees. What more can you want? If you’ve been online and a little tech savvy for a lot of your childhood, you may even have a blingee account still. the site is still active hasn’t updated its look for a WHILE, but it’s a pleasing site to look at.
Variety is of the essence here, as there are more than just blingees to create. There are internet postcards and stamps as well, with lots of little effects to add like sparkles and glitter and backgrounds of your problematic kins.
it’s cute ahaha <3
Cons:
G-D FORBID YOU LOSE YOUR PASSWORD!! I believe there is a bug right now that won’t let you sign up, even though the FAQ claims that you don’t need an account to make blingees (you very much do!!). I have emailed about the process of logging in after you reset your password and if there is a wait period until you can log in again, and I’m still waiting for a response. I also told them about the signing up part. I’ll update later...
You need flash. Flash is leaving soon :(
Pretty damn confusing to use actually. So much so you wonder if it’s worth the trouble...
Honestly its a very archaic site, would recommend using Bloggif frfr

Glitterfly: it’s glitter. its a lot of glitter. Theres 50 cent glitter images on this site. It’s legit.
What does it offer me?/Pros:
Glitter. And lots of things to put glitter on. And i mean A LOT!
Allows you to upload a picture to throw glitter on.
The jonas brothers are here. and camp rock.
Make glitter words, change their color, and roll that sucker in some sparkles!
askjhdjasf theres a tab to make??? a fucking PIMP CXARD/???JKHFSK (its just an american express black card stock image with a fake number on it)
Cons:
my G-d is it ugly. So much purple....
use an adblock
Not a lot of glitter effect options or color options for the words
No way to get rid of the watermark at the bottom, but what’s a little credit?

FOR NOW that’s about it! For some artwork, I use either my own drawings or images that I just...have on my phone or free cliparts that fit the topic. Uh...that’s all, goodbye!
#not a userbox#not obscure#refrence#tools#if anyone has any others they'd like to share i am here for it#long post
46 notes
·
View notes
Last Seen Blogs

gnebangla
GNE BANGLA

kendralimblog-blog
Kendra Lim

the-sleepover
The Sleepover {2020} online subtitrat in Românâ
thedirtwitchk
The Stash