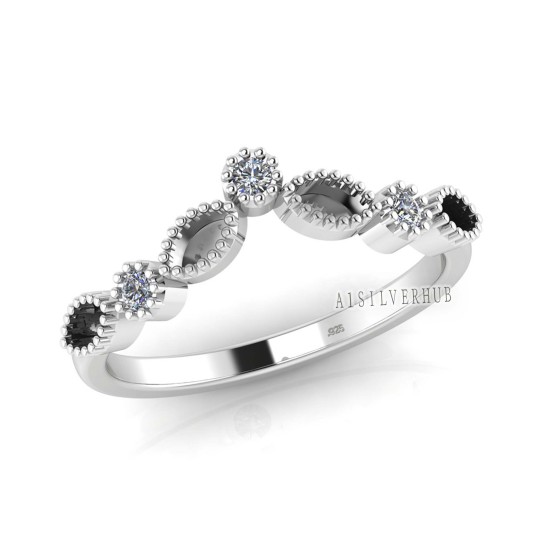
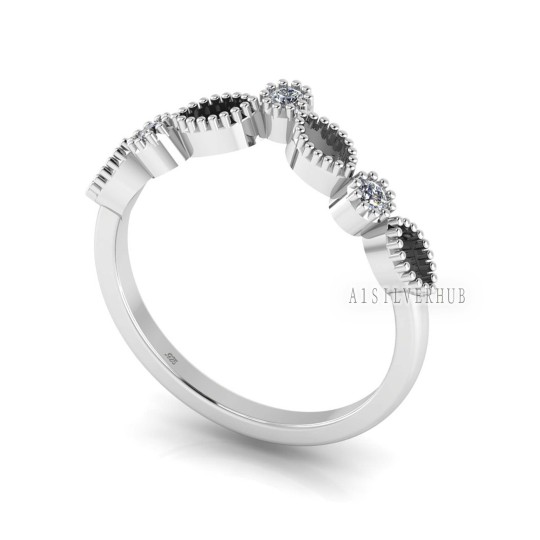
#Size: 2x4mm
Text
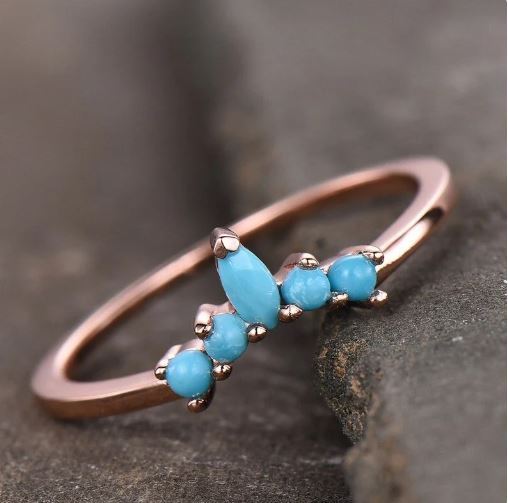
#Turquoise Ring#Wedding Band#925 Sterling Silver#Curve Stacking Ring#Matching#Anniversary Gift#Prong Set Ring#Marquise Rose Gold Ring#Metal: 925 Solid Sterling Silver#Type: Engagement Ring#Stone: Blue Turquoise#Size: 2x4mm#3mm#Shape: Marquise#Round#jewelry#fashion#jewellery#handmade#earrings#accessories#necklace#gold#handmadejewelry#love#style#jewelrydesigner#silver#jewelryaddict#ring
1 note
·
View note
Text
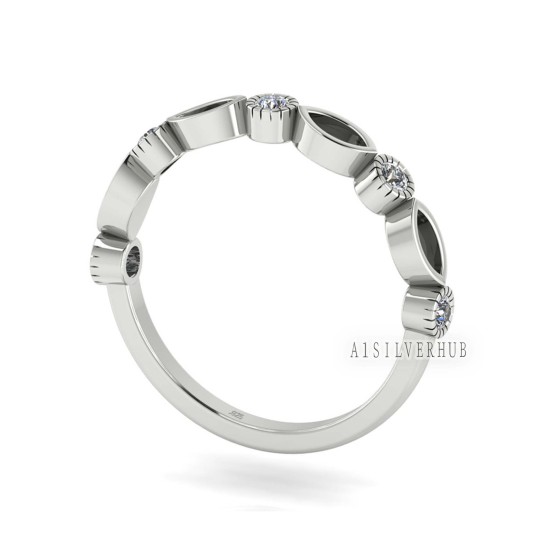

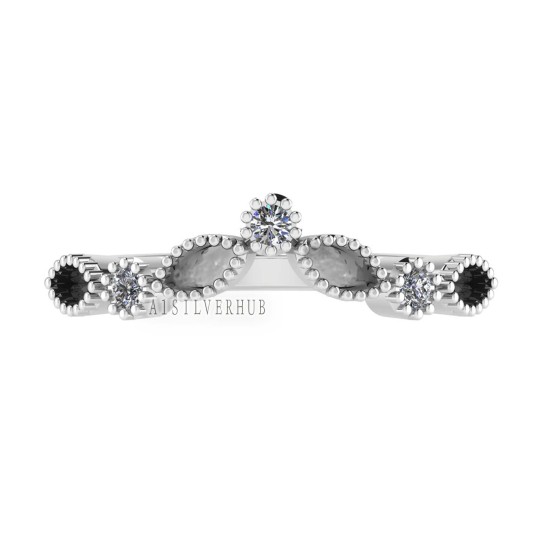
925 Sterling Silver 2x4mm Marquise Blank Bezel with 2mm CZ Setted Half Eternity Band Ring, Good for Resin & Ashes Work, Breastmilk DIY Craft
Description :
Round CZ size - 2mm
Marquise Bezel Size - 2x4mm
Metal: 925 Solid Sterling Silver
Type: Half Eternity Band Ring
Ring Size: Optional
Quantity: 1 Piece
Link on my bio to purchase
#Good for Resin & Ashes Work#Breastmilk DIY Craft#Description :#Round CZ size - 2mm#Marquise Bezel Size - 2x4mm#Metal: 925 Solid Sterling Silver#Type: Half Eternity Band Ring#Ring Size: Optional#Quantity: 1 Piece#Link on my bio to purchase#ring#sterlingsilver#keepsake#resinart#resin#DIY#fypシ#fyp#mothersday#art#live#trending#ebay#etsy#onlinestore#usa#uk#fashion#fashionjewelry#enemaljewellery
0 notes
Text
0 notes
Link
Check out this listing I just added to my Poshmark closet: AAA Natural RUBY FACETED BEADS NECKLACE 3 STRAND 17-19.
0 notes
Photo
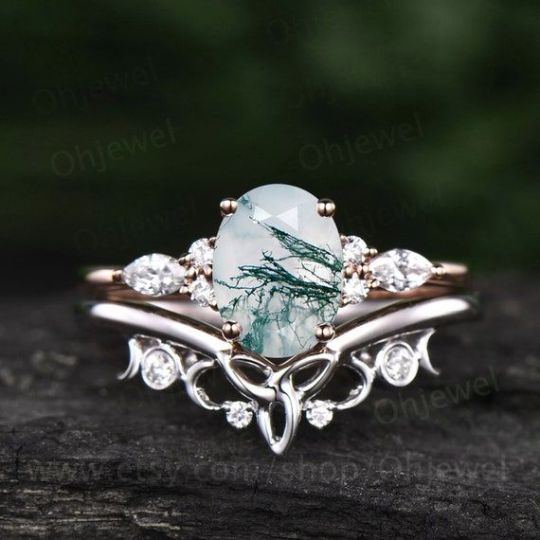
Unique bridal ring set oval cut moss agate engagement ring set vintage moissanite ring set white gold women cluster marquise ring jewelry
#wedding The 2pcs ring set only sell the same gold color. This is a moss agate engagement ring in solid gold,about 6x8mm oval cut. The accent stones are round 1.5mm and marquise 2x4mm moissanites. The matching band stones are moissanites. 925 silver ring with side CZ. It can be made in any ring size. However please contact me to custom make it to a special big or small size. It can be made in white gold,rose gold or yellow gold with 14k or 18k. However for some people who are nickel allergic,I can also
0 notes
Link
0 notes
Link
Natural Ethiopian Opal Marquise Cabochon Gemstone, Rainbow Color Opal Cabochon Marquise Calibrated Gemstone Wholesaler Lot For Sale
Gems Name :- Ethiopian Opal
Gems Size :-2x4, 5x2.5, 6x3, 7x3.5, 8x4, 9x4.5, 10x5, 12x6, 14x7, 8x16mm
Gems Shape :-Marquise
Gems Cut :- Cabochon Cut
Gems Color :- Multi Color
Country of Origin:- Ethiopia
0 notes
Text
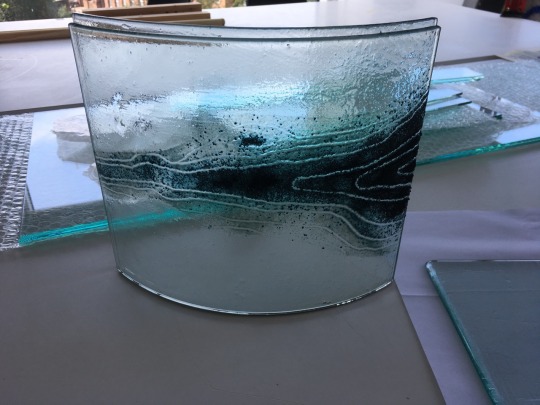
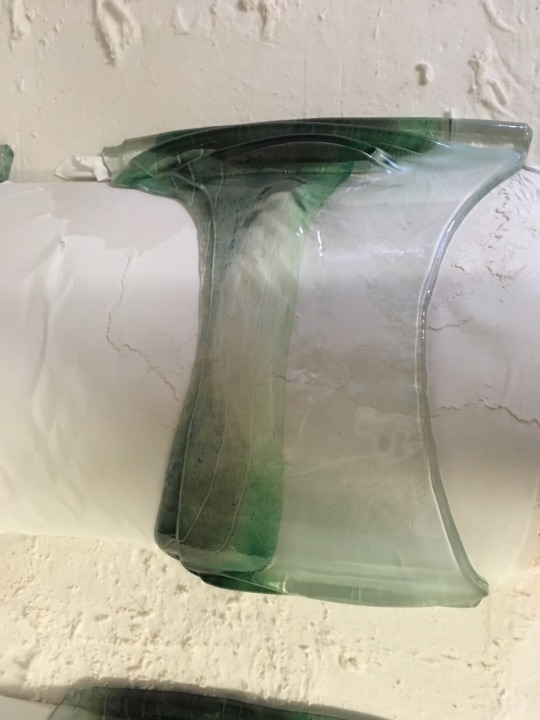
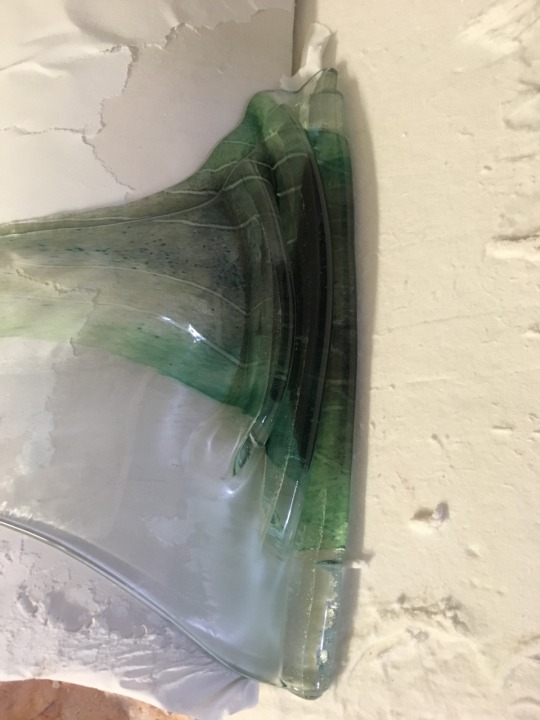
First small sample worked well - 2x4mm float glass with Optus Iris Frits of varying size. However, larger pieces slumped too much - will need to decrease top temp slightly and hold time. Also, appears to be a hot spot in centre of flatbed kiln.
0 notes
Link
0 notes
Photo

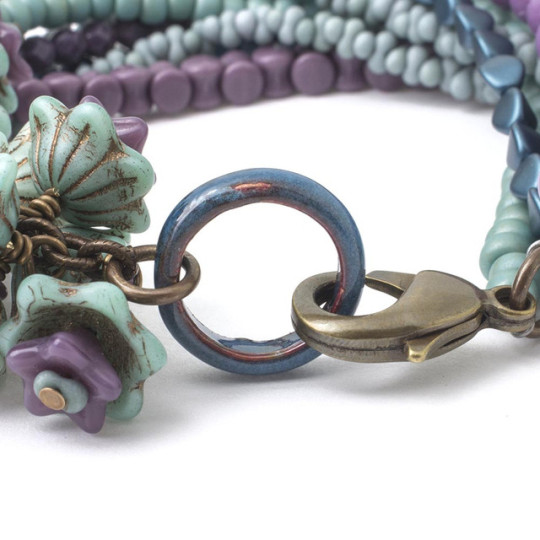

2x4mm Matte Opaque Sage Green Peanut Japanese Seed Bead
Size 6 Matte Opaque Sea Foam Green Round Japanese Seed Bead
4mm Round Fire Polished Czech Glass Bead - Alabaster Pastel Petrol
Opaque Purple Fire Polished Round Glass Bead - 4mm
4x6mm Opaque Purple Pellet Glass Bead
5x3mm Alabaster Pastel Petrol Pinch Czech Pressed Glass Bead
6mm Shiny Hollyhock Purple Czech Glass Pearl Beads
6x9mm Amethyst Opal Day Lily Czech Pressed Glass Bead
12mm Turquoise/Sea Green Silk with Dark Bronze Wide Bellflower Czech Glass Bead
Enameled Copper Ring Component by C-Koop Beads - Delft Turquoise - 16mm
Petite Etched Cable Chain by Vintaj - Natural Brass - 4mm
Brass Lobster Claw Clasp - Antique Brass - 19mm
2mm Natural Brass Tube Crimp Bead by Vintaj
Brass Round Closed Jump Ring - Antique Brass - 18 gauge - 6mm
7mm Natural Brass 16.5 Gauge Open Jump Ring by Vintaj
Head Pin by Vintaj - Natural Brass - 22 gauge - 2 inch
Soft Flex Beading Wire - Clear - .014" diameter - 10 foot spool
0 notes
Text


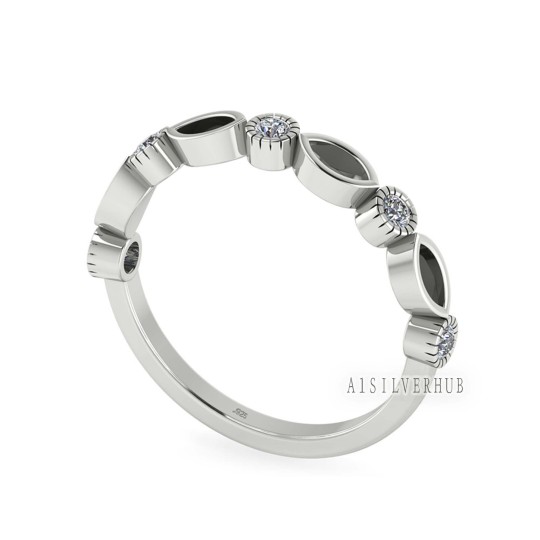
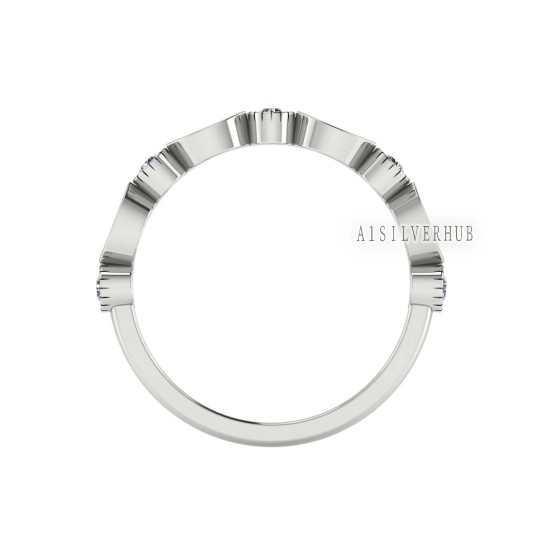
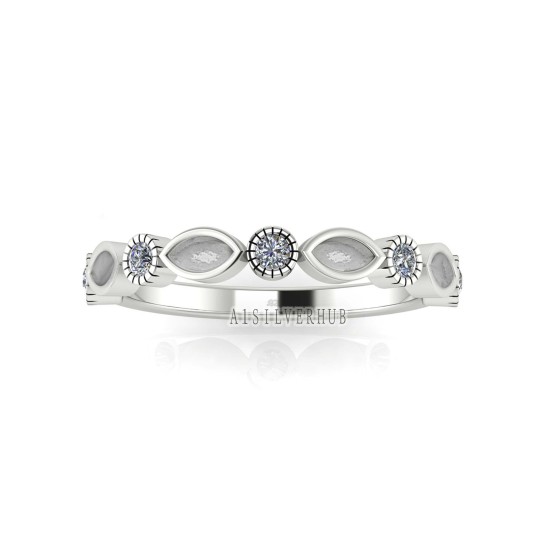
925 Sterling Solid Silver Marquise Blank Bezel with CZ Set Ring, Good for Resin & Ashes Breastmilk DIY Work, Keepsake Ring, Memorial Jewelry
Description :
Round Bezel CZ size - 2mm
Marquise Bezel Size - 2x4mm
Metal: 925 Solid Sterling Silver
Type: Chevron Band Ring
Ring Size: Optional
Quantity: 1 Piece
Link on my bio to purchase
#925 Sterling Solid Silver Marquise Blank Bezel with CZ Set Ring#Good for Resin & Ashes Breastmilk DIY Work#Keepsake Ring#Memorial Jewelry#Description :#Round Bezel CZ size - 2mm#Marquise Bezel Size - 2x4mm#Metal: 925 Solid Sterling Silver#Type: Chevron Band Ring#Ring Size: Optional#Quantity: 1 Piece#Link on my bio to purchase#findings#resin#resinart#findingsforresin#catring#instagram#onlineshopping#fashion#accesories#trending#smallbusniess#support#usa#uk#london#japan#thailand#etsy
1 note
·
View note
Link
0 notes
Link
Check out this listing I just added to my Poshmark closet: AAA Natural RUBY FACETED BEADS NECKLACE 3 STRAND 17-19.
0 notes
Photo
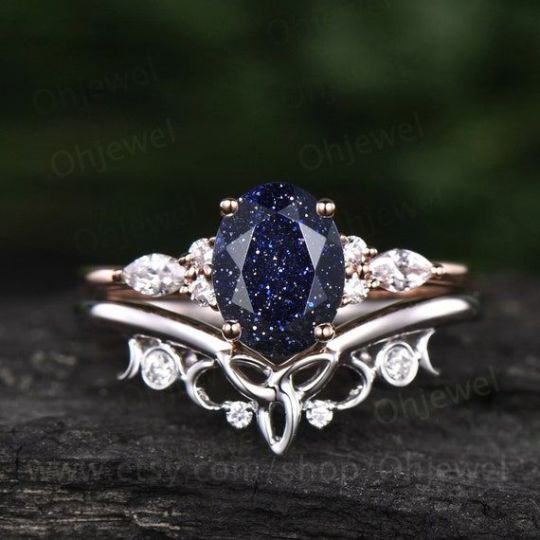
Oval blue sandstone engagement ring set 14k rose gold Galaxy vintage unique engagement ring moissanite ring for women Norse Viking Jewelry
#weddinghair 2pcs ring set only sell the same gold color. This is a blue sandstone engagement ring in solid gold,about 6x8mm oval cut. The accent stones are round 1.5mm and marquise 2x4mm moissanites (925 sterling silver with accent Simulated Diamonds). The matching band stones are moissanites (925 sterling silver with accent Simulated Diamonds). It can be made in any ring size. However please contact me to custom make it to a special big or small size. It can be made in white gold,rose gold or yellow gold
0 notes
Text
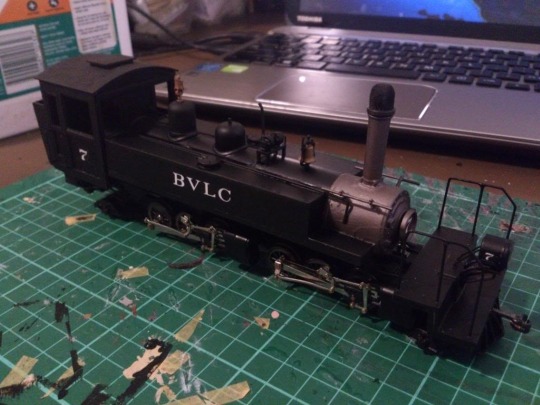
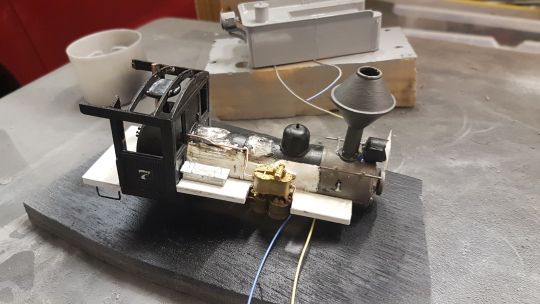
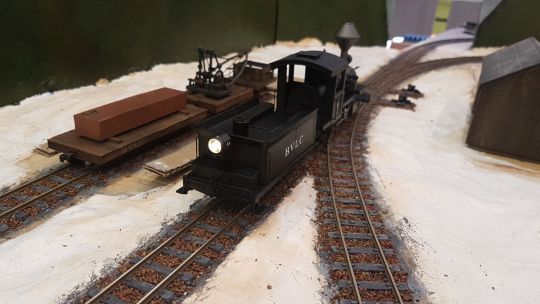
BVLC No. 9 - An Improvised Loco
I was off work last week, and I decided to add another locomotive to the Bradford Valley Lumber Company. This would be number 9, out of the 7 that can fit around my turntable. (Yes, I'll be expanding the turntable area). Given that I had a shoebox full of failed locomotive conversions (most of which were HO to On30), I figured that I may be able to use the remnants of these projects to build a working locomotive. So I set myself a challenge, to build an On30 locomotive in one week using only parts I had on hand.
My first step was to select the mechanism for the loco. I had three steam engines in the 'graveyard' (as I call that shoebox), all of which were former HO models. One was a Roundhouse 'old-time' 2-8-0, one a Bachmann saddle tank 0-6-0 and the last a Mantua 2-6-6-2T. I couldn't get the first two to work satisfactorily following the conversion. However, the converted Mantua locomotive had been BVLC No. 7 for a little while.
When I made this model from the 2-6-6-2T, I used the original frame from the HO scale engine. However, this frame was damaged during that conversion. Later on, when I went to clean the model's wheels, the damaged part of the frame gave way and I was unable to repair it. It's been in the graveyard since then.
As this was a known working mechanism, I decided to use it as the basis for my new no. 9. In order to keep things simple, just the rear set of drivers from the original Mantua engine would be used. This was where the motor was mounted. However, this presented a problem. On the original Mantua mechanism, each set of driving wheels picked up one rail.
My initial plan was to make it a tank engine, as I didn't have any spare tender engine cabs on hand. As such, I tried adding wheel wiper pickups made from Kadee coupler springs to the rear of the non-pickup wheels. However, due to a traction tyre and a lack of space, only one of these wipers would have actually been able to pick up power. I had a spare tender to hand, from the 2-6-0 I'd converted into loco no. 8. I also had a spare set of Bachmann caboose trucks, which had axle wiper power pickups. Thus, I decided to make it a tender loco, with the wheels picking up from the opposite rail to the drivers.
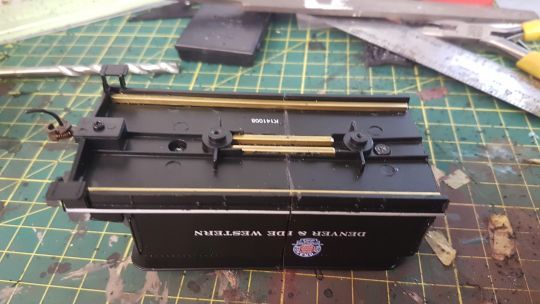
In order to allow the loco to fit on my turntable, I had to shorten the tender. I started by cutting a section out of the middle of the chassis, then gluing it back together with some brass bar for reinforcement. Following this, I shortened the body the same way, with styrene strip to hold it together.
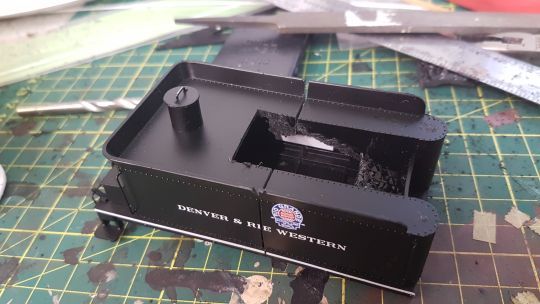
As I wanted to make this locomotive a wood-burner, I also had to remove most of the coal load from the front of the tender. I left a little bit and filed the top of it flat, to support a platform for the wood load I'd eventually be putting in it.
Once the glue had dried, I filled in the gaps with body putty. I had also shortened the front of the tender, and so I glued some styrene strip across the front to form a sill. Holes for the speaker were also drilled out.
In order to maximise the power pickup, I wanted to have all-wheel pickup on the tender. To this end, I trimmed two Kadee coupler springs, spread them outwards and glued them to small strips of styrene.
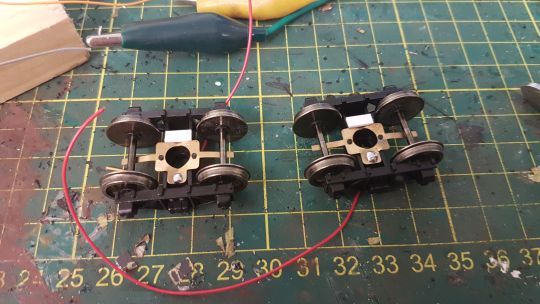
Another strip of styrene was glued to the caboose trucks, opposite the wheels that pick up power. Once this had dried, the spring wipers were glued to these strips.

While they were drying, I turned my attention to the wheels. I tried using the lead truck from the Mantua 2-6-6-2T, but the mounting point at the front of the chassis was too high for it. I considered making the locomotive an 0-6-2, but research showed that this wheel arrangement was very rare in the United States. I then remembered that I had a spare lead truck from my Bachmann Forney, which I'd converted to an 0-4-0 a few months ago. I just had to enlarge the mounting hole on it slightly, and it worked.
One of the driving wheels was also missing a traction tyre. I had some Bullfrog Snot on hand, and was able to use it as a replacement. This was the last I was able to do on the model for a couple of days.
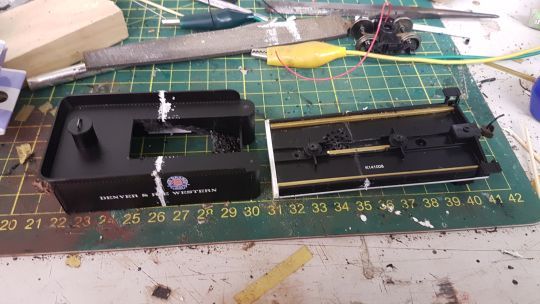
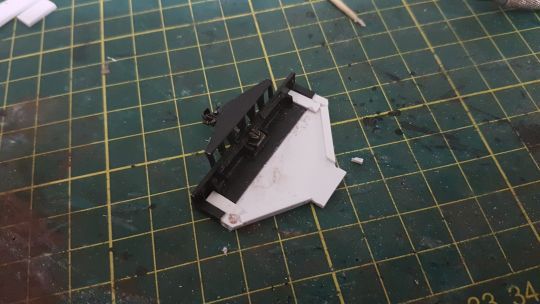
When I was able to get back to the build, my next step was to sort out the cab. I decided to adapt the cab from the 2-6-6-2T conversion, as I wanted a boiler the same size as the one I'd had on that engine.
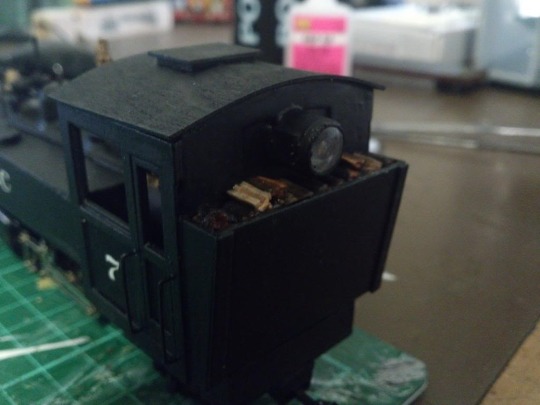
As this was a tank engine cab, I had to modify it slightly. After removing the fuel bunker, I retrieved the speaker and rear headlight. I also removed the side doors and rear wall.
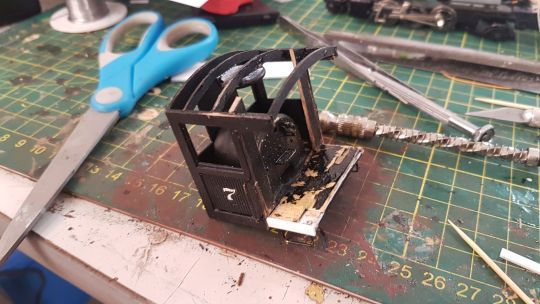
I cut the rear wall vertically, 1 scale foot in from each side. After filing these two sections to fit, I glued them just inside the cab wall, just in front of where the cab doors had been. I also relocated one of the top cross-beams from the middle of the cab to the rear. Once these had dried, I filed the cab floor flat. Styrene strips were then glued around the edges of the cab floor, then some thin styrene over the top to provide a smooth, flat floor.

Once that had dried, I fitted the cab to the chassis. The original rear section of the frame was still intact, and it had two holes which were just large enough for a 2mm screw to pass through. I used these, along with some 2x4mm screws, to hold the cab in place.
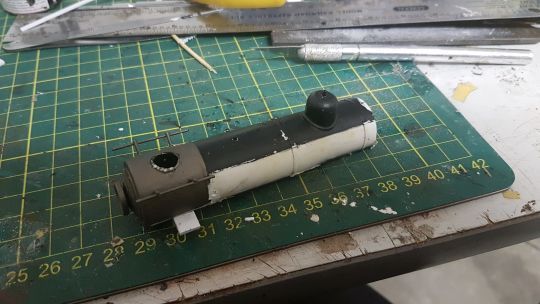
Fortunately, I was able to re-use the boiler from the original 2-6-6-2T engine. The side tanks had mostly been attached to the frame, and were only attached to the boiler where the top edge met the boiler bands. They came off and left behind an intact boiler, which just needed a bit of sanding down in one or two spots.
After cutting it to length, I filed the underside of the boiler flat, just behind the smokebox. Some 2mm styrene was glued in place, to allow the boiler to rest on the supports at the front of the chassis.
I left this to dry, and started working on the pilot. I wanted to use the front of the original pilot deck with the cowcatcher for this model, however this section was too short on its own. As such, I extended it with some 2mm styrene.
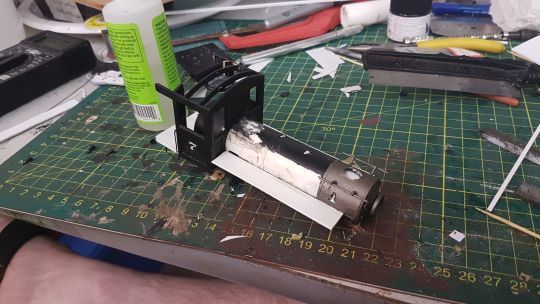
I then turned my attention back to the body of the engine. After joining the boiler to the cab, I needed to sort out the sides of the firebox as well as supports for the running board. I was able to re-use part of the original Mantua frame sides to do both. Once those sections were glued in place, I cut two footplates and glued them along the sides. Some 0.5mm styrene was also glued under the smokebox, where the original smokestack had broken off.

I had originally extended the rear of the chassis when building the 2-6-6-2T. In order to guide the wires, I drilled five holes at the rear of the extension. Styrene was also added at the rear, just behind the motor, to hide it from view. For the drawbar, I reused the one that originally held the front and rear driving engines of the 2-6-6-2T together.
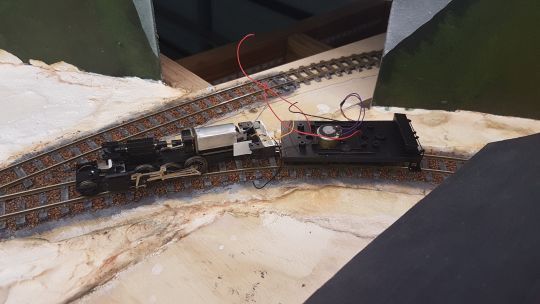
Testing on my layout's tightest curve confirmed that this allowed sufficient clearance between the locomotive and the tender.
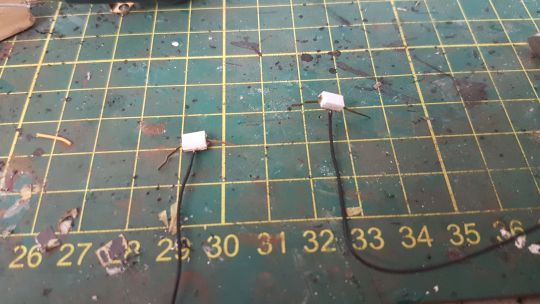
My next step was to install the speaker and decoder, which I was able to re-use from the original model. I had to replace the remains of the foam baffle around the front of the speaker, and used some spare brass tubing to do so. With the motor and power pickups wired in, I tested the loco on my layout.
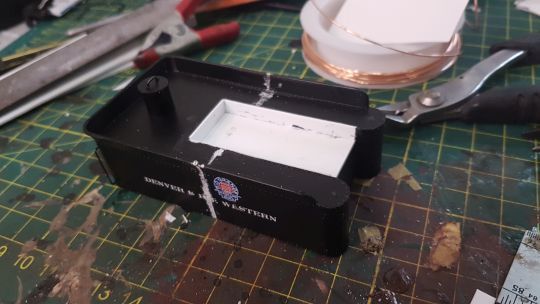
With the mechanism confirmed working, I started on the detailing. I built a bunker for the wood, in the gap where the coal load had been. I also sanded the body putty back, so that it was smooth with the body of the tender. There wasn't space to add a rear light on top of the tender due to the position of the water hatch. However the front light of the 2-6-6-2T was on a bracket that allowed it to be mounted on a vertical surface. It had originally come from the rear of a Bachmann On30 Heisler. After drilling two holes for the LED leads, I mounted this light on the rear of the tender.
I then detailed the locomotive body and pilot, using parts I had to hand. One of the domes had to be removed carefully with acetone, before being relocated near the front of the boiler. The rear headlight from the 2-6-6-2T was put at the front to act as a headlight. In order to secure the funnel, a hole was drilled through the styrene I'd glued under the front of the boiler. I then drilled out the bottom of the funnel, inserted a length of brass rod, and used that to fix it in place. I didn't add the rear dome before painting, as the whistle mounted upon it had already been painted.
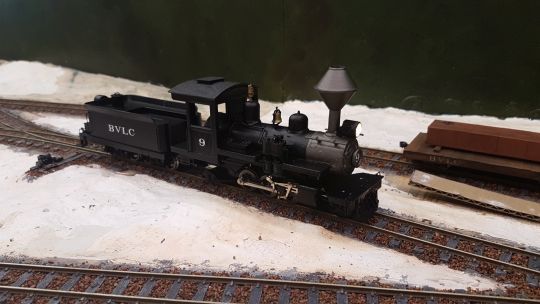
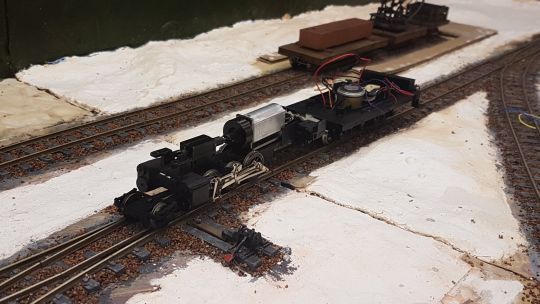
With the model painted and lettered, I wired up the headlights and put it together. Another test run confirmed it was working as expected.

All that remained was for me to add the couplers and wood load. Now that she's finished, I'll have to start on that turntable expansion :).
0 notes
Text

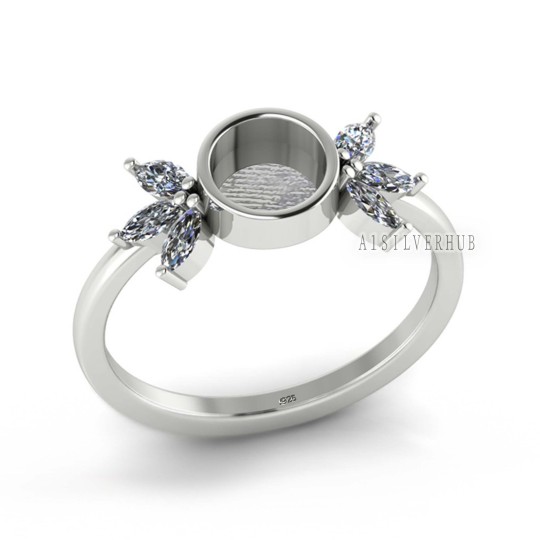
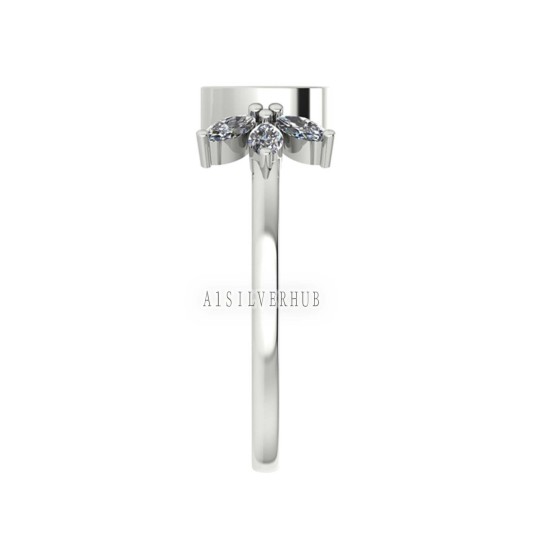

925 Sterling Solid Silver 6mm Round Shape Blank Bezel with Tiny Marquise CZ Ring, Good for Resin & Ashes Breastmilk DIY Work, Keepsake Ring
Description :
Round Bezel Size - 6mm
Marquise CZ Size - 2x4mm
Metal: 925 Solid Sterling Silver
Type: Bezel Ring
Ring Size: Optional
Quantity: 1 Piece
Link on my bio to purchase
#gemstone#jewelry#resinfindings#rings#etsy#ebay#925sterlingsilver#resinart#resin#diy#diycrafts#usa#onlineshopping#fashion#philippines#engamentring#giftforher#thailand#japan#southkorea#jaipur#accessoires#travel#instagram#followforfollowback
5 notes
·
View notes
Last Seen Blogs

mascne-blog
𝓲𝓼𝓵𝓪 𝓶𝓪𝓼𝓸𝓷𝓮

weallwanther-ig
WEALLWANTHER Instagram

ecubeenthusiasts
We are publishers of YouTube content

hdavenpt
helô

oceanflowerrs
some kind of girl