
sinthubakes
Welcome to my baking paradise!
Hi! My name's Sinthu and I run this blog. Check out all off my sugar-laden recipes and feel free to leave a comment and share. Enjoy your stay!
91 posts
Don't wanna be here? Send us removal request.
Last Seen Blogs

niceguitars-blog
Nice guitars, gear, set-up and repair.

whimsyyart
Whimsyy

aimshasmoved-blog
i've moved to "touchingmetouchingyou"

nal65
Untitled

thewoesofyaoi
yaoi is how i experience emotions
Text
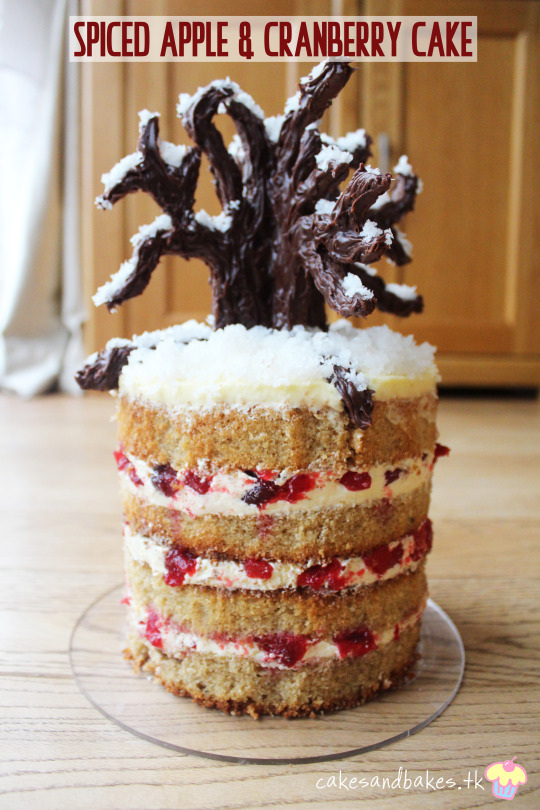
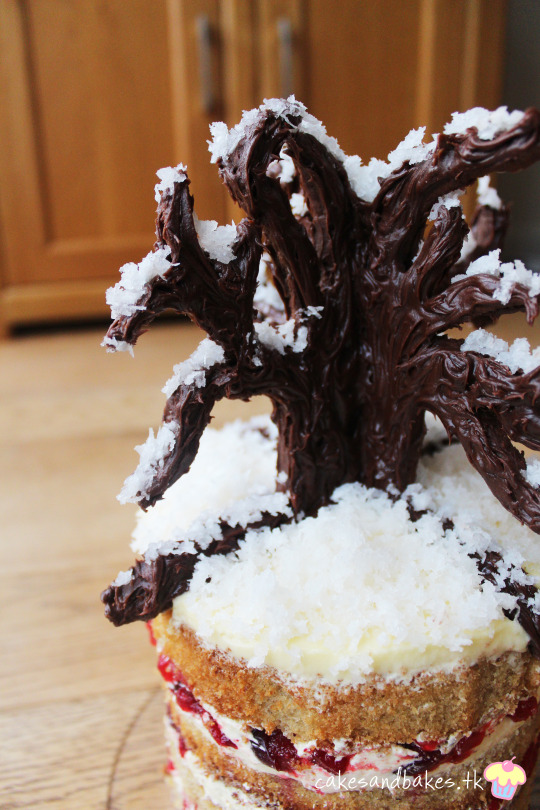
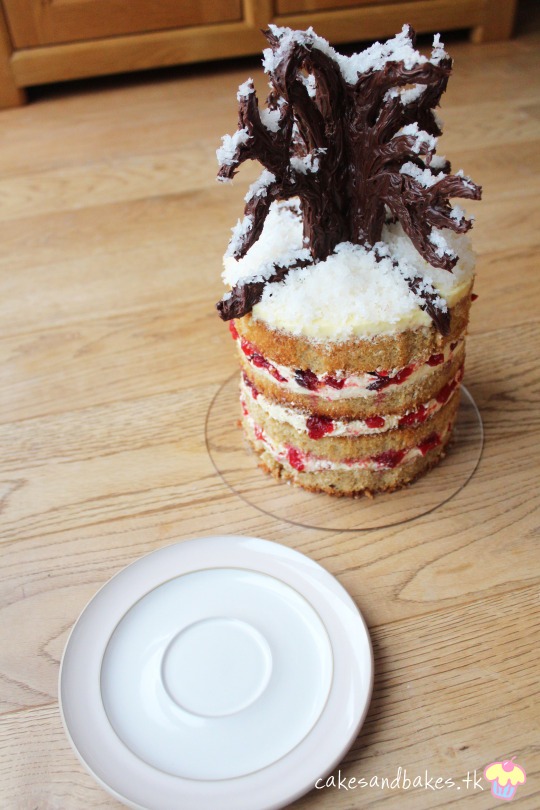
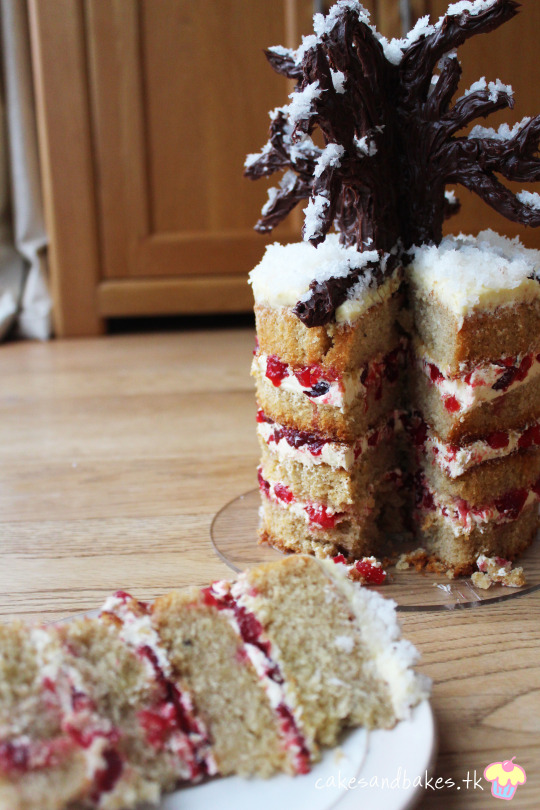
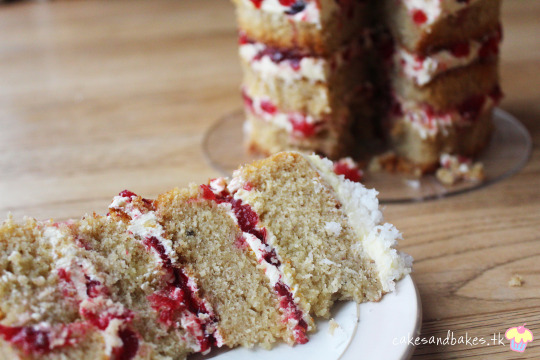
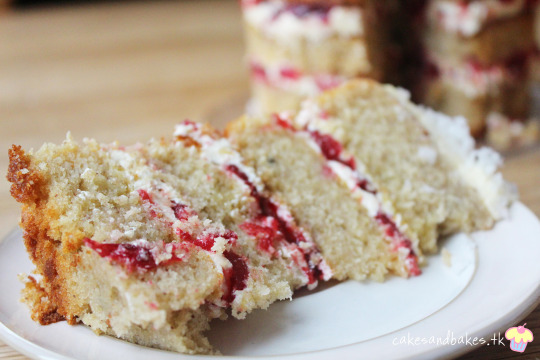
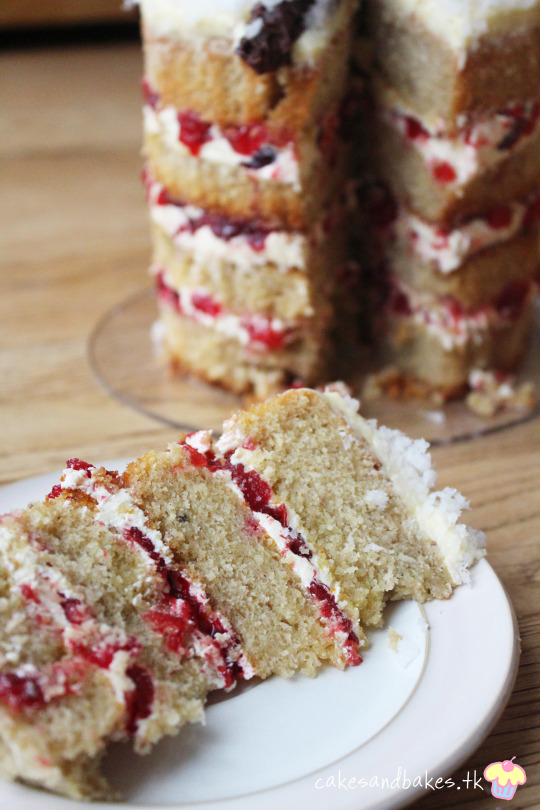
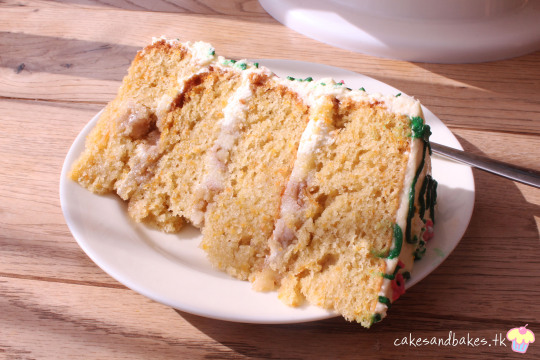
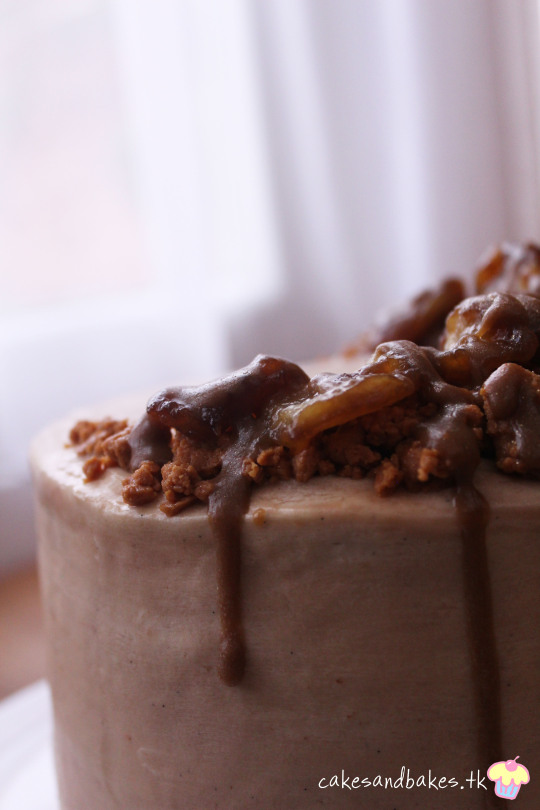
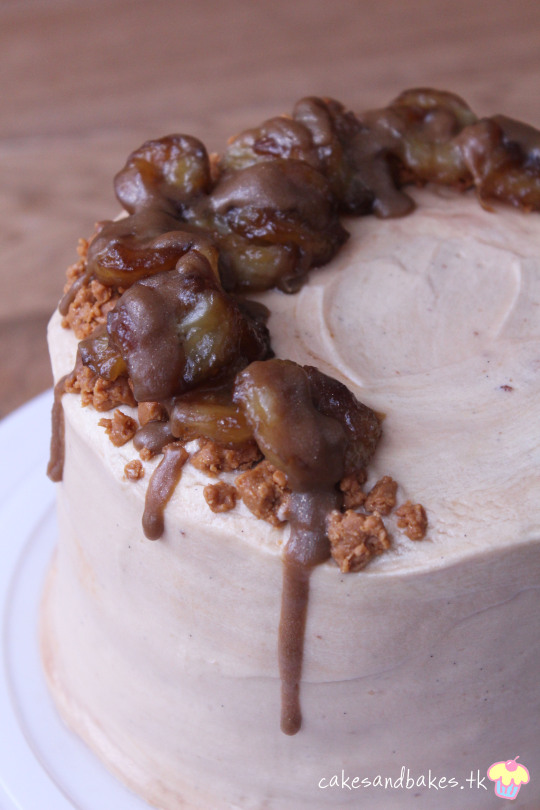
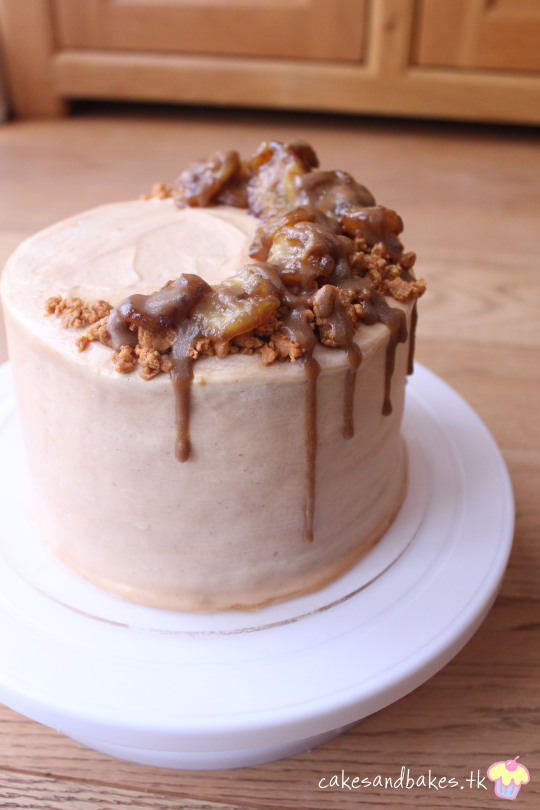
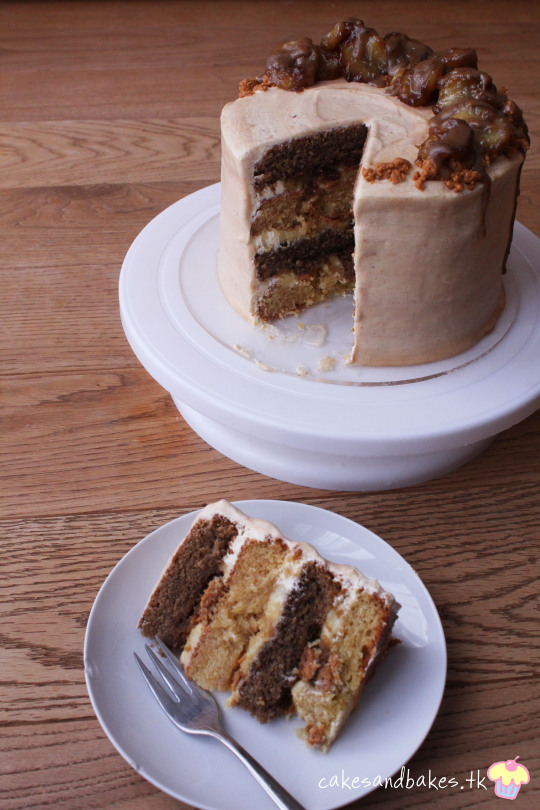
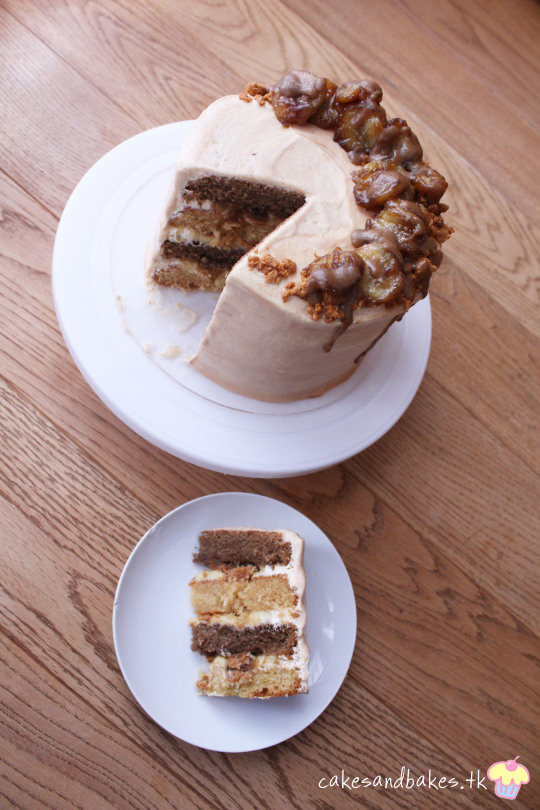
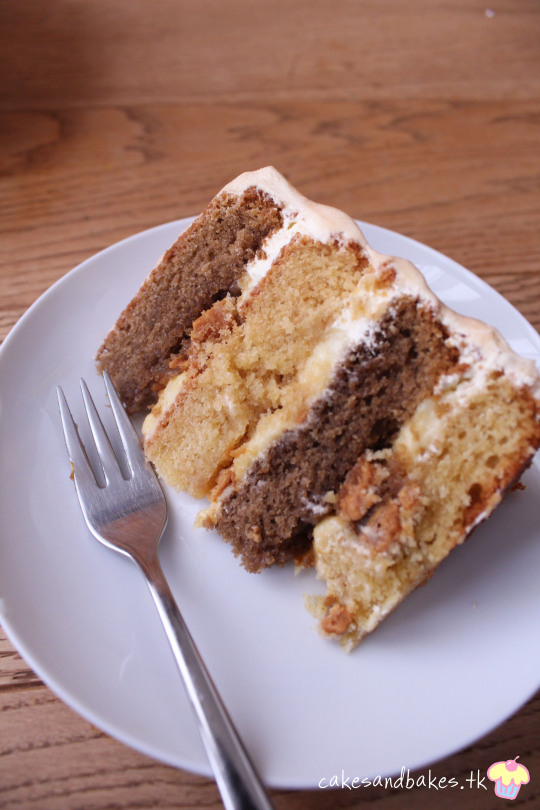
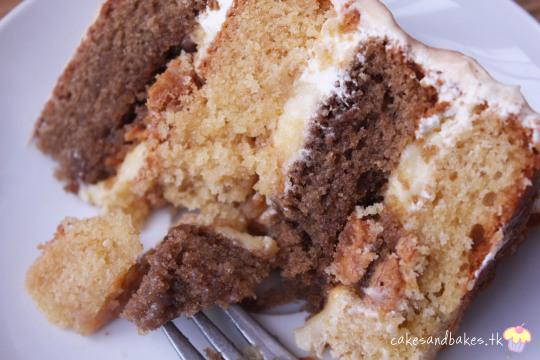
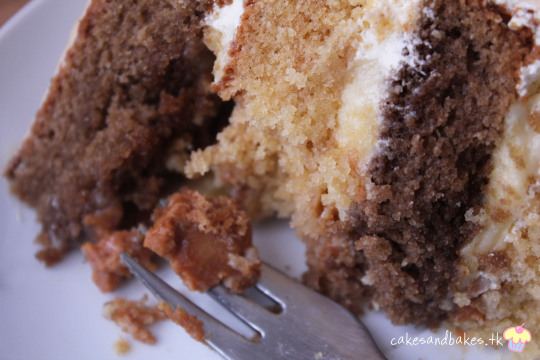
Christmas Spiced Apple & Cranberry Cake with Orange Syrup
Looking for a festive cake to adorn your Christmas dinner table this year? I’ve got the perfect recipe.

This cake, as the title would have it, comprises of four cake layers spiced with cinnamon and cardamom. The layers are then soaked in a tangy orange syrup and filled with a light buttercream and indulgent apple and cranberry filling.
All very festive flavours. Yum.

I’ve been home from university since the beginning of December and have been doing nothing aside from catching up on sleep, good home food (i.e., not instant noodles for every meal) and getting to see friends whenever I can.
Of course, there’s a lot of studying I need to cram in before term starts again. I may be somewhat kind of maybe extremely behind on work. But, first, cake.

I haven’t baked in so long! Before this cake, I had made a cake for my work experience placement that was orange and cranberry (Christmas themed) but other than that, I hadn’t baked for myself/my family in months! It goes with saying, I have missed baking a lot!

I have sadly neglected my blogger duties intensely with my unbelievably irregular posting schedule and I cannot promise that I’ll do better next year. University is a lot more stressful than I thought it would be and it seems like the stress keeps building!

So I try to bake when I can, and it usually ends up that I have a few recipes made and photographed but not written up! Hopefully, I can get this posted soon after this recipe.

Who’s excited for Christmas?
I’m going to be a bit of a downer and say that while I love the season and the general vibes it brings, I really don’t do much at all on the day and it’s like any other day of the year for my family and I.
I will most probably be watching Christmas movies (thank you Netflix for your never-ending supply of cringey Xmas romance films) all day, having said that, with some yummy hot chocolate and maybe some freshly baked cookies!
While I may not “do” Christmas, I definitely “do” cake so I can guarantee you this one’s a winner. The aromatic spices really make this cake what it is! I’m telling you, cardamom in cake is so unbelievably delicious. The orange syrup adds delicate citrus notes and melds well with the tangy yet sweet fruit filling. The texture is also perfect; light like a sponge, the syrup soaks very easily into the cake, amping up the moisture.
Of course, the decoration is completely optional, but I think it’s quite pretty!
So if you’re looking for an appropriately themed, indulgent and soft-textured cake, you’ve come to the right spot!
Yield: 1 4 layer 6 inch cake
Ingredients:
For the cake:
340g butter/margarine
300g caster sugar
100ml milk
50g yoghurt, plain
6 eggs
50g honey
2 tsp vanilla extract
3 tsp ground cinnamon
Seeds from 3 cardamom pods, ground
340g self-raising flour
½ tsp baking powder
For the filling:
3 medium apples
250g cranberries
150g sugar
2 tsp ground cinnamon
Juice of 1 lemon
For the orange syrup:
Juice of 2 oranges
Zest of 2 oranges
100g caster sugar
You will also need:
Your favourite/any chocolate cut-out cookie recipe, with 4 pieces cut out into half tree shapes
Your favourite vanilla and chocolate buttercream recipe
70g fresh coconut (or dessicated if you can’t find grated coconut), mixed with a few tbsp of caster sugar
Method:
Cake:
Preheat the oven to and prepare two 6 inch cake pans.
In the bowl of a stand mixer, cream the butter/margarine and sugar on high speed until light and fluffy in texture.
Beat the eggs in, one at a time, until well incorporated.
In a separate bowl, mix to combine the milk, yoghurt, honey, extract and spices.
In another bowl, mix the flour and baking powder together and then add half of this mixture to the cake batter, mixing on medium speed until almost combined.
Next, add in all of the milk mixture and beat until well mixed.
Finish by incorporating the remaining flour, scraping down the sides of the bowl to ensure no lumps of flour remain.
Divide the batter between the two prepared cake tins by eye or weight and bake for 50 to 60 minutes, checking with a skewer inserted into the middle to see if cooked through.
Leave to cool in the tins on a cooling rack.
Filling:
Begin by washing and peeling your apples. Finely dice all 3 apples into small chunks and transfer into a large saucepan.
Wash the cranberries and add to the apples, along with the sugar, lemon juice and cinnamon.
On medium heat, stir the fruit mixture occasionally and leave to cook while the fruit breaks down.
Continue to stir and cook as the filling begins to thicken, the cranberries have burst and the mixture is a deep red colour.
Once it has reached a thick near-jam-like consistency, take off the heat and leave to cool.
Syrup:
In a saucepan over medium heat, combine the sugar, lemon juice and zest and stir until the sugar has dissolved completely.
Bring the syrup to a near boil then remove from the heat and leave to cool.
Assembly:
Carefully remove both cakes from their tins and torte them so that you now have four cake layers.
Soak each layer generously with the orange syrup and adhere the first base layer to your cake board with a small amount of buttercream.
Begin stacking your layers; first apply a layer of buttercream (about ½ cm thick) and then add a few tablespoons of the fruit filling into the centre. Leave a small border of buttercream around your filling so that the filling doesn’t spill out. The fruit layer should be between ½ and 1 cm thick. Spread a few more tablespoons of buttercream on top of the fruit layer just to cover the surface and then place your next cake layer on top. Repeat until all the layers are stacked. Chill for 30 mins.
Using a serrated knife, carve around the sides of your cake for a clean finish, filling in the gaps between the layers with extra buttercream. Scrape the sides of your cake with an offset spatula to smooth the filling between layers and add extra pieces of fruit from left over filling to make it more aesthetically pleasing.
OPTIONAL: Apply a thick layer of buttercream to the top of your cake and create a large X-shaped slit in the centre of your cake, large enough to insert all four of your tree cookie pieces.
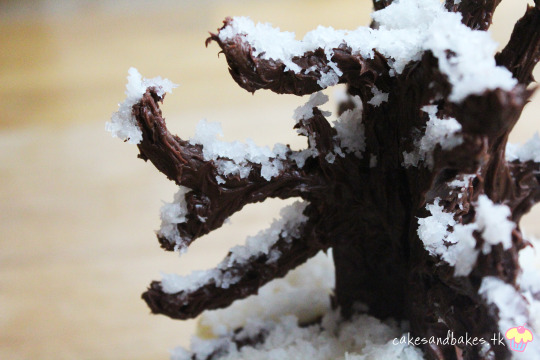
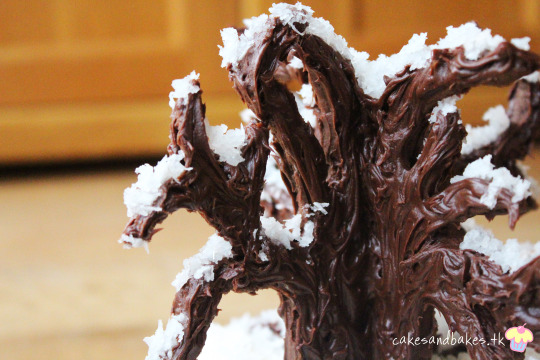
After you have inserted your cookie pieces into your cake, transfer some chocolate buttercream into a piping bag and pipe chocolate icing all over your cookie pieces. Use a fork or skewer to add texture to the icing for a more realistic tree look.
Finish your cake by spooning on the coconut mixture onto specific parts of your tree and the top of your cake for a snowy effect.
#cake#cakes#bake#bakery#baking#cake decorating#fruit#apple#cranberry#orange#cinnamon#cardamom#spice#spice cake#christmas#xmas#festive#food#foodie#food photography#food blog#food blogger#baking blog#eat#christmas cake#christmas food#recipe#buttercream#dessert#sweet
0 notes
Text
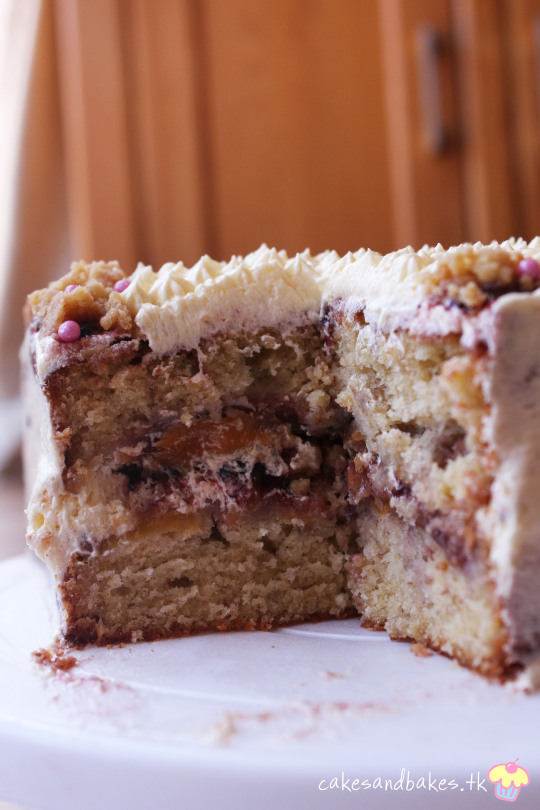
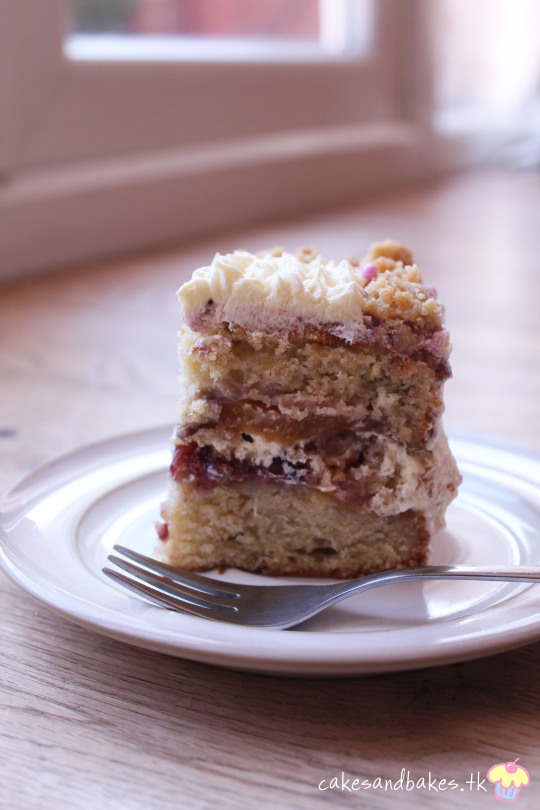
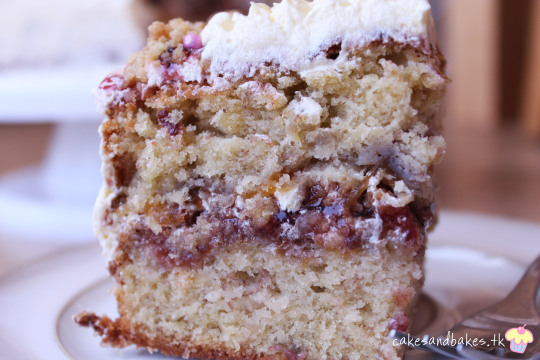
Fruit Streusel Cake (I’m back!!)

Long time, no bake, my friends!
I apologise for the inactivity; it’s been months since I last posted. This was mostly in part due to exams, university, my buzzing social life (this is a joke) and a bit of laziness/procrastination. Hey! I’m allowed to be a little bit lazy… I did just finish my first year of vet school.
It’s all good though, I fortunately ended up passing the year! No idea how, mind you, but I’ll take it!

So with the 3 (yes, three!!!) months of summer vacay I have until university starts back up again, I will be making sure to bake a whole lot more. I really want to redeem myself after my macaron catastrophe last time!

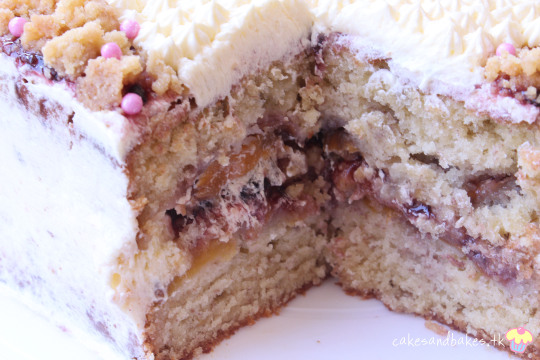
This cake was kind of an impromptu bake. I didn’t originally plan to include banana in this cake but I was short on eggs so the 2 mashed bananas replace the 3 eggs I lacked. The texture still came out wonderfully! I was also planning on using peaches but ended up with nectarines in it, instead!
All’s well that end’s well; the cake tastes beautiful and I’ve gotten good reviews back on it.

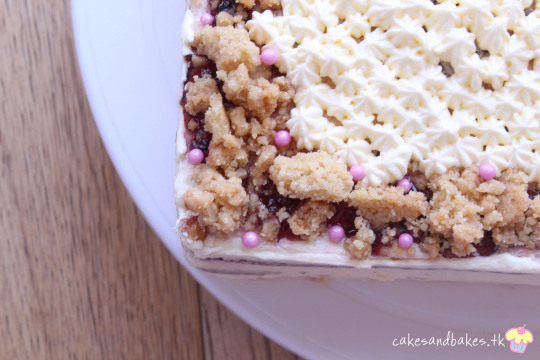
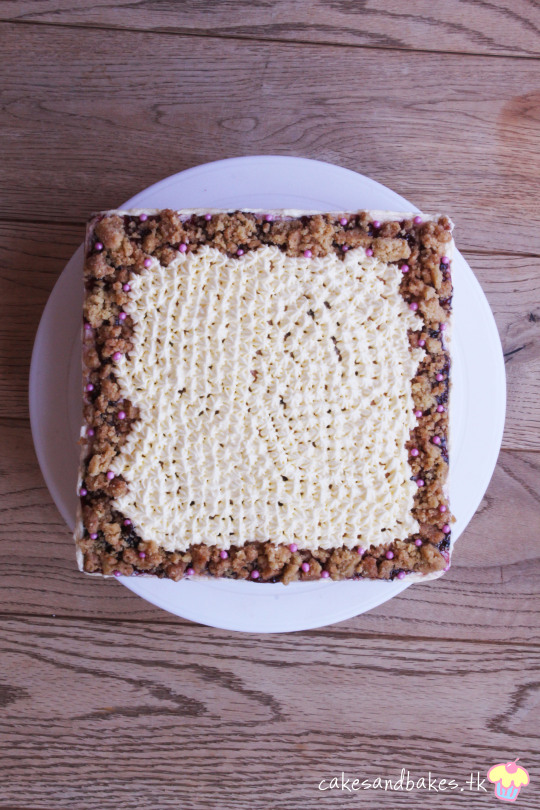
To pack more into the cake, I decided to add a blackberry filling as well as a generous layer of crumble in between the cake layers.
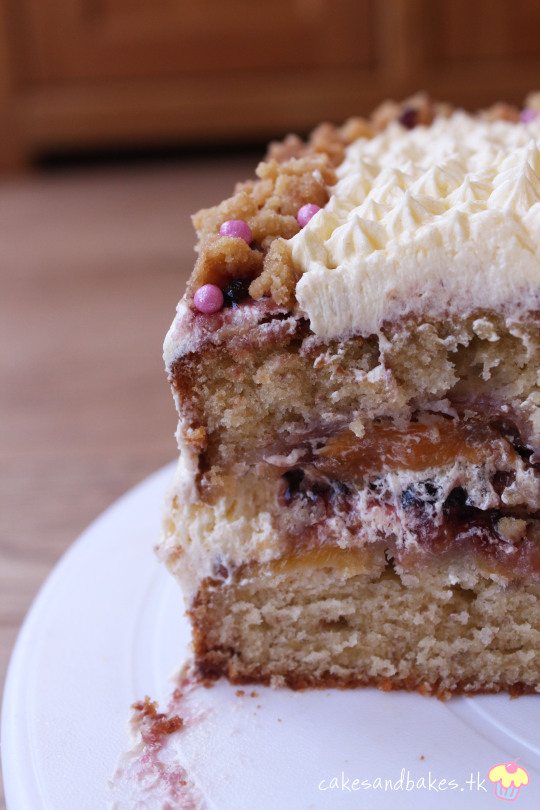
The cake texture is fluffy and moist, the nectarines are sweet, the blackberry filling adds further fruitiness and the crumble adds another level of texture. To decorate the cake, I just went with a classically sweet buttercream in a semi-naked style. Topped with more filling and streusel, I piped some buttercream stars in the centre and added a few extra decorations.
You definitely need a big glass of water after eating a slice, though. It’s packed full of flavour and sugar. Pace yourselves, guys.
On un-related cake notes, I hope everyone is enjoying the start of their summer holidays! I’m finally getting to catching up on the infinite list of unfinished shows I started during term time. What a productive summer ahead.
I can watch a lot of tv in 3 months. My poor eyes.

Also, please pray for my bank account balance. Let’s just say going out to eat racks up a lot of money very quickly.

Anyways, let’s distract ourselves from money woes with more cake pics. I think it’s working for me.

Yield: 1 9-inch square cake
Ingredients:
For the cake:
310g butter/margarine
270g caster sugar
2 tsp vanilla extract
3 eggs
2 bananas, mashed
310g self-raising flour
4 large and just ripe nectarines, sliced thinly
Brown sugar for sprinkling
For the blackberry jam:
150g blackberries
180g sugar
Juice of ½ a lime
50ml water mixed with 2 tbsp cornstarch
For the streusel, you can find the recipe here
+ your favourite batch of buttercream, sprinkles & other toppings as desired
Method:
Cake:
Preheat the oven to 350°F/177°C and line a 9-inch square baking pan with greaseproof paper.
In the bowl of a stand mixer, combine the butter, sugar and vanilla extract and cream until pale and fluffy.
Next, beat in the eggs until well incorporated, followed by the mashed banana.
After mixing well, add in the flour and beat until no pockets of flour remain (scrape down the sides of the bowl with a spatula to make sure).
Sprinkle 2 to 3 teaspoons of brown sugar onto the baking tray and begin to lay down the nectarine slices in rows until the whole tray is covered. Sprinkle 2 teaspoons more of sugar on top of the fruit. Reserve half of the slices for the second bake.
Spoon on top half of the cake batter and gently level it out with a rubber spatula. Bake for 40 to 45 minutes or until a cake tester comes out clean. Leave to cool completely.
Blackberry jam:
In a medium saucepan over medium heat, combine all the listed ingredients and stir.
As the mixture begins to bubble, stir from time to time to prevent clumping/the mix overflowing.
Once slightly thickened and syrupy, remove from the heat and leave to cool.
Assembly:
Both cake layers should bake flat but level if needed. Place your first cake layer onto your board so that the nectarines are facing upwards.
Spread a few dollops of buttercream on top using an offset spatula so that you end up with a thin layer and a buttercream dam around the sides (alternatively, pipe buttercream around the edges to create the dam).
Spoon on top the blackberry jam into a thin and even layer.
Next, break up the streusel if needed and layer a generous amount on top of the jam.
Spread a thin layer of buttercream on to the nectarine side of your other cake layer and, carefully, place this on top of the first layer (nectarine side facing down this time).
Apply a thin crumb coat and chill for 30 minutes.
Finish decorating as desired, I left the sides semi-naked, added extra watered-down jam to the top, followed by crumble, and then piped stars on the top. And, of course, gold-lustre and sprinkles!
#cake#cakes#streusel#crumble#fruit#fruit cake#baking#sweet#summer#dessert#food#foodie#food blog#food pics#food photography#cake decorating#blackberries#nectarines#banana#cakestagram#jam#recipe#baker#bake
1 note
·
View note
Text
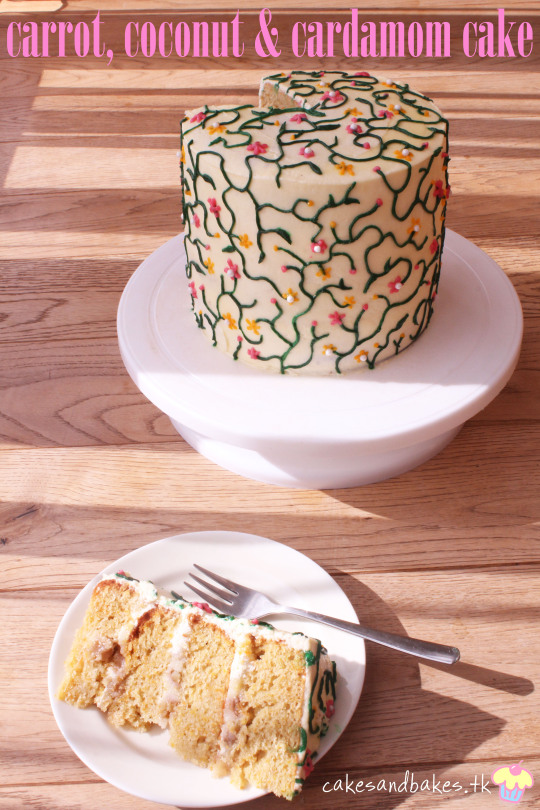
Happy Easter! Indulgent Spring Carrot Cake
Hello, everyone! I’m on Easter break now so I’m back at home. And you know what that means! A new blog post.
I know, I know. It’s been super long since I last posted. And truth be told, before this cake, I hadn’t baked in about 2 months! 2 whole months. Can you believe it?! This is what university stress does to you my friends.
But, alas, here we are. Back from university and with a fresh new recipe. This one’s definitely a keeper.
Since it’s Easter round about now and Spring has arrived (although that is pretty debatable considering the amount of snow that hit the UK a couple weeks back), I thought a carrot cake would be perfect for the occasion!

Of course, since this is kinda my comeback recipe, I had to amp it up a bit and that’s where the coconut curd, cardamom syrup and walnut brittle come in!

They add in a whole load of different textures and flavours that really make this cake unique.

One piece of advice; add cardamom syrup to everything. Please. It will change your life. After adding it to my pistachio and rosewater cake a while back, I’m always aching to drench one of my cakes in it wherever appropriate.

Carrot and cardamom goes pretty well. I imagine this syrup will also be perfect for a banana cake or other type of spice cake. I don’t know where it’d actually not fit the flavour profile, if I’m honest.

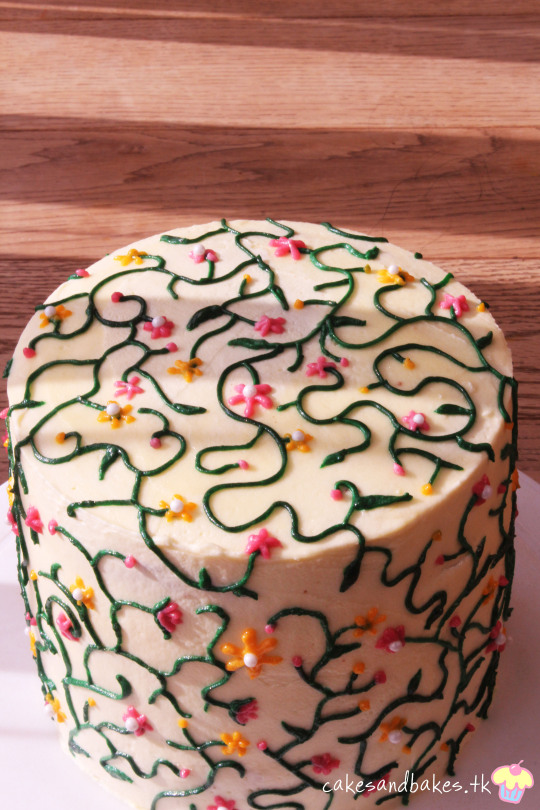
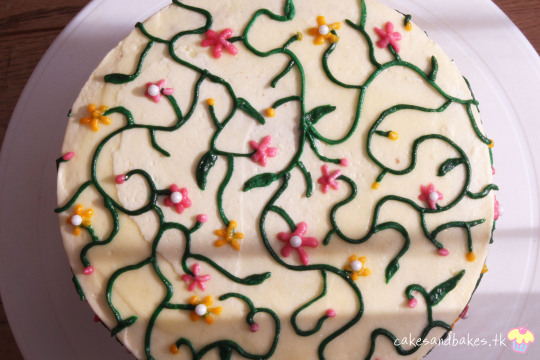
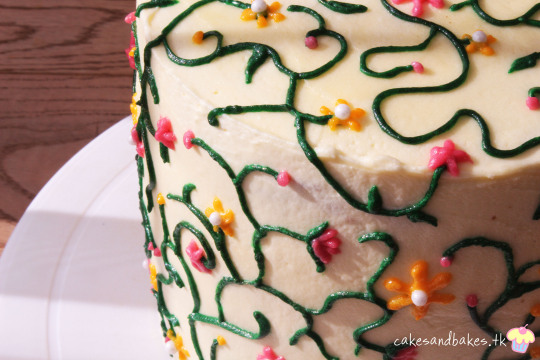
For decorating, I was stuck on what to do. I did want to do something intricate and floral but I didn’t have the patience to sit there all day making buttercream roses. And that’s how I came up with this design!

Very simple but also very pretty. I think it fits the Spring season quite well, don’t you think?

It’s actually super simple. All you do is separate out your buttercream into their individual colours, pipe a few vines all around the cake in whichever fashion you desire and then small flowers on the ends of the vines!

Add a few leaves here and there, some white pearls and gold lustre and you’re pretty much sorted. Got quite a lot of positive feedback on this cake. You should definitely try it out for yourselves!
My next recipe is in the works, too! I’m thinking something also Spring themed but whether or not it will actually work is another issue. You’ll just have to wait and see!

Hope you all have a lovely Easter and see you in the next blog post!

Yield: 1 4 layer 6 inch cake (it’s pretty big you guys, feel free to scale down)
Ingredients:
For the cake:
170ml oil
200g carrots
310g caster sugar
390g self-raising flour
6 eggs, large
1 ½ tsp baking powder
1 tsp cinnamon
For the cardamom syrup:
100ml water
100g sugar
7 or 8 cardamom pods
For the walnut brittle, click here, broken into small pieces
For the coconut curd, click here
You will also need: 1 large batch of buttercream (~300g fat to 400g icing sugar), dyed in the colours of your choosing
Method:
Cake:
Preheat the oven to 350°F/177°C and prepare 2 6-inch cake tins.
In a large bowl in a stand mixer, beat to combine the oil and the sugar.
Once combined, mix in the eggs and cinnamon, one at a time, until well incorporated.
After the eggs have been beaten in thoroughly, add in the carrots and mix once more.
Finally, adding in parts, mix the flour and baking powder into the batter until no lumps of flour remain. Make sure to scrape down the sides of the bowl.
Divide the batter between the two tins by eye or by weight and bake for 1hr. Check with a cake tester or skewer inserted into the middle to see if it has baked through. Leave to cool before removing from the pans.
Cardamom syrup:
In a saucepan over medium heat, combine the water, sugar and cardamom pods.
Bring to a boil, ensuring all the sugar has dissolved.
Leave to cool.
Assembly:
To assemble, level your cake layers and torte them so that you now have 4 equal cake layers.
Soak each layer generously in the cardamom syrup (you may choose to prick the cakes with a fork beforehand).
Secure your base layer onto your cake board with a dab of buttercream and begin the layering process. First spread a small amount of buttercream onto the layer and then create a dam of buttercream (you can either pipe this or use an off-set spatula). Next, add about 4 tablespoons of coconut curd within the dam and arrange small pieces of walnut brittle into the curd. Place the next layer on top and repeat until the whole cake has been stacked.
Once layered, cover the cake with a crumb coat and chill for 30 minutes to an hour.
After chilling, apply a slightly thicker final coat of buttercream and chill once more. After this, you can decorate as you like! I piped vines and flowers all across the cake but feel free to be creative with it.
Enjoy!
#cake#cakes#carrot cake#easter#spring#dessert#food#sweet#recipe#food blog#cake decorating#flowers#buttercream#walnut brittle#nuts#coconut#cardamom#cinnamon#desserts#foodie#eats#sugar#baking#bakery#bake#baker
6 notes
·
View notes
Text
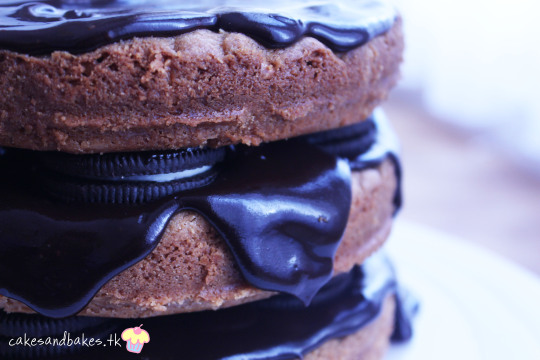
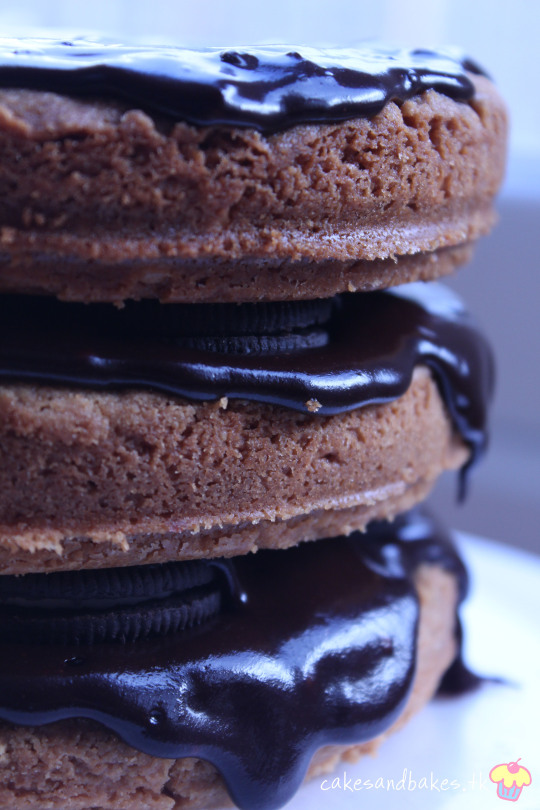
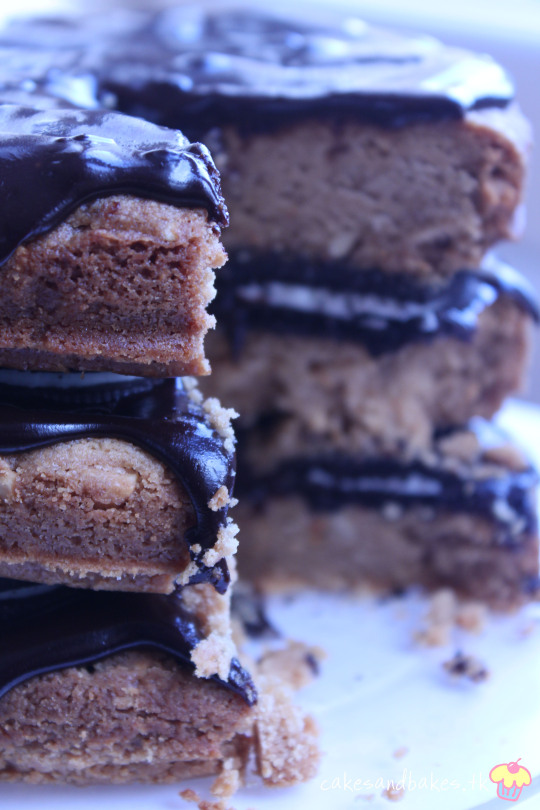
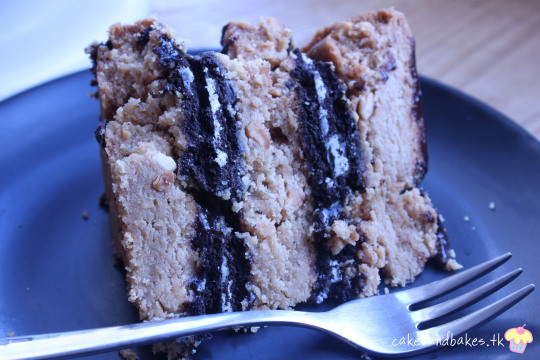
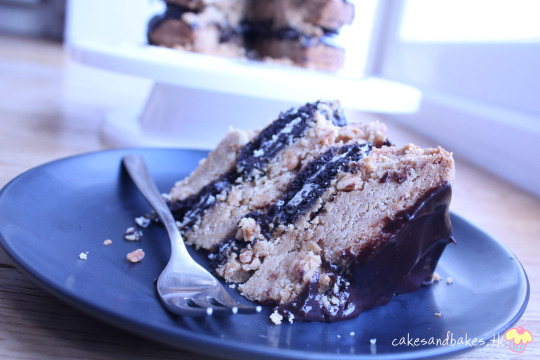
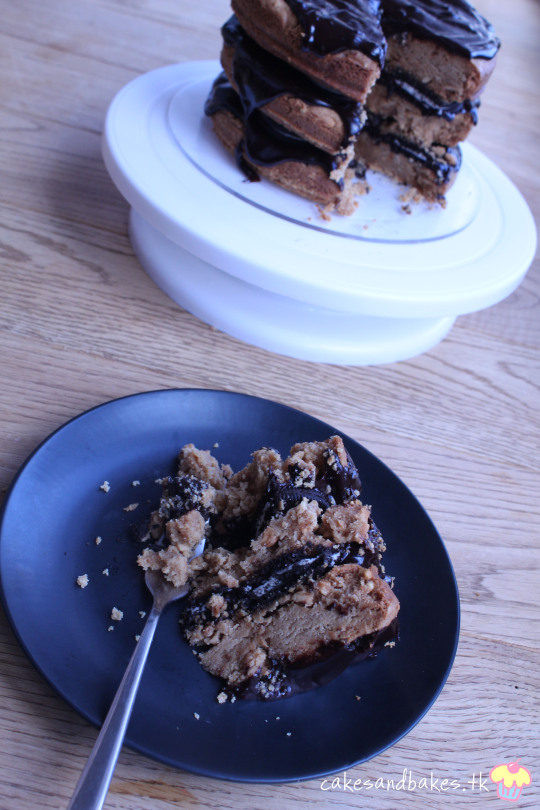
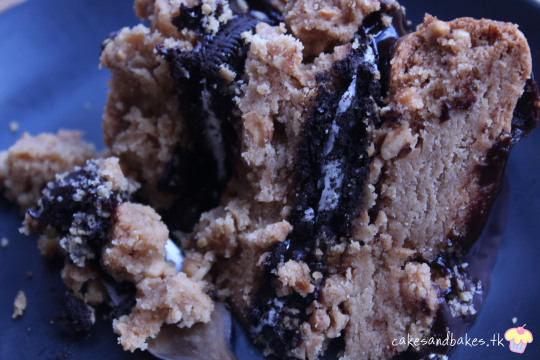
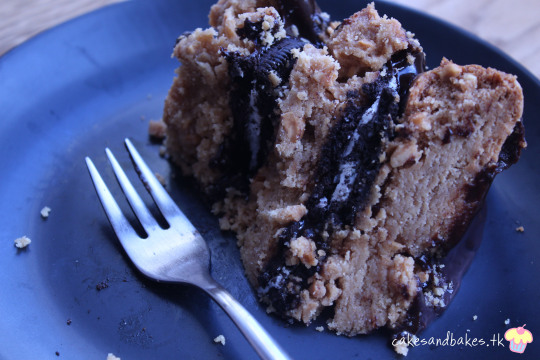
Vegan PB, Oreo & Chocolate Cookie Cake (HNY!)

Happy New Year everyone!
It’s quite unbelievable to think it’s already the start of another year. So much happened in 2017 and yet it also feels like I wasted 90% of the year doing nothing.

This year, though, I’m going to be pro-active and accomplish stuff. At least, I say that now.

This month, as part of ‘Veganuary’, I decided to post a vegan recipe for all you dessert lovers out there who crave sugar but without all those animal products.
And seeing that I hadn’t made cookies in a while, I thought this would be a great excuse to stuff myself silly with edible cookie dough.

‘Veganuary’ hasn’t been hard for me at all, actually. I’ve slipped up once, admittedly, when I completely forgot about being vegan when I was at an event with free food. The thing is, being vegan is actually pretty easy.
I didn’t realise how much of my diet was actually vegan to begin with. The only non-vegan products I’d consume were yoghurt, honey occasionally and anything I had baked.

I definitely miss yoghurt but not so much so that I think I can’t sustain this diet for the rest of the month. And honey hasn’t been so hard considering I’ve also got a bottle of golden syrup when needed.

The other thing is that while most people notice weight loss once going vegan, I really haven’t noticed anything. Mainly because I’m still eating the same food and snacking on the same things.
I still go crazy with all the nuts I eat and rice and vegetables are still my staple. This is a lot easier than people think it is.

Not only is it easy, but being vegan is very obviously good for the environment (and your health, of course). Just one google search and you’ll see all the environmental benefits of a vegan lifestyle.
Do I miss cake? Well, I’m not going to say I don’t. But with this cookie cake, I don’t really care. My sister was shocked when I told her it was completely vegan. I’d say it’s because it doesn’t taste vegan but that phrase does irk me. What does vegan taste like? Cruelty-free?

No, there’s no such thing as vegan-tasting. Let’s just say this tastes DELICIOUS.

I also made vegan coconut and cranberry pancakes the other day for breakfast. My mum and my sister were hounding me to sacrifice a pancake or two for them. Maybe that’ll appear on this blog one day too!

As for this beauty, it starts out with a peanut butter cookie base. The dough itself is absolutely to die for and bakes up into a crumbly and soft cookie.

Almost biscuit-like. A flax-egg might help bind the cookie a bit better together.

I layered the giant cookies with more cookies (a.k.a Oreos because DUH, vegan & yummy) with the vegan chocolate frosting featured in one of my ‘Tried & Tested’ recipes.
You’re going to be coming back for slice after slice of this one. And while it may not be guilt-free (there is definitely still an obscene amount of sugar here), it is most certainly cruelty-free.
Without further ado, here’s the recipe!
Yield: 1 3 layer 6 inch cake
Ingredients:
350g crunchy peanut butter
160ml coconut oil
320g caster sugar
1 tsp vanilla extract
370g plain/all-purpose flour
1 ½ tsp bicarbonate of soda/baking soda
½ tsp salt
2 tbsp golden syrup
2 tbsp liquid glucose
150ml water or almond milk
You will also need:
1 pack of Oreos (any flavour you like!)
1 batch of this chocolate frosting
Method:
Preheat the oven to 350°F/177°C and line three 6 inch cake pans.
In a microwave-safe bowl, combine the peanut butter and oil and microwave for 30 second intervals, stirring each time, until melted.
Transfer this mix to a larger mixing bowl and whisk in the sugar and vanilla extract.
Next, add in the water, syrup and glucose and mix until incorporated.
Finish with folding in the flour and bicarbonate of soda until just combined.
Divide the dough into 3 portions (I did this by scoops) and press each portion down into an even layer into each prepared pan.
Bake for 35 to 40 minutes until slightly browned. It’s a very crumbly cookie so undercooking is not really a good idea. Leave to cool completely before removing from the pans.
Layer the cookies with a layer of frosting, a layer of whole Oreo cookies and more frosting. Then, dig in!
#cakes#cake#cookies#cookie#cookie cake#stack#layer cake#chocolate#oreo#cookies and cream#oreos#vegan#vegan food#vegan dessert#vegan baking#veganuary#vegan recipes#food blog#food photography#pb#peanut butter#nuts#baking#bakery#baker#baking blog#new year#food#foodie#eats
8 notes
·
View notes
Text
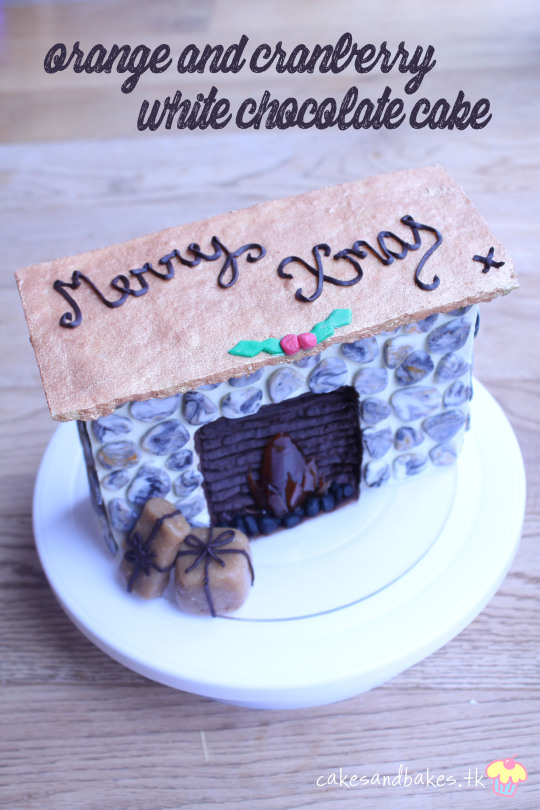
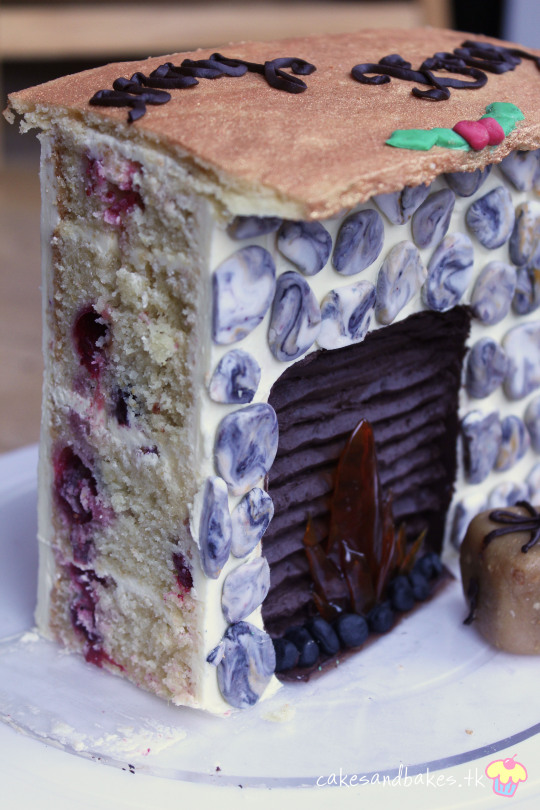
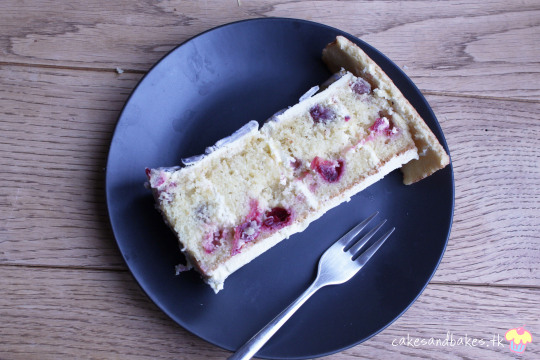
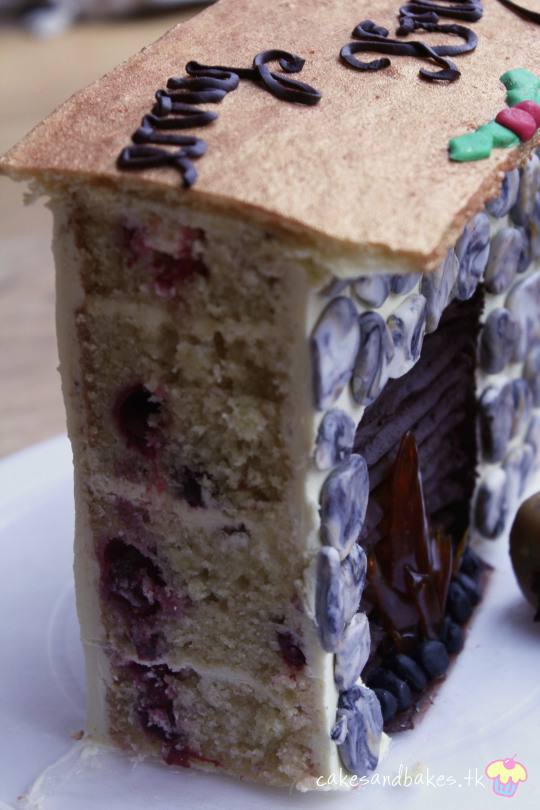
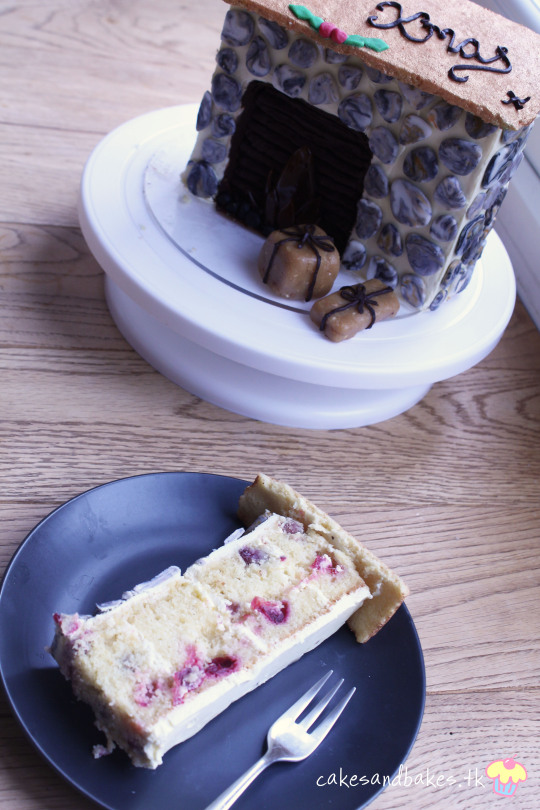
Merry Christmas! Orange, Cranberry & White Chocolate Cake
Merry Christmas! Hope you are all enjoying the festivities with friends and family.

This cake is quite appropriately themed for the occasion; who doesn’t like cosying up to a fireplace (or, in my case, a radiator) during the cold winter months. It is also a good opportunity to go overboard with decorating.

While I kept mine quite simple (not that I was super tired and fed up or anything), you can really do a lot with this cake.

You could make miniature fondant Christmas cards, a candelabra, tinsel and other garlands all to adorn your cake fireplace.

The flavours are also quite Christmassy! The cake itself is orange with cranberries tossed into the mixture. It is then sandwiched with what I can only describe as the best buttercream I have ever tasted; white chocolate ganache is combined with a regular buttercream to make an incredibly fluffy and smooth frosting.

To be honest, even if you can’t be bothered to make this cake, just make a batch of this frosting and you’re set for a good night.

The fondant stones are also very beautiful. To make these, just marble some fondant with beige and black food colouring (or, really, any colour you desire) and get to rolling and moulding! While slightly tedious, it’s definitely worth it for the final appearance.
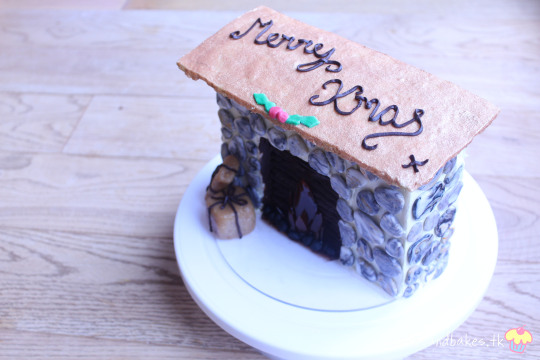
The gold cookie is also a nice touch to the fireplace. But, heads up, if you’re actually looking to eat the cookie, the alcohol taste from the rosewater extract is incredibly strong. The aesthetic is lovely but the taste is a bit vile.
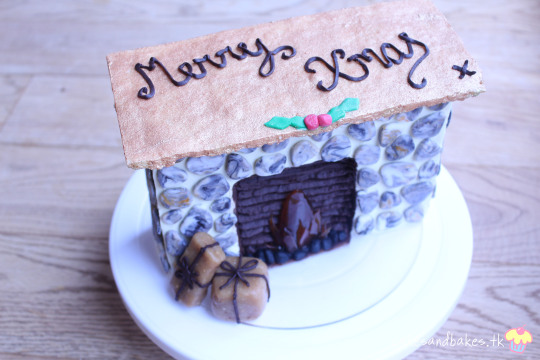
To add, I made some peanut butter cookie dough and shaped it into presents. I then piped on a little bow on each and arranged them near the fireplace.
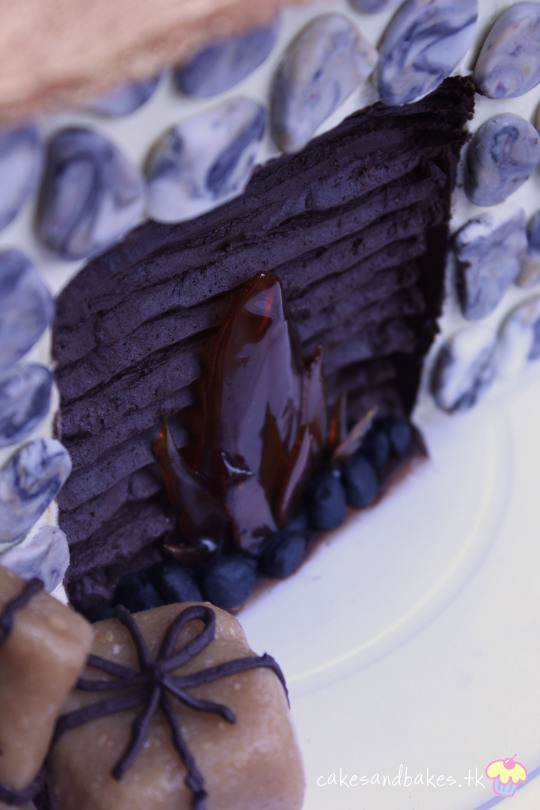
If you had a bigger serving board and enough willpower, you could even construct your own miniature cookie Christmas tree besides the fireplace to place these cute presents underneath.

With regards to that cookie dough recipe, it may end up being featured on this blog sometime in the future. I am considering doing ‘Veganuary’ so may spring up some tasty vegan recipes in the next year.
I have always wanted to turn vegan eventually so thought this would be a good opportunity to try it out. There are definitely some delicious vegan recipes out there I need to try.

There’ll probably be about 1 or 2 more recipe posts before I return back to university and until my inactivity most likely resumes, unfortunately.
But for now, let’s not think about work. It’s the holidays! And that calls for food.
Specifically, cake. Lots of it. Slice upon slice.
Yum.
Yield: 1 square 9 inch cake
Ingredients:
For the cake:
100ml oil
100g butter/margarine
300g caster sugar
5 eggs
1 tsp vanilla extract
Zest of 2 large oranges and the juice of 1
150g cranberries, tossed in 1 tbsp of flour
310g self-raising flour
For the ganache buttercream:
300g white chocolate
300ml double cream
250g butter/margarine
300g icing sugar
You will also need:
Your favourite sugar or any cut-out cookie made around 9 inches long and 3.5 inches wide (small-batch)
Fondant plus black and beige food colouring
Gold lustre + alcohol (I use rosewater extract)
Cocoa powder
Sugar for the fire, roughly 100g
Method:
Cake:
Preheat the oven to 350°F/177°C and grease and line a 9 inch square cake tin.
In the bowl of a stand-mixer with a paddle attachment, cream together the oil, butter or margarine and sugar until fluffy.
Next, beat in the eggs, one at a time, lemon zest and juice as well as the vanilla extract until fully combined.
After mixing, add in the flour and beat until no pockets of flour remain. Scrape down the sides of the bowl with a rubber spatula and fold in the cranberries.
Pour the batter into the prepared square tin and bake for 50 minutes to 1 hour or until a cake tester comes out clean. You may need to cover the cake with some foil at some point during the hour to prevent it from browning too much on the top. Remove from the oven and leave to cool.
Buttercream:
In the bowl of a stand mixer with a whisk attachment, cream the butter/margarine and sugar until extremely light in colour and fluffy (5 or so minutes on high). Make sure to scrape down the sides of the bowl.
Break the white chocolate into a separate bowl and pour in the cream. Heat the mix in 30 second intervals for 2 minutes in the microwave, stirring in between. Once heated, set aside for 5 minutes and then stir until homogeneous. Leave to cool.
Once the ganache is cool, transfer it all into the buttercream and whisk the mixture on high for a further 5 minutes until combined. The buttercream will be very smooth so you may want to chill it until it sets up firmer.
Assembly:
Level the cake, if necessary, though it should not dome too much. Cut about 1.5 inches off the square so you have a more rectangular looking cake (it can be trimmed down more later on). Next, using a sharp knife, carve a smaller rectangle from the top of the cake about ½ a cm deep, leaving about 4cm either side of the rectangle. Trim the cake smaller so that it measures about 12 by 8 cm.
Slice the cake horizontally into 4 equal rectangles so that you essentially have 4 layers to stack. Affix the first base layer on its side onto the cake board with buttercream and continue to stack these layers up so that the cake is now standing up.
Use some buttercream to apply a thin crumb coat across the cake and chill for 30 minutes.
Once chilled, use an off-set spatula to apply a thicker cut of buttercream to the cake. It only needs to be fairly smooth as the fondant stones will cover the front of the cake. The inner rectangle does not need to be iced. Chill again.
Meanwhile, take about 300g of fondant and add both beige and black food colouring to it. Begin to knead the fondant just enough so that the colour marbles throughout the fondant. Make sure to leave some white spaces of fondant and some areas with more colour. Take small pieces of fondant and roll them into balls. Then, flatten them out and shape them into your desired shape. Repeat this until you have slightly more than you need to cover the front and sides of your cake.
Remove the cake and apply the fondant stones to the front and sides of the cake. Chill once more while you prepare the remaining decorations.
Take your baked cookie and trim it so that its size is perfect for your cake. My cookie only slightly hung over the sides of my cake. Mix some of the gold lustre with rosewater extract and paint the cookie you baked all over (except for the underneath) and leave to dry.
Take some of the remaining buttercream and mix in 4 or so tablespoons of cocoa powder. Transfer this into a piping bag with a leaf piping tip (or any that pipes a rectangular shape) and pipe rows of buttercream to cover the area of the small cut out rectangle (you can spread the sides with the buttercream instead). Return the cake to chilling while you make the sugar shards.
In a saucepan over medium heat, begin to heat about 100g of sugar (the exact amount doesn’t matter, you only need a small amount) and heat until it caramelises and turns a deep red-brown colour (i.e. beginning to burn around the sides). Pour this out onto parchment or foil and leave to harden before breaking into shards.
Dye some fondant black and use it to make small pieces of coal. Arrange these at the base of the fireplace (at the bottom of the smaller rectangle).
Finally, place the sugar cake on top of the cake and add as many decorations as you desire! I kept mine simple with a small holly and piped “Merry Xmas x” on top and some cookie dough presents at the side of the fireplace.
#cake#christmas#xmas#merry christmas#christmas cake#festive#theme#themed#cakes#cake decorating#baking#baker#bakery#food#food blog#foodie#eats#food pics#recipe#dessert#baking blog#buttercream#chocolate#orange#cranberry#citrus#ganache#fondant
2 notes
·
View notes
Text
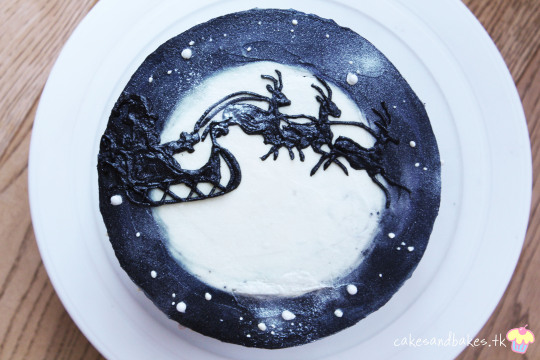
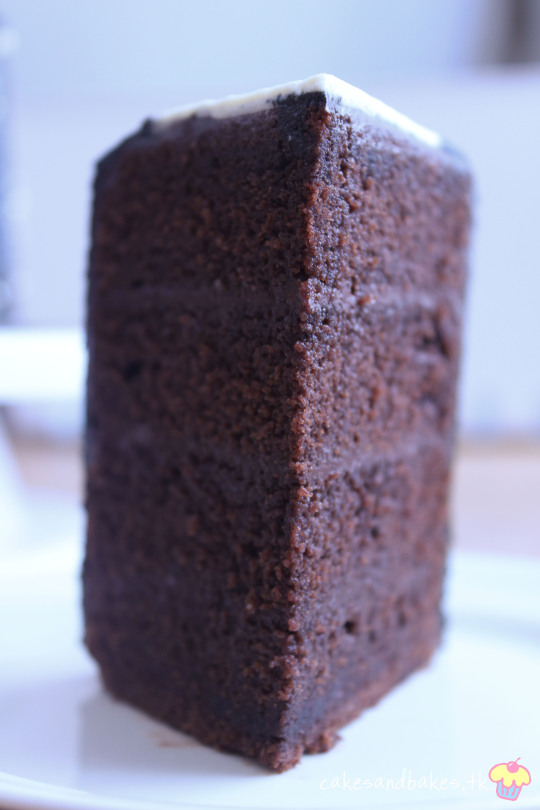
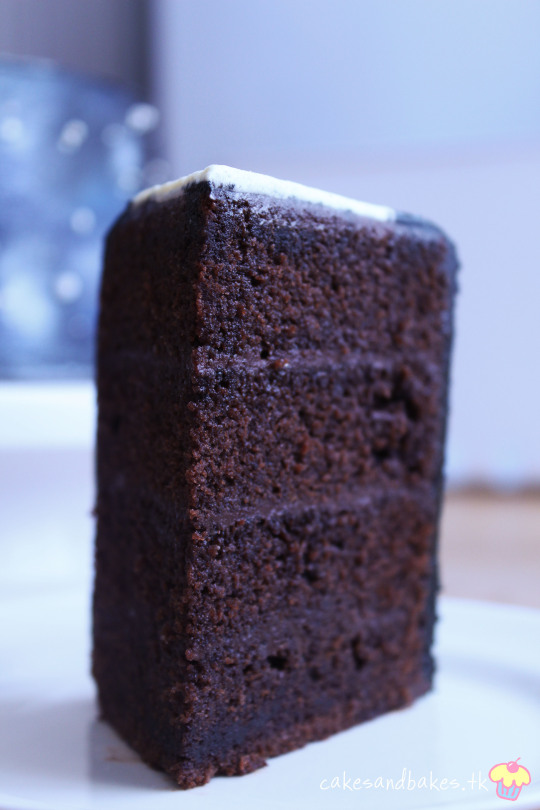
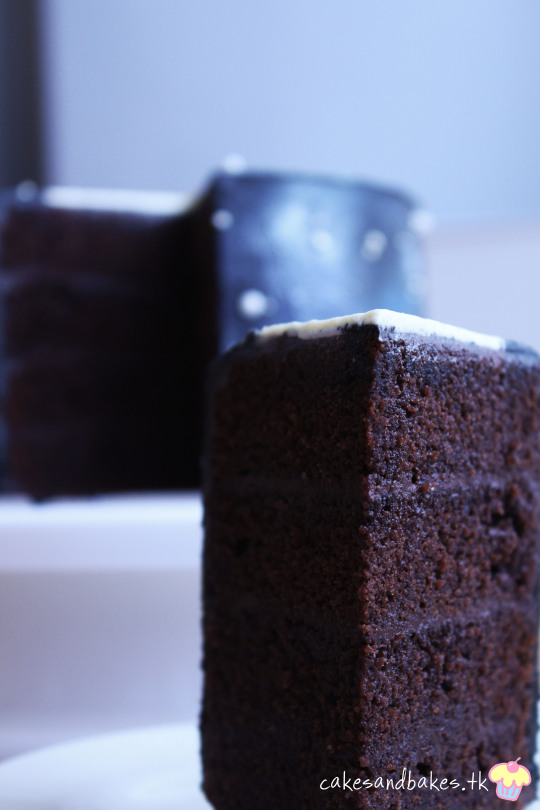
Chocolate & Ginger Night Before Christmas Cake

Wow, it’s definitely been a while.
First, apologies for the severe lack of posting recently. As mentioned before, I just started university and had switched my posting schedule to monthly posts. However, it seemed like I couldn’t even stick to that!

University sure is stressful, leaving almost no time to bake at all.
Luckily, I’m on my Christmas break now (a grand total of 6 weeks off, my friends) so baking is not too much of an inconvenience and I can definitely start eating more cake.

Is that a good thing? I’m pretty sure it is.
Anyways, seeing that it is December now, I thought what better way to break my inactivity with a Christmas themed cake?
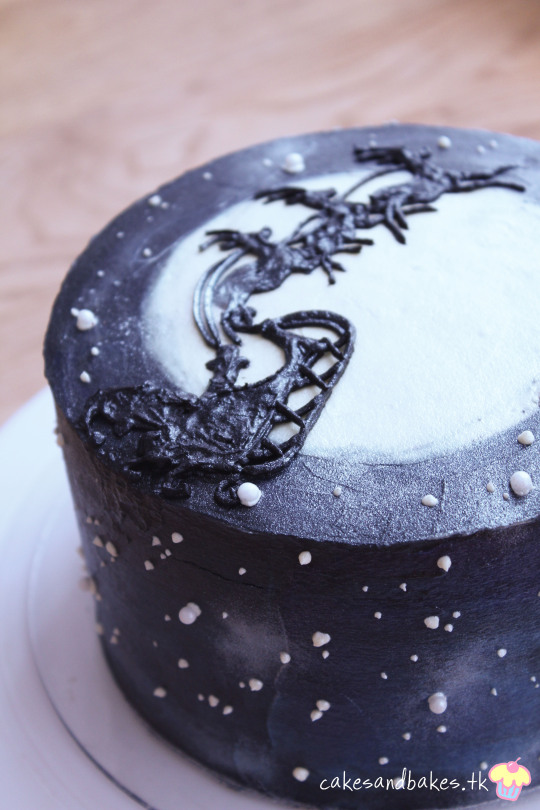
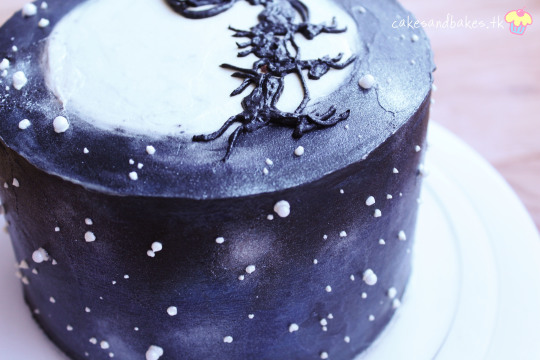
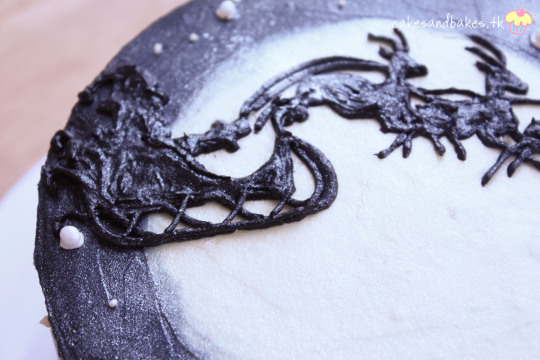
Of course, I had to add some fancy piping in there to jazz it up. Hence, the buttercream silhouette on top.
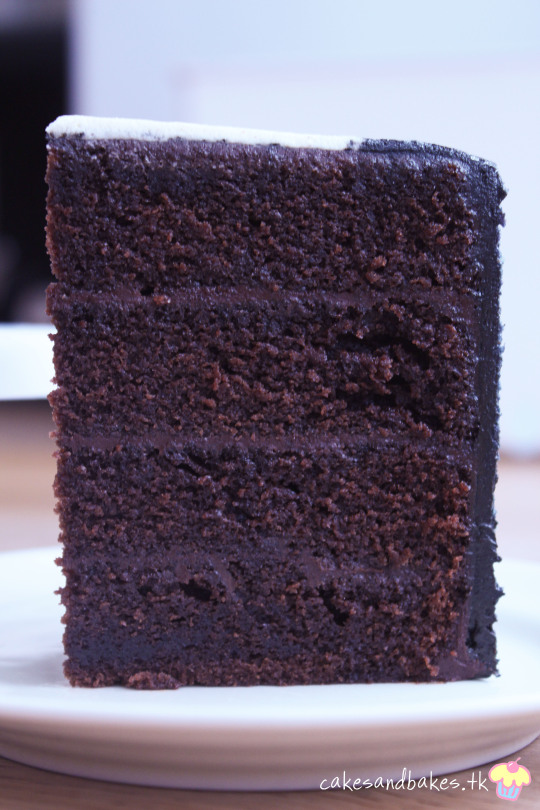
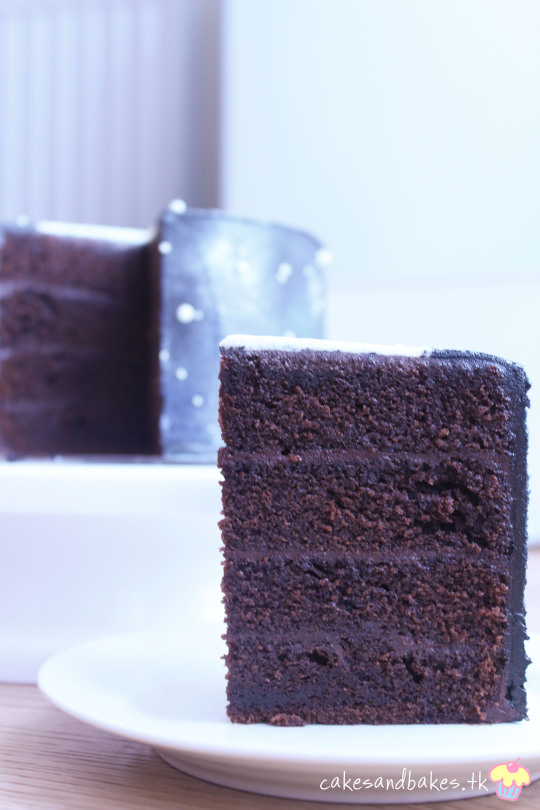
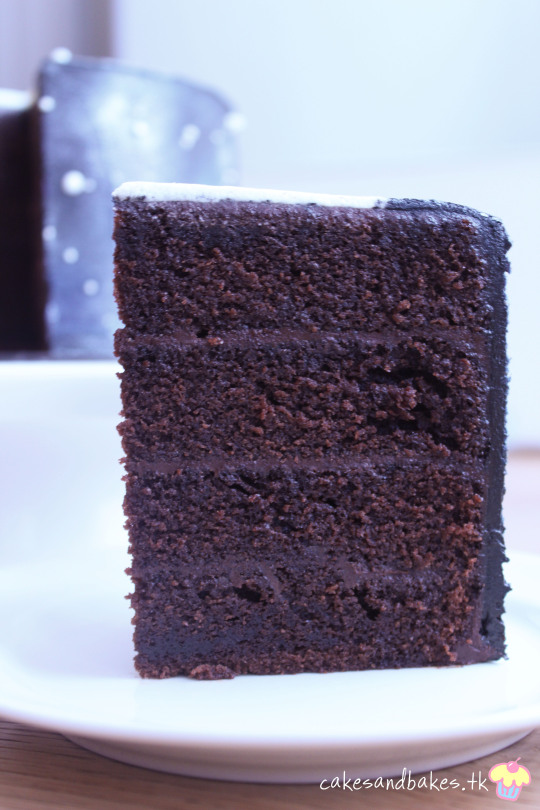
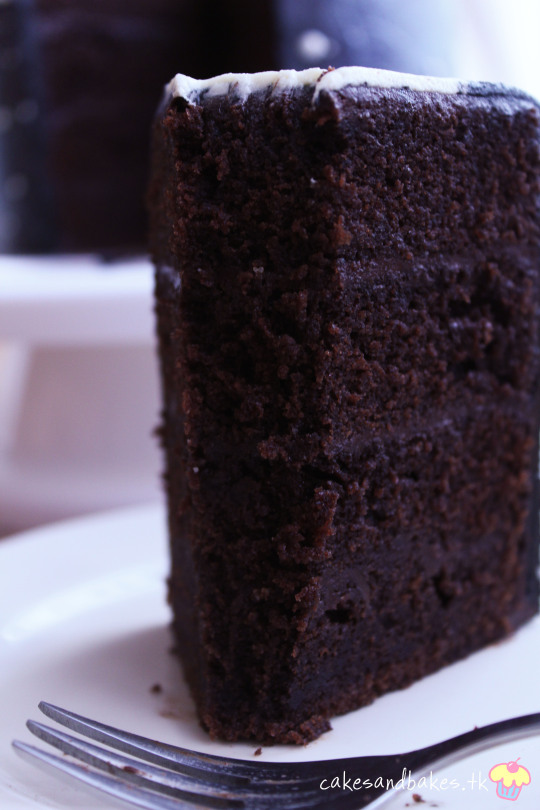
The cake flavour itself is rather simple; the cake is chocolate (quite possibly one of the best chocolate cakes I’ve made) with a lush chocolate ganache filling and a delicate ginger sugar syrup to soak the cake layers.
Chocolate and ginger definitely work well together and the syrup isn’t too strong to seem overpowering. It compliments the chocolate well and prevents it from being just a bit too rich.
I’ve got a few more ideas for recipes for Christmas and otherwise so keep an eye out for those! To be honest, I’ve been craving cookies lately…
As for decoration, I was contemplating whether to go a complex route and carry out an idea that involves carving and multiple components or to keep it simple but with some attractive piping work.
While my piping may not be top notch, I think it is getting better.
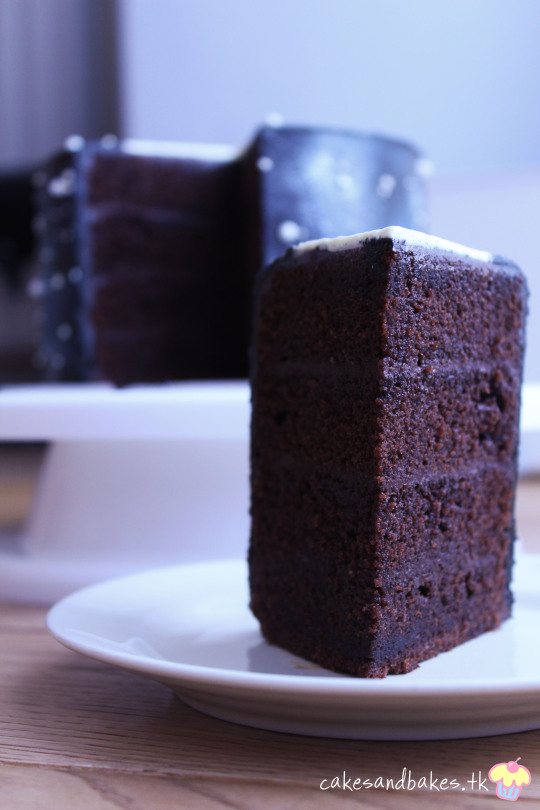
For the rest of the cake, I used the watercolour buttercream technique to create the night sky look and finished it with an array of stars and silver glitter. It turned out very beautiful.
Can you notice the area where I accidentally smudged the cake after the buttercream had crusted? I managed to salvage it to some extent.
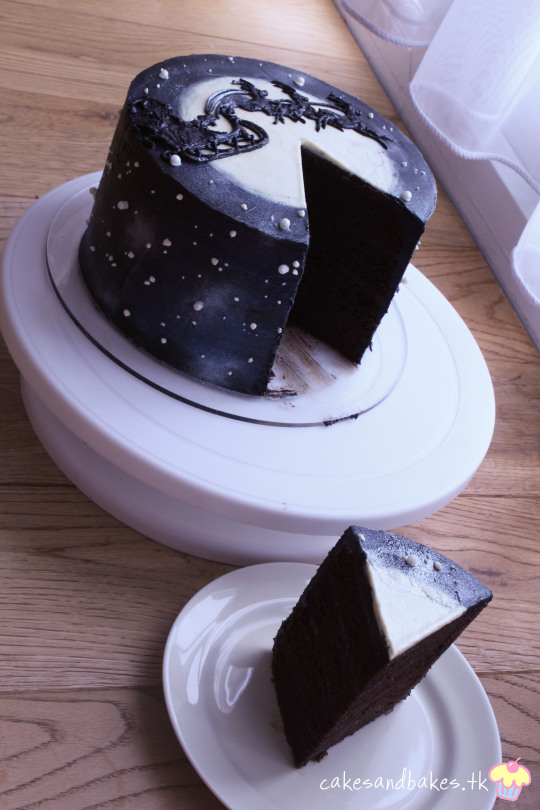
The cake also cuts very neatly. I mean, look at those layers! So clean.
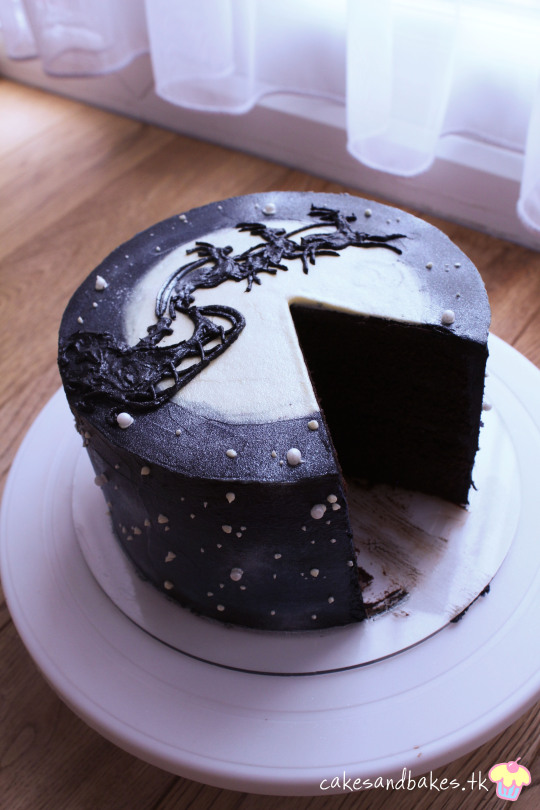
^^^ That is all I want for Christmas, y’all.

I definitely recommend making this cake or, at the very least, try out this cake as a decoration for Christmas. It’s quick enough to do in a couple of hours but still rather impressive.

I still can’t get over how perfect this slice is. And look at that crumb!

Boy, it’s good to be home.
Yield: 1 4 layer 6-inch cake
Ingredients:
For the cake:
200g margarine
110ml oil
340g sugar
6 eggs
1 tsp vanilla extract
200ml boiling water + 1 tbsp ground coffee
75g cocoa powder
350g self raising flour
For the ginger syrup:
100g sugar
100ml water
45g ginger, peeled and in pieces
You will also need:
Ganache (made from roughly 200g chocolate and 200ml double cream)
Buttercream (roughly 200g butter/margarine and 300g icing sugar) divided into four portions equally and dyed blue, purple, black (for the black, add 6 or so tbsp of cocoa powder) and one uncoloured
Extra decorations such as glitter spray (silver) and white pearls
Method:
Cake:
Preheat the oven to 350°F/177°C and grease and line two 6 inch cake tins.
In the bowl of a stand mixer, cream together the butter, oil and sugar until well combined and paler in colour.
In a separate bowl, whisk to combine the flour and cocoa powder.
Next, beat in the eggs one at a time, along with the vanilla extract.
After incorporating the eggs, alternate between the addition of the hot coffee and the flour and cocoa powder mixture.
Divide the mixture between the two cake tins and bake for 50 to 55 minutes or until a cake tester inserted into the centre comes out clean. Leave to cool before removing from tins.
Syrup:
In a saucepan over medium heat, combine the sugar and water and bring to a boil.
Once the sugar has dissolved and the mixture is bubbling, add in the ginger pieces and boil for a further 5 minutes.
Remove from the heat and leave to cool completely. Leave the ginger pieces in the syrup.
Assembly:
Torte the two cakes so that you end up with 4 equal layers.
Soak the layers in the ginger syrup and set aside.
Place the first layer onto your cake board, securing the base with a small amount of ganache. Begin to layer up the cake with 2 too 3 tablespoons of ganache between the layers.
Once the layers have all been stacked, cover the whole cake with a crumb coat using some of the remaining ganache. Chill for 30 minutes.
Combine the rest of the ganache with the black buttercream and once chilled, ice the cake in this frosting into a smooth layer. Chill for another 30 minutes.
Once chilled, using an offset spatula, add small dabs of purple and blue buttercream across the sides and top of the cake and use either the same spatula or a cake scraper to smooth and blend the icing together. Continue blending until you get your desired look and chill once more.
After chilling, outline a large circle on the top of the cake with a knife and “scoop” out the icing inside the circle. Place 2 or so tablespoons of the uncoloured buttercream into this ditch and smooth it out using the offset spatula to create the moon. Use some extra black buttercream along the edges to slightly blend the moon into the sky.
Transfer the remaining white buttercream into a piping bag with a small tip cut off the corner and pipe spots around the cake in different sizes to create the stars. Add the white pearls to some of these stars.
Transfer the remaining black icing into a piping bag with a small tip cut off the corner and use it to pipe the silhouette of Santa and his sleigh (a quick Google search for an image and some good hand-eye co-ordination will help you here).
Finish with a few sprays of silver glitter across the cake.
#cake#cakes#christmas#christmas cake#festive#xmas#christmas food#food blog#food photography#foodie#foods#food pics#merry christmas#christmas baking#baked#bakery#bake#baking#baking blog
72 notes
·
View notes
Text
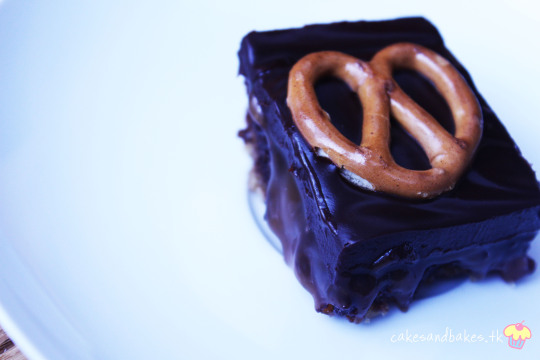
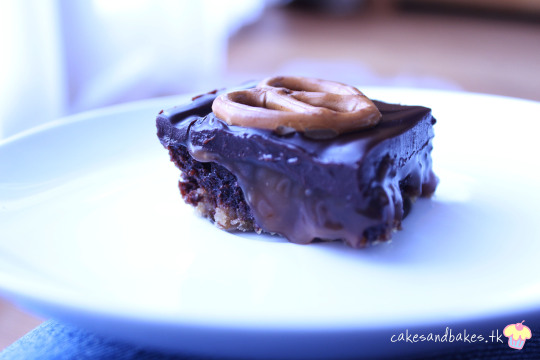
Pretzel & Caramel Brownies

Chocolate + caramel + pretzel = heaven.
First off, I apologise for the serious lack of posting. As you may already know, I am officially a university student!

While that’s all very exciting, it does mean that I have been absolutely overloaded with work as well as the dire task of making friends.

I did switch my posting schedule to monthly posts but even that seems to be a bit of a task for me! I’ll try very hard to stick to it but, apologies in advance, it’s very likely I will be late on a couple more future posts.
These brownies were a batch I had made for the students in my accommodation block and they went down really well. I’m planning on baking cake later on today with a couple of friends to get my mind off of university stress.

Of course, who could resist a rich and fudgy brownie encrusted with salty and sweet nuggets of pretzel, topped off with a silky smooth ganache? That’s right, no one.

I mean, I certainly couldn’t.
I actually had made a batch similar to this a while back that I never posted; they were similar to these brownies with the exception of an Oreo truffle (remember those cookies I made?) layer instead of the salted caramel. Both variants are delicious and, dare I say it, if you really wanted to, you could even make a batch with both.
Focussing on the brownie part, this recipe is actually spot on for me. I love slightly gooey brownies (amplified by the drippy caramel) with a dense texture but also with a tight crumb to it.
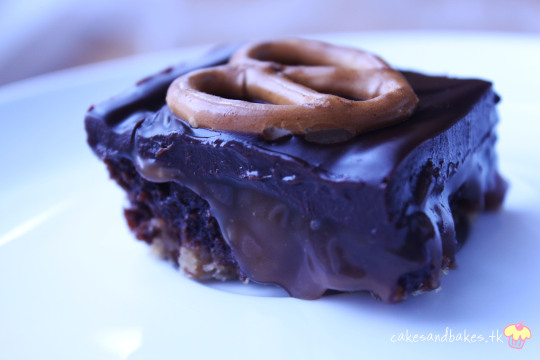
Pretzels are also always a good thing to add to any bake. Sweet and salty all the way.

I chose to top the brownies with ganache just to make it extra rich/fancy (but you could really make them without it). These were a delight to eat and to share, though I should mention that they were rather messy so I’d advise making the caramel a bit thicker so that it sets up firmer and doesn’t run off as much.

Enjoy!

Yield: 24 brownies
Ingredients:
For the pretzel crust:
175g pretzels
50g butter/margarine, melted
60g plain/all-purpose flour
100g caster sugar
For the brownies:
160g butter/margarine
60ml oil
210g caster sugar
2 eggs
230g plain/dark chocolate
50g cocoa powder
3 tbsp honey
90g plain flour
You will also need:
Caramel (recipe here)
Ganache (300ml double cream, 450g plain chocolate mixed with 2 tbsp honey)
Method:
Crust:
In a food processor, blitz the pretzels (leaving 16 or so left over to top the brownies with) until you get a mixture of finer crumbs and small chunks.
Combine the pretzel crust with the remaining ingredients and set aside.
Brownies:
Preheat the oven to 350°F/177°C and grease and line an 8-inch square tray. You will need to do this twice for the 24 brownies or use a 9x13 pan.
Over medium heat, melt together the butter, sugar and chocolate in a saucepan, mixing well.
Once melted, remove from the heat and mix in the oil, followed by the eggs once it has cooled down a bit.
Next, transferring the mix into a large bowl, fold in the flour and cocoa powder until just combined.
Take half of your pretzel crust (if you’re baking the brownies in two batches) and flatten it down onto the baking tin.
Next, pour over the brownie mixture and, with a spatula, spread into an even layer, being cautious of the pretzel layer.
Bake for 30 minutes, turning the pan around in between and using a skewer to check. You want it to come out relatively sticky and then after a few minutes of cooling, place the brownies in the fridge to cool completely.
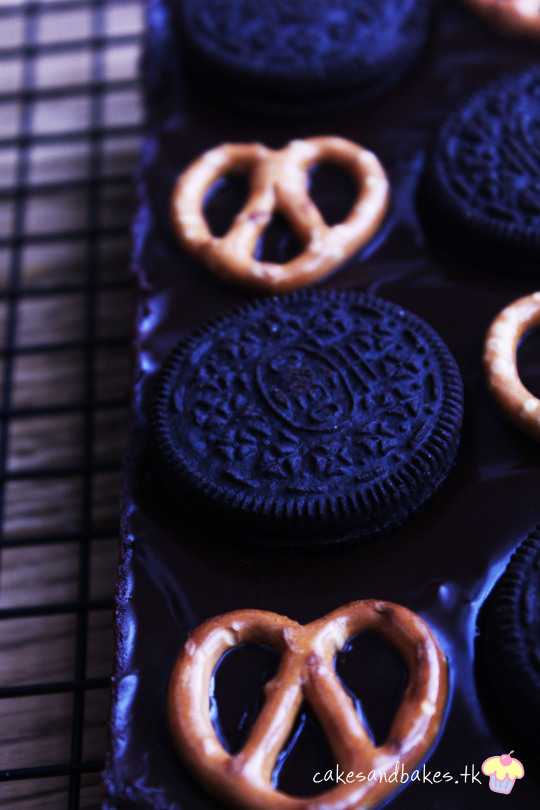
Once finished, top with the caramel and freeze/refrigerate until set. Then, follow with the ganache and, while it’s still wet, top with your extra pretzels and Oreos if desired.
#brownies#brownie#oreo#pretzels#caramel#salted caramel#recipe#dessert#baking#bakery#baker#bake#sweet#chocolate#ganache#food#foodie#food photography#food pics#food blog#eats#sugar
0 notes
Text
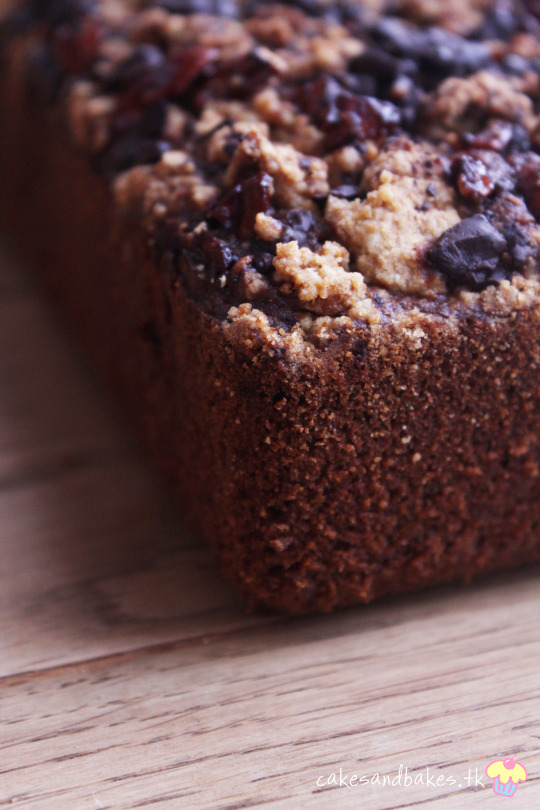
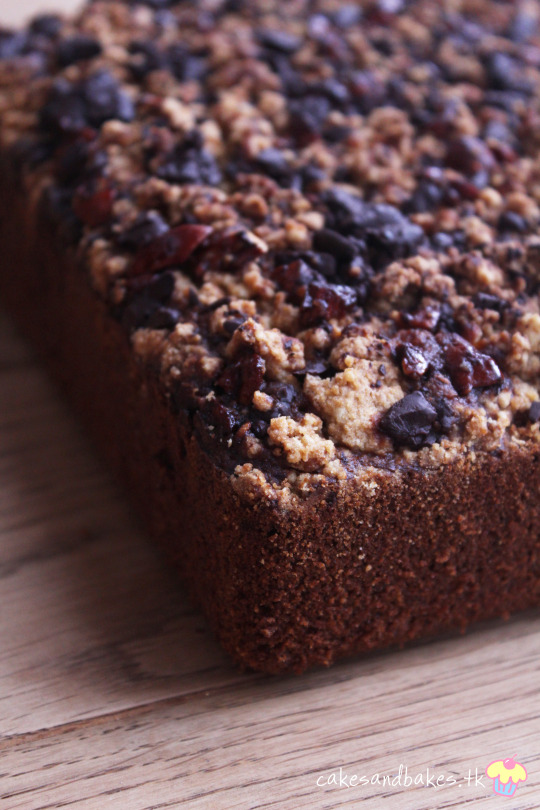
Banana Streusel Cake w/ Honey Roasted Nuts & Dark Chocolate Chunks

This cake is a great way to welcome the colder months coming ahead. Very satisfying and packed with a whole load of flavour.
First off, apologies for my lack of posting last week. I landed in London on the Tuesday and couldn't find the time to get a recipe post out for Thursday. But I'm sure this recipe was worth the wait.
Banana cake is always a classic. You can't go wrong with it. It's just an all-round winner.
Hence when I had realised I hadn't eaten/made banana cake in quite a while my heart compelled me to do just that. Of course, I couldn't leave it to be a simple banana bread loaf.

That's not how I cake.

Instead, I decided to top it with a deliciously buttery brown sugar crumble. And to amplify the crumble even further, I threw in some chocolate and nuts for good measure.

I chose to roast the nuts along with a bit of honey which added a lot of flavour. After baking and browning further, they are quite delicious as a snack on their own. Of course, they're even better on cake.

This is also a good opportunity to give everyone a heads up that my posting schedule will be changing to monthly posts soon.

This is due to me joining university now and since my schedule won't really allow time for much baking, it'll be easier for me to have a more relaxed schedule instead. Of course, if I do find the time to make something I'll post it on whatever Thursday of that week.

I'm actually quite nervous for university. You know, the whole making friends, meeting new people and of course the intense workload. But I think I'll survive. Or maybe it just the sugar high from this cake that's luring me into false pretenses.

Nonetheless, I am quite excited (as I am equally as terrified) and cake is a great way to celebrate good things, I say as I shove another slice into my mouth.
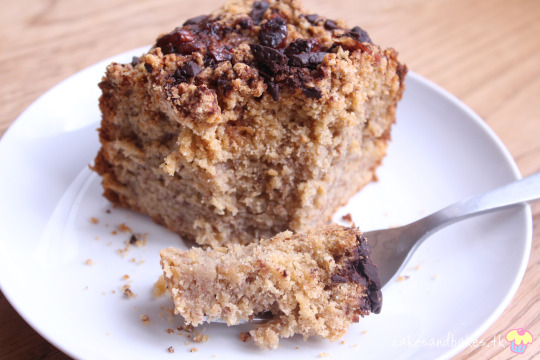
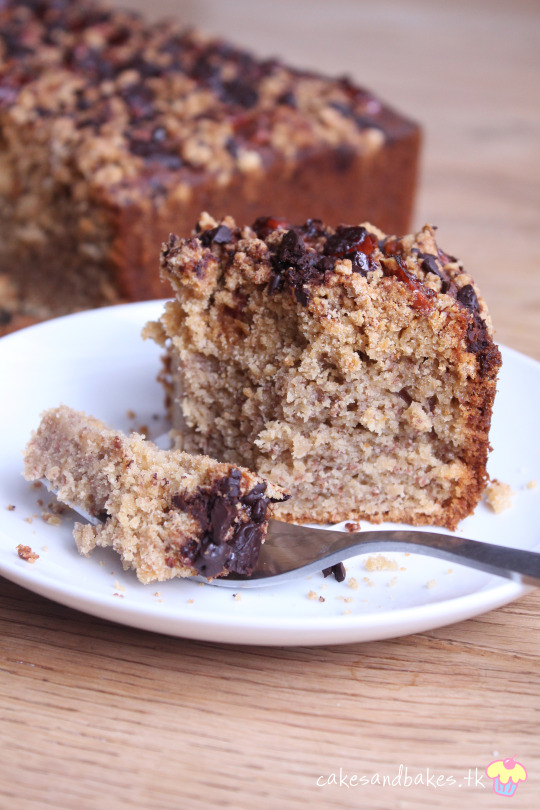
The dark chocolate helps to cut through the sweetness here and the streusel itself isn't too sweet either which helps since the cake has plenty of sweetness on its on. I used fairly ripe bananas here but I'd advise using really brown bananas for extra banana goodness.
Also, needless to say, you can choose to include whatever nuts you choose; I imagine walnuts would be particularly tasty.

And the streusel can be modified to include oats (just swap some flour out for rolled oats) and you could even add a bit of cinnamon for some warmth.

This recipe is definitely a keeper. The cake itself is moist and dense with a tight crumb and the layer of crumb is a winner (plus it tastes even better with a drizzle of honey). Without further ado, here's the recipe. Enjoy!

Yield: 1 8 inch square cake
Ingredients:
For the nuts:
30g cashews
30g almonds
1 tbsp butter
3 tbsp honey
For the streusel:
100g butter
150g brown sugar
300g plain flour
2 tbsp honey
For the cake:
150ml oil
4 eggs
1 tbsp milk
1 tsp vanilla extract
3 large bananas, mashed
1/2 tsp bicarbonate of soda
2 tsp vinegar
280g self raising flour
You will also need 30g dark chocolate, chopped
Method:
Nuts:
Preheat the oven to 350°F/177°C and grease a baking tray.
Using a sharp knife, carefully chop the cashews and almonds into smaller and random chunks.
In a medium pan over high heat, melt and combine the butter and honey.
Once liquid, toss in the nuts and move around until fully coated. Leave to continue cooking for a further 5 minutes until toasted nicely.
Remove from the heat and then arrange the nuts onto the baking tray. Toast in the oven for 5 to 7 minutes until more golden in colour.
Streusel:
In a large bowl, mix to combine the flour and sugar.
Next, add in the butter and rub it into the flour mixture using your hands to reach a larger than breadcrumbs consistency.
Finally, incorporate the honey and set aside.
Cake:
In a large bowl, mix to combine the oil and sugar.
Once well mixed, beat in the eggs one at a time until thoroughly combined, along with the vanilla extract and milk.
Add the mashed bananas into the mixture and stir, followed by the flour, mixing until almost combined.
Next, add in the bicarbonate of soda and vinegar and continue mixing until no pockets of flour remain. Make sure to scrape down the sides of the bowl.
Transfer the mixture into the baking tin.
Combine half of the nuts with the streusel (you'll need to break the nuts a bit) and leave the rest for topping. Cover the cake batter in the crumb mixture, the remaining nuts and dark chocolate. Bake for 1 hour or until a cake tester comes out clean. Leave to cool.
#banana#banana cake#banana bread#cake#cakes#baking#baker#bake#baking blog#food#food blog#foodie#food photography#dessert#sweet#crumb cake#crumble#streusel#chocolate#nuts#cashews#almonds
6 notes
·
View notes
Text
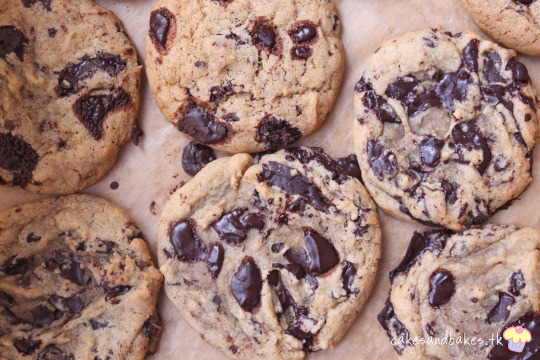
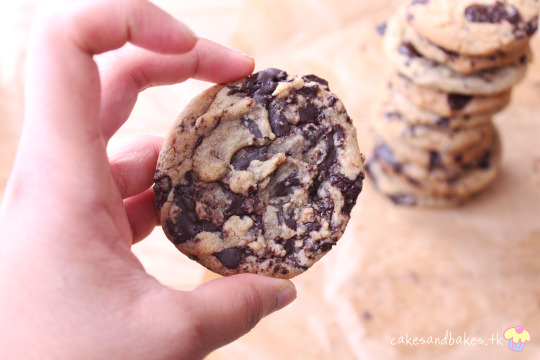
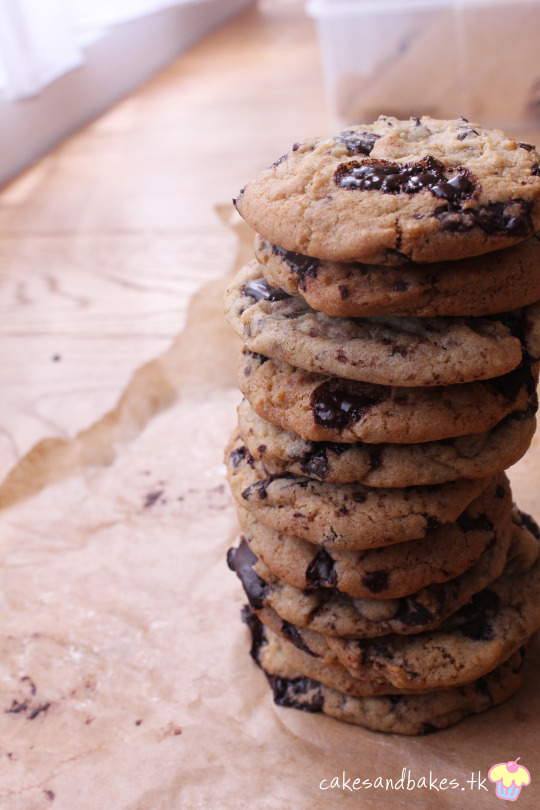
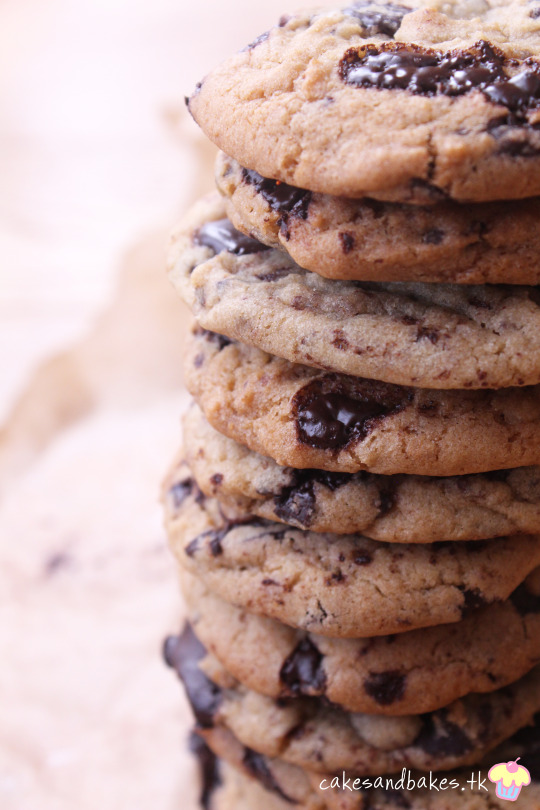
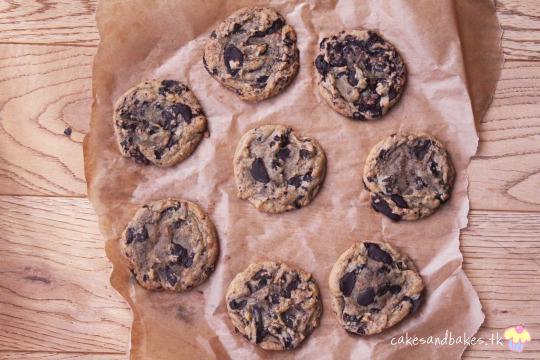
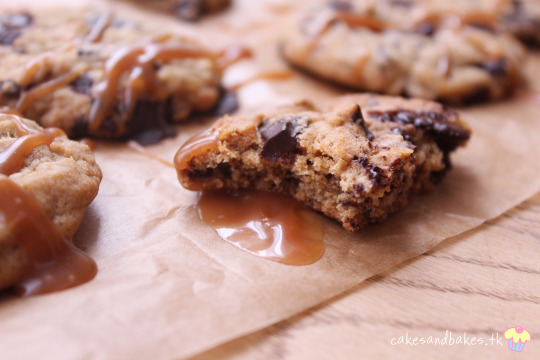
Ultimate Chocolate Chip Cookies {Chewy, Soft & Gooey}

Finally, after reviewing all of the Cookie Quest recipes I have tried out the past couple of months, I am excited to share with you all my own recipe for the ULTIMATE chocolate chip cookie!
When I was coming up with this recipe, I had to look back through all of my CQ posts and pin point which ones were my favourites and what characteristic ingredient or method did they have that attributed to their great taste/texture.

But, of course, I also needed to narrow down just exactly what my favourite cookie was. Oh my, this was a tough one.

I managed to narrow it down to chewy, soft, gooey and when it comes to thickness, not too thick. Before this series, I was certain I preferred dense and thick cookies, but now? I think the thinner ones have won my heart over.
You'd also be surprised to know that these cookies (my favourite cookies) are also packed with chocolate despite me previously only liking cookies with morsels of chocolate scattered throughout.
And I have to say, these cookies were definitely worth all of that recipe testing. They are absolutely divine. I'm not even exaggerating when I say these are probably - no, definitely - the best cookies I have ever made in my whole baking life. I can't tell you enough how good they are.
The cookies are not too thin so you still have enough cookie to sink your teeth into, but they're light enough that you probably won't be able to stop at just one.
They're soft but definitely not cakey and they're incredibly chewy. Honestly, I was shocked myself at how chewy they were.

Absolutely spot-on. My friends and family also raved about how good these were.

I like my cookies relatively gooey so I under-baked some by a couple of minutes. To show you a comparison, here are cookies I baked for different lengths of time.
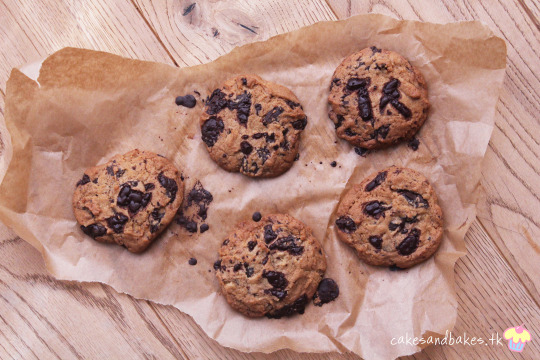
The more over-baked ones were only baked for a couple of minutes extra but the under-baked ones were taken out early and shoved into the fridge to cool faster.

All the cookies were delicious; even the darker cookies that had baked for longer still retained the same level of chewiness, only now they had a crisper top and less "goo" factor. They went well with a cup of coffee.

The delightful chew of these cookies is due to the addition of the bread flour, corn starch and glucose syrup. If you don't have glucose syrup on hand, corn syrup or honey may be substituted.
The extra egg yolk helps keep the softness and melting the butter with the sugars amps up the natural caramel notes of a classic chocolate chip cookie.
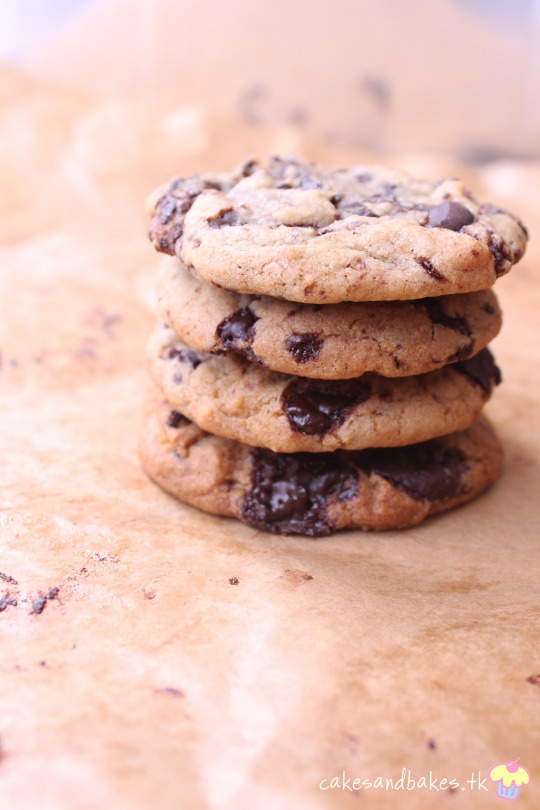
You may also have noticed that I didn't use the standard plain chocolate chips used in the other CQ recipes.
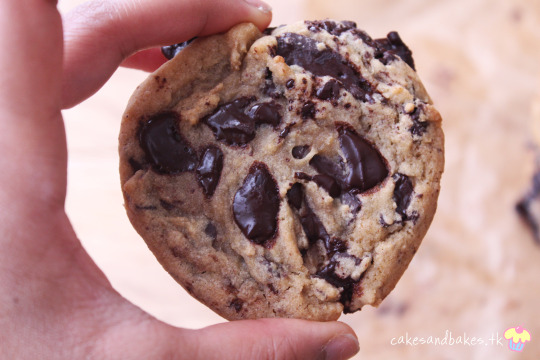
Honestly, quality chocolate does make a huge difference to chocolate chip cookies and I had a bag of chocolate disks given as a birthday present from a friend from Hotel Chocolat so it was a perfect time to use them!

Because the chocolate is so high-quality, it does melt in your mouth and while that's not on my part or on this recipe, I definitely suggest investing some extra cash into some really good chocolate if you want to make my ultimate CCCs as a one time thing.
If you like cookies on the regular though, that probably isn't a good idea and the cookie itself would still taste amazing with normal chocolate chips.
You could also just sub in store-bought baking chocolate but chop it up as the difference in size of the chunks of chocolate dispersed throughout the cookie also make the experience of eating it more enjoyable too.
These cookies are just pure bliss. My heart aches at the fact that I don't have one to stuff into my mouth at this very moment in time.

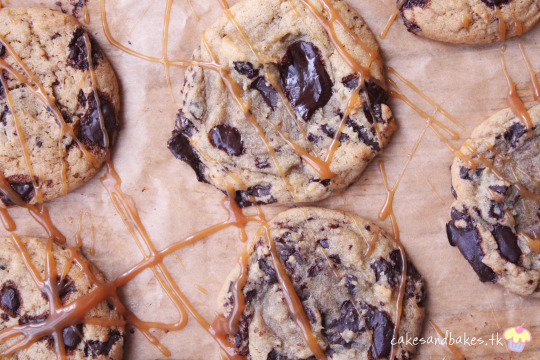
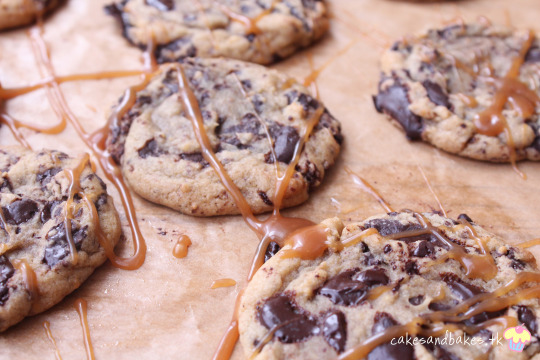
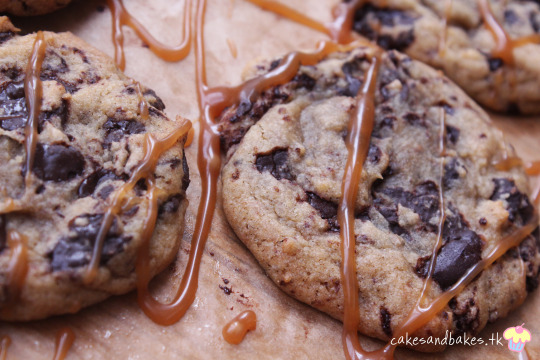
And, if these CCCs weren't already perfect enough, I decided to pair them with a silky smooth salted caramel drizzle. Or a dip. No judgement here.
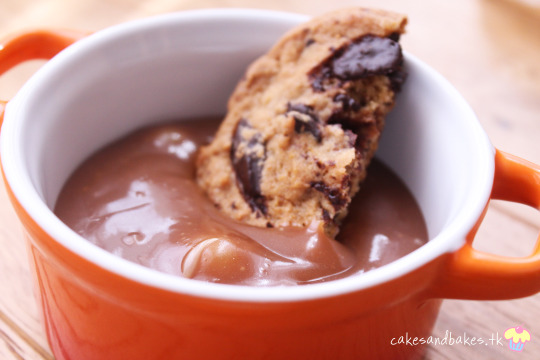
To drizzle or to dip, that is the question. Of course, dip does mean more caramel in your mouth and that's always a bonus.
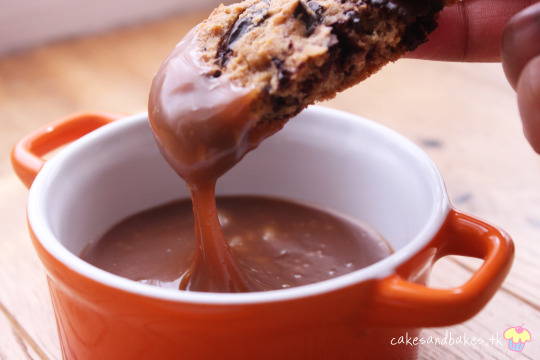
Anyways, whether you dunk it or not, these cookies are for sure to keep all of your family and friends coming back for more. That is, if you choose to share, of course.
Yield: This made so many cookies I lost count but probably 30
Ingredients:
200g butter/margarine
4 tbsp glucose syrup
250g fine brown sugar
150g caster sugar
1 egg
1 egg yolk
200g plain/all-purpose flour
200g bread flour
1 tbsp corn starch
1 tsp baking powder
1 tsp bicarbonate of soda
1 tsp salt
2 tsp vanilla extract
400g dark chocolate disks, chopped
Optional: Salted caramel to drizzle or dip (find the recipe here, I changed the recipe slightly to use all cream rather than half cream and half milk, both are delicious but all cream is more indulgent)
Method:
In a saucepan over medium heat, combine the butter with both sugars and the syrup and stir until melted and combined. There will be a lot of butter on top but don't worry too much about it. Leave the mix to cool until it is lukewarm. Note: this whole method can be done by hand (which is what I did) but you may wish to use a stand-mixer.
Transfer the mixture into a large bowl and stir briefly to combine if it has separated too much. Beat in the egg, extra yolk and vanilla until thoroughly incorporated and the mix has thickened and is glossy.
Next, fold in both flours, raising agents, salt and mix until almost combined. Make sure to scrape down the side of the bowl.
Finally, making sure your dough is COMPLETELY (!) cool, fold in the chopped chocolate (reserving two or three tablespoons) and leave the cookie dough to chill for 1 hour.
After chilling, preheat the oven to 350°F/177°C and line a baking tray with greaseproof paper. Take tablespoon-sized portions of cookie dough and roll into a ball, then tear the ball into half and stick the two halves together with the torn side facing up. Arrange onto a baking tray and use left over chocolate to decorate the tops.
#cookie quest#tried & tested#t&t#cookies#cookie#chocolate#chocolate chip#chocolate chip cookies#recipe#dessert#sweet#food#foodie#food blog#baking#baker#bakery#baking blog#food photography#desserts#eats#ultimate
18 notes
·
View notes
Text
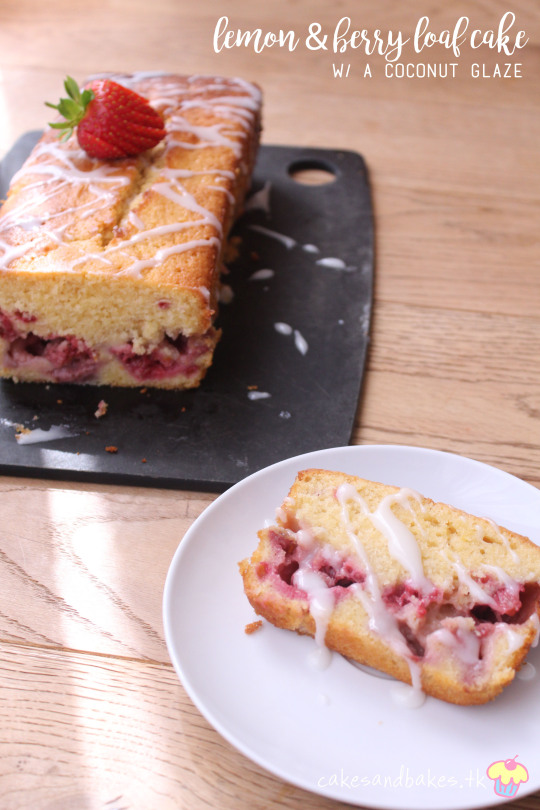
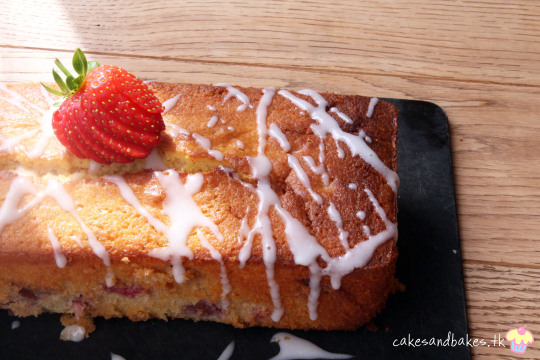
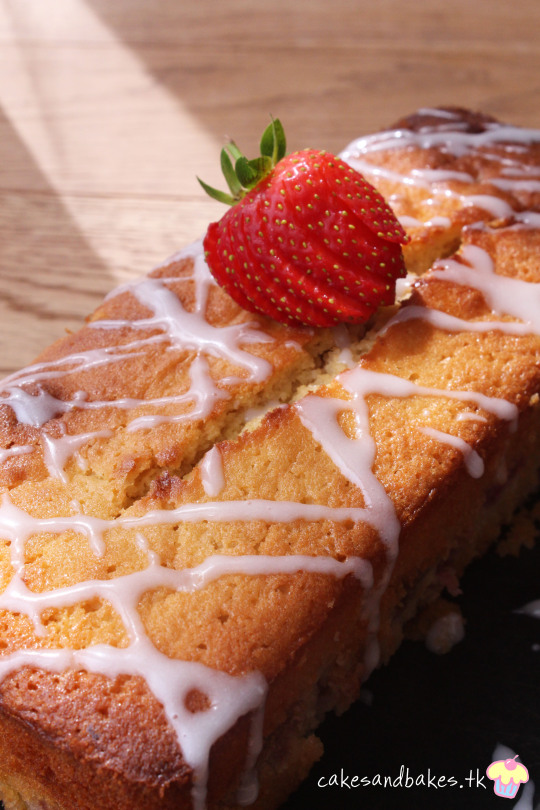
Lemon & Berry Loaf Cake
This week we go back to basics with a simple lemon loaf, with a few extra add-ins that make it truly delicious!
Firstly, I should probably start off by saying that by the time this recipe posts, I'll actually be on a plane! I'm heading off to India and will be staying there for roughly a month (though I should have another queued post out during that time.

I might be a bit late on the post after that since I'll need some time to settle back into UK life!
Another thing I should also mention is that I receive my exam results tomorrow for my A Levels which basically determine whether or not I get into university.

I've already accepted that I won't be getting into my first choice but actually having it confirmed with a piece of paper with my grades on it is probably going to be a bit of a shock. If this happens, it might be that I end up being a bit inactive for a while so that I can take some time to move on and recover from the disappointment.

Obviously, I hope it doesn't come to this, but, unfortunately, I'm pretty sure I'm going to be a sobbing wreck.

Anyways, with results day looming on me, I've been feeling extremely nervous. And, of course, baking is the best therapy for my nerves. Hence, this lemon and berry cake!

At first, I was planning to make a classic lemon drizzle to share with friends I was meeting up with and then I decided to veer from the classic recipe and throw in a few raspberries and strawberries.

Instead of the normal lemon drizzle that is soaked into fluffy and buttery pound cake, I went with a delightful coconut glaze made with coconut milk powder that had a delicate sweetness to it.

This cake is truly lovely. It is quite simple when it comes down to it but the flavour profile is definitely worth trying. All my friends loved this cake!
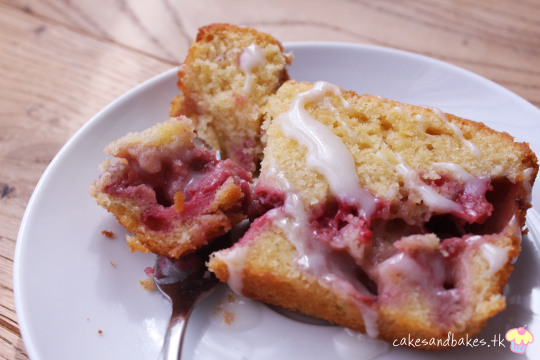
It is definitely fluffy in texture and the pockets of fruit dispersed throughout the cake amplify the taste. Of course, the glaze is superb as well and it's so easy to make!

All in all, you should definitely make this cake. The flavour combo is a real summer winner and with only a few more weeks until school resumes, this cake will definitely leave you with some good summer vibes.
Yield: 1 large loaf cake
Ingredients:
For the cake:
227g butter/margarine
227g caster sugar
4 large eggs
250g self-raising flour
150g raspberries
200g strawberries
Zest of 3 lemons
Juice of 2 lemons
1 tsp vanilla extract
For the glaze:
5 tbsp coconut milk powder
4 tbsp icing sugar
2 to 3 tbsp water
Method:
Cake:
Preheat the oven to and prepare a 9 x 5 inch loaf tin.
In the bowl of a stand mixer, using a paddle attachment on high speed, cream together the butter and sugar until pale in colour and fluffy in texture.
Once creamed, beat in the eggs one at a time, adding in the vanilla extract, lemon zest and juice, also. If your mixture curdles, don't worry, it will come together once the flour is added.
Next, fold in the flour into the mixture until just combined. Remove from the stand mixer and use a rubber spatula to scrape down the sides of the bowl. Set aside.
Wash the strawberries and raspberries, slicing the raspberries into quarters or smaller chunks, if you prefer. Toss the fruit in a few tablespoons of plain flour until evenly coated.
Finally, fold in the fruit into the batter (be careful not to break the raspberries too much) and transfer into your loaf tin. Bake for 45 to 50 minutes or until a cake tester inserted comes out clean.
Glaze:
In a small bowl, combine the icing sugar and coconut milk powder along with the water. Make sure to stir thoroughly so that no lumps remain.
Add more water to adjust it to your desired consistency and then drizzle generously on top of the cake.
#lemon#berry#raspberry#strawberry#recipe#dessert#pound cake#loaf cake#lemon and berry#summer#fruit#sugar#sweet#cakes#cake#baking#baker#bakery#food#foodie#food photography#food blog#food blogger#baking blog
2 notes
·
View notes
Text
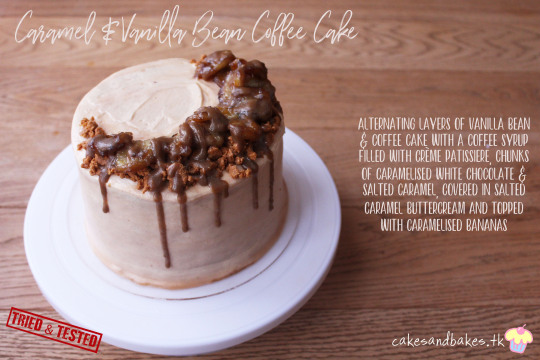
Tried & Tested: Caramel & Vanilla Bean Coffee Cake with Caramelised White Chocolate
This cake was inspired by a tiramisu cupcake I had from Lola's cupcakes. I had wanted to make a tiramisu cake originally but I had run out of cocoa powder. So, I ended up with this.

And let's just say I'm not mad at it. Not in the slightest.
I chose to continue with the coffee theme and made both vanilla bean and coffee cake layers.

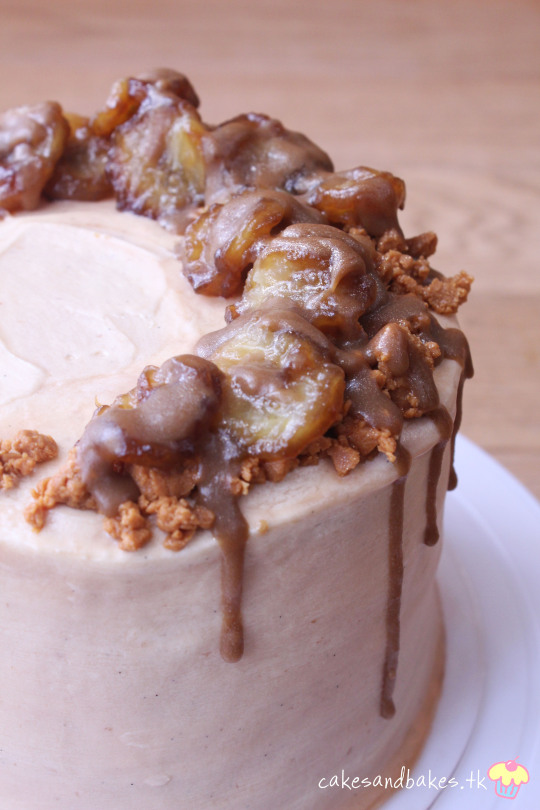
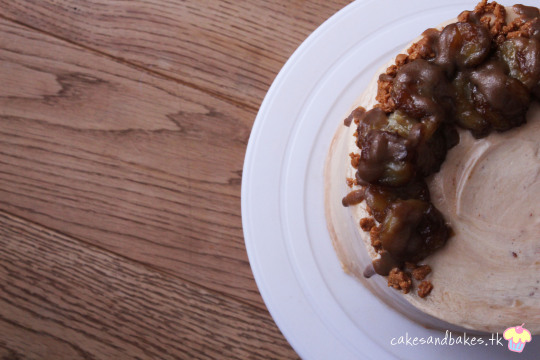
However, I did want this cake to be a bit more indulgent so I tossed in pretty much everything I could think of; caramelised white chocolate, crème patissiere, salted caramel and caramelised bananas.
Needless to say, this cake did take a lot of preparation.
Yet, even with all these components, the cake still tasted amazing. After all, the main flavours are caramel and coffee.
The cake, itself, being a classic sponge, is soft and fluffy and the coffee cake is not overwhelmingly coffee-flavoured so it's not too sickly.

The syrup helps to make the cake even more moist while adding extra coffee flavour to whatever extent you like.

The tried and tested recipe, here, is the caramelised white chocolate. This is my last Tried & Tested recipe so I figured it would be nice to review something a lot more simple to feature in an original recipe.

The caramelised white chocolate chunks taste somewhat like dulce de leche. I personally am not a fan of white chocolate but I actually really enjoyed the taste of it and it added a nice depth and texture to the cake.
Hence, from now on, my fortnightly posts will all be original unless I decide to introduce another segment!

I also used my classic salted caramel recipe that I've used in several other cakes and it worked very well. While I chose to mix the remaining caramel into my buttercream, you could opt to use it to drizzle on top of the cake, instead.
The caramelised bananas topping was actually a bit sudden since I hadn't planned on it but I wasn't sure what I would top the cake with otherwise.

The toffee sauce was just a way of using up the leftover mixture but it turned out to be pretty tasty.
This cake also looked really pretty on the inside with the different layers. That didn't stop my from scarfing it down, though.
I got some pretty good reviews from eager family members, too.
Before this cake, I hadn't made cake in a while. Honestly, I had forgotten how much I love cake so I definitely need to make it more often.
Also, I promise my ultimate chocolate chip cookie recipe will be on its way soon!
Until then, I'll leave you with these photos.
Yield: 1 4 layer 6 inch cake
Recipe for the caramelised white chocolate from The Tough Cookie and the rest is from moi:
Ingredients:
For the cake:
225g butter/margarine
220g caster sugar
245g self-raising flour
3 tbsp milk
4 large eggs
2 tsp vanilla extract
2 tbsp instant coffee granules mized with 3 tbsp hot water
For the filling:
4 egg yolks
90g sugar
40g plain flour
300ml milk
50ml double cream
For the salted caramel recipe, click HERE.
For the coffee syrup:
50g caster sugar
50ml water
3 tbsp instant coffee granules
For the caramelised white chocolate:
240g white chocolate
An air-tight & water-tight jar
For the caramelised bananas:
1 large banana sliced
3 tbsp brown sugar
2 tbsp butter/margarine
(+ roughly 50 ml double cream to make the toffee sauce to drizzle on top along with 2 tsp instant coffee)
You will also need:
A large batch of butter cream (roughly made up of 300g butter)
Gold lustre etc. for decorating
Method:
Cake:
Preheat your oven to 350°F/177°C and prepare two 6 inch round cake tins with greaseproof paper.
In the bowl of a stand mixer, cream together with a paddle attachment on medium-high speed the butter and sugar until extremely pale in colour and fluffy.
Next, beat in the eggs one at a time, mixing until well incorporated, adding the vanilla extract and milk as well.
Add the flour into the batter as well and mix until no lumps of flour remain.
Either by weight or eye, divide the batter into two portions. To one of the portions you can add extra vanilla bean paste (this is optional) and to the other, add in the coffee, mixing until just combined.
Transfer the batter into their individual tins and bake for 50 to 55 minutes or a cake tester, when inserted into the centre of the cake, comes out clean. Set aside to cool.
Filling:
In a large bowl, whisk to combine the egg yolks and sugar until slightly paler in colour and thicker.
Bit by bit, add in the flour into the egg yolk mixture, making sure not to leave any lumps.
Once all the flour has been incorporated, set the mixture aside and begin to heat the milk and cream in a saucepan over medium heat. Bring the milk and cream to a near boil and then remove from the heat.
Next, slowly add in small portions of the milk into the egg mixture, whisking constantly and thoroughly after each addition.
After adding all the milk, transfer the mixture back into the saucepan and heat on low, whisking constantly. This will take a while but once it starts to thicken, the process will speed up so keep an eye out.
Continue to whisk and heat until the mixture begins to thicken. Make sure you are whisking evenly so that you don't get a lumpy crème patissiere and continue to whisk until it has thickened significantly. It does set up more after cooling but you want this to be at a consistency where your whisk leaves a relatively firm mark in the mixture.
Remove from the heat, cover with cling film (touching the surface so as not to form a skin) and set aside.
Coffee syrup:
In a small saucepan on medium heat, combine the sugar, water and coffee and stir until dissolved.
Bring the mix to a boil and then remove from the heat and leave to cool.
For the caramelised white chocolate:
Bring a large kettle of water to a boil and pour it into a deep pan. Set aside.
Break/chop the chocolate into small pieces and melt using the double boiler method.
Transfer all of the melted chocolate into the glass jar and seal the jar tight. Place sideways into your pan of hot water.
Place the pan over high heat and bring the hot water to a boil again. Then, turn the heat down so that the water is at a low simmer and cover with a lid for 2 to 3 hours. The white chocolate should turn a deep golden colour. Make sure the water level doesn't drop below the level of the chocolate in the jar and top-up if necessary.
Once a golden brown colour, safely remove the jar from the hot water and set aside to cool.
Caramelised bananas & toffee sauce:
In a non-stick frying pan on medium heat, combine the butter and brown sugar and stir until well combined.
Next, arrange the banana slices on top of the butter and sugar mixture and cook for a couple of minutes on each side until well browned.
Once cooked, transfer the slices onto a plate and add the cream and coffee to the remaining butter and sugar mixture in the pan.
Heat the sauce once more until well combined, remove from the heat and strain. Set aside.
Assembly:
Level your cake layers and torte each so that you have two coffee layers and two vanilla layers.
Place one of the vanilla layers onto your cake board using a dab of buttercream.
Using an offset spatula, spread about 2 tsp of buttercream on top of the layer and then pipe a ring of buttercream around the outside. Fill the dam with about 1 to 2 tbsp of the crème patissiere. Top with chunks of the caramelised chocolate and a drizzle of salted caramel, before placing the next layer on top. Repeat this with all layers, soaking the coffee cake layers with the coffee syrup before layering.
Next, apply a thin crumb coat of buttercream to seal in any gaps around the cake and chill for 15 to 20 minutes.
With the remaining buttercream, stir in the left over caramel and (if desired) some of the coffee syrup). Use this buttercream to apply your final coat of buttercream, chilling when needed to help achieve a smooth finish.
Finally, top with more caramelised white chocolate, caramelised bananas and the toffee sauce.
#baking#baking blog#recipe#dessert#food#food blog#foodie#food photography#cake#cakes#cake decorating#caramel#salted caramel#caramelised bananas#espresso#coffee#coffee cake#white chocolate#toffee#creme patissiere#chocolate#layer cake#sweet#sugar#eats#buttercream
0 notes
Text
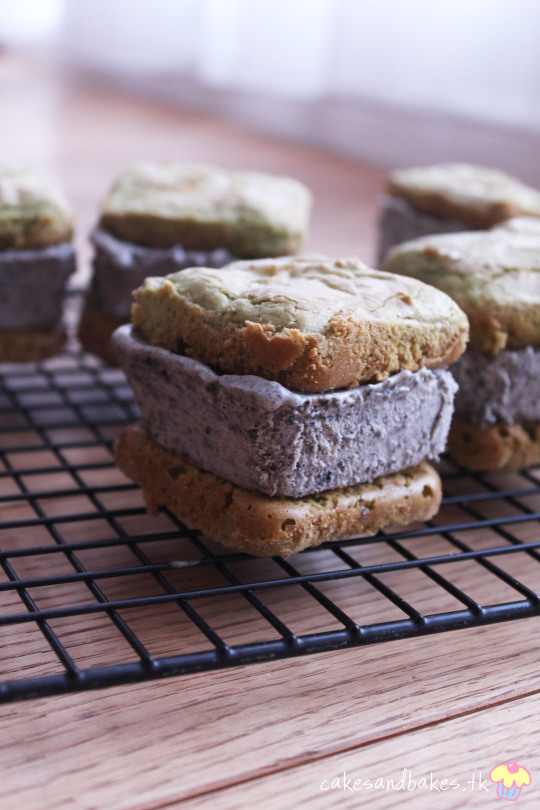
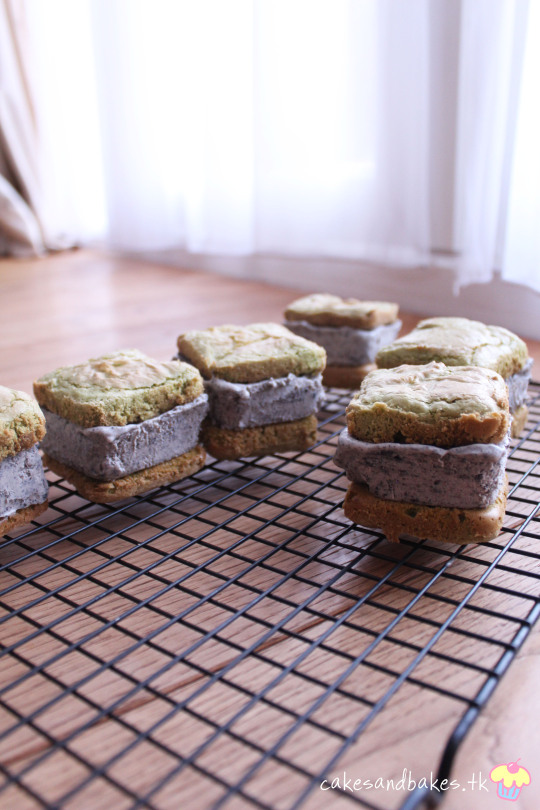
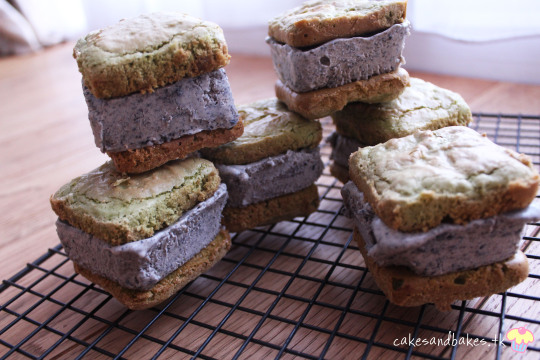
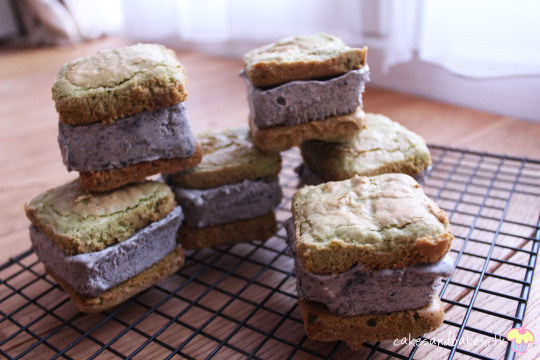
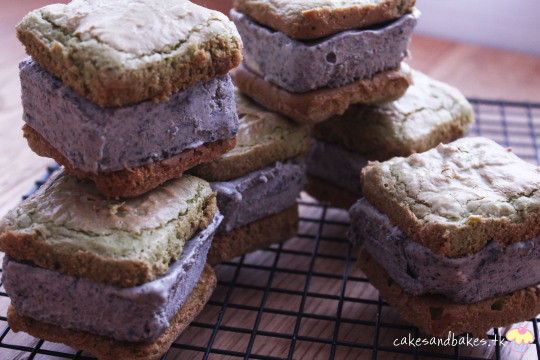
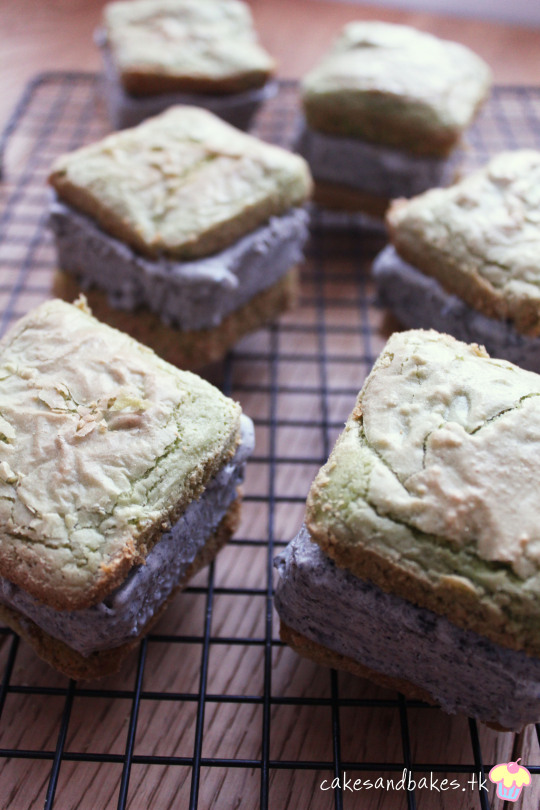
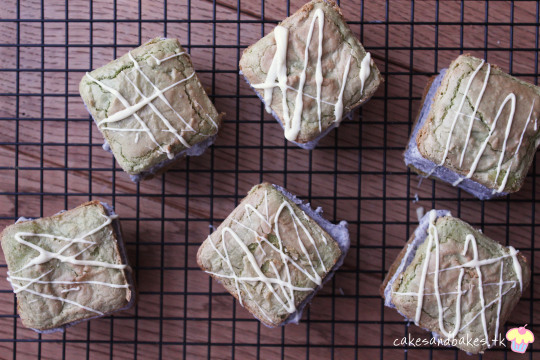
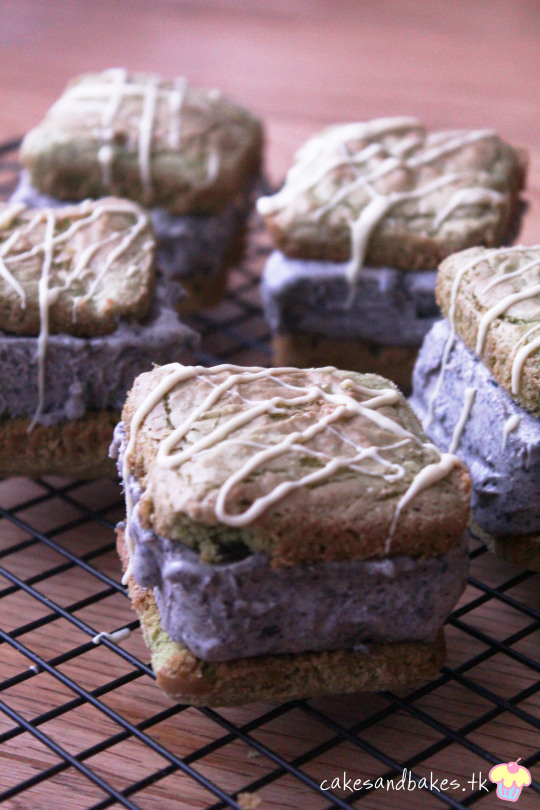
Matcha & Almond Black Sesame Ice Cream Sandwiches: Baking Fails

Today's post gets real summery with some lush ice cream sandwiches... and some real talk on baking fails.
We've all been there ( and if you haven't, teach me your ways). Baking failures happen to everyone. One day, everything might go according to plan and the next, everything collapses.
Why, you ask? Honestly, it's a number of things. It could be the technical aspect of things like humidity, over-mixing and the sorts or it could be a more abstract factor like lack of planning, lack of concentration and lack of motivation.
Luckily for me, yesterday I encountered all of the above. Combine those factors with macarons and, ladies and gents, you have a recipe for disaster.
To put it bluntly, I over-mixed my batter. I thought it'd be a great idea to watch a Youtube video to pass the time while getting my macaronage on. Don't do this.
Multi-tasking and macarons aren't compatible.
Anyways, fast forward a couple hours, I baked a batch and they came out looking rather strange; no feet, a very weird bubbly top, uneven browning and somewhat hollow. They tasted great, though.
Rather than baking the rest and settling with mediocrity or throwing out the whole batch, I decided to turn my runny macaron batter into a cookie mix!
This was very much a guesstimate procedure. I added about roughly the same amount of flour as I had added of ground almonds and less than a third of that amount of oil. I mixed it all up, divided it into a brownie tin, baked it and voila!
These ice cream sandwiches were born and they are downright delicious.
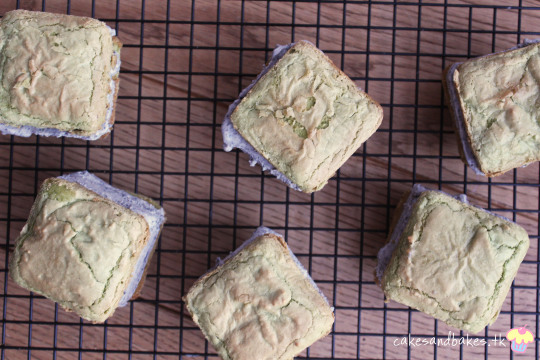
The cookie, fresh out of the oven, is cakey and soft but hardens up to a more biscuit-like texture. Bake for less time if you want it softer, although the ice cream does soften it up, anyways. Due to the whipped egg whites, the cookie has a wonderfully crisp and crackly top and a good chew to it.

Depending on how much matcha powder you use, the flavour is quite subtle (which is good). The undertones of matcha really meld well with the creamy nuttiness of the black sesame ice cream.
I've actually never had black sesame ice cream properly. The other day I was out at Pride with a friend and we went to get ice cream afterwards. She had a scoop of black sesame ice cream and it looked absolutely delicious so I tried a small scoop of it and, needless to say, I fell in love.
Hence, this recipe.
Sure, I did intend to make macarons and these aren't what I was going for at all. But it tastes good and it gives me a good opportunity to talk about baking fails.
I've had a lot of baking failures in my bakehood; some not so bad, some catastrophic and some so traumatic I don't even want to remember them. Baking isn't an exact science (you've probably heard this before).
Baking IS scientific. Everything needs to be in the correct proportions and whatnot, but there's a lot more to it. Even a different attitude is enough to flip your baking upside down.
My point is, failure happens all the time. Sometimes you can prevent it and other times, you either can't be bothered to or it's truly out of your hands. This doesn't mean you should get discouraged. If something goes wrong, try to make the best out of it, think of something else or look at why it went wrong and tackle it with a different route.
When you over-mix your macaron batter, you can either cry, bake it and cry, throw it away, or try and salvage it. I did all of those things in that exact order yesterday.

Look, you won't be able to get macarons from over-mixing. That's obvious. But you still can get something downright delicious. And you know what, I'm not discouraged from making macarons again. Next time, I'll be more cautious and observant of what I am doing.
To sum up, baking fails are a point for improvement and a reality check. Keep going and don't feel like your skill has lessened because you have a bad day. True ability doesn't go away that easily.
Recipe:
Yield: About 10 to 15 ice cream sandwiches
Ingredients:
For the matcha cookies:
5 medium egg whites
114g ground almonds
225g powdered sugar
75g caster sugar
Vanilla extract/paste
2 tbsp matcha powder
30ml vegetable oil
115g plain flour
Pinch of salt
Green food colouring (optional)
For the ice cream:
397ml (1 tin) sweetened condensed milk
480ml double cream
100g black sesame seeds
Method:
Cookies:
Preheat the oven to 350°F/177°C and line a brownie tin (or any tin really, you could also probably make drop cookies?) with greaseproof paper.
In a food processor, blitz to combine the matcha powder, powdered sugar and ground almonds until fine. Sift into a large glass bowl and set aside.
In the bowl of a stand-mixer on high speed, whip the egg whites, salt and vanilla until you reach soft peak stage.
Still on high speed, continue to whisk in the remaining sugar (as well as optional colouring) and continue beating until you reach very stiff peaks.
Fold the almond mixture into the egg whites as you would to the correct macaron stage. Now, if you haven't over-mixed it, you could very well just make macarons. But alas, I am me and I did over-mix it, so let's pretend you've mixed it too much.
Add the flour into the batter and fold with a spatula until no large lumps remain.
Once the flour has been incorporated, stir in the oil mixture until the dough is well mixed.
Divide the batter between the squares in the tin evenly and smooth with the back of your spatula. Bake for 10 to 15 minutes or until golden brown around the edges and still slightly soft to the touch. Run a knife around the edges and leave to cool before turning out onto a wire rack.
Ice cream:
In a food processor, blitz black sesame seeds until just before you reach a paste. It should be well processed (with some larger bits for texture) and damp (the oils are only starting to come out).
In a large bowl, whisk to combine the vanilla, condensed milk and ground sesame seeds. Set aside.
In a separate bowl, using an electric whisk or stand mixer, whip on high the double cream until you reach soft peaks. Use a spatula to continue folding until you get SLIGHTLY stiffer peaks.
Mix in one third of the whipped cream into the condensed milk mixture to loosen it. Continue to fold the rest of the whipped cream until no large lumps remain, making sure not to deflate the mixture.
Pour the batter in square moulds (or the same brownie tin used earlier, lined) and freeze for 6 hours or so or overnight is best. To serve, remove a square of ice cream and sandwich with two cookies. A drizzle of white chocolate tastes lovely with this.
#cookies#cookie#matcha#green tea#matcha cookies#black sesame#ice cream#food#food photography#food blog#food blogger#baking#baker#bakery#bake#baking blog#sweet#desserts#ice cream sandwich#cookie sandwich#baking fail
1 note
·
View note
Text
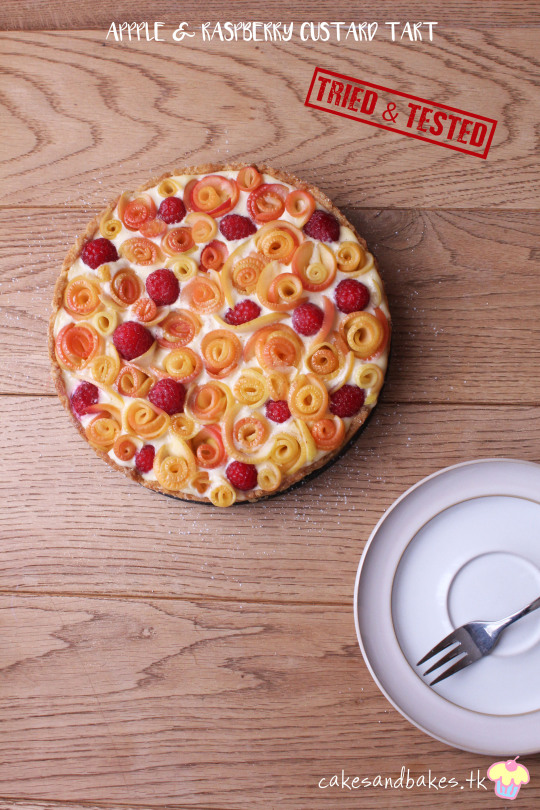
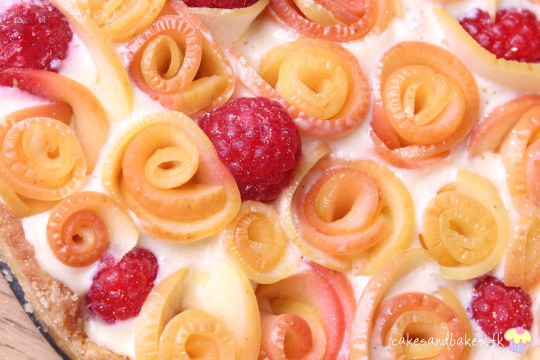
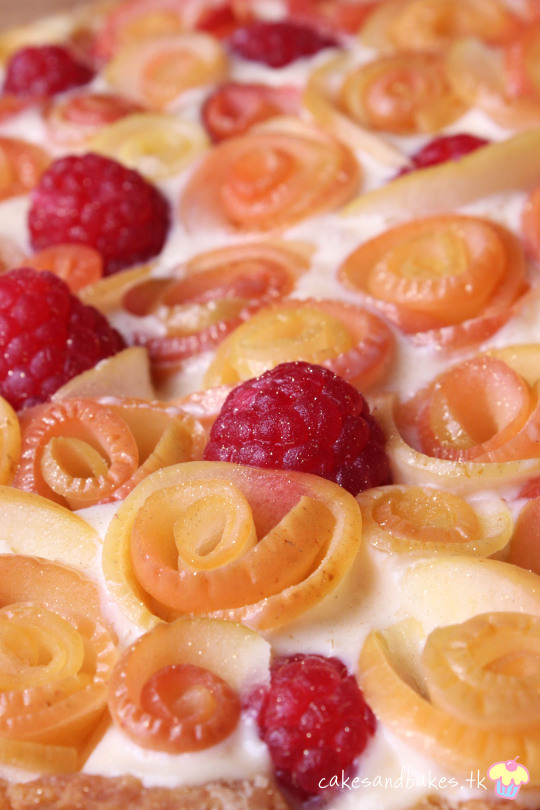
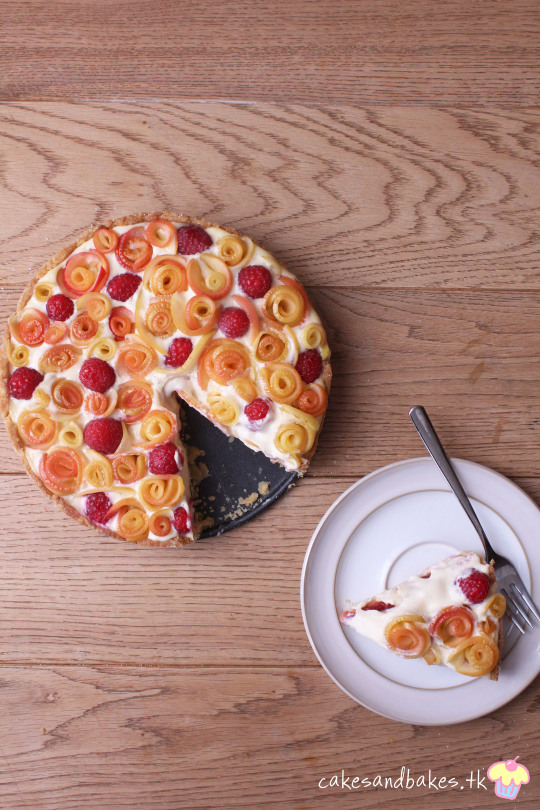
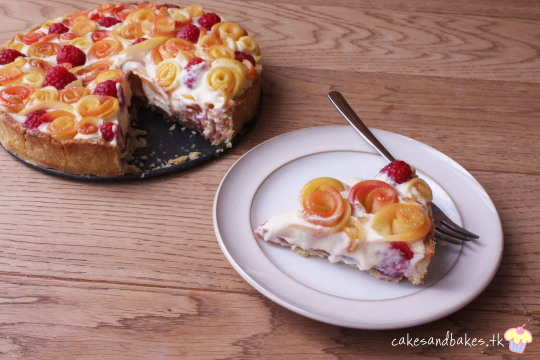
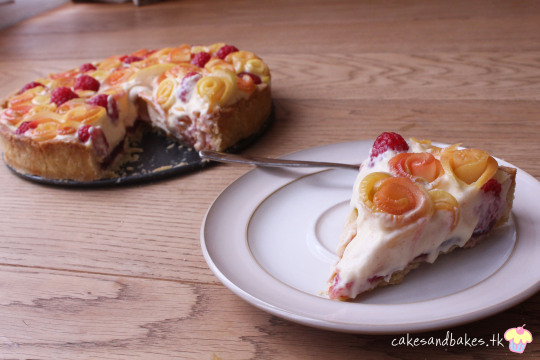
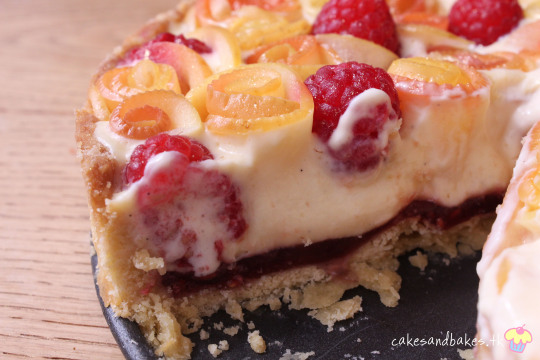
Tried & Tested: French Pastry Dough - Apple & Raspberry Rose Tart
Exams are over! Let's celebrate with some good summer food.

This tart didn't exactly turn out as pretty as I wanted it to but I'd say it's still gorgeous.

Look, in my defence, it was 11pm at night, I was super tired and I was watching 'Lion'.

I was an emotional wreck. I'm surprised I even managed to finish this tart off at all through the flood of tears that movie had me in.
Honestly, if you haven't seen 'Lion', go watch it NOW. Dev Patel's acting was extraordinary and Sunny is the cutest boy ever.
I wasn't really sure what recipe to try and test out. A tart was definitely on the mind but I wanted something simple so decided to go with a classic fruit and custard combo.

Since I had raspberries and apples on hand, I chose to go with those two fruits, but really, you could definitely mix and match fruits for this recipe.

Custard isn't hard to make but pastry is definitely something I have struggled with before.
Hence, I decided that I was to test out a simple no-fuss no-roll but flaky and crisp pastry dough.
David Lebovitz's French tart dough recipe did seem a little unusual initially.

Firstly, rather than the traditional method of rubbing cold butter into flour, the butter was melted along with oil and simply combined with the flour instead.

However, the pastry turned out beautifully. It was a lovely golden brown all over and the texture was spot on. It was light, flaky and still had that buttery flavour even with the addition of oil.
Don't even get me started on the custard.
To tell you the truth, I actually hated custard when I was younger and, even now, I tend not to eat it very often because the creaminess can get really sickly.

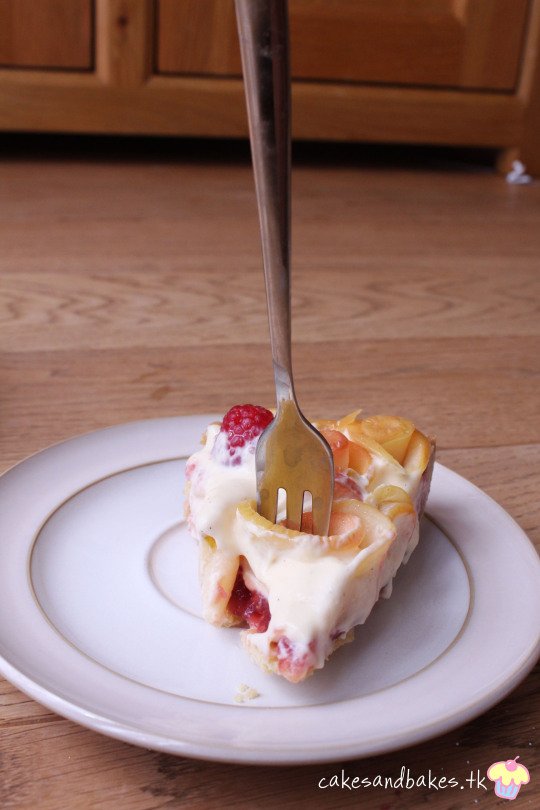
However, this custard was perfectly smooth and just the right amount of creaminess since milk is also used. Plus, the tartness of the apple slices and raspberries help to cut through it and makes it rather quite delicious.
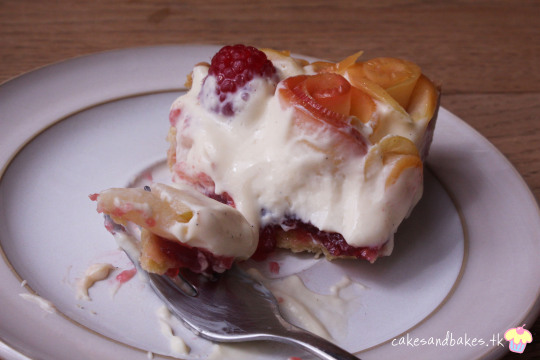
The apple slices are soaked in the juice to prevent browning and then heated to soften them up. I was a bit on the edge about how the texture of the apples would taste but as long as you heat them enough, they taste divine!
In fact, over a few days, they do begin to soften up more and are actually my favourite part of this tart.
Having just finished exams, this tart w/as a great way to cheer me up after how badly I screwed up.
Yeah, I might not get into my university of choice... but at least I still have a few slices of this tart left.
Recipe for pastry from David Lebovitz, rest from yours truly
Yield: 1 8-inch tart
Ingredients:
For the pastry:
85g unsalted butter, cut into pieces
1 tbsp vegetable oil
3 tbsp water
3 tbsp sugar (increased from 1)
1/8 tsp salt
160g all-purpose/plain flour
For the custard:
3 tsp cornstarch/plain flour
55g caster sugar
1 tsp vanilla bean paste
200ml whole milk
300ml double cream
2 egg yolks
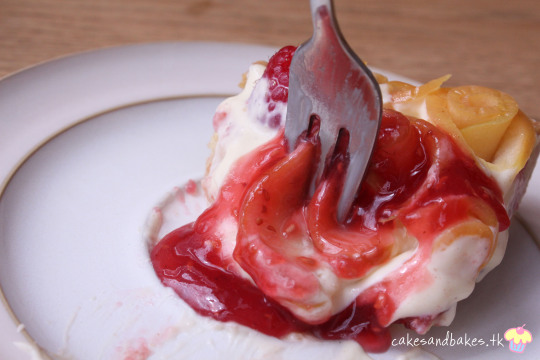
For the raspberry jelly:
75g raspberries
85g raspberry jam (you can opt for seedless)
55g sugar
Juice of 1 large lemon
4 tbsp water
1 tsp of agar agar
You will also need:
50g raspberries
5 large apples
250 ml apple juice
Juice of 2 lemons
80g sugar
Method:
Pastry:
Preheat the oven to 410°F/210°C.
In an ovenproof bowl, combine the butter, oil, water, sugar, and salt.
Place the bowl in the oven for 15 minutes, until the butter is completely melted, bubbling slightly and starting to brown around the edges.
Next, carefully remove the bowl from oven and add in all of the flour and stir quickly until a ball of dough is formed.
Transfer the dough into your tart mold (I used a regular springform pan because I didn't have one on hand) and, once cool enough, press it into the tin and up the sides.
Using a fork, prick the dough all over and bake for 15 minutes until golden brown. Leave to cool completely.
Jelly:
In a saucepan, combine the jam and sugar and whisk to combine until there are no lumps remaining.
Toss in the raspberries and lemon juice and begin to heat the mixture on low to medium heat.
In a small bowl, combine the water and agar and leave for a couple of minutes to soak.
Use a fork to gently mash the raspberries (they should begin to break down with the heat) and then add the agar.
Bring the mix to the boil and leave for 5 minutes to cook and thicken. Set aside to cool for a few minutes. Make sure to not let it cool too much as this is when the agar will start to set.
Custard:
In a large bowl, whisk to combine the egg yolks, cornstarch and sugar until pale in colour.
In a separate bowl, combine together the milk, double cream and vanilla bean paste.
Slowly and in parts, add the milk mixture into the egg yolks, whisking thoroughly and making sure there are no lumps.
Transfer the mixture to a large saucepan on low to medium heat. Stir continuously for 8 minutes until the mixture thickens enough that your whisk leaves a trail and it sticks to the back of a spoon. Leave to cool slightly.
Assembly:
Once the pastry shell has cooled, pour the jelly into the shell and spread evenly. Leave the tart to cool in the fridge until the jelly has at least partially set.
Next, pour the custard on top of the jelly and leave to set partially in the fridge for about 10 to 15 minutes.
Meanwhile, in a large bowl, mix together the apple juice, lemon juice and sugar, stirring to combine.
Wash and peel all the apples and slice very thinly. You can use a mandoline for this if you have one. After slicing each apple, make sure to transfer these slices into the bowl of juice.
Cover the bowl with a lid and heat in the microwave for 5 to 6 minutes until steamy and almost bubbling. Be careful as it will be very hot. Leave to cool for 10 to 15 minutes.
Once cool enough to handle, begin rolling the apple slices into roses and layering apple slices around to form the flower.
Wrapping the slices together tightly, carefully arrange the rose into the custard. The custard shouldn't be so set that the rose won't stick into it but it should be firm enough that it doesn't unravel. Repeat this for as many times as it takes to cover the tart with the apple roses. Fill in any gaps with raspberries and finish with gold lustre.
#raspberry#raspberries#apple#custard#custard tart#tart#pastry#pastries#french pastry#david lebovitz#fruit#fruit tart#baking#baker#bakery#bake#recipe#dessert#sweet#food#food blog#foodie#food pics#baking blog
32 notes
·
View notes
Text
Chocolate & Strawberry Decadence

It's currently exam season so it's been quite hectic, meaning I haven't really had the chance to bake anything for a few weeks.
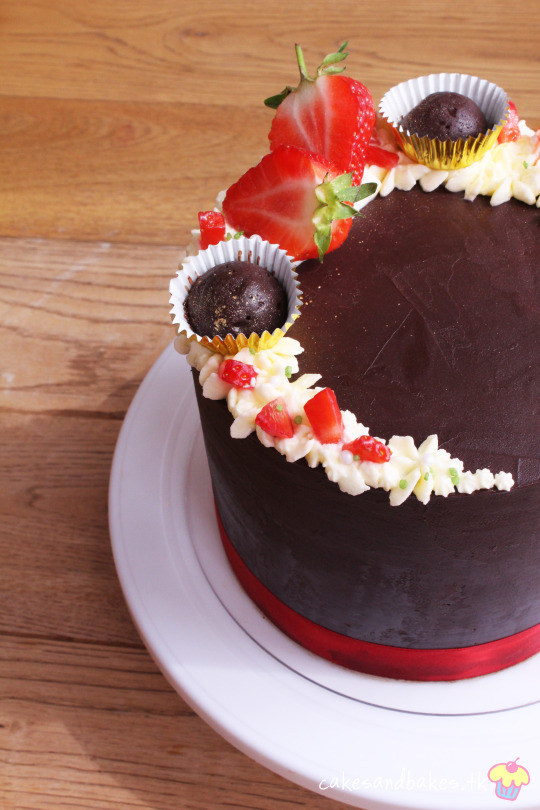
Luckily, I managed to to squeeze in a cake right before my exams started for my sister's birthday. And, this is what I came up with.
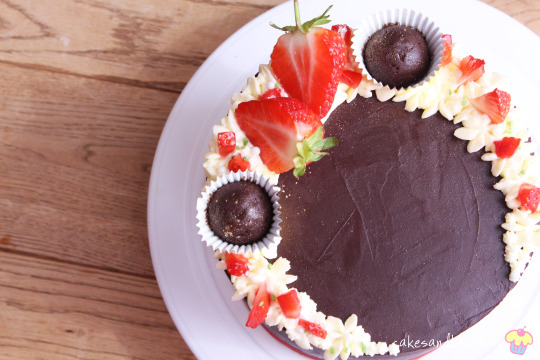
My sister is most definitely a sugar-fanatic, almost as sugar-crazy as I am. Almost.

So when I asked her what cake she wanted for her birthday, she was quick to say she wanted a chocolate cake. She actually asks me to make chocolate cake quite often but I am always eager to try something more adventurous technically or flavour-wise.

But, since this was her birthday after all, a chocolate cake it would be!
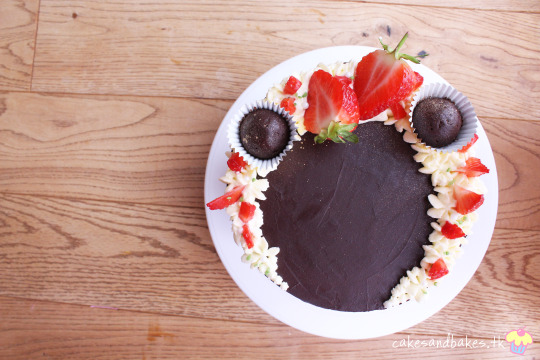
At her request, I paired this decadent chocolate cake with a sweet but tangy strawberry filling and a thick and creamy chocolate ganache. I like to use plain chocolate for my ganache since it's not overly bitter but definitely cuts through any excess sweetness in a cake.
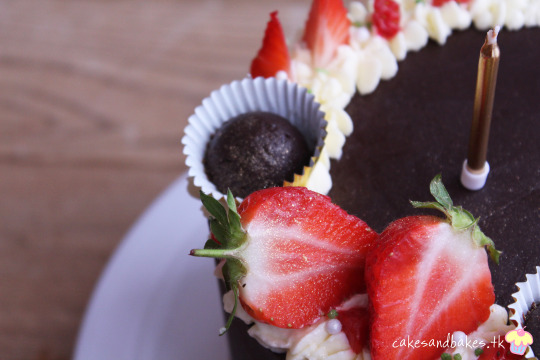
Can we also take a moment to appreciate just how smooth the sides are?!

Chilling is important here people!
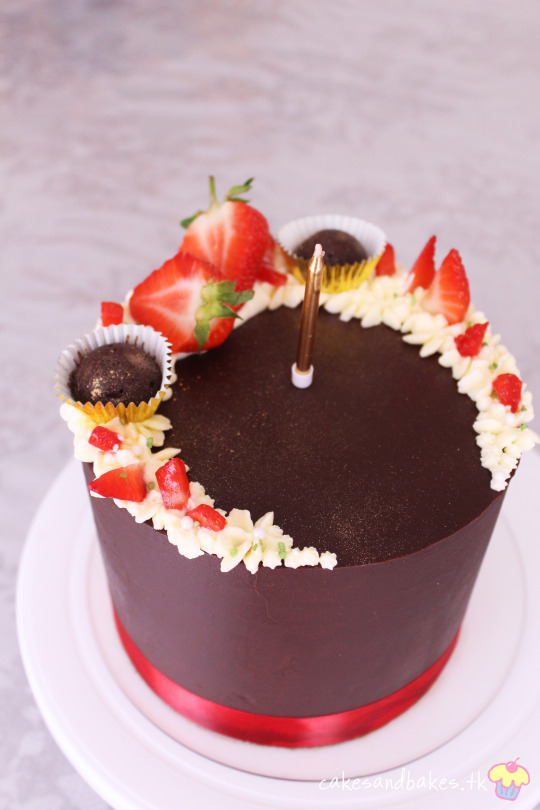
I like to chill my cake right after filling so that the cake layers don't move about while I'm applying the crumb coat. It also means the coats will set up quicker and you have less of a chance of getting crumbs into your final layer.
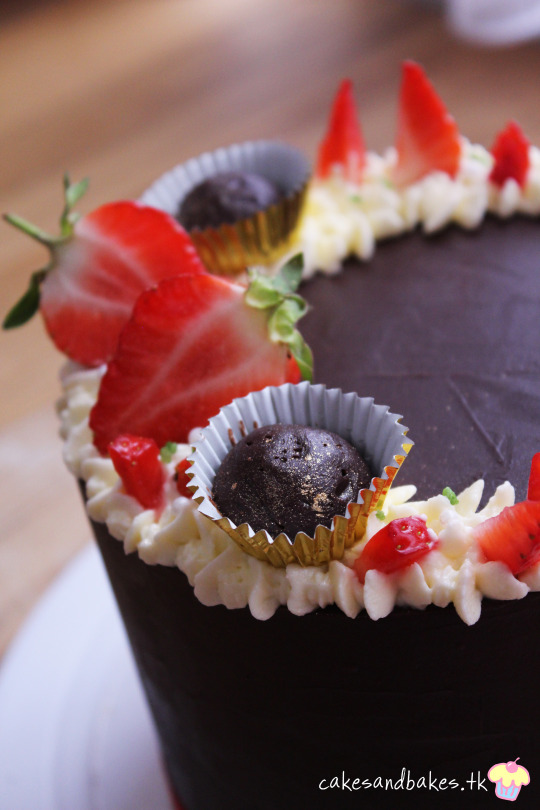
I've also become quite quick at cake decorating, It used to take me an agonisingly long time to get reasonably smooth sides but, recently, I've been a lot of faster at it.

Hopefully, that means I'm improving!

The strawberry filling is pretty much the same as my raspberry filling I always use but sets up slightly thicker.
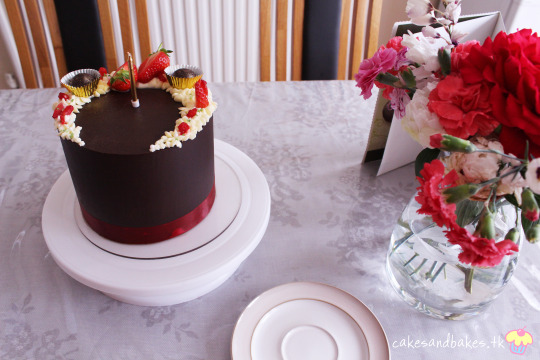
Although I used a thin layer of ganache in between layers as well, the strawberry filling still does soak into the cake a bit so that the deep chocolate cake flavour is also infused with the sweet and light notes of strawberries.

Along with fresh strawberries and whipped cream, I also made some left over truffles from the ganache and put them into cute truffle cases placed on top of the cake. Of course, I added some gold lustre for effect.

In terms of texture, this cake is pretty much spot on. The cake has a soft and tender crumb that is still tight and holds its structure well. Honestly, this chocolate cake is pretty much perfect and my sister absolutely adored it.

If you're in need of a decadent chocolate cake, this is definitely the recipe for you. I liked my slices slightly warmed in the microwave with a lot more hot ganache drizzled over. Add a scoop of ice cream and you're set to go.
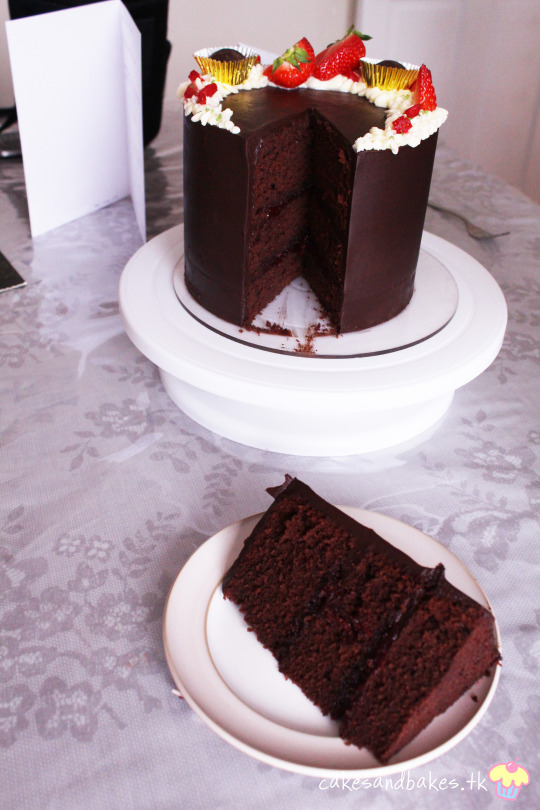
Yield: 1 three layered 6 inch cake
Ingredients:
For the cake:
270g margarine/butter
50ml oil
227g caster sugar
142g soft brown sugar
6 eggs
50ml milk mixed with juice of 1/2 a lime
2 tsp vanilla extract
270g self-raising flour
85g cocoa powder
55ml boiling water mixed with 10-15g instant coffee
For the ganache:
450ml double cream
400g plain chocolate
For the strawberry jam:
350g frozen strawberries
200g caster sugar
Juice of 1/2 a lime
You will also need:
Freshly whipped cream
Strawberries
Sprinkles etc.
Method:
Cake:
Preheat your oven to 350°F/177°C and prepare three 6" cake pans with greaseproof paper. I only have two so I did mine in batches.
In a stand mixer fixed with a paddle attachment, cream together the sugars, butter and oil.
Once paler in colour and fluffy, beat in the eggs one at a time, following with the vanilla extract and milk-lime mixture.
Next, on low-speed, fold in the cocoa powder and flour until almost incorporated.
Beat in the coffee mixture and continue mixing the batter so that no lumps of flour remain. Remember to scrape down the sides of the bowl to ensure thorough mixing.
Divide the batter equally by eye or by weight between your cake pans and bake for 1 hour. Use a cake tester inserted into the middle of the cake to check whether they have baked through. Leave to cool on a wire rack.
Ganache:
In a large bowl, break the chocolate up into small squares.
In a saucepan over medium heat, bring the double cream up to a near-boil.
Once the cream is hot enough, pour the hot cream all over the broken up chocolate. Cover the bowl with a plate and set aside for 2 to 3 minutes.
Stir to combine the cream and chocolate mixture until homogeneous. If your chocolate has only partially melted, you can heat it in the microwave for 10 second bursts until it has completely melted and been mixed through.
Strawberry filling:
In a saucepan over medium heat, combine the strawberries, lime juice and sugar.
Bring the mixture to a boil, stirring occassionally and using a fork to mash the strawberries.
Leave it to bubble for 5 to 10 minutes, checking from time to time to make sure the filling doesn't burn.
Once the filling has thickened significantly and has become very syrupy, remove it from the heat and transfer to another bowl to cool.
Assembly:
Remove the cakes from the pans and level the tops using a serrated knife.
Place one of the layers onto your cake board, securing with a dab of ganache.
Add 2 to 3 tbsp of the ganache to the first layer and spread it out from the centre outwards to create a dam for the filling. You can also do this by piping a ring of ganache around the outside of the cake layer (slightly in from the edges).
Fill the dam with 2 to 3 tbsp of filling, being careful not to overfill. Place the next layer on top and continue until you have stacked all the layers. Chill the cake for 30 or so minutes until the ganache has set.
Melt the remaining ganache in the microwave for 10 seconds until slightly looser but still at a spreadable consistency. Apply a thin crumb coat around the cake, sealing in the gaps in between the layers. If your cake has been chilled enough, this should set up quite quickly.
Once the crumb coat has firmed up, apply a thicker layer of ganache and use your off-set spatula and a bench scraper to get the sides as smooth as possible. Chilling in between coats can also be helpful.
Decorate the cake with fresh cut strawberries, freshly whipped cream piped stars and other garnishes. I also chose to wrap a red ribbon around the base.
#cake#cakes#chocolate#chocolate cake#cake decorating#baking#bakery#ganache#baker#baking blog#food#food blog#recipe#dessert#layer cake#strawberry#strawberries n cream#birthday cake#foodie#eats#cakestagram#chocolate and strawberry
2 notes
·
View notes
Text
Tried & Tested: Pistachio, Cardamom and Rosewater Cake with Coconut Buttercream
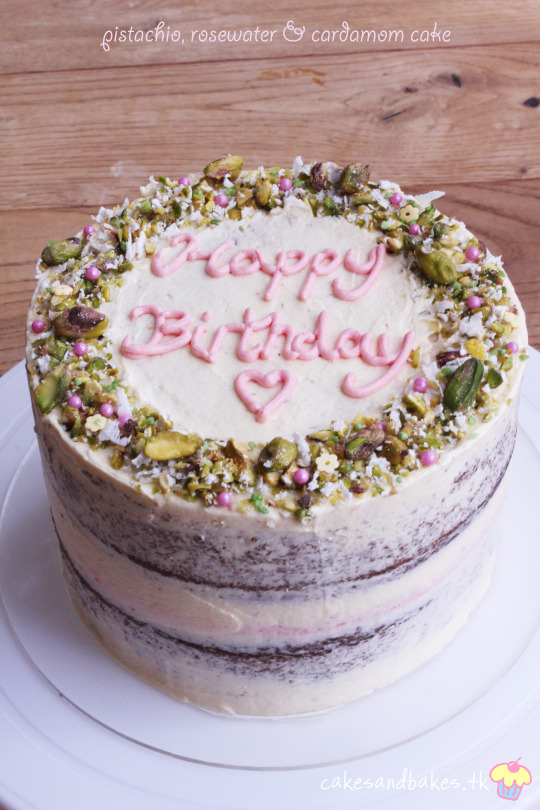
This week's Tried & Tested recipe is a delicious pistachio, cardamom and rosewater cake that I covered in coconut buttercream. What a flavour combo!

I made this cake for my dad's birthday which only just recently passed. At first, I was unsure of what to make my dad for his birthday cake.

He's not much of a sweet tooth and when it comes to cake, he swears by the classic ol' butter cake recipe. But this year, I wanted to make something more exciting with flavours that he would actually like.

And so I settled on this cake.
All of the flavour components compliment each other extremely well. If you hadn't seen my birthday cake post before, I made a pistachio and rosewater cake for one of those layers too and that was actually my favourite flavour of the whole cake. That's a pretty big thing considering there was red velvet and cookie dough in the mix, as well. Go check it out!

I was well aware of pistachio and rosewater going well together and the warmth and aromatic nature of cardamom just made sense.

To finish, I settled on a simple buttercream mixed in with some coconut milk paste (made from a powder) which just added this whole other level of creaminess and delicate sweetness to the frosting. I definitely recommend it. The original recipe suggests a rosewater meringue buttercream but I'm really not a meringue buttercream person. I've said this quite a few times.
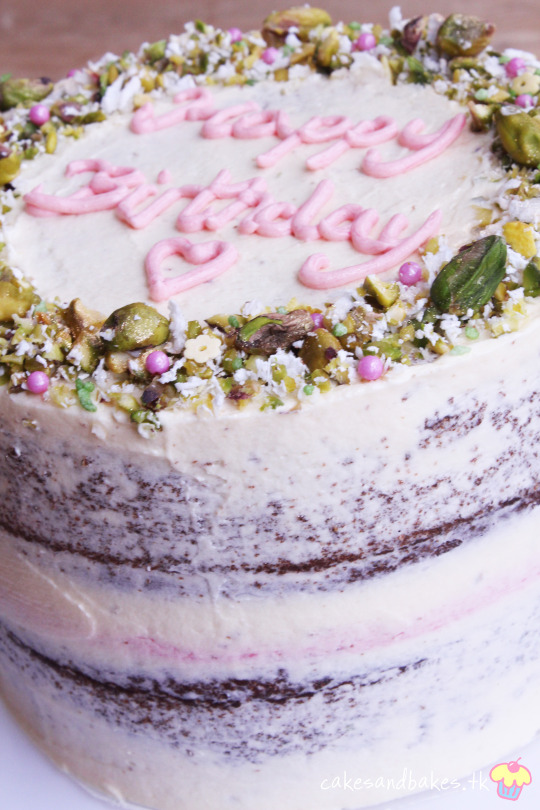
Everyone always praises meringue buttercreams for their silky smooth mouth-feel but I actually love the grainy feel of a powdered sugar buttercream, especially when it crusts over. Of course, go with whatever frosting you'd prefer.

The actual texture of the cake is incredibly fluffy and light and as I increased the amount of ground pistachio in the cake, the nuttiness really comes through.
Because the cake has such a delicate crumb, I was able to eat slice upon slice of this beauty. That might be a bad thing...
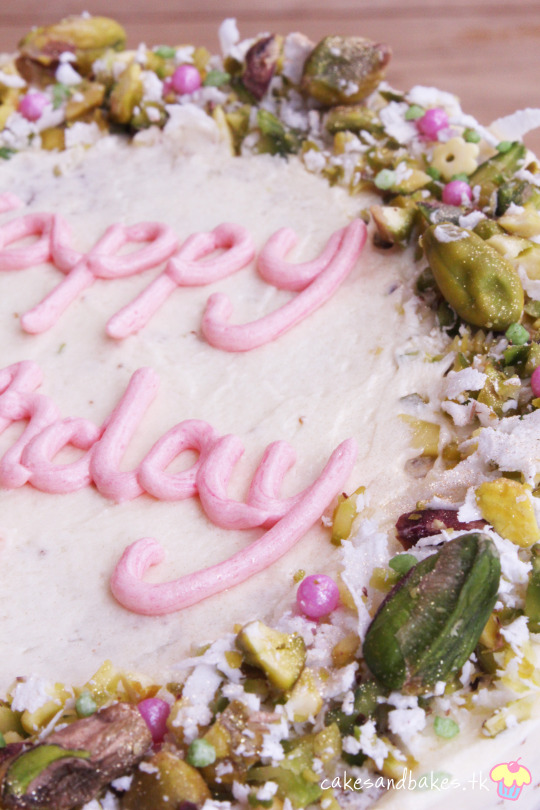
I decorated this cake rather simply since my dad isn't too keen on frosting so I didn't want to put too much onto the cake.
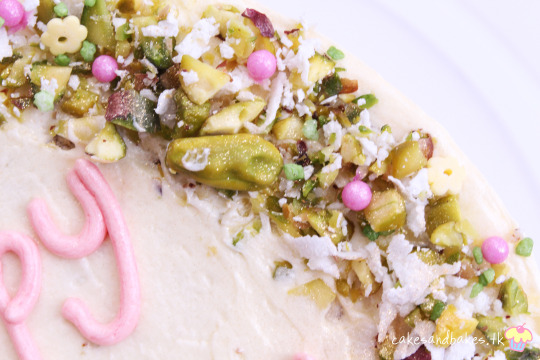
Even though it's a bit plain, I'd say it looks quite pretty! I added some gold lustre dust for a touch of sparkle.

I should also mention that my exams have just started so (although I will try not to be), the blog may be quite inactive for a while. Either way, my exams finish near the end of June so if I don't manage to post any recipes over the next few weeks, I'll definitely be back by July.

Without further ado, here’s the recipe!
Recipe from Food52
Yield: 1 medium sized 6 inch layer cake
Ingredients:
For the cake:
120g raw pistachios (increased from 75), shelled
250g self-raising flour (I ended up using 280g since the batter felt a bit too loose)
1/4 tsp salt
1 tsp freshly ground cardamom (This is more than specified in the recipe but it was definitely the right amount for me)
168g unsalted butter, room temp
300g caster sugar
3 large egg, room temp
360ml milk, room temp
2 tsp vanilla extract
1 tsp almond extract (I omitted since I didn't have any on hand)
Green food colouring (optional)
You will also need:
Rosewater sugar syrup (120g sugar dissolve in 120ml water and boiled together with 1-2 tsp rosewater extract to taste, cooled)
Coconut Buttercream (regular buttercream of about 250g butter to 300g icing sugar, mixed with 5 tbsp coconut milk powder with enough water to make a paste) plus desired food colours (I dyed a 1/4 of the batch pink)
Extra ground pistachios, sprinkles, freshly grated coconut etc.
Method:
Cake:
Preheat your oven to 350°F/177°C and prepare two 6" cake pans with greaseproof paper.
In a food processor, blend the shelled pistachios until very finely ground. Take care not to turn it into a paste!
In a separate bowl, sift together the flour, salt, and cardamom into a medium bowl and set aside.
Using a stand mixer and a paddle attachment, cream the butter and sugar until very pale in colour and fluffy.
Once creamed, beat in the eggs, one at a time along with the extracts. Make sure to scrape down the sides of the bowl.
Next, beat in half of the flour mixture and once almost combined, add half of the milk. Repeat once more with the remaining flour and milk. Be careful not to over-mix but make sure there are no obvious lumps of flour.
Lastly, fold in the ground pistachios along with the optional green food colouring.
By eye or by weight, divide the batter between the two cake pans and bake for 50 minutes to 1 hour. Use a cake tester to check that the cakes are baked through. Leave to cool before removing from the pans.
Assembling:
Level both cake layers and prod all over with a fork thoroughly.
Spoon over the rosewater syrup until the cake layers, soaking each well. You may also want to flip the cakes over and repeat on the underside so that the syrup soaks through.
Place the first cake layer onto your serving board and spread on a thin layer of buttercream onto the top (or however much you would like) and top with the second cake layer.
Use some of the uncoloured buttercream to apply a thin crumb coat and chill for 30 minutes.
Once chilled, apply another thin coat of buttercream and use a bench scraper or off-set spatula to smooth it out. You may opt to go for a thick full coat of buttercream but I went for a semi-naked look since this was for my dad's birthday and he's not too keen on lots of frosting. After you've fully covered your cake, chill for another 10 to 20 minutes.
In a small bowl, combine about 2 to 3 tbsp ground pistachios with an equal amount of freshly grated coconut and sprinkle the mixture in a circle around the edges of the top of the cake.
Add sprinkles and whole pistachios along with gold lustre. Top with any further decorations and enjoy!
#cakes#cake#layer cake#pistachio#rosewater#coconut#cardamom#cake decorating#coconut buttercream#pistachio cake#baking#baker#bake#food#foodie#food photography#eats#sweet#dessert#desserts#sugar#semi naked cakes#food blog#food blogger#baking blog
0 notes
Text
Banana, Salted Caramel & Chocolate Ice Cream Sundae Cookie Dough Cake
This cake was my entry for Round 1 of Yolanda Gampp's #REPLICAKE competition.
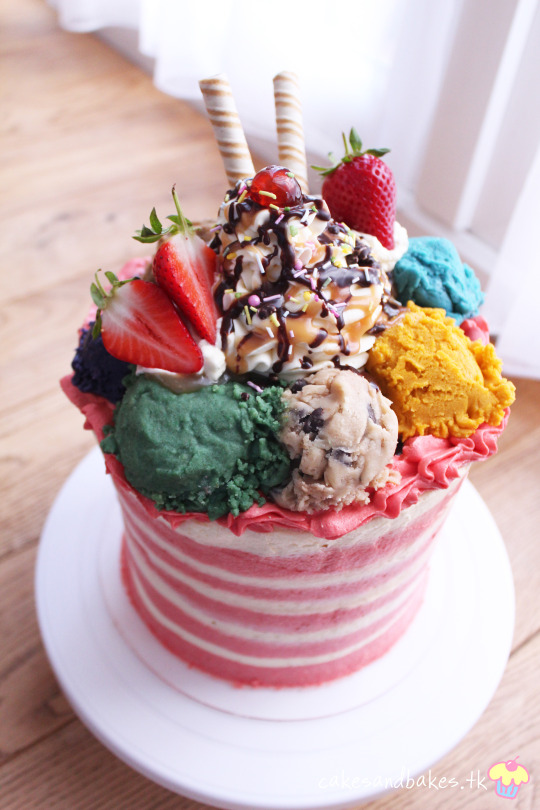
You've probably heard of Yolanda Gampp aka How To Cake It. Her YouTube channel has over 3 million subscribers and she puts out great weekly content.

If you haven't checked her out already, I recommend that you do! This cake was inspired by her ice cream sundae cupcakes. While they were already cute enough, I decided gigantifying them would definitely level-up them. I was right, naturally.
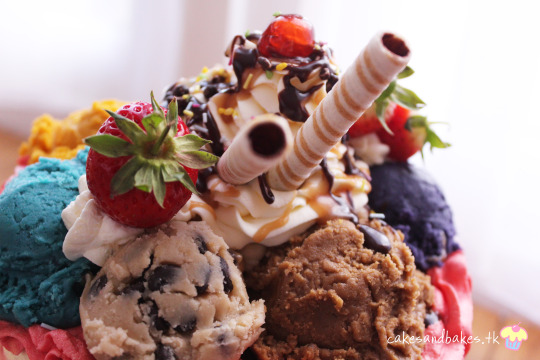
This cake is honestly huge. I initially had only baked 2 cakes but decided to bake an extra cake after not being satisfied with the height of the cake. I'm glad I did. Of course, you can scale this cake down as you wish.
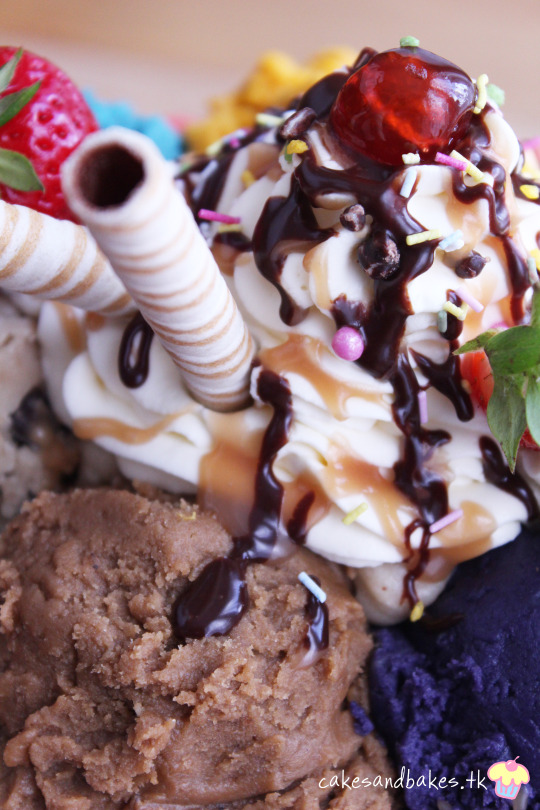
The actual cake is a moist and dense banana cake with a hint of cinnamon. I paired the cake with my favourite salted caramel recipe and a dark chocolate ganache to counteract the sweetness.

The frosting is just a classic buttercream recipe but you could opt to use a meringue buttercream if you so wished.

I personally don't like meringue buttercreams as they taste too buttery and aren't sweet enough. A lot of people complain about regular buttercream having the grainy mouth feel of powdered sugar but that's actually one of the things I like about it!

This cake actually took me quite long to make as a whole. The carving was quite quick since I didn't need to shave much off the cake but the overall decorating process was quite tedious.

I'm a little on the indecisive side so arranging the ice cream scoops to make them look realistic enough took quite a bit of time.
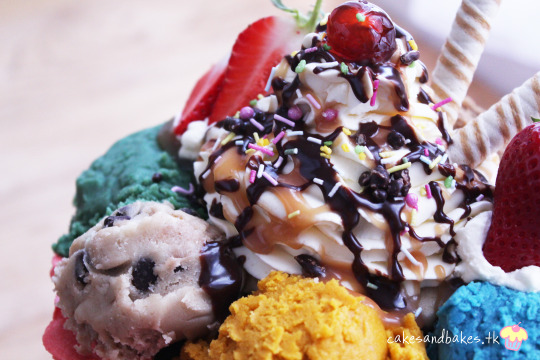
I think the finished product looks pretty great, though! I love the striped buttercream effect.

Make sure when you are blend your buttercream stripes together that you don't move the angle of your bench scraper or off-set spatula too much that the colours mix together.
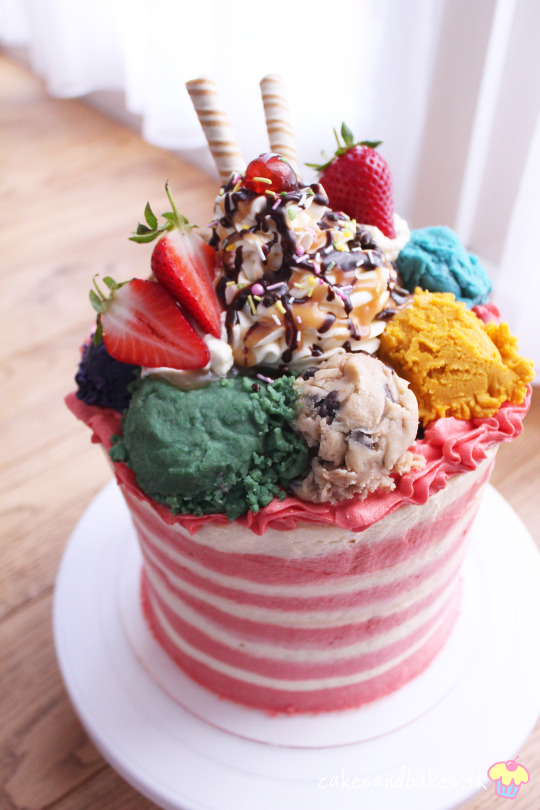
If this happens, scrape off a dab of the blended area and replace with some fresh buttercream and continue blending.

While I didn't flavour every scoop according to their colour, you definitely can with the use of extracts or flavoured syrups!
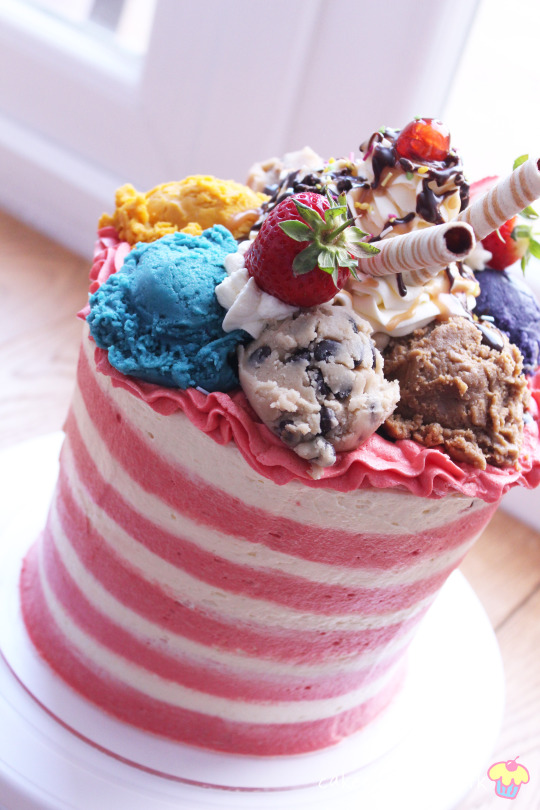
You can also use your regular sugar cookie dough recipe minus the egg and with toasted flour if you don't like the taste of coconut oil but I personally love it and it also means that the cookie scoops set up really firm and hold their shape well.
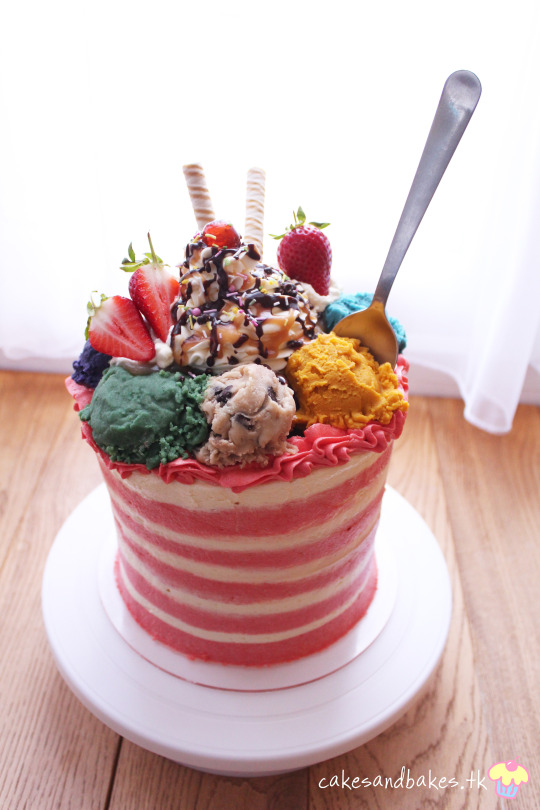
To top, I piped a mountain of whipped cream, dowsed the whole thing in melted down ganache and caramel and showered the cake in sprinkles. I don't really like glace cherries but since this was an ice cream sundae cake, I placed a small cherry right on top.
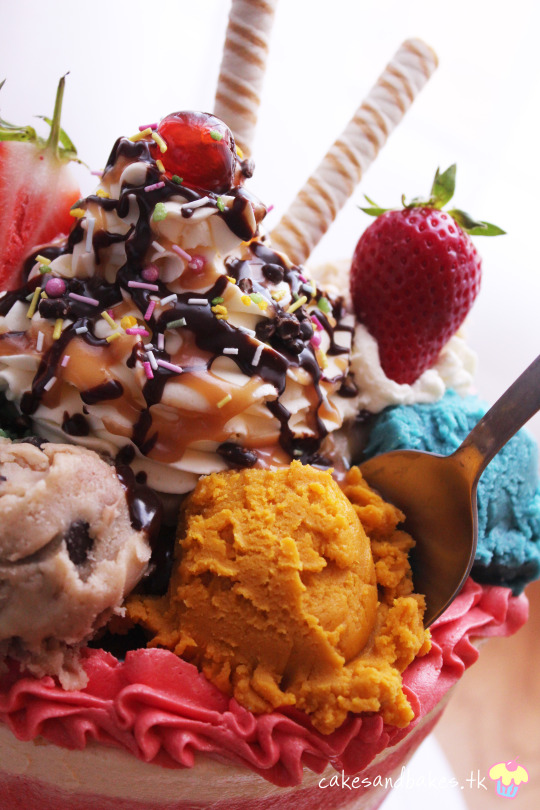
Cake is quite honestly the only thing that is pulling me through these weeks of revisions. My exams start in 2 weeks (officially) and these exams are what determine if I get into my chosen university or not so I will be (or rather should be) studying hard and may seem a bit inactive on my Instagram account.
Queued posts will still stick to the regular schedule and I will try to bake as much as I can since it really does help me relax and is a good break from all the studying.
Yield: 1 huge 6 layer cake
Ingredients:
For the cake:
5 large bananas, very ripe and thoroughly mashed
500g self-raising flour
6 large eggs
225g butter/margarine
120ml oil
300g caster sugar
2 tsp cinnamon
2 tsp vanilla extract
For the ganache:
250g plain chocolate
250ml double/heavy cream
For the salted caramel, find the recipe here and double it.
For the coconut oil cookie dough (alternatively, use your own favourite cookie dough recipe. This one sets up quite hard):
225g coconut oil, softened
180g brown sugar
330g plain flour
Chocolate chips, strong coffee, food colouring
You will also need:
Large batch of buttercream (Roughly 400g butter and 600g icing sugar)
Whipped cream, glace cherry, sprinkles, wafer rolls etc.
Method:
Cake:
Preheat the oven to 350°F/177°C and line two 6 inch cake pans and one 7 inch cake tin with greaseproof paper.
In a large bowl on a stand mixer, cream together the butter, oil and sugar until well combined and pale in colour.
Next, beat in the eggs, one at a time, along with the cinnamon and vanilla extract.
Mix in the banana mixture until just combined and then fold in the flour until no lumps remain. Make sure to scrape down the sides of the bowl.
Divide the batter between the cake pans. You won't need much in the 7 inch - it's just to help with better tapering of the cake, so put most of the batter into the other pans.
Bake for 1 hour or until a cake tester comes out clean when inserted into the middle of the cake. Leave to cool completely.
Ganache:
In a saucepan, bring the double cream to a near boil.
In a separate bowl, break the chocolate into small squares. Once the cream has reached a near boil, pour it over the chocolate and cover the bowl with a saucer.
After 5 minutes, begin to stir the mixture until homogeneous. Leave to cool in the fridge to thicken slightly.
Cookie dough:
In a large pan on low heat, begin to toast the flour. You will need to constantly be moving around the flour with a spatula so that it does not burn. Once it is hot to the touch, remove from the heat and leave to cool.
In a large bowl, combine the oil and sugar until well combined.
Stir in the flour bit by bit after the flour has cooled until it reaches a very soft cookie dough consistency that is still scoopable. You may need more or less flour. Leave out at room temperature. If you keep it in the fridge, it will set extremely hard. If it sets up too hard, you will need to melt it down in the microwave and add extra milk.
Assembly:
Level and torte all of the cakes so that you have 6 layers. Place the first largest 7 inch layer onto a cake board or platter and begin to layer up the cake with ganache and salted caramel in between each layer with a ganache "dam" (a ring of ganache is piped around the outside of the cake layer prior to filling ) to prevent the filling from spilling out the sides. Leave some ganache left over for crumb coating. Your cake layers should follow like this: 7 inch, 7 inch, 6 inch, 6 inch, 6 inch, 6 inch. Do not overfill, you can always serve extra caramel with the cake. Trust me on this. Chill the cake for at least 30 minutes in the freezer until the ganache has set up.
Using a sharp serrated knife, begin to carve the cake. You are carving the cake upside down (since it's easier) so being with trimming the first cake layer an inch or two inwards to create a smaller base. You don't want it too small for lack of support so trim it to 5 inches. Continue with the rest of the cake so that the cake tapers out gradually in a smooth slope.
Once you are satisfied with the cake shape, use left over ganache (slightly thinned down) to apply a thin crumb coat all over the cake. Chill the cake for another half hour.
After chilling, place another cake board on top of the cake and quickly flip the cake over so that the smallest part is now the base. Insert 5 or so dowels arranged in a ring for support.
Divide your buttercream into two portions and dye one pink. Transfer both into piping bags with a large corner cut off the end (vary the size of the corner for how thick you want your stripes to be).
Pipe rings of buttercream all around the cake, alternating colours and starting at the bottom. Once the whole cake has been covered in buttercream rings, chill for 20 minutes in the freezer until the buttercream has hardened slightly.
Take your offset spatula and begin to blend the stripes together, moving your spatula around the cake horizontally and not moving the angle of your spatula. Be careful, you don't want to smudge the edges and colours together but you want to smoothen out the stripes. Chill for another 30 minutes.
Using the rest of your pink buttercream in a piping bag with a star tip, pipe a ruffle border around the top of the cake and fill in the top of the cake with any more left over ganache or leave it empty.
Take your cookie dough and if it has hardened up too much, add some milk and heat it in the microwave for a couple of seconds. Divide the cookie dough into small portions and dye each portion a different colour or flavour them differently. I went for chocolate chip, coffee and different coloured cookie dough scoops.
Once you have prepared all of them, use an ice cream scoop to make cookie dough scoops. Arrange these all over the top of the cake and use a fork to roughen up the edges of the scoop so it looks more realistic.
Top the cake with whipped cream, sprinkles, a glace cherry, more ganache and caramel and wafer rolls. Chill for another 10 minutes just to set up the icing.
#cake#cakes#cake decorating#layer cake#caramel#salted caramel#banana cake#chocolate#ganache#yolanda gampp#how to cake it#replicake#baking#baker#bakery#food#foodie#food blog#baking blog#cookie dough#coconut oil#ice cream#sundae
2 notes
·
View notes
Text
Tried & Tested: Soft & Chewy Chocolate Chip Cookies {Cookie Quest: X}
It sure has been a long time coming... but finally, here we are - the tenth instalment of my Cookie Quest.

It's not been the easiest of journeys at times. Having to eat more cookies than I can count on my hands took a lot of energy out of me. I honestly didn't know if I would make it.

Obviously, that's a lie.

This CQ has been fun! I loved trying out different recipes with different proportions of ingredients/techniques and seeing what overall effect they had on the cookie. I've learnt a lot.

And I think I've finally settled on what my perfect chocolate chip cookie is.

If you've been here from the beginning, you might know that I had a thing against cakey chocolate chip cookies. I wasn't really a fan of them at all. If I wanted cake, I would make cake.
But after this recipe, I've realised that cakey cookies aren't all that bad.

Perhaps a lot of my misunderstood hatred on cakey cookies were that they seemed to be rather dry.
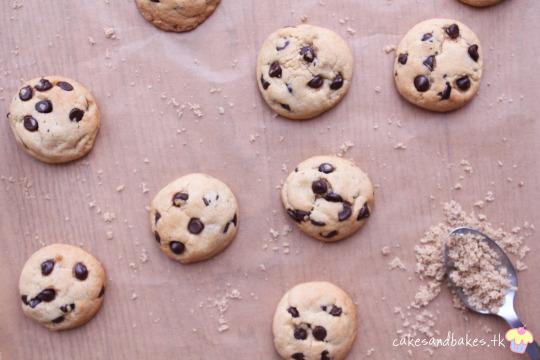
These cookies, however, had a softness reminiscent of cake but were not dry at all. Instead, they were chewy, crisp on the bottom and also gooey in the centres. I absolutely loved these cookies.
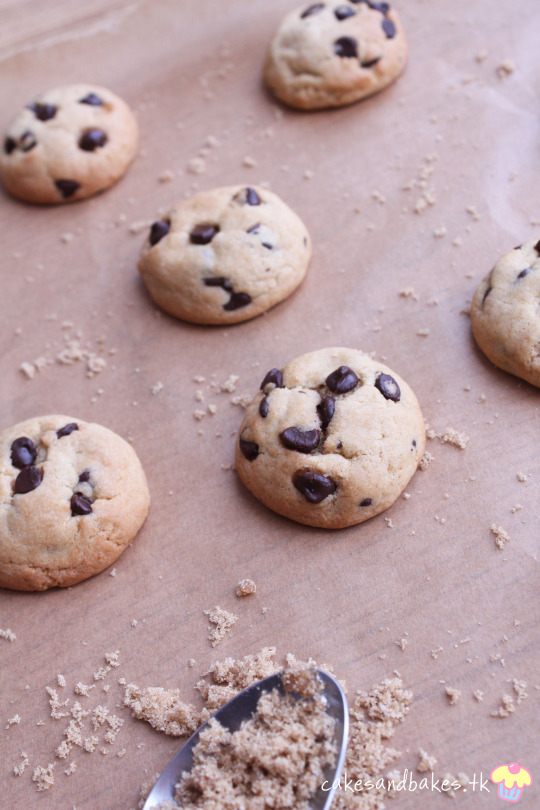
The first bite I took from this batch of cookies was packed with a lot of chew factor which is attributed to the total use of bread flour (a higher protein content than regular flour) and the ratio of brown sugar to white sugar. Both points have been duly noted. I loved the chewiness of these cookies.

They also baked well and browned nicely on the bottoms. The tops and insides were soft and the brown sugar lent a nice caramel-esque flavour.
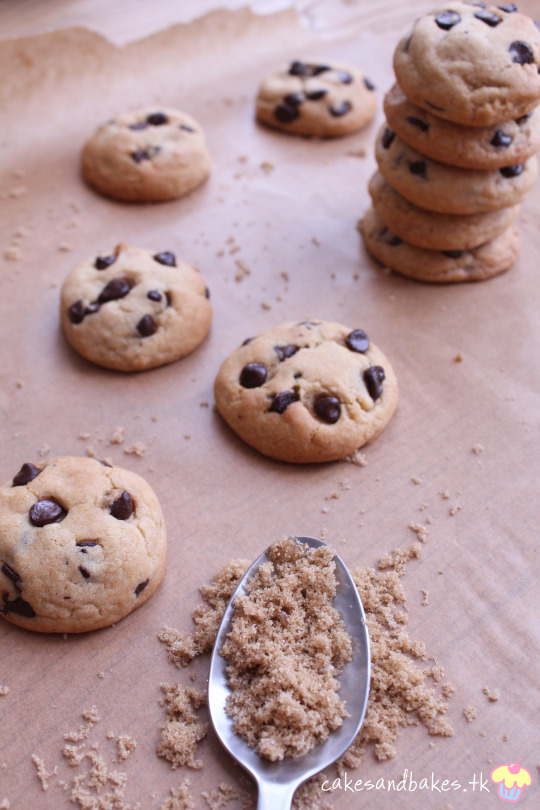
These cookies were definitely a good recipe to finish this series on and I have a lot of ideas in my head for when I create my own ultimate CCC recipe.
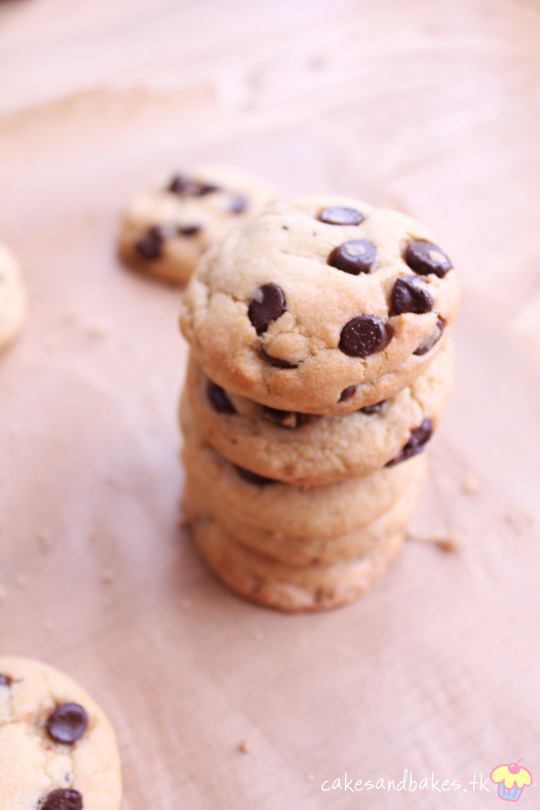
I can't wait to start recipe-testing! It should be uploaded in a few post's time (later than the usual schedule for my CQ posts) since I really want to get them perfect.
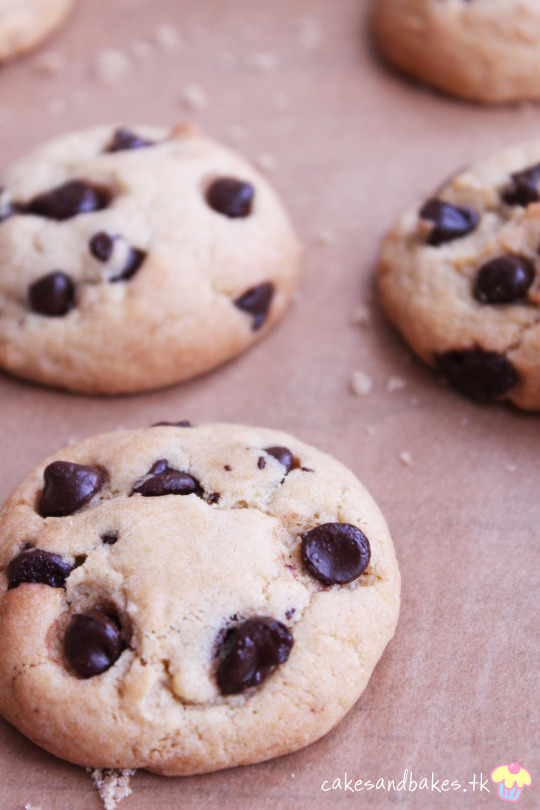
I definitely want to try something like this again. Maybe chocolate cake? Brownies? The options are endless.

However, I do know that I would like to do an "Around The World" quest where I try different cakes/goodies from different cultures. That would be a lot of fun!

Stay tuned for my own recipe to come in most probably a month to two's time where I will recount my favourite recipes from this quest as well as sharing in depth what I have learnt from this process. In the meantime, enjoy this recipe!

Next post's recipe is also a winner. Hint: there's caramel, chocolate and a lot of cookie dough.
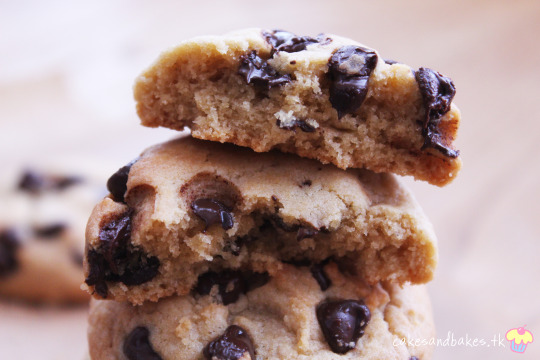
Recipe from Baking is a Science
Yield: Roughly 2 dozen medium-sized cookies
Ingredients:
113g unsalted butter, softened
200g brown sugar
50g granulated sugar
1 egg, room temperature
½ tsp vanilla extract
255g bread flour
½ tsp bicarbonate of soda
½ tsp salt
175g semi-sweet chocolate chips or dark chocolate chips (I used roughly 140g just because I like my cookies with less chocolate)
Method:
In a large bowl, using a stand mixer or a hand mixer, cream together the butter and the sugars until light and fluffy.
Next, beat in the egg and vanilla, mixing until just incorporated.
In a separate bowl, combine the bread flour, bicarbonate of soda and salt.
Slowly add the flour mixture to the wet mixture and mix until a dough has formed. (If the dough is very dry, you can use your hands to bring the dough together but I didn't find this necessary - perhaps my egg was too large?)
Finally, fold in the chocolate chips.
Chill the dough, covered, for at least two hours or up to 36 hours. Once chilled, remove from the fridge 15 minutes prior to baking. The dough can also be frozen.
Preheat the oven to 350°F/177°C and line a baking tray with greaseproof paper.
Taking 2-3 tablespoon sized portions of dough, roll the dough into balls and arrange spaced out slightly onto a baking tray.
Bake the cookies for 12-14 minutes, or until the tops are lightly browned. 10 minutes will give you a nice doughy inside and 13 will give you a more set, golden cookie. Baked cookies will last in a sealed container for up to three days.
#cookie quest#cq#tried and tested#tried & tested#t&t#recipe#dessert#baking#baker#bake#sweet#cookies#cookie#food#food blog#food blogger#baking blog#bakery#chocolate chip cookies#chocolate chip cookie#chocolate
1 note
·
View note