
Last Seen Blogs

mrbytchez2
They Call Me Mr. Bytchez

relatosinstantaneos
Relatos instantáneos

saycee
saycee

quibbs126
I like random stuff

realpoisxn
I did something bad
Text
How to Automatically Add Tags Based on Conditions
How to Automatically Add Tags Based on Conditions
ServiceNow's auto-tagging feature allows for an expanded suite of features for greater organizational and search capabilities for your organization
Auto-tagging in ServiceNow is a great way to expand search capabilities for users who are looking to more easily find what they are looking for.This could be something like users looking for Problem records with certain attachment types, tagging knowledge articles to help your user community find KB articles quicker, or tagging CI classes or even drilling down further and tagging certain CIs within a class under a specific set of conditions.If you'd like to brush up on your tag basics, head over to this article which goes over the fundamentals of tagging.
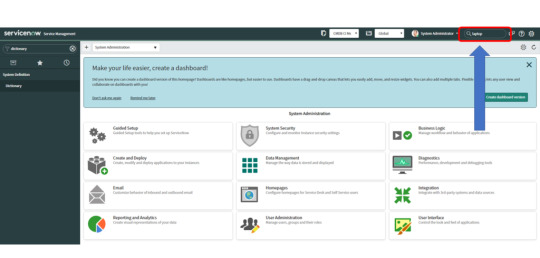
Procedure:Here is an explanation of how to use the auto-tagging feature with a simple example auto-tagging all records within a CI class.First we'll navigate to System Definition > Tags and create a new record. In this example:Name: LaptopOwner: Type: StandardViewable by: EveryoneActive: trueSave your tag record.To proceed to the next step, we will have to add the Conditions for Labels embedded list to the form:Next, create a new record in the Conditions for Labels embedded list by double clicking Insert a new row and then clicking on the magnifying glass > New. Fill out the Label Table form and then submit.Title:
Read the full article
0 notes
Text
The Database Structure: Tables, Records, and Fields
The Database Structure: Tables, Records, and Fields
A table is a group of records used to store application data. A record is comprised of fields that contain individual data and functions
When creating a table, you can create a new table or extend the table off of an existing table to inherit the existing table's fields and functionalities, which creates a parent/child table relationship. One example of this is how the Incident, Problem, Change, and Request table extends off of the Task table to inherit its properties.
To create a new table:
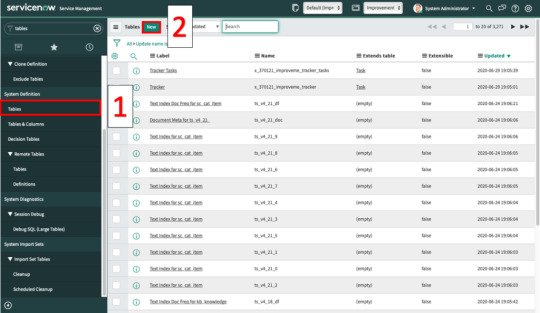
1. Navigate to System Definition > Tables.
2. Click New.
3. Give your table a Label. We'll label this table "Test Table". This will automatically fill in the Name field.
4. To extend off of a table, type in the desired table in the Extends table field. This will transfer the extended table's properties to the new table.
5. Now when we search "Test Table" in the filter navigator, we see the table that we created.
6. To create a Record, click new.
7. The record gets pre-populated with the fields that were inherited by the Task table. Number, Assigned to, Configuration item, Active, Priority, State, Parent, Short description, Description, and Work notes are all fields that have been inherited by the Task table.
8.
Read the full article
0 notes
Text
Creating Templates
Creating Templates
Templates are used to easily pull up a pre-populated set of fields that are used repeatedly when creating records
Selecting a template allows you to populate data on a form automatically.
To Create a Template:
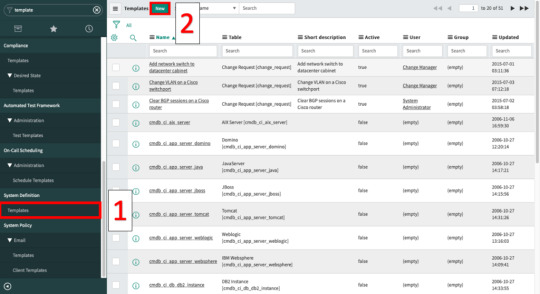
1. Navigate to System Definition > Templates.
2. Click on New.
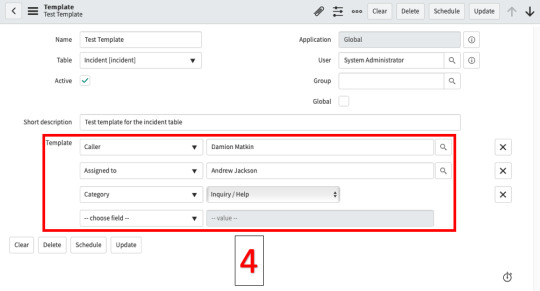
3. Give the template a name and choose a table.
4. Once you choose a table, you will be able to build out your template with the desired fields. For this example, we'll create a template called "Test Template" where we set the caller to Damion Matkin, the record will be assigned to Andrew Jackson, and the category is Inquiry/Help.
Now, every time we use our "Test Template", the fields will auto-populate to the values set in the template.
How To Apply a Template To a Form:
1. Navigate to a form that you would like to apply a template to.
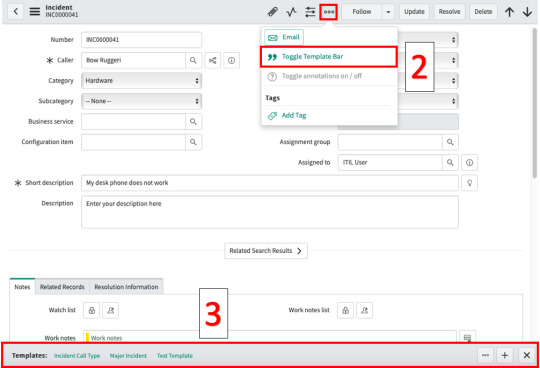
2. Click on the "More Options" button and then click on the "Toggle Template Bar" button.
3. You'll notice the template bar will appear at the bottom of the screen. Choose the template that you would like applied to the form.
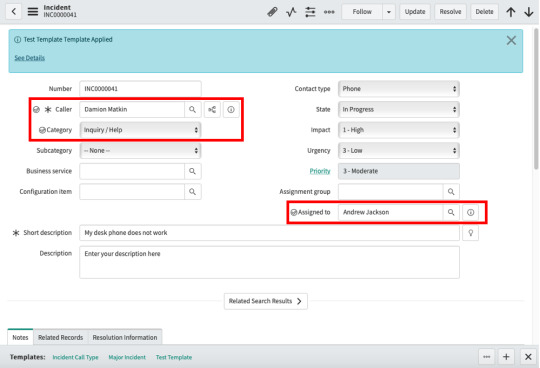
4. We'll use the "Test Template" we created in our previous example and apply it to this incident record. Click on Test Template.

5. Now, the Caller field has been set to Damion Matkin, Assigned to has been set to Andrew Jackson, and Category has been set to Inquiry/Help.
Let us know if there’s anything we missed or you would like us to expand upon in the comments! Don't forget to subscribe!
At the time of this writing, we are on the Madrid release. The information presented in this article may not apply to your instance if you are on a different version of ServiceNow.
Read the full article
0 notes
Text
Configuration Item Tag and Keyword Search

Configuration Item Tag and Keyword Search
Define and enable CI search for related keywords within global text search
Usually, CMDBs are so large and over-stuffed with so many configuration items that users face the challenge of effectively searching for CIs. If a CI exists but is not found, a user may decide to create a new CI which can lead to unnecessary duplication over time. One way to help mitigate the risk of CI duplication is to implement a more robust search functionality.
This article will explain in depth how to configure global search to leverage tags so that your users can easily find what they are looking for. The following examples illustrate how to set up auto-tagging of records and how to leverage tags with global search for records on the cmdb_ci_computer table.
If you'd like to brush up on your tag basics, head over to this article which goes over the fundamentals of tagging.
Configure Search Groups
First, we'll add the table(s) we want our global search to query by defining search groups.
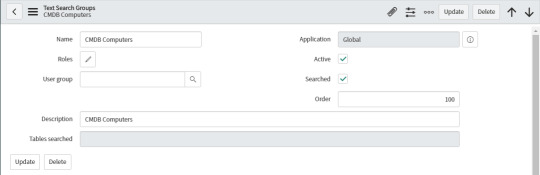
Navigate to System Definition > Search Groups and click New. Give your search group a descriptive name.
In this example:
Name: CMDB Computers
Description: CMDB Computers
Active: true
Searched: true
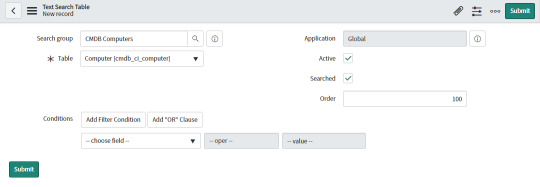
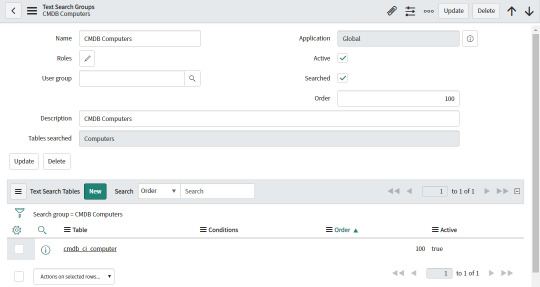
After saving the record, you should see the Text Search Tables related list at the bottom of the screen. Click the New button to create a new Text Search Table record and fill out and submit the form.
Search Group: CMDB Computers
Table: Computer
Active: true
Searched: true
You should have been taken back to the Search Group record, which should now look like this:
The Search Group we just created should now show up on the global search results. If we were to stop here, our search would be limited to exact matches only.
**Note: If you're happy with this functionality and would like to stop here, make sure to re-index your table. To do this, navigate to System Definition > Dictionary and search for the Collection record for your table and click the Generate Text Index related link.

Set up Tag Indexing
Now we are going to text index tags on our table so global search can query our tags.
Staying on the same dictionary collection record, find the Attributes related list and click the New button. Fill in the following and then submit:
Attribute: Text Index Tags
Value: all_shared

We've just told the system to index all shared tags. Keep in mind private tags will not be indexed.
Create a Tag Record
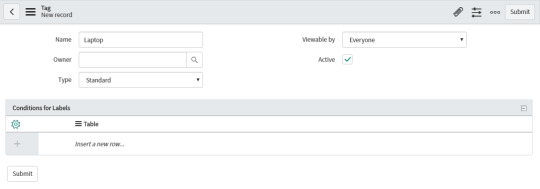
Now it's time to create our tags. Navigate to System Definition > Tags and create a new record.
In this example:
Name: Laptop
Owner:
Type: Standard
Viewable by: Everyone
Active: true
Save your tag record.
To proceed to the next step, we will have to add the Conditions for Labels embedded list to the form:
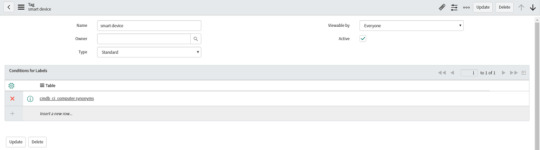
Create a new record in the Conditions for Labels embedded list by double clicking Insert a new row and then clicking on the magnifying glass > New. Fill out the Label Table form and then submit.
In this example:
Title: cmdb_ci_computer synonyms
Table: Computer
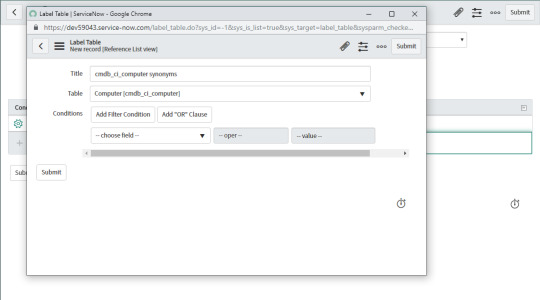
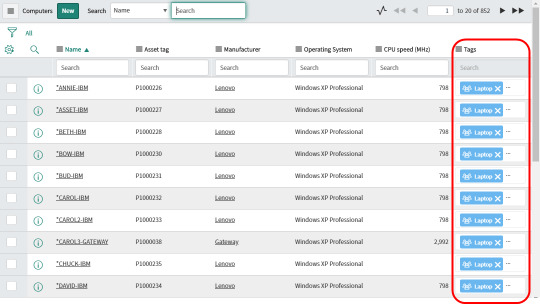
What we've done here is we've told the system to apply this tag automatically to the records in the cmdb_ci_computer table. Since I did not specify any conditions, it will apply the tag to all records in the cmdb_ci_computer table. You can verify your tags were successfully applied from the Label Entries related list.
Let's go ahead and re-index the table to ensure our tags are captured in the global search results.
**Note: To get to the dictionary entry, navigate to System Definition > Dictionary and search for the Collection record for your table and click the Generate Text Index related link.
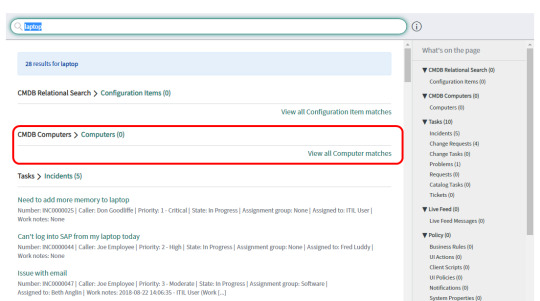
Finally, try searching for your tag keyword in the global search bar.
You should now see the query results returning records where the search term matched your tag.
Keyword Grouping in Tags
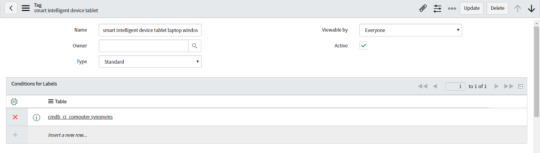
A handy feature that comes with implementing tags this way is that you can add multiple keywords to each tag. You can create a tag and stuff as many keywords in the Name field as you want. You may have to increase the max length if you want to add more than 40 characters. (Just be aware of any performance hits your instance may take because of extra long tags).
For example, I created a tag with the name "smart intelligent device tablet laptop windows 10 2000 xp vista". Now, each one of those terms is searchable through the global search as long as that tag is associated to a record.
Tag Search Behavior
OK, onto the exciting stuff! The global text search leverages the Zing search engine to make sense of search terms and return query results. Let's take a look at how the Zing search engine handles a few different scenarios when it comes to tags.
The first batch of tests I performed was on a tag I created that had two keywords in it: smart device.
I performed a few different scenarios which you'll see below by searching for different combinations in the global search. The results are only those records which were returned in the CMDB Computer search group which we defined earlier in this article.
Scenario 1:
Global search term: smart device
Result: 850 returned records
Explanation: Searching for the full tag, even with a space between the two words, matches all 811 records with "smart device" tags.
Scenario 2:
Global search term: smartdevice
Result: 0 returned records
Explanation: Zing was not able to match the search term with the "smart device" tag. This tells me Zing delimits search terms, at least by spaces.
Scenario 3:
Global search term: smart,device
Result: 850 returned records
Explanation: Zing must also delimit by commas.
Scenario 4:
Global search term: device smart
Result: 850 returned records
Explanation: Further evidence that terms are parsed and delimited as searches can contain terms in any order and will return records with matching tags as long as all terms are found within that tag.
Scenario 5:
Global search term: smart
Result: 850 returned records
Explanation: It makes sense that searching for a single term would still return all records if Zing delimits the separate terms in the tag.
Scenario 6:
Global search term: device
Result: 850 returned records
Explanation: Same as scenario 4.
Scenario 7:
Global search term: smar
Result: 0 returned records
Explanation: Zing does not handle misspellings.
Scenario 8:
Global search term: windows device
Result: 364 returned records
Explanation: Records with the smart device tag were not successfully returned. However, there were still results because windows and/or device were terms found in the actual record data. This, along with scenario 4, leads me to believe that for tags, the system must match all search terms to terms found within tags. If it does not find even one search term in the tags for a given record, it will not return it in the results set. I performed an additional test for this which I will include here where I created another tag called windows and re-indexed the table. After doing this, the search term windows device returned all 850 records. So my conclusion based on this is that the search terms are delimited and the system attempts to match each term to a term found in all tags on a given record.
For actual record data (ie. field values on the form), I noticed a trend where only one of the search terms needed to match with the record data. For example, the system could match the search term windows within the record data, but not device, and still return that record in its result set.
Let us know if there’s anything we missed or you would like us to expand upon in the comments! Don't forget to subscribe!
At the time of this writing, we are on the Madrid release. The information presented in this article may not apply to your instance if you are on a different version of ServiceNow.
Read the full article
0 notes
Text
Tags
Tags
Tags are used to group and categorize individual records
There are 3 methods to create a tag.
The first way to create a tag is by adding a tag through the list of tags table.
1. Navigate to Self-Service > My Tags or System Definition > Tags.
2. Click on the "New" button.
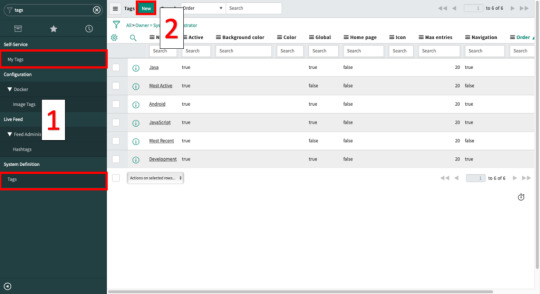
3. Give the tag a name and assign it to an owner. Click Submit when done.
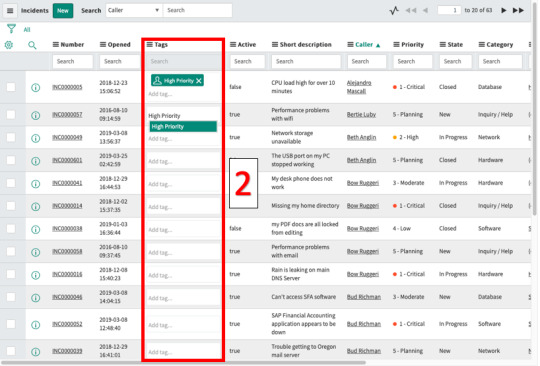
The second way to create a tag is by adding a tag through any list.
1. Navigate to a list of records that you would like to add a tag to.
**Note: If you do not see a "Tags" column, right click on the column header, click on the left cog to personalize your list columns.
2. Add a tag by typing it into the "Tags" field of the record you want to add a tag to.
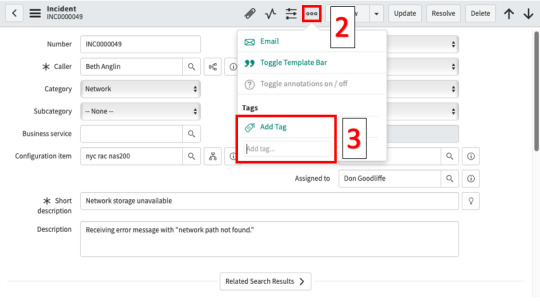
The third way to create a tag is by adding it through any form.
1. Open a form that you would like to add a tag to.
2. Click on the "More options" icon.
3. Click on "Add Tag" and type in the tag.
How To Edit Tags:
1. To edit a tag, navigate to a list of records that have tags assigned to them.
2. Click on the icon to the left of the tag.
3. Here you can edit the name of the tag as well as change who can view the tag. Click Save.
**Note: If you edit a tag, all identical tags will be changed along with it. Additionally, duplicate tags with the same name are prevented by the system.

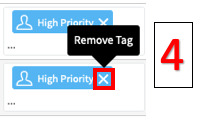
4. To delete a tag, click on the "X" to the right of the tag.
Merging tags allows you to easily reassign or combine tags.
How To Merge Tags:
1. Navigate to Self-Service > My Tags or System Definition > Tags.
2. Select the check box of all tags you would like to merge.
3. Click Actions on selected rows... > Merge Tags.
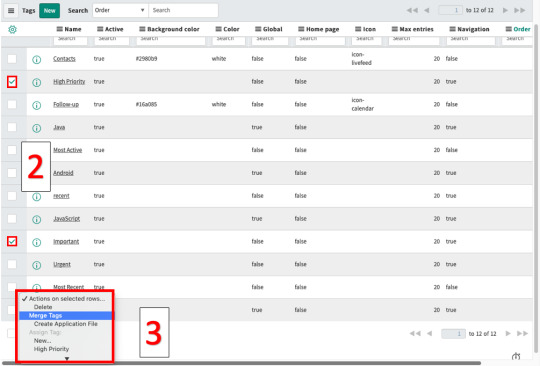
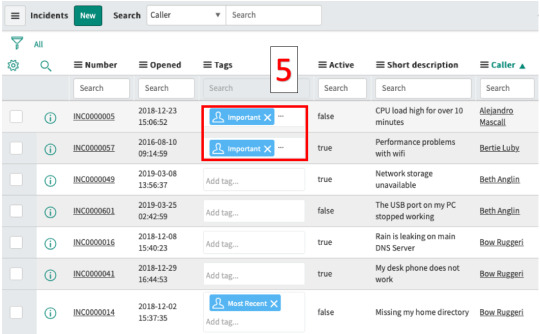
4. Give the merged tags a name. For this example, we'll merge the "High Priority" tag with the "Important" tag. Now all "High Priority" tags will be changed to "Important". click Ok.

5. Now you'll notice that the "High Priority" tags that we used in our previous example have been converted to "Important" tags.
Let us know if there’s anything we missed or you would like us to expand upon in the comments! Don't forget to subscribe!
At the time of this writing, we are on the Madrid release. The information presented in this article may not apply to your instance if you are on a different version of ServiceNow.
Read the full article
0 notes
Text
Sum Values From Related Tables Calculator
Sum Values From Related Tables Calculator
Have the system automatically calculate values in a related or embedded list
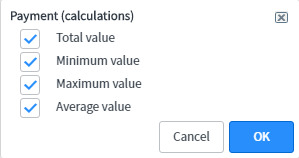
It's very simple to have an embedded or related list perform certain calculations. Out-of-the-box, there are four different calculations you can have the system perform - Total Value, Minimum Value, Maximum Value, and Average Value, and they do exactly what they sound like.
Total Value (Sum): Adds and totals the value of all records for a given field. Not available for strings, date and date/time field types.
Minimum Value (Min): Displays the lowest value for a given field.
Maximum Value (Max): Displays the highest value for a given field.
Average Value (Avg): Calculates the average value for a given field. Not available for strings, date and date/time field types.
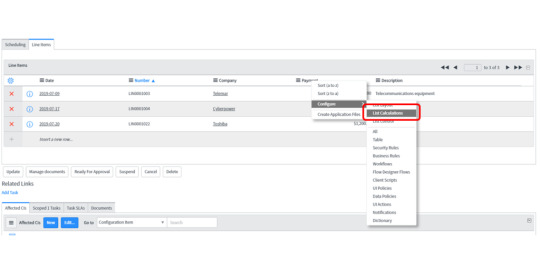
To add list calculations, right click on the column you want the calculation to be performed on:
Select which calculations you want to be performed and click OK:
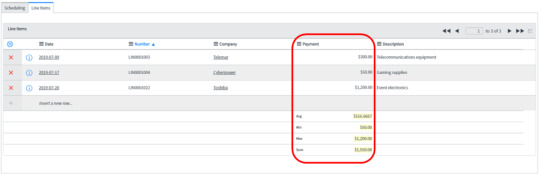
You should now see the calculations you selected on your list:
Let us know if there’s anything we missed or you would like us to expand upon in the comments! Don't forget to subscribe!
At the time of this writing, we are on the London release. The information presented in this article may not apply to your instance if you are on a different version of ServiceNow.
Read the full article
0 notes
Text
Toggle Show/Hide Empty Variables
Toggle Show/Hide Empty Variables
Add a checkbox to your form to show or hide empty variables in the variable editor
If you're running into issues with the variable editor taking up too much real estate on your form but need all variables in your variable editor to be visible to your users (even if empty), there are a couple of ways to accomplish this. Read this article if you're simply looking to hide all empty variables unconditionally.
Put the variable editor in its own form section
Show/hide empty variables with code
Put the Variable Editor in its Own Form Section
This is the easiest and recommended way to save real estate on your form. Simply putting the variable editor in its own form section will allow users to see all variables while giving your users the convenience of not having to scroll through an extra long form.
Navigate to the form layout you want to configure > Form view and section > Section > New

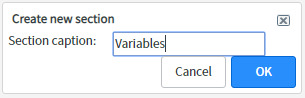
Name your new form section Variables and click OK.
Add the Variable Editor from the left side to the right slide of the slushbucket.
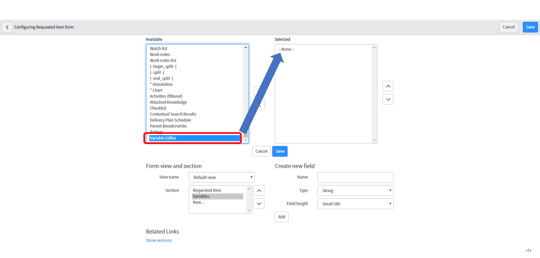
**Note: Make sure the Variable Editor is not in any other sections before saving. If it is, remove it before saving the form. When I had the variable editor on two form sections and saved, I wasn't able to pull up the context menu by right clicking on the column header. Try this if you're running into this issue as well.
Save
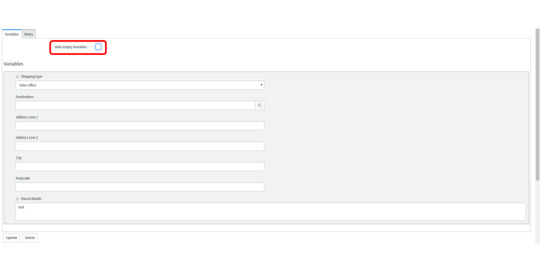
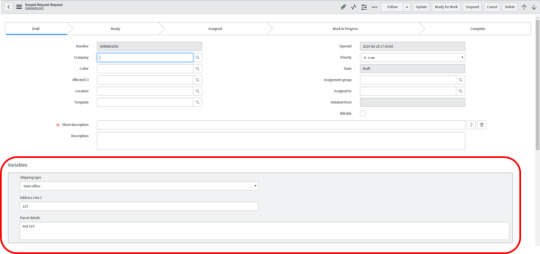
Your form should now look like this.

**Note: If your form does not have tabbed form sections, it may be because you only have one form section on your form. If that doesn't work, check that you have the tabbed forms checkbox checked in your system settings.
Show/Hide Empty Variables with Code
If you want to take it a step further, you can add a checkbox which toggles any empty variables in the variable editor. You can even combine putting the variable editor in its own form section and hiding empty variables with code if you want.
First create a field on the form called "Hide Empty Variables"
Create the following business rule:
"Hide Empty Variables" Business Rule
Name: Hide Empty Variables
Table: Task
When: display
Script:
(function executeRule(current, previous /*null when async*/) {
//Initialize the scratchpad variable
g_scratchpad.emptyVars = '';
//Check to see if a variable pool exists
var count = 0;
for(vars in current.variable_pool){
count++;
break;
}
//If a variable pool exists then collect empty variable names
if(count > 0){
var emptyVars = ;
var table = current.getTableName();
//Query for the empty variables for this record
//Catalog item and task variables pull from 'sc_item_option_mtom' table
if(table == 'sc_req_item' || table == 'sc_task'){
var itemVars = new GlideRecord('sc_item_option_mtom');
if(table == 'sc_req_item'){
itemVars.addQuery('request_item', current.sys_id);
}
if(table == 'sc_task'){
itemVars.addQuery('request_item', current.request_item.sys_id);
}
itemVars.addNullQuery('sc_item_option.value');
//Exclude Label and Container variables
itemVars.addQuery('sc_item_option.item_option_new.type', '!=', 11);
itemVars.addQuery('sc_item_option.item_option_new.type', '!=', 19);
itemVars.addQuery('sc_item_option.item_option_new.type', '!=', 20);
//itemVars.addQuery('cat_item', '!=', "New Move Request");
itemVars.query();
while(itemVars.next()){
//Add variable names to the emptyVars array
emptyVars.push(itemVars.sc_item_option.item_option_new.name.toString());
}
}
else{
//All other variables pulled from 'question_answer' table
var producerVars = new GlideRecord('question_answer');
producerVars.addQuery('table_sys_id', current.sys_id);
producerVars.addNullQuery('value');
//Exclude Label and Container variables
producerVars.addQuery('question.type', '!=', 11);
producerVars.addQuery('question.type', '!=', 19);
producerVars.addQuery('question.type', '!=', 20);
producerVars.query();
while(producerVars.next()){
//Add variable names to the emptyVars array
emptyVars.push(producerVars.question.name.toString());
}
}
//Store the result in the scratchpad
g_scratchpad.emptyVars = emptyVars.join();
}
})(current, previous);
3. Create the following Client Script:
"Toggle Show/Hide Empty Variables" Client Script
Name: Toggle Show/Hide Empty Variables
Table: Requested Item (sc_req_item)
Type: onChange
Field name: Hide Empty Variables
Script:
function onChange(control, oldValue, newValue, isLoading, isTemplate) {
if (isLoading) {
return;
}
// Check for undefined value
if (typeof g_scratchpad.emptyVars == 'undefined') return;
var emptyVars;
// Hide all empty variables using the scratchpad object passed from 'Hide Empty Variables' business rule
if(g_scratchpad.emptyVars != '')
emptyVars = g_scratchpad.emptyVars.split(',');
if (typeof emptyVars != 'undefined') {
if (newValue == 'true') {
for (var i = 0; i g_form.setDisplay('variables.' + emptyVars, false);
}
} else {
for (var j = 0; j g_form.setDisplay('variables.' + emptyVars,true);
}
}
}
4. Test out the functionality by checking and unchecking the "Hide Empty Variables" checkbox. When checked, it should hide all variables without values.
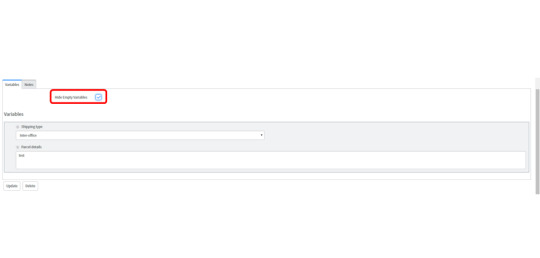
When unchecked, it should show all variables again including empty ones.
Let us know if there’s anything we missed or you would like us to expand upon in the comments!
At the time of this writing, we are on the London release. The information presented in this article may not apply to your instance if you are on a different version of ServiceNow.
Read the full article
0 notes
Text
How Do I Make My Forms Tabbed?
How Do I Make My Forms Tabbed?
Tabbing forms allows for a more condensed layout
For this example we'll create tabs for one of the items:
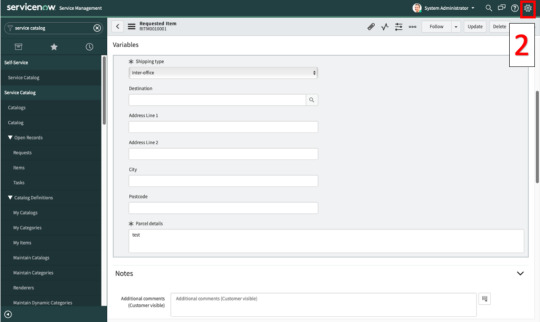
1. Navigate to the form you want your sections to be tabbed on.
2. Click on the cog in the top right corner.
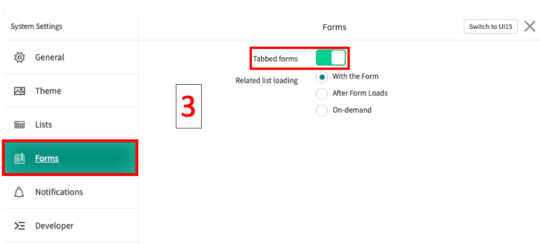
3. Click on the Forms section and turn on "Tabbed Forms".
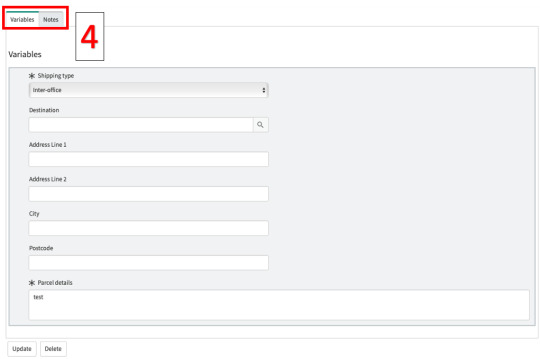
4. Now your form sections should be tabbed.
Let us know if there’s anything we missed or you would like us to expand upon in the comments! Don't forget to subscribe!
At the time of this writing, we are on the Madrid release. The information presented in this article may not apply to your instance if you are on a different version of ServiceNow.
Read the full article
0 notes
Text
Breadcrumbs
Breadcrumbs
Breadcrumbs are a hierarchy of filters that can be created, edited, and deleted
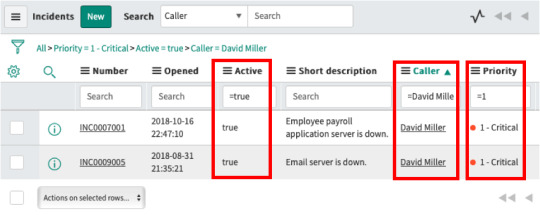
Breadcrumbs are displayed in this format:
All > (Filter 1) > (Filter 2) > ...
In this example, our breadcrumbs are:
All > Priority = 1 - Critical > Active = true > Caller = David Miller
This will sort out only records that are active, priority is critical, and caller is David Miller.
How to delete a single breadcrumb:
1. To remove a single breadcrumb condition, click on the ">" to the left of the breadcrumb conditions you want to delete.
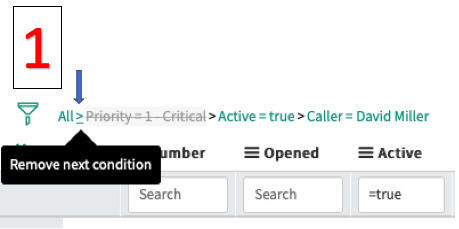
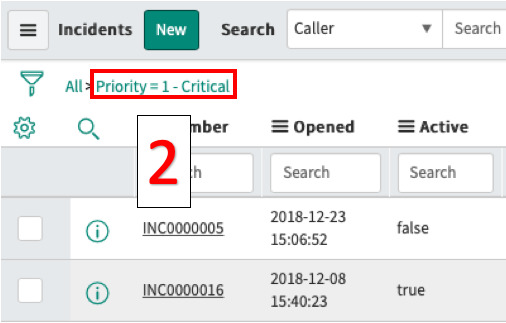
2. For this example, we removed the "Priority = 1 - Critical" breadcrumb condition. Records with all priority are now displayed.
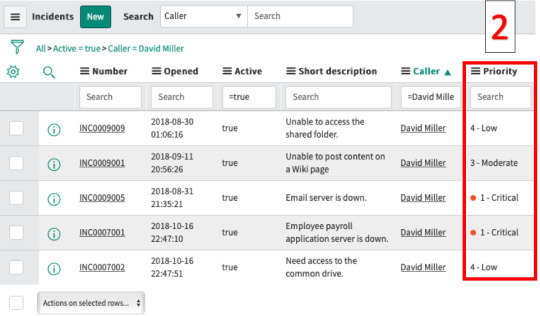
How to delete multiple breadcrumbs:
1. To delete multiple breadcrumb conditions at once, click directly on a breadcrumb conditions and all subsequent breadcrumb conditions to the right of it will be deleted. For this example, we'll click on the "Priority = 1 - Critical" breadcrumb condition and all breadcrumb conditions to the right of it will be deleted.
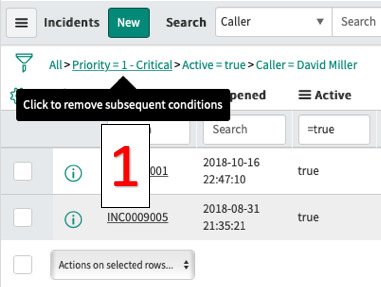
2. We see that all breadcrumb conditions after the "Priority = 1 - Critical" breadcrumb condition has been removed. We no longer see the breadcrumb conditions "Active = true" and "Caller = David Miller".
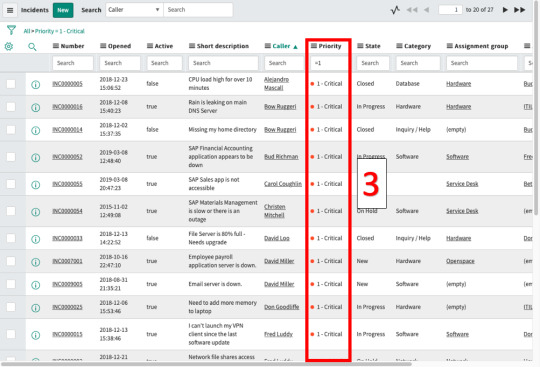
3. Now, our list only shows all records with the "Priority = 1 - Critical" status.
Let us know if there’s anything we missed or you would like us to expand upon in the comments! Don't forget to subscribe!
At the time of this writing, we are on the London release. The information presented in this article may not apply to your instance if you are on a different version of ServiceNow.
Read the full article
0 notes
Text
How To Use Wildcard Searches and Where You Can Use Them
How To Use Wildcard Searches and When To Use Them
Use wildcard searches to find specific information and filter searches
1. Make sure that your instance has wildcard searches activated. To activate your wildcard searches, navigate to Contextual Search > Search Contexts > Knowledge Base Search.
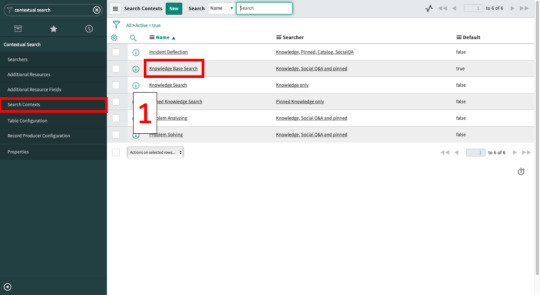
2. Check the "Enable wildcard searches" box to activate wildcard searches. Click "Update" when done.

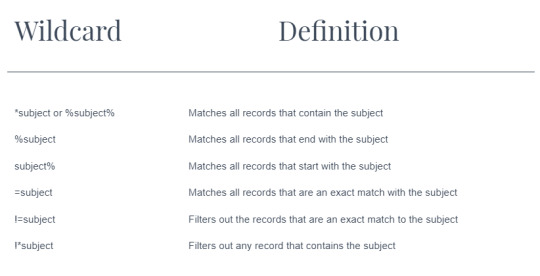
Wildcard
Definition
*subject or %subject%
%subject
subject%
=subject
!=subject
!*subject
Matches all records that contain the subject
Matches all records that end with the subject
Matches all records that start with the subject
Matches all records that are an exact match with the subject
Filters out the records that are an exact match to the subject
Filters out any record that contains the subject
When to use wildcard searches
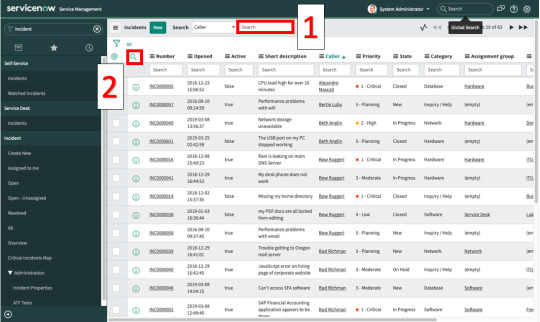
1. Search bar
2. Column search
Let us know if there’s anything we missed or you would like us to expand upon in the comments!
At the time of this writing, we are on the London release. The information presented in this article may not apply to your instance if you are on a different version of ServiceNow.
Read the full article
0 notes
Text
Changing Delivery Time and Delivery Date

Changing Delivery Time and Delivery Date
How to use the Workflow's Expected time, Relative duration, Schedule and Timezone to manipulate the Delivery Date and Time
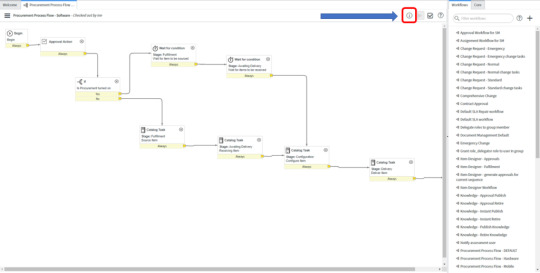
Modifying the Delivery Time on an order form or the Delivery Date on the checkout page are surprisingly difficult for something that should be simple. The fix actually is very simple - both are controlled by the associated workflow's Expected Time.
In the Workflow Editor, checkout the workflow you want to edit. Next, click on the "i" icon on the upper right of of the screen.
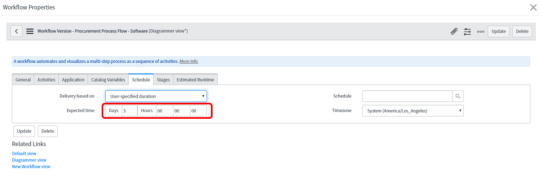
Set the Expected time on the Schedule tab:
Test out your changes by going back to the Service Catalog and bringing up the item with the Delivery Date/Time you were looking to change. You should notice the Delivery Time on the order form and the Delivery Date on the proceeding checkout screen have changed.

In addition to the Expected time, the Delivery based on, Schedule and Timezone fields impact the Delivery Date/Time as well. These can also be found on the Workflow Properties Schedule tab.
Delivery based on
User-specified duration - Allows you to set the Expected time field
Relative duration - Allows you to specify the Relative duration field, which has a predefined selection of relative durations to choose from. You can also create your own Relative duration on the cmn_relative_duration table.
Schedule - Schedules run the duration from the Expected time or Relative duration only within the times allowed by the Schedule. For example, if your Schedule is "8-5 weekdays", the duration timer will only run from 8am to 5pm in the timezone specified. The duration timer will freeze while outside of the schedule.
Timezone - Works with the schedule to run or freeze the duration timer.
Let us know if there’s anything we missed or you would like us to expand upon in the comments! Don't forget to subscribe!
At the time of this writing, we are on the London release. The information presented in this article may not apply to your instance if you are on a different version of ServiceNow.
Read the full article
0 notes
Text
Adding Variables from the Variable Editor into the Description Field
Adding Variables from the Variable Editor into the Description Field
A multi-line text field like the Description field can be leveraged to manipulate variable information
Copying variables into the Description field provides a way to search on and parse through information from catalog item or record producer variables. The reasons you might want this sort of functionality:
Search for variable information from the list view
Parse and manipulate variable information
Save screen real-estate by hiding the variable editor
Variable information does not necessarily need to be added to a multi-line text field either. You can easily parse values out and use them to populate other field types as well, or to store as variables in a script. These are not covered in scope of this article, however, let us know in the comments if this is something you would like to see!
**Note: The following implementation only converts choice and reference values to their display values. Let us know if you would like a more robust version of this and which field types you would like covered!
First, create the below Business Rule on the Task table. If you would like to restrict this Business Rule to only run on a specific table, add a condition where Task type is .
"Copy Variables" Business Rule
Name: Copy Variables
Table: Task
When: display
Script:
(function executeRule(current, previous /*null when async*/) {
//Initialize the scratchpad variable
g_scratchpad.varJSON = '';
var type, name, value, reference, val, item;
//Check to see if a variable pool exists
var count = 0;
for(vars in current.variable_pool){
count++;
break;
}
//If a variable pool exists then collect variable names and values
if(count > 0){
var varJSON = {};
var table = current.getTableName();
//Catalog item and task variables pull from 'sc_item_option_mtom' table
if(table == 'sc_req_item' || table == 'sc_task'){
var itemVars = new GlideRecord('sc_item_option_mtom');
if(table == 'sc_req_item'){
itemVars.addQuery('request_item', current.sys_id);
}
if(table == 'sc_task'){
itemVars.addQuery('request_item', current.request_item.sys_id);
}
//Exclude Label and Container variables
itemVars.addQuery('sc_item_option.item_option_new.type', '!=', 11);
itemVars.addQuery('sc_item_option.item_option_new.type', '!=', 19);
itemVars.addQuery('sc_item_option.item_option_new.type', '!=', 20);
// Set Order
itemVars.orderBy('sc_item_option.order');
itemVars.query();
while(itemVars.next()){
//Add variable names and values to the varJSON object
type = itemVars.sc_item_option.item_option_new.type.toString();
name = itemVars.sc_item_option.item_option_new.question_text.toString();
val = itemVars.sc_item_option.value.toString();
// Reference
if (type == 8) {
reference = itemVars.sc_item_option.item_option_new.reference.toString();
value = getReferenceDisplayValue(reference,val);
}
// Select Box
else if (type == 5) {
item = itemVars.sc_item_option.item_option_new.sys_id;
value = getChoiceDisplayValue(item, val);
}
// Default
else {
value = val;
}
// Replace blank values with
if (value == '') {
value = '';
}
varJSON = value;
}
}
//All other variables pulled from 'question_answer' table
else{
var producerVars = new GlideRecord('question_answer');
producerVars.addQuery('table_sys_id', current.sys_id);
//Exclude Label and Container variables
producerVars.addQuery('question.type', '!=', 11);
producerVars.addQuery('question.type', '!=', 19);
producerVars.addQuery('question.type', '!=', 20);
// Set Order
producerVars.orderBy('order');
producerVars.query();
while(producerVars.next()){
//Add variable names and values to the varJSON object
type = producerVars.question.type.toString();
name = producerVars.question.question_text.toString();
val = producerVars.value.toString();
// Reference
if (type == 8) {
reference = producerVars.question.reference.toString();
value = getReferenceDisplayValue(reference,val);
}
// Select Box
else if (type == 5) {
item = producerVars.question.sys_id;
value = getChoiceDisplayValue(item,val);
}
// Default
else {
value = val;
}
// Replace blank values with
if (value == '') {
value = '';
}
varJSON = value;
}
}
// Convert varJSON into a string and store the result in the scratchpad
g_scratchpad.varJSON = JSON.stringify(varJSON);
}
// Function to convert reference value to display value
function getReferenceDisplayValue(table,value) {
var displayValue1 = '';
var gr1 = new GlideRecord(table);
gr1.addQuery('sys_id',value);
gr1.query();
if (gr1.next()) {
displayValue1 = gr1.getDisplayValue();
}
return displayValue1;
}
// Function to convert choice value to display value
function getChoiceDisplayValue(item_option,value) {
var displayValue2 = '';
var gr2 = new GlideRecord('question_choice');
gr2.addEncodedQuery('question=' + item_option + '^value=' + value);
gr2.query();
if (gr2.next()) {
displayValue2 = gr2.text + '';
}
return displayValue2;
}
})(current, previous);
Next, create the below Client Script on the Task table.
"Copy Variables" Client Script
Name: Copy Variables
Table: Task
Type: onLoad
Script:
function onLoad() {
// Check for undefined value
if (typeof g_scratchpad.varJSON == 'undefined') {
return;
}
// Copy variable labels and values from g_scratchpad.varJSON from Business Rule "Copy Variables"
if(g_scratchpad.varJSON != ''){
var varJSON = JSON.parse(g_scratchpad.varJSON);
var str = '';
for (var key in varJSON) {
if (varJSON.hasOwnProperty(key)) {
str += key + ": " + varJSON + "nn";
}
}
// Copies the variable labels and values to the Description field
g_form.setValue('description',str);
}
}
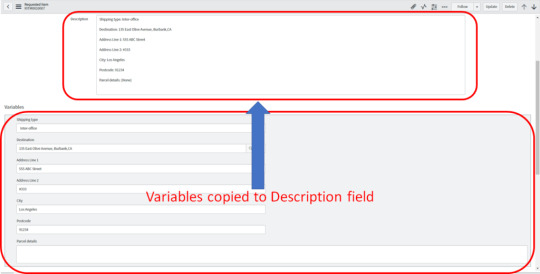
The end result should look like this:
Let us know if there’s anything we missed or you would like us to expand upon in the comments!
At the time of this writing, we are on the London release. The information presented in this article may not apply to your instance if you are on a different version of ServiceNow.
Read the full article
0 notes
Text
How To Restore Deleted Records

How To Restore Deleted Records
If you accidentally delete a record, you can restore the record to its original state
**Note: In order for a deleted record to show up in the deleted records table, the record that was deleted must be from an audited table
1. Navigate to System Definition > Deleted Records.
2. Click on the boxes of the records that you wish to restore.
3. Click on the "Actions on selected rows..." dropdown menu.

4. Click on "Undelete Records" and your record will be recovered!
Let us know if there’s anything we missed or you would like us to expand upon in the comments!
At the time of this writing, we are on the London release. The information presented in this article may not apply to your instance if you are on a different version of ServiceNow.
Read the full article
0 notes
Text
Searching for Text in the Activity Log
Searching for Text in the Activity Log
This article covers how to search the list view for a specific keyword in the activity log
The activity log tracks the history of changes made to a particular record, including changes to information within the record as well as any email notifications that get sent pertaining to that record. Since activity logs contain loads of valuable information, it quickly becomes a necessity to be able to search the activity logs in the list view. This article will show you how to add and search for text in the Journal fields. At the present moment, I don't know if there is a way to enable search for all text found in activity logs.
We've also added a quick tidbit about searching for text in the Variable Editor!
Searching for Text in the Activity Log
Searching for Text in the Variable Editor
Searching for Text in the Activity Log
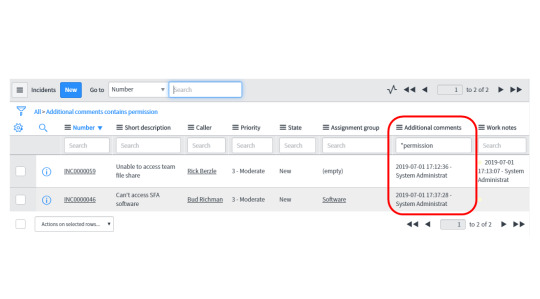
Add the journal fields you want to add search capabilities for to the list view and click Save:
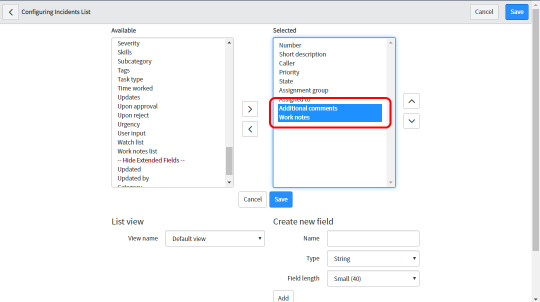
You should see the journal fields as columns on the list view:
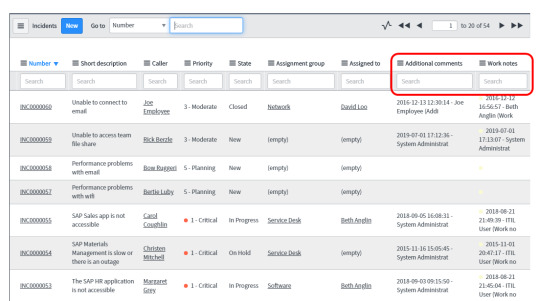
Use the column search since journal fields don't appear in the search dropdown.
Searching for Text in the Variable Editor
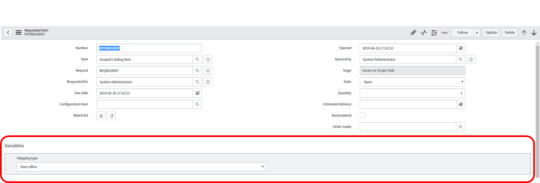
The variable editor is a formatter and thus is not configured for search capabilities out-of-box. Configuring search for the variable editor can be achieved by adding the variable information to a multi-line text field and adding the multi-line text field to the list layout.
Let us know if there’s anything we missed or you would like us to expand upon in the comments!
At the time of this writing, we are on the London release. The information presented in this article may not apply to your instance if you are on a different version of ServiceNow.
Read the full article
0 notes
Text
Hiding Empty Variables in the Variable Editor (Scoped)
Hiding Empty Variables in the Variable Editor (Scoped)
In this article we will dive into scripting for the variable editor on both the client and server in a scoped implementation
Working with the variable editor in ServiceNow can be challenging. There aren't many ways to manipulate the variable editor without having to code. Therefore the learning curve to implement logic around variables can be steep. Luckily, there are ways to achieve most common business requirements via script which we will discuss. In this article we will discuss how to hide variables on a form's variable editor.
If you are looking to implement this in the global scope, check out this article instead.
Hide Empty Variables in the Variable Editor (Scoped)
If you are having difficulty hiding empty variables in a scoped implementation, try the following.
Create the Business Rule below in the global scope. Replace the in red below with the table you want to hide the variables on.
"Hide Empty Variables" Business Rule (Scoped Implementation)
Name: Hide Empty Variables
Application: Global
Table: Task
When: display
Filter Conditions: Task type is
Script:
//Initialize the scratchpad variable
g_scratchpad.emptyVars = '';
//Check to see if a variable pool exists
var count = 0;
for(vars in current.variable_pool){
count++;
break;
}
//If a variable pool exists then collect empty variable names
if(count > 0){
var emptyVars = ;
var table = current.getTableName();
//Query for the empty variables for this record
//Catalog item and task variables pull from 'sc_item_option_mtom' table
if(table == 'sc_req_item' || table == 'sc_task'){
var itemVars = new GlideRecord('sc_item_option_mtom');
if(table == 'sc_req_item'){
itemVars.addQuery('request_item', current.sys_id);
}
if(table == 'sc_task'){
itemVars.addQuery('request_item', current.request_item.sys_id);
}
itemVars.addNullQuery('sc_item_option.value');
//Exclude Label and Container variables
itemVars.addQuery('sc_item_option.item_option_new.type', '!=', 11);
itemVars.addQuery('sc_item_option.item_option_new.type', '!=', 19);
itemVars.addQuery('sc_item_option.item_option_new.type', '!=', 20);
//itemVars.addQuery('cat_item', '!=', "New Move Request");
itemVars.query();
while(itemVars.next()){
//Add variable names to the emptyVars array
emptyVars.push(itemVars.sc_item_option.item_option_new.name.toString());
}
}
else{
//All other variables pulled from 'question_answer' table
var producerVars = new GlideRecord('question_answer');
producerVars.addQuery('table_sys_id', current.sys_id);
producerVars.addNullQuery('value');
//Exclude Label and Container variables
producerVars.addQuery('question.type', '!=', 11);
producerVars.addQuery('question.type', '!=', 19);
producerVars.addQuery('question.type', '!=', 20);
producerVars.query();
while(producerVars.next()){
//Add variable names to the emptyVars array
emptyVars.push(producerVars.question.name.toString());
}
}
//Store the result in the scratchpad
g_scratchpad.emptyVars = emptyVars.join();
}
Next, add a UI Policy in the global scope. Once again make sure you replace the in red with the table you are hiding the variables on.
"Hide Empty Variables" UI Policy (Scoped Implementation)
Table: Task
Application: Global
Short description: Hide Empty Variables
Conditions: Task type is
Global: True
onLoad: True
Inherit: True
Run Scripts: True
Execute if true:
function onCondition() {
// Check for undefined value
if (typeof g_scratchpad.emptyVars == 'undefined') return;
// Hide all empty variables using the scratchpad object passed from 'Hide Empty Variables' business rule
if(g_scratchpad.emptyVars != ''){
var emptyVars = g_scratchpad.emptyVars.split(',');
for(var i = 0; i g_form.setDisplay('variables.' + emptyVars, false);
}
}
}
Let us know if there’s anything we missed or you would like us to expand upon in the comments!
At the time of this writing, we are on the London release. The information presented in this article may not apply to your instance if you are on a different version of ServiceNow.
Read the full article
0 notes
Text
Hiding Empty Variables in the Variable Editor
Hiding Empty Variables in the Variable Editor
In this article we will dive into scripting for the variable editor on both the client and server
Working with the variable editor in ServiceNow can be challenging. There aren't many ways to manipulate the variable editor without having to code. Therefore the learning curve to implement logic around variables can be steep. Luckily, there are ways to achieve most common business requirements via script which we will discuss. In this article we will discuss how to hide variables on a form's variable editor via code. Or, if you're looking to give your users the ability to toggle empty variable visibility on and off, check out this article.If you are looking to implement this within a scoped application, read this article instead.
Hide Empty Variables in the Variable Editor
Much of the time, empty variables don't provide any value to your users while taking up valuable real estate in the variable editor. Hiding empty variables in the variable editor is simple. You should be able to create the below Business Rule and Client Script and paste in the code without having to make any modifications. I can't take credit for this implementation. It was created by Jacob Kimball awhile back and discussed on servicenowguru.First, create the following Business Rule on your table. Make sure it triggers on "Display".
"Hide Empty Variables" Business Rule
Name: Hide Empty Variables
Table: Task
When: displayScript:
(function executeRule(current, previous /*null when async*/) {
//Initialize the scratchpad variable
g_scratchpad.emptyVars = '';
//Check to see if a variable pool exists
var count = 0;
for(vars in current.variable_pool){
count++;
break;
}
//If a variable pool exists then collect empty variable names
if(count > 0){
var emptyVars = ;
var table = current.getTableName();
//Query for the empty variables for this record
//Catalog item and task variables pull from 'sc_item_option_mtom' table
if(table == 'sc_req_item' || table == 'sc_task'){
var itemVars = new GlideRecord('sc_item_option_mtom');
if(table == 'sc_req_item'){
itemVars.addQuery('request_item', current.sys_id);
}
if(table == 'sc_task'){
itemVars.addQuery('request_item', current.request_item.sys_id);
}
itemVars.addNullQuery('sc_item_option.value');
//Exclude Label and Container variables
itemVars.addQuery('sc_item_option.item_option_new.type', '!=', 11);
itemVars.addQuery('sc_item_option.item_option_new.type', '!=', 19);
itemVars.addQuery('sc_item_option.item_option_new.type', '!=', 20);
//itemVars.addQuery('cat_item', '!=', "New Move Request");
itemVars.query();
while(itemVars.next()){
//Add variable names to the emptyVars array
emptyVars.push(itemVars.sc_item_option.item_option_new.name.toString());
}
}
else{
//All other variables pulled from 'question_answer' table
var producerVars = new GlideRecord('question_answer');
producerVars.addQuery('table_sys_id', current.sys_id);
producerVars.addNullQuery('value');
//Exclude Label and Container variables
producerVars.addQuery('question.type', '!=', 11);
producerVars.addQuery('question.type', '!=', 19);
producerVars.addQuery('question.type', '!=', 20);
producerVars.query();
while(producerVars.next()){
//Add variable names to the emptyVars array
emptyVars.push(producerVars.question.name.toString());
}
}
//Store the result in the scratchpad
g_scratchpad.emptyVars = emptyVars.join();
}
})(current, previous);
Next, create the following Client Script on the same table.
"Hide Empty Variables" Client Script
Name: Hide Empty Variables
Table: Task
Type: onLoad
Inherited: TrueScript:
function onLoad() {
// Check for undefined value
if (typeof g_scratchpad.emptyVars == 'undefined') return;
// Hide all empty variables using the scratchpad object passed from 'Hide Empty Variables' business rule
if(g_scratchpad.emptyVars != ''){
var emptyVars = g_scratchpad.emptyVars.split(',');
for (var i = 0; i g_form.setDisplay('variables.' + emptyVars, false);
}
}
}
Let us know if there’s anything we missed or you would like us to expand upon in the comments!At the time of this writing, we are on the London release. The information presented in this article may not apply to your instance if you are on a different version of ServiceNow.
Read the full article
0 notes
Text
User Administration Guide
User Administration Guide
A comprehensive user administration guide on how to create users, give users roles, and add users to groups
Creating Users:
Adding users allows others to login to your instance and use it as needed.
1. Navigate to User Administration > Users.
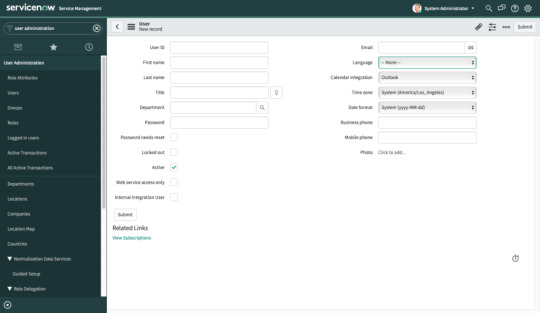
2. Create New.
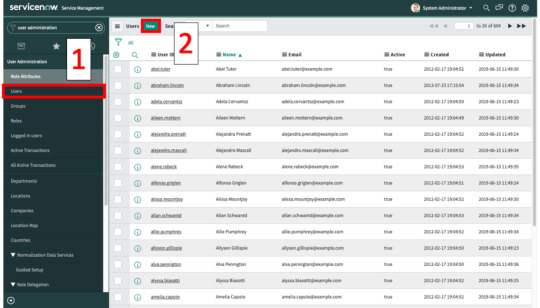
3. Fill out the necessary fields to create a new user and click Submit.
**Note: The User ID must have its own unique value. You may not create a duplicate User ID that is already in the system.
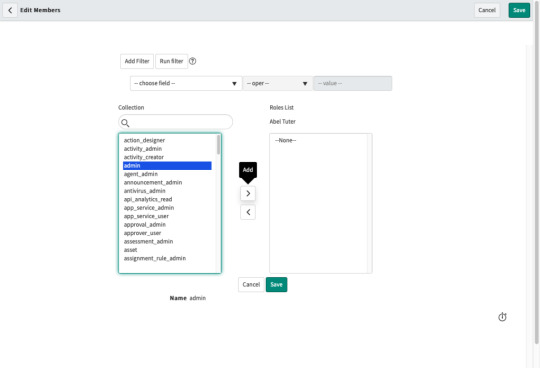
Giving Users Roles:
1. You may assign roles to individual users. Navigate to User Administration > Users.
2. Click on the user that you would like to assign a role to. For this example, we will use the user "Abel Tuter". Click on his User ID to open his record.
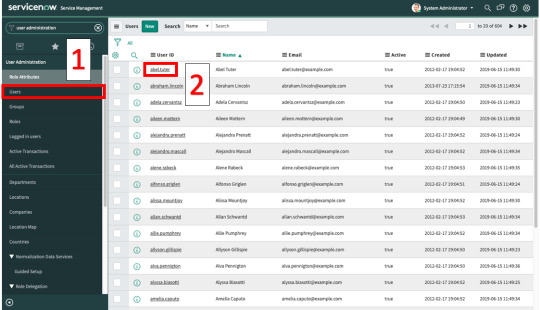
3. Scroll down to the Roles tab and click on the "Edit..." button.

4. We'll give Abel Tuter the "admin" role. Find "admin" and click on the add ">" button. You'll notice the "admin" role move from Collection to Roles List. Click Save.
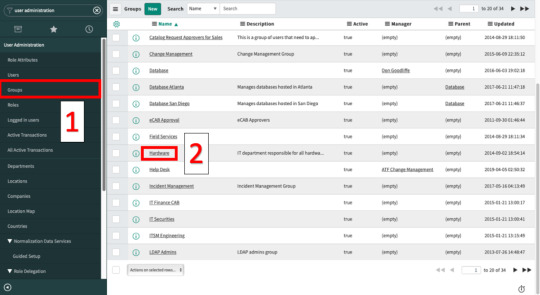
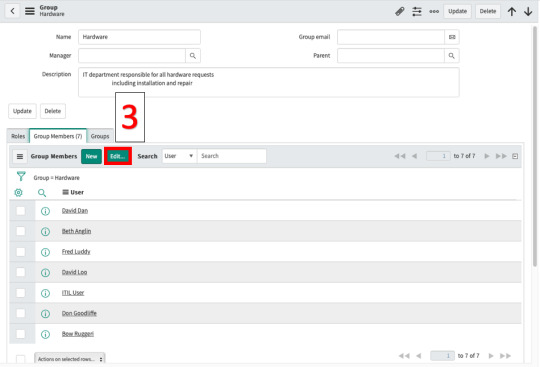
Adding Users To Groups:
All users in a group automatically inherits the roles that are assigned to the group. To add a user to a group:
1. Navigate to User Administration > Groups.
2. Click on a group name. For this example, we'll add user "Abel Tuter" to the "Hardware" group.
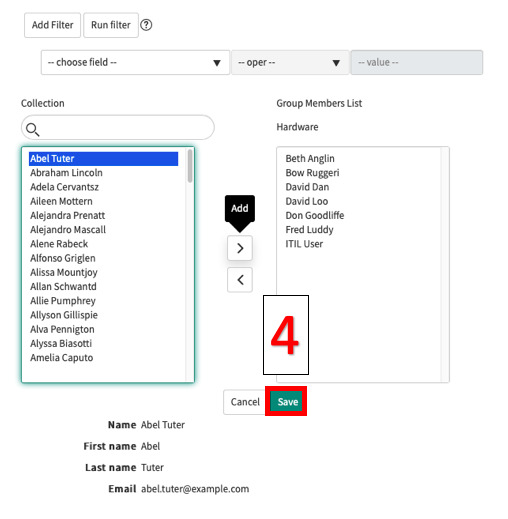
3. Select the "Group Members" tab and click on the "Edit..." button.
4. Find Abel Tuter and click on the add ">" button. You'll see Abel Tuter move to the Hardware group. Click Save.
Let us know if there’s anything we missed or you would like us to expand upon in the comments!
At the time of this writing, we are on the London release. The information presented in this article may not apply to your instance if you are on a different version of ServiceNow.
Read the full article
0 notes